1
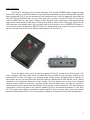
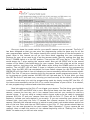
LT Owners Manual
Version 2.2
Dec 2008
This manual will only be distributed as a digital file which
in a small but important way helps our environment.
Please recycle whenever you can.
Pclix LT Users Manual 2.2
Congratulations! You are now the proud owner of a new Pclix LT. While this device is
extremely easy to get the hang of, we strongly encourage you to carefully read through the
entire manual. By doing so, you’ll learn all the various options and features built into every
Pclix LT; plus you’ll get some tips and tricks for time-lapse photography as well. We
encourage you to provide any feedback regarding our products, service or support. Please
visit our website at http://www.pclix.com to do so. Enjoy.
Index
Page
User Warnings
Introduction
Inside the Box
User Interface
Power Adapter (optional)
Battery Installation
Setting Your Camera Model (7)
Camera Model Programming Chart
Communicating with your Camera
Infrared Light
Contact Switch Closure
Basic Operation Mode
Advanced Operation Mode
Programming & Using the User Intervals (9)
Factory Pre-Programmed User Intervals
User Interval Programming Sequence
Split Second Mode (0)
Setting Delay Start Option
Delay Start Time Programming Sequence (2)
Delay Start OFF / ON Programming Sequence (1)
Setting Image Count Option
Image Count Programming Sequence (4)
Image Count OFF/ON Programming Sequence (3)
Setting Bulb Length Option
Bulb Length Programming Sequence (6)
Bulb Length OFF/ON Programming Sequence (5)
Setting Interval Warning Length
Interval Warning Programming Sequence (82)
Setting Closed Contact Length
Closed Contact Length Programming Sequence (87)
Quick Programming Guide
Time-lapse Tips, Tricks and Resources
Time-Lapse Shooting Equation
3
4
4
5
6
6
6
7
8
8
9
9
10
11
11
12
12
13
14
15
15
16
16
16
17
17
18
18
18
18
19
20
22
Thank-you
Privacy Statement
Warranty Information
23
23
23
Copyright
23
2
User Warnings:
-
Do not leave batteries in the Pclix LT for extended periods of time if you intend not to
use the device. Ensure that you have installed the batteries correctly. Do not attempt
to charge the batteries of the Pclix LT and always use a fresh pair when required.
Properly dispose of old batteries. If your community has a recycling program that
accepts batteries make use of it, not only for the batteries in this product but for others
as well. Batteries may explode or leak if handled incorrectly. Do not dispose batteries in
fire of any kind.
-
Please keep the Pclix LT out of the reach of children. While the Pclix LT is too big too fit
down a child’s throat the batteries are not, nor is the nylon hand strap. The camera
cable could become tangled around a child’s neck causing injury or death. It is your
responsibility to ensure this device is stored in a safe place away from children and
pets.
-
While the Pclix LT is a tough little device it is not waterproof nor is it weather proof.
Treat it the way you would treat your camera. If you are in dicey weather consider
protecting your Pclix LT using a small plastic ziplock bag or something similar. Water or
weather damage of any kind to the Pclix LT will void the warranty.
-
Pclix and our parent company 1017 Visual Effects Inc. will not be responsible for any
lost income due the use, misuse or failure of this device however caused. Nor will we be
held liable for any damages including all camera equipment as a result of the use of
this product.
-
Pclix and our parent company 1017 Visual Effects Inc. reserves the right to change the
specifications of the hardware and software described in this manual at any time
without notice.
3
Introduction:
For decades cinematographers have been using very expensive motion picture
equipment to photograph all kinds of amazing time-lapse sequences. During that time timelapse photography was out of the reach for most people due to the high cost of the equipment
needed, the film stock, processing and either transferring the results to videotape or
projecting it in a theater. Those days are now behind us. With the huge advances in digital
cameras, personal computers and the availability of dozens of software applications this type
of photography is available to just about anyone, including you. By adding the Pclix LT into
the mix you now have the ability to shoot time-lapse images anywhere, anytime.
With no special adjustments other than setting the infrared transmitter code to suit
your camera, your new Pclix LT can turn your digital camera into a time-lapse movie-making
machine with intervals from 1 - 89 seconds in 1 second steps; 2, 5, 10, 20, and 30 minute
intervals; and 2, 4, 12, and 24 hour intervals. Longer or in-between intervals can be readily
set as described in the advanced section below. As well the Pclix LT is the only device
available which allows you to trigger a camera in tenths of a second instead of just whole
seconds using the Split Second Mode. This means you can set an interval anywhere between
0.1 – 9.9 seconds in tenths of a second.
The Pclix LT has been designed from the ground up with you the photographer in mind.
Not only will the Pclix LT allow you to photograph truly amazing time-lapse sequences, it’s
also extremely easy to use. The Pclix fits into just about any camera bag, it’s built to tough
standards and will run on two AAA batteries for about a month. Using the Pclix LT you can
very accurately photograph time-lapse sequences using any interval you choose between 0.1
and 9.9 seconds in tenths of a second or 1 second to 100 hours in one second increments. As
well you can set the number of images to be taken, program a delayed start, define the
shutter length using the bulb feature and set the Pclix LT to control one of dozens of different
camera models.
The Pclix will function with any digital camera that is listed on our compatible camera
list that has an Infrared Remote feature or the ability for a contact switch closer. Many
cameras have at least one of these options however sadly many have neither. Currently the
Pclix is compatible with dozens of camera models from Nikon, Canon, Olympus, Minolta and
Pentax. See our website for a current listing of compatible cameras.
What’s Inside the Box:
-
Pclix LT
Black Nylon Tripod/Hand strap with a 360 degree swiveling plastic hook
2 x AAA Alkaline Batteries
CD containing the latest Pclix LT manual
Plastic Laminated Quick Reference Guide for your camera bag
Camera Control Cable – If you selected a camera control cable when you ordered it will
be included in the box.
Power Adapter – 3 volt (Optional) Included if you selected this option during ordering.
Some very good Karma
4
User Interface:
The Pclix LT consists of four simple switches, first a black POWER switch along the right
side of the device, a red FIRE switch on the top face and finally two grey rotating dial switches
each numbered 0 to 9. For the purpose of this manual we will refer to these two grey dials as
the LEFT dial and RIGHT dial. For the most part you can think of the LEFT dial as “the tens”
and the RIGHT dial as “the ones”. However they do have other meanings in the programming
menu that is discussed a little later. Above and a little to either side of the grey dials are two
LEDs with an icon beside each. On the right next to the camera icon is GREEN LED when lit,
on the left a clock icon beside a RED LED when lit. Using these four simple controls you will be
able to set and control all of the features and options for the Pclix LT.
There are three other items on the front panel of Pclix LT to help it do what it does. The
first is another LED that looks much the same as the two LEDs on the top face, however this
Infrared LED is used to trigger your camera using Infrared light. Infrared light is invisible to
the human eye so you will never see this LED light up. Beside the IR LED there’s a 1/8” stereo
connector, this connector does one of two things. The first allows you to plug in an Infrared
camera control cable or secondly a contact switch closure cable. Only one can be used at a
time and the type of cable must be defined in the camera model preference. The last electrical
connection on the front face is for a power adapter which is an optional accessory for the Pclix
LT. This power jack makes it possible to power the Pclix from a source other than the internal
batteries allowing the Pclix LT to run for years instead of a month with the internal batteries.
5
Power Adapter:
If you’ve ordered the optional power adapter it will be included with your order. The
obvious advantage of this adapter is you do not have to worry about batteries running low.
There are many instances when a time-lapse sequence could take a lot longer than a month
to shoot. Buildings can take many months or longer to complete so do many scientific
experiments. In cases like these, an adapter can be used to power the Pclix for years if
necessary.
Battery Installation:
The Pclix LT uses two AAA Alkaline batteries that are included with your order. To install
the batteries simply slide the battery cover door located on the backside of the Pclix in the
direction of the arrow. The battery holder has the proper polarity printed on it to ensure the
batteries are installed correctly. DO NOT use rechargeable batteries with the Pclix LT,
rechargeable batteries are generally 1.2 volts each not the 1.5 volts required by the Pclix.
NOTE: The Pclix LT can trigger a camera in two ways. One via infrared light, the other by
using a dedicated camera cable wired from the Pclix LT to your camera. When using infrared
light the Pclix is designed to function properly down to around 2.2 volts. However when using
a camera control cable the Pclix LT will NOT trigger your camera if the battery voltage drops
below 2.7 volts. In this case the Pclix LT will appear to operate correctly however no trigger
will be sent to your camera. If you are experiencing a situation where your camera is properly
connected and the Pclix LT appears to be working correctly and no triggers are being received
by your camera then replace the batteries. If that fails to correct the problem then contact us
for further assistance.
Setting Your Camera Model:
The first thing you must do before all others is to ensure the Pclix LT is programmed to
the correct camera model you will be using. Normally this should only ever have to be done
once because the Pclix remembers this user preference forever or until you reprogram it.
There are two reasons why you might change this user preference later. You might want to
use the Pclix LT with a different camera model or if you want to change from the Infrared
Cable to the Switch Contact Closure Cable. Basically once this user preference is set like all
user preferences, it will remain set until you change it.
So let’s proceed to set your Pclix LT to control your particular camera. In order to
perform this function the power switch of Pclix LT must be in the OFF position. Simply slide
the BLACK power switch towards you using your right thumb to turn OFF the device.
Now from the chart below find your camera model to determine the programming code
number that is associated with your camera. Example: If your camera is a Nikon D70 then the
Pclix LT camera model programming code would be “71”. If you are connecting the Pclix LT to
your camera using a contact switch closure cable, then the model code will be “77” regardless
of the camera’s make and model. Let’s say that again. If you are using a dedicated camera
cable connecting the Pclix and your camera you must use model code “77”. Otherwise use the
infrared code from the following chart for your particular camera model.
6
Pclix LT Digital Camera Model Programming Chart
Once you know the model code for your specific camera you can proceed. The Pclix LT
has been designed so that you can enter the programming mode the same way for all the
user programmable options. This makes learning the various functions of the device easier to
grasp. Later in this manual we will go into more detail regarding the user preferences.
However for now, all we need to do is set the camera model. Start by making sure that the
Pclix LT POWER switch is in the OFF position. Then set the LEFT grey dial to 7, the LEFT dial
would always be 7 when setting the camera model. Now set the RIGHT dial to the second
number of the Model Code listed above for your camera. Once both dials are at the correct
number position, hold down the red FIRE button while sliding the POWER switch to the ON
position. The red LEFT LED will flash 3 times to indicate you are entering the programming
mode. Once the RED LED has completed it’s three flashes release the red FIRE button, the
GREEN LED will then flash 4 time to indicate you have successfully defined the camera model.
NOTE: The Pclix LT has error checking built into the camera model programming mode. If you
try to program an invalid number the RED LED will light and stay lit. At this point you must
turn OFF the Pclix LT and start over, ensuring you have correctly set the dials to a valid model
number. The last step is to exit the programming mode by simply turning OFF the Pclix LT.
You have now successfully set the Pclix LT to control the camera of your choice. In a nutshell,
all user programming is entered and exited this same way.
Now lets make sure the Pclix LT can trigger your camera. The first thing you should do
is set both the LEFT and RIGHT dial to zero. Now follow these next few steps. Turn ON your
camera, remove the lens cap, put it into manual focus and set your camera to receive a
remote trigger. If you are using a contact switch closure make sure the cable is connected
between the Pclix LT and your camera. Next turn ON the Pclix LT. There will be 3 GREEN
flashes to indicate you have started it up correctly. If you are controlling your camera using
infrared light, then point the Pclix LT towards the infrared receiver on the front of your
camera. Normally the infrared receiver is behind a small plastic red window above and to one
side of the lens. Now push the red FIRE button on the Pclix LT. Your camera should take an
image. You can now proceed to the next chapter “Basic Operation”. If your camera did not
respond, then re-read this section of the manual beginning with at “Setting Your Camera
Model” to make sure you did not miss a step.
7
Communicating with your Camera:
As mentioned there are two ways for the Pclix LT to communicate with your camera,
Infrared Light and Contact Switch Closure. Let’s deal with Infrared Light first.
Infrared Light:
If you are going to be communicating with your camera using Infrared Light you have
two options. Every Pclix LT has a built in Infrared LED on the front panel of the device. If you
have programmed your Pclix LT using any of the camera model codes other than 77 then you
are able to trigger your camera without any cables attached. The one drawback to this
approach is the camera needs to “see” the Pclix LT. This means the Pclix LT must be in front
of the lens but NOT in the frame. You can easily point the Pclix LT towards the camera just
outside of the frame and it will happily instruct your camera to take an image. Likewise, you
can use this same technique when using the Pclix LT as a simple wireless remote. The Pclix LT
will trigger your camera up to 4.5 meters away and in some cases further.
The second Infrared method is to plug in the Infrared control cable into the 1/8” jack
on the front panel of the Pclix LT. When this cable in installed, the Infrared LED on the front
panel will be disabled. Using this cable allows you to position the Pclix LT behind the camera
making the operation a little easier and the controls more accessible. There is however one
small drawback to this method. That is what is the best solution to attaching the Infrared
Cable to the camera? Since camera models come in a variety of shapes and sizes coming up
with one solution to attach the cable to your camera; is a difficult challenge. After trying many
different methods the simplest solution for most cameras seems to be a small piece of black
electrical tape. It sounds hokey I know, but it actually works the best. By using a piece a few
inches long you can tape the end of the cable right over the Infrared window on your camera
effectively blocking out all other light sources. This method should not mark or damage your
camera in anyway. However there are a very few camera models which do not like the
infrared light source right up against the receiver on the camera. If your camera does not
respond properly when the optical cable is taped over the receiver then it must be held a few
inches give or take away from the receiver. This method requires a wee bit of engineering in
order to hold the cable in the proper place. Here are a few ideas as a starting point. Perhaps
an elastic band around the lens will hold the optical cable in the right place. A small piece of
stiff but bendable wire wrapped around a tripod leg with the optical cable taped to it could
also hold the cable in the proper place. Truly this is a little like the wild west in the sense that
there is no out of the box solution in these few cases. However as long as your camera can
see the infrared light trigger it doesn’t much matter how or where the cable is mounted.
8
Contact Switch Closure:
If your camera requires a Contact Switch Closure than you must ensure you have
programmed the Pclix LT to model code 77. This will disable both the internal Infrared LED
and also the ability to use an Infrared Control Cable. It will also allow the Pclix LT to close an
optically isolated internal switch thereby causing your camera to take an image. We offer
many different Contact Closure cables due to the different camera types. Basically the
connection is the same for all. Simply plug in the 1/8” end of the cable into the Pclix LT jack
and the other end into the contact switch closure jack on your camera.
Basic Operation
The Pclix LT has been designed to allow you the user to quickly start shooting in the
basic mode. In the “Tips and Tricks” section of this manual you will find some suggestions to
follow as a starting point when shooting a time-lapse sequence. You will need to have a good
understanding of the operation of your camera such as using manual focus, the different
shooting modes and setting your camera into remote mode. As always, you have many
options as to how you can configure your camera for photography and your chosen settings
will influence your results when using the Pclix LT. Due to the dozens of camera models the
Pclix LT can be used with we cannot possibly go into operational details for every make of
camera, so please consult your camera manual.
Now lets make sure the Pclix LT can trigger your camera. The first thing you should do
is set both the LEFT and RIGHT dial to zero. Now follow these next few steps. Turn ON your
camera, remove the lens cap, set it in manual focus and also set your camera to receive a
remote trigger. If you are using a contact switch closure, be sure the cable is connected
between the Pclix LT and your camera. Next turn ON the Pclix LT, there will be 3 GREEN
flashes to indicate it has started up correctly. If you are controlling your camera using infrared
light, then point the Pclix LT towards the infrared receiver on the front of your camera.
Normally the infrared receiver is behind a small red plastic window above and to one side of
the lens. Now push the red FIRE button on the Pclix LT. Your camera should take an image.
Congratulations you are set and can proceed to shooting your first time-lapse sequence. If
your camera did not respond, then re-read the manual starting at “Setting Your Camera
Model” to ensure you did not miss a step.
In the basic mode you have 89 interval settings right at your fingertips, actually 99
when you include the user definable intervals which will be covered in the “Advanced
Operation” section of this manual. For now we are only going to concentrate on the first 89.
You should think of these 89 intervals settings as 1 second to 89 seconds and using any of
them is as easy as dialing in the interval you desire using the LEFT and RIGHT grey dials.
Think of the LEFT dial as the “tens” and the RIGHT dial as the “ones”. Once you have set your
interval and configured your camera to accept an infrared trigger or contact switch closure
simply turn ON the Pclix LT. Once ON, the Pclix LT will flash the GREEN LED three times to
indicate it is operating correctly. There will then be a short delay and the GREEN LED will flash
again, during this flash your camera should take an image if everything is set correctly. If you
have an interval of anything other than 1 second then the RED LED will flash every second of
the countdown. Once your desired interval is reached the GREEN LED will flash and your
camera will be instructed to take an image. Otherwise if you have the interval set to 1 second
the GREEN LED will flash every second and your camera will also take an image on each
GREEN flash.
9
When operating in this basic time-lapse mode you can change the interval at anytime
without turning OFF the Pclix LT. Simply dial in your new interval time, the Pclix will continue
to countdown your old interval, once at zero the GREEN LED will flash and an image will be
taken. Then your new interval setting will be loaded and used from that point on.
In this Basic Operational mode the Pclix LT will continue to instruct your camera to take
an image until the Pclix LT is switched OFF, your camera battery goes dead or the memory
card becomes full.
The RED fire button can be used at anytime to take an image. For example, if during a
long interval you would like to trigger the camera for whatever reason, you can do so. Or you
can set both dials to zero and use the Pclix LT as a simple wireless remote.
Advanced Operation
In the Pclix LT “Advanced Operation” mode, you have the ability to change the way the
device functions. Various user preferences and custom timing options can be set and saved
into the Pclix LT. All settings are saved into flash memory and will stay there until further
changes are made. This means that you do not need to worry about loosing your custom
settings if the batteries need to be replaced or the Pclix LT is left turned OFF for extended
periods of time.
The programming features of the Pclix LT have been designed so you can quickly and
easily change any or all of the user preferences anywhere, anytime. There is no need to preprogram settings using a computer or PDA before you decide what you are going to
photograph. From within the programming area you can set the Pclix LT to control various
camera models. You can define up to 10 custom user intervals, set a starting delay time, set
the number of images to be taken and define a shutter bulb length. Once these settings are
programmed you can switch these options ON or OFF independently without affecting the
selected durations or image counts.
There are three basic steps in order to put the Pclix LT into the programming mode.
The first is to make sure the power switch for the Pclix is in the OFF position. The second is to
set the LEFT hand grey dial to the user option you wish to set and in some programming
cases also set the RIGHT hand grey dial as well. The third is to hold down the RED fire button
while you turn ON the Pclix LT. If you have done this correctly the RED LED will flash 3 times.
Once the three flashes have finished you can release the RED fire button. At this point the
GREEN LED will flash from 1 to 4 times to indicate you’ve either completed the programming
option you wanted to set or to proceed to the next step. The software of the Pclix LT will warn
you if you have made an error or attempted to enter an illegal number. All programming
options end with the GREEN LED flashing four times indicating your settings have been saved
in memory. You must turn OFF the Pclix to exit the programming mode. Now your settings
have been saved in memory and you are free to turn ON the device.
10
Programming and Using the User Interval Settings (9)
First let’s explain how to program and use the user programmable interval settings (9).
More than likely this is the user function you will use most often and due to the nature this
function it has the most steps in order to enter your settings. Subsequent programmable
functions of the Pclix LT are much easier to explain once you are familiar with setting the user
programmable interval function (9).
There is one major difference in the way the user programmable intervals and the basic
intervals operate. As we described in the “Basic Operation” section of this manual, if the 1 to
89 intervals are changed as the Pclix LT is running, then the present interval finishes and an
image is taken. Finally the new interval is loaded and used from that point on. In the user
programmable intervals the Pclix LT does NOT wait until the present interval is finished.
Instead when you change from one user interval to another, the Pclix LT will load the new
interval and take an image immediately. This is done because you might change from a very
long user interval to a very short user interval. Remember when I say long; it can be up to
100 hours.
When you are using the Pclix LT in the “Basic Operation” mode, you can set the dials
anywhere between 1 and 89 thereby making that setting the interval. However the Pclix LT
actually has 99 dial positions not 89. It is these last 10 which are used for your user definable
intervals. The dial positions 90 to 99 can be programmed to any interval you choose between
1 second and 100 hours, actually 99 hours, 59 minutes and 59 seconds to be exact and all in
1 second increments. In fact the Pclix LT comes pre-programmed with the following intervals
saved into those 10 locations. However as you’ll see in the following few paragraphs, it’s a
breeze to change one or all of these user interval registers in mere seconds to whatever you
like.
Factory Pre-Programmed User Intervals and their Dial Locations:
Dials
90
91
92
93
94
Interval
-
2 minutes
5 minutes
10 minutes
20 minutes
30 minutes
Dials
95
96
97
98
99
Interval
-
1 hour
2 hours
4 hours
12 hours
24 hours (1 day)
In order to program your own intervals, you must put the Pclix LT into Programming
Mode as we did earlier in this manual in order to set the camera model.
As mentioned, there are 10 user intervals registers numbered 90 – 99. The first thing
you need to do is shut OFF the Pclix LT, then set the LEFT dial to 9 and the RIGHT dial to the
register you would like to save your interval into. For example: if you would like to save your
user interval into register 92 then set the dials to 92. Next hold down the red FIRE button and
turn on the Pclix LT, the RED LED will flash 3 times indicating you are in the programming
mode. Now release the red FIRE button. After doing so the GREEN LED will flash 1 time. This
single flash is telling you to input the number of hours you want your interval to be. Set the
LEFT and RIGHT dials to that number, somewhere between 00 and 99. Once you have set the
dials to your desired number of hours then push the red FIRE button once, the GREEN LED
11
will now flash 2 times asking for you to set the number of minutes you’d like for your interval.
Set the dials somewhere between 00 – 59 and then push the red FIRE button again. This time
the GREEN LED will flash 3 times, Now all that is left to do, is to enter the number of seconds
you would like in your interval. Again, set the dials to a number between 00 – 59 and push
the red FIRE button one last time. If everything has been done correctly the GREEN LED will
flash 4 times and your interval will be saved in the user interval register you selected in the
first step register 92. Now turn OFF the Pclix LT to exit the programming mode.
Congratulations you have just programmed your first user interval! It’s that easy. All it takes
is 4 simple steps that can be done anywhere, anytime. Now set the dials to 92 and turn ON
the Pclix LT, the Pclix LT will now trigger your camera at the interval you have programmed.
Now go through the steps a few more times saving different length intervals into a different
registers to get the hang of it.
User Interval Programming Sequence (9):
-
Turn the Pclix LT OFF
set the dials to the interval register to be programmed 90 – 99
while pushing the red Fire button turn ON the Pclix LT to enter programming mode
after 3 RED LED flashes release FIRE button
the GREEN LED will flash once indicating to enter the interval hours
set the interval hours using the LEFT and RIGHT dials
push the FIRE button to enter the hours, the GREEN LED will flash 2 times
set the interval minutes using the LEFT and RIGHT dials
push the FIRE button to enter the minutes, the GREEN LED will flash 3 times
set the interval seconds using the LEFT and RIGHT dials
push the FIRE button to enter the seconds, the GREEN LED will flash 4 times
turn OFF Pclix LT to exit programming mode
You’re done.
NOTE: The Pclix LT has error checking built-in making it impossible to enter a number higher
than 59 for either the minutes or the seconds. If you have the dials set to a number above 59
then the RED LED will flash once to indicate an error. Change the dials to a number 59 or
below and then push the red FIRE button.
Now that you’ve got the hang of user interval programming and how easy it is, the rest
of the Pclix LT user functions are even easier. These encompass the “Start Delay Option”,
“Image Count Option”, “Bulb Length Option”, “Split Second Mode”, “Interval Warning” and
“Closed Contact Length”. The first three of these options each have a number or length of
time which can be programmed into those functions; they also can be turned ON or OFF with
out effecting the programmed number or length of time; the forth being the Split Second
Mode can only be turned ON or OFF. The last two are custom user settings. In the next few
pages we will describe with all these functions starting with the “Split Second Mode”.
Split Second Mode (0):
As far as we know the Split Second Mode is unique to the Pclix LT and digital time-lapse
photography. What this feature does is allow you to split a second of time into tenths and use
those tenths in your interval settings. Imagine the difference in results between a 1 second
interval and a 2 second interval. Basically everything is moving 100% faster in the 1 second
interval vs. the 2 second interval. With this mode you can have an interval anywhere from
12
0.4* to 9.9 seconds and all in tenths of a second steps. This makes it possible to have an
interval of 0.5 seconds or 1.5, 2.3, 4.5, 6.7 seconds and so on. As with other interval settings
on the Pclix LT this feature works with both the Image Count Option and Start Delay Option.
However if you have the Bulb Option turned ON the Pclix LT will shut it OFF when you turn ON
Split Second Mode. The two cannot be used at the same time. One other limitation is you
cannot save Split Second interval times into the User Interval registers.
In this mode only the LEFT Dial sets the seconds and the RIGHT Dial sets the tenths of
a second. Also if your interval is anything above 1 second then the RED led will flash to
indicate the passing of seconds counting down to the next camera trigger.
You must take into account the speed at which your camera can take an image and
then be ready to take another when using this mode this includes the time it takes to write
the image to your memory card if your camera does not buffer images. Also take into account
the length of the shutter required for a proper exposure. Some digital cameras are able to
take many images a second others do not offer this functionality. You will need to determine
how fast your camera can take images over and over again using the fastest interval. For this
test turn on the Split Second Mode as described below and set your camera to receive a
remote trigger. The play around with the interval setting to determine how fast your camera
is able to repeatedly shoot with out missing shots when the Pclix LT instructs the camera to
take an image. Basically you need to experiment a little bit to see what settings work best
with your camera model.
To turn on the Split Second Mode first turn OFF the Pclix LT, then set the LT Dial to 0
and the RT Dial to 1, now Hold down the red FIRE button and turn ON the Pclix LT, release the
FIRE button, after the 4 GREEN flashes turn OFF the Pclix LT. You will know when this mode is
ON because when you turn ON the Pclix LT in normal mode the GREEN LED will only flash 2
times as opposed to the normal 3 for all other functions. To turn OFF the Split second Mode
set both LEFT and RIGHT Dials to 0 and repeat the steps above.
*This number is totally dependent upon the camera. Most cameras are not able to shoot and
process images this quickly when being remotely controlled. This limitation is due for the most
part to the internal software of the camera and not the Pclix LT.
Setting Delayed Start Option (2):
This option allows you to set a delayed start for your image sequence. The delay can be
anywhere from 1 second to 99 hours and 59 minutes, in 1 second increments. In this mode,
you set the desired start delay length and then turn it ON or OFF in order to use it. If this
delayed start length is one that you might use fairly regularly the ability to turn it ON or OFF
is very handy instead of re-programming it each time. This option could be used to start a
sequence very early in the morning perhaps to catch the sun coming up if you are a late riser.
Or maybe you might be away for a period of time and need the sequence to start unattended.
With this option those kinds of scenarios are possible as are others. We will deal with setting
the delay time first, then how to turn it ON and OFF.
This setting is programmed much the same as the user interval times are entered with
one exception. That is the programming code to enter the Delayed Start Option is to set the
LEFT dial on 2, the RIGHT dial is not used so it can be set to anything.
13
So to program the Delay Start turn OFF the Pclix LT as you always need to do in order
to get into programming mode. Then set the LEFT dial to 2 and hold down the red FIRE button
and turn ON the Pclix LT, after the RED LED flashes 3 time release the FIRE button.
The GREEN LED will now flash once indicating you need to enter the delay hours using the
LEFT and RIGHT dials. Once you’ve set the hours push the red FIRE button, the GREEN LED
will flash 2 times indicating you now need to enter the minutes for the delay. Set the dials for
the minutes and then push the red FIRE button again, you’ll see 3 GREEN flashes/ Now all
that’s left to do is program the seconds, set the seconds and push the FIRE button one last
time. You should now see the GREEN LED flash 4 time which means you have successfully
programmed a Delayed Start Time. Turn OFF the Pclix LT.
The next step is to turn ON the Delay Start Option. In order to do this you must put the
Pclix LT into programming mode one more time. Set the dials to 11 and startup the Pclix LT in
the programming mode. Once you release the red FIRE button the GREEN LED will flash 4
times indicating you have now turned ON the Delay Start Option. Now turn off the Pclix LT to
exit programming mode. You’ve now programmed the Delay Start time remember you must
turn ON the Delay Start Option using the Programming code of 11 in order to use it. To shut
OFF the Delay Start Option you would use the programming code of 10. NOTE: If you plan on
using the Delay Start Option it is advised that you confirm your camera is receiving
commands by pushing the red FIRE button a few times at the beginning of the Delay Start
countdown.
The Pclix LT will let you know what Options you have set ON or OFF. In the Delay Start
Option, it does this during the LED startup sequence when the Pclix LT is turned ON. In
normal mode the GREEN LED will flash 3 times during startup, if the Delay Start Option is set
ON then on the first flash of the GREEN LED on startup the RED LED will also flash at the
same time to indicate the Delay Start is ON.
When the Pclix LT is counting down the Delay Start time the GREEN LED will flash once
every 3 seconds to indicate you are in the process of counting down the delay. Once the Delay
Start time reaches zero then Pclix LT will instruct your camera to take pictures as normal.
Delay Start Programming Sequence (2):
-
Turn the Pclix LT OFF
set the LEFT dial to 2, the RIGHT dial can be any number
while pushing the red Fire button turn ON Pclix LT to enter programming mode
after 3 RED LED flashes release FIRE button
the GREEN LED will flash once indicating to enter the Start Delay hours
set the Delay Start hours using the LEFT and RIGHT dials
push FIRE button to enter the hours, the GREEN LED will flash 2 times
set the Delay Start minutes using the LEFT and RIGHT dials
push FIRE button to enter the Delay Start minutes, the GREEN LED will flash 3 times
set the Delay Start seconds using the LEFT and RIGHT dials
push FIRE button to enter the seconds, the GREEN LED will flash 4 times
turn OFF the Pclix LT to exit programming mode
You’ve just set the Delay Start time.
14
Delay Start OFF / ON Programming Sequence (1):
-
Turn the Pclix LT OFF
set the LEFT dial to 1 and set the RIGHT to 1 for Delay ON or 0 for Delay OFF
while pushing the red Fire button turn ON Pclix LT to enter programming mode
after 3 RED LED flashes release FIRE button
the GREEN LED will flash 4 times indicating you have successfully set either ON or OFF
turn OFF the Pclix LT to exit programming mode
Setting Image Count Option (4):
The Image Count Option allows you to tell the Pclix LT how many images to instruct
your camera to take. Once that number is reached the Pclix LT will stop instructing your
camera to take additional images and indicate your sequence is finished by flashing the RED
LED once every 3 seconds until you shut OFF the device. You can program the Image Count
to any number of images between 1 and 9,999. This option is handy to stop the camera from
continuing to take images once the memory card is full. Also if you know the final frame count
of your sequence, you can set the Image Count to that number and have the camera stop.
Programming this option is accomplished basically the same way as other options on
the Pclix LT. You first must turn OFF the Pclix LT, then set the LEFT dial to 4, the RIGHT dial
can be anything. Now that the dials are set, hold down the red FIRE button and turn ON the
Pclix LT, after the 3 RED flashes release the FIRE button, the GREEN LED will flash 2 times.
Let’s say for example; you want your camera to take 1547 images. Set the LEFT dial to the
thousands, in this case 1 and the RIGHT dial to the hundreds which is 5 in our example. With
these two dials set, push the red FIRE button. The GREEN LED will flash 3 times asking for the
tens and ones which in our example the LEFT dial should be set to 4 and the RIGHT dial set to
7. Now push the red FIRE button to enter the last two numbers of your Image Count. At this
point the GREEN LED will flash 4 times to indicate your Image Count has been set. Turn OFF
the Pclix LT
Like the Delay Start Option, the Image Count must also be turned ON in order to use it.
You can turn it ON by setting the dials to 31 and entering programming mode in the usual
way, or OFF by setting the dials to 30 and entering the programming mode.
The Image Count Option let’s you know if it is ON or OFF during normal startup. In
normal mode the GREEN LED will flash 3 times during startup, if the Image Count Option is
set ON then the RED LED will flash during the second flash of the GREEN LED at startup.
Once your Image Count is finished the RED LED will flash every 3 seconds to indicate
your sequence is finished shooting. To clear the Pclix LT after shooting your sequence turn
OFF the device. If you turn the Pclix LT back ON it will repeat the Image Count down until you
set the Image Count Option OFF.
15
Image Count Programming Sequence (4):
-
Turn the Pclix LT OFF
set the LEFT dial to 4, the RIGHT dial can be any number
while pushing the red Fire button turn ON Pclix LT to enter programming mode
after 3 RED LED flashes release FIRE button
the GREEN LED will flash twice telling you to enter the thousands & hundreds
set the thousands & hundreds using the LEFT and RIGHT dials
push FIRE button to enter those numbers, the GREEN LED will flash 3 times
set the tens & ones using the LEFT and RIGHT dials
push FIRE button to enter the tens & ones, the GREEN LED will flash 4 times
turn OFF the Pclix LT to exit programming mode
You’ve just set the Image Count.
Image Count OFF / ON Programming Sequence (3):
-
Turn the Pclix LT OFF
set the LEFT dial to 3 and the RIGHT to 1 for Image Count ON or 0 for OFF
while pushing the red Fire button turn ON Pclix LT to enter programming mode
after 3 RED LED flashes release FIRE button
the GREEN LED will flash 4 times indicating you have successfully set either ON or OFF
turn OFF the Pclix LT to exit programming mode
Setting Bulb Length Option (6):
The Bulb Length Option allows you to instruct the camera as to how long the shutter
will remain open. This function is very handy if you are doing astrophotography or in other
situations where there is next to no light. In this mode the Pclix LT will send an Infrared
command to open the shutter, wait the bulb length then send another Infrared command to
close the shutter. If you are using a Contact Switch Closure the Pclix LT will close the internal
switch and keep it closed, once the length of the bulb setting is reached the internal switch is
released causing the camera shutter to close.
You are able to define a Bulb Length of up to 59 minutes and 59 seconds using the
programming mode. NOTE: Your bulb length must be at least 1 second shorter then your
interval length for this option to function correctly. To set the Bulb Length start by turning
OFF the Pclix LT. You first set the LEFT dial to 6, the RIGHT dial can be anything. Now hold
down the red FIRE button while turning ON the Pclix LT. After the 3 RED LED flashes
indicating you are now in programming mode release the FIRE button, the GREEN LED will
flash 2 times asking for you to set the minutes of your bulb length. Once set push the red
FIRE button again, the GREEN LED will flash 3 times asking you to enter the seconds of your
bulb length. Once set push the red FIRE button one last time, there will be 4 GREEN LED
flashes indicating you have correctly set the bulb length. Remember the Pclix LT will flash the
RED LED once to indicate an error if you try and enter a number greater than 59 for the
16
minutes or the seconds. Reset the dials to a number of 59 or below, now push the red FIRE
button to enter your number.
You can turn ON the Bulb Length Option by setting the dials to 51 and entering
programming mode in the usual way, or OFF by setting the dials to 50 and entering the
programming mode.
Like the other Options the Pclix LT let’s you know if the Bulb Length Option is ON or
OFF during normal startup. In normal mode the GREEN LED will flash 3 times during startup,
if the Bulb Length Option is set ON then the RED LED will flash during the third flash of the
GREEN LED at startup.
During the time the shutter is open the GREEN LED will remain lit to indicate the
shutter is in the open state.
Bulb Length Programming Sequence (6):
-
Turn the Pclix LT OFF
set the LEFT dial to 6, the RIGHT dial can be any number
while pushing the red Fire button turn ON Pclix LT to enter programming mode
after 3 RED LED flashes release FIRE button
the GREEN LED will flash twice asking you to enter the Bulb Length minutes
set the Bulb Length minutes using the LEFT and RIGHT dials
push FIRE button to enter the minutes, the GREEN LED will flash 3 times
set the Bulb Length seconds using the LEFT and RIGHT dials
push FIRE button to enter the Bulb Length seconds, the GREEN LED will flash 4 times
turn OFF the Pclix LT to exit programming mode
You’ve just set the Bulb Length time.
Please Note: Some camera models have built in maximum lengths that the bulb can be kept
open. As an example, Olympus cameras having the bulb feature limit the exposure length to 8
minutes. Please consult your camera manual for possible limitations regarding your camera
model.
Bulb Length OFF / ON Programming Sequence (5):
-
Turn the Pclix LT OFF
set the LEFT dial to 5 and set the RIGHT to 1 for Bulb Length ON or 0 for OFF
while pushing the red Fire button turn ON Pclix LT to enter programming mode
after 3 RED LED flashes release FIRE button
the GREEN LED will flash 4 times indicating you have successfully set either ON or OFF
turn OFF the Pclix LT to exit programming mode
17
Setting Interval Warning Length (82)
Wouldn’t it be great if the Pclix LT could warn you it’s about to trigger your camera, of
course it would. After all you don’t want to be photographed watering your flower just as your
camera takes another time-lapse image of the flower opening to full bloom. The Pclix LT has
the ability to give you a visible warning providing two rules are met. First, the interval must
be 1 minute or longer and second the interval must be a user-programmed interval stored in
any of the registers numbered 90 to 99. Normally when the Pclix LT is counting down to the
next interval the RED LED gives a quick flash every second, however when the Pclix LT is
within the length of the warning the RED LED flash inverts. Meaning the RED LED stays lit
with the RED LED turning OFF quickly every second instead of turning ON. The factory default
for the length of the warning is 20 seconds but you can change the length of the warning to
anything between and including 01 and 59 seconds using the programming sequence below.
If you try and set a warning length of 60 seconds or greater you will get an error warning
indicated by a RED LED flash, reset the dials and try again.
Interval Warning Length Programming Sequence (82):
-
Turn the Pclix LT OFF
set the LEFT dial to 8 and the RIGHT dial to 2
while pushing the red Fire button turn ON Pclix LT to enter programming mode
after 3 RED LED flashes release FIRE button
the GREEN LED will flash three times asking you to enter the Warning Length
set the Warning Length seconds (01–59) using the LEFT and RIGHT dials
push FIRE button to enter the Warning Length, the GREEN LED will flash 4 times
turn OFF the Pclix LT to exit programming mode
You’ve just set the Warning Length time.
Setting Closed Contact Length (87)
This user setting allows you to set the length of the closed contact switch closure. By
factory default the closed contact length is set to 20/100ths of a second. This setting only
comes into play if the Pclix LT is set to camera model code “77”. Using the programming
sequence below you can set the contact closure length anywhere from 1/100th to 99/100ths
of a second in length. If your camera is missing the odd frame then increasing the contact
closure length should solve the problem. Likewise if you are using a camera which is able to
shoot high frame rates then shortening the length might allow you to trigger your camera
quicker when the Pclix LT is in “Split Second Mode”.
Setting Closed Contact Programming Sequence (87):
-
Turn the Pclix LT OFF
set the LEFT dial to 8 and the RIGHT dial to 7
while pushing the red Fire button turn ON Pclix LT to enter programming mode
after 3 RED LED flashes release FIRE button
the GREEN LED will flash three times asking you to enter the Warning Length
set the Closed Contact Length (01–99) using the LEFT and RIGHT dials
push FIRE button to enter the Warning Length, the GREEN LED will flash 4 times
turn OFF the Pclix LT to exit programming mode
You have now changed the Closed Contact Length.
18
Quick Programming Guide:
The images below are from our Quick Programming Guide for the Pclix LT. The LF DIAL
column is the number used to enter the various functions. The USER OPTION column lists
those functions and the last column RT DIAL and STEPS for PPROGRAMMING SEQUENCE lists
the steps needed to set the user preferences for each USER OPTION. Please read the detailed
instructions in the previous pages for in depth detail regarding programming.
19
Time-lapse Tips, Tricks and Resources
By adding the Pclix LT into your photography toolbox you now have the ability to shoot
time-lapse images anywhere, anytime. To get you started I have detailed some of the
information I have learned along the way plus added tips and tricks from other Pclix users. If
you would like to share any of the sequences you have captured using our products by all
means let us know. We’ll always have a handful posted on our website for the world to see.
Tips
Here are some simple guidelines to follow which can make a huge difference in your end
product.
-
Always mount your camera on a tripod or very stable camera mount
-
Make sure your camera batteries are fully charged
-
Make sure you have plenty of room on your memory card(s)
-
Pack an extra set of AAA batteries. The Pclix will run for about a month on a set but at
some point they are going to run out and you don’t want that to happen in the middle
of nowhere.
-
If you plan on shooting in snow, rain, hail, sandstorms or other extreme weather
consider using a camera pouch to protect both your camera and the Pclix. There are
many types available and most are worth every cent on a bad weather day.
-
Take some time to consider the best place to put your camera. Depending on the
length of time you will be shooting many variables can change during that time. Things
like the position of the sun, the need for someone else to use the same spot your
camera is positioned on. You don’t want to position your camera at the waters edge
where at high tide you’ll be up to your waist in water. You also need to consider the
owner of the property you might be shooting on, a tripod is a dead giveaway that you
mean business. In a way you need to try and predict the future or at least have a good
understanding of how your environment will change over the time you will be there.
20
Tricks
Some of these tricks might also be considered tips but they have to fall into one or the
other so under tricks they will be. Many cameras are full of features and user options, others
are not which leads me to say that all cameras are different in both operation, setup and
quality. For example the steps needed to change the image quality on a Nikon camera would
be completely different for a Canon camera. So it is very important that you read your camera
manual and understand how to change it’s user settings and features.
-
For the most part you will want to keep your camera in manual focus. I say this for a
few reasons, first you don’t generally want the focus to change from one frame to the
next. Say something passes very close to the lens causing the focus to change and
then on the next frame once the frame is clear it changes yet again, you get the idea.
Another reason is that it might take longer for your camera to focus than the interval
you have chosen causing your camera to skip intervals.
-
Many cameras have an automatic “White Balance” feature. At times this can cause
problems depending on the subject matter. Every once in while the White Balance will
not be set correctly in my experience. By manually setting the White Balance to the
proper lighting conditions you will be guaranteed consistent White Balance from frame
to frame.
-
Aperture and Shutter Length are two other settings which you should to pay close
attention to. If for example you are shooting a time-lapse sequence where the lighting
conditions will not change at all, then consider manual mode for these two variables.
However if say the lighting is going to change drastically over time, a sunset perhaps,
then setting the Aperture to a fixed F-stop and letting the Shutter compensate for the
changes in light is perhaps a better way to go. It really comes down to this. Between
the Pclix LT and your camera there are many settings which can be adjusted, each one
for the most part will affect and influence the others. You should also consider covering
the eyepiece of your camera when shooting time-lapse images, extra light can enter
through the eyepiece and affect the light meter readings. Experiment a little, get to
know the ins and outs of your particular camera and how you can use it’s different
shooting modes to your advantage. Also pack your camera manual in your camera bag
just in case.
-
I’d recommend that whatever surface you place your tripod on should be as solid as
possible. Be aware that the legs of your tripod can shift part way though your shoot if
you are on sand, soft ground, snow, etc. If the surface is soft or has a bounce to it
you’ll see it in your finished sequence.
-
Ensure that the tripod legs and head are tightened down securely and that your camera
is solidly mounted to your tripod. Wind can be a problem at times causing small
movements of your camera. These small movements will be much more evident the
longer the lens you use.
-
Your camera allows you the ability to change the size and image quality of the shots
you take. Consider this when shooting time-lapse sequences. If for example you are
intending to use the results in a setting where high resolution and quality are necessary
say in the shooting of stock footage then use of high resolution and better quality are a
must. In other cases smaller frame sizes and or image quality might be acceptable. Just
21
remember the larger the frame size and the greater the quality equals much larger
image file sizes. Something to think about and consider before you shoot.
-
Many cameras have power saving features which will power down the camera after a
length of time if no buttons are pushed. In many cameras you have the ability to
change this length of time and in many cases shut this feature OFF completely.
Basically you don’t want the Pclix LT interval to be longer than the power saving setting
of your camera.
-
Many cameras require that you turn on the Infrared Remote function when you want to
trigger the cameras remotely. Also check to see if your camera will disable this feature
if after a certain length of time if the camera does not receive a trigger. The Nikon D70s
for example can be set to a maximum of 15 minutes, the Infrared Remote feature is
automatically switched off by the camera if no signal is received in that time. However
if this same camera is powered from the Nikon Adapter instead of the internal batteries
that Infrared Remote function is NOT shut off automatically. Other cameras function
slightly differently so ensure you understand the settings of your camera in the remote
mode.
Time-Lapse Shooting Equation:
One question that comes up quite often is “What is the best interval to use in a certain
shooting situation?” Good question indeed. The answer to that question is like asking “How
long is a piece of string?” However, there are a few quick ways to get you in the ballpark plus
a few variables that can be added in order to get a bit more creative.
Here is a basic (some would say not so basic) equation to help determine the best
interval between shots. This is only a starting point, obviously many combinations of shooting
lengths, interval settings, frame rates and other factors can come into play. However as you
get more comfortable with the process this will become easier to understand and you well
then be able to focus more on the creative aspect of time-lapse photography.
Equation – Obtain Shooting Interval
Let’s say for example you are going to photograph a sunset and you imagine your
shooting time will be about two hours. You first need to convert that two hours into minutes
which gives you 120 minutes. But what we really need is the total number of seconds in that
original 2 hours, so take the 120 minutes and multiply that by 60 seconds. You end up with
7200 total seconds.
(2 hours multiplied by 60 minutes multiplied by 60 seconds) = 7200 total seconds
Now lets say you would like the length of your finished sequence to be 10 seconds, you
must first multiply 10 seconds by either 24, 25 or 30 frames (or images) per second. Typically
standard video has 30 frames per second in North America and 25 frames per seconds in
Europe. Whereas film and High Definition Video generally have 24 frames per second. Lets
assume we would like 30 frames per seconds because our time-lapse sequence will eventually
be shown on television in North America. So we use the equation below…
10 seconds multiplied by 30 frames per second = 300 frames for our finished sequence
22
So all that is left to do is divide the first part by the second part, this will give you the
proper interval setting for the sunset example above using the Pclix LT.
7200 seconds of shooting divided by 300 final sequence frames = an interval of 24 seconds
OK, I know, it looks completed the first time through but really it’s not when you get
the hang of it. So again here is the full equation from start to finish. You must first calculate
the numbers inside the brackets and then numbers outside to obtain the proper interval
number.
(Your intended shoot time in minutes multiplied by 60 seconds) divided by (the length of your
finished shot in seconds multiplied by 24 or 30 frames per second) = interval of Pclix LT
Thank-You
Again we thank-you for purchasing our products. Please visit our website anytime for
up to date information, links, FAQ and examples from other using this same amazing little
device. Please feel free to contact us for any reason; suggestions, support or sales. Our
contact details are easily found on our website and we look forward to hearing from you.
Enjoy.
Privacy Statement
Pclix is a division of 1017 Visual Effects Inc. and as such we will not share any
information you provide us to any third parties but with one exception. We are a business that
takes credit cards as a form of payment so we must pass your payment information onto our
merchant bank for processing. Occasionally we will send emails to our clients to introduce new
products or new features to current products. If you prefer not to receive email from us kindly
let us know. Please see visit https://www.pclix.com/shopping for our full online privacy
statement.
Warranty
All Pclix products are covered by warranty for the period of one (1) year from the date
of purchase due to manufacturing defects and/or component failure. This warranty is limited
to only the above mentioned areas and does not cover damage or failure due to weather, or
misuse. DO NOT open or unscrew the back panel from the Pclix LT case, doing so will void
your warranty.
The information covered in this manual is under copyright and may not under any
circumstances be reproduced in any electronic or printed form without express written
permission. It can however be printed by individuals who have purchased equipment from
1017 Visual Effects Inc. for the purpose of instruction on the use of our products.
Pclix is a division of 1017 Visual Effects Inc., Toronto, Canada
1017 Visual Effects Inc.©2008
23