1
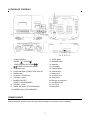
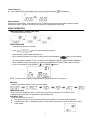
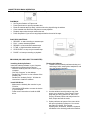
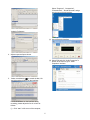
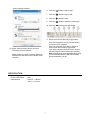
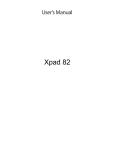
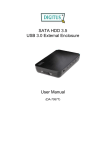
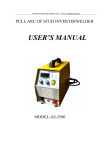
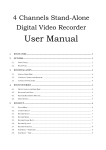
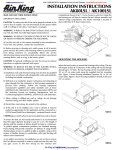
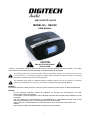
USB CASSETTE PLAYER MODEL NO. : GE4140 - USER MANUAL - CAUTION RISK OF ELECTRIC SHOCK DO NOT OPEN CAUTION : TO REDUCE THE RISK OF ELECTRIC SHOCK, DO NOT REMOVE COVER ( OR BACK ). NO USER SERVICEABLE PARTS INSIDE. REFER SERVICING TO QUALIFIED SERVICE PERSONNEL. The lightning flash with arrowhead symbol, within an equilateral triangle, is intended to alert the user to the presence of un-insulated “dangerous voltage“ within the product’s enclosure that may be of sufficient magnitude to constitute a risk of electric shock to persons. The exclamation point within an equilateral triangle is intended to alert the user to the presence of important operating and maintenance ( servicing ) instructions in the literature accompanying the appliance. WARNING : TO REDUCE THE RISK OF FIRE OR ELECTIC SHOCK, DO NOT EXPOSE THIS APPLIANCE TO RAIN OR MOISTURE. CAUTION DO NOT REMOVE EXTERNAL CASES OR CABINETS TO EXPOSE THE ELECTRONICS. NO USER SERVICEABLE PARTS ARE WITHIN! IF THE SUPPLY CORD IS DAMAGED, IT MUST BE REPLACED BEFORE FURTHER USE IN ORDER TO AVOID A HAZARD. USE OF CONTROLS OR ADJUSTMENTS OR PERFORMANCE OF PROCEDURES OTHER THAN THOSE SPECIFIED HEREIN MAY RESULT IN HAZARDOUS RADIATION EXPOSURE. DO NOT INSTALL THIS EQUIPMENT IN A CONFINED SPACE, SUCH AS A BOOK CASE OR BUILT IN CABINET. THE APPARATUS MUST NOT BE EXPOSED TO DRIPPING OR SPLASHING. 1 LOCATION OF CONTROLS 1. Control Pad button : PRESET , PRESET 2. 3. 4. 5. 6. 7. 8. 9. 10. 11. SLEEP button 12. SNOOZE button 13. Speakers 14. LCD display 15. Cassette knobs 16. Cassette door 17. Battery door 18. AC power cord 19. FM antenna 20. USB port (to computer) 21. Headphones jack 22. Aux in jack 23. Microphone TUNER SCAN/CLOCK ALARM TUNER SCAN/CLOCK ALARM STANDBY button FUNCTION button (TUNER, TAPE, AUX IN) AM/FM button EQ button – Equalizer set VOLUME + button MODE/CLOCK SET (MODE = RADIO MEMORY) VOLUME - button TIMER SET button (FOR ALARM SET) BUZZER button (FOR ALARM SET) POWER SOURCE This Unit is designed to operate on normal 240V ~ 50Hz household power source. Do not attempt to operate the system using other power sources. This may result in damage to the unit and void your warranty. 2 SET UP ☆ Setting the Time When power cord is plugged in flashes on the display. Press MODE/CLOCK SET button for 3 seconds, follow by or 24 hours) Press MODE/CLOCK SET button again , follow by Repeat above steps to adjust the minute. Press MODE/CLOCK SET button to confirm. to adjust hour format (12 button to adjust the hour ☆ Setting the Wake TIMER This unit includes a timer to wake you up to RADIO, TAPE or BUZZER. The Wake timer can be set at standby mode only. Ensure the clock has been set to the correct time. Press TIMER SET button(FOR ALARM SETTING) on for 3 seconds, “ON” show on the display with flashing hour digits * Press * Repeat above steps to set Timer Off-time, Function (Tuner or TAPE) & Volume. * * * Upon completion, all settings will cyclic once and then switch to current time with clock icon. By pressing BUZZER button, system switches to traditional alarm sound. REMARKS: WAKE UP BY TAPE (SHOULD BE PRESS THE PALY BUTTON OF CASSETTE TAPE), OTHERWISE, TAPE WAKE UP CAN NOT BE ACTIVATED. Note:1. ERROR reported if Off-time found equal or smaller than On-Time. 2. By pressing the TIMER SET button, the alarm is switched off. 3. For adjustment, press TIMER SET button for 3 seconds & input new selection. * to input desired hour & minutes, press TIMER button again to confirm . SNOOZE When system activates at wake timer, it can be temporarily switched off by pressing Snooze button. After 10 minutes, the system reminds you to wake up again. If you want to cancel the alarm set please refer to P.4 ☆ Setting the SLEEP timer This unit includes Sleep timer that automatically switch off after 10 to 90 minutes (to standby mode). * Press SLEEP button which will start with 90 minutes. * Every additional pressing reduces timer by 10 minutes. * After a few seconds, Sleep time display will switch back to current time with sleep icon Note: If current music source is less than Sleep time, ensure repeat function is activated. 3 Cancel Alarm set Press TIMER SET button(ALARM) again can be cancel Alarm setting ( icon disappear) . Battery Backup When there is power failure, all settings will be lost. To safeguard, this system has a battery backup (2xAAA batteries excluded). Suggest to check function regularly by unplugging the power cord. BASIC OPERATION FUNCTION selector (TUNER, TAPE, AUX) To select desired sound source. RADIO OPERATION * Press function selector to “TUNER” * * Press key to choose desired tuning station. * * Adjust Volume to obtain desired listening level. * When selected FM station is received in stereo quality, stereo indication ( * * ) lights up on the display 30 preset stations available: To store a station, press MODE/CLOCK SET [MODE=RADIO MEMORY ] button, MEMORY lights up & memory no. flashes, press [MODE/CLOCK SET ] button again to confirm. Listen to stored station, press [PRESET ] or [ PRESET ] button . NOTE: To achieve best reception, always extend fully FM antenna wire (on rear panel). EQ button 5 options of Equalizer: Classic, Rock, Pop, Jazz & Bass. HEADPHONE JACK Be sure that your headphones have a 3.5mm stereo plug with an impedance of 8-32 Ohms. When headphones are connected, the speakers will automatically mute. AUX INPUT JACK Press function selector to “ AUX” This system includes an AUX IN jack and allows sound emission of external audio equipments. Connect audio output or headphones jack of external audio equipments to AUX IN jack on rear panel of this system. 4 CASSETTE DECK BASIC OPERATION Before operation, make sure Function Selector is in the Tape mode. PLAYBACK Set Function Selector to Tape mode. Press Eject button to open the cassette door. Place the cassette tape into Deck, with the side to be played facing the window. Close cassette door and Press Play button to start playback. Playback stops when the tape reaches the end. Press Stop button if you want to stop playback before the end of the tape. PLAY DECK CONTROLS 1. RECORD : to start recording to cassette tape. 2. PLAY : to start cassette playback. 3. REWIND : to fast rewind the cassette tape 4. F.FWD : to fast forward the cassette tape 5. STOP/ EJECT: to stop or eject cassette tape 6. PAUSE : to interrupt recording or playback ENCODING (VIA USB CABLE TO COMPUTER) Running the Software 1. Double-click the Audacity software showing red and orange “balls” wearing blue headphone, and go to the following interface: Installing Audacity Software Install the Audacity software in your Computer (supplied disc matches with the device): - Insert the Audacity disc into CD drive of your computer. - Click “My Computer” on the desktop. - Double-click “CD drive” to view contents of the Audacity disc. - Double-click “Audacity Set Up” & follow the instruction to install the software. Install USB Driver - Make sure the Audacity disc remains in your CD drive. - Use supplied USB cable to connect the device to your computer. - Follow screen instruction to install the USB driver. 2. Use the attribute controls button at top of the screen, go to beginning, Play, Record, Pause, Stop and go to end. Use the File, Edit, View, Project, Generate, Effect and Analyze menu to Save, Export and edit the music. 3. Select preference at bottom of the menu which will open up Audacity Preference. You can set the Audio I/O, Quality, File Formats, Spectrograms, Directories, Interface, Keyboard and Mouse in the Audacity preference Interface. 5 Select “Programs” , “Accessories”, “Entertainment” , “Sound Recorder” and go into the sound record interface. Audacity Preference (ii) Sound Recorder Interface 4. Adjust output and input volume. (iii) Select Edit and click “Audio Properties” in bottom of the menu to go to “Audio Properties” interface: 5. Select record button ( ) to record the disc, left and right tracks will show on the interface; If no fluctuant wave on the interface during recording, please adjust the line in volume as follows: (i) Click “start” in left corner of the computer, 6 Audio properties Interface 6. Click the ( ) button to skip to start; 7. Click the ( ) button to skip to end; 8. Click the ( ) button to play; 9. Click the ( ) button to pause the record play; 10. Click the ( ) button to stop the Record. 11. Export music files to WAV, MP3, Ogg format. (iv) Select sound recording volume and go to “Recording Control” interface: - Adjust the line in volume to most or middle, the fluctuant wave will show on the interface when recording. SPECIFICATION Power Supply Power Consumption Radio Section : AC 240V ~ 50Hz : 25W : FM 87.5 – 108 MHz AM 525 – 1620 Khz 7 Once you finished the record, you should save your music to the computer. Click File menu and move down to Export as WAV format, MP3 format or Ogg format. Click anyone format to save the music, and you will ask for the file name of the music recorded. Note: Audacity does not export MP3 files directly, you should download the LAME MP3 encoder, which named lame_enc.dll.