1
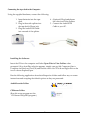
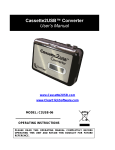
Welcome to the Cassette to CD Kit™ User’s
Manual (Windows Edition)
1.
a.
b.
Installation Instructions
Connecting tape-deck to the computer
Installing the Software
2.
a.
Using Audio Editor
Setting up and Testing for Audio
3.
a.
b.
Recording Audio
Saving your tracks Individually
Saving Multiple tracks with Labels
4.
a.
b.
Burning the CD
Setting up the Playlist
Burning a 2nd Copy
5.
F.A.Q.s/Troubleshooting
Minimum System Requirements:
•
•
•
•
•
Windows XP, Vista, 7/8
CD burner drive
Blank CD's (CD-Rs recommended)
1-2 GB free disk space
Available USB port
Connecting the tape-deck to the Computer:
Using the supplied hardware, connect the following:
1. Insert batteries into the tapedeck.
2. Plug in the audio splitter into
the tape deck’s Phone jack.
3. Plug the Audio2USB Cable
into one end of the splitter.
4. (Optional) Plug headphones
into other end of the splitter.
5. Connect the Audio2USB
Cable to your PC.
Installing the Software:
Insert the CD into the computer and Select Open Files to View Folders when
prompted. (If no AutoPlay selection appears, simply open up My Computer (Start >
Computer on Windows Vista/7/8) and find the drive our CD is in and right click on the
icon to choose Explore/Open.
Run the following applications from their Respective folders and follow any on screen
instructions and accepting the default options as they are presented:
AudioRecorder Folder:
CDBurner Folder:
(Run this setup program not the
CD Burner Setup.MSI program.)
2
Setting Up the Cassette2USB Recorder (Audacity):
Double click on the desktop icon to launch the program.
The initial screen will appear:
From the Edit menu choose Preferences.
On the Devices option, set the Playback Device to your computer’s Speaker option, set the
Recording Device to the Microphone Array USB option (Note: the name of your device may
vary, but will be the “USB” option each time), and the Channels to 2 (Stereo). Click OK.
3
Testing for Audio:
Insert a tape into the cassette player and start the cassette playing. You may plug in the
headphones (purchased separately) into the headphone jack to verify that you hear your tape
playing or to queue up your tape to where you wish to start recording.
In Audacity, click the Red Record (Circle) button:
If all settings and connections are correct, then you should receive “waveform” this is the visual
representation what your audio recording looks like.
The flat lines represent silences and the “peaks and valleys” represent vocals or music. This will
be important later as we divide our songs into tracks for the CD burner. (Note: if you are
receiving ONLY “flat lines” then no recording is taking place, please see our FAQ section for
troubleshooting tips.)
Tip: the “peaks and valleys”
should not touch or “flat top” the
tracks, if they do your audio will
be cut off. Adjust the input level
slider lower (left) until the
waveform is more centered within
the track.
4
Recording and Saving Audio Files Individually:
Queue up the tape in the cassette player to the beginning position of the track to be recorded.
Press Play on the Cassette Player and the Record (red circle) button in Audacity.
Wave forms will begin to be displayed. Allow both the cassette player and Audacity to run until
the tape stops. Then click the Stop button in Audacity (the yellow square).
Note: you may press the blue Pause button to hold the recording while you flip your tape
over then click the blue Pause button a second time to resume recording. Press the Stop
button (yellow square) when finished.
With the wave form recorded, you will use the mouse to click and drag between the silences (flat
lines) as shown above.
Note: If you cannot see the starting and finishing silences, from the View menu choose to Zoom
Out or Zoom In. You can also use the magnifying glass in the upper left hand corner toolbox (a
left-click will zoom in and a right-click will zoom out when using this tool). Be sure to click
back onto the selection tool to make your selection.
5
From the File menu choose Export Selection…
Select a location such as the Music (or My Music) folder inside the My Documents folder. (Note:
WAV will be the default format).
Name the track usually starting with the
Track Number - Artist Name – Song Name (as shown).
Click the Save button to save the track. (Note: You will be prompted to save the “Metadata”.
This screen is only necessary if you did not include the Artist Name or Song name in the title of
the file. You can simply press the “OK” button to continue the export.)
Repeat the process for the remaining tracks that are recorded. Remember they are not saved to
the computer permanently until they are exported. When finished you may exit Audacity and say
NO when asked to save the file.
6
Saving Multiple Audio Files Automatically with Labels:
It is possible to name your tracks and have Audacity export them as individual files all at once.
With your recording finished, from the Tracks menu choose Add New -> Label Track.
A new Label Track will appear below the Audio Tracks. Click on the track where the first song
begins and from the Tracks menu choose Add Label at Selection (Ctrl-B).
Begin typing the “Artist’s Name – Song Name” then press Enter. A new label will appear.
Click in the center of the next silence between songs and press Ctrl-B to add the next label and
so on for the remaining tracks in the audio file.
7
Once you have all your tracks labeled, from the File menu choose Export Multiple…
Select the WAV Export Format and make sure that the Export Location is the Music folder you
choose earlier.
Leave all other options set to their defaults and click the Export button.
(Note: the Metadata window will open for each exported track, to disable this, choose Edit >
Preferences: Import / Export, uncheck "Show Metadata Editor prior to export step", then OK.)
Once the export completes, you will receive a confirmation screen. This export will have split all
your tracks into individual files based on where the labels are located. A track is defined as the
audio recording between the labels.
8
Burning the CD:
Insert a Blank CD into the burner drive. Close or cancel the Windows AutoPlay window
that pops up.
Double click on the Cassette to CD Kit CD Burner icon to open the
program.
Open File (Track)
Move Track Up
Move Track Down
Delete Track
Close CD Tray
Eject CD Tray
Use the button bar on the right hand side to add, subtract, and order the track listing in
the center window. The scale at the bottom will indicate how many minutes of audio is
currently in the listing.
Click the Burn button to begin the burning process. The CD will eject when finished.
Note: If you wish to burn a 2nd copy of the CD you just created, insert another blank CD
and click the Burn button again.
Close the program when finished.
9
Frequently Asked Questions/Troubleshooting:
Q.
All I get is a flat line, no wave forms are being created or I only have one USB
Multi-Channel option, what do I do?
a.
Some computers only have one USB Multi-Channel selection. In the drop down
box next to the input tool bar be sure the selected option is set to line in (by
default it may be set to Microphone).
Q.
Where is the tutorial on how to use the software?
a.
The tutorial is on the Cassette to CD Kit disc. Simply explore the disc and open
the “Start Here.html” file. Here is a link to the step-by-step tutorial on the
website at: http://www.cassettetocdkit.com/tutorial
Q.
I lose the sound after watching the tutorial on the disc and performing
Step #1?
a.
This is a common issue. It happens if you try to do the steps as they are being
showed to you on the screen. Once you plug in the sound card (blue box) it takes
over the control of your computer's sound. Unplug the sound card (blue box)
and watch all the steps in order from start to finish. Then perform the steps as
you go along.
Q.
I have over 100 tapes and that would take a lot of batteries. Where can I get a
power adapter for my cassette player?
a.
You can get a power adapter for the cassette tape player for just $10-$20 at your
local Wal-Mart or Radio Shack. We recommend taking the cassette player with
you so they can help you get the correct voltage and polarity for the adapter.
Q.
I have over 1000 tapes and/or would like to use my own cassette player, can
this be done?
a.
If your personal cassette player has a 1/8” (3.5mm) headphone jack, you can
simply unplug our player and use your own.
10
Q.
I am in Audacity, but there is no Line In option available, what do I do?
a.
Open the CD through My Computer and locate the Driver folder. Then run the
driver setup program again. After the computer reboots, the option should be
available to the Audacity program.
Q.
I have the audio input all the way up and still have very small wave forms,
how do I fix this?
a.
Adjusting the volume knob on the cassette player to be louder will increase the
size of the waveform.
Q.
All I get is flat lines I don’t get any sound in my audio recordings. What do I
do now?
Q.
1.
2.
Make sure your connections are correct and tight.
Make sure you have the correct USB audio device "Line In" option selected
in the preferences and that the channels are set to 2 (stereo).
3.
Make sure your volume is turned up on your cassette player as well as in
the program and that the cassette player is moving the tape.
4.
Lastly, try unplugging and plugging in the USB cable, before starting up
the Audacity program.
Can I export my files as MP3?
1.
Yes, simply download the LAME encoder from the following website:
http://www.cassettetocdkit.com/lame_win.html
2.
Run the downloaded file to begin the installation.
Note: DO NOT change the destination location of
"C:\Program Files\Lame for Audacity".
3.
Return to Audacity and use the "Export as MP3" command on any
recorded file.
4.
Audacity will ask for the location of "lame_enc.dll" library. Browse to
"C:\Program Files\Lame for Audacity", select the "lame_enc.dll", click
Open then OK.
11
Still Need Some Help?
Open a support ticket at the
support center at:
http://support.cassettetocdkit.com
12