1
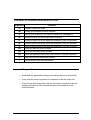
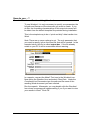
Meta5/Word
Integration
User’s Guide to Wordtool
1
Table of Contents
Introduction to Wordtool
W hat is W ordtool?
What Wordtool brings to Your Desktop
Features
Getting More Information
System Requirements
Manual Conventions
Installation Instructions Overview
Single User Install
Alternate Meta5 System Administrator Install
3
3
3
4
4
4
5
6
6
9
Using Wordtool
Expert Tips
Command Line Parameters
Command Line Parameters Quick Reference Chart
Important Things to Remember
12
12
14
17
17
How Do You… ?
Transfer Data from a Text Icon Using Wordtool
Insert User-specified Text from the Comm and Line
Insert a Picture File in a Document Using W ordtool
Insert an Object File in a Document Using W ordtool
18
18
19
21
23
Licensed materials. Program property of Meta5. All ri ghts reserved. Unauthorized
reproduction or distribution of any material or programming contents contained on this
disc i s prohibited.
Microsoft and Windows are trademarks of the Mi crosoft Corporation.
© 2000 Meta5, Inc.
User’s Guide to Wordtool
2
What is Wordtool?
By purchasing Wordtool you have taken a big step in integrating
Meta5 with your Windows desktop. You now have the ability to use
Meta5 capsules to create Microsoft Word documents.
We hope you will find that with Wordtool your Meta5 productivity
and range of application usage will increase dramatically. Wordtool
is truly the perfect tool for creating applications that use Word.
What Wordtool Brings to Your Desktop
Think about the difficulty involved in using Meta5 to generate
reports and then transferring those reports into Microsoft Word. So
much time and effort is spent setting font characteristics, page
layouts, and other features once you finally get the data into Word.
Imagine being able to transfer Meta5 data directly into Word and
have a formatted Word document created for you automatically.
Wordtool allows you to take the results of iterating capsules and
create customized Word documents on the fly. All you need to do
is include one icon in your capsule and set one command line
parameter. Sit back and watch as your Meta5 capsules create
customized Word documents for you.
This new and exciting technology is already being used by
customers who want to increase their efficiency and make Meta5
more useful and powerful. Spreadsheet, Text, Query and Reporter
data can be transferred to Word using Wordtool.
To sum it up, Wordtool allows you to use the full set of features
found in Word instead of the Meta5 text icon.
User’s Guide to Wordtool
3
Features
•
Creates multiple Word files during iterations
•
Automatically inserts pictures into your Word documents
•
Custom formatting for inserted data is available by using
templates
•
Allows for insertion of data into multiple areas of Word
documents.
•
Compatible with NT Capsule Server
•
Customizable formats by capsule
•
Customizable default formats
Getting More Information
Wordtool User’s Manual Version 1.0
This User’s Guide is intended to explain Wordtool in great detail. It
explains all of the concepts and tools in detail, and directs you
where to go to obtain more information.
System Requirements
•
Windows 95/98/NT
•
META5 version 1.02
•
Microsoft Office/Word 97
•
Hard Disk Space < 6MB
User’s Guide to Wordtool
4
Manual Conventions
Some of the words and symbols indicate that you should perform a specific
action, such as selecting an icon or pressing a key. The following table
describes these conventions.
Convention
Words appearing in bold typeface
that are generally preceded by the
word “type”
A series of numbers followed by a
period, such as 1.
Words appearing in “quotation marks”
or in italic type
User’s Guide to Wordtool
Refers to
Words you actually type
Instructional Steps
Words that are new terms or
emphasize a particular point
5
Installation Instructions Overview
The Wordtool Setup program is used to install the necessary
program files into the Meta5 Node Overlay directory of your PC.
Also, some required Visual Basic Run Time Libraries are installed
into the Windows System directory. Wordtool is executed by using
a PC Application Icon in an Meta5 Capsule.
Single User Install
1. Insert the Wordtool CD-ROM into your drive. Windows should
automatically start the installation process. If it does not, click
the Start button and select Run. In the dialog box, type:
D:\WORDTOOL\SETUP.EXE
replacing D:\ with your CD-ROM drive letter.
2. Follow the on-screen instructions to continue the installation.
3. When prompted for a directory in which to install Wordtool, you
must specify the full path of your Meta5 nodeovly directory.
Wordtool must be installed in your Meta5 nodeovly directory in
order to function properly.
4. The installation program has three install options: typical,
compact, and custom.
TYPICAL: This install should be used in most cases when you
are installing Wordtool on an Meta5 workstation. It installs the
necessary program files, Visual Basic support files,
documentation, and necessary Meta5 updates.
COMPACT: This installs the same files as TYPICAL without
the documentation files.
CUSTOM: Advanced users should select this option to tailor
the install to their needs. You can select/deselect any options
as necessary. Important: If you wish to install Wordtool on a
capsule server, you must choose a CUSTOM install and must
select all three Meta5 Updates.
User’s Guide to Wordtool
6
Custom install presents you with the following options:
Application Files: Files needed in order for Wordtool to run.
These include the Wordtool executable. These files are
installed in your Meta5 nodeovly directory.
VB Support Files: Visual Basic Runtime Libraries needed to run
Wordtool. These files are installed in your Windows System
directory. They may already exist on your system. If so, you do
not need to select this option.
Documentation Files: Files detailing the installation and use of
Wordtool. These files will be copied to your Meta5 nodeovly
directory. You can clear this option if you want to save disk
space.
META5 Updates: Files that update certain Meta5 components
in order for Wordtool to function properly on both a capsule
server and a workstation. Unless you are certain these updates
are already present on your system, you should select this
option. These files can also be found in the Meta5 Fixpack
scheduled for distribution in October 1999. These files are
divided into three categories: Common, Nodeovly, and Exe
Updates.
Common Updates are needed to run Wordtool on capsule
servers or workstations. These files are installed in the Meta5
User’s Guide to Wordtool
7
nodeovly directory.
Nodeovly Updates are needed to run Wordtool on a capsule
server. Do NOT install these updates on a workstation. These
files are installed in the Meta5 nodeovly directory.
Exe Updates are also needed to run Wordtool on a capsule
server. Do NOT install these updates on a workstation. These
files are installed in the Meta5 EXE directory.
5. Continue following the on-screen instructions until installation
completes.
6. Once installation has completed, the Wordtool Registration
program will run. Enter the Wordtool Registration Key provided
with your CD and click Okay.
7. Start Meta5, open the Blank Icons file drawer and copy out a
new PC Application Icon. In order to use Wordtool, you need to
configure the PC Application Icon as follows:
Enter Wordtool in the Path and File/Icon Name field.
Note: You may need to enter the full path for the Wordtool.exe file
on your system if you installed it into a directory other than the
default C:\META5DSK\NODEOVLY during setup.
Configure the Command-Line Parameters to the following:
c:\output.doc
(This will serve as the path and filename for the resulting Word
document. We have chosen output.doc for illustration purposes,
and you should change this to another name or an @-variable
when running your capsules.)
Highlight Capsule next to where it says Execution Information.
The Data Transfer type should be File. You will need to set the PC
Input File to c:\wdata$$$.txt and the Input File Type to TXT. (This
name is required and will serve as the temporary clipboard file for
Wordtool)
Set PC Output File to c:\wlog$$$.txt and Output File Type to
TXT. Then make sure that Run Application In is set to Foreground.
(This name is required and will serve as the run log file for
Wordtool)
User’s Guide to Wordtool
8
You should rename the PC Application Icon to Wordtool.
5. Once the Wordtool icon is fully configured, you’re ready to run.
To transfer data to Word, simply copy the Wordtool icon into a
capsule and connect a source Meta5 Query, Reporter,
Spreadsheet, Transformer or Text icon to it.
Note: There are no arrow options to set. The only parameter that
you need to specify is the new Word file that will be created. In the
instructions above, this file is called c:\output.doc. You can change
this file name to whatever you wish. If the file already exists on
your PC it will be overwritten without warning.
The format characteristics of the resulting document will be taken
from the wdefault.doc template that was installed for you during
Setup. If you wish to have a different format and use custom
features of Wordtool, you should read the section on Expert Tips or
User’s Guide to Wordtool
9
if you want to change the default format of your Word documents
simply modify the wdefault.doc file with the characteristics you wish
to use. This file can be found in your Meta5 Nodeovly directory.
Alternate Meta5 System Administrator Installation Instructions
These instructions detail how to install the Wordtool program for
availability to all users of the system through a public file drawer. You
will need Meta5 System Administrator Privileges in order to do this.
1. Log in to the File Service Console, FSCNSL.EXE, with the
system ID and password.
2. Use the Restore command to restore the Wordtool file drawer to
the system. You will need to use the following syntax at the
prompt:
restore D:\Wordtool\Wordtool.FDR a1 /l:Wordtool
3. Log in to the Meta5 System Desktop and copy the Wordtool file
drawer to the Public File Drawer.
NOTE: To use Wordtool, it will be necessary to run the Wordtool
Installer Capsule on every computer using the program. The
following are instructions for the Wordtool Installer Capsule:
From an Meta5 Desktop, make a copy of the Wordtool Installer
Capsule (from Wordtool file drawer). Open the Data Entry Icon and
type in the path of the Meta5 install directory, usually
C:\META5DSK, and click on Enter.
Run the capsule. This will save copies of Wordtool.exe,
Wdefault.doc, and WTReg.exe into the Meta5 nodeovly directory of
your local PC.
Run the Register Wordtool PC Application Icon. Enter the
registration key provided to you by RDS and click OK.
Wordtool is now installed.
4. The Wordtool Icon is fully configured and you are ready to run.
To transfer data to Word, simply copy the Wordtool icon into a
User’s Guide to Wordtool
10
capsule and connect the source Meta5 Query, Reporter,
Spreadsheet or Text icon to it.
Note: There are no arrow options to set. The only parameter that you
need to specify is the new Word file that will be created. In the
example below, this file is called demo.doc. If the file already exists on
your PC, it will be overwritten without warning.
The format characteristics of the resulting document will be taken from
the wdefault.doc template that was installed for you by the Wordtool
Installer capsule. If you wish to have a different format and use
custom features of Wordtool, you should read the section on Expert
Tips or if you want to change the default format of your Word
documents simply modify the wdefault.doc file with the characteristics
you wish to use. This file can be found in your Meta5 Nodeovly
directory.
User’s Guide to Wordtool
11
Expert Tips
To use Wordtool, it is only necessary to specify one parameter, the
full path and name of the document you want to create. The
formatting characteristics of this output document will be taken from
the default template file provided during installation. This is the
simplest way to do a “quick and dirty” data transfer into Word.
Custom Formatting
If you wish to have unique formatting in your newly created Word
document, you will need to create a template document with the
custom fonts, sizes, colors and other information that you require.
Here are the steps to do this:
1. Open Word to a new file.
2. Set the format characteristics you desire. For example, you can
change the Font to Bold 13 Point Courier, set the tabs and
margins, add a header and footer, etc.
3. Add a bookmark if you wish to insert your data someplace other
than the very top of your document. Go to the Insert menu and
select Bookmark…. A dialog box will appear, asking you to name
your new bookmark and listing the names of any other bookmarks
in your document. Give your bookmark a name (for illustrative
purposes, we will use the name “body”, but you may choose any
name you wish) and click Add.
4. Give this custom template file a name (our example uses the file
name c:\template.doc). Save and close it.
5. You will need to type this file name in the Command Line
Parameters of the Wordtool icon so that it will be used as the
template file.
The syntax for the Command Line should be as follows:
c:\template.doc c:\output.doc
where c:\template.doc and c:\output.doc are the document template
and output files, respectively.
User’s Guide to Wordtool
12
Note: once again, these file names are used here as an example
and you can use any file names you want. If your filename
contains blanks, use double quotes around the file name.
The data being inserted into c:\output.doc will be inserted at the
very top of your document unless you specify a body area using the
–ib feature. The –ib feature is used to insert your Meta5 data at a
specified bookmark. Details can be found in the Command Line
Parameters section of this manual.
User’s Guide to Wordtool
13
Command Line Parameters
-di
Disable interactive mode
Suppresses pop-up error messages when Wordtool is run on a
local desktop. Has no effect when Wordtool is run on a capsule
server. The capsule server only runs in disabled interactive mode.
-dt
Delete Template
This parameter deletes the template file when Wordtool finishes
running. Be sure you do not wish to keep your template file before
using this parameter. This feature is used when inserting multiple
sets of data into different parts of one Word document. You would
use the output from a prior run as a template for the next set of data
to be inserted.
-e
Error File
This parameter allows you to specify a file name for Wordtool’s
error log. By default, the error log is written to C:\wlog$$$.txt ($$$
will be replaced by DSK if Wordtool is run on a workstation, or E00,
E01, E02… if it is run on a capsule server). If you want to view the
Wordtool error log within a capsule, you can connect Wordtool to a
text icon. The error log’s contents will be saved in the text icon
when your capsule is run. If you specify a different error log file
name than the default, you will have to edit your Wordtool icon,
replacing the PC Output File entry (c:\wlog$$$.txt) with your new
error log file name.
-ib
Insert Body Text
This parameter tells Wordtool where you want the data from your
source icon to be inserted in your output Word document. Wordtool
will copy the data into your document at the specified bookmark.
For example, to copy your Meta5 data to the bookmark called
BODY, you would type: –ib BODY
To set a bookmark in your template file, open the template file in
Word and select Bookmark… from the Insert menu. Specify a
name for your bookmark and click Add.
Note: If you do not use the –ib parameter in your command line,
Wordtool will insert your Meta5 data at the top of your document.
User’s Guide to Wordtool
14
-io
Insert Object File
Inserts an object file at the specified bookmark. Multiple objects
can be inserted by using the –io option multiple times on the
command line. For example:
–io Bookmark1 object1.obj –io Bookmark2 object2.obj
-ip
Insert Picture File
Inserts a picture file at the specified bookmark. These pictures will
be displayed along with your text in your finished document.
Multiple pictures can be inserted by repeating the –ip option on the
command line. For example:
–ip Bookmark1 photo1.bmp –ip Bookmark2 photo2.bmp
-it
Insert Text
Insert user specified text at the user-defined bookmark in the output
file. For example, to insert the text “Sales Report” at the bookmark
TITLE1, you would type: -it TITLE1 “Sales Report”
To insert text at multiple bookmarks, you can repeat the –it function
on the command line, i.e.:
-it TITLE1 “Sales Report” –it TITLE2 “Chicago Market – 1998”
This feature is commonly used to insert @-variable information in
various areas in your Word document. For example: –it TITLE1
“@A” where the value of @A is Sales Report.
Note: It is necessary to enclose inserted text within double quotes if
the text contains spaces or dashes.
-kd
Keep Data File
Keep the data file when finished. By default, Wordtool deletes the
wdata$$$.txt file when it is finished. If you wish to keep this file,
simply include this parameter on the command line. This feature is
used mostly for debugging purposes. Also note that the $$$ token
will be replaced by DSK on the desktop and E00, E01… on the
capsule server.
-pd
Print Document
Print the document on the default printer when finished. To use,
simply type -pd on the command line. Remember that this
command will print the document on the default printer of the
machine where the capsule is being run. If it is run on a capsule
User’s Guide to Wordtool
15
server then it will print out on the default printer of the capsule
server, not your workstation.
-rm
Run Macro
Runs the specified macro after data transfer has completed but
before printing and saving take place. For example, to run a macro
titled “Macro1” you would type: -rm Macro1
You can run multiple macros by repeating the function on the
command line. For example: -rm Macro1 –rm Macro2
-v
Visible
Makes the running Word object visible. You will be able to watch
Wordtool copy the data from the data file into your output document
during a capsule run. This parameter should not be used in
capsules being sent to a capsule server. To use, simply type –v on
the command line.
-Null Argument
This argument acts as a buffer between Wordtool features
(-commands) and Word files on the command line (template/output
files). Other than this, Wordtool ignores the -- argument.
User’s Guide to Wordtool
16
Command Line Parameters Quick Reference Chart
Argument
Function
-di
Disable interactive mode
-dt
Delete the template file when finished
-e
Allows you to specify a file name to send error messages to
-ib
Insert the body text at the specified bookmark
-io
Insert an object file at the specified bookmark (may be repeated)
-ip
Insert a picture file at the specified bookmark (may be repeated)
-it
Insert specified text at the specified bookmark (may be repeated)
-kd
Keep the data file when finished
-pd
Print the document when finished
-rm
Runs the specified macro after data transfer. (may be repeated)
-v
Make the running Word object visible
--
Null argument (see documentation)
Important Things to Remember
•
Command line parameters always precede template and output files.
•
If only one file name is specified it is assumed to be the output file.
•
If two file names are specified, the first filename is assumed to be the
template filename and the second filename is assumed to be the
output filename.
User’s Guide to Wordtool
17
How do you….?
Transfer Data from a Text Icon Using Wordtool
To use Wordtool, it is only necessary to specify one parameter; the
full path and filename of the document you want to create. If you
do this, the formatting characteristics of this output document will
be taken from the default template file provided during installation.
This is the simplest way to do a “quick and dirty” data transfer into
Word.
Note: There are no arrow options to set. The only parameter that
you need to specify is the new Word file that will be created. In the
example below, this file is called output.doc. If the file already
exists on your PC it will be overwritten without warning.
In a capsule, connect the Meta5 Text icon to the Wordtool icon.
Now option the Wordtool Icon and select Other Data. Under the
Command-Line Parameters type the path and file name of the
resulting Word document you want created.
Run the capsule. Afterwards, you may double click the Wordtool
Icon where a message will appear asking if you if you want to view
your results in Word. Click OK.
User’s Guide to Wordtool
18
How do you….?
Insert User Specified Text from the Command Line Using Wordtool
At times, you may find it more convenient to specify a string of text
that you wish to insert into a Word document on the command line.
For instance, you may have several relatively small sentences
stored in @-variables that you would like placed in different areas
of a document and you only wish to run Wordtool once. The
easiest way to do this is to make use of the –it function.
If you wanted to insert the sentence, “Sales dollars for 4th quarter
1998” at a specific place in your Word document, you would first
need to create a bookmark in your template file at the location
where you would like the sentence to appear. (See the section titled
Expert Tips for details on creating template files and bookmarks)
Once you’ve placed a bookmark in your template file, you need to
option your Wordtool icon and include the following on the
command line:
–it Title1 “Sales dollars for 4th quarter 1998”
Note: the example above assumes a bookmark named “Title1”
exists in your template file. “Title1” should be replaced with the
name of the bookmark you created in your template file.
Alternatively, you could store the sentence in an @-variable. If this
were the case, you would instead include the following on the
command line:
–it Title1 “@A”
User’s Guide to Wordtool
19
If you wish to insert text in more that one place in your Word
document, you can simply use multiple –It statements. For
example:
–it Title1 “Sales dollars for 1998” –it Greeting “Dear Dr. Smith”
Or, if you have your sentences stored in @-variables:
–it Title1 “@A” –it Greeting “@B”
User’s Guide to Wordtool
20
How do you….?
Insert a Picture File in a Document Using Wordtool
Graphics can help improve the appearance of your finished
documents. Wordtool supports insertion of graphic files in your
output document from the command line through the use of the –ip
function.
You will need to place a bookmark in your template file at the
location you would like your graphic to be inserted. (See the section
titled Expert Tips for details on creating template files and
bookmarks)
To use the –ip function, you need to option the Wordtool icon and
add the –ip function to the command line along with the name of a
bookmark and the path and file name of the graphic file you wish to
insert. You would include something like this on your command
line:
–ip Picture c:\graphics\logo.bmp
This addition would insert the picture file c:\graphics\logo.bmp in
your output document at location denoted by the bookmark Picture.
You can store the name of the graphic file or the bookmark in an
@-variable if you wish to use different graphics files or different
placements for various conditions within one application. For
example:
–ip @B @A
User’s Guide to Wordtool
21
In this case, the value of @A is being used as the path and file
name of the graphic file you wish to insert. The value of @B is
being used as the name of the bookmark at which you wish to
insert the picture.
If you wish to insert multiple graphics (or one graphic multiple
times), you simply need to repeat the use of the –ip function. For
example:
–ip Pic1 c:\bluelogo.bmp –ip Pic2 c:\redlogo.bmp
This would insert two graphics files (bluelogo.bmp and
redlogo.bmp) at different places in your output document.
User’s Guide to Wordtool
22
How do you….?
Insert an Object File in a Document Using Wordtool
Word allows you to embed a variety of file types in your documents.
You can embed almost any type of MS Office file. A further benefit
of embedding objects is the ability to include multimedia files, such
as sound files and video clips, within your document. Wordtool
supports insertion of objects in your output document from the
command line through the use of the –io function.
Once again, you will need to place a bookmark in your template file
at the location you would like your object to be inserted. (See the
section titled Expert Tips for details on creating template files and
bookmarks)
To use the –io function, you need to option the Wordtool icon and
add the –io function to the command line along with the name of a
bookmark and the path and file name of the object you wish to
insert. You would include something like this on your command
line:
–io Object1 c:\windows\media\tada.wav
This addition would insert the wave file c:\windows\media\tada.wav
to your document at the location denoted by the bookmark Object1.
You can store the name of the object file or the bookmark in an
@-variable if you wish to use different object files or different
placements for various conditions within one application. For
example:
–io @B @A
User’s Guide to Wordtool
23
In this case, the value of @A is being used as the path and file
name of the object you wish to insert. The value of @B is being
used as the name of the bookmark at which you wish to insert the
object.
If you wish to insert multiple objects (or one object multiple times),
you simply need to repeat the use of the –io function. For example:
–io Object1 c:\report.xls –io Object2 c:\clock.avi
This would insert two objects (report.xls and clock.avi) at different
places in your output document.
User’s Guide to Wordtool
24