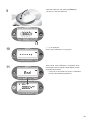
1
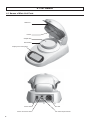
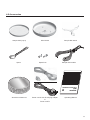
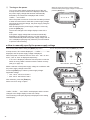
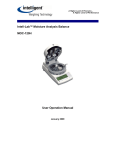
Infrared Moisture Determination Balance
FD-660
Operating Manual
CONTENTS
1. Safety Precautions ........................................................................................................................................... 3
2. Measuring Principle and Features .................................................................................................................. 6
■ Measuring principle ....................................................................................................................6
■ Features .....................................................................................................................................6
■ Measurable objects ....................................................................................................................7
3. Specifications ................................................................................................................................................... 8
4. Part Names ........................................................................................................................................................ 9
4-1 Names of Main Unit Parts .......................................................................................................9
4-2 Accessories ...........................................................................................................................10
4-3 Display .................................................................................................................................. 11
4-4 Control Panel Functions ........................................................................................................12
5. Assembly and Installation ............................................................................................................................. 13
■ How to manually specify the power supply voltage .................................................................15
6. Measurement Procedure................................................................................................................................ 17
■ Tips on how to ensure accurate measurements ......................................................................21
● First measurement ........................................................................................................................ 21
● For multiple measurements in succession .................................................................................... 22
● How to use sample dish and aluminium foil sheet ........................................................................ 22
● Measurement of powdered, particulate, and viscous samples ..................................................... 22
● Measurement of liquid sample ...................................................................................................... 22
● Measurement of large particulate sample ..................................................................................... 22
● Removal of soil, sample gas, and others ...................................................................................... 23
● Deodorizing windshield case ........................................................................................................ 23
7. Specifying Measuring Settings ..................................................................................................................... 24
8. Menu Settings ................................................................................................................................................. 27
8-1 Setting for MODE (measuring mode) ....................................................................................27
● Setting for AUTO (automatic) mode .............................................................................................. 27
● Setting for TIME (timed) mode ...................................................................................................... 29
8-2. Setting for TEMP (drying temperature) ................................................................................31
8-3 Selection of UNIT (measurement standard and minimum display digit) ...............................33
8-4 Selection of OUTPUT (output format) ...................................................................................35
■ Sample Printer Output .................................................................................................................. 38
■ Computer Output Format .............................................................................................................. 39
8-5. Setting for BIAS (offset value) ..............................................................................................40
8-6. CAL (scale calibration) .........................................................................................................42
9. Maintenance .................................................................................................................................................... 46
9-1. How to Perform Maintenance ..............................................................................................46
9-2. Fuse Replacement ...............................................................................................................46
9-3. Heater Replacement ............................................................................................................47
10. Error Display ................................................................................................................................................. 48
2
1. Safety Precautions
Improper use of the infrared moisture tester in violation of the following safety notes may result in death, injury
or damage to property due to fire, smoke and other problems. Furthermore, the infrared moisture tester has high
temperature components which can cause burns if proper safety guidelines are not followed.
■ Please observe the safety precautions.
Please read the precautions noted in the operating manual.
■ Do not use if broken.
If you suspect a problem or malfunction in the unit, discontinue use and immediately have the unit inspected by
certified Kett service personnel.
■ Warning symbol explanation.
In order to prevent damage resulting from erroneously operating the equipment, the following symbols are indicated
in the operating manual and on the product.
Please review the descriptions.
Warning
Failure to observe these items may lead to death or injury to the user.
Caution
Failure to observe these items may lead to injury to the user or damage to property.
Note
Items which the user should be aware of in order to safely use the unit.
Warning
•
•
•
•
•
•
•
•
•
•
Do not measure materials that may cause a dangerous chemical change by the application of heat.
Failure to observe this may result in an explosion or generation of poisonous gas.
Do not place flammable materials near the infrared moisture tester.
Some parts of the infrared moisture tester become extremely hot during operation and could lead to fire if
flammable materials are placed nearby.
This product should be used only with the applicable power supply voltage.
Using this product with incorrect voltage may cause the product to be overheated, which may result in trouble
or fire.
Do not attempt to disassemble, modify or rebuild the infrared moisture tester.
Doing so may result in an accident, electric shock, or other problems. If you believe the unit may be
malfunctioning take it to an authorized Kett service center for service.
Do not allow the unit to come in contact with water.
The infrared moisture tester is not waterproof. Do not allow water or other liquids to get into the unit’s
enclosure as this may lead to electric shock or malfunction.
3
Caution
•
Do not touch the heat-dispersing component of the heater cover or the sample dish with your bare hands.
Doing so may result in burns.
The infrared moisture tester is at a high temperature during and immediately after making measurements.
When touching the unit, only use the specified control knobs and accessories.
Be sure to follow proper procedures during operation.
•
•
•
•
When opening or closing the lid to the heater, always be sure to use the handle.
Place the wind shield, sample dish tray, and sample dish appropriately (see "5. Assembly and Installation" on
page 13).
When removing a sample dish, do not allow your hands to come into contact with the heater or any of the
metal parts around the heater, as doing so could result in burns.
The sample dish and area around the sample dish will be very hot immediately after performing a
measurement. Be sure to place the sample dish in an appropriate place to allow it to cool.
Never perform measurements using hazardous materials
•
•
•
•
•
•
•
Heating materials which would present a risk of explosion or combustion, or materials which could give off
noxious fumes when heated, is extremely dangerous and this instrument should never be used with any such
materials. The same also applies to the use of any materials which might cause hazardous chemical reactions
to take place when heated.
When heating materials that would first dry along the surface, and then allow the internal pressure to rise
excessively, there is a danger that heating such materials could cause them to rupture. Such materials should
never be measured, as doing so could be dangerous.
If any materials being measured ignites, immediately remove the power plug from its socket and take
appropriate measures to extinguish the fire.
Never place any easily flammable objects near the product.
The components of the infrared moisture tester can become very hot when measurements are being taken or
immediately after measurements have been taken. This heat could cause objects or materials to catch fire if
they were to come into contact with the unit. No easily flammable objects or materials should be kept near the
product.
Never place any objects which might easily be damaged by heat near the unit, as doing so might result in
deformation or damage to the objects in question.
No objects should ever be placed upon the heater.
If you see fire coming from the unit or notice smoke, an odd smell, or any other sign of abnormal functioning,
remove the power plug from its socket, and take whatever other steps would be appropriate to deal with the
problem.
Notes on using the control keys
•
•
•
4
Never turn on the power to the unit while holding down any of the control keys.
Never press any keys other than those directed or press two or more keys together at the same time unless
directed to do so.
When there is any danger that the unit might be damaged by lightning, remove the power plug from its socket.
Stopping operation
•
The [Start/Stop] key can be pressed at any time during operation to halt operation.
If you suspect for any reason that the product is not operating properly or that there is any sort of danger,
immediately press the [Start/Stop] key to halt operation.
Setup and storage
•
•
•
•
•
•
•
Avoid using or storing the unit in a location where it would be exposed to excessively high or low temperatures,
high levels of humidity, direct sunlight, electromagnetic interference, corrosive gases, or large amounts of dust.
Place the unit on a flat and stable surface where it will not be subjected to significant vibration during use.
When moving the unit, never tilt it any more than necessary.
Take care never to drop or bump the unit or otherwise allow it to be subjected to strong shocks or the
application of excessive force.
When removing the power cord or RS-232C interface cable, never pull on the cord or cable and instead, hold
the plug or cable connector when removing.
When the unit is not to be used over an extended period of time, remove the power plug from its socket.
Use the supplied power cord and make sure to connect to the protective earth.
5
2. Measuring Principle and Features
■ Measuring principle
This unit determines the moisture and solid contents of samples by heating them using infrared illumination
and measuring changes in mass due to evaporation. This is referred to as the loss on drying method and is
the simplest method for determining moisture content and thus mandated by many public regulations related to
measurement standards.
■ Features
● Auto Taring mechanism
The auto taring mechanism is incorporated in this instrument. This mechanism allows for measurement while
performing a zero point calibration, and therefore, scale drift is eliminated even when a test is performed over a
long period of time. This feature allows for reliable measurement.
● Organic carbon heater
An organic carbon heater is introduced for the heat source. This heater emits infrared rays more than 2 times
stronger than a halogen heater in the wavelength range (2.5 to 3μm) in which moisture reacts with heat. This
feature provides extremely efficient drying.
The service life is 7,000 hours* which is approximately 4 times the life of a comparable conventional infrared
lamp. In addition, it is better for the environment as polluting halides and metals are not used.
* Indicates actual measured time for the operation of infrared heater. This is not a guarantee of service life.
● 2 types of measuring modes
This product provides 2 types of measuring modes, and therefore, can perform measurement under appropriate
drying settings in accordance with the drying characteristics of the sample to be measured. (Automatic mode,
Timed mode)
● Pre Heat mode
This product is equipped with a Pre Heat mode to eliminate a measurement error occurring immediately after
turning on the power or when the temperature inside the measuring instrument is not stable.
● The ability to store measuring settings
Five (5) measuring settings storage numbers are provided. Storing various sample measuring settings on
numbers allows users to perform measuring preparation smoothly.
● Data memory function
This unit is able to store up to 50 sets of measurement data in memory, thus making it possible to output large
batches of data all at one time.
● PC connectivity
The connection of a PC and the use of the data logger, “FDL-02” (option) allows the drying state during
measurement, final measurements, graphs, and the like to be displayed on the PC.
● Printer port
The connection of the printer (option) allows the drying state during measurement, final measurements, and the
like to be printed out.
● Stainless-steel sample dish with 10 mm in diameter
● Scale calibration
■ Measurable objects
● Materials from which only water evaporates by heating
● Materials for which no dangerous chemical reactions or other changes occur as a result of
heating
* Measurements can be performed using virtually any material meeting these conditions.
6
3. Specifications
Measurement method
: Detection of weight loss by heating & drying
Sample weight
: 1 - 80g optional weight sampling format
Minimum displayable
units
: Moisture content (solids): 0.1% or 0.01% (selectable), Weight: 0.005g
(* The indication of 0.01% is not a guarantee of accuracy.)
Measurable quantities
: Moisture content (wet base & dry base), weight, solid content
Measurement range
: 0 - 100% (wet base, solids)
0 - 500% (dry base)
Reproducibility (Standard : Samples with a weight of 5 g or higher: 0.1%
deviation)
(When using standard samples and measuring settings as determined by Kett
Electric Laboratory)
Measurement Mode
: Automatic mode
Timed mode (1 - 120 min.)
Temperature setting
range
: 30 to 180ºC (in steps of 1ºC, temperature on dish)
Display
: Backlit LCD display (96 x 40mm)
External output
: RS-232C interface
Communications
: Data output from "the data logger software FDL-02" (option)
Storage of measurement
settings
: 5 types
Temperature/humidity
operating range
: 5 to 40ºC, 85% RH or less (no condensation)
Heat source
: Organic carbon heater (280 W x 2)
Temperature sensor
: Thermistor
Power supply
: AC 100V-120V (50/60Hz) : Power cord A (Flat blade attachment plug, Type A-1)
AC 200V-240V (50/60Hz) : Power cord B (Round pin attachment plug, Type C-4)
Power consumption
: Max. 900 W
Dimensions and weight
: 222 (W) x 360 (D) x 196 (H) mm, 3.2 kg
Sample dish
: Stainless steel (110 mm in diameter, 11 mm in depth)
Accessories
: 2 sample dishes, sample dish handler, wind shield, sample dish tray, spoon, spare
fuse, package of aluminium foil sheets (10 per package), Power cord A or B (Power
plug conversion adapter), operating manual
Options
: Printer set (includes a VZ-330 printer, a printer interface cable (VZC-14), printer paper, and an AC adapter), printer paper (10 rolls), package of aluminium foil sheets
(500 sheets), RS-232C cable (VZC-52), Data Logger software FDL-02, Sample
crusher TQ-100, Deodorizing windshield case FW-100
7
4. Part Names
4-1 Names of Main Unit Parts
Heater lid
Heater
Sample dish
Wind shield
Display and control panel
Power switch
Power conversion switch
8
AC inlet
RS-232C output terminal
4-2 Accessories
Sample dish (2 pcs)
Spoon
Aluminium sheets x10
Wind shield
Spare fuse
Power cord A with 3P-2P plug adapter
or
Power cord B
Sample dish stand
Sample dish handler
Operating Manual
9
4-3 Display
①
②
④
⑤
③
⑥
⑦
⑧
⑨
⑩
⑪
⑫
Item No.
10
Name
⑬
⑭
⑮
Description
①
②
③
④
⑤
⑥
Stability indicator
Displayed when the internal scale becomes stable.
Temperature display
Used to display the temperature under the heater lid.
Measuring time display
Used to display the amount of elapsed time during measuring.
Mode setting display
Displayed when the measuring mode is selected.
⑦
⑧
⑨
⑩
Measurement data output display Displayed when a measurement data output format is selected.
Drying temperature setting display Displayed when the drying temperature is specified.
Display for measurement standard Displayed when the measurement standard and minimum display digit are
and minimum display digit
selected.
Bias setting display
Displayed when the offset value of the moisture (or solid) is specified.
Calibration display
Displayed when the scale is calibrated.
Tare/Reset display
Lights up when taring (zero adjustment) can be performed.
Blinks during taring (zero adjustment).
Lights up when the screen can be returned to the weight display screen after
measurement.
⑪
Start/Stop display
Lights up when the unit can start measuring.
Blinks during measurement.
Lights up when measurement can be forcibly terminated.
⑫
Moisture/Solid/Weight display
When measuring weight (i.e., when in idling mode), used to display the weight
in grams. When performing measurements, used to display the moisture content
and solids content as percentages.
"oL" is displayed when the weight exceeds the measurable range at measuring
a weight.
⑬
Measuring settings area number
display
Used to display the number of the currently selected measuring settings area
number.
⑭
Menu display
Displayed when a measuring setting number, a measuring mode, a
measurement standard, an output format, or an offset value is specified.
⑮
Setting value display
Each item and its value are displayed when a measuring mode, a drying
temperature, a measurement standard, measurement data output format, or an
offset value is specified.
The measuring mode is displayed during measurement.
When an offset value is specified, the value is displayed after the measurement.
4-4 Control Panel Functions
❶
Item No.
Name
1
Tare/Reset key
2
Pre Heat key
3
Menu key
4
7
Select key
▲ (Up) key
▼ (Down) key
Enter key
8
Start/Stop key
5
6
❷
❸
❹
❺ ❻
❼
❽
Description
Used to perform zero adjustment (blinks during taring).
Also used to perform a reset after an error has occurred.
Also used to return to display of weight after completion of
measurement.
Used to warm up the whole system before measuring a sample.
Also used to warm up the measuring instrument when it is cooled
because of a long measuring interval (see page 21 for further
information).
[Temperature: 120ºC, time: 5 minutes] fixed
Replace the sample dish after preheating.
Used at the start and end of specifying a measuring mode, a
drying temperature, a measurement standard, measurement data
output format, or an offset value.
Used to select different settings or setting values.
Used to raise the setting value.
Used to lower the setting value.
Used to confirm currently selected settings.
Used to start measuring or to abort a measuring operation.
Used to forcibly terminate the measurement.
Also used to turn off the alarm which sounds to indicate that a
measuring operation has been completed.
11
5. Assembly and Installation
① Opening the package
Open the package and check to make sure all listed
items are included. (→P.10)
② Installing the main unit
Place the unit on a flat and stable workbench that is
insensitive to external vibration, wind, and the like.
③ Checking the power supply voltage
Check to see whether the power conversion switch
on the rear panel of the main unit is set to the working
voltage side.
* Itissettothe(100-120volts)sideinJapanandthe
US.
If the switch is not set to the working voltage side, the
error (Er701) is displayed when the power is turned on.
SER No. BC10001
④ Attaching the wind shield
*
Open the heater lid.
Place the wind shield so that the ▽ mark on the shield
points downward.
When the wind shield is appropriately placed, no
backlash or rotation may be created.
Be careful not to apply excessive force on the center
shaft when attaching the wind shield. Failure to
observe this may damage the instrument.
⑤ Placing the sample dish stand
*
12
Engage the sample dish stand (trivet) with the wind
shield so that the △ mark on the stand is aligned with
the ▽ mark on the shield. When the wind shield is
appropriately placed, no backlash or rotation may be
created
Be careful not to apply excessive force on the center
shaft when placing the sample dish stand. Failure to
observe this may damage the instrument.
Made in Japan
⑥ Placing the sample dish
Gently place the sample dish on the sample dish stand.
* Putthesampledishontheproperplaceonthe
sampledishstand,andbecarefulnottoputthedish
ontheedgeofthestand.
⑦ Close the heater lid
⑧ Connecting the power cord
Connect the power supply cord to the power supply input
on the rear panel. After that, plug the power cord into a
100 VAC wall outlet.
⑨ Connecting the printer (option)
When a printer is used, use the printer-specific cable that
is supplied with the printer. Connect the cable to the RS232C output terminal.
Refer to "the VZ-330 Printer User’s Manual" supplied with
the printer for descriptions about the printer.
*
Somepartsmustbeorientedinafixeddirection
forassembly.Notethatplacingpartsinthewrong
directionmayresultinerrorsinoperationorin
erroneousreadingsbeingobtained,andthatyou
shouldtakecarethatallpartsareputintoplacein
theirproperpositions.
AC inlet
RS-232C output terminal
13
⑩ Turning on the power
Turn on the power switch located at the rear of the unit.
A beep sounds, and all contents are displayed. After that,
the power supply voltage that has been automatically
detected by the instrument is displayed with "CHE5",
"CHE4", ... and "CHE0".
When the power is turned on for the first time after purchase
or when the instrument is used with a power supply voltage
other than the previous voltage, the power supply voltage is
displayed with "-----".
After ensuring that the power supply voltage is correct by,
press the [Enter] key.
The screen changes to the weight display screen with a
beep.
If the power supply voltage that has been automatically
detected by the instrument is wrong, or if the instrument
cannot automatically detect the power supply voltage and “Er
701” is displayed (see page 46), follow the procedure below
to perform manual setting.
When the power is turned on for the first time,
ensure that the power supply voltage is correct and
press the [Enter] key.
■ How to manually specify the power supply voltage
Turn on the power while holding the [Menu] key down.
Turn on the power while holding the [Menu] key down.
A beep sounds, "All contents displayed" → "CHE5" → "-----" are
displayed, and the power supply voltage is displayed.
When the power conversion switch is set to 100 - 120 V or 220 240 V, "100" or "220" is displayed respectively.
* If "Er 701" is displayed, selection with the power conversion
switch is wrong. Make a selection with the switch correctly
(see (3) on page 13).
+
SER No. BC10001
Made in Japan
After selection, press the [Enter] key.
Make a selection of the power supply voltage in accordance with
the power supply voltage to be used.
Press the [Select] key to select a power supply voltage.
Applicable voltage
• 100 - 120 V: 100 V/110 V/120 V
• 200 - 240 V: 220 V/230 V/120 V
Beep
After selection, press the [Enter] key.
Select 100 V for using in Japan.
①
"CHE4", "CHE3", ..., and "CHE0" are displayed, and the screen
changes to the weight display screen with a beep.
The measuring mode (see page 22) is displayed on the setting
value display.
Beep
14
②
6. Measurement Procedure
If a measurement is performed immediately after turning on the power, an error may be caused. It is recommended
to leave the instrument for approx. 30 minutes after turning on the power or perform "Pre Heat" (see "■ Tips on
how to ensure accurate measurements, ● First measurement" on page 21).
Before beginning a measurement, check to make sure that the sample dish is appropriately placed and there is no
residue remaining in the sample dish. Proceed to the measurement procedure after ensuring that every part of the
main unit is stable and that the heater lid is firmly closed in particular (see "5. Assembly and Installation" on page
13).
① Settings
When performing measurements for the first time,
or when you wish to change current settings before
measuring, then you should specify the measurement
settings.
(see "7. Specifying Measuring Settings" on page 24)
② Zero Point Adjustment
Check to make sure that the stability indicator (O) is being
displayed, and then press the [Tare/Reset] key.
During zero adjustment (taring)
The [Tare/Reset] key blinks, and “-----” is displayed on the
screen. The sample dish and wind shield move vertically
and the zero adjustment is performed.
The procedure is completed after the [Tare/Reset] key
lights with a beep and “0.000g” is displayed.
* Alwaysconfirmthattheheaterlidisclosedwhen
performingatare.Alsomakesurethatthetesteris
notexposedtodraftsorwind,orsubjectedtoany
vibrationswhenatareisbeingperformed.
Beep
③ Placing a sample on the sampling tray
Open the lid to the heater and place the sample inside.
Be sure to place the sample as flat as possible into the
tester so that heat is evenly applied to the sample during
measurement.
(See “■ Tips on how to ensure accurate measurements”
on page 21 for further information.)
○
×
15
④ Starts measurement
Close the heater lid.
Check to make sure that the stability indicator (O) is being
displayed, and then press the [Start/Stop] key.
* Theremaybetimeswhenthestabilityindicator(O)
isnotdisplayedbecauseofexternalvibrationsor
draftsorwind.Insuchacase,measurementcanbe
performedbutthemeasurementresultmaynot
beaccurate.Youshouldalwaysbesuretoconduct
measurementsinalocationasfreeaspossible
ofvibrations,drafts,wind,oranyotherharmful
influences.
* Pressingthe[Start/Stop]keywhiletheheaterlidis
openwillcauseasafetyalertbuzzertosoundand
measuringtobestopped.
The [Start/Stop] key blinks and heating & drying will
begin. The display switches from the weight (g) display to
the moisture content (%) display and the measuring time
is also displayed.
The measuring time shows the elapsed drying time
(minute).
The zero adjustment is automatically performed once
every minute (and once every 30 seconds when the
measurement is about to finish) during moisture content
measurement.
* Neveropentheheaterlidduringmoisturecontent
measurement.Doingsoisnotonlyhazardousbut
alsocouldcontributetomakingitimpossibleto
obtainaccuratemeasurements.Whentheheater
lidstillneedstobeopenedtoobservethesample
duringmeasurementorforotherreasons,openit
forlessthan15seconds(awarningbuzzersounds
10secondsafteropeningtheheaterlid,the
measurementstops15atseconds,and"ER306"is
displayed).
*
Tostopameasurementinprogress,pressthe[Start/Stop]
key.
⑤ Completion of the test
After completion of the test, the measured results are
displayed and the BIAS setting value (see page 36) is
displayed on the setting value display. At the same time,
the [Tare/Reset] key lights up and a buzzer sounds for 10
seconds.
To stop the buzzer, press the [Start/Stop] key. The
measured results continued to be displayed.
*Ifthisproductisconnectedtoaprinter(option),
pressingthe[Enter]keywhileabuzzerissounding
causesthesignaturefieldtobeprinted.(See“Sample
PrinterOutput”onpage36forfurtherinformation.)
16
blip, blip, blip, ...
To add a signature field on
a printout, press the [Enter]
key.
For
stopping
a buzzer
⑥ Reset
Press the [Tare/Reset] key.
The display of the results of the measurement (i.e.,
moisture content) will disappear and be replaced by a
display of the weight of the sample after drying.
*Resetcannotbeperformedwhileabuzzersounds.
⑦ Disposing of samples after measurement
Open the heater lid, remove the sample dish with the
sample dish handler, and dispose of measured sample.
* Notethatthesampleandsampledishmaybevery
hotandyoushouldbecarefulinhandlingthemat
thistime.
⑧ Preparing for the Next Measurement
Leave the lid to the heater open to allow the tester to cool.
When performing sequential measurements, make sure
that the entire unit has cooled before proceeding to the
next measurement.
You should also keep a spare (cooled) sample dish
available to use in the next measurement.
(See “■ Tips on how to ensure accurate measurements”
on page 21 for further information.)
* Theguidelineisfor“theentireunit”iswhen40ºCor
lowerisdisplayed.
When ready, return to step ② and begin the next
measurement.
⑨ Turning off the power
When all the measurements have been completed, remove the power plug from the power outlet.
When not using the main unit, always remove the power
plug from the power outlet.
17
■ Tips on how to ensure accurate measurements
● First measurement
If a test is performed immediately after turning on the power, a measurement error may be caused.
It is recommended to turn on the power 30 minutes before use to optimize instrument stability.
In addition, we recommend using the Pre Heat function available with the instrument.
How to operate the Pre Heat function
1
Place the sample dish, and close the heater lid.
*Nosampleisnecessary.
Press the [Pre Heat] key.
2
The [Start/Stop] key blinks, heating begins.
3
Pre heating will finish in 5 minutes.
The [Tare/Reset] key lights up.
4
Open the heater lid, and remove the sample dish with the
sample dish handler.
*
Note that the sample dish may be very hot and you
should be careful in handling it at this time.
Leave the heater lid open to allow the tester to cool.
5
Ensure that the entire unit has cooled, and place the spare
(cool) sample dish.
*
The guideline for "the entire unit has cooled" is 40ºC or
lower on the display.
Use a cool
sample dish.
18
● For multiple measurements in succession
Placing a sample onto a sample dish which is already warm may cause moisture from the sample to evaporate
before the test is begun and cause errors to occur in measurement. Always be sure to use a cool sample dish
when performing a second or subsequent measurements.
You should also take care to allow an even amount of time to elapse between measurements, as errors in
measurement may occur if the temperature of the internal scale of the unit does not remain at a constant level.
*
Two sample dishes are supplied with this unit.
● How to use sample dish and aluminium foil sheet
It is impossible to obtain accurate measurements if residue from the sample last measured remains on the sample
dish. To avoid such problems, either wipe the sample dish clean of any dirt or soil (see “9. Maintenance” on page
44 for further instructions) or use disposable aluminium foil sheets to protect against residues, soil, or dirt.
* Ten disposable aluminium foil sheets are supplied with the unit.
● Measurement of powdered, particulate, and viscous samples
The easier it is to heat the surface of a sample material, the easier it is for projecting portions of the material or
for material at the top of a mound of material to become burnt. If the material is placed in a mound on the dish or
if the material is not flat and evenly laid out, this is likely to happen, thus making it impossible to obtain accurate
measurements.
Note that while the precision of measurement improves the more flatly and evenly samples are placed and
the higher the amount of sample material used, the quantity of sample material used is too great if the surface
becomes burned before lower layers are fully dried.
Always be sure to lay out samples flatly and evenly as indicated in the diagram below.
● Measurement of liquid sample
Virtually all liquid materials will coagulate after being dried, and when working with such materials they should be
placed on the provided sheets of aluminium foil. Note that these aluminium foil sheets are water-permeable, thus
making it possible to obtain wide and even placement and making them effective for use in shortening measuring
times and obtaining accurate measurements.
Depending on the sample in question, the use of sand to speed up drying (Silica sand or ocean sand with a mesh
of 20 or so) may be even more effective.
● Measurement of large particulate sample
A long time may be required to thoroughly dry samples if the sample grains are large. In
addition, the sample surface may be burned, thus making accurate measurement impossible.
For this reason you should always crush samples to an appropriate size. The Sample Crusher
TQ-100 (option) is excellent for this purpose.
● Removal of soil, sample gas, and others
TQ-100
Depending on the sample, oil and volatile substances may stick to the temperature sensor and on the inside of the
heater base when the sample is being dried.
If the sample is in the form of a powder, under certain circumstances, the powder may accumulate on the upper
side of the heater lid or in the space between the heater and lid. These types of powder substances can change
the temperature around the sample and the air flow in the dryer section of the machine, resulting in an error in
measured moisture.
A substantial error can easily arise if the upper side of the heater lid gets clogged with deposited material.
Frequently clean the end of the sensor, the inside of the heater base, the upper side of the heater lid, and the
space between the heater and lid. Remove any dirt or sample residue.
• Wipe off the dirt with a dry, soft cloth.
• If dirt remains, wipe with a damp cloth (not dripping) with a water/neutral detergent mix. Then, dry the
instrument after rinsing the cloth in running water, wringing it well, and wiping off the detergent.
● Deodorizing windshield case
If the impact of exterior wind (from air-conditioners etc.) on the body is unavoidable, or if the sample generates a
bad odor during moisture content measurement, or if the device is in an environment that will accumulate powder
on its body from the sample, it is possible to lower reduce the impact of these problems by placing the device
inside the deodorizing windshield case FW-100 (option).
19
7. Specifying Measuring Settings
When moisture content is measured, test settings such as drying temperature and measurement mode need to be
specified in advance.
The specified measuring settings can be stored in the measuring setting storage areas.
There are 5 measuring setting storage areas as shown in the circle below ! to %.
There are 5 menu items that need to be specified in the (see the circles below).
MODE : Measuring mode
TEMP: Drying temperature
UNIT: Measurement standard and
Minimum display digit
OUTPUT: Output format
BIAS: Offset value
First, select a measuring setting storage area from ! to %.
Next, specify MODE (measuring mode), TEMP (drying temperature), and BIAS (offset value).
UNIT (measurement standard and minimum display digit) and OUTPUT (output format) are common in all areas.
The stored settings can be always recalled, and therefore,
storing settings for each sample type to be measured is
useful.
Refer to the next chapter, "8. Menu Settings (pages 26 or
later)" for details on how to set each menu item.
The following factory settings are stored in the ! to %
areas.
• MODE: Automatic mode (change in moisture content:
0.1%, monitoring time: 1 minute)
• TEMP: 120 ºC
• BIAS: 0.0 %
The following common menu items are stored.
• UNIT: Wet base
• OUTPUT: Printer Output
20
● Setting procedure
1
2
With the display showing the weight in grams, press the
[Menu] key.
[Menu] lights up, and one of ! to % blinks.
Select an area number to which the measuring settings
are stored from ! to % with use of the [▲] or [▼] key.
3
4
After the desired number blinks, press the [Enter] key.
“3” is selected in the example on the left.
The "3" changes from blinking to lit.
Now, the measuring setting storage number is set to 3.
At the same time, "MODE" in the menu blinks, and the
menu setting can now be performed (see "8. Menu
Settings" on page 26).
Pressing the [Menu] key returns the screen to the weight
display screen.
5
21
8. Menu Settings
8-1 Setting for MODE (measuring mode)
This unit is equipped with 2 measuring modes; one is “AUTO (automatic) mode”, and the other is “TIME (timed)
mode”.
Use those modes depending on test requirements.
● Setting for AUTO (automatic) mode
The test finishes when the amount of change in the moisture content changes by 0.1% or less within the specified
monitoring time.
The monitoring time can be selected from 0.5, 1, 1.5, or 2 minutes.
Specifying a longer monitoring time causes measurement values to approach an equilibrium value, but more time
is then required for the test.
Specifying a shorter monitoring time reduces the amount of time required for measurement, but the test is
completed while there may still be a wide variation in measurements. Determine the automatic settings in
accordance with your objectives and the type of sample to be measured.
Measured
Value (%)
*
Change in
moisture content
0.1%
Monitoring period
Measured Time
Because the moisture value
and the amount of moisture
change are calculated with
inclusion of values less than
the displayed decimal places,
the unit may not stop even
when the amount of moisture
change reads 0.1% because
of value rounding off.
● Setting procedure
1
2
With the display showing the weight in grams, press the
[Menu] key.
[Menu] lights up, and the number of the current measuring
setting storage area blinks.
To change the number, use the [▲] or [▼] key (see "7.
Specifying Measuring Settings" on page 24).
When the desired measuring settings area number starts
flashing, press the [Enter] key.
22
3
Move to the selection of menu item.
Every time the [Select] key is pressed, the menu items
alternately blink in the order of “MODE” → “TEMP” →
“UNIT” → “OUTPUT” → “BIAS” → “CAL” → “MODE” → ….
① Press the [Select] key.
② Press the [Enter] key after “MODE” blinks.
4
①
②
Move to the selection of a measuring mode.
The currently selected measuring mode blinks.
Every time the [Select] key is pressed, “AUTO (automatic
mode)” and “TIME (timed mode)” alternately blink.
① Press the [Select] key.
② Press the [Enter] key after “AUT” blinks.
5
①
Automatic measuring mode is now selected.
②
Automatically, the monitoring time is displayed. The
currently selected monitoring time blinks.
6
Every time the [▲] or [▼] key is pressed, "0.5 min” → “1 min””
→ “1.5 min” → “2 min” → “0.5 min”... alternately blink.
① Press the [▲] or [▼] key to move to the monitoring
time to be selected.
② Press the [Enter] key after your selecting monitoring
time blinks (1.5 minutes is selected in the example on
the left).
①
7
②
A monitoring time is now selected.
Since the measuring mode is specified, the "MODE" starts
blinking.
To exit from the "MODE" menu setting, press the [Menu]
key. The screen returns to the weight display screen.
To specify other menu items, press the [Select] key.
8
23
● Setting for TIME (timed) mode
In timed mode, the test time is specified before the test and the sample is dried to determine its moisture content.
When the specified measuring time is reached, the test is halted.
The measurement time can be specified from 1 to 120 minutes in steps of 1 minute.
● Setting procedure
1
With the display showing the weight in grams, press the
[Menu] key.
2
[Menu] lights up, and the number of the current measuring
setting storage area blinks.
To change the number, use the [▲] or [▼] key (see "7.
Specifying Measuring Settings" on page 24).
When the desired measuring settings area number starts
flashing, press the [Enter] key.
3
Move to the selection of menu item.
Every time the [Select] key is pressed, the menu items
alternately blinks in the order of “MODE” → “TEMP” →
“UNIT” → “OUTPUT” → “BIAS” → “CAL” → “MODE” → ….
① Press the [Select] key.
② Press the [Enter] key after “MODE” blinks.
①
②
4
Move to the selection of a measuring mode.
The currently selected measuring mode blinks.
Every time the [Select] key is pressed, “AUTO (automatic
mode)” and “TIME (timed mode)” alternately blink.
① Press the [Select] key.
② Press the [Enter] key after “TIME” blinks.
①
24
②
Timed measurement mode is now selected.
5
Automatically, the monitoring time is displayed.
The currently selected measuring time blinks.
6
① Press the [▲] or [▼] key to specify the desired measuring time (12 minutes is specified in the example on
the left).
Configurable time range: “1 min” to “120 min”
② Press the [Enter] key.
The measuring time is now specified.
①
7
②
Since the measuring mode is now specified, the "MODE"
starts blinking.
To exit from the "MODE" menu setting, press the [Menu]
key. The screen returns to the weight display screen.
To specify other menu items, press the [Select] key.
8
25
8-2. Setting for TEMP (drying temperature)
The following describes the optimal procedure to be followed to specify the drying temperature to be used in drying
samples when conducting measurements.
The factory default drying temperature is set to 120°C. However, depending on the type of sample, its moisture
content, or other settings, the proper drying temperature to use may vary. To find the proper drying temperatures to
be used for different types of materials, conduct repeated measurements until you find the correct temperature to
use for each type of material.
The temperature may be set to a temperature of anywhere from 30 to 180ºC in 1 degree increments.
• Note that the drying temperature does not refer to the temperature of the material being tested but is instead
the temperature on the dish calculated from the temperature detected by the temperature sensor. The drying
temperature may differ from the temperature of the material being dried depending on the material’s color,
moisture content, type, or shape.
• Generally speaking, drying is performed more quickly when a higher drying temperature is specified, but if the
temperature specified is too high it might result in the sample becoming scorched or burned, thus making it
impossible to obtain accurate measurements.
• Note that the meaning of the term ‘drying temperature’ as it is specified here differs from that of the drying
temperature for our other models because of a structural design differences between the models.
• If the ambient temperature is close to the drying temperature, the heater may not work.
● Setting procedure
1
With the display showing the weight in grams, press the
[Menu] key.
2
[Menu] lights up, and the number of the current measuring
setting storage area blinks.
To change the number, use the [▲] or [▼] key (see "7.
Specifying Measuring Settings" on page 24).
When the desired measurement settings area number
starts flashing, press the [Enter] key.
3
Move to the selection of menu item.
Every time the [Select] key is pressed, the menu items
alternately blinks in the order of “MODE” → “TEMP” →
“UNIT” → “OUTPUT” → “BIAS” → “CAL” → “MODE” → ….
① Press the [Select] key.
② Press the [Enter] key after “TEMP” blinks.
①
26
②
4
Move to the setting of the drying temperature.
The currently selected drying temperature blinks.
5
① Press the [▲] or [▼] key to specify the desired drying
temperature (105ºC is specified in the example on
the left).
② Press the [Enter] key.
Configurable temperature range: "30 ºC” to “120 ºC”
①
6
②
The blinking drying temperature changes from blinking to
lit, and the drying temperature is specified.
"TEMP" starts to blink.
To exit from the "TEMP" menu setting, press the [Menu]
key. The screen returns to the weight display screen.
To specify other menu items, press the [Select] key.
7
27
8-3 Selection of UNIT (measurement standard and minimum display digit)
● Selecting the measurement standard
This is used to select and specify the measurement standards to be used when performing measurements. There
are 3 types of measurement standards; measuring by changes in wet content, measuring by changes in dry
content, and measuring by changes in solid content, and therefore, the standard to be used should be selected in
accordance with the type of material to be measured.
Display during specification
Type
Formula
Description
of setting
Percentage of evaporated
W–D
Wet Base
×100 (%)
moisture weight with respect to
W
the weight before drying.
Percentage of evaporated
W–D
×100 (%)
moisture weight with respect to
Dry Base
D
the weight after drying.
Percentage of residual weight
D
Solid
×100 (%)
after drying with respect to the
W
weight before drying.
[Notation used in formula]
W: Wet weight before measurement, D: Dry weight after measurement
(While a measurement is being performed, the weight at each point in time is used as the dry weight in calculating
measurements.)
● Selecting the minimum display digit
Select 0.1% or 0.01% for the minimum display digit, and configure it.
• Note that the minimum display digit has no effect when performing comparative measurements.
The UNIT setting is common for all measuring setting storage areas.
● Setting procedure
1
With the display showing the weight in grams, press the
[Menu] key.
2
[Menu] lights up, and the number of the current measuring
setting storage area blinks.
The UNIT setting is common to all measuring storage
areas, and therefore, selection is not required.
Just press the [Enter] key.
3
Move to the menu item selection.
Every time the [Select] key is pressed, the menu items
alternately blinks in the order of “MODE” → “TEMP” →
“UNIT” → “OUTPUT” → “BIAS” → “CAL” → “MODE” → …
① Press the [Select] key.
② Press the [Enter] key after “UNIT” blinks.
* For UNIT, the measuring setting storage areas ! to
% are specified in common, and therefore, all area
numbers are displayed.
①
28
②
4
Every time the [Select] key is pressed, “WET” → “DRY” →
“SOL” → “WET” → ... alternately blink.
① Press the [Select] key.
② Press the [Enter] key after the desired measurement
standard blinks (“DRY” is selected in the example on
the left).
①
②
5
The measurement standard is now selected.
The minimum display digit is automatically lit.
The currently selected minimum display digit blinks.
6
Every time the [Select] key is pressed, “0.1” and “0.01”
alternately blink.
① Press the [Select] key.
② Press the [Enter] key after the desired minimum display digit blinks (“0.1%” is selected in the example on
the left).
7
①
②
The measurement standard and minimum display digit are
specified, and "UNIT" starts to blink.
To exit from the "UNIT" menu setting, press the [Menu]
key. The screen returns to the weight display screen.
To specify other menu items, press the [Select] key.
8
29
8-4 Selection of OUTPUT (output format)
Connection to a PC or an optional printer allows for measurement data output.
● PC (“PC” displayed on the screen of the main unit)
The use of the data logger software, “FDL-02”, allows users to load data onto a PC.
Refer to the operating instructions of “FDL-02” for further information.
● Printer (“PRT” displayed on the screen of the main unit)
The following 6 kinds of output intervals are selectable.
Output interval
30 sec.
1 min.
2 min.
5 min.
10 min.
Final results only
Display during
specification of setting
The setting contents of UNIT are common in all measuring setting storage areas.
● Setting procedure
1
With the display showing the weight in grams, press the
[Menu] key.
2
[Menu] lights up, and the number of the current measuring
setting storage area blinks.
The OUTPUT setting is common to all measuring storage
areas, and therefore, selection is not required.
Just press the [Enter] key.
3
Move to the selection of menu item.
Every time the [Select] key is pressed, the menu items
alternately blinks in the order of “MODE” → “TEMP” →
“UNIT” → “OUTPUT” → “BIAS” → “CAL” → “MODE” → ….
① Press the [Select] key, and
② Press the [Enter] key after “UNIT” blinks.
*
①
4
30
②
For OUTPUT, the measuring setting storage areas !
to % are specified in common, and therefore, all area
numbers are displayed.
The currently selected output format blinks.
Every time the [Select] key is pressed, “PC” and “PRT”
alternately blink.
5
① Press the [Select] key.
② Press the [Enter] key after the desired output format
blinks (“PRT” is selected in the example on the left).
An output format is selected.
When the printer (PRT) is selected, move to the selection
of output interval.
①
②
6
The currently selected output interval blinks.
Every time the [▲] or [▼] key is pressed, "30 S" → "1
M" → "2 M" → "5 M" → "10 M" → "FIN" → "30 S"...
alternately blink.
7
① Press the [▲] or [▼] key.
② Press the [Enter] key after the desired output interval
blinks (“FIN” is selected in the example on the left).
①
8
②
The output format is now specified, and "OUTPUT" starts
to blink.
To exit from the "OUTPUT" menu setting, press the
[Menu] key. The screen returns to the weight display
screen.
To specify other menu items, press the [Select] key.
9
31
The FD-720 may be connected to a printer to make it possible to output measurement data or other information to
the printer.
Output which may be generated includes data consisting of intermediate or final measurements, sample codes,
and measurement times.
• A dot-matrix printer can also be used. In that case, however, graphical output cannot be obtained. Please
contact Kett if you require further information.
■ Sample Printer Output
•
32
Note on the decimal precision of printed weight data
Although the minimum weight which may be displayed by the FD-660 is 0.005 grams, weights (Mass) are
printed to a precision of 4 decimal points because the values printed consist of averages from 7 measurements
taken over each 30-second interval for each set of weight data output.
■ Computer Output Format
Interfacetype:RS-232C
Numericoutputformat:JIS(ASCII)
Delimitercode:0x09(tab)
Delimiter:0x0D(CR)+0x0A(LF)
■ Title output format at the time of measurement start (Underscore characters (i.e., ‘_’) are
used below to indicate blanks (i.e., ‘20’ in hexadecimal)
1.
2.
3.
4.
5.
6.
7.
8.
“KETT_ELECTRIC_LABORATORY” + delimiter
“_Model_:_FD-660” + delimiter
“_S/N_”+”XXXXXXX” (7-byte Serial No.) + delimiter
“_Setting_:_”+”X” (1-byte setting number) + delimiter
“_Unit_:_” + “Wet Base Moist.” or “Dry Base Moist.” or “Solid Content” + delimiter
Automatic format
“_Mode_:_Auto” + delimiter
“_Setting Temp._:_” + “XXX” (3-byte temperature setting) + “C” + delimiter
“_Auto Stop Cond._:_”+”X.X” (3-byte automatic settings setting) + “min” + delimiter
Timed format
“_Mode_:_Time” + delimiter
“_Setting_Temp._:_” + “XXX” (3-byte temperature setting) + “C” + delimiter
“_Drying_Time_:_” + “XXX” (3-byte drying time setting) + “min.” + delimiter
“_Bias_:_”(+”-”) + “X.X”+”%” + delimiter
■ Measurement output format
tab + “Time (min.)” + tab + “Temp. (C)” + tab + “Mass (g)” + tab + “Moist (%)” + delimiter
■ Intermediate measurement output format
The number of characters indicating the moisture content varies with display setting.
tab + “XXX.X” (5-byte measuring time) + tab + “XXX” (3-byte thermistor temperature) +
tab + “XX.XXXX” (7-byte sample weight) + tab + moisture content “XXX.XX” (6-byte moisture content) + delimiter
Or
tab + “XXX.X” (5-byte measuring time) + tab + “XXX” (3-byte thermistor temperature) +
tab + “XX.XXXX” (7-byte sample weight) + tab + moisture content “XXX.X” (5-byte moisture content) + delimiter
■ Final measurement output format
The number of characters indicating the moisture content varies with display setting.
tab + “XXX.X” (5-byte measuring time) + tab + “XXX” (3-byte thermistor temperature) +
tab + “XX.XXXX” (7-byte sample weight) + tab + moisture content “XXX.XX” (6-byte moisture content) + delimiter
Or
tab + “XXX.X” (5-byte measuring time) + tab + “XXX” (3-byte thermistor temperature) +
tab + “XX.XXXX” (7-byte sample weight) + tab + moisture content “XXX.X” (5-byte moisture content) + delimiter
33
8-5. Setting for BIAS (offset value)
At times, it may be necessary for measurements to be corrected for bias.
The bias may be specified with a value between -9.9 and 9.9% in 0.1% increments. A bias should be specified in
cases like those described below.
• There are numerous reasons why measured values with this unit do not completely agree with expected values
measured with the official method (standard method). When this happens, adjusting the difference between
measured value using this unit and measured value using the official method (standard method) with an offset
value allows the measured value using this unit to be used as a value in accordance with the official method
(standard method).
* Inmostcases,itispossibletochangethemeasuringsettingsusedtomakethemeasurementsobtained
usingthisunittomatchtheexpectedvaluesmeasuredwiththeofficialmethod(standardmethod).Butif
suchsettingswouldcausethesampletobeburned,wouldcausethetimerequiredformeasurementto
becometoolong,orotherwiseresultinproblems,abias(offset)shouldbespecifiedinstead.
• When using more than one unit, there may be times when it is impossible to obtain identical measurements
even when the same measuring settings are used, because of differences in the locations where the units are
placed or because of differences in the surrounding environment. In such cases, the offset value of the unit that
is to serve as the standard should be set to zero and the offset value of the other units set to account for any
such differences.
● Setting procedure
1
With the display showing the weight in grams, press the
[Menu] key.
2
[Menu] lights up, and the number of the current measuring
setting storage area blinks.
To change the number, use the [▲] or [▼] key (see "7.
Specifying Measuring Settings" on page 24).
When the desired measuring settings area number starts
flashing, press the [Enter] key.
3
Move to menu item selection.
Every time the [Select] key is pressed, the menu items
alternately blinks in the order of “MODE” → “TEMP” →
“UNIT” → “OUTPUT” → “BIAS” → “CAL” → “MODE” → ….
① Press the [Select] key.
② Press the [Enter] key after “BIAS” blinks.
①
34
②
4
Move to the setting of the offset value.
The currently selected offset value blinks.
5
① Press the [▲] or [▼] key to specify the desired offset
value (0.2% is specified in the example on the left).
② Press the [Enter] key.
①
6
②
The blinking offset value changes from blinking to lit, and
the offset value is specified.
"BIAS" starts blinking.
To exit from "BIAS" menu setting, press the [Menu] key.
The screen returns to the weight display screen.
To specify other menu items, press the [Select] key.
7
35
8-6. CAL (scale calibration)
The scale calibration is performed with 0-point and 50-gram weight.
Separately prepare a weight of 50 g with one-thousandth (mg) indication described and less than 28 mm in height.
• The power to the unit should be turned on at least 30 minutes before calibration is performed in order to ensure
accurate calibration.
• This unit is significantly sensitive to ambient environment such as vibration, wind, and the like. Calibration
should be performed after stabilizing the operating environment.
• It is impossible to accurately calibrate the scale immediately after performing measurements or at any other
time when the heater lid is hot.
Allowthetemperatureoftheheaterlidtocooldowntoambienttemperaturebeforeperformingcalibration.
• The weights used should consist of standard OIML weights or some other type of non-magnetic weights.
• The heater lid must be closed during calibration to avoid wind effects.
• If you wish to abort a calibration already in progress, press the [Tare/Reset] key.
An ‘Abort’ message will be displayed and the screen will return to a weight display.
CAL is performed for all measuring setting storage areas.
● Setting procedure
1
With the display showing the weight in grams, press the
[Menu] key.
2
[Menu] lights up, and the number of the current measuring
setting storage area blinks.
The CAL setting is common to all measuring storage
areas, and therefore, selection is not required.
Just press the [Enter] key.
3
Move to the selection of menu item.
Every time the [Select] key is pressed, the menu items
alternately blinks in the order of “MODE” → “TEMP” →
“UNIT” → “OUTPUT” → “BIAS” → “CAL” → “MODE” → ….
① Press the [Select] key.
② Press the [Enter] key after “CAL” blinks.
①
4
②
"CAL" turns to lit, and other items are turned off.
"50.000g" blinks.
Calibration with 50 grams is started.
When the weight to be used is 50.000 grams, proceed to
the step 5 on page 42.
When the weight to be used is not 50.000 grams, refer to
the right page to perform the setting.
36
When the weight to be used is not 50.000 grams;
Press the [Select] key after “50.000g” blinks.
Blinking turns to lit.
Press the [▲] or [▼] key to specify the mass of the weight.
In the example on the left, 50.015 grams is specified.
Press the [Enter] key.
The specified mass of the weight blinks.
Set up is complete.
Proceed to the step 5 on the next page.
37
38
5
Open the heater lid, and place the weight on the sample
dish.
• When placing a weight on the sample dish, it should
be placed so that the center of gravity of the weight is
near the center of the dish.
6
Close the heater lid, and press the [Enter] key.
• Be sure to close the heater lid.
7
"-----g" is displayed.
Now, the 50-gram calibration is in progress.
8
After a short interval, "0.000g" blinks.
Open the heater lid, and remove the weight from the
sample dish.
9
Close the heater lid, and press the [Enter] key.
* Be sure to close the heater lid.
10
"-----g" is displayed.
Now, 0-point calibration is in progress.
11
After a while, scale calibration is completed, "End"
is displayed, and the regular weight display screen
automatically resumes.
• If this unit is connected to a printer, a calibration
record is automatically printed out.
39
9. Maintenance
9-1. How to Perform Maintenance
Maintenance should be performed after turning off the power, unplugging the power cord, and ensuring that the
moisture tester is thoroughly cooled.
① How to disassemble
Remove the sample dish first, followed by sample dish tray, and the wind shield in order.
② Installing parts and components
See “5. Assembly and Installation” on page 13.
③ Remove any traces of spillage or soiling from samples.
④
•
•
•
•
⑤
•
•
•
•
•
•
Maintenance of the main unit
Wipe off the dirt with a dry, soft cloth.
Avoid applying strong pressure when wiping, even if you find dirt or soiling difficult to remove.
If dirt remains, wipe with a damp cloth (not dripping) containing water and a small amount of neutral
detergent. Rinse the cloth in running water, wringing it well, and wiping off the detergent. Then dry the
instrument
Do not touch the glass part of the heater with your bare hand.
Maintenance of parts and accessories
The spoon, sample dish, and wind shield can be washed in water with a sponge.
Remove the sample dish and wind shield from the main unit when washing them.
Wait until completely dry and then reattach them to the main unit before using the unit again.
When using detergents, be sure to follow the instructions provided with the detergent in question.
Never use paint thinner, benzene, or any volatile cleaning agents, or any abrasive cleansers or
polishes.
Never use wire brushes or other hard cleaning tools.
9-2. Fuse Replacement
① Turn off the power, and unplug the power cord.
② Insert a flat-blade screwdriver from the top of the fuse holder on the rear panel of the main unit, and pull the
fuse holder towards you.
③ Remove the fuses from the fuse holder and check to see if any are burned out.
④ If there are no burned-out fuses, return the fuse holder to its original position. If there is a burned-out fuse,
replace it with one of the spare fuses or with a compatible (T8A 250V) fuse.
⑤ Put the fuse holder back to its original position in the main unit.
40
9-3. Heater Replacement
① Turn off the power, and unplug the power cord.
② Remove the heater lid.
1
1.
Remove the screws on both sides of
the heater lid after ensuring that the
heater lid and heater are thoroughly
cooled.
2.
Lift the heater lid diagonally forward
while moving it forward, and remove
the lid.
1.
Disconnect the coupling on the back
side of the main unit. If it is hard to
disconnect the coupling, open the
rear cover slightly from side to side
and try to disconnect it.
Raise the bracket holding the wire of
the heater, and disengage the wire.
Remove the metal thumb nut that
secures the heater holder base.
Disengage the hook while moving
the heater holder base backward,
and lift it.
2
③ Remove the heater.
2.
3.
4.
④ Mount a new heater.
•
Firmly secure the wire and heater holder base.
Do not touch the glass part of the new heater with your bare hands.
Ifanoilspotorsoilisattachedtotheglasssurface,theheatermaydeteriorate,anditslifemaybe
shortened.
⑤ Finally, attach the heater lid.
41
10. Error Display
If any of the following error messages are displayed, follow the procedures described below to check for the cause
of the error and take appropriate actions to remove the error.
If the error cannot be removed by following the procedures described below, then you should contact the vendor
from which you purchased the unit or the Kett Tokyo sales office or a local Kett office or sales office for assistance.
Error display
Description
A sample dish tray and a sample dish are
not mounted.
Properly mount a sample dish.
(See “5. Assembly and Installation” on page 13)
The sample weight is too light.
(1 gram or less)
The minimum sample weight for this product is 1
gram.
Try measuring again using a sample of at least 1
gram.
Press the [Tare/Reset] key to cancel the error.
Er104
The sample weight is too heavy.
(80 grams or more)
The maximum sample weight which can be used
with this product is a weight of 120 grams.
Try measuring again using a sample of 80 grams
or less.
Press the [Tare/Reset] key to cancel the error.
Er201
Invalid moisture content value
(when the sample weight increases by 0.1
grams or more)
This error is displayed when a sample is added
during measurement.
Press the [Tare/Reset] key to cancel the error.
Er202
Invalid moisture content value
(when the sample weight in process is -1
gram or less)
Press the [Tare/Reset] key to cancel the error.
Er306
Heater lid open
Press the [Tare/Reset] key to cancel the error.
Er401
Internal weight measuring unit
communications error
Turn off the power and then turn the power back on
again.
Er501
Invalid weight used during scale calibration
Use a calibration weight of the correct weight.
Press the [Tare/Reset] key to cancel the error.
Er502
Instability encountered during scale
calibration
Perform the calibration again with the unit placed
on a flat, stable surface not subject to the effects of
external vibration, drafts, or wind.
Press the [Tare/Reset] key to cancel the error.
Power error
Turn the power to the unit off, check to make sure
that the power conversion switch located on the
back of the unit is set to the correct position.
Then turn the power back on again.
Power supply voltage automatic detection
error
Specify the power supply voltage manually.
(See "■ How to manually specify the power supply
voltage" on page 15)
Er102
Er103
Er701
42
Action to be taken
If any of the following errors are displayed, it indicates that a failure or breakdown of internal parts or components
has occurred.
Contact the vendor from which you purchased the unit or the Kett Tokyo sales office or a local Kett office or sales
office for assistance.
Error display
Failure information
Er301
Temperature sensor short-circuit
Er302
Temperature sensor not connected
Er303
Heater overheated
This error indicates the existence of an extremely hazardous condition. Turn off the power
immediately. Please contact us urgently.
Er304
Temperature measurement error
Er305
Heater overheated
Er601
Er602
Er603
Auto-taring mechanism error
Er702
Power error
Er801
Memory error
43
Warning
• Reprinting of part or the whole of the contents of this document is strictly forbidden.
• The visual appearance, screen, etc. of the products and accessory items mentioned in this document may
differ from those of the actual products and accessory items, although operation and function will not be
affected.
• Although the contents of this document were drafted with great care, if you notice unclear points, errors,
omissions, etc., please contact our company.
• Regardless of the above warnings, responsibility is not assumed concerning effects resulting from use of this
document.
1311・PA・0101・100