1
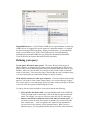
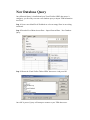
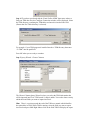
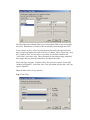
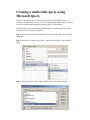
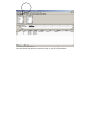
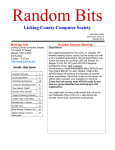
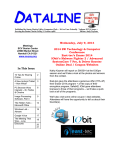
Importing TSM Data into Microsoft
Excel using Microsoft Query
An alternate way to report on TSM information is to use Microsoft Excel’s import
facilities using Microsoft Query to selectively import the required data from one or a
number of TSM tables into Excel.
What is Microsoft Query?
Microsoft Query, a standard component of the Microsoft Office suite, is a program for
bringing data from external sources into other Microsoft Office programs — in
particular, Microsoft Excel. By using Query to retrieve data from TSM, you don't
have to retype the data you want to analyse in Excel. You can also update your Excel
reports and summaries automatically from the original source database whenever the
database is updated with new information.
In most cases, you can import data by using the Import Data of Microsoft Excel as
described in Excel documentation. Use Query or another program only if you need to
perform specialized query tasks such as the following:
•
•
•
•
Filter rows or columns of data before they are brought into Excel.
Create a parameter query (A type of query that, when you run it, prompts for
values (criteria) to use to select the records for the result set so that the same
query can be used to retrieve different result sets.).
Sort data before it is brought into Excel.
Join multiple tables. (ie link job card with associated parts used, time sheets
and customer information).
Microsoft Query provides a simple front end, easily accessible from within Excel, to
perform these specialized query tasks.
Selecting data from TSM tables. You retrieve data from TSM tables by creating a
query, which is a question you ask about the TSM data stored in TSM tables. For
example, you might want to extract all maintenance contracts due for renewal, or the
job card sales figures for a specific product by region. You can retrieve a part of the
data by selecting only the data for the product and region you want to analyse and
omitting the data you don't need.
With Query, you can select the columns of data that you want and bring only that data
into Excel.
Updating your worksheet in one operation After you have TSM data in an Excel
workbook, whenever your TSM database changes, you can refresh the data to update
your analysis — without having to recreate your summary reports and charts. For
example, you can create a monthly sales summary and refresh it every month when
the new sales figures come in.
What is a data source? A data source is a stored set of connection rules that allows
Microsoft Excel and Microsoft Query to connect to your TSM database tables. When
you use Query to set up a data source, you give the data source a name, and then
supply the name and location of the TSM data files and the type of database. The
information also includes the name of an ODBC driver, which is a program that
makes connections to a specific type of database. TSM uses the Visual FoxPro driver.
How Query uses data sources After you set up a Visual FoxPro data source for
your TSM database, you can use it whenever you want to create a query to select and
retrieve data from TSM — without having to retype all of the connection rules
information. Query uses the data source to connect to the external TSM database and
show you what data is available. After you create your query and return the data to
Excel, Query retrieves the data and provides the Excel workbook with both the query
and data source information so you can reconnect to TSM when you want to refresh
the data.
A data source is the means through which Query and Excel connect to a specific
database and retrieve data.
You can use Query to set up ODBC data sources to retrieve data. In Query, you can
use the Query Wizard to create a simple query (A means of finding all the records
stored in a data source that fit a set of criteria you name. Queries can contain
operators, quotation marks, wildcard characters, and parentheses to help focus your
search), or you can use advanced criteria in Query to create a more complex query.
You can access Query from Excel, or you can create a query from within the
PivotTable and PivotChart Wizard.
Using Query to retrieve data Bringing external data into Excel with Query takes
three steps: First you set up a data source to connect to your TSM database, then you
use the Query Wizard to select the TSM data you want, and finally you return return
the TSM data to Excel where you can format it, summarize it, and create reports from
it.
Installing Query Microsoft Query, including the Query Wizard, is an optional
feature for Excel. Under most circumstances, you are prompted to install Query when
you point to Import External Data (Get external Data on Excel 2000 and below)
on the Data menu and click New Database Query.
Install ODBC drivers A Visual FoxPro ODBC driver (Open Database Connectivity
(ODBC) driver: A program file used to connect to a particular database.) is required
to retrieve data from TSM using Query. When you install Query, you automatically
install a set of ODBC drivers. If the Visual FoxPro driver is not automatically
installed when you install ODBC then you will need to download and install the
Visual FoxPro driver from the Microsoft Web Site separately.
Defining your query
Use the Query Wizard for most queries The Query Wizard, which is part of
Microsoft Query, is designed for users who are new to creating queries. The wizard
makes it easy to select and bring together data from different tables and fields in your
database. After you select the data, you can also use the wizard to filter and sort the
results of your query. You can use the Query Wizard either to create a complete query
or to start a query that you make further changes to directly in Query.
Work directly in Query for other types of queries If you are familiar with creating
queries or you want to create a more complex query, you can work directly in Query.
You can use Query to view and change queries you start creating in the Query Wizard,
or you can create new queries without using the wizard.
Use Query directly when you want to create queries that do the following:
•
•
Select specific data from a field In a large database table such as TSM Job
Cards, you might want to choose only some of the data to report on and omit
others. For example, you can use criteria to select only jobs in a date range
Retrieve data based on different criteria each time you run the query If
you need to create the same Excel report or summary for several areas in the
same external data — such as a separate sales report for each department —
you can create a type of query called a parameter query. When you run a
parameter query, you are prompted for the data to use as the criteria when the
•
query selects records. For example, a parameter query might prompt you to
enter a specific date range, and you could reuse this query to create a monthly
activity report.
Combine data in different ways You can use Query to combine, or join, the
data from different tables in your database. For example, your Job Card table
and customer information table might be joined in ways that show which
customers have had jobs recently.
Working with the data in Microsoft Excel
After you create a query in either the Query Wizard or Microsoft Query, you can pass
the data to a Microsoft Excel worksheet. The data becomes an external data range or a
PivotTable report that you can format, analyse, and refresh.
Formatting and analysing the data In Excel, you can use familiar tools such as the
Chart Wizard or automatic subtotals to present and summarize the data. You can
format the data, and your formatting is retained when you refresh the external data
from the TSM database. If you add columns of formulas to the external data range,
the formulas can be copied automatically to any new rows that are added to the range
when you refresh the data. You can use your own column labels instead of the field
names, and add row numbers automatically. For information about controlling the
formatting and layout of an external data range, see Excel Help.
Reusing and sharing queries In both the Query Wizard and Query, you can save
a .dqy query file that you can modify, reuse, and share. Excel can open .dqy files
directly, which allows you or other users to create additional external data ranges
from the same query.
If you want to share an Excel summary or report that is based on external data, you
can give other users a workbook that contains an external data range, or you can
create a report template. A report template lets you save the summary or report
without saving the external data so that the file is smaller. The external data is
retrieved when a user opens the report template. For information about creating report
templates, see Excel Help.
Refreshing external data When you refresh external data, you run the query to
retrieve any new or changed data that matches your specifications. You can refresh a
query in both Query and Excel. Excel provides several options for refreshing queries,
including refreshing the data whenever you open the workbook and automatically
refreshing it at timed intervals. You can continue to work in Excel while data is being
refreshed, and you can also check the status while it's being refreshed. For
information about refreshing external data in Excel, see Excel Help.
New Database Query
Once Microsoft Query is installed and your Visual FoxPro ODBC data source is
configures, you are ready to create a new database query to import TSM information
into Excel.
Step 1. Create a new blank Excel Workbook or select an empty Sheet in an existing
workbook.
Step 2. From the Excel Menu choose Data – Import External Data – New Database
Query
Step 3. Choose the Visual FoxPro Tables ODBC data source. And press OK.
Once OK is pressed, Query will attempt to connect to your TSM data source.
Step 4. IF you have not already told the Visual FoxPro ODBC data source where to
find your TSM data files, the Configure Connection window will be displayed. Select
the TSM directory containing the TSM tables and enter this into the Path: field
(Ensure that Free Table directory is selected).
For example, if your TSM program is installed into the c:\TSM directory then enter
“C:\TSM” into the path field.
Press OK when you are ready to continue.
Step 5. Query Wizard – Choose Columns
The Choose Columns Query Wizard is where you select the TSM information that
will be imported into Excel. TSM stored it’s data in tables. You need to know exactly
which table and fields you want to import into Excel.
Hint: There is a section towards the end of the TSM user manual which identifies
the main tables in TSM. While TSM is running, select the field you want to export
into Excel and press Shift Right-Mouse click on the field TSM will display the report
expression such as “Servcard.CustomerID”. This means that the table the information
is from is “Servcard” and the field name is “CustomerID”
In the “Available tables and columns” box, you can choose the columns (or fields) of
TSM data that you want to include in your query to find TSM data.
To view the columns for data in a table, click the + sign beside the available tables
and columns box.
To include an available column, double-click it or use the > button to move it to the
“Columns in your query” box.
To change the order of the columns, click a column to move up or down in the
“Columns in you query” box, and then click the buttons to the right of the box.
For our first exercise, we will import all incomplete TSM job cards with a Job Type if
“Maint” into Excel.
Select Servcard (jobs) from the “Available tables and columns box” and enter all the
fields you want to export into the “Columns in your query” box. Ensure you include
the “datecomp” (date completed) field and “jobtype” (Job Type) field which we are
going to filter on.
Once you have selected all the TSM fields to display, press the Next button.
Step 6: Filter Data
The Filter Data Query Wizard allows you to select which TSM records are brought
into Excel. Without this, all records in the elected table will be brought into Excel.
In our example, we have selected records from the Servcard (jobs) table and wish
only to import incomplete jobs with a Job Type of “Maint”. Select “DateComp” from
the “Column to filter” box and select “is less than” for the filter condition and
“01/01/1980” as the filter value. This will include all jobs with an empty completed
date (empty dates are generally identified as less than 01/01/1980).
Select “JobType” from the “Column to filter” box and select “equals” for the filter
condition and “MAINT” as the filter value. This will include all jobs with a Job Type
equal to “MAINT”.
Note: the filter values are case sensitive.
Step 7: Sort Order
Choose the fields you want to sort the output by. In this example, output will be sorted
by date completed and then by servcardid (Job Number).
Step 8: Finish
Once your query is completed you can Save the Query for reuse and return the date
extracted from TSM into your Microsoft Excel spreadsheet.
To finish the query and retrieve the data, press Finish.
If you want to add this query to the list of queries that are available when you choose
a query to run, click Save Query.
If you want to use Microsoft Query to make further changes to your query, click the
“View data or edit query in Microsoft Query” option, and then click Finish.
Creating a multi-table query using
Microsoft Query
Often, you will want to retrieve data from more than one TSM table at once. For
example, you might want to extract a list of all maintenance contracts that are due for
renewal next month and include the customer address / contact details.
The following exercise assumes that Microsoft Query is installed and your Visual
FoxPro drivers are correctly configured.
Step 1. Create a new blank Excel Workbook or select an empty Sheet in an existing
workbook.
Step 2. From the Excel Menu choose Data – Import External Data – New Database
Query
Step 3. Choose the Visual FoxPro Tables ODBC data source. And press OK.
Ensure that the “Use the Query Wizard to create/edit queries” option is NOT set.
Once OK is pressed, Microsoft Query will start up requesting that you select a data
source.
Step 4. Select the TSM directory containing the TSM tables and enter this into the
Path: field (Ensure that Free Table directory is selected).
For example, if your TSM program is installed into the c:\TSM directory then enter
“C:\TSM” into the path field.
Press OK when you are ready to continue.
Step 5. Microsoft Query – Add Tables
Select the tables that you want to access TSM data from. In this example, we want 2
tables; MAINTAIN and CUSTOMER. MAINTAIN is the table that hold
maintenance contract information and CUSTOMER stores the customers information.
Hint: There is a section towards the end of the TSM user manual which identifies
the main tables in TSM. While in TSM, select the field you want to export into Excel
and press Shift Right-Mouse click on the field TSM will display the report expression
such as “Servcard.CustomerID”. This means that the table the information is from is
“Servcard” and the field name is “CustomerID”
Once you have selected your 2 tables, they will appear in Microsoft Query.
Step 6: Link the tables
A critical step in the process is to link the 2 tables together by their common key field.
Each set of linked tables has a parent table and a child table. For each record in the
parent table, there could be one or more matching records in the child table. For
example, for each Job Card in the parent table, there could be multiple parts used or
time sheet entries. The job card can also link to the Customer file.
The parent – child relationship is determined by linking a common field in each table.
For example, the Job Card has a job number. Each entry in the parts used table uses
the job number as the link back to the job card.
In our example, the customer table is linked to the Maintenance Contract table by its
Customer ID. That is, the CustomerID in the Maintenance Table is used to identify
the relevant customer linked to the contract.
We therefore need to tell Microsoft Query to link these 2 tables by their Customer ID
Select the CustomerID field in both tables and drag the MAINTAIN table
CustomerID onto the CUSTOMER table CustomerID. A link will be drawn between
the 2 tables. Always drag from the parent table to the child table.
Step 7: Select fields to include
Select the fields you want to include in your Excel Spreadsheet by double clicking on
the relevant fields in both the MAINTAIN table and the CUSTOMER table.
Step 6: Enter Criteria
We now need to select the criteria by which we will filter the records returned. In our
example, we only want contracts within a renewal date range.
Select Criteria – Add Criteria
The Add Criteria window will be displayed.
Select the maintain.renewdate field and select the “is greater than or equal to”
operator. Enter the starting date in the value field and press the Add button.
Now enter the ending date in the Value field and press the Add button then press the
Close button.
The Criteria panel will be filled in with your criteria, in this case, all contracts due for
renewal between the beginning of February and the beginning of June.
Step 8: Run your Query.
When you are ready, press the ! Query Now button. All matching contracts with their
associated customer details will be returned to Microsoft query.
Press the Return Data button to return the results to your Excel Spreadsheet.