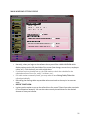
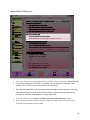
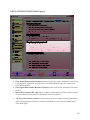
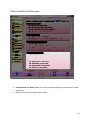
1
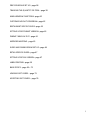
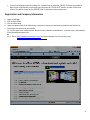
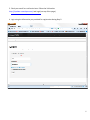
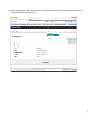
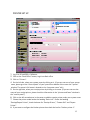
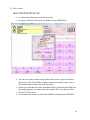
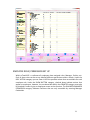
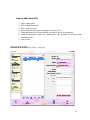
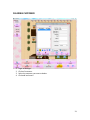
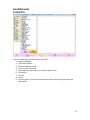
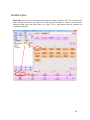
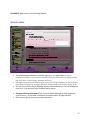
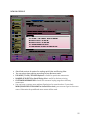
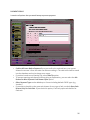
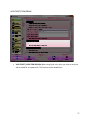
uTouchPOS++ User Manual
uTouchPOS
[email protected]
[email protected]
1
Copyright © 2011- 2012 by uTouchPOS Systems.
All Rights Reserved.
TABLE OF CONTENTS
TABLE OF CONTENTS – page 2, 3
LOGGING IN TO UTOUCHPOS – page 4
LOG-OUT/CLOCK-OUT– page 5
REGISTRATION AND COMPANY INFORMATION– page 6
PRINTER/DEVICE SETUP – page 15
MULTI STATION POS SET UP – page 16
ROLE/PERMISSION SETUP – page 18
EMPLOYEE SETUP – page 19
TAX SETUP– page 21
IMPORTING INVENTORY /MENU– page 23
IMPORTING CUSTOMER– page 26
CLEARING INVENTORY– page 27
CLEARING CUSTOMER– page 28
CLEARING SALES FILES /DATA– page 29
MAKING A SALE– page 30
SALES REPORT– page 33
ITEM MANAGEMENT– page 36
INPUTTING INVENTORY /MENU– page 36
2
PRICE SCHEDULE SET UP– page 38
TRACKING THE QUANTITY OF ITEM – page 39
MAIN WINDOW FUNCTIONS– page 40
CUSTOMER LOYALITY PROGRAM– page 42
RESTAURANT SPECIFIC GUIDE– page 43
SETTING UP RESTURANT VERSION– page 43
DINING TABLE LAY OUT– page 44
MODIFIER MAPPING - page 45
SLIDES AND DINING ROOM SET UP– page 46
RETAIL SPECIFIC GUIDE– page 47
SETTING UP RETAIL VERSION– page 47
LABEL PRINTING– page 48
BACK OFFICE - page 49—72
LOADING GIFT CARDS – page 73
ACCEPTING GIFT CARDS – page 76
3
Logging In To uTouchPOS ++
To log in to uTouchPOS ++ Software, you will need to input your employee number and your employee
password. There are three default employees in software
Manager
Employee Number: 1
Employee Password: 1
Click Enter, and then click ok
Cashier
Employee Number: 222
Employee Password: 222
Server
Employee Number: 333
Employee Password: 333
Each employee should have their own employee number and password. Each employee having their own
personal username and password will ensure that employees will only be allowed to have access to
actions that are allocated to their role (for example, a server cannot sign in as a cashier thereby gaining
access to the cash drawer).
4
If you don't have any clock-in data or are already clocked - out, the clock-in record will be generated
automatically. Clock-in/clock-out data will be collected for each sales report ran.
At the end of the day the employee has to clock-out from the software and this will be useful for
generating employee report
If you fail to login 5 times with the wrong password, the account will be locked for 30 minutes.
Manager accounts can reset employee passwords or you can access to back office while in recovery
mode. The default recovery mode username / password is 1/recovery1. We also recommend you
change the default recovery username and password which can be found in the Back Office > Main
Setup > Advanced Options > Security.
Logout / Clock-out
Once you have logged in successfully, you will see the Main Window, where you will see a dining table
layout if in restaurant mode or a list of recent tickets if in retail mode. All of these features are
customizable.
5
If you want to logout without clocking-out, you will have to press the "LOGOUT" button to go back to
login screen. And likewise, to clock-out you can press the "CLOCK-OUT" button to make a time card
record. This will be shown on the REPORT later to calculate total working hours.
Registration and Company Information
1.
2.
3.
4.
5.
Login as Manager
Click on Back office
Click on Main setup
Under the general tab of the Main Setup, you have to enter your business information and license key
You can get license key via two options
(a) You can email your order number, Business name, address1 and address2 , terminal name , Mac address
to [email protected]
or
(b) 1. Go to http://update.utouchpos.com/ and select Register on the top menu bar
.
.
6
2. Fill out the information requested along with the email address you provided when you
purchased.
7
3. Check your email for a confirmation letter. Follow the link back to
http://update.utouchpos.com/ and Login (on top of the page).
4. Login using the information you provided for registration during Step 2.
8
5. Select “My Licenses” under My Account on the top or My License Keys on the right hand side, to see
all license keys that belong to you.
9
6. Since you don’t have any license key generated yet, it should be blank. Select “Generate License
Key”, located on the right hand side.
10
7. You can select your order number in the combo-box. Select the order number which
corresponds with your uTouchPOS++ software purchase.
11
8. Input your business information exactly as you have entered i t in to uTouchPOS++ software. This
information is located in the Back Office (Default login: username: 1 and password: 1) > Main setup>
General. Please note the graphic above for the required fields. Make sure you copy the information exactly
as you have entered it into the software as it is case sensitive. Click Create.
12
9. You will see the license key generated based on your store information. You can see all of your license
keys from the “List License Keys” menu on the right. Copy and paste that License Key into the Back
Office section of UtouchPos++ and Save. Then restart the software.
13
10. Once you generate a license key, you CANNOT regenerate it again or change it.
So please make sure to input your business information correctly.
14
PRINTER SET UP
1. Log in to uTouchPOS ++ Software.
2. Click on the “Back Office” button, Login into Back office.
3. Click on “Printers".
4. On the left side, select your system name by clicking on it. (If you are not sure of your system
name, please go to the “control panel” of your system then double click to enter the “system”
window. The system’s full name is located on the “computer name” tab.)
5. On the right side, select your receipt printer by clicking on its name. (If you are not sure the
name of your receipt printer, please check the information in the “printers and faxes” window in
the “control panel”).
6. Click on the left arrow button in the center to add the receipt printer under your system name
7. Choose the printer model under the heading “Basic Info”. Under the heading
“Receipt/Report Printer", check the boxes for “Receipt Printer”, “Drawer Pull” and “Report
Printer”.
8. If you want to configure the kitchen printer then check the box for “kitchen printer 1”.
15
9. Click on Save.
MULTI STATION POS SET UP
It includes back office server and POS terminals
All stations and back office server should be in same WORKGROUP
1. You must set up the network using the back office server. Log on to the back
office server, start uTouchPOS++ software. While on the Login screen, click on
DB setup (located on the bottom, left-hand side).
2. Choose your data base file. Either RetailBlank.FDB or Restaurant Blank.FDB (click
the magnifying glass icon, select the folder marked “DB”, then select the file).
3. Click on TEST, then Save
4. For the back office server, by default the DBHOST will be labelled LOCALHOST.
16
5. The DBHOST can be renamed, but make sure to note the name you choose. e.g.
SERVER
6. Now log on to the client PC (POS station or Terminal), and start uTouchPOS ++.
While on the login screen, click on DB setup and label DBHOST using the same
information that you previously used. (e.g. Server).
7. Choose your Data base file for either RetailBlank.FDB or Restaurant Blank.FDB.
8. Click on TEST and Save.
17
EMPLOYEE ROLE/ PERMISSION SET UP
Within uTouchPOS ++ software all employees have assigned roles, Manager, Cashier, etc.
Each of these roles can be set up allowing different permissions and or actions. Under the
ROLE ACTION category you can view a list of the possible actions that are available for each
employee role. Under the SHOW BUTTON category, checked boxes indicate actions that
appear to employees, however, the correlated box within the GRANTED category must also
be checked in order to give an employee access to that function. The ONLYWITH MANAGER
PERMISSION category indicates functions that are only accessible by entering Manager
Credentials.
18
Steps to Add a New ROLE
1.
2.
3.
4.
5.
6.
Click on Back office.
Click on Role/Permission.
Click + (add new role).
Select new role and type the employee name (e.g. Tom).
Check the boxes for the actions which you want to give to the employee.
Check the appropriate boxes for “show button” and “granted” for specific actions
and permissions.
7. Click on Save.
EMPLOYEE SETUP Back Office > Employee
19
There are default employee names already programmed into the software—Tom as Manager ,
John as cashier and Jane as server—which can be changed.
Steps to add a new employee
1.
2.
3.
4.
5.
Click on Back office.
Click on Employee.
Click on + (add new employee).
Select the role (manger or cashier or server or new role).
Click on Employee code column and enter the login code for employee. This number
should be different for all employees.
6. Click on the “Change Password” button. You will now enter the password that the
employee will use to login to the software.
7. Check the Active box
8. Click on save
9. On the right hand window, you can fill in other information for employee like SSN, Driver
license, etc, as needed.
10. Repeat all above steps for each employee.
On Employee page, you can add, delete or update employee's information. If you
want to keep records for an employee who is no longer working for your
company, just uncheck Active option on the right pane instead of deleting it.
If the employee has access to Back Office, they should be given a strong
password, which should contain at least 1 alphabet and 1 numeric character.
The length of password must be longer than 6 characters. For employees who
don't have access to Back Office, less complicated passwords are acceptable.
If an employee fails to login because he/she has input the wrong password 5
times, the account will be locked for 30 minutes. In this case, employees who
have access to the back office can unlock the account.
20
TAX SETUP
uTouchPOS ++ Software will calculate sales tax when making a sale. For this feature to function
properly, you will need to set up the appropriate tax for your State/Province. The Tax Rate is
organized by TAX GROUP (name of Tax) and TAX ITEM (the standard rate of tax and any
conditions that should be applied to the rate).
21
1.
2.
3.
4.
5.
6.
Click on Back Office.
Click on Tax.
To add a New Tax group, click the plus sign “+” on the left-hand side.
Type the name for the Tax group. (e.g. US SALES TAX). The label is always TX.
Click on Save
To add a new Tax Item click the plus sign on the right-hand side. (This plus sign has an
additional graphic).
7. Input the name for the Tax item (e.g. TAX) and the rate (e.g. 8%). This is the basic
rate.
8. If there is an alternative tax rate in your area, you will select the “Alternative Tax”
box, and then fill in the appropriate information in the “Alternative Tax Condition”
area. For example, the alternative rate is 5% when the total sale is less than 4 dollars.
9. Click on save.
10. If your area charges more than one tax rate, you will add more tax items by clicking on
the plus sign on the right-hand side and selecting the same Tax group name. Update
your tax rate as needed.
22
Importing Inventory/ Menu
1. First you must remove the sample database from your software. To do this, click on
DB set up, and select either the Retail Blank.FDB or RestaurantBlank.FDB and Save it.
2. Login as Manager
3. Click on Back Office
4. Click on Export Inventory, save it as blanktemplate.csv
5. Now open your excel file template and fill out the categories according to your
inventory or menu.
6. Select all the data, CTRL+A and then copy (CTRL+C).
7. Click on Back office. Click on Import Inventory
8. Click on Paste.
9. Click on save. The software will then ask you to make a backup? Click yes.
10. The software will indicate “Success” and the number of imported items. Click save.
11. Click on the back office and click on Menu/Inventory. Now you can see your
imported items.
23
24
In order to successfully import your Inventory/Menu, your PC needs to have Microsoft
Excel (Microsoft office).
25
IMPORTING CUSTOMERS
You can import customers from older versions of utouch software using Microsoft
access database. Using your test.mdb file, you can import all of your customers.
1. login as Manager.
2. Click on Customers.
3. Click Import from MDB.
4. Locate your test.mdb file.
(c:\programfiles(x86)\Rescuegeeks\UTouchPOS\db\test.mdb)
5. Select it. Click open. Click ok.
6. Click save.
26
CLEARING INVENTORY
1.
2.
3.
4.
5.
6.
7.
Login as Manager.
Click on Back office.
Click on Menu/Inventory.
Select your item.
Click on X.
Click save.
If you want to delete all items then select all items and click on X.
And save.
27
CLEARING CUSTOMER
1.
2.
3.
4.
Login as Manager.
Click on Customers.
Select the customer you want to delete.
Click on X and save it.
28
CLEARING SALES
FILES/DATA
You can remove previous sales history from POS
1. Login as Manager.
2. Click on Back Office.
3. Click on Database Access.
4. Click on Clear Sales data.
5. The software will prompt you to create a back up file.
6. Click on yes.
7. Click ok.
8. Save it.
9. Click on reports. If this was successful then there should no longer be any be
sales totals.
29
MAKING A SALE
Quick Sale: You will select this option when you are ready to make a sale. This will open the
order window where you can search for items by their barcode, or select a menu button.
Selecting these items will add them to a ticket. This is also where you will process the
customer’s payment.
30
1. Login as cashier or Manager.
2. Click on Quick sale.
3. Scan the item or select your item from the Inventory/Menu Group Button. You can also
click on the List option and search your items by name and clicking ADD TO ORDER.
4. Item will appear on left hand window.
5. Click on confirm order. For restaurants, this will send tickets to the kitchen.
6. When ready to close out a check/ticket, click on payment.
7. Select your payment option, cash, debit or credit. Click enter.
8. A receipt will automatically be printed if your printer has been properly setup within the
software.
PAYMENT BY CASH: Click on “Payment”, select “Cash”. Under “Tendered Amount”, enter the
amount of cash that the customer has given you. If the customer has given you the exact
change, you can instead click “Exact”. If you accept Tips, you can also enter the tip amount in
the “Gratuity (Tip)” bar when needed. When you type in this information, uTouchPOS Software
will automatically calculate the amount of change that you need to return to the customer. The
change amount will be shown in the “Remaining Balance” bar. To complete the sale, you will
click “Enter” and then you will see the ticket shown on the main screen of your software.
PAYMENT BY CREDIT CARD: Click on “Payment”, select “Credit Card.
"Pre-Auth” – This will be used if you wish to be able to edit tip amount after the sale has been
closed. This window will calculate the amount of the bill. If you accept tips, you will also enter
the tip amount.
31
For “Pre-Auth”, the sale will only be processed at the end of the day when you use the CC Batch
Close.
"Final Sale” _ the sale will be finalized and will be processed right away. If you do not accept
tips, you will always use final sale. Once you have clicked on either Pre-Auth or Final Sale, a
window will pop up telling you to enter the credit card number. You will now swipe the
customer’s credit card through your credit card reader. Once the card has been swiped, the
information will be processed and you will receive a message telling you that the card has been
approved, or declined. Click “OK”.
"Voice-Auth"_ If a credit card transaction cannot be authorized electronically (for example, if
the software or equipment isn't working), the merchant can authorize the transaction by
phone. You must call your merchant provider to complete this action.
Other options in Quick Sale include:
Print Bill: The Print Bill option will be used if you wish to print another copy of the bill
for the most recent ticket.
Split Bill: Watch Youtube Video. If there are customers who purchase their items on the
same ticket, they have the option to pay separately. You can split the bill amount by the
items they have each chosen, by the dollar amount, or directly in half.
Void Item: will be used to void certain items from the current ticket. Before you click
Void Item, you will have to make sure that the appropriate item is selected.
Void Ticket: will be used to void all items from sale.
This feature is used to void a ticket that has already been completed. uTouchPOS
software will ask if you want to complete the void, click yes. You will enter the reason
for the void, and press enter to finalize. You can view a list of the voids that have been
preformed, and the reasons that they have been voided.
Item DC (discount): To give a customer a discount for specific item, you will use the
discount button. Discount an item by selecting it before clicking on Discount. Once you
have clicked the discount option, you will have the choice to discount the item/bill by a
dollar amount or a percentage. The new discounted price will be reflected after you click
on “Enter” in the Discount option.
Ticket DC: To give a customer a discount for total sales amount.
Close: will close the order screen.
32
Customer: By using the customer option, you can add customers to the software
database. To add a new customer, you will click on “Add New” and enter the customer
information in on the right side. Click “Save” before closing.
SALES REPORTS
X Reports
X-Report is the report which will print a summary of all events, but will not reset the sale data
you can view this report any time
X-Employee
It shows the Total sales amount by the employee
X- Terminal
It shows the individual sales amount on each POS terminal .It is useful when you have
multi station POS set up
X- Store
It gives total sale for each terminal
Z-REPORT: Z-Report is the report which will only be printed at the END of the day, it will print a
summary, and it will reset the totals for the period/day.
33
The options for the more specific reports are as follows:
Overall Sales: This will print a summary of the overall sales from the last time that a Z-report
was generated.
Sales by Menu/Inventory Category: This will print a summary of the overall sales from the last
time that a Z-Report was generated – the sales will be organized/separated by the Menu
Categories that your Inventory has been split into.
Sales by Menu/Inventory Group: This will print a summary of the overall sales from the last
time that a Z-Report was generated – the sales will be organized/separated by the Menu
Groups that your Inventory has been split into.
Sales by Menu/Inventory Item: This will print a summary of the overall sales from the last time
that a Z-Report was generated – the sales will be organized/separated by the Menu Items
themselves.
34
Sales by Payment Type: This will print a summary of the overall sales from the last time that a
Z-Report was generated – the sales will be organized/separated by the way that customers
have paid (cash, credit, discount, etc.)
Sales by Employee: This will print a summary of the overall sales from the last time that a ZReport was generated – the sales will be organized/separated by which employee was in charge
of the sale.
Sale By Dining table: This will print a summary of the overall sales from the last time that a ZReport was generated –– the sales will be organized/separated by the name of the Dinning
table which has been set up in uTouch POS software(Hall1,Bar1,etc)
Sales by Hour: This will print a summary of the overall sales from the last time that a Z-Report
was generated – the sales will be organized/separated by the time that each sale was made.
Sales by Day: This will print a summary of the overall sales for each day – you will choose how
far back the report will go by selecting “Custom”, entering the dates/times into the From/To
areas, and then clicking on “Sales by Day”.
Sales by Month: This will print a summary of the overall sales for each Month – you will choose
how far back the report will go by selecting “Custom”, entering the dates/times into the
From/To areas, and then clicking on “Sales by Month”.
Tax Report: This will print a summary of the overall taxes that have been charged from the time
period you indicate (Last Z, Current, or Custom).
Clock-In/Out: This will print a summary of when all employees have clocked into uTouchPOS
Software and when they have clocked out. This will allow you to keep track of the hours that
employees have worked within the timeframe that you choose (Last Z, Current, or Custom).
Discount Report: This will print a summary of the discounts that have been given to customers
or employees on items/bills within the time frame that you choose (Last Z, Current, or Custom).
Discount History: This will print the entire history of all discounts that have been given to
customers or employees on items/bills.
Void History: This will print the entire history of all voids that have been made for items/bills.
Refund History: This will print the entire history of all refunds that have been made for
items/bills.
Drawer History: This will print the reasons that had been entered for opening cash drawer
Overall Gratuity: This will print the overall summary of all tips that have been received by
employees within the time frame that you choose
35
Gratuity by Employee: This will print the summary of all tips that have been received by each
employee within the time frame that you choose.
ITEM MANAGEMENT
INPUTTING INVENTORY /MENU
To insert an Inventory/Menu into uTouchPOS ++ software ,you have to arrange your
inventory/Menu items into Groups and Categories.
Groups : Inventory items or Menu items are separated into Groups. (For example, Pepsi
is the inventory item and its group would be soft drinks. For a restaurant Menu, Pizza is
the menu item and the group would be Meal).
Categories: Inventory groups are separated further into categories. Categories are the
broadest separation of groups. For example, “beverages” is the category and group
would be “soft drinks”. Food is a category for the Meal group name.
36
Adding New Categories
1.
2.
3.
4.
5.
Login as Manager.
Click on Menu/Inventory.
Click on Category tab.
Click on + (add new category).
Type the name of category. (e.g, Beverages, description and order number
0,1,2,___etc.)
6. Click on Save.
7. Click on Group tab.
8. Click on + (add new group).
9. Type the name of group (e.g, Soft drinks, description and order number0,1,2,---etc.)
10. Click on save.
11. Click on Item tab.
12. Click + (add new item).
13. Type the name of the item (eg, pizza or pepsi). Click save.
14. Now select your item (pizza), located on left hand side.
15. On right hand side, you can select the color of the item button, and type a
description for the item.
16. Select category.
17. Select group, type the order number 0,1,2---etc.
37
18. If applicable: Scan your item. The bar code will appear after the scan.
19. You can select the size and color for each retail item.
20. Enter the regular price of the item within the price1 category (e.g. $10.00).
21. Click on save.
Unfixed price for item
In step 20, if you leave the item price as $0.00 and check the unfixed price box, you can
enter the price you want at the time of sale.
PRICE SCHEDULE SET UP
In Menu/Inventory, click on show advanced properties. This will give you access to
price2, price3 and price4. These prices can be used to set a schedule for when these
prices will be applied.
1. Login as Manager.
2. Click on Back office.
3. Click on Price schedule.
38
4.
5.
6.
7.
Click on + to add a new schedule.
In the Name tab, type the name of the schedule (e.g. schedule1).
Select the price you wish to change (price2, price3 or price4).
If the box for weekly recursive is checked the price schedule would be applied for each
day of the week.
8. On the right-hand side, select the day of week you want the price change to occur.
9. Select start time and end time.
10. In order to activate this price schedule select Active. Likewise, If you want the price
schedule to cease don’t click the Active box and write N inside the weekly recursive
category.
11. If you want to schedule a price on a specific date, then uncheck weekly recursive and
enter the date.
12. Click on save.
TRACKING THE QUANTITY OF AN ITEM
You can set up tracking and low quantity alert options within the Menu/Inventory
section. Once programmed, the item quantity will then be reduced whenever the item is
sold. uTouchPOS++ will also give you notification messages for low quantity items in
your inventory.
39
1.
2.
3.
4.
5.
6.
7.
8.
9.
Login as Manager.
Click on Back office.
Click on Inventory /menu.
Select the item on left hand side.
Under quantity, enter the current quantity for an item (e.g. 50).
Check the box to show advanced properties. Scroll down to the Misc. section.
Check the box for Track Quantity and Low Quantity Alert.
Under low quantity, enter the quantity at which you want the software to alert you.
Save it.
MAIN WINDOW FUNCTIONS
Open Ticket: This option can be used to view the details of previous tickets. On the main
window you will be able to see a list of the most recent tickets. You must first select one
of these tickets before clicking on the open ticket button. Once you have the ticket
selected, the open ticket option will pull up this ticket in the order screen. You can now
view the items that were purchased on this ticket.
40
Bill Recall: This will allow you to search for past bills/tickets by searching their bill
number. Once you have entered the proper bill number, you can either re-print the bill,
or re-print the receipt.
Drawer: Clicking on Drawer will allow the employee to open the cash drawer. A reason
for opening the drawer is required, for which a box is given to write an explanation. This
explanation is stored in Drawer history.
Payment: See “MAKING A SALE”. If you have already entered a customer’s purchase
information in the Order Screen, but they have not yet paid, you can select the ticket
from the main screen, by clicking on it. Once you have selected the correct ticket, you
will click on payment. This will automatically open the payment option through the
order screen, and you can complete the payment.
Tickets: By clicking on Tickets, you can see a list of the past tickets that will go further back in
time than the main screen will show. The list of the tickets will also show which employee made
which sale. You can select a past ticket by clicking on it, and you can view the details of the sale
by clicking on “Details”.
Customer: See “MAIN WINDOW FUNCTIONS > QUICK SALE > CUSTOMER”.
CC CAPTURE: This feature will allow you to view a list of the credit card sales made throughout
the day – you will need this option if you will be entering credit card tips at the end of the day.
Here you can adjust the tips and can change the tip amount.
CC BATCH CLOSE: After the adjustment of tips you can close the batch at the end of the day.
CC BATCH SUMMARY: Gives you the Net batch amount of credit purchases and credit returns
for the day. It will also serve as a set up for the Batch close – at the end of the day the summary
will be used to request a transfer of funds (funds earned from sales will be transferred to your
company’s account). Once this request has been submitted and approved, you can click on
Credit Card Batch Close.
CC BATCH CLEAR: If there is an error in the batch close due to a faulty transaction your
merchant provider will ask you to perform this function. However, it is not recommended.
CASH TIP Adj: Will allow you to search for a past ticket/bill and adjust the tip amount.
This option should not be accessible to employees such as cashiers or servers. To adjust
the tip amount, click on Tip Adj, search for the correct bill, and type in the correct
amount for the tip. Press “Enter” to save the changes.
41
Main window functions (continued)
Refund:
If you need to refund a processed sale, click on Refund. Once the Recall Bill and Refund screen has
opened, you will need to type in the bill/receipt number in the appropriate bar. Once you have
entered the bill/receipt number, the software will automatically bring up the bill amount and the
order details. You will now have to enter the refund amount in the same way that the customer
originally paid (cash, credit, etc), and you can enter a reason for the refund within the appropriate
box. Once you have entered all the appropriate information, click “Enter” or “Refund” to complete
the refund process.
Customer Loyalty Program
The customer database can be used to give credits to regular customers. They can use their
credits for shopping depending on the limit which you enter in software.
1. Click on Back Office.
2. Click on Main setup.
3. Click on the tab for customer loyalty.
42
4. Check the Use Customer Loyalty box.
5. Input the percentage of the sales amount which you want to give the customer as
Saving Credit.
6. Input the threshold at which customer can use their saving credit for shopping.
7. Save.
RESTAURANT SPECIFIC GUIDE
SETTING UP UTOUCHPOS++ RESTURANT VERSION
1. On the login screen, click on DBSETUP.
2. Choose DB FILE.
3. Click on db folder select RestaurantBlank.FDB or RestaurantSample.FDB.
4. Click open.
5. Click Test.
6. Click save and close.
7. Login as Manager.
8. Click on Back office.
9. Click on POS TYPE.
10. Go to ORDER SCREEN SETTINGS and check the options according to your Business
needs.
11. Go to USE FULL FEATURES FOR RESTAURANT and check the options relating to
Restaurants that you wish to use.
12. Save.
43
DINING TABLE LAYOUT (BACK OFFICE > DINING TABLE LAYOUT)
In uTouchPOS ++ Software, you can edit the layout of the dining tables to suit the layout of your
restaurant.
1.
2.
3.
4.
Login in to uTouchPOS ++ as Manager.
Click on Back Office.
Click on Dining room.
Click on + , Add new dining room, enter the name (e.g. 3rd floor), enter the height and
width of the room. Save.
5. Click on Dining Table Layout.
6. Select the room you wish to edit using the drop down menu of dining rooms.
7. From the Tools, select Background, choose your background from the given choices by
clicking on it, and drag it onto the dining room template.
8. From the Tools, select Properties, choose your desired items and drag it to left.
9. From the Tools, select Dining table, choose your desired table and drag it to left.
10. To edit the name or number of a table, select it by double clicking the item, and then
type the name you want.
11. Click on save and close
44
Modifier Mapping
Every menu item can be modified for cooking instructions, toppings, unique requests
and more (e.g. if you want to add extra topping to pizza or salad). These features
require modifier mapping.
1. Login uTouchPOS++ as Manager.
2. Click on Back Office.
3. Click on Menu/Inventory.
4. Click on the Modifier Mapping tab.
5. Click + on the right-hand side, type the name of your group (e.g. Pizza Topping).
6. Scroll to the right and check the box under REQUIRED (Y/N).
7. Click save.
8. Go to the Modifier Tab.
9. Click +, type the name of modifier (e.g. Pepperoni) and include extra price if needed.
10. Click on the Modifier Group Tab and select your group (e.g. Pizza Topping).
11. Click Save.
12. Click on the Modifier Mapping tab.
45
13. On the left hand side you will see your Menu Item list. Select the item (e.g. small pizza)
that you would like to add the modifier group.
14. Select the modifier group you created (e.g. Pizza Topping).
15. Click the arrow pointing to the left.
16. Click save.
17. You will no be able to see the modifier group (Pizza Topping) under your item (small
pizza).
SLIDES AND DINING ROOM
1.
2.
3.
4.
Login to uTouchPOS++ as Manager.
Click on Back Office.
Click on Role/Permission.
Check Manager's role, Random Slide and Dining Table should be checked under the
Show button & Granted tabs.
5. Go to c:\utouchPOS++\slides folder and save the desired image of the slide.
6. The slides will display and change after a few seconds.
46
Retail specific guide
SETTING UP UTOUCHPOS++ RETAIL VERSION
1. On the login screen, click on DBSETUP.
2. Choose DB FILE.
3. Click on db folder select Retail blank.FDB or RetailSample.FDB.
4. Click open.
5. Click Test.
6. Click save and close.
7. Login as Manager.
8. Click on Back office.
9. Click on POS TYPE.
10. Check order screen setting options according to your business needs.
11. Go to Use features for Retail and check Hide options relating to Restaurants.
12. Save.
47
LABEL PRINTING
uTouchPOS++ software allows you to print labels/barcodes from your inventory.
Go to c:\uTouchPOS++\redist\bcfont and extract the file bcfont.zip
Copy the barfont.ttf file into c:\windows\Fonts
Click on Back Office
Click on Label Printing and confirm barcode font to be IDAUTOMATIONHC39M
Click on show me an example
Open note pad and follow the example format (i.e four columns separated by Tab)
First column should be the UPC code, 2nd column should be the name of ITEM, 3rd
column should be the description, 4th column should be the price of item.
8. Select all the data from note pad, copy, and click Paste button within the label printing
window. The bar codes will appear.
9. Click on Save. The barcodes will be saved in .pdf format, enter the filename and click
save.
10. Now they can be printed by text printer.
1.
2.
3.
4.
5.
6.
7.
48
Back Office
Is used for the set up of your business 's main functions and features
If you are logged in as manager, you can see the BACK OFFICE button in your
command button list on the bottom of the Main Window
.
49
Permission Dialog
Back Office has sensitive data (Business Information, Employee Information and so on). You will
have to enter the manager username / password again to access it.
50
Back Office Structure
Main Setup includes business information like business name, address and other options
that are customizable.
In the Printer page, you can add your receipt printer, pole display and kitchen printer.
In the Employee page, you can add, delete or update employee information. If an
employee forgets his code or password, you will visit this page to view or reset his
information.
You can have multiple dining rooms in the Dining Room page and the layout for each
room can be edited using the Dining Table Layout page.
The Tax page contains tax set up information.
In the Menu/Inventory page, you can add your menu/modifiers for restaurant and
inventories for retail.
Some restaurants have a Price Shift policy. You can program the software to change the
price automatically based on a schedule, modified using the Price Schedule page.
Label Printing is for retail stores who want to print out barcode labels for inventory
items. With this feature, you wont don't need to buy an expensive barcode printer. It
uses the barcodes from your inventory and saves it as a PDF file so that you can print the
label with your normal office printer.
51
The Database Access page will show all database tables.
You can import/export inventories from/to your spread sheet S/W (Ms-Excel, Open
Office).
You can keep track of your employee's action and see it the Action Log page.
MAIN SETUP (BACK OFFICE > MAIN SETUP)
General:
Under the general tab of the Main Setup, you can enter your Business information .Your
store information includes location and company name, and will be printed on receipts
and bills for customers. See REGISTRATION AND COMPANY INFORMATION
In the General Options group, you can setup the date/time format as you prefer.
Usually the Long Date Format and Long Time Format will be used, but in cases with
restricted/small space (e.g., receipt printing), the Short Date/Time Format would be
used.
If you need to show buttons on your order screen, you can adjust the number of
buttons by changing the number of columns and rows. If you have a large amount of
menu/inventory items to traverse, you may want to make a larger number of buttons
available.
If you changed anything within the Back Office and want to apply it, press the SAVE
button.
52
Back Office > Main Setup > General Tab
Advanced: The “Advanced” tab allows you to make the software run properly for the way you
run your business. These options will personalize what options will come up, and what options
will not as you are processing orders and payments.
53
ADVANCED Tab consists of the following features
SECURITY GROUP
Trace All Employee Actions: the Action Log page in the Back Office will show
employee's actions. If you check this option, it will record all actions including activity
like Quick Sale, Confirm Order, Payment and so on.
Manager password should be kept secure. You can change frequency at which you are
prompted to change the manager password, but the maximum number of days is 90.
You can set the time limit for Manager Account Password expiry or You can disable the
time limit, if you uncheck Force Password expiry option.
Emergency Recovery Password: This is used to unlock Manager or other employee
(user) Account , if it has been locked due to invalid number of Login attempts
Enter an emergency recovery Password and save it.
54
NEW SALE GROUP
Quick Sale consists of options for making quick Sales and Dinning Sales.
You can select these optioins according to your Business needs.
FOR HERE / TO GO / DELIVERY Options is useful for quick sale restaurants.
NUMBER OF GUESTS for Quick/Dining Sale is useful for kitchen printing.
CUSTOMER INFORMATION is useful for customer loyalty program or delivery
restaurants.
You can have a custom menu without fixed prices for special orders. If you check
MENU/INVENTORY ITEM NAME for Unfixed Price Item, you can even type in the menu
name. Otherwise the predefined menu name will be used.
55
PAYMENT GROUP
It consists of options that you would setup to process payment
Confirm All Items Before Payment Once you confirm the ordered item, you are not
allowed to remove it from the order list without voiding it. The void record will be saved
into the database and can be shown on a report.
If you don't need to use Gratuity/Tip, select Hide Tip option.
To prevent opening cash drawer without giving an explanation, you can select the Ask
Reason for Non-Payment Cash Drawer Open option.
Other Payment Type can be added up to 4 items including default CHECK type. (e.g.,
Voucher)
If you want to be able to the open cash drawer for any type of sale, uncheck Open Cash
Drawer Only For Cash Sale. If you check this option, it will only open cash drawer for
Cash sale.
56
VOID TICKET/ITEM GROUP
VOID TICKET /VOID ITEM REASON: When using Quick sale, when you void an item you
will be asked for an explanation. This feature can be disabled her.
57
MAIN WINDOWS OPTIONS GROUP
Normally, when you login to the software there you will be a MAIN WINDOW which
display options on the left-hand side of the screen (last change, current time, employee
name, etc.). Click the box if you wish to hide them.
If you have a price schedule set up, the S/W needs to check the schedule for the
required amount of time (i.e. every 3 minutes, etc.).
For multi-station restaurant/retail, you may want to have Dining Table/Ticket List
refresh periodically.
Refreshing the dinning table map enables other terminals to the map in its accurate
state.
RECENT TICKET VIEW:
It gives you the option to set up the refresh time for recent Tickets from other terminals
(In a multistation network). You can also view recently closed tickets for the desired
amount of time you indicate.
58
MAIN SETUP (BACK OFFICE > MAIN SETUP) (CONTINUED)
TERMINAL OPTIONS:
Under this TAB you have the option to edit the appearance of uTouchPOS ++ Software
for this terminal.
Terminal Options only affect to single terminal. It is not saved on database.
We strongly recommend you setup Auto Logout After Idle option for security. If you are
using credit card integration, inputting a time value is mandatory. You cannot assign a
value longer than 15 minutes.
Full screen window : The software would open in full screen
Theme : you can select your color theme, Pink, Bubble, grey, green, etc.
59
Back up directory: here you have the path for the backup folder for your current
database.
Current Data Base: Here you have the path of current database file.
If you want to make any changes, then you have to choose that option and Click on Save
again.
POS Type:
Under this TAB you can set up the features relating specific to restaurant or retail
60
ORDER SCREEN SETTING group
Order screen settings:
If you have a bar code on your product, enable Show Barcode Input on Order Screen
If you want to select a product with a button, enable Show Menu/Inventory Buttons on
Order Screen. It may slow down loading speed on the order screen if you have
thousands of inventory items. In general, this is useful for restaurant or retail where
there are hundreds of products.
Only Non-UPC Items Will be Shown on Menu/Inventory Buttons will help you to use
both Barcode Scan and Button Selection features. For example, in convenience stores,
most items have a barcodes except certain perishable items like coffee or fruit. You can
select coffee and fruit from its button and scan items using the barcode.
61
MAIN SCREEN SETTING group
Each order ticket has a unique identification number, which is called the Ticket Barcode.
In the Main window of uTouchPOS ++ software you can enable the ticket bar code
window. This is used to keep track of tickets for customers.
The ticket barcode feature can be used to keep a tab open for bar customers. By using
ticket barcode you can keep track of that customer, you can enter the name of the
customer in ticket bar code window or swipe credit card.
To use this feature check Show Ticket Barcode Scan in Main Window options.
With the above options enabled, you can merge or transfer the existing order with
Ticket Barcode instead of Dining Table.
62
USEFUL FEATURES FOR RESTURANTS group
Close Order Window After Payment option will close the order window as soon as you
finish payment. Otherwise you will stay in the Order Window and it will create next
ticket automatically.
Auto Logout When Order Window is Closed options is useful for restaurant with many
servers.
Reload All Inventories On Login option might be useful when you have a small number
of menu items and you want to traverse the menu very quickly.
Use Cache for Inventory option is useful when you don't change inventory/menu that
often. Otherwise you will have to restart uTouchPOS++ to see recently added items
from Back Office.
63
USEFUL FEATURES FOR RETAIL group
Useful features for Retail allows you to Hide all options relating to restaurants for retail
businesses.
Select the features according to your needs.
64
Back Office > Main Setup > Print Tab
ORDER CONFIRMATION, KITCHEN AND BAR PRINTING group
Print Bill When Order Confirmed option is for restaurants that require payment at the
time when the customer initially orders. (There are different options regarding printing
for kitchen and bar printers in restaurants).
Show Menu/Inventory Group on Kitchen Print is an option in case you want to identify
the group (appetizer, dessert, etc.) of the item when the ticket prints to the kitchen.
You can show or hide the Number of Guests with Show Guests on Kitchen Print option.
65
BILL / RECEIPT PRINTING OPTIONS group
This TAB allows you to add information that will be printed to the kitchen, on bills, and
on receipts
There are different options regarding printing a Tip line. You can add a line to bills and
receipts where the tip/gratuity will be written. This will remain disabled if your business
does not accept tips, or if you do not want it to be printed on the receipt or bill.
You can also decide whether or not the Item description will be displayed on the bills
and receipts.
You can also decide whether or not to print the receipt each time after payment.
You can make tip and signature lines on the bill for you clients.
Hide Order Type (Dine-In / Take-Out / Delivery) On Bill/Receipt option is for retail
stores or restaurants which have only one service type. You can also hide Dining Table
ID or Employee Name on Receipt.
66
CUSTOM HEADER / FOOTER group
You can add any extra information you would like to add to the receipts/bills such as a
"welcome" or a “thank you” to the customer. If you do not want to add any headers, you
can leave this area blank, or you can choose to use a random header or random footer by
selecting Random option. Make sure to click “Save” before closing so that your changes will
be applied.
67
POLE DISPLAY group
You can customize pole display idle message and adjust frequency.
68
Back Office > Main Setup > Customer Loyalty Tab
Customer loyalty will be used when/if you wish to keep regular customers in the
software database. Once you have added customers into the database (click on + Add
New) you will be able to apply loyalty, or credit, to the customer. You can choose to give
credits to customers when they spend a certain amount, to calculate the credit including
tax or excluding tax (customers will get a percentage of the sale in a credit, a percentage
which you will choose), and you can choose to apply credit only when customers are
paying with cash. Once you have set up the customer loyalty, click “Save” and the
changes will be applied.
69
Back Office > Main Setup > Devices
WEIGH SCALE
uTouchPOS++ 1.x only works with NCI compatible weigh scales. To setup your scale,
refer to the manual enclosed to the scale.
Press Default button to reset all values. (If you've changed the DIP switch on the scale, it
might have changed some settings other than default). You can adjust the values on the
screen and press the SAVE button to apply the change.
Polling Interval is millisecond value of interval to query to the scale. The recommended
value is 500 - 1000.
Press Test button, to see if uTouchPOS++ is actually communicating with your scale.
Each response from scale will be added to Test Result text box.
70
Back Office > Main Setup > External Module Tab
It is used for credit card and gift card integration
71
Back Office > Main Setup > Misc
ANIMATIONS GROUP
You can adjust animation type on Main Window, Order Window, and Menu/Modifier
Buttons. This is just an eye candy and it doesn't affect the functionality of any of the
features.
72
Loading Gift Cards
If you are not using our Mercury Merchant services, your merchant service provider will supply
the gift cards needed to function with their credit card terminal.
In your uTouchPOS++ software, you will enter an item called “Gift Card”. You will enter this
item with an “unfixed price”, which will allow you to manually enter the amount to be loaded
onto the card. If your state/province charges sales tax, you will enter this item with a “NO TAX”
rate.
Once you have entered the gift card into the sale, you will accept payment from your customer.
Once you have taken the payment, you will swipe the card through your stand alone unit and
load the card with the amount paid by the customer.
If you are using Mercury merchant services:
Since everything is integrated, all of the processing will be done directly through uTouchPOS++
software.
1. Click on Back Office. Click on Inventory/Menu. Click on + and enter as an item “Gift
Card”.
2. Check the box "Unfixed price".
73
3. On the top, check the box "show advanced properties".
4. Scroll down and check the box "Gift Card ". Click save.
5. Go to Main setup, and then click on Tab External modules.
6. Check the box Integrate Gift Cards and save it.
74
To complete a Gift Card Sale: Using the Quick sale feature, click on gift card. The software will
ask how much you wish to charge for a gift card when you are making a sale. When you put in
the amount you will be charging for the gift card, uTouchPOS ++will ask you if you are activating
a new card or recharging a previously activated card. You will select the appropriate option and
then follow the steps when the software prompts you. After you swipe the card through your
integrated credit card swipe, you will be notified once the card has loaded successfully, and the
gift card will be brought into the sale on the order screen.
Next, you will click on “payment” (you will first click on “confirm order” for Restaurants
Using a kitchen printer) and choose the method of payment. You can now accept the
Payment from your customer and complete the transaction.
75
Accepting Gift Cards
uTouchPOS makes it quick and easy to accept gift cards. You will enter the items into a sale as
you normally would (see “making a sale”) and then you will click on “payment” (for Restaurants
using a kitchen printer you will need to click on “confirm order” first). For payment type you
will select “gift card” and then you will swipe your customers card through either your
integrated credit card swipe or through your standalone unit.
76