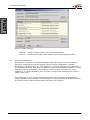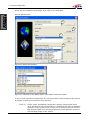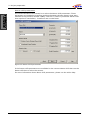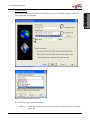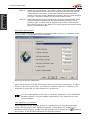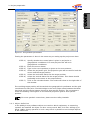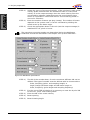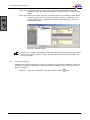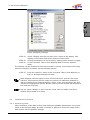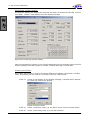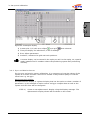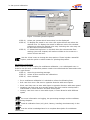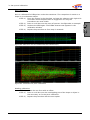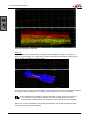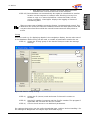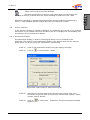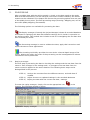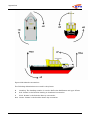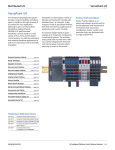
1
Quick Start
Quality Positioning Services
Huis ter Heideweg 16
3705 LZ, Zeist
The Netherlands
Tel General: +31–(0)30-6941200
Tel Support: +31–(0)30-6941220
Fax: +31 – (0)30–6923663
Website: http://www.qps.nl
E-mail: support@qps nl
COLOFON
Title
Subject
Revision
Date
Written by
Email
Internet
Telephone
Fax
Quickstart v7.5
QINSy User Manual
2.0
29-3-2006
QPS support department
[email protected]
www.qps.nl
+31 (0) 30 69 41 200
+31 (0) 30 69 23 663
REVISION HISTORY
no
1.0
1.4
2.0
date
Changes made
15-4-2005
29-3-2006
Updated manual for changes in made Sounding grid utility
Layout of document. Updated all components described with
new figures and text.
QPS bv, Zeist, The Netherlands
2
Table of contents
TABLE OF CONTENTS
1.
GENERAL INFORMATION .................................................................................... 6
1.1.
1.2.
1.3.
1.4.
1.5.
1.6.
1.7.
2.
Introduction to QINSy ...................................................................................... 6
Introduction to this manual............................................................................... 7
Graphical User Interface ................................................................................... 8
Help............................................................................................................... 9
The structure of QINSy....................................................................................10
The Project Folder...........................................................................................13
Relational database ........................................................................................14
PROJECT PREPARATION ................................................................................... 15
2.1.
Creating a new project ....................................................................................15
2.2.
Defining Global settings ..................................................................................15
2.3.
Template Database .........................................................................................16
2.3.1. Creating a new empty template database ....................................................16
2.3.2. Creating a template database based on an existing template..........................17
2.4.
Database Setup..............................................................................................18
2.4.1. Geodetic Parameters Wizard.......................................................................19
2.4.2. Object definition .......................................................................................25
2.4.3. System definition ......................................................................................29
2.4.4. Tide ........................................................................................................39
2.5.
I/O Tester......................................................................................................39
2.6.
Line Database Manager ...................................................................................40
2.6.1. Importing files into the Line Database Manager ............................................41
2.6.2. Create new Objects ...................................................................................45
2.6.3. Editing objects..........................................................................................47
2.7.
DXF to QXF Conversion ...................................................................................48
2.8.
Sounding Grid Utility.......................................................................................48
2.8.1. Creating a sounding grid............................................................................48
3.
SET-UP AND CALIBRATION ............................................................................... 50
3.1.
Auto start ......................................................................................................50
3.2.
Controller ......................................................................................................51
3.2.1. Computation setup....................................................................................51
3.3.
Creating displays ............................................................................................54
3.4.
Calibration and check......................................................................................55
3.4.1. Position system ........................................................................................55
3.4.2. Gyro and Motion Sensor.............................................................................57
3.4.3. Single beam echosounder ..........................................................................61
3.4.4. Multibeam Echosounder .............................................................................61
4.
ONLINE............................................................................................................. 71
4.1.
Height Settings ..............................................................................................71
4.1.1. Tide ........................................................................................................72
4.2.
Sound velocity ...............................................................................................73
4.3.
Session setup.................................................................................................74
4.4.
Echosounder settings ......................................................................................82
4.5.
Controlling Data .............................................................................................84
4.6.
Online displays...............................................................................................85
4.6.1. Helmsman display.....................................................................................85
4.6.2. Navigation display.....................................................................................88
5.
PROCESSING .................................................................................................... 95
5.1.
Replay manager .............................................................................................95
5.1.1. Analyzing data..........................................................................................96
5.2.
Changing settings......................................................................................... 100
QPS bv, Zeist, The Netherlands
1
Table of contents
5.2.1. Cloning settings...................................................................................... 100
5.3.
Replaying the data........................................................................................ 101
5.4.
Processing manager...................................................................................... 102
5.4.1. The Processing Manager .......................................................................... 102
5.4.2. Validator................................................................................................ 106
5.4.3. Tide Data Manager .................................................................................. 117
5.4.4. Sounding Grid Utility ............................................................................... 120
QPS bv, Zeist, The Netherlands
2
Table of contents
APPENDICES
List of Tables
Table 1: list of filter methods in validator ...................................................................... 113
Table 2: list of interpolation methods ............................................................................ 117
Table 3: import tide data format .................................................................................. 119
List of figures
Figure
Figure
Figure
Figure
Figure
Figure
Figure
Figure
Figure
Figure
Figure
Figure
Figure
Figure
Figure
Figure
Figure
Figure
Figure
Figure
Figure
Figure
Figure
Figure
Figure
Figure
Figure
Figure
Figure
Figure
Figure
Figure
Figure
Figure
Figure
Figure
Figure
Figure
Figure
Figure
Figure
Figure
Figure
Figure
Figure
Figure
Figure
Figure
Figure
1 QINSy Console.................................................................................................. 8
2 QINSy Console.................................................................................................10
3: QINSy Knowledge Base ...................................................................................12
4 Project window ................................................................................................13
5 Folder settings.................................................................................................14
6 Global settings.................................................................................................16
7 Template manager ...........................................................................................16
8 Extract database settings ..................................................................................17
9 Database Setup ...............................................................................................18
10 Total Propagated Error ....................................................................................19
11 Datum Parameters .........................................................................................20
12 Selection of the Mean Water Level Model reduction model ...................................20
13 Datum Shift parameters ..................................................................................22
14 Output datum ................................................................................................23
15 Height Model Selection....................................................................................23
16 Projection parameters .....................................................................................24
17 Test geodetic parameters ................................................................................25
18 Object Definitions...........................................................................................26
19: Squat definition ............................................................................................27
20 Vessel Parameters ..........................................................................................28
21: Shape definition............................................................................................29
22: System selection...........................................................................................30
23 System location .............................................................................................32
24 GPS receiver settings ......................................................................................32
25 Echosounder transducers................................................................................33
26: Echosounder settings.....................................................................................34
27 Echosounder Accuracy Parameter settings .........................................................35
28 Multibeam parameters settings ........................................................................35
29 Multibeam parameters ....................................................................................36
30 Multibeam parameters ....................................................................................37
31 Gyro parameters ............................................................................................37
32 Attitude sensor parameters .............................................................................38
33 MRU SD settings ............................................................................................38
34: I/O Tests Utility ............................................................................................39
35 Line Database Manager ...................................................................................41
36 Line Database Manager import options..............................................................42
37 Import ASCII file ............................................................................................42
38 Preview ASCII file...........................................................................................43
39 ASCII import column settings ..........................................................................43
40 ASCII import options ......................................................................................44
41 Import *.pro file.............................................................................................44
42 Edit object dialog ...........................................................................................45
43 Add object.....................................................................................................45
44 Generate winglines .........................................................................................46
45 Generate Crosslines........................................................................................46
46 Interpolate / extrapolate KP numbers ...............................................................47
47: Create new Sounding Grid..............................................................................49
48: Sounding Grid layers .....................................................................................49
49 Startup folder of the Start Menu.......................................................................50
QPS bv, Zeist, The Netherlands
3
Table of contents
Figure
Figure
Figure
Figure
Figure
Figure
Figure
Figure
Figure
Figure
Figure
Figure
Figure
Figure
Figure
Figure
Figure
Figure
Figure
Figure
Figure
Figure
Figure
Figure
Figure
Figure
Figure
Figure
Figure
Figure
Figure
Figure
Figure
Figure
Figure
Figure
Figure
Figure
Figure
Figure
Figure
Figure
Figure
Figure
Figure
Figure
Figure
Figure
Figure
Figure
Figure
Figure
Figure
Figure
Figure
Figure
Figure
Figure
50 Auto Start Online ...........................................................................................50
51 Controller ......................................................................................................51
52 Computation setup .........................................................................................52
53 New computation ...........................................................................................52
54 Select positioning system ................................................................................52
55: position system thresholds .............................................................................53
56 Prediction setup .............................................................................................53
57 Attitude setup................................................................................................54
58 Display manager ............................................................................................55
59 Positioning System display ..............................................................................56
60 Select nodes ..................................................................................................56
61 Scatterplot display .........................................................................................57
62 Alpha Numeric display wizard page 1 ................................................................58
63: observation information .................................................................................58
64 Alpha numeric wizard page 6 ...........................................................................59
65 Resulting alphanumeric display ........................................................................59
66: Entering C-O's in the template; left: gyrocompass, right: motion sensor. .............59
67 Time plot: Select observation ..........................................................................60
68 Time plot display............................................................................................60
69: echosounder display ......................................................................................61
70 Raw multibeam display ...................................................................................62
71 Swath System Display ....................................................................................62
72 Swath System Properties.................................................................................63
73 Area to use for the calibration ..........................................................................64
74 Part of the Colour map window ........................................................................64
75 Line selection.................................................................................................64
76 Areas used for the roll calibration .....................................................................65
77 Calibrate Transducer Alignments ......................................................................65
78 Swath view....................................................................................................66
79: automatic calibration module..........................................................................66
80: Selection of area underneath the transducer(s).................................................67
81: DTM data for pitch calibration .........................................................................67
82 Heading calibration.........................................................................................68
83 Latency calibration .........................................................................................68
84 Mounting angles multibeam.............................................................................69
85 Height settings ..............................................................................................71
86 Manual input driver ........................................................................................72
87 Sound velocity profile .....................................................................................73
88: export sound velocity profiles .........................................................................74
89 Session set-up; Line planning ..........................................................................74
90 Session set-up; Line planning ..........................................................................75
91: Session setup – Line planning.........................................................................76
92 Alpha Numerical Display..................................................................................77
93: using an alternative line as reference ..............................................................77
94 Session setup: Storage settings: Databases.......................................................78
95 Session setup: Storage settings: Sounding Grid .................................................78
96 Session setup: Storage settings: DTM File .........................................................79
97 Session setup: Storage settings: Control ...........................................................80
98 Session setup: Fixing......................................................................................81
99 Computation setup echosounder ......................................................................82
100 De spike data; left single spike, right seabed slope filter....................................83
101 Swath reducer (top = original profile, bottom = reduced) ..................................84
102 Controller modes ..........................................................................................84
103: select node for helmsman display..................................................................85
104: View Properties Helmsman display ................................................................86
105 Helmsman display ........................................................................................87
106 Navigation display ........................................................................................88
107: Navigation display layer overview..................................................................89
QPS bv, Zeist, The Netherlands
4
Table of contents
Figure
Figure
Figure
Figure
Figure
Figure
Figure
Figure
Figure
Figure
Figure
Figure
Figure
Figure
Figure
Figure
Figure
Figure
Figure
Figure
Figure
108: Object tracking ...........................................................................................90
109: Object shape with predicted and trailed shape ................................................91
110: Object display properties..............................................................................92
111: Replay manager ..........................................................................................95
112: Analyze module ..........................................................................................96
113: Select observations .....................................................................................97
114: Filter groups ...............................................................................................98
115 Group Filter properties ..................................................................................98
116: Add filter window ........................................................................................99
117 Processing manager.................................................................................... 102
118 Validator ................................................................................................... 107
119: swath view ............................................................................................... 108
120: Setting alternative line in validator .............................................................. 115
121: Tide definition layout ................................................................................. 118
122: create new sounding grid ........................................................................... 122
123 QINSy DATA FLOW ..................................................................................... 128
124 Project structure of QINSy ........................................................................... 129
125 Offsets in the ship Geometry........................................................................ 130
126 Attitude conventions ................................................................................... 131
127 Accurate height settings .............................................................................. 132
128: Unreliable height settings........................................................................... 133
QPS bv, Zeist, The Netherlands
5
1: General Information
1.
GENERAL INFORMATION
1.1.
Introduction to QINSy
Thank you for purchasing QINSy Survey. QINSy (Quality Integrated Navigation
System) was developed by QPS who have been known for delivering hydrographic
software on time and as promised throughout the years. The system is a powerful and
reliable personal computer based suite of programs in the C++ language running
under the 32 bit operating systems Windows 2000 and Windows XP. As with all QPS
software products, QINSy has been developed following the ISO 9001 principles for
system design.
QINSy is an integrated system which:
•
Can combine up to 999 different observations from interfaced measurement
devices in a so-called computation
•
Can run as many computations and open as many displays as the computer
hardware will allow.
•
Provides rigorous Quality Control in the computation by using advanced
statistical testing techniques
•
Conforms to the Microsoft User Interface Guidelines
•
Means computing power is the operational limiting factor
•
Supports all Multi Channel Communications Boards that are also supported by
WinNT/2000/XP.
The development of QINSy Survey started in 1995. The first version was released two
years later. This manual describes the latest release of the software. It incorporates a
completely new User Interface, and allows the user to define settings in a central
application that are then used throughout the other applications in the QINSy suite,
while maintaining the flexibility of the software.
QPS bv, Zeist, The Netherlands
6
1: General Information
1.2.
Introduction to this manual
This manual is as a guideline for setting-up, executing and pre-processing a survey. It
is not intended to provide full coverage of the QINSy Survey suite, but will provide
both the new and the experienced user with a quick overview of the software.
The topic presentation order in this manual duplicates the order of steps the
hydrographic surveyor takes when performing a hydrographic survey. Hence, the
general layout of this document is as follows:
•
Project preparation.
Defining the geodetic parameters
Defining the system layout
Creating a line plan
Converting DXF information
Creating a Sounding Grid
•
Settings and Calibration
Setting up the positioning system(s)
QINSy as a calibration aid for gyro, motion sensor and echosounder.
Multibeam Echosounder calibration using the processing manager
•
Online
Line planning
Sound velocity
Online settings (echosounder, tidal information etc.)
Recording data
Navigation and helmsman display
•
Processing
Analysing the raw data
Replaying databases
Cleaning the processed X, Y, Z data
Applying tidal information
Exporting of data
Volume computations
The division in different project stages allows the user to select the relevant chapters
when operating QINSy Survey during a specific project stage.
QPS bv, Zeist, The Netherlands
7
1: General Information
1.3.
Graphical User Interface
Since QINSy Survey is a Microsoft Windows® based software package, it has a
standard Windows look and feel. This means that menu options and buttons operate
the same way as other packages running under Windows.
In most windows, using the right mouse button on a part of the screen opens a menu
containing options relevant to that part of the window. The same options can also be
found in the main menu bar located at the top of the window.
Most windows can be resized by simply dragging the corners while holding down the
left mouse button.
Windows that cannot be resized will either have a “greyed out” maximize button
or none at all.
The following picture provides an overview of the used terminology with respect to the
User Interface in this document.
Maximize
Title bar
Menu bar
Tool bar
Close window
Minimize
Window area
Right click menu
Window divider
Scroll bar
Status bar
Resize corner
Figure 1 QINSy Console
Most settings and options can be started in a number of ways, i.e. through the right
click menu, the menu bar, the tool bar or from an icon in the window area. Throughout
this manual only one method will be shown in an example, but other ways of
accessing the command may exist.
QPS bv, Zeist, The Netherlands
8
1: General Information
1.4.
Help
Since this manual is written as a quick start, only the most frequently used options are
described. For more detailed help, a number of options are available, both on paper
and electronically.
•
Driver’s manual. This manual will provide information on cable layout and
interface settings for various types of equipment.
•
Quick start. This manual
•
How to. The “How To” documents are located on the installation CD-ROM and
explain specific QINSy actions in detail. If there are questions about a specific
topic like, for example, Pipeline detection, have a look through these
documents.
•
Online Help. The Online Help can be accessed from any location within the
software. The Online Help is always installed and does not require the
installation CD-ROM.
There are a number of ways to access the Online help.
Press function key [F1] on the keyboard
Left click on the Help menu item in the menu bar.
Using the yellow question mark, gives general information about the application.
By clicking on this button, the mouse cursor changes into a question mark. By
subsequently clicking somewhere within the window this will give information about
this specific part of the application
If the function of a certain button is unclear, locate the cursor over the button with the
mouse cursor. After a short while a yellow quick help will occur next to the mouse
cursor with a short description. In the status bar, a longer description will appear
explaining the function of the button.
1
At various points in this manual “recipes” will be given to indicate the various
steps needed to complete a certain action. In complicated windows, a picture is
shown with callouts identifying the place where certain steps correspond.
At certain points special attention is needed or additional information is given.
This is signified by a picture and text in italic.
QPS bv, Zeist, The Netherlands
9
1: General Information
1.5.
The structure of QINSy
QINSy Survey is a modular build program, which means that it is not one program,
but a suite of applications linked together.
The entry point for QINSy is a program called the “Console”. From this
console all other programs are started.
After starting the Console, a window looking like the figure below will
become available.
Figure 2 QINSy Console
The icons in the top half of the window are always present. These buttons represent
the various stages of a survey. The icons have the following function:
Setup. This application is used to configure the template database for the
project and to set a certain database or template active. Use this
application to change for example the geodetic parameters, vessel shape,
sensor I/O or other parts of the system configuration.
Online. This button will start the Controller with the selected template. This
template is used as the base for the raw data collection.
Replay. This application allows the user to change the database
configuration and replay the data. Another option is to analyze the raw
data that was gathered during the survey on a sensor basis.
Processing. The results manager is used to pre-process the collected x,y,z
data. In this application spikes are removed from the data and tidal
information is applied.
QPS bv, Zeist, The Netherlands
10
1: General Information
Apart from the basic applications there are a number of additional applications that
may appear in the bottom half of the window. These icons can be switched on or off
depending on the wishes of the user. Switching these icons on or off is done by:
STEP 1)
Right click in the bottom half of the window
STEP 2)
Select Add/Remove QPS programs from the menu
STEP 3)
Select / De select the programs to be shown in the bottom half of the
window.
Deselecting a program does not mean that it cannot be used anymore; it just
does not appear in the Console.
There are four programs that are normally used on a regular basis. These are:
Line Database Manager. Use this tool to create and edit lines, targets and
routes. This tool is compatible with the QINSy Mapping (Terramodel) file
format.
Sounding Grid Utility. With this utility a rectangular grid is created for
storage of sounding data online, or for example to perform volume
calculations.
I/O tester. The I/O tester displays the raw data that is received on the PC
communication ports.
DXF 2 QXF. This tool converts files from the Drawing Exchange Format
(DXF) to the WGS84 based QINSy Exchange Format. Charts made with
AutoCAD, for example, can be converted for online use.
A shortcut to Windows Explorer exists in the Toolbar of the Console. Click on
to
open Windows Explorer and access the main directory of the current project. Click on
to access the selected support folder.
An online Knowledge Base is available. This database contains documentation on
various survey practices and how to use these in QINSy. Click on
interface will appear as shown below:
QPS bv, Zeist, The Netherlands
and the
11
1: General Information
Figure 3: QINSy Knowledge Base
Click on an item to see the full description.
The use of secondary applications will be discussed in the next chapters. Besides
QINSy applications, the console can also show a number of other programs that may
be used during a survey on a regular basis. This can for instance be the Windows
Explorer, or a compression tool to compress the database files generated by QINSy.
These applications are added in the same manner as adding a QINSy application; only
now select Add Program… instead of Add/Remove QPS program.
The QINSy dongle is a license for the software. There are several Add On’s available.
The permission of the dongle allows certain programs to run. Use ‘Add/Remove QPS
programs’ – select HASP. Click once and the HASP loader window appears. Verify if the
Add On’s listed confirm with your QINSy purchase.
QPS bv, Zeist, The Netherlands
12
1: General Information
1.6.
The Project Folder
QINSy Survey allows the user to store data by per project basis. As soon as a new
project (folder) in QINSy is started a number of sub folders will be created. Each sub
folder contains data of a specific type. QINSy will automatically search for data in that
specific sub folder once a project has been selected. See Appendix B for more
information.
Click on the
button to open the project folder window in which all projects are
listed. Use the “Manage” button to add, or remove project folders from the list. Use
the “New” button to create a new project and select the folder that is created.
A project that has been copied onto the hard disk can be selected using the “Manage”
button and selecting the Add Existing Project option.
Figure 4 Project window
Information files that are relevant for a number of projects (e.g. chart data or vessel
shape files) can be stored in a general support folder. This support folder can be set
from the Console using the following steps:
STEP 1)
Open the Console from the desktop
STEP 2)
Click on the
STEP 3)
The following window will appear
QPS bv, Zeist, The Netherlands
button.
13
1: General Information
Figure 5 Folder settings
1.7.
STEP 4)
Select a support folder using the Browse button
STEP 5)
Check the file types to be stored in the General support folder.
Relational database
The base for a project is a relational database that will contain all the information
about the configuration and the settings like the vessel configuration, geodetic
parameters, I/O parameters etc. This database is called a template and is selected in
the Template Manager. Raw data is logged in a copy of the template database, so both
raw data and the configuration and settings used to acquire that data are stored
together in one single database (file). For most surveys each database will contain a
single survey line.
The advantage of such a single database containing all information belonging to a
certain dataset is that settings can be changed on a file-by-file basis without affecting
the overall project settings made during the start of the project.
QPS bv, Zeist, The Netherlands
14
2: Project preparation
2.
PROJECT PREPARATION
This chapter describes the actions that are required during the planning and
mobilisation phase of a survey project. This includes setting the geodetic parameters,
installation of the equipment and setting up the system in the software.
Information that needs to be entered in QINSy Survey are for example: information
about the vessel geometry, position of antennas and transducers, the kind of
instruments that are onboard, how they are related to each other, I/O configurations,
sound velocity profiles etc.
2.1.
Creating a new project
Before a new template database can be build a new project needs to be created within
QINSy.
Take the following steps to do this
STEP 1)
Start the Console. From the tool bar, click on the
the active project list to start a new project.
STEP 2)
Click on the “New” button and enter the name of the project. Press
[Enter] and select the main folder where the new project folder is to
be located, use the “Browse” button to select the main folder.
STEP 3)
The Console will ask if the subfolders can be created.
To open an existing project, click on the
“Open” from the menu bar.
2.2.
button to open
button, select the project and click on
Defining Global settings
Settings of various project parameters may be set globally. For example, geographic
format, number of decimal places for coordinates, presentation colour selections and
so on. To define global settings:
STEP 1)
Start the Console. Click on the
button in the task bar to open the
Global Settings dialog window illustrated below. Alternatively, select
“Settings” from the menu bar. In the drop down menu, select
“Global”.
STEP 2)
Click on each of the four tabs and define the settings.
STEP 3)
Click OK when finished.
QPS bv, Zeist, The Netherlands
15
2: Project preparation
Figure 6 Global settings
2.3.
Template Database
To define a template database the user need to define either a new template database
from scratch or use an existing template database as a basis an modify it.
2.3.1. Creating a new empty template database
Start the Setup module from the Console by double clicking on the
upper half of the window. The following window will appear.
icon in the
Figure 7 Template manager
To create a new, empty template database click on the
button. The program will
ask for a database name. Enter a descriptive name for the template, e.g. SeaEagle.
After this the template Setup program will automatically start.
QPS bv, Zeist, The Netherlands
16
2: Project preparation
2.3.2. Creating a template database based on an existing template
Another option to create a new template is to modify an existing template. This should
always be done very carefully, since all settings from the existing template are copied
to the new one.
STEP 1)
Open the Setup application from the Console.
STEP 2)
Select the template from which to extract the settings. This template
must be in the project directory.
STEP 3)
From the menu bar select the option “Tools”, “Extract”
STEP 4)
A new window will open showing the following options.
Figure 8 Extract database settings
STEP 5)
Enter the name of the new template and select the options to be
copied to the new database. All the settings from the Database Setup
Program are copied by default.
QPS bv, Zeist, The Netherlands
17
2: Project preparation
2.4.
Database Setup
To edit the settings in an exiting template database, or to define a new template
database, run the Database Setup Program. Select the
icon in the taskbar of the
Template Manager to enter the Database Setup Program. A new window appears, like
the following picture.
Figure 9 Database Setup
On the left side of the window divider the database setup is shown in a way similar to
how Windows Explorer shows folders and sub folders. The actual layout of the tree
depends on the selected geodetic parameters, objects and systems.
If a new template database is created from scratch, the Database Setup wizard will
automatically start after the template has been created. If the template database was
created using the extract option, run one of the four template wizards to edit the
database setup by simply left clicking on the appropriate icon with the mouse.
Geodetic parameters wizard, to define datum’s, projection, units etc
Create new object wizard, like vessel, ROV’s, etc
Create new system wizard, to define sensor I/O parameters, locations etc.
Administration wizard, to add typical project information etc.
It is important that a wizard is completed correctly once started. Otherwise
the system may not work properly.
QPS bv, Zeist, The Netherlands
18
2: Project preparation
Total Propagated Error (TPE)
The Total Propagated Error (TPE) of a point is a measure for the accuracy to be
expected for such a point, when all relevant error sources are taken into account.
Instead of “TPE”, the term “error budget” is also used. The TPE for a DTM point on the
sea floor that is computed from an echosounder measurement consists of the TPE of
the echosounder system transducer position plus the contribution of the relative depth
sounding.
Error sources that are to be considered are (GPS) position, draft, squat, load, tide
(including spatial/temporal prediction to the depth measurement position), geoid
model, bathy depth, node offsets, timing offsets, SOG and CMG, gyro heading, pitch,
roll and heave, mounting offsets, beam range, beam angle, beam width, beam
steering, sound velocity at transducer head, sound velocity profile. Hence the
indication “Total”.
All measurements are considered to be uncorrelated random variables with normally
distributed errors, all error sources acting independently, so all covariance terms can
be disregarded, and the TPE can be computed statistically using the well-known Law of
Error Propagation. Hence the indication “Propagated”.
The TPE value thus results from the combination of all contributing errors, hence the
indication “Error”.
In most echosounder error budget analysis studies and hydrographical survey
standards, such as IHO S-44, separate TPE’s (or error budgets) for horizontal position
(georeferencing) and vertical depth (soundings) are considered. The accuracy of a
position is the accuracy of the position of a feature (e.g. sounding, navigation aid) to
be located within a geodetic reference frame. Depth accuracy is to be understood as
the accuracy of the reduced depths. Typically, sounding accuracy criteria are 10 times
as strict as georeference criteria.
In QINSy, as in IHO S-44, accuracy values are always presented as 95% confidence
level values. However, a priori standard deviations for error sources are always to be
entered as 1-σ values (68% confidence level).
GPS
MBE
Figure 10 Total Propagated Error
2.4.1. Geodetic Parameters Wizard
The geodetic parameters wizard allows the user to define all parameters such as the
survey datum, the projection type and the projection parameters.
QPS bv, Zeist, The Netherlands
19
2: Project preparation
There are four different setup pages that need to be completed.
Datum parameters
1
2
3
4
Figure 11 Datum Parameters
Figure 12 Selection of the Mean Water Level Model reduction model
In this screen, the datum parameters are set that will be used throughout the project.
A number of steps are involved in this selection.
STEP 1)
Select under “Predefined Coordinate Systems” either State Plane
when working in the United States or predefined for other predefined
systems. If the system to be used is not in either of the lists use the
Not Defined option and set the parameters of the geodetic system in
the following pages of the wizard.
QPS bv, Zeist, The Netherlands
20
2: Project preparation
STEP 2)
Survey Unit needs to be set to the correct units used in the project.
Click on “Edit Unit” and select the required unit. All coordinates and
distances will be measured in this unit throughout the project.
STEP 3)
Add or Edit the two datum’s that will be used throughout the project.
For most surveys the first datum will be WGS84 and the second
datum will be the survey datum. All the results online will be
expressed in the survey datum
STEP 4)
The selected model will be used to calculate the CoG height on that
model. When the height of the GPS receiver is Online set as
„accurate“, the selected model is not used; the GPS height is used.
When the height is set to un-accurate, the selected model is used in
the Height Aiding driver to calculate the actual height of the CoG on
that geoid. On the selected model a correction/reduction model can
be selected to get local heights. (Appendix D). With the offset setting,
all heights can be shifted with a fixed height. The offset value will be
added to the calculated height. The selected height model will also be
used in the Height Aiding driver for the tide reduction.
QPS bv, Zeist, The Netherlands
21
2: Project preparation
Datum shift parameters
The second window of the wizard is to select the datum shift parameters. These
parameters are needed to transform positions between the two datum’s that were
selected in the previous window. QINSy uses the so-called 7-parameter datum shift
that requires 3 translations, 3 rotations and a scale factor.
Figure 13 Datum Shift parameters
If the Datum shift parameters are available for the reverse datum shift then use the
datum shift box to select the reverse.
For more information about datum shift parameters, please use the online help.
QPS bv, Zeist, The Netherlands
22
2: Project preparation
Output datum
The third window is to select the output datum; this is the datum used to create an
ASCII point file for example.
1
2
3
Figure 14 Output datum
Figure 15 Height Model Selection
The following steps need to be taken:
STEP 1)
Select the survey datum for the positioning results from the available
datum list.
QPS bv, Zeist, The Netherlands
23
2: Project preparation
STEP 2)
Select the vertical datum. The output values of the measured depths
will be calculated on this model. For most projects the used vertical
output datum is the same as the mean sea level model that was
chosen in the first screen (datum parameters). Here it is also possible
to select a correction model on the chosen output model .
STEP 3)
Depending on the project specification select an absolute DTM, which
will give heights referenced to the vertical datum selected in the
previous step, or select relative heights, which will be measured to
the reference point on the object. For most projects the model chosen
will be an absolute model.
Projection parameters
The projections parameters describe the method used to project a coordinate on the
survey datum to a projection (grid) coordinate.
Figure 16 Projection parameters
Select the projection that will be used and enter the necessary parameters. If UTM is
chosen as the survey projection, the UTM zone number needs to be selected or the
longitude of grid origin, all other options are “greyed out”.
It is the responsibility for the user to check the parameters of the predefined
geodetic systems. The test geodetic parameters is very useful for this (see
next paragraph)
Test geodetic parameters
After completion of the geodetic wizard, it is good practice to test the parameters
using a known point in both coordinate systems. A test option is included in the
Database Setup Program. Simply start the testing tool by clicking on the
the tool bar. A new window opens with the following options.
QPS bv, Zeist, The Netherlands
button in
24
2: Project preparation
4
1
2
5
6
3
7
Figure 17 Test geodetic parameters
Testing the parameters is done in the same way as setting up the project was done.
STEP 1)
Specify whether the control point is given in projection or
geographical coordinates. For most projects this will be in
geographical coordinates.
STEP 2)
Enter the source datum.
STEP 3)
Type in the source position as given on the source datum
STEP 4)
Select the projection grid. The projection grid will be used for both the
source and the target position.
STEP 5)
Select the horizontal datum for the target position.
STEP 6)
Select the vertical datum for the target position. This datum should
preferably be the same as the output datum.
STEP 7)
Click on the calculate button. The results will show on the right side of
the window.
The resulting target position will shows both the geographical coordinates and the grid
coordinates for that point. The MSL Height is the local height offset between the Mean
Sea Level and the vertical datum chosen for that specific position. The convergence
shows the heading convergence on the selected projection grid for that specific
position.
For more geodetic conversions, please use the Utility Geodetic.
2.4.2. Object definition
In the QINSy Survey software objects are used on which equipment, or measuring
systems are installed. An object can be a survey vessel, ROV, SSS fish, drilling rig or
barge. QINSy Survey operates in such a way that it is possible to use multiple objects
at the same time.
QPS bv, Zeist, The Netherlands
25
2: Project preparation
To define the objects needed for the project, the Object Wizard can be used. Clicking
on the appropriate icon
window will appear.
with the mouse can start the Object Wizard. The following
1
2
3
4
5
Figure 18 Object Definitions
Define an object using the following steps:
STEP 1)
Select the type of object; in most cases this will be a vessel.
STEP 2)
Enter a name for this object, e.g. the name of the vessel.
STEP 3)
Enter the reference point of the vessel. This point will have the
coordinates 0,0,0 in the vessel coordinate frame. It is recommended
to choose this point as close as possible to the centre of gravity from
the vessel to ensure optimum performance.
STEP 4)
Enter the distance between the object reference point and the draft
reference of the vessel. The draft reference is the point on the vessel
where the draught is zero. This would normally be the keel. If the
object reference point is above the draft reference level, then this
value is positive. Is the object reference point below the draft
reference level, then this value is negative.
STEP 5)
Select the type of squat model to be used.
QPS bv, Zeist, The Netherlands
26
2: Project preparation
Figure 19: Squat definition
For a second order polynomial measurements need to be made to generate a list with
squat and velocity. Using the formula in the figure the coefficient X1 and X2 can be
calculated. The numbers above are an example.
If an existing template was opened and the squat option is checked, then unchecking this option will reset the squat parameters already defined back to
zero.
Vessel Parameters
QPS bv, Zeist, The Netherlands
27
2: Project preparation
Figure 20 Vessel Parameters
STEP 1)
Enter a priori standard deviations for draft (default 0.05 m).
STEP 2)
Enter a priori standard deviations for squat (default 0.05 m).
STEP 3)
Enter a priori standard deviations for load (default 0.05 m).
STEP 4)
Enter a priori standard deviations for tide, including spatial/temporal
prediction to the vessel position as well as tide file errors (default
0.10 m).
STEP 5)
Enter a priori standard deviations for timing error between navigation
systems.
These SD’s are only used in case a position system height is set to unreliable in a
computation setup; otherwise the SD of the position system height observation is
used. See Height Aiding Driver Window.
The vessel parameter page is only available when object type is vessel or survey
vessel. The other fields on this page only serve administrative purposes and are not
applicable to the computation of TPE values.
Shape definition
The next screen in the Object Wizard depends on whether the squat box was checked
or not. Since the squat parameters are unknown for most vessels, this will not be
further discussed. Next the shape definition screen will show. The object shape is used
online in the navigation display to give the user an idea of the shape of the vessel and
the heading. It is possible to define the shape manually or import a vessel shape from
a previous project.
QPS bv, Zeist, The Netherlands
28
2: Project preparation
Figure 21: Shape definition
The object shape is defined as a series of X, Y points. Depending on whether the pen is
UP or DOWN during drawing a line is drawn connecting two subsequent points or the
pen moves. It is also possible to fill a polygon with a certain colour or use a different
line type.
A more detailed description of the Shape definition can be found in the online
help
2.4.3. System definition
Having defined the geodetic parameters and the object, the next step is to define the
systems that are going to be used during the survey. Systems include measurement
devices like GPS, echosounder and gyrocompass. To define a new system, click on the
icon.
QPS bv, Zeist, The Netherlands
29
2: Project preparation
System selection
1
2
3
4
5
5
Figure 22: System selection
To enter a new system the following steps need to be taken.
STEP 1)
Enter a descriptive name for the system.
STEP 2)
Select the type of system. E.g. a DGPS system is a ‘position
navigation system’. A complete list of system descriptions can be
found in the online help.
QPS bv, Zeist, The Netherlands
30
2: Project preparation
STEP 3)
Select the corresponding driver (software program that decodes the
data string) for the system to be installed. The different output
formats are specified in the QINSy Driver’s Manual that can be found
on the installation CD-ROM.
STEP 4)
Enter the correct values for the interfacing of the sensor with the
computer, the correct COM-port with the correct parameters. More
information about this can be found in the manual of the system or on
the system itself.
STEP 5)
If the system outputs at a higher frequency than is needed for the
survey (e.g. for a gyrocompass), a maximum update rate can be
entered. This means that data from the system is decoded only every
x seconds. A value of 0 means that all data will be decoded, 0.2
means 5 samples per second.
STEP 6)
If the data that is outputted to the computer has latency, then a
constant latency for that system can be entered here.
When a Digiboard is used with default installation, the ports are number from
1 to xx (depending on the maximum number of ports). In Windows the
number of the first port depends on the installation settings in Windows.
Latency for the GPS system should preferably be measured using a PPS
output from the GPS receiver. If a PPS output is used than the latency of the
GPS receiver should be entered as zero in this field. The value entered in this
field is used during an Online session. Changing it has no effect during replay.
If a data string from an instrument is in ASCII format and there is no driver
for the instrument then it is possible to generate a new driver. Use the
Generic Input Driver utility of QINSy. Help on this topic can be found in the
online help.
System parameters: system location
The next window shows the parameter settings for the selected system. The layout of
this screen depends on the selected system type. All systems require as a minimum
the object name where the system is located on, and the location of the system on
that object (with the exception of heading systems). The location of a system on an
object is called a variable node.
1
QPS bv, Zeist, The Netherlands
31
2: Project preparation
2
Figure 23 System location
Create a node for each antenna or transducer. Clicking on the
node, or edits an existing node using the
button creates a new
button.
Enter a name for this new node, the offsets for this node relative to the reference point
(0,0,0) of the object and the a priori SD of this offset measurement.
Every time a new node is created, it is stored as a new variable node in the
list.
System parameters: GPS receiver
Apart from setting the location of the system : with respect to the reference point of
the object, a number of other parameters need to be set:
1
1
2
3
4
Figure 24 GPS receiver settings
QPS bv, Zeist, The Netherlands
32
2: Project preparation
STEP 1)
If more than one receiver is used on the vessel, enter a different
receiver number for each.
STEP 2)
Define the datum on which the receiver measures its positions.
Normally this will be WGS84 for horizontal datum.
STEP 3)
Select the datum on which the heights are measured. For most GPS
receivers this is either WGS84 or the Mean Sea Level (Earth) model.
STEP 4)
Define the A priori SD from the positioning system.
System parameters: Echosounder
1
3
4
2
5
Figure 25 Echosounder transducers
STEP 1)
Add each transducer to the transducer list using the add button and
then selecting the node.
STEP 2)
Select the transducer in the list and set the slot number and the label.
STEP 3)
Set the mounting angles of the transducer.
STEP 4)
Enter the beam width
STEP 5)
Tick the box when the mounting angles must apply
QPS bv, Zeist, The Netherlands
33
2: Project preparation
3
1
2
4
Figure 26: Echosounder settings
STEP 1)
“Water Depth Reference”: select Sea level if the offset from the mean
water level to the transducer ("draft") is entered in the echosounder
itself. If this is not the case, then select Transducer.
STEP 2)
“Propagation Velocity”:, input the velocity as used in the
echosounder. Under calibrated velocity enter the true sound velocity.
If both are the same than the correct sound velocity should only be
entered on the echosounder
STEP 3)
If the motion sensor is connected directly to the echosounder, the
output soundings are already corrected for motion, then these boxes
should be checked to prevent double heave corrections.
STEP 4)
Select the unit of depth measurement. Options are Survey Units,
Meters and International Feet.
QPS bv, Zeist, The Netherlands
34
2: Project preparation
1
2
3
Figure 27 Echosounder Accuracy Parameter settings
STEP 1)
The SD of the sounder data; for each transducer different SD can be
defined. The type of sounder must be defined with its characteristics:
Pulse, Sampling (pulse- and sampling length) or
Angle, Range (SD beam angle and SD beam range) or
Pulse, Frequency (pulse length and sampling frequency)
STEP 2)
For the correct TPE calculation it is necessary to enter the A priori SD
for the roll-, pitch- and heading offset.
STEP 3)
Enter the SD of the sound velocity
System parameters: Multibeam Echosounder:
1
2
3
Figure 28 Multibeam parameters settings
QPS bv, Zeist, The Netherlands
35
2: Project preparation
STEP 1)
Select the source of the sound velocity. If the unit has it’s own sound
velocity probe mounted near the transducer head or if the sound
velocity is in the output message, then the sound velocity from the
unit should be selected. Otherwise enter the sound velocity here.
Online it is possible to create and select a Sound velocity profile to
correct for refraction.
STEP 2)
Enter the number of beams per ping (sweep). The number of beams
depends on the system used. It can be calculated by dividing the
swath sector by the beam angle.
STEP 3)
Check the appropriate boxes if the unit (and the output message) is
stabilized for roll, pitch or heave.
The transducer mounting angles are determined during the Multibeam
calibration and will be discussed in the chapter “Set-up and calibration”.
1
2
3
4
5
Figure 29 Multibeam parameters
STEP 1)
The SD of the sounder data; for each transducer different SD can be
defined. The type of sounder must be defined with its characteristics
Pulse, Sampling (pulse- and sampling length) or
Angle, Range (SD beam angle and SD beam range) or
Pulse, Frequency (pulse length and sampling frequency)
STEP 2)
For the correct TPE calculation it is necessary to enter the A priori SD
for the roll-, pitch- and heading offset.
STEP 3)
Enter the SD of the sound velocity
STEP 4)
Beam opening
STEP 5)
Beam Steering Angle
QPS bv, Zeist, The Netherlands
36
2: Project preparation
1
2
Figure 30 Multibeam parameters
STEP 1)
If sound velocity is measured at transducer head, enter the system.
Beam angle correction is done in QINSy rather than the HW
component.
STEP 2)
If an angular system is availble for MBE alignment corrections, enter
the system here.
System parameters: Gyrocompass
Figure 31 Gyro parameters
For a normal gyrocompass installation all values as shown here are already correct.
The only value that will change during the start-up phase of the project is the fixed
system C-O. This C-O is determined during the gyro calibration.
QPS bv, Zeist, The Netherlands
37
2: Project preparation
System parameters: Pitch, roll and heave sensor:
2
1
3
4
5
Figure 32 Attitude sensor parameters
STEP 1)
Under “Rotation Convention” enter the agreed positive and negative
directions for pitch and roll. This can be found in the manual of the
system. See Appendix C for the conventions used within QINSy.
STEP 2)
Under “Rotation Measurements” enter the angle parameters for pitch
and roll. These can be found in the manual of the system.
STEP 3)
Sign and units from the heave sensor
STEP 4)
C-O offsets from the MRU sensor
STEP 5)
Heave settings, enter filter length and delay
The C-O’s for the attitude sensor are determined during the motion sensor
calibration and should be entered either here or in the motion sensor itself.
It is very important to mount the attitude sensor (pitch, roll and heave) in the
correct location. QPS advises the use of a location as close as possible to the
Centre Of Gravity (COG). If the sensor is installed away from the COG then
the offset between the COG and the sensor should be inputted in either the
software or the sensor.
1
2
Figure 33 MRU SD settings
STEP 1)
SD’s from the measurements
STEP 2)
SD’s from the mounting offsets
QPS bv, Zeist, The Netherlands
38
2: Project preparation
2.4.4. Tide
If a tide gauge, or a manual tide setting is used during the online survey, a tide gauge
must be defined in the database setup.
STEP 1)
Define a new system tide gauge.
STEP 2)
At the parameter screen select “Add Tide” and then “Add” to add a
new Fixed Node. This node is the place where the tide gauge is
situated.
STEP 3)
Select the fixed node and finish the setup.
STEP 4)
Highlight the created tidal observation. Edit the slot if multiple tidal
observations exist.
STEP 5)
In the observation parameters screen, enter values for ‘A-priori SD’,
‘Fixed C-O’, ‘Variable C-O’, ‘Scale Factor’. Press ‘Apply properties to
Observation to activate the changes.
STEP 6)
Click on Finish to finalize the setup.
If a manual tide gauge is added as a system to the database, there is no need
to enter the coordinates and height of the node. During the online session a
window will be available where the tidal height can be entered.
2.5.
I/O Tester
After setting up all the systems, the user can test the PC communication with
the systems using the I/O tester.
STEP 1)
From the QINSy Program group in the Start menu (or the Console)
select the I/O tester.
Figure 34: I/O Tests Utility
STEP 2)
From the File menu select Import QINSy Database. The I/O tester
opens all the communication ports defined in the template that is
selected, along with the appropriate communication settings and
names.
QPS bv, Zeist, The Netherlands
39
2: Project preparation
STEP 3)
Check the output of the devices. Most systems will output their data
as an ASCII string, so the data in the windows should be legible.
Some systems use a binary output so the characters are illegible.
STEP 4)
If the data is not legible in a window where it should be, the port
settings can be changed by using the
button. A dialogue window
appears allowing the user to change the communication settings.
STEP 5)
Change the settings until the data looks like it should be. Now go back
to the database setup and enter the correct parameters.
Every port can be logged, i.e. if there is a problem, a file can be logged with the I/O
tester and the data can be checked.
STEP 6)
From the Transfer menu select Start recording. Enter the path and
name for the log file.
More information about the I/O tester utility can be found in the online help.
2.6.
Line Database Manager
Most surveys are performed using pre-planned survey lines. The Line Database
Manager provides the user with a tool for creating, storing and editing lines. The Line
Database Manager uses the same format as QINSy Mapping (Terramodel) so data can
be exchanged between the two packages using the *.pro format.
A line database can include three object types.
•
Point. (For example, waypoints, targets, anchor, or buoy positions.)
•
Single Line. (For example, single survey lines.) ‘Single Lines’ are lines defined
by a start and end co-ordinate. Between the two coordinates a line is drawn.
This could either be a straight line or a curved line.
•
Route. (For example, pipeline, a track, a boundary, a waypoint route, as set,
etc.) A ‘Route’ is a line with different sections (polyline). Every section has is
own length, bearing and radius.
The Line Database Manager can be started from the Console or directly from
the start menu.
After starting up a blank Line Database window will become visible.
QPS bv, Zeist, The Netherlands
40
2: Project preparation
Figure 35 Line Database Manager
Starting with a new, empty Line Database. First save this database to a new name
using the
button from the toolbar. As soon as the file is saved, it becomes locked
meaning that other users cannot change it as long as it is opened during our session.
2.6.1. Importing files into the Line Database Manager
A fast way of creating new targets/lines/routes is by importing them from an ASCII file
or a Terramodel *.pro file, by using the options “File” and “Import” from the menu
bar.
A new window will become visible with a number of options.
QPS bv, Zeist, The Netherlands
41
2: Project preparation
Figure 36 Line Database Manager import options
Select the format of the original file.
Select the file to be imported to the line database.
Depending on the selected file format, the remainder of the wizard will have a number
of different screens. The following will show the ASCII X,Y,Z and the Line Database
format (*.pro).
Instead of importing files, it is also possible to use the “Cut” and “Paste” option
from e.g. Excel. Simply cut the column(s) with data from a spreadsheet, and
paste them into the Line Database (using Ctrl-V)
Importing ASCII X, Y, Z Data
2
3
4
1
Figure 37 Import ASCII file
QPS bv, Zeist, The Netherlands
42
2: Project preparation
STEP 1)
In the dialog click Preview. This opens the file in Notepad, so that the
content of the file is shown. Leave this window open until the next
screen is finished.
Figure 38 Preview ASCII file
STEP 2)
Determine whether the file contains data with a fixed width (all coordinates are the same length in the same column), or whether values
are delimited by a colon.
STEP 3)
Set the Start At Row and End At Row values which determines from
which row to which row the data in the file will be imported. Leaving
the values at zero will import the whole file.
STEP 4)
Change the number of fields according to the number of columns in
the file to be imported. (The number of columns can be counted in the
Preview window where the Notepad file is still open.)
The next screen allows the user to select which column contains what data.
5
6
Figure 39 ASCII import column settings
STEP 5)
Select a field in the Category column and right click on it. Now select
the category that matches the field in the corresponding column from
the preview.
STEP 6)
If the fixed width field was selected in the previous screen, enter the
starting point of each field and the end point or the field length. If
delimited fields was selected, than it is not necessary to enter these
parameters.
QPS bv, Zeist, The Netherlands
43
2: Project preparation
7
8
Figure 40 ASCII import options
STEP 7)
Sets what the resulting object will be.
STEP 8)
Select the layer to store the object on and the color the object will
have.
When there are a lot of data files with the same layout, save the setting in an
ISF file (Import Settings file). Clicking Load on the third page of the wizard
can later retrieve the settings.
Importing a Terramodel file or Line Database
The first steps are identical to importing an ASCII X,Y,Z file.
1
2
3
Figure 41 Import *.pro file
STEP 1)
Select what type of object to import from the file into the existing line
database.
STEP 2)
Select whether to use the layer settings from the import project.
STEP 3)
If this box is checked then only objects that have a name label in the
file will be imported into the database.
QPS bv, Zeist, The Netherlands
44
2: Project preparation
2.6.2. Create new Objects
There are two ways to create new objects in the Line Database. The first is by entering
them directly into the database using the “Edit” menu from the menu bar. The second
way is to draw them on the screen.
Drawing new objects
STEP 1)
Select the
button from the tool bar. Click on the start position of
the new line or route (or single position for a point). Click for the next
positions on the screen, until the object is defined.
STEP 2)
Click on the right mouse button. Select Cancel to abort the option. No
new object is created. Select remove last click to remove the last
section of the route. Select Save to save the new created object, enter
a name and select a layer on which the new created object will be
stored. Reset the “New Object “ button.
It is also possible to reset the screen to cover the entire area (zoom extents) using
the
button.
Typing in new objects
Select the type of object to be added from the “Edit” menu. A new dialog will open,
which will look a little different depending on the type of object to be added to the Line
Database. Below a Route object is used as an example.
Figure 42 Edit object dialog
STEP 1)
To add a new line to the database, click on the “modify” button and
select the option “Add”. A new dialog window will open.
Figure 43 Add object
STEP 2)
Select the number of new objects, their color and on which layer to
store the line.
STEP 3)
A new, empty object is created. Edit the name and enter the start and
end positions to define the object. When creating a route, instead of
entering the end point, it is also possible to enter a bearing and
distance or a radius. The end coordinate of each section is the starting
coordinate of the next section.
Generate Crossline and Winglines.
Winglines are lines that run parallel to the line where they were created on. Crosslines
run perpendicular to the main line
QPS bv, Zeist, The Netherlands
45
2: Project preparation
STEP 1)
From the “Edit” menu select “Routes” or “Single lines”. The Edit
Object dialog will show. Select the line on which the wing / cross lines
should be created and click “Tools”.
STEP 2)
Click Generate Wingline / Crossline to create along lines among the
routes. This will open a new dialog depending on the type of line.
Winglines
EOL
SOL
Figure 44 Generate winglines
STEP 3)
Select the number of lines to be generated and the spacing between
the lines (Offtrack distance).
STEP 4)
In case of a route the From and To fields define from which section
(first control point) to which section (last control point) to generate
winglines.
Crosslines
Spacing
Lp
Ls
Perp.
Add.
Figure 45 Generate Crosslines
STEP 5)
Define the distance between every crossline. It is possible to define
the length of the crosslines both on port and starboard site and give
the crossline a prefix, which will be shown in the Edit Routes dialog.
QPS bv, Zeist, The Netherlands
46
2: Project preparation
STEP 6)
A check mark in Perpendicular Add will create perpendicular lines.
Additionally an extra offset angle can be set.
STEP 7)
In case of a route the From and To fields define from which section
(first control point) to which section (last control point) to generate
crosslines, or select a start and end KP.
2.6.3. Editing objects
To edit an object that is visible on the screen, go to the menu bar and select the type
of object to be edited, or simply select the edit mouse mode using the
button, right
click on the object to be edited and select “Modify”,” Edit”. Now change the
coordinates, for example, by simply typing in the correct values.
Another option is to display all the objects of a type of object and modify them using
the “Modify” option on the dialog. A number of options are available
•
To delete a single line, select the single line to be deleted and click ModifyDelete. A confirmation will be asked.
•
To change the color of a single line, click the single line’s color field and click
Modify-Change color.. This will open the Color dialog, where the single line’s
color can be changed, click OK to confirm.
•
To Change the layer where the single line is stored on, click the single line’s
layer field and click Modify-Change Layer. This will open the Select Layer
dialog, where the user select the layer on which the single line is stored.
•
Sections can be removed from a route, by selecting the section to be removed
and clicking the Delete button.
•
To insert a section in an existing route, click the section above the position
where to insert a section into and click Insert. This will add a new line to the
route. Double click its fields to change the data (Easting, Northing, Height, KP,
Radius).
Extrapolate / Interpolate KP numbers
Interpolating / extrapolating KP numbers is necessary when the KP numbering on the
route differs from the true distance along the route. QINSy will initially number the KP
according to metric values. Simply adjust the KP of the end of the line and interpolate
/ extrapolate the KP values in-between.
Open the “Edit”, “Route” dialog from the menu bar and select the appropriate option
from the “Tools” menu. A new dialog will appear.
Figure 46 Interpolate / extrapolate KP numbers
Simply define the point where to start the KP calculation from, and the point where
the KP calculation should end.
QPS bv, Zeist, The Netherlands
47
2: Project preparation
2.7.
DXF to QXF Conversion
The DXF to QXF conversion utility should be used to convert a DXF (Digital eXchange
Format) file to a QPS format file (with similar properties to DXF). The primary reason
for the conversion is to ensure that point co-ordinates are in the WGS-84 geodetic
system as the QINSy Navigation Display uses WGS-84 as the geodetic base, the
second reason is to obtain a binary version that improves Navigation Display update
rate.
The converted DXF data can be used within the Navigation Display, on top of the
electronic chart.
From the Start menu or the Console select the DXF to QXF Conversion
utility.
Use the
button to select a DXF file. The user has to know the datum and projection
button and select the QINSy
parameters were used to build this DXF. Click the
database with the right geodetic parameters. With the other taps in this window the
user can check them. It is not possible to edit them in this window; if they are not
correct, chose another database or edit them in the database setup. Click on the
button to start the conversion, check and/or select the right settings and click OK to
start the process.
The DXF file is now converted to a QXF format. It is now possible to show the QXF in
the Navigation Display.
If there are blocks in the DXF explode them first. A block will not be converted
to the QXF format. Binary DXF is not supported.
2.8.
Sounding Grid Utility
A grid is a rectangular raster that is composed of a number of cells. Each cell has a
coordinate and will store a number of parameters like:
•
Mean depth. This depth is based upon all the sounding that lie within that cell
•
Deepest point. This is the deepest sounding lying within that cell.
•
Shallowest point. This is the least depth sounding lying within that cell
•
Standard deviation. The spreading of the soundings used to generate the mean
depth.
•
Hit count. The number of soundings used to generate the mean depth and
standard deviation
The grid format does not have a boundary and is created on-the-fly.
A grid could contain out of multiple layers. These layers could be used for different
types of data, eg. Multibeam data, Side Scan Sonar data etc.
2.8.1. Creating a sounding grid
Use the ‘Sounding Grid Utility’ to create a sounding grid. The program is started
from the Start menu or the Console
QPS bv, Zeist, The Netherlands
48
2: Project preparation
STEP 1)
Create a new sounding by selecting “File” and then “New Sounding
Grid”
Figure 47: Create new Sounding Grid
STEP 2)
Specify file name, unit type and base cell size. Also select if the grid
origin is automatically generated or that it must be specified.
STEP 3)
Add or remove layers by selecting “Add Layer” or “Remove Layer”
STEP 4)
Different kinds of data can be stored in the layers. Select a layer and
select the type of data and which attributes they must include.
STEP 5)
Finish by selecting “OK”. The sounding grid is created, exit the
Sounding Grid Utility.
Figure 48: Sounding Grid layers
Figure 48 shows an example of a sounding grid with a singlebeam echosounder with
two channels and a multibeam echosounder for bathymetry and backscatter.
Determine the cell size based upon the type of project and survey. A small cell
size will give a high definition grid that will be relatively large. For a large
survey with a small cell size be sure to have enough disk space.
QPS bv, Zeist, The Netherlands
49
3: Set-up and calibration
3.
SET-UP AND CALIBRATION
In the previous chapter the interface settings of the sensors in the database with their
offset positions relative to the object reference point were described. The next step is
from the Console. In order to go Online, a template must be set
to go Online
active in the Template Manager. The Online part of the software is what is used to
record the data during the survey. This chapter will also describe the ways in how to
use QINSy to aid in system check and calibration.
3.1.
Auto start
It is possible to automatically go Online upon booting the computer. This requires
some knowledge of the Windows operating system. The following steps need to be
taken:
STEP 1)
Place the shortcut from the Console
in the start-up folder using
the Explorer. This start-up folder is found in the following location:
‘Documents and Settings\All users\Startmenu \Programs\Startup’.
1
Figure 49 Startup folder of the Start Menu
STEP 2)
Make certain that the right template is set as active template using
the Template Manager
from the Console.
4
Figure 50 Auto Start Online
QPS bv, Zeist, The Netherlands
50
3: Set-up and calibration
3.2.
STEP 3)
In the Console select from the “Tools” menu “Options”. A new dialog
window will show.
STEP 4)
Check the Automatic online checkbox in this menu.
STEP 5)
To start the Online module with all the displays automatically active,
see further on in this chapter in the paragraph on selecting Displays.
Controller
The ‘Controller’ is the first dialog that appears when going online. This dialog will
manage and control the Online session.
Figure 51 Controller
With a new database, a number of settings need to be done so that the position and
depth is calculated correctly. This is done in the “Computation wizard”.
3.2.1. Computation setup
Clicking on the
icon in the tool bar will start the computation setup wizard. A new
dialog will appear showing the various calculation options. Computations are needed
by QINSy to link e.g. the depth readings from the echosounder to the position
readings of the antenna.
1
QPS bv, Zeist, The Netherlands
51
3: Set-up and calibration
Figure 52 Computation setup
Whenever a new template is started, one computation is created with default settings.
This computation needs to be checked to see if the settings are usable for the kind of
survey. It is also possible to create a second, third, nth computation.
STEP 1)
Click on the “Computation” tab in the dialog and select “New
Computation”. A new computation is added.
5
2
3
4
Figure 53 New computation
STEP 2)
Enter a name for the computation. The computational parameters that
are entered as a default are correct for most surveys. More
information can be found in the Online Help.
STEP 3)
Enter an approximate position. When using DGPS, this position is
correct for working in Europe. Outside Europe, change it to local
coordinates.
STEP 4)
If there is more than one computation, set the computation priority (0
being the highest). If the primary system is not working correctly,
QINSy will automatically switch to the secondary system.
STEP 5)
By default the new computation is set off (All objects are
“unchecked”). Switch the computation on by checking it.
STEP 6)
A warning may appear that no height was defined for this calculation.
Select the positioning system that is the base for this computation
and set it to be used. The right pane of the dialog will change.
8
7
9
Figure 54 Select positioning system
QPS bv, Zeist, The Netherlands
52
3: Set-up and calibration
STEP 7)
Select the Height mode of the positioning system. For all systems,
with the exception of RTK DGPS systems the height status should
normally be set to Unreliable. This means that tidal levels and the
Means Sea Level model will be used to correct the depths.
STEP 8)
Set the a priori SD correct. When using unreliable height the height
aiding a priori SD is set to automatic. When using accurate height,
enter a number here. (normally twice the horizontal SD).
STEP 9)
Enter positioning system thresholds. Enter the age, RMS and solution
mode or a selection of these options.
Figure 55: position system thresholds
STEP 10) Using the systems in the tree, or the “Shortcut” tab on the left of the
window, various system parameters can be edited. Select “Overview”
and click on the computation / object. The right window pane will
show four tabs. Select the “COG/SOG – prediction” tab.
12
11
Figure 56 Prediction setup
STEP 11) The prediction parameters are used to set the time the system will
predict a position when no, or faulty data is coming from the
positioning system. After the prediction time, the system will switch
to the next available computation.
QPS bv, Zeist, The Netherlands
53
3: Set-up and calibration
STEP 12) The filtering tab is used to set the prediction parameters and the
prediction type. For more information on these filters, see the Online
Help.
STEP 13) When more than one gyro or motion sensor is available, select which
system is to be used as primary system. Currently, QINSy will not
switch between the computation methods automatically; this has to
be done manually.
13
Figure 57 Attitude setup
There are a number of settings in the computation setup that will be discussed
in the next chapter (Online). These are the parameters that will change from
survey to survey.
3.3.
Creating displays
QINSy Survey has the option to create any number of pre-defined displays. There are
a number of display types that can be selected. Each display can be customized and
given a location.
STEP 1)
Open the Controller. From the tool bar, select
QPS bv, Zeist, The Netherlands
icon.
54
3: Set-up and calibration
2
Figure 58 Display manager
STEP 2)
Select a display and click on Add. Give a name to the display. Two
displays of the same kind cannot have the same name.
STEP 3)
Arrange the displays on the screen by making them smaller or bigger.
STEP 4)
In the Controller, select “Save Displays Now” from the “Options”
menu.
The displays can be saved each time the Controller is closed, and retrieve them every
time the controller is started, set the following options.
STEP 5)
From the “Options” menu in the ‘Controller’ select “Save Displays on
Exit” or “Retrieve Displays on Start”.
Many displays have the option to turn off the status bar, tool bar and menu
and title. Turning these off will create more space for additional windows as
well as creating a less cluttered display. Select “View” from the menu bar and
deselect the appropriate options. Double clicking on the window will bring back
the menu bar and title.
Use the option “Always on top” from the “View” menu to make sure that a
window stays visible at all times.
3.4.
Calibration and check
3.4.1. Position system
After installation of the GPS receiver and setting the geodetic parameters, the system
needs to be checked. QINSy provides a number of options to check the output of the
GPS system and the geodetic settings.
QPS bv, Zeist, The Netherlands
55
3: Set-up and calibration
Positioning system display
The position display will display the data that has been received from the GPS receiver
(raw data). Create a new display from the display manager.
Figure 59 Positioning System display
Select the positioning system to be viewed. Depending on the selected system and the
output message from that system a number of fields will begin to show data.
Scatter plot display
The scatter plot display is used to show the difference between a fixed and a variable
node. This display can be used for a position check on a benchmark.
STEP 1)
Create a new display in the display manager. A wizard will be started
to create the scatter plot display.
Figure 60 Select nodes
STEP 2)
Select a reference node, e.g. the bench mark (from the fixed nodes)
STEP 3)
Select a secondary node, e.g. the GPS antenna.
QPS bv, Zeist, The Netherlands
56
3: Set-up and calibration
1
3
2
4
Figure 61 Scatterplot display
1) Scatter plot (X,Y) with error ellipse
and grid
when selected.
2) Time plot display for individual X,Y and Z readings.
3) Error ellipse parameters
4) Statistics, referenced to grid and track positions.
A scatter display can be started in the replay as well. In the replay, do a partial
replay between the fix numbers where the positioning system was performing
correctly.
3.4.2. Gyro and Motion Sensor
For the gyro and motion sensor calibrations, it is necessary to know the values of the
system at a certain moment. There are a number of ways within QINSy to read the
value from e.g. the gyro.
Alpha numeric display
The alphanumeric display is a general display that has the option to show a number of
parameters. In this example a motion sensor and gyro compass data as well as the
system and UTC time will be configured.
STEP 1)
Create a new alphanumeric display using the Display manager. The
alphanumeric display wizard will be shown on the screen.
QPS bv, Zeist, The Netherlands
57
3: Set-up and calibration
Figure 62 Alpha Numeric display wizard page 1
STEP 2)
From displays 1 to 5 select the readings to be shown in the
alphanumeric display.
STEP 3)
It is possible to show systems with and without their C-O’s as entered
in the template setup. For a calibration, switch this correction off.
3
Figure 63: observation information
STEP 4)
In the last dialog the layout of the display can be arranged. This
includes the font, color and layout of the display.
QPS bv, Zeist, The Netherlands
58
3: Set-up and calibration
Figure 64 Alpha numeric wizard page 6
STEP 5)
Use auto layout to set a number of parameter automatically, or
double click on any item to edit it manually.
The Result of the previous setup will look something like (when from the view menu
the toolbar, status bar and menu are disabled):
Figure 65 Resulting alphanumeric display
Double click on an item in the screen to open a display properties screen. The label,
location on the screen and format can be changed here.
The C-O’s that will result from the gyro / motion sensor calibration must be entered in
the template, using the template manager from the Console.
Figure 66: Entering C-O's in the template; left: gyrocompass, right: motion sensor.
QPS bv, Zeist, The Netherlands
59
3: Set-up and calibration
Time plot display
The time plot display can be used to show the data from a sensor or computation
graphically over time.
STEP 1)
Create a new time plot display using the display manager.
2
3
4
Figure 67 Time plot: Select observation
STEP 2)
Select the type of observation to be displayed, and if needed the
computation that it results from
STEP 3)
Select the system to be displayed.
STEP 4)
Select the values from the system to be displayed and click “Add”.
Figure 68 Time plot display
QPS bv, Zeist, The Netherlands
60
3: Set-up and calibration
Use the “View settings” and “Observation Settings” option from the “View”
menu to change the layout and scales of the display. The time plot scale
changes depending on the selected system in the lower half of the window.
3.4.3. Single beam echosounder
During a single calibration (bar check) the value from the system can be read from the
alphanumeric display, or from the echosounder display.
STEP 1)
Create a new echosounder display using the display manager.
STEP 2)
An empty echosounder display will show.
Figure 69: echosounder display
STEP 3)
Right click in the display area of the window and select “System
Properties”
STEP 4)
Select the system(s) to be displayed. For multibeam echosounders,
also select the beam number to display.
The displayed depth is the raw depth from the echosounder i.e. it is not
corrected for draft, sound velocity or tide from the software.
3.4.4. Multibeam Echosounder
A multibeam calibration (or patch test) is performed through sailing a number of predefined lines, followed by the calculation of the mounting offsets. Sailing lines and
logging data is described in the next chapter, this paragraph will describe the available
displays for logging Multibeam data and the computation of the mounting offsets.
Raw Multibeam Display
The raw multibeam display shows the raw data as it is being received from the
multibeam echosounder, i.e. without attitude and sound velocity correction. This
display can be useful if the multibeam control screen is not visible (remote location).
STEP 5)
Create a raw Multibeam display using the display manager.
QPS bv, Zeist, The Netherlands
61
3: Set-up and calibration
Figure 70 Raw multibeam display
STEP 6)
Select the multibeam system to be viewed, using the “Select”,
“Multibeam System” from the menu bar.
STEP 7)
Select “View”, “Auto Scale to Swath” to adjust the display in such a
way, that all data will be displayed.
Use the “View” menu to change the view options. These include a waterfall
option, and the exclusion of zero data .
Swath System Display
To view the corrected data, use the Swath System Display. The advantage of this
display over the Raw Multibeam Display is that it will show the data as it is outputted
to e.g. the Sounding Grid, or the Processing Manager.
STEP 1)
Create a new Swath System Display using the display manager
Figure 71 Swath System Display
STEP 2)
Select the echosounder to be displayed using the Select-Echosounder
option from the menu bar. Besides multibeam systems it is also
possible to select single beam data for display.
QPS bv, Zeist, The Netherlands
62
3: Set-up and calibration
3
5
4
Figure 72 Swath System Properties
STEP 3)
Select per system which items what is to be displayed.
STEP 4)
To display the swath in one color click monochrome and select the
desired color. To display the swath in different colors click rainbow
palette and select the desired color map. Selecting the color map can
be done with the Browse button.
STEP 5)
If “Show blocking limits” is checked, then the echosounder filter
settings (see next chapter) will become visible on the screen as a
series of lines and arcs.
Use the “View” menu to change the view options. These include a waterfall
option, and the option to add a header for printing the profiles.
Multibeam calibration
QINSy features a built in utility for multibeam calibration, a so-called patch test. In
order to use this tool, a calibration pattern needs to be sailed and the data needs to be
in the *.qpd format.
STEP 1)
Start the processing manager
STEP 2)
Select all lines used for the calibrations
STEP 3)
Start validator.
•
For a multibeam calibration it is advised to collect the following lines:
•
Roll: two lines over a flat area in opposite direction with same speed
•
Pitch: two lines over an area with slopes in opposite direction with same speed
•
Heading: two lines over an area with slopes, the lines need to overlap half a
swath width in same direction and with same speed
•
Latency: two lines over an area with slopes, in same direction with different
speed
For more information on logging, the processing manager and the validator,
see following chapters:
Load all calibration lines (roll, pitch, latency, heading) simultaneously in the
validator.
See the online knowledge base for a complete description for multibeam
calibrations.
QPS bv, Zeist, The Netherlands
63
3: Set-up and calibration
Figure 73 Area to use for the calibration
The different calibrations are carried out separate from each other.
STEP 4)
Activate only the lines for that specific calibration that you want to
carry out.
STEP 5)
To identify the lines from each other, give them a unique colour by
selecting View – Colours – Colour Settings – Colour Map.
Figure 74 Part of the Colour map window
STEP 6)
In the Colour Map windows select “Unique colour per QPD.
Roll calibration:
Select the two lines on the same track in opposite direction.
Figure 75 Line selection
QPS bv, Zeist, The Netherlands
64
3: Set-up and calibration
Figure 76 Areas used for the roll calibration
STEP 7)
Set the survey line as reference: click right mouse button in the plan
view and select CoordinateSystem-Surveyline.
If the surveydata is not aligned properly with the surveyline, an alternative line can be
drawn.
STEP 8)
Press the
button, click in the plan view on the left side in the
middle of the survey area, then a left click on the right side, if
necessary more clicks to extent the line, close/save the line with a
right click.
STEP 9)
To draw a cross block, press the
button. Click on point left of the
survey line and one line on the right. If the box is too wide, use
to give the box the right size.
STEP 10) Enable the editing/calibration in the validator press
“View=Validate”.
STEP 11) Activate the calibration press the
button.
The calibrate transducer alignment window appears:
Figure 77 Calibrate Transducer Alignments
In the swath view the data from both lines in the scroll box is visible; each line in its
one colour.
QPS bv, Zeist, The Netherlands
65
3: Set-up and calibration
Figure 78 Swath view
STEP 12) Click on Auto.
STEP 13) Select Step – Course.
STEP 14) Click on Start. An estimated angle is calculated.
STEP 15) Select Step – Fine. Repeat the procedure.
STEP 16) Select Step – Very Fine. Repeat the procedure.
STEP 17) Move forward/backward through the DTM to verify this for alternative
areas. Use
to move around.
STEP 18) Repeat from step 13 onwards.
STEP 19) Once several numbers have come up for the estimated angle, take an
average of the applicable values.
STEP 20) Run through the entire DTM to verify if the swaths match.
Figure 79: automatic calibration module
QPS bv, Zeist, The Netherlands
66
3: Set-up and calibration
Pitch calibration:
Pitch is calibrated for DTM points under the transducer. The comparison is made on a
slope or an underwater object.
STEP 1)
Place the mouse in the planview, activate the submenu with right click
and select Show Footprint Data to toggle this off. Only the
transducers are now visible.
STEP 2)
Draw a scroll box over the area of interest. See Figure 80 as example.
STEP 3)
Activate the DTM again. The DTMof interest now appears in the
calibration window.
STEP 4)
Repeat the procedure as from step 12 onwards.
Figure 80: Selection of area underneath the transducer(s)
Figure 81: DTM data for pitch calibration
Heading calibration:
STEP 1)
Select the two lines with an offset.
STEP 2)
Draw a scroll box over the overlapping part of the slope or object in
the same way as for the pitch calibration.
STEP 3)
Repeat the procedure with the auto option.
QPS bv, Zeist, The Netherlands
67
3: Set-up and calibration
Figure 82 Heading calibration
Latency:
Using a PPS and synchronising the QINSy and multibeam pc there should be no
latency in the system. To check that, sail the same line with different speed over a
slope. Draw a scroll box over the slope.
Figure 83 Latency calibration
If there is latency, then it will be visible in the profile view. From the distance between
the profiles and the difference in sailing speed the latency can be calculated.
This calibration procedure assumes that PPS is used during the survey to
avoid latency or the latency between the positioning system and the
echosounder is determined correct and is corrected for during recording.
When the correct parameters have been determined, the found mounting angles
should be entered in the template.
QPS bv, Zeist, The Netherlands
68
3: Set-up and calibration
Figure 84 Mounting angles multibeam
QPS bv, Zeist, The Netherlands
69
3: Set-up and calibration
This page left intentionally blank.
QPS bv, Zeist, The Netherlands
70
4: Online
4.
ONLINE
Before going online, make sure that the correct template has been set active using the
option from the Console. The controller will now
template manager. Select the
open and, depending on the display settings, a number of displays that were stored
during a previous session.
4.1.
Height Settings
In order to relate the measured depths to the vertical datum used for the survey, it is
necessary to know the height of the transducer with respect to this datum. If a
positioning system is used that outputs an unreliable height (e.g. DGPS), then a
number of parameters need to be set in the Controller. These settings are not needed
for a system that outputs an accurate height (e.g. RTK DGPS). More information on
Height settings can be found in Appendix D.
STEP 1)
From the Controller, open the computation setup using the
button
from the tool bar. Select the object / computation from the tree and
click on the “Height” tab.
1
1
2
3
4
5
Figure 85 Height settings
STEP 2)
Select the heave method that will be used to correct the height data.
STEP 3)
Set the tide method, and the tide gauge’s / files that have to be used
for the depth correction.
STEP 4)
Enter the draft of the vessel. This is the draft relative to the draft
reference as entered in the template setup.
STEP 5)
If a squat model was defined in the template setup, enter the squat
method and the related parameters.
If tide is applied during an online session, than the resulting dtm data that is
outputted to e.g. the Processing Manager is also corrected for tide. If tide is
to be applied in processing, then do not correct for tide online.
QPS bv, Zeist, The Netherlands
71
4: Online
4.1.1. Tide
During an online session there are three options for inputting tidal information into the
raw database. The first is inputting data from a tide gauge that transmits data to the
vessel. The other option is to use one or two manual gauges. If a manual tide gauge
was defined in the template setup than an input driver is started when the Controller
is started during an online session.
1
2
3
Figure 86 Manual input driver
STEP 1)
Select the observation that to be changed.
STEP 2)
Enter the new value for e.g. the manual tide gauge and press update
STEP 3)
If the box is checked than the value will automatically be updated
every x seconds. The number of seconds can be changed using the
“Change” button.
Another option of inputting tidal information (e.g. during replay) is by creating a tidal
data file. This file should have the following layout:
23/11/99 10:10 1.24
23/11/99 10:20 1.10
23/11/99 10:30 0.98
A maximum of two files or gauges can be used for the online computation of
the tide. If more gauges need to be used, than the tidal processor from the
Processing Manager should be used instead of the online option.
The tidal value is determined based upon a weighted distance from the
gauge(s).
When tide gauges or tide files are used it is necessary to have fixed nodes
defined in the database set up. The fixed node gives the position where the
gauge is located and the correct height reference system to be used.
QPS bv, Zeist, The Netherlands
72
4: Online
4.2.
Sound velocity
The sound velocity is needed to correct the depth readings from the echosounder to
true depths, depending on the echosounder settings. Most echosounders allow the
input of a single sound velocity, where QINSy is able to use the entire sound velocity
profile as measured.
To enter a sound velocity profile:
STEP 1)
In the controller click the echosounder option from the settings menu.
STEP 2)
Select the velocity profile group to make the velocity profile dialog
visible.
3
5
4
Figure 87 Sound velocity profile
STEP 3)
There can be several profiles defined in the database; each gets its
own profile Id. The profile location and time are administrative and
are not used for the correction
STEP 4)
The profile can be entered manually by adding observations (depth /
velocity)
STEP 5)
Or the profile can be imported as a text file generated by a sound
velocity probe. When importing a file, make sure that the depth
interval is entered correctly since only one value per interval is used.
STEP 6)
The loaded profile can be exported in three different formats. See
Figure 88
QPS bv, Zeist, The Netherlands
73
4: Online
Figure 88: export sound velocity profiles
4.3.
Session setup
Before starting the survey a number of settings need to be made in the Session Setup.
These settings include line planning and storage and fixing options.
STEP 1)
In the controller click on the
showing a number of groups.
button. A new dialog will open
Line Planning
STEP 1)
Select the “Planning” group to enter the line planning.
1
4
2
3
Figure 89 Session set-up; Line planning
STEP 2)
Select the Line database for the survey using the “Line database”
button.
QPS bv, Zeist, The Netherlands
74
4: Online
STEP 3)
In the right windowpane all the available objects are visible. By
default all objects in the line database are selected. It is possible to
(de) select objects by moving them between the panes using the
arrow buttons. Use the “Selection” menu or right click on a line for
more selection options.
STEP 4)
The object on top of the list is selected as the first line to be sailed.
With the “Up” and “Dn” button the objects can be moved in the list.
Check the option “Lock” order to keep the same order in the list. Use
the button “First” to put a line on top of the list.
During the survey the next / previous line from the line planning can be
selected using the “Page Up’ and “Page Dn” buttons.
Line Planning
To activate the “Additional Mainlines” option, select in the controller Settings – Session
– Show Additional Lines setup. The “Session Setup – Planning Overview” window will
get a new item the “Additional Mainlines.
Figure 90 Session set-up; Line planning
The first 4 items stays the same; a 5th item is added. Activating this “Additional
mainlines”, the following window pops up.
QPS bv, Zeist, The Netherlands
75
4: Online
Figure 91: Session setup – Line planning.
Number 1 stays the Current line selected in “Overview”. It is possible to add 9
additional points/lines/routes.
STEP 1)
Add a name or description in the “Description” column;
STEP 2)
Select the “Type” in the third column and
STEP 3)
Select a point/line/route in column “Name”. Only what is already
selected in “Overview” can be selected here.
It is now possible to setup a “Alpha Numerical Display” with the Current Line or a
display with one of the Additional Mainlines.
QPS bv, Zeist, The Netherlands
76
4: Online
Figure 92 Alpha Numerical Display
The whole alpha numerical display is setup with information related to the selected
Main Line. Assume you select Pipeline 1 as main line and on page 2 for steered node
the DX (distance across). The result then shows when you are crossing the pipeline.
Figure 93: using an alternative line as reference
QPS bv, Zeist, The Netherlands
77
4: Online
Storage
STEP 1)
Select the “Storage” group in the Session Setup to make the storage
settings visible.
1
2
3
4
Figure 94 Session setup: Storage settings: Databases
STEP 2)
Select whether to use a manually entered filename or use the line
name. The last option is recommended when using the processing
manager to validate the data.
STEP 3)
If a prefix is used, then each database will get a sequence number.
Whenever a new recording session is started the sequence number
will be increased with one.
STEP 4)
Select “Sounding Grid” to enter the storage properties for the
Sounding Grid Utility”, the following window will appear.
5
6
7
Figure 95 Session setup: Storage settings: Sounding Grid
QPS bv, Zeist, The Netherlands
78
4: Online
STEP 5)
To enable storage to a sounding grid select sounding grid from the
“Format” pull-down menu and select the sounding grid file that will be
used to store the depth data.
STEP 6)
Each system can store it’s data to it’s own layer in the sounding grid,
select a specific layer from the pull-down menu for each system.
STEP 7)
Select “DTM File” to enter the storage properties of DTM data, the
following window will appear.
8
9
Figure 96 Session setup: Storage settings: DTM File
STEP 8)
Select the output format for the storage of the corrected data. The
most commonly used format will be the QINSy Processing format.
STEP 9)
Select which systems to use when storing the depth data.
STEP 10) Choose the control option from the storage group for further settings
on logging data.
QPS bv, Zeist, The Netherlands
79
4: Online
11
12
13
14
15
Figure 97 Session setup: Storage settings: Control
STEP 11) When collecting much data (e.g. multibeam) the resulting database
can grow to a respectable size when sailing longer lines. Split the
databases to a size that can be handled by the processing software
using a number of splitting options.
STEP 12) QINSy can select lines automatically, choose from:
•
•
Disabled (select manually)
•
Dynamic: the line closest to the vessel is automatically
selected.
Planning: the next line is the one down the list in the planning
group.
STEP 13) Line bearing selection method has the following options:
•
Planning: the bearing selected in the Planning Group is used.
•
Heading based: line is directed in the forward heading of the
vessel. When vessel turns, the line is reversed.
•
Closest distance to SOL or EOL: line is directed such that more
than half the line is ahead. When vessel is halfway the line, it
reverses (when not logging).
STEP 14) QINSy has the option to automatically start and stop recording:
QPS bv, Zeist, The Netherlands
•
Disabled: user needs to activate start and stop logging
manually.
•
Fix based: loggings starts and stops based on fixing generated.
•
Distance based: logging starts and stops a certain distance
before and after the line coordinates. When negative numbers
are used, logging is started into the line and stopped before
EOL coordinates.
•
MP based: logging is started and stopped as specified Meter
Point.
•
Time based: enter local times to start and stop logging.
80
4: Online
•
Wait before next line: amount of seconds before the next
available line is set as active line in the controller.
STEP 15) Recorded data can automatically be copied or transferred to another
location on the computer or network after finishing a survey line.
Select to copy or to move the DB files. Select the folder (can be
across a network). View logfile: displays the logging of events of
transferring data.
There are two types of QINSy processing format; Condensed and normal. The
difference lies in the fact that the condensed format sets data passive that did
not pass the online filters while the normal format stores all data points as
active.
Fixing
Fixes are used e.g. for displaying depths in the navigation display, but are also stored
in the database. Before fixing can be used, a number of parameters need to be set.
STEP 1)
Select the “Fixing” group in the Session Setup to make the storage
settings.
2
1
3
4
Figure 98 Session setup: Fixing
STEP 2)
Select the fix (event) mode and enter fix interval in meters or
seconds.
STEP 3)
Set the fix number increment and the first fix number. The program if
applicable will calculate the last fix number.
STEP 4)
Use the check boxes to set additional parameters.
For settings the Anchors see the online knowledge base, subject ‘Anchor Handling’. For
the settings for Bargetrack see subject ‘Pipe and cable laying’.
QPS bv, Zeist, The Netherlands
81
4: Online
4.4.
Echosounder settings
Under certain circumstances data from an echosounder can contain a lot of noise.
Although noise should preferably be removed using filters on the echosounder itself,
this is not always possible. In order to clean the data QINSy offers a number of online
filters that can reject most of the larger spikes in the data. The stored reduced QPD
contains all data but data this fails these filters are set passive.
Open the echosounder settings window
Echosounder settings.
from the Controller or menu Settings –
4
2
3
5
6
Figure 99 Computation setup echosounder
Select the echosounder, single and multibeam have different options.
STEP 5)
Data exclusion has the following options:
QPS bv, Zeist, The Netherlands
•
Depth outside. All depths (relative to the transducer head) that
fall outside this range will be ignored.
•
Range outside. All ranges (relative to the transducer head)
that fall outside this range will be ignored.
•
Sector outside. Ignores all depths outside a sector-calculated
left and right from the vertical (i.e. straight down = 0° roll).
82
4: Online
This option is useful when the vessel experiences large roll
errors.
STEP 6)
•
Quality outside: reject data with a quality number inside the
given range. The quality number is read direct from the
hardware data string.
•
Heave above. Ignores all data when the heave is above a
certain limit.
•
TPE exceeds: reject data that does not meet horizontal/vertical
or both (depth and position) TPE criteria. Note that SD values
in the template database need to be realistic.
•
Exclude beams. This option should be used if a number of
beams give unreliable information. Enter beam number
separated by comma, .. if a range is required.
De-spike data. A number of filters for de spiking the data are
available.
•
Single Spike: this filter will ignore all data that deviates more
than a certain threshold from the surrounding two data points
•
Seabed slope: this filter will reject all data that have an angle
between them that is shallower than the defined threshold.
The angle is calculated between two adjacent beams.
•
Cross validation: this is a statistical filter that determines the
average bottom and filters all values that fall outside the limit
based upon the filter settings. Depending on the setting spikes
that are upward, downward or in both directions will be
filtered.
Figure 100 De spike data; left single spike, right seabed slope filter.
STEP 7)
Data reduction parameters: single swath reducer.
•
QPS bv, Zeist, The Netherlands
A swath of a multibeam is reduced such that adjacent
datapoints with a relative height difference less than the
minimum object height are set passive. To avoid that too few
data points remain in the swath, the link distance will set a
point active if the horizontal distance exceeds this value.
83
4: Online
Figure 101 Swath reducer (top = original profile, bottom = reduced)
STEP 8)
Refraction: select whether to use the sound velocity profile as defined
in the template / echosounder settings, or the single sound velocity as
defined by the echosounder system setup in the template.
The echosounder filters only affect the data that is stored in the Sounding grid
or the DTM file. All depths will be stored in the database as raw depths.
4.5.
Controlling Data
The Controller is used during the Online and replay sessions to coordinate the flow of
data. During the online session the recording of data and the line selection is done
using the Controller. There are 4 operational modes for the Controller, of which 2
relate to both the online and the offline session.
No action
Recording data
Paused
Replay data
Figure 102 Controller modes
The dataflow is controlled by the “Tape deck” controls in the tool bar, or using the
function keys on the keyboard.
/
pausing.
Start logging data during an online session or continue logging after
/
Stop logging / replay of data at the end of a survey line.
/
Pause data during recording or replay
/
Start replay during an offline session or continue replaying after pausing.
Select previous line from the line database
QPS bv, Zeist, The Netherlands
84
4: Online
Select next line from the line database.
Reverse the direction of the line. This option does not work when the
heading of the line is based upon the vessel heading or distance to SOL / EOL.
Whenever recording is stopped and started again and the sequence numbering is
active, a new database will be created with the next sequence number.
4.6.
Online displays
In the previous chapter a number of displays for calibration and control of our systems
were used. In this chapter the focus will be on the use of displays for line keeping and
visualization of the position and depths.
4.6.1. Helmsman display
The Helmsman display is used for line keeping when a line is selected in the
Controller. The position in the Helmsman display is by default given for the Steered
Node, which can be set using the computation setup dialog.
STEP 1)
Open a new helmsman display using the display manager.
STEP 2)
Click on
or menu Select – Node.
Figure 103: select node for helmsman display
STEP 3)
Normally the steered node from the Controller will be used. This
should be set as the node of the primary echosounder system. Select
another node if desired.
STEP 4)
Click on
appears:
QPS bv, Zeist, The Netherlands
or menu View – Properties. The View Properties window
85
4: Online
5
6
7
8
9
10
11
Figure 104: View Properties Helmsman display
STEP 5)
Activate speed indicator to see a bar for crossline speed indication.
STEP 6)
Inverse speed, select this to see speed indication of survey line
relative to vessel.
STEP 7)
Use across object speed, this shows the amount the vessel deviates
from its straight course. When going in a straight line (not necessarily
the heading of the survey line), this value reads zero, when turning
this number updates with input from calculated positions from the
Controller.
STEP 8)
Set the length to the desired amount of history.
STEP 9)
Show fixmarks, shows the fixnumbers along the track.
STEP 10) Show bold track, set the dots to bold font.
STEP 11) Show intended fixmarks, shows the fixnumbers along the route,
calculated from SOL point.
STEP 12) Left pane shows distance along the line/route. Green is runin, blue is
online, red is runout.
STEP 13) The computed course over ground is displayed in the bottom right
corner.
QPS bv, Zeist, The Netherlands
86
4: Online
4
5
12
9
11
13
Figure 105 Helmsman display
QPS bv, Zeist, The Netherlands
87
4: Online
4.6.2. Navigation display
The navigation display is used to display a top view of the area with background
charts, the sounding grid and the vessel (track).
STEP 1)
Start the display manager from the Controller
STEP 2)
Click on Navigation Display, click Add and enter a name for the
display.
STEP 3)
The Navigation Display starts, several layers are initialized.
STEP 4)
Below is an example of all possible layers with data included.
Geotiff
image
QXF
file
Line
database
file
Chart
feature
vessel
Sounding
grid
ENC chart
Color
scale
Status bar with
scale, position and
grid details
Figure 106 Navigation display
STEP 5)
Click on
QPS bv, Zeist, The Netherlands
or Layers – Layer overview. The Layers become visible.
88
4: Online
Figure 107: Navigation display layer overview
STEP 6)
Enable all layers if they are disabled.
STEP 7)
Click on ENC, activate the desired settings for displaying ENC charts.
Recommended presentation mode is traditional.
STEP 8)
Click on DXF/QXF. Add a QXF file for background reference. Use the
DXF2QXF converter to set DXF data compatible with the Navigation
Display. Place the data in folder DxfToQxf.
STEP 9)
Click on Line Planning. Activate the options and set values as desired.
This dialog sets the display of lines selected in the Controller –
Session Setup.
STEP 10) Click on Line Database. Add additional line databases for viewing
only. These are not selected in the Controller and cannot be used as
survey line. Allow user to see the lines without taking load on
Controller CPU.
QPS bv, Zeist, The Netherlands
89
4: Online
STEP 11) Click on Sounding Grid. Select the correct layer and color map. Under
Tab ‘Render Options’, select render type for displaying details and
shading/contrast. Improve coverage will show the grid when zooming
out.
STEP 12) Click GeoTiff Image. Add a file to be displayed.
STEP 13) Click on chart features. Select types and color. Select color scale to
display for reference using the sounding grid.
After settings the layers correct and the data required, various other options for object
tracking and preplot shape can be set.
STEP 1)
Open the View Properties (View-Properties)
STEP 2)
Select the Group View on the left pane.
STEP 3)
Click on icon Object tracking.
STEP 4)
Activate ‘Tracking enabled’ and select the track point mode. This will
set the vessel in a certain position on screen.
STEP 5)
Enable the tracked objects.
STEP 6)
Adjust the tolerance levels to your liking. The window will recenter
when the tolerance to the window edge is reached.
STEP 7)
Activate ‘Relative motion’ if the vessel should remain steady and the
background moving.
Figure 108: Object tracking
The preplot shape will draw a vessel shape at the start of line or at a user specified
location. This is to vizualize the intended starting point for survey.
QPS bv, Zeist, The Netherlands
90
4: Online
Figure 109: Object shape with predicted and trailed shape
Fix numbers and time is displayed to the right of the object.
STEP 1)
Click on
QPS bv, Zeist, The Netherlands
or select View – Properties, Group Objects.
91
4: Online
Figure 110: Object display properties
STEP 2)
On Tab Drawing options, the vessel shape will be automatically shown
for the primairy computation. Activate the drawing for other
computations to see the difference.
STEP 3)
Activate ‘Allow overscale symbol’ when zooming out. The vessel wiil
be drawn in a simple shape of constant size regardless of screen
scale.
STEP 4)
Use blowup factor to show the vessel enlarged with its real shape.
STEP 5)
Draw predicted object will display the vessel in a calculated position
at the number of seconds. Type the number of seconds desired.
STEP 6)
Draw trail of objects will draw vessel shapes at positions at time
interval behind the current position.
STEP 7)
Draw trail of speed vectors, default every update. Type a number if
the update should be in seconds.
STEP 8)
Click on TAB node to display node positions and labels.
QPS bv, Zeist, The Netherlands
92
4: Online
STEP 9)
Click on TAB Fix Marks/MBE coverage to display fix numbers and
times. A coverage area under the MBE is displayed even when not
recording. This is useful to the helmsman to steer for full coverage.
Other toolbar buttons:
STEP 1)
Click on
to open the Pick report dialog. Click on the screen, the
ENC chart details are now shown.
STEP 2)
to open the range and bearing window. Click and hold in
Click on
the navigation screen starting at the point of interest. A circle with a
range is drawn and the bearing to the target. Click at the target again
and the range and bearing are shown.
STEP 3)
Click on
to open the range marker window. Click Add, select the
From position and To position. When using mouse position, click on
Select, move the mouse in the navigation screen and click once. Click
Apply.
STEP 4)
Click on
to open the range and bearing window. Draw a line.
to save the waypoints. Type a filename and select a line
Click on
database file or create a new one. A dialog appears asking to set the
drawn line as active line in the Controller. Click YES if you want to
survey this line now, else NO.
STEP 5)
Click on
to open the Anchor Planning window. First Anchors need
to be defined – see Online knowledge base ‘Anchor Handling’. Move
the mouse over the Anchor position and use right click for submenu
with possible actions. Click and drag left to move the Anchor across
the screen.
STEP 6)
Click on
STEP 7)
to set mouse to recenter. Click once left, this pixel now
Click on
becomes centre of the screen.
STEP 8)
to draw a zoom window. Draw a rectangle over the area
Click on
of interest to zoom in.
STEP 9)
Click on
to refresh the screen (F5 alternatively)
to zoom out and
to zoom in.
STEP 10) Click on
to return to previous view, click on
current view.
STEP 11) Click on
to activate or de-activate vessel tracking.
STEP 12) Click on
to open View-Chart Setup.
STEP 13) Click on
to open View-Object tracking.
STEP 14) Click on
to open View-Pre plot shape.
STEP 15) Click on
to open View-ENC layer.
STEP 16) Click on
to open View-DXF/QXF.
STEP 17) Click on
to open Line Planning layer.
STEP 18) Click on
to open Line Databases layer.
STEP 19) Click on
QPS bv, Zeist, The Netherlands
to return to your
to open Sounding Grid layer properties.
93
4: Online
STEP 20) Click on
to open Geo Tiff image layer.
STEP 21) Click on
to open Targets layer (note that an AIS or ARPA system
needs to be defined in DbSetup for this to work).
STEP 22) Click on
STEP 23) Click on
STEP 24) Click on
to open Chart features layer.
to open Anchors layer.
to open View Properties - Objects
to open S-57 objects screen. Edits to the undelaying
STEP 25) Click on
ENC chart can be made from here.
QPS bv, Zeist, The Netherlands
94
5: Processing
5.
PROCESSING
After recording data with the Online module, a check on the data needs to be made.
Raw recorded observations can be analyzed. The terrain model created by the Online
module can be validated. This chapter will discuss the processing options that are part
of the QINSy Survey suite. The final processing stage (Charting / Mapping etc) can be
done with QINSy Mapping (Terramodel).
The following options are available for processing the data.
The Replay manager (formerly the Project Manager) shows all recorded database
and allows for replaying the data with different settings and is similar in operation to
the Online module. This module also includes a tool for investigating the raw data that
was recorded per sensor.
The Processing manager is used to validate the data, apply tidal corrections and
export the data to other applications.
The Sounding Grid Utility provides the user with a coloured depth image of the
survey. Within this utility the result of the processing can be investigated and volume
calculations can be performed.
5.1.
Replay manager
The first step in processing the data is checking the settings and the raw data from the
sensors. Then changes in the settings and / or changes to the raw data from the
sensors must be applied to the entire dataset. The following three steps can be
distinguished in this process.
STEP 1)
Analyse the raw data from the different sensors, and edit them if
needed.
STEP 2)
Adjust incorrect or updated settings in the recorded databases
STEP 3)
Replay the data with the correct raw data / settings.
To enter the replay manager, simply click on the appropriate icon
Console. The following window is shown.
in the
Figure 111: Replay manager
QPS bv, Zeist, The Netherlands
95
5: Processing
All the databases containing raw data that are within the project are shown. In the
columns the dates are displayed at which a certain action took place. The most
important actions are DB Setup, Analyse and Replay.
5.1.1. Analyzing data
The Analyze module is for analyzing raw data, which means that not the processed
input from the sensors is shown, but the data as it was recorded. Echosounder data is
shown with the depth reading that was received during the survey, Multibeam data
will show the slant range per beam etc.
The Analyze module is not intended for validating data, but to search for erroneous
sensor readings, check sign conventions (e.g. RTK Height vs. Heave) etc.
To start the analyze module, simply highlight the database to be analysed and click on
the
button. The module is started and a new window is opened.
Figure 112: Analyze module
All raw data is displayed as a time series
, with the exception of the position
information (Latitude, Longitude) that can also be displayed as a
alphanumeric option is also available.
check the update rate of a system.
position plot. An
The alphanumeric option can be useful to
The alphanumeric option will only show the first x entries in the database. To
change the number of entries visible, select “Settings”, “General” from the
menu and click on the “Numerical View Tab”
QPS bv, Zeist, The Netherlands
96
5: Processing
Selecting observations
The first time analyze is started, it will display all the available sensors. To (de) select
sensors take the following steps:
STEP 1)
Click on the
STEP 2)
A new dialog window will show with all available groups /
observations.
button in the toolbar.
4
3
Figure 113: Select observations
STEP 3)
Select the observation groups, or select single observations by
changing the radio button from “Groups” to “Observations”.
Observation groups contain all the observations from a certain type of
sensor, e.g. all motion sensor data in the database. It is possible to
define new groups or use the default groups.
STEP 4)
Use the > and < button to send observations from one side of the
panel to the other. Use the >> and << buttons to send all
observations.
Use the scroll buttons
in the tool bar to toggle between the selected
observations. The number of observations per view can be changed using the
“Settings”, “General” option from the menu bar. Use the “Observation Graphs” tab and
set the number of observations to be displayed in the view.
With the
buttons in the tool bar, the mouse mode can be selected. The
middle button is a function whereby a line can be drawn between observations, noting
the time difference and the value difference between the two sensors. This is a useful
tool when investigating delays between sensor readings.
QPS bv, Zeist, The Netherlands
97
5: Processing
Filtering data
It is possible to define the filter groups by clicking on the
button from the tool
bar. Filter groups are used for automatic editing of data. This can be de-spiking raw
data, smoothing it or adding a latency. The last option can be very important is a
latency in e.g. the positioning system was found after the survey was performed.
STEP 1)
To apply this latency, a specific filter first using the
to be setup. A new dialog will show:
option needs
6
2
Figure 114: Filter groups
STEP 2)
Select the group to be filtered (e.g. Position Lat/Lon) and click on the
“Properties” button. This will start the filter settings dialog:
Figure 115 Group Filter properties
QPS bv, Zeist, The Netherlands
98
5: Processing
STEP 3)
Remove all the filters that are not needed. Leave the Raw data filter
in place, since this will ensure that all data is filtered using the raw
data as a base.
STEP 4)
Add a new filter by clicking on the “Add” button. A new dialog will
appear:
5
Figure 116: Add filter window
STEP 5)
Select the appropriate filter from the pull down menu and fill in the
settings. These settings depend on the type of filter that was selected.
STEP 6)
Complete the filter setup and click on the Start button in the filter
selection dialog.
More information on filter settings can be found in the Online Help.
If a position latency filter is used be sure that the same filter is also applied
to the height data from the same system.
It is not possible to change the latency in the database and replay the data.
The latency in the database is only used during an online session.
When data is edited or filtered with the analyse tool, the edited data point is
interpolated and not removed.
De-Spiking data
It is possible to de-spike raw data from within the analyse module. Using the edit
options false heave may be corrected or spikes in the gyro output. These edit options
are not meant for validating the data, use the Processing Manager for this.
To correct false data, click on the
button from the toolbar. Now draw a box
around the correct data for a specific sensor. Erroneous data will be labelled and
depending on the view settings will show on screen in a different colour. Use the
buttons in the tool bar to switch between the different views.
To manually edit the data, click on the
supposed to be.
QPS bv, Zeist, The Netherlands
button, and draw a line where the data is
99
5: Processing
5.2.
Changing settings
QINSy Survey was developed in such a way that all the settings are stored together
with the data, giving the user full control over the various settings. After the survey
has been completed and the data is being processed, all the settings can be changed.
So the primary concern of the Online surveyor is to collect good raw data.
Both the system setup in the database as well as the computational setup from the
controller can be changed in the processing session.
The original settings will not be stored. If the original settings need to be
retained, store the original database somewhere as a backup.
To make corrections to the database setup (template) to modify e.g. calibrated offsets
or to change the sound velocity, complete the following steps.
STEP 1)
Select the database that requires modification
STEP 2)
Open Database Setup module (menu Action- DB Setup or use right
mouse menu and select from drop down menu or click Ctrl+D or icon
)
STEP 3)
The database setup will show on the screen. Modify the settings to
reflect the correct changes and exit the database. Save on exit.
In order to make corrections to the online settings (computation or echosounder
setup):
STEP 4)
Select the database.
STEP 5)
Start Replay (Action-Replay or select from right mouse menu or Ctr+R
STEP 6)
Open the computation setup and / or echosounder setup.
STEP 7)
Make the appropriate changes.
STEP 8)
Stop the replay session by closing the Controller.
or icon
)
The available settings in the controller will differ slightly from those that are
available online. The fix settings will not be available, and the store option
will not show information on raw data storage.
5.2.1. Cloning settings
After the settings have been changed, it is possible to copy these settings to other
databases.
STEP 1)
Select the database from which to clone the settings.
STEP 2)
Open menu Tools-Clone Settings or press Ctrl+C.
STEP 3)
A dialog will appear showing the selected database, click Next.
STEP 4)
In the next window, select the database settings to be cloned.
STEP 5)
Select the Controller settings to be cloned.
STEP 6)
Select the databases where the settings need to be cloned to.
STEP 7)
Click on Finish.
QPS bv, Zeist, The Netherlands
100
5: Processing
Make sure the databases have identical settings before cloning. If in the list of
databases to be cloned to, settings are different, this database will be excluded from
the list.
When cloning the Height settings be sure to also clone the computation
settings. To be sure, select all settings for both DB Setup and Controller.
5.3.
Replaying the data
If all the settings are correct, replay of the data can be started. It is possible to either
replay a single survey line (database) or a batch of lines. The last option will be the
most common, and is used to reprocess a survey after the system setup was changed,
or the data was analysed.
Replaying a single line will give the user full control over the settings stored with the
data, replaying a batch of lines gives a limited number of settings. During replay the
entire line is sailed again, only this time not in real time. While replaying the user has
full control over the display settings and can show any display on screen to investigate
the data.
Replay several databases at the time
Most surveys will consist of more than one survey line. In this case doing a replay with
a number of survey lines at a time speeds up the processing process. This type of
replay is called a batch replay. When using a batch it is possible to replay one
database after another. All the databases need to have identical settings though. If
this is not the case, clone the settings from one database to the others, or replay the
data in different batches.
STEP 1)
In the Replay manager select one of the databases that need to be
replayed.
STEP 2)
Start Replay (Action-Replay or select from right mouse menu or Ctr+R
or icon
)
STEP 3)
The Controller will appear as usual. Open the Session Setup and
select the appropriate output formats.
STEP 4)
Open the Group Replay and set the relay speed to full speed if a lot of
data needs to be replayed.
STEP 5)
Close the session setup.
STEP 6)
Open Computation setup. Make the required changes.
STEP 7)
Exit Controller.
STEP 8)
Clone the settings from this database to the other databases.
STEP 9)
Select all databases to be replayed.
STEP 10) The Controller will appear.
STEP 11) In the ‘Controller’ press the [F3] function key. All databases will be
replayed.
To pause a replay session, use the pause button.
To speed up the process, do not use any online displays.
QPS bv, Zeist, The Netherlands
101
5: Processing
5.4.
Processing manager
The processing manager is used for validation of the data. No information about the
raw data is available in this module, only the X,Y and Z of the depth data are available
i.e. a “raw” depth with a position. Every setting that was applied during the Online or
Replay session is included in the data. If applicable, tidal data can be added and
corrected for in the processing manager.
5.4.1. The Processing Manager
To start the processing manager, click on the appropriate icon
in the Console. A
window like the Replay manager will show on the screen. Now the columns will
provide information about the start and end point of the file, as well as whether tides
were applied and whether the data was validated or exported.
Chart
overview
Index of
QPDs
Figure 117 Processing manager
On the left pane is a 2D overview of the sounding data. In the right pane is an index of
the loaded QPD files of this project.
STEP 1)
Activate the chart view via menu View-Chart View.
STEP 2)
Activate support files (click on
STEP 3)
In the Open Support Files window, activate Sounding Grid. Click on
or menu File-Open Support Files)
to open a select window. Select a Grid file from the window. (Note
that multilayer grids are not supported at this time)
STEP 4)
Do the same for the Line Database file. Select the file that was used
during the survey.
STEP 5)
If required a mapping file can be loaded as background reference for
coastal reference.
STEP 6)
Open Chart Options window (click on
Options).
STEP 7)
Click on Group Chart, select a background color. Printing options can
be set here for hardcopy.
STEP 8)
Click on Group Layers and then QPD. Select a color for the various
items.
STEP 9)
Select the required items under ‘Show the following items’ Suggest to
activate all.
QPS bv, Zeist, The Netherlands
or menu View – Chart
102
5: Processing
STEP 10) Click on icon Sounding Grid on the left side. At color map select an
appropriate color scheme. Enter values for minimum (deepest) and
maximum (shallowest). Click OK.
It is now possible to select a number of QPDs from the Chart View.
STEP 1)
Click on
STEP 2)
Click and hold to draw a rectangle.
STEP 3)
All QPDs crossing this rectangle are now selecting in the index list
(highlighted in light grey).
. The mouse is now activated for selection.
On the right pane the index of the QPD’s is built from the qpd files in the current
project DtmData folder. The columns visible can be set by the user:
STEP 1)
Open the selection window via View-Columns.
STEP 2)
In the left pane default all items are selected. Make a choice by deactivating or activating the required items.
STEP 3)
In the right pane the sequence is listed top to bottom. This is
displayed left to right. Select an item and click ‘Move Up’ or ‘Move
Down’ to change the sequence.
QPDs from a different project (location or date) can be accessed simultaneously.
STEP 1)
Open the secondary project via File – Open Secondary Project.
STEP 2)
In the Browse for folder window, navigate through the tree structure
on the PC and select the project name (main directory) of the
required project. Click OK.
STEP 3)
The secondary project is listed in the index. If not visible drag the
horizontal divider bar at the bottom of the index window upwards.
STEP 4)
The chart view is automatically reset to display both projects
simultaneously.
History
Every action that is performed on a file in the processing manager is logged and
becomes part of the history of that file. To view the history of a file, select the file and
select “View”, “History” from the menu bar.
Import and export of data
It is possible to import data into the Processing Manager. Various dataformats can be
imported.
STEP 1)
Click on
STEP 2)
Select ‘Echosounder data files’ to import other QPD files into the
current project.
STEP 3)
Select ‘Tide Definition Files’ to import a file for tidal reduction, the
tidal station parameters and survey lines used into the current
project.
STEP 4)
Select ‘Tide Data File’ to import a tidal file with tidal levels
corresponding to the tide definition file into the current project.
QPS bv, Zeist, The Netherlands
or menu File – Import to start the import window.
103
5: Processing
STEP 5)
Select ‘Levelling data or ASCII’ to import ascii points file into the
current project.
STEP 6)
Click on Add, select a file. Click Next.
STEP 7)
Browse for a linedatabase file which correlates to the ascii file
imported. If no file exists, create one using the Line Database
Manager.
STEP 8)
Import ASCII data window, select the items to be imported. Enter the
correct starting column and length for each field. If required a
threshold offline can be used skip points. Verify the preview and click
Import if all settings are OK.
STEP 9)
Click on ‘Donar Interface Format’ to import a ‘Rijkswaterstaat’ (Dutch
Public Works) internal format into the current project.
STEP 10) Click on ‘Sounding grid’ to import a sounding grid into the current
project.
It is also possible to export one or more QPDs.
STEP 1)
Select the QPDs to be exported.
STEP 2)
Click on
or menu File – Export.
From the menu various formats can be chosen:
STEP 1)
Click on QINSy Mapping. The export to QINSy Mapping window opens.
STEP 2)
You can export the data to a new file using a predefined template.
Activate this option and browse for the template.
STEP 3)
All data can be exported into one file – activate this, browse and enter
a filename. Otherwise each QPD will create a new file with the QPD
filename used.
STEP 4)
If points are far apart, the lines drawn through singlebeam data can
be broken. Activate this and enter a value (unit = surveyunits).
STEP 5)
Under items, click on the object type. Select from the drop down
menu Options are: not exported, points, pline and set.
STEP 6)
Select a color for each item.
STEP 7)
Default layers are selected. Make changes if required. Click on Finish
to export.
Exporting to a sounding grid:
STEP 1)
Select QINSy Sounding Grid from the drop down list under Export.
The Export QPD Data Points to Sounding Grid File window opens.
STEP 2)
Under Sounding Grid File, click on
and browse for the file. If the
grid file does not exist, create this first using the Sounding Grid
utility. Close the SGU once the file is created.
STEP 3)
Under System, select the Export System (=Layer) that each system in
the QPD is exported to.
Export to a Donar Interface format:
STEP 1)
Select Donar Interface format from the drop down list. The export
wizard starts.
QPS bv, Zeist, The Netherlands
104
5: Processing
STEP 2)
Select the echosounder system to export. (only one at a time).
STEP 3)
Activate export to single ascii file if required. Browse and enter a
filename in the Save As dialog.
STEP 4)
Click on Next.
STEP 5)
On page 2, select the appropriate fields from the drop down menus.
Click Next.
STEP 6)
On page 3 enter the codes as required. Click on Finish.
STEP 7)
The files will be placed under the current project in subfolder
\Export\Donar.
Export to user defined ascii:
STEP 1)
Select User defined ASCII from the drop down list. Export to ASCII
wizard opens.
STEP 2)
Activate ‘export to single ascii file’ if required. Browse and type a
filename.
STEP 3)
Export using interval mode. Select from Distance, Fix., MP or time and
enter the interval. If de-activated, all data will be exported.
STEP 4)
Under Category, select the items to be exported. Normally the options
is DTM points.
STEP 5)
Under export options, activate the appropriate settings. It is possible
to select to another survey datum.
STEP 6)
When survey line was selected, page 2 shows the survey line
parameter export selection. Activate required items, enter the legth of
the field, the number of digits (precision) and the starting column.
Click on Next.
STEP 7)
If DTM points were selected, on page 3 shows the Parameter Export
Selection.
STEP 8)
Activate required items, enter the legth of the field, the number of
digits (precision) and the starting column. Click on Next.
STEP 9)
If transducer positions were selected, page 4 shows the TD position
parameter export selection. Activate required items, enter the legth of
the field, the number of digits (precision) and the starting column.
Click on Next.
STEP 10) If objects were selected, page 5 shows the Object parameter export
selection. Activate required items, enter the legth of the field, the
number of digits (precision) and the starting column. Click on Next.
STEP 11) If export to other datum was selected page 6 shows the databases
required for conversion. Click on browse and select the template used
during online survey. For the second database browse to the project
containing the alternative geodetic settings. Click on Finish.
Export to Pisys profiles:
STEP 1)
Select Pisys from the drop down menu. The window Export to Pisys
opens.
STEP 2)
Browse and type a filename.
STEP 3)
Enter an interval for exporting.
STEP 4)
Under Category select the items to be exported.
STEP 5)
If required, activate ‘use the local time zone’
STEP 6)
Under format select either ‘Transverse Profile Format 1’ or Transverse
format profile 3’.
QPS bv, Zeist, The Netherlands
105
5: Processing
STEP 7)
Pipe name and diameter are fixed values. Click on Finish.
Export to Preduct:
STEP 1)
Select Preduct from the drop down menu. The Export QTR file to
Preduct window starts.
STEP 2)
Under file options activate ‘export to single ascii file’ if required and
browse. Enter a filename.
STEP 3)
If required active interval mode.
STEP 4)
Under Category select the items required.
STEP 5)
Under Export options, select ‘Export validated data only’ if required.
Click Next.
STEP 6)
On page 2, select the template database used for surveying. Click
Finish.
Export to CODA corrected Navigation File:
STEP 1)
Select Coda corrected from the drop down menu. The Export to CODA
corrected Navigation window starts.
STEP 2)
Under file options activate ‘export to single ascii file’ if required and
browse. Enter a filename.
STEP 3)
If required active interval mode.
STEP 4)
Under ‘Echosounder on Fish’ select only one system. Click Next.
STEP 5)
On page 2, select the heading mode. Select ‘use fish E/S depth as
attitude’ if required. This will use the depth of the ROV as attitude.
Click on Finish.
Export to Sitras Pipeline inspection:
STEP 1)
Select Sitras (Pipeline inspection) from the drop down menu. The
Export to Sitras window starts.
STEP 2)
Under File options, select the filename format from the drop down
menu.
STEP 3)
Browse for the correct export folder if required.
STEP 4)
Enter the correct Sitras code (only available if Sitras name convention
is used)
STEP 5)
Under available systems, active the required systems. An ROV system
must be selected.
STEP 6)
Under geodetic options select the template database. This is used for
converting grid coordinates to geographical coordinates. Click on
Next.
STEP 7)
On page 2, type text in the fields which are not greyed out. Click on
finish.
5.4.2. Validator
In the Validator the data can be validated/edited using manual options as well as
some filters. The data is shown in several different views so that the user can take a
good look at the data.
STEP 1)
Select the files that need to be validated in the Processing Manager.
QPS bv, Zeist, The Netherlands
106
5: Processing
STEP 2)
From the tool bar select the
Tools-Validator.
1
button to start the validator or menu
5
2
6
7
3
4
Figure 118 Validator
The window is divided into a vertical numerical pane on the left and three graphical
horizontal panes on the right. See Figure 118 where these panes are labelled with
numbers. These correspond to:
1) Index of loaded QPD’s into the validator. Each qpd can have various systems
creating a dtm. In this example a combination of Multibeam data for two
heads, singlebeam data for two channels and pressure reading is listed.
2) Point info. When moving the cursor across the views (profile, plan or swath),
the point nearest to the cursor is grabbed. Details of this point are then listed.
3) General info: shows the depth count of the activated systems. Default all
loaded qpd files are counted for. These may not be visible as only the first line
is selected. If a qpd file is de-activated (this is different from de-activating a
line), the count is reduced.
4) Profile View: displays a side view of the DTM data. On the y-axis are heights (10 = 10m deep), on the horizontal axis are the MP (meter points along the
survey line).
5) Plan view: displays a top down view of the DTM data. User can select the
coordinate system (use right mouse submenu and select between Survey Line,
Alternative Line, World North Up or World Best Fit). Default Survey Line system
appears. On vertical axis are across offsets from the loaded survey line in the
Controller online and horizontal axis are MP values. (same as in profile view).
QPS bv, Zeist, The Netherlands
107
5: Processing
6) 3D view: shows the DTM in a rotational 3D view. Use left mouse button to click
and hold, Rotate the model whilst keeping the button pressed. Use right click to
hold. Move up to zoom in or move down to zoom out. Alternatively the scroll
roller can be used.
The bottom view can also display a swath view of the data. This is a slice
perpendicular to the survey line or user alternative line. It shows swaths displayed
perpendicular to the sailing direction of the vessel.
Figure 119: swath view
This data has a box of 1m deep. If the selection box is extended, more inline slope
effects will become visible.
To create a selection box:
STEP 1)
Click on
STEP 2)
Click and hold left mouse button in the Plan View. Draw a rectangle
from top left to bottom right for a small part of the data in the Plan
View.
STEP 3)
The data then becomes visible in the Swath View.
or menu Scroll – Pick Scroll Box.
Alternatively select a predefined box to view the data:
STEP 1)
Click on
STEP 2)
The scroll box properties window opens. Scroll reference line can be
selected. Under dimensions set the required values. Offline = 0 means
the centre of the window is on the survey line.
STEP 3)
Play time interval, set this in (part of) seconds. The scroll box will
move along the selected scroll reference line at this interval to show
data in the swath view. Default 0.001 is fast – adjust to required
inspection speed.
STEP 4)
Click OK to close the window. The scroll box is initialized at the
linestart.
or menu Scroll – Properties.
To scroll along the datamodel:
QPS bv, Zeist, The Netherlands
108
5: Processing
STEP 1)
Click on
or menu Scroll - Play and Scroll – Play Back. Click
once again to stop playing.
STEP 2)
The scroll box is shown in the Profile View, Plan View. These are
directly underneath each other when Survey Line is set as reference.
In the Swath View the data is shown from the scroll box.
STEP 3)
If 3D view is used, the scroll box remains stationary and the
datamodel is moved.
STEP 4)
Use
to move one frame at a time or to beginning or
end of the survey line.
Arrange the views
There are four available views. Only three can be shown simultaneously.
STEP 1)
Open menu View – Options. The Options window is started.
STEP 2)
Click on Group Layout. In the Layout box use the drop down menu to
select a view for three different panes.
STEP 3)
Click on Apply.
STEP 4)
Go to group Views.
STEP 5)
Click on 3D view. Set the vertical exaggeration to your requirements
to illustrate the height differences more profound.
STEP 6)
Click on Mask Outside Scroll Box to have only data inside the scroll
box visisble. The other data is displayed in shaded terms.
STEP 7)
Click on Swath View. If required enable the option to draw a pipe in
the swath view.
STEP 8)
Click on Profile View.
STEP 9)
Draw big dots: data points are drawn using more pixels.
STEP 10) Draw Lines: consecutive data points are connected by a line.
STEP 11) Draw highlights:
STEP 12) Show transducer data: displays transducer data in the view. (default
off)
STEP 13) Show footprint data: displays the DTM model in the view. (default on)
STEP 14) Show raw data: displays data before editing.
STEP 15) Click on group Program, enable ‘Maximize window on startup’ if
required.
STEP 16) Click OK to finish the view settings.
Using colors
Data can be shown in various colors. These settings assist in identifying data on
specific criteria.
STEP 1)
Click on
STEP 2)
Select Tab ‘Color Map’.
or menu View – Colors.
Data can be shown color coded to depth:
STEP 3)
Select color map. Under properties browse for the color scheme. If
‘Enable Project Settings’ is activated, the color scheme and depth
QPS bv, Zeist, The Netherlands
109
5: Processing
values are taken from the Global Settings in the Console. De-activate
this if required.
STEP 4)
Activate ‘enable automatic scaling’. The range will be adjusted to the
shallowest and deepest data points.
STEP 5)
Select overflow (above shallowest) and underflow (below deepest)
colors.
Data can be shown in one unique color:
STEP 6)
Select unique color.
STEP 7)
Click on Apply. Data is now shown in one solid color.
Data can be shown per QPD. This is useful when viewing multiple QPDs
simultaneously:
STEP 8)
Select ‘Unique color per QPD’.
STEP 9)
Click Apply. Each qpd has its own unique color. These colors are
loaded automatically.
Data can be shown per bathymetrical system. This allows quick identification between
for example two channels of a single beam echosounder.
STEP 10) Select ‘Unique color per system’.
STEP 11) Click on Apply.
The other color coding in general can be set under TAB ‘General Colors’
STEP 12) Select TAB ‘General Colors’
STEP 13) Under graph colors select an appropriate color for each field.
STEP 14) Click OK to finalize the color settings.
Scaling of the views
By default automatic rescaling is done. This means all data will be shown in the
complete pane. It is possible to adjust this to use a better horizontal/vertical ratio:
STEP 1)
Click on
STEP 2)
If on automatic, select fixed.
STEP 3)
Enter a value for horizontal scale. This is used in the Plan View and
Profile View for along survey line distance.
STEP 4)
Enter a value for depth. This is used in Profile View and Swath View.
For example -35 top and -55 bottom (depth of interest is inside this
range)
STEP 5)
Enter a value for offset across. This is used in Plan View and Swath
View. For example -100 left and 100 right.
or menu View – Scale. Scale Settings window opens.
In the above example, the depth range = 20 meters and offset across range = 200
meters. This means that in the Swath View data is exaggerated scale 10.
QPS bv, Zeist, The Netherlands
110
5: Processing
By zooming in or out the scaling factor remains. If a different focal point is selected,
the scaling remains. If the Scale Settings windows is activated and pressed OK, it
returns to these settings.
Moving around the views
Whilst processing the data, zooming and recenter options are available:
STEP 1)
Click on
STEP 2)
Click on
STEP 3)
Click on
to show all data in view. (scaling automatic)
STEP 4)
Click on
to return to the previous view.
to set mouse mode to draw a rectangle to zoom into.
to zoom in or zoom out.
For each view there are options available. Place the mouse in the view and use right
click to open a submenu. Using the View menu from menu bar gives access to the
following:
STEP 1)
Tree View – toggle mode, select matching items or single item. When
selecting a system for one qpd, this system is automatically selected
for all qpds.
STEP 2)
Tree View – show beams: shows the individual beams of a multibeam
in a qpd. Option to deselect separate beams.
STEP 3)
Swath View – Uniform Scale: ratio between horizontal and vertical
scale remains constant when activated.
STEP 4)
3D View – Scroll Box camera: when activated the scroll box is
stationary and seabed model moves. When deactivated the scroll box
moves and seabed is stationary.
Line selection
When multiple QPDs are loaded, default only the first line is shown. The plan view
reference is the first survey line.
STEP 1)
Click on
to go to the next line.
STEP 2)
Click on
to go to the previous line.
STEP 3)
Click on
to go the last line in the queue.
STEP 4)
Click on
to go to the first line in the queue.
STEP 5)
Click on
to select all lines at once.
Editing data
Now the data is visible in the format most comfortable, it can be edited or filtered.
STEP 1)
Click on
to activate the validation status. (or menu Settings –
Viewed Data=Validated).
STEP 2)
To remove data manually from the Profile View, first make sure that
footprint data is activated and transducer data is deactivated. (use
right mouse click submenu)
QPS bv, Zeist, The Netherlands
111
5: Processing
STEP 3)
Use
to draw a polygon around the data. Finish using right mouse
click. Data is set passive. (menu Edit – Clip – Inside Polygon).
STEP 4)
Use
to draw a rectangle around the data. Data is set passive.
(menu Edit – Clip – Inside Window)..
STEP 5)
to activate passive data again using a polygon. menu Edit –
Use
Clip – Enable Inside Polygon).
STEP 6)
Use
to activate passive data again using a rectangle. menu Edit –
Clip – Outside Window).
Tip: Enable option ‘View Raw data’ from the right mouse submenu to see the passive
dataset.
Filtering data
The next step is to modify existing data on remove existing data based on
mathematical criteria. (Note that when saying ‘remove’ data is only set passive. It is
not physically removed from the QPD).
Filter can be applied to four different groups in the QPD:
•
Object Data – Position and motion data of the object (vessel/ROV) in the QPD.
•
Transducer Data – position of the transducer. Important: all footprint data is
moved accordingly as it is connected to the transducer.
•
Footprint Data – Seabed model.
•
Selected Data – one of the three above but only on specific selection criteria by
mouse.
Creating a new filter:
STEP 1)
Click on
or menu Settings – Filter. The Filter window opens.
STEP 2)
Browse to a previously saved filter scheme of click on Add to create a
new filter.
STEP 3)
Use to drop down menu to select a filter. The possibilities are:
Filter Method
Mathetical routine
Adaptive Clip (Z)
follow mean depth value, clip outside a window
Butterworth Smooting (MP-X)
filter high noise in across line direction
Butterworth Smoothing (XY)
filter high noise in inline direction
Butterworth Smoothing (Z)
filter high noise in vertical direction
Clip Above (Z)
remove all data above a fixed value
Clip Below (Z)
remove all data below a fixed value
Clip on Flag (XYZ)
remove data flagged by online controller
echosounder settings
Clip Outside (Quality)
remove data with certain Quality figures in the MBE
data string
Line Decimator (XYZ)
Inline data point reduction per beam
Mean (XY)
smooth data in inline and across line direction
Mean (Z)
smooth data in vertical direction
Median (Z)
smooth data in vertical direction
Multiply (Z)
multiply data in vertical direction with a scale factor
Raw Value (XYZ)
restore original un-filtered data point
QPS bv, Zeist, The Netherlands
112
5: Processing
Shift (Z)
move data in a fixed vertical direction
Shift (Z) by file
move data in vertical direction based on date and
time
Spline Surface Despiker
area based spline approximation filter
Table 1: list of filter methods in validator
Set up a list of filters to apply to the dataset.
Save the filter for later usage. The filter definition file is saved under the \Support
folder of your current project. If the filter should be available across projects, go to
Console and under Settings – Folders activate a Support Folder and then activate
“Support Files (lsf,shp).
Now filters have been set, they can be ran on the data:
STEP 1)
Click on
STEP 2)
Select from the list: Objects (All or Active), Transducers (All or
Active), Footprints (All or Active) or Selected data.
STEP 3)
If selected data is chosen, the toolbar for selected data is activated.
STEP 4)
Click on
to select per system. Click on the Plan View or Profile View
to select one system (zoom in if required).
STEP 5)
Click on
swath.
to select per swath. Click on the Plan View to select one
STEP 6)
Click on
beam.
to select per beam. Click on the Plan View to select one
STEP 7)
Click on
to select inside window. Draw a rectangle in Profile/Plan
or Swath View.
STEP 8)
Click on
STEP 9)
Click on Execute to run the filter.
or menu Edit – Filter.
to deselect all previous selected data using this toolbar.
STEP 10) Click on Close to close the selection window.
STEP 11) If other options are chosen to filter and the selected filters are good,
click OK to run the filter.
STEP 12) The Filtering window is started showing the progress. Once at 100%
click Close.
STEP 13) Check in Validator under General Info the amount of points that have
been filtered.
Manipulating data
Other than removing data or filtering, user can draw an interpolation of data.
STEP 1)
Click on
STEP 2)
Select “Snap to Data”
STEP 3)
Move the cursor (shaped as a square) across the data. A small green
indicator is shown at the nearest data to the cursor.
STEP 4)
Click and hold, move the cursor the final data point. A thin green line
is updated showing the outcome of the Interpolation method.
QPS bv, Zeist, The Netherlands
or menu Edit – Interpolate.
113
5: Processing
STEP 5)
Release at the final data point. Data points inbetween are moved
along an straight interpolation line.
STEP 6)
Redo this but select “Freehand”
STEP 7)
Move the cursor to the starting data point. Click and hold.
STEP 8)
Move the cursor to the final position intended for the last data point.
An indicator is shown at the closest final data point.
STEP 9)
Release. All data points are moved along a straight interpolated line.
The final data point is moved from its position to the cursor position.
Data can also be shifted in horizontal or vertical direction:
STEP 1)
Click on
STEP 2)
Use the Select toolbar to select data.
STEP 3)
In the swath Tools window select a method from the drop down list.
STEP 4)
If applicable, select a reference system in the properties dialog.
STEP 5)
Click on execute to perform the data shift.
or menu Edit – Shift.
Detecting a pipe
Validator has an option to create a track for a best mean fit of a pipeline on the
seabed. In the Console Knowledge Base under group Processing is a description
‘Processing Pipeline Surveys”.
STEP 1)
Load a QTM into the Validator containing pipeline data.
STEP 2)
Filter the unwanted DTM points. (see Knowlegde Base)
STEP 3)
Click on
STEP 4)
Set the values in the screen according to the correct depth and across
distance or,
STEP 5)
Click on
and select from the drop down menu one of the
detection types. Draw a rectangle in the swath view. The properties
are automatically updated.
STEP 6)
A window for each type is drawn in the Swath View.
STEP 7)
Click on
STEP 8)
At the end, click on Exit in the pipe detection menu.
STEP 9)
A new system ‘detected pipe’ is added in the QPD.
or menu Pipe – Detect. Pipe detection window starts.
to play the scroll box along the dataset.
STEP 10) Smooth the data as required.
STEP 11) Click on
view.
to manually interpolate pipe data in planview or profile
STEP 12) See the Knowledge Base module to export this to a different format.
Do not set the values to undefined. This way the detection will not produce a detected
pipe.
Once the pipe is detected it can be used as reference line. The DTM data can
afterwards be shifted to this line.
QPS bv, Zeist, The Netherlands
114
5: Processing
STEP 1)
Export the detected pipe to a QINSy Mapping file. (see Knowledge
Base). Select the option route as type.
STEP 2)
Place this file in the \Linedata folder.
STEP 3)
Load the QPD into the Validator.
STEP 4)
Go to menu Settings – Alternative Line and select the new created
Line Database File.
STEP 5)
Go to menu Settings – Viewed Data = Validated.
STEP 6)
Go to menu Scroll – Properties.
STEP 7)
In the Scroll Box properties screen, under Scroll Reference Line, use
the drop down menu and select ‘Line name’: <exported line of
detected pipe>. Click OK.
STEP 8)
Go to menu Edit – Shift.
STEP 9)
Go to menu Edit – Select, use the rectangle option to select all data in
the Plan View.
STEP 10) In the Swath Tools screen, under Method select “Shift to Zero offset
(X,Y). Click Execute.
Figure 120: Setting alternative line in validator
Multibeam calibration
When starting a survey with a multibeam system, it is calibrated for mounting angle
offsets.
See the Console knowledge base chapter “Calibration of a dual head Multibeam
Echosounder”.
STEP 1)
Load the appropriate QPDs into the Validator.
STEP 2)
Activate the lines for roll and pitch. Deactivate the line for heading.
STEP 3)
Start roll calibration: draw a scroll box perpendicular to the sailing
track in a flat area.
STEP 4)
Set scroll properties Range to 1m. This allows greater detail in the
Views.
QPS bv, Zeist, The Netherlands
115
5: Processing
STEP 5)
Click on
or menu Calibrate – Transducer Alignment. The
transducer alignment window appears.
STEP 6)
Select the correct transducer and select Roll (if not selected).
STEP 7)
Press Auto. Automatic Calibration window appears.
STEP 8)
Select Step Course. Click on Start.
STEP 9)
Repeat this with the Steps until ‘Very Fine’. Click Apply.
STEP 10) Play the dataset which is now corrected for roll mounting error.
STEP 11) Draw the scroll box along line on a slope or over an object.
STEP 12) In the calibrate transducer alignment, select ‘Pitch”
STEP 13) Repeat steps 7-10 for Pitch.
STEP 14) Activate the adjacent line for heading calibration, de-activate the line
sailed in same direction.
STEP 15) Draw a scroll box in sailing directionon a slope (or object) where the
two adjacent lines have both their outer beams covered.
STEP 16) In calibrate transducer alignment, select “Heading”.
STEP 17) Repeat as in steps 7-10.
STEP 18) Click on Apply. Click on report to generate a calibration report.
The values found need to be entered in DbSetup, in the MBE system. See Figure 84
Mounting angles multibeam on page 69.
Merging data
Merging system data fills gaps resulting from the primary system and filled by the
secondary system.
STEP 1)
Open menu Edit – Merge System Data.
STEP 2)
Under Settings, select primary system and secondary system.
STEP 3)
Enter the timespan limit. If primary system fails across this timespan,
secondary data is used.
STEP 4)
Click OK to execute.
Merging of hydrographical and land survey data.
STEP 1)
Import the land survey data into the Processing Manager using . Use
the same line from a Line Database File as reference as the QPD.
STEP 2)
Load the QPDs into the validator.
STEP 3)
De-select the footprints that are not to be merged.
STEP 4)
Go to menu Edit – Merge. The Merge Control screen appears.
STEP 5)
In the Overlap method, use drop down menu to select. Options are:
All data, Oldest (date), Newest (date) and Weighted Mean.
STEP 6)
Under Browse, select a filename or create a new one.
STEP 7)
Click Merge.
QPS bv, Zeist, The Netherlands
116
5: Processing
5.4.3. Tide Data Manager
When data is surveyed in non RTK mode, tidal correction is required to level the data
to the correct sounding datum. User has a choice of Tide interpolation methods.
Tidal data is built of two parts in QINSy software. First is the definition file. This
contains tidal method, station location and identification and survey lines to be used.
Next is the tidal data. This is a tidal value with corresponding data and time.
This means that first a tidal definition file needs to be created and at any later stage
tidal data can be added to this definition file.
STEP 1)
In the Processing Manager, click on
or menu Tools – Tide Data
Manager. The tide data manager screen appears. The output file will
be located at <project File>\Tide\TideDefinition folder. (or a Support
folder as set in Console)
STEP 2)
Click on
or menu File – New Tide Definition File. The Tide
Definition Setup Wizard starts.
STEP 3)
First enter a file name in the field “Tide definition file” Use normal
keyboard characters and numbers conform to Windows filenaming
conventions.
STEP 4)
Under “Tide Interpolation method” use drop down menu to select a
interpolation method for the vessel with reference to the tidal
station(s). Options are:
Interpolation method
Description
Single
One tidal station – 100% value used regardless of position
Linear
Multiple stations with distance weighted interpolation of all
stations in list.
Linear Co Tidal
Data is shifted based on HW level of two stations
RWS (RWSLOD)
Interpolation of four tidal stations. Developed for Dutch Public
Works.
Virtual
One tidal station, tidal data is based on vessel position
Table 2: list of interpolation methods
STEP 1)
If Linear (Co-Tidal) is selected, at “Number of tide stations, set the
required number of stations to be used.
STEP 2)
Under Tide Stations, enter the station name, station ID and data type.
Select from Manual data, Tide Data file, Simplified ATT.
STEP 3)
Repeat this if multiple stations exist.
STEP 4)
Click on Next.
STEP 5)
On page 2, enter the coordinates of the tidal stations in Lat/Lon
(WGS84) or Easting/Northing on survey datum. The E/N coordinates
are automatically used in Tide Data files.
STEP 6)
Enter time offset from Greenwich. Use the timezone as it is without
DST. Check PC regional time settings.
STEP 7)
Click Next.
STEP 8)
Page 3, the survey lines are selected. The linename must correspond
to the linename defined in the QPD file!
STEP 9)
Add survey lines from a database or manually add survey lines.
QPS bv, Zeist, The Netherlands
117
5: Processing
STEP 10) Click “Select”, browse for the line database file. Under linetype, select
Single Line or Route. Click the boxes of the intended lines. (use shift
or ctrl to select multiple lines at once). Click OK.
STEP 11) Click Next.
STEP 12) Page 4 gives a summary. Check all entered values and click Finish if
ok.
In the tree View of the Tide Data Manager the settings are visible:
Figure 121: Tide definition layout
Now the tidal data can be added to the definition file:
STEP 1)
Click on or menu File – New Tide Data file. The “create tide data file”
window opens.
STEP 2)
Under data type, select Manual Data or Tide Data File.
A manual tidal file:
STEP 1)
If manual data is selected, enter the period and interval. Click OK.
STEP 2)
The “new tide data file” screen opens. Under “tide data file” enter a
filename. (use location combined with a date in the filename.
STEP 3)
Enter the station id as defined in the tide definition file. The name is
automatically updated.
STEP 4)
Enter the coordinates at Easting and Northing.
STEP 5)
The fields “Vertical datum”, “method” and “maintenance” are
descriptive. Enter as appropriate.
STEP 6)
Under Tide data, enter the values at the correct date and times.
STEP 7)
At the bottom, actions can be done on the fields. Add opens a window
to add values at the bottom of the existing list. Insert adds a value
above the value currently selected at half the interval. Delete removes
selected values without recalculating the time frame. Shift opens a
window to shift data in days/hours/minutes. (optional backwards in
time). Edit UTC time opens the Time table for editing. Only one field
at a time can be changed.
STEP 8)
Click OK if all data is correct.
Tide data file:
STEP 1)
Import Tide Station Data window appears. Select the correct data
format:
data format
QPS bv, Zeist, The Netherlands
description
118
5: Processing
YMD HM[S.s] xxx – Any format
20060207 13:20 1.25
DMY HM[S.s] xxx – Any format
07022006 13:20 1.25
MFPS – Format (MET)
Format for Dutch Public Works; 3 files needed.
(.adm .dat .kwa)
RIKZ Fixed format
Format for Dutch Public Works
Preduct – Fixed format
Specific format for Dutch Navy
DMYHM xxx MSQ Dialmace format
070220061320 1.250
Queensland MSQ HeightData format
specific format containing four record types
Argoss – Fixed format
Date+time xcel format, x.xx m
Table 3: import tide data format
STEP 2)
Click on Add, select the file to be imported.
STEP 3)
Highlight the filename. Its contents is displayed in the preview pane.
STEP 4)
Under time offset, enter the time difference from UTC to local time.
STEP 5)
Under tide factor enter a scale factor if the height is not in survey
units.
STEP 6)
Under Tide offset, enter a fixed C-O value if applicable.
STEP 7)
Click on Import. The data is imported and in the right pane of the Tide
Data manager is the file available.
STEP 8)
Highlight the file. In the bottom pane is the tidal curve displayed.
STEP 9)
Double click the filename, the “edit tide data” screen opens.
STEP 10) Enter the station ID. The station name and coordinates (E/N) are
automatically updated.
STEP 11) To import a second tide data file, go to menu File – Import Tide Data.
STEP 12) Repeat steps 1 to 9.
Now two tide files are imported. Before applying the tidal correction, the tidal data
itself can be edited.
STEP 1)
Move the cursor to the graphical pane.
STEP 2)
Use right click to open submenu. Select “Edit Tide data status”.
STEP 3)
Use the inside window to de-activate a tidal reading.
STEP 4)
Use the outside window to activate a tidal reading.
STEP 5)
Alternatively, double click the filename or menu Edit – Tide Data File.
STEP 6)
In the field status, click right to open submenu. Select OK, Invalid or
Predicted from the list.
STEP 7)
Click OK once edits are finished. Answer Yes to overwrite. Close the
Tide Data manager.
Tidal data has been setup. Now it is applied to the seabed data model.
STEP 1)
In the processing manager, select the QPDs tide will be applied to.
STEP 2)
Click on
or menu Tools – Tide Data Processor. The Tide Processor
screen is opened.
STEP 3)
Click on Start.
STEP 4)
The following information should appear: “Initializing”, “Processing
QPD file ‘filename’”, list of system names, “Finished processing”,
“Succesfully applied tide to <number> data file(s). If this does not
appear, something in the definition setup or tidal values,times,dates
is incorrect. Repair and try again.
QPS bv, Zeist, The Netherlands
119
5: Processing
STEP 5)
Click on Close.
In the processing manager, in the index list under column Tide, today’s date appears.
STEP 1)
Load the QPD into the validator.
STEP 2)
In the Profile View, click right and activate “Show raw data”.
The raw data is displayed and the height difference should be the tidal correction.
Move the cursor across the DTM and view the tidal value in the Point Info index. (note
that “Applied Tide” may say No, it is however applied. Activate Object data to see
this.)
STEP 3)
To compare raw value versus tidal filtered values, right click in Profile
View. Select “Apply Tide to Raw data” to overlay the filtered with the
raw.
STEP 4)
Tidal correction can be removed. Use Settings – Viewed = Validated.
Go to Edit – Reset Tide, select All Data.
STEP 5)
Close the Validator.
When using linear method for multiple stations along a river, only use the two
nearest stations required. This method assumes an open water situation with tidal
influence from all stations simultaneously.
5.4.4. Sounding Grid Utility
The Sounding Grid Utility can be used in an online and processing environment. The
online usage will show coverage of the seabed obtained during the survey campaign.
In a processing environment is it a tool for quality check of large data and visual
inspections. Additional tools are built into the sounding grid for calculations and
import/export features.
To create an new empty sounding grid:
STEP 1)
Click on
. (If this icon is not visible in the bottom pane, use right
click and select from Add/Remove QPS programs), The Sounding Grid
Utility (SGU) is started.
You should see the following messages:
“Creating and registering managers…”
“Loading the registry settings…”
“Initializing the geodetic parameters…”
“Preparing managers…”
STEP 2)
A screen appears with text: “do you want to load the last used
sounding grid [gridname]. Click Yes to open an earlier created SG or
No to create a new one. (First time SGU is ever started on your
system this will not appear)
STEP 3)
If answered NO, a blank SG will appear with “Untitled – Sounding Grid
Utility” in the window.
STEP 4)
Click on
or menu File – New Sounding Grid. The “create new
sounding grid” window appears.
QPS bv, Zeist, The Netherlands
120
5: Processing
STEP 5)
In the right pane, at File – NEWGRID.grd, click on
window opens.
, the “Save As”
STEP 6)
Enter a filename for the new grid and click on “Save”.
STEP 7)
Back in the “create new sounding grid” window, at Unit Type, select
Survey Units for a metrical grid or select “Geographical Seconds” for a
geometrical grid.
STEP 8)
At Base Cell size, enter a value in Survey units or geographical
seconds. (default 1.00)
STEP 9)
At origin, select “generate automatically” (first entry in data is used)
or “specify”.
STEP 10) If specific origin is activated, type the coordinates. (left bottom
corner)
Now the base parameters for the grid are defined. Data from a system in DbSetup can
be stored on separate layers. In the Online Controller are listed the Sytems generating
data for the grid. Default are these SBE data, MBE data, MBE backscatter,
magnetometer data and other data types.
For recognition, layers in the SG can have the same naming convention as used in the
Controller. Layer names will then reflect the data contained in the layer.
STEP 1)
Click on ‘Add Layer’. In the left pane under Surveydata and reference
is an icon created with ‘New layer’.
STEP 2)
Click on this icon. In the right pane the properties of this layer are
opened.
STEP 3)
Click once in the field ‘New layer’ and type a name for the layer. (ie
EM3000 port bathy).
STEP 4)
The field below, select from the drop down list the type of data for
this layer. Note that this is only administrative, it has no effect on the
storage of the actual data. Choices are: bathymetric data, side scan
data, magnetometer data and other data types.
STEP 5)
In the field below select the properties of this layer. Options are:
value (last added value per cell), mean and count, mean and count
and SD (standard deviation of the cell), value/hit count/SD/minimum
and maximum value,
STEP 6)
value/hit count/SD/minimum and maximum value/date/quality flag,
or user defined and select the fields required. Advise to use All
properties. Note that grid size will increase with added properties to a
grid.
STEP 7)
Repeat this for each system in DbSetup used for data acquisition.
Figure 122 shows an example a creating a new grid with multiple layers for multiple
systems.
QPS bv, Zeist, The Netherlands
121
5: Processing
Figure 122: create new sounding grid
Online sounding grid
For online data acquisition, the sounding grid is activated in the Controller and shown
in the Navigation Display.
STEP 1)
In the Controller click on
STEP 2)
Click on the Group Storage and then on
STEP 3)
Under Filename – Format use the drop down menu and select type
*.grd – Sounding Grid.
STEP 4)
Under Filename, use and browse for the grid just created (or an older
one if required). Note that the Sounding Grid Utility cannot have
access to the same file at the same time. Close the SGU or select a
different file in the SGU.
STEP 5)
Under Systems – Layers, use the drop down menu. The list is taken
from the layers in the grid just created. Repeat this for each system.
STEP 6)
Click OK to close the session setup.
or menu Settings – Session Setup.
.
In Controller you see ‘Sounding grid file: MySoundingGrid.grd’.
Activating the grid in the navigation display:
STEP 1)
In Controller click on
STEP 2)
Open an existing Navigation display or create a new one.
STEP 3)
In the Navigation Display click on
Overview.
STEP 4)
Enable the layer ‘Sounding Grid’ if not already enabled.
STEP 5)
Click on
STEP 6)
Under Tab Colors, select the active layer to be shown. Select the
attribute to be shown.
QPS bv, Zeist, The Netherlands
or menu Options – Displays.
or menu Layers – Layer
. The Sounding Grid view properties tabs appear.
122
5: Processing
STEP 7)
Under combination layer, select a reference layer. (this can be used to
compare online acquisition data with previous surveys loaded into the
grid).
STEP 8)
Select a reference attribute.
STEP 9)
Select a mode. (note that under active layer, the layer REFERENCE
needs to be selected).
STEP 10) Under Color Map settings use project Settings as defined in Console –
Global settings or de-activate this option.
STEP 11) If de-activated, under color map, browse for the folder containing the
color maps. (default location: C:\Program Files\QPS\QINSy 7.0\Color
Maps).
STEP 12) At field minimum and maximum enter required values. Repeat this
step for each layer found under ‘Active Layer – Attribute’.
STEP 13) Select an appropriate overflow color (value > maximum) and
underflow color (value < minimum).
STEP 14) Click on TAB ‘Render Options’ This will set shading and rendering
types.
STEP 15) Under render type, select from the pull down menu. Options are:
Gradient Colors, Sun illuminated and Gradient&Sun. note that when
using gradients the shaded layer must be identical to the layer in the
color TAB.
STEP 16) Under shade layer select the same layer as active layer in color Tab.
STEP 17) Under Azimuth and elevation, type values applicable. Try with an
azimuth alongline and acrossline and see the difference. Same for
elevations.
STEP 18) Under adjustment, level of exaggeration, contrast and transperency
can be set.
STEP 19) At ‘Improve Coverage’ select ‘Disable’ or one of the higher levels. This
means the grid will show data from a higher level in the grid. (if your
base cell size is 1m and select 3 levels then the grid is shown as
8x8m data).
STEP 20) Activate ‘Draw overflow/underflow’ to show data out of range in the
TAB Colors.
When recording data starts and MBE or SBE data is received by the Controller, the
Navigation Display is automatically updated with the latest bathymetrical data
received.
Offline Sounding Grid
The online sounding grid is used for online data collection. It is unlikely this will be the
final product. For processing and viewing offline a new empty sounding grid is needed
or layers must be added to the online used grid.
When a new empty grid is created, the validated data needs to be imported into the
grid. QPDs can be exported directly from Processing manager to the grid or ascii point
files can be imported. When QINSy processing is done using validator, quickest way is
to export these files directly.
•
Create a new grid with the required layers and corresponding attributes.
•
Close this grid.
•
Start Processing from Console.
QPS bv, Zeist, The Netherlands
123
5: Processing
•
Select the QPD files that need exporting.
•
Open menu File – Export - Sounding Grid or click on
Points to Sounding Grid File’ opens.
•
Under ‘Sounding Grid File’, Select the correct sounding grid.
•
Select the export system (=layer) for each system.
•
Click on ‘Export’.
•
A dialog appears showing the progress of the export. Click on close once
finished.
•
Click on close in the ‘Export QPD Data Points to Sounding Grid File’ window.
•
The grid file can now be opened in the SGU.
. The ‘Export QPD Data
Start the Sounding grid utility and open the grid.
First the required layer and depth range is selected.
STEP 1)
Click on the drop down menu of
the appropriate layer.
STEP 2)
Click on
STEP 3)
Click on Tab ‘Colors’ if this is not visible.
STEP 4)
Under attribute, select the type. Options are limited to the properties
of the grid. In a full grid, choose between mean, maximum,
minimum, count, standard deviation, date, quality.
STEP 5)
At combination layer, select a reference layer if you want to see the
difference between a previous survey and the current survey.
STEP 6)
Under reference attribute, select the type (same as above).
STEP 7)
Under mode, select between ‘Active-Reference’, ‘Reference – Active’
or Active plus Reference’.
STEP 8)
Under color map settings, enable project settings if you want to use
the same fixed settings for the datatypes as set in the Console
(Settings – Global – Colors). Set to disabled to set your own levels or
auto scaling option.
STEP 9)
At maximum or minimum set the levels. Note that depth is seen as a
negative value. Click on auto to have the grid calculate these values.
and select
or menu Layers – Sounding Grid.
STEP 10) Use
to select a color for overflow (level above maximum) and
underflow (level below maximum). Select a color from the Color
window that appears.
STEP 11) Click on Tab ‘Render Options.’
STEP 12) Under Render type, select from the drop down menu. ‘Gradient colors’
= simple 2D color shading. ‘Sun illuminated’ = shading perspective in
black and white. ‘Gradient and sun’ = combination of colors and
shading giving a 3D effect. Set shade layer to ‘same as active layer’
STEP 13) Under azimuth and evaluation, set values for the angle and height of
sun shading effect. Note that when azimuth is perpendicular to line
heading or parallel to line heading the terrain model is accentuated in
different ways.
STEP 14) Under adjustment, select values for shade exaggerations, shade
contrast, transparency.
STEP 15) Improve coverage will show grids of a higher level This will give better
coverage when zooming out.
STEP 16) Draw cell borders – option to show the cell borders. Color is default
light grey.
QPS bv, Zeist, The Netherlands
124
5: Processing
STEP 17) Draw overflow: cells with values exceeding minimum levels are drawn
in color.
STEP 18) Click OK when all settings are done.
Importing data into the current sounding grid:
STEP 1)
First create a layer on which the data should be imported. Click on
or menu File – Edit Sounding Grid Layers.
STEP 2)
Enter a name for the layer and set its properties correct.
STEP 3)
Click on
STEP 4)
Under file type select the format of the file to be imported. User can
create his own ascii format. If this option is selected, a new field
‘Layout’ appears.
STEP 5)
Click on the browse button. The ‘Import User Defined ASCII Layout’
starts.
STEP 6)
Click on New. Under Settings type a name for the format.
STEP 7)
Under Delimited, use the drop down arrow to select a separation
character.
STEP 8)
Under Start Row, select 1
STEP 9)
Under End Row, select the last row used. (in the example below = 4).
or menu File – Import. The import window starts.
STEP 10) Click on Add to add a field.
STEP 11) Use the drop down menu to select a category
STEP 12) Set the scalefactor as required.
STEP 13) Repeat this for all fields required.
STEP 14) Click OK.
STEP 15) Back in the import dialog, select import mode. Choose between
‘merge with existing data’ or ‘overwrite existing data’.
STEP 16) Under import settings, select the layer, scale factor, datatype, date
and time.
STEP 17) Under ‘import files and layers’, click on the grey icon to browse for the
required files. Default search location is <MyCurrentProject\DtmData.
STEP 18) Click on Import.
STEP 19) Click on Close once the dialog is finished.
Click on
to display the view properties of the layer. Use auto to set the color scale
to the full range of the data.
Advanced Tools in the Sounding Grid:
These can be found under Tools menu and are:
Volume computations. This will calculate volume between the active layer and a
combination layer. A previous survey or theoretical DTM model should be imported in
the combination layer. A upper and lower tolerance level can be set.
Quick Profile. This will draw a depth profile along a mouse drawn line. Activate this
option, draw a line across the survey area. A dialog with profiles appears with all
layers visible under the drawn line. If a linedatabase is overlaid and user click on a line
of the linedatabase, the data under this line is calculated.
QPS bv, Zeist, The Netherlands
125
5: Processing
Statistics. This will generate a graph with statistical information of the active layer. A
S-curve is drawn through the dataset The mouse position updates with statistical
information as user moves across the screen.
Generate bathymetrhy. A dialog for creating spotsoundings (depthnumbers in a
chart) and contourlines. Select which layer should be used. At detail level, select the
level. For example when base cell size = 1.00m select level 3 to use 8x8m cells to
generate the spotsoundings. Set the required link angles and distance. On the second
page, select the format. This can be display, DXF and PRO. If Qernel is installed this
will work for DXF and PRO otherwise display only!
If the SevenCs kernel is activated in the Console folder settings, these spotsoundings
and depthcontours can also be exported to ENC format.
QPS bv, Zeist, The Netherlands
126
Appendices
Appendix A QINSy structure
QINSy Survey is a modular build program, which means that it is not one program,
but a suite of applications linked together. To orient the reader, the QINSy system
incorporates the following tools that cover the entire range of hydrographic activity,
from survey preparation and design all the way through to production of deliverables.
A schematic provided on the following page illustrates the relationships.
QINSy Console
QINSy programs.
a “wrapper” program that enfolds and launches all the other
Project Manager
folders.
used to automatically organize project folders and all their sub-
Setup
used to define survey configuration parameters including geodetic, survey
vessel, and device parameters in a template database.
Line Database Manager
used to generate and/or import survey lines.
Sounding Grid Utility
used to define the soundings coverage plot displayed online
to show progress of the survey as well as important quality control attributes of the
soundings.
I/O Tester Utility
used to test interfacing and to display data strings.
DXF to QXF Utility
used to convert DXF to a fast binary format for real-time display.
Online
used for data acquisition including storage of raw data to QINSy *.db
files, storage of soundings results data to user selectable format, and to display and
quality control the data.
Raw Data Manager used to launch additional programs like Analyze (for filtering and
editing raw data), Replay (for replaying raw and/or filtered *.db files to generate new
results), and Export (raw data in different formats).
Processing Manager used to post process soundings results data generated from the
Online and/or Replay programs.
Validator
launched from within the Processing Manager and used to edit and
validate soundings ready for export.
Tide Processing
used to apply tide to soundings if not done online in real-time.
QINSy Mapping
used to generate contours, volumes, DTMs and charts from final
soundings data imported from the Processing Manager.
QPS bv, Zeist, The Netherlands
127
Appendices
Figure 123 QINSy DATA FLOW
QPS bv, Zeist, The Netherlands
128
Appendices
Appendix B Project structure
Figure 124 Project structure of QINSy
The contents of the most used subfolders:
Database: “empty” databases with the project settings and configuration as well as
the databases with logged data (*.db). When a database has been analysed, a copy of
the database is made and stored as (*.filt.db).
DtmData: Points files (*.pts) or ASCII data files containing XYZ information.
DxfToQxf: Chart data in the DXF format (e.g. AutoCAD) or the QXF format
Export: Data that is exported from a processing session to another format like ASCII.
(*.*)
Graphics: Folder to store screen captures. (*.*)
GridData: The Sounding Grid files created with the ‘Sounding Grid Utility’.
Import: Import data can be stored here. (*.*)
LineData: The line databases created with the ‘Line Database Manager’. (*.pro)
Logfiles: Logfiles created while running the Alert Display or when using the Man Over
Board option. (*.txt)
Mapping: The project files of QINSy Mapping (Terramodel) (*.pro)
Results: The results of positioning calculation (position and node parameters) (*.res)
Support: All general files, for example the shape file. (*.*)
Temp: All temporary files. (*.*).
Tide: Tidal data files created by the Processing Manager
QPS bv, Zeist, The Netherlands
129
Appendices
Appendix C Sign convention
Figure 125 Offsets in the ship Geometry
This mark signifies the Centre Of Gravity or the Central Reference Point of
the vessel. This point has the coordinates X=0, Y=0 and Z=0 in the ship
geometry.
QPS bv, Zeist, The Netherlands
130
Appendices
Figure 126 Attitude conventions
The following abbreviations are used in the picture:
H
Heading. The heading rotation is used to define the Multibeam and gyro offsets
R
Roll. Drawn is the Positive Heeling to Starboard convention.
P
Pitch. Drawn is the Positive Bow Up convention
Hve
Heave. Drawn is the Positive Heave Up convention
QPS bv, Zeist, The Netherlands
131
Appendices
Appendix D Height settings
When it comes to calculating the height of the transducer above the local vertical
datum, two situations can be distinguished:
3D Positioning: A system with a reliable height output is used (e.g. RTK DGPS or Total
station) and the height must be corrected to the local vertical datum (RTK).
2D Position plus Tide: A positioning system with an unreliable height output is used
(e.g. DPGS) and the height is found using the height aiding of QINSy Survey.
In the graphics, the border of the boxes are used to identify the location of the
setting:
Computation Set-up, Height settings
Computation Set-up, Positioning system
Template set-up, Geodetic parameters
Template set-up, Positioning system
Template set-up, Variable node
3D Positioning / Accurate Height
If a system is used which outputs an accurate height (e.g. RTK DGPS), then the
following height setting should be made in QINSy Survey.
Figure 127 Accurate height settings
Template set-up
Define the (vertical) datum parameters using the geodetic set-up wizard
Define the positioning system in the template setup
Define the location(s) of the systems
Online settings
Define a new computation with the height set to accurate
QPS bv, Zeist, The Netherlands
132
Appendices
2D Positioning + Tide (Unreliable height)
If a system is used that outputs an unreliable height e.g. a DGPS a number of
parameters need to be set to calculate the height of the transducer above the vertical
datum.
Figure 128: Unreliable height settings
Template set-up
Define the (vertical) datum parameters using the geodetic set-up wizard
Define the height of the COG above the draft reference
Define a (number of) tide gauge’s in the template setup
Define the location(s) of the systems in the template setup
Online settings
Set the height parameters in the computation setup
Heave parameters
Tide parameters (tide gauge /tide file)
Input the draft of the vessel relative to the draft reference
If the squat parameters were defined, set the squat method, depth reference and the
vessel speed reference
Appendix E Notes
QPS bv, Zeist, The Netherlands
133
QPS bv, Zeist, The Netherlands
134
Appendices
QPS bv, Zeist, The Netherlands
135
QPS bv, Zeist, The Netherlands
136
Appendices
QPS bv, Zeist, The Netherlands
137
INDEX
Appendix F Index
C
E
Centre Of Gravity
Object Definition ...............................24
Console ................................................ 8
Add/Remove QPS programs................. 9
Autostarting .....................................48
DXF 2 QXF ........................................ 9
I/O Tester ......................................... 9
Line Database Manager....................... 9
Online .............................................. 8
Processing......................................... 8
Replay .............................................. 8
Setup ............................................... 8
Sounding Grid Utility .......................... 9
Controller
Starting ...........................................49
Convergence........................................23
Crosslines
Generating .......................................44
Echosounder
Applying sound velocity ....................
Calibration aids................................
De-spiking data online ......................
Draft ..............................................
heave sensor ...................................
Online filters....................................
Water Depth Reference .....................
D
Data
Analyzing raw data............................94
Batch replay .....................................99
De-spiking raw data ..........................97
Filtering raw data..............................96
Processing......................................100
Replaying.........................................99
Validating ......................................104
Database
Selecting storage ..............................76
Datum / Spheroid.................................18
Datum shift .........................................20
Display
Alpha numeric ..................................55
Creating...........................................52
Echosounder.....................................59
Helmsman........................................83
Navigation .......................................86
Positioning system ............................54
Raw Multibeam .................................59
Scatterplot .......................................54
Swath System Display .......................60
Timeplot ..........................................58
Draft
Object Definition ...............................24
Draft
Height calculation .............................69
DTM
Creating aDTM..................................22
DXF
Convert to QXF .................................46
82
59
81
32
32
80
32
F
Fix
Settings .......................................... 79
G
Geodetic Parameters
Test geodetical parameters................ 22
GPS Receiver
System Setup .................................. 30
GPS Receiver
Receiver number .............................. 31
GPS Receiver
Horizontal Datum ............................. 31
GPS Receiver
Vertical Datum................................. 31
Graphical User Interface ......................... 6
Gyro
Calibration aids................................ 55
C-O ................................................ 57
Fixed C-O........................................ 35
Selecting in computation ................... 52
System Setup .................................. 35
H
Heave
Height calculation.............................
Height
offset..............................................
Height
Unreliable .......................................
Height
Setting height mode .........................
Hohe
Nicht Zuverlässig .............................
69
22
19
51
19
I
I/O Tester........................................... 37
K
KP
Interpolating / Extrapolating.............. 45
L
Latency
QPS bv, Zeist, The Netherlands
138
INDEX
Offline correction ..............................97
System Setup ...................................29
Line
Planning during survey ......................72
Line Database
Creating...........................................39
Creating new objects .........................43
Importing as .PRO file........................42
Importing as ASCII............................40
M
Motion Sensor
Angular measurement .......................36
Calibration aids.................................55
Centre Of Gravity ..............................36
C-O's ...............................................57
Rotation convention ..........................36
Selecting in computation....................52
System Setup ...................................36
Multibeam
Blocking limits ..................................61
Calibration aids.................................59
Mounting angles ...............................66
number of beams ..............................34
Patch test.........................................61
Sound Velocity..................................34
System setup ...................................34
O
Object
Change layer ....................................45
Changing color..................................45
Deleting Line Data Object...................45
Editing Line Data ..............................45
How to define a new object ................23
Selecting computation .......................50
Observation
Viewing raw data ..............................95
Output datum ......................................21
P
Position
Filterinig ..........................................51
Setting approximate ..........................50
Positioning
Checking aids ...................................53
PPS pulse
System Setup ...................................29
Project
Creating...........................................13
Folders ............................................11
Projection ............................................22
Q
QXF
Creating from DXF.............................46
QPS bv, Zeist, The Netherlands
R
Recording
Automatic start/stop.........................
Online.............................................
Reference point
Object Defintion ...............................
Reference point
System Setup ..................................
Relational database .............................
Route
Add section .....................................
Delete section..................................
Generating crossline .........................
KP numbering ..................................
78
82
24
30
12
45
45
45
45
S
Settings
Changing database...........................
Cloning ...........................................
Setup
Computation....................................
Shape
Object Definition ..............................
Sound velocity
Calibrated .......................................
Used...............................................
Using a profile .................................
Sounding grid
Filling online....................................
Squat
Height calculation.............................
Survey datum .....................................
Survey unit.........................................
System
Defining a new system......................
System location
System Setup ..................................
System selection .................................
98
98
49
26
32
32
71
77
69
21
19
27
29
28
T
Template
Creating..........................................
Extracting .......................................
Setup .............................................
Tide
Gauge Setup ...................................
Height calculation.............................
Inputting manual tide data ................
Manual Gauge..................................
Tide file in replay .............................
14
15
16
37
69
70
37
70
U
Update rate
System Setup .................................. 29
UTM................................................... 22
139
INDEX
V
W
Variable node
System Setup ...................................29
Vertical datum .....................................22
Vertical Datum .....................................22
WGS84
Converting DXF to ............................ 46
Geodetic Parameters......................... 19
Winglines
Generating ...................................... 43
QPS bv, Zeist, The Netherlands
140