1
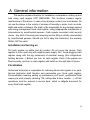
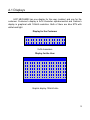
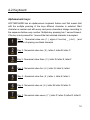
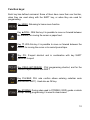
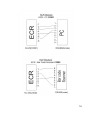
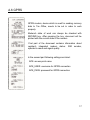
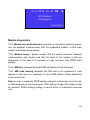
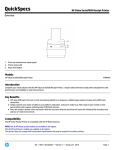
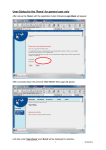
User Manual
HCP Mechare
1
Content
Content...............................................................................................................2
Copyright notice..................................................................................................5
A General information........................................................................................6
Installation and turning on............................................................................6
Fiscalization.................................................................................................6
Maintenance................................................................................................7
Cash register general features.....................................................................7
A.1 – Displays .................................................................................................9
A.2 – Keyboard .............................................................................................10
Alphanumeric keys: ...................................................................................10
Function keys: ...........................................................................................12
A.3 – Printer ..................................................................................................14
A.4 – Power supply .......................................................................................15
A.5 – Connections.........................................................................................15
A.6 – GPRS ..................................................................................................17
Modem diagnostics....................................................................................19
A.7 – Working with cash register ...................................................................20
Text editing................................................................................................20
Deleting edited text ....................................................................................20
Character editing .......................................................................................21
Changing letters (small/capital)..................................................................21
2
Print with bold letters .................................................................................21
Centering text ............................................................................................21
B Sale menu ....................................................................................................22
B.1 – Sale by PLU code/barcode...............................................................22
B.2 – Error correction during sale procedure .............................................22
B.3 – Payments .........................................................................................23
B.4 – Refund mode....................................................................................24
C Reports (Fiscal)...........................................................................................25
Menu 2.1 – Z-report...................................................................................25
Menu 2.2 – X-report...................................................................................25
Menu 2.3 – Fiscal reading report ...............................................................25
Menu 2.4 – Nontaxable PLU report............................................................26
Menu 2.5 – Discount/Surcharge ................................................................26
Menu 2.6 – Cash IN/OUT ..........................................................................26
Menu 2.7 – Date & Time Settings ..............................................................27
D Device settings............................................................................................28
D.1 – Header and Advertisement settings .....................................................28
Menu 3.1.1 Header setting ........................................................................28
Menu 3.1.2 Advertisement setting .............................................................28
D.2 – VAT setting ..........................................................................................29
D.3 – General device settings .......................................................................29
Menu 3.3.1 Language selection.................................................................29
3
Menu 3.3.2 Set COM1 ...............................................................................29
Menu 3.3.3 GPRS Modem.........................................................................30
Menu 3.3.4 Keyboard settings ...................................................................30
Menu 3.3.5 Printer settings ........................................................................30
Menu 3.3.6 Display settings.......................................................................30
D.4 – PLU settings ........................................................................................31
Barcode input ............................................................................................31
PLU description input.................................................................................32
PLU price input ..........................................................................................32
PLU VAT input...........................................................................................32
PLU measurement unit input .....................................................................32
PLU department ........................................................................................32
D.5 – LAN .....................................................................................................34
D.6 – Department definition...........................................................................34
D.7 – Cashiers ..............................................................................................34
D.8 – Lager option.........................................................................................35
E Character table..............................................................................................36
4
Copyright notice
Copyright 2009 HCP communication products. All rights reserved. No part
of this publication may be reproduced, stored in a retrieval system, or
transmitted, in any form or by any means without the permission of HCP
communication products. HCP shall not be responsible for any damage caused
by the use of the product contained herein.
5
A General information
This section contains direction for installation, maintenance, setting up and
safe using cash register HCP MECHARE. This brochure contains regular
maintenance of the device. In case of any damage contact your local dealer. Do
not use the device in the vicinity of sources of humidity or water, such as sinks,
baths and water containers. We shall not be responsible for any damage caused
with wrong management fiscal cash register, using inappropriate components or
interventions by unauthorized persons. Cash register accordant valid security
norms. Any kind of touching and removing service filling is strictly uncommitted
by unauthorized persons. Should you fail to obey this instruction, the warranty
SHALL NOT be valid.
Installation and turning on
Put cash register on stable and dry surface. Do not cover the device. Cash
register is to be used only with original power supply, 24V. Avoid plugging cash
register along with the big consumers of electrical energy (like refrigerators,
heating devices...). Before you turn on cash register check if the papers are
fitted correctly, and turn on cash register with switch on the right side of device.
Fiscalization
Authorized technician is responsible for releasing fiscal cash register in to work.
Service technician shall fiscalize and personalize your fiscal cash register.
Personalization meaning setting up parameters you'll need, qualification fiscal
memory to work properly (entering TIN, setting date & time, header …). All this
operations must be entered in service book, which is obligate document for
every fiscal cash register.
6
Maintenance
Periodically, for purpose of hygienic working conditions, we recommend to clean
the device with clean cloth.
Cash register general features
thermal printing mechanism
customer display
– character LCD
cashier display
– graphic LCD
keyboard
GPRS modem
ports
cash drawer connector
multilingual interface
language
price format
max receipt value format
PLU description max
characters
num of departments
num of cashiers
cashier access level
VAT
number of PLU
number of z-reports
programm memory
fiscal memory
RAM memory
RAM battery backup
dimension LxWxH
APS CP 290R-DS, 75 mm/s
double station, 432 dots, 2x28mm paper,
50mm max diameter
18 characters per line
2x16 characters
128x64 dots
rubber
5x6 matrix, 28 keys
integrated
2xRS232
yes
no
English
7+2
11+2
up to 34 characters
12
10
3 levels of access
4 VAT rates
30 changes max
32 000
2 500 max
512kB
256kB
1Mb
min 3 months
235x218x97mm
7
cash register weight
power supply
consumption
operating temperature
storage temperature
humidity
1,35 kg
24V
stand by 1W
max 15W
0 +40°C
-40°C +70°C
From 0 to 95%
8
A.1 Displays
HCP MECHARE has one display for the user (cashier) and one for the
customer. Customer’s display is 2x16 character alphanumerical and Cashier’s
display is graphical with 128x64 resolution. Both of them are blue STN with
white back light.
Display for the Customer
2x16 characters
Display for the User
Graphic display 128x64 dots
9
A.2 Keyboard
Alphanumeric keys:
HCP MECHARE has an alphanumeric keyboard feature and that means that
with the multiple pressing of the keys different character is selected. Start
character is number and with every next press characters change according to
the sequence bellow every number. Multiple key pressing has 1 second timeout,
if the key is not pressed for 1 second the last selected character is accepted.
Key 1 : Numerical value one ( 1 ), signs of low line( _ ), dot ( . ) and
function of spacing one blank character
Key 2 : Numerical value two ( 2 ), letter A, letter B, letter C
Key 3 : Numerical value three ( 3 ), letter D, letter E, letter F
Key 4 : Numerical value four ( 4 ), letter G, letter H, letter I
Key 5 : Numerical value five ( 5 ), letter J, letter K, letter L
Key 6 : Numerical value six ( 6 ), letter M, letter N, letter O
Key 7 : Numerical value seven ( 7 ), letter P, letter Q, letter R, letter S
10
Key 8 : Numerical value eight ( 8 ), letter T, letter U, letter V
Key 9 : Numerical value nine ( 9 ), letter W, letter X, letter Y, letter Z
Key X : Multiply( x ), slash sign( / ), exclamation mark (!), question
mark (?), letter Dž, letter Š. Combining with the SHIFT key it has one
more function, function of centering the text
Key 0 : Numerical value null ( 0 ), space function, letter Ć, letter Č
Key . : Comma mark( , ), and sign (&), percent sign (%), letter Ž
11
Function keys:
Each key has defined command. Some of them have more than one function,
when they are used along with the SHIFT key, or when they are used for
programming.
Key MENU: Returning to home menu function
Key ▲/ROLL: With this key it is possible to move on forward between
the menues, for moving the cursor or paper feed.
Key ▼: With this key it is possible to move on forward between the
menus, for moving the cursor or to rewind journal tape.
Key Z/X: Z-report shortcut and in combination with key SHIFT
performs X-report
Key PROG ART/PERIOD : PLU programming shortcut, and for the
PERIOD report function use SHIFT
Key PLU/BAR: PLU sale confirm allows entering code/bar code
(without/with SHIFT). Used also as OK key.
Key STORNO: During sales used to STORNO (VOID) goods or whole
receipt. During programming it is used to clear screen.
12
Key C: Used in general as cancel or delete function. When surfing
menus used as cancel and when editing text used as delete. When
editing text combined with SHIFT used to return to previous menu.
Key SHIFT: It changes function to multifunction key.
Key DISCOUNT/SURCHARGE:Used to set the appropriate temporary
DISCOUNT/SURCHARGE. Default DISCOUNT/SURCHARGE are set
in menu 2.5
Key REFUND: By pressing this key before starting of fiscal receipt,
cash register transfers to REFUND mode, also print’s GPRS
parameters settings in every other working mode.
Key VOUCHER/PRINT: Voucher payment and print settings key
Key CHEQUE/BON: Check payment or Bon payment
Key CARD: Credit Card payment
Key SUBTOTAL: Subtotal
Key TOTAL: Total and cash payment function
13
A.3 Printer
Printing mechanism used is APS CP 290R-DS, double station, 2x28mm
paper width. It is possible to write 18 characters in one line. Paper rolls width is
28mm, diameter up to 50mm. Next examples show's proper fitting of the paper
rolls.
14
A.4 Power supply
ECR HCP MECHARE uses power supply of 24V DC and also has a backup
battery power.
A.5 Connections
Picture of the connectors from left to right: for a cash drawer, PC, Bar Code
Scanner, GSM antenna and power supply DC.
15
16
A.6 GPRS
GPRS modem, device which is used for sending currency
data to Tax Office, needs to be set in order to work
properly.
Modem's state of work can always be checked with
REFUND key. After pressing the key, document will be
printed with the current state of the modem.
First part of the document contains information about
register's integrated modem status: SIM number,
operator’s name and signal quality.
In the second part following settings are listed:
APN: access point name
APN_USER: username for GPRS connection
APN_PASS: password for GPRS connection
17
The third part of printout contains data of current modem
state:
The name of the command file. Each command file is
related to the MRC of the cash register.
Current command.
Date and time when the command was processed.
Number of retries of FTP connection.
Date and time of the previous connection to the FTP
server.
Date and time of next scheduled connection.
Cash register terminal tries to send a data 5 times (6 times in case of failure)
with 2 minute break in beetween retries, and then the execution is postponed for
24h. After successfully transfered data ECR print’s GPRS STATUS DATA
SENT!!! (or not sent).The letter mark appears 12 hours before uploading and
blinks.It is diplayed untill succesful execution of command. If the user notices
that letter mark is displayed more than 3-4 days, then he should notify the
service.
18
01. 01. 2008 09 : 48
HCP Mechare
Cash Register
www.hcp.rs
Modem diagnostics
*Text: Modem can not be detected is printed in a case when central processor
can not establish communication with the embedded modem. In that case
contact authorized service person.
*Text: Modem bussy ! printed markes that the central processor attempts
communication with modem and that the state of the modem is still not
determend. In this case it is necessary to wait and then retry GPRS state
printing.
*Text: SIM Error represents physical SIM card absence from the board
*Text: SIM code missing represent that SIM card is not registered in cash
register. In this case it is necessary to unlock SIM, please contact authorized
service personnel.
Note: In order to make any GPRS settings change it is necessary to put the Jp2
on the board and use service program. After making changes this jumper should
be removed. GPRS settings change is service action of authorized personnel
only.
19
A.7 – Working with cash register
Basic keys for handling through menus are ROLL
and
.
These keys enables handling options between menus/sub menus and
allowes you to go forward and us backward to previous menu/submenu.
Key PLU/BAR has OK functionality in all menus/sub menus.
Key C has Cancel functionality in all menus/sub menus.
Beside standard menu and options handling, there's faster way to entering
menues using numerical keyboard. Every menu/sub menu has assigned
numerical value which provide's ease location of menu/sub menu. For the most
intrinsically functions like Z report, X report and Periodic report, there are
shortcut keys for direct access to the requested submenus. These keys are
marked on the keyboard and on top of them are written names of sub menus to
whom they lead. Direct shortcuts are written with white letters, and the second
functions are written with yellow letters (SHIFT + Function key).
For the example, pressing the key Z/X and it's confirmation with the
PLU/BAR, Z report will be printed, but by pressing the combination with SHIFT, X
report will be printed....
Text editing
HCP Cash Registers are fully capable to satisfied modern technology demands.
Text editing follow that need. When is needed to define an article, or define
advertisement message, or header it is arranged like this - keys on the keyboard
are marked with specified letters which are edit every time you use these keys.
For better understanding certain markers are used. First marker indicates
beginning of the text line and standard cursor marks current position during
editing.
Deleting edited text
To delete completely edited text use key STORNO, and for just one last entered
character use key C.
20
Character editing
Example: Entering letter S - to edit this letter it is necessary to press key 7/PQRS
4 times, because letter S is forth in row of letters defined for this key. Important
thing to know is that key timeout is 1s. That means that after 1 second interval
the last selected character will be accepted. Characters, defined for example
key 7, will continuously change with every new press of the key ( P > Q > R >
S > 7 > P....). When character lasts on the display longer than 1s, device
accept's character and cursor moves for one place.
Changing letters (small/capital)
To change letters (small/capital) use CHEQUE key. Letter change is indicated in
upper right angle of the display (ab - small letters, AB - capital letters).
Print with bold letters
When Header or Advertisement is edited it is possible to print with bold letters.
REFUND key turns this function on and off.
Centering text
Like printing bold letters, centering text is available only when Header and
Advertisement message are edited. To center text use SHIFT + X.
21
B Sale menu
This menu is used for sale of goods on the cash register. ECR has memory
reserved for 32 000 PLU where any PLU is programmed with assigned code.
The sale per one receipt is limited to 200 items with unlimited number of
payments. Sale can be made using cash register keyboard or barcode reader,
or with any combination of these input interfaces.
B.1 Sale by PLU code/barcode
Sale can be done using keyboard or barcode reader.
Sale is made by typing in the PLU code (barcode) and then by pressing key
PLU.
Sale by PLU code using barcode reader
When a sale is made using a barcode reader it is only necessary to enter
quantity. In case that the quantity is not typed in then the sale is made with
default quantity 1,000. Also with barcode reader weight barcodes can be used.
B.2 Error correction during sale procedure
Function key C
By pressing function key C the last input is deleted, and by pressing first SHIFT
and then C bring’s you back to previous menu.
22
Canceling of receipt items(VOID) can be done in 3 ways:
Cancel of last item on the receipt is made by pressing key STORNO and then
PLU.
Canceling of items by code/barcode is made by pressing next key sequence:
first input code/barcode by keyboard or barcode reader then STORNO and then
press PLU.
Canceling of whole receipt is done by pressing SHIFT and then STORNO.
Note: Canceling of receipt can be applied before any payment started on the
receipt. After payment start there is no way to cancel receipt.
B.3 Payments
There are 4 different ways of payment currently implemented in the cash
register: cash, credit/debit card, voucher and by cheque.
Cash
Payment in cash is made by first entering the specified amount of cash received
and then by pressing key TOTAL. In case that the entered amount is greater or
equal to the receipt sum, than the receipt is finished with the correct return
printed and displayed. If the key TOTAL is pressed without specifying the
amount then the receipt is automatically finished with the amount equal to the
receipt sum and the return amount is 0. This feature is valid for any kind of
payment, if the keys, TOTAL, CHEQUE, VOUCHER and CARD are pressed
without specified amount before that, than the receipt is finished automatically.
Cheque
Payment is made in the same manner as cash with distinction of using key
CHEQUE instead of TOTAL.
Voucher
Payment is made in the same manner as cash with distinction of using key
VOUCHER instead of TOTAL.
23
Credit/Debit Card
Payment is made in the same manner as cash with distinction of using key
CARD instead of TOTAL.
Note 1: It is possible to use more different ways of payment the same receipt
by entering the appropriate amounts for each payment, as long as the sum of all
payments does not overcome the sum of receipt.
Note 2: Cash Register forbids too small and to big amounts of payments. Big
amounts are limited with maximum numbers cash register can process, and the
small amount are limited in next way, too small value is when a quantity
multiplied with the PLU price rounded to 2 digits is equal 0. For example: if the
price is 0.2 and the quantity is 0.1, then the sale amount is 0.1x0.2=0.02, and
this rounded to 2 digits 0.02~0.00 is zero.
B.4 Refund mode
This function is turning on and off with the key REFUND only when you are in
the sale menu. It puts in a record every time when sold goods is turned back
(usually for claim) and the money for that goods needs to be refunded.
24
C Reports (Fiscal)
Menu 2.1 – Z-report
Number of Z-reports is limited to 2500. When Z-report is done VAT sale
counters are reset to zero. Sale counters per PLU and sale counters per cashier
are not reset to zero. Sale by PLU and sale per cashier are reset separately.
Menu 2.2 – X-report
When x-report is done, all VAT sales are printed but no sale counter is reset.
X report is nonfiscal report and it will have **NON FISCAL** printed in the report.
Menu 2.3 – Fiscal reading report
Summary fiscal reading report can be a sum of Z reports between two dates or
from Z number to Z number. In order to issue this report it is necessary to
specify start date and end date, or starting Z number up to the ending Z number.
By default start date is the date of fiscalisation (putting the cash register in to the
work) and the current date in the cash register.
Another kind of period report is Fiscal reading report where all of the Z reports
data inside period is printed one by one.
NOTE: PLEASE PAY ATTENTION WHEN ISSUING FISCAL READING
REPORT. FISCAL READING REPORT CAN NOT BE INTERRUPTED IN ANY
WAY AND IT HAS TO BE PRINTED TO THE END IN WHOLE. IF A MISTAKE
IS MADE, FOR EXAMPLE FISCAL READING REPORT FOR 1000 Z REPORT
ALL OF THE 1000 Z REPORTS HAS TO BE PRINTED. THIS CAN DAMAGE
CASH REGISTER AND CONSUME BIG AMOUNT OF PAPER.
25
Menu 2.4 – Nontaxable PLU report
This report contains the data of all nontaxable PLU-s, their description, code
and price in overall.
If the report is started and the user wants to abort, the only way is to switch off
and then again switch on the cash register.
This report is also non fiscal report and it will have **NON FISCAL** annotation
printed on it.
Menu 2.5 – Discount/Surcharge
This menu is used to set default discount and surcharge percentages.
Discount and Surcharge can not work at the same time, and receipt can not be
issued with both discount and surcharge on it. On one receipt can be only
discount or surcharge.
When a discount is set surcgarge is automatically set to 0, and if surcharge is
set , discount is automatically set to 0.
This values are the default values applied to every issued receipt.
With a shorcut key DISCOUNT/SURCHARGE values are also set but only for
next issued receipt, and then values are changed back to default values.
Menu 2.6 – Cash IN/OUT
When starting money is needed for beginning of the fiscal day and to return
change, here cashier can log and enter sum of cash which is added.
Other important thing is to take out the cash from the cash drawer and to
register that in this option. So this can be called Official Payment and it is
strictly for cashiers foresaw. This function manages cash flow apart.
26
Menu 2.7 – Date & Time Settings
Date and time can be set in this menu after the Z report is done. So there is
no need to execute reset to adjust time & date. After executing a reset or a Z
report, that time become last valid and next adjustment can be
chronologically only after that time.
27
D Device settings
Menu 3 allows configuring cash register. In this menu different parameters can
be set like VAT, PLU, keyboard, display …
D.1 – Header and Advertisement settings
Note: This option is available only after Z report with no sales made after Zreport.
Menu 3.1.1 Header setting
Header contains data regarding cash register ID number (MRC) and tax payer
identification number (TIN). After first set MRC and TIN cannot be changed.
Header consists of maximum 11 lines with 18 characters each. Header should
include info regarding name of company, address and basic contacts (phone,
fax, mail….). Creating of the header can be done by editing text (previously
explained), and moving between lines is performed using keys SUBTOTAL and
TOTAL. In every moment, written content can be printed on the paper by using
the VOUCHER key.
Menu 3.1.2 Advertisement setting
Advertisement message can be only programmed with PC program and it is
same format as header. There are 15 different advertisement messages that
can be programmed and in the menu 3.1.2 advertisement message can be
selected. If none of the advertisement messages is selected than no message is
printed on the receipt.
28
D.2 – VAT setting
Menu 3.3.2 VAT rates
Cash register supports up to 3 VAT rates and up to 30 changes of it before filling
up the fiscal memory. After 30 changes cash register continues to work
normally, only there is no way to change VAT rates again.
In case of error input during VAT settings it is necessary to press key STORNO
to cancel and then input again. Validation of each set value is done with either of
keys PLU, SUBTOTAL or TOTAL and printing of input values is done with key
VOUCHER. After input of last 3rd VAT appears a query of final confirmation of
all VAT rates. After a final confirmation a new set of VAT is stored to the cash
register and it becomes valid for all tax calculation.
D.3 – General device settings
Menu 3.3.1 Language Selection
This option is not applicable for this version of software.
Menu 3.3.2 Set COM1
In this menu baud rate of COM1 can be set. Offered values are 9600, 19200,
38400, 115200 and 230400 bps. After COM1 baud rate setting it is necessary to
switch cash register off and back on again for new setting to become valid.
COM1 is used for communication of cash register with PC. Default baud rate is
115 200 bps.
COM2 is used for barcode reader and for fiscal memory readout according to
the specified protocol for GPRS terminals, and it’s default baud rate is 9600 bps.
29
Menu 3.3.3 GPRS Modem settings
In this menu usage of GPRS modem can be configured. Cash register can work
without GPRS modem. This selection wheatear cash register will use a modem
or not is left to be service action.
Menu 3.3.4 Keyboard settings
Keypad tones can be turned on and off.
Menu 3.3.5 Printer settings
Print intensity setting. There are 8 levels of print intensity available numbered
from 0 to 7.
Print speed setting. There are 8 levels of print speed available numbered from 0
to 7.
Print footer length settings. Footer can be set from 0 to 7 lines.
Menu 3.3.6 Display settings
Display brightness can be changed here using the up and down keys.
30
D.4 – PLU definition
Entering to the PLU definition can be done by accessing menu 3.4 or using a
shortcut key.
- shorcut key for accessing this menu
- key used to print the current settings for selected PLU
HCP MECHARE cash register has memory area reserved for 32 000 PLU. Each
PLU can be set with next parameters:
* barcode
:
up to 14 digits
* description
:
up to 34 characters
* price
:
up to 21.000.000,00
* VAT
:
NONTXBL,TAX1,TAX2,TAX3
* measurement unit
:
(15)
* department
:
(12)
Each PLU in base has barcode definition that can be used as a code for selling
by using a keyboard.
Barcode/code input
Barcode/code can be entered with barcode reader or with keyboard. With
barcode, cash register automatically transfers to the next input menu and if the
input is done with keyboard, PLU/BAR key needs to be pressed for confirmation
of finished input.
31
PLU description input
PLU description can be up to 34 characters. The description input is done by
keyboard, where each key represent several letters. Letter is selected by
multiple pressing of the key until the right letter is selected.
PLU price input
Price input can be done with maximum two decimal digits. PLU cannot have
undefined price or price 0, 00.
PLU VAT input
Each PLU requires VAT rate at which it will be sold. When a VAT is assigned to
PLU it has to be defined previously. For VAT rate selection, beside arrow keys,
numeric keys can also be used, key 1 is VAT X1, key 2 is VAT X2 … and so on.
PLU measurement unit input
HCP MECHARE cash register has 10 predefined measurement units (pcs, kg,
g, t, l, dl, m, m2, m3, h and 5 units that can be customized. Each PLU requires
measurement unit definition. Selected unit can be seen on the receipt after
character ‘/’.
PLU department
For each PLU there is possible 12 department selection. When a PLU is sold,
for accompanied department the sale is incised.
When a new PLU is defined, the process requires pass through all of these
menus. If a fiscal day is started (a sale made after issuing Z report) for existing
PLU it is possible only to change a price, other parameters can be changed only
after Z report.
Plu can be deleted when a menu Plu code input is active and the requested Plu
code entered, after that SHIFT + VOID + PLU.
32
PLU price can be changed in the midle of receipt. The only limitation is that on
that on one receipt PLU can not have 2 different prices. When a PLU is sold on
the receipt with one price than price of that PLU can not be changed untill the
receipt is finished. After price change user is transfered to sale to continue
working. For accessing PLU price change a PLU price change shortcut key can
be used.
PLU Lager (Quantity on stock)
For each PLU can be entered a quantity of goods that are on stock and can be
sold. This quantity can be rounded on third decimal.
33
D.5 – LAN
This option is not applicable for this version of software.
D.6 – Department definition
In this menu the description of 12 available departments can be changed. The
description is entered in a same manner as the description of PLU with multiple
pressing of numeric keys representing letters.
D.7 – Cashiers
Each cashier can be assigned with access code and access level. There are 3
available access levels. Option for cashier access can be turned on or off as
requested. When a cashier access is turned on, than each log in is memorised
to electronic journal and to each cashier is assigned sale during log in. This sale
can be read or printed out in a cashiers report. Up to 10 cashiers can be
defined.
Next submenu is related to cashier’s timeout. This timeout is time when a
logged cashier is not making sales. After defined period of time cahier is
automaticly logged off. After that log in is required for continuing of work. This
feature can be turned on or off regarding of that if it is required or not, and it is
intended for places where more chasiers are operating at one cash register at
the same time.
Cashier log out is done by pressing key MENU and after that key STORNO.
Next submenu is used for cashier definition. Cashier definition requests next:
cashier access code, cashier description and cashier access level.
Cashiers access code is minimum 3 digits op to maximum 9 digits.
Cashier description is max 19 characters.
34
Access level can be selected from 3 values:
- lowest, allowed only sale menu (menu 1), new PLU definition and PLU
price change
- medium, allowed sale menu (menu 1), reports menu (menu 2), new PLU
definition and PLU price change
- highest, access to all functions.
Cahier is logged in with typing in an access code and by pressing key PLU.
After that action cashier is in sale menu (menu 1).
The last menu in cashier menu is used to reset sales of cashiers.
D.8 - Lager option
Stock definition is available in menu 3.8 Lager option. There are three
submenus:
Lager ADD, Adding quantities to PLU
Lager SUB, Subtracting quantities from PLU,
Lager SET, Setting starting quantity to PLU.
By changing one of these parameters and comfirming with TOTAL an issue
will be printed with basic information.
35
F Character table
0
0
1
2
3
4
5
6
7
8
9
A
B
C
D
E
F
!
”
#
$
%
&
’
(
)
*
+
,
-
.
/
1
0
1
2
3
4
5
6
7
8
9
:
;
<
=
>
?
2
@
A
B
C
D
E
F
G
H
I
J
K
L
M
N
O
3
P
Q
R
S
T
U
V
W
X
Y
Z
ć
\
č
^
_
4
`
a
b
c
d
e
f
g
h
I
j
k
l
m
n
o
5
p
q
r
s
t
u
v
w
x
y
z
ž
|
š
~
Ш
6
Ć
Č
Š
Ž
Б
В
Г
Д
Ђ Ж
З
И
Л
Љ Н Њ
7
П
Р
С
Ћ
У
Ф
Х
Ц
Ч
Џ
б
в
г
д
ђ
ж
8
з
и
л
љ
н
њ
п
р
с
ћ
у
ф
х
ц
ч
џ
9
ш
36