1
Project
Number:
MIS
‐
DMS
‐
0801
Dartmouth
Harbormaster
Database
System
A
Major
Qualifying
Project
Submitted
to
the
Faculty
of
the
WORCESTER
POLYTECHNIC
INSTITUTE
in
partial
fulfillment
of
the
requirements
for
the
Degree
of
Bachelor
of
Science
by
_____________________________________________________
Millisent
Fury
Hopkins
_____________________________________________________
William
D.
Price
Date:
January
12,
2009
_____________________________________________________
Professor
Diane
Strong,
Project
Advisor
This
report
represents
the
work
of
one
or
more
WPI
undergraduate
students
submitted
to
the
faculty
as
evidence
of
completion
of
a
degree
requirement.
WPI
routinely
publishes
these
reports
on
its
web
site
without
editorial
or
peer
review.
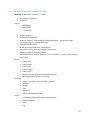
Table
of
Contents
Abstract....................................................................................................................................... 6
Executive
Summary ................................................................................................................ 7
Acknowledgments................................................................................................................... 9
Authorship
Page ....................................................................................................................10
Chapter
1.
Introduction.......................................................................................................11
Chapter
2.
Literature
Review ............................................................................................13
2.1
Industry
Overview .................................................................................................................. 13
2.2
Technology
Analysis .............................................................................................................. 15
2.2.1
Database
System
Analysis............................................................................................................. 16
2.2.2
Front
End
System
Analysis ........................................................................................................... 17
2.2.3
Technology
Analysis
Conclusion ................................................................................................ 21
Chapter
3.
Asis
System .......................................................................................................22
3.1
Overview
of
Current
System................................................................................................ 22
3.1.1
Business
Processes........................................................................................................................... 22
3.1.2
Quickbase
Use
Cases........................................................................................................................ 22
3.1.3
Manual
Records ................................................................................................................................. 38
3.2
Requirements
Definition...................................................................................................... 39
3.3
Feasibility
Analysis................................................................................................................. 40
3.3.2
Technical
Feasibility ........................................................................................................................ 40
3.3.2
Economic
Feasibility........................................................................................................................ 41
3.3.2
Organizational
Feasibility ............................................................................................................. 42
3.4
CostBenefit
Analysis ............................................................................................................. 43
Chapter
4.
Methods ...............................................................................................................44
4.1
SDLC............................................................................................................................................. 44
4.2
Work
Schedule ......................................................................................................................... 45
4.3
Task
List ..................................................................................................................................... 46
Chapter
5.
Design
of
the
tobe
System ............................................................................47
5.1
Technology
Decisions ............................................................................................................ 47
5.2
Data
Model ................................................................................................................................ 47
5.3
User
Interface........................................................................................................................... 50
Chapter
6.
Documentation
of
the
System ......................................................................53
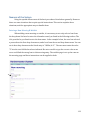
6.1
Using
the
System ..................................................................................................................... 53
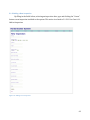
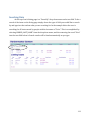
6.1.1
Harbormaster
System
Dashboard ............................................................................................. 53
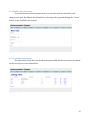
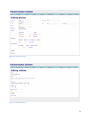
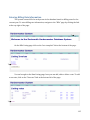
6.1.2
Listing
Pages ....................................................................................................................................... 54
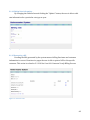
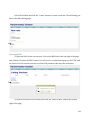
6.1.3
Adding
a
person................................................................................................................................. 57
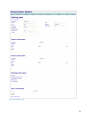
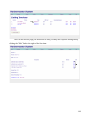
6.1.4
Adding
a
Candidate
to
the
Waitlist
for
Moorings................................................................ 58
6.1.5
Adding
a
Boat...................................................................................................................................... 59
6.1.6
Adding
a
Mooring.............................................................................................................................. 60
6.1.7
Adding
a
New
Dinghy...................................................................................................................... 61
6.1.8
Adding
a
New
Issue.......................................................................................................................... 62
6.1.9
Adding
a
New
Inspection............................................................................................................... 63
6.1.10
Editing
a
mooring........................................................................................................................... 64
2
6.1.11
Adding
a
New
Ticket ..................................................................................................................... 65
6.1.12
Ticket
Payment................................................................................................................................ 66
6.1.13
Adding
Rate
Information ............................................................................................................ 67
6.1.13
Listing
Rate
Information ............................................................................................................. 67
6.1.14
Editing
Rate
Information ............................................................................................................ 68
6.1.15
Generating
a
Bill.............................................................................................................................. 68
6.1.15
Editing
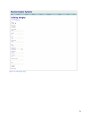
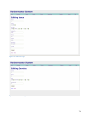
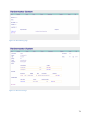
Pages.................................................................................................................................... 69
6.1.16
Show
Pages ....................................................................................................................................... 75
6.2
Additional
References ........................................................................................................... 80
Chapter
7.
Conclusions ........................................................................................................81
7.1
Testing ........................................................................................................................................ 81
7.2
Deployment............................................................................................................................... 81
7.3
Future
Recommendations.................................................................................................... 81
7.3
Group
Reflection ..................................................................................................................... 82
Works
Cited .............................................................................................................................86
Appendix
I.
Samples
of
Manual
Documents..................................................................88
I.i
Dinghy
Renewal
Form ............................................................................................................. 89
I.ii
Waterways
Use
Application:
Form
A
(BOAT
PERMIT) ................................................ 90
I.iii
Renewal
Form.......................................................................................................................... 91
Appendix
II.
Technical
Documentation..........................................................................92
Appendix
III.
httpdproxy_code ........................................................................................99
Appendix
IV.
User
Manual ............................................................................................... 101
Appendix
V.
Meeting
Agendas........................................................................................ 122
V.i
MQP
Meeting
Agenda
September
11,
2008 ..................................................................123
V.ii
MQP
Meeting
Agenda
September
18,
2008.................................................................124
V.iii
MQP
Meeting
Agenda
October
2,
2008........................................................................125
V.iv
MQP
Meeting
Agenda
October
9,
2008 ........................................................................126
V.v
MQP
Meeting
Agenda
December
17,
2008...................................................................127
Appendix
VI.
Proposal
Presentation............................................................................ 129
Appendix
VII.
Final
Presentation .................................................................................. 132
Appendix
VIII.
Letter
of
Acknowledgement .............................................................. 135
3
Table
of
Figures
and
Tables
Figure
1:
System
Request
–
Town
of
Dartmouth
Harbormaster
System ....................... 11
Figure
2:
Add
a
new
person ............................................................................................................... 23
Figure
3:
Add
a
person
to
waitlist ................................................................................................... 24
Figure
4:
Add
a
new
boat..................................................................................................................... 25
Figure
5:
Add
a
new
mooring ............................................................................................................ 26
Figure
6:
Add
a
dinghy.......................................................................................................................... 27
Figure
7:
Add
a
new
issue ................................................................................................................... 28
Figure
8:
A
customer
requests
a
pump‐out................................................................................. 29
Figure
9:
Performing
pump‐outs
and
logging
pump‐out
data ............................................ 30
Figure
10:
Generate
the
year‐end
pump‐out
report................................................................ 31
Figure
11:
Generate
letters
and
invoices
for
renewals .......................................................... 32
Figure
12:
Input
inspection
information
for
a
mooring......................................................... 33
Figure
13:
Process
a
payment
from
a
customer........................................................................ 34
Figure
14:
Permittee
requests
change
in
mooring
permit.................................................... 35
Figure
15:
Mooring
permittee
requests
another
be
allowed
to
use
their
mooring ... 36
Figure
16:
Add
a
new
ticket................................................................................................................ 37
Figure
17:
A
customer
pays
a
ticket................................................................................................ 38
Figure
18:
Gantt
Chart .......................................................................................................................... 46
Figure
19:
Entity
Relationship
Diagram
–
Dartmouth
Harbormaster
System ............. 48
Figure
20:
Add
New
Mooring
Screenshot .................................................................................... 51
Figure
21:
Listing
Boats
Screenshot ............................................................................................... 51
Figure
22:
New
Boat
Screenshot...................................................................................................... 52
Figure
23:
Harbormaster
System
Dashboard............................................................................. 53
Figure
24:
Listing
Boats ....................................................................................................................... 54
Figure
25:
Listing
Moorings ............................................................................................................... 54
Figure
26:
Listing
People..................................................................................................................... 54
Figure
27:
Listing
Waitlists................................................................................................................. 55
Figure
28:
Listing
Tickets.................................................................................................................... 55
Figure
29:
Listing
Inspections........................................................................................................... 55
Figure
30:
Listing
Dinghies................................................................................................................. 56
Figure
31:
Listing
Issues ...................................................................................................................... 56
Figure
32:
Listing
Bills.......................................................................................................................... 56
Figure
23:
Adding
a
new
person ...................................................................................................... 57
Figure
24:
Add
a
candidate
to
waitlist........................................................................................... 58
Figure
25:
Adding
a
new
boat............................................................................................................ 59
Figure
26:
Adding
a
new
mooring ................................................................................................... 60
Figure
27:
Adding
a
new
dinghy ...................................................................................................... 61
Figure
28:
Adding
a
new
issue .......................................................................................................... 62
Figure
29:
Adding
a
new
inspection ............................................................................................... 63
Figure
30:
Editing
a
mooring............................................................................................................. 64
Figure
31:
Adding
a
new
ticket ......................................................................................................... 65
Figure
32:
Ticket
payment.................................................................................................................. 66
Figure
34:
Input
Rate
Information .................................................................................................. 67
Figure
34:
Listing
Rate
Information ............................................................................................... 67
4
Figure
35:
Editing
Rate
Information............................................................................................... 68
Figure
33:
Generate
a
bill .................................................................................................................... 68
Figure
47:
Edit
Boat
Page .................................................................................................................... 70
Figure
48:
Edit
Person
Page ............................................................................................................... 71
Figure
49:
Edit
Waitlist
Page ............................................................................................................. 71
Figure
50:
Edit
Inspection
Page........................................................................................................ 72
Figure
51:
Edit
Dinghy
Page............................................................................................................... 73
Figure
52:
Edit
Issue
Page................................................................................................................... 74
Figure
53:
Edit
Invoice
Page .............................................................................................................. 74
Figure
54:
Show
Boat
Page ................................................................................................................. 75
Figure
55:
Show
Mooring
Page ......................................................................................................... 76
Figure
56:
Show
Person
Page ............................................................................................................ 76
Figure
57:
Show
Waitlist
Page .......................................................................................................... 77
Figure
58:
Show
Ticket
Page.............................................................................................................. 77
Figure
59:
Show
Inspection
Page..................................................................................................... 78
Figure
60:
Show
Dinghy
Page............................................................................................................ 79
Figure
61:
Show
Issue
Page................................................................................................................ 79
Figure
62:
Show
Invoice
Page ........................................................................................................... 80
Table
1:
Cost‐Benefit
Analysis........................................................................................................... 43
5
Abstract
This
project
examined
the
database
system
in
use
at
the
Dartmouth
Harbormaster’s
Office
which
is
responsible
for
organizing
diverse
data
for
running
a
harbor
of
over
2,000
boats.
The
database
system
created
in
this
project
replaced
a
web‐based
application
that
did
not
meet
the
needs
of
the
office
with
a
free,
mySQL
based
back‐end
and
a
web‐based
front‐end.
The
final
database
system
is
fully‐
functional
and
running
on
the
office’s
server
for
use
by
the
Harbormaster
and
his
assistants.
6
Executive
Summary
The
Town
of
Dartmouth
Harbormaster
office
has
spent
years
using
its
current
system
of
tracking
and
manipulating
data.
These
data
include
information
regarding
people,
boats,
moorings,
and
billing
information.
As
an
organization
funded
completely
by
the
fees
paid
to
them
by
boat
owners
who
purchase
waterways
permits
and
pay
for
moorings,
the
Dartmouth
Harbormaster
must
be
vigilant
to
maintain
accurate
records
that
also
allow
efficient
billing
methods.
While
the
current
system
serves
this
purpose,
the
employees
of
the
Harbormaster
office
have
realized
that
improvements
could
be
made
to
both
the
efficiency
of
data
tracking,
and
to
operating
costs.
The
goal
of
this
project
was
to
replace
this
costly,
non‐expandable,
web‐
based
system
with
a
free,
mySQL
based
back‐end
and
a
web‐based
front‐end.
The
first
step
towards
reaching
this
goal
was
to
meet
with
the
Harbormaster
and
some
of
his
assistants
to
research
the
use
of
the
current
system.
By
doing
so
the
team
was
able
to
gain
an
understanding
of
the
procedures
in
place
and
begin
to
build
a
list
of
requirements
for
the
new
system.
By
asking
questions
and
exploring
the
as‐is
system
the
team
was
able
to
define
use
cases
identifying
the
basic
interactions
with
the
system
to
aid
in
the
design
of
the
new
one.
After
observation
and
collection
of
requirements,
the
team
met
with
the
office
staff
to
ensure
the
requirements
gathered
were
accurate.
The
team
then
built
an
entity
diagram
to
visually
present
the
relations
between
data
flowing
through
the
system.
From
this
data
model,
attributes
for
each
entity
were
defined
and
the
makings
of
a
back‐end
were
started.
After
a
successful
proposal
to
the
client,
the
project
team
began
the
development
of
the
system
outlined.
A
system
was
developed
using
Ruby
on
Rails,
an
open
source
web
framework.
The
team
split
into
two
groups,
one
of
which
focused
on
the
user
interface
and
the
other
on
the
systems
programming.
Special
consideration
was
given
to
the
interface
to
emulate
the
legacy
system
and
new
features
were
developed
by
the
systems
programmer.
7
After
successful
unit
testing,
the
team
deployed
the
system
to
a
web
server
located
at
the
Dartmouth
Harbormaster
office.
This
web‐based
application
can
now
be
accessed
via
any
computer
with
an
Internet
connection.
Documentation
was
then
gathered
on
the
system
and
attached
to
this
document
for
users
and
administrators
of
the
new
application.
8
Acknowledgments
Millisent
Fury
Hopkins
and
William
Price
would
like
to
acknowledge
the
project
sponsor,
Town
of
Dartmouth
Harbormaster,
Steve
Melo,
and
the
project
liaison,
Julian
Race
for
their
continued
trust
and
cooperation
through
the
duration
of
this
project.
We
would
also
like
to
thank
our
advisor,
Diane
Strong
for
her
support
and
constructive
feedback
during
our
tight
development
schedule.
9
Authorship
Page
Abstract
–
Millisent
Fury
Hopkins
Executive
Summary
–
Millisent
Fury
Hopkins
and
William
Price
Acknowledgments
‐
Millisent
Fury
Hopkins
Introduction
–
Millisent
Fury
Hopkins
and
William
Price
Industry
Overview
‐
Millisent
Fury
Hopkins
Technology
Analysis
‐
William
Price
As‐is
System
‐
William
Price
Overview
of
Current
System
‐
Millisent
Fury
Hopkins
Feasibility
&
Cost‐Benefit
Analysis
–
William
Price
Methods
–
Millisent
Fury
Hopkins
Design
of
the
to‐be
System
–
Millisent
Fury
Hopkins
and
William
Price
Documentation
of
the
System
–
Millisent
Fury
Hopkins
Conclusions
–
William
Price
Presentations
–
William
Price
Technical
Documentation
–
William
Price
User
Manual
‐
Millisent
Fury
Hopkins
and
William
Price
10
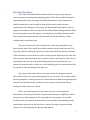
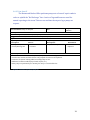
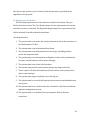
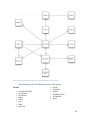
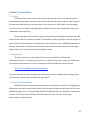
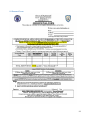
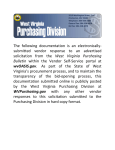
Chapter
1.
Introduction
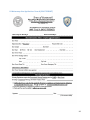
The
Harbormaster
office
issued
a
request
for
a
system
(Figure
1:
System
Request
–
Town
of
Dartmouth
Harbormaster
System)
with
some
specific
requirements
for
the
system
they
desire.
This
request
contains
information
on
the
project
sponsor,
the
functionality
they
desire,
and
the
timeframe
for
completing
the
project.
This
document
is
a
response
to
this
request
and
is
broken
into
five
main
sections.
Figure
1:
System
Request
–
Town
of
Dartmouth
Harbormaster
System
11
After
this
Introduction
is
a
Literature
Review.
In
this
chapter,
our
team
has
performed
an
Industry
Review
and
a
Technology
Analysis.
The
Industry
Review
is
a
chance
for
the
development
team
to
demonstrate
an
understanding
of
the
industry
in
which
a
new
system
would
be
used.
The
Technology
Analysis
is
an
overview
of
available
technologies
that
could
be
used
in
the
new
system.
Following
the
Literature
Review
is
an
analysis
of
the
as‐is
system.
This
analysis
evaluates
the
data
that
is
being
tracked
and
assesses
what
is
efficient
and
what
could
use
improvement.
This
is
achieved
by
examining
the
business
processes
performed,
the
steps
performed
in
each
process
(called
use
cases),
and
a
brief
look
at
manual
record
keeping.
This
is
followed
by
a
definition
of
requirements
for
a
new
system,
and
an
analysis
of
the
risk
involved
in
a
project
to
develop
a
new
system.
Chapter
4
is
about
the
methods
used
to
propose,
design,
and
implement
the
new
system.
This
chapter
contains
a
project
plan,
a
list
of
deliverables
and
deadlines,
and
an
overview
of
the
system
development
life
cycle.
Chapter
5
presents
the
design
of
the
new
system,
also
known
as
the
“to‐be”
system.
It
includes
an
outline
of
the
data
relationships
and
an
overview
of
what
the
user
interface
of
the
new
system
looks
like.
Chapter
6
provides
screen‐shots
of
the
working
system
to
provide
a
“feel”
for
the
system
developed.
Along
with
the
images
are
descriptions
of
functionality
provided
on
that
screen.
The
new
system
has
many
advantages,
which
are
discussed
in
the
following
sections.
12
Chapter
2.
Literature
Review
2.1
Industry
Overview
The
United
States
of
America
has
trade
and
security
interests
in
the
surrounding
waters.
The
shores
of
the
United
States
are
guarded
on
three
different
levels
by
federal,
state
and
local
agencies.
There
are
95,000
miles
of
coastline
that
require
the
attention
of
these
agencies
to
promote
transnational
trade,
protect
the
United
States’
borders
and
project
military
power.
On
the
federal
level,
the
United
States
Coast
Guard
is
an
arm
of
the
military
that
has
continued
to
provide
maritime
defense
since
1790
when
its
precursor,
Revenue
Marine
was
established
by
the
First
Congress
of
the
United
States
(United
States
Coast
Guard,
2008,
p.
2).
The
Coast
Guard
has
the
following
roles:
“Maritime
security,
maritime
safety,
protection
of
natural
resources,
maritime
mobility
and
national
defense”
(United
States
Coast
Guard,
2008,
p.
5).
The
Guard
serves
to
protect
and
secure
the
nation’s
“ports,
inland
waterways,
along
the
coast
and
any
other
maritime
region
where
U.S.
interests
may
be
at
risk”
(United
States
Coast
Guard,
2008,
pp.
5‐6).
Its
role
in
maritime
security
includes
border
control
along
the
U.S.
coast
and
enforcement
of
customs
laws
as
well
as
all
federal
laws,
treaties
and
any
international
agreements
in
the
seas
under
U.S.
jurisdiction.
Aside
from
border
control
and
customs
law
enforcement,
the
U.S.
Coast
Guard
is
a
protector
of
environmental
resources
in
the
seas
surrounding
the
U.S.
In
1976
the
Magnuson‐Stevens
Fishery
Conservation
and
Management
Act
was
passed
creating
an
Exclusive
Economic
Zone
(EEZ).
The
EEZ
is
an
increased
area
of
200
nautical
miles
of
offshore
natural
ocean
resources
which
need
protection
(United
States
Coast
Guard,
2008,
p.
8).
Along
with
environmental
protection,
as
National
Recreational
Boating
Safety
Coordinator,
the
Coast
Guard
plays
a
role
in
assuring
the
safety
of
boaters
and
their
boats
by
boating
regulations
and
education
programs
(United
States
Coast
Guard,
2008,
p.
9).
13
On
the
state
level,
the
Massachusetts
State
Police
Marine
Section
is
responsible
for
patrolling
the
waters
of
the
Charles
and
Mystic
Rivers
and
the
Harbor
Islands
National
Park.
In
terms
of
law
enforcement
and
protection,
the
Marine
Section
often
provides
escort
to
the
U.S.S.
Constitution,
visiting
cruise
ships
and
Liquid
Natural
Gas
tankers.
The
Marine
Section
also
provides
any
presidential
or
diplomatic
detail
needed
in
the
waters
of
the
Boston
Harbor,
Martha’s
Vineyard
and
the
Charles
River
(Commonwealth
of
Massachusetts,
2008).
If
the
need
should
arise,
the
Marine
Section
aids
the
Underwater
Recovery
Unit
(URT)
with
search
and
rescue
missions.
The
Massachusetts
State
Police
Underwater
Recovery
Unit
is
a
team
of
troopers
specially
trained
in
diving
and
other
missions
executed
in
the
water.
The
divers
of
the
URT
are
trained
to
dive
in
all
weather
conditions
and
water
temperature
in
addition
to
small
spaces
such
as
drainage
pipes.
Decisions
about
whether
or
not
to
participate
in
a
mission
are
left
to
the
Team
Commander
as
safety
is
the
first
priority
of
the
URT.
The
URT
contributes
to
missions
inside
and
out
of
the
Commonwealth
for
state
agencies
as
well
as
federal
offices
like
the
Federal
Bureau
of
Investigations,
Secret
Service
and
U.S.
Customs
(Commonwealth
of
Massachusetts,
2008).
The
Massachusetts
Environmental
Police
are
in
charge
of
coordinating
programming
to
educate
the
public
about
boat
safety.
Boat
Massachusetts
is
the
manual
written
by
the
Environmental
Police
to
provide
a
guide
to
the
rules
and
waterways
regulations
for
Massachusetts’
boaters.
At
the
local
level,
the
Harbormaster
for
Dartmouth
is
appointed
by
the
mayor
to
supervise
the
harbor
and
81
miles
of
coastline
(Town
of
Dartmouth).
The
Dartmouth
Harbormaster’s
office
is
overseen
by
the
Dartmouth
Waterways
Commission
along
with
the
Dartmouth
Waterways
Department.
The
Harbormaster
is
also
the
Waterways
Director
and
manages
areas
that
touch
the
waterways,
such
as
the
various
parks
and
beaches
in
Dartmouth
(Melo,
2008).
The
purpose
of
these
organizations
is
to
create
and
enforce
laws
and
regulations
to
maintain
a
safe
and
14
enjoyable
experience
for
those
who
use
Dartmouth’s
waterways
(Town
of
Dartmouth,
2007,
p.
205).
Enforcement
of
the
waterway
and
boating
laws
set
forth
by
local,
state
and
federal
governments,
including
Massachusetts
General
Laws
pertaining
to
harbors,
docks,
and
waterways
(M.G.L.
Chapters
90B,
91,
102,
266)
ensures
the
responsible
use
of
the
harbor
(Town
Of
Dartmouth
Waterways
Management
Department,
2005).
The
Harbormaster’s
office
is
staffed
by
the
Harbormaster
and
nine
assistant
harbormasters
who
enforce
these
laws
in
conjunction
with
law
enforcement
agencies.
In
addition
to
granting
various
permits
to
boats
and
their
owners
and
enforcing
mooring
inspections,
the
office
does
its
part
to
execute
Dartmouth’s
“No
Discharge”
designation
in
the
Harbor
by
pumping
out
vessels’
septic
systems.
Thousands
of
gallons
of
sewage
were
kept
out
of
the
waterways
in
2007
from
participation
in
this
project
(Town
of
Dartmouth,
2007,
p.
205).
The
Harbormaster’s
Office
is
funded
through
user‐based
fees,
such
as
waterway
user
and
mooring
registration
fees,
and
supplemental
grants
to
assist
with
costs
of
waste
removal
(Town
of
Dartmouth,
2001,
p.
165).
In
the
event
of
an
emergency
in
the
waters
of
Dartmouth
Harbor
and
Buzzard’s
Bay,
the
staff
of
the
Harbormaster’s
Office
is
trained
in
medical
response.
In
support
of
Dartmouth
Police
and
Fire
Departments,
United
States
Coast
Guard
and
State
Police
the
Harbormaster’s
Office
will
assist
in
medical
response,
mariner
distress,
emergency
evacuation,
and
search
and
rescue
(Melo,
2008).
2.2
Technology
Analysis
This
technology
analysis
section
highlights
the
advantages
and
disadvantages
of
using
different
technologies
in
the
new
system.
There
are
two
main
areas
of
technology
we
will
be
analyzing,
the
front‐end
and
the
back‐end.
These
two
systems
work
together
to
create
an
environment
for
the
user
to
access
and
manipulate
data
(the
back
end)
with
an
optimal
user
interface
(the
front
end).
15
Below
are
some
definitions
of
terms
used
in
this
section:
•
Open
Source:
A
piece
of
software
where
the
source
code
(the
code
that
makes
up
the
software)
is
open
to
the
public.
These
software
packages
are
usually
free
of
charge
and
have
an
Internet
community
of
developers
who
add
to
the
existing
code
to
expand
and
add
new
items.
•
Framework:
Sets
of
existing
code
that
can
be
used
to
make
development
easier
for
a
specific
purpose.
•
SQL:
Structured
Query
Language
–
A
language
used
for
database
queries
and
data
manipulation.
2.2.1
Database
System
Analysis
The
back
end
of
the
system
is
the
set
of
tables
where
the
data
are
actually
stored.
The
end
user
never
actually
interacts
directly
with
the
back
end.
All
data
are
accessed
and
displayed
by
the
front‐end
application.
The
back‐end
is
like
the
storage
warehouse
where
all
the
data
are
stored,
and
the
front
end
is
like
an
associate
who
goes
and
finds
that
data
for
you.
For
the
back‐end
analysis,
we
have
made
the
assumption
that
the
system
must
be
inexpensive
and
have
the
capability
to
interact
with
a
front‐end
web
application.
2.2.1.1
MySQL
MySQL
is
an
open
source
database
that
is
used
by
many
web
developers
and
by
many
major
corporations
including
Google,
Yahoo,
and
YouTube
(MySQL
::
About
MySQL,
2008).
Because
of
its
ease
of
use,
many
web
frameworks
have
built‐in
adapters
to
connect
easily
to
MySQL
databases.
MySQL
is
open
source,
but
it
is
also
offered
by
Sun
Microsystems,
which
supports
it
and
offers
Enterprise
options
that
a
client
can
opt
to
purchase.
The
basic
mySQL
server
package,
as
well
as
some
useful
tools
such
as
“MySQL
Administrator”
and
“MySQL
Query
Browser”
are
available
free
of
charge.
16
These
free
tools
help
not
only
with
development,
but
even
more
so
with
the
ongoing
maintenance
of
the
database.
MySQL
Advantages:
•
•
•
•
Well‐documented
and
large
support
community.
Proven
excellence
for
supporting
web
development.
Free
database
package
and
free
administrator
tools.
Development
team
has
experience.
MySQL
Disadvantages:
•
No
graphic
user
interface
for
building
tables.
2.2.1.2
Microsoft
SQL
Server
Express
The
Express
edition
of
Microsoft
SQL
Server
2008
is
a
free
SQL
server
that
is
offered
for
download
on
the
Microsoft
Developer
Network.
This
software
is
developed
and
supported
by
the
Microsoft
Corporation.
While
the
backing
of
a
major
corporation
is
generally
a
good
thing,
the
Express
edition
of
SQL
Server
2008
is
stripped
of
some
functionality
offered
by
other
SQL
Server
versions
(Anderson,
2008).
The
database
is
optimized
for
use
with
the
.NET
framework
and
has
built
in
connectors
for
ASP
web
page
design.
Microsoft
SQL
Server
2008
Advantages:
•
•
•
Good
starting
point
for
a
Microsoft
platform.
Interacts
well
with
.NET
applications.
Free
GUI
tools
to
help
manage
database.
Microsoft
SQL
Server
2008
Disadvantages:
•
•
4GB
data
limit.
Not
intended
to
compete
with
full
featured
open
source
databases.
2.2.2
Front
End
System
Analysis
The
“front
end”
of
a
system
is
the
part
of
a
system
with
which
the
end
user
interacts
directly.
In
the
case
of
the
system
being
designed
currently,
the
front
end
is
a
web
application
that
interacts
with
the
database
server
to
access
the
necessary
17
data.
We
are
also
assuming
that
the
front‐end
application
options
should
be
relatively
inexpensive,
and
must
have
web
features.
2.2.2.1
PHP
PHP
is
short
for
the
HTML‐embedded
scripting
language
PHP:
Hypertext
Preprocessor.
An
HTML‐embedded
language
is
a
language
where
the
scripts
can
be
written
and
referenced
directly
in
the
HTML
code
that
builds
the
web
pages.
This
extremely
popular
language
has
grown
to
become
one
of
the
most
commonly
used
languages
for
web
applications.
Originally
developed
in
1995
as
a
series
of
Perl
scripts,
PHP
has
gone
through
five
release
versions,
the
most
recent,
PHP
5.0
being
released
in
July
2004
(The
PHP
Group,
2008).
The
language
was
influenced
by
C,
Java,
and
Perl
and
has
similar
syntax.
PHP
is
used
very
commonly
in
applications
that
access
databases.
There
is
functionality
for
connecting
to
mySQL
databases,
as
well
as
other
types
of
back‐end
systems.
Since
it
is
a
major
open‐source
language,
there
is
a
large
community
of
developers
that
help
expand
and
support
the
language
as
well.
PHP
Advantages:
•
•
Uses
syntax
that
is
similar
to
many
popular
compiled
languages.
Can
be
embedded
into
HTML
(useful
because
it
cuts
down
on
code
files
on
the
web
server)
PHP
Disadvantages:
•
•
Development
team
would
need
to
learn
both
PHP
and
HTML.
Other
options
are
more
user
friendly
for
database
applications.
2.2.2.2
ASP
.NET
ASP
.NET
is
a
language
developed
by
the
Microsoft
Corporation
that
utilizes
its
.NET
framework
to
create
web
pages.
Many
major
companies
utilize
ASP
to
deliver
their
web
pages,
including
myspace.com,
Dell,
monster.com
and
newegg.com
(Microsoft,
2008).
Microsoft
provides
a
free
development
environment
with
18
Microsoft
Visual
Web
Developer
that
allows
the
developer
to
customize
user
interfaces
more
easily.
Since
the
Microsoft
Corporation
designed
ASP,
users
can
look
forward
to
easier
integration
on
Windows
systems
and
support
and
documentation
provided
by
a
major
corporation.
ASP
features
flexibility
in
web
design,
and
can
be
the
framework
for
nearly
any
kind
of
website
application,
whether
it
requires
a
database
or
not.
ASP
.NET
Advantages:
•
•
•
•
Has
been
in
use
for
a
while
and
has
a
lot
of
documentation
and
examples.
Utilizes
the
.NET
framework
which
the
development
team
knows
a
little.
Has
a
custom
development
environment.
Integrates
easily
with
other
Microsoft
systems.
ASP
.NET
Disadvantages:
•
•
Works
best
with
Microsoft
SQL
Server,
which
has
a
4GB
limit
Harder
to
connect
to
open
source
databases.
2.2.2.3
Ruby
on
Rails
Ruby
on
Rails
(RoR)
is
a
web
development
framework
launched
first
in
December
2005
(Lenz,
2008).
The
framework
is
written
in
the
scripting
language
Ruby
that
was
developed
in
the
early
1990’s
by
Yukihiro
Matsumoto
(About
Ruby,
2008).
The
Rails
framework
was
built
to
help
make
the
design
of
web‐driven
database
applications
easier
and
faster.
This
was
accomplished
by
creating
a
framework
that
automatically
generated
many
of
the
more
tedious
and
boring
sections
of
code.
The
goal
is
to
allow
the
developer
to
focus
more
on
the
application
functionality
than
on
the
long,
but
necessary
code
base.
Ruby
on
Rails
is
open
source
software
that
has
a
large
community
of
involved
developers.
Over
the
years
these
developers
helped
to
fix
bugs
and
write
new
functionality
into
the
language
(Lenz,
2008).
The
Rails
framework
helps
the
developer
by
adhering
to
some
programming
principles
that
make
the
development
of
applications
easier
and
more
efficient.
The
most
important
of
these
principles
is
the
“don’t
repeat
yourself”
principle,
in
which
the
program
stores
frequently
used
19
code
in
one
place
and
references
it
for
multiple
applications
rather
than
forcing
the
copy
and
paste
of
code
(Lenz,
2008).
Rails
Advantages:
•
•
•
•
•
Open
source
software
community
provides
lots
of
support.
Framework
is
designed
for
taking
a
database
online.
Built
in
support
for
many
database
packages
(mySQL,
Oracle,
SQL
Server)
Allows
focus
on
functionality
instead
of
on
configurations
Built
in
relational
integrity.
Makes
querying
easier.
Rails
Disadvantages:
•
Development
team
would
need
to
learn
Ruby.
2.2.2.4
Django
Django,
like
Ruby
on
Rails,
is
a
web
development
framework
designed
to
help
make
the
development
of
database
driven
web‐applications
easier.
Unlike
RoR
however,
this
framework
is
written
in
the
scripting
language
Python.
Django
was
released
as
open
source
software
in
July
2005.
The
framework
was
developed
in
a
news
market,
and
thus
had
a
great
strength
in
delivering
content
based
pages
(Holovaty,
2007).
This
language
has
become
another
front‐runner
in
the
web
development
framework
landscape,
but
it
is
sometimes
overshadowed
by
the
popularity
of
RoR.
Django
Advantages:
Template
feature
allows
multiple
pages
to
look
the
same
with
minimal
effort.
Django
automatically
connects
to
the
database
server
and
will
send
it
the
necessary
commands
to
create
the
schema.
Django
Disadvantages:
•
•
•
•
The
development
team
would
need
to
learn.
Depending
on
the
requirements
of
the
pages,
there
may
be
a
need
for
an
HTML
template
for
each
individual
page
on
top
of
the
application.
20
2.2.3
Technology
Analysis
Conclusion
With
an
understanding
of
the
available
options,
technology
decisions
can
be
made
that
will
produce
the
best
product
for
the
requirements.
The
requirements
are
outlined
in
Chapter
3,
and
our
technology
decisions
to
meet
those
requirements
are
in
Chapter
5.
21
Chapter
3.
As‐is
System
3.1
Overview
of
Current
System
The
Overview
of
the
Current
System
is
an
assessment
of
what
is
currently
in
use
at
the
Harbormaster
Office.
This
assessment
was
completed
in
steps.
First
a
list
of
business
processes
was
made.
These
business
processes
were
then
each
looked
at
in
more
detail
to
create
Use
Cases.
These
steps
allow
for
a
more
accurate
requirements
definition.
3.1.1
Business
Processes
A
business
process
is
defined
as
a
group
of
tasks
that
fulfill
the
need
of
a
business.
When
data
need
to
be
stored,
or
a
bill
needs
to
be
generated,
a
business
process
is
performed
to
fulfill
that
need.
An
understanding
of
business
processes
helps
the
development
team
to
define
requirements
for
a
new
system.
The
following
is
a
list
of
business
processes
observed:
•
•
•
•
•
•
•
•
Enter
New
Person
Add
Candidate
to
Waitlist
Add
a
New
Boat
Register
a
New
Mooring
Add
new
Dinghy
Add
New
Issue
Pump‐out
Request
Processing
Pump‐out
•
•
•
•
•
•
•
Generate
Pump‐out
Report
Generate
Yearly
Billing
Process
Add
a
New
Inspection
Process
Bill
Payment
RFP:
Change
in
Mooring
Permit
RFP:
Mooring
Use
Ticket
Payment
3.1.2
Quickbase
Use
Cases
The
existing
system
stores
electronic
data
in
an
online
database
called
Quickbase
that
is
offered
by
Intuit
Inc.
The
Quickbase
system
is
accessed
using
a
webpage
online,
and
has
some
relational
integrity.
Quickbase
allows
users
to
enter
and
manipulate
data,
however
the
user
interface
is
cluttered,
and
the
system
lacks
the
flexibility
desired.
Use
cases
are
step‐by‐step
walkthroughs
of
the
major
business
processes
performed
in
the
Quickbase
system.
The
use
cases
are
used
to
analyze
the
strengths
and
weaknesses
of
the
current
system.
Also
use
cases
help
the
development
team
22
understand
the
user
interface,
so
a
similar
interface
can
be
created
for
the
new
system.
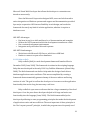
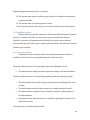
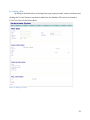
3.1.2.1
Use
Case
#1
This
use
case
outlines
steps
followed
to
add
a
new
person
to
the
system.
Adding
a
new
person
happens
when
the
Harbormaster’s
Office
receives
a
candidate
for
the
waitlist
or
a
new
boat
owner
requests
a
waterways
use
permit.
It
is
also
used
when
a
current
customer
submits
a
request
for
another
person
to
use
their
mooring,
or
when
a
boat
and/or
mooring
is
passed
to
a
family
member
of
a
customer.
Use
Case
Name:
Enter
New
Person
ID:
1
Importance
Level:
High
Primary
Actor:
User
Short
Description:
Add
a
new
person
entry
Trigger:
A
new
customer
submits
a
waitlist,
mooring,
or
waterways
permit
application.
Type:
EXTERNAL
TEMPORAL
Major
Inputs:
Major
Outputs:
Description:
Source:
Description:
Destination:
1.
Application
for:
1.
Customer
1.
New
person
entry
1.
Person
table
‐Waterways
Use
‐Waitlist
‐RFP
‐Dinghy
Major
Steps
Performed:
1.
Open
Quickbase
2.
Select
'Add
a
New
Person'
from
the
Person
drop‐down
menu.
3.
Enter
Name
and
Contact
Information
from
application
in
associated
fields
4.
Enter
in
any
Bills
or
Warnings
5.
Click
Save
6.
File
paper
copy
of
application
Figure
2:
Add
a
new
person
23
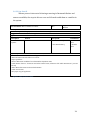
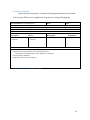
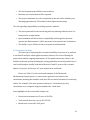
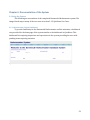
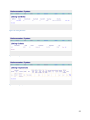
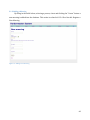
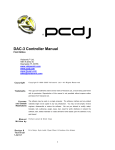
3.1.2.2
Use
Case
#2
When
a
person
is
interested
in
having
a
mooring
in
Dartmouth
Harbor
and
none
are
available,
the
steps
in
this
use
case
are
followed
to
add
them
to
a
waitlist
in
the
system.
Use
Case
Name:
Add
a
Candidate
to
waitlist
ID:
2
Importance
Level:
Medium
Primary
Actor:
User
Short
Description:
Adding
a
person
to
the
Waitlist
for
moorings
Trigger:
Candidate
submits
waitlist
application
Type:
EXTERNAL
TEMPORAL
Major
Inputs:
Major
Outputs:
Description:
Source:
Description:
1.
Form
and
1.
Candidate
1.
New
Person
Entry
payment
2.
New
Waitlist
Entry
Destination:
1.
Person
table
2.
Waitlist
table
Major
Steps
Performed:
1.
Form
is
received
from
Candidate
with
payment
of
$15
2.
Date
and
time
received
is
filled
out
on
form
3.
Open
Quickbase
4.
Select
'Add
a
New
Candidate'
from
the
Waitlist
dropdown
menu
5.
Click
'Browse
choices...'
for
Person
and
select
name
if
exists,
otherwise
click
'Add
a
New
Person'
(see
Use
Case
#1)
6.
Enter
Desired
Location
and
Vessel
Information
7.
Click
'Save'
button
8.
File
paper
copy
of
application
Figure
3:
Add
a
person
to
waitlist
24
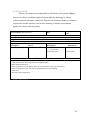
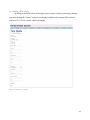
3.1.2.3
Use
Case
#3
This
use
case
maps
out
the
steps
taken
to
add
a
boat
to
the
system.
Adding
a
boat
occurs
when
a
candidate
applies
for
the
waitlist
for
moorings,
or
when
a
current
customer
purchases
a
new
boat.
This
use
case
is
also
used
when
a
customer
requests
for
another
person
to
use
his/her
mooring,
or
when
a
new
customer
applies
for
a
waterways
use
permit.
Use
Case
Name:
Add
a
New
Boat
ID:
3
Primary
Actor:
User
Short
Description:
Add
a
new
boat
Trigger:
Customer
submits
Waterways
Permit
Application
Type:
EXTERNAL
TEMPORAL
Major
Inputs:
Major
Outputs:
Description:
Source:
Description:
1.
Waterways
Use
App.
Customer
1.
New
Person
Entry
‐(if
necessary)
2.
New
Boat
Entry
Major
Steps
Performed:
1.
Open
Quickbase
2.
Click
on
'Add
a
New
Boat'
from
the
Boats
dropdown
menu.
3.
Enter
Vessel
Information
4.
Select
boat
owner
from
dropdown
menu,
or
create
if
doesn't
exist
(see
Use
Case
#1)
5.
Select
existing
mooring
or
add
new
one
(if
applicable
[see
Use
Case
#4])
6.
Click
Save.
7.
File
hard
copy
of
application.
Importance
Level:
High
Destination:
1.
Person
Table
2.
Boat
Table
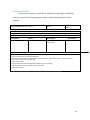
Figure
4:
Add
a
new
boat
25
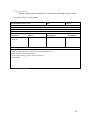
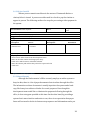
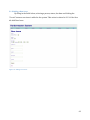
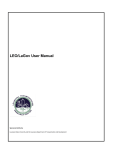
3.1.2.4
Use
Case
#4
This
use
case
describes
the
process
for
registering
a
new
mooring
when
one
becomes
available
for
a
customer
on
the
waitlist.
Use
Case
Name:
Register
a
New
Mooring
Primary
Actor:
User
Short
Description:
Add
a
new
mooring
Trigger:
A
mooring
becomes
available
Type:
EXTERNAL
TEMPORAL
Major
Inputs:
Description:
Source:
1.
Mooring
information
1.
user
2.
Candidate
accepts
mooring
offer
2.
Candidate
ID:
4
Major
Outputs:
Description:
1.
Mooring
offer
to
candidate
2.
New
Mooring
and
Boat
Registration
Form
Major
Steps
Performed:
1.
Open
Quickbase
2.
Select
'Add
a
New
Mooring'
from
Moorings
dropdown
menu
3.
Input
mooring
number
4.
Click
'Save'
button
5.
Click
'Add
Inspection'
button
(see
Use
Case
#11
)
6.
Click
'Browse
choices...'
for
Owner
of
Record
and
select
name
7.
Select
Status
and
Permit
Category
8.
Click
'Save'
button
Importance
Level:
High
1.
Candidate
Destination:
2.
Candidate
Figure
5:
Add
a
new
mooring
26
3.1.2.5
Use
Case
#5
This
use
case
explains
the
steps
for
adding
a
new
dinghy
to
the
system.
Adding
a
new
dinghy
occurs
when
a
customer
submits
an
application
for
dinghy
registration.
Use
Case
Name:
Add
New
Dinghy
ID:
5
Importance
Level:
Medium
Primary
Actor:
user
Short
Description:
Add
a
dinghy
Trigger:
Customer
submits
Dinghy
Registration
Form
Type:
EXTERNAL
TEMPORAL
Major
Inputs:
Major
Outputs:
Description:
Source:
Description:
Destination:
1.
Form
and
payment
1.
Customer
1.
New
person
1.
Person
table
(‐
if
necessary)
2.
New
Dinghy
2.
Dinghy
table
Major
Steps
Performed:
1.
Open
Quickbase
2.
Select
'Add
a
New
Dinghy'
from
Dinghies
dropdown
menu
3.
Click
'Browse
choices...'
for
Owner
and
select
name
if
exists,
otherwise
click
'Add
a
New
Person'
(see
Use
Case
#1)
4.
Select
owner
status
5.
Input
Dinghy
Location
and
Information
6.
Click
'Save'
button
7.
File
paper
copy
Figure
6:
Add
a
dinghy
27
3.1.2.6
Use
Case
#6
When
a
customer
has
a
complaint
or
a
problem
the
following
steps
are
taken
to
create
an
“issue”
in
the
system.
Use
Case
Name:
Add
New
Issue
ID:
6
Primary
Actor:
User
Short
Description:
Add
new
a
new
issue
Trigger:
Customer
calls,
radios,
or
walks
in
with
a
problem.
Type:
EXTERNAL
TEMPORAL
Major
Inputs:
Major
Outputs:
Description:
Source:
Description:
1.
Complaint,
issue,
or
1.
Customer
1.
New
Issue
Record
Request
Major
Steps
Performed:
1.
Open
Quickbase
2.
Click
on
'Add
a
New
Issue'
button
on
the
Issues
dropdown
menu.
3.
Enter
in
subject
and
issue
description
4.
Select
boat,
mooring,
or
person
the
issue
relates
to.
5.
Click
on
Save.
Importance
Level:
Medium
Destination:
1.
Issues
Table
Figure
7:
Add
a
new
issue
28
3.1.2.7
Use
Case
#7
The
Dartmouth
Harbor
Office
performs
pump‐outs
of
vessels’
septic
tanks
in
order
to
uphold
the
"No
Discharge"
law.
A
series
of
logs
and
forms
are
used
for
annual
reporting
to
the
town.
This
use
case
outlines
the
steps
to
log
a
pump‐out
request.
Use
Case
Name:
Pump‐out
Request
ID:
7
Primary
Actor:
User
Short
Description:
A
customer
requests
a
pump‐out.
Trigger:
Customer
calls,
radios,
or
walks
in
and
requests
a
pump‐out.
Type:
EXTERNAL
TEMPORAL
Major
Inputs:
Major
Outputs:
Description:
Source:
Description:
1.
Pump‐out
Request
1.
Customer
1.
Updated
Pump‐out
List
2.
Vessel/Mooring
Info
2.
Customer
Major
Steps
Performed:
1.
Customer
contacts
the
office
and
requests
a
pump‐out,
information
is
given.
2.
Vessel
name,
location,
and
side
of
boat
to
be
pumped
are
noted
on
the
clipboard.
3.
Customer
has
option
of
being
added
to
weekly
pump‐out
list.
4.
Additional
comments
added
(day
of
week
request,
etc.)
5.
After
pump‐out
performed
(use
case
#8);
the
entry
is
crossed
off
the
list.
Importance
Level:
Medium
Destination:
1.
Office
clipboard
Figure
8:
A
customer
requests
a
pumpout
29
3.1.2.8
Use
Case
#8
To
keep
the
waters
of
Dartmouth
Harbor
clean,
the
Harbormaster’s
Office
offers
the
service
of
septic
pump‐outs.
The
following
use
case
outlines
the
procedure
of
performing
a
pump‐out.
Use
Case
Name:
Processing
Pump
Out
ID:
8
Primary
Actor:
Assistant
Harbormaster
Short
Description:
Performing
pump‐outs
and
logging
pump‐out
data
Trigger:
Daily
Activity
Type:
EXTERNAL
TEMPORAL
Major
Inputs:
Major
Outputs:
Description:
Source:
Description:
1.
Pump‐out
List
1.
Office
1.
Updated
Pump‐out
List
Major
Steps
Performed:
1.
Perform
pump‐out
and
log
as
complete
2.
Repeat
step
1
for
rest
of
boats
on
Pump‐out
list
3.
Return
to
Harbormaster's
Office
4.
Copy
completed
pump‐outs
from
list
to
Pump‐outs
Log
book
Importance
Level:
Medium
Destination:
1.
Pump‐out
Log
book
Figure
9:
Performing
pumpouts
and
logging
pumpout
data
30
3.1.2.9
Use
Case
#9
To
continue
receiving
grant
funding
provided
for
waste
removals,
an
end
of
the
year
report
needs
to
be
submitted
with
totals
for
gallons
of
waste
removed
by
date.
This
use
case
describes
the
steps
to
generate
that
report.
Use
Case
Name:
Generate
Pump‐out
Report
ID:
9
Primary
Actor:
User
Short
Description:
Generate
the
year‐end
pump‐out
report
for
grant
renewal
Trigger:
Yearly
temporal
report.
Type:
EXTERNAL
TEMPORAL
Major
Inputs:
Major
Outputs:
Description:
Source:
Description:
1.
Pump‐out
log
book
1.
Office
1.
Yearly
Summary
Report
Major
Steps
Performed:
1.
Open
Microsoft
Excel.
2.
Manually
enter
data
from
pump‐out
log
to
Excel.
3.
Repeat
for
each
entry
in
the
year
of
the
report.
4.
Print
out
report.
5.
Click
'Save'
button
Importance
Level:
Medium
Destination:
1.
Print
Figure
10:
Generate
the
yearend
pumpout
report
31
3.1.2.10
Use
Case
#10
As
the
Harbormaster’s
Office
is
funded
through
user
fees,
a
yearly
billing
process
needs
to
occur
to
receive
payments.
This
use
case
explains
the
steps
taken
to
generate
yearly
bills.
Use
Case
Name:
Generate
Yearly
Billing
Process
ID:
10
Importance
Level:
High
Primary
Actor:
User
Short
Description:
Generate
letters
and
invoices
for
all
renewals
for
the
coming
year.
Trigger:
Every
year
mooring
permitees
are
sent
invoices
for
boats,
moorings,
dinghies,
&
wait.
Type:
EXTERNAL
TEMPORAL
Major
Inputs:
Major
Outputs:
Description:
Source:
Description:
Destination:
1.
Person
data
1.
Database
1.
Invoice
1.
Customer
2.
Boat
data
2.
Database
3.
Mooring
data
3.
Database
4.
Dinghy
data
4.
Database
5.
Waitlist
data
5.
Database
6.
Rates
6.
Harbor
Office
Major
Steps
Performed:
1.
Generate
CSV
files
of
Quickbase
tables.
2.
Upload
Person,
Boat,
and
Mooring
CSV
files
to
MS
Access
and
create
relationships.
3.
Use
MailMerge
feature
to
generate
a
.doc
file
of
invoices.
4.
Manually
scan
each
invoice
for
errors.
5.
Update
.doc
file
with
any
updates
or
error
corrections.
6.
Upload
Dinghy
CSV
to
MS
Access.
7.
Use
MailMerge
feature
to
generate
.doc
file
of
Dinghy
invoices.
8.
Upload
Waitlist
CSV
to
MS
Access.
8.
Use
MailMerge
feature
to
generate
.doc
file
of
Waitlist
invoices.
9.
Print
out
the
three
.doc
files.
10.
Manually
sort
the
papers
to
put
the
invoices
for
the
same
person
together.
11.
Stuff
envelopes,
manually
stamp,
and
then
mail.
Figure
11:
Generate
letters
and
invoices
for
renewals
32
3.1.2.11
Use
Case
#11
To
ensure
the
safety
of
those
who
use
Dartmouth
Harbor,
inspections
of
moorings
are
required
every
three
years
by
law.
The
following
use
case
goes
through
the
process
of
adding
an
inspection
to
a
moorings
record
in
the
system.
Use
Case
Name:
Add
an
Inspection
ID:
11
Primary
Actor:
User
Short
Description:
Input
inspection
information
for
a
mooring
Trigger:
New
inspection
recently
completed
Type:
EXTERNAL
TEMPORAL
Major
Inputs:
Major
Outputs:
Description:
Source:
Description:
1.
Inspection
report
1.
Inspection
company
1.
Inspection
information
Major
Steps
Performed:
1.
Open
Quickbase
2.
Select
'Add
a
New
Inspection'
from
Inspections
drop
down
3.
Click
'Browse
choices...'
for
Related
Mooring
and
select
number
4.
Input
inspection
date
and
Inspector
and
related
mooring
information
5.
Click
'Save'
button
Importance
Level:
Low
Destination:
1.
Inspection
table
Figure
12:
Input
inspection
information
for
a
mooring
33
3.1.2.12
Use
Case
#12
Once
bills
have
been
sent
to
customers,
their
payments
need
to
be
recorded
in
the
system.
This
use
case
explains
the
steps
for
processing
a
bill
payment.
Use
Case
Name:
Process
Bill
Payment
ID:
12
Primary
Actor:
User
Short
Description:
Process
a
payment
from
a
customer.
Trigger:
Receive
check
in
mail
from
customer.
Type:
EXTERNAL
TEMPORAL
Major
Inputs:
Major
Outputs:
Description:
Source:
Description:
1.
Invoice
1.
Customer
1.
Updated
Balance
2.
Payment
2.
Customer
Major
Steps
Performed:
1.
Using
information
on
invoice,
query
database
for
person.
2.
Enter
in
the
amount
paid
in
the
corresponding
columns.
‐May
need
to
use
multiple
forms,
since
dinghies
are
unrelated.
3.
Save
updates
in
database.
4.
Mail
the
check
to
the
town
Collector.
Importance
Level:
High
Destination:
1.
Database
Figure
13:
Process
a
payment
from
a
customer
34
3.1.2.13
Use
Case
#13
This
use
case
describes
the
steps
for
changing
a
mooring
permit
in
the
system.
This
would
happen
in
the
event
of
a
transfer
to
a
family
member,
or
the
purchase
of
a
new
boat.
Use
Case
Name:
RFP:
Change
in
Mooring
Permit
ID:
13
Primary
Actor:
User
Short
Description:
A
user
requests
a
change
in
their
mooring
permit.
Trigger:
RFP
form
received
in
mail.
Type:
EXTERNAL
TEMPORAL
Major
Inputs:
Major
Outputs:
Description:
Source:
Description:
1.
RFP:
Change
in
Permit
1.
Customer
1.
Updated
Mooring
Permit
2.
New
Boat
Entry
‐If
necessary
3.
New
Person
Entry
‐If
necessary
Major
Steps
Performed:
1.
Determine
type
of
RFP:
‐
Transfer
to
Family
Member
‐
Approve
new
vessel
of
record
for
mooring.
‐
Other
2.
Alter
Quickbase
entry
on
mooring
to
reflect
change.
‐
Change
person
linked
to
mooring
in
case
of
transfer
‐
Change
in
boat
linked
to
mooring
in
case
of
new
vessel
of
record.
3.
Create
new
person
or
boat
if
necessary
(see
use
case
#1
and
#3
respectively.)
Importance
Level:
Medium
Destination:
1.
Mooring
Table
2.
Boat
Table
3.
Person
Table
Figure
14:
Permittee
requests
change
in
mooring
permit
35
3.1.2.14
Use
Case
#14
In
the
event
a
customer
would
like
to
lend
his/her
mooring
to
a
friend
for
part
of
a
season,
the
following
steps
are
taken
to
input
that
information
in
the
system.
Use
Case
Name:
RFP:
Mooring
Use
ID:
14
Importance
Level:
Low
Primary
Actor:
User
Short
Description:
Mooring
permittee
requests
another
be
able
to
use
his/her
mooring
Trigger:
RFP
received
from
mooring
permittee
Type:
EXTERNAL
TEMPORAL
Major
Inputs:
Major
Outputs:
Description:
Source:
Description:
Destination:
1.
RFP:
Mooring
Use
form
1.
Mooring
Permittee
1.
Permitted
User
1.
Person
table
information
Major
Steps
Performed:
1.
Open
Quickbase
2.
Select
'Find
People'
from
People
dropdown
3.
Select
the
Permitted
User's
name
if
exists,
otherwise
click
'Add
a
New
Person'
(see
Use
Case
#1)
4.
Set
'Status',
'rfp
status'
and
'RFP
Type'
5.
Click
'Save'
button
6.
Select
'Add
a
New
Boat'
from
Boats
dropdown,
(see
Use
Case
#3)
7.
Input
Permittee's
mooring
number
in
location
field
8.
Click
'Save'
button
Figure
15:
Mooring
permittee
requests
another
be
allowed
to
use
their
mooring
36
3.1.2.15
Use
Case
#15
To
ensure
the
safety
of
those
in
the
waters
of
Dartmouth
Harbor,
the
Harbormaster’s
Office
is
also
in
charge
of
handing
out
violations
to
those
not
following
the
law.
This
use
case
outlines
the
process
for
entering
a
ticket
into
the
system.
Use
Case
Name:
Add
a
New
Ticket
ID:
15
Primary
Actor:
User
Short
Description:
Create
a
new
ticket
entry
Trigger:
Person
commits
an
offense
and
is
given
a
citation.
Type:
EXTERNAL
TEMPORAL
Major
Inputs:
Major
Outputs:
Description:
Source:
Description:
1.
Ticket
1.
HM
Employee
1.
New
ticket
entry
Major
Steps
Performed:
1.
Open
Quickbase
2.
Select
'Add
a
New
Ticket'
from
the
Ticket
drop‐down
menu.
3.
Enter
Ticket
Number
and
select
an
existing
person
(or
create
new
if
necessary)
4.
Enter
in
amount
of
citation
5.
Click
Save
1.
Open
Quickbase
2.
Select
'Add
a
New
Ticket'
from
the
Ticket
drop‐down
menu.
3.
Enter
Ticket
Number
and
select
an
existing
person
(or
create
new
if
necessary)
Importance
Level:
Medium
Destination:
1.
Ticket
table
Figure
16:
Add
a
new
ticket
37
3.1.2.16
Use
Case
#16
When
a
person
commits
an
offense
in
the
waters
of
Dartmouth
Harbor
a
citation/ticket
is
issued.
A
person
can
either
mail
in
a
check
to
pay
the
citation
or
appear
in
person.
The
following
outlines
the
steps
for
processing
a
ticket
payment
in
the
system.
Use
Case
Name:
Ticket
Payment
ID:
15
Primary
Actor:
User
Short
Description:
A
customer
pays
a
ticket
or
citation.
Trigger:
A
customer
makes
a
payment
for
a
fine.
Type:
EXTERNAL
TEMPORAL
Major
Inputs:
Major
Outputs:
Description:
Source:
Description:
1.
Ticket
1.
Customer
1.
Updated
Ticket
Entry
2.
Amount
Paid
2.
Customer
Major
Steps
Performed:
1.
Open
Quickbase.
2.
Select
'Find
a
Ticket'
from
the
Tickets
dropdown
menu.
3.
Enter
in
the
ticket
number
and
bring
up
the
entry.
4.
Click
on
the
'Edit'
button
to
make
fields
editable.
5.
Enter
the
amount
paid
and
the
date
paid
in
the
respective
fields.
6.
Click
Save.
Importance
Level:
Low
Destination:
1.
Ticket
Table
Figure
17:
A
customer
pays
a
ticket
3.1.3
Manual
Records
Although
the
Harbormaster’s
Office
currently
employs
an
online
system
to
keep
its
data,
there
is
a
list
of
paper
documents
that
circulates
through
the
office.
The
information
on
these
documents
is
usually
input
into
the
system
and
a
hard‐
copy
filed
away
in
a
cabinet
or
binder
for
record
purposes.
Even
though
the
development
team
would
like
to
eliminate
the
paperwork
flowing
through
the
office,
it
does
not
appear
possible
at
this
time.
On
the
other
hand,
by
providing
a
system
that
is
more
intuitive
and
easier
to
use,
there
is
an
expectation
that
paper
forms
will
not
need
to
be
the
in‐between
step
anymore
and
information
can
be
put
38
directly
into
the
system.
Copies
of
some
of
said
documents
are
provided
in
the
appendix
to
this
proposal.
3.2
Requirements
Definition
The
following
requirements
list
the
features
needed
in
the
system.
They
are
broken
into
two
sections.
The
Core
Requirements
are
the
requirements
the
system
must
have
in
order
to
function.
The
Expanded
Requirements
are
requirements
that
will
be
included
if
feasible
within
the
timeframe.
Core
Requirements:
1. The
system
must
store
name
and
contact
information
about
the
customers
of
the
Harbormaster’s
Office.
2. The
system
must
store
information
about
boats.
3. The
system
must
store
information
about
moorings,
including
number,
owner
and
inspection
date.
4. The
system
must
store
information
on
dinghies
such
as
contact
information
of
owner,
and
information
and
location
of
dinghy.
5. The
system
must
store
ticket/violation
data.
6. The
system
must
produce
reports
about
people,
moorings
and
boats.
7. These
reports
will
draw
information
from
other
tables
such
as
inspections,
tickets,
and
warnings.
8. The
system
must
support
multiple
users
with
log‐ins.
9. The
system
must
be
secured
with
appropriate
passwords
and
administrative
restrictions.
10. The
system
must
have
a
web‐based
front‐end
and
be
a
SQL‐based
relational
database
management
system.
11. The
system
must
be
accessible
from
any
computer
with
an
Internet
connection.
39
Expanded
Requirements
(In
order
of
priority):
12. The
system
must
support
mail‐merge
activities
for
sending
out
registration
renewals
and
bills.
13. The
system
must
store
photographs
of
boats.
14. The
system
must
provide
a
way
to
track/store
transient
vessel
information.
3.3
Feasibility
Analysis
We
performed
a
feasibility
analysis
for
the
Dartmouth
Harbormaster
System
project
to
evaluate
risk.
There
are
three
main
areas
covered
in
this
analysis:
technical,
economic,
and
organizational
feasibility.
No
project
comes
without
inherent
risk;
the
goal
of
this
report
is
help
understand
where
the
risks
arise
and
the
possible
repercussions.
3.3.2
Technical
Feasibility
Technically,
the
development
of
the
Dartmouth
Harbormaster
System
is
feasible;
however
there
are
a
reasonable
amount
of
risks
involved.
Dartmouth
Harbormaster’s
risk
regarding
computerized
databases
is
low.
•
The
Harbormaster
employees
have
experience
using
a
web‐based
database.
Dartmouth
Harbormaster’s
risk
regarding
familiarity
with
the
technology
is
high.
•
The
development
team
will
be
using
web
application
technology
that
is
new
to
them.
•
The
development
team
does
have
experience
using
the
database
server.
•
Few
Harbormaster
employees
have
technical
experience
with
database
or
web
development.
•
Development
tools
and
references
are
available
regarding
all
software
to
be
used
in
the
system.
The
project
size
is
considered
medium
risk.
40
•
The
development
team
will
have
two
members.
•
Business
user
involvement
will
be
required.
•
The
project
timeframe
is
set
for
completion
by
the
end
of
the
calendar
year,
allowing
approximately
2.5
months
for
development
and
testing.
The
risk
regarding
compatibility
to
existing
systems
is
medium.
•
The
new
system
will
not
be
interacting
with
any
existing
software
since
it
is
being
used
as
a
replacement.
•
Open
standards
will
allow
future
compatibility
and
integration
into
new
systems
the
Harbormaster’s
office
may
want
to
incorporate
into
its
business.
•
The
ability
to
port
old
data
to
the
new
system
is
undetermined.
3.3.2
Economic
Feasibility
The
best
way
of
estimating
the
economic
feasibility
of
a
project
is
to
perform
a
cost‐benefit
analysis,
which
applies
monetary
values
to
the
costs
of
having
the
project
done
and
the
ongoing
maintenance.
It
also
applies
monetary
values
to
the
benefits
of
the
new
system
including
the
savings
gained
by
increased
productivity.
A
cost
benefit
analysis
usually
looks
ahead
between
3
and
10
years
at
the
economic
impact
of
a
project.
In
this
case,
a
5‐year
analysis
was
conducted.
Please
see
Table
1
for
the
cost
benefit
analysis
of
the
Dartmouth
Harbormaster
System
project.
A
conservative
approach
was
taken
for
the
calculations,
meaning
the
numbers
used
were
the
low
end
of
estimates
for
monetary
values.
For
example,
if
the
new
system
would
save
1‐3
man‐hours
per
day,
calculations
were
computed
using
the
numbers
for
1
man‐hour.
Some
highlights
of
the
cost‐benefit
analysis
are:
•
Return
on
investment
over
5
years
is
30.95%.
•
Total
benefit
after
five
years
is
$21,237.80.
•
Break‐even
occurs
after
3.49
years.
41
These
numbers
indicate
that
this
system
will
pay
for
itself
through
savings
and
increased
productivity
in
three
and
a
half
years.
The
system
will
also
grant
over
a
30%
return
on
the
initial
investment.
The
development
of
this
system
is
economically
feasible.
3.3.2
Organizational
Feasibility
This
project
yields
a
medium
risk
from
the
organizational
perspective.
The
objective
of
the
system
is
in
line
with
the
mission
of
the
Harbormaster
and
will
certainly
help
attain
the
goals
set
forth
by
the
Harbormaster
office.
Time
saved
by
using
the
new
system
will
allow
for
more
projects
on
the
water
and
more
services
provided
to
clients.
The
project
champion,
Assistant
Harbormaster
Julian
Race,
is
very
well
equipped
to
act
as
the
project
liaison
and
will
be
qualified
to
use
and
maintain
the
system
in
the
future
after
the
system
goes
live.
Mr.
Race
has
gained
the
support
of
not
only
the
Harbormaster’s
office
but
also
of
the
town
of
Dartmouth
as
well.
The
users
of
this
system,
the
Harbormaster
employees,
will
be
well
equipped
to
use
the
new
system.
There
is
question,
however,
as
to
how
well
it
will
be
received.
The
methods
used
in
this
office
may
be
inefficient,
but
most
of
the
staff
have
accepted
them
and
grown
used
to
the
way
things
are
done.
Adoption
of
the
new
system
may
not
be
without
resistance
or
confusion
among
the
users.
42
3.4
Cost‐Benefit
Analysis1
Table
1:
CostBenefit
Analysis
1
Explanation
of
values:
•
•
•
•
Savings
from
increased
efficiency:
Calculated
at
one‐man
hour
($14.03)
saved
per
day.
Cost
of
time
spent
with
Development
team:
Calculated
at
2
Assistant
Harbormaster
(Asst.
HM)
and
1
HM
hour
per
visit
for
11
visits
(14.03+14.03+31.41)*11
visits.
Operational
Labor:
Estimated
2
man‐hours
of
Asst.
HM
work
per
work.
Training
cost:
Budgeted
5
hours
of
training
time
per
employee
in
year
#2.
Year
#3
allows
for
20
hours
of
training.
Years
#4
and
#5
allow
for
15
hours.
Also
includes
30
hours
for
the
system
admin
to
learn
Ruby
on
Rails.
43
Chapter
4.
Methods
4.1
SDLC
The
primary
method
used
to
guide
this
project
is
the
System
Development
Life
Cycle
(SDLC),
which
is
a
process
for
developing
systems.
SDLC
is
a
standard
set
of
steps
to
follow
for
systems
development,
specifically
planning,
analysis,
design
and
implementation.
In
the
planning
phase,
the
development
team
gathers
requirements
for
the
system,
in
other
words,
what
the
system
needs
to
do
or
what
functionality
it
needs
to
contain.
In
addition
to
requirements,
the
team
gets
a
sense
of
the
value
of
the
system
for
the
business
and
sets
out
a
plan
for
the
project.
The
analysis
phase
is
where
the
team
investigates
the
costs
and
benefits
of
implementing
a
new
system
(Dennis,
Wixom,
&
Roth,
2006).
In
the
design
phase
the
team
does
just
that,
designs
the
system
in
the
physical
and
technical
sense
by
creating
the
architecture
and
user
interface
designs.
The
design
phase
also
includes
any
testing
and
fine
tuning
to
specifications.
The
final
phase
of
the
SDLC
is
the
implementation
phase,
the
time
when
the
system
is
put
in
place
and
training
for
it
begins
(Dennis,
Wixom,
&
Roth,
2006).
44
4.2
Work
Schedule
Milestone/Deliverable
Target
Date
1. Meet
with
Harbormaster
to
discuss
system
needs
August
26,
2008
2. Refine
system
requirements
and
project
scope
September
3,
2008
3. Complete
System
Request
and
Industry
Review
September
4,
2008
4. Complete
Use
Case,
Feasibility
and
Technology
Analyses
September
10,
2008
5. Create
Data
Model
September
14,
2008
6. Draft
User
Interface
September
26,
2008
7. Present
Proposal
October
1,
2008
8. Begin
System
Architecture
design
October
2,
2008
9. Begin
User
Interface
design
November
5,
2008
10. Begin
System
Testing
December
3,
2008
11. Implement
System
December
29,
2008
12. Final
Presentation
January
6,
2009
13. Finalize
Project
Report
January
12,
2009
45
4.3
Task
List
The
following
figure
is
a
schedule
of
tasks
for
project
completion.
The
schedule
runs
Sunday
to
Saturday
from
August
26,
2008
to
January
14,
2009.
Figure
18:
Gantt
Chart
46
Chapter
5.
Design
of
the
to‐be
System
5.1
Technology
Decisions
The
new
system
is
built
using
mySQL
for
back‐end.
This
is
a
free
and
dynamic
database
server
that
has
the
web
capabilities
that
are
required.
The
front‐end
of
the
system
is
written
using
Ruby
on
Rails
(RoR).
This
front‐end
decision
allows
for
future
expandability
and
contains
features
that
will
assist
in
web
development.
5.2
Data
Model
A
data
model
is
a
diagram
that
shows
the
different
types
of
data
to
be
stored
(entities)
and
their
relationships
to
each
other.
Each
square
represents
an
entity,
with
the
name
being
in
the
center.
A
line
represents
a
relationship
to
another
entity.
The
values
reading
“1”
and
“M”
denote
the
kind
of
relationship
the
line
represents.
For
example,
if
one
person
can
own
multiple
dinghies,
there
is
a
“1”
next
to
person,
and
an
“M”
next
to
Dinghy.
This
model
is
used
to
create
the
back‐end
of
the
system.
The
relationships
indicate
how
data
is
pulled
from
multiple
tables.
47
Figure
20:
Entity
Relationship
Diagram
–
Dartmouth
Harbormaster
System
The
following
is
a
list
of
field
names
for
the
to‐be
system.
Person
•
•
•
•
•
•
•
•
Customer
ID
(PK)
First
Name
Last
Name
Suffix
Street
City
State
Zip
Code
•
•
•
•
•
•
Phone
Alt
Phone
E‐Mail
Resident
Status
Alt
address
Notes
48
Boat
•
•
•
•
•
•
•
•
•
•
•
•
•
•
•
Boat
ID
(PK)
Vessel
Name
Owner
(FK)
Length
Draft
Color
Type
Vessel
Year
Manufacturer
Registration
Pump‐out
Location
Active
Notes
Beam
Mooring
•
•
•
•
•
•
•
•
•
•
•
•
•
•
•
•
•
•
•
•
•
•
•
•
Mooring
Number
(PK)
Owner
(FK)
Site
Depth
Latitude
Longitude
Permit
type
Notes
Dinghy
•
•
•
•
•
•
•
•
•
•
•
•
•
•
•
•
Tickets
•
•
•
•
•
•
•
•
•
•
Ticket
Number
(PK)
Violator
(FK)
Date
Time
Boat
ID
(FK)
Location
Officer
Violation
Code
Fine
Total
Notes
Mooring
Inspection
Dinghy
ID
(PK)
Owner
(FK)
Status
Location
Permit
Type
Decal
Number
Length
Color
Manufacturer
Model
HIN
Type
Registration
Reg.
State
Features/Identifying
Marks
Notes
Waitlist
•
Inspection
ID
(PK)
Mooring
Number
(FK)
Inspection
Date
Inspector
Weight
Type
Bottom
Chain
Size
Bottom
Chain
Length
Bottom
Chain
Condition
Top
Chain
Size
Top
Chain
Length
Top
Chain
Condition
Pennant
Size
Pennant
Length
Pennant
Condition
Mooring
Eye
Condition
Notes
Waitlist
Number
(PK)
49
•
•
•
•
•
•
•
•
Person
(FK)
Boat
(FK)
Entry
time
Status
Desired
Location
Notes
Assigned
location
Assigned
date
Issues
•
•
•
•
•
•
•
•
•
Issue
ID
(PK)
Person
(FK)
Status
Due
Date
Assigned
To
Priority
Subject
Description
Work
log
BI
HDR
(Billing
Header)
•
•
•
•
Invoice
#
(PK)
Person
(FK)
Date
Amount
Paid
BI
LINE
(Billing
Line
Detail)
•
•
•
•
•
Billing
Line
#
(PK)
Invoice
(FK)
Rate
Type
(FK)
Amount
Description
RATES
•
•
•
Rate
Year
(PK)
Rate
Type
(PK)
Rate
Amount
MOORING
HIST
•
•
•
•
Mooring
Hist
#
(PK)
Mooring
(FK)
Owner
(PK)
Boat
(FK)
5.3
User
Interface
The
user
interface
is
the
part
of
the
application
that
appears
in
the
web
browser.
One
of
the
major
user
interface
goals
is
to
utilize
a
similar
style
to
Quickbase
to
facilitate
user
learning
of
the
new
system.
In
order
to
assure
this
the
user
interface
for
the
system
was
designed
by
following
the
layout
of
information
in
Quickbase’s
pages.
The
following
figures
are
examples
of
what
some
pages
look
like
in
the
final
system.
50
Figure
21:
Add
New
Mooring
Screenshot
Figure
22:
Listing
Boats
Screenshot
51
Figure
23:
New
Boat
Screenshot
52
Chapter
6.
Documentation
of
the
System
6.1
Using
the
System
The
following
are
screenshots
of
the
completed
Dartmouth
Harbormaster
system.
The
images
listed
map
to
many
of
the
use
cases
in
section
3.1.2
Quickbase
Use
Cases.
6.1.1
Harbormaster
System
Dashboard
To
provide
familiarity
for
the
Dartmouth
Harbormaster
and
his
assistants,
a
dashboard
was
provided
for
the
homepage
of
the
system
similar
to
the
dashboard
in
Quickbase.
This
dashboard
lists
expiring
inspections
and
open
issues
in
the
system
providing
the
user
with
pending
items
requiring
attention.
Figure
24:
Harbormaster
System
Dashboard
53
6.1.2
Listing
Pages
In
addition
to
the
dashboard
page,
listing
pages
were
also
included
to
mimic
some
of
the
basics
of
the
Quickbase
system.
These
listing
pages
are
index
pages
for
the
various
data
categories
in
the
system.
The
following
are
screenshots
of
the
listing
pages
for
Boats,
Moorings,
People,
Waitlist,
Tickets,
Inspections,
Dinghies,
Issues
and
Bills.
Figure
25:
Listing
Boats
Figure
26:
Listing
Moorings
Figure
27:
Listing
People
54
Figure
28:
Listing
Waitlists
Figure
29:
Listing
Tickets
Figure
30:
Listing
Inspections
55
Figure
31:
Listing
Dinghies
Figure
32:
Listing
Issues
Figure
33:
Listing
Bills
56
6.1.3
Adding
a
person
By
filling
in
the
fields
below
and
clicking
the
“Create”
button
a
new
person
is
added
into
the
database.
This
action
is
related
to
3.1.2.1
Use
Case
#1:
Enter
New
Person.
Figure
34:
Adding
a
new
person
57
6.1.4
Adding
a
Candidate
to
the
Waitlist
for
Moorings
To
add
a
person’s
request
for
a
mooring
to
the
waitlist,
use
the
new
waitlist
screen.
On
this
screen,
a
user
must
select
a
person
from
the
drop‐down
box,
in
turn
activating
the
boat
drop‐down
to
select
a
boat
for
the
person.
Listed
next
to
the
boat
name
is
an
id
number
to
be
entered
into
the
next
textbox.
Select
a
status
for
the
waitlist
application
and
type
in
a
desired
location.
This
action
is
related
to
3.1.2.2
Use
Case
#2:
Add
a
Candidate
to
waitlist.
Figure
35:
Add
a
candidate
to
waitlist
58
6.1.5
Adding
a
Boat
By
filling
in
the
fields
below,
selecting
a
boat
type,
pump‐out
side,
owner,
and
status
and
clicking
the
“Create”
button
a
new
boat
is
added
into
the
database.
This
action
is
related
to
3.1.2.3
Use
Case
#3:
Add
a
New
Boat.
Figure
36:
Adding
a
new
boat
59
6.1.6
Adding
a
Mooring
By
filling
in
the
fields
below,
selecting
a
person,
a
boat
and
clicking
the
“Create”
button
a
new
mooring
is
added
into
the
database.
This
action
is
related
to3.1.2.4
Use
Case
#4:
Register
a
New
Mooring.
Figure
37:
Adding
a
new
mooring
60
6.1.7
Adding
a
New
Dinghy
By
filling
in
the
fields
below,
selecting
a
person,
status,
location,
permit
type,
dinghy
type
and
clicking
the
“Create”
button
a
new
dinghy
is
added
to
the
system.
This
action
is
related
to
3.1.2.5
Use
Case
#5:
Add
New
Dinghy.
Figure
38:
Adding
a
new
dinghy
61
6.1.8
Adding
a
New
Issue
By
filling
in
the
fields
below,
selecting
a
person,
status,
due
date
and
clicking
the
“Create”
button
a
new
issue
is
added
to
the
system.
This
action
is
related
to
3.1.2.6
Use
Case
#6:
Add
New
Issue.
Figure
39:
Adding
a
new
issue
62
6.1.9
Adding
a
New
Inspection
By
filling
in
the
fields
below,
selecting
an
inspection
date,
type
and
clicking
the
“Create”
button
a
new
inspection
is
added
to
the
system.
This
action
is
related
to
3.1.2.11
Use
Case
#11:
Add
an
Inspection.
Figure
40:
Adding
a
new
inspection
63
6.1.10
Editing
a
mooring
By
changing
any
of
the
fields
below
and
clicking
the
“Update”
button
an
existing
mooring
is
changed
in
the
system.
This
action
is
related
to
3.1.2.13
Use
Case
#13:
RFP:
Change
in
Mooring
Permit.
Figure
41:
Editing
a
mooring
64
6.1.11
Adding
a
New
Ticket
Filling
out
the
following
form,
selecting
a
person,
boat,
status,
a
date
issued
and
clicking
the
“Create”
button
adds
a
new
ticket
to
the
system.
This
action
is
related
to
3.1.2.15
Use
Case
#15:
Add
a
New
Ticket.
Figure
42:
Adding
a
new
ticket
65
6.1.12
Ticket
Payment
By
changing
the
“Status”
drop
down
to
“Paid”
in
the
Editing
ticket
screen
and
clicking
the
“Update”
button
a
ticket
is
now
recorded
as
paid
in
the
system.
This
action
is
related
to
3.1.2.16
Use
Case
#16:
Ticket
Payment.
Figure
43:
Ticket
payment
66
6.1.13
Adding
Rate
Information
To
provide
historical
data
on
payment
rates,
a
new
rate
must
be
entered
for
each
category
each
year.
By
filling
in
the
fields
below,
selecting
a
rate
type
and
clicking
the
“Create”
button,
a
rate
is
added
to
the
system.
Figure
44:
Input
Rate
Information
6.1.13
Listing
Rate
Information
The
page
below
shows
the
rates
listed
in
the
system.
Bills
for
the
current
year
are
based
on
the
current
year’s
rate
information.
Figure
45:
Listing
Rate
Information
67
6.1.14
Editing
Rate
Information
By
changing
the
fields
below
and
clicking
the
“Update”
button,
the
user
is
able
to
edit
rate
information
for
a
particular
rate
type
or
year.
Figure
46:
Editing
Rate
Information
6.1.15
Generating
a
Bill
Proofing
the
bills
generated
by
the
system
ensures
billing
line
items
and
customer
information
is
correct.
From
invoice
pages
the
user
is
able
to
print
a
bill
for
this
specific
customer.
This
action
is
related
to
3.1.2.10
Use
Case
#10:
Generate
Yearly
Billing
Process.
Figure
47:
Generate
a
bill
68
6.1.15
Editing
Pages
In
addition
to
the
listing
and
new
pages
for
each
data
type
in
the
system,
there
are
also
related
edit
pages
for
changing
data.
The
following
are
screenshots
of
the
edit
pages
for
pages
for
Boats,
People,
Waitlist,
Inspections,
Dinghies,
Issues
and
Bills.
69
Figure
48:
Edit
Boat
Page
70
Figure
49:
Edit
Person
Page
Figure
50:
Edit
Waitlist
Page
71
Figure
51:
Edit
Inspection
Page
72
Figure
52:
Edit
Dinghy
Page
73
Figure
53:
Edit
Issue
Page
Figure
54:
Edit
Invoice
Page
74
6.1.16
Show
Pages
To
provide
the
ability
to
view
data
within
the
system
there
are
“show”
pages.
By
clicking
on
the
“show”
link
beside
any
record
on
the
listing
pages
the
user
is
able
to
view
that
specific
record
in
the
system.
Many
of
the
show
pages
pull
information
from
other
entities
to
show
the
relationship
between
them.
For
example,
by
looking
at
the
show
page
for
a
boat,
if
that
boat
has
a
mooring,
the
mooring
information
also
shows
as
does
the
owner
information.
Figure
55:
Show
Boat
Page
75
Figure
56:
Show
Mooring
Page
Figure
57:
Show
Person
Page
76
Figure
58:
Show
Waitlist
Page
Figure
59:
Show
Ticket
Page
77
Figure
60:
Show
Inspection
Page
78
Figure
61:
Show
Dinghy
Page
Figure
62:
Show
Issue
Page
79
Figure
63:
Show
Invoice
Page
6.2
Additional
References
For
additional
information
about
using
the
system
please
see
Appendix
IV.
User
Manual.
For
more
information
on
the
construction
of
the
website
or
how
the
web
framework
works,
please
reference
Appendix
II.
Technical
Documentation.
80
Chapter
7.
Conclusions
7.1
Testing
Two
approaches
were
used
to
the
testing
of
this
system.
As
the
code
was
developed,
each
developer
performed
unit
tests
of
their
own
code.
No
code
was
acceptable
until
it
passed
the
unit
tests
satisfactorily
on
the
developer’s
local
web
server.
Each
field
on
each
webpage
was
tested
as
it
was
added
to
the
application,
and
all
functions
were
tested
before
they
were
committed
to
the
repository.
The
second
approach
used
in
the
system
testing
involved
having
the
developer
who
did
not
write
the
code
test
it
on
their
machine.
This
allowed
a
fresh
perspective,
and
also
helped
us
ensure
that
the
code
worked
across
platforms,
as
one
developer
used
a
UNIX‐based
machine
to
develop,
and
another
used
Windows.
Having
each
developer
perform
unit
tests
for
the
pages
helped
ensure
that
nothing
would
slip
through
the
cracks.
7.2
Deployment
The
application
has
been
deployed
on
the
server
located
in
the
Dartmouth
Harbormaster
office.
It
is
running
on
version
2.2
of
Apache
web
server,
and
is
accessible
from
any
computer
with
Internet
access
by
entering
the
following
URL
into
a
web
browser:
http://dartmouthharbormaster.webhop.net
For
more
information
on
the
deployment
of
the
system,
such
as
configuration
settings,
please
reference
the
technical
documentation
in
Appendix
II.
7.3
Future
Recommendations
While
this
system
is
functional
and
meets
the
requirements
set
forth
at
the
beginning
of
this
project,
there
are
certain
features
that
could
be
improved
upon
in
the
future.
Mr.
Race
has
submitted
requests
for
some
formatting
and
functionality
changes
that
should
be
completed
at
a
future
date.
These
future
additions
will
be
broken
into
three
sections:
formatting,
functionality,
and
deployment.
81
Formatting:
•
On
the
new
inspection
page
place
chain
sizes/lengths
into
a
table
format
to
make
data
entry
more
intuitive.
o Rows:
Chain
location
(Top/Bottom/Pennant)
o Columns:
Size,
Length,
Condition
•
Put
the
values
into
a
table
on
the
rates
index
page
o Rows:
Year
o Columns:
Rate
Types
•
Alter
formatting
on
printable
PDF
bills.
o Place
mailing
address
in
location
to
line
up
with
a
windowed
envelope.
Functionality:
•
On
all
tables
create
a
new
column
that
will
store
the
username
of
the
last
person
to
update
the
record.
•
Create
a
function
that
will
actively
sort
data
on
index
pages
based
upon
user
input.
o Example:
A
user
clicks
a
link
to
sort
all
people
by
city
without
reloading.
•
Investigate
the
live
search
functionality
to
remove
case
sensitivity
from
the
searches.
Deployment:
•
Use
apache
security
to
only
allow
permitted
users
to
view
the
website.
•
Consider
hosting
application
on
UNIX‐based
server.
o Rails
runs
faster
on
a
UNIX
system.
•
Consider
upgrading
server
hardware
to
enhance
performance.
o Upgrades
to:
Processor
RAM
7.3
Group
Reflection
Over
the
course
of
the
past
four
and
a
half
months
we
have
had
the
pleasure
of
working
on
a
unique
and
challenging
project.
The
experience
has
been
very
beneficial
to
both
group
82
members,
as
we
have
gained
invaluable
experience
in
dealing
directly
with
a
client.
In
many
career
paths
that
we
may
choose
to
take
at
some
point
in
our
lives,
we
will
need
to
work
directly
with
a
client.
Over
our
time
at
WPI
we
have
completed
a
plethora
of
projects
of
varying
scope
and
objectives.
This
is
the
first
time
however,
that
we
have
developed
something
that
will
see
real
world
use.
This
places
a
whole
new
meaning
on
the
work
that
is
being
done.
The
group
works
harder
to
ensure
their
client
is
happy
and
will
be
able
to
use
the
finished
product.
There
was
a
world
of
difference
between
simulated
projects
that
were
completed
in
our
coursework,
and
this
final
project.
Having
gone
through
the
entire
system
development
lifecycle
(SDLC)
now,
we
have
learned
a
great
deal
about
each
step
along
the
way.
We
were
quite
ambitious
with
this
project
considering
our
team
and
timeframe,
and
that
is
reflected
in
our
project
scope
and
requirements.
We
have
learned
the
consequences
of
promising
a
lot
to
a
client,
because
the
client
then
expects
those
features.
Sometimes
even
the
mention
of
a
potential
feature
will
heighten
client
expectations.
We
have
learned
to
be
more
conservative
and
thoughtful
about
what
we
discuss
with
a
client
so
as
to
not
raise
expectations
to
an
unrealistic
level.
Having
set
these
ambitious
goals,
we
found
ourselves
working
extra
hard
to
keep
up
with
the
work
that
we
promised.
This
forced
us
to
push
deadlines
and
deploy
later
than
expected.
In
many
projects
that
we
will
undertake
in
our
careers
we
may
need
to
deal
with
a
similar
situation
where
we
need
to
approach
a
client
and
explain
to
them
why
the
project
is
being
delayed.
This
is
not
an
enjoyable
experience,
however
it
will
prove
to
be
something
we
will
need
to
understand
how
to
handle
and
we
are
grateful
to
learn
to
handle
it
early
in
our
careers.
Another
valuable
experience
that
we
had
involved
the
division
of
work
between
the
two
of
us;
we
had
to
take
some
time
to
sit
down
and
see
where
each
person’s
strengths
and
weaknesses
were.
Doing
this
involved
being
open
about
ourselves
and
the
ability
to
be
openly
critical
of
each
other
while
staying
constructive.
Division
of
labor
based
upon
our
experiences
and
strengths
proved
to
be
very
helpful
in
finishing
tasks
in
a
timely
manner
and
with
the
best
83
quality
of
work.
These
skills
can
be
very
useful
in
the
future,
whether
it
involves
taking
leadership
in
a
project
or
interviewing
for
a
position
and
explaining
strengths
and
weaknesses.
Looking
back
at
the
many
steps
we
took
to
get
to
this
point
is
quite
astonishing.
While
working
on
this
project,
one
group
member
shared
the
project
goals
with
some
professional
consultants
who
he
worked
with;
all
of
whom
said
our
timeline
was
tight
and
we
would
be
hard
pressed
to
accomplish
our
goals
in
the
allotted
time.
We
are
both
proud
to
say
we
have
risen
to
the
occasion.
We
feel
that
we
have
followed
through
on
the
SDLC
and
accomplished
what
we
set
out
to
accomplish,
despite
the
challenges
we
faced
along
the
way.
We
are
both
very
proud
of
our
work,
and
how
we
managed
to
collaborate
effectively
to
accomplish
our
tasks
within
our
allotted
timeframe.
84
85
Works
Cited
About
Ruby.
(2008).
Retrieved
September
7,
2008,
from
Ruby:
http://www.ruby‐
lang.org/en/about/
Anderson,
T.
(2008,
31
July).
SQL
Server
2008
Express:
The
Free
Database
from
Microsoft.
Retrieved
September
10,
2008,
from
DevX.com:
http://www.devx.com/MicrosoftISV/Article/38728
Commonwealth
of
Massachusetts.
(2008).
The
Official
Website
of
the
Executive
Office
of
Public
Safety
and
Security
(EOPSS).
Retrieved
September
9,
2008,
from
State
Police
Marine
Section:
http://www.mass.gov/?pageID=eopsterminal&L=4&L0=Home&L1=Homeland+Security+%26
+Emergency+Response&L2=Response&L3=Emergency+Tactical+%26+Response+Teams&sid
=Eeops&b=terminalcontent&f=msp_units_msp_marine_section&csid=Eeops
Commonwealth
of
Massachusetts.
(2008).
The
Official
Website
of
the
Executive
Office
of
Public
Safety
and
Security
(EOPSS).
Retrieved
September
9,
2008,
from
State
Police
Underwater
Recovery
Team
:
http://www.mass.gov/?pageID=eopsterminal&L=4&L0=Home&L1=Homeland+Security+%26
+Emergency+Response&L2=Response&L3=Emergency+Tactical+%26+Response+Teams&sid
=Eeops&b=terminalcontent&f=msp_units_msp_underwater_recovery_page1&csid=Eeops
Dennis,
A.,
Wixom,
B.
H.,
&
Roth,
R.
M.
(2006).
Systems
Anaysis
and
Design.
USA:
John
Wiley
&
Sons,
Inc.
Holovaty,
A.
,.‐M.
(2007,
December
12).
Chapter
1:
Introduction
to
Django.
Retrieved
September
7,
2008,
from
The
Django
Book:
http://www.djangobook.com/en/1.0/chapter01/
Lenz,
P.
(2008).
Simply
Rails
2.
Collingwood
VIC,
Australia:
Sitepoint
Pty.
Ltd.
Melo,
S.
(2008,
September
3).
Town
of
Dartmouth
Harbormaster.
(M.
Fury
Hopkins,
&
W.
Price,
Interviewers)
Microsoft.
(2008).
Get
Started:
The
Official
Microsoft
ASP
.NET
Site.
Retrieved
September
7,
2008,
from
ASP.net:
http://www.asp.net/get‐started/
MySQL
::
About
MySQL.
(2008).
Retrieved
September
10,
2008,
from
MySQL:
http://www.mysql.com/about/
The
PHP
Group.
(2008,
September
6).
History
of
PHP
and
related
projects
Manual.
Retrieved
September
7,
2008,
from
PHP:
http://us.php.net/manual/en/history.php
Town
of
Dartmouth.
(2007).
2007
Town
of
Dartmouth
Annual
Report.
Retrieved
September
2,
2008,
from
Town
of
Dartmouth
‐
Annual
Town
Report:
http://town.dartmouth.ma.us/Town%20Report%20Book%202007%20Final.pdf
Town
of
Dartmouth.
(2001).
Dartmouth
AR
2001.
Retrieved
September
2,
2008,
from
Town
of
Dartmouth,
MA
‐
Official
Home
Page:
http://www.town.dartmouth.ma.us/Dartmouth%20AR%202001.pdf
86
Town
of
Dartmouth.
(n.d.).
Mission
Statement
for
Dartmouth
Harbormaster
Office
and
Waterways
Department.
Dartmouth,
MA,
United
States
Of
America.
Town
Of
Dartmouth
Waterways
Management
Department.
(2005,
May).
Mission
Statement.
Mission
Statement
for
Dartmouth
Harbormaster
Office
and
Waterways
Department
.
Town
Of
Dartmouth,
Massachusetts,
United
States
of
America.
United
States
Coast
Guard.
(2008,
February
4).
USCG:
About
Us
Overview
Publication
1.
Retrieved
September
4,
2008,
from
United
States
Coast
Guard:
http://www.uscg.mil/top/about/pub1.asp
87
Appendix
I.
Samples
of
Manual
Documents
The
following
is
an
example
list
of
manual
documents
used
by
the
Town
of
Dartmouth
Harbormaster’s
Office.
88
I.i
Dinghy
Renewal
Form
89
I.ii
Waterways
Use
Application:
Form
A
(BOAT
PERMIT)
90
I.iii
Renewal
Form
91
Appendix
II.
Technical
Documentation
This
appendix
includes
instructions
on
the
installation
of
the
Ruby
on
Rails
language
pack
,
the
suggested
Integrated
Development
Environment
(IDE)
,
mySQL
and
a
suggested
reading
list.
92
Dartmouth
Harbormaster
System
Technical
Documentation
William
D.
Price
January
2009
93
Installing
Before
you
can
run
this
software
on
a
server,
you
must
install
the
following
items:
•
•
•
•
•
Ruby
1.8.6
MySQL
5.0
Rubygems
Rails
2.1.2
Configuration
gems
Ruby
1.8.6
&
Rubygems
Ruby
can
be
installed
to
a
Windows
based
machine
by
downloading
and
executing
the
file
ruby186‐26.exe
from
http://rubyforge.org/frs/?group_id=167.
It
is
a
standard
Windows
installer;
you
can
use
all
standard
options.
Select
the
checkbox
to
enable
Rubygems
as
well.
MySQL
Installing
MySQL
involves
downloading
a
version
of
MySQL
5.0
from
http://dev.mysql.com/downloads/.
Rails
2.1.2
Open
a
command
prompt
and
enter
the
following
line:
gem
install
rails
–v
2.1.2
Some
text
will
scroll
through
the
command
prompt,
be
patient
and
wait
for
a
new
line
to
appear.
Configuration
Gems
Similar
to
the
install
of
rails,
a
few
more
gems
are
needed
in
order
to
run
the
application
to
its
full
capability.
Run
the
follow
commands
form
a
command
prompt:
gem
install
prawn
–includedependencies
gem
install
mongrel
–includedependencies
gem
install
mysql
Optional
Installations:
If
you
wish
to
edit
any
of
the
code,
the
recommended
Integrated
Development
Environment
(IDE)
is
NetBeans.
You
can
download
NetBeans
at
http://www.netbeans.org/downloads/.
Select
the
Ruby
version.
During
the
install,
uncheck
the
box
for
GlassFish.
Configuring
the
Database
94
Open
MySQL
by
typing
into
the
command
prompt
(replacing
username
with
your
username
created
during
installation):
mysql
–u
username
–p
Once
you
are
logged
in
(the
command
prompt
line
will
read
“mysql>”)
enter
the
following
commands:
create
database
harbor_dev
create
database
harbor_test
create
database
harbor_prd
These
commands
create
three
databases
for
use
in
each
of
the
rails
environments,
development,
testing,
and
production.
Configuring
Rails
to
communicate
with
MySQL
Open
the
Rails
application
in
NetBeans
and
open
the
folder
called
Configuration.
Open
the
file
in
this
folder
called
database.yml.
In
this
file,
enter
the
username
and
password
you
set
up
for
MySQL
for
each
environment.
Save
the
file,
and
then
let’s
test
to
make
sure
the
communication
works.
In
NetBeans,
right
click
on
the
main
project
folder
(HarborSystem)
and
select
the
option:
Migrate
Database
=>
To
Current
Version.
A
database
migration
automatically
creates
all
the
tables
in
MySQL.
If
there
are
no
errors,
it
is
set‐up
correctly.
You
can
then
click
on
the
Run
button
n
the
top
of
NetBeans,
and
it
should
open
a
web
browser
with
a
development
version
of
the
web‐page.
Loading
Data
To
load
data
into
the
system,
CSV
fields
should
be
generated
from
the
old
data,
and
then
formatted
into
the
correct
column
order
for
the
corresponding
table.
The
order
of
columns
and
data
types
can
be
obtained
from
running
the
SQL
command:
describe
tablename.
To
load
the
data
from
the
CSV
into
the
table,
please
reference
the
MySQL
documentation
page
for
LOAD
DATA
located
at:
http://dev.mysql.com/doc/refman/5.0/en/load‐data.html
Manipulating
Data
95
All
data
stored
in
the
system
can
be
manipulated
within
the
application
on
the
web
by
clicking
Edit,
however
if
something
needs
to
be
changed
in
the
back‐end,
the
data
can
be
manipulated
by
using
standard
SQL
queries
when
logged
into
the
correct
database.
*NOTE:
Be
careful
when
editing
related
data.
The
database
does
not
cascade,
so
deletion
of
an
object
that
has
related
data
can
cause
errors!
How
Rails
Operates
There
are
three
core
types
of
files
that
work
together
to
create
a
Rails
web
application.
Each
of
these
files
handles
a
different
aspect
of
the
application.
The
files
are:
• Models
• Controllers
• Views
Models
–
These
files
are
located
within
the
Model
folder
in
the
project
directory.
These
files
define
relationships
between
different
entities,
and
also
define
special
attributes
for
a
data
type.
For
example,
in
the
Person
model,
there
is
a
function
that
will
return
the
person’s
first
name
concatenated
to
their
last
name.
This
can
be
called
like
any
other
attribute
that
exists
within
the
table.
Controllers
‐
These
files
are
located
in
the
Controller
folder
in
the
project
directory.
Functions
are
contained
in
these
files
for
each
webpage
that
exists
for
a
given
model.
Different
variables
that
are
defined
here
can
be
called
in
the
associated
View
code.
These
files
are
important
to
keep
the
database
searching
and
calculations
on
the
server
end,
to
minimize
the
amount
of
work
that
the
client
browser
needs
to
do.
A
good
website
wants
as
much
calculation
done
on
the
server
end
as
possible
to
enhance
performance.
A
special
Application
controller
also
exists
with
functions
that
can
be
called
on
any
View
page.
Views
–
These
files
are
embedded
ruby
HTML
files
(view.html.erb)
that
are
read
by
the
browser
and
create
the
webpage
that
the
end
user
will
see.
They
are
located
in
the
View
folder
of
the
application
directory,
and
are
broken
down
into
views
for
each
model.
If
any
changes
need
to
be
made
to
a
webpage
that
is
displayed,
the
view
files
are
the
place
to
make
edits.
The
file
is
written
with
standard
HTML
tags,
with
special
tags
surrounding
ruby
code
that
allows
it
to
be
executed.
The
format
for
embedded
ruby
code
is
as
follows:
<%
code
%>.
These
HTML
files
can
also
follow
CSS
stylesheets,
which
are
located
in
the
root/public/stylesheets
folder
in
the
application
directory.
96
For
more
information
on
how
Rails
works,
please
see
the
recommended
articles
at
the
end
of
this
section.
Deploying
the
system
on
Apache
2.2
In
order
to
deploy
this
system
on
Apache
2.2
(assumed
installed
to
c:/apache),
some
new
gems
must
be
installed.
First,
run
the
command:
gem
install
mongrel_service
includedependencies
After
this
installation
is
complete,
install
mongrel
as
a
windows
service
on
the
server
by
navigating
to
the
application
directory
in
a
command
prompt
and
using
the
following
commands:
mongrel_rails
service::install
–N
HarborSystem_4001
–p
4001
–e
production
mongrel_rails
service::install
–N
HarborSystem_4002
–p
4002
–e
production
Now
mongrel
will
run
two
instances
of
the
application
automatically
on
server
startup.
Having
two
mongrel
instances
helps
with
application
load
balancing.
Now
navigate
to
the
apache/conf
and
open
the
file
httpd.conf.
Add
the
following
line
to
the
bottom
of
the
file:
Include
httpdproxy.conf
Save
and
close
the
file,
and
then
create
a
new
file
in
the
apache/conf
folder
called:
httpdproxy.conf.
Enter
the
code
included
in
Appendix
III.
httpd‐proxy_code
in
this
file
and
save.
Restart
the
Apache
server
and
navigate
to
the
domain
specified
during
your
install
of
Apache
and
you
should
see
your
application!
Plugins
This
application
utilizes
two
plug‐ins
that
allow
it
to
expand
functionality.
These
files
are
located
in
the
vender/plug‐ins
folder
in
the
application
directory.
Included
is
the
name
of
the
plug‐in,
and
website(s)
with
useful
resources.
Restful_authentication
–
For
creating
unique
user
sessions.
http://wiki.rubyonrails.org/rails/pages/restful_authentication
Prawnto
–
For
creating
PDF
files.
http://www.cracklabs.com/prawnto
Recommended
Reading
97
To
gain
a
better
understanding
of
this
software,
and
the
platform
it
was
developed
on,
the
following
articles
and
tutorials
are
recommended
for
reading
and
for
practice.
Ruby
on
Rails
Complete
API
(For
reference)
http://api.rubyonrails.org/
Learn
Ruby
on
Rails:
The
Ultimate
Beginner’s
Tutorial
http://www.sitepoint.com/article/learn‐ruby‐on‐rails/
Deploying
Rails
Applications:
A
StepByStep
Guide
http://www.scribd.com/doc/7281218/
98
Appendix
III.
httpd‐proxy_code
This
appendix
contains
the
source
code
found
in
the
httpd‐proxy.conf
document
that
is
located
on
the
Harbormaster
server
in
C:\apache\conf.
The
code
specifies
a
configuration
in
which
all
requests
coming
through
the
apache
server
are
routed
to
two
instances
of
Mongrel
web
server.
For
more
information
on
the
use
of
this
code,
please
see
the
deployment
section
of
Appendix
II.
Technical
Documentation.
99
<VirtualHost *:80>
ServerName dartmouthharbormaster.webhop.net
DocumentRoot c:/web/HarborSystem/public
<Directory "c:/web/HarborSystem/public">
Options FollowSymLinks
AllowOverride None
Order allow,deny
Allow from all
</Directory>
#Configure Mongrel Instance
<Proxy balancer://mongrel_cluster>
BalancerMember http://127.0.0.1:4001
BalancerMember http://127.0.0.1:4002
</proxy>
RewriteEngine On
# Uncomment for rewrite debugging
#RewriteLog logs/your_app_deflate_log deflate
#Rewrite LogLevel
# Check for
RewriteCond
RewriteCond
RewriteRule
maintenance file and redirect all system requests
%{DOCUMENT_ROOT}/system/maintenance.html -f
%{SCRIPT_FILENAME} !maintenance.html
^.$ /system/maintenance.html [L]
#Rewrite index to check for static
RewriteRule ^/$ /index.html [QSA]
# Rewrite to check for Rails cached page
RewriteRule ^([^.]+)$ $1.html [QSA]
# Redirect all non-static requests to cluster
RewriteCond %{DOCUMENT_ROOT}/%{REQUEST_FILENAME} !-f
RewriteRule ^/(.*)$ balancer://mongrel_cluster%{REQUEST_URI} [P,QSA,L]
# Deflate
AddOutputFilterByType DEFLATE text/html text/plain text/xml
BrowserMatch ^Mozilla/4 gzip-only-text/html
BrowserMatch ^Mozilla/4\.0[678] no-gzip
BrowserMatch \bMSIE !no-gzip !gzip-only-text/html
# Uncomment for deflate debugging
#DeflateFilterNote Input input_info
#DeflateFilterNote Output output_info
#DeflateFilterNote Ratio ratio_info
#LogFormat '"%r" %{output_info}n/%{input_info}n (%{ratio_info}n%%);
deflate
#CustomLog logs/your_app_deflate_log deflate
ErrorLog logs/your_app_error_log
CustomLog logs/your_access_log combined
</VirtualHost>
100
Appendix
IV.
User
Manual
This
includes
instructions
for
the
user
on
how
to
add
and
manipulate
data
in
the
system.
Also
included
is
how
to
add
billing
rates
for
the
year
and
produce
bills.
101
Dartmouth
Harbormaster
System
User
Manual
William
D.
Price
&
Millisent
Fury
Hopkins
January
2009
102
Contents
Overview ............................................................................................................................................ 104
Explanation
of
Page
Elements..................................................................................................... 105
Accessing
the
system ..................................................................................................................... 106
Navigating
the
system.................................................................................................................... 107
Entering
Data.................................................................................................................................... 108
Viewing
data ..................................................................................................................................... 110
Searching
Data ................................................................................................................................. 111
Nuances
of
the
System ................................................................................................................... 112
Entering
a
New
Mooring
&
Waitlist ..................................................................................................... 112
Marking
a
Ticket
as
Paid ......................................................................................................................... 113
Entering
Billing
Rate
Information............................................................................................. 115
Generating
Bills.......................................................................................................................................... 116
Record
a
Payment
for
a
Bill.................................................................................................................... 119
Conclusion ......................................................................................................................................... 121
103
Overview
The
Dartmouth
Harbormaster
System
is
a
web‐based
application
that
was
developed
for
use
by
the
Harbormaster
and
Assistant
Harbormasters
for
tracking
data
important
to
their
function.
The
following
pages
outline
the
use
of
this
system.
We
begin
with
a
brief
explanation
of
page
elements
to
ensure
you
understand
the
different
methods
we
will
reference
to
enter
data
and
navigate
the
system.
We
then
discuss
creating
a
user
account,
and
finding
your
way
to
different
types
of
data
within
the
system.
From
here
you
will
learn
how
to
enter
data,
and
then
view
whatever
you
have
entered.
The
system
contains
a
strong
live
search
function,
which
is
explained
the
next
section.
We
follow
with
a
section
that
explains
some
of
the
nuances
of
the
system,
and
we
end
with
an
explanation
of
how
to
generate
invoices.
Please
follow
these
instructions
whenever
using
the
system
to
ensure
the
system
works
correctly
for
you
for
many
years
to
come.
104
Explanation
of
Page
Elements
Below
is
a
listing
of
elements
that
are
used
on
the
web
pages
in
this
system.
•
Drop
Down
Menu
–
o These
menus
are
filled
with
a
list
of
selectable
values.
Click
the
arrow
on
the
right
side
of
the
menu
and
the
list
expands.
Then
select
the
item
on
the
list
you
wish
to
use.
•
Text
Field
‐
o This
field
is
a
blank
box
that
allows
you
to
enter
a
value
into
it.
It
is
recommended
to
write
“N/A”
into
a
text
field
that
you
have
no
data
for
instead
of
leaving
it
blank.
The
example
above
has
a
value
entered
already.
•
Button
‐
o Clicking
on
a
button
performs
an
action
in
the
system.
In
the
example
above
clicking
the
button
would
generate
all
the
invoices
for
the
current
year.
For
more
information
on
this
particular
button
see
page
15.
•
Link
‐
o A
link
is
a
piece
of
text
that
is
underlined,
and
either
blue
or
purple.
Clicking
a
link
navigates
you
to
a
new
webpage.
The
example
above
would
navigate
you
to
a
page
to
create
a
new
invoice.
105
Accessing
the
system
Before
you
can
work
with
the
system
you
must
be
in
the
system
as
a
“user”.
To
become
a
“user”
have
someone
who
is
already
a
user
on
the
system
log
on
and
access
http://dartmouthharbormaster.webhop.net/signup.
The
system
comes
with
an
administrator
account
already
created.
Please
see
your
system
administrator
for
more
information.
Choose
a
login
name,
fill
in
the
email
address
field
and
select
a
password.
Once
“Sign
up”
is
clicked
and
the
login
is
unique,
a
new
user
has
been
created.
You
may
now
access
the
system
via
http://dartmouthharbormaster.webhop.net/.
106
Navigating
the
system
Users
are
able
to
access
different
portions
of
the
system
by
clicking
on
the
links
along
the
top
of
the
page.
Clicking
on
a
link
will
bring
you
to
the
Listing
page
for
that
type
of
data.
From
the
listing
page
the
user
is
able
to
look
at
and
edit
a
specific
entry
in
the
system.
For
example,
clicking
the
“Boat”
link
will
navigate
you
to
the
page
that
contains
a
listing
of
all
boats
entered
into
the
system.
107
Entering
Data
To
input
a
new
entry
into
the
system,
click
on
the
“New”
link
at
the
bottom
of
the
Listing
page.
For
example,
when
creating
a
new
boat,
you
navigate
to
the
boats
area
of
the
system
by
clicking
the
“Boats”
link
at
the
top
of
the
page.
Then
scroll
to
the
bottom
of
the
list
page
and
click
the
link
that
reads
“New
Boat”.
See
the
diagram
below
for
more
details.
This
will
bring
you
to
a
blank
entry
page
for
you
to
input
the
information
for
a
new
item
in
the
system.
Fill
in
the
applicable
fields,
select
the
necessary
drop
downs
and
click
the
“Create”
button
to
create
the
new
entry
in
the
system.
In
the
example
on
the
next
page
you
see
the
“New
Boat”
page.
The
circled
area
contains
text
fields
and
drop
down
menus
that
are
labeled
for
the
type
of
data
they
contain.
Enter
the
name
of
the
boat
into
“Vessel
Name”,
the
draft
into
“Draft”
and
so
on
until
you
enter
the
required
information.
For
an
explanation
on
drop
down
menus
please
see
page
4.
In
the
next
section,
select
the
owner
of
this
boat
from
the
drop
down
menu
labeled
as
“Person”.
This
drop
down
will
contain
a
list
of
each
person
entered
into
the
system
already.
Be
sure
to
click
the
correct
person,
because
this
will
link
the
boat
to
that
person.
At
the
bottom
you
select
from
one
last
drop
down
if
the
boat
if
active
or
not.
108
109
Viewing
data
Once
the
item
is
created
you
will
be
brought
to
the
show
page
where
you
can
check
over
the
entry
for
any
mistakes.
If
there
are,
simply
click
“Edit”
and
make
the
appropriate
changes.
Then
click
the
“Update”
button
to
save
the
changes.
By
clicking
“Back”
you
will
return
to
the
Listing
page
to
find
your
new
entry
is
now
listed.
110
Searching
Data
At
the
top
of
each
Listing
page
is
a
“Search
By”
drop
down
menu
and
a
text
field.
To
do
a
search
of
the
items
on
the
listing
page
simply
choose
the
type
of
field
you
would
like
to
search
by
and
type
into
the
textbox
what
you
are
searching
for.
In
the
example
below
the
user
is
searching
for
all
boats
owned
by
people
with
the
last
name
of
“Price”.
This
is
accomplished
by
selecting
OWNER_LAST_NAME”
from
the
drop
down
menu,
and
then
entering
the
word
“Price”
into
the
text
field
below
it.
Search
results
will
be
listed
automatically
as
you
type.
111
Nuances
of
the
System
Using
the
system
follows
most
of
the
basic
procedures
listed
above
generally.
However
there
are
some
situations
that
require
special
instructions.
This
section
explains
those
situations,
and
the
appropriate
ways
to
handle
them.
Entering
a
New
Mooring
&
Waitlist
When
adding
a
new
mooring
or
waitlist,
it
is
necessary
to
not
only
select
a
boat
from
the
drop
down
list
but
also
enter
the
id
number
exactly
as
listed
in
the
following
textbox.
The
id
is
provided
to
you
listed
next
to
the
boat
name.
In
the
example
below,
the
user
has
selected
a
person
from
the
first
drop
down
menu,
and
a
boat
from
the
second
drop
down
menu.
You
can
see
in
boat
drop
down
menu
the
listed
entry
is
“Chillin,
id:
3”.
The
user
must
enter
the
value
“3”
into
the
text
field
below
where
indicated.
Be
extra
careful
to
type
the
correct
value
as
an
error
could
link
the
wrong
boat
to
this
mooring
entry.
The
waitlist
page
is
set
up
the
same
as
the
mooring
page
and
these
instructions
can
be
applied
to
both.
112
Marking
a
Ticket
as
Paid
To
mark
a
Ticket
as
Paid,
click
on
the
“Tickets”
link
at
the
top
of
the
page.
This
will
bring
you
to
the
Tickets
Listing
page.
Click
the
“Edit”
link
next
to
the
bill
you
would
like
to
mark
as
paid.
113
Change
the
“Status”
drop
down
menu
to
“PAID”
and
click
the
“Update”
button
to
save
your
changes.
On
the
Tickets
Listing
page
you
will
see
that
the
ticket
is
now
listed
as
paid.
114
Entering
Billing
Rate
Information
The
system
creates
bills
for
each
person
in
the
database
based
on
billing
rates
for
the
current
year.
To
enter
billing
rate
information,
navigate
to
the
“Bills”
page
by
clicking
the
link
at
the
top
right
of
the
page.
On
the
Bills
Listing
page
click
on
the
“rate
template”
link
at
the
bottom
of
the
page.
You
are
brought
to
the
Rate
Listing
page,
here
you
can
add,
edit
or
delete
a
rate.
To
add
a
new
rate,
click
on
the
“New
rate”
link
at
the
bottom
left
of
the
page.
115
Fill
in
all
the
fields
and
click
the
“Create”
button
to
create
a
new
rate.
This
will
bring
you
back
to
the
Rate
Listing
page.
Generating
Bills
To
generate
bills
for
the
current
year,
click
on
the
Bills
link
at
the
top
right
of
the
page
and
click
the
“Generate
all
Bills”
button.
You
will
receive
a
confirmation
pop‐up,
click
“OK”
and
the
invoices
for
the
current
year
are
now
listed.
Be
patient
as
this
may
take
some
time.
To
print
all
the
bills
for
the
current
year
click
the
“Print
All
Bills”
link
on
the
bottom
right
of
the
page.
116
A
PDF
will
open
in
a
new
widow
with
all
the
bills
for
the
year
from
the
system
in
it,
ready
to
print.
If
for
some
reason
an
individual
bill
is
incorrect,
you
may
return
to
the
system
by
clicking
“Back”
on
your
web
browser
or
via
http://dartmouthharbormaster.webhop.net/
and
then
to
the
Bills
Listing
page
by
clicking
the
“Bills”
link
at
the
top
right
of
the
page.
Click
on
the
Invoice
date
of
the
bill
you
would
like
to
edit.
117
Once
on
the
invoice
page
you
would
like
to
edit,
you
may
edit
a
specific
billing
line
by
clicking
the
“Edit”
link
to
the
right
of
the
line
item.
118
Record
a
Payment
for
a
Bill
By
clicking
the
“Bills”
link
at
the
top
right
of
the
page,
and
clicking
the
invoice
date
of
the
bill
you
would
like
to
update,
you
are
brought
to
the
invoice
page.
Click
the
“Edit”
link
at
the
bottom
of
the
page.
On
the
Editing
Invoice
page
you
are
able
to
type
in
the
amount
paid
into
the
textbox
below
“Amount
paid”.
Click
the
“Update”
button
to
save
the
information.
119
You
will
see
the
updated
information
on
the
Invoice
page.
120
Conclusion
By
correctly
following
the
instructions
in
this
user
manual
you
will
help
ensure
the
system
runs
correctly.
If
you
need
more
detailed
information
on
technical
aspects
of
the
system,
please
see
the
technical
documentation
provided
with
the
system.
Any
questions
not
answered
in
this
user
manual
should
be
directed
to
the
system
administrator.
121
Appendix
V.
Meeting
Agendas
The
following
are
meeting
agendas
for
this
Major
Qualifying
Project.
122
V.i
MQP
Meeting
Agenda
September
11,
2008
Harbormaster System MQP
Agenda
100 Institute Rd
Worcester, MA 01609
9/11/2008
Meeting Called By:
MQP Group
Type of Meeting:
Weekly Status Meeting
Attendees:
Facilitator:
Will Price
Letter of Intent
Presenter Name:
Diane Strong, Will Price,
Millisent Fury Hopkins
Will Price
Discussion: Letter of Intent
Other Information: Letter has been obtained.
Action Items:
Person Responsible:
Deadline:
Submit Letter of Intent to Chuck Korniik
Diane Strong
ASAP
Use Cases
Presenter:
Will and Millie
Discussion: Came up with 17 use cases during on-site meeting.
Notes:
Conclusions:
Action Items:
Person Responsible:
Review Use Cases
All
Review Draft v0.5
Deadline:
Presenter: Will and Millie
Discussion: Includes: Introduction (System Request), Lit Review (Industry Review, Technology Analysis),
As-is System (Use Cases, Requirements, Feasibility.),
Notes:
Action Items:
Person Responsible:
Deadline:
Set Goals for Draft v1.0
All
Next Meeting
123
V.ii
MQP
Meeting
Agenda
September
18,
2008
Harbormaster System MQP
Agenda
100 Institute Rd
Worcester, MA 01609
9/18/2008
Meeting Called By:
MQP Group
Type of Meeting:
Weekly Status Meeting
Facilitator:
Millisent Fury Hopkins
Project
Milestones
Presenter
Name:
Attendees:
Diane Strong, Will Price,
Millisent Fury Hopkins
Millisent
Fury
Hopkins
Discussion:
Project
Plan
Other
Information:
Does
this
need
to
be
broken
down
by
task?
Action
Items:
Update
as
needed
Entity
Relationship
Diagram
Person
Responsible:
Deadline:
Millie
N/A
Presenter
Name:
Will
Discussion:
Explain
briefly
entities
and
relationships
Notes:
Conclusions:
Action
Items:
Review
Use
Cases
Proposal
Presentation
Date
Person
Responsible:
Deadline:
All
Presenter
Name:
Will
and
Millie
Discussion:
October
1,
2008
looks
more
feasible
Notes:
need
to
contact
Julian
and
Steve
to
book
a
space
in
Dartmouth
Town
Hall
Action
Items:
Person
Responsible:
Deadline:
Will
and
Millie
Next
Meeting
124
V.iii
MQP
Meeting
Agenda
October
2,
2008
Harbormaster System MQP
Agenda
100 Institute Rd
Worcester, MA 01609
10/02/2008
Meeting Called By:
MQP Group
Type of Meeting:
Weekly Status Meeting
Facilitator:
Millisent Fury Hopkins
Attendees:
Diane Strong, Will Price,
Millisent Fury Hopkins
Presentation
Presenter Name: Millie &Will
Discussion: Proposal Presentation
Other Information: Comments?
Action Items: Send Julian a copy
Person Responsible:
Deadline:
Update as needed
Will
ASAP
Action Items:
Person Responsible:
Deadline:
Revise as necessary
All
Next Meeting
Gantt Chart
Presenter Name: Millie
Discussion: Gantt Chart
Notes: Are there enough tasks listed?
Conclusions:
Final Report
Presenter Name: Will and Millie
Discussion: Final Report
Notes: Is there anything we should be writing now?
Action Items:
Person Responsible:
Deadline:
Will and Millie
N/A
125
V.iv
MQP
Meeting
Agenda
October
9,
2008
Harbormaster System MQP
Agenda
100 Institute Rd
Worcester, MA 01609
10/09/2008
Meeting Called By:
MQP Group
Type of Meeting:
Weekly Status Meeting
Facilitator:
Will Price
Attendees:
Diane Strong, Will Price,
Millisent Fury Hopkins
RoR Basics
Presenter Name: Will Price
Description: Will discusses the basic principles of Rails programming. Necessary to understand the Task List.
Examples from existing code will be used. Topics to be covered: Models, Controllers, Views, Migrations,
Relationships
Not
Notes:
Task List
Presenter Name: Will and Millie
st
Description: 1 draft of a task list has been formed, must review
Notes:
126
V.v
MQP
Meeting
Agenda
December
17,
2008
Meeting
Wednesday
December
17,
2008
• Boat
type
not
showing
• Sticker
#?
People
• Add
dinghy
• Add
tickets
• Add
waitlist
• Dinghy
location
• Registration
expiration
• Remove
“destroy”
from
dashboard
and
index
pages
–
put
on
edit
pages
• List
of
moorings
on
person
show
page
• Print
all
bills
into
a
pdf
• Bi‐hdr
not
a
drop
down
but
a
search
box?
• Associate
lat/long
with
mooring
not
inspections
• Format
decimal
to
currency
on
bill
• Recommendation
details/
directions
how
to
mySQL
‐>
access‐>
mail‐merge
if
can’t
batch
Boats
• Vessel
year
• Vessel
name
• Vessel
type
• Vessel
length
• Vessel
color
• Owner
first
initial,
last
name
linked
to
person
• Mooring
number
linked
to
mooring
Mooring
• Scope
=
top
chain
+
bottom
chain
+pennant
• Number
• Weight
• Type
• Inspector
• link
to
last
inspection
date
People
• concatenate
column
first
name
and
last
name
• primary
number
• email
• city
127
• state
Waitlist
–order
by
number,
only
show
active
• name
• desired
location
• vessel
• length
• draft
• type
• entry
date
and
time
Tickets
• Ticket
number
• Status
• Amount
• Boat
name
• Registration
• State
• Type
Issues
‐
fine
• First
30
characters
and
append
“…”’
• Drop
worklog
to
detail
(show
page)
Inspections
–
leave
for
now
• Add
borders
Dinghies
• Drop
id
• Add
name
128
Appendix
VI.
Proposal
Presentation
The
following
are
slides
from
the
proposal
presentation.
129
130
131
Appendix
VII.
Final
Presentation
The
following
are
slides
from
the
presentation
made
to
the
Town
of
Dartmouth
Waterways
Commission
on
January
6,
2009.
132
133
134
Appendix
VIII.
Letter
of
Acknowledgement
135