1
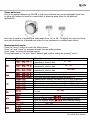
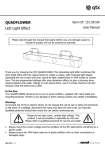
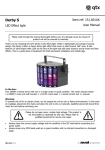
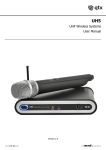
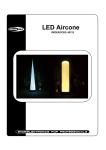
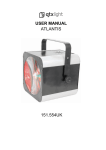
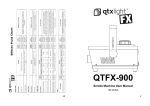
Item ref: 151.557UK PB-COB Zoom LED PAR Bar with Wireless Foot Control User Manual Please read through this manual thoroughly before use, any damage cause by misuse of product will not be covered by warranty. Thank you for choosing this QTX PB-COB PAR bar. A PAR bar kit fantastic for mobile DJs and performers who need their lighting to be quick to set up and easily transportable. This PAR bar boasts 4 high power Cans, each fitted with 1 x 30W 4-in-1 COB LEDs. Smooth colour blending control can be achieved with the included wireless foot controller or via DMX. The main unit also has 4 built in white LEDs to add a flash effect, adding extra dynamics to the light display. In the box: Your PB-COB should arrive to you in a single carton in good condition. Carton 1: PAR bar with 4 LED PAR Cans Wireless foot controller Padded carry case 2 x IEC mains lead (UK and EU) Tripod stand Mounting/free standing brackets Warning: To prevent risk of fire or electric shock, do not expose the unit to rain or damp environments. In the event of a spillage, disconnect the mains and allow the unit to dry out naturally. Qualified personnel should then check the unit before continuing use. Please do not open cover, contains high voltage. This product is not serviceable or repairable by the end user. Please refer to qualified personnel for service and repair. Always check the correct supply voltage and the condition of the IEC lead before connecting to a power outlet. Always ensure any DMX leads used are in good condition with no shorted connections or damaged plugs. er or professional when unit malfunction. Setup: PB-COB is ready to use straight from the box, no complicated set up required. Simply erect the tripod stand supplied and slot in the PAR bar unit on top of stand via the 35mm top hat. Pan and tilt for each PARcan can be adjusted individually to illuminate the required area. The PB-COB is also suitable for free standing or ceiling mounting, simply attach the supplied brackets to both ends of the PAR bar as free standing feet or for mounting to the ceiling. Product Layout: 1. 2. 3. 4. 5. 6. 7. DMX signal out (XLR male socket) DMX signal in (XLR female plug) IEC power out IEC power in Built in microphone Microphone sensitivity 7 Segment LCD display 8. 9. 10. 11. Manual control button White flash LED 10W 4in1 COB PAR cans Earth connection screw Do NOT remove 12. Wireless antenna 151.557UK User Manual Zoom-able cans: One of the special features on PB-COB is that each individual can has an adjustable focal lens to allow light output to focus for a spot effect or dilate as wash effect to suit different applications. Each can is capable of projecting a beam angle from 14° to 36°. To adjust, turn the front focal lens anti-clockwise for a focused spot effect or turn clockwise for a dilated wash effect. Manual control menu: Press the “menu” button to enter the setting menu. Press “up” and “down” to navigate through various setting options. Press “enter” to enter the desired setting. Choose set value by “up” and “down” buttons and confirm setting by pressing “enter”. Menu Sub menu () () () () () () Function PAR light only auto program 1-17, speed adjustment, slow to fast Flash light only auto program 1-10, speed adjustment, slow to fast PAR light and flash auto program 1-3, speed adjustment, slow to fast PAR light only sound activate program 1-12 Flash light only sound activate program 1-10 PAR light and flash sound activate program 1-3 Manual colour mixing, red value 0% to 100% brightness Manual colour mixing, green value 0% to 100% brightness Manual colour mixing, blue value 0% to 100% brightness Manual colour mixing, white value 0% to 100% brightness Strobe setting for manual colour mixing mode, slow to fast Synchronised auto mode, speed adjustment, slow to fast Synchronised sound activate mode DMX 3 channel mode, start address setting DMX 6 channel mode, start address setting DMX 28 channel mode, start address setting Slave mode, ID value Enable as master for synchronised set up Enable wireless function for foot control Unit self function test Reset to initial factory setting 151.557UK User Manual Operation: The PB-COB can operate in stand-alone, master, slave or DMX modes. Stand-alone: For stand-alone display show, Auto, sound-activated or manual colour mode may be selected. Simply select (auto mode) or (sound activate mode) from the menu and select if you want PAR cans only (XX or XX), Flash only (XX or XX) or PAR cans and flash (XX or XX). For auto modes, speed (to ) can be set after the preferred mode is confirmed. For manual colour modes, select and enter each RGBW colour mixing value and strobe speed, if required. Master/Slave: More than one units of PB-COB can be operated together via a DMX link. To set a unit as master, select from the menu follow by , select to enable unit as master. In addition to mirroring the master unit effect, all slave units can also perform a sequential chase. In order to perform the sequential chase correctly, all slave units need to have their ID value set accordingly. The master unit will recognize slave units in order of ID value, for example a setup of four slave units with address value of 1,2,3,4 with be the same as 1,12,24,56. Synchronise mode: Two units of PB-COB can be synchronised with each other via a DMX connection. When under synchronised mode, both units will share the same speed, pattern or sound activation but display a different light show. To enter synchronised mode, simply select from the menu and choose from for synchronized auto mode or for synchronized sound-activated mode. DMX mode: The PB-COB can be controlled by DMX signal, simply connect the DMX signal source to the DMX in at the rear of the unit via a balanced XLR lead. Extra fixtures can be controlled by the same DMX signal by looping through the DMX out on the PB-COB. To enter DMX mode, select from the menu and choose which channel mode you wish to use (3, 6 or 28 channel mode). Confirm the correct DMX start address. A flashing address value indicates that the unit has correctly entered DMX mode and is awaiting a DMX signal. The DMX address value will remain lit as soon as DMX signal is detected from the DMX connection. 151.557UK User Manual Foot Controller: PB-COB uses wireless technology to allow wire-free control from the foot controller. This greatly increases the flexibility for light set up and controlling, great for mobile gigs and performances. Wireless foot control is powered by a single A23 cell. The battery compartment is located at the bottom of the foot controller (a Philips tip screwdriver is required to open the compartment). To enable the wireless function on the PB-COB unit, select > from the menu and select yes to confirm. Make sure both antennas are pointed upward from the foot controller and from the PB-COB unit. Now the PB-COB is ready to be controlled by the foot controller. AUTO – Press to cycle through various preset auto programs, cycling through > > > > >….etc MUSIC – Press to cycle through various preset sound to light programs, cycling through > > > > >….etc COLOUR – Press to cycle through 15 preset static colours BLACKOUT – press to enter and exit blackout mode 151.557UK User Manual DMX channel value reference: 3 channel mode (channel 2/3 functions is depend on the value of channel 1): Channel Channel 1 Channel 2 (channel 1 at 010-050) Channel 2 (channel 1 at 051-090) Channel 2 (channel 1 at 091-130) DMX Value 000-009 010-050 051-090 091-130 131-170 171-210 211-255 000-014 015-029 030-044 045-059 060-074 075-089 090-104 105-119 120-134 135-149 150-164 165-179 180-194 195-209 210-224 225-239 240-255 000-024 025-049 050-074 075-099 100-124 125-149 150-174 175-199 200-224 225-255 000-099 Function Black out PAR only auto show Flash only auto show PAR and flash auto show PAR only auto show Flash only auto show PAR and flash auto show PAR only auto program 1 PAR only auto program 2 PAR only auto program 3 PAR only auto program 4 PAR only auto program 5 PAR only auto program 6 PAR only auto program 7 PAR only auto program 8 PAR only auto program 9 PAR only auto program 10 PAR only auto program 11 PAR only auto program 12 PAR only auto program 13 PAR only auto program 14 PAR only auto program 15 PAR only auto program 16 PAR only auto program 17 Flash only auto program 1 Flash only auto program 2 Flash only auto program 3 Flash only auto program 4 Flash only auto program 5 Flash only auto program 6 Flash only auto program 7 Flash only auto program 8 Flash only auto program 9 Flash only auto program 10 PAR and flash auto program 1 100-199 PAR and flash auto program 2 200-255 PAR and flash auto program 3 151.557UK User Manual Channel 2 (channel 1 at 131-170) Channel 2 (channel 1 at 171-210) Channel 2 (channel 1 at 211-255) Channel 3 (Channel 1 at 010-130) 6 channel mode: Channel Channel 1 Channel 2 Channel 3 Channel 4 Channel 5 Channel 6 000-014 015-029 030-044 045-059 060-074 075-089 090-104 105-119 120-134 135-149 150-164 165-179 180-194 195-209 210-224 225-239 240-255 000-024 025-049 050-074 075-099 100-124 125-149 150-174 175-199 200-224 225-255 000-099 100-199 200-255 000-255 PAR only auto program 1 PAR only auto program 2 PAR only auto program 3 PAR only auto program 4 PAR only auto program 5 PAR only auto program 6 PAR only auto program 7 PAR only auto program 8 PAR only auto program 9 PAR only auto program 10 PAR only auto program 11 PAR only auto program 12 PAR only auto program 13 PAR only auto program 14 PAR only auto program 15 PAR only auto program 16 PAR only auto program 17 Flash only auto program 1 Flash only auto program 2 Flash only auto program 3 Flash only auto program 4 Flash only auto program 5 Flash only auto program 6 Flash only auto program 7 Flash only auto program 8 Flash only auto program 9 Flash only auto program 10 PAR and flash auto program 1 PAR and flash auto program 2 PAR and flash auto program 3 Auto program speed, slow to fast DMX Value 000-255 000-255 000-255 000-255 000-191 192-200 201-249 250-255 000-255 Function PAR Red dimmer 0-100% PAR Green dimmer 0-100% PAR Blue dimmer 0-100% PAR White dimmer 0-100% Flash dimmer 0-100% Sound to light flash Continuous flash All on Flash speed 0-100% 151.557UK User Manual 28 channel mode: Channel Channel 1 Channel 2 Channel 3 Channel 4 Channel 5 Channel 6 Channel 7 Channel 8 Channel 9 Channel 10 Channel 11 Channel 12 Channel 13 Channel 14 Channel 15 Channel 16 Channel 17 Channel 18 Channel 19 Channel 20 Channel 21 Channel 22 Channel 23 Channel 24 Channel 25 Channel 26 Channel 27 Channel 28 DMX Value 000-255 000-255 000-255 000-255 000-255 000-255 000-255 000-255 000-255 000-255 000-255 000-255 000-255 000-255 000-255 000-255 000-255 000-255 000-255 000-255 000-255 000-255 000-255 000-255 000-255 000-255 000-255 000-255 Function PAR 1 Red dimmer 0-100% PAR 1 Green dimmer 0-100% PAR 1 Blue dimmer 0-100% PAR 1 White dimmer 0-100% PAR 1 Master dimmer 0-100% PAR 1 Strobe speed 0-100% PAR 2 Red dimmer 0-100% PAR 2 Green dimmer 0-100% PAR 2 Blue dimmer 0-100% PAR 2 White dimmer 0-100% PAR 2 Master dimmer 0-100% PAR 2 Strobe speed 0-100% PAR 3 Red dimmer 0-100% PAR 3 Green dimmer 0-100% PAR 3 Blue dimmer 0-100% PAR 3 White dimmer 0-100% PAR 3 Master dimmer 0-100% PAR 3 Strobe speed 0-100% PAR 4 Red dimmer 0-100% PAR 4 Green dimmer 0-100% PAR 4 Blue dimmer 0-100% PAR 4 White dimmer 0-100% PAR 4 Master dimmer 0-100% PAR 4 Strobe speed 0-100% Flash 1 speed 0-100% Flash 2 speed 0-100% Flash 3 speed 0-100% Flash 4 speed 0-100% 151.557UK User Manual Specifications Power 110-240Vac, 50/60Hz (IEC) Power consumption 130W Fuse rating LED type T3.15A 4 x 30W RGBW COB LED and 4 x 1W white LED Beam angle 14-36° DMX channels 3, 6 or 28 Height adjustment 1.5 - 2.5m Dimensions : PAR bar 1023 x 215 x 71mm Weight 11.2kg LED safety standard BSEN62471:2008 Troubleshooting No power (mains) No light output No strobe output Unresponsive to DMX Check mains voltage is correct and outlet is switched on Check IEC lead and fuse (if fuse continually blows, refer to your dealer) Check control panel mode settings (standby, slave, sensitivity, DMX) Check DMX settings from controller (dimmer levels, blackout etc.) Check foot control ensure unit not in black out mode Check strobe settings on control panel or from DMX controller Check Mic sensitivity is not set to minimum Check DMX connection and leads Check that unit is in DMX mode and ensure DMX address remains lit to confirm receiving DMX signal Check DMX controller is not set to black out Check DMX controller is on correct fixture/page Check master dimmer value Check correct DMX address is set Overheating/ cutting out Check that the unit is not too close to a heat source Foot control not working Check wireless function is enabled on the light unit Check control has battery inserted and battery is not flat Check antennas on both light unit and control are lifted Check the unit and control is not located next to wireless router as interference may occur 151.557UK User Manual This product is classed as Electrical or Electronic equipment and should not be disposed with other household or commercial waste at the end of its useful life. The goods must be disposed of according to your local council guidelines. Errors and omissions excepted. Copyright© 2015. AVSL Group Ltd. 151.557UK User Manual