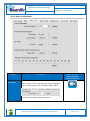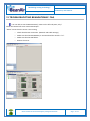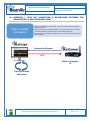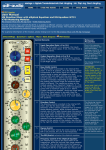
1
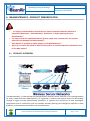
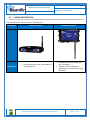
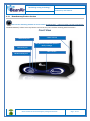
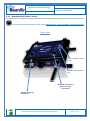
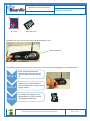
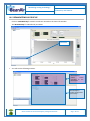
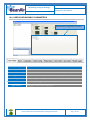
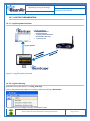
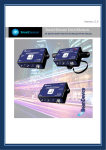
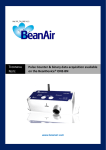
Chantier Error! Reference source not found. Auteur ADJIBI Claude NGUYEN Van Dung Version 2.4 BEANAIR® BEANGATEWAY® USER MANUAL Ref : Error! Reference source not found.-Error! Reference source not found.Date Reference source not found. Modèle : CTR-100 de parution : Error! “Rethinking sensing technology” Document version : 2.4 BeanGateway® User Manual Document type : User Manual DOCUMENT Document ID External reference UM_RF_05 UM_RF_05_ENG_BeanGateway Author Aleksandr Drimitov, Embedded Software Engineer Project Code BeanGateway® User Guide Document’s name Version Date V2.4 15/11/2015 VALIDATION Fonction For validation Destination Writer Aleksandr Drimitov Reader Mohamed-Yosri Jaou. Validation Antje Jacob For info DIFFUSION Fonction Destination For action Reader n°1 Maxime Obr., Embedded software engineer Reader n°2 Mohamed-Yosri Jaou., Embedded software engineer For info UPDATES Version Date Auteur 2.0 17/03/2013 Christophe DONTEGREUIL 2.1 20/01/2014 2.2 Evolution & Status External Mounting brackets description New BeanGateway® Indoor description Christophe DONTEGREUIL BeanGateway® wall mounting instructions 16/10/2014 Aleksandr Drimitov BeanGateway® Picture changed TimeSync function added 2.3 08/06/2015 Aleksandr Drimitov RS485, RS232 technical specifications added ModBus® Protocol 2.4 17/11/2015 Aleksandr Drimitov New videos added Removing a Beandevice® from a WSN –process description Please consider the environment before printing this document. Page : 2 / 79 “Rethinking sensing technology” Document type : User Manual Document version : 2.4 BeanGateway® User Manual Disclaimer The contents are confidential and any disclosure to persons other than the officers, employees, agents or subcontractors of the owner or licensee of this document, without the prior written consent of BeanAir GmbH, is strictly prohibited. BeanAir makes every effort to ensure the quality of the information it makes available. Notwithstanding the foregoing, BeanAir does not make any warranty as to the information contained herein, and does not accept any liability for any injury, loss or damage of any kind incurred by use of or reliance upon the information. BeanAir disclaims any and all responsibility for the application of the devices characterized in this document, and notes that the application of the device must comply with the safety standards of the applicable country, and where applicable, with the relevant wiring rules. BeanAir reserves the right to make modifications, additions and deletions to this document due to typographical errors, inaccurate information, or improvements to programs and/or equipment at any time and without notice. Such changes will, nevertheless be incorporated into new editions of this document. Copyright: Transmittal, reproduction, dissemination and/or editing of this document as well as utilization of its contents and communication thereof to others without express authorization are prohibited. Offenders will be held liable for payment of damages. All rights are reserved. Copyright © BeanAir GmbH 2015 Please consider the environment before printing this document. Page : 3 / 79 “Rethinking sensing technology” Document type : User Manual Document version : 2.4 BeanGateway® User Manual Contents 1. TECHNICAL SUPPORT .................................................................................................................................... 7 2. VISUAL SYMBOLS DEFINITION ...................................................................................................................... 8 3. ACRONYMS AND ABBREVIATIONS ............................................................................................................... 9 4. RELATED DOCUMENTS & VIDEOS .............................................................................................................. 10 4.1 Applications Notes ................................................................................................................................... 10 4.2 Technical Notes ....................................................................................................................................... 11 4.3 Related videos ......................................................................................................................................... 12 5. DOCUMENT ORGANIZATION ........................................................................................................................ 13 6. BEANGATEWAY® - PRODUCT PRESENTATION ........................................................................................ 14 6.1 Product overview ..................................................................................................................................... 14 6.2 BeanGateway® Technical specifications ................................................................................................ 16 6.2.1 Common specifications.................................................................................................................. 16 6.2.1.1 Wireless sensor network coordinator .......................................................................... 16 6.2.1.2 Ethernet/LAN Network ................................................................................................. 16 6.2.1.3 Power supply ............................................................................................................... 16 6.2.1.4 Embedded file system on Micro-SD® -Options ........................................................... 17 6.3 Casing description ................................................................................................................................... 18 6.3.1 BeanGateway® Indoor Version ..................................................................................................... 19 6.3.2 BeanGateway® Outdoor version ................................................................................................... 21 6.3.3 Led Description .............................................................................................................................. 23 6.4 Antenna specifications............................................................................................................................. 24 6.4.1 2.4 GHz – Indoor Antenna ............................................................................................................. 24 6.4.1 2.4 GHz – Outdoor Antenna .......................................................................................................... 25 6.5 Integrated UPS (Uninteruptible power supply) ........................................................................................ 26 7. SERIAL LINE SPECIFICATIONS (RS232/RS485) ......................................................................................... 27 7.1 RS232 Line (BeanGateway® Indoor only) .............................................................................................. 27 7.1.1 Technical features ......................................................................................................................... 27 7.1.2 Wiring code .................................................................................................................................... 27 7.2 RS485 Line .............................................................................................................................................. 28 7.2.1 Technical features ......................................................................................................................... 28 7.2.2 Switchable termination ................................................................................................................... 28 7.2.3 RJ45 Wiring code (BeanGateway® Indoor version) ...................................................................... 28 Please consider the environment before printing this document. Page : 4 / 79 “Rethinking sensing technology” Document type : User Manual 7.2.4 Document version : 2.4 BeanGateway® User Manual M12-4 Pins Plug Wiring code (BeanGateway® Outdoor version) ................................................. 29 8. DATA LOGGER MODULE (MICRO-SD®) ...................................................................................................... 31 8.1 Introduction .............................................................................................................................................. 31 8.2 How to insert a Micro-SD® card on your Beangateway®? ..................................................................... 31 8.3 Functions ................................................................................................................................................. 33 8.4 Common Files on the memory card ........................................................................................................ 33 8.4.1 Organization of Files ...................................................................................................................... 33 8.4.2 Type of file created on the memory card ....................................................................................... 34 8.5 Using the Data converter application (from raw file to text file) ............................................................... 34 8.5.1 Location of the converter ............................................................................................................... 34 8.5.2 How to use the conversion application? ........................................................................................ 34 8.6 Log text files generated by the application .............................................................................................. 35 8.7 Controlling the MicroSD Data Logger of the BeanGateway using the BeanScape ................................ 36 9. GATEWAY® INSTALLATION GUIDELINES ................................................................................................... 39 9.1 How to install the BeanGateway® ........................................................................................................... 39 9.1.1 Wall mounting ................................................................................................................................ 39 9.1.2 Desktop installation ........................................................................................................................ 40 9.1.3 Wall mounting kit for the BeanGateway® outdoor ........................................................................ 40 9.1.3.1 Die cast external mounting brackets ........................................................................... 40 9.1.4 Mounting brackets design .............................................................................................................. 41 9.1.5 Plug the 2.4GHz antenna .............................................................................................................. 42 9.1.5.1 BeanGateway® outdoor version .................................................................................. 43 9.2 Power supply socket wiring ..................................................................................................................... 43 9.2.1 BeanGateway® outdoor power supply .......................................................................................... 44 9.2.2 BeanGateway® indoor power supply ............................................................................................ 44 10. START YOUR APPLICATION ......................................................................................................................... 47 10.1 Connect your BeanGateway® to your PC/Laptop ................................................................................... 47 10.2 Setting up a network on your computer................................................................................................... 48 10.3 Start the BeanScape® ............................................................................................................................. 52 10.4 LAN/ETHERNET Configuration (for advanced user only) ....................................................................... 54 10.5 BeanGateway® profile ............................................................................................................................ 56 10.5.1 BeanGateway® profile status description ..................................................................................... 57 10.5.1.1 Frame : Battery status ................................................................................................. 58 10.6 User-configurable parameters ................................................................................................................. 59 10.6.1 Custom Display.............................................................................................................................. 60 10.6.2 Notes.............................................................................................................................................. 60 10.6.3 Radio Configuration ....................................................................................................................... 61 10.6.4 System Configuration .................................................................................................................... 64 10.7 Log File Organization .............................................................................................................................. 66 10.7.1 Log file system overview................................................................................................................ 66 10.7.2 Log file directory ............................................................................................................................ 66 Please consider the environment before printing this document. Page : 5 / 79 “Rethinking sensing technology” Document type : User Manual Document version : 2.4 BeanGateway® User Manual 11. MAINTAINING AND SUPERVISING BEANGATEWAY® ............................................................................... 70 11.1 Diagnosis using BeanScape® ................................................................................................................. 70 11.1.1 Knowing the PAN ID and IP address of your BeanGateway ......................................................... 70 11.1.2 System Maintenance ..................................................................................................................... 71 12. TROUBLESHOOTING BEANGATEWAY: FAQ .............................................................................................. 72 13. ENVIRONNEMENTAL CONSTRAINTS .......................................................................................................... 73 13.1 Sealing ..................................................................................................................................................... 73 13.2 Sensitivity to radio frequency .................................................................................................................. 73 13.3 Temperature ............................................................................................................................................ 73 13.4 Humidity ................................................................................................................................................... 73 13.5 Reflections, Obstructions and Multipath .................................................................................................. 73 13.6 SHOCKS & VIBRATIONS ....................................................................................................................... 73 13.7 Antenna ................................................................................................................................................... 74 13.8 Others features ........................................................................................................................................ 74 14. APPENDICES .................................................................................................................................................. 75 14.1 Appendix 1: How the connection is established between the Beangateway® and the BeanScape® ? . 76 Please consider the environment before printing this document. Page : 6 / 79 “Rethinking sensing technology” Document type : User Manual Document version : 2.4 BeanGateway® User Manual 1. TECHNICAL SUPPORT For general contact, technical support, to report documentation errors and to order manuals, contact BeanAir Technical Support Center (BTSC) at: [email protected] For detailed information about where you can buy the BeanAir equipment/software or for recommendations on accessories and components visit: www.beanair.com To register for product news and announcements or for product questions contact BeanAir’s Technical Support Center (BTSC). Our aim is to make this user manual as helpful as possible. Keep us informed of your comments and suggestions for improvements. BeanAir appreciates feedback from the users of our information. Please consider the environment before printing this document. Page : 7 / 79 “Rethinking sensing technology” Document type : User Manual Document version : 2.4 BeanGateway® User Manual 2. VISUAL SYMBOLS DEFINITION Symbols Definition Caution or Warning – Alerts the user with important information about BeanAir wireless sensor networks (WSN), if this information is not followed, the equipment /software may fail or malfunction. Danger – This information MUST be followed if not you may damage the equipment permanently or bodily injury may occur. Tip or Information – Provides advice and suggestions that may be useful when installing BeanAir Wireless Sensor Networks. Please consider the environment before printing this document. Page : 8 / 79 “Rethinking sensing technology” Document type : User Manual Document version : 2.4 BeanGateway® User Manual 3. ACRONYMS AND ABBREVIATIONS AES Advanced Encryption Standard CCA Clear Channel Assessment CSMA/CA Carrier Sense Multiple Access/Collision Avoidance GTS Guaranteed Time-Slot kSps Kilo samples per second LLC Logical Link Control LQI Link quality indicator LDCDA Low duty cycle data acquisition MAC Media Access Control PAN Personal Area Network PER Packet error rate RF Radio Frequency SD Secure Digital WSN Wireless sensor Network Please consider the environment before printing this document. Page : 9 / 79 “Rethinking sensing technology” Document type : User Manual Document version : 2.4 BeanGateway® User Manual 4. RELATED DOCUMENTS & VIDEOS In addition to this User manual, please consult the related application notes, technical notes and videos: 4.1 APPLICATIONS NOTES Document name (Click on the weblink) Related product AN_RF_007 :“ Beanair_WSN_Deployment“ All BeanAir products Wireless sensor guidelines AN_RF_006 – „How to extend your wireless range“ All BeanAir products A guideline very useful for extending your wireless range AN_RF_005 – BeanGateway® & Data Terminal Equipment Interface BeanGateway® Description DTE interface BeanGateway® networks Architecture deployment on the All BeanAir products Coexistence & interferences of different RF technologies in the 2.4 GHz frequencies band. AN_RF_003 - “IEEE 802.15.4 2.4 GHz Vs 868 MHz” All BeanAir products Comparison between 868 MHz frequency band and a 2.4 GHz frequency band. AN_RF_002 – “Structural Health monitoring on bridges” All BeanAir products The aim of this document is to overview Beanair® products suited for bridge monitoring, their deployment, as well as their capacity and limits by overviewing various data acquisition modes available on each BeanDevice®. AN_RF_004 – “Coexistence And [email protected]” Please consider the environment before printing this document. Page : 10 / 79 “Rethinking sensing technology” Document type : User Manual 4.2 Document version : 2.4 BeanGateway® User Manual TECHNICAL NOTES Document name (Click on the weblink) Affected product Description All the BeanDevice® This technical note describes the sleeping & active power mode on the BeanDevice®. TN_RF_009 – « BeanGateway® management on LAN infrastructure » BeanGateway® BeanGateway® integration on a LAN infrastructure TN_RF_008 – “Data acquisition modes available on the BeanDevice®” All the BeanDevice® Data acquisition modes available on the BeanDevice® TN_RF_007 – “BeanDevice® DataLogger User Guide ” All the BeanDevice® This document presents the DataLogger feature on the BeanDevice® TN_RF_006 – “WSN Association process” All the BeanDevice® Description of the BeanDevice® network association BeanDevice® SUN-BN This document presents Pulse counter (ex: energy metering application) and binary data acquisition features on the BeanDevice® SUN-BN. TN_RF_010 – « BeanDevice® Power Management » TN_RF_005 – “Pulse counter & binary data acquisition on the BeanDevice® SUN-BN” TN_RF_004 - Ambient Light sensor technical specifications RF_TN_003- “Aggregation capacity of wireless sensor networks” BeanDevice® SUN-XX (Ecosensor) All the products Technical description of the Ambient light sensor available on the BeanDevice® SUNXX products Network capacity characterization Beanair Wireless Sensor Networks of RF_TN_002 V1.0 - Current consumption in active & sleeping mode BeanDevice® Current consumption estimation of the BeanDevice in active and sleeping mode RF_TN_001 V1.0- Wireless range benchmarking BeanDevice® Wireless range benchmarking of the BeanDevice® Please consider the environment before printing this document. Page : 11 / 79 “Rethinking sensing technology” Document type : User Manual 4.3 Document version : 2.4 BeanGateway® User Manual RELATED VIDEOS All the videos are available on our Youtube channel Beanair video link (Youtube) Company Presentation Related products All BeanGateway® - Ethernet Outdoor version introduction BeanGateway® - Ethernet Outdoor version introduction BeanGateway® – Ethernet Indoor version presentation BeanGateway® Ethernet Indoor version Beandevice® AN-XX wireless range demonstration BeanDevice® AN-XX & Beandevice® AN-XX Extender BeanDevice® AN-XX presentation BeanDevice® AN-XX & Beandevice® AN-XX Extender BeanDevice® AX-3D presentation BeanDevice® AX-3D BeanDevice® HI-INC presentation BeanDevice® HI-INC BeanDevice® AX-3DS presentation BeanDevice® AX-3DS BeanDevice® SUN-T presentation BeanDevice® SUN-T BeanDevice® SUN-TIR presentation Beandevice® SUN-TIR BeanDevice® SUN-BN presentation BeanDevice® SUN-BN BeanDevice® SUN presentation BeanDevice® SUN BeanScape® – WSN supervision software BeanScape® BeanGateway® Ethernet/LAN Configuration, directly connected to the Laptop/PC BeanGateway® Performing an energy scan on your BeanGateway® BeanGateway® Automatic RF Channel selection BeanGateway® Wireless sensors profile deletion from the BeanGateway® Database All Network Diagnostic configuration on the BeanGateway® BeanGateway® RF Power configuration on the BeanGateway® BeanGateway® Please consider the environment before printing this document. Page : 12 / 79 “Rethinking sensing technology” Document type : User Manual Document version : 2.4 BeanGateway® User Manual 5. DOCUMENT ORGANIZATION BeanGateway® product presentation BeanGateway® installation guidelines Starting your application Maintaining and supervising your BeanGateway® Troubleshooting Environnemental Constraints • Details the BeanGateway® product presentation • Details the installation guidelines of the BeanGateway® • Details the BeanGateway® supervision from the BeanScape® • Details the BeanGateway® maintenance (for experienced user) • BeanGateway® FAQ • Describes environnemental constraints (temperature, humidity, mechanical chocs, vibration...) Please consider the environment before printing this document. Page : 13 / 79 “Rethinking sensing technology” Document type : User Manual Document version : 2.4 BeanGateway® User Manual 6. BEANGATEWAY® - PRODUCT PRESENTATION It is highly recommended to read all the user manual related to BeanAir software & equipment (BeanScape ®, BeanGateway®, BeanDevice ®) before getting start your BeanGateway®. Use only accessories supplied by BeanAir (power supply unit, and antenna). Use of other materials may damage the BeanGateway®; Only BeanAir is qualified to make changes on the BeanGateway®; Don’t try to remove the adhesive label on the product; it contains important information such as the MAC address 6.1 PRODUCT OVERVIEW The BeanGateway® is used to build and manage BeanAir wireless sensor networks. It can manage queues for every network element (BeanDevice®). As a gateway, it controls the external access to the network through a highly secured authenticated procedure. It supports the conversion of data exchanged, compression and IP connectivity with the network thereby reducing the intelligence required in these platforms, maintenance and therefore the associated cost. Please consider the environment before printing this document. Page : 14 / 79 “Rethinking sensing technology” Document type : User Manual Document version : 2.4 BeanGateway® User Manual It allows communication with the Wireless Sensors Network through IEEE 802.15.4 protocol. The BeanGateway® provides standard protocols for a better communication with a SCADA supervision software: LAN/Ethernet ModBus TCP/RS485/RS232 It offers the following features: Design, configuration and supervision of the entire Wireless sensors network. Data Organization from the various sensors. Data Transmission to the BeanScape®. Backing up wireless sensors network mapping. Information processing continuously even during a power outage. Data recording on Micro-SD card (option) Please consider the environment before printing this document. Page : 15 / 79 Document version : 2.4 “Rethinking sensing technology” BeanGateway® User Manual Document type : User Manual 6.2 BEANGATEWAY® TECHNICAL SPECIFICATIONS 6.2.1 Common specifications These specifications are common to all the BeanGateway® version. 6.2.1.1 Wireless sensor network coordinator Specifications Wireless Stack Wireless Sensor Network Coordinator Antenna Diversity IEEE 802.15.4 IEEE Peer-to-peer/ Star 802.15.4 Self-managed antenna diversity function Data rate 250 Kbits/s RF Characteristics ISM 2.4GHz – 16 Channels RF Transmit power Configurable transmit power: +0,5 dBm to +20 dBm Receiver sensitivity -95,5 dBm to -101 dBm Encryption AES 128 bits (integrated AES coprocessor) Maximum Radio Range 1 km (L.O.S.) · Energy Scan for choosing a suitable RF Channel · BeanDevice® PER (Packet Error Rate) calculation WSN Diagnostic tool · LQI (Link Quality Indicator) between the BeanGateway® GSM/GPRS and the BeanDevice® WSN Topology · RF channels Blacklist 6.2.1.2 Ethernet/LAN Network Specifications Ethernet/LAN Network Network/Transport Protocol Client TCP/IP, UDP, DNS, DHCP Data Link Protocol Ethernet / Fast-Ethernet with auto-uplink (MDI/MDI-X auto) - IEEE 802.3x IP Addressing Dynamic (DHCP) or static IP configuration LAN parameters (DNS, DHCP, Keep Alive…) are configurable from the BeanScape® ( RS232 Interface or UDP/Ethernet Interface). 6.2.1.3 Power supply Specifications Power Consumption Power Supply 250 mA to 300 mA during wireless RX/TX and Ethernet activated Please consider the environment before printing this document. Page : 16 / 79 “Rethinking sensing technology” Document type : User Manual External power supply Integrated Lithium-Ion Battery 6.2.1.4 Document version : 2.4 BeanGateway® User Manual +9V to +28 V , integrated Lithium-Ion battery charger with high-precision battery monitoring Lithium-Ion rechargeable battery 950 mAh (reference BAT0.95DMG) In case of external power supply failure, the BeanGateway® can switch on the internal battery. Embedded file system on Micro-SD® -Options Specifications Embedded File System on Micro-SD® Option(s) All the User data are stored on an external memory (Micro-SD® technology): · Measurement storage for Wireless Sensor Network (network configuration, measurement, alarms notifications …) ; · Maximum storage capacity (2Go) · CSV files management (for exporting data on Excel® and Access®) Please consider the environment before printing this document. Page : 17 / 79 “Rethinking sensing technology” Document type : User Manual 6.3 Document version : 2.4 BeanGateway® User Manual CASING DESCRIPTION The BeanGateway® casing comes in two versions: Enclosure Applications Indoor Version Indoor application only, the product is not waterproof Outdoor version Remote sites (wind, water pipe, gas, mountains ...) Wireless Sensor Networks deployment in outdoor over long distances. Please consider the environment before printing this document. Page : 18 / 79 “Rethinking sensing technology” Document type : User Manual 6.3.1 Document version : 2.4 BeanGateway® User Manual BeanGateway® Indoor Version Click on the following weblink to see the video: BeanGateway® – Ethernet Indoor version presentation The BeanGateway® indoor has many buttons and connectors, let's see their meaning with illustrations Front View WSN activity Led 2.4GHz antenna CNC/ Network push button (Restore factory settings) LAN activity Led Micro-SD Slot ModBus activity Led Please consider the environment before printing this document. Page : 19 / 79 “Rethinking sensing technology” Document type : User Manual Document version : 2.4 BeanGateway® User Manual Rear View 5dBi Omni Antenna Power supply DC 8-28 Volts OFF (left side)/ON (Right Side) switch RJ45 shielded & Auto-MDIX socket for LAN network SUBD9/RS232 Connector RS485/Modbus (Option) Please consider the environment before printing this document. Page : 20 / 79 “Rethinking sensing technology” Document type : User Manual 6.3.2 Document version : 2.4 BeanGateway® User Manual BeanGateway® Outdoor version Click on the following weblink to see the video: BeanGateway® - Ethernet Outdoor version introduction Front view LAN network activity LED Wireless sensor networks LED “Network” Push Button (factory settings restoration) ON/OFF “Latching” Push Button Please consider the environment before printing this document. Page : 21 / 79 “Rethinking sensing technology” Document type : User Manual Function Document version : 2.4 BeanGateway® User Manual Description Network push button “Network” push button restores the factory settings. Beandevice® profiles are deleted RF parameters are restored to the factory settings (TX power, Authorized RF channels, RF Channel) LAN/Ethernet parameters are restored to the factory settings Hold this button more than 10 seconds, factory settings are restored when WSN activity Led starts to blink in red color. LAN network activity Led This bi-color GREEN / RED Led represents the LAN activity WSN activity Led This bi-color GREEN / RED Led represents the WSN activity ON/OFF Button Allows to power up/power off the BeanGateway® Rear view N-Type RF Socket M8-3Pins power supply socket (DC 8-28 Volts) RJ45 connector integrated in a cable gland (IP67 Weatherproof) Please consider the environment before printing this document. RS485 (ModBus RS485 option only) Page : 22 / 79 “Rethinking sensing technology” Document type : User Manual Document version : 2.4 BeanGateway® User Manual To ensure an excellent seal of the BeanGateway® casing, please make sure that the following conditions are met: During transportation, cable connections and locknuts could loosen , make sure they are tight Do not overtighten or exert force on your RJ45 cable or power cable If the external power supply is not used, make sure the power supply cap is present on the M8 socket; Make sure that all the N-Type antennas are tightly screwed; The external switch-mode power supply is not watertight; The BeanGateway® outdoor is delivered with a 2-meters length LAN/RJ45 cable. If the cable length is not enough for your application, use a RJ45 coupler (not provided with our material). 6.3.3 Led Description GSM/GPRS Activity LED Action WSN Activity LED LAN Network activity LED with DataLogging on Micro-SD® activtaed BeanGateway® Power ON LED is flashing green LED is fixed red and turn off by an interval of 15s and then turns back LED is flashing green The BeanGateway® is initialized and set up the mapping of its wireless network sensors Press the RESET button LED is flashing green LED is fixed green and it turn off by an interval of 15s and then turns back LED is flashing green The coordinator is initialized (same action as above) Data’s reception from wireless sensor network LED is flashing green fixed green LED is flashing green Memorization, organization and data transmission to the network supervisor control monitor Reception of configuration information from the BeanScape® LED is flashing green fixed green LED is flashing green Transmission of configuration information to the WSN Please consider the environment before printing this document. Results / Impact Page : 23 / 79 “Rethinking sensing technology” Document type : User Manual DataLogging on the MicroSD 6.4 / LED is flashing RED Document version : 2.4 BeanGateway® User Manual / / ANTENNA SPECIFICATIONS 6.4.1 2.4 GHz – Indoor Antenna RF antenna specifications Power Gain 5.5 dBi V.S.W.R. <2.0 Connector type RP-SMA (female) Impedance 50 Ohm Polarization Vertical Dimensions (Length & Diameter in mm) 200 x 14 Please consider the environment before printing this document. Page : 24 / 79 Document version : 2.4 “Rethinking sensing technology” BeanGateway® User Manual Document type : User Manual 6.4.1 2.4 GHz – Outdoor Antenna RF antenna specifications Power Gain 5.5 dBi V.S.W.R. <2.0 Connector type N-Type male Impedance 50 Ohm Resistance to wind 180 mph Sealing IP67 Polarization Vertical Dimensions (Length & Diameter 95 x 19 in mm) Please consider the environment before printing this document. Page : 25 / 79 “Rethinking sensing technology” Document type : User Manual 6.5 Document version : 2.4 BeanGateway® User Manual INTEGRATED UPS (UNINTERUPTIBLE POWER SUPPLY) The BeanGateway® operates with an external power supply (DC 8-28V). An integrated rechargeable battery with a capacity of 950mAh is used as an UPS battery (uninterruptible power supply). The internal battery provides instantaneous protection from external power supply interruptions, the wireless sensor network activity & Ethernet LAN activity are maintained during this time (3h00 to 3h30 approximately). The BeanGateway® starts emitting a beep sound every 2 seconds. The beep sound will stop when the external power supply is restored. Precautions: Do not try to change the internal battery. You will void the warranty of your BeanGateway®. Use the power supply wall plug-in provided by Beanair®. Beep sound is only available on the BeanGateway® Indoor version Please consider the environment before printing this document. Page : 26 / 79 “Rethinking sensing technology” Document type : User Manual Document version : 2.4 BeanGateway® User Manual 7. SERIAL LINE SPECIFICATIONS (RS232/RS485) 7.1 RS232 LINE (BEANGATEWAY® INDOOR ONLY) 7.1.1 Technical features RS232 is only available on the BeanGateway® Indoor, this feature is not available on the BeanGateway® Outdoor Features Description Baud Rate Default Value : 19,2 Kbps Minimum value: TBD Maximum value : 115,2 Kbps Configurable from the BeanScape® software SUBD9 Connector Percent error between 0% - between 50Hz and 4800 bauds desired and actual <0,16% -- between 7200Hz and 115,2 Kbauds baudrate. ESD Protection 7.1.2 +15kV Wiring code Features Description PIN 1 Not used PIN 2 RX Data (DTE), TX Data (DCE) PIN 3 TX Data (DTE), RX Data (DCE) PIN 4 Not used PIN 5 Signal ground PIN 6 Not used PIN 7 Not used PIN 8 Not used PIN 9 Not used Please consider the environment before printing this document. Page : 27 / 79 “Rethinking sensing technology” Document type : User Manual Document version : 2.4 BeanGateway® User Manual RTS and CTS signals are not used Each TXD must be wired with RXD of the other device RTS may be wired with CTS of the other device, DTR may be wired with DSR of the other device. 7.2 RS485 LINE 7.2.1 Technical features Features Description Data Rate Default Value : 19,2 Kbps Minimum value: 9,6 kbps Maximum value : 115,2 Kbps Configurable from the BeanScape® Manager or ModBus Command Baud Rate accuracy 1% in transmission situation Accept 2% in reception situation Connector type BeanGateway® Indoor RJ45 BeanGateway® Outdoor M12 – 4 Pins (Waterproof IP67) Switchable Termination 120 Ohm termination resistor ESD Protection +15kV 7.2.2 Switchable termination Proper cable termination is very important for good signal fidelity. If the cable is not terminated with its characteristic impedance, reflections will result in distorted waveforms. The RS485 Bus on the BeanGateway® integrates a switchable termination resistors on the receiver input pins. This provides the advantage of being able to easily change, through logic control, the line termination for optimal performance when configuring your ModBus network. 7.2.3 RJ45 Wiring code (BeanGateway® Indoor version) Please consider the environment before printing this document. Page : 28 / 79 Document version : 2.4 “Rethinking sensing technology” BeanGateway® User Manual Document type : User Manual 7.2.4 Pin Number Wire color PIN1 Orange/White PIN2 Orange PIN3 Green/White PIN4 Blue PIN5 Blue/White PIN6 Green PIN7 Brown/White PIN8 Brown Function Description M12-4 Pins Plug Wiring code (BeanGateway® Outdoor version) A M12 Plug is provided with your BeanGateway® outdoor (if RS485 option is selected), Pin assignation follows M12 standard. Pin Number Function Label name displayed Description PIN1 D- Rx Data - PIN2 D+ Tx Data + PIN3 Gnd Gnd Electrical Ground PIN4 Not connected Please consider the environment before printing this document. Page : 29 / 79 “Rethinking sensing technology” Document type : User Manual Document version : 2.4 BeanGateway® User Manual Wiring Code - M12-4Pins Plug View External view PIN2 : D+ PIN3 : Gnd PIN1: D- PIN4 : N.C. M12-4pins plug (A Coding) Wiring Code - M12-4Pins « Socket » View PIN1: D- PIN4 : N.C. PIN2 : D+ PIN3 : Gnd Please consider the environment before printing this document. Page : 30 / 79 “Rethinking sensing technology” Document type : User Manual Document version : 2.4 BeanGateway® User Manual 8. DATA LOGGER MODULE (MICRO-SD®) 8.1 INTRODUCTION The Micro SD® option on the BeanGateway® can record measurements from the BeanGateway® on a micro SD Card. This function is useful in applications where the user cannot afford to lose measurement data, or in case of a temporary loss of network connection (local or remote) the measurement data is stored on the optional MicroSD of the BeanGateway®. In other embedded applications, where there are no possibilities of connecting your devices with an IT Environment, this will become a mandatory feature. The Micro SD Data Logger on the BeanGateway® should not be confused with the embedded Data Logger on the BeanDevice®. Data logging on Micro-SD® is not compatible with the following data acquisition mode: Streaming Mode Streaming Packet Mode SSD (Smart shock detection) 8.2 HOW TO INSERT A MICRO-SD® CARD ON YOUR BEANGATEWAY®? A Micro-SD® card is provided with the BeanGateway® (the max capacity is 2Go), and a card adapter. Micro-SD® card and its SD adaptator Use only Micro-SD® card. Don’t try to insert SD Card on your BeanGateway®. You risk to damage your BeanGateway®. Please consider the environment before printing this document. Page : 31 / 79 “Rethinking sensing technology” BeanGateway® User Manual Document type : User Manual SD® Card Document version : 2.4 Micro-SD® Card The Micro-SD® slot is on the front side of the BeanGateway® case: Micro-SD® Slot The following steps show how to insert a Micro-SD® card and to start DataLogging on your BeanGateway®: Step 1 •Power off the BeanGateway® •Slide the Micro-SD® card into the card slot, with the label side face up. • Power-On your BeanGateway® Step 2 Step 3 • Start the BeanScape® and get to the Logger window •To configure the Logger on your BeanGateway®, go to the chapter "DataLogging on MicroSD" Please consider the environment before printing this document. Page : 32 / 79 “Rethinking sensing technology” Document type : User Manual Document version : 2.4 BeanGateway® User Manual When DataLogging is enabled on your BeanGateway®, don’t try to remove the Micro-SD® card. You will lose all the data recorded on your Micro-SD® during a write/read operation. If you want to remove properly the Micro-SD® card, firstly power off your BeanGateway®. Do not expose your Micro-SD® card in a place subject to electro-static discharge and/or electrical noise. If your Micro-SD® card is damaged, you should change it. The BeanGateway® can not read/write on Micro-SD® HC Card which is generally used on Digital Camera video (High Capacity). 8.3 FUNCTIONS The BeanGateway® logger, allows backing up of your measurement data on an optional memory card (micro SD Card). When the logger mode is enabled, all the measurement data transmitted by the BeanDevice® are stored on the memory card. This option is not available with the Streaming, Streaming Packet and SSD (Smart shock detection) measurement mode. 8.4 COMMON FILES ON THE MEMORY CARD 8.4.1 Organization of Files A file is created by your BeanDevice® in the root directory of the memory card. The format of the file name is: "MXXXXXX.blg" where X are the last six characters forming the corresponding MacID of your BeanDevice®. Example: for a BeanDevice® MacID which is "0x00158D00000AAA02" then the created file on the memory card will be "M0AAA02.BLG" Please consider the environment before printing this document. Page : 33 / 79 “Rethinking sensing technology” Document type : User Manual 8.4.2 Document version : 2.4 BeanGateway® User Manual Type of file created on the memory card Data stored on the memory card is formatted as raw data. That is to say that the generated files are not directly readable as it is. An application is required to convert them into text file. This application is the "raw BeanGateway log parser." 8.5 USING THE DATA CONVERTER APPLICATION (FROM RAW FILE TO TEXT FILE) 8.5.1 Location of the converter The conversion application can be found in the directory where the executable BeanScape "BeanScape.exe" file is found. By default, the install location path would be "C: \ Program Files \ BeanScape." The executable file can be identified by the name "AppliBeanRawLogConverter.exe." The complete path is "C: \ Program Files \ BeanScape \ AppliBeanRawLogConverter.exe" (if it is a default installation). 8.5.2 How to use the conversion application? Once the application is launched, it is very easy to use: Click on "Open Raw Log File" (to open the raw log file) A dialog box prompts you to select the log file from the SD card of the BeanGateway (file ending with the extension "*. blg") Once done, the first information displayed in the application window o At the top (table) are the general information about the BeanDevice and sensors connected to it. (MacID, number of sensors, sensor technology, measuring range, ...) o In the lower part (text box) are the unconverted measurements and the dates involved, and at the end of the text are information on the data of extraction o This is an optional information. The last step is to generate log files ending in text format by clicking on the button "Generate readable log text file" A dialog box prompts you to select the destination folder where the files will be created text log. (). A message prompts you saying that the operation is complete. Warning: Newly generated files will overwrite the old files in case they have the same name. Please consider the environment before printing this document. Page : 34 / 79 “Rethinking sensing technology” Document type : User Manual Document version : 2.4 BeanGateway® User Manual Application for conversing raw logs 8.6 LOG TEXT FILES GENERATED BY THE APPLICATION Please consider the environment before printing this document. Page : 35 / 79 “Rethinking sensing technology” Document type : User Manual Document version : 2.4 BeanGateway® User Manual The log text files generated by the application are those generated by the BeanScape. Individual log files are created for each sensor. The format of the file name is: "0xXXXXXXXXXXXXXXXX_Y.txt" where X represents the character 16 characters of the MacID BeanDevice, and character Y is the sensor ID question. Once the logs are processed, the measurements are converted into their own unit, for example in the case of a temperature sensor, the measure will be expressed in degrees Celsius (° C). Example: A BeanDevice TH (humidity - temperature) having sensors attached: a humidity sensor and a temperature sensor, the MacID is "0x0011223344556677" Ids and associated sensors are respectively "0" and "1". After the log of several measures of the BeanDevice on the memory card of the BeanGateway, you will see that the file generated with the name "M556677.blg." Once this file is converted by the conversion application, two log files are generated in text format. "0x0011223344556677_0.txt" the log file of the humidity sensor and "0x0011223344556677_1.txt" the log file of the temperature sensor . 8.7 CONTROLLING THE MICROSD DATA LOGGER OF THE BEANGATEWAY USING THE BEANSCAPE From the BeanGateway profile, you can access the tab "Logger Module." Under that you will find two fields. The first field identifies the current state of embedded logger: The field "Logger status" indicates whether the logger is currently enabled or not. The field "Logger ready" indicates whether the logger is currently operational (green when operational, if not red). The LED will be red if no memory card is present in the BeanGateway, or if the module initialization logger is not yet complete. The second field allows you to enable or disable the onboard logger: Select "Enable log" and click "Validate" to activate the logger. Select "Disable log" and click "Validate" to disable the logger. Please consider the environment before printing this document. Page : 36 / 79 “Rethinking sensing technology” Document type : User Manual Document version : 2.4 BeanGateway® User Manual BeanScape Application : “Logger Module” Tab Once the Logger mode is enabled, do not remove your Micro-SD® before switching off your BeanGateway®. If you remove your card Micro-SD® during the writing phase, the Micro SD may get corrupted and you may lose all the measurements stored in it. Please consider the environment before printing this document. Page : 37 / 79 “Rethinking sensing technology” Document type : User Manual Document version : 2.4 BeanGateway® User Manual Please consider the environment before printing this document. Page : 38 / 79 “Rethinking sensing technology” Document type : User Manual Document version : 2.4 BeanGateway® User Manual 9. GATEWAY® INSTALLATION GUIDELINES 9.1 HOW TO INSTALL THE BEANGATEWAY® 9.1.1 Wall mounting For a better wireless link, we recommend to mount the BeanGateway® on a wall/mast above 2-3meters from the ground. If your WSN is deployed on the same floor, the RF antenna should be mounted vertically. Dipole antenna radiation pattern Figure 1: A BeanGateway® indoor mounted on a wall If your WSN is deployed on the same floor, a horizontal position of the antenna will decrease the RF signal. Please consider the environment before printing this document. Page : 39 / 79 “Rethinking sensing technology” Document type : User Manual Document version : 2.4 BeanGateway® User Manual For further information about WSN deployment guideline, Read the following technical note: TN_RF_009 – « BeanGateway® management on LAN infrastructure » 9.1.2 Desktop installation The BeanGateway® indoor version can also be installed on your desktop, the RF Antenna should be mounted vertically. If your WSN is deployed on the same floor, a horizontal position of the antenna will decrease the RF signal. 9.1.3 9.1.3.1 Wall mounting kit for the BeanGateway® outdoor Die cast external mounting brackets The BeanGateway® outdoor is provided with die cast external mounting brackets (4 x brackets and 4 x M5 attaching screws) External mounting brackets enable the BeanGateway® outdoor to be wall or panel mounted without opening the box. Please consider the environment before printing this document. Page : 40 / 79 “Rethinking sensing technology” Document type : User Manual Document version : 2.4 BeanGateway® User Manual Mounting Holes Mounting brackets 9.1.4 Mounting brackets design Please consider the environment before printing this document. Page : 41 / 79 “Rethinking sensing technology” Document type : User Manual 9.1.5 Document version : 2.4 BeanGateway® User Manual Plug the 2.4GHz antenna The BeanScape® provides a Wireless Network Diagnostic tool (Real-Time PER & LQI estimation, Energy Scan on RF Channels) allowing the user to evaluate the RF Link between the BeanDevice® and the BeanGateway®. Only the hardware version V3.4 of the BeanGateway® comes with antenna diversity. The antenna socket used on the BeanGateway® (indoor) is a RPSMA (Reverse polarity SMA) type, this type of antenna is a standard for indoor application. Plug your RF antenna on the antenna socket of your BeanGateway® (clockwise). Do not force on the connectors. Antenna socket (RPSMA) Don’t try to plug another type of antenna on your Beangateway®, you will damage the connectors. Please consider the environment before printing this document. Page : 42 / 79 “Rethinking sensing technology” Document type : User Manual 9.1.5.1 Document version : 2.4 BeanGateway® User Manual BeanGateway® outdoor version Click on the following weblink to see the video: BeanGateway® - Ethernet Outdoor version introduction The antenna socket used on the BeanGateway® is a N-Type antenna, this type of antenna is a standard for outdoor application. Plug your RF antenna on the antenna socket of your BeanGateway® (clockwise). Do not force on the connectors. Antenna Don’t try to plug another type of antenna on your Beangateway®, you will damage the connectors. 9.2 POWER SUPPLY SOCKET WIRING The BeanGateway® operates with an external power supply (DC 8-28V). An integrated rechargeable battery with a capacity of 950mAh is used as an UPS battery (uninterruptible power supply). The internal battery provides instantaneous protection from external power supply interruptions, the wireless sensor network activity & Ethernet LAN activity are maintained during this time (3h00 to 3h30 approximately). If you use another type of DC power supply, you will damage your BeanGateway®: If you inverse the power supply polarity; If the maximum supply voltage value is exceeded (28V); Please consider the environment before printing this document. Page : 43 / 79 “Rethinking sensing technology” Document type : User Manual 9.2.1 Document version : 2.4 BeanGateway® User Manual BeanGateway® outdoor power supply The Beangateway® Outdoor version integrates a M8-3P socket. The AC-DC power supply adapter is provided with a M8-3P plug. External power supply wiring code 1 : Gnd 3 : Pwr+ 2 : Not used 1 2 M8 - 3 pins socket Legend : Pwr+ : Power supply 8-28V DC Gnd : Ground 9.2.2 BeanGateway® indoor power supply It’s highly recommended to use your BeanGateway® with the DC power supply bloc provided with the BeanGateway®. If it’s needed to power supply the BeanGateway® with another type of DC power supply, the user must refer to the polarity: Please consider the environment before printing this document. Page : 44 / 79 “Rethinking sensing technology” Document type : User Manual Document version : 2.4 BeanGateway® User Manual Jack connector 2,1mm (Int) / 5.1 mm (ext) Figure 2 : External power supply - BeanGateway Indoor Please consider the environment before printing this document. Page : 45 / 79 “Rethinking sensing technology” Document type : User Manual Document version : 2.4 BeanGateway® User Manual Please consider the environment before printing this document. Page : 46 / 79 “Rethinking sensing technology” Document type : User Manual Document version : 2.4 BeanGateway® User Manual 10. START YOUR APPLICATION 10.1 CONNECT YOUR BEANGATEWAY® TO YOUR PC/LAPTOP For further information about LAN Network configuration: Read the following technical note: TN_RF_009 – « BeanGateway® management on LAN infrastructure » Click on the following web link to see the video: BeanGateway® Ethernet/LAN Configuration, directly connected to the Laptop/PC BeanScape® on a PC BeanGateway® To view the entire wireless sensor network from your BeanScape®, you must firstly connect your Beangateway® to a PC where the BeanScape® is alreday installed. Connection is established through an Ethernet cable. Make sure: Ethernet cable is connected to both your PC and BeanGateway® BeanGateway® is powered and in "ON" position. BeanScape® is installed on your PC Please consider the environment before printing this document. Page : 47 / 79 “Rethinking sensing technology” Document type : User Manual Document version : 2.4 BeanGateway® User Manual No antivirus/firewall is blocking the Network activity between the BeanGateway® and the BeanScape® For further information on how to install the BeanScape®, please read the BeanScape® User Manual. 10.2 SETTING UP A NETWORK ON YOUR COMPUTER To configure the network on your computer/workstation: Click on Then on Double-click on You will see the following window Select the icon corresponding to the (NIC) network interface card on what you connected the BeanGateway® Double-click the icon. You get the following window: Please consider the environment before printing this document. Page : 48 / 79 “Rethinking sensing technology” Document type : User Manual Document version : 2.4 BeanGateway® User Manual Click You get the following window: Double-click You get the following window: Please consider the environment before printing this document. Page : 49 / 79 “Rethinking sensing technology” Document type : User Manual Document version : 2.4 BeanGateway® User Manual In case you set the DHCP active on your BeanGateway®, the BeanGateway® IP is directly obtained by the network, choose the option If the DHCP option has not been activated, you must enter a static IP 192.168.4.2 on your PC with a subnet mask: 255.255.255.0. Click “OK” to confirm and safeguard your work. Please consider the environment before printing this document. Page : 50 / 79 “Rethinking sensing technology” Document type : User Manual Document version : 2.4 BeanGateway® User Manual Your computer is now connected to your wireless sensor networks. In order facilitate these exchanges you must give commands from BeanScape®. Reach the "Start" menu in the bottom left of the computer screen. The above image shows the start menu. Select the folder named “Control Panel ". You will find more information by opening Windows “Local Area Network Connection” and clicking on the tab. You will see the following window: By default the BeanGateway® IP address is set at 192.168.4.123 with the DHCP disabled. The BeanGateway® is considered as a client by the BeanScape® (server) having the IP address by default set to 192.168.4.2. Make sure that no antivirus/firewall is blocking the Network activity between the BeanGateway® and the BeanScape® Please consider the environment before printing this document. Page : 51 / 79 “Rethinking sensing technology” Document type : User Manual Document version : 2.4 BeanGateway® User Manual 10.3 START THE BEANSCAPE® To start BeanScape ®, please follow the instructions: Start BeanScape® by double-clicking the icon You get the following screen: Start the server by clicking the Start button Please consider the environment before printing this document. Page : 52 / 79 “Rethinking sensing technology” Document type : User Manual Document version : 2.4 BeanGateway® User Manual Click here The BeanScape® server starts, and creates the BeanDevice® mapping based. Please consider the environment before printing this document. Page : 53 / 79 “Rethinking sensing technology” Document type : User Manual Document version : 2.4 BeanGateway® User Manual 10.4 LAN/ETHERNET CONFIGURATION (FOR ADVANCED USER ONLY) Click on the following weblink to see the video: BeanGateway® Ethernet/LAN Configuration, directly connected to the Laptop/PC Please check your Network settings before you make any changes. By default, the BeanGateway® is configured with a static IP address: 192.168.4.123. This allows the user to connect fastly the Beangateway® to a PC. If you want to set the BeanGateway® IP on your business network and get a dynamic IP address (via DHCP), you can configure the BeanGateway® via a serial port or via the Ethernet. Go on your Beangateway® profile and click on Tools, then click on Beangateway config. A new window will open called “Beangateway® configuration” Please consider the environment before printing this document. Page : 54 / 79 “Rethinking sensing technology” Document type : User Manual Document version : 2.4 BeanGateway® User Manual Choose the configuration Port: Serial Port or Ethernet Select the Serial Port on your PC Localize the entire device connected on the LAN router DHCP Enabled (if the case checked) Keep alive Timeout (ms) IP address of your BeanGateway® Subnet mask Keep alive interval (ms) network Keep alive max retry Subnet Gateway IP Address DNS Enabled (if the case is checked) BeanScape®/ Socket Port UDP Port PC BeanScape® / PC IP Address DHCP Enabled: Check this case if you want to enable the DHCP. For further informations about DHCP read the Technical Note “BeanGateway® management on your Local Area Network infrastructure”. If DHCP is not activated, the user must configure the Beangateway® IP parameters: o IP Address: BeanGateway IP Address. The BeanGateway® IP address should have the following form: “X.Y.Z.B“. With A, B, X, Y and Z numbers between 0 and 255 o Subnet Network mask: The subnet mask is set to "255.255.255.0" by default o Gateway IP Address: Subnet network mask DNS Enabled: Check this case if you want to enable the DNS. For further information about DNS read the Technical Note “BeanGateway® management on your Local Area Network infrastructure”. The gateway IP address subnet is the default "X.Y.Z.1" Port: By default the communication port used is "5313". This port is generally free, if not choose another Socket Port. For further information, please read the following technical note– TN_RF_009 – « BeanGateway® management on LAN infrastructure » Please consider the environment before printing this document. Page : 55 / 79 “Rethinking sensing technology” Document type : User Manual Document version : 2.4 BeanGateway® User Manual 10.5 BEANGATEWAY® PROFILE Click on a BeanGateway® network coordinator located on the lower left window. The BeanGateway® is identified by its PAN ID. Click here You will see the following window: BeanGateway® profile status recorded on the BeanScape® BeanGateway® profile configuration parameters Please consider the environment before printing this document. Page : 56 / 79 Document version : 2.4 “Rethinking sensing technology” BeanGateway® User Manual Document type : User Manual The BeanGateway® profile is divided into two frames: Profile status Profile configuration parameters 10.5.1 BeanGateway® profile status description 4 1 2 3 6 5 1 This frame displays all the ID allocated to the BeanGateway®: MAC Address (encoded on 64-bits): MAC Address (encoded on 64-bits): The Media Access Control address is a unique identifier assigned to the BeanDevice® by the manufacturer for identification. PAN Address (encoded on 16-bits): Personal Area Network address. Network Address on 16-bits: This address is allocated by the BeanGateway® when you start the network. Label: By default the MAC address is registered as a Label. This label can be changed by the user. Radio configuration: 2 TX power: Displays Radio TX Power in dBm (antenna power is not included) Radio channel: used (Radio Channel between 11 and 26) Used Radio Channels: Authorized RF Channels are displayed here; Antenna diversity: Antenna diversity technique is displayed here: Antenna A, Antenna B, Antenna diversity activated (only available on the BeanGateway® V3.4 hardware version) This frame displays the BeanGateway® version: 3 Radio module: Radio module used on the BeanGateway® Hardware version : BeanGateway® hardware version Please consider the environment before printing this document. Page : 57 / 79 “Rethinking sensing technology” Document type : User Manual Document version : 2.4 BeanGateway® User Manual Software version: BeanGateway® software version Wireless Protocol stack: Wireless protocol stack used Battery status frame. See next section. 4 Diagnostic Cycle: Displays diagostic cycle in seconds (battery charge status, internal temperature, LQI, PER…). Alarm status : Displays buzzer status Temperature: Internal temperature of the BeanDevice® with a resolution of 0,125°C Power supply Status: Main or Battery Battery voltage: Battery voltage in Volts Battery level: Battery charge level, 0 to 100% with a resolution of 0, 01% 5 6 10.5.1.1 Frame : Battery status This frame displays information on battery/primary cell status. The BeanGateway® performs frequently a battery diagnostic on the BeanGateway ®. An alarm notification is transmitted automatically to the BeanGateway ® if a battery failure is detected on the BeanGateway ®. If any battery status information is displayed (ex: BeanGateway ® is not connected), status led is white. When LEDS are green a normal state is indicated. During a malfunction, the LEDS turns red. Here are the details: Led definition Green Led signification Red led signification Disable Discharge Battery discharge activated Battery discharge deactivated Disable Charge Battery charge activated Battery charge deactivated Over current during battery discharge No over current during battery discharge Over current during battery discharge detected Over current during battery charge No over current during battery charge Over current during battery charge detected Overvoltage Any presence of battery overvoltage Battery over voltage detected on the battery Under voltage Any presence of battery under voltage Battery under voltage detected on the battery Please consider the environment before printing this document. Page : 58 / 79 “Rethinking sensing technology” Document version : 2.4 BeanGateway® User Manual Document type : User Manual 10.6 USER-CONFIGURABLE PARAMETERS BeanGateway® configuration parameters Frame Description Custom Display Customize the BeanGateway® label Notes This area contains the notes related to the BeanGateway®. Configuration Radio parameters configuration (RF channels, Energy Scan, PAN ID….) System configuration System configuration (Diagnostic cycle, Nwk deletion, Post system clock…) Module Status Module status ( Logger) Logger Module Datalogger on Micro-SD® configuration Please consider the environment before printing this document. Page : 59 / 79 “Rethinking sensing technology” Document type : User Manual Document version : 2.4 BeanGateway® User Manual 10.6.1 Custom Display Parameter Description Type You can enter here the type of BeanGateway® you want to use. Reference You can assign an internal reference to the BeanDevice® you have purchased. Label You can assign any sort of Label to your BeanGateway ®. Therefore, the user can easily associate the BeanGateway® with its equipment or environment (example: Nwk_Room_1, Nwk_Room_2). 10.6.2 Notes This area contains the notes related to the BeanGateway®. To edit this field, enter data to save and click on "Validate". Please consider the environment before printing this document. Page : 60 / 79 “Rethinking sensing technology” Document type : User Manual Document version : 2.4 BeanGateway® User Manual 10.6.3 Radio Configuration Setting PAN ID Configuration Description Watch the short technical Video (Click on the Icon) Select a PAN ID value between 0 to 3FFE. If you select a value > 3FFF , the value will not be assigned. Enter a value without “0x”. Example: 03AB , 3DC2. In the case if you have several networks Please consider the environment before printing this document. Page : 61 / 79 “Rethinking sensing technology” Document type : User Manual Document version : 2.4 BeanGateway® User Manual In the case if you have several WSN connected to your Beanscape® Radio Channel configuration List of channels on which the component can be set. The maximum number of RF channels is 16. The user can select a RF channel manually or automatically. Blacklisted RF channels will not appear in this list. « Ch_Auto» is an automatic detection of the most effective channel between channel 11 and channel 26. Automatic RF channel selection To change this area, select a value from the list and click the “Validate” button to save the base area. If an automatic detection is selected, the user can select the scanning duration on each channel. Manual RF Channel selection It is strongly recommended to select Automatic channel selection if you have few information about radio activities on your site. Energy Scan (Diagnostic) The Energy Scan allows the user to know the network quality on each Radio channel. This operation allows the user to choose the appropriate RF channel on a site where the WSN is deployed. This value can vary between 0 (excellent) and 255 (poor). You can configure the scanning time means of each radio channel, by selecting the tab the scan time in ms and confirm it by pressing the “validate” button. A new energy scan is performed by clicking on the “Validate” button. Please consider the environment before printing this document. Page : 62 / 79 “Rethinking sensing technology” Document type : User Manual RF Power Document version : 2.4 BeanGateway® User Manual Select the RF channels which must be used. The RF channels which are not selected are blacklisted from the energy scan process & automatic RF channel selection. Click on the “Validate” button. Authorized channel selection Select the RF channels which must be used. The RF channels which are not selected are blacklisted from the energy scan process & automatic RF channel selection. Select RF channels with the least detected activity. RF Figure 3 : Conversion table - Energy Scan power in dBm Please consider the environment before printing this document. Page : 63 / 79 “Rethinking sensing technology” Document type : User Manual Document version : 2.4 BeanGateway® User Manual 10.6.4 System Configuration Setting Description Diagnostic cycle Only available on the hardware version V1R4 You can set the BeanGateway® diagnostic cycle (Battery status). Profile erasement/Back to default config This field is used forBeanevice® profile erasement or factor settings restoration. Watch the short technical Video (Click on the Icon) Network profile deletion: Beandevice® profiles are deleted from the BeanGateway® DataBase & RF Please consider the environment before printing this document. Page : 64 / 79 “Rethinking sensing technology” Document type : User Manual Document version : 2.4 BeanGateway® User Manual parameters are restored to the factory settings (TX power, Authorized RF channels, RF Channel). Full: Beandevice® profiles are deleted & RF parameters are restored to the factory settings (TX power, Authorized RF channels, RF Channel) & LAN/Ethernet parameters are restored to the factory settings Click on Delete Beep sound confguration Delete Device Only available on the BeanGateway Indoor Configure the Buzzer alarm : Disabled: Buzzer is disabled Battery alarm event: The BeanGateway® emits a beep sound every 2 seconds if the external power supply is disconnected Localize : A beep sound allows to localize your BeanGateway® Remove a BeanDevice® from your network Only available on the BeanGateway® software version 4.4 BeanDevice® profile Please consider the environment before printing this document. Page : 65 / 79 “Rethinking sensing technology” Document type : User Manual Document version : 2.4 BeanGateway® User Manual 10.7 LOG FILE ORGANIZATION 10.7.1 Log file system overview Log file organization 1 Log file for Wireless Network Diagnostic 1 Log file for GPS coordinates (BeanGateway GPS only) 1 system Log File Log file updates PC Figure 4 : Log file system overview 10.7.2 Log file directory By default the Log file directory is: C:\log_beanscape Click on the tab Tools then Options to configure advanced settings in BeanScape®: This window lets you configure the logs, and the data cache. Please consider the environment before printing this document. Page : 66 / 79 “Rethinking sensing technology” Document type : User Manual Document version : 2.4 BeanGateway® User Manual You will see the following window : Please consider the environment before printing this document. Page : 67 / 79 “Rethinking sensing technology” Document type : User Manual Document version : 2.4 BeanGateway® User Manual Please consider the environment before printing this document. Page : 68 / 79 “Rethinking sensing technology” Document type : User Manual Document version : 2.4 BeanGateway® User Manual For further information about the BeanScape® configuration, please read the BeanScape® User Manual. Please consider the environment before printing this document. Page : 69 / 79 “Rethinking sensing technology” Document type : User Manual Document version : 2.4 BeanGateway® User Manual 11. MAINTAINING AND SUPERVISING BEANGATEWAY® 11.1 DIAGNOSIS USING BEANSCAPE® Using the BeanScape® software, BeanScape diagnostic information and self-monitoring can be visualized 11.1.1 Knowing the PAN ID and IP address of your BeanGateway To find the IP address and ID PAN BeanGateway network click "hide" in the window at the bottom left of BeanScape ®. You see the following window: BeanGateway® IP Address PAN ID This window is the BeanScape® control server. Please consider the environment before printing this document. Page : 70 / 79 “Rethinking sensing technology” Document type : User Manual Document version : 2.4 BeanGateway® User Manual 11.1.2 System Maintenance On the main screen, select the scrolling menu “BeanGateway®” then left-click on “System Maintenance” You will see the following window: TX Fault Threshold: This value does not change. Clear Network context (software) : This option may be substituted for the push button “Network”. However, when the BeanGateway® is not available (not powered or in sleeping mode) this option is not usable. Delete measurement data: Delete stored measurements. Restore default parameters: This option allows you to revert to factory settings. Primary Cell/Battery profile modifications : Not available on the BeanGateway®. This feature is only available on the BeanDevice® Reset the « Reset counter »: Not available on the BeanGateway® Please consider the environment before printing this document. Page : 71 / 79 “Rethinking sensing technology” Document type : User Manual Document version : 2.4 BeanGateway® User Manual 12. TROUBLESHOOTING BEANGATEWAY: FAQ I am not able to see the BeanGateway® status on the left side pane, why? Check the bottom left server status BeanScape ®. “Status” means that the server is not running. o Check the Ethernet connection. (Network and Cable settings) o Make sure that the BeanGateway is connected and the switch is “on”. o Make sure that the LED flashes o Restart the server Please consider the environment before printing this document. Page : 72 / 79 “Rethinking sensing technology” Document type : User Manual Document version : 2.4 BeanGateway® User Manual 13. ENVIRONNEMENTAL CONSTRAINTS 13.1 SEALING BeanGateway® Indoor version is provided with a protection rating IP40. BeanGateway® outdoor product is provided with a protection rating IP67. Do not place the BeanGateway ® in a maritime environment with high turbulence. Avoid accumulation and infiltration of water through the back cover of the BeanGateway® casing. Tighten all connections that may interfere with the seal. 13.2 SENSITIVITY TO RADIO FREQUENCY For further information, please refer to the application note: AN_RF_007 :“ Beanair_WSN_Deployment“ 13.3 TEMPERATURE The BeanGateway® operating temperature is -20 ° C to +65 ° C. It is recommended not to exceed these ranges. This could permanently damage the BeanGateway®. 13.4 HUMIDITY BeanGateway® outdoor version can operate in a 90% humid environment. However, the IEEE 802.15.4 radio waves may deteriorate in the presence of water. Avoid placing the BeanGateway ® in an enclosure surrounded by water, almost bushy plants (plants are composed of 90% water). 13.5 REFLECTIONS, OBSTRUCTIONS AND MULTIPATH For further information, please refer to the application note: AN_RF_007 :“ Beanair_WSN_Deployment“ 13.6 SHOCKS & VIBRATIONS BeanGateway® can withstand the shocks of intensity exceeding 2g. Avoid dropping the BeanGateway ®. Secure the BeanGateway ® to a wall, pole or on a DIN rail. Please consider the environment before printing this document. Page : 73 / 79 “Rethinking sensing technology” Document type : User Manual Document version : 2.4 BeanGateway® User Manual Do not force on the connections. 13.7 ANTENNA Depending on the type of antenna (omnidirectional, bidirectional), orient it in a particular position so that the emitted field is optimal. (See field emission 1.2.1) When you move the BeanGateway®, make several tests by changing the orientation of the antenna and get the best arrangement. For further information, please refer to the application note: AN_RF_007 :“ Beanair_WSN_Deployment“ 13.8 OTHERS FEATURES While having the highest BeanGateway possible transmission and receive over a wide area. Do not take off the blue labels pasted on BeanGateway ® products Please consider the environment before printing this document. Page : 74 / 79 “Rethinking sensing technology” Document type : User Manual Document version : 2.4 BeanGateway® User Manual 14. APPENDICES Please consider the environment before printing this document. Page : 75 / 79 “Rethinking sensing technology” Document type : User Manual Document version : 2.4 BeanGateway® User Manual 14.1 APPENDIX 1: HOW THE CONNECTION IS ESTABLISHED BETWEEN THE BEANGATEWAY® AND THE BEANSCAPE® ? Step 1: Socket connexion •When the BeanScape® is launched , as a server it starts with listening for a socket connexion •When you power up the BeanGateway®, a request for socket connexion is established between the Beanscape® and the BeanGaterway® •If this request is accepted by the BeanScape®, an ACK is transmitted to the BeanGateway® Connection Request ACK Static or Dynamic IP Listen for socket connexion Please consider the environment before printing this document. Page : 76 / 79 “Rethinking sensing technology” Document type : User Manual Step 2: BeanGateway® Profile Transmission Document version : 2.4 BeanGateway® User Manual •The BeanGateway® profile is retained on its flash memory. This profile contains are the informations about the BeanGateway® ID (NWK Add, PAN ID, MAC ID, IP...) , versions ID (Hardware, embedded software, stack...), Radio Management parameters (Radio channel, TX Power, ....); •The BeanGateway® profile is transmitted to the BeanScape®; BeanGateway® profile Transmission ACK BeanGateway ® profile is backuped on BeanScape Database BeanGateway® profile are backuped on a Flash memory Please consider the environment before printing this document. Page : 77 / 79 “Rethinking sensing technology” BeanGateway® User Manual Document type : User Manual Step 3: WSN Mapping transmission Document version : 2.4 • The WSNmapping concerns all the Beandevice® profile. The WSN mapping is backuped on the BeanGateway® flash memory. When a new BeanDevice® joins a WSN, its profile is transmitted to the BeanGateway® and the BeanScape®. • The BeanScape® displays the WSN Mapping with the BeanDevice® profile; • WSN Mapping is backuped on the BeanScape® Database. BeanDevice® profile Transmission ACK BeanDevice® profile are backuped on BeanScape® Database BeanDevice® profile are backuped on a Flash memory Please consider the environment before printing this document. Page : 78 / 79 “Rethinking sensing technology” Document type : User Manual Step 4: Time & Date update Document version : 2.4 BeanGateway® User Manual • Date transmission by NTP (Net-Time Protocole) •Time & Date are updated on the BeanGateway instantly • The BeanGateway integrates a Real-Time-Clock directly powered by th internal battery which allows to maintain the Time and Date if the BeanGateway® is power donw Time transmission through NTP (Net Time protocol) ACK Computer time and date must be updated BeanGateway® Time and Date is synhcronized with your PC The WSN Time & Date are synchronized with your PC. The User must make sure that the Time & Date on his computer are correct. Please consider the environment before printing this document. Page : 79 / 79