1
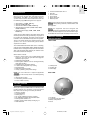
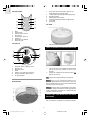
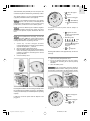
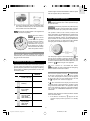
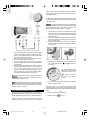
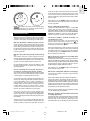
iBall™ Wireless Stereo Speaker
with Transmitter Dock for iPod®
Model: IB368
User Manual
IB368manual(EU)cover
1
8/25/2005, 12:13 PM
The iBall Wireless Stereo Speaker with Transmitter Dock
for iPod is designed to give you years of service if
handled properly. Ensure that you heed all warnings to
minimize product malfunction and reduce the chances
of incurring personal injury. Before using the unit,
observe the following guidelines to ensure proper care
and maintenance.
VENTILATION
Slots and openings in the product are provided for
ventilation and to ensure reliable operation of the product
and to protect it from overheating. These openings should
never be blocked or covered by placing the product on a
bed, sofa, rug or other similar surface. The product should
not be placed in a built-in installation such as a bookcase
or rack unless proper ventilation is provided or Oregon
Scientificís instructions have been adhered to.
HEAT
The product should be situated away from heat sources
such as radiators, heat registers, stoves, or other
products (including amplifiers) that produce heat.
The lightning flash with arrowhead
symbol within an equilateral triangle, is
intended to alert the user to the presence
of uninsulated "dangerous voltage" within
the products enclosure that may be of
sufficient magnitude to constitute a risk
of electric shock to persons.
POWER SOURCES
The system should be operated only from the type of
power source indicated on the marking label. If you are
not sure of the type of power supply to your home, consult
your Oregon Scientific dealer or local power company.
For products intended to operate battery power, or other
sources, refer to the operating instructions.
The exclamation point within an
equilateral triangle is intended to alert
the user to the presence of important
operating and maintenance (servicing)
instructions in the literature accompanying the appliance.
GROUNDING OR POLARIZATION
The product may be equipped with a polarized
alternating-current line plug (a plug having one blade
wider than the other). This plug will fit into the power
outlet only one way. The product may be equipped with
a 3-blade grounding-type plug, a plug having a third
(grounding) pin. This plug should only fit into a groundingtype power outlet.
To prevent fire or shock hazard, do not use this plug
with an extension cord, receptacle or other outlet unless
the blades can be fully inserted to prevent blade
exposure.
READ INSTRUCTIONS
All safety and operating instructions should be read and
followed before operating the product and should be
retained for future reference. All warnings on the product
and in the operating instructions should be adhered to.
Both plugs are safety features of the product. If either
plug is unable to fully insert into its respective outlet, try
reversing the plug. If the plug should still fail to insert,
contact your electrician to replace the obsolete outlet.
Do not defeat the safety purpose of the polarized or
grounding-type plug.
CLEANING
Unplug all adapters and cables from the wall outlet before
cleaning. Do not use liquid cleaners or aerosol cleaners.
Use a damp cloth for cleaning.
POWER-CORD PROTECTION
Power supply cords should be routed so that they are
not likely to be walked on or pinched by items placed
upon or against them, paying particular attention to cords
at plugs, convenience receptacles, and the point where
they exit from the product.
ATTACHMENTS
Do not use attachments not recommended by Oregon
Scientific as they may cause hazards.
WATER AND MOISTURE
Do not use this product near water - for example, near a
bathtub, washbowl, kitchen sink or laundry tub; in a wet
basement; or swimming pool; and the like.
PROTECTIVE ATTACHMENT PLUG
The product is equipped with an attachment plug having
overload protection. This is a safety feature. See user
manual for replacement or resetting of protective device.
If replacement of the plug is required, be sure the service
technician has used a replacement plug specified by
Oregon Scientific that has the same overload protection
as the original plug.
1
EU_IB368manual(eng)R12
1
8/31/2005, 3:48 PM
EN
ACCESSORIES
Take care when placing the product on an unstable cart,
stand, tripod, bracket or table. Quick stops, excessive
force and uneven surfaces may cause the system to
overturn and fall, causing serious injury to a child or adult,
and serious damage to the product. Use only with a cart,
stand, tripod, bracket or table recommended by Oregon
Scientific, or sold with the product.
IMPORTANT SAFETY INSTRUCTIONS
EN
REPLACEMENT PARTS
When parts need replacing, ensure the authorized
service center uses parts specified by the manufacturer
or parts that have the same characteristics as the original
parts. Unauthorized substitutes may result in fire, electric
shock or other hazards.
OUTDOOR ANTENNA GROUNDING
If an outside antenna or cable system is connected to
the product, be sure the antenna or cable system is
grounded so as to provide some protection against
voltage surges and built-up static charges. Article
810 of the National Electrical Code, ANSI / NFPA 70,
provides information with regard to proper grounding of
the mast and supporting structure, grounding of the leadin wire to an antenna discharge unit, size of grounding
conductors, location of antenna-discharge unit,
connection to grounding electrodes, and requirements
for the grounding electrode.
SAFETY CHECK
After repairs or service, ask the authorized service center
to perform safety checks to confirm that the unit is in
proper working condition (if you have the product
serviced, remember to bring the entire system so the
authorized service center may have access to all the
necessary components in the system).
LIGHTNING
For added protection for the system during a lightning
storm, or when it is left unattended and unused for long
periods of time, unplug it from the wall outlet and
disconnect any cables. This will prevent damage to the
system due to lightning and power-line surges.
WALL MOUNTING
The product should be mounted to a wall only as
recommended by Oregon Scientific.
POWER LINES
An outside antenna system should not be located near
any overhead power lines or other electric light or power
circuits, or when it can fall into such power lines or
circuits. When installing an outside antenna system,
extreme care should be taken to keep from touching
such power lines or circuits as contact with them might
be fatal.
MAINTENANCE
Do not subject the product to extreme impact, shock
or fluctuations in humidity.
Do not make any changes or modifications to the
product. Unauthorized changes may void your right
to use the product and invalidate the warranty.
Do not tamper with internal components or attempt
to service the product yourself. If any electronic
circuitry is exposed, do not, under any
circumstances, touch the circuitry as there is a
danger of electric shock.
The unit should not be exposed to dripping or
splashing and no objects filled with liquids, such as
vases, should be placed on the unit.
Do not scratch hard objects against the LCD as the
surface can be easily damaged. Take special care
when handling a damaged LCD, as the liquid crystals
can be harmful to your health.
Do not use or store the unit in locations that may
adversely affect the product such as rain, snow,
moisture, dust or desert. Keep your player in a dry,
well-ventilated place to prevent it from molding.
Do not place this unit in direct sunlight for long
periods. This may deform or discolour the cabinet
and may cause malfunction.
Keep this unit away from strong magnetic fields.
Exposure to magnetic fields may cause a loss to the
wireless signal reception or even damage the unit's
internal circuitry.
Stains on the unit should be wiped off with a soft,
lint-free cloth. If the unit is heavily stained, wipe it
with a cloth soaked in water-diluted neutral detergent
and wrung well, then wipe clean. Remember to
unplug the unit from the wall outlet before cleaning.
Never use alcohol, solvent, aerosol cleaners,
chemical, paint thinner or benzene to clean the unit.
The speaker grill requires no special care, although
you may pull the grill out from the unit and clean or
vacuum the individual grill holes carefully if
necessary.
The temperature around the center unit must be
between 5˚C and 35˚C (41˚F and 95˚F). Operating
the unit in temperatures outside this range will
increase the risk of damage and malfunction.
OVERLOADING
Do not overload wall outlets, extension cords, or integral
convenience receptacles as this can result in a risk of
fire or electric shock.
OBJECT AND LIQUID ENTRY
Never push objects of any kind into this product through
the openings as they may touch dangerous voltage
points or short-out parts that could result in fire or electric
shock. Never spill liquid of any kind on the product.
DAMAGE REQUIRING SERVICE
Do no attempt to service this product yourself as opening
or removing covers may expose you to dangerous
voltage or other hazards. Unplug the system from the
wall outlet and refer servicing to qualified service
personnel under the following conditions:
When the power-supply cord, plug or cables have
been damaged.
If liquid has been spilled, or objects have fallen into
the product.
If the system has been exposed to rain or water.
If the system does not operate normally by following
the operating instructions. Adjust only those controls
that are covered by the operating instructions as an
improper adjustment of other controls may result in
damage and will often require extensive work by a
qualified technician to restore the product to its
normal operation.
If the system has been dropped or damaged in any
way.
When the product exhibits a distinct change in
performance - this indicates a need for service.
2
EU_IB368manual(eng)R12
2
8/31/2005, 3:48 PM
EN
Ensure the equipment is installed near a socketoutlet and easily accessible.
Protect the cables from being walked on or pinched
particularly at plugs, receptacles, and the point where
they exit from the product.
Do not run power cords under rugs or carpets or
place heavy objects on them.
When unplugging the AC adapters from the wall
outlet or unplugging any cables from the speaker or
Transmitter, always pull the plug or connector, not
the cord.
Ensure the cables are correctly connected. Improper
connections may damage the system due to shortcircuiting.
Listening to music at high volume for long periods of
time may damage your hearing. Keep the volume at
a moderate level.
The technical specifications for this product and the
contents of the user manual are subject to change
without notice.
NOTE Under environments where there is electrostatic
discharge, radio frequency interference and / or AC
power line exhibiting radio interference, the unit may
malfunction and resume normal operation only when
interference stops. In some cases, the unit may require
a manual reset by the user to resume normal operation.
3
EU_IB368manual(eng)R12
3
8/31/2005, 3:49 PM
EN
iBall Wireless Stereo Speaker
with Transmitter Dock for iPod
Model: IB368
USER MANUAL
CONTENTS
Important Safety Instructions ................................. 1
Maintenance ............................................................. 2
Contents ................................................................... 4
Introduction .............................................................. 5
Getting Started ......................................................... 5
Unpacking .............................................................. 5
Product Overview .................................................... 5
Wireless Speaker ................................................... 5
Transmitter Dock ................................................... 6
Using the Wireless Speaker Adapter ..................... 6
Installing the Wireless Speaker Batteries .............. 6
Rechargeable Batteries ......................................... 7
Alkaline Batteries ................................................... 7
Wall Mounting the Speaker (Optional) ................... 8
Using the Transmitter Dock Adapter ...................... 8
Docking the iPod ...................................................... 8
Charging the iPod Battery ..................................... 9
Upgrading iPod Software ........................................ 9
Basic Speaker Operation ........................................ 9
Power On / Off ....................................................... 9
Play / Pause ......................................................... 10
Next / Previous and Fast-forward / Rewind ......... 10
Volume ................................................................. 10
Mute ..................................................................... 11
Bass and Treble ................................................... 11
Setting the Clock .................................................... 11
Synchronizing with the Computer ........................ 11
Setting up iBall Connections ................................ 12
Audio Connection ................................................ 12
Video Connection ................................................ 13
Recognizing Wireless signals ............................... 14
Troubleshooting ..................................................... 15
Specifications ......................................................... 16
About Oregon Scientific ........................................ 16
Copyright ................................................................ 16
FCC Statement ....................................................... 16
Declaration of Conformity .................................... 16
EC-Declaration of Conformity ............................... 17
4
EU_IB368manual(eng)R12
4
8/31/2005, 3:49 PM
Thank you for purchasing the Oregon Scientific iBall
Wireless Stereo Speaker with Transmitter Dock for
iPod (IB368). The iBall is an ultra-portable wireless
speaker and transmitter dock combination made for
the following Apple® iPod digital music players:
Screws for wall-mount unit x 4
Allen key
Lint-free cloth
User manual
Quick start guide
Warranty card
NOTE Please observe the local regulations regarding
the disposal of packing materials, dead batteries and
old equipment.
iPod shuffle™ (512MB, 1GB only)
iPod mini (4GB, 6GB only)
iPod with Click Wheel (20GB, 40GB only)
iPod with dock connector (10GB, 15GB, 20GB,
30GB, 40GB only)
iPod with color display (20GB, 30GB, 40GB,
60GB only)
NOTE This equipment has been designed and
manufactured to meet international safety standards but,
like any electrical equipment, care must be taken if you
are to obtain the best results and safety is to be assured.
Simply plug the iPod into the transmitter dock, which
wirelessly transmits audio generated by the player to
the speaker for playback. The iPod’s basic playback
functions can be controlled directly from the speaker.
There is no need to connect any cables or wires to the
speaker, so it can be conveniently placed almost
anywhere in the home.
PRODUCT OVERVIEW
WIRELESS SPEAKER
FRONT VIEW
The multifunctional transmitter dock acts as a docking,
charging and synchronization station, allowing the iPod’s
batteries to be recharged directly from the transmitter
dock. The transmitter dock also lets you transfer music
files between iPod and computer.
Other features include:
Wireless transmission using 2.4GHz digital radio
frequency at a range of up to 30 meters (approx.
100 feet) in open space
Total power output of 6W
Rechargeable batteries can be recharged directly
from within speaker
Adjustable bass and treble controls
2-color LCD backlight for easy viewing
Real-time clock
Wall mount unit for speaker
Unique, portable, go-anywhere design
1. Control panel
2. Speaker grill
3. LCD display
BACK VIEW
NOTE The use of this item is subject to applicable
regulations of the country where used. EU operating
exception:
Italy: Private use only
Luxembourg: Private use only
France: Indoor use only
GETTING STARTED
UNPACKING
When you unpack your iBall, make sure to keep all the
packing materials in a safe place, in case you need to
later return it for servicing. In this box you will find:
Wireless speaker
Transmitter dock
Docking tray x 7
9V / 2A AC adapter for wireless speaker
9V / 800mA AC adapter for transmitter dock
Rechargeable batteries x 6
Battery cap to enable battery recharging x 1
Wall-mount unit
1. DC IN jack
2. Screw holes for wall mount
3. Battery compartment
4. Reset
5
EU_IB368manual(eng)R12
5
8/31/2005, 3:50 PM
EN
INTRODUCTION
EN
CONTROL PANEL
1.
2.
3.
4.
5.
6.
7.
30-pin jack (for connecting to a computer via
Apple iPod Dock Connector cable)
S-Video output (for iPod with color display only)
RF mating button
Docking tray release button
Line-out jack (Composite Video + Audio L/R out)
Aux-in jack
DC IN jack
TOP VIEW
1.
2.
3.
4.
5.
6.
7.
8.
Mute
Volume down
Previous track / rewind
Play / Pause
Sound mode / clock set
Volume up
Next track / fast-forward
Power On / Off
LCD DISPLAY
1.
iPod connector
USING THE WIRELESS SPEAKER ADAPTER
1.
2.
3.
4.
5.
6.
7.
Playback / battery / docking status
Mute on / off
Reception status
Clock
Volume / bass and treble status bar
Charging indicator / battery status
AC plug indicator
1.
2.
Connect the 9V / 2A AC adapter into the DC IN 9V
jack on the wireless speaker as shown in the
diagram.
Plug the AC adapter into an electrical socket.
appears on the LCD.
TIP Using the AC adapter will help save batteries.
TRANSMITTER DOCK
NOTE Always use the supplied AC adapter that is
designed specifically for the speaker only. Using any
other AC adapter may cause the unit to malfunction and
increase the risk of fire or injury.
BOTTOM VIEW
NOTE Should you notice any abnormality in the speaker
AC adapter, disconnect it from the electrical socket and
speaker immediately and take it to a qualified Oregon
Scientific dealer for servicing.
INSTALLING THE WIRELESS SPEAKER
BATTERIES
While use of the AC adapter to operate the speaker will
help save batteries, the option to use batteries provides
6
EU_IB368manual(eng)R12
6
8/31/2005, 3:50 PM
EN
added flexibility and portability to move and place the
unit almost anywhere without being restricted by cables.
does not appear.
The speaker requires 6 “C-size” rechargeable batteries
(supplied) or alkaline batteries (not supplied).
(iPod undocked).
If batteries run low on power and AC adapter is
plugged in:
RECHARGEABLE BATTERIES
NOTE For best performance and safety, use only the
Oregon Scientific 3000mAh rechargeable batteries
supplied with the iBall. Using other brands or types of
rechargeable batteries may damage the unit.
4.
(iPod docked)
or
NOTE Do not use different types of batteries together
or mix new batteries with old ones. When any of the
batteries are depleted, replace all batteries with new
ones.
2.
3.
blinks and toggles
with
NOTE In a non-controlled environment, many factors
affect battery life, such as volume, LCD backlight and
temperature. When batteries are not used for a long
period of time, remove them to save battery power.
1.
appears.
appears to show
speaker is being operated
by AC power.
Alternating icons
blink
to indicate batteries are
recharging.
disappears
when batteries fully
charged.
Select any 1 of the 6 Oregon Scientific
rechargeable batteries and fit the supplied battery
cap over the top of the “_” terminal.
Open the battery compartment cover.
Place the battery with cap into the specified battery
slot of the battery compartment and insert the
remaining 5 batteries according to the correct
polarity indicators.
Close the battery cover.
or
appears.
Rechargeable batteries take approximately 16 hours to
recharge.
ALKALINE BATTERIES
1. Open the battery compartment cover.
2. Insert the alkaline batteries into the battery
compartment according to the correct polarity
indicators.
3. Close the battery cover.
CAUTION Do not use the battery cap if the speaker is
powered by alkaline batteries. Doing so may increase
the risk of fire, personal injury, or damage to the speaker.
If batteries run low on power and AC adapter is not
plugged in:
Rechargeable batteries can be recharged directly within
the speaker if the AC adapter is plugged in. The batteries
recharge automatically to maintain optimum operating
capacity.
If batteries run low on power and AC adapter is not
plugged in:
does not appear.
appears.
with
7
EU_IB368manual(eng)R12
7
8/31/2005, 3:51 PM
blinks and toggles
or
.
EN
If batteries run low on power and AC adapter is plugged
in:
USING THE TRANSMITTER DOCK ADAPTER
appears to show
speaker is being
operated by AC power.
does not appear.
or
appears.
1. Connect the AC adapter connector into the DC IN
9V / 800mA jack at the back of the transmitter dock.
2. Plug your AC adapter into an electrical socket.
WALL MOUNTING THE SPEAKER
(OPTIONAL)
NOTE Always use the supplied AC power adapter that
is designed specifically for the transmitter dock only.
Using any other AC power adapter may cause the unit
to malfunction and increase the risk of fire or injury.
The speaker is equipped with rubber supports to give
your unit a stable base while placed on a flat surface.
NOTE Should you notice any abnormality in the
transmitter dock AC adapter, disconnect it from the
electrical socket and transmitter dock immediately and
take it to a qualified Oregon Scientific dealer for servicing.
NOTE Placement of this product on wood surfaces with
certain types of finishes, such as clear varnish, may
result in damage to the finish. Consult the furniture
manufacturer’s care instructions for direction as to the
types of objects that may safely be placed on the wood
surface. Oregon Scientific shall not be responsible for
any damage to wood surfaces from contact with this
product.
DOCKING THE iPOD
The transmitter dock acts as a docking station for
different versions of the iPod:
1. Insert the appropriate docking tray intended
specifically for use with your iPod model into the
transmitter dock.
Fix the location of your speaker against the wall using
the supplied allen key, L-shaped wall-mount unit and 4
screws:
TIP View the engraving at the bottom of each tray, which
contains an iPod description and / or size of internal
hard disk to ensure that you correctly match the
appropriate tray for your iPod.
1. Position the wall-mount unit’s vertical panel onto the
area of the wall where you would like to hang the
unit.
2. Secure the 15 mm (0.6 in)
screws into the
corresponding holes of the vertical panel until it is
firmly fixed against the wall.
3. Place the speaker onto the horizontal panel of the
wall-mount unit, making sure to align the 2 screw
holes of the horizontal panel with those of the
speaker.
4. Insert the remaining two 10mm (0.4 in)
screws
into the aligned holes and secure the speaker onto
the horizontal panel. The wall-mount unit and
speaker should be securely fixed in place.
2. Insert the iPod into the docking tray. Make sure to
align the docking tray’s connectors with the iPod
connection slot.
8
EU_IB368manual(eng)R12
8
8/31/2005, 3:51 PM
BASIC SPEAKER OPERATION
TIP For best performance, the speaker and transmitter
dock should be placed at least 1 meter apart with a range
of up to 30 meters.
3. To remove a docking tray from the transmitter dock,
first undock the iPod, then press the release button
at the bottom of the transmitter dock.
CAUTION To avoid being exposed to any radio frequency
emission, the speaker and transmitter dock should be
placed at least 20 cm (8 in) away from nearby persons.
NOTE The tray for the iPod shuffle is not supplied and
must be purchased separately.
The speaker’s volume, mute / unmute, and bass and
treble sound effects are controlled from the speaker itself.
The iPod’s basic functions - play / pause, previous / next
track and fast-forward / rewind - are controlled from the
player itself but can also be conveniently controlled from
the speaker wherever it is placed in the home without
having to go to the iPod to adjust these settings.
NOTE When the shuffle is
docked,
appears on the
speaker LCD. The speaker
cannot control the shuffle’s
functions, which must be
controlled from the player
itself. Adjusting the shuffle’s
volume from the unit directly
affects the speaker’s volume.
CHARGING THE iPOD BATTERY
Once the iPod is docked, its battery begins charging
automatically if the transmitter dock AC adapter is
plugged into the wall socket.
The iPod playlist appears on the iPod display
and
appears on the speaker’s LCD if the speaker and iPod
are powered on, the transmitter dock is plugged in, and
the iPod is docked onto the transmitter dock. Press the
speaker’s
button to begin music playback.
UPGRADING iPOD SOFTWARE
If the iPod does not function or respond properly when
docked into the transmitter dock, in which case, you may
need to update the software on your iPod to ensure
optimal playback performance and proper functioning
with the iBall. The following iPod software versions will
work with the iBall:
TIP See section on “SETTING UP iBALL
CONNECTIONS” for more information on configuring
different audio and video connections.
POWER ON / OFF
iPOD MODEL
iPod shuffle
(512MB, 1GB only)
SOFTWARE
VERSION
1.1 or later
iPod mini (4GB,
6GB only)
1.2 or later
iPod with Click
Wheel (20GB,
40GB only)
3.0 or later
iPod with dock
connector (10GB,
15GB, 20GB,
30GB, 40GB only)
2.2 or later
iPod with color
display (20GB,
30GB, 40GB,
60GB only)
1.0 or later
To turn on the speaker, press the
button located
on the unit’s control panel. The volume bar, speaker
icon, clock, and playback / battery status all appear
on the on the LCD. The LCD backlight turns on and
the
reception icon should also appear.
If
does not show on the display, that means the
reception signal is interrupted or the speaker is out of
range of the transmitter dock. If the playback / battery
status icon disappears and there is no audio playback,
see section on “TROUBLESHOOTING” for more
information.
Playback status depends on whether the iPod is docked
to the transmitter dock:
If the iPod is not docked,
appears on the
speaker display and the speaker is in standby
mode.
9
EU_IB368manual(eng)R12
9
8/31/2005, 3:51 PM
EN
Go to the Apple website to download the software update
that corresponds with your iPod model.
EN
NEXT / PREVIOUS AND FAST-FORWARD / REWIND
If the iPod is docked and playing music,
appears on the speaker display with the speaker
playing back music from the iPod.
If the iPod is docked and is paused,
NEXT / PREVIOUS
appears on
the speaker display and the speaker is in standby
mode. Press the speaker’s
button to start playing
music from the iPod.
appears briefly on the
speaker display before
reappears.
To power off the speaker,
press the
button
again. The clock
continues to function and
appropriate the battery /
AC adapter indicator
remains on the LCD even
when the speaker is
turned off.
During playback, press the
or
button once to go
back to the previous track or advance to the next track
for playback.
or
briefly appears on the
display, respectively, before returning to
.
FAST-FORWARD / REWIND
NOTE The iPod automatically shuts down after the
speaker is powered off.
NOTE The iPod does not need to be docked to the
transmitter dock to power on or off the speaker.
TIP When left unused for a long period of time, the unit
should be unplugged from the electrical socket. If you
are using batteries to operate the wireless speaker,
remove them to save battery power.
Press and hold the
or
button to rewind or fastforward to an earlier or later location within a currently
PLAY / PAUSE
played track.
or
appears on the display,
respectively, until the desired track location is reached.
reappears.
NOTE Pressing the
or
button when the iPod is
paused will still allow you to fast-forward / rewind a track
or go to the next / previous track.
VOLUME
1. If the speaker is powered on but is on pause (or in
standby mode), press the
button and the
docked iPod begins audio playback.
shown before
2. Press the
To increase volume during
playback, unit is on idle or
paused playback, press
the
button once. To
continuously increase
volume, press and hold the
button down until the
desired volume level is
reached.
is briefly
appears on the speaker LCD.
button again to pause.
shown on the display before
is briefly
reappears.
NOTE Do not turn up the volume while listening to a
portion of audio with very low-level inputs or no signals.
If you do, the speaker may become damaged when a
peak level portion is played.
10
EU_IB368manual(eng)R12
10
8/31/2005, 3:51 PM
EN
To decrease volume, press
the
button once. To
continuously decrease
volume, press and hold the
button down until the
desired volume level is
reached.
MUTE
2. Press the
1. To mute the sound of
the wireless speaker
during playback,press
button once to exit.
NOTE “Auto quit” activates when idle for more than 10
seconds.
the
button.
appears on the LCD.
SETTING THE CLOCK
NOTE The clock can only be adjusted by minute
increments and not by hour increments, and when the
system is powered off.
2. To deactivate the mute
function, press the
button again.
reappears.
1. Ensure the speaker is powered off. Press the
button. Both hands on the clock will flash and the
display’s blue backlight turns on.
2. Use the
/
buttons to set the time: press the
button once to advance the clock by 1 minute
and press the
button to turn the clock back by
1 minute. Press and hold the
/
buttons down
to set the time faster.
3. Press the
button to confirm the newly set time
and exit the clock setting mode. The backlight
turns off.
TIP If you increase (or decrease) the volume while the
speaker is on mute, the Mute function will deactivate
and audio playback can be heard again.
BASS AND TREBLE
Adjusting the wireless speaker’s bass and treble settings
allows the device to playback audio with a different range
of sound and tonal effects.
ADJUSTING BASS
NOTE No other buttons can be pressed while the setting
clock function is on. “Auto quit” activates when the
function is idle for more than 10 seconds; the last time
that was set prior to idling is not saved.
1. Press the
button once during playback or when
speaker is on idle or pause.
appears on the
LCD.
2. Use the
/
buttons to increase or decrease the
bass. To continuously increase or decrease the
bass, press and hold the
/
button down until
the desired bass level is reached. The volume / bass
and treble bar decreases or increases accordingly.
NOTE The clock will show on the LCD regardless of
whether your wireless speaker is powered on or off.
SYNCHRONIZING WITH THE COMPUTER
Once the iPod is docked into the transmitter dock, the
iPod synchronizes with a computer and music (and
photos with iPod with color display) files can be
transferred from computer to the iPod.
3. Press the
button again.
1. Power off the iBall speaker.
2. Plug one end of the Apple iPod Dock Connector
cable that is supplied with the iPod to the transmitter
dock’s 30-pin jack and the other end (Firewire or
USB connector) to the computer. The iPod
synchronizes with your computer. Use Apple
iTunes® or other software on your computer to
transfer music files to the iPod.
3. After file transfer is complete, unplug the Dock
Connector cable from the iPod and press any button
on the iPod to turn on the unit.
4. Operate the iPod and iBall speaker as normal.
appears on the LCD.
ADJUSTING TREBLE
1. Use the
/
buttons to increase or decrease the
treble. To continuously increase or decrease the
treble, press and hold the
/
button down until
the desired treble level is reached.
11
EU_IB368manual(eng)R12
11
8/31/2005, 3:51 PM
EN
TIP Your secondary audio source may only have line-in
jacks available, in which case a standard stereo cable
can be used to connect to the transmitter dock.
2. Plug the other end of the cable (stereo connector)
to the transmitter dock line-out jack.
3. Set the secondary audio source to “AUX” (auxiliary)
mode. If music is already playing back f r o m t h e
iBall speaker, music will begin playback from the
speakers of the secondary audio source.
4. Instead of having to go to the iPod to control its
play / pause and previous / next track functions, they
can be adjusted directly from the iBall speaker (with
the exception of the iPod shuffle, since its functions
can only be controlled directly from the unit itself).
TIP The iPod, iPod mini, iPod shuffle and iPod with
color display can use a line-out connection to enable
music playback on secondary audio source.
SETTING UP iBALL CONNECTIONS
The speaker and transmitter dock can be connected to
different audio sources and video output devices while the
iPod remains docked to the transmitter dock, allowing for
flexible ways to playback music and photos (iPod with color
display).
TRANSMITTER DOCK AUX-IN
The transmitter dock’s aux-in jack allows a secondary
audio source to be connected, allowing you to switch
between listening to audio from the iPod or the secondary
audio source at anytime.
AUDIO CONNECTION
TRANSMITTER DOCK LINE-OUT
The transmitter dock’s line-out jack (Composite Video +
Audio L/R out) allows a secondary audio source such
as the Oregon Scientific Music Element 2.1 CD Micro
System to be connected. This allows music from the
docked iPod to playback on Music Element’s speakers
at the same time as the iBall speaker.
1. Use a red-white audio cable and connect the redwhite connectors to the audio-out jacks of the
secondary audio source.
TIP Your secondary audio source may only have lineout jacks available, in which case a standard stereo cable
can be used to connect to the transmitter dock.
1. Use a red-white audio cable and connect the redwhite connectors to the AUX-IN jacks of the
secondary audio source.
12
EU_IB368manual(eng)R12
12
8/31/2005, 3:51 PM
TRANSMITTER DOCK LINE-OUT
TIP Before switching to the secondary audio source,
press the
button on the iPod or speaker to pause
playback. This allows you to resume playback of the
same track when switching back to the iPod as the
primary audio source.
The color of iBall speaker’s LCD backlight, which is blue
when the playback source is the iPod, changes to green.
appears to indicate the switch to the secondary
audio source. Music from the external source is played
back from both the secondary audio source speakers
and the iBall speaker. Settings such as volume, and
treble and bass remain unchanged.
1. Use a red-white-yellow audio-video cable and
connect the red-white-yellow connectors to the linein jacks of the output device.
2. Plug the other end of the cable (stereo connector)
to the transmitter dock line-out jack.
3. From the iPod with color display, choose whether
to view photos individually or as a slideshow and if
the output device comes with speakers, select music
to playback.
4. To switch back to the iPod (which is either paused
or playing music), press the speaker
button
once.
NOTE Functions of the secondary audio source cannot
be controlled or adjusted by the speaker.
TRANSMITTER DOCK S-VIDEO AND LINE-OUT
The transmitter dock has an S-Video output jack to
accommodate output devices such as TVs that have an
S-Video connector. Using S-Video is recommended over
composite video because S-Video provides sharper,
better quality images than composite video.
NOTE Each time the speaker and iPod are powered
on, the iPod becomes the default audio source even
though a secondary audio source is connected to the
transmitter dock.
VIDEO CONNECTION
The iPod with color display provides the option of not only
music playback but also the ability to view photos stored on
the device through a video output device such as a TV.
13
EU_IB368manual(eng)R12
13
8/31/2005, 3:51 PM
EN
2. Plug the other end of the cable (stereo connector)
to the transmitter dock AUX-in jack.
3. The iPod docked to the transmitter dock is selected
as the audio source by default. To switch to the
secondary audio source during playback, press and
hold the iBall speaker
button for 3 seconds.
EN
within a 30-meter range (approx. 100 feet) is nearby
whose radio frequency transmission signals jam with
your iBall’s signals.
To eliminate signal jamming, follow the procedures below
to set the RF mating function between the speaker and
transmitter dock.
NOTE The entire RF mating process must be completed
within 20 seconds in order for the speaker and transmitter
dock to function properly, otherwise the process has
likely timed out and will need to be restarted.
1. Disconnect all secondary audio sources or video
output devices from the transmitter dock although
you may choose to leave the iPod docked onto the
transmitter dock.
2. Leave the AC adapter connected to the transmitter
dock. If the adapter is not plugged in, connect it to
the transmitter dock.
3. Designate the speaker to start the RF mating
process. Plug in the speaker’s AC adapter if batteries
are not used.
1. Use a red-white-yellow audio cable and connect the
red-white connectors to the line-in jacks of the output
device. The yellow (composite video) connector
does not need to be connected.
2. Plug the other end of the cable (stereo connector)
to the transmitter dock line-out jack.
3. Use an S-Video cable and plug each end to the
respective video output device and transmitter dock
S-Video jacks.
4. From the iPod with color display, choose whether
to view photos individually or as a slideshow and if
the TV comes with speakers, select music to
playback. The iPod with color display play / pause
track and previous / next track or photo functions
are adjusted directly from the player itself.
4. Power on the speaker and from its control panel,
press and hold both the
and
buttons for
3 seconds.
The LCD backlight on the
iBall speaker turns off (the
speaker itself remains on).
appears and blinks
NOTE Controlling iPod functions from the iPod itself
during a video connection does not influence what is
shown on the speaker’s LCD.
during the RF mating
process.
TIP Under both video connection scenarios, the speaker
can remain powered on and iPod music will playback.
But if the speaker is operating on batteries, turn off the
speaker to conserve power.
5. Press the RF mating button located at the bottom
of the transmitter dock.
Once RF mating is successfully completed, the LCD
backlight lights up with status icons appearing that
indicate whether the iPod is docked onto the transmitter
dock.
RECOGNIZING WIRELESS SIGNALS
If iPod is not docked,
The iBall speaker and transmitter dock is manufactured
preset to automatically recognize each other wirelessly
during operation through a process called “RF mating”.
If iPod is docked,
appears.
appears.
However, there are certain occasions when signal
jamming can occur, for example when a second iBall
14
EU_IB368manual(eng)R12
14
8/31/2005, 3:51 PM
Alternatively, press the RESET button at the bottom of
the speaker to reset the unit and check to see if the unit
resumes operation.
How do I eliminate signal jamming?
Signals transmitted from devices such as a second iBall
nearby may jam with signals transmitted from the
transmitter dock to speaker. If signal jamming occurs,
follow the procedures outlined in the “RECOGNIZING
WIRELESS SIGNALS” section to set the RF mating
function between the speaker and transmitter dock.
NOTE Depending on the nature and strength of signal
jamming, the process may need to be repeated several
times before RF mating is successful.
TROUBLESHOOTING
Use this troubleshooting guide to help you remedy any
difficulties you may be experiencing while using the iBall.
Should any problem persist after you have checked these
symptoms, consult your nearest Oregon Scientific dealer.
The wireless speaker is powered on but why is it
not emitting any sound?
Check to ensure the power is on and increase the
volume. If there is still no sound, check to see if
is lit
on the LCD. If it is, press the
button on the speaker
control panel to unmute the speaker.
Why does the wireless speaker not power on at all?
Ensure the power cord is firmly plugged into the power
outlet. On the rare occasion, the unit may not operate
due to data signal interference or static electricity. Turn
the power off and unplug the unit from the power outlet
briefly, and then plug it in again so it will reset itself and
turn the speaker on.
Data signal interference or static electricity may disrupt
the signal reception from the audio source. Power off
the speaker, wait a few seconds, and turn the unit back
on. Alternatively, press the RESET button at the bottom
of the speaker to reset the unit.
Why does the power keep turning off after turning
on?
The batteries may have run out of power or are not
correctly aligned with their polarity. For alkaline batteries,
re-install checking the polarity; if the unit still does not
operate, insert new alkaline batteries into the unit.
Why is the wireless speaker not responding when
the buttons are pressed?
Remove and reconnect the AC power plug or reinsert the
batteries and switch the speaker on again, checking that the
power is on. If there is still no response, the speaker’s control
panel membrane may be damaged. Take the unit to a
qualified Oregon Scientific dealer for servicing.
For rechargeable batteries, plug the AC adapter so the
speaker can operate on AC power and recharge the
depleted batteries.
Alternatively, press the RESET button at the bottom of
the speaker to reset the unit.
How do I eliminate the severe hum, distortion or
noise that is coming from the wireless speaker?
The speaker may be positioned too closely to the audio
source, such as a TV or radio. Move the speaker at least
1 meter (approx. 3 feet) away from the source.
Why are the rechargeable batteries not charging?
The correct AC adapter should be plugged into the
wireless speaker.
Ensure that a battery cap must be placed on top of the “_”
terminal of a battery. The battery with the cap must be
positioned into the specified battery slot of the battery
compartment with the other batteries installed as normal.
Do not use the battery cap if the speaker is powered by
alkaline batteries. Doing so may increase the risk of fire,
personal injury, or damage to the speaker.
Check that the speaker’s position and connections are
clear of any strong magnetic fields or radio frequencies
such as Bluetooth, wireless LAN, microwaves or
fluorescent light, which may interfere with reception.
Similarly, make sure the speaker is not placed near any
2.4GHz DECT phones or mobile phones, whose
frequencies can interfere with wireless transmission
between the remote control device and speaker.
When placing the batteries into the compartment, make
sure to correctly align the polarities.
The plugs and jacks may be dirty, affecting the
connections and thus causing sound distortion. Wipe
clean. In some cases, volume might not be appropriately
adjusted. Adjusting the volume will help to clear any hum
or distortion.
My iPod is docked to the transmitter dock but why
is nothing happening?
The iPod may not be inserted properly into the transmitter
dock. Remove the iPod and reinsert, making sure to
correctly align its pin connectors with those of the
transmitter dock. Or, the docking tray inserted into the
There may be excess moisture condensed inside the
speaker or on the speaker grill that might affect the unit’s
ability to produce audio, especially after turning on
15
EU_IB368manual(eng)R12
15
8/31/2005, 3:51 PM
EN
heating in the room, if the room is damp, or if the speaker
is brought directly from a cold to a warm place. In this
case, leave the system turned off for a few hours until
moisture evaporates, unplug the AC power cord and then
plug it in again.
EN
transmitter might not match your iPod model. Remove
and make sure to use the correct tray instead.
you need to reach us, as well as frequently asked
questions and customer downloads.
We hope you will find all the information you need on
our website. However if you’re in the U.S. and would
like to contact the Oregon Scientific customer care
department directly, please visit:
www2.oregonscientific.com/service/support OR call
1-800-853-8883. For international inquiries, please visit
www2.oregonscientific.com/about/international/default.
asp.
If attempting to synchronize the iPod with the computer,
ensure the cable supplied with the iPod is connected
firmly to the transmitter dock and computer.
The iBall is functioning properly and the audio /
video connections are set up correctly. But why is
iPod not responding even though it is docked?
The iPod may need to be reset. You may also upgrade
the iPod’s software. See section on “UPGRADING iPOD
SOFTWARE” for more information.
COPYRIGHT
Apple, iPod and iTunes are trademarks of Apple
Computer, Inc., registered in the U.S. and other
countries.
A docked iPod with color display in slideshow mode may
not respond to commands from the iBall speaker, i.e.,
the iPod remains in battery charging mode. To resolve
this issue, press any button on the iPod so that it "wakes
up" and exits slideshow mode, then go back to the main
menu screen. Power on the iBall speaker to regain
control of the iPod.
FCC STATEMENT
This device complies with Part 15 of the FCC Rules.
Operation is subject to the following two conditions: (1)
This device may not cause harmful interference, and
(2) This device must accept any interference received,
including interference that may cause undesired
operation.
SPECIFICATIONS
TYPE
Dimensions
(W x H x D)
Radio
transmission
Amplifier output
Audio system
Power sources
Battery life
Wireless audio
transmission
Sound features
Speaker system
DESCRIPTION
Wireless speaker:
203 x 187 x 196 mm
(8 x 7.4 x 7.7 inches)
WARNING Changes or modifications not expressly
approved by the party responsible for compliance could
void the user’s authority to operate the equipment.
Transmitter dock:
108 x 107 x 57.9 mm
(4.3 x 4.2 x 2.3 inches)
Range of 30 meters (approx. 100
feet) in open space
6W (1.5W x 2; 3W for subwoofer)
THD: 0.5% at 1kHz
S/N ratio: 60dB
Channel separation: 35dB
Level balance: +/- 3dB
110V/60Hz or 230V/50Hz (AC)
adapter
6 x C-size batteries
6 x 3000mAh 1.2V rechargeable
batteries
Alkaline: 16 hours of continuous use
Rechargeable: 8 hours of
continuous use
2.4GHz digital transmission for
stereo audio
Equalizer (Bass, Treble in steps
from -6 to +6)
2 stereo tweeters and 1 subwoofer
by magnetic shield driver
NOTE This equipment has been tested and found to
comply with the limits for a Class B digital device,
pursuant to Part 15 of the FCC Rules. These limits are
designed to provide reasonable protection against
harmful interference in a residential installation.
This equipment generates, uses and can radiate radio
frequency energy and, if not installed and used in
accordance with the instructions, may cause harmful
interference to radio communications. However, there
is no guarantee that interference will not occur in a
particular installation. If this equipment does cause
harmful interference to radio or television reception,
which can be determined by turning the equipment off
and on, the user is encouraged to try to correct the
interference by one or more of the following measures:
Reorient or relocate the receiving antenna.
Increase the separation between the equipment and
receiver.
Connect the equipment into an outlet on a circuit
different from that to which the receiver is connected.
Consult the dealer or an experienced radio / TV
technician for help.
ABOUT OREGON SCIENTIFIC
To learn more about StyleFi, go to www.oregonscientific.
com/stylefi.
DECLARATION OF CONFORMITY
The following information is not to be used as contact
for support or sales. Please call our customer service
number (listed on our website at www.oregonscientific.
com), or on the warranty card for this product) for all
inquiries instead.
Visit our website (www.oregonscientific.com) to learn
more about other Oregon Scientific products such as
digital cameras; MP3 players; children’s electronic
learning products and games; projection clocks; health
and fitness gear; weather stations; and digital and
conference phones. The website also includes contact
information for our customer care department in case
16
EU_IB368manual(eng)R12
16
8/31/2005, 3:52 PM
EN
We
Name:
Address:
Telephone No.:
Oregon Scientific, Inc.
19861 SW 95th Ave., Tualatin,
Oregon 97062 USA
1-800-853-8883
declare that the product
Product No.:
Product Name:
IB368
iBall Wireless Stereo Speaker with
Transmitter Dock for iPod
Manufacturer:
IDT Technology Limited
Address:
Block C, 9/F, Kaiser Estate,
Phase 1,41 Man Yue St.,
Hung Hom, Kowloon,
Hong Kong
is in conformity with Part 15 of the FCC Rules. Operation
is subject to the following two conditions: 1) This device
may not cause harmful interference. 2) This device must
accept any interference received, including interference
that may cause undesired operation.
EC-DECLARATION OF CONFORMITY
Hereby, Oregon Scientific, declares that this iBall
Wireless Stereo Speaker with Transmitter Dock for iPod
model IB368 is in compliance with the essential
requirements and other relevant provisions of Directive
1999/5/EC. A copy of the signed and dated Declaration
of Conformity is available on request via our Oregon
Scientific Customer Service.
0359
COUNTRIES RTTE APPROVAL COMPLIED
All EC countries, Switzerland
and Norway
CH
N
17
EU_IB368manual(eng)R12
17
8/31/2005, 3:52 PM
© 2005 Oregon Scientific. All rights reserved.
005-05082-00
IB368manual(EU)cover
2
8/25/2005, 12:13 PM