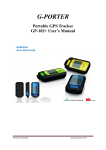
1
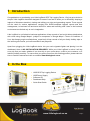
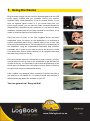
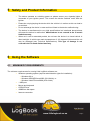
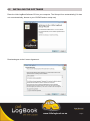
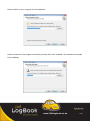
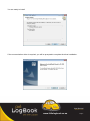
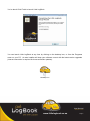
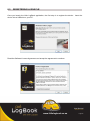
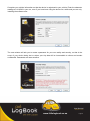
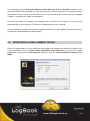
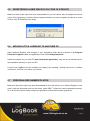
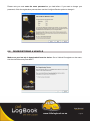
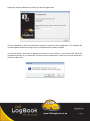
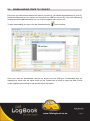
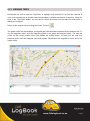
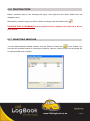
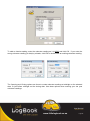
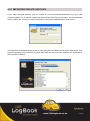
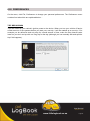
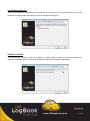
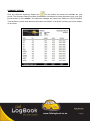
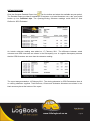
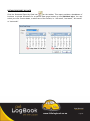
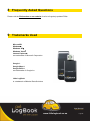
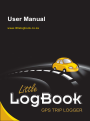
User Manual www.littlelogbook.co.za Contents 1 Introduction ....................................................................................................................... 2 2 In the Box ......................................................................................................................... 2 3 Using the Device .............................................................................................................. 3 4 Technical Specifications ................................................................................................... 4 5 Safety and Product Information ........................................................................................ 5 6 Using the Software ........................................................................................................... 5 6.1 MINIMUM PC REQUIREMENTS ....................................................................................... 5 6.2 INSTALLING THE SOFTWARE ......................................................................................... 6 6.3 REGISTERING A VEHICLE............................................................................................. 10 6.4 REGISTERING A REPLACEMENT DEVICE.................................................................... 12 6.5 REGISTERING A NEW VEHICLE ON YOUR OLD DEVICE ............................................ 13 6.6 MOVING LITTLE LOGBOOK TO ANOTHER PC ............................................................. 13 6.7 PERSONALISED NUMBER PLATES .............................................................................. 13 6.8 DE-REGISTERING A VEHICLE....................................................................................... 14 6.9 DOWNLOADING TRIPS TO YOUR PC ........................................................................... 16 6.10 CONFIGURING THE DEVICE ......................................................................................... 17 6.11 RENAMING START & END LOCATIONS ........................................................................ 17 6.12 CATEGORISING TRIPS .................................................................................................. 20 6.13 VIEWING TRIPS ............................................................................................................. 21 6.14 COMBINING TRIPS ........................................................................................................ 22 6.15 SPLITTING TRIPS........................................................................................................... 22 6.16 DELETING TRIPS ........................................................................................................... 23 6.17 SELECTING VEHICLES .................................................................................................. 23 6.18 VEHICLE ODOMETER .................................................................................................... 24 6.19 IMPORTING PRIVATE GEOTAGS .................................................................................. 26 6.20 PREFERENCES.............................................................................................................. 27 6.21 GENERATING REPORTS ............................................................................................... 29 7 Best Practices................................................................................................................. 33 8 Frequently Asked Questions ........................................................................................... 36 9 Trademarks Used ........................................................................................................... 36 User Manual Revision 1.2.0.9 www.littlelogbook.co.za Page 1 1 Introduction Congratulations on purchasing your Little LogBook GPS Trip Logging Device. Life just got a whole lot simpler! Little LogBook has been designed for ease of use and to assist you in effortlessly keeping a logbook of kilometers travelled, viewing and editing your trips and generating reports. These reports can be used for various applications, ranging from SARS-compliant logbook reports and fleet management, to business fuel and travel claims for sales and travelling staff. Uses in the business environment are limited only to one’s imagination. Little LogBook is not limited to business applications. Keep records of and revisit leisure destinations with views using Google Maps™ (subject to acceptance of Google Maps™ Terms & Conditions of Use, http://maps.google.com/help/terms_maps.html). Keep records of all your family holiday trips or the various golf courses you have travelled to and played at. Apart from plugging the Little LogBook device into your car’s cigarette lighter and placing it on the dashboard, there is NO INSTALLATION REQUIRED. While your Little LogBook is active it will log every trip that you make, whether it is a short trip to your corner shop, a visit to your customer, or a leisurely holiday road trip. To ensure that you get the most from this exciting product, please take the time to read this manual and visit our website www.littlelogbook.co.za 2 In the Box • • • • • USB GPS Trip Logging Device USB Power Supply Software CD Dashboard Strip Quick Start Guide User Manual Revision 1.2.0.9 www.littlelogbook.co.za Page 2 3 Using the Device Plug the power supply into the vehicle's cigarette lighter with the USB power supply included with your purchase. Should your vehicle’s cigarette lighter socket already be in use for another reason, or you have no cigarette lighter socket, or if you would simply like your power supply hidden, you can have the cable connected behind the dashboard by a professional auto electrician or a car sound & alarm installation company with only the plug exposed for connection. It is a matter of personal preference and requirements. Once the point of power to the Little LogBook device has been established, place the device on the dashboard in as horizontal a position as possible and in such a manner where it has a clear view of the sky and satellites above. Fix the cable end to a cleaned spot on the dashboard, using the self-adhesive Dashboard Strip provided, preferably well in reach as you need to remove the device to create your reports later. Ensure that the device is in an upright position with the black front pointing to the sky. On some vehicles where the windscreen’s angle is steep, you may need to place the unit up close to the windscreen to get the best line of sight to the sky. It is important to ensure that the positioning of the device does not hamper your view and the excess cable is coiled up to ensure it will not be a hazard whilst driving. Little LogBook only operates when connected to power and after it has acquired a full satellite fix. It is easily inserted and removed to later download trip data to the software on your PC. You are geared up! Easy as that! User Manual Revision 1.2.0.9 www.littlelogbook.co.za Page 3 4 Technical Specifications • • • • • • • • • • • • • • • • • • 65 channels satellite tracking Start up times (Satellite dependant): 2 – 180 seconds Superior sensitivity: -160dBm tracking Update Rate: 1 Hz (max) Dynamics: 4G (39.2 m/sec2) Dimension: 2.89 in (L) x 1.06 in (W) x 0.39 in (H) Support standard NMEA-0183 at 4800/9600/19200/38400 bps GPS protocol: NMEA +0183 - GGA, GSA, GSV, GLL, RMC, VTG, ZDA DATUM: WGS84 (User Definable) Support AGPS SBAS (WAAS, EGNOS) support 2MB flash memory for data logging, with 16 bytes binary data per record that stores up to 250K Start & stop locations can be renamed by user Support G-mouse function Accuracy: Position: 5m CEP without SA Velocity: 0.1m/sec, without SA Time: +/- 50ns synchronized to GPS time • • • • • Operation Limits: Altitude <18,000 m or Velocity < 515 m/s Operating Temperature: -20° to 60° Celsius; Humidity: 5% ~ 95% USB 2.0 USB powered Power Consumption <42 mA (1Hz standard version) User Manual Revision 1.2.0.9 www.littlelogbook.co.za Page 4 5 Safety and Product Information • • • • • The device operates on switching power so please ensure your cigarette lighter is connected to your ignition power. This means the device switches on/off with the ignition. Please do not plug/unplug the device while the vehicle is in motion as this can lead to an accident. Do not submerge the device in water as this will lead to the device malfunctioning. The device is manufactured to very high specifications but intentional abuse/misuse will cause the device to malfunction. Abuse/misuse is not covered in the 12 month limited warranty. When not in use for extended periods, do not leave the device in a closed vehicle in direct sunlight. A vehicle can reach temperatures of 110 degrees Celsius and the unit may be damaged (see Technical Specifications). This type of damage is not covered in the 12 month limited warranty. 6 Using the Software 6.1 MINIMUM PC REQUIREMENTS The minimum requirements for running Little LogBook software are: • • • • • • Windows operating system (requires administrative rights for installation): → Windows 98; or → Windows 2000/XP/Server2003 (32 & 64-bit); or → Windows Vista/7/Server2008 (32 & 64-bit) 1 USB port Mouse and keyboard CD/DVD Drive 40MB free disk space Internet connection User Manual Revision 1.2.0.9 www.littlelogbook.co.za Page 5 6.2 INSTALLING THE SOFTWARE Place the Little LogBook Software CD into your computer. The Setup will run automatically (if it does not run automatically, browse to your CD/DVD and run setup.exe) Read and agree to the License Agreement. User Manual Revision 1.2.0.9 www.littlelogbook.co.za Page 6 Select a folder on your computer for the installation. Select a location for the program’s shortcuts (this step will not be available if the software has already been installed). User Manual Revision 1.2.0.9 www.littlelogbook.co.za Page 7 You are ready to install. If the communication driver is required, you will be prompted to complete the driver installation. User Manual Revision 1.2.0.9 www.littlelogbook.co.za Page 8 You’re done! Click Finish to launch Little LogBook. You can launch Little LogBook at any time by clicking on the desktop icon, or from the Programs menu on your PC. An auto installer will keep your software current with the latest version upgrades (internet connection is required for these automatic updates). Desktop Icon User Manual Revision 1.2.0.9 www.littlelogbook.co.za Page 9 6.3 REGISTERING A VEHICLE Once you launch the Little LogBook application, the first step is to register the device. Insert the device into a USB slot on your PC. Read the Software License Agreement and accept the agreement to continue. User Manual Revision 1.2.0.9 www.littlelogbook.co.za Page 10 Complete your vehicle information so that the device is registered to your vehicle. Enter the odometer reading as it is NOW in your car, even if you have been using the device for a while and you are only installing the software now. The next window will ask you to create a password for your own safety and security, so that in the event of your device being lost or stolen your trip data will be inaccessible to others and remain confidential. Passwords are case sensitive. User Manual Revision 1.2.0.9 www.littlelogbook.co.za Page 11 It is important that you write your password down and keep it in a safe place, because if you cannot remember your password your only option will be to return the device to our support centre so the password can be reset. In this process all your trip data will be lost and you will incur shipping charges – so please don’t forget your password! You have the option to remember your password so you don’t have to type it in every time you download trips to your computer. Tick the box Remember Me on this computer. Once the Setup is complete and you have registered the device, Little LogBook will check for trips on your device and download them automatically. 6.4 REGISTERING A REPLACEMENT DEVICE Plug in the replacement unit, then follow the same steps as in registering a vehicle (6.3) above, but it is very important to enter the same vehicle registration, make and year as you did in the original registration, as well as the same password. However, enter the current odometer reading as it is NOW. User Manual Revision 1.2.0.9 www.littlelogbook.co.za Page 12 6.5 REGISTERING A NEW VEHICLE ON YOUR OLD DEVICE Make sure that all the trips have been downloaded for your old vehicle then de-register the device (see 6.8 De-registering a Vehicle). When prompted whether you want to register the device to a new vehicle, click YES and follow the steps. 6.6 MOVING LITTLE LOGBOOK TO ANOTHER PC Open Windows Explorer and navigate to your installation folder which by default is C:\Program Files\Little LogBook. Make a copy/backup of the file YourRegistration.llb. Install the software on your new PC (don’t launch the application), copy the file you backed up into the installation directory on your new PC. Launch Little LogBook and the software will display the message “vehicles found but no default vehicle set”. Click OK, now select your vehicle. 6.7 PERSONALISED NUMBER PLATES Make sure that all the trips have been downloaded for your old vehicle, go to Vehicle Register on the menu, read the information and tick the boxes, press NEXT. Follow the normal registration process, fill in all the new vehicle details except the registration number that has been grayed out. User Manual Revision 1.2.0.9 www.littlelogbook.co.za Page 13 Please note you must enter the same password as you had before. If you want to change your password, finish the registration process then use the Configure Device option to change it. 6.8 DE-REGISTERING A VEHICLE Make sure your last trip is downloaded from the device. Go to Vehicle De-register on the menu, tick the check box and press NEXT. User Manual Revision 1.2.0.9 www.littlelogbook.co.za Page 14 Supply the correct password to confirm you are the legal owner. Tick the checkbox in the final confirmation screen to continue with de-registration. The software will now de-register the device and give you a confirmation that it was successful. You will be asked if you want to register the device to a new vehicle. If you select YES, follow the registration process. If you select NO, the device will be cleared as if it was new, and can be given to someone else to use. User Manual Revision 1.2.0.9 www.littlelogbook.co.za Page 15 6.9 DOWNLOADING TRIPS TO YOUR PC Every time you have accumulated a few trips on your device, you should download these to your PC. Remove the device from your vehicle and connect it to a USB port on your PC. Open the software by clicking the Little LogBook desktop icon, or via the Programs menu on your PC. To start downloading your trips, click the Download button on the toolbar. Once your trips are downloaded, remove the device from the USB port. Downloaded trips are displayed by month with the latest month on top. Double-click a month to open trip data for that month, displaying the last trip on top and first trip at the bottom. User Manual Revision 1.2.0.9 www.littlelogbook.co.za Page 16 6.10 CONFIGURING THE DEVICE The Device Configuration tool • • • allows you to perform various tasks: Clear trip data from the device – please make sure that all your trips have been downloaded to your computer before you clear the device as the data will be permanently deleted. Configure AGPS data (Internet connection is required). Change your password and “Remember me” settings 6.11 RENAMING START & END LOCATIONS The start of a trip is identified when the device is powered up by switching on your vehicle and acquiring a full satellite fix. The trip ends when your vehicle is switched off or power is disconnected to the device. If the device has no power for longer than ± 5 minutes (default setting), the device will identify your journey up to that point as a trip. (5 minutes is the default setting which can be changed, see 6.20 Preferences.) User Manual Revision 1.2.0.9 www.littlelogbook.co.za Page 17 During the trip data download process, the software automatically assigns GeoTags (place names) to the Start and End locations of your recorded trips, e.g. Sandton to Centurion. These points can be renamed to reflect a visit to a Client, e.g. Office to Client ABC. Every time you return to the same location, the software automatically assigns the previously recorded location’s name. Renaming these Start and End GeoTags has many benefits in identifying trips for future reporting. To rename a Start or End location, simply select the trip (highlight it), then right-click the selected trip and select Start or End from the dropdown menu. A list of the nearest GeoTags and previously created locations is displayed. Either choose from the list or add a new name by clicking New. Every time you revisit this location it will automatically reflect the assigned GeoTag. If you change vehicles, you can import all your private GeoTags into the new vehicle’s logbook, see 6.19 Importing Private GeoTags. User Manual Revision 1.2.0.9 www.littlelogbook.co.za Page 18 When creating a new GeoTag, you can move the marker location on the map. as close as possible to the actual To edit your private GeoTags, select a trip on the main screen, right-click and select Edit Tags. The private GeoTags can now be renamed, move the marker as close as possible to the actual location on the map. GeoTags can be deleted by clicking the Delete icon. Destinations that are currently marked as Private or Business will keep the deleted name, but no further trips will use this deleted GeoTag. User Manual Revision 1.2.0.9 www.littlelogbook.co.za Page 19 6.12 CATEGORISING TRIPS Trips must be categorised as either Private (green) or Business (blue). Until one of these categories has been selected, trips are marked as Unknown and the text is bold. Highlight the trip(s) you wish to categorise (select multiple trips using the Shift or Control keys on your keyboard while clicking on trips). Right-click and select either Business or Private or Other from the dropdown menu (categories can be changed at any time). Selecting Other enables you to further categorise your private trips, e.g. you can differentiate between your annual holiday and a trip to the dentist. Assign a suitable icon to your personal category for ease of viewing and selecting later. Categorising a trip as Business automatically prompts you to assign a qualifying description for the business trip – this ensures that your reports are SARS-compliant. Trips not categorised as Business in this manner will automatically be categorised as Private in the reports generated by the software. User Manual Revision 1.2.0.9 www.littlelogbook.co.za Page 20 6.13 VIEWING TRIPS Double-click on a trip to open the Trip Editor, or highlight a trip and select Trip from the View tab. A view of the selected trip is opened using Google Maps™ (internet connection is required). Using the tools in the Trip Editor toolbar, you are able to centre and zoom into the start and end points to identify the locations. Return to the original trip view using the Centre Trip tool The graph under the map displays your speed (kph) and kilometers travelled for the selected trip. To use the magnifier slider, click the magnifying glass in the graph and drag the slider. The map will centre on the current position when you release the mouse button. To zoom into the map at a particular point, click the magnifier once and release. Double-click the magnifier to zoom out to the map’s extent. User Manual Revision 1.2.0.9 www.littlelogbook.co.za Page 21 6.14 COMBINING TRIPS There will be occasions where you want to combine consecutive trips into one continuous trip. For example, if you stop and turn off your car to refuel and it takes longer than ± 5 minutes (default setting), the device will assume you have reached your destination and start a new trip when you start driving again. You can combine multiple trips as long as they are sequential. Select the trips you wish to combine, then click the Combine button on the toolbar – it couldn’t be easier! Alternatively, right-click and select Combine from the dropdown menu. If you want to undo the combined trip, click Split Trip and all the trips you combined will be displayed in different colours. Click Save and your trips will be separated as before. 6.15 SPLITTING TRIPS Open the Trip Editor by double-clicking the trip you want to split. Click and drag the slider with your mouse to move the marker to a point along the route where you want to split the trip. Alternatively, click on the slider and use the left & right arrow keys on your keyboard. You can zoom into the selected point by clicking the magnifier above the slider. Select the trip in the bottom section of the Trip Editor window. Click the Split Trip button and both trips are now displayed. If you have previously combined certain trips and you choose to split them again, your Trip Editor will reveal the original separate trips. To save the changes, click the Save button on the toolbar . To discard any changes, press the Escape key or close the Trip Editor without saving. If you want to undo a trip you have split, select the trips and click Combine. User Manual Revision 1.2.0.9 www.littlelogbook.co.za Page 22 6.16 DELETING TRIPS Delete unwanted trips by first selecting the trip(s), then right-click and select Delete from the dropdown menu. Alternatively, select the trip(s) you wish to delete and simply click the Delete button DELETING TRIPS IS PERMANENT and the action cannot be undone even if the trip is still on your device! 6.17 SELECTING VEHICLES You can switch between multiple vehicles using the Select a Vehicle icon on the toolbar. You can have an unlimited number of vehicles per computer. Select a vehicle from the list and press OK (or simply double-click a vehicle). User Manual Revision 1.2.0.9 www.littlelogbook.co.za Page 23 You will now be prompted to switch vehicles. Check the “Don’t ask again” box if you do not wish to see this message again. Press OK to switch, or CANCEL to select the original vehicle. In the Preferences menu (see 6.20 below), you can set the software to automatically switch to the vehicle that the device belongs to. 6.18 VEHICLE ODOMETER Click the Vehicle Odometer icon to edit your vehicle’s odometer readings and create more accurate reports. You can add odometer readings for the Opening or Closing of a tax year, and Interim readings can also be added at any time which will assist with the accuracy of reports. User Manual Revision 1.2.0.9 www.littlelogbook.co.za Page 24 To add an Interim reading, enter the odometer reading as it is NOW and click OK. If you enter the wrong odometer reading (or date) by mistake, click Edit or double-click an existing odometer reading. The Opening and Closing options are there to create odometer readings at midnight on the selected date, or just before midnight on the closing date. Use these options when entering your tax year odometer readings. User Manual Revision 1.2.0.9 www.littlelogbook.co.za Page 25 6.19 IMPORTING PRIVATE GEOTAGS If you have changed vehicles, you can import all your user-defined destinations into your new vehicle’s logbook. Go to Vehicle, Import and select Private GeoTags on the menu. Use the dropdown menu to select the vehicle you want to import from, then enter the password for that vehicle. You can select or deselect all the points at once using the checkboxes on the right. When done, click Import. Depending on the number of private GeoTags and the size of the logbook, this could take a while, please be patient. User Manual Revision 1.2.0.9 www.littlelogbook.co.za Page 26 6.20 PREFERENCES On the menu, click File, Preferences to change your personal preferences. The Preferences menu contains four tabs which are explained below… TRIP BREAKDOWN Trips are based on your vehicle’s ignition power to the device. When you turn your vehicle off and a certain amount of time passes before you start your next trip, it will be marked as a new trip. If for example you do deliveries and only stop for a small amount of time, make the Stop Interval value lower so you don’t end up with one long trip for the day (although you can manually edit and split the trip if this happens). User Manual Revision 1.2.0.9 www.littlelogbook.co.za Page 27 AUTOSWITCH VEHICLE When downloading or configuring a device that does not belong to the current selected vehicle, the software will automatically switch to the vehicle the device belongs to. REPORTS FOLDER You can specify a folder to save your reports in, which makes it easier to find and manage your reports. By default reports are saved in: installation folder\reports\vehicle registration. User Manual Revision 1.2.0.9 www.littlelogbook.co.za Page 28 PROXY SETTINGS If you cannot download updates or AGPS data and your internet connection is working, you might find that you are behind a proxy server. Most corporates today use proxy servers. Please contact your network administrator and ask for your proxy settings. 6.21 GENERATING REPORTS The Little LogBook software generates SARS-compliant reports from all your trips within the SARS tax year. Reports are generated in PDF format so you need to have a PDF viewer installed on your computer, e.g. Adobe Reader (get it free at http://get.adobe.com/reader/). Remember, don’t print reports if you really don’t have to! Let’s save our trees and protect our planet There are three report options to choose from: Summary, Detailed and Detailed by Date which are explained below… User Manual Revision 1.2.0.9 www.littlelogbook.co.za Page 29 SUMMARY REPORT Click the Generate Summary Report icon on the toolbar and select the available tax year period. The Summary Report provides a breakdown of business vs private kilometers over a tax year period broken up into months. The odometer readings are either User Defined or GPS Estimated. Total business, private and odometer kilometers are shown in the black summary bar at the bottom of the report. User Manual Revision 1.2.0.9 www.littlelogbook.co.za Page 30 DETAILED REPORT Click the Generate Detailed Report icon on the toolbar and select the available tax year period. The Detailed Report provides a breakdown of business vs private kilometers over a tax year period broken up into individual trips. The Opening/Closing odometer readings could either be User Defined or GPS Estimated. An Interim odometer reading was added on 17 February 2011. The difference between actual odometer and GPS kilometers are shown in the Discrepancy row. A negative discrepancy denotes that the GPS kilometers are more than the odometer reading. The report was generated on 18 February 2011. The closing odometer is GPS Estimated as there is no closing odometer supplied. Total Business, Private and Odometer kilometers are shown in the black summary bar at the bottom of the report. User Manual Revision 1.2.0.9 www.littlelogbook.co.za Page 31 DETAILED REPORT BY DATE Click the Generate Report by Date icon on the toolbar. This report provides a breakdown of business vs private kilometers for a specific date range broken up into individual trips. You can select your own Custom dates, or select one of the Presets, i.e. “this week”, “last week”, “this month” or “last month”. User Manual Revision 1.2.0.9 www.littlelogbook.co.za Page 32 7 Best Practices We recommend the following tips and "best practices" for getting the most out of your Little LogBook. The steps can be achieved in a few minutes once a week and will greatly improve your logging accuracy, keeping both you and the taxman happy! 7.1 DOWNLOAD AND MARK YOUR TRIPS REGULARLY Regularly downloading and marking your trips – at least once a week – makes your life easier and serves as a good backup strategy should your device be stolen, lost or damaged. Please note: In the event that the memory becomes full, the device will stop logging any new trips until the memory is cleared! When downloading your trips you can see the memory usage of the device on the “usage bar”… User Manual Revision 1.2.0.9 www.littlelogbook.co.za Page 33 7.2 KEEP YOUR ODOMETER READING UP TO DATE Keep your odometer reading up to date – preferably when you download your trips. This can be done as follows: • select Vehicle from the menu • select Odometer • click the Add button • make sure that the Interim Odometer radio button is selected • add the latest odometer reading from your vehicle and click OK Regularly entering your interim odometer reading keeps your device and your real odometer reading in sync with each other, and results in greater accuracy when generating your SARS-compliant reports. 7.3 USE THE AGPS DOWNLOAD FUNCTION To ensure more accurate and quicker satellite fixes (especially for your first trip of the day), use the AGPS Download function. This can be done as follows: • make sure you have a working internet connection • make sure the device is plugged into a working USB port on your PC • Click Configure Device on the toolbar • Click the AGPS Download button • Once AGPS has been updated click the Close button • Remove the device, you are ready to start logging Your AGPS data will now be valid for the next 7 days. Thereafter you can renew it by repeating the steps above. User Manual Revision 1.2.0.9 www.littlelogbook.co.za Page 34 7.4 CLEAR YOUR DEVICE REGULARLY For performance reasons, it is advisable to regularly clear your device and essentially wipe it clean – after you have successfully downloaded your last trip of course! Please note: In the event that the memory becomes full, the device will stop logging any new trips until the memory is cleared! This can be done as follows: • Make sure the device is plugged into a working USB port on your PC • Click Configure Device on the toolbar • The device’s memory usage is shown in the Clear Device section • Click the Clear Device button It is strongly recommended that you update your AGPS data after you have cleared your device (an internet connection is required). 7.5 HOW TO BACKUP YOUR DATA • Go to C:\Program Files\Little Logbook folder (installation folder) • You will find a file with your registration number and the extension .llb, for example ABC123GP.llb • This file contains all your trips and should be backed up after you have downloaded trips and cleared your device • Alternatively, you can mark all your trips as Business or Private, generate a report for the period, and save the PDF User Manual Revision 1.2.0.9 www.littlelogbook.co.za Page 35 8 Frequently Asked Questions Please visit the FAQ section on our website for a list of regularly updated FAQs. 9 Trademarks Used Microsoft Windows Windows XP Windows Vista Internet Explorer are trademarks of Microsoft Corporation Google™ Google Maps™ Google Earth™ are trademarks of Google Inc Little LogBook is a trademark of Mbeleni Data Solutions User Manual Revision 1.2.0.9 www.littlelogbook.co.za Page 36