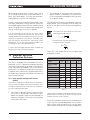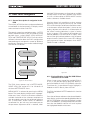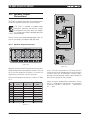
1
Operation Manual
PLM™ Series
Powered Loudspeaker Management™ systems
Rev. 1.0.2
Item no. OM-PLM 1 CONTENTs
1 CONTENTs...................................................................................................................................................2
2 APPROVALS . ...............................................................................................................................................6
3 WARNINGS..................................................................................................................................................6
3.1 Explanation of graphical symbols.........................................................................................................6
3.1.1 WARNING.................................................................................................................................6
3.1.2 CAUTION..................................................................................................................................6
3.2 Important Safety Instructions...............................................................................................................6
3.3 User responsibility................................................................................................................................7
3.3.1 Mains connection grounding.....................................................................................................7
3.3.2 Speaker output hazard...............................................................................................................7
3.3.3 Radio interference.....................................................................................................................7
3.3.4 Speaker damage........................................................................................................................7
3.3.5 Maintenance..............................................................................................................................7
4 WELCOME....................................................................................................................................................8
4.1 Introduction .........................................................................................................................................8
4.2 Main Features.......................................................................................................................................8
4.2.1 Amplifier platform......................................................................................................................8
4.2.2 Amplifier DSP: Gain, ISVPL™, load verification and performance monitoring...........................8
4.2.3 Dolby ® Lake® Processing and Controller...................................................................................9
4.2.4 SmaartLive® integration.............................................................................................................9
4.2.5 Dante™ audio network...............................................................................................................9
5 INSTALLATION..........................................................................................................................................10
5.1 Unpacking...........................................................................................................................................10
5.2 Mounting............................................................................................................................................10
5.3 Rear Mounting....................................................................................................................................10
5.4 Cooling................................................................................................................................................11
5.5 Operating voltage...............................................................................................................................12
5.6 Grounding...........................................................................................................................................12
6 PLM SERIES FEATURES...........................................................................................................................13
6.1 Front Panel overview..........................................................................................................................13
6.2 Rear Panel overview...........................................................................................................................15
6.2.1 Input connectors and Links.....................................................................................................15
6.2.2 Output connectors..................................................................................................................15
6.2.3 Network connectors................................................................................................................16
6.2.3.110/100Base-T network............................................................................................................16
6.3 Integrated Dolby Lake Processing......................................................................................................17
6.3.1 Dolby Lake Controller (DLC) PLM Edition software ...............................................................17
7 OPERATION AND PERFORMANCE.........................................................................................................18
7.1 Introduction to Operation....................................................................................................................18
7.1.1 Operation precautions.............................................................................................................18
7.2 Power Output Performance................................................................................................................18
7.2.1 Symmetrical power.................................................................................................................18
7.2.2 Asymmetrical power...............................................................................................................18
7.2.3 Power over time......................................................................................................................18
7.3 Amplifier and Load Protection Systems.............................................................................................19
7.3.1 Inter-Sample Voltage Peak Limiter (ISVPL).............................................................................19
7.3.2 Current Peak Limiter (CPL)......................................................................................................20
7.3.3 Power Average Limiter (PAL)..................................................................................................20
7.3.4 Current Average Limiter (CAL)................................................................................................20
2 PLM Series Operation Manual
CONTENTs 1
7.3.5 Voltage Clip Limiter....................................................................................................................20
7.3.6 Temperature Protection.............................................................................................................20
7.3.7 DC Protection.............................................................................................................................21
7.3.8 VHF Protection...........................................................................................................................21
7.3.9 Short circuit protection...............................................................................................................22
7.4 Power Supply......................................................................................................................................22
8 Signal flow and processing.........................................................................................................23
8.1 Signal Flow ........................................................................................................................................23
8.2 Loudspeaker processor configuration.................................................................................................24
8.3 Modules and Frames..........................................................................................................................25
8.3.1 LoadLibrary™ and Fingerprints..................................................................................................25
8.3.2 Super Modules..........................................................................................................................26
8.4 Presets................................................................................................................................................26
8.4.1 Module Presets.........................................................................................................................26
8.4.2 Frame Presets...........................................................................................................................26
8.4.3 Subsystem Presets...................................................................................................................26
8.4.4 System Presets.........................................................................................................................26
9 FRONT PANEL INTERFACE......................................................................................................................27
9.1 Front Panel Navigation........................................................................................................................27
9.1.1 General description of navigation in the PLM..........................................................................27
9.1.2 Pinging Modules in the DLC PLM Edition software from the PLM........................................27
9.2 Key Lock Front Panel..........................................................................................................................28
9.3 Power button .....................................................................................................................................28
9.4 Mute Enable button ...........................................................................................................................28
9.5 Meter button .....................................................................................................................................28
9.6 Menu button ......................................................................................................................................28
9.7 Network activity LED . .......................................................................................................................29
9.8 Rotary encoder ..................................................................................................................................29
9.9 Exit button .........................................................................................................................................29
9.10 Soft-function buttons . ...................................................................................................................... 30
9.10.1 Mute Functions....................................................................................................................... 30
9.10.1.1 PLM Input Mute............................................................................................................. 30
9.10.1.2 Module Input Mute........................................................................................................ 30
9.10.1.3 Module Output Mute......................................................................................................31
9.10.1.4 Power Output Mute........................................................................................................31
9.10.2 LED Faults, Warnings and Clip indications...............................................................................31
9.10.2.1 Green indications........................................................................................................... 33
9.10.2.2 Yellow indications.......................................................................................................... 33
9.10.2.3 Red indications.............................................................................................................. 33
9.11 Meter Mode....................................................................................................................................... 35
9.11.1 Meter view 1 – Home View.................................................................................................... 36
9.11.2 Meter View 2 – Module View................................................................................................. 36
9.11.3 Meter View 3 – Temperature View..........................................................................................37
9.12 Menu Mode....................................................................................................................................... 38
9.12.1 Menu View............................................................................................................................. 38
9.12.2 Module submenu................................................................................................................... 39
9.12.2.1 User Gain....................................................................................................................... 39
9.12.2.2Delay............................................................................................................................. 39
9.12.2.3 Phase Reverse............................................................................................................... 39
9.12.2.4 Amp Gain....................................................................................................................... 39
9.12.2.5 Limiters.......................................................................................................................... 39
PLM Series Operation Manual 3
1 CONTENTs
9.12.2.5.1 Inter-Sample Voltage Peak Limiter (ISVPL)............................................................ 40
9.12.2.5.2 MaxPeak Level (MaxPeakLvl)................................................................................ 40
9.12.2.5.3 MaxRMS Level (MaxRMSLvl)............................................................................... 40
9.12.2.5.4 MaxRMS Corner (MaxRMSCor)........................................................................... 40
9.12.5.5.5 MaxRMS Attack (MaxRMSAtk)............................................................................ 40
9.12.2.5.6 MaxRMS Release (MaxRMSRel).......................................................................... 40
9.12.2.6 Mutes............................................................................................................................ 40
9.12.3 Input Routing and Settings submenu.......................................................................................41
9.12.3.1 Input selection and sensitivity settings..........................................................................41
9.12.3.2 IsoFloat™.......................................................................................................................42
9.12.3.3 AES/EBU input termination............................................................................................42
9.12.4 Attenuation submenu.............................................................................................................. 43
9.12.5 Frame submenu...................................................................................................................... 43
9.12.5.1 Frame Name.................................................................................................................. 43
9.12.5.2 Frame Info..................................................................................................................... 43
9.12.5.2.1 Firmware version (‘FW version’)............................................................................ 44
9.12.5.2.2 Latency (‘Inh. Latency’)......................................................................................... 44
9.12.5.2.3 Max Output Voltage (‘MaxOutVolt’)...................................................................... 44
9.12.5.2.4 Max Output Current (‘MaxOutCurr’)..................................................................... 44
9.12.5.2.5 Serial Number (‘Serial no.’).................................................................................... 44
9.12.5.3 Frame Reset ................................................................................................................. 44
9.12.5.3.1 Factory Reset........................................................................................................ 44
9.12.5.3.2 Soft Reset............................................................................................................. 44
9.12.5.4 Network......................................................................................................................... 44
9.12.5.4.1 IP Address............................................................................................................. 45
9.12.5.4.2 MAC Address........................................................................................................ 45
9.12.5.4.3 Frame ID............................................................................................................... 45
9.12.5.4.4 Network statuses (‘Online’)................................................................................... 45
9.12.5.4.5 IP Mask................................................................................................................. 45
9.12.5.5 Latency match............................................................................................................... 45
9.12.5.6 Display adjustments...................................................................................................... 45
9.12.5.6.1 Display Contrast.................................................................................................... 45
9.12.5.6.2 Dimming................................................................................................................ 45
9.12.6 Frame Preset submenu........................................................................................................... 45
9.12.7 LoadSmart™........................................................................................................................... 46
9.12.7.1 Configure # of cabinets in parallel.................................................................................. 46
9.12.7.2 LoadSmart verification................................................................................................... 46
9.12.8 Dante........................................................................................................................................47
9.12.8.1 Break In Physical Line.....................................................................................................47
9.12.8.2 Probe Routing.................................................................................................................47
10back panel interface........................................................................................................................ 48
10.1 Power inlet......................................................................................................................................... 48
10.1.1 PowerCon® wiring details....................................................................................................... 48
10.2 Audio Input and Links........................................................................................................................ 48
10.2.1 Analog inputs and Links.......................................................................................................... 48
10.2.1.1 Unbalanced operation.................................................................................................... 48
10.2.1.2 Iso-Float electronic balancing........................................................................................ 49
10.2.2 Digital inputs and Links........................................................................................................... 49
10.3 Speaker Output Connections............................................................................................................ 50
10.3.1 Speakon Output Connectors................................................................................................... 50
10.3.2 Binding Post Output Connectors.............................................................................................51
4 PLM Series Operation Manual
CONTENTs 1
10.4 RJ45 connectors.................................................................................................................................51
11APPENDIX..................................................................................................................................................52
11.1 Faults and warnings overview............................................................................................................52
11.2 Maintenance...................................................................................................................................... 55
11.3 Additional Documentation................................................................................................................. 55
11.4 Current draw and thermal dissipation specifications......................................................................... 55
11.5 Factory Default Settings.................................................................................................................... 55
11.6 Glossary of terms, acronyms, abbreviations, etc. used in this manual.............................................. 55
12APPLICATION GUIDE............................................................................................................................... 62
12.1 I/O Panels.......................................................................................................................................... 62
12.2 Power Distribution............................................................................................................................. 62
12.3 Gain Structure.................................................................................................................................... 63
12.3.1 Gain / Level Optimization....................................................................................................... 63
12.4 Speaker configurations.......................................................................................................................67
12.5 Connecting Digital Audio Devices......................................................................................................67
12.5.1 AES/EBU digital audio..............................................................................................................67
12.5.2 Sampling rates and latency......................................................................................................67
12.5.3 Interconnecting digital audio................................................................................................... 68
12.5.4 Cable....................................................................................................................................... 68
12.5.5 Accessories............................................................................................................................ 69
12.5.5.1 Passive splitters............................................................................................................ 69
12.5.5.2 Distribution amplifiers................................................................................................... 69
12.5.6 Application hints..................................................................................................................... 69
12.6 Firmware Upgrades............................................................................................................................70
12.6.1 Firmware Upgrades Using the Update Utility..........................................................................70
12.6.2 Firmware Upgrades Using the Dolby Lake Controller PLM Edition.........................................71
12.7 Hot swapping PLM devices................................................................................................................72
13TECHNICAL SPECIFICATIONS.................................................................................................................73
14WARRANTY...............................................................................................................................................74
PLM Series Operation Manual 5
2 APPROVALS
This equipment conforms to the requirements of the EMC Directive 2004/108/EC and the requirements of the Low Voltage Directive
2006/95/EC.
Standards applied: EMC Emission EN55103-1, E3
EMC Immunity EN55103-2, E3, with S/N below 1% at normal operation level.
Electrical Safety EN60065, Class I
This equipment is tested and approved according to the U.S. safety standard ANSI/ UL 60065 and Canadian safety standard CSA
C22.2 NO. 60065. ETL made the tests and they are a Nationally Recognized Testing Laboratory (NRTL).
3 WARNINGS
3.1 Explanation of graphical symbols
The lightning symbol within a triangle is intended to alert the user to the presence of un-insulated “dangerous voltage” within the amplifier’s
enclosure that may be of sufficient magnitude to constitute a risk of electric shock to humans.
The exclamation point within a triangle is intended to alert the user to presence of important operating and service instructions in the literature
accompanying the product.
3.1.1 WARNING
To reduce risk of fire or electric shock, do not expose this
apparatus to rain or moisture.
3.1.2
CAUTION
To reduce the risk of fire or electric shock, do not remove
screws. No user-serviceable parts inside. Refer servicing to
qualified service personnel
3.2 Important Safety Instructions
Before using your PLM, be sure to carefully read the applicable items of this Quick Start and Field Reference Guide and the Safety Instructions.
1. 2. 3. 4. 5. 6. 7. 8. 9. 10.
11.
12.
13.
14.
15.
16.
17.
18.
19.
20.
Keep this manual for future reference.
Heed all warnings.
Follow all instructions.
Do not use this unit near water.
Do not spill water or other liquids into or on the unit. Do not operate the unit while wet or standing in liquid.
Clean only with dry cloth.
Do not block the air intake or exhaust ports. Install the unit in accordance with the instructions.
Do not operate the unit near heat producing devices such as radiators, heat registers, stoves or other apparatus that produce heat. Always operate
the unit with the chassis ground wire connected to the electrical safety earth. Do not defeat the safety purpose of a grounding-type plug. A
grounding-type plug has two pins and a third grounding prong. The third prong is provided for your safety. If the provided plug does not fit into your
outlet, consult an electrician for replacement of the obsolete outlet.
Connect only to AC power outlets rated 100-120 V or 200-240 V, 50-60 Hz as dictated by the unit’s voltage configuration.
Do not use this unit if the power cord is broken or frayed. Protect the power cord from being walked upon or pinched, particularly at the plug and
the point where it exits from the apparatus.
Only use accessories specified by the manufacturer.
The unit is intended to use in a 19” rack. Follow the mounting instructions. When a rack on wheels is used, use caution when moving the loaded
rack to avoid injury from tipping over.
Unplug this apparatus during lightning storms or when unused for long periods of time.
Do not connect the unit’s outputs in parallel or series with any other unit’s output. Do not connect the unit’s output to any other voltage source, such
as battery, mains source, or power supply, regardless of whether the unit is turned on or off.
Do not run any of the unit’s outputs back into another channel’s input.
Refer all servicing to qualified service personnel. Servicing is required when the apparatus has been damaged in any way such as:
▸▸ Power-supply cord or plug is damaged.
▸▸ Liquid has been spilled into the unit
▸▸ An object has fallen into the unit
▸▸ The unit has been exposed to rain or moisture
▸▸ The unit does not operate normally
▸▸ The unit was dropped or the chassis is damaged
Do not remove top or bottom covers. Removal of the covers will expose hazardous voltages. There are no user serviceable parts inside and
removal may void the warranty.
An experienced user shall always supervise this professional audio equipment, especially if inexperienced adults or minors are using the
equipment.
The mains plug is used as the disconnect device and shall remain readily accessible. If the mains plug is not readily accessible
due to mounting in a 19” rack, then the mains plug for the entire rack must be readily accessible.
The US National Differencescl.16.3 requires that network cables must be flame rated VW-1.
6 PLM Series Operation Manual
WARNINGS 3
3.3 User responsibility
3.3.1 Mains connection grounding
Your PLM must be connected to a grounded
socket outlet.
3.3.2Speaker output hazard
PLMs are capable of producing hazardous
output voltages. To avoid electrical shock, do
not touch any exposed speaker wiring while the PLM
is operating. The external wiring connected to the
speaker terminals shall be installed by a qualified
person, or ready-made leads or cords of appropriate
capacity shall be used.
As the power output channels produce high
voltage, do not connect or disconnect speaker
cables when the mains power is on.
3.3.3 Radio interference
A sample of this product has been tested and complies
with the limits for the European Electro Magnetic
Compatibility (EMC) directive. This equipment has
also been tested and found to comply with the limits
for a Class B digital device, pursuant to Part 15 of
the FCC Rules. These limits are designed to provide
reasonable protection against harmful interference
from electrical equipment. This product uses radio
frequency energy and if not used or installed in
accordance with these operating instructions, may
cause interference to other equipment, such as
radio receivers. However, there is no guarantee
that interference will not occur in a particular
installation.
▸▸
▸▸
Check if the affected unit complies with the EMC
limits for immunity, (CE-labeled). If not, address
the problem with the manufacturer or supplier.
All electrical products sold in the EC must be
approved for immunity against electromagnetic
fields, high voltage flashes, and radio interference.
Consult the dealer or an experienced radio/TV
technician for help.
3.3.4Speaker damage
Your PLM Series device is very powerful and
can be potentially dangerous to both
loudspeakers and humans alike. Many loudspeakers
can be easily damaged or destroyed by overpowering
them. Always check the speaker’s continuous and
peak power capabilities. Although the PLM’s
attenuators can be used to reduce the overall gain,
an increase of the input signal can result in full output
power, which may cause damage to connected
speakers.
3.3.5 Maintenance
For safe and reliable operation, the dust covers behind
the front panel should be cleaned regularly. If the dust
filters are not maintained there will be safety risks.
For example the unit can ignite the dust and a fire
will occur due to high internal temperatures. There
is also a risk that the unit will malfunction since it is
dependent on constant airflow from front to rear. If
the dust filters are not clean and the unit malfunctions, any resultant problems will not be covered by
the warranty.
If this equipment does cause harmful interference to
radio or television reception, which can be determined
by turning the equipment on and off, the user is
encouraged to try to correct the interference by one
or more of the following measures:
▸▸
▸▸
▸▸
Reorient or relocate the antenna.
Increase the separation between the equipment
and receiver.
Connect the equipment to an outlet on a
circuit different from that to which the receiver is
connected.
PLM Series Operation Manual 7
4 WELCOME
4.1 Introduction
4.2 Main Features
Thank you for choosing the Lab.gruppen PLM Series
of Powered Loudspeaker Management systems for
your sound reinforcement needs. We are confident
that you will be pleased with the performance, unique
features, configuration flexibility, reliability, and longterm durability offered by PLM Series products.
The PLM Series incorporates a number of sophisticated
technologies to ensure the best possible performance
and many years of reliable operation. The following
section summarizes the benefits of each feature,
and gives a reference to the corresponding section
in this or other manuals.
This manual (together with the companion manuals
dealing with software, networking etc.) provides a
comprehensive guide to the features and functionality
of the PLM Series of Powered Loudspeaker
Management systems. Please read them through
thoroughly to become fully acquainted with the many
configuration and control options available in PLM
Series products . Most features are accessible either
via the intuitive front panel interface or remotely,
with the included Dolby Lake Controller PLM Edition
software package.
4.2.1 Amplifier platform
The PLM Series amplifier section is built on the
foundation of Lab.gruppen’s robust, road-proven
FP+ Series. Features in common with the FP+ Series
include extraordinary power density, patented Class
TD® output stages, Regulated Switch Mode Power
Supply (R.SMPS™), the high-efficiency Intercooler®
copper-finned cooling system, and a full suite of
protection features. Signal inputs are analog, AES
digital, and a digital audio network; loop-through
outputs or redundant pairs are provided for each
input type. (See section 6.2.)
To facilitate timely installation and use of this PLM
Series product you will find,as a part of the PLM
Series welcome package that came with the product,
the PLM Series Quick Start and Field Reference
Guide (QS&FRG). The PLM Series QS&FRG contains
the basic information needed to safely install a PLM
system and place it in service.
We do, however, highly recommend reading through
all manuals in their entirety. As you become thoroughly
familiar with all aspects of the PLM Series, you may
learn about features and options that will affect your
choices of operational modes or loudspeaker system
configurations.
The Lab.gruppen PLM Series utilizes proven Dolby
Lake Processor technology and expands upon it,
providing a suite of load verification and performance
monitoring features. The power amplification section
builds on the foundation of the road-tested FP+
and legendary fP Series, providing the same sonic
signature – powerful, tight bass and transparent
high frequency response. In addition, the PLM
Series establishes new benchmarks for high power
and channel density in tandem with digital signal
processing, system management, and protection
features found in no other product.
Thank you again for placing your confidence in
Lab.gruppen products.
8 PLM Series Operation Manual
4.2.2 Amplifier DSP: Gain, ISVPL, load
verification and performance monitoring
Input gain (sensitivity) is set in the digital domain in
the PLM Series, controllable through the DLC PLM
Edition software or the front-panel interface. The
DSP-implemented Inter-Sample Voltage Peak Limiter
(ISVPL) tailors each output to the characteristics of
the connected load. (See section 7.3.1.)
The on-board DSP also implements a comprehensive
set of tools for load verification and real-time
performance monitoring. These functions utilize
LoadLibrary, a comprehensive database for each
loudspeaker component of the connected load
(usually one or more band-limited drivers in a multiway system). Using this data and a brief test signal,
LoadSmart then compares actual-to-predicted
response, identifying any malfunctioning components
or connection errors. During the actual performance,
SpeakerSafe™ monitors real-time load status,
including amplifier, loudspeaker voice coil and magnet
temperatures; this allows operators to avoid power
compression and identify potential problems. (See
Dolby Lake Controller User Manual PLM Edition
Addendum for more detailed information on PLM
Series load verification and real-time performance
monitoring functions.)
WELCOME 4
4.2.3 Dolby Lake Processing and Controller
The PLM Series integrates seamlessly into the
Dolby Lake processing environment. Two processing
modules offer precise settings for gain, delay,
crossover slope, equalization and limiting. Dolby Lake
processing features incorporated in each module
include Raised Cosine Equalization, linear phase
crossovers and LimiterMax™ loudspeaker protection.
The Super Module feature allows hardware processing
modules in two or more separate PLM Series units
to function as a single module in the Dolby Lake
Controller PLM Edition software interface. (See
section 8.2 and the separate Dolby Lake Controller
User Manual.)
4.2.4SmaartLive integration
The Dolby Lake Controller PLM Edition enables
seamless, plug-in integration of the industry-standard
SmaartLive analysis system. With this feature,
operators can measure with SmaartLive and make
EQ adjustments at the same time, using the same
software controller on a Wi-Fi enabled Tablet PC.
(See the separate Dolby Lake Controller User
Manual.)
4.2.5 Dante audio network
All PLM Series products include Dante digital
audio networking as standard. Based on the latest
advances in networking, Dante offers simplified
system configuration and extremely low latency
while delivering very high quality uncompressed
digital audio over the entire PLM Series network.
The Zen™ automatic configuration feature enables
“plug-and-play” setup without third-party DHCP or
DNS servers. Dante is fully compatible with new
high-bandwidth network backbones, allowing high
channel counts while also transporting third-party
control protocols through the same network.
PLM Series Operation Manual 9
5 INSTALLATION
5.1 Unpacking
Carefully open the shipping carton and check for any
damage to the PLM Series product or the supplied
accessories. Every Lab.gruppen product is tested and
inspected before leaving the factory and should arrive
in perfect condition. If any damage is discovered,
please notify the shipping company immediately.
Only the consignee may initiate a claim with the
carrier or their insurers for damage incurred during
shipping. Save the carton and packing materials for
the carrier’s inspection.
In addition to the PLM, the shipping carton should
contain the following items:
▸▸
▸▸
▸▸
▸▸
▸▸
PLM Series Network Configuration Guide
AC mains lead (power cord)
Rear brackets for additional rack support (pair)
Mounting hardware for above
CD-ROM containing:
**
**
**
**
**
PLM Series Quick Start and Field Reference Guide
Dolby Lake Controller PLM Edition software
PLM Series Operation Manual
Dolby Lake Controller User Manual
Dolby Lake Controller User Manual PLM Edition Addendum
We recommend that you keep the original carton and
all other packaging materials to facilitate shipping of
the PLM should the need arise.
5.2 Mounting
Airflow for cooling the PLM is from front panel
(intake) to rear panel (exit). Therefore there must be
nothing at the front or rear of the rack in which the
PLM is mounted – such as doors or lids - to impede
the airflow.
Note that there must always be sufficient space at
the rear of the PLM to permit efficient air exit (see
section 5.4) and to accommodate rear connectors
and cables; allowance must be made for cable or
loom bends within a rack. In particular, the mains
cable (AC cord) and its Neutrik PowerCon connector
require at least 12 cm (4.75 inches) clear rack depth
behind the PLM rear panel.
10 PLM Series Operation Manual
The PLM Series products have no top or bottom
vents; PLM’s may be stacked directly on top of each
other. It may be desirable to include a 1U spacer
between PLMs to permit more convenient rear panel
wiring.
5.3 Rear Mounting
Two rear support brackets, plus mounting
hardware, are included with the PLM (figure 5-1).
It is recommended that these are used wherever
possible. They should be fitted to vertical rack rails
at the rear of the rack. Refer to figures 5-2 and 5-3
for details of their installation.
Note that the support brackets are reversible and
may be fitted to point either to the front or rear of
the rack. The orientation used in a particular situation
will depend on the depth of the rack.
x2
x2
x2
x2
Figure 5-1
Two mounting methods are possible; note that
Method 1 additionally provides extra security against
unauthorized removal.
INSTALLATION 5
For situations where rapid removal and replacement
of units is of paramount importance, Method 2 may
be used as it does not involve any permanently
secured fixing at the rear of the unit.
Figure 5-2
Method 1:
Use washer for fixed installation.
5.4 Cooling
The PLM uses a forced-air cooling system with
airflow from front to rear, allowing high continuous
power levels without thermal problems. (Front-to-rear
airflow is preferable as air at the front of a rack is
cooler than that at the rear in nearly all situations.)
Never attempt to reverse the airflow. The operation
of the PLM’s cooling system is dependent on frontto-rear airflow; it will not function effectively with
airflow in the opposite direction.
Make sure an adequate air supply is provided in
front of the PLM, and that the rear of the PLM has
sufficient space to allow the exit air to escape. If the
PLM is rack-mounted, never operate the unit with
any front or rear rack doors or covers in position.
Also note that any unused rack spaces should have
solid blanks fitted (not ventilation blanks) to ensure
efficient air circulation. Leaving gaps in between
items of equipment degrades the effectiveness of
forced-air cooling.
If installing one or more PLM’s in a rack with other
fan-cooled equipment, be sure that all the other
units also use front-to-rear airflow for cooling. If
this precaution is not observed, there is a risk of
overheating, as units with the reverse airflow will
be drawing in air which has already been heated by
the PLMs units.
Figure 5-2
Method 2:
Use tube for slide-on installation.
The PLM is equipped with a sophisticated
temperature sensing system which protects
it from any overheating which may occur
as a result of inadequate ventillation. Should
a power output channel overheat, the temperature
sensing circuits will mute that channel until the
temperature reduces to a safe level. If the power
supply overheats, another sensing circuit will mute
all channels until the power supply temperature
reduces to a safe operating level.
Always make sure that the dust filters behind the
detachable front panel are clean to ensure maximum
possible airflow.
If the device malfunctions as a result of
dirty dust filters, any required repairs are
not covered by the warranty.
PLM Series Operation Manual 11
5 INSTALLATION
5.5 Operating voltage
5.6 Grounding
The label adjacent to the mains (AC) input
connector indicates the AC mains voltage for
which the amplifier is wired and approved. The
amplifier is built in two versions: 115 V and 230 V.
Connect the mains cable (AC cord) only to an AC
source of the voltage shown on the label.
Analog inputs feature the Iso-Float ground isolation
system. Iso-Float technology combines the benefits
of transformer-coupled isolation with the advantages
of clean, direct-coupled inputs. Iso-Float provides a
cost-effective alternative to isolation transformers for
avoiding ground loops.
Any damage resulting from a PLM Series
product being connected to an AC source
of incorrect voltage will not be covered by
the warranty.
The audio converters are galvanically isolated, and
not connected to the main ground. High-speed
transformers and opto-isolators create a barrier
between the PLM and the outside electrical
environment.
The PLM uses primary switching, which means the
mains power is rectified on the primary side of the
transformer. This makes the power supply insensitive
to mains frequency variation, and it will operate
normally on line frequencies from 45 to 75 Hz.
If the mains plug (AC plug) fitted to the mains cable
(AC cord) is not appropriate for your country, it can
be removed and a locally-sourced one fitted instead,
observing the following color coding:
230 V versions
115 V versions
Connect to
BROWN
BLACK
LIVE
BLUE
WHITE
NEUTRAL
GREEN/YELLOW
GREEN
EARTH (GROUND)
Table 5-1
If you are not 100% confident of your competence to replace the mains plug (AC plug), the
task should be carried out by qualified personnel.
Once a suitable AC supply is connected, the PLM
can be turned on using the front panel power switch.
When the unit is switched on, the PLM goes through
a soft-start sequence as it performs a diagnostic
routine on the internal circuitry. The fans will run at
high speed for a short period before dropping to idle
speed, and the power symbol in the power switch will
change from red (Standby mode) to green (active).
In-rush current is controlled and limited during
the soft-start sequence, enabling multiple
PLMs on the same AC mains circuit to be
powered up simultaneously.
12 PLM Series Operation Manual
Iso-Float may be disabled via the supplied
Dolby Lake Controller PLM Edition software,
or via the PLM’s front panel menu system.
In the interests of safety, NEVER disconnect the earth
(ground) pin on the mains cable (AC power cord).
Use correctly-shielded balanced audio input
connections to minimise hum and interference. Refer
to section 10.2.1 for more information.
6 QUICK GUIDE OVERVIEW
6.1 Front Panel overview
5
4
8
10
3
1
2
6
7
9
11
PLM SERIES
12
2
1
Figure
6-1
The PLM’s front panel is based around a 2.5” daylightreadable 128 x 128 pixel backlit liquid crystal display
(LCD), through which control and monitoring of most
of the PLM’s functions are performed via a simple
menu system. Controls are grouped in two switch
clusters alongside the display; these include a number
of dedicated-function keys (such as METER and
MENU), eight “soft” keys (functions vary according
to the current display page), and a data entry wheel
(rotary encoder).
Handles
Two sturdy metal handles are fitted to the front panel.
The handles always should be used when carrying
the PLM and fitting it in or removing it from a rack.
Ensure that any door or removable rack front cover
has sufficient depth to clear the handles.
Dust Filters
Two dust filters are fitted behind metal covers. To
remove the covers, loosen the thumbscrews located
behind the front handles. Once detached, the dust
filter elements can be removed for cleaning. See
section 12.2 for information on cleaning the dust
filters.
The device never should be operated
without the dust filters in place.
Display
The display will illuminate when the PLM is active.
Many of the traditional controls, and displays found on
conventional amplifiers are replaced on the PLM by a
simple set of on-screen “pages”, which allow all PLM
operating parameters to be monitored and controlled.
PLM functions are controlled with the eight “soft”
keys immediately adjacent to the display, together
with the single rotary encoder knob. Primary fault and
status indications are given by multicolor LEDs.
The display is protected by a tough, transparent
plastic film, which may be cleaned with a soft cloth;
solvents should not be used.
The layout of various display “pages” is standardized
to a high degree for ease of use. In general, each
page is divided into two columns of four blocks,
with the left-hand column referring to inputs and
the right-hand to outputs. Each block has four rows
of data, which can be either alphanumeric or in the
form of a bargraph meter.
Comprehensive details of the various display pages
and the associated controls are given in section 9 –
Front Panel Interface.
Standby
The PLM is powered on and off by the top left-most
button, STANDBY. See Dolby Lake Controller User
Manual PLM Edition Addendum (sections 5.3.1
and 5.7) for further information regarding local and
remote power control.
PLM Series Operation Manual 13
QUICK GUIDE OVERVIEW 6
Mute Enable
Select MUTE ENABLE to allow muting via the soft
button of the inputs to the Dolby Lake system, the
power output channels, or both. The MUTE ENABLE
legend in the button flashes when the mode is
selected. A second press will deselect the mode;
however, if left active, MUTE ENABLE mode will
automatically cancel after two minutes if no further
mute actions are taken.
Meter
The METER button scrolls through three alternative
views: HOME, MODULE, and TEMPERATURE.
Pressing METER when in MENU mode returns the
screen to METER mode, and the HOME view is
displayed.
The display has two basic operating
modes: METER (default) and MENU.
Menu
Pressing the MENU button puts the screen display
into MENU mode, and the “top” page of the MENU
“tree” is displayed. Once in MENU mode, most of
the PLM Series’ operating functions can be accessed.
See sections 9.12.2 to 9.12.8 for more details.
Soft function buttons
Eight soft function buttons are set adjacent to
the display in two groups of four. These buttons
are unlabelled because their functions change
according to the current menu mode as displayed
on the screen.
Status LEDs
Eight tricolor LEDs are integrated into the soft buttons
for convenience. These convey both fault and warning
indications, plus the currently selected mute status
of the Dolby Lake Processing system inputs and
the output channels. Full details can be found in
section 9.10.
14 PLM Series Operation Manual
High-intensity LED
A white, high-intensity LED is located to the right
of the display. This LED illuminates when the PLM
Series’ control system is being accessed remotely
via the DLC PLM Edition software.
Encoder
The rotary encoder is used to modify various PLM
parameters (e.g. input level) in conjunction with the
various display pages. When a menu item is selected
that permits adjustment of parameter values, the ring
around the knob illuminates.
Exit
The EXIT key is used primarily while navigating the
menu system in MENU mode; pressing it takes the
display back to a previous screen (“up one level” in
the menu tree). In METER mode, pressing the EXIT
key always returns the display to the HOME view.
6 QUICK GUIDE OVERVIEW
6.2 Rear Panel overview
2
1
5
INPUT SPEAKER OUTPUTS
CH CH 3
CH 2
CH 4
2
1
LINK INPUT 2
4
3
INPUT 1-2
LINK 2
7
LINK 1-2
8
ACT PRIM LINK
ACT
9
SEC
LINK
PLM 10000Q
200/240V
2500W
50-60Hz
ANALOG WITH ISO-FLOAT TM
PIN 1: SCRN 2: POS 3: NEG
SWITCHED 10/100 Base-TX
AES/EBU
CLASS 2 WIRING
Ser. N:o
Must be grounded/earthed
Made in Sweden
Removed!
SPEAKER OUTPUTS
INPUT LINK INPUT 2
6
1+/- CH 1+/2+/- CH 2+/-
1+/- CH 1+/2+/- CH 2+/-
3+/- CH 3+/4+/- CH 4+/-
1+/- CH 3+/2+/- CH 4+/-
LINK 1-2
ACT PRIM LINK
ACT
SEC
LINK
200/240V
2500W
50-60Hz
Figure 6-2
See section 10 for full details of
connector pinouts, etc.
Ser. N:o
In comparison to analog signals, digital audio
signals such as AES/EBU require quite
different cabling and routing techniques. In
particular, standard XLR “mic cables” - even
high-quality ones - are rarely suitable for digital audio.
Always use 110 ohm digital audio cables. NEVER
CONNECT A DIGITAL AUDIO SOURCE TO AN
ANALOG INPUT, OR VICE-VERSA. Always use the
correct type of cable and connectors for the two
different types of signals. If you are unfamiliar with
digital audio transmission techniques, seek guidance
from authoritative references or qualified personnel
before attempting to interconnect equipment in the
digital domain. See section 12.5 for further
information.
INPUT 1-2
PLM 10000Q
ANALOG WITH ISO-FLOAT TM
CLASS 2 WIRING
LINK 2
Removed!
6.2.1 Input connectors and Links
Analog inputs
Analog inputs are available on two standard XLR3F
latching connectors. The inputs are electronically
balanced using Dolby’s patented Iso-Float circuitry.
The impedance is 20 kOhms, and the inputs can
accept a maximum input level of +26 dBu.
Analog links
Two latching XLR3M connectors are fitted adjacent
to the analog input connectors. These are paralleled
to the input connectors to provide an analog
loopthrough to feed additional PLM Series units, or
other equipment.
AES/EBU inputs
A latching XLR3F connector is provided which accepts
an AES/EBU digital audio signal. Input impedance is
110 ohms.
Note that the AES/EBU digital audio format is twochannel, and thus both PLM inputs are fed via a
single connector. Selection of the analog or digital
inputs is made via the front panel display or control
software.
PIN 1: SCRN 2: POS 3: NEG
AES/EBU
SWITCHED 10/100 Base-TX
Must be grounded/earthed
Made in Sweden
AES/EBU link
A latching XLR3M connector is fitted adjacent to the
AES/EBU input connector. This is paralleled to the
input connector to provide an AES/EBU loop-thru
to feed further PLMs, or other equipment. An AES/
EBU 110 ohm termination load can be enabled, via
the front panel menu, when the PLM is the last
unit connected within an AES/EBU daisy-chained
system.
6.2.2 Output connectors
The PLM is available with a choice of output
connectors for power outputs: binding posts or
Neutrik Speakon.
The PLM is capable of bridge-mode
operation, however the present system
management software does not support
this mode and therefore bridged operation
is NOT recommended.
Please contact [email protected] for
further information on bridge-mode operation.
PLM Series Operation Manual 15
6 QUICK GUIDE OVERVIEW
the PLM Series Network Configuration Guide.
Binding posts
In this version, the power outputs for loudspeaker
connection are available on four separate pairs of
fully-enclosed binding posts.
Speakon connectors
In this version, the power outputs are simultaneously
available on a single 8-pole Neutrik Speakon
connector, and on two 4-pole Neutrik Speakon
connectors. The two 4-pole connectors carry the
outputs of channels 1 & 2 and 3 & 4 respectively.
The figure below shows the proper wiring scheme
for these Speakon outputs.
Pin
No.
NL4 #1 Chs.
1&2
NL8 Chs.
1-4
NL4 #2 Chs.
3&4
1+
Ch. 1 o/p +
Ch. 1 o/p +
Ch. 3 o/p +
1-
Ch. 1 o/p -
Ch. 1 o/p -
Ch. 3 o/p -
2+
Ch. 2 o/p +
Ch. 2 o/p +
Ch. 4 o/p +
2-
Ch. 2 o/p -
Ch. 2 o/p -
Ch. 4 o/p -
3+
Ch. 3 o/p +
3-
Ch. 3 o/p -
4+
Ch. 4 o/p +
4-
Ch. 4 o/p -
6.2.3 Network connectors
The two Neutrik RJ45 EtherCon ® connectors
permit integration into an Ethernet control network
encompassing multiple PLM Series units as well as a
PC running the DLC PLM Edition software. Network
connection permits full control of all PLM functions,
and monitoring of all PLM operating parameters, from
a remote position. The PLM Series also supports
the Dante audio networking protocol, which allows
transmission of multichannel, high-definition digital
audio over the same Ethernet connection.
6.2.3.1 10/100Base-T network
The Ethernet ports automatically switch to operate
at the two standard Ethernet data rates of 10Base-T
and 100Base-T, and also allow either “crossed” or
“straight” network cables to be used. Two LEDs
above each port indicate connection to a valid network
(LINK) and network activity (ACT).
Full information on how to connect the PLM to a
network is contained within a separate document ,
16 PLM Series Operation Manual
Primary connector
Use this connector when the network is a simple
“star” configuration, consisting of individual Cat-5e
connections between PLMs and a local Ethernet
switch. Alternatively it can be used to connect to
the Secondary connector of another PLM within a
network, thus forming a daisy-chain topology. Further
information on PLM network configurations can be
found in the PLM Series Network Configuration
Guide.
Secondary connector
The secondary network connector can be used as a
loop-through to daisy-chain multiple PLMs into the
network. Alternatively, system security can be greatly
increased by using a dual-network topology. In this
case, the Secondary connector is connected to an
alternative Ethernet distribution system employing
a second set of switches, thereby ensuring full
redundancy and no single point-of-failure in the case
that Dante is used and a switch or cable fails. Further
information on PLM network configurations can be
found in the PLM Series Network Configuration
Guide.
Mains connector
AC input to the PLM is via a Neutrik PowerCon
connector, rated at 32 A.
6 QUICK GUIDE OVERVIEW
6.3 Integrated Dolby Lake
Processing
As outlined in Section 4, PLM Series products
contain a fully integrated Dolby Lake loudspeaker
management system, providing many of the features
available as standard in the Dolby Lake Processor
(DLP) stand-alone unit. The Dolby Lake system within
the PLM provides fully-programmable crossovers,
EQ, dynamics and other functions, and is controlled
via the supplied DLC PLM Edition software. (See
section 6.3.1.) Additionally, some functions of the
Dolby Lake system can be accessed from the PLM’s
front panel screen.
Setting up the integral Dolby Lake system via the
DLC PLM Edition software includes selecting the
basic PLM configuration, including input mixers, input
format (analog or digital, etc.), crossover configuration
and output routing.
A full description of how the DLC PLM Edition software
is used with the PLM is contained in the separate
document (supplied on CD-ROM with the PLM): DLC
User Manual PLM Edition Addendum
Also see accompanying document, the PLM Series
Network Configuration Guide for details of how to
connect one or more PLMs to a PC via a network.
6.3.1 Dolby Lake Controller PLM Edition
The CD-ROM supplied with the PLM contains the
Dolby Lake Controller PLM Edition software package.
This should be installed on any PC(s) that are to
be used to control and monitor the PLM(s). In a
touring situation where multiple networked PLMs
are involved, this will generally be a Tablet PC.
The Dolby Lake Controller PLM Edition software is
easily installed by inserting the CD in the computer’s
CD drive and allowing the auto-setup routine to
run. Select INSTALL then Dolby Lake Controller
software from the installation window to initiate
installation. For most installations, the subsequent
suggested default paths can be accepted.
Please note that, if pre-existing DLC presets
are present on your PC when you install the
DLC PLM Edition software, choosing a
specific installation path may be preferable.
See the DLC User Manual PLM Edition Addendum
for more information.
Refer to chapter 2 of the DLC User Manual for further
details on how to install the software and configure
your computer for optimum performance.
Minimum recommended computer specifications
are:
▸▸ Intel® Pentium® 866 MHz or faster.
▸▸ 256 MB RAM or greater.
▸▸ 64 MB Video RAM or greater.
▸▸ Windows XP.
▸▸ DirectX® 8.1 or higher (pre-installed with
Windows XP).
▸▸ 100Base-T wired Ethernet adapter and/or 802.11g
wireless Ethernet adapter.
▸▸ XGA display screen with min. resolution of 1024
x 768 pixels.
If you are unsure about installing new software on
a PC, please contact your organisation’s IT Dept., or
another suitably qualified specialist first.
Once the software is installed, the application can be
launched by clicking the desktop icon created during
the install process in the usual way.
Full details of how to use the software application
are contained in the documents DLC User Manual
and DLC User Manual PLM Edition Addendum,
both of which are supplied with the PLM.
Figure 6-3
PLM Series Operation Manual 17
7 OPERATION AND PERFORMANCE
7.1 Introduction to Operation
This chapter provides comprehensive information
on PLM Series connection, setup, operation and
performance. The detailed information included here
is essential to realizing the full functionality of the
PLM Series.
7.1.1 Operation precautions
Make sure that the Standby button on the PLM’s
front panel is either unlit, or is showing red (i.e., the
PLM is in STANDBY mode), before making any input
or output connections.
Make sure that the AC voltage is correct and
matches that printed on the label adjacent to
the AC mains connector.
Make sure that no signal is present at the input to the
PLM when powering it up to prevent any inadvertent
bursts of high level audio.
7.2 Power Output Performance
The PLM uses Lab.gruppen’s patented Class TD
technology in the output stages, which couples the
efficiency of Class D topologies to the sonic purity
of Class B designs.
The primary benefit is that Lab.gruppen’s Class
TD works perfectly under all load conditions. The
output maintains its flat frequency response even into
complex loads with very low nominal impedances.
Reliability is very high, and there is no interference
with nearby RF equipment. Superior efficiency allows
greater power density while minimizing cooling
requirements, yet sound quality matches that of
the best Class B designs.
7.2.1Symmetrical Power
The example PLM 10000Q can deliver power as per
Table 7-1 when all four channels are driven equally.
Load
Impedance
(ohms)
Max.
Output
power
(Watts)
2.0
2.7
4
8
16
2350
2700
2300
1200
660
Table 7-1
7.2.2 Asymmetrical power
The example PLM 10000Q can deliver power as per
Table 7-2 when two channels are driven 3 dB lower
than the other two.
Load
Impedance
(ohms)
Max.
Output
power
(Watts)
2.0
2.7
4
8
16
2350
2900
2400
1200
660
Table 7-2
7.2.3 Power over time
Power ratings given above are applicable to the
example PLM 10000Q running at these levels for a
period of 60 minutes. Due to thermal considerations
in the power supply and elsewhere, it is possible
to draw higher power levels for a shorter period
of time. The graph below illustrates how the rated
power figures are derived and the higher short-term
capability.
Peak output voltage at “max power burst”
Figure
7-1
18 PLM Series Operation Manual
OPERATION AND PERFORMANCE 7
Power ratings are based on a “real-life” duty cycle of
25 ms full power every 400 ms. Between bursts, a
lower signal level applies, such that the continuous
average power is 1/8th of the rated power.
▸▸
In reality, when some channels are delivering less than
maximum rated power, energy reserves in the PSU
are available to permit other channels to deliver more
power. The graph shows the peak output voltage over
time for a continuous sine wave is applied.
The table below represents the absolute maximum
output power that an individual PLM channel can
deliver at the given ISVPL setting and impedance
shown.
If all four channels are driven with the same signal
into the same impedance (solid red line), then the rail
voltage (dotted red line) will drop faster than when two
channels are delivering “max power” (solid blue line)
and two channels are delivering “half power” (solid
orange line). This is termed asymmetric loading. The
rail voltage for this is the dotted blue line.
The amplitude of the output signal “between”
digital samples is predicted. This permits the
ISVPL to respond to analog peaks that may occur
at the power output.
The formula for generating the value for a
desired power into a load is
V peak = 2 P Z
The formula for calculating the power for a given ISVPL setting is
P=
It can be seen that higher power output is available for
25 ms bursts with asymmetric loading.
7.3 Amplifier and Load
Protection Systems
The PLM is equipped with a comprehensive set of
protection circuits. If operating conditions become
sufficiently extreme that any of these circuits become
active, indication is provided by LEDs in one or more
soft buttons 5-8, together with adjacent warning text.
In addition to this, notification is also presented within
the Dolby Lake Controller PLM Edition software and
within system log files.
7.3.1 Inter-Sample Voltage Peak Limiter
(ISVPL)
The ISVPL is a high quality voltage limiter. Its purpose is
to ensure that the voltage at the output terminals never
exceeds the threshold which has been set. It operates
on two fundamental principles:
▸▸
The signal is delayed slightly in order to allow
the ISVPL to “look ahead” and reduce the gain
before any voltage in excess of the threshold can
appear at the output. This results in zero voltage
overshoot at the output.
2
V peak
2Z
where |Z| is the magnitude of the complex load
impedance in ohms.
MAX. SINEWAVE BURST POWER (Watts)
Load Impedance
(ohms)
2.7
4
8
2926
1463
16
ISVPL SETTING
(V peak)
153 (max.)
3365*
732
150
3365*
2813
1406
703
121
2742
1830
915
458
101
1910
1275
638
319
83
1290
861
431
215
70
918
613
306
153
56
587
392
196
98
47
414
276
138
69
38
361
181
90
45
17.8 (min.)
79
40
20
10
Table 7-3
* Note that these ratings are limited by the CPL (Current
Peak Limiter) functions, not by ISVPL settings, due to
amplifier channel current capacity
The ISVPL threshold may be set at any level between
17.8 V and 153 V (model dependent) via the PLM’s
menu system. (See Section 9.12.2.5.1 or the Dolby
Lake Controller User Manual PLM Edition Addendum
PLM Series Operation Manual 19
7 OPERATION AND PERFORMANCE
for details.) Note that the maximum ISVPL setting
of 153 V is greater than the 150 V maximum peak
voltage available from the example PLM 10000Q.
Other models may differ. This is to accommodate
the small degree of production spread of maximum
output voltage that exists between PLMs. By
allowing a maximum ISVPL setting fractionally higher
than the maximum safe output voltage under any
condition ensures that severe clipping will never be
encountered.
7.3.2 Current Peak Limiter (CPL)
The output Current Peak Limiter (CPL) ensures that
the power output section will not be damaged by
forcing it to deliver current levels at the outputs that
exceed the maximum current ratings of the output
transistors. The CPL keeps the output transistors
within their Safe Operating Area (SOA).
The CPL is non-adjustable.
CPL activity is indicated by the affected output
channel LED (one of the four LEDs in the soft buttons
to the right of the display) flashing red together with
a CURRENT CLIP warning message displayed on
the screen adjacent to the LED. A warning is also
displayed on the controlling PC via the network.
This condition indicates an attempt to draw excessive
current at the output. The output is attenuated until
the output current falls below the maximum current
rating. (See section 13 Technical Specifications for
further details concerning ratings.)
If this fault condition is indicated, check the
output cables and examine the state of the
loudspeaker. If there appears to be a normal
impedance present, it may be possible to
rectify the condition by altering the ISVPL settings
or lowering the input levels. CPL operation may also
be occasioned by too low an output impedance, as
would be caused by too many loudspeaker cabinets
in parallel.
7.3.3 Power Average Limiter (PAL)
The Power Average Limiter (PAL) controls the AC
current into the power supply. Power consumption
is limited to the rated design parameters of the
power supply, ensuring that the PSU will never be
overloaded. Also, high power products such as those
in the PLM Series can potentially draw more current
20 PLM Series Operation Manual
(with output devices still within safe operating areas)
than is allowed by the mains fuse
Only the 230 V version is fitted with a fuse.
It is not possible to source fuses with sufficient
current capacity for the 115 V versions.
The PAL protection feature can help prevent the
supply’s external breaker from tripping within time
intervals of less than three minutes. For longer time
intervals, it is the responsibility of the user to ensure
that the average level of the audio is within limits that
ensure that the breaker doesn’t trip.
PAL activity is indicated by the LED within the first soft
button adjacent to the display flashing red, together
with a PAL ACTIVE warning message displayed on
the screen. A warning is also displayed on the DLC
PLM Edition software.
7.3.4 Current Average Limiter (CAL)
The Current Average Limiter (CAL) monitors the RMS
current drawn from each output channel to ensure
that the power output stages are not overloaded.
When activated, it regulates the current to a safe
level to protect the channel. The CAL should not be
activated in normal usage, but if it is, its operation
is indicated by an active LED and the message CAL
ACTIVE. Futher indication is given within the DLC
PLM Edition software.
7.3.5 Voltage Clip Limiter (VCL)
If current draw from the PLM’s power supply is
too high, the PSU’s regulation capability may be
exceeded and the internal voltage rails may drop.
This can cause clipping; if this occurs the Voltage
Clip Limiter acts rapidly to prevent clipping occuring
on the subsequent peaks.
7.3.6 Temperature Protection
Thermal measurements are made at several points
within each channel as well as on the power supply.
If the maximum permitted temperature is exceeded,
a high temperature warning is given. In the case of
an amplifier component overheating, this will be
indicated by one of the output channel LEDs (in the
right-hand soft buttons) showing steady red. The
adjacent fault message will show TEMP FLT:CH. In
the case of the PSU overheating, the fault is indicated
by the top left soft button’s LED turning steady red,
and the adjacent on-screen text displaying the fault
OPERATION AND PERFORMANCE 7
message TEMP FLT:PSU. In either case, a report is
also sent via the control network to the DLC PLM
Edition software.
However, before the monitored components reach
their maximum permitted temperature, a warning is
given by the appropriate LEDs (as above) first turning
yellow and an adjacent warning message TEMP
WARN:CH being displayed. Again, a corresponding
message is sent via the network to the DLC PLM
Edition software.
threshold line is detected, VHF protection becomes
active.
VHF protection is dependent on a combination of
output power level and frequency. Figure 7-2 shows
a decreasing power threshold, from approximately 10
kHz upwards, which illustrates increasing sensitivity
of the protection system with frequency. When
continuous output power above the threshold line
is detected, VHF protection becomes active.
If an output channel temperature fault condition
arises, the output of the channel causing the condition
will be muted. Temperature checking will continue
thereafter at 0.5 second intervals, with the output
remaining muted until the fault condition clears.
7.3.7 DC Protection
DC protection is implemented on each output to
prevent damage to connected loudspeakers or any
PLM components. DC present at the output will
cause the PLM’s fuse to blow
This only applies to 230 V versions as no
fuse is fitted to 115 V models). This is not
a user-servicable fault condition and the
unit should be returned for repair.
Figure 7-2
The attack time of the VHF protection circuitry also
changes with frequency, becoming shorter at higher
frequencies. This is shown in figure 7-3.
7.3.8 VHF Protection
The PLM includes protection circuits that detect Very
High Frequency (VHF) content in the input signal. The
detection is frequency-conscious, and is from 10 kHz
upwards. If VHF signals are detected above the allowed
threshold, the output will mute for approximately 6
seconds before a further measurement is taken.
Once no continuous VHF signal is detected, the
output unmutes and the amplifier returns to normal
operation.
Figure 7-3
This protection system recognizes that continuous
VHF signals at high levels do not appear in speech or
music. Any such content can therefore be considered
as a fault condition. VHF protection is essential to
avoid damage to HF drivers.
The VHF protection circuit is NOT a limiter and
does not alter the PLM’s frequency response. It
is implemented solely to detect continuous VHF
content. HF content of normal music or speech
signals at peak levels will be passed in full.
VHF protection is dependent on a combination
of output power level and frequency. The graph
below shows a decreasing power threshold, from
approximately 10 kHz upwards, which illustrates
increasing sensitivity of the protection system with
frequency. When continuous output power above the
Operation of the VHF protection circuits is indicated
by one (or more) of the output channel LEDs (in the
right-hand soft buttons) showing steady red. The
adjacent fault message will show VHF FAULT. It is
also reported as a fault via the control network.
PLM Series Operation Manual 21
7 OPERATION AND PERFORMANCE
7.3.9Short circuit protection
A low impedance or short circuit at the power output
terminals is detected when the output current is high
(Current Peak Limiter is active) and, simultaneously,
the peak output voltage is less than 42 V. When
this situation occurs, the output stage is muted to
protect it from damage. Operation of the short circuit
protection system is indicated by an output channel
LED (in the right-hand soft buttons) showing steady
red. The adjacent fault message will show SHORT
CIRCUIT. It is also reported as a fault via the control
network to the DLC PLM Edition software. The
presence of a short circuit (or low impedance) is
re-tested every 6 seconds, and the output remains
muted until the fault clears.
Low Inrush Current
High power amplifiers with inadequate inrush current
limiting can draw considerable current from the
mains at turn-on. This can result in fast-acting mains
breakers tripping. This is not the case with the PLM,
which has very low inrush current as the capacitors
are charged slowly and in a controlled manner so
that breakers will not trip.
Several PLMs can, under normal conditions, be
powered up simultaneously. If you do experience
problems powering up multiple PLMs simultaneously,
they must either be turned on manually in an ordered
manner, or sequenced remotely using the DLC PLM
Edition’s Global Control feature. Alternatively, the
capacity of the mains supply should be increased.
7.4 Power Supply
The R.SMPS (Regulated Switch Mode Power Supply)
is designed to keep supply voltage rails at optimum
levels even when mains voltages sag. Mains voltages
can drop as much as 20% below nominal before
there is any effect on rail voltages. Thus the R.SMPS
can deliver full rail voltage to the output stage at
all times, allowing the PLM to exhibit consistent
transient response and undistorted LF response.
Figure 8-1: PLM Signal Flow Diagram (Part 1)
Module Input Gain
Input Mixer Gain
Analog 1/2
AES 1
AES 2
Dante X
Dante Y
Input
Router
Input
Mixer 1
Gain
Phase Rev
Mute
EQ
Input
Router
Input
Mixer 2
PLM Input Mute
22 PLM Series Operation Manual
Gain
Phase Rev
Mute
EQ
Module Mute
Output EQ
Levels
Phase Rev
Mute
Output EQ
Levels
Phase Rev
Mute
Output EQ
Levels
Phase Rev
Mute
Output EQ
Levels
Phase Rev
Mute
Delay
Crossovers
Analog 1/2
AES 1
AES 2
Dante X
Dante Y
Delay
Signal flow and processing 8
1. PLM Input Mutes – These mute the actual PLM
input signal, whichever input type is selected (analog,
digital, etc.)
8.1 Signal Flow
The design of the input stage of the PLM has sufficient
headroom to make it almost impossible for signal
clipping to occur. Because of the integration of the
Dolby Lake processing system in the PLM, there are
four separate points in the signal chain where signal
level can be adjusted. It is important to understand
the significance of the various level adjustments to
obtain optimum performance from the PLM.
2. Module Input Mutes – These mute the inputs
to whichever Dolby processing Modules have been
defined for the PLM configuration, and will be post
any input mixing and routing.
3. Module Output Mutes – These mute the individual
processing module outputs, e.g. Hi, Mid, Low
channels.
Adjustment of input levels to, and output levels from,
the Dolby Lake processing system (the MODULE
inputs and outputs) plus the PLM’s power stage gain
can be made either from the front panel display screen
or the DLC PLM Edition software. The per-channel
attenuation can only be made from the front panel
by selecting MENU > MODULE > ATTENUATION.
In addition to these level adjustments, the physical
inputs to the PLM can be mixed with level adjustment
pre the Dolby Lake module; this adjustment is only
available from the DLC PLM Edition software.
4. Power Output Mutes – These mute the signals
within the actual amplifier output power stages
themselves.
The Current Peak Limiter (CPL) dynamically limits the
drive to the power stage based on three parameters:
sensed output current level, feedback from the output
stage, and sensed voltage clip from the ISVPL. This
ensures that power output is maintained within the
design limits of the PLM.
The adjustable Inter-Sample Voltage Peak Limiter
(ISVPL) sets the PLM’s maximum output voltage
and therefore also the maximum output power. The
ISVPL setting is made via MENU > MODULE >
LIMITERS > ISVPL, and can also be set from the
DLC PLM Edition software.
Unlike traditional amplifiers, the PLM can be muted
at several different points in its audio chain. It is
important to understand where these mutes are
located and how to control them.
It can be seen from figure 8-1 that muting is possible
at four points within the signal chain:
Figure 8-1: PLM Signal Flow Diagram (Part 2)
Attenuator
Module Output Gain
Amplifier Gain
Levels
Phase Rev
Mute
LimiterMax
RMS / Peak
Attenuator
Mute
Phase Rev
ISVPL
Amp Gain
LoadSmart
SpeakerSafe
AMP
Output EQ
Levels
Phase Rev
Mute
LimiterMax
RMS / Peak
Attenuator
Mute
Phase Rev
ISVPL
Amp Gain
LoadSmart
SpeakerSafe
AMP
Output EQ
Levels
Phase Rev
Mute
LimiterMax
RMS / Peak
Attenuator
Mute
Phase Rev
ISVPL
Amp Gain
LoadSmart
SpeakerSafe
AMP
Output EQ
Levels
Phase Rev
Mute
LimiterMax
RMS / Peak
Attenuator
Mute
Phase Rev
ISVPL
Amp Gain
LoadSmart
SpeakerSafe
AMP
Output Routing
Output EQ
Module Output Mute
Amplifier Output Mute
PLM Series Operation Manual 23
8 Signal flow and processing
The sophisticated output section monitors faults
and generates warnings when appropriate; warnings
are displayed on the front panel of the PLM and
also sent as messages over the control network.
These indications allow the operator to adjust system
settings if necessary. In the rare event that maximum
ratings are grossly exceeded, the PLM will shut down
until the condition has been rectified or the incorrect
setting has been readjusted. Sensing circuits also
transmit local output power stage temperature,
processor card temperature, and PSU temperature
to the appropriate protection circuits. Refer to section
7.3 – Amplifier and Load Protection Systems for
more details.
Table 8-1 lists analog input sensitivity in dBu and Vrms
for an example PLM 10000Q with a 4 ohm load for
various Amp Gain settings and maximum/minimum
ISVPL settings. Analog input headroom is set at 26
dBu (see section 9.12.3.1).
INPUT
SENSITIVITY
WITH ISVPL SET
TO 153 V
GAIN SETTING
(dB)
dBu
Vrms
Figure 8-2: DLC PLM Edition screenshot showing module and
signal flow of a 2-way crossover.
The processor can be configured in a variety
of other ways, e.g. as a 3-way crossover
with dedicated auxiliary processing for a
Sub output. (This would be ideal for a 3-way
main or side-fill hang plus a subwoofer). In this case,
the PLM is configured as 1-in/4-out, utilizing the
system as a single set of processing elements, or
Module.
INPUT
SENSITIVITY
WITH ISVPL SET
TO 17.8 V
dBu
Vrms
+44
-1.1
0.68
-19.8
79mV
+41
+1.9
0.96
-16.8
0.11
+38
+4.9
1.36
-13.8
0.16
+35
+7.9
1.92
-10.8
0.22
+32
+10.9
2.71
-7.8
0.32
+29
+13.9
3.84
-4.8
0.45
+26
+16.9
5.42
-1.8
0.63
+22
+20.9
8.59
+2.2
0.99
Table 8-1
8.2 Loudspeaker processor
configuration
The PLM includes a dedicated Dolby Lake processing
system configured with two inputs and six outputs.
The relationship between inputs and outputs can be
defined by the user via the DLC PLM Edition software
package. The simplest configuration (the default)
is that each input feeds its own set of processing
elements, including a two-way crossover. The set
24 PLM Series Operation Manual
of per-channel processing elements is referred to
as a Module, which in this case has a 1-in/2-out
configuration.
Figure 8-3: Module screenshot showing signal flow of a 3-way
crossover plus 1 aux.
The Dolby Lake processing system provides two
distinct categories of crossovers:
▸▸
Infinite Impulse Response filters (IIR) such as
the classic Bessel, Butterworth or Linkwitz-Riley
types; these are available with slopes ranging
from 6 dB/octave to 48 dB/octave.
▸▸
Finite Impulse Response filters (FIR) providing
zero phase shift with steep transition slopes
at the crossover frequencies. These are also
referred to as Linear Phase Crossovers.
Each set of processing elements is referred to as
a Module and can be configured as crossovers,
full-bandwidth auxiliary outputs, or a combination
of the two.
Details of how to configure the Dolby Lake processing
system can be found in the Dolby Lake Controller
User Manual.
Signal flow and processing 8
8.3 Modules and Frames
A Frame represents one physical PLM on the
network. A maximum of two Modules are contained
within each PLM Frame; these are referred to as
Module A and Module B. The number of Modules
shown in a given Frame is dependent upon the signal
processing configuration of that Frame.
Modules can be configured with the following
processing elements, either singly or in
combination:
▸▸
▸▸
▸▸
Classic Crossovers (Bessel, Butterworth,
Linkwitz-Riley)
Linear Phase Crossovers
Auxiliary Outputs.
The Dolby Lake Controller PLM Edition software is
also provided as standard with a PLM LoadLibrary
of Modules pre-configured for many well-known
models of loudspeaker.
Module file types available on the PLM are:
Notation*
Description
1
1 Auxiliary Output
2
Classic 2-way crossover or 2 Auxiliary
outputs
2+1
Classic 2-way crossover + 1 Auxiliary
output
LP2
Linear Phase 2-way crossover + 1 Auxiliary
output
3
Classic 3-way crossover or 3 Auxiliary
outputs
3+1
Classic 3-way crossover + 1 Auxiliary
output
LP3
Linear Phase 3-way crossover
4
Classic 4-way crossover or 4 Auxiliary
outputs
LP4
Linear Phase 4-way crossover
5**
Classic 5-way crossover or 5 Auxiliary
outputs (see Note)
6**
Classic 6-way crossover or 6 Auxiliary
outputs (see Note)
Table 8-2
* designation as seen on DLC PLM Edition
Module display.
** These Module types can only be partly
implemented within a single PLM, due to
the PLM being limited to four outputs. The
processor’s Output Router can be used to
select which four Module outputs are routed internally
in the PLM. The further outputs can then be realised
in other Frames by using Super Modules (see section
8.3.2)
The PLM’s default configuration is 2 x 1-in/2-out,
using two Modules, Module A and Module B. Each
Module is configured as provide two auxiliary outputs,
providing a total of four outputs. It is important to
understand, though, the consequences of assigning
alternative configurations.
Example 1:
Reconfiguring Module A with a 3-way module file
(e.g. a Classic 3-way crossover) results in Module
A needing processing capacity for three output
channels. This leaves Module B similarly with
processing capacity for three output channels. The
total number of processed outputs remains six and
the PLM Frame will display two Modules.
Example 2:
Reconfiguring Module A with a 4-way module file
(Classic 4-way crossover) results in Module A needing
processing power for four outputs. To achieve this,
Module A requires additional processing for one
output channel from Module B. Module B therefore
is reduced to two outputs. The total number of
processed outputs remains six and the PLM Frame
will display two Modules. Module A as a 4-way and
Module B as either a 2-way or 2-Aux.
Detailed information relating to loading Module files
and subsequent manipulation of the Modules can be
found in the Dolby Lake Controller User Manual,
chapter 7.5.
8.3.1 LoadLibrary and Fingerprints
The DLC PLM Edition software differs from the
standard Dolby Lake Controller software in that
it incorporates an additional library of Modules,
specific to the PLM. Each of these Modules contains
information about the loudspeakers’ electrical
characteristics in addition the standard Module data.
This PLM-specific library is called the LoadLibrary
and the data set for a particular speaker type is called
that type’s Fingerprint.
When a PLM-specific loudspeaker type is loaded,
PLM Series Operation Manual 25
8 Signal flow and processing
its load characteristics are included. The PLM’s
LoadSmart and SpeakerSafe systems use this
data to verify and monitor the loads before and
during performance. See Dolby Lake Controller
User Manual PLM Edition Addendum for more
information concerning LoadSmart and SpeakerSafe
operation.
or stored for future use. It is not possible to store
a Module Preset (or configuration file) within the
PLM. For further details on storing Module data see
chapter 7.5 (Module Store/Recall) of the Dolby Lake
Controller User Manual. Module presets based on
modules from the LoadLibrary will also include the
loudspeaker specific Fingerprint data.
8.3.2Super Modules
A Super Module allows the user to control multiple
Modules of the same type, distributed across
multiple Frames, as a single entity within the DLC
PLM Edition software. Any changes made within
the Super Module are replicated in all the assigned
Modules, resulting in improved efficiency in system
configuration and a reduction in on-screen icons
within the DLC PLM Edition software.
8.4.2 Frame Presets
A maximum of 100 Frame Presets can be stored
within the PLM’s processor. The data within a Frame
Preset includes the configurations of all Modules in
the Frame: Gain, delay and limiter levels; input mixer
configurations; and output routing information. As
Frame Presets are stored within the PLM, complete
processor configurations may be recalled without the
need to connect the PLM to a PC.
Consider the case of Modules in three PLMs being
configured as Classic 3-Way Crossovers. In this case
each PLM has Hi, Mid and Low outputs, but one
spare input and one spare output is available on each.
In this case, a total of three spare inputs and outputs
are available. In order for these not to go to waste it
is possible to combine them as a Super Module. By
allowing utilization of available DSP across multiple
frames, this Super Module is capable, for example,
of providing an additional 3-way crossover.
Frame Presets can either be recalled via the DLC PLM
Edition software, or via the PLM front panel display.
See chapter 9.12.6.1 Recall Frame Preset and chapter
5.7.3 Frame Presets of the Dolby Lake Controller
User Manual for further information.
In this example, it would be necessary to parallel the
‘spare’ inputs on each of the three PLMs together.
The Hi, Mid and Low outputs would be spread across
the three PLMs.
8.4 Presets
The Dolby system provides four types of Presets:
Module Presets, Frame Presets, Subsystem Presets
and System Presets. These can be used to store
Module configuration data on a per-Module or perFrame basis, or globally across the entire system of
networked PLMs.
8.4.1 Module Presets
Once a Module has been configured for a specific
speaker system (including crossover, EQ, limiter and
delay settings) it is good practice to store the data in
the PC. This allows the Module configuration data
to be loaded into other Modules on the network
26 PLM Series Operation Manual
8.4.3Subsystem Presets
The Subsystem Presets function allows selected
Module and Super Module configurations to be
stored from a larger system of networked PLMs
and Dolby Lake Processors.
For further information see chapter 6.7 of the Dolby
Lake Controller User Manual.
8.4.4System Presets
The System Presets function allows entire system
configurations to be stored in a network of PLMs and
Dolby Lake Processors. This enables fast retrieval and
switching of configurations as there is minimal data
being sent between the Controller and processors.
For further information see chapter 6.7 of the Dolby
Lake Controller User Manual.
FRONT PANEL INTERFACE 9
9.1 Front Panel Navigation
9.1.1 General description of navigation in the
PLM
The majority of PLM functions can be controlled and/
or monitored via the front-panel LCD display screen
and associated switches and LEDs.
The control system has two basic modes – METER
MODE and MENU MODE. METER mode has three
possible views, called HOME VIEW, MODULE
VIEW and TEMPERATURE VIEW. Each view offers
different information about the PLM’s configuration
and performance and permits control of different
parameters. The three views can be scrolled through
with the METER button.
individual PLM parameters are listed and are available
for adjustment via the rotary encoder. See section
9.12 for a full description of MENU MODE and the
various submenus available therein.
Warnings about fault conditions or other extreme
operating states are given primarily by the tricolor
LEDs within the eight soft buttons around the screen;
a simultaneous textual description is shown on the
display, adjacent to the button. A full description of
the various warning indications is given in section
9.10.2. In general, LEDs to the left of the display will
indicate problems with the PLM or its inputs, while
those to the right indicate problems with the power
output channels. Note that the same LEDs indicate
mute statuses of inputs and outputs when MUTE
ENABLE mode is selected.
Home View
Module View
PLM Inputs
Temperature View
Figure 9-1: Meter Modes
The PLM always powers up in METER MODE,
HOME VIEW. See section 9.1.11 for full details of
the three METER MODE views.
MENU MODE is selected by pressing the MENU
button. The screen display changes to the “top page”
of the menu “tree”, which lists the various submenus
available. Selection of the submenu required can
then be made by pressing the soft button adjacent
to it. In some cases, further “levels” of submenus
are offered first, but with very few button presses
the parameter adjustment level is reached, when
PLM Output Channels
Figure 9-2
9.1.2 Pinging Modules in the DLC PLM Edition
software from the PLM
When a large system comprising multiple PLMs is
in use, it may be desirable to positively identify a
particular Module in the DLC PLM Edition software.
To achieve this, it is possible to Ping (or ‘highlight’) a
Module on the PC directly from the PLM.
The PLM should be in METER mode for this function
to operate.
Press the soft button adjacent to the chosen Module’s
input display, and the corresponding Module label on
the DLC PLM Edition software will highlight in yellow
text. If the Module is yet to be placed within the work
area then the Module scroll bar will scroll to place
the highlighted Module mid-screen.
PLM Series Operation Manual 27
9 FRONT PANEL INTERFACE
9.2 Key Lock Front Panel
It is possible to “lock out” the
PLM’s front panel buttons for
security purposes. When this
function is active, all control must
be made via the control network.
The lock is set by simultaneously
pressing the top and bottom
left-hand soft buttons. Unlocking
can be achieved by repeating this
process.
Figure 9-3
9.3 Power button
The PLM is powered by pressing the top left-most
button in the left-hand cluster. It has a bicolor ‘power’
symbol
which illuminates red when the PLM is
connected to the AC mains, and turns green when
the button is pressed to turn the PLM on. A second
press returns the PLM to STANDBY mode.
Alternatively, it can be de-selected by a second press
of the MUTE ENABLE button.
9.5
PRESSMeter button
The PLM control system has two operating modes,
METER mode (the default) and MENU mode. Each
mode has a family of screen displays specific to the
mode. In all normal operating situations, the system
will be in METER mode, which allows the user to
PRESS monitor PLM parameters such as signal level,
output power and temperatures.
In METER mode, there are three possible screen
displays, referred to as “Views”. Pressing the METER
button will scroll through the three views in turn:
Note that Home View is the default.
Pressing METER mode when in MENU mode will
return the system to METER mode, with HOME
view displayed.
A detailed description of the information displayed
in each of the three Views (HOME, MODULE and
TEMPERATURE) can be found in sections 9.11.1,
9.11.2 and 9.11.3 respectively.
9.4 Mute Enable button
From the front panel it is possible to mute module
inputs and power outputs.
However, before any muting can be done, MUTE
ENABLE mode must first be selected by pressing the
MUTE ENABLE button. Once selected, the legend
in the button flashes, and the soft buttons will now
act as mute buttons. The two central buttons to the
left mute Module A and B inputs respectively. The
four buttons to the right mute the power output
channels. On-screen text adjacent to the soft buttons
confirm when a Module input or output channel has
been muted.
Note that the system must be in METER mode for
MUTE ENABLE to be selectable.
If no further mute selections are made, MUTE
ENABLE mode self-cancels after two minutes.
28 PLM Series Operation Manual
9.6 Menu button
The alternative operating mode – MENU - is selected
by pressing the MENU button. The screen display
changes to the opening “page” of the menu system
which shows a list of the seven “next-level”
submenus. Each submenu title is adjacent to a soft
button, which can then be pressed to select it.
Pressing the MENU button while in MENU mode
takes the display “back up” one menu level.
MENU mode only needs to be selected when it is
desired to reconfigure the PLM in some way, or to
alter an operating parameter.
MENU mode is described in full in section 9.12.
FRONT PANEL INTERFACE 9
9.7 Network activity LED
Located above the Rotary Encoder is an ultra-bright
white LED. This LED illuminates when there is
network activity between the DLC PLM Edition
software and the PLM.
The Network Activity LED can be dimmed
via the front panel (Frame, Front,
Dimming).
This feature is useful for two reasons:
1) It provides visual confirmation that there is network
communication between the DLC PLM Edition
software and PLM.
2) It enables the engineer to visually confirm which
PLM is selected via the DLC PLM Edition software,
especially if parameters are being changed.
9.8 Rotary encoder
The rotary encoder is used to alter various PLM
parameters (e.g. input level) in conjunction with the
various display pages. When a menu item is selected
that can have its parameter value adjusted by the
rotary control, the ring around the knob illuminates.
Turn the encoder clockwise to increment the selected
parameter or anti-clockwise to decrement it.
With several PLM parameters, it is possible to enable
a combination of input and output channels to be
simultaneously adjusted. To select which channels
are adjusted press the associated soft button. This
toggles the displayed parameter value between
normal text and ‘inverse video’ text. When highlighted,
the rotary controller alters the parameter value. Note:
Certain MENU screens, such as MENU > Module >
Limiters > ISVPL, permit parameters to be adjusted
across all four output channels simultaneously by
default. An example is given below:
1. first select the parameter that requires changing via the MENU screen. e.g. ISVPL.
2. Press MENU > Module > Limiters > ISVPL
PLM Series Operation Manual 29
9 FRONT PANEL INTERFACE
The current ISVPL values for output channels 1 to
4 are displayed on the right hand of the screen and
the ring surrounding the rotary encoder is illuminated
indicating that the rotary encoder is active.
Figure 9-4
9.10 Soft-function buttons
Eight silicon rubber buttons are set adjacent to the
display in two groups of four. These buttons are
unlabelled because their functions change according
to the on-screen page currently displayed.
3. Pressing the adjacent soft buttons to the displayed
ISVPL values selects or deselects the parameters
from the rotary encoder.
Selected De-selected
ISVPL value is highlighted (inverse video)
ISVPL value is not highlighted (standard video)
4. Select which PLM channels are to be assigned
to the rotary encoder, then turn the rotary encoder
to adjust the parameter values as required.
It is also possible to use the multi-select function to
alter multiple channel parameters even if the values
differ between each channel. Turning the rotary
encoder simply adjusts each parameter (by +/- 0.1
V in the case of the ISVPL screen).
Soft Buttons
Figure 9-5
In METER mode, and with MUTE ENABLE active,
the soft buttons are used to mute and unmute the
PLM’s individual Module inputs and power stage
outputs.
In MENU mode these buttons are used to navigate
the menu structure.
Each button contains a tricolor LED. This
LED conveys fault and warning indication
as well as mute statuses. The LED’s
function does not necessarily correspond
to the current soft button function.
9.9 Exit button
The EXIT key is used while navigating the menu
system in MENU mode, and takes the display back
to a previous screen (“up one level” in the menu
tree).
In METER mode, pressing the EXIT key will always
return the display to the HOME view.
9.10.1 Mute Functions
The PLM provides mute functions at several different
points in its audio chain. See figure 8-1 (PLM Signal
Flow Diagram) for mute locations and description.
The four available mutes are:
1.
2.
3.
4.
30 PLM Series Operation Manual
PLM Input Mutes
Module Input Mutes
Module Output Mutes
Power Output Mutes
FRONT PANEL INTERFACE 9
Two of these mutes may be controlled from the PLM
front panel by using the MUTE ENABLE button;
these are:
▸▸
▸▸
Module Input Mutes
Power Output Mutes
For safety it is not possible to change either
of these mutes without first selecting MUTE
ENABLE.
It is also possible to control these mutes from the
DLC PLM Edition software. Module Output Mutes
can be controlled via the menu system (i.e. in MENU
mode, not METER mode) or the DLC PLM Edition
software. PLM Input Mutes can only be controlled
from the DLC PLM Edition software.
When MUTE ENABLE is selected, six of the front
panel soft buttons become the mute switches for the
Module Inputs and PLM Outputs. See figure 9.6.
Ch1
Module A
Ch2
Module B
Ch3
Ch4
Figure 9-6
9.10.1.1 PLM Input Mute
Muting of the PLM’s inputs is not available via the
MUTE ENABLE button in METER mode. It can only
be actioned from the DLC PLM Edition software.
PLM Input Mute is within the Dolby Lake processing
system, post input type selection, and pre input
mixing and routing.
Refer to the Dolby Lake Controller User Manual
for details of mute selection via the software.
9.10.1.2 Module Input Mute
The centre pair of soft buttons located on the left
hand of the screen (soft buttons 2 and 3 - see figure
9-6) control the input mutes. Button 2 toggles the
input mute of Module A in the Dolby Lake processing
system, while Button 3 toggles the input mute of
Module B.
Module Input Mute is within the Dolby Lake
processing system and not at the physical inputs to
the PLM. This means it is possible to mute the input
to one Module, while mixing input sources together
and feeding the sum to the second Module. This is
not possible with the PLM Input Mute.
Once the Module input is muted the soft button’s
integral LED turns red and the text ‘MUTE’ is displayed
in inverse video. When unmuted, the integral LED
turns green and the display shows the text OK.
Display of fault conditions always have
priority over mute status displays on the
soft button LEDs. If an input fault condition
arises, the LEDs will indicate this and not
the mute status. The mute status can still be viewed
via MENU mode or the DLC PLM Edition software.
Module Input Mutes may also be controlled from the
menu system. See section 9.12.2.6 for details.
Refer to the Dolby Lake Controller User Manual
for details of mute selection via the software.
9.10.1.3 Module Output Mute
Muting of the Dolby Lake processing system’s Module
outputs is not available via the MUTE ENABLE button
in METER mode, but through the PLM’s MENU
system instead. It may also be actioned from the
DLC PLM Edition software.
Module Output Mute is within the Dolby Lake
processing system, at the crossover outputs. It is
post Module output EQ and level adjustment, but
pre any of the PLM’s protection circuitry.
See section 9.12.2.6 for details of selecting the
Module Output Mute via the menu system.
Refer to the DLC User Manual for details of mute
selection via the software.
9.10.1.4 Power Output Mute
The four soft buttons (5-8) located on the right hand
of the screen control the Power Output Mutes of
output channels 1-4 respectively.
PLM Series Operation Manual 31
9 FRONT PANEL INTERFACE
These mutes are located within the PLM’s power
output stage.
When the selected output is muted, the soft button’s
integral LED turns red and the text AMP-CH MUTE
is displayed in inverse video. When unmuted, the
integral LED turns green (unless any other output
warning conditions are active).
If an output fault condition arises the LEDs
will indicate this status and not the output
mute condition, thus remaining red if the
output is already muted. However, a textual
description of the fault is provided on the display.
The output mute status can still be viewed via the
MENU system or the DLC PLM Edition software.
9.10.2 LED Faults, Warnings and Clip indications
A tricolor LED is integral within each of the eight soft
buttons. These convey a variety of status indications:
including faults and warnings; signal clip indications;
and PLM Module Input, Module Output and Power
Output mute statuses.
LED Color
Status
Green
Status Good
Yellow
Warning
Red
Fault
Flashing Red
Clip
The positions of the LEDs logically follow the signal
flow, with Module inputs located on the left of the
screen and outputs on the right. See section 9.10.1
Mute Functions for further information concerning
Mute operation.
Network/
Frame
Status
1
5
Channel
Output 1
Module A
Input
2
6
Channel
Output 2
Module B
Input
3
7
Channel
Output 3
Not Used
4
8
Channel
Output 4
Figure 9-7
The relationship between LEDs and inputs
and outputs is maintained in MENU mode.
It is important to appreciate that the LEDs
often operate independently of the function
of the soft buttons.
Clip Indication
The front panel LEDs also indicate input and output
clip or pre-clip conditions that can occur within the
PLM.
Input Clip
Input clipping is monitored at two positions in the
signal chain:
Table 9-1
The above list only applies to warnings, fault
and clip indications, not mute statuses.
An unlit output LED indicates that the output
channel is not routed to a Module output.
Under normal operating conditions (i.e. in METER
mode, with no fault conditions), seven of the LEDs
provide indication of PLM/Frame network connectivity
to the DLC PLM Edition software, plus mute status
indication for the two Module inputs (A and B) and
the four output channels (1 thru 4). The eighth button
is currently unused.
32 PLM Series Operation Manual
▸▸
The analog input stage*; if the input signal
exceeds either +12 dBu or +26 dBu (according
to analog sensitivity setting), a clip indication
will be given. Does not apply if digital or Dante
inputs selected.
▸▸
Dolby Lake processor Module inputs: if the
signal level at this point exceeds +25 dBu, a clip
indication will be given.
The clip indication is given by the associated Module
LED flashing red. In addition, the warning INPUT
CLIP is displayed on the screen. If a second clip
within 400mS is detected, the LED will remain on
for a longer period.
Figure 9-8: Input clip LED and on-screen warning
FRONT PANEL INTERFACE 9
Output Clip
All output channels are monitored by a suite of
protection circuits that include a Current Peak
Limiter (CPL) and an Inter-Sample Voltage Peak
Limiter (ISVPL). See section 7.3 Amplifier and Load
Protection Systems for further information. If the CPL
protection device is active, or a voltage clip occurs,
then the appropriate Channel Output LED will flash
red. In addition, a corresponding text warning will
also be displayed on the screen.
An ‘Event Log’ file records these faults (with date
and time stamp) within the PLM. See Chapter 5.3 of
the DLC User Manual PLM Edition Addendum for
further information on accessing the Event Log.
A detailed description of each warning can be found
in table 12-1.
Figure 9-9: CPL Active
Figure 9-10: Voltage Clip
Warning or Fault Indications
If certain parameters within the PLM approach or
exceed preset limits, a warning condition or fault
condition may arise. One or more LEDs will then
provide an appropriate visual indication. A textual
on-screen description of the condition will also be
displayed adjacent to the LED(s).
The LEDs can show three colors, each conveying a
different status.
9.10.2.1 Green indications
A green indication of LEDs 2, 3 and 5-8 confirm
that inputs or outputs are unmuted and operating
normally.
9.10.2.2 Yellow indications
Yellow LED indications are reserved for PLM
warnings. See Table 9-2.
An ‘Event Log’ file logs these warnings (with date
and time stamps) within the PLM. See Chapter 5.3
of the DLC User Manual PLM Edition Addendum
for further information on accessing the Event Log.
A detailed description of each warning can be found
in Table 12-1.
9.10.2.3 Red indications
Red LED indications are reserved for PLM faults.
See Table 9-3.
PLM Series Operation Manual 33
9 FRONT PANEL INTERFACE
Warning
LED
LED
Number
On Screen
Warning Text
Event Log Text
Amp Temp Warning
Channel
5~8
TEMP WARN:CH
Temp.warning; Channel
Fewer Speakers
Channel
5~8
UNDER SPKR CNT
Under Speaker Count
More Speakers
Channel
5~8
OVER SPKR CNT
Over Speaker Count
Mag Temp Warning
Channel
5~8
TEMP WARN:MAG
Temp.Warning; Speaker Magnet
VC Temp Warning
Channel
5~8
TEMP WARN:VC
Temp.Warning; Speaker Voice-Coil
Uncertain About Load
Channel
5~8
TYPE: UNCERTAIN
Uncertain About Speaker Type
No Live/Verification Model
Channel
5~8
NO LOAD DATA
Channel Warning: No Load Model
Load Not Verified
Channel
5~8
LOAD NOT VER
Channel Warning: Load Not Verified
Model Precision Low
Channel
5~8
LS PREC. LOW
LoadSmart Precision Low
Controller Offline
Frame
1
CTRL OFFLINE
Live Not Started
Channel
5~8
SPKSAFE INACT
SpeakerSafe Not Started
Table 9-2: Yellow LED Warning Table
Fault/Clip/Mute
LED
LED
Number
On Screen
Warning Text
Event Log Text
No Input Source Available
Module
2, 3
n/a
Frame Fault: No Input Source
Audio In Fault
Frame
1
AUDIO FAULT
Frame Fault: Audio Interface
Amp Temp Fault
Channel
5~8
TEMP FLT:CH
Temp Fault: Amp Channel
Mag Temp Fault
Channel
5~8
TEMP FLT:MAG
Temp Fault: Magnet
VC Temp Fault
Channel
5~8
TEMP FLT:VC
Temp Fault: Voice Coil
PSU Temp Fault
Frame
1
TEMP FLT:PSU
Temp Fault: Power Supply Unit
Slot Temp Fault
Frame
1
TEMP FLT:DSP
Temp Fault: DSP Section
No Load
Channel
5~8
NO LOAD
Channel Fault: No Load Detected
Short Circuit
Channel
5~8
SHORT CIRCUIT
Channel Fault: Short Circuit Protection
VHF
Channel
5~8
VHF FAULT
Channel Fault: Very High Frequency
Needs Service
Channel
5~8
SERVICE CH.
Channel Fault: Unit Needs Service
Wrong Type Of Speaker
Channel
5~8
WRONG LOAD
Load Type / Routing Mismatch
Off Fault
Frame
1
SERVICE PSU
Frame Fault: Unit Needs Service
CAL
Channel
5~8
CAL ACTIVE
n/a
Input Clip
Module
2,3
INPUT CLIP
n/a
Module Clip
Module
2,3
MOD. CLIP
n/a
CPL
Channel
5~8
CURRENT CLIP
n/a
PAL
Frame
1
PAL ACTIVE
n/a
ISVPL
Channel
5~8
VOLTAGE CLIP
n/a
Module Input Mute
Module
2,3
MOD. IN MUTE
Module Input Mute
Module Output Mute
Channel
5~8
MOD. OUT MUTE
Module Output Mute
Amp CH Mute
Channel
5~8
AMP CH. MUTE
Amp Channel Mute
Table 9-3: Red LED Fault/Clip/Mute Table
34 PLM Series Operation Manual
FRONT PANEL INTERFACE 9
If the processor is configured as a single 4-way
crossover, the relationship between inputs and
outputs will be indicated as shown:
9.11 Meter Mode
In METER mode, there are three possible screen
displays, referred to as “Views”. Pressing the METER
button scrolls through the three views – Home,
Module and Temperature - in turn. Each of the three
views provides different information about the PLM’s
performance and settings.
The three views are similar in layout. The display
screen is divided into eight “blocks”, arranged in two
columns of four, so that each block is associated with
one soft button/tricolor LED. Each block has four
rows of alphanumeric characters, either showing
textual information or acting as bargraph meters.
In addition, four sets of alphanumeric characters
are displayed in inverse video in the screen
center between the left and right columns. These
provide confirmation of the PLM’s Module/output
configuration. The letters A or B refer to the two
Dolby Lake processing modules, and the numbers
1-4 to the PLM’s output channels. Two examples of
displays are given as illustration:
If the processor is configured as two independent
2-way crossovers, the relationship between inputs
and outputs will be indicated as shown:
HOME
----
A
1
CL2W
-24
A
2
-50
B
1
CL2W
B
2
HI
LOW
HI
LOW
HOME
----
A
1
CL4W
-24
A
2
A
3
A
4
HI
HI MID
LOW MID
LOW
-09
-02
-13
-∞
-11
-∞
-45
-∞
Figure 9-12
This indicates that all four output channels are driven
from Module A.
In general, the four display blocks in the right-hand
column (5-8) provide information relating to the output
sections or Dolby Lake processor Module outputs,
while the center two blocks in the left-hand column
(2 & 3) provide information relating to the inputs to
the amplifier or the Dolby Lake processor Module
inputs. The upper and lower blocks in the left-hand
column (1 & 4) display global information about the
PLM (Frame data).
-09
-02
-13
-∞
-11
-∞
-45
-∞
Figure 9-11
Figure 9-13
This indicates that output channels 1 and 2 are driven
from Module A and output channels 3 and 4 from
Module B.
PLM Series Operation Manual 35
9 FRONT PANEL INTERFACE
9.11.1 Meter view 1 – Home View
HOME
---FAULT/WARNING
CL3W
Y-10
-24
FAULT/WARNING
1 AUX
Y-10SUB
-50
FAULT/WARNING
A
1
A
2
A
3
B
1
HI
-09
-02
FAULT/WARNING
MID
-13
-∞
FAULT/WARNING
LO
-11
-∞
FAULT/WARNING
SUB
-45
-∞
FAULT/WARNING
Figure 9-14
Home View is the default view. Any names (labels)
which have been assigned to the Module inputs and
outputs are displayed; input and output signal levels
can be monitored, and any faults and/or warnings
indicated by red or yellow soft button LEDs are given
textual explanation.
* See tables 9-2 and 9-3 for details of actual text
displayed for each fault/warning type.
Frame block:
▸▸ Line 1 HOME flag – confirms Home view
▸▸ Line 2 Frame name – displays Frame ident
confirming “which PLM this is”. A row of hyphens
is displayed if no name has been assigned.
▸▸ Line 3 (blank)
▸▸ Line 4 Frame fault/warning – In the event of
a Frame fault or warning, text describing the
problem is displayed here*
Input blocks:
▸▸ Line 1 Module name – displays name given to
Dolby Lake processing Modules A and B (if any).
This data item is also displayed in most of the
parameter adjustment pages in Menu Mode.
▸▸ Line 2 Fingerprint name
▸▸ Line 3 Input meter showing signal level at the
input to the Dolby Lake processing Module. A
numeric indication in dB of the difference between
the signal level and input clip level is also provided
at the right-hand end of the meter.
▸▸ Line 4 Module fault/warning – In the event of
a Module fault or warning, text describing the
problem is displayed here.
Block 4 is unused in METER mode.
36 PLM Series Operation Manual
Output blocks:
▸▸ Line 1 Channel name – displays name assigned
to PLM’s power output channel (e.g. LF1 etc.).
This data item is also displayed in most of the
parameter adjustment pages in Menu Mode.
▸▸ Line 2 Output meter showing signal level at
the PLM’s power output stage, with full-scale
indication representing output clip. A numeric
indication of signal level in dBu is also provided
at the right-hand end of the meter.
▸▸ Line 3 Gain reduction meter showing degree
of limiting being applied by the ISVPL and/or the
LimiterMax within the Dolby Lake processing
system.
▸▸ Line 4 Fault/warning indication for the PLM’s
power output stage. In the event of a power
output channel fault or warning, text describing
the problem is displayed here.*
9.11.2 Meter View 2 – Module View
A
1
V
I
P
L
-∞
A
2
V
I
P
L
-∞
-24
A
3
V
I
P
L
-∞
-50
B
1
V
I
P
L
-∞
MODULE METERS
FAULT/WARNING
CL3W
1 AUX
Figure 9-15
Module View provides further signal level information
in the form of additional power output meters.
Frame block:
▸▸ Line 1 MODULE METERS flag – confirms
Module view
▸▸ Line 2 (blank)
▸▸ Line 3 (blank)
▸▸ Line 4 Frame fault/warning – in the event of
a Frame fault or warning, text describing the
problem is displayed here.*
Input blocks:
▸▸ Line 1 Module name – displays name given
to Dolby Lake processing Modules A and B (if
any)
FRONT PANEL INTERFACE 9
▸▸
▸▸
▸▸
Line 2 (blank)
Line 3 Input meter showing signal level at
the Module input. A numeric indication of peak
level is also provided at the right-hand end of the
meter.
Line 4 (blank)
Block 4 is unused in METER mode.
Output blocks:
▸▸ Line 1 Output voltage meter, denoted by ‘V’.
This meter indicates the PLM’s power output
stage voltage relative to its clip level.
▸▸ Line 2 Output current meter, denoted by initial
‘I’. This meter indicates the current the PLM
power output stage is driving into its load, relative
to the maximum permissible current the fixed
CPL allows.
▸▸ Line 3 Output power meter, denoted by initial
‘P’. This meter indicates the instantaneous output
power being developed in the load relative to the
PLM’s maximum output power capability.
▸▸ Line 4 Gain reduction meter showing degree
of limiting being applied by the ISVPL and/or the
LimiterMax within the Dolby Lake processing
system.
9.11.3 Meter View 3 – Temperature View
TEMP METERS
PSU
SLOT
07%
13%
A
1
AMP
VC
MAG
04%
30°
30°
A
2
AMP
VC
MAG
04%
30°
30°
A
3
AMP
VC
MAG
04%
30°
30°
B
1
AMP
VC
MAG
04%
30°
30°
▸▸
denoted by ‘PSU’. A bargraph meter showing
the current PSU temperature as a percentage
of its maximum permitted value. The numerical
percentage value is also displayed at the righthand end of the meter.
Line 4 Processor temperature meter, denoted
by ‘DSP’. A bargraph meter showing the current
temperature of the main Dolby Lake processor
as a percentage of its maximum permitted value.
The numerical percentage value is also displayed
at the right-hand end of the meter.
Blocks 2, 3 and 4 are unused in Temperature View.
Output blocks:
▸▸ Line 1 Current actual temperature of the
channel’s power output stage (denoted by ‘AMP’)
as a percentage of its maximum permitted value.
The numerical percentage value is also displayed
at the right-hand end of the meter.
▸▸ Line 2 Computed temperature of voice coil of
loudspeaker connected to the output channel
(denoted by ‘VC’). This parameter is calculated
using the power currently being dissipated in the
load and loudspeaker data from the LoadLibrary
fingerprint. Displayed in degrees Celsius. The
numerical value is also displayed at the right-hand
end of the meter.
▸▸ Line 3 Computed temperature of magnet of
loudspeaker connected to the output channel
(denoted by ‘MAG’). This parameter is calculated
and displayed in a similar way to the voice coil
temperature.
▸▸ Line 4 Gain reduction meter showing degree
of limiting being applied by the ISVPL and/or the
LimiterMax within the Dolby Lake processing
system.
Figure 9-16
Temperature View provides information about the
current operating temperatures within the PLM and
loudspeakers.
Frame block:
▸▸ Line 1 TEMP METERS flag – confirms
Temperature view
▸▸ Line 2 (blank)
▸▸ Line 3 Power supply temperature meter,
PLM Series Operation Manual 37
9 FRONT PANEL INTERFACE
9.12 Menu Mode
Pressing EXIT at any time reverts the displays to
the ‘next level up’, and any altered parameters are
retained automatically.
9.12.1Menu View
Note that soft button 1 does not have any options
associated with it in any of the submenu levels. The
text in block 1 confirms Menu mode, and also the
submenu and further options selected.
Menu
Frame
Module
Frame Prst
Input Cfg
Load mon.
Attenuation
Dante
Figure 9-17
Most of the PLM’s operating functions are accessed
via the menu system in MENU mode. These include
adjustment of gain, selection of input type, limiter
settings, network setup, etc. MENU mode may be
accessed at any time by pressing the MENU button
on the front panel.
The menu system follows a conventional tree-andbranch structure; the ‘top page’ of the menu system
– that displayed when MENU is first pressed – gives
access to various submenus, the title of each of which
is shown in the eight ‘blocks’ of the display. Pressing
the adjacent soft button selects that submenu, and
the display changes to a set of further options within
the submenu. These options may then be selected in
a similar fashion, which in some cases may involve
a further ‘level’ of selection. When ‘parameter level’
is reached, individual PLM parameters may be
selected for adjustment by pressing the adjacent soft
button. The displayed parameter value will then be
highlighted (appear in inverse video), and is adjustable
by the rotary encoder, the ring around the encoder
knob illuminating to confirm this. Note that it may be
possible to adjust two or more parameters on the
same parameter level page simultaneously simply
by selecting all those to be adjusted. Any offsets
in present values are retained. Some of the PLM
parameters assume multiple selection as the default
setting, so all inputs or outputs are normally adjusted
simultaneously.
38 PLM Series Operation Manual
Group sum displays
Some of the PLM’s parameters display two values
instead of one. The parameters concerned are:
▸▸
▸▸
▸▸
▸▸
Module > User Gain
Module > Delay
Module > Limiters > MaxRMS Level
Module > Limiters > MaxPeak Level
For each of these parameters, the primary value,
which is adjusted by the rotary control, is shown
above the Group Sum value, which is displayed in
brackets.
The Group Sum parameter value will initially be the
same as the primary value. However, as Dolby Lake
processing Modules may belong to Groups (possibly
spanning mutilple Frames), and these parameters
may be adjusted in the DLC PLM Edition software
for the whole Group, it is useful for the effect of this
additional Group adjustment to be taken into account.
The Group Sum parameter value is effectively the sum
of the individual Module value and any gain, delay,
etc., that has been applied to the whole Group.
Menu Structure
From the top page of the menu system, the following
seven submenus are available:
▸▸
▸▸
▸▸
▸▸
▸▸
▸▸
▸▸
Module
Input configuration
Attenuation
Frame
Frame Preset
Load Data
Dante
FRONT PANEL INTERFACE 9
9.12.2 Module submenu
This submenu is selected by pressing soft button 2,
named Module from the menu top page.
Menu
Module
User Gain
The Group Sum value is also displayed (in brackets)
for this parameter for each channel.
Amp Gain
Limiters
Delay
Polarity
adjusted from the Dolby Lake Controller PLM Edition
Software.
Mute
Figure 9-18
The options available are as follows:
9.12.2.1 User Gain
This option is selected by pressing soft button 2
(User Gain) from Menu è Module.
This allows the Module gain to be adjusted at two
different places. Soft buttons 2 and 3 select Module A
or Module B inputs respectively for gain adjustment.
Soft buttons 5-8 select Module outputs 1-4 for
gain adjustment. Gain may be adjusted in 0.1 dB
increments from -100 dB to +20 dB. The Module
gain parameters may also be adjusted from the DLC
PLM Edition software.
The Group Sum value is also displayed (in brackets)
for this parameter for each channel.
9.12.2.2 Delay
This option is selected by pressing soft button 3
(Delay) from Menu è Module.
The audio signal may be delayed (typically for reasons
of driver or delay tower alignment) at either the PLM
inputs or on individual outputs. Delay added at the
inputs will, of course, affect all outputs equally, and
will be generally be introduced to time-align arrays
of loudspeakers at different locations. Delaying
individual outputs may be desirable to time-align
drivers in the same cabinet or array.
9.12.2.3 Phase Reverse
This option is selected by pressing soft button 4
(Polarity) from Menu è Module.
Audio phase reversal is available at the inputs to
Module A and Module B, and also individually on the
four output channels. The on-screen text displays
“Positive” for normal operation, and “Negative”
when a signal is phase inverted. The input or output
may be selected with the adjacent soft button and
the polarity changed with the rotary encoder. The
Module phase reverse settings may also be adjusted
from the DLC PLM Edition software.
9.12.2.4 Amp Gain
This option is selected by pressing soft button 5
(Amp Gain) from Menu è Module.
This adjusts the gain of the PLM’s power output stage
for each output channel. The default gain setting is
35 dB, but this is variable in 0.1 dB increments from
22 dB to 44 dB. Care should be taken in altering Amp
Gain, which should be adjusted in conjunction with
the User Gain controls (see section 9.12.2.1).
9.12.2.5 Limiters
This option is selected by pressing soft button 6
(Limiters) from Menu è Module.
Various parameters of the PLM’s Inter-Sample
Voltage Peak Limiter (ISVPL) and the Dolby Lake
processing system’s LimiterMax can be adjusted in
this submenu. By default, simultaneous adjustment
of most limiter parameters in all four output channels
is selected, though channels may be adjusted
individually if desired. Attack and Release times are
exceptions to this.
Delay is adjustable in increments of 0.1 mS. Maximum
input delay is 1.8 S, and maximum output delay is
100 mS. The Module delay parameters may also be
PLM Series Operation Manual 39
9 FRONT PANEL INTERFACE
9.12.2.5.1 Inter-Sample Voltage Peak Limiter (ISVPL)
The purpose of the ISVPL is to prevent the voltage
at the PLM’s output terminals exceeding a predetermined value. Selecting ISVPL (soft button 2)
permits adjustment of this value, in the range 17.8
V to 153 V (model dependent). (Note this represents
an instantaneous peak voltage, not the RMS value
of the output signal.)
The remainder of the limiter adjustments
refer to the LimiterMax within the Dolby
Lake processing system, which features
control of both peak and RMS levels, referred
to as MaxPeak and MaxRMS respectvely. Full details
of the operation of LimiterMax can be found in the
DLC User Manual, chapter 5.2.3 to 5.2.5.
9.12.2.5.2 MaxPeak Level (MaxPeakLvl)
This sets the maximum peak signal level at the
processor’s Module outputs It is adjustable from -30
dBu to +30 dBu in 0.1 dB increments. The MaxPeak
level parameters may also be adjusted from the DLC
PLM Edition software.
The Group Sum value is also displayed (in brackets)
for this parameter for each channel.
9.12.2.5.3 MaxRMS Level (MaxRMSLvl)
This sets the maximum RMS signal level at the
processor’s Module outputs. It is adjustable from -30
dBu to +30 dBu in 0.1 dB increments. The MaxRMS
level parameters may also be adjusted from the DLC
PLM Edition software.
The Group Sum value is also displayed (in brackets)
for this parameter for each channel.
9.12.2.5.4 MaxRMS Corner (MaxRMSCor)
The transfer curve of the RMS section of the Dolby
Lake LimiterMax is selectable to “soft-knee” or
“hard-knee” characteristic. With a “soft-knee” curve,
limiting is gently increased as signal level approaches
the threshold, whereas with a “hard-knee” curve,
full limiting is applied to any signal exceeding the
threshold by any amount, but none to signals below
the threshold. The Corner parameter is selectable in
0.1 dB increments from -100 dB to 0 dB, this figure
representing the level below the limiter threshold at
40 PLM Series Operation Manual
which compression commences. Thus, the greater
the value (negatively), the “softer” the knee. A setting
of 0 dB implies a “hard-knee” characteristic. The
LimiterMax Corner parameter may also be adjusted
from the DLC PLM Edition software.
9.12.5.5.5 MaxRMS Attack (MaxRMSAtk)
This sets the attack time of the MaxRMS limiter. It
is selectable in 0.1 ms increments from 1mS to 500
ms. The attack time parameters may also be adjusted
from the DLC PLM Edition software.
9.12.2.5.6 MaxRMS Release (MaxRMSRel)
This sets the release time of the MaxRMS limiter.
It is selectable in 0.1 ms increments from 1mS to
500 ms. The release time parameters may also be
adjusted from the DLC PLM Edition software.
It can be seen that the MaxRMS attack and
release times may be set to different values.
Note that on the DLC PLM Edition software,
there is an additional auto-time constant
function, which sets them to crossover-dependent
optimal values for best RMS operation.
Adjustment of attack and release times can
only be made to one channel at a time;
pressing soft buttons 5–8 selects each
channel in turn.
9.12.2.6 Mutes
This option is selected by pressing soft button 8
(Mute) from Menu è Module.
The audio signal may be muted at the Module input
stage or the Module output stage from within the
menu system. (Note that the Module input mute
can also be actioned from the front panel when in
METER mode.)
The display shows the current mute status for the
two mute positions as Muted or Not Muted. Soft
buttons 2 and 3 select the Input Mutes for Modules
A and B respectively, and buttons 5 – 8 the Module
output mutes for the four output channels. Once
selected, the mute state can be changed with the
rotary encoder.
Note that the LEDs in the associated soft buttons
FRONT PANEL INTERFACE 9
(5–8) turn red when the Module output mutes are
applied from this menu page. On exiting the menu
system, it will be seen that they remain red – indicating
a MUTE condition – and the screen blocks will display
Mod. Out Mute.
9.12.3 Input Routing and Settings submenu
This submenu is selected by pressing soft button 3,
labelled Input Cfg from the menu top page.
Menu
Input Cfg
modified by adjustment of the Input Mixer levels via
the DLC PLM Edition software. See the DLC User
Manual chapter 7.2.2 for further details.
Each Router is essentially a six-input switch,
permitting one of six possible sources to be routed
to either Input Mixer. The six sources are:
▸▸
▸▸
▸▸
▸▸
▸▸
▸▸
Analog input 1 ( Analog 1)
Analog input 2 ( Analog 2)
AES/EBU digital input Ch A ( AES 1)
AES/EBU digital input Ch B ( AES 2)
Dante network Ch A (Dante 1)
Dante network Ch B (Dante 2)
Router 1
A “seventh” routing selection is to have no input
selected. (Empty)
Router 2
Iso Float
Aes Term
Figure 9-19
The options available are as follows:
9.12.3.1 Input selection and sensitivity settings
This option is selected by pressing soft buttons 2 or
3 (Router 1 or Router 2) from Menu è Input Cfg
for Modules A or B respectively.
Menu
Input Cfg
Router 1
Prio 1
AES 1
0.00dB
Prio 2
Empty
Prio 3
Empty
Auto select
Prio 4 *
Analog 1
26.00 dBu
Figure 9-20
It can be seen from figure 8-1 that each processing
module – A and B – is fed with a signal which is a
mix of the two input signals selected by the two
input routers. In the simplest configuration, the input
mixers will be set so that the signal selected by
Router 1 feeds Module A only, and that selected by
Router 2 feeds Module B only. However, this can be
There are two possible signals for selection
from the AES/EBU digital input source, as
the AES/EBU bitstream carries two audio
channels on a single XLR connector.
The various inputs are assigned to one of four
priority levels. The AES/EBU input has priority over
the analog inputs. This is because it is likely that in
any situation where both digital and analog signals
are available, the digital signals will be the preferred
input choice, with analog available as backup. Thus
it is not possible to select an analog input as the
highest priority if digital sources are also defined at
other priority levels. Also note that it is not possible
to have both analog inputs in the priority list.
Two modes of input selection are available, Auto
Select and Forced Selection.
In Auto Select mode, the control system inspects the
input set as Priority 1 for a valid input signal. If none
is found, it will proceed to the input set as Priority
2, and so on until a valid input signal is found. This
polling process will also take place if the current
selected input fails.
In Forced Selection mode, one of the four priorities
is permanently “forced” to be the selected input,
whatever its input type.
The selected Router (Router 1 or Router 2) may be set
to Auto Select mode or Forced Selection mode with
soft button 4. The rotary encoder scrolls between
the following options:
PLM Series Operation Manual 41
9 FRONT PANEL INTERFACE
▸▸
▸▸
▸▸
▸▸
▸▸
Auto Select (default)
Force Priority 1
Force Priority 2
Force Priority 3
Force Priority 4
Assignment of the inputs to the priority levels
A factory default setting assigns certain inputs to the
four priority levels automatically. These assignments
are:
Input Router 1:
Priority 1:
AES/EBU chapter1 (AES1)
Priority 2:
Empty
Priority 3:
Empty
Priority 4:
Analog input 1 (Analog 1)
Input Router 2:
Priority 1:
AES/EBU chapter2 (AES2)
Priority 2:
Empty
Priority 3:
Empty
Priority 4:
Analog input 2 (Analog 2)
These assignments may be changed by pressing
soft buttons 5 – 8 and using the rotary encoder to
scroll through alternative options. It is important
to appreciate that due to the signal type hierarchy
inherent in the input selection process, it is not
possible to select an analog source to a higher priority
than a digital source. For this reason, analog sources
are assigned to Priority 4 by the default setting. Note
that Dante inputs are not selectable from the front
panel of the PLM; their assignment must be made
from the DLC PLM Edition software.
Analog Input Sensitivity and Digital Gain
Offset
The soft button adjacent to each of blocks 5 - 8 selects
either the input source (Line 2) or the input sensitivity/
digital gain offset (Line 3) for adjustment.
Line 3 of each block shows the currently set input
sensitivity (in the case of the analog inputs) or digital
gain offset (in the case of the digital inputs). The
maximum input level which can be accepted by the
analog input pre-amplifiers without clipping may be
set to 12 dBu or 26 dBu.
Digital gain offset may be applied to AES/EBU
digital input signals in 0.1 dB increments from -100
dB to +15 dB. This parameter may be adjusted by
pressing the associated soft button to highlight the
42 PLM Series Operation Manual
current sensitivity/offset value, and using the rotary
encoder.
All input selection and sensitivity parameters may also
be adjusted from the DLC PLM Edition software.
9.12.3.2 IsoFloat
This option is selected by pressing soft button 4
(IsoFloat) from Menu è Input Cfg.
The PLM’s analog inputs utilize Dolby Laboratories’
IsoFloat patented transformerless electronic balancing
circuitry. This provides electrical isolation from an
analog source comparable to that achieved with
transformer-based designs. However, pin 1 of the
XLR input connector may be connected to ground
within the PLM if desired. This option is selected by
using the rotary encoder to toggle between Floating
and Grounded. It may be necessary under some
circumstances to alter this setting to resolve ground
loop problems when using analog inputs. The IsoFloat
setting may also be adjusted from the DLC PLM
Edition software.
9.12.3.3 AES/EBU input termination
This option is selected by pressing soft button 8 (AES
Term) from MenugInput Cfg.
Please see the warning regarding using AES/
EBU signals at section 6.2.1.
For fault-free operation when using AES/EBU digital
audio as an input source, inputs must be correctly
terminated with the characteristic impedance of 110
ohm. Whether a particular unit in an set of multiple
PLMs should have its AES/EBU input terminated will
be determined by the method used to distribute the
AES/EBU signals.
The rule is – if the PLM is at the end of a distribution
line, its setting should be Terminated. Otherwise, it
should be Unterminated. If an AES/EBU distribution
amplifier (DA) is being used to distribute the digital
audio signals, with one DA output per PLM, then all
terminations should be on. However, if the AES/EBU
link connectors are being used to “daisy-chain” the
PLM inputs together, then only the “last” PLM in the
chain should have its termination set on.
FRONT PANEL INTERFACE 9
Once the Menu è Input Cfg è Aes Term
page is displayed, the rotary encoder can be used to
change the termination setting from Unterminated
to Terminated.
9.12.4 Attenuation submenu
This submenu is selected by pressing soft button 4,
labeled Attenuation from the menu top page.
Menu
Attenuation
A1: Low
0.00dB
A2: Mid
9.12.5 Frame submenu
This submenu is selected by pressing soft button 5,
labeled ‘Frame’, from the menu top page.
Menu
Frame
Frame Label
----
Network
Frame Info
Lat. Match
Frame Rst
Front
0.00dB
A3: High
0.00dB
Figure 9-22
B1: Aux
Sel All
0.00dB
Figure 9-21
Adjustment of attenuation at the input to the PLM’s
power stage is available on a per-channel basis. This
adjustment is effectively the PLM’s equivalent of a
conventional level control. The PLM may be turned
“right down” with this adjustment before powering
on or off. See the signal flow block diagram (figure
8-1).
The default setting is 0 dB (i.e. no attenuation),
but this may be varied in 0.1 dB increments down
to -100 dB (note the inclusion of the minus sign
means the display is strictly showing gain rather
than attenuation).
On entering the submenu, the default is for all four
channels to be deselected. Soft button 4, Sel All,
selects all channels; a second press deselects them.
Alternatively, individual channels may be adjusted
independently by selecting them one at a time
with soft buttons 5-8. Note that it is not possible to
adjust attenuation for a ‘subset’ of channels, only one
channel at a time or all channels may be adjusted.
This submenu provides information and options
relating to the PLM as a physical unit. It is referred
to as a ‘Frame’ for consistency with Dolby Lake’s
own terminology.
9.12.5.1 Frame Name
Display block 2 shows the Frame name if one
has been assigned, a row of hyphens is displayed
otherwise. Assignment of a name to a Frame is only
possible from the DLC PLM Edition software.
9.12.5.2 Frame Info
This option is selected by pressing soft button 3,
(Frame Info) from Menu è Frame. It provides
the user with various fixed information about the
PLM and its current settings. This display shows
data only, which cannot be modified.
Menu
Frame
Frame Info
MaxOutVolt
153.0Vmax
FW Version
MaxOutCurr
59.0Imax
Inh. Latency
Serial no.
000xxxx
Figure 9-23
9.12.5.2.1 Firmware version (‘FW version’)
Selecting this option displays a page showing the
PLM Series Operation Manual 43
9 FRONT PANEL INTERFACE
version numbers of the various firmware elements
within the PLM. This information may be of relevance
if a technical issue should arise; factory technical
staff will probably request these numbers.
...
Frame Info
FW Version
Firmware Bundle
version
Bundle
00.01.14
DLM
00.01.14
Dolby Lake FW
version
Amp
0.10.0b4
Amplifier FW
version
Disp
0.6.0p29
Front Panel
Display FW
version
Figure 9-24
9.12.5.2.2 Latency (‘Inh. Latency’)
Any processing of audio signals in the digital domain
necessitates a small, but finite processing delay.
This is termed system latency. It may be desirable
to know what the latency is, so that its value may be
subtracted from any delay deliberately introduced into
the signal chain by the user for reasons of loudspeaker
time-alignment. In many cases, the latency will be
sufficiently small compared with any time-alignment
delay that it can be ignored.
The page displayed when this option is selected
shows the latency currently incurred through the
PLM, measured from input to output.
9.12.5.2.3 Max Output Voltage (‘MaxOutVolt’)
This displays the maximum output voltage that can
exist across the PLM’s output terminals. (Note this
is the absolute maximum, NOT the voltage defined
by the ISVPL setting.)
9.12.5.2.4 Max Output Current (‘MaxOutCurr’)
This displays the maximum output current that can
be delivered by the PLM, summed across all four
output channels.
9.12.5.2.5Serial Number (‘Serial no.’)
This displays the PLM’s serial number. Note that this
is embedded in the PLM, and therefore cannot be
removed or altered if the PLM is stolen.
9.12.5.3 Frame Reset
This option is selected by pressing soft button 4,
(Frame Rst) from Menu è Frame.
It is possible to reset all the PLM parameters back to
the original factory default values. See section 12.5
for a full list of these values.
Two levels of reset are provided, ‘Soft’ and
‘Factory’
9.12.5.3.1 Factory Reset
Factory Reset resets all PLM settings and parameters
to the original factory-defined default states. This
includes the deletion of any System and Frame
Presets stored within the PLM. It also re-initializes
the network ports.
9.12.5.3.2Soft Reset
Soft Reset resets PLM settings and parameters to
the original factory-defined default values, but does
not alter any Presets saved in the PLM.
9.12.5.4 Network
This option is selected by pressing soft button 6,
(Network) from Menu è Frame. The Network page
gives information relating to the PLM’s network
settings. These settings are only alterable from the
DLC PLM Edition software.
Menu
Frame
Network
PRIM LINK OK
NO SEC LINK
DLC ONLINE
IP Addr
169.254.129.24
IP Mask
255.255.0.0
MAC Addr
80:20:8:a6:14:
0
Frame ID
58000010:
fcda7101
Figure 9-25
44 PLM Series Operation Manual
front PANEL INTERFACE 9
The information displayed is:
▸▸
▸▸
▸▸
▸▸
Block 2: IP Address
Block 3: MAC Address
Block 4: Frame ID
Block 5: Network statuses:
**
**
**
▸▸
Primary network connection
Secondary network connection
DLC PLM Edition software on/off-line
Block 6: IP Mask
9.12.5.4.1 IP Address
This displays the Internet Protocol (IP) address
currently set for the unit. The setting of an IP address
can only be carried out from the DLC PLM Edition
software. See DLC User Manual chapter 7.2.6 –
Technical Data.
9.12.5.4.2 MAC Address
The Media Access Control (MAC) address is the
unique Ethernet address of the selected unit. It is
fixed.
9.12.5.4.3 Frame ID
The Frame ID is a unique Dolby Lake product identifier,
and cannot be changed.
9.12.5.4.4 Network statuses (‘Online’)
These indications are effectively mimics of the rear
Ethernet connectors’ LINK LED statuses, and confirm
valid network connectivity
9.12.5.4.5 IP Mask
This displays the IP address subnet mask currently
set for the unit. It can be changed from the DLC PLM
Edition software. See DLC User Manual chapter
7.2.6 – Technical Data.
9.12.5.6 Display adjustments
This option is selected by pressing soft button 8,
(Front) from Menu è Frame.
The parameters of the display screen itself may be
adjusted here, to suit ambient lighting conditions.
9.12.5.6.1 Display Contrast
Press soft button 2 and use the rotary encoder to
adjust the contrast of the display. A wide range of
adjustment is available.
9.12.5.6.2 Dimming
Press soft button 3 and use the rotary encoder to
adjust the display backlight. Four levels of dimming
are available.
9.12.6 Frame Preset submenu
This submenu is selected by pressing soft button 6,
labelled Frame Prst from the menu top page.
Up to 100 Frame Presets can be stored within the
PLM processor. The data within a Frame Preset
includes the configurations of all Modules in the
Frame: gain, delay and limiter levels; input mixer
configurations; and output routing information. As
Frame Presets are stored within the PLM, complete
processor configurations may be recalled without the
need to connect the PLM to a PC.
To recall a previously saved Frame Preset, press soft
button 2 to highlight the text, and then use the rotary
control to display the Preset required. Then press
soft button 8 (‘Recall’) to load the Frame Preset into
the PLM.
Frame Presets must be saved initially from
the DLC PLM Edition software.
9.12.5.5 Latency match
This option is selected by pressing soft button 7,
(Lat. Match) from Menu è Frame.
Once selected, the Latency Match function can
be turned on or off with the rotary encoder. When
on, the PLM automatically introduces additional
processing delay so that all channels incur a total
processing delay which equals that of the processing
delay of legacy Dolby Lake equipment. See DLC User
Manual chapter 7.2.6 for further information.
PLM Series Operation Manual 45
9 FRONT PANEL INTERFACE
9.12.7 LoadSmart
This submenu is selected by pressing soft button 7,
labelled Load mon from the menu top page. Note
that the options available in this submenu are also
accessible from the DLC PLM Edition software.
The Load Results page gives four items of information
per output channel:
▸▸
▸▸
Menu
Load mon.
▸▸
Configure #
of cabinets
in parallel
▸▸
LoadSmart
verification
Figure 9-27
9.12.7.1 Configure of cabinets in parallel
This option (soft button 2) allows the user to enter
the number of speaker cabinets connected to each
PLM output channel. Each channel may be selected
in turn and the rotary control used to enter a value
of 0, 1, 2, 3 or 4. This figure is used by the PLM’s
LoadSmart load verification and SpeakerSafe realtime performance monitoring routines to confirm
the correct connection and status of the speakers
connected to each PLM channel.
9.12.7.2 LoadSmart verification
LoadSmart load verification may be initiated by
pressing soft button 3, and then pressing it again
(“Yes”) from the the check page that follows.
LoadSmart performs a rapid test of all output channels,
and shows the results on a Results page, which is
automatically displayed a few seconds later.
Menu
Load mon.
Results.
Accept
temp
measure.
Cancel
A
1
WRONG SPEAKER
SP.COUNT WRONG
SP.COUNT: 0
VC TEMP: 0
A
2
CORRECT SPEAKER
SP.COUNT OK
SP.COUNT: 1
VC TEMP: -8
A
3
CORRECT SPEAKER
SP.COUNT OK
SP.COUNT: 1
VC TEMP: 0
B
1
NO MODEL
SP.COUNT OK
SP.COUNT: 0
VC TEMP: 0
Confirmation of speaker fingerprint assigned
to the channel. If none has been assigned, No
Model will be displayed.
Result of speaker cabinet count; this will either
be OK or Wrong
Estimated number of speakers connected to
the channel.
Computed voice coil temperature, calculated
from manufacturer’s data contained within the
loudspeaker fingerprint.
If the range of voice coil temperatures displayed
is acceptable, pressing the Accept temp measure
button starts SpeakerSafe monitoring, setting these
temperatures as the starting values. If the user has
reason to believe that the range of displayed voicecoil
temperatures contains one or more anomalous results,
possibly as a result of production spreads, the DLC
PLM Edition software should be used instead, where
a starting temperature for SpeakerSafe monitoring
may be entered manually. See the DLC User Manual
PLM Edition Addendum, sections. 5.2.4.3 to 5.4.2.6
for more information.
SpeakerSafe now continuously monitors the status
of the load on each power output channel, and the
results displayed at Meter Mode, Temperature View,
and also on the Status and History tabs of the DLC
PLM Edition software.
9.12.8 Dante
This submenu is selected by pressing soft button 8,
labelled Dante from the menu top page. If Dante has
not been enabled in the DLC PLM Edition software,
the submenu will not be available and a notification
to this effect will be displayed instead.
Menu
Dante
Dante Tx 1
Analog 1
Dante Tx 2
Analog 1
Figure 9-28
Figure 9-29
46 PLM Series Operation Manual
FRONT PANEL INTERFACE 9
See DLC User Manual PLM Edition for for further
information regarding Dante implementation.
9.12.8.1Break In Physical Line
Any PLM on a Dante network may act as the means
of inputting audio signals (analog or AES/EBU) into
the system. The audio is embedded in the Dante data
stream in that PLM, and is thus available to other
Dante-enabled devices (i.e. further PLMs). In this
way, the PLM is being used as a “break-in box”.
9.12.8.2 Probe Routing
The Dante protocol allows for the inclusion of two
“probes” from each Dante-enabled device on the
network. These are essentially items of “metadata”,
allowing device monitoring. The assignment of
internal PLM parameters to the probes is selectable
from this submenu option; the default assignments
are output voltage and current for Channel 1.
PLM Series Operation Manual 47
10 back panel interface
10.1 Power inlet
A Neutrik NAC3 Series PowerCon connector rated
at 32 A is fitted to the rear of the PLM for AC mains
input. The power cable (AC cord) supplied with the
PLM has the mating connector ready-fitted, but may
require a mains (AC) plug specific to your country
to be fitted to the other end. See section 5.5 for
wiring details.
10.1.1 PowerCon wiring details
If it is necessary to rewire the PowerCon connector,
or to make custom power cables for your particular
installation, please observe the following connection
details:
PowerCon Pin
230 V Version
115 V Version
L
Brown
Black
N
Blue
White
Green/Yellow
Green
Pin 1: Ground/shield
Pin 2: Hot (+)
Pin 3: Cold (-)
Figure 10-2
When paralleling analog inputs of several
PLMs, either by using the Link connectors
or an external paralleling system, bear in
mind that the drive capability of the source’s
output stage (typically a mixing console) may be
limited. As a general rule, it is inadvisable to attempt
to parallel more than four PLM inputs together in this
way. (Two inputs on the same PLM do count as two!)
If it is necessary to drive a greater number, the use
of a good quality balanced audio line driver or
distribution amplifier is recommended.
10.2.1.1 Unbalanced operation
Balanced interconnections are recommended
whenever possible. However, if it is necessary to
drive the PLM from equipment with an unbalanced
output, wire the inputs as shown in the diagram
below:
Table 10-1
2
10.2 Audio Input and Links
HOT
HOT
COLD
COLD
SCRN
SCRN
Unbalanced Output
(Typically phono)
1
3
Balanced Input
(XLR)
Figure 10-3
10.2.1 Analog inputs and Links
INPUT 1
LINK 1
INPUT 2
ANALOG WITH ISO-FLOAT
LINK 2
TM
PIN 1: SCRN 2: POS 3: NEG
Figure 10-1
The electronically-balanced analog inputs are on
XLR3F connectors. The Link outputs on XLR3M
connectors are directly paralleled to the inputs. All
XLRs are wired to IEC268 as follows in figure 10-2:
48 PLM Series Operation Manual
This method still uses twin-and-screen (‘balanced’)
cable and standard XLR pin connections at the
PLM end, but the ‘cold’ wire and the cable screen
are connected together to the signal ground of the
equipment at the source end.
This usually provides better noise and hum rejection
than the more common method of joining pins 1 and
3 together in the XLR. However, if only a singlecore (“unbalanced”) cable is available, the following
method may be employed. See figure 10-4.
Back Panel Interface 10
2
HOT
1
HOT
The AES/EBU digital audio format uses a balanced
electrical configuration similar to balanced analog
audio. The pinout is shown in Table 10-2.
SCRN
SCRN
Unbalanced Output
(Typically phono)
Balanced Input
(XLR)
3
Figure 10-4
10.2.1.2 Iso-Float electronic balancing
The PLM’s electronic input balancing circuits use
Dolby Laboratories patented Iso-Float system.
The Iso-Float technology combines the benefits of
transformer-coupled isolation with the advantages of
clean, direct-coupled inputs and outputs. The audio
converters are galvanically isolated, and not connected
to the main ground. High-quality transformers and
opto-isolators create a barrier between the PLM
and possible grounding aberrations from the outside
electrical environment.
Iso-Float on the PLM is accessed via the menu
system; see section 9.12.3.2 for details. Additionally it
is possible to control Iso-Float directly from the DLC
PLM Edition software.
10.2.2 Digital inputs and Links
INPUT 1-2
AES/EBU Wiring Table
Pin 1
Ground/Shield
Pin 2
Hot (+)
Pin 3
Cold (-)
Table 10-2
Note that this is the only possible method of wiring –
there is no equivalent of an “unbalanced” connection
in the digital domain.
The AES/EBU signal format carries 2 channels of
audio (plus other control data) on a single cable/
connector. Selection of Ch A or Ch B is performed
within the digital processing section of the PLM and
is controlled from the menu system. See section
9.12.3.1 for full details.
The AES/EBU Link connector may be used to “daisychain” the inputs of multiple PLMs together. Unlike
daisy-chaining of analog inputs, attention must be
paid to line termination. When daisy-chaining PLMs
together, only the “last” PLM in the chain should be
set to Terminated. All other PLMs should be set to
Unterminated. See section 9.12.3.3 for full details
of setting input termination.
LINK 1-2
AES/EBU
Figure 10-5
The AES/EBU digital audio input is on an XLR3F
connector, which is directly paralleled to the adjacent
XLR3M AES/EBU Link connector.
Please read the warnings regarding the
connection of digital audio signals in section
6.2.1 before attempting to use the AES/EBU
input.
As with balanced analog audio, there is a finite
limit to how many PLMs may have their AES/EBU
inputs “daisy-chained” together. The practical limit
will be determined by cable type and length as well
as the output circuit of the driving source. It may
be necessary to employ an AES/EBU line driver or
distribution amplifier to achieve reliable results in
some situations.
Factory tests indicate that it may be possible to
connect up to 20 PLMs in this way, but the number
achievable in any given situation may be less than
this.
See section 13.5 for further information on
interconnecting digital audio equipment.
PLM Series Operation Manual 49
10 back panel interface
10.3 Speaker Output Connections
NL4
PLM Output
Channels 1 & 2
The PLM is available with either 4 mm binding posts
or Neutrik Speakon connectors for the outputs.
The PLM is capable of bridge-mode
operation, however the present system
management software does not support
this mode and therefore bridged operation
is NOT recommended.
4+
1+
41+
31-
3+
1-
22+
2+
Please contact [email protected] for
further information on bridge-mode operation.
2-
3+
3-
10.3.1Speakon Output Connectors
4+
4SPEAKER OUTPUTS
CLASS 2 WIRING
1+/- CH 1+/2+/- CH 2+/-
1+/- CH 1+/2+/- CH 2+/-
3+/- CH 3+/4+/- CH 4+/-
NL8
PLM Output
Channels 1 - 4
1+/- CH 3+/2+/- CH 4+/-
NL4
PLM Output
Channels 3 & 4
Figure 10-6
Figure 10-7
Speakon versions of the PLM are fitted with two NL4
4-pole and one NL8 8-pole Speakon sockets. The two
NL4s carry the outputs of channels 1 & 2 and 3 & 4
respectively, and the NL8 all four channels.
Pinout of the Speakon connectors is shown in Table
10-3.
Pin
No.
NL4 #1 Chs.
1&2
NL8
Chs. 1 - 4
NL4 #2 Chs.
3&4
1+
channel 1 o/p +
channel 1 o/p +
channel 3 o/p +
1-
channel 1 o/p -
channel 1 o/p -
channel 3 o/p -
2+
channel 2 o/p +
channel 2 o/p +
channel 4 o/p +
2-
channel 2 o/p -
channel 2 o/p -
channel 4 o/p -
3+
channel 3 o/p +
3-
channel 3 o/p -
4+
channel 4 o/p +
4-
channel 4 o/p Table 10-3
50 PLM Series Operation Manual
Users will find it convenient to use either the NL4
connectors or the NL8 depending on the installation
situation. Both sets of connectors may be used if
desired, with one set being wired to a local connection
panel for test purposes, for example.
When wiring the loudspeaker connections, ensure
that all ‘+’ loudspeaker connections are connected
to the pins marked ‘+’, and that all ‘ - ‘ connections
to ‘ – ‘ pins.
Back panel interface 10
10.3.2Binding Post Output Connectors
10.4 RJ45 connectors
SPEAKER OUTPUTS
ACT PRIM LINK
CH 1
CH 3
CH 2
CH 4
CLASS 2 WIRING
ACT
SEC
LINK
SWITCHED 10/100 Base-TX
Figure 10-8
Figure 10-9
Binding post versions of the PLM are fitted with
four pairs of black and red 4 mm binding posts. Each
pair provides the output from one power output
channel.
The network connections of the PLM are on two
Neutrik EtherCon RJ45 sockets. The second
connector may be used for linking multiple PLMs,
or alternatively for connection of a secondary network
for full redundancy.
Connect the ‘+’ loudspeaker terminals to the red
binding posts and the ‘ – ‘terminals to the black
binding posts.
There are three methods of connecting to the binding
posts.
▸▸
▸▸
▸▸
Solder 4 mm Banana plugs to the ends of the
speaker wires and plug into the center of the
turrets.
The network connections on the PLM auto-sense
whether standard (‘straight’) or ‘crossed’ Cat-5e
cables are in use, and thus either type may be
used. Pre-made cables with moulded RJ45 plugs
are recommended. If it is necessary to make up
custom Cat-5e network cables, use the following
pinout:
Pin No.
Color
Thread the stripped ends of the wires through
the holes in the posts. Enter the wires for output
channels 1 and 3 from above and for channels 2
and 4 from below. Tighten the plastic turrets by
finger only – be careful not to overtighten.
1
Brown
2
Brown + White
3
Green
4
Blue + White
5
Blue
Crimp 4mm insulated spade terminals onto the
ends of the wires. These can be pushed into the
binding post assembly from above (Chs 1 and
3) or below (Chs 2 and 4). The hole in the post
is ignored. Hand tighten plastic turrets, being
careful not to overtighten.
6
Green + White
7
Orange
8
Orange + White
The outputs of the PLM can produce a high
voltage. Do not connect or disconnect
loudspeaker(s) while the PLM is powered on. Never
operate the PLM with any portion of bare loudspeaker
wire exposed. On Speakon versions, do not use
mating plugs without the rear covers in place.
Table 10-4
Figure 10-10
When the PLM is connected to an active network,
the yellow LINK LED above the connector being
used illuminates. Data activity on the network is
indicated by illumination of the green ACT LED. It is
normal for the ACT LED to flicker either sporadically
or continuously.
PLM Series Operation Manual 51
11 APPENDIX
11.1 Faults and warnings
overview
Indication of the various fault or warning conditions
that may arise in the PLM is given by the tricolor
LEDs in the eight soft buttons around the display.
Because each LED indicates several types of fault
or warning, a brief textual description of the fault or
warning type is given on the display adjacent to the
soft button(s).
Section 9.10.2 details all the warning and fault
indications.
Table 11-1 provides additional explanation of what
problems the PLM might have encountered to give
rise to the each of the fault or warning conditions.
Note that some of the conditions give rise to both
a warning and a fault indication; in these cases
the warning is given by a yellow LED indication as
the operating parameter in question approaches
the safety threshold, with the fault state being
indicated by the LED turning red when the threshold
is actually reached (with a mute being applied in
some cases).
52 PLM Series Operation Manual
APPENDIX 11
Displayed Text
Event Log Text
Category
Type
Description
TEMP WARN:CH
Temp.warning; Channel
Warning
TEMP FLT:CH
Temp Fault: Amp
Channel
Fault
Amp Temperature
Temperature in amplifier power stage exceeds
safety limit
UNDER SPKR CNT
Under Speaker Count
Warning
Fewer Speakers
A higher load impedance has been measured than
was predicted by the Load Library for the assigned
speaker type
OVER SPKR CNT
Over Speaker Count
Warning
More Speakers
A lower load impedance has been measured than
was predicted by the Load Library for the assigned
speaker type
NO LOAD
Channel Fault: No Load
Detected
Fault
No load
LoadSmart is measuring zero load current
SHORT CIRCUIT
Channel Fault: Short
Circuit Protection
Fault
Short circuit load
LoadSmart is measuring both very high load
current and very low output voltage
TEMP WARN:MAG
Temp.Warning; Speaker
Magnet
Warning
TEMP FLT:MAG
Temp Fault: Magnet
Fault
TEMP WARN:VC
Temp.Warning; Speaker
Voice-Coil
Warning
TEMP FLT:VC
Temp Fault: Voice Coil
Fault
Speaker voice coil
temperature
WRONG LOAD
Load Type / Routing
Mismatch
Fault
Load type mismatch
LoadSmart is measuring load characteristics which
differ from those of the assigned speaker type
TYPE: UNCERTAIN
Uncertain About
Speaker Type
Warning
Load uncertainty
When speaker Fingerprints are taken a tolerance
band is also defined to take into account production
variations. If LoadSmart results lie in this band a
Load uncertainty warning results. The user should
re-check the load and if all appears to be correct it is
likely that normal operation will result.
NO LOAD MODEL
Channel Warning: No
Load Model
Warning
No Live Model
This warning will result if a Module is loaded which
does not include a Fingerprint, such as a standard
Dolby Lake Module.
LOAD NOT VER
Channel Warning: Load
Not Verified
Warning
Load not verified
A Module containing a Fingerprint has been loaded,
but the load is yet to be verified with LoadSmart.
LM PREC. LOW
Load Monitoring
precision low
Warning
Model precision low
A SpeakerSafe warning indicating insufficient data
to produce reliable results. This may occur, for
example, if a channel is being driven at a very low
level.
CTRL OFFLINE
n/a
Warning
Controller offline
The PLM is no longer able to communicate with the
Dolby Lake Controller.
n/a
Frame Fault: No Input
Source
Fault
No input source
The chosen input type has been deselected and
the input type selector has no alternative input
sources in the priority list.
AUDIO FAULT
Frame Fault: Audio
Interface
Fault
Audio interface fault
An internal audio fault has arisen and the unit needs
servicing.
TEMP FLT:PSU
Temp Fault: Power
Supply Unit
Fault
Power supply
temperature
The temperature of the PLM’s PSU has exceeded
its safety limit
TEMP FLT:DSP
Temp Fault: DSP area
slot compartment
Fault
DSP compartment
temperature
The temperature of the PLM’s processing circuitry
has exceeded its safety limit
VHF FAULT
Channel Fault: Very
High Frequency
Fault
VHF at output
An exceptionally high level of continuous HF has
been detected at the PLM’s power output stage
SERVICE CH.
Channel Fault: Unit
Needs Service
Fault
Needs service
One or more fuses in the power stage have blown.
This is not a user-servicable fault and the unit
should be returned to your dealer.
High temperature in amplifier power stage
Speaker magnet
temperature
The temperature of the speaker magnet is high (as
computed from LoadLibrary data)
The temperature of the speaker magnet (as
computed from LoadLibrary data) has exceeded the
manufacturers’ recommended maximum
The temperature of the speaker voice coil is high (as
computed from LoadLibrary data)
The temperature of the speaker voice coil (as
computed from LoadLibrary data) has exceeded the
manufacturers’ recommended maximum
PLM Series Operation Manual 53
11 APPENDIX
Displayed Text
Event Log Text
Category
Type
Description
SERVICE PSU
Frame Fault: Unit Needs
Service
Fault
PSU fault
A fault has developed in the PSU. This is not a userservicable fault and the unit should be returned to
your dealer.
INPUT CLIP
n/a
Clip
Input clip
The input signal level is too high and is causing
clipping at the input stage
MODULE CLIP
n/a
Clip
Module clip
The signal level entering the Dolby Lake processing
module is too high and is clipping.
CURRENT CLIP
n/a
Clip
Current Protection active
PLM’s power output stage current has exceeded
the fixed safe maximum and the Current Peak
Limiter has become active to limit it.
CAL ACTIVE
n/a
Fault
Current Average Limiter
Ensures that the PLM’s power output stages are
not overloaded.
PAL ACTIVE
n/a
Fault
Power limiter active
Total amplifier power being delivered has exceeded
the safe maximum value and the PAL has become
active.
VOLTAGE CLIP
n/a
Fault
Voltage limiter active
The peak voltage at the output terminals has
exceeded the user-defined safe maximum.
MOD. IN MUTE
Module Input Mute
Mute
status
Module input Mute
The audio signal has been muted in the input stage
of the Dolby Lake processor
MOD. OUT MUTE
Module Output Mute
Mute
status
Module output Mute
The audio signal has been muted in the output
stage of the Dolby Lake processor
AMP CH. MUTE
Amp Channel Mute
Mute
status
Amplifier Mute
The audio signal has been muted in the power
output stage
SPKSAFE INACT
SpeakerSafe not
started
Warning
SpeakerSafe inactive
Warns that after LoadSmart verification,
SpeakerSafe live monitoring was not started
n/a
LoadSmart verification
Event
LoadSmart active
Warns that LoadSmart load verification is in
progress
Table 11-1
54 PLM Series Operation Manual
APPENDIX 11
11.2 Maintenance
11.5 Factory Default Settings
During normal operation your PLM will provide
trouble-free service. The main user maintenance is
to periodically clean the dust filters behind the front
grilles. The two grilles can be removed by undoing the
knurled-head screws, and the foam filter elements
then withdrawn. They are best cleaned with a handheld vacuum cleaner.
Modules:
If the LCD display needs cleaning, use a soft cloth
only – do NOT use solvent cleaners of any kind as
they may attack the plastic.
In some extreme cases it may be necessary to clean
the inside of the PLM. This procedure should only
be carried out by qualified service personnel. This
may be necessary if the PLM has had prolonged
operation in an extreme environment such as one
where “cracked oil” smoke machines are in use.
If you are using your PLM in such a heavy duty
application, it is recommended to have it serviced
every 3 years as a purely preventative measure.
11.3 Additional Documentation
In case you didn’t find what you were looking for
in this Operation Manual, check out the website
www.labgruppen.com/plm, where you can find a
multitude of additional documentation for the PLM
Series.
11.4 Current draw and thermal dissipation specifications
Table 11-2 contains data on measured current
consumption and calculated heat dissipation for
four operating conditions: i) Power on, no signal; ii)
Normal operation (1/8 of rated power); iii) Heavy duty
operation (1/4 rated power – see Note 3 at foot of
table); iv) 20 kHz sine wave
Modules:
2 x 2 Aux
Levels:Unity (all gain adjustments)
EQ:
All EQ flat
Polarity: In phase
MaxRMS: 20 dB
MaxPeak: 21 dB
Input mutes On
Autoselect On
Input sensitivity: +26 dBu
Dante Disabled.
AES/EBU Terminated
IsoFloat Enabled
ISVPL:
153 V
Amp Gain:
35 dB
Router 1
▸▸ AES 1 set as Priority 1
▸▸ Analog 1 set as Priority 4
Router 2
▸▸ AES 2 set as Priority 1
▸▸ Analog 2 set as Priority 4
Frame/Power Output Stage
Attenuation:
Polarity:
Mute: Load Model:
0 dB
In phase.
Unmuted
Not loaded
11.6 Glossary of terms, acronyms, abbreviations, etc. used in this manual
The explanations given in table 1-3 are based on
the specific use of each term in this manual. The
definitions are not intended to be exhaustive. Many
of the terms have wider meanings!
PLM Series Operation Manual 55
11 APPENDIX
PLM 10000Q
Level
Load
Rated power
Line Current *2)
115 VAC
230 VAC
Watt *1)
Thermal Dissipation
In
Out
Standby, with remote power off.
4.8
0
5
16
4
Powered on, idling.
145
0
145
496
125
307
Amp (I)
Pink noise (1/8
rated power)
Pink noise (1/4
rated power)
*3)
Sine 20kHz
Dissipated
BTU/hr
kCal/hr
Watt
16 Ω / Ch.
660 x 4
9.3
4.8
687
330
357
1218
8 Ω / Ch.
1300 x 4
16.3
8.5
1250
650
600
2048
516
4 Ω / Ch.
2300 x 4
25.2
13.2
2014
1150
864
2949
743
2.67 Ω / Ch.
2700 x 4
31.5
16.4
2553
1350
1203
4106
1034
2 Ω / Ch.
2350 x 4
29.2
15.2
2341
1175
1166
3980
1003
16 Ω / Ch.
660 x 4
14.7
7.7
1098
660
438
1495
377
8 Ω / Ch.
1300 x 4
26.0
13.6
2049
1300
749
2556
644
1243
4 Ω / Ch.
2300 x 4
45.8
23.9
3746
2300
1446
4935
2.67 Ω / Ch.
2700 x 4
52.5
27.4
4420
2700
1720
5870
1479
2 Ω / Ch.
2500 x 4
54.2
28.3
4437
2500
1937
6611
1666
16 Ω / Ch.
1 x4
2.7
1.4
160
4
156
532
134
16 Ω / Ch.
0.25 x 4
2.5
1.3
149
1
148
505
127
Mains connector - 230 V CE version / 230V ETL version / 115 V ETL version
32 A, Neutrik® PowerCon® Twist lock
*1) The amplifier section’s PSU operates as a non-resistive load, so the calculation “Volts x Amps = Watts” would not be correct. Instead, measured
and specified here is what is known as the “Active Power” of the amplifier section providing useful, real-world values of power consumption and
heat dissipation.
*2) Current draw figures measured at 230 V. 115 V figures are 230 V figures multiplied by two.
*3) Figures measured at maximum power before amplifier protection and limiter features are engaged. Typically this is between 1/4 and 1/3 of rated
power. Note that the maximum power condition is very extreme and will not occur during normal operation. Also note that the mains breaker will not
be tripped even if operation is in excess of maximum ratings.
Table 11-2: PLM 10000Q Current Draw and Thermal Dissipation specifications
56 PLM Series Operation Manual
APPENDIX 11
Term
Description
10/100Base-T
10Base-T and 100Base-T are IT industry-speak for two different standards of Ethernet network. In broad terms, the older 10Base-T
operates at 10Mbps but has now been largely supplanted by the 100Mbps 100Base-T.
Access Point
See Wireless Access Point.
AES/EBU
AES/EBU is the abbreviated term generally used to refer to the internationally agreed standard for transmitting two channels of digital
audio between items of equipment. The AES/EBU standard caters for audio at up to 24-bit and various sample rates. It is also allows for
various items of Control and User data to be included in the bitstream. XLR3 connectors are used for interconnection, but special cabling
techniques must be observed.
Analog
Conventional “non-digital” audio is termed analog audio. Conventional power amplifiers are inherently analog devices as far as power
amplification is concerned, though the PLM can accept digital as well as analog inputs.
Attack time
How fast a dynamics control circuit - such as a limiter or compressor - reacts to an increase in input signal level (above the threshold) is
termed its Attack Time. Attack Time may be fixed, program-dependent or adjustable by the user. The various limiting circuits in the PLM
include examples of all three.
Auto-sensing
The Ethernet ports on the PLM automatically determine the base speed of the network they are connected to (10Base-T or 100Base-T) and
configure themselves appropriately. This is termed auto-sensing.
Auto-uplink
The Ethernet ports on the PLM are able to operate with either straight or crossed network cables. This ability to connect correctly with
either type is termed auto-uplinking.
Auxiliary output
Some of the configurations possible in the Dolby Lake processing system Modules result in a single audio processing channel being created
in addition to a crossover. This is termed an Auxiliary output.
Backbone
Large Ethernet networks are often implemented with a very high speed “trunk” part of the network topology feeding main switches, which
in turn support smaller, lower-speed local networks. The term backbone is used to describe such a trunk.
Balanced
Various types of electrical signal are transmitted between equipment in a balanced configuration. This requires three conductors, which
are generally termed Hot (+), Cold (-) and Screen. Balanced transmission of analog audio is preferable to unbalanced, and is mandatory for
AES/EBU digital audio and RS485 control data. The analog audio inputs on the PLM are balanced.
Bandwidth
The bandwidth of a signal channel or interconnection is the range of frequencies it is able to handle. The term can be applied to both audio
channels and Ethernet networks.
Bessel (filter)
There are many different designs of audio filters, such as are used in crossover networks for example. They tend to differ primarily in the
flatness of frequency reponse in the pass-band and in the phase relationship of signals at different frequencies. The Dolby Lake processing
system offers a choice of traditional filters (Infinite Impulse Response) of which Bessel is an example.
Block
The PLM’s front panel display is divided into eight areas termed in this manual as blocks. Each block is adjacent to one of the soft
buttons.
Butterworth (filter)
See Bessel.
Cat-5e/Cat-6, etc.
Designations of industry-standard cables suitable for Ethernet networks using four twisted pairs of conductors. Often referred to as UTP
cable (Unscreened Twisted Pair). Cat-5 has generally been replaced by Cat-5e (e = ‘enhanced’). Either Cat-5e or Cat-6 cable are suitable
for networking the PLM.
Chain
An Ethernet network comprising several PLMs (or other devices) interconnected using the Secondary connectors to daisy-chain the units
together is an example of a network with a chain topology.
Channel
The four outputs of the PLM and their associated processing sections are termed Channels. On the front panel, the four right-hand soft
buttons and display blocks relate to the four channels.
Clip/Clipping
If the level of an audio signal is so great it reaches the limit that can be handled by a particular processing stage, clipping is said to occur.
In an analog stage, this will be when the peak signal level equals the internal supply voltage of the stage, and distortion will be heard.
Clipping can also occur in digital processing, when a condition termed ‘data overflow’ results. This will be heard as a very unpleasant form
of extreme distortion. Careful adjustment of signal levels and an understanding of the PLM’s gain structure will avoid clipping.
Clock
Digital audio is produced by sampling analog audio at a known, fixed rate, controlled by some form of master clock. Problems can occur
when interconnecting two pieces of digital audio equipment if their internal master clocks are not synchronized. Various techniques may
be employed to ensure that this is the case.
CPL
Short for Current Peak Limiter, a Lab.gruppen protection technique which ensures that the amplifier’s output transistors can never attempt
to deliver more than their rated current.
Crossed network
cable
An Ethernet cable in which four of the eight conductors (pins 1, 2, 5 & 6) are not wired pin-to-pin. Such a cable is required in conventional IT
networks to connect two PCs together without using a hub or switch. The auto-uplink feature of the PLM’s Ethernet ports allows crossed
cables to be used if wished. See also Straight network cable.
Crossover
An audio processor which divides the audio signal into two or more bands of frequencies, each of which is then amplified independently
and routed to a loudspeaker of the appropriate type for those frequencies.
Daisy chain
Connecting the inputs of a series of audio equipment by wiring from the first piece of equipment to the second, then from that to the third
and so on is termed daisy-chaining. On the PLM, daisy-chaining is simple as all inputs – analog, AES/EBU digital and Ethernet – are provided
with Link connectors.
Dante
A new-generation audio data protocol developed by Audinate ® Pty Ltd, allowing multichannel high-resolution digital audio plus control data
to be transmitted via standard IT-industry networks using TCP/IP data packeting. The Dolby Lake processing system integrated within the
PLM includes a Dante interface, which can provide the audio inputs to the PLM.
dB
Abbreviation for decibel, standard unit used to describe the ratio between two different voltage or power levels. Hence parameters of gain
and attenuation are expressed in positive or negative dB’s respectively; e.g., a gain of 6 dB (+6 dB) means the signal voltage is doubled.
Note that a dB is not an expression of an absolute signal level – see dBu.
dB/octave
The slope of an audio filter (such as implemented in crossovers) is expressed in dBs per octave, generally written as dB/oct. The higher the
number, the steeper the slope, and thus a lesser amount of the unwanted frequencies.
PLM Series Operation Manual 57
11 APPENDIX
Term
Description
dBu
dBu’s are usually used instead of voltages to describe signal levels in audio systems. A signal level of 0 dBu may be taken as 0,775Vrms.
Delay
It is possible to delay into the audio signal in each of the PLM’s inputs and/or output channels to time-align loudspeaker arrays.
Digital gain offset
Digital gain offset is effectively a ‘fine’ gain adjustment performed in the digital domain, which can be applied to digital input signals to
optimise the signal to the PLM’s gain structure.
Distribution amplifier
A distribution amplifier (usually abbreviated to DA) is an audio buffer stage – usually with zero gain – with one input and several outputs.
Mono, stereo and AES/EBU digital versions can be obtained. Use of a DA to feed a signal to several destinations ensures correct impedance
matching and isolation between source and destinations.
Dolby Lake Controller
PLM Edition
The Dolby Lake Controller PLM Edition is the software application used to control one or more PLM devices. This software application is
based on Dolby Lake’s standard Dolby Lake Controller but also provides additional functionality to allow control over various dedicated Lab.
gruppen features within the PLM. It is also possible to use the Dolby Lake Controller PLM Edition to control larger systems configured with
PLMs, Dolby Lake Processors and other Dolby Lake legacy devices.
Dolby Lake Processor
A stand-alone loudspeaker management system manufactured by Dolby using Lake technology. The Dolby Lake processing system
integrated in the PLM is a slightly scaled-version of the Dolby Lake Processor.
DSP
Short for Digital Signal Processing. The central processing part of a digital audio device, where the “number-crunching” is carried out.
Dual-network
topology
A network topology consisting of two (usually) identical networks, one connecting to the Primary Ethernet ports and the other to the
Secondary ports. Although more complex to implement, the advantage of using a dual-network system is one of greatly improved reliability
as one complete network remains operational if the other should fail.
Electronic balancing
See Balancing. In the analog domain, balanced inputs and outputs may be provided on audio equipment either by the use of transformers
(traditional, very good, but heavy and expensive) or via electronic balancing circuits (nearly as good, without full electrical isolation, but a
great deal cheaper).
EQ
Short for Equalization. Altering the relative amplitude of individual parts of an audio signal’s frequency spectrum is termed ‘applying EQ’
Ethernet
Ethernet is the network protocol now almost universally adopted for data interchange between computer equipment.
Event log
The details of any fault or warning conditions which arise in the PLM during operation are recorded in a data file created by the DLC PLM
Edition software called the Event Log.
Fault
A Fault in the PLM occurs when one of the PLM’s operating parameters exceeds pre-determined safety levels, or when a condition is
detected that otherwise seriously affects the PLM’s performance. Some fault conditions may result in one or all of the PLM channels
being muted.
Fingerprint
The Dolby Lake Controller PLM Edition comes includes LoadLibrary consisting of data describing the electrical characteristics of commonlyused loudspeakers. The file for each speaker type is termed its Fingerprint.
Finite impulse
response (filter)
An alternative design of crossover filter realisable in the digital domain, providing linear phase characteristics. FIR filtering is provided in the
Dolby Lake processing within the PLM.
Floating
An analog balanced input or output is said to be floating when full electrical isolation exists between that input or output and the equipment
connected to it. Transformer-coupled inputs and outputs are inherently floating. Electronically balanced inputs and outputs can never be
truly floating, though better designs – such as found in the PLM - do mimic the characteristics of transformer-coupled designs to a high
degree.
Forced-air cooling
A method of cooling and ventilating electronic equipment using one or more fans. Air is deliberately sucked in on one side of the chassis and
blown out of another. Some equipment has thermostatically-controlled fan(s) which remain off until the temperature rises. The alternative
‘non-forced’ method used for low-power equipment is cooling by convection.
Frame
Dolby Lake terminology for a physical unit containing a Dolby Lake processing system, i.e. a single PLM or Dolby Lake Processor.
Frame ID
An electronic identification ‘label’ which can be given to each Frame in an amplification system. Naming Frames in a large system is
desirable as it simplifies identification in the Dolby Lake Controller.
Frame Preset
Frame Presets are a class of Presets within the Dolby Lake processing system. Up to 100 can be stored in the PLM itself, and each holds
the complete configuration of all Modules and the Modules’ internal settings.
Gain
The difference in signal level between the input and output of an audio stage, expressed in dBs and relative to the input.
Ground loop
The presence of hum at an amplifier’s output may be due to a ground loop. This can arise if the amplifier is connected to an analog
signal source such that their signal grounds and electrical grounds are both continuous. Proper attention to wiring of XLR connectors and
grounding of amplifier chassis will avoid ground loops.
Hard knee
Compressors and limiters have a transfer characteristic such that signals at a level lower than the threshold are unaltered, while those above
the threshold have their dynamic range reduced by a greater (limiter) or lesser (compressor) amount. The characteristic’s transition at the
threshold level is termed the knee; a hard knee characteristic implies an abrupt change from no-limiting to limiting for a small increase of
level.
Headroom
Headroom at a particular point in an audio processing system is a measure of the dynamic range available at that point. It is how many dBs
the signal would have to increase by before clipping occurs. Headroom is rarely constant at all points in any piece of audio equipment; for
this reason, care should always be taken when adjusting level at various points in the signal chain to optimize headroom.
Hub
A type of network interface device with multiple Ethernet ports. Data arriving at any port is sent to all others. Hubs have been largely
replaced by Switches.
Infinite impulse
response (filter)
See Bessel.
Input level
The amplitude of an audio signal at the point where it is applied to the input of the PLM, or at the input of an intermediate stage within it. An
analog input signal level will be expressed in dBu’s, while a digital input signal level in dBfS (dBs below digital clip level; fS = full-scale)
58 PLM Series Operation Manual
APPENDIX 11
Term
Description
In-rush current
When power is applied to a piece of electronic equipment, the initial current taken by the PSU can be very high as the various capacitors in
the circuitry charge up. This is called the in-rush current. In the case of power amplifiers, which contain numerous very large capacitors, the
in-rush current can be enough to blow fuses or breakers. The PLM’s PSU contains circuitry to control the in-rush current to prevent this.
Inverse video
Text on the display screen is normally white on the blue background. When text is selected for adjustment, it appears in inverse video, as
blue on a white ”highlighted’ box.
IP address
Every item of equipment connected to an Ethernet network has a unique address called the IP address, so that data gets to the correct
place. IP addresses are written as four groups of three decimal numbers between 0 and 255. In a system consisting of PLM’s and a DLC,
they are assigned and detected automatically, so there should be no need for users to even be aware of them.
IP subnet mask
IP subnet masks are required in all IP networks. The subnet is determined by the size and type of network being used. For small networks
(less than 254 addresses) a subnet mask of 255.255.255.0 can be used. (A Class C network).
Iso-Float
Iso-Float is Dolby Lake’s proprietary method of electronic balancing, which provides a particularly high level of isolation and immunity from
ground loops.
ISVPL
Short for Inter-Sample Voltage Peak Limiter. A proprietary Lab.gruppen technique for ensuring that the voltage at the output terminals of
an PLM does not exceed a pre-determined level.
Lake Contour
Predecessor to the Dolby Lake Processor.
Latency
The small but finite delay incurred by audio signals when they are transformed into the digital domain, processed digitally and then converted
back into analog signals. In the Dolby Lake system, latency is assured to be constant.
Legacy Dolby
equipment
This term refers to older Dolby Lake stand-alone audio equipment which may form part of an audio system. The DLC PLM Edition has the
capability to control Dolby Lake legacy products.
Limiter
A dynamics control device which prevents audio signals from exceeding a pre-determined output level. It achieves this by applying
gain reduction to any signal which exceeds a set threshold, the degree of reduction increasing as the signal exceeds the threshold by a
increasing margin.
LimiterMax
LimiterMax is the name given to Dolby Lake’s proprietary package of dynamics control which forms part of the Dolby Lake processing
system.
Line driver
An analog audio amplifier, usually with zero gain, having very low output impedance and high drive capability. They are used for transmitting
balanced analog audio over very long cables.
Linear phase
crossover
See FIR Filters
Linkwitz-Riley
See Bessel
LoadLibrary
The Dolby Lake Controller PLM Edition software incorporates LoadLibrary, an additional set of Modules specific to the PLM Series. These
Modules include a database of the electrical characteristics of various popular loudspeakers in addition to the standard Module data. The
PLM uses the load data when verifying and monitoring amplifier loads. See Fingerprint, LoadSmart and SpeakerSafe.
Loads, equal/unequal
The PLM draws different current levels from the AC supply, and thus has different power ratings, according to whether all channels of the
amplifier are driving into the same load impedance, or if there are different impedances on different channels.
LoadSmart
LoadSmart is a load verification procedure within the PLM which allows the operator to confirm that each PLM output has the correct
quantity and type of speaker connected to it. It is intended to be used pre-performance prior to running SpeakerSafe.
Loop-thru
This term refers to the Link connectors provided on the PLM for daisy-chaining further amplifiers or other equipment. The use of these to
connect further devices is termed a loop-thru.
Loudspeaker
management system
A type of audio signal processing device specifically designed to precede or be integrated with one or more power amplifiers, and to
perform dynamics control, EQ and crossover functions. The Dolby Lake processing system integrated in the PLM is an example of a
Loudspeaker management system.
MAC address
In addition to an IP address, every device on an Ethernet network has a MAC address. This address is fixed at the time of manufacture, and
is effectively the permanent identifier of the physical unit. MAC stands for Media Access Control
MaxPeak
Dolby Lake’s LimiterMax provides independent dynamics control over signal peaks (MaxPeak) and the average signal level (MaxRMS).
MaxRMS
See MaxPeak.
Menu
A means of organizing the various PLM functions and parameters into a set of on-screen pages, which can be displayed one at a time on
the PLM’s front panel display.
Mesa Quad EQ
A 4-channel EQ processor made by Dolby Lake, no longer in production.
Module
Module is the term used in the Dolby Lake Controller PLM Edition to describe the virtual set of signal processing that routes an audio input
to the various frequency-weighted outputs of a crossover. The processing system within the PLM allows for two Modules, each of which
may be assigned a range of crossover configurations, input sources, etc.
Module Preset
A class of Preset within the Dolby Lake processing system. A Module Preset contains all the configuration data and settings for one
Module, and is saved in the Dolby Lake Controller PLM Edition software, not in the PLM.
Non-resistive load
Power (in watts) only equals voltage (volts) times current (amps) if the load is purely resistive. Real-world loads such as loudspeakers exhibit
varying degrees of non-resistivity, and are termed reactive loads.
Offline
A device on an Ethernet network which is not communicating with the rest of the network either due to a fault or intentionally is said to
be offline.
Online
A device on an Ethernet network which is fully operational and communicating with the rest of the network is said to be online.
Page
The set of data shown on the front panel display at any one time.
PLM Series Operation Manual 59
11 APPENDIX
Term
Description
PAL
Short for Power Average Limiter, PAL is proprietary Lab.gruppen circuit which provides additional amplifier protection. The PAL ensures
that the power drawn by the PSU from the AC mains does not exceed the fuse or breaker ratings.
Parallel
Two or more e.g. inputs which are wired together so that all inputs are connected to the same source are said to be paralleled. Signal levels
will be reduced if too many inputs are paralleled; in the case of AES/EBU, this may result in a complete of audio.
Parameter
Any control function which can be adjusted by the user to one of several different values is termed a parameter. Input level, delay, limiter
threshold, etc., are all parameters.
Pass-through cable
See Straight network cable.
Phase reverse
Audio signals may be phase reversed in either the analog or digital domain by various techniques. Adding a signal to the phase reversed
version of itself results in complete cancellation. The PLM allows signals to be phase reversed in both input stages and output channels.
Ping
Pinging is a term coined by the IT industry to the procedure of sending a command over a network to a particular Ethernet device asking it
to confirm its identity and possibly reply with additional information. Thus an PLM on a network can be pinged from the DLC; on receipt of
the ‘ping’, the hi-intensity white LED on the front panel illuminates. Reverse pinging is also possible with the PLM, whereby instigating a
ping from the PLM registers a visual ident on the DLC screen.
PowerCon
An industrial-quality AC mains connector manufactured by Neutrik.
Preset
A specific set of PLM configurations and parameters which can be saved for later recall. The PLM allows four types of Presets to be saved;
see Module Preset, Frame Preset, Array Preset and System Reset.
Primary
The Primary Ethernet port on the PLM is the means of connecting the PLM to a network. See also Secondary.
PSU
Abbreviation of Power Supply Unit. The PSU in any item of electronic equipment converts the AC mains into a set of internal DC voltages
which run the electronic assemblies themselves.
Release time
The length of a time a dynamics control device – e.g. a limiter – maintains gain reduction on the input signal after the signal has dropped
back below the threshold is called the release time. It may be necessary to adjust release time for a particular type of program material to
render the effect of ‘noise pumping’ as inaudible as possible
RJ45
RJ45s are the industry-standard connectors for Ethernet ports.
RMS
Abbreviation of Root Mean Square. The RMS value of an audio signal is a more useful indication of level than its peak value. For a pure
sinusoidal signal, the RMS voltage is 0.707 of the value of the peak voltage.
Router
As far as networks of the type discussed in this manual are concerned, see Switch.
Secondary
The Secondary Ethernet port on the PLM can be used either as a daisy-chain output, repeating the network connection at the Primary port,
or for the connection of a separate second network for full redundancy.
Sensitivity
The gain available in an audio amplifier (or other processor) can be expressed as the amplifier’s sensitivity. The sensitivity is the lowest level
signal the amplifier can accept while still delivering its full output voltage – i.e., with the gain set to maximum.
Short circuit
protection
A Lab.gruppen proprietary protective circuit designed to mute a channel when a short circuit is detected at its output terminals to prevent
damage to the amplifier.
Slot
The physical location within the PLM for the processors.
Soft buttons
The eight buttons around the front panel display are called soft buttons because their function varies depending upon which display page
is currently on-screen.
Soft knee
See hard knee. In a soft-knee limiter, the degree of gain reduction gently increases as input signal level rises through the threshold. Soft
knee limiting is generally regarded as sounding more natural.
SpeakerSafe
Once activated in the Dolby Lake Controller PLM Edition software, SpeakerSafe constantly monitors the voltage and current at the PLM’s
outputs. Using Fingerprint data, the software then calculates parameters such as voice coil and magnet temperatures, providing the
operator with real-time performance monitoring. See LoadLibrary.
Speakon
An industrial-quality loudspeaker connector manufactured by Neutrik. 4-pole (2 speakers) and 8-pole (4 speakers) versions are fitted to
Speakon versions of the PLM.
Star
A network topology which uses a network switch to connect to individual PLMs. Each PLM connects to one port on the switch with its own
cable, thus the network looks like a star when drawn as a diagram with the switch at the centre.
Straight network
cable
A Cat-5/6 network cable with full pin-to-pin connections is called a straight network cable. The PLM can connect to a network using either
straight or crossed network cables.
Sub-woofer (output)
A sub-woofer is a loudspeaker designed for very low frequencies only. See Auxiliary output. One possible use of an auxiliary output would
be to provide a dedicated LF output for a sub-woofer.
Subsystem
It is possible when working with large networked systems to store selected components of the system into a Subsystem. This is useful if
working on a tour that encompasses both large and mid-sized venues. The same core DLC data can then be used for a reduced count of
PLMs or other processors.
Super Module
A Super Module is a virtual construct that can be realized within the DLC, allowing a set of Modules in different Frames to be treated as a
single Module.
Switch (Ethernet)
An Ethernet switch allows several Ethernet devices to be connected to a network using a star topology. More intelligent than the earlier
hubs which they now largely replace, they route packets of data only to the units for which they are intended, and also perform other system
housekeeping and control functions.
System Preset
A class of Preset within the Dolby Lake processing system, System Presets allow Module or Frame configurations and settings to be stored
for the entire network of PLM’s and other processors.
Tablet PC
A compact PC which uses a touchscreen instead of keyboard and mouse. The Dolby Lake Controller PLM Edition has been optimized for
use on Tablet PCs.
60 PLM Series Operation Manual
APPENDIX 11
Term
Description
Termination
AES/EBU digital audio interconnections must be correctly terminated for reliable operation. The 110 ohm terminations must be set ‘on’ at
the beginning and end of a set of daisy-chained digital audio equipment such as PLMs, and ‘off’ at any intermediate ones.
Topology
A fancy mathematical word for “arrangement” or “configuration”. The topology of a network is a means of visualizing the overall
configuration of the network.
Unbalanced
Analog audio is often transmitted between equipment in unbalanced form – as in a home stereo system. Although the PLM’s analog inputs
are balanced, it may be necessary to use an unbalanced connection if the source itself has an unbalanced output.
VHF protection
VHF protection is another amplifier safety circuit developed by Lab.gruppen. The presence of continuous HF audio can easily damage
loudspeakers, so the protection circuit monitors the output this, muting the amplifier channel if necessary.
View
The information available in the front panel display’s Meter mode is split into three pages which are termed Views.
V peak
Indicates the peak voltage of an audio signal. For a sinusoidal signal, the peak voltage = 1.414 x the RMS voltage, Vrms. Not to be confused
with peak-to-peak voltage (written V pk-pk), which = V peak x 2.
Vrms
The RMS voltage of a signal. See RMS.
Warning
A Warning in the PLM occurs when one of the PLM’s operating parameter approaches a pre-determined safety level. Warning conditions
are indicated by yellow LED indications in the front panel display.
Wireless access point
A device used to connect an Ethernet network to another computer without cables. Think of it as a radio transmitter/receiver for data.
Wireless network
An Ethernet network where some or all cabled connections are replaced by wireless links.
XLR
Industry-standard 3-pole latching connectors for both analog and AES/EBU digital audio.
Table 11-3: Glossary of Terms
Figure. 12-1: Example I/O Connector Panel
PLM Series Operation Manual 61
12 APPLICATION GUIDE
12.1 I/O Panels
System interconnection on-site is made quicker and
simpler if racks are prewired internally to connection
panels. If the panels are fitted to the front of the rack,
all audio, loudspeaker, network and power cables may
then be simply plugged in at one position without
requiring access to the rear of the rack.
Rental companies and other large system users will
most likely already have their own preferred designs
for such panels; figure 12-1 is a suggested layout
which others may find useful. This panel is used
purely for audio connections (both AES/EBU and
analog). A separate panel can be used for Ethernet
connections.
12.2 Power Distribution
For professional applications it is recommend that the
sum of the available mains power is above 3000 W
per PLM (e.g. 230 V x 16 A, 120 V x 32 A). Please see
the following examples suggesting power distriibution
methods across multiple PLM devices.
6 x PLM and 230 V mains supply.
If the mains supply is 230 V and the system
requirement is six PLMs, then the mains capacity
would need to be able to provide 3 x 32 A. There are
two methods of achieving this:
▸▸
▸▸
Three racks, each with two PLMs and a 32 A
single phase mains supply. The 32 A capacity is
shared between the two PLMs within the rack.
This is beneficial as the two PLMs don’t have to
draw the same current. The only limitation is that
in combination they don’t draw over 32 A.
Three racks, each with three PLMs and a 16 A
three phase mains supply. This requires central
power distribution to be configured as two 3 x 16
A circuits from 3 x 32 A. One phase is used for
each PLM within the rack. This has the benefit
that each PLM has its own breaker, but they all
have to operate within the same limit of 16 A;
therefore, more care must be taken to ensure that
no breaker blows if different loads are used.
62 PLM Series Operation Manual
6 x PLM and 115 V mains supply.
If the mains supply is 115 V and the system
requirement is 6 PLMs, then the mains capacity
would need to be able to supply two 3 x 30 A circuits.
There are two methods of achieving this:
▸▸
Two racks, each with three 230 V version PLMs
and a 30 A three phase mains supply. In the rack
the 30 A is shared between the three PLMs. This
has the benefit that the three PLMs don’t have
to draw the same current; one can be allowed
to draw a little more than the other two. The
only limitation is that in combination they don’t
draw over 30 A.
▸▸
Two racks, each with three 115 V version PLMs
and a 30 A three phase mains supply. One phase
is used for each PLM within the rack. This has
the benefit that each PLM has its own breaker,
but they all have to operate within the same limit
of 30 A; therefore, more care must be taken to
ensure that no breaker blows if different loads
are used.
All of the examples given will work, although the
first examples for both 230 V and 115 V operation
has a slight advantage due to their “power sharing”
ability.
As the PLM is equipped with PAL, the power supply
will limit its mains current draw (both momentary
current draw and current draw over time) to be <28
A for the 230 V version and <53 A for the 115 V
version.
There is no requirement for approved equipment to
have a fuse as long as it doesn’t create a fire under
fault conditions.
The 230 V version of the PLM is equipped with a
slow blow 30 A ceramic fuse.
The 115 V version is equipped with a metal cylinder
instead of a fuse due to suitable fuses at the required
current rating being unavailable.
application guide 12
12.3 Gain Structure
The architecture of the PLM Series provides gain
adjustments at a number of points in the signal flow
path. Thus, there are many places in which one can
adjust the levels in the PLM. Each point serves a
different purpose. The following can be used as
guidelines for adjustment of the gain settings, from
input to output. The block signal flow diagram (figure
8-1 page 22-23: PLM Signal Flow Diagram) can also
be used as a reference to help in understanding the
signal path through the PLM’s architecture.
Locations for setting gain in the following
paragraphs refer to the Dolby Lake Controller
PLM Edition software.
Input headroom (Analog Inputs). As a rule, this
should be set to 12 dBu if the source is (or can be)
limited to 12 dBu; otherwise it should be at 26 dBu.
This setting has no direct influence on the rest of
the gain stages in the PLM, or on the overall noise
floor. The PLM’s variable input gain is strictly meant
to provide the appropriate headroom at the input
stage. (Set in I/O Config window, Input Configuration,
left side.)
Input mixer. This setting should be left at “0” or
most setups. If only one input channel is used, the
other can be set to “- inf”. (Set in I/O Config, module
pane.)
Input gain. This is used to adjust the level between
different cabinets in the system. It should be left
at 0 dB unless you want to lower the level for the
cabinet(s) driven by this module (Set in I/O Config,
module pane).
Output gain (Levels). One adjustment is provided
per output channel in the module to balance the
mutual gain between frequency bands in a multi-way
set up. Generally, this setting is derived from the
LoadLibrary “fingerprint” data within the PLM preset.
As such, it should not need to be adjusted further.
(Set in I/O Config, module pane.)
Amp Gain. Corresponds to the gain that you would
have available in a conventional system if the amplifier
was outside the PLM. It should retain the same
settings as in the module file that is loaded: The
limiter and output gain settings in the output stage of
the module were configured with this gain setting and
will not be automatically compensated if changes are
made. This configuration scheme, though unusual,
allows for backwards compatibility with other Dolby
products. (Set in Lab.gruppen Info, Control tab.)
The following details can assist in setting an
appropriate gain structure within the PLM.
12.3.1 Gain / Level Optimization
Optimum setting of the PLM gain structure requires
particular attention to two matters:
Make sure it can get loud enough.
To do this, you need to ensure that you have sufficient
headroom in the signal path to avoid clipping before
you reach the limiters. At the same time, you need
to achieve enough gain through the PLM to engage
the limiters and realize a high average SPL as a
consequence. Try to allow for a headroom of 10
dB or more for all channels. The simplest way to
accomplish this is to increase the input gain on the
module.
Minimize the noise.
As a first step, use a digital input signal (AES or Dante)
when possible. If using analog inputs, make sure that
you don’t introduce headroom on the input side that
is unused or unreasonably high. If you don’t need full
power, or at least not a high average power, you may
also lower the gain on the input of the module.
Figures 12-3 through 12-6 demonstrate how
altering the gain structure within the PLM affects
performance.
Attenuator. One adjustment is provided per output
channel in the PLM. This control replaces the
traditional knob found on conventional amplifiers.
It should typically be left at 0 dB during use. (Set in
Lab.gruppen Info, Status tab).
PLM Series Operation Manual 63
12 APPLICATION GUIDE
When using AES (or Dante) inputs:
Figure 12-2 illustrates the recommended configuration
of the PLM when using a digital input source.
Figure 12-3 illustrates how to achieve the lowest
possible output noise; however, this is not a
recommended setup
Parameter list:
Parameter list:
Input clip: 0 dBFS
Amp gain:
35 dB
SNR:
114.2 dB Absolute Noise Floor = -71.3 dBu
Input clip:
0 dBFS
Amp gain:
22 dB
SNR:
114.8 dB Absolute Noise Floor = -71.9 dBu
Gain Structure: "High SPL - Low noise - Good headroom"
100,0
50,0
dB/dBu
0,0
Clip
-50,0
Nominal
-100,0
-150,0
Noise
Analog
AES Input
Input Mixer
Module In
Module Out
Amp
Attenuation
Analog Ref
Amp Gain
ISVPL
Output
-200,0
-250,0
Figure
12-2
Gain Structure: "High SPL - Low noise - Good headroom"
100,0
50,0
dB/dBu
0,0
Clip
-50,0
Nominal
-100,0
-150,0
Noise
Analog
AES Input
Input Mixer
Module In
Module Out
Amp
Attenuation
Analog Ref
Amp Gain
ISVPL
Output
-200,0
-250,0
Figure
12-3
As can be seen above, the improvement in noise performance (at the cost of losing headroom and compression
features) is only 0.6 dB. It is therefore recommended not to try to optimize performance in this manner.
64 PLM Series Operation Manual
application guide 12
When using analog inputs:
Figure 12-4 illustrates how to minimize absolute noise
within the PLM, while limiting available SPL.
Figure 12-5 illustrates how to minimize absolute noise
while achieving full power. In this illustration it can
be seen that there is no available headroom.
Parameter list:
Parameter list:
Input clip:
12 dBu
Amp gain:
22 dB
SNR:
105.5 dB Absolute Noise Floor = -71.5 dBu
Input clip:
12 dBu
Amp gain:
30.9 dB
SNR:
111.3 dB
Absolute Noise Floor = -68.4 dBu
SPL is limited to -8.9 dB relative to clip in this
“minimum absolute noise level application”. Gain Structure: "Low SPL - Low Input" Application (Low noise with limited output)
60,0
40,0
20,0
dB/dBu
0,0
-20,0
Clip
-40,0
Nominal
-60,0
Noise
-80,0
-100,0
-120,0
-140,0
Analog
AES Input
Input Mixer
Module In
Module Out
Amp
Attenuation
Analog Ref
Amp Gain
ISVPL
Output
Figure
12-4
Gain Structure: "Low SPL - Low Input" Application (Low noise with limited output)
80,0
60,0
40,0
dB/dBu
20,0
0,0
Clip
-20,0
Nominal
-40,0
Noise
-60,0
-80,0
-100,0
-120,0
-140,0
Analog
AES Input
Input Mixer
Module In
Module Out
Amp
Attenuation
Analog Ref
Amp Gain
ISVPL
Output
Figure
12-5
PLM Series Operation Manual 65
12 APPLICATION GUIDE
When using analog inputs (continued):
Figure 12-6 illustrates how moderate noise with
extreme SPL can be achieved.
Parameter list
Input clip:
0 dBFS
Amp gain:
35 dB
SNR:
114.2 dB Absolute Noise Floor = -71.3 dBu
The reason why the SPL will be extremely high here
is that so much headroom is available at the input and
withiin the processing stage. This makes it possible
to increase the average SPL by utilizing the internal
compression possibilities.
Gain Structure: "High SPL" Application (Moderate noise with very high output)
60.0
40.0
20.0
dB/dBu
0.0
-20.0
Clip
-40.0
Nominal
-60.0
Noise
-80.0
-100.0
-120.0
-140.0
Analog
AES Input
Input Mixer
Module In
Module Out
Amp
Figure
12-6
66 PLM Series Operation Manual
Attenuation
Analog Ref
Amp Gain
ISVPL
Output
application guide 12
12.4 Speaker configurations
Care must be taken when connecting more than one
loudspeaker cabinet to a PLM power output.
Connecting two speakers in parallel to a PLM power
output presents a load to the amplifier which is half
the impedance of that presented by one speaker.
Thus the current that two speakers will attempt to
draw from the output stage is double that for one
speaker, and this higher current may be sufficient to
cause the Current Peak Limiter to become active. The
more speakers connected to an output in parallel,
the lower the impedance and the higher the current
draw.
Multiple loudspeakers may be driven by a PLM power
output more satisfactorily if a “series-parallel” wiring
configuration is adopted. Care must be taken with
polarities.
In this case, the nominal impedance is the same as
with one speaker; however, the principle of power
sharing still applies, and it is not possible to get
the amplifier section to deliver more than its rated
power.
Nominal loads as low as 2 ohms are
supported within the PLM Series; however,
it is important to understand that a 2 ohm
nominal load will have impedance dips at
its resonances that can go substantially below 2
ohms. In such cases it is likely that the resulting
higher current will cause the Current Peak Limiter to
become active.
12.5 Connecting Digital Audio Devices
When connecting inherently digital audio equipment
fitted with both analog and digital inputs and/or
outputs, the digital option is generally preferable.
Connecting digitally avoids unnecessary conversions
between the analog and digital domains, and as these
conversions are the main source of distortion and
errors in a digital system, maximum audio fidelity
is maintained.
Digital audio is data, not audio. It therefore requires
different handling and interconnection techniques
from line level analog audio. This section of the
manual gives some guidance for those unfamiliar
with these techniques.
12.5.1 AES/EBU digital audio
The PLM is able to directly accept an AES/EBU digital
audio signal as an input. It is important to remember
that a single AES/EBU connection can carry two
channels of audio. These will generally be the L & R
of a stereo pair, but can just as easily be two unrelated
mono signals.
Electrically, the AES/EBU interface uses a 3-wire
balanced connection in accordance with the RS422
standard for data transmission. See figure 12-7. Note
the “hot“ and “cold“ wires are a twisted pair.
Pin 1: Ground/shield
Pin 2: Hot (+)
Pin 3: Cold (-)
Figure 12-7
Although the PLM (in common with most professional
audio equipment) uses industry standard XLRs for
connection of both digital and analog audio signals,
it is important not to confuse the two types.
NEVER CONNECT A DIGITAL AUDIO SOURCE TO
AN Analog INPUT, OR VICE-VERSA.
The AES/EBU standard allows for two channels
of audio data at up to 24 bits resolution. Some
digital audio sources may only have a resolution of
16 or 20 bits; it should be possible to interconnect
professional equipment with AES/EBU inputs and
outputs correctly without the user being aware of
any resolution differences. In addition to the audio
data, the AES/EBU standard also carries control data,
which, for example, can provide a receiving device
with information about the signal.
12.5.2 Sampling rates and latency
Any piece of equipment processing audio digitally
will impose a small time delay on the original analog
input. Most of this delay is generated internally by the
conversions between analog and digital (ADC), and
then back to analog (DAC) again. This delay is often
PLM Series Operation Manual 67
12 APPLICATION GUIDE
referred to as the latency of a piece of equipment.
Ultimately, the delays may become large enough to be
audible and lead to phasing problems. For this reason,
it is desirable to use digital interconnections rather
than analog ones between the various components
of a digital audio system (mixer, outboard, crossovers,
amplifiers, etc.) wherever possible. Doing this will also
maximize audio quality, as other technical problems
(such as cable losses) will also be avoided.
12.5.3 Interconnecting digital audio
Some interconnection methods commonly used with
analog audio may not possible when using AES/
EBU digital audio. If it is required to connect an AES/
EBU output to multiple AES/EBU inputs (such as
multiple PLMs), one of the following methods should
be employed:
▸▸
Connect the source signal to the AES/EBU input
on the first PLM. Connect the dedicated LINK
output on this PLM to the AES/EBU input on
the next. Continue to daisy-chain the PLMs in
this way until the last, using separate cables in
each case. Factory tests indicate that it may be
possible to daisy-chain up to 20 PLMs in this
manner, depending on environmental conditions,
cables type etc. This method has the advantage
of minimizing latency between units; however,
it does present a ‘single point-of-failure’ which
may be a consideration.
▸▸
Use an AES/EBU distribution amplifier* with at
least as many outputs as the number of PLMs
being driven. Connect the AES/EBU source
signal to the DA input, and use separate cables
to connect each DA output to the AES/EBU input
on each PLM.
Any audio signal in a digital audio system has a sample
rate associated with it. The two most common sample
rates are 44.1 kHz, used in consumer applications
such as CDs, and 48 kHz, used in professional and
broadcast applications. Multiples of these rates, e.g.
96 kHz, may also be encountered.
Care needs to be taken to ensure sample rate
compatibility between a digital audio source and the
equipment it is driving. Incompatibility will result in
silence! Much recent equipment employs universal
sampling rate conversion (generally referred to as
“SRC”) on inputs to resample the input signal if
necessary.
This leads to maximum flexibility in interfacing
different equipment, but is achieved at the expense of
increased overall latency, typically by about 2 ms.
It is desirable in live sound applications to keep the total
latency of the system to a minimum. One method of
doing this is to interconnect digital equipment digitally
- via an AES/EBU interface - wherever possible, thus
avoiding ADC & DAC delays Another is to ensure that
all digital equipment is set to the same sample rate,
thus avoiding SRC delays.
Sound engineers have traditionally corrected for
acoustic path differences – typically between different
speaker clusters – by adding delays to the various
amplifier feeds. In a wholly or partly digital system,
it is also necessary to take account of latency delays.
Having set a system up, including any outboard
processing, the system architecture (the “wiring”)
should not be altered once the speaker clusters have
been aligned as any alteration in latency may nullify
the time alignment. The PLM’s Dolby Lake system
permits delay to be added per-channel; adjustments
of a few milliseconds are usually adequate to achieve
coherence between clusters.
68 PLM Series Operation Manual
*It may be possible to use a passive splitter instead
of a DA under some circumstances – see section
12.5.5.1.
12.5.4 Cable
It may be necessary to pay greater attention to the
choice of cable used to transmit AES/EBU digital audio
than with analog audio. Because the digital audio
signal is essentially high-speed data, cables suitable
for a far higher bandwidth are needed (typically 12
MHz instead of 20 kHz). It is also more important
that cable of the correct characteristic impedance
(110 ohm) is used. Impedance mismatching can
produce reflections within the cable, which in turn
can produce clocking and data errors.
Standard XLR microphone cables may work in
digital audio but this cannot be guaranteed under all
conditions. Cable types suitable for microphones may
have inadequate and unpredictable properties at the
high frequencies needed for data transmission.
application guide 12
For transmission distances up to 100 m, use a screened
twisted-pair cable, ideally with an impedance of 110
ohms at all frequencies up to 12 MHz. Cable meeting
these requirements will generally be marketed as
being suitable for digital audio. Some cable types
with lower HF attenuation characteristics may permit
transmission distances of up to 200 m. These figures
apply to an AES/EBU signal at 96 kHz sample rate;
practical distances may be double at 48 kHz. Users
are strongly recommended to experiment with cable
types and lengths before setting up a system.
It should be noted that significant differences
in performance exist between the various
cables sold as “suitable for digital audio“.
Users are recommended to experiment
“off-site”.
12.5.5 Accessories
As will be seen from the preceding paragraphs, much
greater care needs to be exercised in distributing
AES/EBU digital audio than analog audio. In some
cases, some items of additional hardware may be
required. Note that none of these items alter the
audio data itself in any way.
12.5.5.1 Passive splitters
A passive splitter is a device using specially-designed
HF transformers to split a digital audio signal to
(usually) 2 outputs. They do not compensate for cable
losses and will generally exhibit signal attenuation.
However they will often be suitable for situations
when only a 2-way split is required, the input signal
is of good quality, and only short cable distances
are involved.
12.5.5.2 Distribution amplifiers
Distribution amplifiers are a more reliable method of
splitting a digital audio signal, as they electronically
“refresh” the input signal, thus correcting waveform
degradation resulting from cable loss. Units with 4,
6, 8 or more outputs are available.
There are two methods in use for “refreshing” the
digital audio signal: repeating and reclocking.
Repeaters are HF switching devices which restore
the waveform edges of the input signal and reset the
output signal amplitude to the standard level. They
do not correct for any inherent jitter (timing errors)
in the input signal, and thus should only be used in
situations where the received AES/EBU signal is
known to be of good quality.
In a situation where the digital audio signal has suffered
deterioration resulting in jitter, it may be necessary to
use a distribution amplifier which reclocks the signal.
Rather than reshaping the waveform, a reclocker
effectively regenerates the signal as new, using a
cleaned-up version of the signal’s embedded clock to
time the new data. With this method, the DA outputs
are virtually identical to the original source signal.
Depending on the design, reclocking may introduce
a small additional amount of latency, which may
need to be taken into account when calculating time
delays.
12.5.6 Application hints
With analog audio distribution, audio quality can be
said to decrease linearly with distance – the longer
the cable, the more the degradation.
Deterioration of digital audio is different. Signal
recovery error correction techniques can recover a
near-perfect signal from one that has suffered cable
loss and has data errors. However, these techniques
will only be effective up to a point; once the received
digital audio signal has degraded beyond a certain
level, audible artifacts will start to occur, usually as
pops and clicks or brief dropouts. Once this point is
reached, should the signal degrade further, it is likely
that the receiver will be unable to decode a usable
signal at all, and all transmission will cease.
The point that should be appreciated is that the
margin between the onset of audible artifacts and
complete loss of data is usually very small. For this
reason, a “margin of safety” should always be built
in, particularly in the matter of cable lengths. In the
case of portable systems, it may well be found that
a cable length that provides error-free operation at
one venue may be unusable at another - with the
same equipment, due to noise from lighting rigs or
similar interference.
Bench test techniques are available for accurately
evaluating the degradation of digital audio signals by
observing the “eye pattern” on an oscilloscope, but
such tests are generally impractical with a portable
system. Thus it is recommended that where possible,
PLM Series Operation Manual 69
12 APPLICATION GUIDE
users should experiment with cable lengths in
rehearsal situations to discover what maximum length
can be used, and then to not use more than 75% of
this length “on the road”. It is also good practice to
ensure that interconnect cables (particularly mixerstage) of various lengths are available, and to use the
shortest that each venue will permit.
It is also recommended that the same types of cable
and connectors are used throughout the system,
as this will minimize any likelihood of impedance
mismatch. If passive splitters are used, they should
be situated as close as possible to the PLMs (or other
devices) connected to their outputs, using cables as
short as possible.
2. Power on all PLMs and connect to the PC using
a wired network.
3. On the PC, go to Start > All Programs > DLC
PLM Edition software Vx.y > Firmware
Update Utilities > PLM Series FW update
utility (where Vx.y represents the current
version of DLC PLM Edition).
4. If the PC is configured with multiple network
adapters, select the required network adapter
from the displayed list and tap OK.
12.6 Firmware Upgrades
This chapter describes the process for upgrading
firmware in the PLM.
As responsible manufacturers, Lab.gruppen and Dolby
adopt a policy of continuous product development. As
with all software-based products, it may be desirable
from time to time to update the firmware in your
PLM with a more recent version. You can contact
your Lab.gruppen dealer or distributor, or visit the
Lab.gruppen website at
http://www.labgruppen.com/plm for details of
available updates.
Firmware upgrades are downloadable from the
Lab.gruppen website.
Figure 12-8
Please select and use a wired networks
with a fixed IP address for performing
firmware upgrades. A loss of network
connectivity could result in a failed firmware
upgrade.
5. The PLMs on the network will appear in a list
with their current firmware versions displayed.
The firmware version to be loaded is shown at
the top of the screen (Target firmware); this will
default to the latest version available. Highlight
the Frames that require updating.
PLM firmware upgrade is conducted via the network
from the PC running the DLC PLM Edition software.
There are two methods of performing the upgrade:
by using the Firmware Update Utility or by using the
DLC PLM Edition software.
12.6.1 Firmware Upgrades Using the Update
Utility
The Firmware Upgrade Utility allows fast upgrade
for large networks of Dolby Lake-equipped products.
Follow the steps shown below to use this method
for firmware upgrade.
1. Install the latest version of Dolby Lake Controller
PLM Edition software on the Tablet PC normally
used to control the system.
70 PLM Series Operation Manual
Figure 12-9
application guide 12
6. Tap Update; tap OK to the warning message.
Figure 12-10
7. The PLMs will be updated with the latest
firmware. A green tick indicates successful
update and the percentage value indicates the
progress of the firmware update of that unit.
A red cross indicates the firmware has not yet
been upgraded to the selected target firmware
version.
Figure 12-12
9. Cycle the power of each PLM by turning the
power switch off, and then either removing the
PowerCon connector from the rear of each PLM
or switching off all power to the PLM racks at
source. Then reconnect the power and switch
the PLMs back on.
10. The PLM will then finalize the installation
process. The message Please Wait is displayed
on the unit followed by Amp Fw updated OK.
Cycle Power.
11. Once again cycle power to complete the
installation process.
Figure 12-11
8. Wait for all selected PLMs to be upgraded and
the information message to appear.
After a firmware update is performed, the
default factory configuration is restored to
the PLM(s). You will need to reload any
alternative configuration back into the
unit(s).
12. On the PC, tap OK, then tap Exit to quit the
Firmware Update Utility.
12.6.2 Firmware Upgrades Using the Dolby
Lake Controller PLM Edition
The PLM firmware may also be upgraded from
the DLC PLM Edition software application. It is
recommended that this method is used only for
upgrading small numbers of PLMs. The Firmware
Update Utility provides a faster upgrade process for
large networks.
PLM Series Operation Manual 71
12 APPLICATION GUIDE
To upgrade using the DLC PLM Edition software:
1. Install the latest version of the DLC PLM Edition
software.
2. Launch the Controller in the normal way.
3. Tap Modules and drag an old module from
the Modules scrolling bar into the work area.
The module will flash indicating that the PLM
it relates to has old firmware and a warning
message will appear.
4. Read the warning message and tap OK.
5. Place all old firmware modules in the work area,
then tap Home.
Figure 12-13
6. Tap the flashing Update Firmware button.
7. Read the onscreen warning message, tapping
Yes to proceed.
8. When all Processors have been updated,
cycle the power of each PLM by turning the
power switch off, and then either removing the
PowerCon connector from the rear of each PLM
or switching off all power to the PLM racks at
source. Then reconnect the power and switch
the PLMs back on.
9. The PLM will then finalize the installation
process. The message Please Wait is displayed
on the unit followed by Amp Fw updated OK.
Cycle Power.
10. Once again cycle power.
11. Wait for each Processor to re-sync following
the power cycle.
72 PLM Series Operation Manual
12. Tap OK to the warning message that advises
that the backup file will be recalled. This file will
reload the PLMs with the data that was present
prior to the upgrade process.
12.7 Hot swapping PLM devices.
Should it be necessary to swap one PLM device
for another within a system it is very important to
make sure that the configuration of the replacement
unit is identical to that of the unit that it replaces.
It is possible to achive this by using the Replace
Frame facility within the DLC PLM Edition software
application. See DLC User Manual chapter 7.4.3 for
further information.
TECHNICAL SPECIFICATIONS 13
Following are the technical specifications for the PLM Series PLM 10000Q. These figures are accurate at the
time of printing but please note that all figures are subject to change without notice. For the most accurate
and
current information
specifications
PLMavailable,
10000Qplease visit www.labgruppen.com/plm.
General
Number of input channels
Number of output channels
Peak total output all channels driven
Peak output voltage per channel
Max. output current per channel
2
4
10800 W
150 V
35.5 Arms
Max. Output Power
All ch.’s driven
Channels A and B, while channels C and D are driven at -3 dB
3)
2 ohms
2350 W
2350 W
2.7 ohms
2700 W
2900 W
Audio Performance
THD + N 20 Hz - 20 kHz for 1 W
THD + N at 1 kHz and 1 dB below clipping
Dynamic range with digital inputs (for all supported sample rates)
Dynamic range with analog inputs
Frequency response (1 W into 8 ohms, 20 Hz - 20 kHz)
CMR
Internal sample rate
Internal data path
Product propagation delay, best case (96 kHz AES)
Product propagation delay, analog input
Product propagation delay, worst case (44.1 kHz AES)
<0.05%
<0.04%
>116 dBA
>114 dB
+ /-0.05 dB
> 50 dB
96 k
32 bit floating point
1.64 ms
1.71 ms
1.90 ms
sample Rate Converters
THD + Noise
0.00003 %, 20 Hz - 20 kHz, unweighted
Analog to Digital inputs
THD + Noise
4 ohms
2300 W
2400 W
8 ohms
1300 W
1300 W
0.00022 %, typical at 1 kHz unweighted at +21 dBu headroom setting
0.00033 %, typical at 20 Hz and 20 kHz unweighted at +21 dBu headroom setting
AEs / EbU inputs
Supported resolutions
Supported sample rates
≤ 24 bit
44.1, 48, 88.2, 96, 176.4, 192 kHz
Dante Audio Network
Supports redundant paths
Flexible topology
Network latency 2)
Yes
Yes
<500 µs
Device presets
Local memory locations for the settings of the product
100
Limiters
Adjustable Inter-Sample Voltage Peak Limiter (ISVPL)
Current Limiter
LimiterMax (rms and peak limiters)
– MaxRMS (rms voltage limiter)
– MaxPeak (peak voltage limiter)
Power Average Limiter (PAL) (max average during 500 ms)
18 - 150 V, step size 0.1 V
35.5 Arms
3 - 106 Vrms
4 - 150 V
12 Arms
Gain
Amplifier gain
Analog attenuator
22 - 44 dB, step size 0.1 dB
-Inf to 0 dB, step size 0.25 dB
back panel interface
AES / EBU / I/O (input + link)
Analog, 2-channel I/O (input + link)
Output connectors (per ch.)
Auto 10/100, Auto Uplink
Control and monitoring interface
Detachable mains cord
Cooling
2 x 3-pin XLR
3-pin XLR, electronically balanced
Neutrik Speakon (1 x NLT8, 2 x NLT4) or Binding Posts (must be specified upon order)
2 x RJ45 EtherCon
Via Ethernet for Dolby Lake Controller software
Neutrik PowerCon 32 A
Two fans, front-to-rear airflow, temperature controlled speed
Front-panel user interface:
Display, daylight readable LCD
Fault/Warning/Limit/Clip indicators
8 Mute and soft function buttons
Standby Power button
Mute Enable button
Meter button
Menu button
Rotary Encoder
Exit button
2.5 inch
RGB LEDs
Yes
On/Off
Enables muting of outputs and inputs via soft-button keypad
Toggles through meter menus
Provides a menu driven interface for full function front panel control
Yes
Provides a “back” function
Power
Operating voltage, 230 V / 115 V nominal
Soft start / Inrush Current Draw
16 ohms
660 W
660 W
1)
140-265 V / 70-135 V
Yes / max. 5 A
Dimensions (W/H/D)
Weight
Finish
W: 483 mm (19”), H: 88 mm (2 U), Overall D: 470 mm (18.5”) deep including handles and rear support.
13 kg (29 lbs.)
Black painted steel chassis with black painted steel / aluminum front
Approvals
CE, ANSI/UL 60065 (ETL), CSA C22.2 NO. 60065, FCC
Note 1): Separate 230 V or 115 V versions available. Not selectable on the product.
Note 2): Assymetrically loading the output channels (as shown, for example): If some channels have reduced output power requirements, the voltage drop from the power supply will be reduced,
resulting in a higher voltage and power output for the other channels.
All specifications are subject to change without notice.
Intercooler and Class TD are national and/or international registered trademarks of Lab.gruppen AB. PLM, Powered Loudspeaker Management, R.SMPS, LoadLibrary, LoadSmart,
SpeakerSafe and ISVPL are trademarks of Lab.gruppen AB. Dolby, Lake, and the double-D symbol are registered trademarks of Dolby Laboratories. Dolby Lake Processor, Lake
Contour, Lake Mesa Quad EQ, LimiterMax and Iso-Float are trademarks of Dolby Laboratories. All other trademarks remain the property of their respective owners.
Copyright © 2008 Lab.gruppen AB. All rights reserved.
PLM Series Operation Manual 73
Lab.gruppen ab • Sweden
internationaL contact • info@L abgruppen.com
|
uS contact • [email protected]
www.labgruppen.com
Item no. TDS-PLM10000Q_V6
14 WARRANTY
General
This product is manufactured by Lab.gruppen, and it
is warranted to be free from any defects caused by
components or factory workmanship, under normal
use and service, for a period of six (6) years from
date of purchase from an authorized Lab.gruppen
dealer.
If the product fails to perform as specified during the
warranty period, Lab.gruppen will undertake to repair,
or at its option, replace this product at no charge to
its owner, provided the unit is returned undamaged,
shipping prepaid, to an authorized service facility or
to the factory.
This warranty shall be null and void if the product is
subjected to: repair work or alteration by a person
other than those authorized by us; mechanical
damage including shipping accidents; war, civil
insurrection, misuse, abuse, operation with incorrect AC
voltage; incorrect connections or accessories;
operation with faulty associated equipment; or
exposure to inclement weather conditions. Damage
due to normal wear and tear is not covered by the
warranty. Units on which the serial number has been
removed or defaced will not be eligible for warranty
service.
Lab.gruppen shall not be responsible for any
incidental or consequential damages. Lab.gruppen’s
responsibility is limited to the product itself.
Lab.gruppen takes no responsibility for any loss due
to cancellation of any events, or rent of replacement
equipment or costs due to a third party’s or customer’s
loss of profit, or any other indirect cost or losses
however incurred.
Lab.gruppen reserves the right to make changes or
improvements in design or manufacturing without
assuming any obligation to change or improve
products previously manufactured.
This warranty is exclusive, and no other warranty is
expressed or implied. This warranty does not affect
the customer’s statutory rights.
International warranties
Please contact your supplier or distributor for this
information, as rights and disclaimers may vary from
country to country.
74 PLM Series Operation Manual
Technical assistance and service
International
If your Lab.gruppen product requires repair, contact
your Lab.gruppen dealer or distributor, or contact
Lab.gruppen by fax or email to obtain the location
of the nearest authorized service centre.
Factory service
In the event Lab.gruppen product requires factory
service, you may contact Lab.gruppen’s service
department for return instructions and a Return
Authorization number.
Please note for product return:
1. Use the original packing.
2. Include a copy of the sales receipt, your name,
return address, phone and fax number, email
address and description of the defect.
3. Mark the Return Authorization number on the
outside of the packing.
4. Ship the product prepaid to:
Lab.gruppen AB
Faktorvägen 1
SE-434 37 Kungsbacka
SWEDEN
Phone: +46 300 56 28 00
Fax: +46 300 56 28 99
[email protected]
[email protected]
www.labgruppen.com
Intercooler and Class TD are national and/or
international registered trademarks of Lab.gruppen
AB. PLM, Powered Loudspeaker Management,
R.SMPS, LoadLibrary, LoadSmart, SpeakerSafe and
ISVPL are trademarks of Lab.gruppen AB.
Dolby, Lake, and the double-D symbol are registered
trademarks of Dolby Laboratories. Dolby Lake
Processor, Lake Contour, Lake Mesa Quad EQ,
LimiterMax and Iso-Float are trademarks of Dolby
Laboratories.
All other trademarks remain the property of their
respective owners. Copyright © 2008 Lab.gruppen
AB. All rights reserved.
L a b . g r u p p e n AB • S w e d e n
internationaL contact • info@L abgruppen.com
U S CONTACT • i n f o u s @ t c e l e c t r o n i c . c o m
www.labgruppen.com