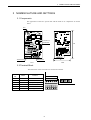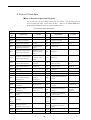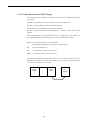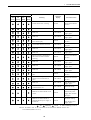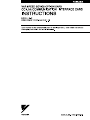
1
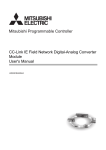
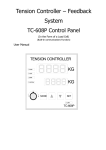
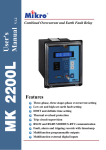
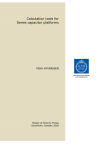
INTRODUCTION INTRODUCTION This Instruction Manual describes operations and specifications of the General-purpose Inverter VARISPEED Series and the CC-Link Communication Interface Card SI-C that is connected to the MITSUBISHI FA Field Network CC-Link for data communications. Read this manual and the SI-C User's Manual (SIEZ-C736-70.7) carefully and be sure you understand the infrormation provided before attempting any operations. For handling of the inverter unit, refer to the VS-616G5 Series Instruction Manual (TOE-S616-10.30) and Varispeed F7 Series Instruction Manual (TOE-S616-55.1). YASKAWA ELECTRIC CORPORATION General Precautions z Some drawings in this manual are shown with the protective cover or shields removed, in order to describe the details with more clarity. Make sure all covers and shields are replaced before operating this product, and operate it in accordance with the instructions in this manual. z This manual may be modified when necessary because of improvements of the product, modification, or changes in specifications. z A new version of the manual will be released under a revised manual number when any changes are made. z Contact your Yaskawa representative or a Yaskawa office listed on the back of this manual to order a new manual if this manual is damaged or lost. Please provide the document number listed on the front cover of this manual when ordering. z Yaskawa cannot guarantee the quality of any product which have been modified by the user. Yaskawa assumes no responsibility for any injury or damage caused by such a modified product. 3 Safety Information Read this instruction manual and the related documents thoroughly before installation, operation, maintenance or inspection of this product. Make sure you understand product information, all precautions and safety information before using the product. Also, keep this manual in a convenient location so that it can be referred to whenever necessary. The following symbols are used to indicate precautions in this manual. WARNING CAUTION Indicates precautions that, if not heeded, could possibly result in loss of life or serious injury. Indicates precautions that, if not heeded, could result in relatively serious or minor injury, damage to the product, or faulty operation. CAUTION Even items described in may result in a serious acccident in some situations. In either case, follow these important notes. NOTE Items to be observed by users are described in the relevant sections. Receiving CAUTION z Do not use any option unit which is damaged or has missing parts. Failure to observe this caution may result in injury. 4 Safety Information Installation and Wiring WARNING z Never touch the inside of the Inverter. Failure to observe this warning may result in electric shock. z Disconnect all power before mounting or removing the option unit or wiring. Then wait for at least the specified time (specified on the front cover) after the power supply is disconnected and all LEDs and CHARGE LED are extinguished. Failure to observe this warning may result in electric shock. z Do not damage or apply excessive stress to the cables. Do not place heavy objects on the cables or place the cables between other objects. Failure to observe this warning may result in electric shock, malfunction, or damage to the equipment. CAUTION z Do not touch the elements of the option card with bare hands. Failure to observe this caution may result in equipment damage caused by static electricity. z Insert the connector firmly. Failure to observe this caution may result in malfunction or damage to the equipment. Setting CAUTION z Be careful when changing Inverter settings. settings. The Inverter is set to suitable Failure to observe this caution may result in damage to the equipment. 5 Contents 1 OUTLINE ・・・・・・・・・・・・・・・・・・・・・・・・・・・・・・・・・・・・・・・・・・・・・・・7 2 RECEIVING ・・・・・・・・・・・・・・・・・・・・・・・・・・・・・・・・・・・・・・・・・・・・8 3 NOMECLATURE AND SETTINGS ・・・・・・・・・・・・・・・・・・・・・・・・・9 3.1 Components・・・・・・・・・・・・・・・・・・・・・・・・・・・・・・・・・・・・・・・・9 3.2 Terminal Block ・・・・・・・・・・・・・・・・・・・・・・・・・・・・・・・・・・・・・・9 3.3 LED ・・・・・・・・・・・・・・・・・・・・・・・・・・・・・・・・・・・・・・・・・・・・・ 10 3.4 Rotary Switch・・・・・・・・・・・・・・・・・・・・・・・・・・・・・・・・・・・・・ 12 4 INSTALLATION AND WIRING・・・・・・・・・・・・・・・・・・・・・・・・・・・ 4.1 Installation ・・・・・・・・・・・・・・・・・・・・・・・・・・・・・・・・・・・・・・・ 4.2 Wiring of CC-Link Cable・・・・・・・・・・・・・・・・・・・・・・・・・・・・ 4.3 Interconnection ・・・・・・・・・・・・・・・・・・・・・・・・・・・・・・・・・・・ 13 13 14 16 5 FUNCTIONS ・・・・・・・・・・・・・・・・・・・・・・・・・・・・・・・・・・・・・・・・・・ 5.1 Initial Setting・・・・・・・・・・・・・・・・・・・・・・・・・・・・・・・・・・・・・・ 5.2 Basic Functions ・・・・・・・・・・・・・・・・・・・・・・・・・・・・・・・・・・・ 5.3 List of CC-Link Data ・・・・・・・・・・・・・・・・・・・・・・・・・・・・・・・ 17 17 19 20 6 SPECIFICATIONS ・・・・・・・・・・・・・・・・・・・・・・・・・・・・・・・・・・・・・ 22 7 TROUBLESHOOTING ・・・・・・・・・・・・・・・・・・・・・・・・・・・・・・・・・ 23 7.1 Inverter Faults ・・・・・・・・・・・・・・・・・・・・・・・・・・・・・・・・・・・・ 23 7.2 CC-Link Interface Card LED Display ・・・・・・・・・・・・・・・・・ 24 6 1 OUTLINE 1 OUTLINE The CC-Link Communication Interface Card SI-C is an interface card to achieve data communication with the CC-Link Master by connecting the VARISPEED Series to MITSUBISHI FA Network CC-Link, and is conforming to the CC-Link version 1.10. This SI-C supports to run or stop the inverter, monitor the operation status, to specify or change various constants in the inverter from the CC-Link master. The following is the inverter series on which the SI-C option card can be installed. VS-616G5: Standard series (inverter software No. S1042 and later) Varispeed F7: Standard series 7 2 RECEIVING Products are rigorously inspected before delivery. Confirm the following points before installation. Item Inspection Method Is the product what you have ordered? Check it with the the number printed in the lower right cornerof the SI-C card. Is the inverter damaged? Check the SI-C card visually for any damage that may have occurred during transport. Contact your Yaskawa representative immediately if any problem should be found concerning the shipment. 8 3 NOMECLATURE AND SETTINGS 3 NOMENCLATURE AND SETTINGS 3.1 Components The appearance of the SI-C option card and the name of its components are shown below. LED Connector for maintenance 105 60 Rotary switch Terminal block Front Back 3.2 Terminal Block The table below shows CC-Link bus connection terminals. Contents SLD Shield 5 SLD Shield 6 FG Grounding 456 23 4 456 23 Signal grounding 23 DG 901 3 456 78 Communication data + Communication data - 78 DA DB 78 1 2 901 Name 901 Terminal No. By RATE STA ×10 STA ×1 FG SLD SLD DG DB DA 9 3.3 LED These LED indicator lamps indicate the status of the CC-Link or the SI-C. L.RUN (Green) RD (Red) SD (Red) L.ERR 10 3 NOMECLATURE AND SETTINGS LED display L.RUN SD RD L.ERR (Green) (Red) (Red) (Red) ∗ Meaning Operator display Corrective action Remove the influence of noise. Normal but an error occurring. Normal Normal Normal H/W error CAL or BUS Turn ON the power supply again. H/W error CAL or BUS Turn ON the power supply again. A CRC error occurred and the SI-C cannot replay. Normal Remove the influence of noise. A local data cannot be received. CAL or BUS Confirm the PLC program. H/W error CAL or BUS Turn ON the power supply again. H/W error CAL or BUS Turn ON the power supply again. Polling response is made but an CRC error occurred in refresh receiving. Normal Remove the influence of noise. H/W error CAL or BUS Turn ON the power supply again. H/W error CAL or BUS Turn ON the power supply again. H/W error CAL or BUS Turn ON the power supply again. A CRC data occurred in a local data. Normal Remove the influence of noise. A local data is not provided or cannot be received because of noise. CAL or BUS Remove the influence of noise. H/W error CAL or BUS Turn ON the power supply again. Data cannot be received because of disconnection, etc. CAL or BUS Check the wiring. Normal Correct the setting and turn the power supply OFF and then ON again. Baud rate or station number is not correct. Baud rate or station number is changed after the power supply is turned ON. : Lit :Blinking 11 Normal Return the setting to the former setting. Turn ON the power supply again. :Not lit ∗: Either blinking or not lit 3.4 Rotary Switch These switches set the baud rate and station number of the CC-Link. 23 23 901 901 23 456 78 901 NOTE 456 78 78 456 B yRATE STA × 10 STA × 1 Baud rate setting Station number setting 2nd digit Station number setting 1st digit Set these three setting switches before turning ON the inverter power supply. Do not change the settings after turning ON the power supply. Be sure to change the settings after turning ON the inverter power supply. Baud Rate Setting Switch Switch 0 1 2 3 4 Communication Speed 156 kbps 625 kbps 2.5 Mbps 5 Mbps 10 Mbps Note: If setting this switch to 5 or above, the LED lamp "L.ERR" lights, resulting in a communication error. Station No. setting switches 1.Set the station number in the range from 1 to 64. "STA×10" sets the 2nd order of the station number. "STA×1" sets the 1st order of the station number. 2.The station number cannot be overlapped. Confirm that the station number to be set has not been set for any other stations. 12 4 INSTALLATION AND WIRING 4 INSTALLATION AND WIRING 4.1 Installation The SI-C Communication Interface Card is mounted on the control board with the front cover of the inverter removed. Mount the card in accordance with the following procedure. 1.Remove the digital operator and the front cover and then wait at least one minute (three minutes for the inverter of 30 kW or more) after turning OFF the inverter power supply. Confirm that the CHARGE indicator lamp has been extinguished. 2.Mount this option card on option C connector 2CN (60-pin) on the inverter control board. At this time, insert the two option card spacer mounting holes into the spacer for the option card on the control board until a click is heard. (See section A in the Side View of the following diagrams.) 3.After mounting the option card, connecting the communication cables and setting the rotary switches, re-install the front cover and the operator. Option A 4CN Option A connector Mounting base of inverter 7CN 2CN Option C connector Option C SI-C Control board 3CN Option D connector A Option D Control terminal Ground connection terminal 12 Front View (G5 Series) 13 Side View (G5 Series) Mounting hole of spacer to be mounted on option A CN4 option A connector CN2 option C connector Spacer to be mounted onoption A (attachment to option A) Spacer to be mounted on option C SI-C (option C) Option clip (to prevent options C and D from coming up) Option D Spacer to be mounted on option D CN3 option D connector Option A Spacer to be mounted on option A F7 Series NOTE When installing the SI-C card, handle it by the edges to prevent damaging the card. 4.2 Wiring of CC-Link Cable Wiring Follow the steps below to wire the CC-Link communication cable on the terminal block. 1.Use a thin flat screwdriver to loosen the screws. 2.Insert the cable from the bottom of the terminal block. 3.Tighten the terminal screws so firmly that the cable will not be removed. (Tightening torque: 0.22 to 0.25 [N y m]) Terminal block Sheath strip length: Approx.5.5mm FG SLDSLD DG DB DA Cable 14 4 INSTALLATION AND WIRING Cable Specifications Be sure to use a cable of the following specifications as the communication cable. Any cable other than the recommended cable shown below cannot assure the performance of the CC-Link. Item Specifications 2 Model FANC-SB 0.5 mm ×3 [Manufactured by Kuramo Electric Co., Ltd] Conductor cross-sectional area 0.5mm2 Conductor resistance (at 20°C) 37.8Ω/km or less Insulation resistance 10000MΩ/km or more Withstand voltage 500 VDC for one minute Static electricity (1 kHz) 60nF/km or less Impedance 100±15Ω DA Sheath Blue Cross-section White Yellow DB Ground cable External dimensions 7mm Approx. mass 65kg/km Note: 1. Shielding Aluminium tape DG Separete the CC-Link communication cable from the main circuit wiring or other power cables. 2. There is a scale indiation of 5.5 mm on the top of the terminal block in the front face of the SI-C. Use this scale to confirm the strip length. Connection of Termination Resistor When the SI-C is connected to the communication line as the end unit, connect an termination resistor between terminals DA and DB. Use the termination resistor attached to the master unit or any one of 110Ω, 1/2W on the market. 15 4.3 Interconnection The figure below shows the interconnection between the inverter, the SI-C card and the CC-Link master. R S T 3-phase, 200 to 230VAC CC-Link master DA DA DB DC SLD DB DC SLD SLD SLD FG * ∗ U V W Inverter 3-phase, 200VAC 0.4kW SI-C FG Ground the terminal only when a communication error occurs. 16 M 5 FUNCTIONS 5 FUNCTIONS SI-C is a communication interface card to execute operation, adjustment and monitoring using the PLC program with the VS-616G5 as a remote device station of the CC-Link. Both the bit data and the word data cyclic transmission are enabled, and high-speed communications up to 10 Mbps is available. 5.1 Initial Setting G5 Series Execute the following constant setting, whenever necessary, before starting communications between the inverter and the PLC. Constant No. Name Description Operator Display Reference selection ∗1 b1-01 0: Digital Operator 1: Control circuit terminals (analog inputs) 2: MEMOBUS communication (using SI-K2) Reference Source Factory Setting 1 3: Option Card 4: MEMOBUS communication (for CP-717) Run command selection ∗1 b1-02 0: Digital Operator 1: Control circuit terminals (sequence inputs) 2: MEMOBUS communication (using SI-K2) Run Source 1 3: Option Card 4: MEMOBUS communication (for CP-717) F9-01 External Fault Input Level from Optical option E-15 Selection F9-02 0: Always detect EF0 Detection 1: Detect during run Action for external fault from Optical option 0: Deceleration to stop/fault detection at C1-02 set time EF0 ERROR SELECT F9-05 Optical option trace sampling time Trace Sample Time Torque reference/torque limit selection from communication cards other than SI-K2 ∗3 Torq/Ref/Lmt Sel F9-06 1:NC contact (external fault at "0") External Fault from Optical Option F9-03 F9-04 0:NO contact (external fault at "1") 1: Coast to stop/fault detection 2: Deceleration to stop/fault detection at CI-09 set time Do not set this constant since it is not used for SI-P card. disabled 1: Torque reference/torque limit from communication 0 1 enabled ∗4 BUS Fault Sel 3: Continue operation/warning ∗2 1: Coast to stop/fault detection 2: Deceleration to stop/fault detection at CI-09 set time 1 Select the stopping method when a transmission error is detected. 0: Deceleration to stop 1: Coast to stop Transmission Error Sel 1 0: Torque reference/torque limit from communication 0: Deceleration to stop/fault detection at C1-02 set time H5-04 0 3: Continue operation/warning ∗2 Operation selection when transmission error detected for communication cards other than SIK2 Operation selection when transmission error detected 0 2: Emergency stop 3: Continue operation 17 3 *1. To run/stop through the CC-Link communications from the PLC, set "3" to b1-02. To set frequency, set "3" to b1-01. *2. Selecting "Continuous operation" continues the operation with the inverter singleunit at fault occurrence. Therefore, provide some other measures (emergency stop switch, etc.) to assure safe operation. *3. Enabled when "3: flux vector control" is selected at A1-02 (control mode selection). In this case, d5-01 (torque control selection) setting alternates torque reference and torque limit. d5-01 = 0 (speed control mode) : Torque limit value d5-01 = 1 (torque control mode) : Torque reference value *4. When "1: Enabled" is selected for F9-05 (factory setting), the motor may not rotate unless torque reference/torque limit is set from the PLC. F7 Series Constant No. Name Description Set the frequency reference input method. Factory Setting 1 0: Digital Operator b1-01 Reference selection ∗1 1: Control circuit terminal (analog input) 2: MEMOBUS communication 3: Option Card 4: Pluse train input Set the run command input method 1 0: Digital Operator b1-02 Run command selection ∗1 1: Control circuit terminal (sequence input) 2: MEMOBUS transmission 3: Option Card Set the stopping method for communications errors. F6-01 Stopping method after communications error 1 0: Deceleration stop using deceleration time in C1-02. 1: Coast to stop 2: Emergency stop using deceleration time in C1-09 3: Continue operation ∗2 F6-02 Input level of external error from Communications Option Card 0: Always detect. 1: Detect during run. 0: Deceleration stop using deceleration time in C1-02 F6-03 Stopping method for external error from Communications Option Card 0 1: Coast to stop 2: Emergency stop using deceleration time in C1-09 3: Continue operation ∗2 18 1 5 FUNCTIONS 5.2 Basic Functions The following describes the basic functions that can be operated from the PLC using the CC-Link communication function. Run Command and Frequency Reference Running or stopping the inverter, or setting or changning the operation frequency can be performed from the PLC. To perform these operations from the PLC, the inverter run command right and frquency commanding right must be set to the PLC side. Switching by inverter constant setting Run command right selection b1-02 = 3: "Option card" (0: "External terminal" at factory setting) Frequency commanding right selection b1-01 = 3: "Option card" (0: "External terminal" at factory setting) For the details, refer to the VS-616G5 Inverter Instruction Manual and the SI-C User's Manual. Monitor The inverter status information can be monitored. Set the monitor code to RWW0 and turn ON the RYC signal, and the data corresponding to the monitor code is stored in the PLC buffer memory. For the monitor codes and the units, refer to the SI-C User's Manual. Constant Setting/Reading Write-in/read-out of the inverter constants and status information, and inverter reset can be performed from the PLC. Set the command code to RW W2 (also set the write-in data to RW W3 when necessary) and turn ON the RYF (command code execution request flag) signal, the inverter performs the processing corresponding to the command code and returns the data. For the command codes and write-in data units and ranges, refer to the SI-C User's Manual. 19 5.3 List of CC-Link Data List of Remote Inputs and Outputs The inverter uses the PLC buffer memory for one station. The following lists the inverter inputs and output viewed from the PLC. Refer to the MITSUBISHI PLC Programming Manual for details on the PLC buffer memory. List of Remote Inputs and Outputs Remote Input (from PLC to Inverter) Device No. Signal Name Remote Output (from Inverter to PLC) Device Remarks Signal Name No. Remarks RY0 Forward run command RX0 During forward run RY1 Reverse run command RX1 During reverse run RY2 Terminal 3 multi-function input terminal function Running (H101:24) RX2 Terminals 9-10 multifunction output RY3 Terminal 4 multi-function input terminal function Fault reset (H102:14) RX3 Speed agree RY4 Terminal 5 multi-function input terminal function Multi-step speed reference 1 (H103:3) RX4 Reserved RY5 Terminal 6 multi-function input terminal function Multi-speed rererence 2 (H104:4) RX5 Reserved RY6 Terminal 7 multi-function input terminal function Jog command (H1-05:6) RX6 Terminal 25 multifunction output Zero speed (H202:1) RY7 Terminal 8 multi-function input terminal function External baseblock RX7 Terminal 26 multifunction output Frequency agree (H2-03:2) Running (H201:0) RY8 Not used RX8 Not used RY9 Inverter output shutoff RX9 Not used RYA Not used RXA Not used RYB Motor actual rotation speed /output frequency changeover *1 RXB Monitoring actual rotation speed RYC Monitor command RXC Monitoring RYD Frequency setting command 1 RAM write-in RXD Completion of frequency setting 1 RAM write-in RYE Frequency setting command 2 Writing frequency reference 1 RXE Completion of frequency setting 2 Writing frequency reference 1 RYF Command code execution request RXF Completion of command code execution RWR1 data contents changeover RY10 to RX10 Not used to RY18 Not used RX18 RY19 Multi-function I/O allocation change request RX19 Completion of multifunction I/O allocation change RY1A Error reset RX1A Error RY1B Not used RX1B Remote station ready 20 5 FUNCTIONS Remote Input (from PLC to Inverter) Device No. Signal Name Remote Output (from Inverter to PLC) Device Remarks Signal Name No. RY1C Not used RX1C Not used RY1D Not used RX1D Not used RY1E Not used RX1E Not used RY1F Not used RX1F Not used *1. Enabled when the control mode is set to the V/f control with PG and flux vector control. *2. Never change the function of multi-function input 8. Remarks List of Remote Registers From PLC to Inverter Device No. Name From Inverter to PLC Check Flag Device No. Name Execution Request Flag RWW0 Monitor code RYC RWR0 Monitor data RXC RWW1 Setting frequency RYA, RXB RWR1 Output frequency RXA RWW2 Command code RWR2 Response code RWW3 Write-in data RWR3 Read-out data RYF RXF For the details, refer to the VS-616G5 Inverter Instruction Manual and the SI-C User's Manual (SIEZ-C736-70.7). 21 6 SPECIFICATIONS Item Specifications Model SI-C Station type Rmote device station Number of Exclusive Stations 1 station Communication speed 156kbps to 10Mbps Communication Power Supply 4.75 to 5.25 VDC (supplied from inverter, insulated from operating power supply.) Operating power supply 4.75 VAC to 5.25 VAC (supplied from inverter) Ambient Temperature -10°C to +50°C Humidity 95%Rh max. (non-condensing) Storage Temperature -20°C to +60°C Location Indoor (free from corrosive gases, dust, etc.) Altitude 1000 m max. 22 7 TROUBLESHOOTING 7 TROUBLESHOOTING 7.1 Inverter Faults The following describes the faults, causes and corrective actions displayed on the VS616G5 operator. For any faults displayed on the operator other than described below, refer to the inverter instruction manual. Fault Display Contents Cause OPE05 Option card selection error Although b1-01 (frequency commanding right) is set to "3", the option card (option C card) is not connected. Connect the SI-C to the connector 2CN on the inverter control board. Option card communication error Disconnection of ommunication line. Confrim that the communication line is connected. Power supply is not turned Check the PLC. External fault from option card An external error is input from the PLC. Turn OFF the external fault input. The inverter is not connected properly to the transmission option. Turn OFF the inverter power supply and check the connection of the SI-C and the inverter before turning ON the power supply again. If the fault lasts, replace the SI-C. The inverter and the option card are not connected properly. The option card A/D converter is defective. Turn OFF the inverter power supply and check the connection of the SI-C and the inverter before turning ON the power supply again. If the fault lasts, replace the SI-C. The transmission option is defective. Turn ON the inverter power supply again. If the fault lasts, replace the option SI-C. Sequence Select BUS Option Com Err EF0 OPT External Flt CPF06 Option Error CPF20 Option A/D Error CPF21 Option CPU Down CPF22 Option Type Err CPF23 Option DPRAM Err Option card connection error Option card A/D converter error Transmission Option card self diagnostic error Corrective Action Transmission Option card model code error Transmission Option card DPRAM error Note: For the details, refer to the VS-616G5 Inverter Instruction Manual and the SI-C User's Manual (SIEZ-C736-70.7). 23 7.2 CC-Link Interface Card LED Display This section describes the failures, causes and corrective actions displayed in the LEDs on the SI-C. Confirm the following points when communication is halted during run. The SI-C and the twisted pair cable are mounted correctly. (Check that there is no imperfect contact or disconnection.) The PLC program has been executed without fail. stopped. The PLC CPU has not been Data communication is not interrupted because of a momentary power failure, etc. The following describes how to check an error with the LED indicator lamps. L.RUN: Lit when refresh data is received normally. Extinguished when data is interrupted for a certain period. SD :Lit when send data is "1". RD :Lit at detection of receiving data carrier. LERR :Lit when local data is CRC abort error. The following outlines the causes and corrective actions of the failures that can be determined according to the LED status of the SI-C in a system configuration where one master is connected to one inverter. Station Power Supply Master Unit 24 No. 1 Inverter 7 LED display L.RUN SD RD L.ERR (Green) (Red) (Red) (Red) ∗ Operator display Meaning TROUBLESHOOTING Corrective action Remove the influence of noise. Normal but an error occurring. Normal Normal Normal H/W error CAL or BUS Turn ON the power supply again. H/W error CAL or BUS Turn ON the power supply again. A CRC error occurred and the SI-C cannot replay. Normal Remove the influence of noise. A local data cannot be received. CAL or BUS Confirm the PLC program. H/W error CAL or BUS Turn ON the power supply again. H/W error CAL or BUS Turn ON the power supply again. Polling response is made but an CRC error occurred in refresh receiving. Normal Remove the influence of noise. H/W error CAL or BUS Turn ON the power supply again. H/W error CAL or BUS Turn ON the power supply again. H/W error CAL or BUS Turn ON the power supply again. A CRC data occurred in a local data. Normal Remove the influence of noise. A local data is not provided or cannot be received because of noise. CAL or BUS Remove the influence of noise. H/W error CAL or BUS Turn ON the power supply again. Data cannot be received because of disconnection, etc. CAL or BUS Check the wiring. Normal Correct the setting and turn the power supply OFF and then ON again. Baud rate or station number is not correct. Baud rate or station number is changed after the power supply is turned ON. : Lit :Blinking Normal Return the setting to the former setting. Turn ON the power supply again. :Not lit *: Either blinking or not lit Note: For the details, refer to the VS-616G5 Inverter Instruction Manual and the SI-C User's Manual (SIEZ-C736-70.7). 25 英文 No.4-4 (A4) メカトロ製品用 TOE VARISPEED SERIES OPTION CARD CC-Link COMMUNICATION INTERFACE CARD INSTRUCTIONS IRUMA BUSINESS CENTER 480, Kamifujisawa, Iruma, Saitama 358-8555, Japan Phone 81-42-962-5696 Fax 81-42-962-6138 YASKAWA ELECTRIC AMERICA, INC. 2121 Norman Drive South, Waukegan, IL 60085, U.S.A. Phone 1-847-887-7000 Fax 1-847-887-7370 MOTOMAN INC. HEADQUARTERS 805 Liberty Lane West Carrollton, OH 45449, U.S.A. Phone 1-937-847-6200 Fax 1-937-847-6277 YASKAWA ELETRICO DO BRASIL COMERCIO LTD.A. Avenida Fagundes Filho, 620 Bairro Saude-Sao Paulo-SP, Brazil Phone 55-11-5071-2552 Fax 55-11-5581-8795 CEP: 04304-000 YASKAWA ELECTRIC EUROPE GmbH Am Kronberger Hang 2, 65824 Schwalbach, Germany Phone 49-6196-569-300 Fax 49-6196-569-398 Motoman Robotics Europe AB Box 504 S38525 Torsas, Sweden Phone 46-486-48800 Fax 46-486-41410 Motoman Robotec GmbH Kammerfeldstraβe 1, 85391 Allershausen, Germany Phone 49-8166-90-100 Fax 49-8166-90-103 YASKAWA ELECTRIC UK LTD. 1 Hunt Hill Orchardton Woods Cumbernauld, G68 9LF, United Kingdom Phone 44-1236-735000 Fax 44-1236-458182 YASKAWA ELECTRIC KOREA CORPORATION Kfpa Bldg #1201, 35-4 Youido-dong, Yeongdungpo-Ku, Seoul 150-010, Korea Phone 82-2-784-7844 Fax 82-2-784-8495 YASKAWA ELECTRIC (SINGAPORE) PTE. LTD. 151 Lorong Chuan, #04-01, New Tech Park Singapore 556741, Singapore Phone 65-6282-3003 Fax 65-6289-3003 YASKAWA ELECTRIC (SHANGHAI) CO., LTD. No.18 Xizang Zhong Road. Room 1805, Harbour Ring Plaza Shanghai 20000, China Phone 86-21-5385-2200 Fax 86-21-5385-3299 YATEC ENGINEERING CORPORATION 4F., No.49 Wu Kong 6 Rd, Wu-Ku Industrial Park, Taipei, Taiwan Phone 886-2-2298-3676 Fax 886-2-2298-3677 YASKAWA ELECTRIC (HK) COMPANY LIMITED Rm. 2909-10, Hong Kong Plaza, 186-191 Connaught Road West, Hong Kong Phone 852-2803-2385 Fax 852-2547-5773 BEIJING OFFICE Room No. 301 Office Building of Beijing International Club, 21 Jianguomenwai Avenue, Beijing 100020, China Phone 86-10-6532-1850 Fax 86-10-6532-1851 TAIPEI OFFICE 9F, 16, Nanking E. Rd., Sec. 3, Taipei, Taiwan Phone 886-2-2502-5003 Fax 886-2-2505-1280 SHANGHAI YASKAWA-TONGJI M & E CO., LTD. 27 Hui He Road Shanghai China 200437 Phone 86-21-6553-6060 Fax 86-21-5588-1190 BEIJING YASKAWA BEIKE AUTOMATION ENGINEERING CO., LTD. 30 Xue Yuan Road, Haidian, Beijing P.R. China Post Code: 100083 Phone 86-10-6233-2782 Fax 86-10-6232-1536 SHOUGANG MOTOMAN ROBOT CO., LTD. 7, Yongchang-North Street, Beijing Economic Technological Investment & Development Area, Beijing 100076, P.R. China Phone 86-10-6788-0551 Fax 86-10-6788-2878 YASKAWA ELECTRIC CORPORATION YASKAWA In the event that the end user of this product is to be the military and said product is to be employed in any weapons systems or the manufacture thereof, the export will fall under the relevant regulations as stipulated in the Foreign Exchange and Foreign Trade Regulations. Therefore, be sure to follow all procedures and submit all relevant documentation according to any and all rules, regulations and laws that may apply. Specifications are subject to change without notice for ongoing product modifications and improvements. MANUAL NO. TOBZ-C736-70.6 © Printed in Japan May 2003 00-11 3 03-4③