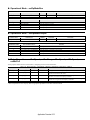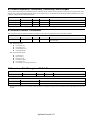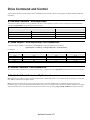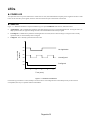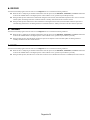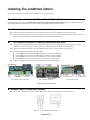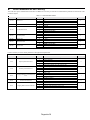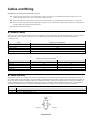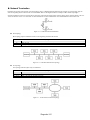
1
LONWORKS® Option Technical Manual Models: CIMR-E7*, P7*, F7* and G7* Document Number TM.AFD.20 Warnings and Cautions This Section provides warnings and cautions pertinent to this product, that if not heeded, may result in personal injury, fatality, or equipment damage. Yaskawa is not responsible for consequences of ignoring these instructions. WARNING YASKAWA manufactures component parts that can be used in a wide variety of industrial applications. The selection and application of YASKAWA products remain the responsibility of the equipment designer or end user. YASKAWA accepts no responsibility for the way its products are incorporated into the final system design. Under no circumstances should any YASKAWA product be incorporated into any product or design as the exclusive or sole safety control. Without exception, all controls should be designed to detect faults dynamically and to fail safely under all circumstances. All products designed to incorporate a component part manufactured by YASKAWA must be supplied to the end user with appropriate warnings and instructions as to that part’s safe use and operation. Any warnings provided by YASKAWA must be promptly provided to the end user. YASKAWA offers an express warranty only as to the quality of its products in conforming to standards and specifications published in the YASKAWA manual. NO OTHER WARRANTY, EXPRESS OR IMPLIED, IS OFFERED. YASKAWA assumes no liability for any personal injury, property damage, losses, or claims arising from misapplication of its products. WARNING ! Read and understand this manual before installing, operating, or servicing this drive. All warnings, cautions, and instructions must be followed. All activity must be performed by qualified personnel. The drive must be installed according to this manual and local codes. ! Do not connect or disconnect wiring while the power is on. Do not remove covers or touch circuit boards while the power is on. Do not remove or insert the digital operator while power is on. ! Before servicing, disconnect all power to the equipment. The internal capacitor remains charged even after the power supply is turned off. Status indicator LEDs and Digital Operator display will be extinguished when the DC bus voltage is below 50 VDC. To prevent electric shock, wait at least 5 minutes after all indicators are OFF and measure the DC bus voltage level to confirm that it is at a safe level. ! Do not perform a withstand voltage test on any part of the unit. This equipment uses sensitive devices and may be damaged by high voltage. ! The drive is not suitable for circuits capable of delivering more than the specified RMS symmetrical amperes. Install adequate branch short circuit protection per applicable codes. Refer to the specification. Failure to do so may result in equipment damage and/or personal injury. ! Do not connect unapproved LC or RC interference suppression filters, capacitors, or over voltage protection devices to the output of the drive. Capacitors may generate peak currents that exceed drive specifications. ! To avoid unnecessary fault displays, caused by contactors or output switches placed between drive and motor, auxiliary contacts must be properly integrated into the control logic circuit. ! YASKAWA is not responsible for any modification of the product made by the user, doing so will void the warranty. This product must not be modified. ! Verify that the rated voltage of the drive matches the voltage of the incoming power supply before applying power. ! To meet CE directives, proper line filters and proper installation are required. ! Some drawings in this manual may be shown with protective covers or shields removed, to describe details. These must be replaced before operation. ! Observe Electrostatic Discharge Procedures when handling the drive and drive components to prevent ESD damage. ! The attached equipment may start unexpectedly upon application of power to the drive. Clear all personnel from the drive, motor and machine area prior to applying power. Secure covers, couplings, shaft keys, machine beds and all safety equipment before energizing the drive. i Introduction This manual explains the specifications and handling of the Yaskawa LONWORKS Option for the Yaskawa models E7, P7, F7 and G7 drives. The LONWORKS Option connects the drive to a LONWORKS network and facilitates the exchange of data utilizing the LonTalk protocol. In this document, the word “inverter”, “ac drive” and “drive” may be used interchangeably. To ensure proper operation of this product, read and understand this manual. For details on installation and operation of the E7, P7, F7 and G7 drives, refer to the appropriate drive’s user and/or technical manual. All drive manuals and support files can be found on the CD that came with the drive. They are also available for download at www.drives.com. For information on LONWORKS contact the Echelon at www.echelon.com. LONWORKS Option Installation Guide document reference IG.AFD.20 E7 User Manual document reference TM.E7.01 E7 Programming Manual document reference TM.E7.02 E7B Drive/Bypass technical Manual document reference TM.E7B.01 F7 User Manual document reference TM.F7.01 F7 Programming Manual document reference TM.F7.02 F7 Parameter Access Technical Manual document reference TM.F7.11 P7 User Manual document reference TM.P7.01 P7 Programming Manual document reference TM.P7.02 G7 Technical Manual document reference TM.G7.01 GPD is a trademark of Yaskawa, Inc. MODBUS is a registered trademark of Schneider Automation, Inc. LONWORKS , Lon , LonBuilder , LonTalk and LonManager are registered trademarks of Echelon Corporation. LonMaker, LonMark, LonLink and NodeBuilder are trademarks of Echelon Corporation. All other trademarks are the property of their respective companies or organizations. Note: Installing the LONWORKS Option on an F7 or G7 drive obstructs the 3CN and 4CN connectors. This means that I/O and encoder feedback options cannot be installed concurrently with the LONWORKS Option on an F7 or G7 drive. When used on a F7, G7 or P7 drive, the drive will appear as an E7 on the network. ii Table of Contents Chapter 1 Installation........................................................................... 1-1 Installation Check Sheet.....................................................................................1-3 Unpack and Inspect............................................................................................1-5 Installation and Wiring ........................................................................................1-6 Set Drive Parameters .......................................................................................1-10 Option LEDs ..................................................................................................... 1-11 Drive Faults ......................................................................................................1-12 Chapter 2 Application Overview......................................................... 2-1 Overview.............................................................................................................2-3 Node Object Network Variable Summary ...........................................................2-4 VFD Object Network Variable Summary.............................................................2-5 Node Object........................................................................................................2-8 VFD object........................................................................................................2-10 Drive Configuration........................................................................................... 2-11 Drive Command and Control ............................................................................2-15 Drive Monitoring ...............................................................................................2-17 Cable Loss Behavior ........................................................................................2-19 Chapter 3 Troubleshooting ................................................................. 3-1 Introduction.........................................................................................................3-3 Troubleshooting Check List ................................................................................3-3 LEDs...................................................................................................................3-5 Installing The LONWORKS Option........................................................................3-7 Cables and Wiring ..............................................................................................3-9 iii This page intentionally left blank. iv Chapter 1 Installation This chapter describes how to install and setup the LONWORKS Option Installation Check Sheet ................................................... 1 - 3 Unpack & Inspect .............................................................. 1 - 5 Installation And Wiring...................................................... 1 - 6 Parameter Settings.......................................................... 1 - 10 Option LEDs...................................................................... 1 - 11 Drive Faults ...................................................................... 1 – 12 Installation 1-1 This page intentionally left blank Installation 1-2 Installation Check Sheet The following is a quick reference guide to install and configure the LONWORKS Option. Make a copy of this page and check-off each item as it is completed. For detailed information please refer to the sections that follow. 1: Unpack the LONWORKS Option and verify that all components are present and undamaged. Refer to Figure 1.1 – LONWORKS Option and Table 1.1 – Product Parts List. 2: Connect power to the drive and verify that the drive functions correctly. This includes running the drive from the operator keypad. Refer to the appropriate drive user and/or technical manual for information on connecting and operating the drive. 3: Remove power from the drive and wait for the charge lamp to be completely extinguished. Wait at least five additional minutes for the drive to be completely discharged. Measure the DC bus voltage level to confirm that it is at a safe level. 4: Install the LONWORKS Option on the drive. 4.1: Remove the operator keypad and all drive covers. 4.2: Mount the LONWORKS Option on the drive. Refer to Figure 1.2 – Mount the LONWORKS Option. 4.3: Install the communications cable. Refer to Figure 1.3 – LONWORKS Option E7, P7 and F7 Drive Connections, Figure 1.4 – LONWORKS Option E7L and E7B Connections and Figure 1.5 – LONWORKS Option G7 Drive Connections. 4.4: Connect a ground wire from the ground terminal on the LONWORKS Option to a noise free ground. If a noise free ground point cannot be found, leave the ground terminal un-terminated. 4.5: Set the termination resistor switch to the ON position on the drive’s terminal assembly. 5: Connect the LONWORKS Option to the LONWORKS communication network. Refer to Figure 1.6 – LONWORKS Option Connections. 7: Configure the LONWORKS network for the drive. The External Interface File (E7_LW.XIF) and the Device Resource Files (E7_LW.TYP, E7_LW.ENU, E7_LW.FPT, and E7_LW.FMT) may be found on the CD supplied with the drive or downloaded from www.drives.com. 8: Apply power to the drive. Set parameters b1-0, b1-02, H5-01, H5-02, H5-03 and H5-07 to their appropriate values. Refer to Table 1.2 – Drive Parameter Settings. 9: Cycle power to the drive. After power has been removed, wait until the charge lamp has been extinguished before reapplying power. 10: Verify that the diagnostic LEDs on the front of the LONWORKS Option are in their correct state. Refer to Table 1.3 –Diagnostic LED Status. 11: Remove power from the drive and wait for the charge lamp to be completely extinguished. Wait at least five additional minutes for the drive to be completely discharged. Measure the DC bus voltage level to confirm that it is at a safe level. 12: Reinstall the operator keypad and all drive covers. Installation 1-3 This page intentionally left blank Installation 1-4 Unpack and Inspect Prior to unpacking, check the package label and verify that the product received matches the product ordered. Unpack the option and verify that the following items are included in the product package and are undamaged. Figure 1.1 –LONWORKS Option Table 1.1 – Product Parts List Part LonWorks Option (46S03587-0121) Installation Guide (IG.AFD.20) UWR00567-1 (Drive Connection Cable - Included) UWR00567-2 (Drive Connection Cable – Optional for E7L or E7B) UWR00567-3 (Drive Connection Cable – Optional for E7L or E7B) Notes: Qty. 12” Cable 20” Cable 78” Cable 1 1 1 Opt Opt Cables UWR00567-2 and UWR00567-3 are used for E7L and E7B applications and must be ordered separately. Installing the LONWORKS Option on an F7 or G7 drive obstructs the 3CN and 4CN connectors. This means that I/O and encoder feedback options cannot be installed concurrently with the LONWORKS Option on an F7 or G7 drive. When mounted on an F7, G7 or P7 drive, the node will appear as an E7 drive to the system software. The External Interface file (E7_LW.XIF) and the Device Resource files (E7_LW.TYP, E7_LW.ENU, E7_LW.FPT and E7_LW.FMT) can be found on t he CD that accompanied the drive. They may also be downloaded from www.drives.com. Installation 1-5 Installation and Wiring The following describes the installation and configuration of the LONWORKS Option. For detailed information about the drive or the LONWORKS option, please refer to the appropriate sections of this manual or the appropriate drive user and/or technical manual.. # Verify Drive Operation ! Connect power to the drive and verify that the drive functions properly. This includes running the drive from the operator keypad. Refer to the appropriate drive technical manual, for information on connecting and operating the drive. ! Remove power from the drive and wait for the charge lamp to be completely extinguished. Wait at least five additional minutes for the drive to be completely discharged. Measure the DC BUS voltage and verify that it is at a safe level. ! Remove the operator keypad and terminal cover. # Mount the LONWORKS Option Mount the LONWORKS Option onto the drive by following the instructions below. An E7 drive is shown but the procedure is identical for the P7, F7 and G7 drives. Figure 1.2 – Mount the LONWORKS Option ! Remove the option card hold down. ! Align the connector on the back of the option with its mating 2CN on the drive. ! Simultaneously align the two stand-offs on the drive control board with their respective holes on the LONWORKS Option. ! Press the option and the drive together until the connector is firmly seated and the stand-offs are locked through their associated mounting holes. ! Connect a ground wire from the Ground Terminal on the option card to a noise free control ground. If a noise free ground is not available, leave the ground terminal on the LONWORKS Option un-terminated. ! Connect the supplied cable (UWR00567-1) to connector J1 on the option board for the E7, P7, F7 and G7. For the E7L and E7B use the cable appropriate for that unit (UWR00567-2 or UWR00567-3). Play close attention to keying of the J1 connector when connecting the cable to the LONWORKS Option and the color coding of the wires when connecting to the drive’s terminal assembly ! Route the wires down the left side of the drive’s control board and connect them to the terminal assembly as shown below. ! Insert the option card hold down. Installation 1-6 # Connect LONWORKS Option to the Drive. ! Determine the drive family on which the LONWORKS Option is installed. Connect the LONWORKS Option communication cable to the drive as shown below. Also set the termination switch to ON. Figure 1.3 – LONWORKS Option E7, P7 and F7 Drive Connections Figure 1.4 – LONWORKS Option E7L and E7B Connections Figure 1.5 – LONWORKS Option G7 Drive Connections Installation 1-7 # Connect The LONWORKS Option To The LONWORKS Communications Network. The LonWorks interface features Echelon’s Smart free topology transceiver (FT3150). The FT3150 transceiver is also directly compatible with Echelon’s LPT-10 Link Power transceiver. A single twisted pair cable can be shared by these transceiver types. The primary network connection is 3-way pluggable Phoenix-style connector included with the option card. The center position is for the shield while the outer positions are for the twisted pair cable, as shown below. The network connection is polarity insensitive. ! Connect the LONWORKS network cable to the 3-pin connector on the LONWORKS Option as shown below. The RJ45 connector is typically used as a local network access point and is not recommended for network conection. ! Tie the LONWORKS cable to a point near the connector to provide strain relief for the connector and cable connection. Figure 1.6 – LONWORKS Option Connections # Set Drive Termination Since the LONWORKS Option utilizes the RS485 connection to the drive, it is necessary to set the termination resistor to the ON position on each drive’s terminal assembly. Refer to Figure 1.3 – LONWORKS Option E7, P7 and F7 Drive Connections, Figure 1.4 – LONWORKS Option E7L Connections and, Figure 1.5 – LONWORKS Option G7 Drive Connections above for the location of the termination switch on the drive’s terminal assembly. # Network installation ! Installation Files Included on the CD that came with the drive are several files that assist in node installation and identification. They may also be downloaded from www.drives.com. These are the External Interface File (E7_LW.XIF) and the Device Resource Files (E7_LW.TYP, E7_LW.ENU, E7_LW.FPT, and E7_LW.FMT). ! External Interface File The external interface file contains a detailed description of a node’s network variables and configuration properties, including network variable type and self-documentation information. Hardware characteristics, such as transceiver type and initial communication parameters, are also defined. By importing this file, many network management tools can “pre-define” a device type prior to connection of the first node. This can greatly reduce installation time. ! Device Resource Files Device resource files define the components of an external interface for a LonWorks device. These files allow installation tools and operator interface applications to interpret and format data properly. Standard resource files are made available by the LonMark Interoperability Association and contain the definition for Standard Network Variable Types (SNVTs), Standard Configuration Property Types (SCPTs) and Standard Functional Profile Types (SFPTs). The resource files included on the installation disk contain additional information specific to this interface. These files should be placed in the \TYPES sub-directory associated with the user’s network management tool and registered in the resource file catalog. Installation 1-8 # Network Identification and Node Configuration The LONWORKS Option is shipped unconfigured. This implies that the application is loaded and communications parameters are defined but the option has not been installed on the network. On power up. An unconfigured node can be recognized by the SERVICE LED flashing at 0.5Hz. Network identification is accomplished with an installation tool. Unique network identities are established by pairing “logical” addresses with a device’s 48-bit Neuron ID. ! SERVICE Button Each option card has a Service Button. If using a configuration tool utilizing this feature, press the Service Button when prompted to do so. When pressed, a broadcast message is sent which contains the Neuron ID and program ID. This uniquely identifies the node on the network. This method works best for small networks or with portable installation tools. ! Find and Wink When it is impractical to press each node’s Service Button for installation (e.g. in large networks or a node is physically enclosed), the “find and wink” installation method is useful. With this method, the installation tool queries the network for all unconfigured nodes. Nodes respond with their Neuron ID and a logical address is assigned. A “wink” command can then be sent to each logical address. In response to this command, the TRANSMIT and RECEIVE LEDs will blink rapidly for several seconds. In this manner, the exact physical location of each node can be identified. ! Reclaiming a Node $ $ $ $ A node can be “reclaimed”, or returned to its unconfigured state, as follows: Remove power from the drive and wait for the charge lamp to be completely extinguished. Press and hold the Service Button. Re-apply drive power, continuing to press and hold the Service Button. After approximately 5 seconds, the SERVICE LED should begin flashing at a 0.5 Hz rate, indicating the unconfigured state. This procedure sets both domain table entries to “undefined” and sets the channel ID to 0. Installation 1-9 Set Drive Parameters ! Remove power from the drive and wait for the charge lamp to be completely extinguished. Wait at least five additional minutes for the drive to be completely discharged. Measure the DC BUS voltage and verify that it is at a safe level. ! Reinstall the operator keypad and all drive covers. Apply power to the drive. ! Set parameter A1-01 to 2, Advanced. ! Set parameters b1-01 and b1-02 to their appropriate values. Refer to the table below for available b1-01 and b1-02 values. Reference Selection and Operation Method Selection can have different values depending on the application. To control both frequency and run/stop over the network, set both b1-01 and b1-02 to 2, Serial Communications. ! Set parameter H5-01 to 1Fh (31dec) ! Set parameter H5-02 to 3, 9600 baud ! Set parameter H5-03 to 0, No Parity ! Set parameter H5-06 to 5, 5ms transmission wait ! Set parameter H5-07 to 0, Disabled ! Set parameter H5-08 to 0, MODBUS ! Parameters H5-04 (Stopping Method at Communications Fault), H5-05 (Serial Fault Detection) and H5-09 (CE Detect Time) should be set according to the desired drive performance during a communications timeout or failure. ! After all drive parameters have been set, power cycle the drive. Communications parameters will not take affect until power has been removed from the drive until the charge lamp has been extinguished and restored. ! If any of these settings is incorrect, “CALL” will blink on the digital operator, as will the RECEIVE, TRANSMIT and FAULT LEDs on the LONWORKS Option. This is an indication that the drive has not yet established communication with the option card. Once the drive has properly exchanged messages with the option card, “CALL”.will no longer be displayed on the digital operator. ! For By-Pass applications, refer to the parameter table accompanying the by-pass unit for parameter settings. Parameter Function A1-01 Access Level b1-01 Reference Selection b1-02 Operation Method Selection H5-01 Serial Communications Address H5-02 Serial Baud Rate Select H5-03 Serial Parity Select H5-06 Transmit Wait H5-07 RTS Control Select H5-08 Protocol Select Table 1.2 – Drive Parameter Settings Data +/- Limits - Description 0 Operator 1 User 2 Advanced 0 Digital Operator 1 Terminals 2 Serial Communication (LonWorks) 3 Option PCB 4 Pulse Input (F7 and G7 Drives only) 0 Digital Operator 1 Terminals 2 Serial Communication (LonWorks) 3 Option PCB 1F 0 – 1Fh (0 – 31 dec) 0 1200 baud 1 2400 baud 2 4800 baud 3 9600 baud (LonWorks) 4 19200 baud 0 None (LonWorks) 1 Even parity 2 Odd parity 5 5 – 65ms 0 Disabled (LonWorks) 1 Enabled 0 MODBUS (LonWorks) 1 N2 (Metasys) (E7, E7B and E7L only) 2 P1 (APOGEE) (E7, E7B and E7L only) Installation 1-10 Default 2 1 1 1Fh 3 0 5 0 0 Option LEDs The LONWORKS Option Unit is equipped with four indication LEDs for module and LONWORKS status indication. The LEDs are located on the unit according to the figure below. Figure 1.7 – LONWORKS LED Locations # Verify LonWorks Option Operation ! Apply power to the drive. ! Verify that the diagnostic LEDs on the front of the LONWORKS Option are in their correct state. Table 1.3 – LED Status LED Display PWR Receive Transmit Fault OFF OFF ON BLINK OFF ON FLASH FLASH OFF Condition Option is Not Configured Application missing Power not supplied ON OFF Communications not established Communications Loss OFF OFF Normal communications OFF OFF Normal communications BLINK BLINK ON ON OFF Service BLINK 0.5Hz FLASH 1sON_2sOFF_ContON OFF Solution % Configure Option % % % % % % % % % % Download application image file Assign network Identity Check that drive has power Check option card seating in CN2 connector Check drive parameters (refer to table above) Check connection between option and drive Check network cable connections Flash each time serial task is complete approximately 0.5Hz when drive is at STOP approximately 1.0Hz when drive RUN is active % Flash for every 5 network variables updates ! Remove power from the drive and wait for the charge lamp to be completely extinguished. Wait at least five additional minutes for the drive to be completely discharged. Measure the DC BUS voltage and verify that it is at a safe level. ! Install the operator keypad and all drive covers. Installation 1-11 Drive Faults The following is a table of faults that could be caused by the LONWORKS Option that will be displayed on the Operator Keypad, their causes, and possible solutions. For any fault displayed on the operator that is not listed in the following table, please see the appropriate drive technical manual. Fault BUS Content Option PCB communications error EF0 Option PCB external fault OPE05 Command selection fault OPE06 Control mode selection fault Table 1.4 – Drive Faults Cause Communication is not established between LONWORKS Master and the drive. Solution % % Drive received an external fault command % from the Option PCB % % Parameter b1-01 is set to Option PCB and no % card is detected % % Parameter b1-02 is set to Option PCB and no % card is detected % Installation 1-12 Check LONWORKS communication LED display. Check multi-function input settings Check PLC or controller program Eliminate cause of fault (machine device in fault state) Install Option PCB Reprogram b1-01 Replace the Option PCB Install Option PCB Reprogram b1-02 Replace the Option PCB Chapter 2 Application Overview This chapter provides an overview of the Node and VFD objects Overview ............................................................................ 2 - 3 Node Object Network Variable Summary ........................ 2 - 4 VFD Object Network Variable Summary .......................... 2 – 5 Node Object ........................................................................2 – 8 VFD Object ........................................................................2 – 10 Drive Configuration ..........................................................2 – 11 Drive Command and Control...........................................2 – 15 Drive Monitoring................................................................2 –17 Cable Loss Behavior ........................................................ 2 - 19 Application Overview 2-1 This page intentionally left blank Application Overview 2-2 Overview This interface uses LonMark objects to communicate on a LonWorks network, as defined in the LonMark functional profile for Variable Speed Motor Drives (6010). Two objects are implemented - the Node Object (0) and the Variable Frequency Drive Object (1), as illustrated in the figure below Figure 2.1 - LonMark Objects The network variables and configuration properties for each object are summarized below. The following chapters contain additional detail on the operation of each object. Application Overview 2-3 Node Object Network Variable Summary Variable Name nviRequest nvoStatus # Table 2.1 - Node Object Network Variable Summary Variable Type Description Used to request a particular mode for an object. Modes supported: ! RQ_NORMAL ! RQ_DISABLED SNVT_obj_request ! RQ_UPDATE_STATUS ! RQ_REPORT_MASK ! RQ_CLEAR_ALARM Used to report the status of an object. Status bits supported: ! INVALID_ID ! INVALID_REQUEST SNVT_obj_status ! DISABLED ! IN_ALARM ! REPORT_MASK Node Object Configuration Property Summary Property Name nciDevMajVer nciDevMinVer Table 2.2 - Node Object Configuration Property Summary Variable Type Default Description Unsigned short 0 Identifies the major version of the device interface. Unsigned short 0 Identifies the minor version of the device interface. Application Overview 2-4 VFD Object Network Variable Summary Index nv1 nv2 nv3 nv4 nv5 nv6 nv7 Variable Name nviDrvSpeedStpt nviDrvSpeedScale nvoDrvCurnt nvoDrvSpeed nvoDrvVolt nvoDrvPwr nvoDrvRunHours nv8 nviOpCommands nv9 nviReadParamNum nv10 nviWriteParamNum nv11 nviWriteParamVal nv12 nvoDrvStatus nv13 nvoFltStatus Table 2.3 - VFD Object Network Variable Summary Variable Type Description SNVT_switch Controls start/stop and a low resolution speed setpoint as a percentage of nciNmlFreq SNVT_lev_percent Controls scaling for nviDrvSpeedStpt Negative values indicate reverse motor direction SNVT_amp Reports output current SNVT_lev_percent Reports output speed as a percentage of nciNmlFreq SNVT_volt Reports AC output voltage SNVT_power_kilo Reports output power SNVT_time_hour Reports accumulated run time Controls the following operational commands: ! bit 0 - External Fault (EF0) ! bit 1 - Fault Reset ! bit 2 - Multifunction Input 1 (terminal S3) SNVT_state ! bit 3 - Multifunction Input 2 (terminal S4) ! bit 4 - Multifunction Input 3 (terminal S5) ! bit 5 - Multifunction Input 4 (terminal S6) ! bit 6 - Multifunction Input 5 (terminal S7) ! bit 7 - Reserved Requests a read of the specified drive parameter The response value is reported in SNVT_count nvoReadParamVal Requests a write of the specified drive parameter The write value is contained in SNVT_count nviWriteParamVal SNVT_count Contains the value to be written to the drive parameter specified in nviWriteParamNum Reports drive operational status: ! bit 0 - Drive Running ! bit 1 - Reverse Run Commanded ! bit 2 - Drive Ready ! bit 3 - Drive Faulted ! bit 4 – Parameter Access Error ! bit 5 – Multi-function Output 1 ! bit 6 – Multi-function Output 2 SNVT_state ! bit 7 – Reserved ! bit 8 - Terminal S1 State ! bit 9 - Terminal S2 State ! bit 10 - Terminal S3 State ! bit 11 - Terminal S4 State ! bit 12 - Terminal S5 State ! bit 13 - Terminal S6 State ! bit 14 - Terminal S7 State ! bit 15 - Reserved Reports drive fault status: ! bit 0 - Overcurrent Ground Short Circuit ! bit 1 - Overvoltage ! bit 2 - Drive Overload ! bit 3 - Overheat ! bit 4 – Reserved ! bit 5 – Fuse Blown ! bit 6 – PID Feedback Lost SNVT_state ! bit 7 - External Fault ! bit 8 - Hardware Fault ! bit 9 - Overload/Overtorque Fault ! bit 10 – Excessive Speed Deviation ! bit 11 - Undervoltage Fault ! bit 12 – Undervoltage/Power Loss Fault ! bit 13 – Input/Output Phase Loss ! bit 14 – Drive Communication Loss ! bit 15 – Operator Error Application Overview 2-5 Index nv14 nv15 nv16 nv17 nv18 nv19 nv20 nv21 nv22 nv23 nv24 nv25 Variable Name nvoSpdStptFb nvoSpdCmd nvoPIDFb nvoDrvBus nvoReadParamVal nviDrvFltRst nvoRunStp nvoDrvFlt nvoDrvParamErr nvoDrvTemp nvoDrvEnergyKwh nvoDrvEnergyMwh Table 2.3 - VFD Object Network Variable Summary Variable Type Description SNVT_lev_percent Reports the speed setpoint as a percentage of nciNmlFreq SNVT_lev_percent Reports the speed command as a percentage of nciNmlFreq regardless of command source SNVT_lev_percent Reports the PID feedback as a percentage of nciNmlFreq SNVT_volt Reports DC Bus voltage SNVT_count Reports value of requested parameter SNVT_switch Resets a drive fault SNVT_switch Reports the Run/Stop status of the drive SNVT_switch Reports drive fault condition SNVT_count Reports parameter access error SNVT_temp Reports drive temperature SNVT_elec_kwh Reports cumulative energy in kWh SNVT_elec_kwh Reports cumulative energy in mWh # Parameter Access Errors These values are returned by nv22 when a communications error occurres. ! 0- Normal ! 2- Incorrect register error ! 33 - Data range error ! 34 - Parameter not writable in Run mode ! 35 – Write when drive is in Undervoltage ! 36 – Process busy ! 255 - Command timeout error Application Overview 2-6 # VFD Object Configuration Property Summary Property Name nciNmlSpeed Variable Type SNVT_rpm nciNmlFreq SNVT_freq_hz nciMinSpeed SNVT_lev_percent nciMaxSpeed SNVT_lev_percent nciRampUpTm SNVT_time_sec nciRampDownTm SNVT_time_sec nciSndHrtBt SNVT_time_sec nciRcvHrtBt SNVT_time_sec nciMinOutTm SNVT_time_sec nciLocation SNVT_str_asc nciDrvSpeedScale SNVT_lev_percent nciOpModeRun SNVT_count nciDrvMaxFreq SNVT_freq_hz nciMtrFLA SNVT_amp nciPLRideThru SNVT_count nciAutoRstrt SNVT_count nciProFreq1 SNVT_freq_hz nciProFreq2 SNVT_freq_hz nciProFreqBW SNVT_freq_hz nciPIDSel SNVT_count nciPID_PGain SNVT_multiplier nciPID_ITime SNVT_time_sec nvoDrvRatedCur SNVT_amp nciStallLevAcc SNVT_count nciStallLevRun SNVT_count nciCblLossSpeed SNVT_lev_percent nciCblLossFltEna SNVT_switch nciOpModeFreqRef SNVT_count Table 2.4 - VFD Object Configuration Property Summary Default Parameter Description 1800 rpm n/a Configures nominal motor speed in rpm Configures nominal motor frequency in hertz All speed related data in percent are referenced 60Hz n/a to this value Configures the minimum motor speed as a percentage of nciNmlFreq Sets the drive’s lower 0% d2-02 limit for frequency commands Configures the maximum motor speed as a percentage of nciNmlFreq Sets the drive’s upper 100% d2-01 limit for frequency commands Configures motor ramp up time from 0 to its operating setpoint Sets the drive’s output 10sec C1-01 acceleration rate Configures motor ramp down time from its operating setpoint to 0 Sets the drive’s output 10sec C1-02 deceleration rate Configures the maximum period of time that expires before automatic propagation of 0sec (off) n/a nvoDrvCurnt nvoDrvSpeed nvoDrvVolt and nvoDrvPwr Configures the maximum period of time that expires between network variable updates 0sec (off) n/a before a cable loss condition is declared and the drive is stopped Configures the minimum period of time that expires before changes in output network 1sec n/a variables are propagated All “\0” n/a Available for a description of the physical location of the node 100% n/a Scales the speed setpoint nviDrvSpeedStpt (saved configured value) 1 b1-02 Selects the source for start/stop and speed commands 60.0Hz E1-04 Reports the maximum output frequency of the drive (read-only) E2-01 Sets the full load current rating of the motor * 2.0sec L2-02 Selects the drive’s response to momentary power loss ride through time 0 L5-01 Selects the number of times the drive attempts to automatically restart after certain faults 0Hz d3-01 Sets the center frequency for the first band of prohibit frequencies 0Hz d3-02 Sets the center frequency for the second band of prohibit frequencies 1.0Hz d3-04 Sets the bandwidth for prohibit frequencies 0 b5-01 Selects the mode of the PID controller 20 b5-02 Sets the proportional gain of the PID controller 5.0sec b5-03 Sets the integral time constant of the PID controller n9-01 Reports the output current rating of the drive (read-only) * L3-02 Sets the stall level for output current during acceleration * L3-06 Sets the stall level for output current while at set speed * 0% n/a Sets speed level commanded if network communication is lost Off n/a Enables an EF0 fault to be declared if network communication is lost 1 b1-01 Selects frequency reference source * - Value dependent on drive capacity. Refer to appropriate Parameter Access and/or Technical Manual. Application Overview 2-7 Node Object The node object supports 2 network variables for controlling the mode and reporting the status of the objects. 2 configuration properties are used to identify the revision level of the interface firmware. Figure 2.2 - Node Object # Object Requests - nviRequest The following table summarizes the supported request modes. Mode Request RQ_NORMAL (0) % % % % RQ_DISABLE (1) RQ_UPDATE_STATUS (2) RQ_REPORT_MASK (5) RQ_CLEAR_ALARM (10) All other requests % % % % % % % % Table 2.5 - Object Requests - nviRequest Node Object #0 Response All objects and network variables are re-enabled. % nvoStatus is updated and reported. % % If running, the motor shall come to a controlled stop. % All objects and network variables are disabled, except the node object. Input updates are ignored and outputs are not propagated. % nvoStatus is updated and reported. % nvoStatus is updated for all objects and reported. % Invalid request. % nvoStatus is updated for all objects and reported. Invalid request. % nvoStatus is updated and reported. % Invalid request. % nvoStatus is updated and reported. % VFD Object #1 Response VFD object network variables are re-enabled. nvoStatus is updated and reported If running, the motor shall come to a controlled stop. VFD object network variables are disabled. Input updates are ignored and outputs are not propagated. Node object network variables remain enabled. nvoStatus is updated and reported nvoStatus is updated and reported. Each status bit supported by the VFD object is set in nvoStatus and reported. Fault reset is issued to drive. nvoStatus is updated and reported. Invalid request. nvoStatus is updated and reported. # Object Status - nvoStatus The output nvoStatus is propagated in response to any request. The following status fields are supported: ! ! ! ! ! ! object_id - indicates the object whose status is being reported. invalid_id - indicates a request to an undefined object id. invalid_request - indicates an invalid request to the specified object id. disabled - indicates the specified object is disabled. in_alarm - indicates the specified object is in alarm. For the VFD object, this bit is set when the drive is faulted. report_mask - indicates the status reported contains a ‘1’ for each status bit supported. Application Overview 2-8 # Firmware Revision – nciDevMajVer, nciDevMinVer These two configuration properties are used to identify the major and minor versions of the interface firmware. The major version number is incremented when the network interface for the device changes. Major revisions require an upgrade of both the external interface file (.xif) and application image file (.nxe). The new external interface file re-defines the network interface to any network management tools in use. The new application image file is downloaded to an installed device to upgrade it’s functionality and network interface definition. The minor version number is incremented for changes which affect device functionality but do not affect the device’s network interface. Minor revisions require an upgrade of the application image file (.nxe) only. The new application image file is downloaded to an installed device to upgrade it’s functionality and network interface definition. Application Overview 2-9 VFD object The VFD object supports 25 network variables and 28 configuration properties for configuring, controlling, and monitoring the operation of the drive, as shown below. Figure 2.4 - VFD Object Application Overview 2-10 Drive Configuration This section describes the configuration properties used to configure the drive. Refer to the appropriate Technical Manual for additional information. # Accel/Decel Times – nciRampUpTm, nciRampDownTm These configuration properties define the ramp rates for starting and stopping the motor, configuring the drive as described below: Property Name nciRampUpTm nciRampDownTm Table 2.6 - Accel/Decel Times – nciRampUpTm, nciRampDownTm Variable Type Default Parameter Description Configures motor ramp up time from 0 to its operating setpoint. SNVT_time_sec 10 sec C1-01 Sets the drive’s output acceleration rate. Configures motor ramp down time from its operating setpoint to SNVT_time_sec 10 sec C1-02 0. Sets the drive’s output deceleration rate. # PID Configuration – nciPIDSel, nciPID_PGain, nciPID_ITime These configuration properties define the mode and gains of the PID controller. The modes selectable by nciPIDSel are described below: Property Name nciPIDSel nciPID_PGain nciPID_ITime nciPIDSel 0 1 2 3 4 Table 2.7 - PID Configuration – nciPIDSel, nciPID_PGain, nciPID_ITime Variable Type Default Parameter Description SNVT_count 0 b5-01 Selects the mode of the PID controller. SNVT_multiplier 2.0 b5-02 Sets the proportional gain of the PID controller. SNVT_time_sec 5.0 sec b5-03 Sets the integral time constant of the PID controller. Table 2.8 - PID Configuration – nciPIDSel PID Mode PID Disabled PID Enabled (D = Feedback) PID Enabled (D = Feed Forward) (Available on F7 and G7 drives only) PID Enabled (Freq. Ref + PID Output (D = Feedback)) PID Enabled (Freq. Ref. + PID Output (D = Feed Forward)) (Available on F7 and G7 drives only) # Stall Prevention – nciStallLevAcc, nciStallLevRun These points define the stall prevention levels during acceleration and run. Each value is specified as a percentage of the drive’s current rating (nciDrvRatedCur). If the output current (nvoDrvCurnt) reaches the specified level during acceleration or run, the output frequency is maintained or lowered as needed to sufficiently reduce the output current. These properties configure the drive as described below: Property Name nciStallLevAcc nciStallLevRun Table 2.9 - Stall Prevention – nciStallLevAcc, nciStallLevRun Variable Type Default Parameter Description SNVT_count L3-02 Sets the stall level for output current during acceleration. * SNVT_count L3-06 Sets the stall level for output current while at set speed. * * Value dependent on drive capacity. Refer to appropriate Parameter Access and Technical Manual. Application Overview 2-11 # Operational Mode – nciOpModeRun Property Name nciOpModeRun Variable Type SNVT_count Table 2.10 - Operational Mode - nciOpModeRun Default Parameter Description 0 b1-02 Selects location of the Run/Stop command Table 2.11 - nciOpModeRun nciOpModeRun 0 1 2 3 Run Command Source Digital Operator External Terminals Serial Communications (LONWORKS) Option Card Remarks nviDrvSpeedStpt has no effect nviDrvSpeedStpt has no effect nviDrvSpeedStpt is controlled via the network nviDrvSpeedStpt has no effect # Operational Mode – nciOpModeFreqRef Property Name nciOpModeFreqRef nciOpModeFreqRef 0 1 2 3 4 Variable Type SNVT_count Table 2.12 - Operational Mode - nciOpModeRun Default Parameter Description 0 b1-01 Selects location of the frequency reference command Table 2.13 - nciOpModeFreqRef Run Command Source Remarks Digital Operator nviDrvSpeedScale has no effect External Terminals nviDrvSpeedScale has no effect Serial Communications (LONWORKS) nviDrvSpeedScale is controlled via the network Option Card nviDrvSpeedScale has no effect Pulse Input nviDrvSpeedScale has no effect (Available on F7 and G7 only) # Motor Properties – nciNmlSpeed, nciNmlFreq, nciMaxSpeed, nciMinSpeed, nciMtrFLA These properties define the motor characteristics, configuring the drive as described below: Property Name nciNmlSpeed nciNmlFreq nciMinSpeed nciMaxSpeed nciMtrFLA Table 2.13 - Motor Properties – nciNmlSpeed, nciNmlFreq, nciMaxSpeed, nciMinSpeed, nciMtrFLA Variable Type Default Parameter Description SNVT_rpm 1800 rpm n/a Configures nominal motor speed in rpm. Configures nominal motor frequency in hertz. All speed related data in SNVT_freq_hz 60 Hz n/a percent are referenced to this value. Configures the minimum motor speed as a percentage of nciNmlFreq. Sets SNVT_lev_percent 0% d2-02 the drive’s lower limit for frequency commands. Configures the maximum motor speed as a percentage of nciNmlFreq. SNVT_lev_percent 100% d2-01 Sets the drive’s upper limit for frequency commands. SNVT_amp E2-01 Sets the full load current rating of the motor. * * Value is dependent on drive capacity. Refer to appropriate parameter access and/or technical manual. Application Overview 2-12 # Prohibit Frequencies - nciProFreq1, nciProFreq2, nciProFreqBW These properties define bands of prohibited frequencies, selected to avoid certain areas of resonant motor vibration. Two separate bands can be defined, with a common bandwidth. When this feature is selected, the motor is accelerated and decelerated through the prohibited areas. These properties configure the drive as described below: Property Name nciProFreq1 nciProFreq2 nciProFreqBW Table 2.14 - Prohibit Frequencies - nciProFreq1, nciProFreq2, nciProFreqBW Variable Type Default Parameter Description SNVT_freq_hz 0 Hz d3-01 Sets the center frequency for the first band of prohibit frequencies. SNVT_freq_hz 0 Hz d3-02 Sets the center frequency for the second band of prohibit frequencies. SNVT_freq_hz 1.0 Hz d3-04 Sets the bandwidth for prohibit frequencies. # Automatic Restarts - nciAutoRstrt This configuration property defines the number of automatic restarts that will be attempted under certain fault conditions. Property Name Variable Type nciAutoRstrt SNVT_count ! Restartable Faults % % % % ! Table 2.15 - Automatic Restarts - nciAutoRstrt Default Parameter Description Selects the number of times the drive attempts to automatically restart 0 L5-01 after certain faults. Overcurrent (oC) Overvoltage (ou) Undervoltage (Uu1) Ground Fault (GF) Non-Restartable Faults % % % % % % Overload (oL_) External (EF_) Hardware (CPF_) Fuse Blown (PUF) Overcurrent (oC) Overvoltage (oV) during deceleration # Power Loss Ride-Through – nciPLRideThru Table 2.16 - Drive Configuration Property - nciPLRideThru Variable Type Default Parameter Description SNVT_count 0.1sec L2-02 Sets the ride through time at momentary power loss Property Name nciPLRideThru Table 2.17 - nciPLRideThru nciPLRideThru 0 0.1 ~ 25.5sec * Value Disabled Enabled Remarks Momentary power loss ride through is disabled The ride through time at momentary power loss * Parameter L2-01 must be set to 1 in order for this variable to be available. A setting of 0 or 2 in parameter L2-01 will disable power loss ride through. Application Overview 2-13 # General Purpose Setup - nviWriteParamNum, nviWriteParamVal Two network variables are defined for setting any drive parameter: nviWriteParamNum - Specifies the drive parameter to be set. Writing to this point initiates the write sequence. Refer to the appropriate drive user, parameter access, programming and/or technical manual for detailed information on drive parameters. The parameter addresses in the above manuals is supplied in hexadecimal format. Refer to your system documentation to determine the correct radix for the values entered. The default radix is decimal. If an invalid parameter address is entered, 65535 (0xFFFFh) will be returned in nvoReadParamVal. nviWriteParamVal - Note: Specifies the value to be written to the specified parameter. Writing to this point completes the write sequence and causes the value to be sent to the drive. Refer to the appropriate drive user, parameter access, programming and/or technical manual for a detailed description of all parameters. The parameter values in the above manuals may be supplied in either hexadecimal or decimal format. Refer to your system documentation to determine the correct radix for the values entered. The default radix is decimal. The increment listed in the technical manual must be considered when specifying a value. For example, to set parameter b2-04, DC Injection Time at Stop, to 1.00 seconds, nviWriteParamVal must be set to 100, since the increment for this parameter is 0.01 seconds. Application Overview 2-14 Drive Command and Control This section describes the network variables used to command and control the drive. Refer to the appropriate Technical Manual for additional information. # Run/Stop Command – nviDrvSpeedStpt This network variable controls the run/stop command to the drive, as described below. The drive must be configured for a network Run/Stop Command (nciOpModeRun = 2) for this input to control the drive. State 0 1 1 Table 2.18 - Run/Stop Command – nviDrvSpeedStpt nviDrvSpeedStpt Value don’t care 0 >0 Run/Stop Command Stop Run Run # Speed Setpoint - nviDrvSpeedStpt, nviDrvSpeedScale These two network variables are used together with nciNmlFreq to control the speed setpoint, as follows: Speed Setpoint = nciNmlFreq * nviDrvSpeedStpt.value * nviDrvSpeedScale For example: nciNmlFreq 60 Hz 60 Hz 60 Hz 50 Hz Table 2.19 - Speed Setpoint - nviDrvSpeedStpt, nviDrvSpeedScale nviDrvSpeedStpt.value nviDrvSpeedScale 100% 100% 100% 75% 75% 50% 60% 35% Frequency Setpoint 60 Hz 45 Hz 22.5 Hz 10.5 Hz # Reverse Command - nviDrvSpeedScale This network variable is used to reverse the direction of the motor. A negative value for nviSpeedScale will cause the motor to reverse direction. # Fault / Fault Reset Control - nviOpCommands Bit 0 of this network variable is used to command an external fault. Commanding this bit to a ‘1’ will fault the drive and bring it to a controlled stop. ‘EF0’ is annunciated on the digital operator. Bit 1 of this input variable is used to reset the fault state of the drive. If no fault conditions exist, the fault state of the drive will be reset immediately upon receipt of this command. If fault conditions persist, the reset command remains latched until all fault conditions are cleared, at which time the fault state is reset. The fault state of the drive may also be reset by issuing a RQ_CLEAR_ALARM mode request to the node. Application Overview 2-15 # MultiFunction Input Commands - nviOpCommands Bit 2, bit 3, bit 4, bit 5 and bit6 of this network variable control the multifunction input commands, as described below. These commands are equivalent to contact closures on external terminals S3 – S7, respectively. Function selection for the multifunction inputs are configured in parameters H1-01 through H1-05. bit # 2 3 4 5 6 Table 2.20 – Multi-Function Input Commands - nviOpCommands Point Description Off (0) State On (1) State Multifunction Input 1 Command Depends on Terminal S3 function selection Depends on Terminal S3 function selection Multifunction Input 2 Command Depends on Terminal S4 function selection Depends on Terminal S4 function selection Multifunction Input 3 Command Depends on Terminal S5 function selection Depends on Terminal S5 function selection Multifunction Input 4 Command Depends on Terminal S6 function selection Depends on Terminal S6 function selection Multifunction Input 5 Command Depends on Terminal S7 function selection Depends on Terminal S7 function selection Default Off Off Off Off Off # Terminal S1 Safety Interlock Control In certain applications, a normally closed safety interlock may be connected to the drive’s terminals S1 and S2. When the connection between S1 and S2 is broken, the drive will automatically stop. The drive Run will restart once the connection is re-established. Refer to the appropriate drive user, programming and/or technical manual for the proper use and wiring of a safety interlock circuit. If a safety interlock is not used, a jumper must be present between terminals S1 and S2. For E7B and E7L units refer to the schematic and instructions that came with the unit, along with the appropriate technical manual. Application Overview 2-16 Drive Monitoring This section describes the network variables used to monitor the drive. Refer to the appropriate Technical Manual for additional information. # Operating Status The following table summarizes the network variables available for monitoring the drive’s operating status. Table 2.21 – Operating Status Index nv1 nv2 nv3 nv4 nv5 nv6 nv7 Variable Name nviDrvSpeedStpt nviDrvSpeedScale nvoDrvCurnt nvoDrvSpeed nvoDrvVolt nvoDrvPwr nvoDrvRunHours Variable Type SNVT_switch SNVT_lev_percent SNVT_amp SNVT_lev_percent SNVT_volt SNVT_power_kilo SNVT_time_hour nv8 nviOpCommands SNVT_state nv9 nviReadParamNum SNVT_count nv10 nviWriteParamNum SNVT_count nv11 nviWriteParamVal SNVT_count nv12 nvoDrvStatus SNVT_state nv13 nvoFltStatus SNVT_state Description Controls start/stop and a low resolution speed setpoint as a percentage of nciNmlFreq Controls scaling for nviDrvSpeedStpt Negative values indicate reverse motor direction Reports output current Reports output speed as a percentage of nciNmlFreq Reports AC output voltage Reports output power Reports accumulated run time Controls the following operational commands: ! bit 0 - External Fault (EF0) ! bit 1 - Fault Reset ! bit 2 - Multifunction Input 1 (terminal S3) ! bit 3 - Multifunction Input 2 (terminal S4) ! bit 4 - Multifunction Input 3 (terminal S5) ! bit 5 - Multifunction Input 4 (terminal S6) ! bit 6 - Multifunction Input 5 (terminal S7) ! bit 7 - Reserved Requests a read of the specified drive parameter The response value is reported in nvoReadParamVal Requests a write of the specified drive parameter The write value is contained in nviWriteParamVal Contains the value to be written to the drive parameter specified in nviWriteParamNum Reports drive operational status: ! bit 0 - Drive Running ! bit 1 - Reverse Run Commanded ! bit 2 - Drive Ready ! bit 3 - Drive Faulted ! bit 4 – Parameter Access Error ! bit 5 – Multi-function Output 1 ! bit 6 – Multi-function Output 2 ! bit 7 – Reserved ! bit 8 - Terminal S1 State ! bit 9 - Terminal S2 State ! bit 10 - Terminal S3 State ! bit 11 - Terminal S4 State ! bit 12 - Terminal S5 State ! bit 13 - Terminal S6 State ! bit 14 - Terminal S7 State ! bit 15 - Reserved Reports drive fault status: ! bit 0 - Overcurrent Ground Short Circuit ! bit 1 - Overvoltage ! bit 2 - Drive Overload ! bit 3 - Overheat ! bit 4 – Reserved ! bit 5 – Fuse Blown ! bit 6 – PID Feedback Lost ! bit 7 - External Fault ! bit 8 - Hardware Fault ! bit 9 - Overload/Overtorque Fault ! bit 10 – Excessive Speed Deviation ! bit 11 - Undervoltage Fault ! bit 12 – Undervoltage/Power Loss Fault ! bit 13 – Input/Output Phase Loss ! bit 14 – Drive Communication Loss ! bit 15 – Operator Error Application Overview 2-17 Table 2.21 – Operating Status Index nv14 nv15 nv16 nv17 nv18 nv19 nv20 nv21 nv22 nv23 nv24 nv25 Variable Name nvoSpdStptFb nvoSpdCmd nvoPIDFb nvoDrvBus nvoReadParamVal nviDrvFltRst nvoRunStp nvoDrvFlt nvoDrvParamErr nvoDrvTemp nvoDrvEnergyKwh nvoDrvEnergyMwh Variable Type SNVT_lev_percent SNVT_lev_percent SNVT_lev_percent SNVT_volt SNVT_count SNVT_switch SNVT_switch SNVT_switch SNVT_count SNVT_temp SNVT_elec_kwh SNVT_elec_kwh Description Reports the speed setpoint as a percentage of nciNmlFreq Reports the speed command as a percentage of nciNmlFreq regardless of command source Reports the PID feedback as a percentage of nciNmlFreq Reports DC Bus voltage Reports value of requested parameter Resets a drive fault Reports the Run/Stop status of the drive Reports drive fault condition Reports parameter access error Reports drive temperature Reports cumulative energy in kWh Reports cumulative energy in mWh # Reading Other Parameters - nviReadParamNum, nvoReadParamNum Two network variables are defined for reading any drive parameter: nviReadParamNum - Specifies the parameter to be read. nvoReadParamVal - Reports the value of the specified parameter. Refer to the appropriate Technical Manual for a detailed description of all parameters. Note: The increment listed in the user, programming, tecnical and parameter access manuals must be considered when interpreting a reported value. For example, a read of b2-04, DC Injection Time at Stop, which reports 100 in nvoReadParamVal is actually a setting of 1.00 sec, since the increment for this parameter is 0.01 seconds. # Configurable Network Traffic This section describes the configuration properties available for customizing the drive’s periodic traffic on the network. # Send Heartbeat - nciSndHrtBt This configuration property defines the maximum period of time that expires before the current values of nvoDrvCurnt, nvoDrvSpeed, nvoDrvVolt, and nvoDrvPwr are automatically transmitted. When enabled, this functionality is intended to indicate to the network that this node is functioning normally. When disabled, the values of these variables are only transmitted upon change. The default value for this configuration property is 0, which is the disabled state. # Minimum Send Time - nciMinOutTm This configuration property defines the minimum period of time between updates of output network variables. When enabled, this functionality reduces network traffic by limiting the automatic propagation of network variables. When disabled, changes in these network variables are transmitted on each change. The default value for this configuration property is 1 second. Application Overview 2-18 Cable Loss Behavior This section describes the configurable cable loss feature of the option card. This feature offers a user maximum flexibility in determining the drive’s response to a loss of communication. After some interval without receipt of a message, the drive can be configured to respond in one of the following manners: ! ! ! ! Continue at last frequency Continue at preset frequency Stop Fault (EF0) Three configuration properties are used to select the desired behavior: ! ! ! nciRcvHrtBt – Receive Heartbeat nciCblLossSpeed – Cable Loss Speed nciCblLossFltEna – Cable Loss Fault Enable The following table summarizes the settings for each type of behavior (X = don’t care): Each behavior is described in additional detail below. Behavior Continue at last frequency Continue at preset frequency Stop Running Fault (EF0) Note: Table 2.22 - Cable Loss Behavior nciRcvHrtBt nciCblLossSpeed 0 X Timeout Interval Preset Speed Timeout Interval 0 Timeout Interval X nciCblLossFltEna X Off Off On Communication must be established and then lost for these features to function as described For modes which describe the drive running after a timeout, a run command must have been issued prior to loss of communications. For safety purposes, it will not automatically start from a stopped condition. If a user requires the drive to start automatically, additional external wiring must be added (consult factory). Upon expiration of the timeout interval, the FAULT LED lights and remains lit until communication is restored. # Continue Running at Last Frequency In this mode, nciRcvHrtBt is set to 0, disabling the cable loss feature. The other 2 settings are ignored. If communication is lost, the drive simply maintains its last commanded state. # Continue Running at Preset Frequency In this mode, nciRcvHrtBt is set to the desired interval and nciCblLossSpeed is set to the desired preset speed. If the time between messages exceeds the timeout interval, the drive’s speed command is set to nciCblLossSpeed and the drive continues running at this new speed. nciCblLossFltEna must be set to ‘Off’. # Stop Running In this mode, nciRcvHrtBt is set to the desired interval and nciCblLossSpeed is set to 0. If the time between messages exceeds the timeout interval, the drive’s speed command is set to 0 and the run command is set to ‘Off’. nciCblLossFltEna must be set to ‘Off’. # Fault In this mode, nciRcvHrtBt is set to the desired interval and nciCblLossFltEna is set to ‘On’. If the time between messages exceeds the timeout interval, an ‘EF0’ fault is declared and the drive stops. nciCblLossSpeed is ignored. Application Overview 2-19 Chapter 3 Troubleshooting This chapter is a basic troubleshooting guide. For detailed information on the drive refer to the appropriate drive user, programming and/or technical manual. Detailed information on LONWORKS can be obtained from www.echelon.com. Introduction ....................................................................... 3 - 3 Troubleshooting Check List ............................................. 3 - 3 LEDs ................................................................................... 3 - 5 Installing The LonWorks Option ...................................... 3 - 7 Cables and Wiring ............................................................. 3 - 9 Diagnostics 3-1 This page intentionally left blank Diagnostics 3-2 Introduction The following is a short guide to troubleshooting the LONWORKS Option installation. It highlights some of the most common issues faced when diagnosing and correcting issues associated with the startup and operation of a drive with a industrial network. While most of the information is centered on the application of the drive, the guidelines presented are applicable to most LONWORKS networks. Diagnosis of network fault issues typically fall into three categories: installation, wiring and cabling, and network configuration. Installation and wiring will be discussed below to help resolve common problems associated in LONWORKS network troubleshooting. Refer to the documentation that accompanied the controller for information on system setup. Troubleshooting Check List 1: The drive operates correctly without the LONWORKS Option installed. This includes running the drive from the operator keypad. Check that the drive responds to commands and faults as the application requires. 2: Check that the LONWORKS Option is correctly installed on the drive. That all connectors are firmly seated and that the option card hold down is on top of the LONWORKS Option, not underneath it. 3: Check that the communications cable plug end has been firmly seated in connector J1 on the LONWORKS Option, and that the cable has been properly connected to the drive’s terminal assembly. 4: Check that the termination switch on the drive’s terminal assembly is in the ON position. 5: Check that the communications cable is not routed near any high voltage or current wires. 6: Check that the LONWORKS network cable has been correctly and securely connected to the LONWORKS Option. 7: Check that the drive communications, command and control parameters are set correctly. 8: Check that the LONWORKS Option has established communication with the drive and that neither the “CALL” message nor any fault message is displayed on the drive operator. 9: Check that the LONWORKS Option is connected to a noise free ground. Verify the state of the ground connection with an oscilloscope. Make sure that the correct equipment is used and that it does not induce noise into the network. A Z-Lead probe attachment for the oscilloscope is recommended. Also, when using line powered equipment, differential probes must be used in order to avoid introducing imbalances onto the network. If a noise free ground cannot be found, leave the LONWORKS Option ground connection unconnected. 10: If a safety interlock is used with the drive, verify that the safety interlock is wired properly and that the controlling multi-function input parameter is programmed correctly. 11: Verify that the LEDs on the LONWORKS Option are in their correct state. 11: Check that all other devices on the network are connected properly. 12: Check that the network is correctly terminated for the topology used. 13: Check that the node has been correctly configured. Refer to the documentation that was supplied with the LONWORKS controller for information on node commissioning and configuration. The External Interface File (E7_LW.XIF) and the Device Resource Files (E7_LW.TYP, E7_LW.ENU, E7_LW.FPT, and E7_LW.FMT) may be found on the CD supplied with the drive or downloaded from www.drives.com. Diagnostics 3-3 This page intentionally left blank Diagnostics 3-4 LEDs # POWER LED The option card receives its power from the drive control board. As such, this LED should be lit anytime power is applied to the drive. If this LED is not lit when drive power applied, check the connection between the option card and the control board. # SERVICE Figure 3.1 – SERVICE LED Behavior depicts the different type of expected SERVICE LED behavior, defined as follows: • Applicationless - Only communication parameters are loaded, allowing access by a network management tool. To bring the node to its fully operational state, the application image file must be downloaded and network identity assigned. • Unconfigured - Communication parameters and the application are loaded, but not a network image. To bring the node to its fully operational state, its network identity must be assigned. • Configured - This is the fully operational state of the node. On No Application Service LED Behavior Off On Unconfigured Off On Configured Off 0 1 2 3 4 5 Time (secs) Figure 3.1 - SERVICE LED Behavior If some other type of behavior is noted, attempt to return the node to its unconfigured state as described previously. If this cannot be accomplished, there may be a problem with the node hardware. Diagnostics 3-5 # RECEIVE This LED’s functionality applies when the node is in its configured state. It is lit under the following conditions: ! While the drive is attempting to establish communication with the option card, the RECEIVE, TRANSMIT, and FAULT LEDs blink in unison and “CALL” blinks on the digital operator. If this condition occurs, repeat the steps outlined previously. ! During normal operation with the drive attached and configured on the network, this LED blinks anytime the drive receives a network variable update. Its blinking under these conditions indicates a “healthy” link between the drive and the network. ! During normal operation with the drive either unattached or unconfigured on the network, this LED blinks while the option card is communicating with the drive. Its blinking under these conditions indicates a “healthy” link between the drive and the option card. # TRANSMIT This LED’s functionality applies when the node is in its configured state. It is lit under the following conditions: ! While the drive is attempting to establish communication with the option card, the RECEIVE, TRANSMIT, and FAULT LEDs blink in unison and “CALL” blinks on the digital operator. If this condition occurs, repeat the steps outlined in previously. ! During normal operation, this LED blinks anytime the option card completes a network variable update. Its blinking indicates a “healthy” link between the drive and the network. # FAULT This LED’s functionality applies when the node is in its configured state. It is lit under the following conditions: ! While the drive is attempting to establish communication with the option card, the RECEIVE, TRANSMIT, and FAULT LEDs blink in unison and “CALL” blinks on the digital operator. If this condition occurs, repeat the steps outlined in previously. ! During normal operation, this LED is lit if a cable loss is detected. Once communication has been re-established, this LED will be off. Diagnostics 3-6 Installing The LONWORKS Option This section provides a brief check of the proper installation of the LONWORKS Option. # Drive Operates Correctly Without The LONWORKS Option Installed Before installing any drive option, verify that the drive functions properly without the option installed. Refer to the appropriate drive user, programming and/or technical manual for information on the proper installation and operation of the drive. # The LONWORKS Option Is Properly Installed ! Verify that the option card hold down on the drive had been removed prior to the installation of the LONWORKS Option. ! Verify that the connection between 2CN on the LONWORKS Option is securely connected to and firmly seated on the 2CN connector on the drive control board and that all stand-offs are locked in their associated mounting holes. # The LONWORKS Option Is Properly Connected to the Drive ! A noise free ground is essential to the proper and stable operation of the network. Verify that the LONWORKS Option is properly connected to a noise free ground. If a noise free ground cannot be found, leave the LONWORKS Option ungrounded. ! Verify that the communication cable is properly and firmly seated on the J1 connector on the LONWORKS Option. ! Select the appropriate connection diagram below. Verify: % % % % ! that the purple wire is connected to the R+ terminal on the drive’s terminal assembly, that the yellow wire is connected to the R- terminal on the drive’s terminal assembly, that the orange wire is connected to the S+ terminal on the drive’s terminal assembly, that the blue wire is connected to the S- terminal on the drive’s terminal assembly. Verify that the termination switch on the drive terminal assembly is in the ON position. E7, F7 and P7 Drive Connections E7L and E7B Connections G7 Drive Connections Figure 3.2 – Drive Connections # Network Cable Is Connected Correctly ! Connect the LONWORKS network cable to the LONWORKS Option. Refer to the figure below for connection details. Figure 3.3 – LONWORKS Network Connections Diagnostics 3-7 # Drive Parameters are Set Correctly The LONWORKS Option communicates with the drive via RS485. It is necessary to set the drive communications parameters to match those of the LONWORKS Option. Parameter Function A1-01 Access Level H5-01 Serial Communications Address H5-02 Serial Baud Rate Select H5-03 Serial Parity Select H5-06 Transmit Wait H5-07 RTS Control Select H5-08 Protocol Select Table 3.1 – Drive Parameter Settings Data +/- Limits - Description 0 Operator 1 User 2 Advanced (LONWORKS) 1F 0 – 1Fh (0 – 31 dec) 0 1200 baud 1 2400 baud 2 4800 baud 3 9600 baud (LONWORKS) 4 19200 baud 0 None (LONWORKS) 1 Even parity 2 Odd parity 5 – 65ms 5 0 Disabled (LONWORKS) 1 Enabled 0 MODBUS (LONWORKS) 1 N2 (Metasys) (E7, E7L and E7B only) 2 P1 (APOGEE) (E7, E7L and E7B only) Default 2 1Fh 3 0 5 0 0 It is also necessary to set the control parameters to the application requirements. Parameter Function b1-01 Frequency Reference Source b1-02 Run/Stop Command Source F6-01 Stopping Method for Communications Error F6-02 External Fault Detection F6-03 Stopping Method for External Fault Table 3.2 – Control Parameters Value Description 0 Operator Keypad 1 External Terminals 2 Serial Communications (LONWORKS) 3 Option PCB 4 Pulse input (Available on F7 and G7 drives only) 0 Operator keypad 1 Terminals 2 Serial Communications (LONWORKS) 3 Option PCB 0 Ramp to Stop 1 Coast to Stop 2 Emergency Stop (Decel time set by C1-09) 3 Operation Continues 0 Always detect 1 Detect During Operation 0 Ramp to Stop 1 Coast to Stop 2 Emergency Stop (Decel time set by C1-09) 3 Operation Continues Diagnostics 3-8 Default 0 0 1 0 1 Cables and Wiring Standard network wiring practices should be followed. ! Do not route any network wires close to high voltage or high current wires. It is recommended that network wiring be in its own conduit or trough. It may, however, be routed with low voltage DC wires. ! If the network must cross high voltage or current wires, the network must cross perpendicular to the high voltage or current wires. ! If a clean, noise free ground cannot be found locally to the device, route a ground wire of sufficient size to each device. Remember to provide a single point ground to avoid ground loops. ! Follow all local electrical codes. # Network Cables Choose the correct cable for the application and network configuration. For more information on cables and cabling refer to “Junction Box and Wiring Guidelines for Twisted Pair LONWORKS Networks” Echelon engineering bulletin #005-0023-01. It may be downloaded from www.echelon.com. Table 3.3 BUS Topology Specifications Maximum bus length(Meters) 2700 2700 1400 900 900 Cable Belden 85102 Belden 8471 Level IV, 22AWG JY(St) Y 2x2x0.8 TIA Category 5 Note: A doubly-terminated bus may have stubs of up to 3 meters from the bus to each device. Cable Belden 85102 Belden 8471 Level IV, 22AWG JY(St) Y 2x2x0.8 TIA Category 5 Table 3.4 Free Topology Specifications Maximum device-to-device distance (Meters) 500 400 400 320 250 Maximum total Wire length(Meters) 500 500 500 500 450 # Shield Grounds Shields can be a prime source of noise in any network. The general rule is to ground the shield at the signal source. Depending on the type of noise and the quality of the ground plane, it may be advisable to ground the shield at each device and/or at both ends of the network segment. If there is noise on the network or intermittent short term communication failures, removing the shield from the device connection is usually one of the first methods used restore communications stability. Also, if there is a disparity in the ground planes between devices, it is preferable to disconnect the shield from the device connection. The shield must still remain contiguous even if removed from a device connector. Table 3.5 – Shield Gournd Device R C1 Description 470kΩ, 5%, ¼W 0.1µF, 10%, Metalized polyester, ≥100V Figure 3.4 – LONWORKS Shield ground Diagnostics 3-9 # Network Termination Determine the topology of the network. In a BUS topology, there is a definite beginning and end to the network. In a Free topology only the either the beginning of end of the network can be determined. Refer to the diagrams below for examples of BUS and Free topologies. Network termination consists of a resistor and two capacitors as shown in the figure below. Note the polarity of the capacitors. Refer to the “FT 3120/FT3150 Smart Transceiver Data Book” for more information on network termination. It be downloaded from www.echelon.com. Figure 3.5 – LONWORKS NetworkTermination ! BUS topology BUS topology requires termination resistors at the beginning and end of the network. Table 3.5 – BUS Topology Terminator Device Values Device R C1 and C2 Description 105Ω, 1%, ⅛W 100µF, ≥50V (typically aluminum-electrolytic) Figure 3.6 – LONWORKS BUS Network Topology ! Free topology Free topology network requires only one terminator. Table 3.6 - Free Topology Terminator Device Values Device R C1 and C2 Description 52.3Ω, 1%, ⅛W 100µF, ≥50V (typically aluminum-electrolytic) Figure 3.7 – LONWORKS Free Network Topology Diagnostics 3-10 LONWORKS® Option YASKAWA ELECTRIC AMERICA, INC. Drives Division 16555 W. Ryerson Rd., New Berlin, WI 53151, U.S.A. Phone: (800) YASKAWA (800-927-5292) Fax: (262) 782-3418 Internet: http://www.drives.com YASKAWA ELECTRIC AMERICA, INC. Chicago-Corporate Headquarters 2121 Norman Drive South, Waukegan, IL 60085, U.S.A. Phone: (800) YASKAWA (800-927-5292) Fax: (847) 887-7310 Internet: http://www.yaskawa.com MOTOMAN INC. 805 Liberty Lane, West Carrollton, OH 45449, U.S.A. Phone: (937) 847-6200 Fax: (937) 847-6277 Internet: http://www.motoman.com YASKAWA ELECTRIC CORPORATION New Pier Takeshiba South Tower, 1-16-1, Kaigan, Minatoku, Tokyo, 105-0022, Japan Phone: 81-3-5402-4511 Fax: 81-3-5402-4580 Internet: http://www.yaskawa.co.jp YASKAWA ELETRICO DO BRASIL COMERCIO LTDA. Avenida Fagundes Filho, 620 Bairro Saude Sao Paolo-SP, Brasil CEP: 04304-000 Phone: 55-11-5071-2552 Fax: 55-11-5581-8795 Internet: http://www.yaskawa.com.br YASKAWA ELECTRIC EUROPE GmbH Am Kronberger Hang 2, 65824 Schwalbach, Germany Phone: 49-6196-569-300 Fax: 49-6196-888-301 MOTOMAN ROBOTICS AB Box 504 S38525, Torsas, Sweden Phone: 46-486-48800 Fax: 46-486-41410 MOTOMAN ROBOTEC GmbH Kammerfeldstrabe 1, 85391 Allershausen, Germany Phone: 49-8166-900 Fax: 49-8166-9039 YASKAWA ELECTRIC UK LTD. 1 Hunt Hill Orchardton Woods Cumbernauld, G68 9LF, Scotland, United Kingdom Phone: 44-12-3673-5000 Fax: 44-12-3645-8182 YEA Document Number: TM.AFD.20 (Supercedes TM4565) Data subject to change without notice. Yaskawa Electric America, Inc. YASKAWA ELECTRIC KOREA CORPORATION Paik Nam Bldg. 901 188-3, 1-Ga Euljiro, Joong-Gu, Seoul, Korea Phone: 82-2-776-7844 Fax: 82-2-753-2639 YASKAWA ELECTRIC (SINGAPORE) PTE. LTD. Head Office: 151 Lorong Chuan, #04-01, New Tech Park Singapore 556741, Singapore Phone: 65-282-3003 Fax: 65-289-3003 TAIPEI OFFICE (AND YATEC ENGINEERING CORPORATION) 10F 146 Sung Chiang Road, Taipei, Taiwan Phone: 886-2-2563-0010 Fax: 886-2-2567-4677 YASKAWA JASON (HK) COMPANY LIMITED Rm. 2909-10, Hong Kong Plaza, 186-191 Connaught Road West, Hong Kong Phone: 852-2803-2385 Fax: 852-2547-5773 BEIJING OFFICE Room No. 301 Office Building of Beijing International Club, 21 Jianguomanwai Avenue, Beijing 100020, China Phone: 86-10-6532-1850 Fax: 86-10-6532-1851 SHANGHAI OFFICE 27 Hui He Road Shanghai 200437 China Phone: 86-21-6553-6600 Fax: 86-21-6531-4242 SHANGHAI YASKAWA-TONJI M & E CO., LTD. 27 Hui He Road Shanghai 200437 China Phone: 86-21-6533-2828 Fax: 86-21-6553-6677 BEIJING YASKAWA BEIKE AUTOMATION ENGINEERING CO., LTD. 30 Xue Yuan Road, Haidian, Beijing 100083 China Phone: 86-10-6232-9943 Fax: 86-10-6234-5002 SHOUGANG MOTOMAN ROBOT CO., LTD. 7, Yongchang-North Street, Beijing Economic & Technological Development Area, Beijing 100076 China Phone: 86-10-6788-0551 Fax: 86-10-6788-2878 YEA, TAICHUNG OFFICE IN TAIWAIN B1, 6F, No.51, Section 2, Kung-Yi Road, Taichung City, Taiwan, R.O.C. Phone: 886-4-2320-2227 Fax:886-4-2320-2239 3/30/2004 Rev 04-03