1
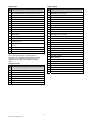
Corrigo E - User Manual
Heating
User manual Corrigo E Heating .......................................................................................................................................... 3
1. About Corrigo E............................................................................................................................................................... 3
2. Installation and wiring...................................................................................................................................................... 5
3. Commissioning.............................................................................................................................................................. 10
4. Functional description ................................................................................................................................................... 11
5. Display, LEDs and buttons ............................................................................................................................................ 13
6. Access rights................................................................................................................................................................. 14
7. Configuration................................................................................................................................................................. 15
8. Settings ......................................................................................................................................................................... 22
9. Time settings................................................................................................................................................................. 23
10. Actual / Setpoint .......................................................................................................................................................... 24
11. Manual / Auto .............................................................................................................................................................. 25
12. Energy / Cold water..................................................................................................................................................... 26
13. Other functions ............................................................................................................................................................ 27
User manual Corrigo E Heating
1. About Corrigo E
Revision C Oct 2006
This user manual covers all models the Corrigo E series
heating controllers.
For detailed description of modules for external
communication, LON, Modbus etc. we refer to separate
documentation.
Also for the PC-software Corrigo E Tool there is a
separate manual.
This user manual is published by AB REGIN without
guarantee.
AB REGIN can at any time, without prior notice, make
changes and improvements to the contents of this
manual if this is called for due to printing errors,
erroneous information or changes to hardware or
software covered by the manual. Any such changes will
always be included in future editions of the manual.
This revision covers program revision 1.5-1-03.
©AB REGIN, 2004.
® Corrigo
Corrigo E for heating is a complete new range of
programmable controllers for control of building heating
systems.
Corrigo E series for heating comprises three model
sizes: 8, 15 or 28 in-/outputs.
Available with or without front panel display and
buttons. For units without front panel display and
buttons a separate, cable-connected terminal E-DSP
with display and buttons is available.
All programming and normal handling can be done
using the display and buttons or from a connected
computer running Corrigo E Tool.
The temperature controllers are PI-controllers for
heating control and tap hot-water control with a preprogrammed set of control modes. To the controllers
can be bound a number of different control functions
and analogue and digital input and output functions.
The choice of which functions are to be used is free, the
only restriction lying in the physical number of inputs
and outputs that the different models have.
The Corrigo is designed for DIN-rail mounting.
The program for a heating unit contains, apart from
other things, the following functions:
Heating sequence control:
Control of 1 - 3 individual heating circuits.
Tap hot water control:
1 or 2 tap hot water circuits and 1 storage-tank charger
circuit.
Differential pressure control
One constant differential pressure control circuit
Boiler control
Basic two step boiler control.
Timer outputs
Up to 5 individually settable timer outputs for control of,
for example, lighting, door locks etc.
Timer control
Year-base clock, individual schedulers, holiday
scheduler.
Water consumption
Energy consumption
3
CORRIGO E Heating Rev. C
Corrigo E Hardware overview
Corrigo
8
Analogue Inputs
2
Digital Inputs
3
Universal Inputs
Analogue Outputs
1
Digital Outputs
2
RS485
Yes
LON
Option
TCP/IP
Option
Display
No
Ext. display
Option
Inputs
Analogue inputs AI
Digital inputs DI
Universal inputs UI
Outputs
Analogue outputs AO
Digital outputs DO
8D
2
3
1
2
Yes
Option
Option
Yes
No
15
4
4
3
4
Yes
Option
Option
No
Option
15D
4
4
3
4
Yes
Option
Option
Yes
No
28
4
8
4
5
7
Yes
Option
Option
No
Option
28D
4
8
4
5
7
Yes
Option
Option
Yes
No
Other data
Display
Settable 0…10 V DC or
PT1000, 12 bit A/D
Potential free closure
Can be set to act as either
an analogue input or a
digital input with
specifications as above
LEDs
Clock
Settable
0…10 V DC; 2…10 V DC;
10…0 V DC or 10…2 V
DC.
8 bit D/A short-circuit
protected.
Triac outputs
24 V AC, 0.5 A continuous
Battery
Battery backup
Communication
Operating system
Supply voltage
Ambient temperature
Casing
CE-marking
Options
LON
TCP/IP
External hand terminal
E-DSP
4
CORRIGO E Heating Rev. C
4 rows of 20 characters.
Background illumination.
Yellow = Changeable
parameter
Red = Alarm indication
Year base 24 hour clock
with battery backup.
Automatic summer-/wintertime changeover.
Replaceable Lithium cell.
Battery life; better than 5
years. Low battery
warning.
Memory and real time
clock
EXOline Port 1, insulated
via a built-in RS485
contact.
The basic version of
Corrigo E can
communicate with
Modbus. You need an
activation code.
Corrigo E can be ordered
with a communication port
for TCP/IP or LON.
EXOreal
24 V AC, 6 VA
0…50°C
148x123x60 (WxHxD incl.
terminals), standard
Euronorm casing.
Protection class IP20. For
DIN-rail mounting.
Conforms with the EMC
standards: CENELEC
EN61000-6-3:2001
CENELEC EN61000-61:2001.
FT3150, gives a second
communication route
Replaces RS485 for EXOline
(Port 1) communication
For use with Corrigo E units
without display
Analogue outputs
Analogue outputs must refer to the A-gnd terminal
placed in the AO terminal block.
All analogue outputs can be individually set to any one
of the following signals:
0…10 V DC
2…10 V DC
10…0 V DC
10…2 V DC
2. Installation and wiring
2.1 Installation
Corrigo E can be mounted in a DIN-standard casing
(minimum 9 modules), on a DIN-rail in a cabinet or,
using a suitable front-mounting kit, in a cabinet door or
other control panel.
Ambient temperature: 0…50°C.
Ambient humidity. Max. 90 %RH, non-condensing
If the Corrigo E and the actuators connected to it share
the same transformer it is essential that the same
transformer-pole is used as reference for all the
equipment. Failure to do so will prevent the equipment
from functioning as intended and may also lead to
damages.
2.2 Wiring
At the end of this chapter there are wiring diagrams
showing the factory set configuration. We have also
included blank diagrams. Since the function of most of
the inputs and outputs depends on the programming of
the unit the final wiring diagram cannot be filled in until
the installer has decided how to use the inputs/outputs.
It is important to make sure that the wiring is correctly
done and in accordance with the instructions given in
this manual.
Digital outputs
Digital outputs must refer to G on terminal 10.
All the digital outputs are triac controlled.
The outputs will deliver 24 V AC, 0.5 A continuous.
The outputs cannot be used to drive DC relays.
2.2.3 Input and output lists
2.2.1 Supply voltage
Use these lists during commissioning to help you keep
track of which input and output functions you wish to
use.
24 V AC ±15%, 50…60 Hz. 6 VA
If the Corrigo E and the actuators connected to it share
the same transformer it is essential that the same
transformer-pole is used as reference for all the
equipment. Failure to do so will prevent the equipment
from functioning as intended and may also lead to
damages.
Analogue inputs
9
Analogue input signal
Outdoor temperature sensor
Supply temperature Heating sequence1
2.2.2 Inputs and outputs
Tap hot water circuit 1, supply temperature
The list of input and output functions in section 2.2.3 is
a handy instrument to help you keep track of which
inputs and outputs you will need to configure.
Return temperature Heating sequence1
Tap hot water circuit 2, supply temperature
Storage tank supply temperature
Analogue inputs
Analogue inputs must refer to an A-gnd terminal placed
in the same terminal block as the input being wired.
Analogue inputs can, depending on the configuration,
be used for either PT1000 temperature sensors or for
0…10 V DC analogue input signals, for example from a
pressure transmitter.
Storage tank return temperature
Wind-speed transmitter, 0…10 V DC
Differential pressure transmitter, 0…10 V DC
Supply temperature Heating sequence2
Return temperature Heating sequence2
Digital inputs
Digital inputs must refer to C+ on terminal 4.
Digital inputs may only be wired to voltage-free
contacts. Any external voltage applied to a digital input
may harm
the unit.
Room temperature Heating sequence2
Universal inputs
A universal input can be configured to act as either an
analogue input or as a digital input.
A universal input configured as analogue input must
refer to an A-gnd terminal placed in the same terminal
block as the input being wired.
A universal inputs configured as an analogue input can,
depending on the configuration, be used for either
PT1000 temperature sensors or for 0…10 V DC
analogue input signals, for example from a pressure
transmitter.
A universal input configured as a digital input must refer
to C+ on terminal 4. It may only be wired to voltage-free
contacts.
Boiler temperature
Room temperature Heating sequence1
Supply temperature Heating sequence3
Return temperature Heating sequence3
Room temperature Heating sequence3
5
CORRIGO E Heating Rev. C
Digital inputs
Digital outputs
9
9
Digital input signal
Digital output signal
Run-indication/alarm circulation pump, P1A-HS1
Start/stop pump, P1A-HS1
Run-indication/alarm circulation pump, P1B-HS1
Start/stop pump, P1B-HS1
Run-indication/alarm circulation pump, P1A-HS2
Actuator HS1 increase
Run-indication/alarm circulation pump, P1B-HS2
Actuator HS1 decrease
Run-indication/alarm circulation pump, P1-HW1
Start/stop pump, P1-HW1
Volume pulses, heating usage
Start/stop pump, P1A-HS2
Volume pulses, cold water usage 1
Start/stop pump, P1B-HS2
Energy pulses, heating usage
Actuator HS2 increase
Pressure switch, expansion vessel pressure
Actuator HS2 decrease
External alarm
Start/stop pump, P1A-HS3
Boiler alarm
Start/stop pump, P1B-HS3
Run-indication/alarm circulation pump, P1A-HS3
Actuator HS3 increase
Run-indication/alarm circulation pump, P1B-HS3
Actuator HS3 decrease
Run-indication/alarm frequency converter for
pressure control
Actuator HW1 increase
Actuator HW1 decrease
Run-indication/alarm storage tank charge pump
P1-HP
Actuator HW2 increase
Actuator HW2 decrease
External power limitation
Start/stop charge pump for storage tank, P1-HP1
Volume pulses, cold water usage 2
Start frequency converter for diff pressure control
Energy pulses, electricity meter
Start step 1, boiler
Note: The universal inputs on Corrigo E28 can,
individually, be configured as either analogue inputs
using any of the analogue input signals above or as
digital inputs using any of the digital input signals
above.
Start step 2, boiler
Analogue outputs
Time channel 4
9
Time channel 1
Time channel 2
Time channel 3
Time channel 5
Analogue output signal
Sum alarm A
Valve actuator, Heating sequence1, HS1
Sum alarm B
Valve actuator, hot water circuit 1, HW1
Sum alarm A + B
Valve actuator, Heating sequence2, HS2
Valve actuator, Heating sequence3, HS3
Valve actuator, hot water circuit 2, HW2
Frequency converter, pressure control
Split of any one of the above circuits
6
CORRIGO E Heating Rev. C
Wiring diagram Corrigo E28 Factory configuration
1
G
2
G0
3
50
B
51
A
Protective earth
52
N
E
Supply voltage 24 V AC, ±15%. 50…60 Hz
4
+C
+24 V DC. Reference for digital inputs DI.
53
10
G
Reference for digital outputs DO.
57
Net+
11
DO1
Start/stop pump, P1A-HS1
58
Net-
12
DO2
Start/stop pump, P1B-HS1
59
Egnd
RS485 EXOline / Modbus
LON-connection (LON-versions only)
13
DO3
Actuator HS1 increase
71
DI1
Run-indication/alarm pump, P1A-HS1
14
DO4
Actuator HS1 decrease
72
DI2
Run-indication/alarm pump, P1B-HS1
15
DO5
Start/stop pump, P1-HW1
73
DI3
Run-indication/alarm pump, P1A-HS2
16
DO6
Start/stop pump, P1A-HS2
74
DI4
Run-indication/alarm pump, P1-HW1
17
DO7
Sum alarm A + B
75
DI5
Volume pulse, heating usage meter
30
Agnd
Reference pole for analogue inputs AI
76
DI6
Energy pulse, heating usage meter
31
AI1
Outdoor temperature sensor
77
DI7
Volume pulse, cold water usage 1
32
AI2
Supply temp, heating sequence 1, HS1
78
DI8
Pressure switch, expansion vessel
33
Agnd
Reference pole for analogue inputs AI
90
Agnd
Reference for analogue outputs AO
34
AI3
Supply temp, hot water sequence 1, HW1
91
AO1
Actuator Heating sequence1, HS1
35
AI4
Return temp, heating sequence 1, HS1
92
AO2
Actuator Heating sequence2, HS2
40
Agnd
Reference pole for universal inputs UI
93
AO3
Actuator Heating sequence3, HS3
41
UI1
Supply temp, heating sequence 2, HS2
94
AO4
42
UI2
Return temp, heating sequence 2, HS2
95
AO5
43
Agnd
Reference pole for universal inputs UI
44
UI3
Room sensor heating sequence 1, HS1
45
UI4
Room sensor heating sequence 2, HS2
This is the wiring for the factory set configuration.
Wiring diagram Corrigo E15H Factory configuration
1
G
2
G0
3
50
Supply voltage 24 V AC, ±15%. 50…60 Hz
B
51
A
Protective earth
52
N
RS485 EXOline / Modbus
4
+C
+24 V DC. Reference for digital inputs DI.
53
E
10
G
Reference for digital outputs DO.
57
Net+
11
DO1
Start/stop pump, P1A-HS1
58
Net-
12
DO2
Start/stop pump, P1B-HS1
59
Egnd
13
DO3
Start/stop pump, P1-HW1
71
DI1
Run-indication/alarm pump, P1A-HS1
14
DO4
Sum alarm A + B
72
DI2
Run-indication/alarm pump, P1B-HS1
LON-connection (LON-versions only)
30
Agnd
Reference pole for analogue inputs AI
73
DI3
Run-indication/alarm pump, P1-HW1
31
AI1
Outdoor temperature sensor
74
DI4
Pressure switch, expansion vessel
32
AI2
Supply temp, heating sequence 1, HS1
90
Agnd
Reference for analogue outputs AO
33
Agnd
Reference pole for analogue inputs AI
91
AO1
Actuator Heating sequence1, HS1
34
AI3
Supply temp, hot water sequence 1, HW1
92
AO2
Actuator Heating sequence2, HS2
35
AI4
Return temp, heating sequence 1, HS1
93
AO3
Actuator Heating sequence3, HS3
This is the wiring for the factory set configuration.
7
CORRIGO E Heating Rev. C
Wiring diagram Corrigo E8H Factory configuration
1
G
2
G0
3
50
B
51
A
Protective earth
52
N
E
Supply voltage 24 V AC, ±15%. 50…60 Hz
RS485 EXOline / Modbus
4
+C
+24 V DC. Reference for digital inputs DI.
53
10
G
Reference for digital outputs DO.
57
Net+
11
DO1
Start/stop pump, P1A-HS11
58
Net-
12
DO2
Start/stop pump, P1B-HS11
59
Egnd
30
Agnd
Reference pole for analogue inputs AI
71
DI1
Run-indication/alarm pump, P1A-HS1
31
AI1
Outdoor temperature sensor
72
DI2
Run-indication/alarm pump, P1B-HS1
32
AI2
Supply temp, heating sequence 1, HS1
73
DI3
Pressure switch, expansion vessel
90
Agnd
Reference for analogue output AO
91
AO1
Actuator Heating sequence1, HS1
LON-connection (LON-versions only)
This is the wiring for the factory set configuration.
Empty wiring diagram Corrigo E28H
1
G
2
G0
3
Supply voltage 24 V AC, ±15%. 50…60 Hz
50
B
Protective earth
51
A
4
+C
+24 V DC. Reference for digital inputs DI.
52
N
10
G
Reference for digital outputs DO.
53
E
11
DO1
57
Net+
12
DO2
58
Net-
13
DO3
59
Egnd
14
DO4
71
DI1
15
DO5
72
DI2
16
DO6
73
DI3
17
DO7
74
DI4
30
Agnd
75
DI5
31
AI1
76
DI6
32
AI2
77
DI7
33
Agnd
78
DI8
34
AI3
90
Agnd
35
AI4
91
AO1
40
Agnd
92
AO2
41
UI1
93
AO3
42
UI2
94
AO4
43
Agnd
95
AO5
44
UI3
45
UI4
Reference pole for analogue inputs AI
Reference pole for analogue inputs AI
Reference pole for universal inputs UI
Reference pole for universal inputs UI
8
CORRIGO E Heating Rev. C
RS485 EXOline / Modbus
LON-connection (LON-versions only)
Reference for analogue outputs AO
Empty wiring diagram Corrigo E15H
1
G
2
G0
50
B
51
A
Protective earth
52
N
+C
+24 V DC. Reference for digital inputs DI.
53
E
10
G
Reference for digital outputs DO.
57
Net+
11
DO1
58
Net-
12
DO2
59
Egnd
13
DO3
71
DI1
14
DO4
72
DI2
30
Agnd
73
DI3
31
AI1
74
DI4
32
AI2
90
Agnd
33
Agnd
91
AO1
34
AI3
92
AO2
35
AI4
93
AO3
3
4
Supply voltage 24 V AC, ±15%. 50…60 Hz
Reference pole for analogue inputs AI
Reference pole for analogue inputs AI
RS485 EXOline / Modbus
LON-connection (LON-versions only)
Reference for analogue outputs AO
Empty wiring diagram Corrigo E8H
1
G
2
G0
50
B
51
A
Protective earth
52
N
+C
+24 V DC. Reference for digital inputs DI.
53
E
10
G
Reference for digital outputs DO.
57
Net+
11
DO1
58
Net-
12
DO2
59
Egnd
30
Agnd
71
DI1
31
AI1
72
DI2
32
AI2
73
DI3
90
Agnd
91
AO1
3
4
Supply voltage 24 V AC, ±15%. 50…60 Hz
Reference pole for analogue inputs AI
9
CORRIGO E Heating Rev. C
RS485 EXOline / Modbus
LON-connection (LON-versions only)
Reference for analogue output AO
read, mark in the list the inputs and outputs you will
be using for the application you are building.
Note that the universal inputs in Corrigo E28 can,
individually, be configured as either analogue or
digital inputs.
Display, buttons and LEDs
Read chapter 5 on how to use the front panel
buttons to navigate the Corrigo E menu system.
Access rights
Chapter 6. Learn how to log in on the Corrigo E
Configuration
Chapter 7. Configuration.
Connect power to the Corrigo. Using the buttons
and menu system, go through the configuration
menus covering the functions you wish to use.
On delivery the units already have the inputs and
outputs assigned to various functions. These can, of
course, be changed.
In chapter 2 Installation and wiring there are two
sets of wiring diagrams, one set showing the preconfigured input / output configuration and one set
where you can fill your own configuration choices.
Settings
Set the control parameters, P-band, I-time for the
temperature control loops in use.
Set the alarm parameters; alarm levels and delay
times.
Timer settings
Set the clock and calendar functions
Setpoints
Set all the setpoints for all active control loops.
Hand/Auto
Learn to use manual control. Very useful for testing
out your system.
3. Commissioning
General
Before the Corrigo can be used it must be configured,
inputs and outputs must be assigned and all relevant
parameters must be set.
All commissioning can be done using the Corrigo front
panel display and buttons or using the display unit EDSP.
Corrigo E Tool
The best way however, is to configure the Corrigo E
by using Corrigo E Tool.
Corrigo E Tool is a PC-based configuration program
specially developed to simplify the commissioning of
the Corrigo E-series.
When using E Tool the whole configuration and all
settings can be done on the computer and then
downloaded to the Corrigo.
An infinite number of different configurations can be
saved in computer memory for later use.
3.1. How to do it
For configuration using E Tool, see the E Tool manual.
For configuration using the front panel there are two
ways to go depending on how much help you need.
Option 1:
•
Jump straight to chapter 5 and 6 Display, buttons
and LEDs and Access rights.
•
After mastering the button and menu system,
connect power to your Corrigo, log on at System
level and go to the menu Configuration.
•
For the time being, skip the configuration menu
Inputs/Outputs and start by configuring Control
functions.
•
Run through the configuration menus in order and
set whatever functions and parameters you wish to
include. Use chapter 4 of this manual for reference.
Keep track of which inputs and outputs you will
need. To help you, there is a list of input and output
functions provided in chapter 2, (2.2.3 Input /
Output list.)
•
Finally, configure Inputs/Outputs.
•
Exit Configuration and go to Settings
•
Set the control values in Settings
•
Set the clock and scheduler functions in Timers.
•
Set the control setpoints in Actual/Setpoint.
Your Corrigo should now be ready to run.
Option 2:
Read this manual in the order given below: The manual
has been designed to act as a guide through the
commissioning.
The last chapters of the manual, not listed below, cover
menus and functions that aren’t used during
commissioning.
Functional description
Start by reading the chapter 4. Functional
description below.
Some functions are essential to the working of the
unit and must be included. Others are more of the
nature of optional extras which can be excluded.
At the end of each function description there is a
table of the necessary inputs and outputs to
implement the function.
At the end of the manual there is a list of all the
analogue and digital inputs and outputs. As you
10
CORRIGO E Heating Rev. C
4.1.7 Building inertia and boost
4. Functional description
The building inertia is settable to one of three levels:
None
Medium
High
The set inertia dictates the influence of outdoor
temperature.
With no inertia, the outdoor temperature is used
directly, with medium inertia a one-hour average is used
and with high inertia a 12-hour average is used.
Boost is used to speed up the raising of the indoor
temperature when switching from night set back
temperature to normal comfort temperature. This is
done by temporarily displacing the supply temperature
set-point curve. The following conditions must be met:
Average outdoor temperature lower than 17°C
Supply set-point value higher than 25°C
Night set-back more than 2°C (room temperature)
The displacement is calculated as follows:
4.1 Heating systems
4.1.0 General
Corrigo E can be configured for 1 to 3 heating systems
(radiator groups), HS1, HS2 and HS3.
4.1.1 Controllers
The heating system controllers are PI-controllers with
settable P-band and I-time.
4.1.2 Control curves
The controllers have individual outdoor temperature /
supply temperature control curves.
Each curve has 8 fix points. The default setting of the
outdoor temperature values for the fix points are -20, 15, -10, -5, ±0, +5, +10, +15. These can not be
changed using the Corrigo front panel but can be
changed using E Tool. The corresponding supply
temperature values are settable using the front panel or
E Tool.
Displacem.=Factor*(17 - outdoor temp)*night setback
Where Factor is settable 0…10 where 0 gives no boost
and 10 gives high boost.
The time in minutes that boost will be active is
calculated as follows:
4.1.3 Adaptation of curves
Room sensors can be used to correct the control
curves. The average room temperature error over 24
hours is calculated. Values 1 hour before and 1 hour
after a day/night or night/day change-over are ignored.
The curves are corrected once daily using the average
room temperature error and a settable correction factor.
The correction will be a parallel displacement of the
entire curve using the following formula:
Time = 1.6*(17 - Outdoor temp)
Time is limited to maximum 60 minutes.
4.1.8 Night set-back
Lowering of the night temperature is set in room
temperature degrees. The corresponding lowering of
the supply temperature is calculated by the controller by
multiplying the value by 3. The Corrigo has individual
schedules for each heating system with two comforttemperature periods per day.
Displacement = (Room setpoint - Average
temp)*Factor
4.1.4 Pump control
Each system can have single or double pumps.
Double pumps are run one at a time with automatic,
weekly change over and automatic start of the backup
pump on malfunction of the active pump.
Outdoor temperature dependent pump stop can be
configured
Pumps are exercised for 5 minutes at 3 pm daily.
4.1.9 Power limitation
Using a digital input the power to the heating systems
can be temporarily restricted. When activated, the
setpoints are lowered by a settable factor (% relative to
20°C). The limitation applies to all configured heating
systems.
The limitation is calculated as below:
4.1.5 Frost protection
Limited setpoint=20+(Setpoint20)*Factor/100
If a controller is set to Off or Man(ual control) and the
outdoor temperature is below a settable value a
minimum, settable supply temperature will be
maintained and the pump will run.
Factor 100 gives no setpoint reduction, 0 gives full
reduction to 20°C.
4.1.6 Wind compensation
To compensate for wind chilling it is possible to connect
a wind sensor and generate a setpoint displacement
according to a settable factor (°C per m/s).
11
CORRIGO E Heating Rev. C
4.2 Tap hot water
4.5 Boiler control
4.2.0 General
A simple boiler control can be enabled.
When the boiler temperature falls below Start
temperature 1 the digital signal Start 1 will be activated.
Should the temperature fall below Start temperature 2
the digital output Start 2 will be activated.
Any active outputs will be deactivated when the boiler
temperature rises above the set Stop temperature.
Corrigo E can be configured for one or two tap hotwater systems HW1 and HW2. These have constant
supply-temperature control.
4.2.1 Controllers
The heating system controllers are PID-controllers with
settable P-band, I-time and D-time.
4.6 Cold-water monitoring
One or two circuits monitoring the cold-water usage can
be configured each using a digital pulse-input from a
water meter. The pulse constant is settable.
Maximum pulse rate is 2 Hz.
4.2.3 Night set-back
The Corrigo E has individual schedules for each hot
water system with two normal-temperature periods per
day.
4.6.1 Values
4.2.4 Pump control (HW1 only)
The following values are calculated
Corrigo E has a digital output signal that can be used to
control the hot-water circulation pump in HW1. The
pump will run according to the settings of the night setback schedule, running during normal temperature
periods and standing still during periods with reduced
temperature.
4.2.5 Periodic overheating
Once daily, at 02:00 am the temperature set-point can
be increased to 62°C to prevent growth of Legionella
bacteria.
The raised set-point is maintained until the supply
temperature reaches 60°C but not shorter than 1 minute
and not longer than 5 minutes. If the pump is stopped it
will start and run for the duration of the overheating
period plus 2 minutes.
•
24 hour usage in litres, today
•
24 hour usage in litres, yesterday
•
24 hour usage in litres, day before yesterday
•
Lowest hourly usage in litres, today
•
Lowest hourly usage in litres, yesterday
•
Usage total in m3. The value is resettable
•
Water-flow (litres / min)
4.6.2 Alarms
Pulse error
High usage
4.3 Storage tank
Leakage control
A storage tank function can be enabled.
The storage tank load pump, P1-HP1 is started
depending on the storage tank supply water and return
water temperatures.
Loading is started if the return water temperature is
lower than the set start temperature.
Loading is stopped when the supply temperature is
higher than the set stop temperature and the return
temperature is higher than the set start temperature +
the set differential.
If no pulses are detected within a
settable time an alarm is activated.
Setting the time to 0 inhibits the
alarm function.
If the daily usage is higher than a
settable value an alarm is
activated.
If the lowest hourly usage during
the previous day is higher than a
settable value an alarm is
activated.
4.7 Energy monitoring
One digital pulse function can be configured for heating
energy monitoring. The pulse constant is settable.
4.7.1 Usage values
The following usage values are calculated:
4.4 Pressure control
Corrigo E can, using an analogue output signal, control
a variable speed pump to maintain a constant settable
pressure.
A digital output signal is available to give a start signal
to the frequency converter. This output is enabled as
soon as the converter control signal rises above 0.1 V.
12
CORRIGO E Heating Rev. C
•
24 hour usage in kWh, today
•
24 hour usage in kWh, yesterday
•
24 hour usage in kWh, day before yesterday
•
Total usage in kWh or MWh. The value is
resettable
5. Display, LEDs and buttons
4.7.2 Power values
Heating power is calculated by measuring the time
between the energy pulses. The following power values
are calculated:
•
Instantaneous value for a certain time or after
a certain number of pulses
•
Average of the above instantaneous value for
the last hour
•
Maximum value for the above instantaneous
value
This section is applicable to Corrigo E units with display
and buttons but also to the hand terminal E-DSP which
can be connected to Corrigo E units without display and
buttons.
5.1 Display
The display has 4 rows of 20 characters.
It has background illumination. The illumination will
normally be off but will activated as soon as any button
is pressed. The illumination will be turned off again after
a period of inactivity.
4.7.3 Leakage monitoring
Once a week, the control valves will be closed and the
energy usage measured for a preset time. An alarm is
generated if the energy leakage is larger than a settable
value, default 3000 W. The time for and duration of the
leakage monitoring is settable. Default is Sundays at
2:00 am for 30 minutes.
5.2 LEDs
There are two LEDs on the front:
The alarm LED marked with the symbol
The “write enable” LED marked with the symbol
The four LEDs placed next to the upper terminal strip
will be described later.
4.7.4 Alarms
Pulse error
High usage
If no pulses are detected within a
settable time an alarm is activated.
Setting the time to 0 inhibits the
alarm function.
If the daily usage is higher than a
settable value an alarm is
activated.
5.3 Buttons
UP
ALARM
LEFT
OK
4.8 Electricity meter
OK
One digital pulse function can be configured for
electricity energy monitoring. The pulse constant is
settable.
C
C
DOWN
There are seven buttons:
4 arrow buttons which will be called UP, DOWN, RIGHT
and LEFT.
The menus in the Corrigo E are organized in a
horizontal tree structure.
The UP / DOWN-buttons are used to move between
menus at the present menu level. The RIGHT / LEFT
buttons are used to move between menu levels.
When changing parameters the UP / DOWN buttons
are used to increase / decrease the value of the
parameter and the RIGHT / LEFT buttons to move
between digits within the parameter.
The OK button.
The OK button is used to confirm the choice of a
parameter setting.
The C button
The C button is used to abort an initiated parameter
change and restore the original value.
The ALARM button, marked with a red button top.
The ALARM button is used to access the alarm list.
4.8.1 Usage values
Total usage in MWh. The value is resettable.
4.9 Timer channel outputs
Up to 5 digital outputs can be used as timer controlled
outputs.
These can be used for controlling, for example, door
locks, lighting, laundry-room equipment etc.
Each timer has its own scheduler with two activation
periods for each day of the week and a year-based
holiday calendar.
4.10 Alarms
4.10.1 Alarm handling
Alarms are indicated by the alarm LED on the front.
All alarms can be monitored, acknowledged and
blocked using the display and buttons.
5.4 Navigating the menus
The start display, the display normally shown, is at the
root of the menu tree.
Pressing DOWN ª will move you through the menu
choices at this, the lowest level.
UP © will move you back through the choices.
To enter a higher menu level, use UP or DOWN to
place the display marker opposite the menu you wish to
access and press RIGHT ¨ .
4.10.2 Alarm priorities
Alarms can be given different priority levels. Digital
outputs can be bound to act as alarm outputs for
different priority levels.
Using the front panel it is possible to change the alarm
priority level (A-/B-/C-alarm/Not active) of any alarm.
13
CORRIGO E Heating Rev. C
RIGHT
If you have sufficient log on privileges the display will
change to the menu you have chosen.
At each level there may be several new menus through
which you may move using the UP / DOWN buttons.
Sometimes there are further submenus linked to a
menu or menu item. This is indicated by an arrow
symbol at the right-hand edge of the display.
To choose one, use RIGHT again. To back down to a
lower menu level, use LEFT.
6. Access rights
There are 3 different log on levels, System level which
has the highest authority, Operator level and the basic
“no-log on” level.
System level gives full read / write access to all settings
and parameters in all menus.
Operator level gives read-only access to all settings and
parameters and write access to all settings and
parameters in all menus except Configuration.
The basic level permits read-only access to all settings
and parameters.
Repeatedly press down-arrow when the start-up display
is shown until the arrow-marker to the left of the text-list
points to Access rights. Press right-arrow
Change parameter
In some menus there are parameters that can be set.
This will be indicated by the LED flashing.
To change a parameter, first press the OK button. A
cursor will appear at the first settable value.
If you wish to change the value, do so by pressing the
UP / DOWN buttons.
In numbers containing several digits you can move
between the digits using the LEFT / RIGHT-buttons.
When the desired value is displayed press OK.
If there are further settable values displayed the cursor
will automatically move to the next one.
To pass a value without changing it, press RIGHT.
To abort a change and return to the initial setting, press
and hold the C-button until the cursor disappears.
Log on
Log off
Change password
6.1 Log on
Log on
Enter password:****
Actual level:None
In this menu it is possible to log on to any level by
entering the appropriate 4-digit code.
The log on menu will also be displayed should you try to
gain access to a menu or try to do an operation
requiring higher authority than you have.
Press the OK-button and a cursor marker will appear at
the first digit position. Repeatedly press the up-arrow
until the correct digit is displayed. Press the right-arrow
to move to the next position.
Repeat the procedure until all four digits are displayed.
Then press OK to confirm.
After a short while the text on the line: Present level will
change to display the new log on level.
Press left-arrow to leave the menu.
6.2 Log off
Use this menu to log off from the present level to the
basic "no-log on" level
Log off?
No
Actual level:System
Logoff is also initiated automatically 5 minutes after the
last time a button is pressed.
6.3 Change password
As default Corrigo comes with the following passwords
for the different levels:
System
1111
Operator
3333
Basic
5555
You can only change the password for log on levels
lower or equal to the presently active level, i. e. if you
are logged in as System you can change all passwords,
but as Operator you can only change the Operator and
Basic passwords.
14
CORRIGO E Heating Rev. C
There is no point in changing the Basic password since
access to that level is granted automatically to all users.
7. Configuration
Start by logging on at System level. See section Access
rights above.
Using DOWN, set the display marker opposite the
menu-title Configuration and press RIGHT.
The main configuration menu will be shown:
Change password for
level:Operator
New password: ****
Inputs/Outputs
HS Supply
Return temp
Pump stop
Twin/Single pump
Run ind/Motor prot
Actuator type
Actuator run time
Actuator exercise
Leakage monitoring
Pulse inputs
Alarm config.
Other params
System
6.4 Forgotten your password?
If the password for System has been changed and then
lost, a temporary password can be obtained from
Regin. This code is date dependent and only valid for
one day.
7.1 In- and Outputs
Analogue inputs
Digital inputs
Universal inputs
Analogue outputs
Digital outputs
7.1.0 General
Free configuration
Any control signal can be bound to any input/output,
the only restriction being that digital signals cannot
be bound to analogue inputs and vice versa. It is up
to the user doing the binding to make sure that
activated functions are bound to appropriate signals.
Delivery setting
On delivery all the physical inputs and outputs have
already been bound to a signal.
The delivery settings are suggestions only and can
easily be changed.
7.1.1 Analogue inputs AI
Analogue input 1
Sign: Outdoortemp
Raw value: 18.3
Compensation: 0.0°C
All analogue inputs are for PT1000 or 0-10 Volts.
Input signals can be compensated for example for
wiring resistance.
The Raw value will show the actual uncompensated
input value.
If an input has been assigned to pressure control the
following submenu will be available:
AI2 Pressure at
0V: 0.0
kPa
10V: 10.0 kPa
Filter factor: 0.2
15
CORRIGO E Heating Rev. C
7.1.2 Digital inputs DI
7.1.4 Analogue outputs
Analogue outputs are 0…10 V DC.
Digital input 1
NO/NC: NO Signal:
HS1-PumpA
Status: Off
Analogue output 1
Sign: HS1 Actuator
Auto
Value: 2.3 V
To simplify adaptation to external functions, all digital
inputs can be configured to be either normally open,
NO, or normally closed, NC.
The inputs are as standard normally open, i. e. if the
input is closed, the function connected to the input in
Corrigo is activated.
7.1.5 Digital outputs
Digital output 1
Signal: HS1-PumpA
Auto
Status: On
7.1.3 Universal inputs UI
On the largest hardware version, E28 there are
universal inputs.
These can individually be configured as either analogue
inputs or as digital inputs.
When configured as analogue inputs they can be bound
to any of the analogue signals described under
Analogue signals.
When configured as digital inputs they can be bound to
any of the digital signals described under Digital
signals.
7.2 HS Heating System, supply
7.2.1 Parallel displacement
To each of the set control curves can be added a
parallel displacement.
Parallel displacemnt
HS1: 0.0
°C
HS2: 0.0
°C
HS3: 0.0
°C
Universal input 1 Æ
Choose AI or DI sign
AI sign: HS2 Supply
DI sign: Not active
7.2.2 Maximum limit
After choosing AI or DI signal (the unused alternative
must be set to Not active) there is a sub-menu with
settings used when the input is configured as an AIinput. This menu is accessed by pressing RIGHT.
A maximum supply temperature can be set individually
for each heating system.
Maximum limit
HS1: 98
°C
HS2: 98
°C
HS3: 98
°C
Universal AI1
Sign: HS2 Supply
Raw value:38.5
Compensation: 0.0°C
Input signals can be compensated for example for
wiring resistance.
The Raw value will show the actual uncompensated
input value.
If an input has been assigned to pressure control the
following submenu will be available:
7.2.3 Minimum limit
A minimum supply temperature can be set individually
for each heating system.
Minimum limit
HS1: 0
°C
HS2: 0
°C
HS3: 0
°C
UAI1 Pressure at
0V: 0.0
kPa
10V: 10.0 kPa
Filter factor: 0.2
7.2.4 Auto-correction of setpoint
Room sensors can be used to correct the control
curves. The average room temperature error over 24
hours is calculated. Values 1 hour before and 1 hour
after a day/night or night/day change-over are ignored.
The curves are corrected once daily using the average
room temperature error and a settable correction factor.
The correction will be a parallel displacement of the
entire curve using the following formula:
Universal DI1
NO/NC: NO Signal:
HS1-PumpA
Status: Off
To simplify adaptation to external functions, all universal
inputs configured as digital inputs can be set as either
normally open, NO, or normally closed, NC.
The inputs are as standard normally open, i. e. if the
input is closed, the function connected to the input in
Corrigo is activated.
Displacement = (Room setpoint - Average
temp)*Factor
Auto-correction
Setpoint HS1
On
16
CORRIGO E Heating Rev. C
Æ
7.5 Twin pump / Single pump
Corr. factor HS1
2.0
Present correction
0.6°C
Each heating system can be configured for either a
single pump or twin pumps.
When twin pumps are configured, the pumps are
alternated weekly on Tuesdays at 10:00 am.
On activation of the pump alarm for the active pump the
Corrigo will automatically switch to the other pump.
7.3 Return water temperature
Individual maximum and minimum return water
temperatures can be set for the heating systems.
Should the water temperature go outside the set limits
the supply water temperature will be adjusted to correct.
The adjustment will be the temperature offset multiplied
by the set limiting factor.
Twin/Single pump
HS1: Twin pumps
HS2: Single pump
HS3: Single pump
7.6 Run indication/Motor protection
7.3.1 Maximum temperature
Inputs are used either for indication of the motor
running or for monitoring of motor protection contacts.
Run indication input should be normally closed.
Open contact when the motor is running, i.e. motor
control output is activated, will generate an alarm
Motor protection should be normally open. Closed
contact when the motor is running, i.e. motor control
output is active, will generate an alarm.
Max. return temp.
HS1:Active
Æ
HS2:Inactive
HS3:Inactive
Max.
HS1:
HS2:
HS3:
return temp
50°C
50°C
50°C
Run ind/Motor prot
HS1: Motor prot
HS2: Motor prot
HS3: Motor prot
7.3.2 Minimum temperature
Min. return temp.
HS1:Active
Æ
HS2:Inactive
HS3:Inactive
Min.
HS1:
HS2:
HS3:
Run ind./Motor prot
HW1: Motor prot
HP1: Motor prot
Freq.Con: Motor prot
7.7 Actuator type
return temp
0°C
0°C
0°C
Choose output signals to the actuators connected to the
analogue control outputs: 0…10 V DC, 2…10 V DC
10…0 V DC or 10…2 V DC
Actuator type
HS1: 0-10V
HS2: 0-10V
HS3: 0-10V
7.3.3 Limiting factor
Return limit factor.
HS1: 1.00
HS2: 1.00
HS3: 1.00
Actuator type
HW1: 0-10V
HW2: 0-10V
Freq: 0-10V
7.4 Pump stop
Each heating system has individual day and night stop
temperatures. An active circulation pump will stop if the
outdoor temperature is higher than the set value and
there is no heating demand.
The pump will start if the temperature falls below the
set stop temperature less the set hysteresis.
Night is between 00:00 am and 05:00 am.
All pumps, even resting twin-pumps, are exercised once
daily for 5 minutes at 3 pm.
Note that although many manufacturers state 0…10 V
DC as control signal, for many actuators the actual
control signal is more often than not 2…10V DC.
Check the actuator documentation carefully.
If uncertain, choose 0…10V DC.
Although control might be less accurate, it will ensure
that the valve always can be driven to its fully opened
and fully closed positions.
Pump stop HS1:On
Temp stop day: 17°C
Temp stop night 17°C
Hysteresis: 2.0°C
17
CORRIGO E Heating Rev. C
7.11 Pulse inputs
7.8 Running time, 3-pos. actuators
These parameters have no function if analogue
actuators are configured.
The values are used to determine the control
parameters for 3-position actuators.
It is important to set correct values since incorrect
values lead to sloppy control.
Actuator
HS1: 255
HS2: 255
HS3: 255
Energy pulse heating
100.0 kWh/Pulse
Volume pulse heating
10.0 liters/Pulse
Cold water 1
10.0 liters/Pulse
Cold water 2
10.0 liters/Pulse
run time
sec
sec
sec
Electric meter
100.0 kWh/Pulse
Actuator run time
HW1: 80 sec
HW2: 80 sec
7.12 Alarm configuration
Permits configuration of all alarms.
Select the appropriate alarm number (from the alarm
list). The alarm text for the alarm will be displayed and
the alarm priority can be set: A-alarm, B-alarm, C-alarm
or not active.
7.9 Valve exercising
The valves can be exercised once daily.
Default time is 3:00 pm but can be set to any time.
The actuators will be forced to either endpoint for the
set actuator running time. The pumps will run and the
temperature offset alarm will be blocked for the duration
of the exercising.
Alarm no (1-65): 1
Malfunction P1A-HS1
Æ
Actuator exercise
HS1: Off
Hour for exerc.: 15
Minute for ex.: 00
Malfunction P1A-HS1
Priority: B-alarm
7.10 Leakage monitoring
Once a week, the control valves will be closed and the
energy usage measured for a preset time. An alarm is
generated should the energy leakage be larger than a
settable value, default 3.0 kW.
The time for and duration of the leakage monitoring is
settable. Default is Sundays at 2:00 am for 30 minutes.
Alarm list
Values in the Priority column show the factory set
values.
Alarm text
Leakage mon:Off
Weekday:Sunday
Hour: 2
Duration: 30 min
Permitted leakage
3.00
kW
Start monitoring now
No
18
CORRIGO E Heating Rev. C
Pri Description
1
Malf. P1A-HS1 B
Malfunction pump P1A-HS1
2
Malf. P1B-HS1 B
Malfunction pump P1B-HS1
3
Malf. P1A-HS2 B
Malfunction pump P1A-HS2
4
Malf. P1B-HS2 B
Malfunction pump P1B-HS2
5
Malf. P1A-HS3 B
Malfunction pump P1A-HS3
6
Malf. P1B-HS3 B
Malfunction pump P1B-HS3
7
Malf. Frequenc B
Malfunction frequency
converter
8
Malf. P1-HWC
A
Malfunction pump P1-HWC
9
Malf. P1-VVB
-
Malfunction pump P1-VVB
10
Exp. vessel
A
Expansion vessel alarm
11
External alarm
A
External alarm
12
Boiler alarm
A
Boiler alarm
13
Deviation HS1
A
Supply temp HS1 deviates
too much from the setpoint for
too long.
Alarm text
Pri Description
14
Deviation HS2
A
Supply temp HS2 deviates
too much from the setpoint for
too long.
15
Deviation HS3
A
Supply temp HS3 deviates
too much from the setpoint for
too long.
Alarm text
Pri Description
45
P1A-HS3
manual
C
P1A-HS3 in manual mode
46
P1B-HS3
manual
C
P1B-HS3 in manual mode
47
P1-HWC1
manual
C
P1-HWC1 in manual mode
48
P1-HWC2
manual
C
P1-HWC2 in manual mode
49
P1-Freq.
Manual
C
P1- frequency controlled in
manual
50
HS1 Supply
max
B
HS1 supply temp maximum
limit activated
51
HS2 Supply
max
B
HS2 supply temp maximum
limit activated
52
HS3 Supply
max
B
HS3 supply temp maximum
limit activated
53
HS1 Supply
min
B
HS1 supply temp minimum
limit activated
16
Deviation
HWC1
A
Supply temp HWC1 deviates
too much from the setpoint for
too long.
17
Deviation
HWC2
A
Supply temp HWC2 deviates
too much from the setpoint for
too long.
18
Sensor error
B
Malfunction of a connected
sensor
19
High HWC1
B
HWC1 temperature too high
20
High HWC2
B
HWC2 temperature too high
21
Boiler high
B
Boiler temperature too high
22
Boiler low
B
Boiler temperature too low
23
Pulse error
volume
B
No pulses from water volume
meter
54
HS2 Supply
min
B
HS2 supply temp minimum
limit activated
24
Pulse error
energy
B
No pulses from energy meter
55
HS3 Supply
min
B
HS3 supply temp minimum
limit activated
25
High cold water B
24 hour cold water usage
higher than limit
56
HS1 Return
max
B
HS1 return temp maximum
limit activated
26
High energy
B
24 hour energy usage higher
than limit
57
HS2 Return
max
B
HS2 return temp maximum
limit activated
27
High cold
water/hour
B
Cold water usage / hour
higher than min. limit
58
HS3 Return
max
B
HS3 return temp maximum
limit activated
28
High leakage
B
Leakage higher than set
value
59
HS1 Return
min
B
HS1 return temp minimum
limit activated
29
Malf. P1A&BHS1
A
Malfunction both circulation
pumps P1A and P1B in HS1
60
B
30
Malf. P1A&BHS2
A
Malfunction both circulation
pumps P1A and P1B in HS2
HS2 Return
min
HS2 return temp minimum
limit activated
61
B
31
Malf. P1A&BHS3
A
Malfunction both circulation
pumps P1A and P1B in HS3
HS3 Return
min
HS3 return temp minimum
limit activated
62
HS1 Frost
B
HS1 frost protection active
32
Pulse error
CW1
B
No pulses from cold water
meter 1.
63
HS2 Frost
B
HS2 frost protection active
64
HS3 Frost
B
HS3 frost protection active
33
Pulse error
CW2
B
No pulses from cold water
meter 2.
65
Battery error
B
Malfunction of the internal
memory-backup battery
34
HS1 manual
C
HS1 in manual mode
35
HS2 manual
C
HS2 in manual mode
36
HS3 manual
C
HS3 in manual mode
37
HWC1 manual
C
HWC1 in manual mode
38
HWC2 manual
C
HWC2 in manual mode
39
Press. manual C
Pressure control in manual
mode
40
Boiler manual
C
Boiler in manual mode
41
P1A-HS1
manual
C
P1A-HS1 in manual mode
42
P1B-HS1
manual
C
P1B-HS1 in manual mode
43
P1A-HS2
manual
C
P1A-HS2 in manual mode
44
P1B-HS2
manual
C
P1B-HS2 in manual mode
19
CORRIGO E Heating Rev. C
7.13 Other parameters
7.13.4 Split of output signal
A collection of different parameters that did not fit into
any of the other menus.
Any one of the temperature control output signals HS1,
HS2, HS3, HWC1 or HWC2 can be split in two.
7.13.1 Building inertia and boost
Split of any
temp sequence:
No split
For detailed information, see 4.1.7 Building inertia and
boost.
The building inertia is settable to one of three levels:
None, Medium or High
The displacement is calculated as follows:
7.13.5 Periodical heating
Periodical heating
HW1: No
HP1: No
Displacem.=Factor*(17 - outd. temp)*night setback
Where Factor is a settable factor 0…10 where 0 gives
no boost and 10 gives maximum boost.
Boost duration time is calculated as below:
7.14 System
Time=1.6*(17 - outdoor temp)
7.14.1 Change language
Use this menu to change the display language
Building inertia
None
Boost factor (0-10)
1
Choose language
English
Note: This menu is also directly accessible by holding
the OK-button depressed during power-up.
7.13.2 Power limitation
Using a digital input the power to the heating systems
can be temporarily restricted. When activated, the
setpoints are lowered by a settable factor (% relative to
20°C). The limitation applies to all configured heating
systems.
The limitation is calculated as below:
7.14.2 Choose start screen; the text
normally shown on the display
There are 4 different to choose from.
Type 1
The second line shows date and time.
The third line shows the text HS1.
The fourth line shows the present temperature
setpoint and actual values for HS1
Limited setpoint=20+(Setpoint-20)*Factor/100
Power limitation
100% rel +20°C
Heating Regulator
04:03:15 11:28
HS1
Sp:32.8°C Act:33.1°C
Factor 100 gives no setpoint lowering, 0 gives full
lowering to 20°C.
Type 2
The second line shows date and time.
The third line shows the text HWC1.
The fourth line shows the present temperature
setpoint and actual values for HWC1
7.13.3 Frost protection
If the controller is in mode Off or Manual and the
outdoor temperature falls below a settable value, a
settable, minimum supply temperature will be
maintained. Circulation pumps will be activated
Heating Regulator
04:03:15 11:28
HWC1
Sp:55.0°C Act:54.8°C
Frost protect.:Off
Outdoor temp activ.
Frost prot:0.0°C
Min sup. temp:10.0°C
20
CORRIGO E Heating Rev. C
Type 3
The second line shows the text HS1/HWC1.
The third line shows the present temperature
setpoint and actual values for HS1.
The fourth line shows the present temperature
setpoint and actual values for HWC1
7.14.6 Communication code Modbus
If Corrigo is to be wired to a network for Modbus
communication, a special code must be purchased from
Regin. Entering the code unlocks the unit so the
addresses can be changed.
The code is unique for each Corrigo and is serialnumber dependent.
Heating Regulator
HS1/HWC1
Sp:32.8°C Act:33.1°C
Sp:55.0°C Act:54.8°C
Communication code
for modbus
0
Modbus: Not Active
Type 4
The second line shows the outdoor temperature.
The third line shows the text HS1.
The fourth line shows the present temperature
setpoint and actual values for HS1
Modbus Address: 1
Speed: 9600 bps
Two stop bits:Yes
Parity:No
Heating Regulator
Outdoor temp: 8.2°C
HS1
Sp:32.8°C Act:33.1°C
7.14.7 Dial-up modem
With the help of a dial-up modem, Corrigo can be
connected to a supervisor Exo-system. We recommend
the modem Westermo TD-32-B. The default password
is exo.
7.14.3 Automatic summer time adjustment
The internal clock is normally configured for automatic
summertime/wintertime adjustment. The function can
be disabled in this menu.
When enabled, the clock will be advanced one hour at
02:00 am the last Sunday of March and retarded one
hour at 03:00 am the last Sunday of October
DialUpModem: No
Number:
Password:
exo
Automatic summer/
winter time change
over
Yes
7.14.8 Alarm forwarding via SMS
Via a connected GSM modem, Corrigo can send an
alarm message to up to 3 different recipients.
To use this function, you first have to purchase a lockup code from Regin.
When there is an alarm, Corrigo sends an alarm
message to the first number on the list. The message
consists of an alarm text, the unit name (the same text
that is shown in the first row of the start display) and the
time when the alarm occurred. If the recipient does not
send an SMS within 5 minutes to confirm that the
message has been received, Corrigo will send the
message to the next number on the list.
7.14.4 Address
Corrigo E uses the addresses below when connecting
to Corrigo E Tool, and when multiple controllers are
connected in a network. E Tool normally uses the
addresses below, so if an address is changed, the new
address must also be entered in E Tool. If several
Corrigo are connected in a network, all the units must
have the same ELA address, but each unit must have a
unique PLA address.
Code to enable
SMS function:
0
Address
PLA: 254
ELA: 254
7.14.5 Display anywhere (Remote control)
SMS: Not Active
Nbr1:
Nbr2:
Nbr3:
If multiple Corrigo units are connected in a network, it is
possible to remote control a unit in the network from a
unit with display. You do this by entering the address of
the unit you wish to remote control in the unit with
display. The function is aborted by pressing the buttons
UP, OK and DOWN simultaneously.
Address for
remote communication
(PLA:ELA) 00:00
21
CORRIGO E Heating Rev. C
Control deviation HWC1 and HWC2
8. Settings
Control deviation
HWC1: 20.0 °C
HWC2: 20.0 °C
In this menu group all settings for all activated functions
should be available. Depending on what choices have
been made during configuration, some of the
alternatives in this menu group may not be shown.
Settings
Control temp
Control pressure
Alarm settings
Scalding limit
Æ
Æ
Scalding
HWC1: 65.0 °C
HWC2: 65.0 °C
8.1 Control temp
Boiler limits
8.1.1 HS1, HS2 and HS3
High boiler temp
70.0
°C
Low boiler temp
30.0
°C
Control parameters for the three heating system
controllers
HS1
P-band: 100.0 °C
I-time: 100.0 sec
High water usage
High 24h water usage
10000.0 liters
High 1h water usage
10000.0 liters
8.1.2 HWC1 and HWC2
Control parameters for the two hot water controllers
High energy usage
HWC1
P-band: 100.0 °C
I-time: 150.0 sec
D-time: 1.0 sec
High 24h energy
usage
10000.0 kWh
8.2 Control pressure
Maximum time between pulses
8.2.1 Control pressure
Max between Vpulse
0
min
Max between Epulse
0
min
Control parameters for pressure control. Only
accessible if pressure control has been configured
Pressure control
P-band: 25.0 kPa
I-time: 100.0 sec
Min.output: 0%
Max between CW1pulse
0
min
Max between CW2pulse
0
min
8.3 Alarm settings
Alarm settings
Alarm limits
Alarm delay
Permitted leakage
Æ
Æ
Permitted leakage
3.00
kW
8.3.1 Alarm limits
8.3.2 Alarm delays
Control deviation, HS1, HS2 and HS3
Control deviation, HS1, HS2 and HS3
Control deviation
HS1: 20.0 °C
HS2: 20.0 °C
HS3: 20.0 °C
Control
HS1: 60
HS2: 60
HS3: 60
22
CORRIGO E Heating Rev. C
deviation
min
min
min
Control deviation HWC1 and HWC2
9. Time settings
Control deviation
HWC1: 60 min
HWC2: 60 min
General
Corrigo has a year-base clock function. This means that
a week-schedule with holiday periods for a full year can
be set. The clock has an automatic summer- wintertime changeover.
Individual schedules for each week-day plus a separate
holiday setting.
Up to 24 individual holiday periods can be configured.
Holiday schedules take precedence over other
schedules.
Each day has up to two individual running periods. For
two-speed fans and pressure controlled fans there are
daily individual schedules for normal speed and
reduced speed , each with up to two running periods.
Up to five separate digital timer outputs can be
configured. Each with individual week-schedules with
two activation periods per day. These outputs can be
used to control lighting, doorlocks etc.
Scalding limit
Scalding
HWC1: 300
HWC2: 300
sec
sec
Boiler limits
High boiler temp
0
sec
Low boiler temp
0
sec
Time/Date
HS1 Night setback
HS2 Night setback
HS3 Night setback
HWC1 Night setback
HWC2 Night setback
Timer output1
Timer output2
Timer output3
Timer output4
Timer output5
Holidays
Expansion vessel / External alarm
Expansion vessel
60
sec
External alarm
60
sec
Æ
Æ
Æ
Æ
Æ
Æ
Æ
Æ
Æ
Æ
Æ
Æ
9.1 Time / Date
This menu shows and permits the setting of time and
date.
Time is shown in 24 hour format.
Date is shown in the format YY:MM:DD
Time: 18:21
Date: 04:02:23
Weekday: Monday
9.2 HS_ Night Set-back
HS1 Night Setback
On
5.0 room-degrees
Æ
Setting comfort temperature periods.
For each control system there are 8 separate setting
menus, one for each weekday and one extra for
holidays.
Holiday schedules take precedence over other
schedules.
For 24 hour running, set a period to 00:00 – 24:00.
To disable a period, set it to 00:00 – 00:00.
23
CORRIGO E Heating Rev. C
10. Actual / Setpoint
HS1 Comfort time
Monday
Per 1: 07:00 – 16:00
Per 2: 00:00 - 00:00
In this menu group all actual current values and setpoint
values are displayed and, providing a sufficiently high
log on level is used, all setpoints can be changed.
The following menus are available providing that the
corresponding input is activated:
9.3 HWC_ Night set-back
HWC1 Night setback
On
Æ
5.0 °C
Pump stop: Off
10.1 Setpoint Heating systems HS1, HS2
and HS3
Outdoortemp: 18.4°C
HS1
Act.: 19.8°C
SetpÆ
Setp: 20.0°C
Setting comfort temperature periods.
For each control system there are 8 separate setting
menus, one for each weekday and one extra for
holidays.
Holiday schedules take precedence over other
schedules.
For 24 hour running, set a period to 00:00 – 24:00.
To disable a period, set it to 00:00 – 0:00.
Submenu: Setpoint
In-between-values are calculated using straight lines
between breakpoints.
Setpoints for temperatures lower than the lowest
breakpoint and higher than the highest breakpoint are
calculated by extending the line between the two last
breakpoints at either end. Example: At the lower end
the setpoint is increasing by 14°C for every 5 °C
lowering of the outdoor temperature. So the setpoint at
–23°C would be 77+3/5 * 14°C = 85.4°C.
HWC1 Comfort time
Monday
Per 1: 07:00 – 16:00
Per 2: 00:00 - 00:00
9.4 Timer outputs 1…5
Outd. comp.
-20 °C = 77
-15 °C = 63
-10 °C = 59
Up to 5 digital outputs can be configured as timer
outputs, each with a separate week-schedule with two
activation periods per day.
Holiday schedules take precedence over other
schedules.
setp.HS1
°C
°C
°C
Outdoor comp. setp.
-5 °C = 54 °C
0 °C = 53 °C
5 °C = 43 °C
Timer output 2
Wednesday
Per 1: 05:30 – 08:00
Per 2: 17:00 – 23:00
Outdoor comp. setp.
10°C = 35 °C
15°C = 25 °C
9.5 Holidays
Up to 24 separate holiday periods for a full year can be
set.
A holiday period can be any number of consecutive
days from one and upwards.
The dates are in the format: MM:DD
When the current date falls within a holiday period, the
scheduler will use the settings for the weekday
“Holiday”.
10.2 Room sensor HS1, HS2 and HS3.
Room sensor HS1
Actual: 20.8°C
Setpoint: 21.0°C
Return temp: 20.0°C
10.3 Return water temperature
Holidays
(mm:dd)
1: 01:01 - 02:01
2: 09:04 – 12:04
3: 01:05 - 01:05
Return temp.
HS1: 20.0°C
HS2: 24.0°C
HS3: 23.0°C
10.4 Supply temp HWC1 and HWC2:
Supply temp. HWC1
Actual: 54.8°C
Setpoint: 55.0°C
24
CORRIGO E Heating Rev. C
11. Manual / Auto
10.5 Storage tank
Supply temp. HP1
45.8°C
Return temp. HP1
38.3°C
General
In this menu the running mode of the unit and all the
configured outputs can be manually controlled.
This is a very handy feature which simplifies the
checking of individual functions in the Corrigo.
It is also possible to manually control each of the
temperature output signals individually.
All the configured digital outputs can be set to On, Off
or Auto.
Æ
Loading HP1
Start temp: 46.0 °C
Stop temp: 55.0 °C
Diff.temp: 2.0 °C
Since leaving any of the outputs in manual control will
disrupt the normal control, an alarm will be generated
as soon as any output is set to a manual mode.
10.6 Boiler temp
Boiler temp:
Start temp1:
Start temp2:
Stop temp:
Since the menus vary according to the configuration of
the outputs only the most common ones will be shown
here. For the digital signals you can normally choose
between Auto and On and Off or similar words
indicating the two possible manual states of the digital
output.
48.2°C
45.0°C
40.0°C
55.0°C
10.7 Pressure control
Heating systems HS1, HS2 and HS3
Pressure control
Actual: 48.8 kPa
Setp.: 50.0 kPa
Manual/Auto
HS1
Auto
Manual set: 0.0
Hot water circuits HWC1 and HWC2
10.8 Wind speed
Manual/Auto
HWC1
Auto
Manual set: 0.0
Wind speed
Actual: 4.6 m/s
Scale factor:
1.0 m/s/V
Compensation
HS1:
0.00 °C/m/s
HS2:
0.00 °C/m/s
HS3:
0.00 °C/m/s
Pressure control.
Pressure control
Auto
Manual set: o.o
Minmum set: 0.0
Pumps HS1, HS2 and HS3
Manual/Auto HS1
P1A:Auto
P1B: Auto
Pump HWC1
Manual/Auto
HWC1:Auto
Frequency converter start
Manual/Auto
Frequency conv.:Auto
25
CORRIGO E Heating Rev. C
Boiler start
12. Energy / Cold water
Manual/Auto
Boiler:Auto
In this menu the pulse-counter input results are
administered.
The pulse constants (pulses/unit) are set in the menu
Configuration/Pulse constants.
Heating meter
Cold water meter 1
Cold water meter 2
Electricity meter
Leakage monitoring
12.1 Heating meter
Energy total
1532 MWh
Hot water total
387 m3
These values can be reset.
Energy
Today: 28.15 kWh
Yesterday:123.45 kWh
D B Y-day:132.11 kWh
Usage
Today: 28.15 lit
Yesterday:123.45 lit
D B Y-day:132.11 lit
Power usage
Instant: 2.1kW
Average/h: 3.2kW
Max aver.: 5.3
12.2 Cold water meters CW1 and CW2
CW1 Usage total
276.2 m3
CW1 Flow
6.4
l/min
CW1 Usage
Today: 88.1 lit
Yesterday:4123.4 lit
D B Y-day:5012.1 lit
Lowest CW1 usage
Today: 0.1 lit./h
Yest.: 0.2 lit./h
26
CORRIGO E Heating Rev. C
12.3 Electricity meter
13. Other functions
13.1 Alarm handling
Energy total
1866.54 mWh
If an alarm condition occurs the Alarm LED on the front
panel on units with display will start flashing. The LED
will continue to flash as long as there are
unacknowledged alarms.
Alarms are logged in the alarm list. The list shows type
of alarm, date and time for the alarm and the alarm
class (A, B or C alarm)
To access the alarm list, press the alarm button, the
front panel button with the red button-top.
The value can be reset.
12.4 Leakage monitoring
Leakage power
1.31 kW
Sensor error
24 Feb 10:43 Class:B
Reset
d
If there are multiple alarms, this is indicated by up /
down arrow symbols at the right-hand edge of the
display
Use the UP and DOWN buttons to access the other
alarms.
At the left end of the bottom display line the alarm
status is shown.
For active, unacknowledged alarms the space is blank.
For alarms that have reset the text: “Reset” is shown.,
Acknowledged, still active or blocked alarms are
indicated by Acknowledged or Blocked.
Alarms are acknowledged by pressing the OK button.
You are then given the choice of acknowledging the
alarm or blocking the alarm.
Acknowledged alarms will remain on the alarm-list until
the alarm input signal resets.
Blocked alarms remain on the alarm-list until the alarm
has reset and the block has been removed. New alarms
of the same type will not be activated as long as the
block remains.
Since blocking alarms can be potentially hazardous,
you need a high log on authority to block alarms.
Class A and B alarms will activate alarm output(s) if
these have been configured.
Class C alarms do not activate the alarm output(s).
Class C alarms are removed from the alarm list when
the alarm input resets even if the alarm has not been
acknowledged.
13.2 Revision numbers
If RIGHT is pressed once when the start-display is
shown, see section 7.14.2, a menu showing the
program revision number and id-number will be
displayed.
13.3 Free text
If RIGHT is pressed twice when the start-display is
shown, see section 7.14.2, a menu showing text of your
choice is displayed.
The text can be used to show information concerning
the commissioning company, name and phone number
to service personnel etc.
Text is entered using E Tool. Up to 4 lines of 20
characters can be entered.
27
CORRIGO E Heating Rev. C
AB Regin
Box 116, SE-428 22 Kållered, Sweden
Visiting address: Bangårdsvägen 35
Phone: +46 31 720 02 00
Fax: +46 31 94 01 46
www.regin.se, [email protected]