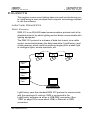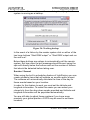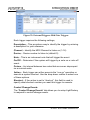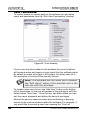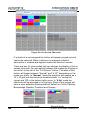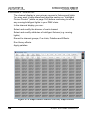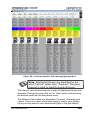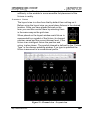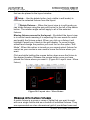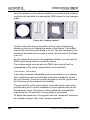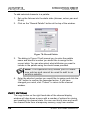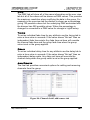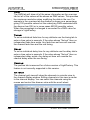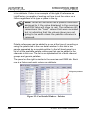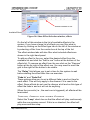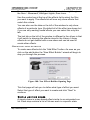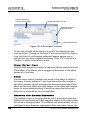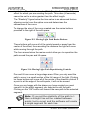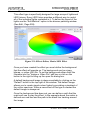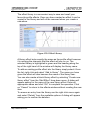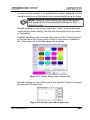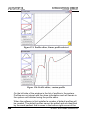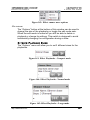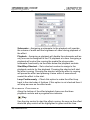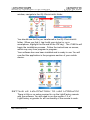
1
LightFactory V2 User Guide V2.3 Copyright © 2004 - 2010 Dream Solutions Ltd Auckland, New Zealand LightFactory User Guide The software described in this book is furnished under a license agreement and may be used only in accordance with the terms of the agreement. Copyright notice Copyright © 2004 - 2010 Dream Solutions Ltd. All Rights Reserved. This document may in whole or in part, be copied, photocopied, reproduced, translated or reduced to any electronic medium or machine-readable form. This document may NOT be modified in any way without prior consent in writing from DREAM SOLUTIONS LIMITED, of Ascot Way, Orewa, Auckland Region, New Zealand. ALL EXAMPLES WITH NAMES, COMPANY NAMES, OR COMPANIES THAT APPEAR IN THIS BOOK ARE IMAGINARY AND DO NOT REFER TO, OR PORTRAY, IN NAME OR IN SUBSTANCE, ANY ACTUAL NAMES, COMPANIES, ENTITIES OR INSTITUTIONS. ANY RESEMBLANCE TO ANY PERSON, COMPANY, ENTITY OR INSTITUTION IS COINCIDENTAL. Disclaimer Every effort has been made to ensure the accuracy of this manual. However, DREAM SOLUTIONS LIMITED makes no warranties with respect to this documentation and disclaims any implied warranties of merchantability and fitness for a particular purpose. DREAM SOLUTIONS LIMITED shall not be liable for any errors or for incidental or consequential damages in connection with the furnishing, performance or use of this manual or the examples herein. The information in this document is subject to change without notice. ii LIGHTFACTORY SOFTWARE LICENCE AGREEMENT These terms and conditions (Licence) form a legally binding agreement between you (Licensee) and Dream Solutions Limited (DSL) of 18 Ascot Way, Orewa, Auckland Region, New Zealand. The Licensee will be permitted to use the LightFactory software, encompassing all applications and databases (Software) only by accepting the terms of this Licence. Clicking on the “I Agree” button will constitute acceptance of the terms of this Licence. If you are not willing to enter into this Licence, the “Cancel” button should be clicked, and you must not install or otherwise download the Software. Where the Licensee is not an individual then the agreement of the person accepting the terms of this Licence shall be deemed to be acceptance by the Licensee. 1. Intellectual Property 1.1 The Licensee acknowledges and agrees that all intellectual property rights, including copyright, relating to the Software are the sole property of DSL. 1.2 The Licensee acknowledges and agrees that all source code and form definitions relating to the Software are the sole property of DSL and may not be modified in any way. 1.3 The Licensee acknowledges and agrees that all enhancements, modifications or customisations, including associated source code and form definitions, made by or on behalf of the Licensee and relating to the Software, vest on creation in and are the sole property of DSL. 1.4 Subject to clause 2.2, the Licensee does not obtain, either under this Licence or by reason of use of the Software, any right to copy the Software, or any right to use the Software after the Licence has terminated. 2. Licence 2.1 The Licensee is granted a non-exclusive, non-transferable, nonsublicensable licence to install and use the Software for the Licensee's own internal business purposes, provided that the Licensee pays the charges for the Licence (as published at iii http://www.lifact.com/prod_pricing.html). 2.2 The Licensee is permitted to make one copy of the Software for backup purposes only. 2.3 The Licensee will during the continuance of the Licence: 2.3.1 use the Software only as allowed for under this Licence and will not resell, rent, sub-license or otherwise make the Software available to any person or entity; 2.3.2 subject to clause 2.2 or as permitted by applicable law, not copy, decompile, adapt, modify or reverse engineer the Software or allow it to be copied, decompiled, adapted, modified or reverse engineered by any third party, or modify the source code or form definitions in any way; 2.3.3 not remove or alter any copyright or other proprietary notice contained in the Software; 2.3.4 effect and maintain adequate security measures to safeguard the Software from access or use by any unauthorised person; and 2.3.5 retain the Software and all copies of it under the Licensee's effective possession and control. 3. Assignment 3.1 The Licensee may not transfer the benefit of this Licence or the Software to any person or entity without the prior written consent of DSL. DSL may assign or transfer this Licence without the Licensee's consent. 4. Warranty 4.1 DSL warrants that when the Software is used with reasonable skill and care it will operate in accordance with the functional specifications (published at http://www.lifact.com/prod_spec.html). This warranty is valid for a period of ninety (90) days from the date of purchase. 4.2 The warranty in clause 4.1 is void if the Licensee is in breach of iv any term of this Licence, or if failure of or defect in the Software has resulted from accident, abuse, misapplication, abnormal use or use other than in accordance with the specifications outlined on the website (http://www.lifact.com/prod_spec.html). 4.3 If a significant defect in the Software is found in the ninety (90) day warranty period, the Licensee may return the Software for a refund on giving written notice to DSL. The Licensee is not entitled to any updates, patches, fixes or upgrades in respect of the Software unless DSL in its absolute discretion otherwise agrees. DSL may in its discretion provide limited email and telephone support in respect of the Software but, following the 90 day warranty period, reserves the right to charge the Licensee for the provision of support. 4.4 Subject to clause 4.1, all conditions, warranties, terms, representations and undertakings, whether express or implied, statutory or otherwise, in respect of the Software are hereby excluded to the extent permitted by law. In particular, but without limitation, DSL disclaims, to the greatest extent permissible by law, any warranty or representation, either express or implied, of the Software's performance, non-infringement or fitness for a particular purpose or process. 5. Limitation of Liability 5.1 To the extent permissible by law, in no event will DSL be liable to the Licensee for any direct, special, incidental, indirect or consequential loss, damage, cost or expense suffered or incurred by the Licensee or any third party in connection with the Software. 5.2 The entire liability of DSL in connection with the Software will not exceed the price paid by the Licensee for the Software. 6. Term and Termination 6.1 This Licence will remain in effect until terminated. 6.2 DSL may terminate this Licence on ninety (90) days' written notice to the Licensee or immediately if the Licensee fails to comply with any term of this Licence. v 6.3 Upon termination by DSL, the Licensee will be required to return the Software to DSL and confirm in writing that no copies of the Software have been made and retained. 6.4 The provisions of clauses 4, 5, 7 and 8 of this agreement shall survive termination of this Licence for whatever reason. 7. Governing Law 7.1 This Licence shall be governed by the laws of New Zealand and is subject to the exclusive jurisdiction of the Courts of New Zealand. 8. Miscellaneous 8.1 This Licence records the entire understanding and agreement between the Licensee and DSL. This Licence supersedes all previous understandings or agreements (whether written, oral or both) between the Licensee and DSL. 8.2 DSL reserves the right to amend the terms of this Licence on sixty (60) days' written notice, posted on DSL's website. Continued use of the Software by the Licensee following the sixty (60) day notice period will constitute acceptance of the amended terms of the Licence, and the provisions of this Licence will be deemed to be altered accordingly. 8.3 Any waiver by DSL of its rights or remedies under this Licence will be effective only if it is recorded in writing and signed by DSL. If the waiver related to a breach of any provision of this Licence, this will not (unless stated otherwise) operate as a waiver of any other breach of that provision. No waiver of any breach, or failure to enforce any provision, of this Licence at any time by DSL will in any way affect limit or waive DSL's right to subsequently require strict compliance with this agreement. 8.4 If the Licensee has any dispute with DSL in connection with this Licence or the Software, it must give written notice to DSL and may submit the dispute for mediation by a single mediator nominated by the President for the time being of the New Zealand Law Society. In the event of any submission to mediation: vi 8.4.1 the mediator will not be acting as an expert or as an arbitrator; 8.4.2 the mediator will determine the procedure and timetable for the mediation; and 8.4.3 the parties will share equally the cost of the mediation. 8.5 The Licensee agrees that it will not issue any legal proceedings against DSL relating to any dispute, unless the Licensee has first taken all reasonable steps to comply with clause 8.4. Nothing in this Licence will prevent DSL from taking any steps it deems in its sole discretion necessary or desirable to protect its intellectual property rights or otherwise to enforce any of its rights under this Licence. 8.6 If any provision of this Licence is or becomes invalid or unenforceable, that provision will be deemed deleted from this Licence. The invalidity of unenforceability of that provision will not affect the other provisions of this Licence, all of which will remain in full force and effect to the extent permitted by law, subject to any modifications made necessary by the deletion of the invalid or unenforceable provision. vii Contents Lighting Concepts LightFactory V2 A Guide for Users Contents Contents ............................................................................... 1 Table of Figures ................................................................... 5 Overview ............................................................................. 10 Concepts .............................................................................11 Lighting Concepts .............................................................................. 11 DMX System .................................................................................... 11 Conventional fixtures ....................................................................... 15 Intelligent Fixtures ............................................................................ 15 LightFactory Concepts ...................................................................... 18 Channel Groups ............................................................................... 18 Cue List ............................................................................................ 20 Effects .............................................................................................. 24 Command Interface ......................................................................... 25 Palettes ............................................................................................ 26 Macros ............................................................................................. 26 Shortcuts .......................................................................................... 26 Computer Concepts ........................................................................... 27 Mouse Scroll Wheel ......................................................................... 27 Drag-and-Drop ................................................................................. 27 Right-click pop-up Menus ................................................................ 27 Screen Real Estate .......................................................................... 27 Window Docking .............................................................................. 28 MIDI .................................................................................................. 28 SMPTE ............................................................................................. 28 SQL Server....................................................................................... 28 Timecode.......................................................................................... 28 USB .................................................................................................. 29 Ethernet ............................................................................................ 29 Installing LightFactory ...................................................... 30 Installation Pre-requisites ................................................................. 30 Installation Procedure ........................................................................ 30 Downloading LightFactory ............................................................... 30 Installing LightFactory ...................................................................... 31 Starting LightFactory ......................................................................... 34 Registration & Licensing ................................................................... 37 UniKey License Dongle .................................................................... 37 License Codes ................................................................................. 39 1 LightFactory V2 A Guide for Users Contents Lighting Concepts Transferring a registration to another PC ......................................... 42 Importing and Exporting Registration Details ................................... 43 Generating a new serial number ...................................................... 44 Transfer registration to hardware ..................................................... 44 Hire Software Online ........................................................................ 45 Installing DMX Hardware ................................................................... 47 Enttec USB DMX Pro Dongle........................................................... 47 Enttec Open USB DMX Dongle ....................................................... 48 Cooper Controls USB DMX interface ............................................... 50 JESE DMX-TRI Interface ................................................................. 51 Artnet DMX on Ethernet ................................................................... 52 Enttec DMX on Ethernet .................................................................. 52 Pathport DMX on Ethernet ............................................................... 52 Optional Hardware installation ......................................................... 53 Installing Wings ................................................................................ 53 Ergodex DX1 Input System .............................................................. 56 XKeys ............................................................................................... 58 Quick Start ......................................................................... 59 Using the Channel Window ............................................................... 60 Patching a Moving Light .................................................................... 62 Controlling a Moving Light ................................................................ 64 Creating a Basic Cue List .................................................................. 65 Creating Cue 1 ................................................................................. 66 Creating Cue 2 ................................................................................. 67 Creating Cue 3 ................................................................................. 68 The Cue List Editor .......................................................................... 68 Setting the transition between cues ................................................. 69 Running the show ............................................................................ 69 Reference/Window Overview ............................................ 71 Command Interface ............................................................................ 71 Command Structure ......................................................................... 72 Master Fade Time ............................................................................ 86 Options menu ................................................................................... 87 Submaster Options ........................................................................ 128 Shortcut Options ............................................................................ 132 Window layout options ................................................................... 137 Channel Display ................................................................................ 138 Layout View .................................................................................... 141 Selection Options ........................................................................... 145 Control Options .............................................................................. 148 2 © 2004 - 2010 Dream Solutions Ltd Contents Lighting Concepts LightFactory V2 A Guide for Users Modifying Selected Channels ........................................................ 153 Intelligent Fixture Control ............................................................... 154 Quick access controls .................................................................... 165 Recording ....................................................................................... 167 Copy Options ................................................................................. 176 Channel Group Editor ...................................................................... 179 Group Name................................................................................... 180 Channels ........................................................................................ 180 Value .............................................................................................. 184 Fade Time ...................................................................................... 185 Behaviour ....................................................................................... 185 Submaster ...................................................................................... 186 Selection Shortcut .......................................................................... 186 Toggle Shortcut .............................................................................. 187 Apply Shortcut ................................................................................ 187 Snap Attributes ............................................................................... 187 Options ........................................................................................... 188 Select Active Button ....................................................................... 188 Sorting ............................................................................................ 189 Filters ............................................................................................. 189 Print channel groups ...................................................................... 189 Cue List Editor .................................................................................. 190 Cue Lists ........................................................................................ 190 Active vs. Selected Cue Lists......................................................... 191 Options Menu ................................................................................. 191 Cue’s .............................................................................................. 195 Testing a show ............................................................................... 216 Effects Editor .................................................................................... 218 Effect Filters ................................................................................... 218 Creating new effects ...................................................................... 219 Simple Chase ................................................................................. 224 Timeline Effects .............................................................................. 226 Profile effect ................................................................................... 235 Matrix Effect ................................................................................... 240 Media Effect ................................................................................... 243 Effect Library .................................................................................. 245 Effect Playback Controls ................................................................ 246 Palettes .............................................................................................. 247 Dimmer Patching .............................................................................. 250 Other information ........................................................................... 252 3 LightFactory V2 A Guide for Users Contents Lighting Concepts Options ........................................................................................... 255 Edit Menu ....................................................................................... 257 Cue Playbacks .................................................................................. 261 Playback Control Buttons ............................................................... 263 Shortcuts and Submasters ............................................................. 264 Options ........................................................................................... 265 Effects Playbacks ............................................................................. 266 Options ........................................................................................... 267 setting up a new Effect playback.................................................... 268 Timeline Effects Options ................................................................ 269 Chase Options................................................................................ 270 Profile Effect Options...................................................................... 272 Matrix Effect Options ...................................................................... 273 Media Effect Options ...................................................................... 275 Playback Controls .......................................................................... 275 Macro Editor ...................................................................................... 277 Additional Commands .................................................................... 278 Raw DMX View .................................................................................. 280 Extras ................................................................................................. 281 Timecode Monitor ........................................................................... 281 Power Meters ................................................................................. 281 LightFactory Remote ....................................................... 283 Installing LFRemote ......................................................................... 283 Setting up LightFactory to use LFRemote ..................................... 285 Telnet Interface ............................................................................... 286 LFRemote in a wireless environment ............................................. 286 Using LF Remote .............................................................................. 287 Connecting ..................................................................................... 287 Entering Commands ...................................................................... 290 Entering Attribute/Property commands .......................................... 291 Running Cues................................................................................. 291 Running Macro’s ............................................................................ 292 On, Off, +, -..................................................................................... 293 BS ................................................................................................... 293 Shutting Down ................................................................................ 293 Index ................................................................................. 294 4 © 2004 - 2010 Dream Solutions Ltd Table of Figures Lighting Concepts LightFactory V2 A Guide for Users Table of Figures Figure 1: Patching - Multiple Dimmers per Channel...................... 14 Figure 2: Default Channel Profile ................................................... 14 Figure 3: Inverse cosine profile ...................................................... 15 Figure 4: Command Interface: Submasters and Shortcuts .............. 20 Figure 5: Unregistered System Screen ............................................ 35 Figure 6: Registration Screen.......................................................... 35 Figure 5: Command Interface ......................................................... 37 Figure 8: Properties Window - Registration Page........................... 38 Figure 9: Convert License ............................................................... 41 Figure 10: Registration Transfer ..................................................... 43 Figure 11: LightFactory Hire .......................................................... 46 Figure 12: System Properties, Wing Configuration ........................ 54 Figure 13: ipconfig shell command output ..................................... 55 Figure 14: Channel Window ........................................................... 60 Figure 15: Dimmer Patching Window ............................................ 62 Figure 16: Channel Display window showing fixture control ........ 64 Figure 17: Show Editor Window .................................................... 68 Figure 18: Basic Cue List Example, Fade In, Fade Out, and Delay settings .................................................................................... 69 Figure 19: Cue Playback Controls .................................................. 70 Figure 20: Command Interface Window......................................... 71 Figure 21: Open a server based show file ....................................... 89 Figure 22: System Properties: System tab ...................................... 91 Figure 23: System Properties: Settings tab ..................................... 95 Figure 24: Tracking backup .......................................................... 100 Figure 25: System Properties, Show Defaults .............................. 101 Figure 26: System Properties - Appearance .................................. 103 Figure 27: System Properties: Registration tab ............................ 106 Figure 28: System Properties: WYSIWYG tab ............................ 108 Figure 29: System Properties - External Wings ............................ 109 Figure 30: System Properties - Media .......................................... 110 Figure 31: System Properties - Special Shortcuts ......................... 112 5 LightFactory V2 A Guide for Users Table of Figures Lighting Concepts Figure 32: External Triggers: Midi Debug Messagages ............... 113 Figure 33: External Triggers: Midi Note Triggers ........................ 114 Figure 34: External Triggers: Midi Control change ..................... 115 Figure 35: External Triggers: Midi Timecoode (MTC) ................ 116 Figure 36: External Triggers: PC Line In ..................................... 118 Figure 37: External Triggers: MIDI/SMPTE Timecode tab ........ 119 Figure 38: External Triggers: ChilliNet tab ................................. 120 Figure 39: External Triggers: iCAN tab ...................................... 121 Figure 40: External Triggers: mySQL trigger ............................. 121 Figure 41: Scheduled Tasks .......................................................... 122 Figure 42 : User Security .............................................................. 126 Figure 43: User Login................................................................... 127 Figure 44: Submaster window – Fader Mode .............................. 129 Figure 45: Submaster window – Grid Mode ................................ 131 Figure 46: On-Screen Shortcuts ................................................... 134 Figure 47: Shortcut grouping title edit ......................................... 135 Figure 48: Shortcut window display options ................................ 135 Figure 49: A simple channel window with only simple fixtures .. 138 Figure 50: A channel window with moving lights patched. ......... 139 Figure 51: Channel view - Layout view ....................................... 141 Figure 52: Layout view tool bar ................................................... 142 Figure 53: Layout View, Adding Channels................................... 143 Figure 54: Layout view - Move fixture ........................................ 144 Figure 55: Fan ............................................................................... 149 Figure 56: Crossed ........................................................................ 150 Figure 57: Auto Fan Option .......................................................... 150 Figure 58: Intelligent Fixture Control .......................................... 154 Figure 59: Pan and Tilt Helper ..................................................... 156 Figure 60: Position Control .......................................................... 158 Figure 61: Colour Control ............................................................ 159 Figure 62: Generic Attribute ......................................................... 162 Figure 63: Generic Attribute + Static Selection............................ 162 Figure 64: Rotation Control - Indexed ......................................... 163 Figure 65: Rotation Control - Continuous .................................... 163 6 © 2004 - 2010 Dream Solutions Ltd Table of Figures Lighting Concepts LightFactory V2 A Guide for Users Figure 66: Framing control ........................................................... 164 Figure 67: Channel View - Quick Access Controls ...................... 165 Figure 68: Fx Library Controls ..................................................... 166 Figure 69: Record group options .................................................. 167 Figure 70: Select group dialog ...................................................... 168 Figure 71: Select group dialog (snapshot) .................................... 169 Figure 72: Record Cue Options .................................................... 170 Figure 73: Update Cue options ..................................................... 170 Figure 74: Cue Selection Dialog ................................................... 171 Figure 75: Record Fx options ....................................................... 173 Figure 76: Creating or selecting a chase step................................ 174 Figure 77: Creating an effect based on library.............................. 175 Figure 78: Record Palette.............................................................. 176 Figure 79: Copy fixture options .................................................... 177 Figure 80: Group Editor ................................................................ 179 Figure 81: "Channel Select" Window ........................................... 180 Figure 82: Channel groups with docked detail window ............... 181 Figure 83: Detail window helper controls .................................... 182 Figure 84: Channel detail, add/remove tab ................................... 183 Figure 85: Cue List Editor ............................................................ 190 Figure 86: Cue list, Options menu ................................................ 191 Figure 87: Cue list tracking sheet ................................................. 192 Figure 88: Cue Options Menu....................................................... 196 Figure 89: Cue List, Scene break example ................................... 197 Figure 90: "Cue List Detail" Window ........................................... 202 Figure 91: Detail window helper controls .................................... 203 Figure 92: Cue Details Window - Palettes .................................... 206 Figure 93: Channel detail, add/remove tab ................................... 207 Figure 94: Show Effect Selection window, effects ....................... 209 Figure 95: Cue List Shortcuts ....................................................... 211 Figure 96: Cue List Channel Groups ............................................ 212 Figure 97: Cue notes window ....................................................... 215 Figure 98: Cue List Editor controls for testing a show ................. 216 Figure 99: Effects Editor ............................................................... 218 7 LightFactory V2 A Guide for Users Table of Figures Lighting Concepts Figure 100: New Effects Builder Opening Page .......................... 219 Figure 101: New Effects Builder, Simple chase ........................... 220 Figure 102: New Effect Builder, Timeline ................................... 220 Figure 103: New Effect Builder, Prop/Attrib Effect (Page 1) ..... 221 Figure 104: New Effect Builder, Prop/Attrib Effect (Page 2) ..... 222 Figure 105: New Effect Builder, Matrix Effect ........................... 222 Figure 106: New Effect Builder, Media Effect ............................ 223 Figure 107: Right click menu options .......................................... 224 Figure 108: Effect Editor, Simple Chase ...................................... 224 Figure 109: Group add channels command interface ................... 225 Figure 110: Effects Editor, Time vs. Fixture Effect ...................... 227 Figure 111: Effect Editor Controls ............................................... 228 Figure 112: Example: Creating an Effect Sequence ..................... 229 Figure 113: Segment State Attribute Editor.................................. 230 Figure 114: Moving Light Path Editor ......................................... 231 Figure 115: Moving Light Path Resize Buttons ........................... 232 Figure 116: Moving Light Path Repositioning Controls .............. 232 Figure 117: Colour path editor...................................................... 233 Figure 118: Effect Editor - Right-click Menu Options for Segments .............................................................................................. 233 Figure 119: Effects Editor, Property / Attribute Effect ................. 235 Figure 120: Prop effect channel list menu .................................... 236 Figure 121: Effects Editor, Matrix/LED Effect ............................ 240 Figure 122: Matrix effect, right click menu.................................. 241 Figure 123: Matrix effect preview window .................................. 242 Figure 124: Effects Editor, Media Effect ...................................... 243 Figure 125: Effect Library ............................................................ 245 Figure 126: Fixture Property Shortcuts ........................................ 248 Figure 127: Colour dialog, show colours tab ............................... 249 Figure 128: Palettes pan and tilt helper box ................................. 249 Figure 129: Dimmer Patching Window ........................................ 250 Figure 130: Quantity control for intelligent fixtures .................... 252 Figure 131: DMX settings column ............................................... 255 Figure 132: Patching options ........................................................ 255 8 © 2004 - 2010 Dream Solutions Ltd Table of Figures Lighting Concepts LightFactory V2 A Guide for Users Figure 133: Profile editor, Linear profile selected ........................ 258 Figure 134: Profile editor, custom profile .................................... 258 Figure 135: Edit Matrices ............................................................. 259 Figure 136: Cue Playback Window .............................................. 261 Figure 137: Playback Example ..................................................... 262 Figure 138: Cue Playback, Cue selection ..................................... 262 Figure 139: Cue PLaybacks, Jump to cue dialog .......................... 264 Figure 140: Cue Playbacks Controls - Shortcut numbers ............. 264 Figure 141: Effects Runners Window ........................................... 266 Figure 142: Effect runner move options ....................................... 267 Figure 143: Effect Playbacks - Compact mode ............................ 267 Figure 144: Effect Playbacks - Normal mode ............................... 267 Figure 145: Effect Playbacks - Large mode.................................. 267 Figure 146: Effect Playback Properties Windows ........................ 268 Figure 147: Macro Editor.............................................................. 277 Figure 148: Macros, Add macro dialog ........................................ 278 Figure 149: Dimmer Display Window .......................................... 280 Figure 150: Timecode monitor...................................................... 281 Figure 151: Power meters ............................................................. 281 Figure 152: LightFactory Remote ................................................. 283 Figure 153: Telnet command interface options............................. 286 Figure 154: LightFactory Remote (Disconnected) ....................... 288 Figure 155: LightFactory Remote, Connect Screen ..................... 288 Figure 156: Network Interface Properties, Support ...................... 289 Figure 157: LightFactory Remote, Main screen ........................... 290 Figure 158: LightFactory Remote, Example Syntax .................... 290 Figure 159: LightFactory Remote, Attribute List ......................... 291 Figure 160: LightFactory Remote, Cue list .................................. 292 Figure 161: LightFactory Remote, Macro Selection .................... 292 9 LightFactory V2 A Guide for Users Overview Lighting Concepts Overview LightFactory is a unique PC based lighting controller that combines the best of traditional lighting control with advanced features only available with the power of a PC. LightFactory was designed with the idea that every lighting engineer, operator or designer could own his or her own control desk. One desk they are completely familiar with, one desk that works for every situation and one desk they can rely on every time. Created by lighting designers for lighting designers, LightFactory allows you to quickly set up a new venue without having to learn a new lighting controller or have budget constraints restrict your choice of desk. With advanced features for all lighting situations, from museum to stage shows, LightFactory does it all. Control over 32,000 dimmers with 10,000 channels. Dimmers can be purchased in 512 dimmer blocks for a truly scalable system. This user guide will take you through all of the features of the software and show you how to use it to its fullest potential. 10 © 2004 - 2010 Dream Solutions Ltd Concepts Lighting Concepts LightFactory V2 A Guide for Users Concepts This section covers some lighting basics as well as introducing you to LightFactory’s main concepts and computer terminology required to use the software. Lighting Concepts DMX System DMX 512 is an EIA-485 based communications protocol and is the standard protocol by which lighting control desks communicate with lighting equipment. The DMX 512 protocol is a stream of data that is sent via a cable system connected between the data transmitter (LightFactory) and a data receiver, which could be anything ranging from a basic light to intelligent lights, smoke machines, etc. Dimmer Pack Dimmer Pack Dimmer Pack Dimmer Pack LightFactory LightFactory uses the standard DMX 512 protocol to communicate with the equipment it controls. DMX is connected to the LightFactory software via either a USB-DMX connection (See “USB” on page 29 for more about USB) or Ethernet to DMX converters. http://www.lifact.com 11 LightFactory V2 A Guide for Users Concepts Lighting Concepts Developed by the Engineering Commission of USITT, the standard started in 1986, with subsequent revisions in 1990 leading to USITT DMX512/1990. In 1998 ESTA began a revision process to develop the standard as an ANSI standard, including a Public Review process. The revised standard, known officially as "Entertainment Technology — USITT DMX512–A — Asynchronous Serial Digital Data Transmission Standard for Controlling Lighting Equipment and Accessories", was approved by ANSI in November 2004. This current standard is also known as "E1.11, USITT DMX512–A", or just "DMX512-A", and is maintained by ESTA. DMX512 is unidirectional and does not include automatic error checking and correction, so it is not safe to use for applications involving life safety, such as controlling pyrotechnics or laser lighting display where audience or performer safety is involved. Dimmers In the simplest terms, a dimmer is a physical apparatus used for controlling the intensity of a basic light. A dimmer can be fully on, fully off, or somewhere in-between. The setting of a dimmer is referred to as the DMX value. DMX values range from zero to 255. A value of zero means the light is off, and 255 means the light is fully on. By adjusting the DMX value up and down, the intensity of the light increases and decreases. Basic dimmers come as units known as Dimmer Packs, usually made up of 4 to 24 dimmers per pack. For example, a 12-pack consists of 12 dimmers. Each dimmer is a physical plug on that 12-pack, each of which operates independently of the other 11. 12 © 2004 - 2010 Dream Solutions Ltd Concepts Lighting Concepts LightFactory V2 A Guide for Users DMX Value The setting of a dimmer is referred to as the DMX value. DMX values range from zero to 255. A value of zero means the light is off, and 255 means the light is fully on. By adjusting the DMX value up and down, the intensity of the light increases and decreases. DMX Universe A DMX universe consists of 512 DMX dimmers. In the case of the LightFactory system, this translates to one USB-DMX box. If more dimmers are required, simply add another USB-DMX box or use one of the DMX to Ethernet options. Channels (Logical/desk channels or Fixtures) A channel is a controller on a lighting console (eg, LightFactory) that is used for controlling dimmers. In the case of a simple light with one dimmer, a single channel would control one dimmer. More sophisticated lighting fixtures, which utilise multiple dimmers to control various properties or attributes of the fixture (such as intensity, position, colour, etc), are controlled by a single channel, i.e., multiple dimmers are controlled by one channel. Dimmer Patching Dimmer patching is the patching of dimmers into channels. This allows a single channel to control any number of dimmers. In LightFactory, this is achieved via the “Dimmer Patching” window. See “Dimmer Patching” on page 247 to learn how to use this feature. Channel 1 2 3 4 5 6 7 8 9 10 http://www.lifact.com Dimmer 1 2 3 4 5 6 7 8 9 10 13 LightFactory V2 A Guide for Users Concepts Lighting Concepts Figure 1: Patching - Multiple Dimmers per Channel Patching is also done to define which channel controls an intelligent fixture, i.e., a fixture that utilises multiple dimmers for its various features. When you patch an intelligent fixture, all the dimmers for that fixture are automatically patched into that channel. See “Intelligent Fixtures” on page 15 for further information about intelligent fixtures. Channel Profile Typically, a channel:dimmer level ratio is 1:1. That is, when the channel is at a certain value, the dimmers in that channel are also at that value. On occasion, it may be necessary to configure a channel to output levels other than 1:1. The actual level sent to the dimmer can be scaled up or down, or configured into a non-linear relationship. For example, a lamp may not perform well below a certain level. The Channel Profile curve can configure the channel to prevent the dimmer from ever reaching such levels. The Channel Profile can be used for configuring individual channels or for multiple channels at once. To learn how to use the Channel Profiles, see “Edit Profiles” on page Error! Bookmark not defined. Figure 2: Default Channel Profile 14 © 2004 - 2010 Dream Solutions Ltd Concepts Lighting Concepts LightFactory V2 A Guide for Users Figure 3: Inverse cosine profile Conventional fixtures Conventional fixtures are those that have only one property that can be controlled from the lighting desk, hence requiring a single dimmer to control it. Examples of conventional fixtures are: Standard luminaires – profiles, fresnels, etc T T Effects Equipment – smoke/fog machines, bubble machines, mirror balls etc T T Intelligent Fixtures Intelligent fixtures, in contrast to conventional fixtures, have multiple attributes that can be controlled from the lighting desk. Fixture Attributes Fixture attributes can be 8-bit or 16-bit. This essentially determines how finely a property can be controlled. A 16-bit attribute uses 2 DMX dimmers to control the value to be set. Instead of 255 value levels the attribute can have 255 * 255 values. A 16-bit property can be more finely controlled than an 8-bit property. For example, 16-bit pan and tilt enables the fixture to be moved much more slowly than 8-bit pan and tilt. 8-bit – has 255 settings, zero to 255 for the property T T 16-bit – has 65535 (255 x 255) settings, zero to 65535 for the property T T http://www.lifact.com 15 LightFactory V2 A Guide for Users Concepts Lighting Concepts LightFactory’s Fixture Library stores attribute information about your fixtures. The library is divided into fixture brands. This helps to organise the wide range of fixtures that are available into manageable groups. Below is a list of common attributes that a fixture may have: Attribute T T Colour wheel (colour changer, colour scroller) Description T T A wheel-shaped device containing circles of coloured media (gels) that attaches to a luminaire in order to create a coloured beam of light. Can be manually controlled or motorised and controlled via a dimmer. 16 Gobo A thin plate with a design cut out of it that can be placed in the path of the light beam, causing a pattern to be projected. Pan Horizontal movement of a lighting fixture Tilt Vertical movement of a lighting fixture Zoom Zoom is a way of controlling the size of the light beam. It is achieved by moving the lens back and forward inside the fixture. Control Channel Advanced fixture properties, such as turning the lamp on and off or controlling cooling fan speed. © 2004 - 2010 Dream Solutions Ltd Concepts LightFactory Concepts LightFactory V2 A Guide for Users Colour mixing Colour mixing comprises multiple colours that can be combined together in varying proportions to achieve a desired colour of light. The most common mixing system is subtractive CMY (cyan, magenta, yellow) and RGB (red, green blue). Framing control Achieved via a set of shutters, this enables the shape of the light beam to be altered. The shutters can be moved towards/away from the edge of the beam, as well as angled to create non-perpendicular corners. Iris Iris is a set of shutters used for controlling the size of the light beam. Opening and closing the shutters allows more or less light through the iris. The light intensity is decreased, due to less light being allowed to pass through. Edge Controls the hardness or softness of the beam edge. Focus Adjusts the beam so that the light is concentrated on the focal point Diffusion Created using a filter, diffusion is the scattering of light. Strobe Flashing light, of which the speed can be configured via the control channel. Table 1: Intelligent Fixture Properties http://www.lifact.com 17 LightFactory V2 A Guide for Users Concepts LightFactory Concepts LightFactory Concepts Channel Groups Channel groups enable you to group together channels in a particular state that can be recalled at a later time. In LightFactory channel groups serve several functions: 1. Channel groups allow the simultaneous control of multiple channels at once. 2. A channel group can also be assigned to a submaster to provide a single handle for controlling the level of the group. 3. A channel group can be applied in a single press of a shortcut. This means that the levels set in the channel group will be set in the fade time supplied with the group. 4. By setting a selection shortcut you can use a single button press to select the channels in the group. 5. Channel groups can be put into a cues so that you do not need to repeat the look when making cue lists. 6. Channel groups can be referenced as advanced palettes in individual attributes of cues. A channel group can be configured to have one of five types of behaviour. This behaviour defines what happens to the current channel settings when the group is being controlled. Note: The behaviour is not used when the channel group in included inside a cue. Override (LTP) – Also known as “Latest Takes Precedence”. This is the default behaviour of channel groups. This behaviour will apply the channel levels set in the group to output channels and take over control of that channel. As soon as something else sets the channel value the group value will get overridden. Likewise as soon as the group value changes it will override the existing values set in the channel. Override will not apply to HTP channels if the override value is less that the set HTP value. You can turn this behaviour off by setting the “Override takes precedence over HTP” option in the system properties, show defaults tab. T 18 T © 2004 - 2010 Dream Solutions Ltd Concepts LightFactory Concepts LightFactory V2 A Guide for Users Build – The values set in the channel group will be added to the current output value of the channels. T T Exclusive – All other channels will be set to zero and only the channels in this group will be applied. T T Highest Takes Precedence (HTP) – When a group value is set with HTP behaviour the output on the channel is determined by what has a higher value. If the value set in the group is higher than the value in the channel then the group will control the channel. If the value in the channel is higher than the group value it will remain unchanged. T T Independent – Channels in an “Independent” group will override all other requests to modify the channel value. As soon as the group level is above 0, channels within this group will be controlled by the group values. T Inhibit – With an inhibit group the value masters all channels that are in the group. The output value of the channel will be scaled by the value of the inhibit group it belongs to. Hue LTP – The Hue LTP behaviour is a special type designed to be used with colour mixing fixture. As the value of the group changes from 0 to 100% the output of the group will be the saturated hue value between 0 and 360 degrees. In real terms this translates to a full colour spectrum that can be accessed from the channel group. Submasters and Shortcuts Submasters and shortcuts are both ways of accessing the various functions of the channel groups. A submaster is generally a slider on a lighting console desk that can be assigned to a channel group. The submaster can then control the output value of the group. There are 3 different shortcut functions available with channel groups: Selection Shortcut – Setting a selection shortcut will allow you to select the channels in the group with a single button press. Toggle Shortcut – A toggle shortcut can be used to temporarily turn the channel group on and off. Pressing it once will set the http://www.lifact.com 19 LightFactory V2 A Guide for Users Concepts LightFactory Concepts channel group to full and once in that state pressing a second time till set the group to 0. Apply Shortcut – Pressing the button assigned to an apply shortcut will set all of the channels to the state recorded into the group without changing the group value. The channel will be “Applied”. Submasters and shortcuts are both accessible via controls at the top of the Command Interface. Shortcuts Submasters Figure 4: Command Interface: Submasters and Shortcuts Cue List A cue list is a series of cues that define how the lighting is set during the various parts of a performance. These are sometimes called a “cue stack” or “cue sheet”. On some systems that only allow a single cue list this may be simply called the “Show”. Example: A band is performing a song in a concert. Rather than having simple lighting that does not change for the duration of the song, cues can be set up to change the lighting as the song progresses. As each “cue” in the song is reached, the lighting can be easily set for that part of the song by activating the relevant cue. T T Shows and cues are set up and managed via the “Cue List Editor”. See “Cue List Editor” on page 189 to learn how. Cue List’s To easily manage and organise of a large number of cues for a production, LightFactory enables cues to be grouped into “Cue List’s”. 20 © 2004 - 2010 Dream Solutions Ltd Concepts LightFactory Concepts LightFactory V2 A Guide for Users Example: A concert contains 10 songs, all of which have different lighting. By creating a “Cue List” for each song, the cues for each song can be easily identified and kept separate. T T Cue Playbacks The Cue List Editor is used for setting up and managing cue lists and cues. When it comes to running a show, the “Cue Playbacks” (previously called Show Runner in version 1 of LightFactory) window can be used. The Cue PLayback window is a simple screen that enables cue lists to be set up in the desired order, defining the starting cue for each. As the show progresses, the lighting technician simply presses the “Go” button for each cue list group to activate each cue. The display shows the current cue and the next cue so that the technician can see progress during the show. To learn how to use show runners, see “Cue Playbacks” on page 261. Cues A cue is an event in a production that is the signal for a specific action. The response may include any lighting change that is required. Cues define how the lighting is set during the various parts of a performance. Using the LightFactory software they can run automatically or be user-controlled. A cue can contain a number of channels, and defines all their states for a particular part of a performance. One or more effects can be included, as well as defining the fade times, dwell, and effect delays. Cue can also trigger executing system shortcuts such as macro’s and palettes. Cues can be sub-grouped into “Cue Lists”, enabling them to be easily identified and managed. See also: “Cue List’s” on page 20. Cue Number Each cue within a cue list has a unique number, known as a cue number. When a cue is created, it is automatically assigned a number. LightFactory supports up to 3 decimal places with each cue numbering allowing for cues to be inserted in between other http://www.lifact.com 21 LightFactory V2 A Guide for Users Concepts LightFactory Concepts cues. When a cue is added to the end of the cue list it will always be given a whole cue number. If a cue is inserted between two other cues then the new cue number will be half way between the cues. Cue Trigger A cue’s trigger defines the circumstances that cause a cue to become active. There are four types of trigger: Cue – he user must physically press a “Cue Go” button either in a show runner or on the show editor window. T T Auto – Cues set with the auto trigger will execute immediately after the previous cue has completed its delay, fade in, and dwell time. An auto cue will not wait for the fade out time so that cross fades can be achieved. T T Midi – The cue will be triggered by an external midi event occurring. See page 113 for information on how to set up MIDI triggers. T T Line In – The cue will be triggered by the line-in audio source. See page 117 for information on how to set up the software for audio triggers. T T Timecode – The cue will trigger when the specified timecode is reached. If the timecode has already passed when this cue is reached, the software will trigger the cue immediately. Enter the timecode value into the field provided. T T Cue Channels The channels that are used or recorded into a particular cue. A cue can contain any number of channels, limited only by the system resources of your PC. Cue Effects Effects can be included in to cue so that they will run when the cue is run and stop when the cue finishes. Cue Shortcuts When a cue runs you can optionally fire any number of shortcuts. This is designed to extend the capabilities of the cue by allowing any function that can be assigned to shortcut to be run in the cue. 22 © 2004 - 2010 Dream Solutions Ltd Concepts LightFactory Concepts LightFactory V2 A Guide for Users Cue Channel Groups To make programming cues easier you can add into the cue any pre-built channel group. The channel groups become a building block for the cue and allow you to change a single channel group and have the effect automatically applied to all cues that contain the group. Tracking (Intelligent Cue Execution) By default LightFactory applies a tracking behaviour to all attributes except the main dimmer when executing cues. To track the dimmer you must turn on the option to do so in the system properties (Show defaults tab). Tracking is a playback function in LightFactory but there are some important recording options that will assist you to program your show. Tracking behaviour will be applied regardless of if the cues are run sequentially or out of order. Tracking means that when the system is transitioning from one cue to the next, it applies only those settings that change from the previous cue. If an attribute does not change from one cue to the next or the channel is not recorded into the cue then the system will not attempt to apply the setting. The channels do not reset themselves between cues if nothing has changed from the previous cue, hence avoiding the possibility of undesirable behaviour occurring between cues. Blocking Blocking is an override of the tracking behaviour for a cue or a channel. A channel that is “Blocked” will always apply the values set regardless of the previous cue state. Blocking is most commonly applied to an entire cue to create a known lighting state in the show. The first cue should always be blocking and in LightFactory this will be done automatically for you. Tracking Recording Options Track Forward – If track forward is selected when recording a cue then the software will look at each cue after the cue being recorded and apply the same channel settings until the channel state changes from its original value. http://www.lifact.com 23 LightFactory V2 A Guide for Users Concepts LightFactory Concepts Cue Only – Only the cue being recorded or updated will be affected by the changes made. All of the cues follow and before the cue will remain unchanged. Track Back - If track back is selected when recording or updating a cue then the software will look at each cue prior to the cue being recorded and apply the same channel settings until the channel state changes from its original value. T Effects Effects are time-based programs of lighting changes, such as chase sequences, simple loops, colour changes, etc. The LightFactory Effects Editor allows effects to be easily created, tested, and adjusted using the intuitive graphical interface. Effects can be run from inside shows via cues (see “Cues” on page 21) or by using Effect Playbacks (see “Effect ” on page 25). For more about effects, see “Effects Editor” on page 218. To facilitate the management of large numbers of effects, effects can be given simple labels that describe what the effect does. Whenever you need to find or select an effect within LightFactory you can use the filters to narrow down the list. Effect Types LightFactory has 5 different effects types that can be created. Each effect type is designed to be the most efficient way of programming the effect you want. Simple Chase – A chase is very similar to a cue list in that each step of the chase contains a static lighting state. As the chase progresses through each step the lighting state changes. Unlike a cue list the timing is made simpler and only a single fade time can be applied between steps. Timeline – With a timeline effect you can design what happens in a graphical format of fixture vs time. Each segment in the timeline defines a lighting state and how it will change. Profile – The profile effect (sometimes called the Profile/Attribute effect) will apply a profile curve to a specific attribute over time. Matrix – The matrix effect is designed to make working with large arrays of lights such as multicolour LEDs easy and efficient. The 24 © 2004 - 2010 Dream Solutions Ltd Concepts LightFactory Concepts LightFactory V2 A Guide for Users Matrix effect allows you to map an image or video file to a channel array while at the same time apply a moving box over the resulting image. Media – LightFactory provides the ability to playback audio and video files directly from the software. This can be used to do sound effects in a show or play a video presentation for a corporate event. Effect Playbacks The Effect Playbacks are simple controls for running effects ad-hoc. The LightFactory Effects Playback screen allows the lighting technician to see at-a-glance all the effects of interest and conveniently run them at the click of a button. Exclusive groups To ensure that only one effect operates within a specified group, exclusive groups can be created. We may have a number of effects for the same group of lights where it makes no sense to run any more than one effect at a time. If we did, the effects would conflict and cause undesirable results. By placing an effect into an exclusive group, it will stop all other grouped effects when you attempt to start it. Command Interface LightFactory comes equipped with a command interface. This is similar to a simple text editor and allows a technician to type commands directly to the system bypassing the graphical interface. It can be advantageous to do this if a quick change is required and the technician is familiar with the required commands. The command interface can be accessed via either the main command window, the channel display or via an external program wing. Command History The command history allows the viewing of past commands made via the command interface. This can be handy when something unexpected has happened and a technician needs to check exactly what commands were sent to the dimmers. http://www.lifact.com 25 LightFactory V2 A Guide for Users Concepts LightFactory Concepts Telnet Interface Telnet allows a technician to connect to LightFactory remotely using a hand-held device or similar. Commands can be sent from the remote device using the command language used by the Command Interface. The freedom of remote access to the LightFactory software means that the technician can be almost anywhere while setting up the lighting fixtures and make changes without needing to go back and forwards to the lighting desk. Palettes Palettes are a way to configure a particular look that you may want to recall quickly and without executing several commands to the system. A palette may put a fixture into a specific position or setup a number of fixtures into a specific colour. LightFactory allows palettes to be assigned a specific list of fixtures or operate on currently selected fixtures. Macros Macros are simple programs made up of a sequence of commands. If a particular sequence of commands is used frequently, it makes sense to create a macro for them. This means that rather than retyping the commands every time, the macro can be run instead, automatically executing the commands. This saves time as well as reducing the chance of errors being made. Shortcuts A shortcut is a quick route to a particular setting or feature that is used frequently. There are many places that shortcuts can be assigned within LightFactory. A shortcut may select some fixtures, run a cue, start an effect, apply a setting, or just about any operation. 26 © 2004 - 2010 Dream Solutions Ltd Concepts Computer Concepts LightFactory V2 A Guide for Users Computer Concepts In order to use the LightFactory software, it is necessary to understand a few basic computer concepts. Mouse Scroll Wheel A mouse is a small device that connects to a computer. It is used for navigating around computer software, by means of a pointer. Many types of mouse have what is known as a scroll wheel. This is a wheel set into the top of the mouse, usually located between the left and right buttons. In LightFactory, the scroll wheel is used for increasing/decreasing dimmer values in a similar way to the sliders on a lighting console desk Drag-and-Drop Drag-and-drop is a commonly used method of moving one or more items from one location to another using the mouse. Typically, it is done by left clicking on the item you wish to move, then, while still holding down the mouse button, moving the mouse to the required destination. Release the mouse button when the mouse pointer is over the destination. In LightFactory, drag-and-drop is used to assign fixtures into channels, dimmer patching, etc… Right-click pop-up Menus Right-click menus are hidden menus, accessible by right-clicking the mouse button. If there is a right-click menu available for a feature, it will appear. Once available, you can click on the desired menu item. If you right-click and a menu appears that you do not want to use, simply press the escape key on your keyboard (or click elsewhere on the screen) and the menu will disappear. Screen Real Estate As the name suggests, screen real estate refers to the screen area you have available on your computer monitor for viewing information. The individual features of LightFactory are in their own separate windows and can be arranged / resized on the computer screen http://www.lifact.com 27 LightFactory V2 A Guide for Users Concepts Computer Concepts according to an individual technician’s preference. LightFactory will remember for next time. It is also possible to add one or more extra monitors, thus expanding the available screen real estate. Window Docking Some windows in LightFactory can be “docked” onto other windows. This means that the two windows are attached to oneanother, which is useful if you want to have two related windows remain next to each other at all times. MIDI Musical Instrument Digital Interface, an industry-standard interface used on electronic musical keyboards and PCs for computer control of musical instruments and devices. T T T T T T T T SMPTE Society of Motion Picture and Television Engineers T T T T T T T T T T SQL Server Structured Query Language server. A computer that provides client computers with highly efficient access to database files. Firebird SQL Server is a type of database. A database is an electronic way of storing information on your computer. When you use LightFactory, your entire lighting configuration is stored in a SQL Server database. This means that you can switch off your computer, even unplug everything, and LightFactory will still remember your set-up. LightFactory’s SQL Server database has built-in backup and restore features to safeguard you against data loss. Timecode A feature within a video tape that identifies individual frames to define how frames are counted throughout a project. It is similar to the page numbers of a book: if the pages of the book are out of sequence or have gaps, then things get confusing. Similarly, if a video tape does not have a timecode, then finding a particular clip on tape would be time-consuming and confusing. 28 © 2004 - 2010 Dream Solutions Ltd Concepts Computer Concepts LightFactory V2 A Guide for Users USB Universal Serial Bus. USB is a standard port that enables you to connect external devices (such as digital cameras, scanners, and mice) to Windows 98 and Macintosh computers. T T T T T T The USB standard supports data transfer rates of 12Mbps (million bits per second), a vast improvement over the serial port standard it is beginning to replace. Aside from speed advantages, USB devices can be connected or disconnected without the need to restart the computer. Many USB devices can work on either a Windows 98 PC or a Mac, provided the device manufacturer offers connectivity software for both computer systems. Many of the latest digital cameras offer USB as well as serial connections. LightFactory uses a USB device to transmit and receive DMX data. Ethernet A very common method of networking computers in a LAN using copper cabling. Ethernet will handle about 10,000,000 bits-persecond and can be used with almost any kind of computer. LightFactory can communicate with DMX systems using standard DMX over Ethernet protocols. http://www.lifact.com 29 LightFactory V2 A Guide for Users Installing LightFactory Installation Pre-requisites Installing LightFactory This chapter tells you how to set up a PC to run LightFactory, how to install the software, set up any required hardware, and run LightFactory for use in any lighting situation. Installation Pre-requisites Before installing LightFactory, you need to ensure your PC meets the following minimum specifications. > 1GHz processor Minimum 256Mb Ram 300Mb of free hard drive space Minimum 1024 x 768 video display Windows XP, Vista, or Windows 7 Operating system It is also highly recommended that you attach an optical mouse with a working scroll wheel. To produce DMX output from LightFactory you must also have installed some form of DMX hardware. See “Installing DMX hardware” (Page 44) for more information on this topic. Installation Procedure Installing LightFactory is a simple process, and requires no special knowledge. The installation procedure is almost completely automated and self-explanatory. LightFactory can be obtained on CD or by downloading the product off our website. Downloading LightFactory To download the latest version of the software go to the LightFactory website, click on the products page and then click on downloads. Alternatively you can go directly to this page by visiting; http://www.lifact.com/download.html 30 © 2004 - 2010 Dream Solutions Ltd Installing LightFactory Installation Procedure LightFactory V2 A Guide for Users Installing LightFactory To install LightFactory: 1. Find the Setup.exe file you have downloaded from the internet or on the CD that come with the product. If you are installing off a CD the Setup.exe will be found in the root directory of the CD. Some CD’s may start this setup program automatically when the CD is placed into the drive. 2. Double click on the Setup.exe and the opening page of the setup will be displayed. 3. Click on the “Next” button to begin the setup procedure. The License Agreement window appears: T T T T Please read this license agreement carefully (A copy of this can be found at the front of this user guide) before continuing with the installation. http://www.lifact.com 31 LightFactory V2 A Guide for Users Installing LightFactory Installation Procedure 4. If you accept the License Agreement, click on the “I Agree” button. If you do not accept the terms of the agreement, click “Cancel“. This will abort the installation. Result: The Select Installation Folder window will be displayed. T T 5. Accept the default destination folder (recommended), or click the “Browse…“ button to browse for a replacement folder. When you are satisfied with the displayed folder, click “Next” to continue. T T T T Result: The “Start Menu Folder” window appears. 6. Accept the default destination start menu folder, or type the name of the folder you want to use. When you are satisfied with the start menu folder, click “Install” to begin the install process. T T Result: The “Copying Files“ window appears and the wizard will begin installing LightFactory. T 32 T © 2004 - 2010 Dream Solutions Ltd Installing LightFactory Installation Procedure LightFactory V2 A Guide for Users Note: During the installation process the software will attempt to pre-install drivers for some of the DMX hardware options. 7. After all of the files have been copied the installation will automatically run the fixture library update procedure. This process may take a few minutes to perform. There is three stages to the fixture import process – Loading the existing library, importing the new information and finally saving the fixtures including the update back to the hard drive. If this is the first time you have installed LightFactory only the seconds and third stage is necessary. 8. Once complete click on the “Next” button to finish the install process. Result: The “Installation Complete” window will appear. http://www.lifact.com 33 LightFactory V2 A Guide for Users Installing LightFactory Starting LightFactory 9. Click “Close” to close the window to finish this installation process. T Starting LightFactory After the installation is complete, you can begin using the software. You can start LightFactory either from the Windows Start menu or from the icon that will have been placed on your desktop. From the Windows Start menu: Select the LightFactory V2 item. T T T From your desktop: Double-click on the LightFactory V2 icon T Result: The LightFactory splash screen will appear and the software will begin to load. 34 © 2004 - 2010 Dream Solutions Ltd Installing LightFactory Starting LightFactory LightFactory V2 A Guide for Users Note: The first time the software runs it will take slightly longer to start-up. This is because it must create the database that is used for saving show information. T During start-up the software will check for a valid registration code. If the software is not registered then the following dialog will be displayed. Figure 5: Unregistered System Screen If you wish to use the software unregistered (Software will function normally but no DMX output will occur) click on the “Continue” button or press enter on the keyboard. To purchase the software on-line or find a local reseller of the software click on the “Purchase” button provided. You must be connected to the Internet as this will open your default web browser and redirect you to the LightFactory web site. To enter a valid registration code received with purchase of the software click on the “Register” button. The following window will allow you to enter these details into the software. Figure 6: Registration Screen http://www.lifact.com 35 LightFactory V2 A Guide for Users Installing LightFactory Starting LightFactory Registration of the software is based on the “Generated Serial Number” and the “Registration Code”. Both of these numbers must match the information supplied for the registration to be valid. The serial number is a unique code generated by LightFactory and will be needed to obtain a valid registration. If you want to copy this number to the clipboard for entering into a web form simply click anywhere on the number. Enter your registration details and click on the “OK” button to continue loading the software. A dialog will inform you if incorrect details have been entered and allow three attempts to correct the mistake before returning you to the previous window. Click on the “Cancel” button at any time to abort this process. Registration details can also be entered through the System Properties in the File menu once the software has started. At any time during this process you can also connect a USB DMX device or USB security token that contains a valid registration. When the software continues the loading process the registration contained on the device will be loaded and applied. Your USB DMX device will only contain a valid registration if you purchased the device and the software as a package. Purchase of a USB DMX device with your software does not guarantee that the device contains a valid registration. If the device does not contain a valid registration you will need to register the system as described in the next section. For information about the “Hire” button and how you can rent a time limited registration see Hire Software Online section (Page 45). After the software has loaded, the main window (Command Interface) will open. You are now ready to use the software. See the “Quick Start” section (Page 59) to begin finding your way around the software. 36 © 2004 - 2010 Dream Solutions Ltd Installing LightFactory Registration & Licensing LightFactory V2 A Guide for Users Figure 5: Command Interface Registration & Licensing When the software starts the registration details are shown in the first few lines of the command interface. In the above example the software is registered to communicate with 2 DMX universes. If more DMX universes are connected than the registration allows the system will simply ignore the additional dimmers. Once the software is running you can access the registration information by clicking on the File menu and selecting System Properties. Click on the “Registration” tab to display the current registration details. UniKey License Dongle LightFactory licenses can be purchases as a hardware USB token called the UniKey Dongle. This is a small USB device that acts as a security token for the software. If you purchased LightFactory in this way you will need to have the UniKey dongle plugged into the computer whenever you are running LightFactory. http://www.lifact.com 37 LightFactory V2 A Guide for Users Installing LightFactory Registration & Licensing Figure 8: Properties Window - Registration Page At any stage you can access the LightFactory web site by clicking on the “Purchase LightFactory Online”. You must be connected to the internet for this to work as this operation will open your web browser on your system. To add or change the registration code on your system enter it into the box provided below the serial number. Click on the apply button to check that the code entered is correct. If at any time you make a mistake and want to retrieve the previous code click on the “Cancel” button at the bottom of the window and then re-open the system properties. Changes to the registration code will only be tested and saved when the “Apply” or “OK” button is pressed. 38 © 2004 - 2010 Dream Solutions Ltd Installing LightFactory Registration & Licensing LightFactory V2 A Guide for Users When the software is registered a green tick will appear on the picture in the top left of this window. Unregistered Registered Registration of the software is based on the “Serial Number” and the “Registration Code”. When you are supplied with a registration code you will also have printed with it the matching serial number. If your registration code does not work check that the serial number on screen is the same as the one printed with your registration code. If you have entered a valid registration code a dialog will inform you that the system is now registered. License Codes If you received a “License Code” when you purchased the software it will need to be converted into a “Registration Code” to unlock the software. A license code is a onetime right to register your copy of LightFactory. Unlike a registration code the license is not linked to your serial number. License codes use the format “nnnnnnnnnnnn-cccccc-cccc” where “n” represents a number and “c” represents a character. If the http://www.lifact.com 39 LightFactory V2 A Guide for Users Installing LightFactory Registration & Licensing supplied code does not have a serial number listed with it then you are likely to have a license code and must convert it to a registration to unlock the software. You can convert license codes into a valid registration either online or using the “Convert License to Registration” option. Both options require a connection to the internet. If you are using a dialup connection connect to the internet before continuing with the procedures below. Note: Information collected during the registration process will be passed on to Dream Solutions Limited, Auckland, New Zealand. This information is treated strictly confidential and will not be used for any purpose than software security. Contact details will not be passed on to any other parties or used for marketing purposes. To read our privacy statement please visit www.lifact.com To convert your license code over the web visit the site: http://www.lifact.com/convert_license.html Note: If you are using the web site to register the software you will need to know the serial number generated by the software. This number can be found in the registration tab of the system properties or in the about screen under the help menu. If you are using the built in conversion process outlined below you will not need the serial number information. 40 © 2004 - 2010 Dream Solutions Ltd Installing LightFactory Registration & Licensing LightFactory V2 A Guide for Users To use the built in conversion facility click on the “Convert License to Registration” button (Third button from the top). Figure 9: Convert License The above window titled “Register Software” will appear. Enter your details into the fields provided and click on the “Register Software” button. The fields in bold are mandatory and must be completed to register the software. http://www.lifact.com 41 LightFactory V2 A Guide for Users Installing LightFactory Registration & Licensing We recommend that you keep the “Print registration code” check box active to print a record of the resulting registration code. This will print on your default printer. When the conversion is successful the window will close and the registration code will be automatically entered into the correct fields of the previous window. Transferring a registration to another PC The registration code generated to activate DMX output in LightFactory uses the generated serial number to authenticate the system. The serial number is an internal number created when the software is first started. Note: This is not the serial number of your PC and only an arbitrary number generated for the purpose of registering LightFactory. To use the software on another computer you will need a new registration code as the PC will have generated a different serial number. The current PC must also be disabled as only 1 system can operate per license. To allow you to run the software on other PCs LightFactory provides the ability to transfer a registration from one PC to another. This process will generate the new code and disable the old in one simple process. Once the software is running click on the File menu and select System Properties. Click on the “Registration” tab and click on the button labelled “Transfer registration to new PC” 42 © 2004 - 2010 Dream Solutions Ltd Installing LightFactory Registration & Licensing LightFactory V2 A Guide for Users Figure 10: Registration Transfer In the box provided you must enter the generated serial number of the PC you want to transfer the registration to. Provided are two buttons to help get the number correct. You can click on the Past to insert the number from the windows clipboard or Import to load a registration file from the other system (See Importing and Exporting Registration Details; Page 43). Once you are sure you have entered the correct serial number from the other system click on the “Proceed” button to generate a new registration code. After the system has generated a new registration code it will create a new serial number for this system and the old registration code will no longer be valid. Enter the new registration code into the LightFactory system matching the serial number you just entered. To aid with this process you can click on the button “Save registration to file” and import the resulting file into the new system. Importing and Exporting Registration Details LightFactory provides the ability to store the registration information in a simple text file to keep as a backup or move between systems. To save the registration details click on the button “Save registration to file” and a save dialog will appear prompting for a file name. http://www.lifact.com 43 LightFactory V2 A Guide for Users Installing LightFactory Transfer registration to hardware Select an appropriate directory and filename and click “Save” to complete this operation. To load an existing registration file into LightFactory click on the button “Load registration from file.” A load file dialog will appear asking you to select the file to load. Click on the Open to confirm loading the registration. Generating a new serial number In a very rear case you may be required to generate a new internal serial number for the registration system. You should only do this if you have been asked to by LightFactory support staff as generating a new serial number on a registered system will de-register the software. If you have been asked to create a new serial number by our support staff, click on the button “Generate a new serial number”. A confirmation will appear warning you that the system will become unregistered. Click on the “Yes” button to proceed and a new serial code will be set in the system Transfer registration to hardware In some cases it may not be desirable for the registration to be locked to the PC you have installed on. You may want to work between several PCs but only require one to be registered at a time. To facilitate this LightFactory provides the ability to move your registration to the Enttec USB Pro or Cooper controls USB to DMX hardware. Note: The software does not currently support moving the registration to any other hardware. Once the registration has been moved to the hardware it is not reversible and you will need the USB interface connected to validate your system. If you have several devices then only one will hold your registration. It is recommended that you mark this device for future reference. Once you have moved the registration to the hardware the software will revert to demo mode (no DMX output) unless the hardware is connected. 44 © 2004 - 2010 Dream Solutions Ltd Installing LightFactory Transfer registration to hardware LightFactory V2 A Guide for Users If you are unsure about this feature please contact out support staff to answer any questions: [email protected] Once you have clicked on the button to move the registration a warning box will prompt you to confirm the operation. You will need to click on the check box “I have read and understand the conditions of this transfer” before proceeding. Hire Software Online LightFactory provides the ability to use a registered version of the product for a limited runtime. This can be useful if you want to try the software on a real show before purchasing or if you only need a lighting controller for limited application. The LightFactory hire system allows you to purchase runtime in 12, 24, 48, and 120 hour blocks. Note: The runtime is counted only when the software is running. If you close down LightFactory the time remaining will still be available the next time you start the software. If for example you still have 6 hours runtime remaining and you do not use the software for a week then when you start it up the 6 hours will still be available. You must have access to an internet connection to purchase runtime blocks. Runtime can be topped up before your time has expired. To hire LightFactory and purchase a block of runtime click on the button – “Hire Software Online” in the registration tab of the system properties. You can also access the hire dialog from the unregistered nag screen when the software starts. The following dialog will appear with further instructions for obtaining a runtime unlock code. http://www.lifact.com 45 LightFactory V2 A Guide for Users Installing LightFactory Transfer registration to hardware Figure 11: LightFactory Hire If you are connected to the Internet on this PC then you can click on the “Purchase unlock code now” button to be re-directed to a online sales form. The unlock serial number will be passed automatically to the web page. If you are not connected to the internet on this PC and want to purchase the unlock code from a different PC you will need to note down the current unlock serial number displayed in red on this window. Once you have noted the serial number you can enter this on the LightFactory web site: http://www.lifact.com/hire.html Once you have completed the purchase you will receive a unlock code that must be entered into the “Unlock Code” field provided. Entering a valid code will then add the purchased amount of time to the software. 46 © 2004 - 2010 Dream Solutions Ltd Installing LightFactory Installing DMX Hardware LightFactory V2 A Guide for Users Installing DMX Hardware Enttec USB DMX Pro Dongle Born from the Open DMX USB interface the PRO version is the ultimate USB DMX adapter for all computer based lighting needs. Features: • • • • • • • • • • • Micro processor enabled 1500 V full isolation (data & power lines to protect your computer from surges) 1 Input & 1 Output connector (there is only one DMX port though) RDM (talkback) compatible Internal frame buffering (will work on any PC) Universe & user config EEPROM Refresh Rate configurable from 1 to 40Hz Break configurable from 96uS to 1.3mS MaB configurable from 10.6uS to 1.3mS No Receive framing problems (compared to Open DMX USB) Upgradeable firmware Obtaining the latest drivers The drivers for the DMX USB Pro Dongle are contained in the driver directory of the LightFactory CD or can be downloaded directly from the Enttec web site. http://www.enttec.com/dmx_usb/vcom_setup.exe http://www.lifact.com 47 LightFactory V2 A Guide for Users Installing LightFactory Installing DMX Hardware Installing driver on Windows 98, 2000, XP 1. Run the program “vcom_setup.exe” before connecting any of the USB Pro devices. The install will notify you when the install is complete. 2. Click on the “OK” button to close this dialog and complete the installation. 3. Connect the USB-DMX Pro Interface to a free USB Port. 4. Your computer should immediately indicate that it has found some new hardware and the installation process should start automatically. If this does not occur then use the Windows “Add new hardware” or “Computer Manager” (Win 2K/XP) option in the control panel to manually install the drivers. 5. On windows 2000 and XP systems the driver for this device should be installed automatically and with only subtle warning balloons popping up in the task bar. Finally a message saying “your new hardware it setup and ready to use” will be displayed. Once you have seen this message then you are ready to start using the interface and you will not need to do anything further. Enttec Open USB DMX Dongle The open DMX USB hardware solution provided to the community by ENTTEC. 48 © 2004 - 2010 Dream Solutions Ltd Installing LightFactory Installing DMX Hardware LightFactory V2 A Guide for Users This DMX USB interface is based on the FTDI 232BM chip - a USB to serial converter. LightFactory can send DMX512 through these devices using the built in driver. Limitations: It is important to release that unlike other DMX interface devices the Open USB DMX hardware requires output to be generated by the PC and can be sensitive to the load and speed of the computer. If the computer gets busy or is too slow you may experience unreliable DMX output. We have tested these devices running only LightFactory on windows 98, 2000, and XP without any problems on any Pentium 4 computer. Obtaining drivers The drivers for the Open DMX USB Dongle are exactly the same as the DMX USB Pro device and can be found in the drivers directory of the installation CD or download from the Enttec web site; http://www.enttec.com/dmx_usb/ftdi_driver.zip Installing driver on Windows 98, 2000 and XP 1. Run the program “vcom_setup.exe” before connecting any of the Open USB devices. The install will notify you when the install is complete. 2. Click on the “OK” button to close this dialog and complete the installation. 3. Connect the Open USB-DMX Interface to a free USB Port. 4. Your computer should immediately indicate that it has found some new hardware and the installation process should start automatically. If this does not occur then use the Windows “Add new hardware” or “Computer Manager” (Win 2K/XP) option in the control panel to manually install the drivers. 5. On windows 2000 and XP systems the driver for this device should be installed automatically and with only subtle warning balloons popping up in the task bar. Finally a message saying http://www.lifact.com 49 LightFactory V2 A Guide for Users Installing LightFactory Installing DMX Hardware “your new hardware it setup and ready to use” will be displayed. Once you have seen this message then you are ready to start using the interface and you will not need to do anything further. Cooper Controls USB DMX interface The cooper controls interface is a compact USB to DMX device with all of the electronics embedded inside the XLR casing. • 1 Universe or 2 Universe versions available • Can be used as DMX Output or DMX Input, via adaptor cable (not supplied) • No heavy output box to trail around, all the circuitry is in the XLR connector The LightFactory installation will pre-install all of the drivers necessary to operate this device. To install simply connect the device to your PC. You will see a windows notification to say that new hardware has been found and that windows is installing this for you. Follow any onscreen instructions and wait for the a message to indicate that the hardware installation was successful before running LightFactory. 50 © 2004 - 2010 Dream Solutions Ltd Installing LightFactory Installing DMX Hardware LightFactory V2 A Guide for Users JESE DMX-TRI Interface The DMX-TRI is an advanced DMX512 and RDM controller for PC applications to control DMX512 and RDM equipment, providing the best all round solution on the market. The DMX-TRI is available as a full RDM controller with DMX512 or an RDM restricted version for DMX512 only. The RDM restricted version is available with the popular 3 Pin XLR or the standard 5 Pin DMX512 Connector. Restricted versions are upgradable to full RDM controllers with an access key, providing ultimate flexibility for the future requirements of RDM operability. When you connect the hardware to a USB port on your PC the DMX-TRI will run a self test, emitting a beep and flashing both mimics for one second as the unit powers up. The first time that the TRI is connected to a USB port on your PC the ‘Found New Hardware’ window will appear whilst the preinstalled driver is configured for the USB port. On completion of the above setup, LightFactory will be ready for use. http://www.lifact.com 51 LightFactory V2 A Guide for Users Installing LightFactory Artnet DMX on Ethernet No special installation is required to communicate with ArtNet DMX on Ethernet or DMXDongle2 devices. You must have a working Ethernet device to use this protocol. Enttec DMX on Ethernet No special installation is required to communicate with Enttec DMX on Ethernet (ESP) devices other than a working Ethernet interface on your computer. Pathport DMX on Ethernet No special installation is required to communicate with Pathway DMX on Ethernet (Pathport) devices other than a working Ethernet interface on your computer. 52 © 2004 - 2010 Dream Solutions Ltd Installing LightFactory Optional Hardware installation LightFactory V2 A Guide for Users Optional Hardware installation Installing Wings The Program, Playback and Shortcut wing is the perfect add on for LightFactory. The wing is Ethernet based and many devices can be connected letting the user customise his or her layout as they want. No special driver installation is required to communicate with the wing devices other than a working Ethernet interface on your computer. Firstly, you need to connect your wing and the computer running LightFactory. If you have an available Ethernet port on your computer, you can connect your Wing directly to your computer using a cross-over patch lead. If your Ethernet port is already in use, or you are using more than one Wing, you will need to connect the computer and the Wing/s to an Ethernet Hub or Switch using a standard Ethernet patch cable. Do not use power over Ethernet hubs or switches. Once you’ve connected the Wing and the computer the Link LED should light up immediately. If not, check the Ethernet cable you’ve used is the correct type (ie – cross over or straight through) and is http://www.lifact.com 53 LightFactory V2 A Guide for Users Installing LightFactory Optional Hardware installation in good working order, and the computer and hub/switch are functioning correctly. You may see the Activity LED blinking occasionally if there is activity on the Ethernet network. Make sure the wing is connected correctly and powered up. Start Light factory and go to the File->System Properties->External Wings Figure 12: System Properties, Wing Configuration The above screen will display the connected wings and any relevant information. In the event you see a warning on the screen, this is due to the fact the IP ranges of your computer and the wing do not match. This means for example that the wing would have an IP of 10.7.81.161 54 © 2004 - 2010 Dream Solutions Ltd Installing LightFactory Optional Hardware installation LightFactory V2 A Guide for Users and your computer 192.168.0.23. In this case both devices are not on the same subnet and cannot talk to each other properly. You can either change the IP of the wing to be in the same subnet as the computer, or change the IP of the computer to be in the same subnet as the wing. For example if the wing has an IP of 10.7.81.161 , you would set the computer to ip 10.7.81.1 with a net mask of 255.255.255.0 You can check your computer’s IP address by clicking on 'Start' then 'Run', type cmd (enter). This will open a command window, then type: ipconfig and press enter: Figure 13: ipconfig shell command output Using the wing The wing is automatically configured by light factory: • Playback wing, fader 1 on the wing is linked to fader 1 in light factory. • Shortcut wing, button 1 is linked to shortcut 1 in light factory. • The program wing will display the LightFactory command interface. Configuring the wing You might need to configure the wing to match the IP settings with the IP settings of your computer. To configure the wing, you can use any web browser such as Internet explorer, Firefox ... http://www.lifact.com 55 LightFactory V2 A Guide for Users Installing LightFactory Optional Hardware installation Type in the address of the node in the address bar like this: http://10.5.2.6 where 10.5.2.6 is the IP address of the Wing. By default , the IP address is 10.x.y.z where x,y and z are the last 3 bytes (the MAC address is in hexadecimal) of MAC/Serial number. Eg: For a MAC of 010203040506 the IP would be: 10.4.5.6 You can also find the IP address on the label situated in the box of the Wing. It should also appear automatically in the ‘External Wings’ window in ‘System Properties’ in LightFactory if it is connected properly. You can also click on the “Configure” button in the wing list to open your default browser and go directly to the configuration page. Once the address typed into your favourite web browser the main page will appear: Status Page The main page is the status page; it displays general information about the wing. DHCP Enable: Ticking this box will enable DHCP configuration of the IP address. You must have a DHCP server running on your network for this to work. If not, the node will wait for 60 seconds for a response then use the pre-configured IP address. During the DHCP timeout no DMX is sent or received. IP: This is the IP address that is used if DHCP is disabled. Saving your settings When you make a change to any setting, make sure you click on the update setting button on the bottom of the page. The change will take effect ENTTEC Wing User Manual 10 immediately but is not saved in non volatile memory. To save the changes permanently click on the SAVE link in the menu. Ergodex DX1 Input System The DX1 Input System includes a Pad, a removable Tray, 25 numbered Keys with a storage tray, pre-printed labels, an installation CD and a Quick Start Guide. The Pad connects to the computer via a USB cable. The pad contains two buttons. The button next to the Ergodex icon brings up the software at a single touch. The second button is a Record Button, which allows Macros to be assigned to Ergodex Keys. 56 © 2004 - 2010 Dream Solutions Ltd Installing LightFactory Optional Hardware installation LightFactory V2 A Guide for Users Ergodex Manager is the program that allows the DX1 Input System to work with your computer. It is responsible for storing all of your Macros and Key assignments for each program that you use with the DX1. It also monitors the currently active program you are using and switches to your assigned Macros for that program automatically. Ergodex Manager includes an intuitive graphical interface to manage all of your Macros. To install Ergodex Manager, close all open programs and place the Installation CD into your CD-ROM drive. If you have auto-run enabled on your computer, the installer program should load after a few moments. If the installer program does not load automatically, run "Install.exe" from the Installation CD. When the installer program loads, click on "Install Software" and follow the on-screen instructions to install Ergodex Manager. During the installation, you will be prompted to plug in your DX1 Pad. When asked, plug the USB cable into one of your computer’s powered USB ports. For Window® XP After plugging in the Pad, the Windows® "Found New Hardware Wizard" will open. (If Windows® Update is enabled, you will start at Screen 1, otherwise you will start at Screen 2.) Note: Windows® XP manages each USB port separately. Windows® XP will require that you go through this installation process each time you plug the DX1 Pad into a new USB port on your computer. For Windows® 2000 Windows® 2000 will load the DX1 Pad automatically after you install Ergodex Manager and plug in the USB cable. Verify Install http://www.lifact.com 57 LightFactory V2 A Guide for Users Installing LightFactory Optional Hardware installation Once the installation is complete, an Ergodex hand icon will appear in the Windows® System Tray (usually in the lower right-hand corner of your Windows® Desktop). This icon shows the connection status of the Pad. A blue hand icon indicates the Pad is properly plugged into your computer. If the Pad is plugged into your computer and the Green Light is on, you are ready to use your DX1 Input System. XKeys X-keys provides a clearly labelled, physical input for shortcuts and special functions so you don't have to think about them. Insert the included disk in your CD ROM drive and follow the instructions to install X-keys Macro Works Software. This software is required to program and operate the X-keys USB device. Please view the Readme file on the installation disk for the latest notes on installation and operation of the software. Should you encounter difficulty installing any of the X-keys products, please check the troubleshooting guide on the web site: www.xkeys.com. If this does not resolve the issue, please E-mail the technical support department: [email protected] or call: (517) 655-5523. 58 © 2004 - 2010 Dream Solutions Ltd Quick Start Optional Hardware installation LightFactory V2 A Guide for Users Quick Start To get you started using your LightFactory system, the following describes a few quick examples of controlling a lighting system. Using the channel window Patching a moving light Controlling a moving light Creating a basic cue list This quick start guide can be used on both a registered and unregistered system. The only difference being that an un-registered system will not output DMX. When the software is started, the “Command Interface” window is displayed and the system is ready to go. On start-up, the software will interrogate your computer and attempt to auto detect any USB hardware you may have connected. In this example, the software is setup to output to the Cooper Controls USB to DMX interface and three universes of ArtNet. Regardless of the dimmers found the software will initially create 500 desk channels that will be patched 1:1 with the available dimmers (The number of desk channels can be increased in the system properties). If you are using different DMX hardware with the system see “System” Page 91 for information about setting the output type. LightFactory will always remember the last lighting state that was used and will automatically load the current show. If you start the software and find channels already active then this is because it is the state when the software was last shutdown. http://www.lifact.com 59 LightFactory V2 A Guide for Users Quick Start Using the Channel Window Note: Make sure that the grand master (GM) is at full for all examples used in this section. T T Using the Channel Window The channel display window is the main access to all of the channels and fixtures that are connected to the software. It allows you to modify the output of a channel, control the attributes of intelligent fixtures and record to the various functions of the software. 1. Open the channel window by clicking on the “Channel Display” button at the bottom of the command interface or by pressing F2 on your keyboard. Figure 14: Channel Window If this is the first time you have used the software you should see the window above displayed on your screen. Each channel in the system is represented by a cell in a two dimensional grid. The grid will try to fit as many channels across as it can and so resizing the window will allow you to see as many channels as possible. If you prefer to have a fixed number of channels across the screen you can set this in the system properties. 2. A standard Windows scroll bar on the right-hand side can be used to scroll through the non-visible channels. If you do not 60 © 2004 - 2010 Dream Solutions Ltd Quick Start Using the Channel Window LightFactory V2 A Guide for Users have any channels selected you can also use the scroll wheel on your mouse to scroll through the channels. 3. Select channel 1 by left clicking on it with your mouse. You will notice that the cell changes colour to a pale blue. 4. Now click on channel 3 and notice that this cell also changes colour. By clicking and “selecting” these channels, we have told the software what it is we want to work with. We can now issue commands to these channels. 5. On your keyboard, enter @30 and press enter. As you enter the numbers, you will see them appear in the command line editor box of the main window. As soon as you press “enter” this text will disappear and the selected channels will now have a value of 30%. The lights connected to those channels should now be displaying 30% of their maximum output. 6. Un-select channel 1 by clicking on its cell with the left mouse button. You will see that the cell is now highlighted green. This indicates that the channel is not selected but is active. Note: An active channel is any channel with an output value above 0. T T 7. With channel 3 still selected, move the scroll wheel on your mouse up one click you should see the value increase by 5% to 35%. The mouse scroll wheel is a convenient way to control the intensity of selected channels when the exact value you want is unknown. Note: If you do not have a scroll wheel on your mouse, use the + and – keys as replacements. T T Channels can also be selected in large numbers by holding the mouse down and dragging it over the channels you want 1. Click on channel 5 and hold down the mouse button 2. Now drag the mouse over to channel 7 and release the button. You should now see channels 3, 5, 6 and 7 all selected. http://www.lifact.com 61 LightFactory V2 A Guide for Users Quick Start Patching a Moving Light 3. Move the scroll wheel up and down and notice that all of the selected channels increase or decrease by 5% with every movement. Patching a Moving Light To use the channel window for controlling a moving or intelligent light we first need to tell the software where and how the fixture is patched into the DMX chain. In this example we have a Martin MAC 250 Entour that is running in extended mode with its starting address set to 26. 1. Open the patching window by clicking on the “Dimmer Patching” button at the bottom of the command interface or press the F7 key on you keyboard. T T Figure 15: Dimmer Patching Window 2. Below the label “Available Fixtures” near the bottom of the window you will see a list of manufacturers of lighting fixtures and devices. Expand the “Martin” brand by clicking on the small plus (+) to the left of the name. You should then see the complete list of the Martin fixtures contained in the fixture library. 62 © 2004 - 2010 Dream Solutions Ltd Quick Start Patching a Moving Light LightFactory V2 A Guide for Users 3. Click on the fixture labelled “MAC 250 Entour (Enhanced)” and notice that the picture on the right-hand side has changed to show your selection. 4. Move the mouse over the “Dimmers” section of the window and notice that as you move the mouse the 18 dimmers trailing your mouse are highlighted. This shows that the fixture we have selected uses 18 dimmers to control it and that we should consider these reserved for this light. 5. Move the mouse over dimmer 26 (our starting address) and click and hold down the left mouse button. Drag the mouse over to the left hand side of the window and over channel 6. When you release the mouse button you will see that the details column of channel 6 now displayed “MAC 250 Entour (Enhanced) @ 26”. This shows us that a MAC 250 is patched with the starting address of 26. See Figure 15. 6. Click on the options menu and select “Save patch & Close window” from the popup menu that appears. Alternatively you can close the window with the X in the top right hand corner and the software will prompt you to save your changes. The dimmer patching window is the only place in LightFactory where you specifically need to save your work. In all other windows the changes are automatically saved with every change. Note: You will notice that dimmer 6 is now “unpatched”. This is because channel 6 that use to be patched to dimmer 6 is now holding the Mac 250 we have just patched. Also channels 26 thought to 43 are now blank and do not contain any patch information. This is because the dimmers that where patched to these channels are now in use by the Mac 250 that we just patched. LightFactory will allow you to overlap patch information but by default it will assume this undesirable and automatically unpatch the channels for you. T http://www.lifact.com 63 LightFactory V2 A Guide for Users Quick Start Controlling a Moving Light We are now ready to use this fixture in the channel window as desk channel 6. To patch other moving lights, simply repeat the procedure above patching each light into the desired channel. Note: You can patch multiple fixtures of the same type all at once by changing the quantity (Qty) number in the available fixtures section of the window. T T Controlling a Moving Light This section assumes that you know how to open the channel window (see page 60) and have already done the example above in “Patching a Moving Light” (page 62). 1. Open the channel window again (if not already open) and click on the “Clear Selection” button along the top of the window. You will now have only the channels that are active highlighted. 2. Have a close look at channel six and notice that the content of the cell has changed. It is now labelled “Fixture: 6” and below the label is the name of the fixture followed by its attributes. 3. Click and select channel 6 and as well as highlighting the cell. The fixture control window will appear and attach itself to the right-hand side of the channel window. Figure 16: Channel Display window showing fixture control The “Channel Control” window can now be used to modify the attributes of the moving light and is separated into three groupings of Position, Colour and Beamshape. The groupings 64 © 2004 - 2010 Dream Solutions Ltd Quick Start Creating a Basic Cue List LightFactory V2 A Guide for Users are tabs that allow you to switch between the groups of attributes you what to modify. If a different type of fixture is used then the grouping may be different. On the “Position” tab you will see a picture of the luminare you have selected as this makes the background for the primary pan and tilt control. Click and drag the mouse around this picture to change the pan and tilt values of the fixture in the channel window. If the fixture is physically attached to the system the changes will immediately take effect and you will see the fixture move. Only the controls that are applicable to the selected fixture will be shown in the fixture control window however if you select multiple fixture types then a generic control window will be displayed. This generic window may have attributes shown that the fixture is not able to do. The software will always try to apply the generic attribute to the best of its ability based on internal logic. For example if you choose a colour from the colour picker and the fixture only has a colour wheel (rather than colour mixing capabilities) the software will find the closest match to the colour chosen. 4. To control the dimmer of intelligent fixtures follow the same procedure for standard dimmers. Click on the “Channel View” window and either enter the desired value or use the scroll mouse to dim the light up and down. Creating a Basic Cue List A basic cue list is a series of cues each containing a specific lighting state or scene. The transition between each lighting state can also be defined to control the timing of how the cue plays back. Note: LightFactory allows you to create multiple cue lists and play back multiple cue lists at the same time. For this example we will focus on a single cue list. Also, in this example we are not covering the use of the effects engine, but only basic cues. T T In the show we are going to create we will have three different scenes and will only use the first 12 channels. The table below shows the three cues and their contents. In this show, the cues http://www.lifact.com 65 LightFactory V2 A Guide for Users Quick Start Creating a Basic Cue List transition from a very bright scene to a very dim scene and then back to a bright scene again. We have also use the moving light that we patched into channel 6 and placed it at a specific position for each scene. Cue 1 2 3 Channel Value 2 80% 3 80% 6 100%, 128X, 27Y 1 20% 6 30%, 128X, 200Y 7 20% 11 20% 8 100% 9 80% Table 2: Basic Show Cues Example Before we create these simple cues in LightFactory, open the channel window (see “Using the Channel Window” on page 60) and set all of the fixtures back to zero so that no channel is active. Do this by clicking on the button “DBO/Clear” at the top right of this window. The channel display will now look as it did when you first started with all the channels having a white background (not highlighted). We are now ready to start programming the show. Creating Cue 1 1. Click on channel 2 and 3 to select them and then type @80 on your keyboard and press enter. The selected channels should now be set to 80%. 2. Clear the selection of these channels and double click on channel 6 to bring it up to 100%. Because channel 6 is an intelligent fixture, the “Channel Fixture Properties” window will automatically appear. Set the pan and tilt to the desired location using the control described above (“Controlling a Moving Light” on page 64). 3. Once you have set the desired scene, click on the “Record Cue” button. 66 © 2004 - 2010 Dream Solutions Ltd Quick Start Creating a Basic Cue List LightFactory V2 A Guide for Users 4. The “Create new cue” dialog box will be displayed. LightFactory will automatically pick the active cue list (If you have just installed then this will be the only cue list) and set the cue number to the next available cue. Press the “OK” button to record this cue. The cue has now been recorded with the active channels in their current state. Creating Cue 2 1. Select channels 2 and 3 and set their value back to zero. 2. Now select channels 1, 7 and 11 and set all their values to 20%. 3. Click on the “Clear Selected” button and then click on channel 6 only. Bring its intensity back to 30% by either typing @30 on your keyboard or using the scroll wheel. 4. In the “Fixture Control” window set the new position that you want the fixture in for cue 2. http://www.lifact.com 67 LightFactory V2 A Guide for Users Quick Start Creating a Basic Cue List 5. Now that the second scene is set, click on the “Record Cue” button again. Alternatively you can use the keyboard shortcut control-c to perform the same operation. 6. In the resulting “Create New Cue” dialog, cue 2 should already be set in the “Cue” edit box. If this is not the case, enter the number 2 and press the “OK” button. Creating Cue 3 1. Click on the “DBO/Clear” button to reset all channels back to dimmer levels of 0. 2. Double click on channel 8 to bring it up to 100%. 3. Unselect channel 8 and select channel 9. Set the value of channel 9 to 80%. 4. Now that the third scene is set, click on the “Record Cue” or press control-c. 5. In the resulting “Create New Cue” dialog, cue 3 should already be set in the “Cue” edit box. If this is not the case, enter the number 3 and press the “OK” button. The Cue List Editor To view the newly created cue list, open the “Cue List Editor” by clicking the button on the command interface or by pressing F4 on your keyboard. Figure 17: Show Editor Window This window will show the three cues we just created, and we will see in the channel field the fixtures we selected. 68 © 2004 - 2010 Dream Solutions Ltd Quick Start Creating a Basic Cue List LightFactory V2 A Guide for Users Setting the transition between cues In this example, we have decided to apply the following transition between each cue. 1. Cue 1 will fade in slowly over 5 seconds 2. Cue 1 will fade out in 2 seconds 3. Cue 2 will then fade in quickly (1 second) 4. Cue 2 will fade out in 3 seconds while cue 3 fades in. To apply these rules, we need to set the fields on the right-hand side of the window. 1. In the row for cue 1, enter the number 5 into the field labelled “Fade In” and the number 2 into the field labelled “Fade Out”. 2. We do not want cues 1 and 2 to cross fade, so we need to set a delayed start on cue 2 of 2 seconds. This will cause cue 2 to wait the same length of time it takes cue 1 to fade out. In the row for cue 2, enter the number 2 in the field labelled “Delay” and enter a 1 into the field “Fade In”. 3. For cue 3 we do want a cross fade so we can set the “fade out” of cue 2 to 3 seconds and the “fade in” of cue 3 to 3 seconds. The right-hand fields should now be set as per Figure 18 below, Figure 18: Basic Cue List Example, Fade In, Fade Out, and Delay settings Running the show We are now ready to run our show for the first time and see the result of the procedure above. If you have a real lighting rig connected to the system, you should see the result apply to your dimmer system. If you do not have any dimmers connected, use the “Channel Display” or “Raw DMX View” to see the output. http://www.lifact.com 69 LightFactory V2 A Guide for Users Quick Start Creating a Basic Cue List If the start cue (cue 0) is not highlighted in green as shown in Figure 18 above, select it as the starting cue by double-clicking on its row. In this example, we have chosen to leave this cue blank without any fixtures set. There is no reason not to use this cue other than to have a blacked-out state when the show begins. Along the bottom of the cue list editor are the playback controls for the currently selected cue (highlighted in green). Figure 19: Cue Playback Controls Press the “Cue Go” button and notice how channels 2, 3, and 6 slowly fade from zero to their set values over a period of 5 seconds. Once this cue has finished, (A progress bar in the status field of the cue list grid will show when the cue has finished execution) click the “Cue Go” button again to go from cue 1 to cue 2. This time cue 1 will fade out, then cue 2 will slowly fade in. The current cue will always be highlighted in green and you will notice the green line following the cue execution At any time we can return to the previous cue by clicking on the “Cue Back” button and can stop a cue execution (i.e. Fade In) by clicking on the “Cue Stop” button. Note: A show can be run either via the Show Editor as per the example above, or via the Show Runners. 70 © 2004 - 2010 Dream Solutions Ltd Reference/Window Overview Command Interface LightFactory V2 A Guide for Users Reference/Window Overview Command Interface The LightFactory command interface is the first window you are presented with when you start the software. This window is where you can access all of the other features in the software such as the cue lists or effects editor. The grand master (GM) on the right-hand side of the window provides overall control of all fixture intensity levels. Figure 20: Command Interface Window The command window can be conveniently attached to the bottom task bar of your windows environment to make it easy to access regardless of how other windows are arranged. Select the “Attach to task bar” in the “Options” popup menu to activate this option. When the software is restarted it will remember the setting and always run attached or detached from the task bar. Clicking on the cog icon to the left of the command entry edit box will turn on or off the command history part of the window. When used in conjunction with the “Attach to task bar” option you can create a thin window at the bottom of the screen to easy access. Cog icon used to turn on or off the command history http://www.lifact.com 71 LightFactory V2 A Guide for Users Reference/Window Overview Command Interface The command window also allows you to control your lighting system using a basic text interface. Traditional lighting desks have provided a command interface as a means to access large numbers of channels where individual buttons or faders were impractical. It may seem antiquated to include a command interface in LightFactory because it has the flexible channel window providing access to thousands of channels from one simple screen, but this is far from true. Once familiar with the command structure the command interface can be a very quick and powerful way of setting up scenes during complex programming sequences. Note: It is also useful to learn the command structure because you can enter the channel selection syntax anywhere you wish to enter a large number of channels. e.g. the Cue List Editor. You can also enter command directly from the channel display without having to shift focus back to the command window. As soon as a key is pressed in the channel display it will appear in the command edit box. T Command Structure The following commands can be entered into the edit box provided along the bottom left of the window. To execute any command simply press enter or click on the “Execute” button to the right. Some commands will execute automatically without needing to press the enter key. This is the case where the last item typed is identified as the last valid character in the line. For example the command “@@” will set the selected channels to full. There is nothing that can be entered after the second @ so the types syntax is considered complete and will execute without needing to press the enter key. Once a command is entered, it will automatically appear in the text box above. If the command was successful, the command will be preceded by “Success” in green text. If the command is followed by the word “Failed” in red text then nothing will happen as the 72 © 2004 - 2010 Dream Solutions Ltd Reference/Window Overview Command Interface LightFactory V2 A Guide for Users software did not recognise the command you entered or a mistake was made in the command syntax. Command History LightFactory displays the last 100 commands entered in the text box just above the command entry edit. To re-process or review any command, simply double-click on the line and the command will reappear in the command entry edit. The command will not execute until you press enter or click on the “Execute” button. This enables you to edit the command before resubmitting it for processing. Note: Commands in the history text box can also be retrieved into the command entry edit using the up and down arrow keys on your keyboard. Pressing the up arrow will cycle through the last 100 commands starting with the last command entered. The down arrow will scroll back through commands you have passed with the up arrow. T T Channel Commands All commands take the following format. The square brackets ([]) indicate optional syntax. [+ or -] Channels [Attribute] @ [DMX] Value [time Value] Channels T T A list of all of the channels you want to apply some change to. Each channel is separated by either a comma (,) or plus (+). A range of channels can be entered using the word “through” or the forward slash (/) symbol between two values. Channels can be removed form a selection using the minus (-) key. If you enter a channel list only the software will select the channels in the channel view. If the channel view is not visible it will be opened and brought to the front of your screen. If you are selecting channels by not entering the “@ Value” on the end of the command then you can add a + or a – to the front of the text to add or subtract from the currently selected channels. http://www.lifact.com 73 LightFactory V2 A Guide for Users Reference/Window Overview Command Interface Additional to the above selection technique you can use the keyword “THRU ON” to select only channels with in a range that are currently active. Examples U 1,2,3,7,19 / 33 … Will select the channels 1, 2, 3, 7, and will also select channels 19 through to channel 33. 1+2+3+7+19/33-21 … Will also select channels 1,2,3,7 and channels 19 through to 33 with the exception of channel 21. -3 / 10 … Will remove channels 3 through to 10 from the current selection. 1 thru on 20 … Will select the active channels between 1 and 20. Attribute This section allows you to access generic attributes of fixtures that you have selected. By default, the software will operate on the dimmer as it is assumed that all fixtures have this function (Not always true). The following attributes can be entered: PAN, TILT, COLOR, GOBO, GOBO R, CONTROL, EFFECT, ZOOM, DIFF, IRIS, EDGE, FOCUS, STROBE, COLOURIDX, GOBOIDX Some of these attributes can accept a number following the command to access features where more than one of an attribute exists. E.g. Some intelligent fixtures have more than one colour wheel. If a command is entered with the word COLOR then colour wheel 1 is selected by default. To select colour wheel 2 the command should read COLOR2 Example To access the gobo wheel 2 on the fixture patched to desk channel 24 through to 30, we could use the command: 24 / 30 gobo2 @ … 74 © 2004 - 2010 Dream Solutions Ltd Reference/Window Overview Command Interface LightFactory V2 A Guide for Users Note: When fixture attributes are used in the command line the value entered is a real world value that is logical to the attribute selected. The gobo command for example will take a number corresponding to the gobo index you want to select. Another example is the zoom attribute that take beam angle (degrees) as its value. To address the dmx values enter the word “dmx” after the @. T Value T T The value you want to set the fixture or fixture attribute to. If standard dimmers are selected, the value will set the dimmer to the entered value as a percentage of full. Accepted values for standard dimmers can be any integer number between 0 and 100. If the selected channel is an intelligent fixture then the software will apply the value to the dimmer property unless a different attribute is specified. Example U 1+2+3+7+19/33 @ 25 This will set channels 1, 2, 3, 7 and channels 19 through 33 to 25% of full. DMX keyword T T The DMX keyword can be placed in front of the desired value to enter a number between 0 and 255 representing the real DMX output level. Example U 1+2+3+7+19/33 @ DMX 125 This will set channels 1, 2, 3, 7 and channels 19 through 33 to output 125 on the DMX line. Rem Dim The Rem Dim keyword can be used to set channel to a value exclusively. Channels not in the selection list will be turned off or blacked out. http://www.lifact.com 75 LightFactory V2 A Guide for Users Reference/Window Overview Command Interface Example U 1+2+3+7+19/33 @ rem dim 30 This will set channels 1, 2, 3, 7 and channels 19 through 33 to 30% and turn off all other channels. Time {fade} Value With any command an optional fade time can be specified. This will determine how long the channels will take to get from the current value to the new desired value. You can use the keyword “fade” or “time” with this directive. The fade/time directive will also be apply to fixture attributes. The syntax is in the format; fade X – where X is any real number representing the time in seconds. The keyword can also be shortened to just the letter “f” followed by the time in seconds that you want to fade. Example U 24/30 zoom @ 23 fade 2.4 This will set the zoom property of fixtures 24 through to 30 to 23 degrees and will take 2.4 seconds to reach this value from the current zoom attribute value. Note: When working with intelligent fixtures such as the one in this example, the term “fixture” replaces the term “channel” in LightFactory. On, Off, Solo, Full, @@ The On, Off, Solo and Full commands can be used to replace the channel value. Setting channels to “Off” will set the dimmer or attribute value to 0. Setting the channels to “On” will set the dimmer or attribute to the on level specified in the system properties. Setting the channel to “Solo” will turn off all other channel while turning on the selected channels. Setting the channel to “Full” will set the dimmer or attribute to 100% 76 © 2004 - 2010 Dream Solutions Ltd Reference/Window Overview Command Interface LightFactory V2 A Guide for Users @@ is a special command that can be used to quickly set the channels to the “On” level. When using the On, Off, Solo and Full keywords you do not need to enter the @ symbol prior to the command. Example 3+6/9 On This will set channels 3 and 6 through to 9 to the on level. PALETTE The palette command is used to reference the value stored in a palette. The value entered after the “Palette” keyword is the palette number to apply. The palette numbers are displayed in the “Palette” window. Example 6/9 color @ palette 2 This will set the colour of channels 6 through to 9 to the colour defined in palette 2. Other Commands Clear (clr) Use the clear function to unselect channels and clear the channel display. Entering the clear command on its own will clear all channels. Optionally you can put a channel list after the clear command to clear only the listed channels. Example clr 1/20 The above command will unselect the channel 1 through to 20. BO (Blackout) Use the blackout command to release channels. Entering the blackout command on its own will release all channels. Optionally you can put a channel list after the backout command to release only the listed channels. http://www.lifact.com 77 LightFactory V2 A Guide for Users Reference/Window Overview Command Interface Example Bo 1+4 The above command will release channels 1 and 4. CONNECT The connect command is used to connect to another remote LightFactory system. This is useful for controlling multiple systems from a single master. Connect {ip address/machine name} Establishes a telnet connection with another LF system. Example Connect 192.168.1.19 The above command will connect to a LightFactory system running on IP address 192.168.1.19. If the connection fails a message in the command line history will be displayed. SEND & SENDTO Once connected to a remote LightFactory system commands can be sent using the “SEND” and “SENDTO” command. Send {command} Send the command to the first connected LF system Sendto {All/remote system} {command} Send the command to a specific remote system or all remote systems. Example Sendto All 1/40@80 The above command will execute the command “1/40@80” on all the remote system that the software is currently connected to. DISCONNECT Use the disconnect command to finish communication with a remote system. 78 © 2004 - 2010 Dream Solutions Ltd Reference/Window Overview Command Interface LightFactory V2 A Guide for Users Disconnect Disconnects all connections to remote systems Disconnect {ip address/machine name} Disconnects a specific remote system Example Disconnect 192.168.1.19 The above command will close the connection with the remote LightFactory system on 192.168.1.19. Load & SAVE Both the load and the save commands can be used for a dual purpose. Load {Path + Filename} Save {Path + Filename} If the file name entered has an extension of “.FDB” then the software will save and load the current show. If the filename extension is not “.FDB” then the system configuration and screen layouts will be saved. Example Save “c:\demo\my show.fdb” The above command will save the current show under the name “my show.fdb” in the “c:\demo” directory. Load “c:\demo\my show.fdb” The above command will load the show “my show.fdb” in the “c:\demo” directory and make it the current show. For more information on loading and saving show see Options menu (Page 87). UNDO The undo is used to revert back to the previous state prior to a command being entered. http://www.lifact.com 79 LightFactory V2 A Guide for Users Reference/Window Overview Command Interface RECORD {REC} The record command can be abbreviated to “Rec” to save typing. Entering the record command followed by enter will popup the “Record Cue” dialog that is used in the channel display when pressing the “Record Cue” button. REC {CUE, FX, GROUP, SUB} {additional information} If the record command is followed by the keywords CUE, FX, GROUP, SUB then the syntax is the same as if the “REC” is placed at the end of the command line. For more information see the CUE, FX, GROUP and SUB sections below. Entering the record command at the start of the command line is useful if you do not want the command to execute automatically. Entering REC at the end of the command line text will cause the command to execute automatically. RECN {desc} {fade in} {fade out} {follow} {delay} {dwell} Short for “Record Now” the “RECN” command will execute a silent cue record without any further interaction. All of the fields are optional and you can add as many or as few of the option as you need. Desc – Cue Description Fade in – Fade in/up time in seconds Fade out – Fade out/down time in seconds Follow – Follow time in seconds Delay – Cue delay time in seconds Dwell – Cue dwell time in seconds. Example Recn “Sunrise to sunset” 20.6 5 The above command will record the current channel state to a new cue at the end of the active cue list. The cue description will be set to “Sunrise to sunset” and the fade in time is 20.6 seconds and the fade out time is 5 seconds. UPDATE {UPD} The update command can be abbreviated to “Upd” to save typing. 80 © 2004 - 2010 Dream Solutions Ltd Reference/Window Overview Command Interface LightFactory V2 A Guide for Users Use the update command to update an existing cue to modify or replace the cue. Entering the “Update” command on its own will immediately update the current live cue with the current channel state. GROUP {GRP} The group command can be abbreviated to “Grp” to save typing. This command has several functions and can be used to set a channel group to a specific level or to record and update a group. GROUP {number list} @ {value} The above syntax can be used to set a channel group to a specific value. Any number of groups can be applied and the same syntax as selecting channels is used as the number list. Example Grp 1,3,8 @ 50 The above command will set the channel groups 1, 3 and 8 at 50%. GROUP {number, name} {SELected} RECord To record a new channel group use the “Record” keyword at the beginning or end of the command. By default the active channels will be recorded but by adding the “Selected” keyword the currently selected channel will be recorded. Example Grp “Back lights” sel rec The above command will create a new group or add to the existing group called “Back Lights” and add the currently selected channels. GROUP {number, name} {SELected} UPDate To update a channel group use the “Update” keyword at the end of the command. Only the channels that are currently in the group will get updated. Example Grp “Back lights” Upd The above command will update the existing group called “Back Lights” with the current channel state. http://www.lifact.com 81 LightFactory V2 A Guide for Users Reference/Window Overview Command Interface FX The effect (Fx) command is used to record chase steps into a simple chase. This command can only be used to add steps to the chase and cannot be used to modify an existing step. For more advanced chase editing it is recommended that the “Fx Editor” is used. FX {number, name} {SELected} REC Example Fx “chase 1” rec The above command will record the current channel state into the next step of the simple chase called “chase 1”. SUBMASTER {SUB} The submaster command can be abbreviated to “Sub” to save typing. This command has several function depending on the text entered after the “Submaster” keyword. SUB {number list} @ {value} The above command can be used to set a submaster or list of submasters to specific value. Any number of submasters can be applied and the same syntax as selecting channels is used as the number list. Example Sub 1/4 @ 23 The above command will set submasters 1 through to 4 at 23%. SUB {number} {SELected} REC The above command will create a new channel group and automatically assign the submaster identified by the {number} to it. The “Selected” keyword can be used to record only the selected channels. Example Sub 4 rec The above command will create a new channel group and 82 © 2004 - 2010 Dream Solutions Ltd Reference/Window Overview Command Interface LightFactory V2 A Guide for Users add the currently active channels to it. It will also assign submaster 4 to the new channel group. SUB -/+ or SUB PAGE {number} Use the above commands to set the current submaster page. Enter a + or a – after the submaster keyword will increase or decrease the current page. Entering a number after the keyword will jump to the specified page. SHORTCUT {SC} The shortcut command can be abbreviated to “SC” to save typing. Use the shortcut command to execute the desired shortcut. Cue The “cue” command can be used to execute cues in the system or record new cues. CUE PLAYBACK {Playback number} {cue number, GO, STOP, BACK, RESET} The above command will execute a cue on a specific cue playback. You can either enter a specific cue number or use the keywords GO, STOP, BACK, and RESET to control the playback. Example cue playback 2 go This will execute the next cue on playback 2. CUE {Cue List} {Cue Number, GO, STOP, BACK, RESET} The above command will execute a cue on the master playback in the “Cue List Editor” window. You can optionally enter a different cue list, cue number or use the keywords GO, STOP, BACK, and RESET to control the playback. Example cue “Act 1” go This will execute the next cue on the cue list “Act 1” if this cue list is not the active cue list then it will become the active cue list and the first cue will be executed. cue “Act 1” 3.4 This will execute cue 3.4 on the cue list “Act 1”. http://www.lifact.com 83 LightFactory V2 A Guide for Users Reference/Window Overview Command Interface CUE {Cue List} {Cue Number} {desc} {fade in} {fade out} {follow} {delay} {dwell} {SELected} REC This command will execute a silent cue record without any further interaction. All of the fields are optional and you can add as many or as few of the option as you need. Cue List – The name of the cue list to record to. Cue Number – The cue number to record Desc – Cue Description Fade in – Fade in/up time in seconds Fade out – Fade out/down time in seconds Follow – Follow time in seconds Delay – Cue delay time in seconds Dwell – Cue dwell time in seconds. Selected – Record only the selected channels to the cue. Example Cue “Act 1” 5.3 “Sunrise” 5 The above command will record the active channels into cue 5.3 of the “Act 1” cue list. If the cue list does not exists it will be created. Also if the cue does not exists it will also be created. The recorded cue will be given the description “Sunrise” and have a fade in time of 5 seconds. If the cue already exists then the parameters not entered in the command will remain unchanged. Macro The macro command can be used to execute any of the macros added to the show. The syntax for this command is Macro <macro Name> Enter the word “macro” followed by the name (or part name) of the macro you want to run. As soon as you enter the command the macro will execute. This command can be shortened to “M <macro name>”. Example M “Reset Movers” The above command will execute the macro called “Reset 84 © 2004 - 2010 Dream Solutions Ltd Reference/Window Overview Command Interface LightFactory V2 A Guide for Users Movers” if it exists. If a macro does not exists the command will fail. Fade The “Fade” command can be used to set the master fade time for the system. The master fade time can be seen on the main command interface just to the right of the execute button. The syntax for this command is Fade <time in seconds> E.g. fade 3.4 Scrollto The “Scollto” command can be used to bring a specific channel into view in the channel display window. This command is useful in conjunction with the quick macro feature in the shortcut window. By creating a quick macro to scroll the channel display to a specific place you can easily jump to any channel when working with a large number of fixtures. The syntax for this command is Scrollto <channel number> E.g. scrollto 115 Shortcut Use the Shortcut command to execute a shortcut, enable or disable a shortcut. The shortcut command can be abbreviated to “SC”. Example SC 2 This will execute shortcut number 2. SC disable This will temporally stop the shortcut from being executed. http://www.lifact.com 85 LightFactory V2 A Guide for Users Reference/Window Overview Command Interface Master Fade Time The master fade can be set for all channels by entering a value into a fade edit box to the left of the shortcut controls. Once you have set the desired fade all changes made to the fixture will apply over this time. The default fade time specifies the time a channel will take to get from its current value to the new value. Internally this value will be overridden by the show and effects controls so it is not necessary to have the default fade at zero when running shows. 86 © 2004 - 2010 Dream Solutions Ltd Reference/Window Overview Command Interface LightFactory V2 A Guide for Users Options menu The options menu is at the bottom left of the command interface, accessible by clicking on the word “Options” with your mouse. There are 13 options in the file menu: Create new blank show – Creates a new blank show file on the hard drive and loads this as the current show. T Open a saved show – Opens an existing show file form the hard drive into memory as the current show. T T Open a server based show file – Opens an existing show file from a firebird server for multi user access. Save a copy of this show – Saves a copy current show to the hard drive with a new name and then makes the new copy the current show. T System Properties – a series of options allowing you to configure hardware, database, default settings, and change your licensing information. T T External Triggers - this feature allows you to set up shows that run without user interaction. T Scheduled Tasks – Virtually all functions within LightFactory can be scheduled to execute automatically at set times. User Permission – Use this feature to control access to various functions by a user name and password. Language – A sub menu will appear when you click on this option. The submenu will display a list of languages that the software can operate in. Open user guide – Opens this document. Registration – Opens the system properties to the registration tab. About LightFactory – Shows the about screen for copyright message. Attach to task bar – Select this option to dock and undock the command window from the task bar. Exit – Close LightFactory. See the following pages for full details about each of these options. http://www.lifact.com 87 LightFactory V2 A Guide for Users Reference/Window Overview Command Interface Create a new blank show This option will create a new show file and load this as the current show. The show that was loaded will remain unchanged and all new programming and patching will be stored in the new file. This option can be likened to the “New” option in a word processor. When selecting this option a standard widows save dialog will prompt you for the file name to save the new show under. The new show file will be given an extension of “.FDB”. Enter the name for your show file in the “File Name” field and click save to proceed with creating the show. Open a saved show When you start-up LightFactory, the “current show” will be loaded automatically. Any programming or changes made will be applied and saved to this “Current Show”. Opening a saved show will make the selected show file the “Current Show”. This can be likened to the “Open” option in a word processor. A standard windows “open file” dialog will appear when this option is selected. Note: LightFactory always has the “current show” loaded. All changes made to the system such as creating a new cue or effect is automatically saved to the current show. T 88 © 2004 - 2010 Dream Solutions Ltd Reference/Window Overview Command Interface LightFactory V2 A Guide for Users Open a server based show file LightFactory can connect to a remote show file to allow multiple users to manipulate the same show. Opening a remote show file is very similar to opening a local show file with the additional requirement of the remote server name. After selecting this option the dialog below will appear: Figure 21: Open a server based show file Connecting to a remote show is similar to the opening a regular show file. You must enter the name of the remote system in the “server name” field. This can be either the machine name or the IP address. In the show name field enter the full path on the remote system to the file. Unfortunately Firebird does not provide an ability to browse for the file name so you must enter the full patch manually. The “preferred interface” option can be used to set the network interface that should be used for communication between LightFactory systems. This is highly recommended that you not use the same network interface as your DMX output (assuming Ethernet based DMX) as this may affect the DMX performance. Note: If you are using LightFactory on the same host computer as the firebird system you must still connect in the same way. If you open the show file using the regular “Open saved show” then the server will not be able to open the file and all remote users will be locked out. http://www.lifact.com 89 LightFactory V2 A Guide for Users Reference/Window Overview Command Interface Once you have entered all of the settings click on the “OK” button to connect to the show. If successful you should see the show file open normally. Save a copy of this show Saving a LightFactory show will make a new show file that contains all the same data as the current show. There should be no change to the data you are actively working on in the system. When selecting this option a standard Widows save dialog will prompt you for the file name to save the new show under. The new show file will be given an extension of “.FDB”. Note: If you select an existing show, all information will be overwritten by the “current show”. A warning dialog will inform you if you are about to overwrite an existing show. System Properties The “system properties” window can be accessed by selecting the “Options” drop down menu. There are nine tabs of settings that you can configure in this window: System Input/Output (DMX) – provides access to settings affecting the flow of DMX data and system channels. This is primarily related to external DMX hardware installed with your software T T System Settings – provides settings that effect the operation of the software. This tab also provides access to the Telnet and tracking backup options. T T Show Defaults – setting in this tab provide default options for cue lists, channel groups and recording. S Appearance – the appearance tab allows you to change colours and fonts used throughout the software. T Registration – Options for registering your LightFactory software. Without a valid registration, LightFactory will not produce any DMX output. T 90 © 2004 - 2010 Dream Solutions Ltd Reference/Window Overview Command Interface LightFactory V2 A Guide for Users Visualiser – Configures integration with WYSIWYG, Capture or Light Converse visualisation tool. External Wings – View the available hardware wings connected to LightFactory and display any debug information. Media – Setting that control the global output of media playback Special Shortcuts – Setup special shortcuts to control miscellaneous functions. System Input/Output (DMX) The system input/ouput tab provides access to settings affecting overall operation of the software. This is primarily related to external DMX hardware installed with your software. Figure 22: System Properties: System tab Number of desk channel LightFactory can support over 10,000 desk channels (also referred to as system channels). Each desk channel can control multiple DMX channels either by patching several DMX channels to a desk channel or by patching an intelligent fixture that requires multiple DMX channels for operation. http://www.lifact.com 91 LightFactory V2 A Guide for Users Reference/Window Overview Command Interface The more desk channels you configure the software for the more CPU and resources will be required. By default the software configures 500 desk channels as this will run without issue on the minimum specification for the software. Any PC purchased in the last couple of years will easily run a lot more than 500 channels. This number will also define the number of cells in the channel display window. Some may find it easier to view this window will only the number of channels they need for a show. Enter the number of channels you want the software to use and restart LightFactory for the change to take effect. Max DMX Universes By default the software will be setup for 10 DMX universes. A DMX universe is a block of 512 DMX channels. You can think of a DMX universe as a physical cable running out from the system. Although any number of Universes can be configured output will always be restricted to the limit of your registration. You can configure as many universes as you want but on the universes registered will be active. This allows you to program any sized show you want without the registration being required until output is needed. As you change the “Max DMX Universe” spin edit you will notice the number of rows in the grid below will also change. Each row defines the output for a DMX universe. Merge DMX input with output The most common use for DMX input is the ability to add external physical submasters to the software. In some cases however it may be desirable to simply merge the input with one of LightFactory’s outputs. The output of the merged DMX channels will be defined by the behaviour set by this combo box. The merge options are “Highest takes precedence (HTP)”, “Lowest takes precedence (LTP)”, “Build”, “Input takes precedence” and “Desk Channel Merging”. Merge with universe Use this spin edit option to set what LightFactory universe the software will merge input with. Merging will only occur on the 92 © 2004 - 2010 Dream Solutions Ltd Reference/Window Overview Command Interface LightFactory V2 A Guide for Users universe if the “Merge DMX input with output” combo box is set to something other than “None”. Configuring DMX universes The grid in this tab of the system properties defines what physical hardware the software will use to send DMX data on a universe. The first column of information cannot be edited and identifies the universe by a number. The first row is different from all of the rest as it defines the input configuration for the software. Device Use the drop down box’s provided in the device column to configure the input or output hardware used by the software to communicate with your DMX system. Supported hardware used to input/output DMX data: Enttec DMX over Ethernet Protocol (ESP) ArtNet DMX over Ethernet Protocol Pathport DMX over Ethernet Protocol Enttec Open USB DMX Interface (output only) Enttec USB DMX Pro Interface Cooper controls USB DMX interface USBDMX.com interface JESE DMX-TRI interface Note: After changing either of the hardware selection you will need to restart LightFactory for the changes to take effect. Port Some device options have several output ports available. Each port is a separate DMX universe. In the case of USB hardware this will refer to a physical plug on the device. For Ethernet hardware the number of ports can be as many as the protocol supports. http://www.lifact.com 93 LightFactory V2 A Guide for Users Reference/Window Overview Command Interface The drop down box in the port column will only list the available ports for the selected device. For USB hardware you must have the device connected for the port to be selected. When selecting the device the next available port number will be automatically chosen and populated into the port field. Network Interface When using any of the Ethernet based protocols you may need to configure the network interface that the software will use to communicate with the DMX system. By default the system will be set to output to all available network interfaces however if you want to restrict the output to a specific device use the Network Interface drop down provided. The network interfaces are identified by the IP address that it is bound to. DMX Frame Rate Some of the USB hardware also provides the ability to set the DMX frame rate. Use this control to define the frame rate you want to use. You should not change this from the default (40) fps unless requested to by our support staff. Changing this frame rate may stop your DMX output from working correctly. Information The “information” column of the grid will display any additional data that could be obtained about the port. For USB devices this will often show the firmware version and device serial number. For Ethernet options this will usually show the official name used to identify the port on the network. 94 © 2004 - 2010 Dream Solutions Ltd Reference/Window Overview Command Interface LightFactory V2 A Guide for Users System Settings The system settings page provides settings that effect the operation of the software. This tab also provides access to the Telnet and tracking backup options. Figure 23: System Properties: Settings tab On Level Use this to specify the value fixtures will be set to when clicking on the “ON” or “SOLO” buttons in the channel window. This also applies to the ON command in the command window. Mouse wheel sensitivity The mouse wheel sensitivity allows you to alter the percentage increment that will apply for each segment rotation. By default, rotating the mouse wheel by one increment will change the fixtures or groups by 5%. http://www.lifact.com 95 LightFactory V2 A Guide for Users Reference/Window Overview Command Interface Fine movement sensitivity The fine movement sensitivity determines the resolution moved when the fixture control is set to fine mode. Number of submaster pages This setting will allow you to configure the maximum page number for the onscreen submasters, external submasters connected via MIDI, DMX or the Playback wing. Number of submasters per page The software will allow up to 100 submasters per page. Use this option to configure the submasters per page count to match the number of physical handles on the device you are using. For example if you have a external 24 channel DMX lighting board connected to DMX input then it is recommended that you set number of submasters per page to 24. This means that when you change to the second page in LightFactory channel 1 on you physical lighting desk will correspond to submaster 25. Submaster debounce level The submaster sensitivity option will determine how much the DMX value of an external or hardware submaster must change before it is registered by the system. In most cases this option should be left at 1 as we want the software to register a change every time the submaster moves. In some cases the external submaster can be set just between 2 values and the output may jump between these values continuously (This is known as bouncing). To get around this problem we can set the submaster debounce to 2 and the system will not update the submaster unless the value moves by 2 or more. Grand Master Submaster To assign a physical submaster to control the grand master set the submaster number in the box provided. Setting this value to 0 will disconnect the grand master from a physical submaster. Note: See the invert GM Submaster Option below. Master Fade Time Submaster 96 © 2004 - 2010 Dream Solutions Ltd Reference/Window Overview Command Interface LightFactory V2 A Guide for Users To assign a physical submaster to control the overall fade time of the system set the submaster number in the box provided. Setting this value to 0 will disconnect the system fade time from a physical submaster. Number of Cue List Playbacks per page There are virtually unlimited cue list playbacks that can be setup in LightFactory. To manage the display of the playbacks set the number you want to appear on each page with this setting. It is recommended that you set this to the maximum number that is visible without the need for the scroll bar. Show command syntax help Default On – This option will toggle the balloon popup that provides context sensitive help about the commands being entered. As you enter a command in the system the popup will appear telling you what commands are valid in the context of what has been types so far. Command line direct 1 digit Default on - In most cases when entering commands the channel values are in multiples of 10 (e.g. 10%, 20%, 50% etc). To save the typing of an extra digit this mode allows you to enter just the first number and the additional 0 will be added automatically. With this mode on you can still enter values below 10 by putting a 0 in front of the number (e,g, 03%, 05%, 08%). Select fixtures after setting Default off – When using the command line to set channel values this option will allow you to perform a selection at the same time. The channels set will automatically become selected after applying the value. Disable double click function Default off – Double clicking on a channel or fixture will toggle it between the on value and off. Use this option to disable this function to prevent accidentally performing this operation. Use advanced colour heuristics http://www.lifact.com 97 LightFactory V2 A Guide for Users Reference/Window Overview Command Interface Default Off - LightFactory has a unique feature that allows the software to calculate colour matching for fixture that have more than the 3 primary colours (RGB, CMY or HSI). For example if a fixture has red, green, blue, amber, and white LEDs (RGBAW) traditional colour matching is only able to apply the first 3. This is because in a perfect system all colours can be achieved by the combination of red, green and blue. Because LEDs are not perfect some manufacturers add additional colours to the fixture to expand the available colours that can be produced. The software however can traditionally only work in a perfect colour space when converting from a selected colour to the elements of that colour. The advanced colour heuristics system of LightFactory attempts to overcome this problem by applying an advanced algorithm to calculate how much of other colours should be applied. It should be noted that this algorithm is not perfect and is an approximation of the maximum output for a selected colour. Because you may need to work with this option frequently you will find the same check box in the attribute colour picker. You can change this setting in either location. Use V1 function key order Default Off - Version 2 of LightFactory uses a different function key layout to the previous version. If you are familiar with the old function key layout you can switch back to it with this option. Multiple shortcut and submaster windows. Default Off – With this option off only one shortcut and one submaster window can be opened at any time. Clicking on the button once opened will cause the window to be brought to the foreground and given the current focus. When this option is turned off click on the buttons will cause another copy of the window to appear. This can be convenient for running the submasters or shortcuts on multiple pages if you have the screen real estate for it. If this option is turned on the save and restore options will only work on the first window opened. 98 © 2004 - 2010 Dream Solutions Ltd Reference/Window Overview Command Interface LightFactory V2 A Guide for Users Check for software updates Default on – With this option on LightFactory will attempt to connect online and check if a new version is available. When a new version is released a popup will notify you soon after startup. Invert GM Submaster Checking this option will invert the operation of the submaster assigned to the grand master. Setting the submaster to 0 will result in the grand master being set to 100%. The flash button can now be used as a DBO function. Enable Telnet command line interface To access the command interface remotely from any computer on the network enable the telnet interface. Once checked you can connect to LightFactory through port number 3100. If you do not see the characters you type in your telnet client enable the “Echo Telnet characters” option. Use the “Telnet Port” edit box to set the IP port number that the software will bind to. Tracking backup options A tracking backup is a second copy of the software running on a separate computer. This backup copy of the software mimics the master system so that in the event of something going wrong with the master the backup can take over. The tracking backup options should only be turned on for the secondary system. The only option needed on the master system is the Telnet interface must be turned on. Check the option “Run as a tracking backup” to identify the system as the backup. Set the Master IP address to identify the master system. The IP address of the master can be found on the command window when the software starts. It is also recommended that you disable the output until a failure is detected. This option will temporarily stop DMX output until the operator tells the software start outputting DMX or the auto failure detection is activated. http://www.lifact.com 99 LightFactory V2 A Guide for Users Reference/Window Overview Command Interface Restart the software and you will see a dialog identifying that the system is running as a backup. Figure 24: Tracking backup In the event of a failure by the master system click on either of the two large buttons “Start DMX output” or “Start DMX output and run the next cue”. Below these buttons are options to automatically poll the remote system. Set how often the poll message should be sent using the spin edit directly below the buttons and set the number of failures that should be detected before taking over. Sunrise / Sunset When using the built in scheduling feature of LightFactory you can create schedule items that will operate on sunrise and/or sunset. The software will automatically calculate the time of the day for these events based on your location. In order for this feature to work you must set the latitude and longitude information. To make this easier you can select your closest city from the drop down combo provided and latitude and longitude information will be populated automatically. You are still able to adjust these numbers if you know more precisely your global position. A GPS may be used to set these numbers. 100 © 2004 - 2010 Dream Solutions Ltd Reference/Window Overview Command Interface LightFactory V2 A Guide for Users Show Defaults Use the show defaults settings to provide default options for cue lists, channel groups and recording. Figure 25: System Properties, Show Defaults Cue List Defaults The cue list defaults will apply every time a new cue is created (By default, these settings are all set to zero seconds). Set a cue default by either typing the desired time or using up and down arrow controls to the right of the edit box. Channel Group Defaults The channel group defaults will apply every time a new channel group is created. Set the default fade time and behaviour using the controls provided. Override takes precedence over HTP – By default (this option off) an HTP channel will continue to apply to all channels including the last override command. If this option is checked then when an override channel group is applied after an HTP channel group then the HTP group will be released. http://www.lifact.com 101 LightFactory V2 A Guide for Users Reference/Window Overview Command Interface Auto assign next available submaster – When checked (default) the submaster field will automatically be populated with the next free submaster when recording a new channel group. Auto assign next available shortcut - When checked (default) the apply shortcut field will automatically be populated with the next free shortcut when recording a new channel group. Apply channel group shortcuts to selection only – When checked channel groups will only apply to the channels currently selected. This option is also available in the “Channel Groups” menu in the channel display. Cue “Fade Out” applies to outgoing cue – Some lighting systems such as strand apply the fade out of a cue differently to LightFactory. With this mode turned on the fade out of a cue applies to the cue executed before this one. T T Use fade mode up/down (off – in/out) – This option allows you to work the way you are familiar with on other consoles. By default LightFactory fades cues with incoming channels and outgoing channels. Up/Down fade mode means that the channel or attributes increasing in value will fade in the “Up” time and channels or attributes decreasing in value will fade in the “Down” time. U T Release set channels on cue go – When you press “cue go” the system will release all channels not being controlled by cues before running the next cue. Don’t record parked channels – By default parked channels are recorded into cues. If you do not want parked channels recorded (e.g. house lights) you can enable this option. Fully track dimmer – By default LightFactory will only track the attributes of a fixture and not the primary dimmer. Turn this option on to switch LightFactory into full tracking mode. Record active palettes by default – This option can also be set at the time of recording. With this option on the software will record all of the active palettes into the new cue or cue being updated. Auto create playback with a new cue list – When a new cue list is created a cue list playback will automatically be created and assigned to the new cue list. 102 © 2004 - 2010 Dream Solutions Ltd Reference/Window Overview Command Interface LightFactory V2 A Guide for Users Do not pre-fetch (Mark) attributes with timing – This option only applies to channels that are set to “Mark” in a cue. The software will ignore any attributes that have complex timing information assigned. Allow null values in cues – When recording cues, attributes groups (position, beam, colour, etc) not selected will be set to a null value rather than zero (0). The attributes will then track their values from the previous cue when executed. Turn this option off to record zero values when attributes are not selected. Send cue execution messages to telnet clients – With this option checked (default) connected telnet clients will receive a message each time a cue is executed. Appearance Use the options in the appearance tab to define how the software looks on screen. This provides the ability to set up the software to your own personal look and feel. If you are running LightFactory on a slow computer system you way also want to turn off some of the graphical options in the channel window. Figure 26: System Properties - Appearance http://www.lifact.com 103 LightFactory V2 A Guide for Users Reference/Window Overview Command Interface Show pan and tilt position within fixture image – By default LightFactory will draw a small x inside the image at the top of the channel cell to represent the position of the pan and tilt values. Turn this option off to disable this feature. Show graphic bar representation of dimmers - The “fade bar” is a blue (default) bar that displays the current channel level and appears just under the text. Toggle this option to determine if the software displays this bar. Show picture of intelligent fixtures - If you have patched an intelligent fixture you can display a picture in each cell of the channel view. Toggle this option to turn this on or off. Show picture of basic fixtures – A basic fixture is a fixture with only a single dimmer attribute. Use this option to toggle if the software will display a picture in each cell of the channel view. Skip over unpatched channels – With this option on the software will not draw a cell for every channel unless it is patched. Unpatched channels will be ignored. When turned off the unpatched channels will appear as a grey cell in the channel display. Return focus to channel grid when opening fixture control – When an intelligent fixture is selected the fixture control window will automatically appear. This option determines if the focus is retained in the channel display or moved to the new fixture control window. Channel Display - Channel Select Colour – Defines the background colour of selected channels. Click on the coloured box to select a different colour. Channel Display - Channel Active Colour – Defines the background colour of active channels. Click on the coloured box to select a different colour. Channel Display – Grid background colour – Defines the background colour of the entire channel grid. Click on the coloured box to select a different colour. Channel Display - Channel Intensity Bar Colour – Defines the colour of bar representing the dimmer output value. Click on the coloured box to select a different colour. 104 © 2004 - 2010 Dream Solutions Ltd Reference/Window Overview Command Interface LightFactory V2 A Guide for Users Channel Display – Layout view background colour – Defines the background colour of layout view. Click on the coloured box to select a different colour. Channel Display, Font – Click on the font button to set the text style used in the channel display. A sample of the font will be displayed just below this button. Fixed column count – If this value is set to zero then the channel view will adjust the number of columns depending on the width of the window. Setting a fixed column count will automatically adjust the width of each of the cells but maintain the same number of columns per row. General Grid Settings – background colour – Defines the background colour of all grids other than the channel display. Click on the coloured box to select a different colour. General Grid Settings – Selected row background colour – Defines the background colour of all selected rows in grids other than the channel display. Click on the coloured box to select a different colour. General Grid Settings - Font – Click on the font button to set the text style used in all grids other than the channel display. A sample of the font will be displayed just below this button. Cue List Editor - Scene breaks background colour - Defines the background colour of all scene break rows in the cue list editor. Click on the coloured box to select a different colour. Reopen windows on startup and loading settings – When saving setting and closing down the software the position of all windows will be saved. With this option turned on the windows will return to the position they were when the software starts up or the setting are restored. Keep command window on top of all other windows – By default whatever window is active will draw itself on top of all other windows including the command interface. Turn this option on to make sure that the command window is always drawn on top of all other windows regardless of its focus status. Create a task bar button for every window – By default (off) LightFactory will appear as a single task bar button. Clicking on the button will minimise or restore the entire application. With this http://www.lifact.com 105 LightFactory V2 A Guide for Users Reference/Window Overview Command Interface option turned on then every window in LightFactory will appear as a separate task bar button. The button will be titled with the window name. Clicking on the button will minimise or restore just the window associated with the button. Registration LightFactory uses a software license to ensure that the product has been legally purchased. Without a valid registration code, the software will still operate normally and no functionality will be restricted, however the software will not produce any DMX output. To enable the DMX hardware interface, a valid registration must be entered - whether at time of install, or through the “Registration” tab in this window. Figure 27: System Properties: Registration tab To change the registration code enter the details into the edit box provided at the top of this page. Registration of the software is based on the “Serial Number” and the “Registration Code”. Both of these number must match for a registration to be valid. 106 © 2004 - 2010 Dream Solutions Ltd Reference/Window Overview Command Interface LightFactory V2 A Guide for Users Enter your registration details and click on the “Apply” to confirm that the details entered are correct. A dialog will inform you if incorrect details have been entered. For more information about registration see the section “Registration & Licensing” (Page 37). Visualisation LightFactory supports integration with the popular WYSIWYG (Cast Group. http://www.cast-soft.com), Capture (http://www.capturesweden.com) and Light Converse visualisation software. To use this feature select the desired visualiser by clicking on the appropriate button. If you want to temporarily disable the output uncheck the “Output live data to visualiser” Accept incoming patch information – Use this option to enable or disable receiving patch information if the visualiser supports sending it. http://www.lifact.com 107 LightFactory V2 A Guide for Users Reference/Window Overview Command Interface Send Fixture Selection Information – With this option turned on LightFactory will send messages to the visualiser to indicate if a fixture is selected or not. Receive Fixture Selection Information - With this option turned on LightFactory will select and de-select fixtures in the channel display when they are selected or de-selected in the visualiser. Enable Auto Focus Exchange – Auto focus is the term used for transfer of fixture state between the visualiser and LightFactory. If enabled changes made to the fixture in the visualiser will be transferred back to LightFactory. For example setting the position of the fixture in the 3D environment can be automatically translated into pan and tilt information in LightFactory. Figure 28: System Properties: WYSIWYG tab 108 © 2004 - 2010 Dream Solutions Ltd Reference/Window Overview Command Interface LightFactory V2 A Guide for Users External Wings External wings are dedicated hardware designed to provide hand on control to LightFactory. They include playback, shortcut, and program devices. Each wing connects to LightFactory via a standard Ethernet connection. If your Ethernet port is already in use, or you are using more than one Wing, you will need to connect the computer and the Wing/s to an Ethernet Hub or Switch using a standard Ethernet patch cable. The window shown below can be used to check that LightFactory is seeing the connected wings and that they are configured correctly. The lower half of the window will show any debug or broadcast messages from the wing and aids with fault finding. Figure 29: System Properties - External Wings http://www.lifact.com 109 LightFactory V2 A Guide for Users Reference/Window Overview Command Interface At the bottom of this window you can set the network interface that the software will use to communicate with the wings. By default the software will pick the first valid interface and on most systems this is the only interface. For more information about using the external wings see the hardware setup section (Installing Wings, Page 53). There is little or no setup required in LightFactory to use the hardware wings and this screen should only be used to check that everything is running correctly or to debug problems. Media The settings in the media tab are used to globally control the output of media playback when using the media effect. Figure 30: System Properties - Media Video Output Monitor – Use this option to define what display on your computer all video content go to. If you only have 1 monitor or you select your primary monitor then the video will play in a 110 © 2004 - 2010 Dream Solutions Ltd Reference/Window Overview Command Interface LightFactory V2 A Guide for Users sizeable window. If you are using a secondary display the video output will automatically be played in full screen. Brightness - The Brightness property defines the luminance intensity. Utilise Colour - The Utilise Colour check box property defines whether colour is utilized or not. Contrast - The Contrast property defines the relative difference between higher and lower luminance values. Hue - The Hue property defines the phase relationship, in degrees, of the chrominance components. Saturation - The Saturation property defines the colour intensity, in IRE units. Volume – The volume property defines the default audio level of the playback. http://www.lifact.com 111 LightFactory V2 A Guide for Users Reference/Window Overview Command Interface Special Shortcuts Special system shortcuts are miscellaneous functions in the software that you may want to put onto a shortcut. Most of these functions are related to the channel view such as the options in the right click menu and at the bottom of the window. The special shortcuts also allow you to set shortcuts to open various windows. The attribute shortcuts also serve a dual purpose depending on the window that currently has focus. If you are in the channel display and have an intelligent fixture selected then the attribute shortcuts will shift focus to the control appropriate for the attribute. Pressing the shortcut while in the command interface will bring up the appropriate word to use in the command line. Figure 31: System Properties - Special Shortcuts 112 © 2004 - 2010 Dream Solutions Ltd Reference/Window Overview Command Interface LightFactory V2 A Guide for Users External Triggers LightFactory provides the ability to connect external triggering devices to control the running of shows. This feature allows you to set up shows that run without user interaction. External triggering is designed to trigger the “Cue Go” function in shows, however LightFactory can also use the MIDI and Timecode triggers to execute any shortcut. Configuration of the external triggers can be found in the file menu. MIDI Control MIDI is a flexible musical instrument-to-PC protocol that provides a number of different messages in the form of notes. To enable the MIDI functions you must turn on the “Enable MIDI Events” option. The “Debug Messages” tab can be used to help identify any problems with receiving MIDI messages. To display more information about incoming MIDI data turn on the “Verbose debug messages” option at the bottom of the window. Figure 32: External Triggers: Midi Debug Messagages Note Triggers The “Note Triggers” tab provides the ability to add any number of note triggers to the system. Click on the “Add” button to create a new line in the list of triggers. To remove a trigger click on the row you wish to remove and click on the “Remove” button. http://www.lifact.com 113 LightFactory V2 A Guide for Users Reference/Window Overview Command Interface Figure 33: External Triggers: Midi Note Triggers Each trigger requires the following settings; Description – This provides a way to identify the trigger by entering a description for your reference. T T Channel – Identify the MIDI Channel to listen on (1-16) T T Device – Device number to listen to (default 0) T T Note – This is an instrument note that will trigger the event. T T On/Off – Determine if the system will trigger by a note on or note off event. Octave – An interval between two notes that are seven steps apart on a musical scale. T T Action – Each trigger can either execute the “cue go” operation or execute a system shortcut. Use the drop-down combo to select one of these options. T T Shortcut – If the action is set to “shortcut”, this field is used to specify what shortcut number you want this trigger to execute. T T Control Change Events The “Control Change Events” tab allows you to setup LightFactory to respond to control change events. 114 © 2004 - 2010 Dream Solutions Ltd Reference/Window Overview Command Interface LightFactory V2 A Guide for Users Figure 34: External Triggers: Midi Control change Submaster & Shortcut Channel # - Set this option to determine the channel number that will be listened to for control change events. Submaster Device – MIDI devices can also be used to control LightFactory submasters in the same way as the DMX input option. Low cost MIDI fader devices can be connected to provide this functionality. To activate this function select the device from the combo box provided. LightFactory will listen for “Control Change” messages and apply the received “Value 2” to the submaster defined by the “Value 1”. To set the first control change identifying number use the “First Control #” option to the right of the device selection box. When submaster’s are changed in LightFactory the software will also send MIDI messages to the selected device to activate motorised faders (if supported). Shortcut Device – The same function as above can also be applied to shortcuts. Select the device to listen to for control change messages and set the start message number to correspond to shortcut 1 in LightFactory. Send submaster change MIDI messages – If your device supports motorized faders then LightFactory can send MIDI control messages back to the device to change the physical slider. This is useful when changing the submaster page in LightFactory or if you make an on-screen change to a submaster. The physical sliders will move with the change you make. If the device you are using does http://www.lifact.com 115 LightFactory V2 A Guide for Users Reference/Window Overview Command Interface not support motorized faders then it is recommended to turn this option off. Ignore shortcut up messages (127) – Some external MIDI devices send 2 messages for a button press. One message for down and one for up. This can trigger the shortcut twice and is undesirable. If you experience this problem turn this option on to ignore all message except 127. Wide Mode – Wide mode will automatically map the maximum number of incoming MIDI control change messages to submasters. Timecode (MTC) The “Timecode (MTC)” tab allows you to setup LightFactory to listen to incoming MIDI timecode data. The MIDI timecode read by LightFactory can be used to trigger timecode events. Figure 35: External Triggers: Midi Timecoode (MTC) Timecode Device – Select the device that timecode data will be read from. Receive MIDI Timecode (MTC) – Enable this check box to begin receiving MIDI timecode form the selected device. When turned on the Send option below it will automatically be turned off. Send MIDI Timecode (MTC) – If this option is turned on then the receive option will be turned off. When using any of the other four timecode options (found in the timecode tab) the timecode will be sent to the selected MIDI device to allow other systems to synchronise with LightFactory. 116 © 2004 - 2010 Dream Solutions Ltd Reference/Window Overview Command Interface LightFactory V2 A Guide for Users Note: For LightFactory to send MIDI messages you must needed to assign the MIDI output in the PC. To do this open the windows control panel and from this open “sounds and audio devices”. On the AUDIO tab the MIDI music playback needs to be assigned to the MIDI output device you want to use (it defaults to the internal MIDI engine). T PC Line-In The PC Line in triggers are only able to trigger the “cue go” function or simple chase steps. There is no shortcut execution with this event. The “PC Line In” tab provides the ability to set the audio source, frequency range, trigger level, and minimum time between events. For LightFactory to listen to the selected audio source you must enable it by clicking on the “Enable Audio Line In Control” http://www.lifact.com 117 LightFactory V2 A Guide for Users Reference/Window Overview Command Interface Figure 36: External Triggers: PC Line In Source – Select the audio source you want to use to trigger the system. Select from Line In, CD ROM, or PC Microphone using the combo edit provided. T T Frequency Range – The frequency range that the software will listen to. The default is 20Hz through to 20kHz. T T Cue Trigger Level – Select the audio level in dB that will trigger the cue go. T T Min Time – Set the minimum time between trigger events. Timecode The timecode configuration provides the ability to set up shortcuts that are triggered by the timecode values being reached. You can also setup a cue list and provide timecode values to each cue. Cues can then be automatically triggered when the timecode value is reached. Note: There is no configuration required for using timecodes to trigger “cue go”. See “Timecode” on page 214 for more information on using timecodes with the cue system. T To enable listening to timecodes, check the box marked with the appropriate timecode device you are using. • 118 DirectX timecode – Uses the internal windows timecode functions provided by the DirectX components. © 2004 - 2010 Dream Solutions Ltd Reference/Window Overview Command Interface LightFactory V2 A Guide for Users • Winamp timecode – Winamp is a popular free media player that is capable of playing video and audio files. LightFactory can read timecode directly from this sowftare when running on the same PC. • Adrienne Timecode – The Adrienne devices are a collection of internal and USB devices that support a number of timecode formats. For more information visit http://www.adrielec.com • Internal Timecode – LigthFactory can also read its own internal timecode produced by the media playback effects. Figure 37: External Triggers: MIDI/SMPTE Timecode tab To add a new timecode trigger, click on the “Add” button and edit the fields provided. To remove any trigger, select the event from the list and click on the “Remove” button. Description – This provides a way to identify the trigger by entering a description for your reference. T T Timecode – Set the time code in the format HH:MM:SS:FF that will trigger the shortcut. The shortcut will only trigger once when the time is reached. T T Shortcut – This field is used to specify which shortcut number you want this trigger to execute. T T ChilliNet The ChilliNet interface provides the ability to send and receive ChilliNet messages over a standard RS232 connection. http://www.lifact.com 119 LightFactory V2 A Guide for Users Reference/Window Overview Command Interface Figure 38: External Triggers: ChilliNet tab For more information about ChilliNet please visit: www.zero88.com ChilliNet panels can be used to automatically control shortcuts and submasters from wall panels. To enable ChilliNet message sending and receiving check the box at the top of this tab. Use the com port combo box to set the physical port that ChilliNet is connected to. The zoning selection can be used to send zone messages to the system for initial setup of the wall panels. Place the wall panel into programming mode and then select the zone you want to program from the drop down box. iCAN The iCAN interface provides the ability to send and receive iCAN messages over a standard RS232 connection. iCAN is configured in the same way as ChilliNet however the communication speed is not fixed and can be changed. 120 © 2004 - 2010 Dream Solutions Ltd Reference/Window Overview Command Interface LightFactory V2 A Guide for Users Figure 39: External Triggers: iCAN tab To enable iCAN message receiving check the box at the top of this tab. Use the com port combo box to set the physical port that iCAN is connected to. The port speed combo can be used to set the communication speed of the connection. mySQL The mySQL interface provides the ability run LightFactory macro scripts from a mySQL server. mySQL is an industry standard database often used by web servers. This option will allow you to trigger LightFactory from a web site or any external application. Figure 40: External Triggers: mySQL trigger The mySQL interface is designed for advanced use of the software in specific applications. Please contact LightFactory support ([email protected]) for more information about this option. http://www.lifact.com 121 LightFactory V2 A Guide for Users Reference/Window Overview Command Interface Scheduled Tasks Scheduled tasks allow you to setup recurring lighting events using the real time clock of Windows. Each task can be scheduled to run daily, weekly, monthly, one-time only, every hour, or every X seconds. Each task executes a LightFactory shortcut. Figure 41: Scheduled Tasks The following tasks are frequently performed when you want to schedule a task to run on your computer. Create a scheduled task Before a task can be scheduled to run, one or more tasks must be created. To create a new task click on the “New Task” button at the top left of the window. 1. As soon as you click select “New Task” the scheduled task wizard will start. Select the shortcut you want to execute on every occurrence of the task and click “Next” to continue. 122 © 2004 - 2010 Dream Solutions Ltd Reference/Window Overview Command Interface LightFactory V2 A Guide for Users 2. In the space provided on the second page enter a meaningful name to describe the task. (e.g. Hourly fountain show 1) Then select how often you want this task to run and click “Next” to continue. 3. The next page is specific to the frequency that you want the task to be performed. a. Daily b. Weekly http://www.lifact.com 123 LightFactory V2 A Guide for Users c. Reference/Window Overview Command Interface Monthly d. One Time Only e. Every Hour or Every X seconds No additional information is required for this option. 4. Once you have selected the schedule options for the task click “Next” to continue to the final page. 5. To complete the setup of the new task click on the “Finished” button. The new task will now appear in the task list and will immediately become active. 124 © 2004 - 2010 Dream Solutions Ltd Reference/Window Overview Command Interface LightFactory V2 A Guide for Users Modify a scheduled task Created scheduled tasks can be modified. You can modify the shortcut to run, the schedule, or the specifics of a particular task. To modify a task double click on the desired entry or click once and select properties from the option at the top of the window. This will start the same wizard you used to create the task. Follow the same procedure to change any of the option or click cancel at any time to return to the task schedular window. Remove a scheduled task For scheduled tasks that are no longer needed, you can remove them entirely by selecting the corresponding row and clicking on the delete button at the top of the window. Temporarily turn off a scheduled tasks You can temporarily turn off or pause scheduled tasks from running using the pause button provided. The status field will show paused tasks. To turn a task back on simply slick on the pause button again. http://www.lifact.com 125 LightFactory V2 A Guide for Users Reference/Window Overview Command Interface User Permissions To control access to various parts of the software you can setup users and passwords from the “Edit User Permissions” window. Figure 42 : User Security Once a user has been added to the software the security feature will become active and require a login each time the software starts. By default no users will exists in the system. An empty user list is the equivalent of turning off the security feature. Note: The software will not allow you to disable the “Edit Users” option if the selected user is the last one with this privilege. To create a new user click on the “Add User” button in the bottom left of the window. A new line will appear in the grid above with the default name “New User”. Once the user has been added you can edit the name, password and define the security privileges. Most of the security features centre around allowing or denying access to the various windows within the software. For example, if you would like to prevent a user from opening the “Cue List” 126 © 2004 - 2010 Dream Solutions Ltd Reference/Window Overview Command Interface LightFactory V2 A Guide for Users window uncheck the option to the right hand panel of the window. The “Record” privilege is a special option that can be used to prevent a user from modifying the show while still providing access to windows like the “Show Runners” and “Channel” view. By default a new user will have all privileges enabled. Use the “Uncheck All” to remove all access to the user. You can then add access to the user as required. Once you have setup a user in the software the security will become enabled. The next time you start the software you will be asked to login with a username and password. Figure 43: User Login The user name will default to the last name used to login to the software and will automatically place the cursor into the password field. Enter the password for the user and press the enter key or click “login” to proceed to the main interface. http://www.lifact.com 127 LightFactory V2 A Guide for Users Reference/Window Overview Command Interface Submaster Options Submasters can be assigned to perform a number of functions. Traditionally a submaster is a physical slide control that allows the user to input a value between 0 and 255. The following functions can be assigned to LightFactory submasters: Channel groups (Scenes & Submasters) Cue “go” execution Cue intensity override Effect Playbacks intensity override Chase step rate control Chase fade time control LightFactory provides up to 100,000 submasters that are accessed through pages. The “System Properties (Page 95)” will allow you to specify how many pages the system creates and how many submasters (up to 100) per page. Obviously, computers do not typically come with a number of physical faders so LightFactory provides access to submasters through either an on-screen interface or through add-on hardware. Open submaster page Submaster page control On-Screen Submasters The on-screen submasters can be viewed as either a slider control or a grid similar to the channel display. The slider view will provide access to up to 30 submasters per page. Each of the submasters per page is represented by a single slide control and spin edit box. The grid view will display as many submasters per page as set in the system properties. Each submaster is represented as a square in the grid that can be selected and modified using the scroll wheel on your mouse. 128 © 2004 - 2010 Dream Solutions Ltd Reference/Window Overview Command Interface LightFactory V2 A Guide for Users Note: LightFactory can support up to 100,000 submasters by connecting external hardware to the system. Not all submasters can be viewed on screen when in fader mode. If you configure more than 30 submasters per page then only the first 30 will be visible in this mode. T T To switch between the fader view and the grid view click on the button to the right of this window. Clicking on this will toggle between each of the views. At the top of this window is a series of buttons to change the submaster page. Changing the page in this window will not change the page number on the main window as it is possible to have the on-screen submasters set to a different page to any external hardware you might be using. Fader Mode Setting a submaster can be done by using your mouse to click-anddrag the slide control, or by typing a value in the edit box below the slider. If you move the slide control, the value in the edit box will change to reflect the new position and changes to the edit box will be reflected in the slide position. Figure 44: Submaster window – Fader Mode The “Flash” button at the bottom of each submaster can be used to temporarily set the submaster to full. Once this button is release the submaster will return to its previous state. http://www.lifact.com 129 LightFactory V2 A Guide for Users Reference/Window Overview Command Interface Selecting the “Latch flash buttons” option at the top of the window will change the behaviour of the flash button so that you do not need to hold the mouse button down. With the toggle option on, clicking and releasing the flash button will take its position to full. To return to the previous state click the flash button again. T Note: If hardware submasters are being used, you will also see the slide position and edit box value change to reflect the hardware. Right clicking on a submaster will bring up additional options to help identity each fader. Change Description – Use this option to label the submaster. The label will appear along the top of the fader. Set Description Colour – The colour of the description can be changed by selecting it form this option. Reset Description Colour – Select this option to return the colour of the description back to its original colour. On the right hand side of this window is a large wheel that can be used to move all of the submaster on this page at once. Click on the wheel and while holding the mouse button down move the mouse up or down to raise or lower the levels. You can select what submasters the wheel will operate on by clicking to the left of the slider for each of the submasters. The master wheel will operate on all submasters that have the small green tick in the bottom left corner. Grid mode Setting submasters in the grid mode is similar to setting channels in the channel display. Each submaster is represented by a cell in a two dimensional grid. 130 © 2004 - 2010 Dream Solutions Ltd Reference/Window Overview Command Interface LightFactory V2 A Guide for Users Figure 45: Submaster window – Grid Mode Submasters can be selected by simply clicking on the desired grid cell. By holding the left mouse button down you can drag an area of the grid to select multiple submasters. Once selected use the mouse wheel or the spin wheel on the right to change the value. Right click on any of the cells in the grid for additional options. Clear selection – Select this option to unselect all submasters. Select active submasters (all pages) – All of the submasters currently above zero will be selected. Clear selection when changing pages – Check this menu item so that all of the submasters are automatically unselected when the page is changed. Inclusive selection mode - This is toggle option that will have a small check mark next to it when turned on. If the “inclusive selection” option is active then each selection made will be added to the previous selection. All submasters currently selected will remain selected unless they are in the new selection area. Any selection will toggle the selection state of a channel. Hardware Submasters LightFactory provides the ability to add physical hardware to the system by using any standard DMX lighting desk, MIDI Control desk or Playback wing. By connecting the DMX-IN hardware, you can connect your existing lighting desk to the software. http://www.lifact.com 131 LightFactory V2 A Guide for Users Reference/Window Overview Command Interface LightFactory will only use the first 100 channels of the lighting desk as submasters, but these 100 channels can be paged to provide up to 100,000 submasters. You can also use the Enttec playback wing as an external submaster board without needing to assign any playbacks. See page 53, (Installing Wings) for more information about connecting the playback wing to your system. LightFactory can also read fader levels from a standard MIDI controller using the “Control Change” messages. If the MIDI device supports motorised faders then LightFactory will also send MIDI messages when changing page or setting the on-screen submasters. This will allow the physical submaster to reflect the current value. Shortcut Options Shortcuts are designed to provide quick access to a number of functions within the software. Some of the assignments that can be made to shortcuts include: 132 © 2004 - 2010 Dream Solutions Ltd Reference/Window Overview Command Interface LightFactory V2 A Guide for Users Channel selection Channel Group Selection Cue Go / Back / Pause / Reset Execute Fixture Properties Effects Run / Pause / Reset Execute level groups And many more… As with submasters, shortcuts can be accessed through an onscreen display or by connecting additional hardware. On-screen shortcuts also have the added feature of being designed for use with a touch screen display. LightFactory provides 100,000 user-assignable shortcuts that are accessed through 100 pages. Access to the on-screen shortcuts is obtained by clicking on the button to the right of the shortcut page selection. Open on-screen shortcut page Shortcut page control On-Screen Shortcuts The shortcut window is a grid of 100 buttons each tagged with a number, description, and colour. http://www.lifact.com 133 LightFactory V2 A Guide for Users Reference/Window Overview Command Interface Figure 46: On-Screen Shortcuts If a shortcut is not assigned the button will appear greyed out and cannot be selected. When a shortcut is assigned a default description is created and appears below the shortcut number. There are two (2) view modes that can change the display of the on screen shortcuts. You can switch between the modes by clicking on the button to the left of the “Full Screen” button. The label of this button will toggle between “Normal” and “4 UP” depending on the mode you are in. In “Normal” mode the shortcuts will appear as a 10 x 10 grid with the shortcuts numbered with 1 in the top left corner and 100 in the bottom right corner. In “4 Up” mode the shortcuts will be arranged in to 4 groups. Each of the groups will have a user definable heading that will default to Colour Palettes, Beamshape Palettes, Positions and Groups. 4 Up mode 134 Normal mode © 2004 - 2010 Dream Solutions Ltd Reference/Window Overview Command Interface LightFactory V2 A Guide for Users To change the label for each of the groups in “4 Up” mode click anywhere in the heading. Figure 47: Shortcut grouping title edit Enter the new name of the group into the box provided and click “OK” to save the change. The new label will be used for all pages of shortcuts. Options To change the global display options for the shortcut window click on the drop down menu on the right of the mode button. Figure 48: Shortcut window display options Use 3D buttons – (Default on) Use this option to change how each button is drawn. When this option is on the buttons will have a 3D style gradient. Set font size – Use this option to change the overall size of the text in each of the shortcuts. Right click options Right clicking on any of the active shortcuts will produce a pop-up menu that will allow you to edit the description and change the button and text colour, add an image or jump directly to the appropriate edit window of the shortcut. You can also use the popup menu to copy and paste the formatting (colour, text colour etc) of the shortcut to other shortcuts. http://www.lifact.com 135 LightFactory V2 A Guide for Users Reference/Window Overview Command Interface Note: Changes made to the description or colour will remain until the shortcut is reassigned. T Edit Shortcut – Select this option to open the editor window associated with this shortcut. Move Shortcut – Upon selecting the move shortcut option your mouse pointer will change to a small hand. Click on any unassigned shortcut to move the original to this cell. Lock/unlock shortcut – A locked shortcut will remain on secern regardless of the page change. This is useful for keeping some operations on screen all of the time. Add Quick Command (macro) – If you right click on a shortcut that is not assigned you will get a single menu item “Add Quick Command”. This is a special function that will allow you to assign a single command function to the shortcut key. You can think of this as a one line macro that that assigned directly to the shortcut key. After selecting this option a dialog will appear asking you to enter the command you want to assign. The command can be any valid command line text (You may want to test your command in the command line window before entering it here). Once entered click on the “OK” button to assign the new command. The command entered will become the description for the shortcut. Clicking on the shortcut will cause the command to be immediately executed in the command line window. The full screen button to the right of the text size edit box allows you to toggle the window into a borderless full screen mode. This can be useful when using the shortcuts page with a touch screen monitor. The window can be returned to its original size by clicking on the same button. Hardware Shortcuts Programmable keyboards can be connected to the LightFactory system to provide physical shortcut buttons. Programmable keyboards are most commonly used in point-of-sale environments but are perfect for this application. Each key can be assigned a sequence of characters to send to the computer and are generally designed for heavy continuous use. 136 © 2004 - 2010 Dream Solutions Ltd Reference/Window Overview Command Interface LightFactory V2 A Guide for Users LightFactory has a built-in command sequence that will trigger shortcuts from programmable keyboards. Each shortcut can be triggered by the key sequence control-Q {digit 1} {digit 2}. For example to trigger shortcut 21 from an external keyboard you would need to program the key sequence control-Q 21. If you are using the Enttec shortcut wing no programming is required as the system will immediately associate the keys with the shortcuts in the system. For more information on shortcut hardware, please visit our web site. www.lifact.com HTU UT Window layout options When LightFactory is shutdown and restarted the position and size of the windows are remembered. The next time you use the software you will notice that the windows will re-open in the same state as they were last left. In the Extras menu are two options that allow the positions (and settings) to be saved and re-loaded. This allows for multiple layouts to be used for different environments. You may, for example, have one layout for programming a show and one for playback. Click on the “Save window layout & settings” to save the current position and size of all the windows to a file on your computer. A save dialog box will appear asking for a name and location to store your layout. Enter a valid name and click “Save”. To restore the position and size of the windows form a saved configuration click on “Load window layout & settings”. An open file dialog will prompt you to select the file containing the settings. Once loaded the windows that are currently open will re-position to the settings saved in the file. http://www.lifact.com 137 LightFactory V2 A Guide for Users Reference/Window Overview Channel Display Channel Display The channel display is your primary access to fixtures and lights. You may want to skip ahead and read the section on “Intelligent Fixture Control” (starts on page 154) before continuing to set up any moving/intelligent lights in your DMX chain. In the channel display you can: Select and modify the dimmer of each channel Select and modify attributes of intelligent fixtures (e.g. moving lights) Record to channel groups, Cue Lists, Palettes and Effects. Run library effects. Apply palettes. Figure 49: A simple channel window with only simple fixtures 138 © 2004 - 2010 Dream Solutions Ltd Reference/Window Overview Channel Display LightFactory V2 A Guide for Users Figure 50: A channel window with moving lights patched. Note: Intelligent fixtures are identified by the word “Fixture” rather than “Channel.” The word channel is used to identify simple dimmers. T The channel view window has four modes of displaying fixtures and channels. Change the view click on the “View” button and selecting the desired view from the drop down menu. The different view modes are Expanded, Compact, Character and Layout. There is no issue using both views to control your lighting rig as you may want to use conventional lights in the grid display http://www.lifact.com 139 LightFactory V2 A Guide for Users Reference/Window Overview Channel Display and intelligent fixtures in the layout screen. LightFactory will switch between the views without effecting the operation of the lights. In the Expanded, Compact and Character view all of the channels and fixtures are displayed sequentially in an n x n matrix of rows and columns. The software will automatically display the maximum number of channels it can across the columns and provide a scroll bar to view channels that are off the bottom of the window. You can however set a fixed number of columns in the “System Properties” under the “Appearance tab”. If a fixed column count is set then the column widths will automatically resize to fit across the page. Expanded (verbose) view – This is the default view and is shown in figure 41 above. The expanded view will show all of the patched channels in an excel style grid of rows and columns. This mode will show the maximum about of information about the fixtures and their state. Each attribute will be listed below the fixture name and dimmer level to show its current value. Compact View – Use the compact view to maximise the number of channels visible on screen at once. This view will show the least amount of information per fixture and is limited to the basic channel number and dimmer level. It will also show graphically a moving light position and colour. Character View – The character view is sometimes referred to as a traditional view of channel information. It is similar to the compact view but will show colour coding to indicate what is controlling the channel and what the channel is doing. 140 • Increasing – Light Blue • Decreasing - Lime • Tracked - Purple • Attribute Changed - Blue • Blocked - White • Submaster Control - Yellow • Effect Control – White © 2004 - 2010 Dream Solutions Ltd Reference/Window Overview Channel Display LightFactory V2 A Guide for Users Layout View - The layout view allows you to place fixtures arbitrarily in the window to more resemble the placement of the fixtures in reality. Layout View The layout view is a free form that by default has nothing on it. Before using the layout view you must place fixtures in the desired location. Once you have placed fixtures on the form you can then control them by selecting them in the same way as the grid view. When placed on the layout window each fixture is represented by a symbol of the fixture, its channel number, name and the current dimmer level. If the fixture is an intelligent fixture the position and colour is also shown. The symbol showed is defined by the “Fixture Type” in the dimmer patching window. If no type is specified the fixture is assumed to a conventional profile. Figure 51: Channel view - Layout view http://www.lifact.com 141 LightFactory V2 A Guide for Users Reference/Window Overview Channel Display Just above the layout panel (black area of the window) is tool bar that is used to edit the layout and insert fixtures onto the view. Figure 52: Layout view tool bar New – Click on the “New” tool button to start a blank layout. This will clear all of the fixtures from the layout view (fixtures will remain patched in the system) provide a blank page to work with. A dialog box will prompt to confirm the “New” operation as this cannot be undone. Open – Click on the “Open” button to load a saved layout and replace the layout currently shown. Save – The current layout is always stored along with your show however if you want to have several layouts you can save it to a file on the hard driver separate to the show. Click on a save button and a standard windows save dialog box will appear. Print – Use the print option to print a hard copy of the layout on a system printer. Zoom – Use the zoom option to modify the size of the view on screen. If the zoom is to too large to fit all of the fixtures on screen then the scroll bars can be used to move around the layout. Edit Mode – Toggle the edit mode button to change the position of the fixtures in the layout view. With the edit mode off the fixture cannot be moved around. Grid – To help line up fixtures in the layout view a grid can be turned on. The fixtures will snap to the dots in the grid when repositioning them. New Tab – To help manage a large number of fixtures in the layout view you can create tabs that will allow you to quickly switch between views. Clicking on the “New Tab” button will prompt you for the name of the tab. Tab names can be edited at any time by double clicking on the tab. To remove a tab from the system click 142 © 2004 - 2010 Dream Solutions Ltd Reference/Window Overview Channel Display LightFactory V2 A Guide for Users on the small “X” on the right of the tab. When only one tab exists the tabs will not be visible. Background image – Clicking on the “Background Image” button will open a standard windows file dialog that can be used to select any bitmap or jpeg image. The loaded image will be shown as the background to the layout. This image will be stored with your show or with any saved layout. Add Channels – To add channels to the layout click on the “Add Channels” button. A window will drop down below the buttons with a grid showing all of the channels in the system. Click on the channels you want to add (as you click the channels will become highlighted) and then click in the layout screen to play the fixtures. You can hold down the shift or control key to select multiple fixtures in any order. Figure 53: Layout View, Adding Channels Add Matrices – As well as channel you can also add any configured matrices to the layout view. This will allow you to modify the entire matrix as a single fixture. http://www.lifact.com 143 LightFactory V2 A Guide for Users Reference/Window Overview Channel Display On the left of the window is the list of available fixtures and matrices that can be placed in the layout window. Delete – Use the delete button (only visible in edit mode) to remove the selected fixtures from the layout. Rotate Fixtures – When the layout view is in edit mode you can rotate fixtures using the spin edit control to the left of the delete button. The rotation angle set will apply to all of the selected fixtures. Moving fixtures around in the layout – By default the layout view is in control mode meaning it is expecting the user wants to control and modify the fixtures output. When you click on a fixture it will highlight it exactly as it does in the grid display. To move fixtures around and change the position you must turn on the option “Edit Mode”. When this option is turned on you cannot select fixtures for control as your mouse is now used to move the fixture where you want. Click and while holding the mouse button down move the fixture to the desired location. Release the mouse button once you have placed the fixture where you want it. (Figure 54: Layout view - Move fixture) Figure 54: Layout view - Move fixture Working with Matrix fixtures A matrix fixture is a group or array of lights that you want to work with as a single fixture and as a number of individual fixtures. They are represented as a two dimensional grid of pre defined rows and 144 © 2004 - 2010 Dream Solutions Ltd Reference/Window Overview Channel Display LightFactory V2 A Guide for Users columns. Fixtures do not necessarily need to occupy every cell of the grid in the matrix. See Page 259 (Edit ) for detailed instructions on how to setup and define a lighting matrix when patching your system. Once a matrix has been defined you can add it to the layout view exactly the same way as any other fixture. You can also work with the matrix the same way you would with a fixture. Selecting the matrix and applying a dimmer level to it will apply this level to all fixtures contained in the matrix. Selection Options Channels can be selected for editing by simply clicking on the desired grid cell. By holding the left mouse button down you can drag an area of the grid to select multiple channels or fixtures. Along the top of the channel window are a number of options to help with channel selection. Each of the options is described below. Select Active Click on this option to select all of the channels that are currently on or have light output. This button also has a drop down menu that can be accessed by clicking to the right of the button. Use this drop down menu to for the following options: Select all fixtures – All of the channels in the system will be selected. Select inactive fixtures – All of the channels that are not on or have light output will be selected. Invert current selection – All of the channels currently selected will become unselected and the ones that where not selected will become selected. Select odd fixtures of current selection – This will turn off the selection state of all the even fixtures. Select even fixtures of current selection - This will turn off the selection state of all the odd fixtures. Inclusive selection mode – This is toggle option that will have a small check mark next to it when turned on. If the “inclusive selection” option is active then each selection made will be added http://www.lifact.com 145 LightFactory V2 A Guide for Users Reference/Window Overview Channel Display to the previous selection. All channels currently selected will remain selected unless they are in the new selection area. Any selection will toggle the selection state of a channel. If this option is not active then each selection made will unselect any currently selected channels. If the selection overlaps any currently selected channels then they will remain selected. If you hold down the control (ctrl) key while making selection in this mode you are able to add channels as per the exclusive mode. Active selection mode – This is toggle option that will have a small check mark next to it when turned on. Turn on the active selection option for channels and fixtures to automatically go to the ON level whenever selected. The fixtures will also turn OFF if the fixture is unselected. When active selection mode is enabled the “Select Active” button will highlight in red as a warning. Highlight selection mode - This is toggle option that will have a small check mark next to it when turned on. Turn on the highlight selection option for channels and fixtures to automatically go to the highlight state whenever selected. Clear Selection Click on the clear selection button to unselect all channels in the system. Select Next This option will select the next patched channel relative to the current selection. If channel 1 is currently selected and this button is pressed then channel 2 will become selected and channel 1 will be unselected. Select Previous Click on this button to select the channel before the currently selected channel. Selection Shortcuts If you have assigned channels to selection shortcuts in the channel groups window then the quick selection menu will provide a convenient place to access them. Selecting a shortcut from the sub menu will act exactly the same as using the shortcut itself. 146 © 2004 - 2010 Dream Solutions Ltd Reference/Window Overview Channel Display LightFactory V2 A Guide for Users For additional convenience the first 9 shortcuts can also be accessed by holding down the control (CTRL) key and pressing the corresponding number on your keyboard. The selection shortcuts that have been assigned to control keys are shown in the drop down menu of the quick access control. Use the option “Filter by selected matrices” to sub-select channels by the currently selected matrices in the layout view. Use the option “Filter by fixtures in the active cue” to limit the selection to only channels used in the currently running cue. If a channel is not in the current cue it will remain unselected when using selection shortcuts. Select channels in cue To select channels that are in a specific cue click on this menu option to open a sub menu of cues and cue lists. All of the channels in the selected cue will become selected in the channel display. Select channels by colour The “select channels by colour” menu will pop up a submenu of all of the colour descriptions set in the dimmer patching window. Click on the colour description to select all channels that match this patch setting. If channels are already selected this option will only select the channels matching this criteria that are already selected. This is done to allow sub selection from a previous selection. For example you can select all channels in a cue and then sub select all of the channels that match a colour description. To select all channels matching the colour description, clear the selection before using this menu option. Select channels by purpose The “select channels by purpose” menu will pop up a submenu of all of the purpose descriptions set in the dimmer patching window. Click on the purpose item to select all channels that match this patch setting. If channels are already selected this option will only select the channels matching this criteria that are already selected. This is done to allow sub selection from a previous selection. http://www.lifact.com 147 LightFactory V2 A Guide for Users Reference/Window Overview Channel Display Select channels by position The “select channels by position” menu will pop up a submenu of all of the position descriptions set in the dimmer patching window. Click on the position item to select all channels that match this patch setting. If channels are already selected this option will only select the channels matching this criteria that are already selected. This is done to allow sub selection from a previous selection. Note: Selected channels will appear green and active channels (channels where the value if greater than 0) will appear in a light blue. Control Options Once channels have been selected you can modify the channel using the control options along the top of the channel display. On Use the “on” function to turn all selected channels to the on level as determined by the system properties setting. By default the on level is 100%. The on level will be applied to all the primary dimmers of selected fixtures. This button also has a drop down menu that can be accessed by clicking to the right of the button. Use this drop down menu to for the following options: Solo – The solo function will turn the selected fixtures to the on level while simultaneously turning all fixtures that are not selected off. Full – Similar to the on function selecting “Full” will set all selected fixtures to 100%. Off Use the “off” button to set all of the selected fixtures to 0%. The on level will be applied to all the primary dimmers of selected fixtures. 148 © 2004 - 2010 Dream Solutions Ltd Reference/Window Overview Channel Display LightFactory V2 A Guide for Users Home The “Home” function is designed for use with intelligent fixtures and will set all of the attributes of the fixture to their home values. Fan The “fan” function is a powerful way to create organised looks on stage without having to modify a number of fixtures one at a time. There are a number of different looks that can be created depending on the attribute you want to control. In Figure 55 below we see all of the fixtures fanned out across the stage and in Figure 56 below the same fixtures are crossed over each other in a two by two formation. Figure 55: Fan http://www.lifact.com 149 LightFactory V2 A Guide for Users Reference/Window Overview Channel Display Figure 56: Crossed To use the “Fan” select the fixtures you want to modify and click on the button at the top of the screen. Figure 57: Auto Fan Option 150 © 2004 - 2010 Dream Solutions Ltd Reference/Window Overview Channel Display LightFactory V2 A Guide for Users Pan & Tilt Use the pan and tilt offset to position the moving lights into the centre of the stage. Adjust the Spread option until the desired look is achieved. Use the check box at the bottom of this selection to switch between a fanned or crossed look on stage. You can fan the fixtures in both pan and tilt by adjusting the appropriate spread. The spread function also allows you to set a negative spread that will change the look of the fan operation. Colour The colour selection can be used to spread out the colour of several fixtures across the spectrum. By default fully saturated colours are used for this fan operation. To use different saturation and intensity levels adjust the controls at the bottom of this section. Use the spread control to “fan” out the colour of each fixture selected. You will see that each fixture is represented as triangle that points at the colour being set. As you move the spread control the triangles will move out from the centre. The centre point can be moved using the control just below the spread. Other attributes LightFactory will also allow you to apply a fan to any of the generic attributes the system knows about. Select the attribute from the drop down combo box and then use the spread control to fan the values. The mode selection will adjust in what order the fan is applied to the attribute. Left to Right will leave the fist fixture unchanged and fan all of the other fixtures out from the first value. Right to Left will leave the last fixture unchanged and fan all of the other fixtures in from the last value. Middle out will cause the middle fixture to remain unchanged and fixture either side of it to fan appropriately. Crossed is a mixture of middle out and outside in. Each alternative fixture will be either middle out or outside in. http://www.lifact.com 151 LightFactory V2 A Guide for Users Reference/Window Overview Channel Display Outside in will cause both the first and last fixtures to remain unchanged while the fixtures in between are proportionally adjusted towards a centre value. Hi-light The highlight (Hi-light – abbreviated) function is designed to temporarily set the fixtures into a known state that will make it stand out to the operator. For a moving light this typically means the home position and in open white. The value that each fixture is set to when hi-light is active can be defined in the fixture library. For most attributes this is the same as the home value. Highlight is a toggle option in LightFactory so that once you have identified the fixtures pressing the button again will return you to the previous stage look. Park Parking selected fixtures will freeze the DMX output and prevent any changes happening to the fixture. Parked fixtures are identified by red text. This button also has a drop down menu that can be accessed by clicking to the right of the button. Use this drop down menu to for the “Release” and “Release All” option. Release Parked channels and fixtures will be released from the park state and changes will become active (operates on selected fixtures). Release All Release all of the fixtures regardless of what is selected. Undo The last operation made can be reversed by clicking on this button. This button also has a drop down menu that can be accessed by clicking to the right of the button. Use this drop down menu to undo up to the last 20 operations. You can undo any operation regardless of the order that it was done in. For channel setting (e.g. changing a dimmer value) the undo is based on a timeout between operations. Because we do not want 152 © 2004 - 2010 Dream Solutions Ltd Reference/Window Overview Channel Display LightFactory V2 A Guide for Users an undo for every click on the mouse wheel a change in fixture values is grouped together unless there is a 2 second gab between operations. DBO / Clear All channels will immediately be turned off and released from their current control. All fixtures will also be unselected. Reset master cue list on DBO Tick this option from the “DBO/Clear” sub menu to reset the master cue list every time the DBO button is pressed. Modifying Selected Channels Once a channel is selected, you can modify its current dimmer value. To set the current dimmer as a percentage, enter a desired number between 0 and 100 by typing the @ symbol before the number. As the number is entered, you will see it appear in the command interface. The number entered will not apply until the “enter” or “return” key is pressed. Once enter is pressed the number will be cleared from the command line and the channels will be set. The channel will fade over the time specified by the master fade time on the command interface. Note: Corrections can be made to any entered value using the “backspace” key. Use the command line to check the entered value before applying. To select fixtures by number rather than clicking in the channel display enter the channel syntax as described in the command line section. Note: Any command that can be used in the command line interface can be typed directly in the channel display. The current value can also be modified using the scroll wheel on your mouse (if equipped). This is a very useful way of controlling the dimmer of any lamp as its gives you a smooth control of the lamp’s intensity. By default, each increment of the scroll wheel will increase or decrease the current value by 5%. This figure can be changed in the properties window. See “System” on page 91. http://www.lifact.com 153 LightFactory V2 A Guide for Users Reference/Window Overview Channel Display The “+” and “-“ key can also be used to increase or decrease the dimmer of the selected channels. Thumb Wheel For systems that do not have a scroll wheel on the mouse or cursor (such as tablet or pen based systems) you can use the on screen wheel provided. Click on this control and hold down the mouse button down. As you move your mouse or cursor up and down the intensity of the channels will change in the same way as the scroll wheel. Intelligent Fixture Control If a selection includes intelligent fixtures then the “Fixture Control” window will appear on the right-hand side of the channel window. See Figure 58. Figure 58: Intelligent Fixture Control If more than one type of fixture is selected then the fixture control window will show the generic control options. With the generic control not all of the attributes available will necessarily be supported. The figure on the right above is the generic control while the left two images are for a specific fixture (the VL3500). 154 © 2004 - 2010 Dream Solutions Ltd Reference/Window Overview Channel Display LightFactory V2 A Guide for Users By default, this window will be docked with the channel window. This option will ensure that the window remains attached to the right-hand side of the channel window. Moving the channel window will move the properties window and moving the properties window will move the channel window. To turn this option off and have the properties window floating free, un-tick the check box at the top of the window titled “Docked” Note: If more than one fixture is selected, the properties window will show the state of the first fixture, however any changes that are made will apply to all of the current selection. If a specific fixture (non generic mode) is being controlled then the attributes that the fixture supports will listed as separate controls on one or more tabs. The tabs across the top of the window will group the attributes into common functions. E.g. Position, Colour and Beam shape. All of the fixture attributes provide access to both a helper control and a real value control. The helper control is generated from the fixtures definition and is typically a way to access real world representation of what the light will do. In the colour example below, the DMX value of 64 can be meaningless to us but the box on the left shows us that the value 64 in colour wheel 1 will produce green. Real property value (DMX) Helper control Sometimes we do want values other than what is available in the helper control. It is optional when setting up new fixtures to provide help information such as all of the available colours in a colour wheel. For this reason, LightFactory always provides access to the actual DMX value and this number can be modified to override the selection in the helper control. You can turn off the DMX values and work only with the real work values by check the box at the top of the window. http://www.lifact.com 155 LightFactory V2 A Guide for Users Reference/Window Overview Channel Display When the fixture properties window is displayed, the helper controls will find the closest match to the current properties DMX value. All of the real value controls can be operated by either typing a value into the box provided, clicking on the up and down buttons to the right of the control, or using the mouse wheel to increment or decrement the value. Movement (Pan & Tilt) The pan and tilt helper is the large square with a picture of the selected fixture in it. Figure 59: Pan and Tilt Helper Note: if no picture is available the LightFactory logo will be displayed. To set the pan and tilt, left click and drag your mouse around the square. You should immediately see that fixture you have selected move relative to your mouse movements. Note: When you click and drag your mouse around the pan and tilt helper control you will notice that your mouse speed slows down. This is only a temporary change, your mouse speed will return to the windows default speed when the button is released. This is to make controlling the fixture easier and more manageable. To the right of the pan and tilt helper is the real value controls. Below this are the DMX values and below the DMX values is an options drop down menu. Click to the right of the button for the drop 156 © 2004 - 2010 Dream Solutions Ltd Reference/Window Overview Channel Display LightFactory V2 A Guide for Users down menu to appear. Clicking on the left hand side of the button will set the fixtures to their home position. Note: If you find that either the pan or tilt operation is inverted to your mouse movements, revisit the patching controls and click on the “flip pan” or “flip tilt” options provided with every channel. Movement Options Home Fixture – Select this option to return the fixture to exactly midway for both pan and tilt. Move fixture relative to current position – When more than one fixture is selected this option will allow you to move the fixtures relative to where they currently positioned. Uncheck this option to ensure all selected fixtures move to the absolute position of the cross hairs. Lock Pan / Lock Tilt – This is a useful option to ensure that a fixture is only moved in one direction. If you lock the pan for example, only the tilt value will be changed when moving the mouse in the window. Toggle Pan and Tilt Control – Turn this option on to change the behaviour of the control so that clicking inside the pan and tilt area will toggle the movement on or off. When this mode is turned on and you click inside the control the moue cursor will disappear and moving the mouse will move the fixture. You do not need to hold your finger down on the button to move the fixture as the control will remain on until you click again on the control. Fine Movement – When “Toggle” mode is turned on you will also see an option titled “Fine Movement” in the position menu. Fine movement will slow the response of mouse moves so that the fixture only a very short distance with each movement of the mouse. Note: You can also access the mine movement option on a temporary bases by holding down the control (ctrl) key and clicking inside the pan and tilt area. http://www.lifact.com 157 LightFactory V2 A Guide for Users Reference/Window Overview Channel Display Position (XYZ) The position control is very similar to the movement control but has rd a 3 degree of movement. We can think of the X and Y coordinate in the same ways as the pan and tilt of the previous control. The Z coordinate is the additional control provided by the “position” attribute. Figure 60: Position Control Unlike the movement control the position control does not display a picture of the selected fixture. Instead the XY control has grid lines. Use the slider in the middle of the control area to set the Z value for the attribute. Dynamic Colour Control The dynamic colour control refers to any attribute that can set the output colour of the fixture to a dynamic range of values. LightFactory uses a unique attribute model that allows you to define these attribute with any combination of colours. When the colour mixing is defined in the fixture editor the attribute is given a base mixing type of RGB, CMY or HSI. RGB (Red, Green, Blue) - The RGB colour model is an additive colour model in which red, green, and blue light are added together in various ways to reproduce a broad array of colours. CMY(Cyan, Magenta, Yellow) – The CMY colour model is a subtractive colour model in which cyan, magenta, and yellow light are removed in various ways to reproduce a broad array of colours. This is the most common mixing system in a moving light as the CMY filters are used to remove colour from the lamp source to produce a resulting colour. 158 © 2004 - 2010 Dream Solutions Ltd Reference/Window Overview Channel Display LightFactory V2 A Guide for Users HSI (hue, saturation, intensity) – SHI, HSB, HSL and HSV are all related representations of points in an RGB colour space, which attempt to describe perceptual colour relationships more accurately than RGB, while remaining computationally simple. HSI describe colours as points in a cylinder whose central axis ranges from black at the bottom to white at the top with neutral colours between them, where angle around the axis corresponds to “hue”, distance from the axis corresponds to “saturation”, and distance along the axis corresponds to “intensity”, “value”, or “brightness”. When working with colours in LightFactory we are able to switch to whatever colour space we want to work in and the software will calculate the correct values to apply to the fixture. Figure 61: Colour Control In the example above the primary mixing model for the fixture is th CMY but additionally the fixture has a 4 colour mixer control for colour temperate correction (CTO). In the top half of the attribute we can indivually change the values of each of the 4 colours using either the slider, the percentage spin edit or DMX value. Buttons are also provided to quickly take the value to full or off. The full value button is labelled with the colour while the off button is labelled “0%”. The bottom half of the colour control allows you to pick from a palette of common colours. Clicking on any of the colours will automatically set the top sliders to the correct value. Advanced Colour Heuristics – If the option “Use advanced colour heuristics is checked then the software will attempt to map the http://www.lifact.com 159 LightFactory V2 A Guide for Users Reference/Window Overview Channel Display selected colour across all of the colour controls (CMY and CTO in this example). With this option turned off only the first 3 will be adjusted to match the colour. The reason for this option is that only the first three colours have a clear and simple algorithm for calculating the mix. Additional colours require significantly more advanced calculations to work out the setting. This is also not an exact match and may not work 100% of the time. In the middle of the attribute control is a button to open the Generic Colour Chooser. This will open a separate dialog box with more options for picking a colour. The generic colour chooser will also allow you to pick colours from the build in library of filters. Note: If the fixture selected only supports colour mixing control then the Generic Colour Chooser will be displayed in place of the fixture control window. Generic Colour Chooser This window is organised into seven or more tabs depending on filters that fixture may have. 160 © 2004 - 2010 Dream Solutions Ltd Reference/Window Overview Channel Display LightFactory V2 A Guide for Users When the generic colour chooser is created it will add additional tabs for the filter wheels that a fixture may have. In the example above the fixture has a colour wheel and a gobo wheel. You will notice the two additional tabs “Filters 1” and “Filters 2” contain respectively colours and gobos (some filter wheels may have a mix of gobos and colours – there is no restriction on this). Show – The show tab is designed to provide a quick access to the common colours you will be using in your show. The main grid will display all of the colours currently configured in the show palettes. By adding a colour to the “Show” tab you will also be creating a palette. To do this select the colour you want using the other tabs and then click on the “Add current colour to show” button. The auto create button can be used to add 16 saturated colours most common to all shows. Palette / Spectrum – The palette and the spectrum tab provide a large range of colours to choose from. They provides the ability to pick a colour quickly by clicking on the on-screen colour. HSI – Use the HSI tab to choose a colour in the Hue, Sturation, Intensity colour space. You can pick the colour using either the 3 slider controls or by clicking in the curcular colour wheel. RGB – Use the RGB tab to choose a colour in the Red Green, Blue colour space. CMY – Use the CMY tab to choose a colour in the Cyan, Magenta, Yellow colour space. Filters – The filters tab provides access to a range of gel filters commonly used in the lighting industry. You can choose from Appolo, Lee or Rosco filters. http://www.lifact.com 161 LightFactory V2 A Guide for Users Reference/Window Overview Channel Display Generic Attributes There are two types of generic attributes that will be discussed here. The most simple of the two simply provides a value control to set the attribute. The more complex of the generic control has the added feature of providing a static list of items that can be selected to arrive at the attributes value. Figure 62: Generic Attribute Figure 63: Generic Attribute + Static Selection Figure 62: Generic Attribute shows an example of a simple generic control. This attribute has a range of values that can be easily set by moving the slider control or entering the real world value or the DMX value into the spin edits provided. There is also two buttons to easily move between the two extreme values. For known attribute types these buttons will be labelled with meaningful text. If the attribute is not known they will be given the default labels of on and off. Figure 63 shows an example of a generic control that also as a static selection of attribute values. The primary purpose of this control is to be able to select a value from a drop down list. This is primarily used for control channels, gobos and colour wheels. In the above example the drop down box provides a list of gobos but the list can be any combination of text, images and colours. Once selected a small slider control under the DMX value can be used to adjust the output value between the range associated with the selected item. 162 © 2004 - 2010 Dream Solutions Ltd Reference/Window Overview Channel Display LightFactory V2 A Guide for Users The mode selection is used to filter the main list and can also interact with the rotation control described next. If the attribute does not have different modes then this control will not be visible. Rotation Control The rotation control can be used independently or associated with a generic control as described above. When operating in connection with a generic control the options available can change depending on what values are selected. Figure 64: Rotation Control - Indexed Figure 65: Rotation Control - Continuous Indexed mode (Figure 64) – Index filters refers to positioning the filter at a specific angle to the light source. In this mode we can set the exact angle that the gobo will appear in the fixture. Continuous Rotation mode (Figure 65) – In continuous rotation mode the filter will be spinning continuously at a set number of revolutions per minute. Continuous mode has 3 settings – clockwise rotation, counter clockwise rotation and stopped. In continuous rotation mode use the buttons to set the rotation direction and then the RPM spin edit to set the rotation speed. The link between this control and the corresponding generic control is a 2 way link. When you change from an indexed filter and a rotating filter the rotation control will automatically change. Likewise changing the rotation mode in the “Rotation Control” will cause the filter to change to the corresponding mode. Framing Control The framing control is a graphical interface to shutter and framing systems implemented by some fixtures. There are typically two different modes that framing shutters can operate – position or http://www.lifact.com 163 LightFactory V2 A Guide for Users Reference/Window Overview Channel Display position/angle. With the LightFactory graphical interface you do not need to be aware of the way the fixture is controlled as the attribute controller will calculate the appropriate DMX values for the changes made. Figure 66: Framing control Use the red points around the white circle to move the framing shutters in and out or change the angle of the blades. The middle red dot will move the entire blade in or out. The two red dots on the outside of the blade can be used to move just one side of the blade in or out. As the blades are moved in the graphical interface you will see the DMX values being used to control the fixture. The rotation angle must be set as a DMX value and will not be represented in the visual representation of the shutters. Joystick Control If you have windows compatible joystick connected to your system then LightFactory will automatically make this available to control the your fixtures. There is no setup required to use the joystick and the functions will be mapped automatically. The pan and tile of the fixture will be controlled by the yoke of the joystick while the Z control available on some joysticks will set the dimmer level. Up to 16 buttons on the joystick will automatically map to the first 16 shortcuts in every page of the system. To adjust the sensitivity of the joystick use the “advanced” options in the “system settings” tab of the “system properties”. 164 © 2004 - 2010 Dream Solutions Ltd Reference/Window Overview Channel Display LightFactory V2 A Guide for Users Quick access controls In the middle of the bottom row of buttons are three quick access controls to the effects library, channel groups and palettes. Each quick access control will drop down a menu to provide access to the various options. Figure 67: Channel View - Quick Access Controls These options allow you to access different functions without having to go into the editor window. For example instead of opening the effects editor to test a library effect we can simply run it directly from the “FX Library” quick access control. FX Library Use the “FX library” control to run any effect that has been saved to the effects library. The effect will run on the channels/fixtures that have currently been selected. Clicking the library item again will turn the effect off. Effects that are currently running in the library are indicated by a check mark next to the name. Click on the “Edit FX Library” option at the bottom of the menu to open the effects editor window. When this window is closed the “fx library” menu will be repopulated to account for any changes you may have made. Stop all effects (library) – Click on this menu item to stop all of the library effects that currently running. Create FX from the running library effects – To create a static effect from a library effect start the effect you want and then select this option from the effects library menu. A popup dialog will request the name for the new effect. Once named click on the OK button and a dialog will appear indicating how many effects have been created. The new effect will now appear in the effects editor for further editing. http://www.lifact.com 165 LightFactory V2 A Guide for Users Reference/Window Overview Channel Display Show library effect controls – The library effect controls will automatically appear when a library effect is started. If this window is closed or becomes hidden behind other windows you can use this option to show the window again. Figure 68: Fx Library Controls The FX library controls window will display a tab on the left hand side of the window for each running library effect. In each tab will be a series of controls for each attribute contained in the effect. In the example above the “movement – circle” effect has a separate control for pan and tilt. Use the large wheels or the spin edits below each wheel to change the behaviour of the running effect. Channel Groups Selecting a “channel group” from the quick selection menu will apply the values of all channels in the group. This is the same operation as the shortcut function and will apply any fade times set in the group. Use the option “Apply channel group shortcuts to selected items only” to restrict the application of channel group to the fixtures that are selected in the channel display. Fixtures not selected will be ignored when a channel group is selected from the drop down menu or an apply shortcut is pressed. 166 © 2004 - 2010 Dream Solutions Ltd Reference/Window Overview Channel Display LightFactory V2 A Guide for Users Palettes Palettes will apply to any selected fixtures when selected from the pop up menu. This operation is the same as using the shortcut that can be assigned to palettes. Recording This section covers recording into the four programming sections of LightFactory. • Channel groups • Cue lists • Effects • Palettes Recording a group On the left hand side of the bottom row of buttons is the “Record Group” option. This button has 2 functions; The main button function (Left hand side of the button) will record a group by taking a snapshot of the selected channels state. The right hand part of the button will drop down a menu with alternative recording options. Channel groups can be viewed by clicking on the “Channel Groups” button on the command interface or by pressing F3 on your keyboard. For more information on channel groups see “Channel Groups” on page 18 and “Channel Group Editor” on page 179. Figure 69: Record group options Add channels to group (dimmer only) This option will add the selected channels to a channel group with the dimmer level set at full and all other attributes turned off. If the group does not exist it will be created before the channels are added. After selecting this option a small dialog will appear: http://www.lifact.com 167 LightFactory V2 A Guide for Users Reference/Window Overview Channel Display Figure 70: Select group dialog Enter the name for the channel group you want to create or select an existing group using the drop down list. You can also assign a submaster and a shortcut at this time. To do this enter these values into the spin edit controls provided. Once you have entered a name or selected a channel group click on the “OK” button to create the channel group. Click on the “Cancel” button to exit and return to the previous screen without recording a group. Add selected channels to group (Snapshot current state) This option is the same as clicking directly on the “Record Group” button. When using the snapshot option for recording channel groups you can select what attributes you want to record into the group. By default the all attributes are turned on. A channel group can have any combination of attributes and does not have to control the dimmer at all. 168 © 2004 - 2010 Dream Solutions Ltd Reference/Window Overview Channel Display LightFactory V2 A Guide for Users Figure 71: Select group dialog (snapshot) If the dimmer is selected this option will record the current state of the channels as the maximum value that a channel will reach when the group is at 100%. Likewise with each of the attributes that are recorded. As the group’s value travels from 0 to 100% the channel’s output value is the proportion of its set maximum. By default, all fixture properties will operate the same way. Remove selected channels form a group Use this option to remove the currently selected channels from a already recorded group. A dialog will prompt you to enter or select the name of the group you want to remove the channels from. Select it from the drop down list and click “OK” to remove the channels. Recording a cue Next to the “Record Group” button is the “Record Cue” and “Update Cue” buttons. These buttons have 2 functions; The main button function (Left hand side of the button) will perform an immediate action. The right hand part of the button will drop down a menu with alternative recording options. Cues can be viewed by clicking on the “Cue List Editor” button on the command interface or pressing F4 on your keyboard. For more http://www.lifact.com 169 LightFactory V2 A Guide for Users Reference/Window Overview Channel Display information on cue lists and the cue system see “Cue List Editor” on page 190 and “Creating a Basic ” on page 65. Figure 72: Record Cue Options Figure 73: Update Cue options Add active channels to a cue Active channels are those where the dimmer is greater than 0%. This is the default option when clicking on the “Record Cue” button. To create a new cue or add channels to an existing cue: 1. Set up the scene as you want it to look and click on the “Record Cue” button or select “Add active channels to a cue” from the drop down menu. 2. The “Record Cue” dialog will pop up to select the cue into which you want to add channels. Set the “cue list” and “cue” number that you want to add the channels to. 170 © 2004 - 2010 Dream Solutions Ltd Reference/Window Overview Channel Display LightFactory V2 A Guide for Users Figure 74: Cue Selection Dialog Note: Drop down combos provide a list of available show groups and cues for you to select from. To create a new cue list and/or a new cue, simply type the new entry into the input box provided. 3. If you want to add a short description to the cue being created, enter this into the field provided. 4. Select the “Record effects currently running” to add any running effects to the cue. 5. If you want to add the active channels to more than one cue check the option “Mode >>”. You will then see a list of all of the cues in the selected cue list. Click on all of the cues you want to record into so that a tick marks your selection. 6. Select “OK” to complete this operation. Note: The “cue selection” dialog will default to the last selected cue list and the next available (integer) cue number. If you are adding channels to an existing cue, then channels that already exist in the cue will be overwritten with the current values. This operation will also record the current state of fixtures and all of their attributes. To cancel the operation and return to the channel window click on the “Cancel” button. http://www.lifact.com 171 LightFactory V2 A Guide for Users Reference/Window Overview Channel Display Record palettes into this cue – Turn on this option to record the currently active palette references into the cue. A palette reference can be either a channel group or a palette. By recording the reference into the cue you can modify a single location to update multiple cues. For example a position palette can be recorded into the cue so that if the position on stage changes you only need to update the position palette, you do not need to find all of the cues that contain that position. Record Attributes – Use the check boxes under the “Record Attributes” heading to determine that will be recorded with the cue. These options are very useful when updating cues as you can update specific attribute types. Tracking – The tracking combo box determines the tracking mode that will be applied to cue list changes. • Cue Only - Select this option to only update the cue you have selected. No tracking changes will be made to the cue list. • Track Backward – Select this option to update all previous cues up to the point where the attribute changes. • Track Forward – Select this option to update all cues following the one being recorded up to the point where the attribute changes. Add selected channels to a cue This operation acts exactly as with “Add active channels” above, however only channels that are currently selected will be added to the cue regardless of their active state. Update (replace) cue with active channels Use this option to change an existing cue so that the current look (channel settings) replaces what is currently recorded. This function operates exactly the same as recording a cue however all existing information and channels will be removed or overwritten. Update cue with only existing channels Use this option to change an existing cue updating only the channels that are already in that cue. Other channels (selected or active) will not be added to the cue. 172 © 2004 - 2010 Dream Solutions Ltd Reference/Window Overview Channel Display LightFactory V2 A Guide for Users Recording an effect The “Record Fx” options can only be used to record simple chases or to create a profile effect from a library effect. For more advanced effects programming options see the “Effect Editor” section on page 218. The main button function will record a new chase step using the active channels. The right hand part of the button will drop down a menu with alternative recording options. Figure 75: Record Fx options Add active channels to simple chase step This menu option can be used to either create a new simple chase or add a step to an existing chase. The keyboard shortcut control-s can be used as an alternative to the right click menu. A simple chase is a series of steps, each containing a set lighting state. This is similar to a cue list, however the transition control is limited and a chase can be run automatically from within a cue. To record a chase step, setup the channels to the state you want to record and select “add active channels to chase step” from the menu. The following dialog will ask you to select the chase you want to record to and provide the option to record into an existing step or a new step. http://www.lifact.com 173 LightFactory V2 A Guide for Users Reference/Window Overview Channel Display Figure 76: Creating or selecting a chase step Select the chase you want to add the lighting state to or enter a new name to create a new chase. The step number will default to the next available step. To create a new step click “OK” and the system will record you chase step. To add the current lighting state to an existing step select the step number from the drop down list and click “OK” The default step and fade time can be set using the edit provided. These values are global to the entire chase and cannot be set per step. To cancel the operation at any time click on the “Cancel” button. Add selected channels to simple chase step This option works the same as “add active channels to simple chase step” however only channels selected will be recorded. Create simple chase from selected fixtures This option provides a very simple method for creating simple chases. Like the option above this works on selected fixtures and will automatically create a chase step for each of the fixtures. Create a simple RGB/CMY Cycle from selected fixtures. This option provides a very simple method for creating simple chases. Like the option above this works on selected fixtures and will automatically create a 6 step chase with each step containing 174 © 2004 - 2010 Dream Solutions Ltd Reference/Window Overview Channel Display LightFactory V2 A Guide for Users all of the selected fixtures. Each step will change the colour to one of the 6 primary saturated colours. Create a simple colour wheel chase from selected fixtures. This option also creates a chase based on the selected fixtures. Only one fixture type can be selected for this option to work. The resulting chase will have as many steps as colour wheel frames are found for the fixtures. Each step will contain all of the selected fixtures and will move the colour wheel one frame per step. Create effect from running library effect If you have library effects running directly in the channel view you can turn them into show effects by selecting this option in the menu. The channels that the effect is currently running on will be used to build the effect. A dialog will be displayed asking for a name to be given to the new show effect. Once you have entered a name for the effect click on the “OK” button to proceed with the operation. To cancel the operation at any time click on the “Cancel” button. Figure 77: Creating an effect based on library Recording a palette Palettes are a way to quickly set a fixture to a particular state. Using a palette is a static operation that will override the current state of a fixture. See “Palettes” on page 247 for more information. http://www.lifact.com 175 LightFactory V2 A Guide for Users Reference/Window Overview Channel Display Record palette To add selected channels to a palette: 1. Set up the fixtures into the static state (dimmer, colour, pan and tilt etc) 2. Click on the “Record Palette” button at the top of the window. Figure 78: Record Palette 3. The dialog in Figure 78 will prompt you to enter the palette name and shortcut number you would like to assign to the current state. You can also select what attributes you want to include in the palette using the check boxes provided. Note: This operation only allows you to create new entries and cannot be used to add to an existing palette. 4. Enter the shortcut number you would like to assign and click the “OK” button to confirm the requested action. If you have changed your mind, click “Cancel” to return to the channel window. Copy Options The copy button on the right hand side of the channel display window will drop down a menu with a number of options for storing and recalling the channel state. You can use this to store and recall the channel state from a temporary memory, copy from another 176 © 2004 - 2010 Dream Solutions Ltd Reference/Window Overview Channel Display LightFactory V2 A Guide for Users fixture or copy the channel state form a cue. Figure 79: Copy fixture options Store current channel state into temporary memory If you are half way through creating a look on stage and need to run a cue or bring up some other lighting state then this option can be used to make a temporary back up of the look you currently have. The state of every channel will be stored away in a separate memory to be recalled at any time in the future. Recall channel state from temporary memory Use the recall option to return the live channel state to the one stored in memory with the previous function. If no channel state is stored then the current state will remain unchanged. Swap channel state with temporary memory Use the swap function to perform both a recall and a store in a single operation. The current state of the channels will be stored in the temporary memory and then the state that was stored will be loaded into the live state. Copy from fixture to selected fixtures Selecting this option will change your mouse cursor to a hand pointer to indicate that you need to select a “copy from” fixture. The attribute and dimmer state of the next fixture you select will be copied to the currently selected fixtures. http://www.lifact.com 177 LightFactory V2 A Guide for Users Reference/Window Overview Channel Display If the selected fixtures are of the same type as the “copy from” fixture then an exact copy can be performed. If not then the software will apply the generic attributes of the selected fixtures. Copy from cue to selected fixtures This is a convenient option to load the state of the selected fixtures form the information stored in a cue. Selecting a cue from the sub menus found off this menu option will set the selected fixtures to the same settings as they appear in the cue. If a selected fixture does not exist in the cue then its values will remain unchanged. 178 © 2004 - 2010 Dream Solutions Ltd Reference/Window Overview Channel Group Editor LightFactory V2 A Guide for Users Channel Group Editor Channel groups (Scenes & Submasters) are a convenient way to manipulate a number of channels and fixtures with one control. Channel groups can operate on any number of fixture attributes and do not need to operate on the dimmer. You can also add channel groups into cues, thus creating stage looks that can be altered in one location and applied across all cues. Channel groups can also be used to aid with selecting fixtures in the channel display. By assigning a selection shortcut the channels contained in the group can be selected or de-selected using either the shortcut or the menu option on the channel display window. Figure 80: Group Editor Channel groups are most commonly associated with traditional scenes or submasters, however you do not need submasters to use channel groups. A channel group is a snapshot of a lighting state where the output of each channel in the group is a proportion of the group value. http://www.lifact.com 179 LightFactory V2 A Guide for Users Reference/Window Overview Channel Group Editor To create a new blank group, click on “New Group.” This will create a group without any channels assigned and all fields set with default values. To remove a group from the system, click on the row containing the group and click on the button “Delete Group.” A dialog box will prompt you to confirm that you wish to remove the group. Click on the “OK” button to remove the group or “Cancel” to return to the previous window. Group Name The group name is a description field that provides easy identification of the group. Enter a meaningful description for future reference. Channels This is a list of the channels included in the group. This list can be edited by entering the channels separated by a coma (,). You can also enter channels using the same syntax as the command window. Example 1,3,4,10/20-15 This will add channels 1, 3, 4 and channels 10 through to 20 excluding 15 to the group. The channels included in the group can also be edited by clicking the ( ) button to the right of the field or by double clicking on the grid cell. This will bring up the “Channel Group Details” window. This window provides greater control over the maximum value the channel will reach when the group is at 100% and provides access to intelligent fixture attributes. Channels included in this group Figure 81: "Channel Select" Window 180 © 2004 - 2010 Dream Solutions Ltd Reference/Window Overview Channel Group Editor LightFactory V2 A Guide for Users This window has five tabs down the left hand edge that correspond to the different information you may want to edit. In channel groups the attributes can have an “Off” value. Cells that are in this state will also be greyed out to make them easily identifiable. To set a value to the “Off” state simply types an O into the cell or any non valid character. “Off” values will be ignored when the channel group applied. The values set in the overview and DMX tabs will determine the maximum value that the attribute will reach when the group is at 100%. For example if a channels dimmer value is set to 50% in the channel group detail window then when the group is at 100% the channels dimmer will be set to 50%. If the group is set to 25% then the channels value will be set to 12.5% (25% of 50%). Docking the channel group detail window To minimise the number of windows open in LightFactory the channel group detail windows can be docked to the bottom of the channel group window. Drag the channel detail window over the bottom frame of the channel group window until a gray box appears around the bottom third of the window. Release the mouse and the detail window will be comes docked. Figure 82: Channel groups with docked detail window To undock the window click on the dotted line at the left of the detail frame and drag the window away from the channel group window. When you release the mouse button the window will undock. http://www.lifact.com 181 LightFactory V2 A Guide for Users Reference/Window Overview Channel Group Editor Overview The overview tab will show the attributes values as real world information. Most values will be shown as percentage information but some values may show other data. A gobo control for example will show an image of the gobo selected and the colour controls will show the colour that is currently assigned. This tab also provides optional time and delay for the individual channels. For attribute level timing see the “timing” and “delay” tabs. Each of the attribute tabs also provide helper controls that can be accessed by double clicking on the cell. For the colour cells the standard LightFactory colour picker will appear. Once you have finished modifying the value with the helper control click anywhere in the previous window to close it. Figure 83: Detail window helper controls 182 © 2004 - 2010 Dream Solutions Ltd Reference/Window Overview Channel Group Editor LightFactory V2 A Guide for Users DMX The DMX tab will show all of the same information as the over view tab but all of the values will be shown as DMX values. This provides the maximum resolution when modifying the data in the group. For example in the overview tab the dimmer is shown as a percentage giving 100 possible values but the underlying DMX associated with the dimmer has 255 possible values. When the percentage is changed is converted to a DMX value for storage in LightFactory. Timing To set an individual fade time for any attribute use the timing tab to enter a time value in seconds. If the value shows “Not set” then no independent fade time exists. Any fade time set here will override the channel fade time and the group fade time when the group value is set or the group applied. Delay To set an individual delay time for any attribute use the delay tab to enter a time value in seconds. If the value shows “Not set” then no independent delay exists. Any delay set here will override the channel delay when the group value is set or the group applied. Add/Delete The final tab provides convenient options for adding and removing channels from the group. Figure 84: Channel detail, add/remove tab http://www.lifact.com 183 LightFactory V2 A Guide for Users Reference/Window Overview Channel Group Editor This window is divided into two halves. On the left hand side is a list of all the channels in the system. Additional information such as purpose, positions etc are also provided to help identify channels. The right hand panel is the list of channels that are included in the group. Along the bottom of this tab are the add and remove buttons. Add Channel syntax entry box Remove Select the desired channels in the left hand panel to add to the channel group and click on the add button (right arrow) at the bottom of the page. To remove select the desired channels from the right hand panel and click on the remove button (left arrow). You can also use the channel syntax box to enter channels to be added. If text is entered into this edit box it will take precedence over the selected channels when the add button is pressed. Note: In any of the tabs you can enter data into multiple cells by highlighting the cells you want to change and then typing the new value. As you type the value will only populate the fist cell. Pressing the enter key after you have finished typing will copy the value to all of the highlighted cells. Value This is the current output state of the group and is a percentage value between 0 and 100%. By default this cell is drawn as a graphical bar representing the value. Activating the edit control by clicking in the cell or starting to type a value when the cell is current will cause the graphical bar to disappear and a standard edit box will appear. Once you have finished editing the value the cell will return to the graphical bar. This value can be set directly by entering a number into the field or by selecting the row and using the mouse wheel controls to raise or lower the value. The resulting output of each of the channels will be 184 © 2004 - 2010 Dream Solutions Ltd Reference/Window Overview Channel Group Editor LightFactory V2 A Guide for Users determined by the “max value” for each of the attributes in the included channels. Note: If a submaster is assigned, the value will directly reflect its current position and will change in real-time with the control. Fade Time The fade time (in seconds) specifies how long the system will take to go from the current value to a new value. Whenever the “Value” field is changed the fade time will affect how long it takes to reach this new value. The fade time can be modified by clicking in the field and changing the value directly or by clicking on the up/down buttons to the right of the field. A channel fade time or an attribute fade time will override any value set in this field. Behaviour A channel group can behave in one of six ways when setting the actual output values. To change the behaviour of a group select the desired option from the drop down menu accessed by clicking on the small arrow to the right of the field. Override (LTP) – Also known as “Latest Takes Presidence”. This is the default behaviour of channel groups. This behaviour will apply the channel levels set in the group to output channels and take over control of that channel. As soon as something else sets the channel value the group value will get overridden. Likewise as soon as the group value changes it will override the existing values set in the channel. T T Build – The values set in the channel group will be added to the current output value of the channels. T T Exclusive – All other channels will be set to zero and only the channels in this group will be applied. T T Highest Takes Precedence (HTP) – When a group value is set with HTP behaviour the output on the channel is determined by what has a higher value. If the value set in the group is higher than the value in the channel then the group will control the channel. If T http://www.lifact.com T 185 LightFactory V2 A Guide for Users Reference/Window Overview Channel Group Editor the value in the channel is higher than the group value it will remain unchanged. Independent – Channels in an “Independent” group will override all other requests to modify the channel value. As soon as the group level is above 0, channels within this group will be controlled by the group values. T Inhibit – With an inhibit group the value masters all channels that are in the group. The output value of the channel will be scaled by the value of the inhibit group it belongs to. Submaster To assign a submaster to a channel group, enter a valid submaster number (1 – 100,000) into this field. Once entered, the submaster will automatically be assigned and become active. Submasters are split into pages of up to 100 possible submasters. The number of pages and the number of submaster per page can be defined in the system properties. If the system is defined with 100 submasters per page then use the page number as the first digit followed by the submaster you want to assign. To access the submasters the first page (page 0) simply enter the number between 1 and 100. For the second page (page 1) enter submasters 101 through to 200. Note: The value of the group will not change until the next time the submaster changes. To learn how to use a submaster once it has been set up, see “Submaster Options” on page 128. Selection Shortcut The selection shortcut is a convenient way to select fixtures in the channel display by pressing a shortcut button. In this operation only the channel numbers are used as the selection criteria. Nothing is changed in the group – specifically the group value remains unchanged. To assign a selection shortcut to a channel group, enter a valid shortcut number into this field. Once entered the shortcut will automatically be assigned and become active. There are 100 shortcuts per page and 100 pages (beginning at 0) of shortcuts. Use the page number as the first digit followed by the submaster 186 © 2004 - 2010 Dream Solutions Ltd Reference/Window Overview Channel Group Editor LightFactory V2 A Guide for Users you want to assign. To access the submasters the first page (page 0) simply enter the number between 1 and 99 (note that shortcut 0 is reserved). For the second page (page 1) enter submasters 100 through to 199. Toggle Shortcut A toggle shortcut can be thought of as a switch in the system that turns a lighting state on or off. When the assigned shortcut is first pressed the channel group will be set to 100% (full) and the channels and attributes will go to their respective values. Pressing the toggle shortcut again will cause the group to turn off (0 value). Changing the value of the group between pressing the toggle shortcut will not change its behaviour. If for example the group is turned on by a toggle shortcut and the value to then changed to 40% clicking the toggle shortcut will cause the group to turn off. To assign a toggle shortcut to a channel group, enter a valid shortcut number into this field. Once entered the shortcut will automatically be assigned and become active. Apply Shortcut Pressing an apply shortcut will apply the groups setting to the channels and fixtures using the fade time set in the group. When using apply shortcuts the ability to set individual attributes and properties to an “Off” state is very important. For example, if you setup a channel group with pan and tilt information set for each fixture and have all other attributes (dimmer, colour, etc) set to off then channel groups become a position preset that can be called up at any time. This is a useful feature for both on-the-fly control or when pre-programming shows away from the final venue. To assign an apply shortcut to a channel group, enter a valid shortcut number into this field. Once entered the shortcut will automatically be assigned and become active. To learn how to use a shortcut once it has been set up, see “Shortcut Options” on page 132. Snap Attributes When “Snap Attributes” is checked, intelligent fixtures attributes will immediately snap to their maximum value as soon as the group value is raised above 0%. http://www.lifact.com 187 LightFactory V2 A Guide for Users Reference/Window Overview Channel Group Editor If this option is not selected the value of the properties will operate the same as the dimmer and will rise and fall as a proportion of the group value. Options Add selected groups to a cue To create a new cue or add groups to an existing cue: 1. Select the groups you want to add to the cue by clicking on the row to highlight it. Use the shift or control key to select multiple groups. 2. Click on the options button and from the resulting drop down menu select “Add selected groups to cue”. 3. The “cue selection” dialog will pop up to select the cue into which you want to add the group. Set the “cue list” and “cue” number that you want to add the channels to. 4. If you want to add a short description to the cue being created, enter this into the field provided. 5. Select “OK” to complete this operation. Note: The “cue selection” dialog will default to the last selected cue list and the next available (integer) cue number. To cancel the operation and return to the channel window click on the “Cancel” button. Add active groups to a cue This operation will work exactly as the above option with active groups (groups with a value above zero) added to the cue rather than selected. Snapshot when adding groups Toggle the “Snapshot when adding groups” option to record the current channel state into all newly added groups. Select Active Button This button serves several functions. By clicking on the left hand side of the button will select all of the active channel groups. Once 188 © 2004 - 2010 Dream Solutions Ltd Reference/Window Overview Channel Group Editor LightFactory V2 A Guide for Users selected you can use the mouse wheel to raise or lower all of the values. Clicking on the drop down right side of the button will pop up a menu with further options. Select All/Unselect All To select all of the groups click on the “Select All” menu option. To unselect all of the currently selected groups click on the “Unselect All” menu item. Select Inactive Click on “Select Inactive” to select all of the groups where the value is currently 0%. Sorting You can sort the channel groups grid by any of the columns by simply clicking on the column header. Clicking a second time will reverse the sort order of the selected column. The column used to sort the channel groups will be indicated by a small triangle to the right of the column name. Filters Use the “Show All Groups” button to select the filter mode you want. To make it easier to manage a large number of channel groups you can turn off different groups by what shortcuts and submasters are assigned. The current filter being applied will be shown in the button title. Print channel groups Click on the “Print” button to print out the channel groups in this show. A drop down menu can be accessed by clicking on the right of this button. The resulting menu will provide access to a preview window and the printer setting control. http://www.lifact.com 189 LightFactory V2 A Guide for Users Reference/Window Overview Cue List Editor Cue List Editor To access the cue list editor click on the “Cue List Editor” button on the command interface window or press F4 on your keyboard. Figure 85: Cue List Editor Shows consist traditionally of a list of cues each of which contains a defined lighting state and/or effect sequence. A cue can be considered any point in a live show when a signal is given for a lighting change to take place. When a cue is triggered, the lighting state becomes active and channels attached to the cue will be set to their preset levels. Cue Lists LightFactory provides the ability to create multiple cue lists to help manage and run complex shows. A “cue list” is a way to collect a number of cues and assign a name or short description. Examples of how cue lists can be used include; Separate different “Acts” within a show Manage a number of shows all running in a single venue Create separate shows for a number of songs likely to play in a concert or venue. To create a new cue list click on the “Options” drop down menu and select “Create a new Cue List” from the resulting options. A dialog will appear titled “Create New Cue List”. Enter the name of the cist list you want to create and click “OK” to continue. 190 © 2004 - 2010 Dream Solutions Ltd Reference/Window Overview Cue List Editor LightFactory V2 A Guide for Users To change the name, click within the “cue list” field and type the desired name. As soon as you exit the field, the new name will be saved. Press “Escape” to cancel the changes you have made and the current cue list name will return. To remove a cue list select the desired cue list from the list (Selected cue lists will be highlighted) then click on the “Options” drop down menu and select “Remove current cue list”. A confirmation box will prompt you to confirm this operation. If you are sure you want to delete the group, click the OK button. Active vs. Selected Cue Lists A selected cue list is the cue list you are currently editing. The name of the cue list is highlighted to identify that it is selected. To select a different list simply click on the desired cue list name. The selected cue list is always the one shown in the right hand panel of the window. The active cue list refers to the play controls in the bottom right of the window. The active cue list is the cue list currently loaded into this master playback and is identified by the green triangle to the left of the name. The currently active cue within the list is also highlighted in the same colour if that cue list is showing. Options Menu As well as creating and deleting cue lists the options menu has several other functions to make working with cue lists easier. Figure 86: Cue list, Options menu http://www.lifact.com 191 LightFactory V2 A Guide for Users Reference/Window Overview Cue List Editor Copy current cue list Use this option to make a duplicate copy of the selected cue list. The new cue list will be named “Copy of” followed by the original cue list name. Blocking & Mark Selecting the “Blocking & Mark” option in the menu will open up the submenu for globally setting the flags inside the cue list. Set “Block” on all cues – This option will check all blocking flags in the selected cue list. Un-Set “Block” on all cues - This option will un-check all blocking flags in the selected cue list. Set “Mark” on all cues - This option will check all mark flags in the selected cue list. Un-Set “Mark” on all cues - This option will un-check all mark flags in the selected cue list. Open tracking sheet The tracking sheet is a convenient way to view how channels are changing between cues. Figure 87: Cue list tracking sheet The view consists of a channels vs cue grid. The channels used in the entire cue list are listed in each row while the cues travel across the columns of the grid as above. 192 © 2004 - 2010 Dream Solutions Ltd Reference/Window Overview Cue List Editor LightFactory V2 A Guide for Users If you have intelligent fixtures recorded into cue you will see a small “+” sign at the start of the row. This indicates that there is more information about the channel available. When you click on the “+” symbol the rows will expand to show all of the attributes for that fixture and what values are set for each cue. After clicking on this the “+” will become a “-“ and can be used to collapse the view back down to the dimmer only. The “Collapse All” and “Expand All” buttons at the bottom of the window can be used to open and close all if the intelligent fixtures listed. The “Channel Range” edit box can be used to enter a range of channels that will filter the view. You can use the standard channel select syntax to filter the channels shown. e.g. 1/20-7 this will show only channels 1 thought to 20 except 7. Check the “Show tracked values” to view what the channels will be in each cue if full tracking is turned on in the system properties. Use primary playback Check this option if you want that master playback on the external playback wing to be used to control the master cue list playback. You can also access this using a programmable keyboard in the same way as shortcuts. The key sequence to run this special playback: Cue Go: control - q followed by “A1” Cue Back: control - q followed by “Z1” Record current channel state when adding cues Check this option to record the currently active channels in to the cue when a new cue is added from the button on this window. Safety playback mode Safety playback mode is designed to prevent accidental triggering of cues during your show. When this option is checked the “GO” button will not immediately execute the next cue when an existing cue is running or the cue is set to follow on. If the previous cue is still running or the next cue is setup to be a follow on cue the “GO” button will be relabelled “Enable”. Clicking http://www.lifact.com 193 LightFactory V2 A Guide for Users Reference/Window Overview Cue List Editor on the “Enable” will change it to “GO” and a second press will force the cue to be executed. This mode ensures that the button must be pressed twice if the use wants to skip over the normal execution rate programmed. Selected cue to follow current cue This option is useful if you have the cue list channel detail window open or docked to the cue list. As the cue list is advanced the current selected cue will automatically follow the cue currently active on stage. The channel detail, effects and groups window will automatically advance to show the information for that cue. Edit cue channels live With this option turned on any changes made to the channels in the current live cue will automatically be reflected on stage. With this option turned off (default) the cue list channel detail window is a blind editor meaning that changes are not seen until the next time the cue runs. Record current channel stage when adding cues With this option turned on the active channels in the channel display will automatically be added to the cue when using the “Add Cue” button. Show / Hide search bar Check this item to turn on or off the search bar at the bottom of the cue list. Print The print option will output the currently selected cue list to the selected printer. Print Preview Select the preview option to open a window that will display the printed page. From this window you can choose to print. Printing Settings This option will open the page setting for printing the cue list. 194 © 2004 - 2010 Dream Solutions Ltd Reference/Window Overview Cue List Editor LightFactory V2 A Guide for Users Reset grid layout to default If you have resized or moved columns in the cue list grid you can restore the default positions and size by selecting this option. Visible Columns Selecting the “Visible Columns” option in the menu will open up the submenu that will list all of the columns in the cue list window. Select each one to turn the column on or off in the grid. Cue’s The “cue list” is a series of cues each numbered between 0.000 and 4294966.999. The cue number determines the default order that cue will be run; however, the strict order is determined by the “next cue” field. To create a new cue: 1. Click the “Add Cue” button below the cue list editor. 2. The newly created cue will be added to the end of the list with a cue number one integer value above the last cue e.g., if the last cue number was 2.35 then the newly created cue will be 3.00. 3. LightFactory will assign the “next cue” field to the first cue, thus creating a show that will automatically wrap around. As the new cue is the last one in the sequence, LightFactory will also change the previous cue and set its “next cue” value to the newly created cue. Note: Double clicking on a cue will automatically make it the currently active cue and make this cue list the currently active cue list. If a cue within this cue list is active then it will appear highlighted light green. To remove a cue: 1. Select the cue from the cue list. 2. Click on the “Delete Cue” button. 3. A confirmation dialog will prompt you to confirm this operation. http://www.lifact.com 195 LightFactory V2 A Guide for Users Reference/Window Overview Cue List Editor Cue Options To assist with many tedious tasks the “Cue Options” drop down menu provides several convenient options related to creating and managing cues. Figure 88: Cue Options Menu Copy this cue Selecting this will create a new cue at the end of the cue list. The cue number will be the next available integer value. All of the properties of the current cue (channels, trigger, etc) will be copied from the cue at the position of your mouse. Insert a new blank cue below This option will create a new cue directly below the cue at the position of you mouse. The cue number will be exactly half way between this cue and the next. The properties of the cue will be set to the system defaults. Insert a new cue above (Copy this cue) This option will create a new cue above the current cue. The cue number will be half way between the previous cue and the current cue. All of the properties (channels, trigger, etc) will be copied from the current cue to the new cue. 196 © 2004 - 2010 Dream Solutions Ltd Reference/Window Overview Cue List Editor LightFactory V2 A Guide for Users Insert a new cue below (Copy this cue) This option will create a new cue below the current cue. The cue number will be half way between the new cue and the current cue. All of the properties (channels, trigger, etc) will be copied from the current cue to the new cue. Insert a scene break below this cue A scene break is a description only row that can be added to your cue list to help remember what is happening at this point in the cue list. Scene breaks are not cues and do not execute any lighting operation. It is a convenient way to label your cue list at key points and assist with cue list management. After selecting this option the software will prompt you for the name of the scene you want to label. Enter the name or description into the edit box provided and click “OK” to add the screen break. In the example below a scene break has been added below cue 4. Figure 89: Cue List, Scene break example Undo Use the undo function (alternatively you can use control-z) to undo the last change made to the cue list. In the case of the cue list channel detail window the undo command will revert back to the channel state when the cue was selected. http://www.lifact.com 197 LightFactory V2 A Guide for Users Reference/Window Overview Cue List Editor Blocking & Mark Selecting the “Blocking & Mark” option in the menu will open up the submenu for globally setting the flags on all fixtures inside the selected cue. Set “Block” on all cues – This option will check all blocking flags in the selected cue. Un-Set “Block” on all cues - This option will un-check all blocking flags in the selected cue. Set “Mark” on all cues - This option will check all mark flags in the selected cue. Un-Set “Mark” on all cues - This option will un-check all mark flags in the selected cue. Set Trigger (Selected Cues) To modify the trigger setting of multiple cues select the rows you want to change, right click and select the trigger from the sub menu. You can select the rows by clicking on the very left of the row where the current row indicator is shown. Hold the control and shift keys while clicking with the left mouse button to select more than one row. If you have the “trigger” column selected then this menu option will apply to every cue in the current cue list. Load cues on double click By default double clicking on a cue will execute the cue in the master playback. The selected cue will become active and the previous live cue will terminate. The selected cue however will run with the same timing as it would it had been executed in sequence. With the “load cue” option checked the cue will execute in zero (0) time. All timing information will be ignored. This is convenient for bringing up a cue when editing if you don’t want to wait for standard execution time. Loading a cue will also force the cue into a blocked state regardless of the “Blocking” flag set for each channel. This means that previous tracking will be ignored and the values recorded in the cue will be the values set in the channels. 198 © 2004 - 2010 Dream Solutions Ltd Reference/Window Overview Cue List Editor LightFactory V2 A Guide for Users Cleanup “next cue” numbering from this point If you have got the “next cue” column out of sequence you can easily return it to the default sate (next cue always follows the cue number) by selecting this option. The cleanup will happen from the currently selected cue down. To clean up the entire cue list select the first cue before selecting this option. Re-number as whole cues from this point If have a lot of point cues in the cue list from inserting cues or rearranging the order of the cue you can use this option to quick renumber. After this operation every cue will be a whole number with no decimal part to it. The re-number will happen from the currently selected cue down. To re-number the entire cue list select the first cue before selecting this option. Timestamp next non zero cue When working with timecodes it is often useful or convenient to create your cue list without any timecode values loaded. Once you have created the cue list you must then go back and assign timecode values manually. To aid with this operation LightFactory provides the ability to timestamp cues with the last read timecode. Once you have created the cue list you can then play back the timecode track and stamp each cue in real time. Because using the right click menu is not a quick enough operation when playing back media in real time a shortcut (control – t) is also provided. Playback the timecode track and press the control-t to stamp the next non zero cue at the appropriate times. Timestamp on cue go Turn this option on to learn the timecode for a show by running it in real time. Every time the “Go” button is pressed in the playback controls the timecode will be record for the next cue with no timeode recorded. Clear notes for the selected cue. Use this option to empty the cue notes field for the selected cues. http://www.lifact.com 199 LightFactory V2 A Guide for Users Reference/Window Overview Cue List Editor Reset all effects in the selected cue The reset effects option is used during playback of the cue list. If the cue contains effects you can manually stop the effect execution without stopping the cue using this option. Run Cue / Load Cue To the right of the cue options menu is the run cue/load cue button. The function of this button will change depending on the “Load cues on double click” option. This button performs the same operation as double clicking on the “status” field of the cue list. It also provides an easy indication of what double clicking on a cue will do. Cue Number The cue number represents the order that the cues appear in the list and by default, it also determines the run order of the show. Cue numbers can be set to any number you want by clicking within the field and typing the new value. Cue numbers must be between 0.000 and 4294966.999. When editing cues it is not necessary to enter the decimal part if all you want is an integer value. Note: LightFactory will automatically re-order the cue list as soon as you exit the field and thus save the new value. The “next cue” value will not be changed if you edit the cue number so you must manually ensure that the show follows the desired sequence. The most common use for editing the cue number is to insert a new cue between two existing cues. To do this, change the cue number to a valid number between the two cues. Example To insert a new cue between cues 2 and 3 we would create a new cue and change its number to 2.5. To ensure that the show follows the sequence 2, 2.5, 3 we would need to change the “next cue” number of cue 2 to 2.5 and the “next cue” of 2.5 to 3. 200 © 2004 - 2010 Dream Solutions Ltd Reference/Window Overview Cue List Editor LightFactory V2 A Guide for Users Note: Changing the cue number can also be used to park a cue for use later. To do this, simply change the cue number to a high value and ensure that none of the other cues have the “next cue” set to this value. Description This field is for your own reference and provides the ability to describe the lighting state contained in the cue. By default, this description contains the cue number. This can be changed by clicking within the field and entering the new description. Channels This is a list of the channels included in the cue. This list can be edited by entering the channels separated by a coma (,) or a space. To edit, click inside the field and type the desired channel list or edit using left and right arrow keys. You can also enter channels using the same syntax as the command window. Example 1,3,4,10/20-15 This will add channels 1, 3, 4 and channels 10 through to 20 excluding 15 to the cue. The channels included in the cue can also be edited by clicking on the ( ) button to the right of the field or by double clicking on the grid cell. This will bring up the “Cue List Detail” window. This window provides greater control over the maximum value the channel will reach when the cue is executed, and provides access to intelligent fixture attributes. http://www.lifact.com 201 LightFactory V2 A Guide for Users Reference/Window Overview Cue List Editor Figure 90: "Cue List Detail" Window This window has seven tabs down the left hand edge that correspond to the different information you may want to edit. If a channel does not have an attribute for a displayed column the cell will be greyed out and cannot be edited. An “n/a” will also appear in the cell. The values set in the overview and DMX tabs will determine the value that the attribute will reach when the cue is executed. Docking the Cue List detail window To minimise the number of windows open in LightFactory the cue list detail windows can be docked to the bottom of the cue list editor window. Drag the channel detail window over the bottom frame of the cue list window until a gray box appears around the bottom third of the window. Release the mouse and the detail window will be comes docked. To undock the window click on the dotted line at the left of the detail frame and drag the window away from the cue list window. When you release the mouse button the window will undock. Overview The overview tab will show the attributes values as real world information. Most values will be shown as percentage information but some values may show other data. A gobo control for example will show an image of the gobo selected and the colour controls will show the colour that is currently assigned. 202 © 2004 - 2010 Dream Solutions Ltd Reference/Window Overview Cue List Editor LightFactory V2 A Guide for Users This tab also provides optional time and delay for the individual channels. For attribute level timing see the “timing” and “delay” tabs. Block – Check the “Block” check box to force this channel to not follow tracking instructions. All of the values set in the cue will be applied to the live output regardless of the previous cue execution. Mark – A marked cue will execute most of its attributes in the previous cue if the channel does not exist in that cue. It uses the fade in and dwell time of the previous cue as the time the fixtures will change. You can also override this operation by setting a non zero value into the “default mark time” found in the “System Properties.” Each of the attribute cells also provide helper controls that can be accessed by double clicking on the cell. For the colour cells the standard LightFactory colour picker will appear. Once you have finished modifying the value with the helper control click anywhere in the previous window to close it. Figure 91: Detail window helper controls http://www.lifact.com 203 LightFactory V2 A Guide for Users Reference/Window Overview Cue List Editor DMX The DMX tab will show all of the same information as the overview tab but all of the values will be shown as DMX values. This provides the maximum resolution when modifying the data in the cue. For example in the overview tab the dimmer is shown as a percentage giving 100 possible values but the underlying DMX associated with the dimmer has 255 (or in some cases 65535) possible values. When the percentage is changed is converted to a DMX value for storage in LightFactory. Timing To set an individual fade time for any attribute use the timing tab to enter a time value in seconds. If the value shows “Not set” then no independent fade time exists. Any fade time set here will override the channel fade time and the cue timing. Delay To set an individual delay time for any attribute use the delay tab to enter a time value in seconds. If the value shows “Not set” then no independent delay exists. Any delay set here will override the channel delay when the cue timing. Profile The profiles tab is reserved for a future version of LightFactory. This feature is not currently supported in this version. Ch Grid The channel grid view will show the channels in a similar view to the channel display window. Editing channels in this view is similar to the channel display. You can select the channels using the mouse and control the dimmer value with the scroll wheel. 204 © 2004 - 2010 Dream Solutions Ltd Reference/Window Overview Cue List Editor LightFactory V2 A Guide for Users The view menu can be used to change the way each channel is displayed. See Channel Display Page 138 for information on the different view styles. In the view menu you can toggle between showing only the channels that are recorded into the cue and showing all of the channels in the system using the “Show only channels included in this cue”. If this option is turned off the channels not recorded into the cue will be displayed in a light gray. With this mode turned on you can use the “Add Selected” button to add channels into the cue. Use the “Remove Selected” button to remove channels from the cue. Palettes Palettes are a powerful way to manage fixture data in a large show. We can think of palettes as references to other objects that have already been programmed in the software. The best example of the usefulness of palettes is position presets. Position presets are a list of pan and tilt positions for each fixture in the show. When we record a cue we could set a fixture to a specific position on stage and record the value to the cue. However if at a later time the position gets moved someplace else we need to go through the cue list to find all of the places that the position was used. Instead we could record that position into a position preset at the beginning and instead to recording the same position into the cue we would reference the position preset we have just made. If the physical position changes at a later time all we need to change is the position preset and all of the cues that reference that information will be updated automatically. This is only one simple example of using palettes as reference values in a cue, we could do the same thing with colour, gobos, focus etc. In LightFactory there is two types of palette references that can be used in a cue. A channel group can be used in cases where each fixture in the reference needs to have a different value. The position preset above is an example of this as every fixture although pointing at the same spot on stage may have slightly different pan and tilt values. http://www.lifact.com 205 LightFactory V2 A Guide for Users Reference/Window Overview Cue List Editor A palette is used in cases where we want to apply an abstract value to an attribute. Colour is an example of this type of reference as LightFactory is capable of working out how to set the colour on a fixture regardless of its type or place in the rig. Note: When an attribute has a palette reference assigned to it the value displayed in the overview and DMX tabs will show in red. The software still remembers the “hard” values that were recorded but is indicating that the values shown are not going to be used unless the palette reference is removed. Palette references can be added to a cue at the time of recording or using the palette tab in the cue detail window. In this tab is two panels separated by a movable splitter. In the left hand panel is a list of all the available palette references that can be added to the channels in this cue. The list is an alphabetical list of both channel groups and generic palettes. The panel on the right is similar to the overview and DMX tab. Each row is a fixture and each column an attribute. Assigned palettes Figure 92: Cue Details Window - Palettes 206 © 2004 - 2010 Dream Solutions Ltd Reference/Window Overview Cue List Editor LightFactory V2 A Guide for Users To add a palette reference to an attribute select it from the panel on the left and while holding the mouse button down drag and drop it onto the attribute. Alternatively you can enter palettes by clicking in the required attribute field and start typing the name of the palette you want. As you begin to type a popup list of palettes will appear. Use the up and down arrow on your keyboard to select the palette you want and press enter to assign it to the attribute. Using the palette reference tab in the detail editor is a very slow way to add palette reference and is designed to be used as an editing tool to make changes after the cue is created. The easiest way to work with palettes is to record them from the channel display. Add/Delete The final tab provides convenient options for adding and removing channels from the cue. Figure 93: Channel detail, add/remove tab This window is divided into two halves. On the left hand side is a list of all the channels in the system. Additional information such as purpose, positions etc are also provided to help identify channels. The right hand panel is the list of channels that are included in the cue. Along the bottom of this tab are the “add” and “remove” buttons. http://www.lifact.com 207 LightFactory V2 A Guide for Users Reference/Window Overview Cue List Editor Add Channel syntax entry box Remove Select the desired channels in the left hand panel to add to the cue and click on the add button (right arrow) at the bottom of the page. To remove select the desired channels from the right hand panel and click on the remove button (left arrow). You can also use the channel syntax box to enter channels to be added. If text is entered into this edit box it will take precedence over the selected channels when the add button is pressed. Note: In any of the tabs you can enter data into multiple cells by highlighting the cells you want to change and then typing the new value. As you type the value will only populate the fist cell. Pressing the enter key after you have finished typing will copy the value to all of the highlighted cells. Effects (FX) Effect sequences are an automated sequence of lighting states that run without user interaction. For more information and detail on how to create effects, see “Effects Editor” on page 218. A simple effect may be a traditional chase sequence or a more complex effect may perform a series of moving light changes. Often when a cue is executed, it is desirable to run an automatic sequence until the next cue is triggered. LightFactory allows you to add any number of effects and chases into any cue. The “Effects (FX)” field is a non-editable field that will show how many effects the cue contains. To edit or add effects to the cue, click the ( ) button to the right of the field or double click on the field. 208 © 2004 - 2010 Dream Solutions Ltd Reference/Window Overview Cue List Editor LightFactory V2 A Guide for Users Effects included in cue Available Effects Figure 94: Show Effect Selection window, effects On the left of this window is the list of available effects in the system. If you have a large list of effects you can filter what is shown by clicking on the effect type tab on the left of the window or by selecting a filter from the combo box at the top of the list. The effect window tabs will also filter what included effects are shown in the right hand panel. To add an effect to the cue, select the desired effect from the available list and click the “Add to cue” button at the bottom of the effects list. To remove an effect from the cue click on the “Remove” button at the far right of the effect row. You may need to scroll the grid to the right for the button to be visible. The “Delay” field allows you to set a time for the system to wait before starting the effect after the cue executes. “Fade In” and “Fade Out” These options allow you to set a different fade in and out time for each effect. This will only apply to the dimmer if it is used in the effect. Some effects do not use the dimmer at all and on this type of effect the fade in and out will not do anything. When the cue exits (i.e., the next cue is triggered), all effects will be terminated. Timeline, Profile and matrix Effects Select the “Loop” check box so that the effect will play continuously while the cue remains current. If this is un-checked, the effect will play once and then stop. http://www.lifact.com 209 LightFactory V2 A Guide for Users Reference/Window Overview Cue List Editor All effects have a default length when the effect is created. To override this default time, set the “Override length” field to the desired value. The effect will automatically be rescaled to run within the specified time. The “Stagger Direction” option is only used for property/attribute effects and set the way the stagger is setup. Simple Chases The “Direction” field specifies how the chase steps will play. Select from forward, backwards, bounce, or random from the dorp down. The “Run times” field allows you to specify how many times through the chase will run before stopping. “Step time” and “Fade time” is provided to override the default values when running the chase in a cue. Set the step time to 0 to run the chase manually using a step shortcut. Setting the “Step Shortcut” will allowing you to manually step the chase. This shortcut will be loaded when the cue enters and removed when the cue exits. This allows you to use the same shortcut in several cues. “Fade” and “Step Submasters” are also loaded when the cue enters and unassigned when the cue exits. This allows you to setup a submaster to manually control the fade transition and step time while the chase is running. Exec Shortcut Each cue can also execute any number of shortcuts when the cue runs. This allows you to run more complex operations such as executing macros, selecting channels, or jumping to another cue list. Shortcuts can be added by simple typing a comma (,) delimited list of shortcuts. Alternatively you can click on the button ( ) to the right of the field or double click to bring up the edit window for “Cue List Shortcuts”. 210 © 2004 - 2010 Dream Solutions Ltd Reference/Window Overview Cue List Editor LightFactory V2 A Guide for Users Figure 95: Cue List Shortcuts To add a new shortcut using the “Cue List Shortcut” window click on the “Add” button in the first cell of the last row in the grid. A new line will appear in the grid and the “Add” button will move down one row. Use the remove buttons on the right of the grid to delete an entry form the grid. In this window you can also specify a delay before running the shortcut. The system will then wait for the specified time before the shortcut executes. To run the shortcut on a recurring bases enter a time between execution in the “Fire every” field. To run the shortcut when the cue exits, tick the check box in the column “Fire on leaving” Channel Groups By adding channel groups to a cue you can setup “stage looks” that can be edited in one place and applied to any number of cues. The channel groups become building blocks for the show and can make programming the entire show a lot faster by reusing common “stage looks”. Channel groups can be added by clicking on the button ( ) to the right of the field or double clicking to bring up the edit window for “Cue List Channel Groups”. http://www.lifact.com 211 LightFactory V2 A Guide for Users Reference/Window Overview Cue List Editor Figure 96: Cue List Channel Groups You can add any number of channel groups to a cue. To add a channel group to the cue, select the desired group from the available list and click the “Add to cue” button. To remove a group from the cue click on the “Remove” button to the right of the row you no longer want in the cue. Inc Channels Only – This option can be used to set the behaviour of channel groups in relation to the channels added to the cue itself. If this option is turned on then the channels in the group will not be applied unless they also exist in the cue. For example, if you have a position preset group with 10 fixtures in it you may want to use only a subset of these fixtures in a cue. To achieve this you would add the subset of channels into the cue normally and also add the group into the cue. Dimmer % - Set the dimmer percentage when using channel groups as scenes that you want to add into the cue. You can use this option to have the same group in many cues but with different weighting on the dimmer. Trigger The cue trigger specifies what causes the cue to execute. By default, this is set to “Cue” indicating that the software is waiting for the “Cue Go” button to be pressed. The previous cue will remain active until the trigger is activated. 212 © 2004 - 2010 Dream Solutions Ltd Reference/Window Overview Cue List Editor LightFactory V2 A Guide for Users To set the cue trigger, click the drop down combo button to the right of the field and select from the following options; Cue Go – The user must physically press a “Cue Go” button either in a show runner or on the show editor window. Auto – Cues set with the auto trigger will execute immediately after the previous cue has completed its delay, fade in, and dwell time. An auto cue will not wait for the fade out time so that cross fades can be achieved. Midi – The cue will be triggered by an external midi event occurring. See page 113 for information on how to set up MIDI triggers. Line In – The cue will be triggered by the line-in audio source. See page 117 for information on how to set up the software for audio triggers. Timecode – The cue will trigger when the specified timecode is reached. If the timecode has already passed when this cue is reached the software will trigger the cue immediately. Enter the timecode value into the field provided. Next Cue Number When this cue has finished (wait, fade in, and dwell), the “next cue” number specifies what cue should be execute next. LightFactory will look into the cue specified by the “next cue” number and wait for the specified trigger to occur before executing it. This field will only accept values of cues that currently exist. Delay To specify a delay before the cue will execute, enter a valid time (in seconds) into this field. Internally a cue has finished just before the fade out executes to allow for cross fades between two cues. The delay can be used to stop this behaviour by setting its delay time to the previous cue’s fade out time. Fade In / Fade Up The fade in field determines the time (in seconds) that the cue takes for each channel to go from their current value to the value contained in the cue. The fade time will apply to all fixture properties that are set within the cue. http://www.lifact.com 213 LightFactory V2 A Guide for Users Reference/Window Overview Cue List Editor If you are running the software is fade up/down mode then this value will determine the time taken for channels and attributes that are increasing in value. Note: An override fade time for individual channels can be set in the “Show Channel Editor” window. See page Error! Bookmark not defined.. Dwell The dwell time is used when you want the cue to operate automatically. For example if you want the cue to fade in, wait for a specific time, and then fade out without any user interaction. The dwell time (in seconds) specifies how long the cue will wait after the fade in before executing the fade out. Fade Out / Fade Down The fade out field determines the time (in seconds) that the cue takes for each channel to go from the value contained in the cue to the value contained in the next cue. If the channel is not contained in the next cue then it will fade to 0. The fade time will apply to all fixture properties that are set within the cue. If you are running the software is fade up/down mode then this value will determine the time taken for channels and attributes that are decfreasing in value. Effects Delay To specify a global delay before effects are started enter a valid time (in seconds) into this field. Follow time If the cue is set to “Auto” trigger then by default the cue will execute after the delay, fade in and dwell times have occurs. If the follow time is set then this will override the length of time before the cue executes. Timecode When timecode triggers are being used, this field will specify the timecode value that the software will wait for. See page 118 for more information about timecodes. 214 © 2004 - 2010 Dream Solutions Ltd Reference/Window Overview Cue List Editor LightFactory V2 A Guide for Users Notes Use the cue notes to record any additional information about the cue that might be useful later. This is a free form field that can hold almost any amount of data. You could for example use the notes field to store the script pages associated with the cue. Double click on the notes field to open the “Cue Notes Editor”. This form is a very simple text editor that will allow you to change text fonts, set alignment, copy and past. In the top menu of the Cue notes editor are options to move to the next or previous cue. As you select these options the cue notes will change to show the notes corresponding to the selected cue. Figure 97: Cue notes window Playback options When a cue is executes LightFactory will display the cue notes in a non editing window. The playback options at the top of the window can be used to set other features during cue execution. Send Notes to Telnet Sessions – If this option is on then when a cue executes the notes will be sent to all telnet clients that are currently connected. Read cue notes on execute – Using the build in speech engine of windows the software will read the text in a computer voice out the standard audio port of your computer. http://www.lifact.com 215 LightFactory V2 A Guide for Users Reference/Window Overview Cue List Editor Clear display if cue notes are blank – If this option is off then the last notes displayed will remain on screen until the next cue with valid notes is executes. With this option on the cue notes screen will be cleared. Preview notes for the next cue on execute – With this option on the playback of cue notes will always be one cue ahead of the current cue. Testing a show The “Cue List Editor” window provides convenient controls to allow you run and test a show. The four controls are the same as each of the cue list playbacks and operate exactly the same way. If the show you are working on has only one cue list there is no reason to use any of the additional playbacks and can run your entire show from the cue list editor window. For more about cue list playbacks, see page Error! Bookmark not defined.. Figure 98: Cue List Editor controls for testing a show Cue Go This will execute the next cue in the active cue list. If there is no current cue active the “cue go” button will execute the first cue in the list. As soon as this button is pressed, the cue will start and a cue progress will be displayed in the status field of the cue. Note: If the cue is triggered by some external event, such as a timecode, then the “cue go” will override this and execute the cue immediately. Cue Stop This will stop the execution of the cue immediately. Any fades or waits will terminate and the current lighting state will be maintained. The will also stop the next cue from being executed regardless of its trigger. 216 © 2004 - 2010 Dream Solutions Ltd Reference/Window Overview Cue List Editor LightFactory V2 A Guide for Users Cue Back The “cue back” button will execute the previous cue (the cue whose “next cue” value is the current cue) and terminate the current cue. Cue Reset “Cue Reset” resets the entire cue list and sets the current cue to nothing. Pressing the “cue go” after a reset will cause the first cue to start. Resetting the cue can be thought of as a “rewind to beginning” function. This will also release all of the channel from cue control. http://www.lifact.com 217 LightFactory V2 A Guide for Users Reference/Window Overview Effects Editor Effects Editor An effect sequence is an automated sequence of lighting states that typically runs without user interaction. There are five types of effects supported in this version of LightFactory. Simple Chase - Simple chases, contains a number of lighting states and are similar to a basic cues list. Timeline – This effect contains a list of fixtures each assigned a number of timed segments. All effects have a default length of time (in seconds) that they will run for. Profile – This effect allows you to assign a profile path to specific attributes of the fixture. As the effect runs over a set time the attribute follows the defined profile path. Matrix – Specifically designed for use with LED or grid lighting this effect provides an easy way to deal with a large number of lights. Media – To playback media files, flash animations, or control a DV desk. To access the effects editor, click the “Effects Editor” button on the command interface window or press the F5 key on your keyboard. Figure 99: Effects Editor Effect Filters LightFactory provides the ability to set filters with every effect to make managing a large number of effects easier. Double click on any of the effects to edit the list of filters that describe this effect. 218 © 2004 - 2010 Dream Solutions Ltd Reference/Window Overview Effects Editor LightFactory V2 A Guide for Users For example a moving light effect that does a circle might be given the filers – Movement, Intelligent Lights, Rear truss. Use the combo box at the top of the effects list to select the filter you want to apply. The effects list will now only show effects that match this criteria. You can also use the tabs on the left of the window to only show effects of a particular type. By default all of the effect are shown but if you are only wanting media effects you can select this only this tab. The last tab on the left of the window is different to the others in that it will switch to showing the effects stored in the Library. Library effects do not get deleted with a new show and can be used to create other effects. Creating new effects To create new effects click the “Add Effect” button. As soon as you click on the add button the “New Effect Builder” wizard will begin to step you through the process. Figure 100: New Effects Builder Opening Page This first page will ask you to define what type of effect you want. Select the type of effect you want to create and click “Next” to continue. Simple lighting chase A simple chase is a step based effect similar to an automated cue list. Each step contains a list of fixtures each in a specific state. http://www.lifact.com 219 LightFactory V2 A Guide for Users Reference/Window Overview Effects Editor Figure 101: New Effects Builder, Simple chase To complete building the effect, enter a name to identify the chase and set how many steps you want to include in the effect. If you want to set the default step time (the time the system will wait before executing the next step) or fade time enter the values into the fields provided. Click on “Finished” to create the new chase and open the chase editor. The newly created chase will immediately become visible in the right-hand side of the effects editor. Timeline effect Provides the ability to build your effect by viewing its behaviour over a timeline. The effect has a fixed length and each fixture can be given a specific behaviour over that time. Figure 102: New Effect Builder, Timeline 220 © 2004 - 2010 Dream Solutions Ltd Reference/Window Overview Effects Editor LightFactory V2 A Guide for Users To complete the creation of an effect enter the name to identify the effect and set the length (in seconds) that you want the effect to run for. Set the fixtures you want to include in the effect by setting the starting fixture number and specifying how many fixtures after that to include. Alternatively you can provide a range of channels using the command syntax in “Channel Range” field. Click on “Finished” to create the new effect and open the effect editor. The newly created effect will immediately become visible in the right-hand side of the effects editor. Profile effect This effect type is based on time vs. level path that is assigned to a list of fixtures and specific attributes or properties. Figure 103: New Effect Builder, Prop/Attrib Effect (Page 1) Enter a name to identify the effect and set the default length. The channels or fixtures can be set using either a channel range (using command interface syntax) or by setting the start channel and number to include. When the effect is created with more than one fixture the wizard can place all fixtures into one path or create a separate entry for each. Use the “All fixtures will use the same path” option to set how the fixtures in the effect are organised. http://www.lifact.com 221 LightFactory V2 A Guide for Users Reference/Window Overview Effects Editor Figure 104: New Effect Builder, Prop/Attrib Effect (Page 2) When you are happy with the settings click on the “next” button to move to page 2 of the effect wizard. Here you can specify the attribute that the effect will be applied to and the default path it will use. The predefined paths (sin, cos, saw, pwm) cannot be edited or changed. To create an effect using a one of these paths as a base that is will be changed select the option “Create a copy of this path for editing” Click on “Finished” to create the new effect and open the effect editor. The newly created effect will immediately become visible in the right-hand side of the effects editor. Matrix/LED Effect The matrix effect is specifically designed for use with large arrays of lights such as LED fixtures. Figure 105: New Effect Builder, Matrix Effect 222 © 2004 - 2010 Dream Solutions Ltd Reference/Window Overview Effects Editor LightFactory V2 A Guide for Users To create a matrix effect you must have already defined the fixture matrix in the dimmer patching window (See Edit , Page 259). To complete the creation of an effect enter the name to identify the effect and set the light matrix that you want to use. Click on “Finished” to create the new effect and open the effect editor. The newly created effect will immediately become visible in the right-hand side of the effects editor. Media Playback Effect Use the media playback effect to play simple video and auto files directly from with LightFactory. Figure 106: New Effect Builder, Media Effect To complete the creation of an effect enter the name to identify the effect and set the media type that you want to use. Click on “Finished” to create the new effect and open the effect editor. The newly created effect will immediately become visible in the right-hand side of the effects editor. Note: This effect type requires the latest version of Microsoft DirectX runtime. Please visit http://www.microsoft.com/windows/directx/defa ult.mspx for more information. Selecting a different effect To change the current effect being edited click on the desired effect name in the list on the left of the window. The name of the currently http://www.lifact.com 223 LightFactory V2 A Guide for Users Reference/Window Overview Effects Editor selected effect will appear at the top of the effects grid to show which effect you are working on. Deleting an Effect To remove an effect form the system select it form the list and click on the “Delete” button at the bottom of the window. A confirmation dialog will ask if you are sure you want to remove the effect. Right click options Right click on any of the effects for options to rename the effect, make a copy of the effect, create an effect playback or add the effect to the library (profile effects only). Figure 107: Right click menu options Simple Chase A simple chase is a series of steps each containing a specific lighting state. Each step can contain any number of channels each in a different state. A chase can either run automatically or wait for a trigger before stepping onto the next state. Figure 108: Effect Editor, Simple Chase 224 © 2004 - 2010 Dream Solutions Ltd Reference/Window Overview Effects Editor LightFactory V2 A Guide for Users Clicking on each step will show the detailed channel state in the right hand panel. To add a new step click on the “Add Step” button found below the step list. New steps will always be added to the end of the list. To remove a step click on the entry you want to delete and click “Delete”. A dialog will ask you to confirm the deletion, click “Yes” to complete this operation or “No” to cancel. The default step time specifies the time waited before the next step will be executed. If this is set to zero (0) then the step will wait indefinitely so that the chase can be stepped manually using the play control. The default fade time specifies the time it takes to transition from step to step. Simple chases will always cross fade between steps by the time specified in the default fade time. Adding channels to a step Along the bottom of the chase editor panel is an edit box and the “add channels” button. Enter the channel list into the exit box provided using the standard channel selection syntax. Press enter or click on the “Add Channels” button to add the channel to the chase step. e.g. “1/5@30” will add channels 1,2,3,4 and 5 to the step with their value set to 30%. Figure 109: Group add channels command interface Removing channels from a step To remove channels from the group, select the channel in the grid above and click on the “remove channels” button. To select channels use the same techniques described in the channel display window. Editing channel values To edit the dimmer or attribute values of the channels in the chase step use the same technique as the channel display. Select the channels to modify by clicking on the desired channels (hold down shift or control to select multiple fixtyures) and then use the scroll wheel on your mouse to modify the dimmer values. http://www.lifact.com 225 LightFactory V2 A Guide for Users Reference/Window Overview Effects Editor If the fixture has more attributes the fixture control window will be display as it does in the channel display. The step channel display panel will only show attributes that are included. Until a attribute is modified it will default to the off state. In the example above channel 101 is using the dimmer, colour controls, position and one of the gobo wheels. To clear an attribute form the selected fixtures use the drop down menu on the end of the “Remove Channels” button. Timeline Effects An effect segment has a start offset time, start state, length and end state. When an effect runs it will progress through the list of segments executing each one in turn. If for example the first segment has an offset of 10 seconds, the segment will execute 10 seconds after the effect itself has started. When a segment is executed, its start lighting state will be set immediately. The fixture will then perform a fade for the length of the segment to its end lighting state. If a segment is for an intelligent fixture then all of the attributes (excluding dimmer) will be pre-fetched and set up for the start state at the end of the previous segment. If for example a moving light will start in a different position for the second segment then it will be moved to this new position at the end of the previous segment. When the effect starts, intelligent fixtures will be set to the start state of the first segment. Timeline effects are viewed in LightFactory as a Fixture vs. Time graph. Along the top of the effect view, you will see a time scale from 0 to the length of the effect. On the left of the effect view is a list of the fixtures included in the timeline. Note: Each segment of an effect cannot overlap any other segment. 226 © 2004 - 2010 Dream Solutions Ltd Reference/Window Overview Effects Editor LightFactory V2 A Guide for Users Figure 110: Effects Editor, Time vs. Fixture Effect Along the top of the view is the number of lines in effect. This can be used to add or remove fixtures. If this number is increased, new lines will be added when the “Apply” button is pressed. Each line can have as many fixtures in it as you want. Use the standard channel selection syntax to enter channels into the fields provided. If more than one fixture is added to a line then all the fixtures in that line will do the same thing when the effect is run. Each line can also reference channels in a channel group. Select the channel group using the drop down box to the right of this field. The channels contained in group will automatically be used for the effect. Also along the top is the “Effect Length” edit that determines the default duration of the effect. Changing the effect length will change the time bar and increase or decrease how long an effect takes to run. To change the length of the effect enter the desired time and click on the apply button. By default, changes to the length of an effect will not change any of the existing segments. If you make the effect shorter, any segments that go beyond the new length will be truncated. Use the “Rescale” check box to ensure that all segments are rescaled to any length changes. If this is checked and you make the effect shorter, all of the segments will also be resized by the same proportion. http://www.lifact.com 227 LightFactory V2 A Guide for Users Reference/Window Overview Effects Editor Set the number of fixtures in this effect Length that effect will run Delete this fixture from the effect. Start offset control Figure 111: Effect Editor Controls To the right of each fixture there is a small X for deleting the line from the effect. Clicking on the small X will remove this line (fixture) from the effect. A confirmation dialog will appear asking you to confirm that you want to delete the fixture. Click “OK” to confirm or “Cancel” to return to the effects editor. Start Offset Field Use this field to specify a delay (in seconds) before starting this part of the effect. This allows you to stagger the execution of the effect across all of the lines. Zoom Use the zoom control to adjust how much of the effect is visible in the frame. A zoom setting of 1 will show the entire effect length in the editor window. As you increases the zoom less and less of the effect will become visible but each section of the effect will become larger for more detailed editing. A scroll bar along the bottom will allow you to move within the zoomed effect. Creating and Editing Segments The graphical view of the effect allows you to easily see when the fixture is doing something. Each segment shows us at a glance that the fixture is changing state. The software will automatically set up intelligent fixtures between segments to their next state; hence, we 228 © 2004 - 2010 Dream Solutions Ltd Reference/Window Overview Effects Editor LightFactory V2 A Guide for Users need not be concerned with fixture attributes between segments. For example, often we may want the colour of a fixture to be set before the light becomes visible. In the LightFactory effects engine, this will be done automatically for us if the next segment has this attribute set. To create a new segment simply click inside the space provided to the right of the fixture, hold the mouse down and drag the segment to the desired length. Click here to start (holding down the left mouse button) Drag mouse to end position Figure 112: Example: Creating an Effect Sequence Note: By default, the newly created segment will have its start and end states set with the dimmer at full (100%) and all other properties set to zero. The size of a segment can be adjusted by clicking and holding the mouse button down at either end of the bar and dragging it to the new length. When the mouse is moved over the end of the bar, its cursor will change to indicate the resize operation. To move a segment to a different start position (offset), hold the mouse button down over the centre of the bar and drag the bar to its new position. To adjust the start and end state of the segment, click once on the bar to bring up the state editor panel. http://www.lifact.com 229 LightFactory V2 A Guide for Users Reference/Window Overview Effects Editor Figure 113: Segment State Attribute Editor The segment state editor panel will show all of the generic attributes that can be set for the segment. Each one has a start state and an end state. To edit any of these values click on the cell and enter the desired value. At any time you can double click on the heading of the column to load values from the fixtures current state. For the pan, tilt and colour entries you can double click to open a helper box that will allow you to select the values. If the end state of a property is zero, changes made to the start state will automatically be copied to the end state to assist with creating new segments. Alternatively you can set a profile for each of the attributes. When a profile is select the start and end values will become disabled and the profile used to determine the output during the segment. The profile is a path that the values will apply during execution. To set a profile click on the appropriate column and select the profile from the list presented. At the bottom of the segment state editor the pan and tilt path is displayed for the selected segment. A moving light path applies to fixtures that have both pan and tilt control, and allows you to create a continuous movement that will follow a defined curve. 230 © 2004 - 2010 Dream Solutions Ltd Reference/Window Overview Effects Editor LightFactory V2 A Guide for Users LightFactory provides an advanced path editor that can be used to define the minimum number of points. A Catmull-Rom Spline curve will automatically create the best-fit curve between each point. Two control points are automatically created to provide the ability to control the curve entering and leaving the first and last point. Figure 114: Moving Light Path Editor To start creating paths, simply click inside the white space containing dashed crosshairs. With each click, a new point will be created and a curve will automatically be placed between them. The points you have created will be shown as small red circles. These points can be moved by clicking on the small circle, holding the mouse down and dragging the point to the desired location. The control points are identified by the small numbers beside each point (there is also no line between the control point and the other points). Control point numbered 1 is the starting point and number 2 is the ending point. Points (excluding control points) can be removed from the curve by clicking on the X button in the controls on the right-hand side. This will remove the last point added to the curve. Points must be removed in the order they were added. The “Path Editor” also provides the ability to test your curve before committing it to the effect. When you click the test button, the fixture will immediately start moving to the path you have created. The length of the path is determined by the “Path Time” field below the http://www.lifact.com 231 LightFactory V2 A Guide for Users Reference/Window Overview Effects Editor test button. The default value for “Path Time” is the length of the effect for which you are creating the path. This value (in seconds) cannot be set to a value greater than the effect length. The “Elasticity” figure below the time value is an advanced feature allowing control over the spline cure and determines the obtuseness of the curve. To change the size of the curve created use the resize buttons provided to the right of the edit space. Figure 115: Moving Light Path Resize Buttons These buttons will move all of the points toward or away from the centre of the effect, thus rescaling the distance the light will move while moving through the path. The four arrows below the resize control allow you to reposition the path around the pan and tilt space. Figure 116: Moving Light Path Repositioning Controls Pan and tilt can cover a large stage area. Often you only want the path to occur in a small section of the full range of the light. Clicking on these buttons will move all of the points in the direction clicked. If a point is at the edge of the edit space, it will not be moved. Once you are happy with the shape you have created you must commit it to the effect segment you selected to edit the path. Clicking on the “OK” button will commit the new path to the selected segment. Note: If you set the elasticity of the path to 1 then a straight line will be created between points (not a curve) and the software will create a single segment for each line. 232 © 2004 - 2010 Dream Solutions Ltd Reference/Window Overview Effects Editor LightFactory V2 A Guide for Users Click on the “Cancel” button to return to the effect editor without committing the new path. You can create a similar path for determining the colour during the segment by click on the colour path area of the bottom of the segment state editor. Figure 117: Colour path editor Options Clicking on the right mouse button while over a segment of the effect will bring up a number of advanced options to assist with creating effects. Figure 118: Effect Editor - Right-click Menu Options for Segments http://www.lifact.com 233 LightFactory V2 A Guide for Users Reference/Window Overview Effects Editor Delete Segment Click on the “Delete Segment” option to remove the currently highlighted segment from the effect. A confirmation dialog will ask you to confirm this operation before the segment is deleted. Delete All Segments Click on the “Delete All Segments” option to remove the segments for this fixture. A confirmation dialog will ask you to confirm this operation before the segment is deleted. Cut, Copy, Copy All, Paste Segments The cut, copy, and paste functions operate exactly as they do in most applications you use within windows. Cutting a segment will remove it from the effect and put on the clipboard for pasting somewhere else, while copying places a copy of the highlighted segment on the clipboard without removing it from the effect. “Copy all segments” ignores the currently highlighted segment and places all of the segments associated with the fixture onto the clipboard. To place a copied segment or segments onto a fixture, select the “Paste” option while the mouse is over the fixture you would like to paste to. Note: When pasting, if a segment conflicts with segments that already exist for this fixture you are pasting to, nothing will happen. After a paste operation, the segments will remain in the clipboard to allow you to paste segments to as many fixtures as desired. This feature is useful after creating a moving light path to copy the newly created path to all of the other fixtures in the effect. To do this, create a path for the first fixture and then select the copy all function. To create the path for all of the remaining fixtures simply paste to each one in turn. 234 © 2004 - 2010 Dream Solutions Ltd Reference/Window Overview Effects Editor LightFactory V2 A Guide for Users Profile effect Create this type of effect to assign a time vs. profile path to specific attributes of fixtures. When the effect runs the selected attribute will apply the set values over a set time. Profile effects are a very powerful way to create complex effects with minimal effort. Once you are use to using this type of effect you will find it the most common effect system you will use. Figure 119: Effects Editor, Property / Attribute Effect In the above example a profile effect has been created to operate in fixtures 200 through to 204. There are two elements in this effect, the first is a “sine” wave working on the pan property and the second is a “Inverse cosine” wave on tilt. For each attribute you want to apply a profile path to you need to create a separate line in the items table. In the above example 2 entries are required to create a circle with the fixtures. The first entry controls the pan property and the second the tilt. If the desired effect was a ballyhoo we might only require one entry applying a profile to the tilt property. To add an entry in the items table simply click on the “Add Line” or “Copy Line” button. This will create a new line with either blank values or the same values as the previous line. To delete an entry click on the “Remove Line” button. Channels / Fixtures This is a simple list of fixtures that the profile and attribute will operate on. You can use the same channel syntax as the command http://www.lifact.com 235 LightFactory V2 A Guide for Users Reference/Window Overview Effects Editor interface to enter the channel list. By default channel will remain in the order they were typed. To sort the list of channels right click and select sort from the popup menu. The order that the channels are listed in is important for the stagger operation. If you right click on the channel list cell you can add or remove channels from the selection shortcuts. The popup menu will provide options to add, replace or remove channels. Each submenu will display the selection shortcuts already setup in the system. Figure 120: Prop effect channel list menu Attribute This value specifies the attribute of each of the fixtures that values will be applied to. Use the drop down menu to select from a generic attribute list the attribute you want to use. You can also enter a number corresponding to the attribute for a specific fixture type. If you are using an attribute number then all of the fixtures should be of the same type. If different types exist then you will get strange results. The generic attribute can be used on any mix of fixtures. If the fixture does not support the selected generic attribute then any applied values will be ignored. Profile The profile is the key to this type of effect as it defines exactly what the selected attribute of the fixtures will do. As the effect plays, the output value (DMX value) is derived from a point in the profile path. A “sine” wave for example will output the DMX values 127 at time 0, 0 at ¼ of the way through the effect and full (255) at ¾ of the way through the effect. The selected profile is shown graphically in each line of the effect To change the profile click on the profile column of the line you want to change. A drop down box will appear listing all of the profiles that exists in the system. 236 © 2004 - 2010 Dream Solutions Ltd Reference/Window Overview Effects Editor LightFactory V2 A Guide for Users The profile chooser will display four profiles access to maximise the number that can be seen. The profile currently assigned to the line will be highlighted with a red border. Use the scroll bar on the left hand side to find other profiles not visible on the page. To select a profile click the appropriate image and the profile picker will close automatically. The selected profile will be shown in the line you are working on. To close the profile picker without changing your selection click on the close button in the bottom right of the window. To modify a profile click on the “Open Profile editor” button at the bottom of this window. This will open a new window to that will allow you to modify or create profiles. See “Profile Editor” on page Error! Bookmark not defined.. Length The length specifies how long the path will play for. The length of the effect is the length of the longest item. If the length of an item is http://www.lifact.com 237 LightFactory V2 A Guide for Users Reference/Window Overview Effects Editor less than the longest path then the speed that the path will play is made proportionally faster. Offset Offset sets where the DMX output values start from. When the path is at 0 the actual output will be the offset value. All resulting values from the path will be added to the offset up to a maximum of 255. You can also set the offset to be “Relative” by entering an “R” into this field. This is also its default value when a new effect is created. Relative offsets mean that the offset will be whatever the fixture is on when the effect starts. This allows you to create a single effect and use it in different parts of the stage throughout your show. If you add the effect into a cue then LightFactory will setup the fixture based on the data in the cue and then apply the effect over top. With this you can have 2 adjacent cues both using the same effect but running completely differently. Note: if you are running this effect on Pan & Tilt then a couple of special conditions apply. Firstly the current position of the light becomes the centre of the path. If (for example) we are doing a circle then the offset is automatically setup for us to make the current position the centre. Secondly, when this type of effect is running you can also use the pan and tilt controls in the channel view to move the position of the effect. Scale The scale is a percentage value that will be applied to the final output. A scale of 50% causes the resulting values from the path to be halved. The combination of offset and scale can be used to restrict the output to a smaller range. Start Position The start position is used to specify the point in the path that will be used when the effect begins. Stagger Staggering a path is a powerful way to make an effect more interesting. The stagger value either specifies how many fixtures 238 © 2004 - 2010 Dream Solutions Ltd Reference/Window Overview Effects Editor LightFactory V2 A Guide for Users the effect will be staggered across or the percentage across the path each fixture will be. A stagger number (Stagger #) of 4 means that fixtures 1 through to 4 will be equally spread across the path so that each fixture starts in a different position. Fixtures 5 though 8 will also be staggered in the same way so that fixture 5 will mirror fixture 1 and fixture 6 will mirror fixture 2 etc. A stagger percentage (Stagger %) of 10% means that each fixture will be 10% further along the path than the fixture before it. If the total length of the path is 10 seconds then when the effect is at 0 seconds fixture 2 will be at 1 second, fixture 2 will be at 2 seconds etc. This results in the fixtures all working slightly different. Making a number of moving lights all perform a simple circle can look good but then to add variety we can use the stagger feature to make each fixture start at a different point in the circle. http://www.lifact.com 239 LightFactory V2 A Guide for Users Reference/Window Overview Effects Editor Matrix Effect This effect type is specifically designed for large arrays of lights and LED fixtures. Every LED fixture provides a different way to control all of the individual lights contained in it. To define the layout of the lights use the “Edit Matricis” option in the dimmer patching window (See Edit , Page 259). Figure 121: Effects Editor, Matrix/LED Effect Once you have created the effect you must define the background that the effect will operate on. The background can be a jpeg, bitmap, or video (AVI) file. To set the background either enter the filename into the “Image or Video File” edit box or click on the button to the right to bring up the open file dialog box. A default background image is always available by clicking on the “Default” button in the top right of the window. The default image allows you to create simple colour fades by providing a pinwheel of the colour spectrum. When a new effect of this type is created the default image is always set. Once the background has been set you can define a path that the matrix will use to play the effect. In the example above the matrix is defined as a red box and the path is the black line tracking around the image. 240 © 2004 - 2010 Dream Solutions Ltd Reference/Window Overview Effects Editor LightFactory V2 A Guide for Users To add a point, click on the desired location and the path will now trace to the newly created point. To move an existing point click on the point (holding the mouse button down) and drag the mouse to the desired location. To remove the last point in the path click on the ( top left corner of the window. ) button in the At any point you can right click to edit the details of the point. Figure 122: Matrix effect, right click menu To remove any other point in the path right click on the desired point and select “Delete” from the resulting popup menu. To change the rotation of the matrix at a point select “Edit Rotation” from the right click menu and enter the desired value (in degrees) into the edit box that appears. To change the scale of the matrix at a specific point select “Edit Size” from the right click menu and enter the desired value into the edit box that appears. When the effect plays the scale of the matrix will transition between values across the length of the path. Use the “Show point information” option (toggle) to turn on or off popup balloons that will show you what the rotation and scale setting are for each point. The balloons will appear as you hover the mouse over each point in the path. When the effect is played from the editor the red box will track the path over the specified time. As the effect runs LightFactory will map the contents of the red box onto the defined matrix. The colour of each fixture will be mapped to the colour on the image or video clip. The preview ( ) button can be used to see the resulting output on screen. http://www.lifact.com 241 LightFactory V2 A Guide for Users Reference/Window Overview Effects Editor Figure 123: Matrix effect preview window Click on the “Show only assigned fixtures” to apply a mask over the preview that represents the fixtures in the real world. Effect Length The length defines how long the effect will play for and can be any value up to 1 hour. If a video file is selected the software will prompt you to set the length of the effect to the same length as the video. If the length of the effect is shorter then the video the video clip will be truncated. Zoom Matrix To change the size of the area that the matrix will use to generate output set the zoom field. When playing back the effect the image will be rescaled to the zoom setting to apply the correct colour. 242 © 2004 - 2010 Dream Solutions Ltd Reference/Window Overview Effects Editor LightFactory V2 A Guide for Users Media Effect The media playback provides an easy way to trigger audio and video clips from with LightFactory. You can use this feature to playback sound effects or video clips within a cue lists. Figure 124: Effects Editor, Media Effect Once you have created the effect you can modify the file that will play, where the file starts playing (in seconds) and how long it will play for. File Name: This is the actual media file located somewhere on your system. Use the button at the end of the edit box to open a file dialog for locating your media. Start Time: Set the time in HH:MM:SS:MS that you want the media clip to play from. If (for example) you want the clip to play 1 minute and 23 seconds into the file then enter 00:01:23:00 into the edit provided. Play Length: Set the length in decimal seconds that the clip will play for before either stopping for playing again from the start position. A play length of 3.5 will play for 3 and a half seconds each time it runs. The system relies on the correct codec’s for the media to be played back. If the codec is not available on the system then an error may occur when attempting the playback. http://www.lifact.com 243 LightFactory V2 A Guide for Users Reference/Window Overview Effects Editor There are a number of global media playback controls that can be set in the “System Properties”. See “Media” on Page 110. If you attempt to play a video file and have only a single monitor connected then the software will only show the video in a window on you primary display. In a multi monitor situation the system will nd default to use the 2 display as the full screen output of the video clip. The effects editor will show a preview of the video clip in the black box. Only when the effect is run in an effect playback or cue list will it play full screen. 244 © 2004 - 2010 Dream Solutions Ltd Reference/Window Overview Effects Editor LightFactory V2 A Guide for Users Effect Library The effect library is a convenient way to save and recall your favourite profile effects. Once you have created an effect it can be copied to the library and will not be removed when you create a new show. Figure 125: Effect Library A library effect looks exactly the same as the profile effect however it is missing the channels that the effect will use to run. The selected library is highlighted in green and the heading along the top of the right hand of the window will display the library name. To add an existing profile effect into the library simply select it from the list, right click and select “Add to library”. The name you have given the effect will also become the name of the library item. You can also create a blank library effect by selecting “Create new library effect” from the “Add Effect” drop down menu. A dialog will appear asking for the name of the new library effect. Enter an appropriate name and click “OK” to complete the operation. Click on “Cancel” to return to the effects window without creating the new item. To remove an entry from the library use the right click menu again and select “Delete” from the available options. A dialog will appear asking you to confirm the deletion. http://www.lifact.com 245 LightFactory V2 A Guide for Users Reference/Window Overview Effects Editor Effect Playback Controls Along the bottom of the effect editor are the three playback controls for testing and debugging your effects. When the effect is played, a progress line will follow the execution through the effect. Play Use the play control to start the effect running. In the case of simple chases the play control is also used to step through the chase. Pause Pausing an effect will stop its execution immediately but keep the position pointer at the current location. If you start the effect again (press “play” button), the effect will continue from this location. Rewind Pressing the rewind button will stop the effect and resets its position back to the start. If the effect is restarted, it will start from the beginning. This will also release the channels used in the effect. 246 © 2004 - 2010 Dream Solutions Ltd Reference/Window Overview Palettes LightFactory V2 A Guide for Users Palettes Palettes are a way to quickly and easily set a list of fixtures to a specific state. Only attributes where the value is not set to “Off” will apply, allowing the shortcut to control a very specific generic attribute of the fixtures. Palettes can operate on a fixed list of generic attributes in LightFactory. A generic attribute is one that can be applied to any fixture regardless of the supporting functionality. In the example below we see a “wide zoom” and a “narrow zoom” row. If we apply this to a fixture that does not have a zoom capability then the command will be ignored. If you apply the wide zoom to a fixture that has a maximum zoom range of 50 degrees then the palette (set to 100 degrees) will apply the closest value it can - In this case 50 degrees. If the palette contains colour information then LightFactory will work out the best way to produce this colour in the fixture. In some cases this may mean finding the closest matching colour in a colour wheel. The generic attributes that can be used in a pallete: Colour Position (pan/tilt) Gobo Index Zoom Focus Iris Diffusion Frost Edge Strobe Shutter Effect A palette can operate on a set list of fixtures or it can apply the setting to the list of currently selected fixtures. If the channel field is left blank then the palette will apply to the fixtures currently selected in the channel display. Palettes can also be used as reference values in cues. By using a palette in the cue you can update a single location and have multiple references updates at once. Open the “Palettes” editor window by clicking on the button at the bottom of the command interface or by pressing F6 on your keyboard. http://www.lifact.com 247 LightFactory V2 A Guide for Users Reference/Window Overview Palettes Figure 126: Fixture Property Shortcuts Create a new palette by clicking on the “Add Palette” button in the top right corner of the window. The “Delete Palette” button will remove the currently selected row (A dialog will prompt you to confirm the delete operation). Note: The easiest way to set up new palette is to use the “record palette” button in the channel window. The currently selected palette is the row highlighted. Each generic attribute is listed as a column in the grid. A palette can have any mix of attribute you want. There is nothing to stop you having a colour and an Iris in the same palette. The palette name field can be used to identify what the palette is designed to do. The name will be displayed in the on-screen shortcuts window. (See “Shortcut Options” on page 132 to learn about the shortcuts window). The “channel” field is the list of channels that the attributes will be applied to. Enter the list of channels by separating each by a comma (,) or space. The apply shortcut column is used to set the shortcut for direct access to the palette. Pressing the assign shortcut will cause the palette to be applied to either the channels listed or to the selected 248 © 2004 - 2010 Dream Solutions Ltd Reference/Window Overview Palettes LightFactory V2 A Guide for Users channels. As soon as the shortcut is set it will show up in the onscreen shortcut window. If the palette has a colour assigned to it the background colour of the shortcut will automatically be set to match. Note: Leaving the channel list blank will apply the properties to the selected fixtures in the channel view. Double clicking on any of the rows in the “colour” column will open up the colour picker dialog. Use this tool to set the colour you want in the palette. Palettes that have colour set are also shown as the “Show Colours” in the first tab of the colour picker. When a new colour is added to the “show Colours” it will also appear as a palette. Figure 127: Colour dialog, show colours tab Double clicking on any of the rows in the “position” column will open the pan and tilt helper box. Figure 128: Palettes pan and tilt helper box http://www.lifact.com 249 LightFactory V2 A Guide for Users Reference/Window Overview Dimmer Patching Dimmer Patching LightFactory provides up to 30,000 control (desk) channels that can be assigned any number of DMX dimmers or intelligent fixtures. Up to 32,768 DMX dimmers are supported by the software and can be patched into the control channels. By default the system will create 500 control channels however you can increase this number in the “System Properties”. You should try and keep the number of channels as low you think you will need as the more channels the system creates the slower the start-up and the more load there will be on the system. To modify the patching of dimmers or intelligent fixtures to channels open the “Dimmer Patch” window by clicking on the “Dimmer Patching” button on the command window or pressing F7 on your keyboard. Available Dimmers System Channels or Fixtures Available fixture for patching Figure 129: Dimmer Patching Window The “Dimmer Patch” window is broken into three sections. Channel View – On the left of the window, this allows you to see all of the channels and how they are currently patched. Dimmer View – At the top right is the dimmer view, containing all of the available dimmers 250 © 2004 - 2010 Dream Solutions Ltd Reference/Window Overview Dimmer Patching LightFactory V2 A Guide for Users Fixture List – At the bottom right is the fixture list, containing all the different fixtures that can be patched into channels. When LightFactory is started for the first time or when a new show is created, all channels will be patched 1 to 1 with the available dimmers. Standard Dimmers By default the “Standard Dimmer” fixture is selected. Standard dimmers use only one dimmer to control the luminare. To change the dimmer associated with a channel: 1. In the dimmer view, click on the desired dimmer number and hold the left mouse button down. 2. Drag the dimmer over the channel in the channel view area. When you release the mouse the channel will automatically be patched to the new value. Multiple dimmers can be patched to a single channel by clicking in the “Detail” field and entering a list of channels separated by a comma (,). Note: Multiple dimmers connected to a channel will output the same value dependent on the channel value and the channel profile curve (for more on profiles, see “Profiles” on page 257. Intelligent Fixtures Intelligent fixtures use more than one physical dimmer to control various aspects or attributes of the luminare. A channel can only be patched to one intelligent fixture and can be identified by the name of the fixture in the detail column of the channel view. To patch an intelligent fixture to a channel: 1. Select the desired luminare from the tree view under the title “Available Fixtures”. http://www.lifact.com 251 LightFactory V2 A Guide for Users Reference/Window Overview Dimmer Patching Note: All of the fixtures are grouped under the brand name and can be accessed by clicking on the small plus (+) to the left of the brand name. The brand will then be expanded showing all of the models available. 2. Click on the fixture model you want to patch and you will see a picture of the light on the right. 3. When you move the mouse over the “Dimmers” section of the window, click the mouse on the dimmer where the fixture starts and, while holding the mouse button down, drag the dimmer over the channel you want to patch. Note: When intelligent fixtures are selected, the dimmers will be highlighted in a grey background to show the number of dimmers that the fixture uses. The channel detail will now show the newly patched fixture followed by the “@” symbol and the start dimmer number. You can patch multiple intelligent fixtures at one time (consecutively) by changing the quantity (Qty) value at the top right of the “Available Fixtures” section. If more than one fixture is patched then additional fixtures will occupy the channels following the first one you drag the patch to. Figure 130: Quantity control for intelligent fixtures Once you have patched an intelligent fixture you can add more to the patch by holding down the shift key on the desired fixture and pressing the down arrow. Other information The channels grid on the left hand side of the window also allows more information about the patch to be stored. Some of the fields directly influence the output of the channel while other are used for reference to help program you show. 252 © 2004 - 2010 Dream Solutions Ltd Reference/Window Overview Dimmer Patching LightFactory V2 A Guide for Users P/T Adjust These options give you the ability to reverse the operation of the pan and tilt control of moving lights. If you find that a moving light has been hung in reverse to the logical movement of the light then you can correct it without having to physically change the position of the light. Use the drop down combo to select the adjustment you want. Flip Pan – The pan function of the fixture will be reversed Flip Tilt – The tilt function of the fixture will be reversed Flip Pan & Tilt – The pan & tilt function of the fixture will be reversed Swap Pan & Tilt – The pan function will operate tilt and the tilt will operate pan. Profile Use the drop down combo box to select the default profile for the dimmer. See Edit Profiles on page 257 for more information about this option. Aux Dimmers Some fixtures require a separate DMX channel for dimmer control. The Vari-Lite VL5 for example does not have the dimmer included in the list of control channels. This is because the dimmer is a separate power feed to the fixture. To aux dimmer can be used to set the channel number for this type of fixture. Use this option when working with colour scrollers where the dimmer is not located at a fixed distance from the control channel. You can enter any list of dimmers required into this field. Position Use the position field to describe where the fixture is located in the lighting rig. This field will be displayed in the verbose view of the channel display. Unit # The unit number can be a number that stays with the fixture. Use the unit number field to store any number you find useful to identify the fixture. http://www.lifact.com 253 LightFactory V2 A Guide for Users Reference/Window Overview Dimmer Patching Purpose The purpose field should describe what the fixture is being used for. For example – general wash, actor special etc. This field will be displayed in the verbose view of the channel display. Colour The colour field can hold any text you want to describe the colour filters that may have been added to the light. This field will be displayed in the verbose view of the channel display. Fixture Type The fixture type field will automatically be populated by patching a fixture from the library. You can however change this at any time. The fixture type is used to determine the symbol used in the layout view for the channel. Power The power field will automatically be populated by patching a fixture from the library. This field should show the power consumption of the light. Weight The weight field will automatically be populated by patching a fixture from the library. This field should show the physical weight of the fixture. Circuit Name, Circuit Number & Dimmer Phase Use these fields to record the power source to the fixture. This information may be needed later to debug power problems. Accessories If the fixture has any added accessories added to it (top hat etc) the information can be recorded into this field. Generic data 1, 2 and 3 Any other information you want to record with the fixture can be stored in any of the three generic fields. Information in these fields will be displayed in the verbose view of the channel display. 254 © 2004 - 2010 Dream Solutions Ltd Reference/Window Overview Dimmer Patching LightFactory V2 A Guide for Users DMX settings The DMX settings column is a read only display of the dip switch settings for the patched address. If the fixtures address is set by dip switched then this field can be used as a handy reference. Figure 131: DMX settings column Options A drop down menu at the top of the patch window provides access to various miscellaneous options. Figure 132: Patching options Insert (Move all fixtures down a channel) Use the insert if you need to add a fixture to the patch and want to add it between two other patched channels. The insert option will http://www.lifact.com 255 LightFactory V2 A Guide for Users Reference/Window Overview Dimmer Patching move all of the patch information down one channel form the currently selected channel. Reset Patch Selecting “Reset patch” from the menu will return all of the channels back to a 1:1 patch. Each channel will be patched to the corresponding dimmer number. To reset only a range of channels select the desired channels by clicking in the left of the system channels grid to highlight the desired channels. Select “Reset patch by range” to only reset the highlighted channels. Clear Patch Selecting “Clear patch” from the menu will remove all of the patch information form the system. Each channel will no longer be patched to dimmers. To clear only a range of channels select the desired channels by clicking in the left of the system channels grid to highlight the desired channels. Select “Clear patch by range” to remove dimmers and patching details form the channels. You can also clear the patch by universe by selecting one of the sub menu items that will appear when clicking on “Clear patch by universe” Import Patch Data To import patching from a delimited file format (csv) select “Import Patch Data” from this menu. An “open file” dialog will be displayed to select the file to import. The format for the imported data is channel, dimmer, fixture brand, fixture name. To supply a list of dimmers for a channel enclose the list in quotation (“) marks. If you are including an intelligent fixture in the patch information it is recommended that the brand and fixture name be enclosed in quotation marks. Print Patch Select “Print Patch” to print all patched channels to a system printer. 256 © 2004 - 2010 Dream Solutions Ltd Reference/Window Overview Dimmer Patching LightFactory V2 A Guide for Users Use the print preview and printer settings to adjust the look and layout of the patch information that will be sent to the printer. Edit Menu The edit menu provides access to the following windows: Edit Fixture Library The fixture library is the list of all available fixtures that can be patched in the software. Each fixture has an associated definition file that contains information about how the LightFactory can manipulate the features of the light. The fixture editor is a separate program provided with LightFactory. You can use the graphical interface to add, remove or modify fixtures. See the “LightFactory Fixture Editor User Guide” for a detailed description of how to work with this application. Edit Profiles The channel profile is a way to adjust the relationship between channel value and the final output of the dimmers. The default relationship is called linear (1:1) meaning that if the channel is set to 0 then the output is 0, if the channel is set to 50 then the output is 50 and if the channel is set to 255 then the output is also 255. Changing the profile allows you to correct for older lamps or make special channels for fixtures that do not have full dimmer functions. (e.g. A smoke machine) Profiles are also used in the “Profile Effect” as the path that the effect will apply to an attribute. See the Profile effect on page 235 for more information. The same editing window is used for both the channel profile and the profile effect. To selection a profile for a channel simply use the drop down list in the channels grid. The list that appears will show a small image of the profile and its name. To adjust a profile or to make a new one choose “Edit Profiles” from the drop down menu attached to the “Edit” button. You can also access the profile editor from the main command window from the “Extras” menu. http://www.lifact.com 257 LightFactory V2 A Guide for Users Reference/Window Overview Dimmer Patching Figure 133: Profile editor, Linear profile selected Figure 134: Profile editor, custom profile On the left side of the window is the list of profiles in the system. Profiles are not stored with the show information and will remain in the system until deleted using the profile editor. When the software is first installed a number of default profiles will be created. The default profiles cannot be edited and are identified by the small padlock that is sown in the bottom right corner of the 258 © 2004 - 2010 Dream Solutions Ltd Reference/Window Overview Dimmer Patching LightFactory V2 A Guide for Users window. To edit a default profile you will first need to make a copy of it using the button provided. To create a new profile click on the “Create New Profile” button under the list of available profiles. A dialog will appear asking for the name of the new profile. Enter a short description of the profile you plan to create and click on the “OK” button. The new profile will default to the “Linear” path. To make a change to this click anywhere on the grid and a small red dot will appear. The path will now smoothly go through the point just created. You can move this point by clicking and holding your mouse button down to drag the point around the window. Repeat this process to create more points. By default the system will draw a tight path between every point created. Use the Elasticity spin edit to adjust the obtuseness of the curve. Setting the elasticity to 1 will draw straight lines between each point without a curved fit. Edit Matrices Before creating matrix or LED effects you must define how the fixtures and lights are laid out in the real world. The “Edit Matrices” window provides a simple interface to provide a rough layout of the fixtures. You can also access this window from the “Extras” menu on the LightFactory command interface window. Figure 135: Edit Matrices http://www.lifact.com 259 LightFactory V2 A Guide for Users Reference/Window Overview Dimmer Patching A lighting matrix is a simple two dimensional grid where each cell can be assigned a channel or fixture from the system. On the left of the window is a list of available matrices that have been created previously. To edit any matrix, click on the name and the right hand grid will change to show the definition. To create a new matrix definition click on the “Add Matrix” button in the bottom left corner of the window. A dialog will ask you to enter a name for the new matrix. Click on the “OK” button and the new definition will appear in the list on the left hand side of the window. To delete a matrix click on the “Remove Matrix” button in the bottom left corner of the window. A dialog will ask you to confirm the operation. Click on the “OK” button to delete it from the system. The size of the matrix can be changed at any time by setting the columns and rows spin edit boxes along the bottom of the window. By default a matrix will be empty with no fixtures assigned. In order to output a matrix effect to fixtures you must identify where the fixtures are in the grid. To do this click on the desired cell and a fixture number will appear. The “Next Fixture” edit at the bottom of the window will automatically increment so that the next fixture can be assigned. At any time you can change the “Next Fixture” number to any desired system channel. By clicking in the grid (holding the mouse button down) and dragging the mouse over several cells you can assign a number of fixtures at the same time. Each cell will be assigned a unique fixture and the “Next Fixture” value will be incremented. Assigning an Image Use the Load & Clear options to assign a picture of the matrix for future reference. The image assigned to the matrix is used when displaying the array of lights in the channel layout view. Click on the “Load” button to open a image dialog. Select any image that represents the matrix of fixtures and click “Open” to complete the operation. The image should appear in the window just above the load and clear buttons. Click on the “Clear” button to remove the image from the system. 260 © 2004 - 2010 Dream Solutions Ltd Reference/Window Overview Cue Playbacks LightFactory V2 A Guide for Users Cue Playbacks The cue playbacks are designed to execute multiple cue lists from one place. Each playback is a repeat of functions seen in the cue list editor window. (See page 189 for more about cues and the show editor) Open the “Cue Playbacks” window by clicking on the button at the bottom of the command interface or by pressing F8 on your keyboard. Figure 136: Cue Playback Window LightFactory provides the ability to assign cue lists to a virually unlimited number of playbacks. Use the system properties settings to define how many playbacks will appear on each page. Use the page control at the bottom left corner of the window to move between pages. To use a cue playback you must assign a “Cue List” and a “Starting Cue” number. This determines which cue will be executed when the http://www.lifact.com 261 LightFactory V2 A Guide for Users Reference/Window Overview Cue Playbacks “Go” button is pressed for the first time. It also determines which cue the system will jump to when the “Reset” is pressed. Add a playback to the system by pressing the “Add” button at the bottom of the page. The new playback will be placed at the end of the list. To remove the last playback click on the “Remove” button provided. A confirmation dialog will ask that you are sure you want to remove the playback. Assign the cue list and starting cue number using this button. Current cue status Cue progress indicator Starting cue number Cue list group Show Runner Number Playback controls Figure 137: Playback Example Click on the button on the left of the playback to assign a cue list and starting cue. The following dialog will appear listing the available cues and cue lists in the system. Figure 138: Cue Playback, Cue selection 262 © 2004 - 2010 Dream Solutions Ltd Reference/Window Overview Cue Playbacks LightFactory V2 A Guide for Users Expand the cue list that you want by clicking on the small plus next to its name and then select the starting cue (Normally Cue 0). Click on “Select” to use this as in the cue playback or click “Cancel” to return without making any changes. To clear out the cue playback and disable the controls use the “Clear” button. The description field can be used to enter a meaningful name to the cue playback for future reference. Use the other fields to set shortcuts and submasters to the playback. After you have selected a valid cue list and starting cue number, the playback controls will become active. You can now use them to run your show. Playback Control Buttons Cue Go This will execute the next cue in the active cue list. If there is no current cue active, the “cue go” button will execute the starting cue number specified. As soon as this button is pressed, the cue will start, the cue progress time will start counting down the execution, and the progress indicator will show the cue progress. If the cue is triggered by some external event, such as a timecode then the “cue go” will override this and execute the cue immediately. Cue Stop This will stop the execution of the cue immediately. Any fades or waits will terminate and the current lighting state will be maintained. This will also stop the next cue from being executed regardless of its trigger. Cue Back The “cue back” button will execute the previous cue (the cue whose “next cue” value is the current cue) and terminate the current cue. Cue Reset “Cue Reset” resets the entire cue list and sets the current cue to zero. Pressing the “cue go” after a reset will cause the start cue number to be executed. http://www.lifact.com 263 LightFactory V2 A Guide for Users Reference/Window Overview Cue Playbacks Step Forward & Back To the left of the cue playback controls are two buttons for stepping forward and backward through the cue list without execution. Stepping though the cues sets the next cue that will be fired by the “cue go”. As you set through the cue the current cue state will change to reflect the next cue to run. Jump to Cue Double clicking on the progress bars will open the jump to cue dialog. This is an easy way to move to a different part of the cue list without having to step through each cue. Figure 139: Cue PLaybacks, Jump to cue dialog Select the cue number you want to run next and then use either the “Snap” or “Fade” buttons to execute the cue. By selecting the “Snap” option the system will execute the cue without any fade times being applied. All fixtures in the selected cue will immediately be set to the setting contained in the cue. Use the “Fade” button to run the cue normally applying all fade times as if a normal cue go had been pressed. Click on the “Cancel” button at any time to return to the playbacks window. Shortcuts and Submasters Alongside each of the playback button labels, you may notice a number enclosed in brackets. These numbers represent shortcuts that have been assigned to the button. In Figure 140 below, we see an example where the “Go” button is assigned shortcut 11 and the “Stop” button assigned shortcut 21. Figure 140: Cue Playbacks Controls - Shortcut numbers 264 © 2004 - 2010 Dream Solutions Ltd Reference/Window Overview Cue Playbacks LightFactory V2 A Guide for Users Go Submasters A “Go Submaster” allows you to manually control the execution of a cue. This overrides the fade-in and fade-out values, making them become irrelevant. The position of the submaster determines the proportion of all channels in the cue. Once the submaster is at full then returning the submaster back to 0 will execute the next cue. This operation overrides all properties of intelligent fixtures and can be a useful way to tracking moving lights manually to follow someone on stage. Level Submasters A “Level Submaster” does not control the execution of the cue but simply overrides the channel values as the cue executes. You still need to use the “Cue Go” button to execute it, but unless the “Level Submaster” is above 0 then no output will be seen. Example If a channel in a cue is set to 50% and the “Level Submaster” is at 80% then when the cue executes the channel will be set to 40%. Changing the submaster while the cue remains active will also change the output of the fixture. Options Disable Reset To avoid accidental executing the reset function in the middle of a show check the “Disable Reset” option at the bottom of the window. Go All Pressing “Go All” is the equivalent of pressing all of the Go buttons for all cue playbacks at the same time. Reset All Click “Reset All” to reset all of the playbacks. Execute cue lists exclusively Click this option to only run one cue list at a time. When you click go on a playback any currently active cue lists will be stopped the current cue used as the outgoing cue for the new playback. http://www.lifact.com 265 LightFactory V2 A Guide for Users Reference/Window Overview Effects Playbacks Effects Playbacks “Effect Playbacks” provide a quick and easy way to access effects in an ad-hoc manner. Once you have created your effects (See “Effects Editor” on page 218 to learn how), they can be used either within cue lists or manually from effects runners. Open the “Effects Playback” window by clicking on the “Fx Playbacks” button at the bottom of the command interface or pressing the F9 key on your keyboard. Figure 141: Effects Runners Window This window will remain empty until you begin adding playbacks by clicking on the “Add Playback” button. Playbacks can be removed by clicking on the small X in the top right of the frame. At any time you can re-order the effects playbacks by right-clicking to bring up the move menu. Click on the “Move Up” or “Move Down” to rearrange the effect runner appearance order. 266 © 2004 - 2010 Dream Solutions Ltd Reference/Window Overview Effects Playbacks LightFactory V2 A Guide for Users Figure 142: Effect runner move options Options The “Options” button at the bottom of this window can be used to change the size of the playbacks or toggle the edit mode sate. When the edit mode is turned off you will be able to delete a playback or change its settings. This switch is designed to avoid accidentally changing the configuration during a show. Effects Playback Sizes The “Options” menu will allow you to set 3 different sizes for the playbacks. Figure 143: Effect Playbacks - Compact mode Figure 144: Effect Playbacks - Normal mode Figure 145: Effect Playbacks - Large mode http://www.lifact.com 267 LightFactory V2 A Guide for Users Reference/Window Overview Effects Playbacks setting up a new Effect playback Left click inside the playback to bring up the “Effect Playback Properties” window. Figure 146: Effect Playback Properties Windows The description field can be used to easily identify the playback and will appear along the top of the control. By default, this will be set to the same as the effect name but can be changed as desired. To set the effect to the playback, select the desired effect from the drop down list and the effect playback will become active. Depending on the type of effect you have selected different options will become visible. Click on the “Edit Effect” button to open the effects editor and automatically show the effect assigned to this playback. 268 © 2004 - 2010 Dream Solutions Ltd Reference/Window Overview Effects Playbacks LightFactory V2 A Guide for Users Exclusive Group When a playback is created it is automatically placed into the “Independent” group (exclusive group 0). Effects contained in the independent group will run independently and can all be run at the same time. Setting an effect into an exclusive group other than 0 will make it exclusive. Only one effects contained in an exclusive group (group other than 0) can be active at any time. If you start another effect in an exclusive group while another is already running then the existing effect will stop and the new one started. Timeline Effects Options Submaster – Assigning a submaster to the playback will override the dimmer of the fixtures contained in the effect. As the effect runs the position of the submaster will determine output of the fixtures. Playback – Assigning a playback will disable the submaster edit box as only one can be assigned to the playback. A playback relates to the Enttec Playback wing. Assigning a playback does more than just utilise the fader on the wing but also allows you to use the play, back and pause buttons to run the effect. Start/Stop Shortcut – Set a shortcut number to assign to the playback controls for this playback. Pressing the shortcut will start the effect running. Pressing the shortcut while the effect is running will pause the effect and pressing it twice within 2 seconds will rewind the effect to the start. http://www.lifact.com 269 LightFactory V2 A Guide for Users Reference/Window Overview Effects Playbacks Override Effect Length – Set this field to change the length that the effect will run for. If this value is set to 0, the default length (Set during creation of the effect) will be used. If the effect length is overridden then all of the segments in the effect will be rescaled to this new length. Loop Continuously – Check this option to make the effect loop back to the start when it finishes. If this option is not checked then it will stop as soon as the effect ends. Chase Options Submaster – Assigning a submaster to the playback will override the dimmer of the fixtures contained in the effect. As the effect runs the position of the submaster will determine output of the fixtures. A submaster assigned to a chase will also cause the effect to automatically start when the value is above 0 and pause with it returns to 0. Playback – Assigning a playback will disable the submaster edit as only one can be assigned to the playback at a time. A playback relates to the Enttec Playback wing. Assigning a playback does more than just utilise the fader on the wing but also allows you to use the play, back and pause buttons to run the effect. 270 © 2004 - 2010 Dream Solutions Ltd Reference/Window Overview Effects Playbacks LightFactory V2 A Guide for Users Step Shortcut – Set a shortcut number to use to step the chase. Pressing the assigned shortcut will cause the chase to transition from the current step to the next. Fade Time Submaster – To manually adjust the fade time or transition time as the chase is running you can assign a submaster that will control this. As each step executes the fade time will be dependent on the position of the submaster. The maximum fade time that can be set by the submaster is 10min. Step Time Submaster - To manually adjust the step time (time between automatic executions of steps) as the chase is running you can assign a submaster that will control this. As each step executes the time before the next step executes will be determined by the position of the submaster. The maximum step time that can be set by the submaster is 10min. Chase Direction – Use this drop down option to specify how chase will run. Forward – The chase will run from the first step to the last. If the chase is set to loop the chase will return to the first step after the last step. Backward – The chase will run from the last step to the first step. If the chase is set to loop the chase will return to the last step after reaching the first step. Bounce – The chase will run from the first step to the last step and then back to the first step. If the chase is setup to loop then this will operation will repeat. Random – Every step in the chase will execute in a random order. Step Time – To specify a step time other than the default defined in when the chase was created enter a value into this field. Setting the step time to zero (0) will cause the default step time to be used. Click on the buttons to the right of the “Step Time” field to set the chase to be triggered by either the audio or tap tempo features. Fade Time - To specify a fade time other than the default defined in when the chase was created enter a value into this field. Setting the fade time to zero (0) will cause the default fade time to be used. http://www.lifact.com 271 LightFactory V2 A Guide for Users Reference/Window Overview Effects Playbacks Profile Effect Options Submaster – Assigning a submaster to the playback will override the dimmer of the fixtures contained in the effect. As the effect runs the position of the submaster will determine output of the fixtures. Playback – Assigning a playback will disable the submaster edit as only one can be assigned to the FX playback at a time. A playback relates to the Enttec Playback wing. Assigning a playback does more than just utilise the fader on the wing but also allows you to use the play, back and pause buttons to run the effect. Start/Stop Shortcut – Set a shortcut number to assign to the playback controls for this playback. Pressing the shortcut will start the effect running. Pressing the shortcut while the effect is running will pause the effect and pressing it twice within 2 seconds will rewind the effect to the start. Override Effect Length – Set this field to change the length that the effect will run for. If this value is set to 0, the default length (Set during creation of the effect) will be used. Loop Continuously – Check this option to make the effect loop back to the start when it finishes. If this option is not checked then it will stop as soon as the effect ends. 272 © 2004 - 2010 Dream Solutions Ltd Reference/Window Overview Effects Playbacks LightFactory V2 A Guide for Users Scale Submaster – Assign a submaster to this field to manually adjust the scale parameter of the effect while it is running. This can provide a dynamic way to vary the effect. Offset Submaster – Assign a submaster to this field to manually adjust the offset parameter of the effect. Stagger Direction – Use this drop down option to specify how stagger will operate on the list of fixtures. Forward – The stagger will be spread across the fixtures starting at the first fixture. Backward – This is the opposite of the forward stagger as the fixtures will be staggered from the last one through to the first. Bounce – Each time the effect runs the direction of the stagger will alternate between forward and backward behaviour. Random – The fixtures in the effect will have a random order and the stagger applied over the new order. Matrix Effect Options Submaster – Assigning a submaster to the playback will override the intensity the all of the fixtures contained in the matrix. http://www.lifact.com 273 LightFactory V2 A Guide for Users Reference/Window Overview Effects Playbacks Playback – Assigning a playback will disable the submaster edit as only one can be assigned to the FX playback at a time. A playback relates to the Enttec Playback wing. Assigning a playback does more than just utilise the intensity control of the fixtures in the matrix but also allows you to use the play, back and pause buttons to run the effect. Start/Stop Shortcut – Set a shortcut number to assign to the playback controls for this playback. Pressing the shortcut will start the effect running. Pressing the shortcut while the effect is running will pause the effect and pressing it twice within 2 seconds will rewind the effect to the start. Override Effect Length – Set this field to change the length that the effect will run for. If this value is set to 0, the default length (Set during creation of the effect) will be used. Loop Continuously – Check this option to make the effect loop back to the start when it finishes. If this option is not checked then it will stop as soon as the effect ends. Step to points only - Set this option to jump between points rather than tracking a smooth path. When the effect is started the length of the effect will be broken up into the number of control points. As the effect runs it will jump from point to point at equal time intervals. Stop at each point - Set this option to run the effect more like a chase where each point becomes a step. The effect will play normally however when each point is reached the effect will pause and wait for a play command. 274 © 2004 - 2010 Dream Solutions Ltd Reference/Window Overview Effects Playbacks LightFactory V2 A Guide for Users Media Effect Options Submaster – Assigning a submaster to the playback will override the volume of audio and the brightness of video during playback of the effect. Playback – Assigning a playback will disable the submaster edit as only one can be assigned to the FX playback at a time. Assigning a playback will control the running the media file plus provide submaster functionally via the slider below the playback controls. Start/Stop Shortcut – Set a shortcut number to assign to the playback controls for this playback. Pressing the shortcut will start the effect running. Pressing the shortcut while the effect is running will pause the effect and pressing it twice within 2 seconds will rewind the effect to the start. Loop Continuously – Check this option to make the effect loop back to the start when it finishes. If this option is not checked then it will stop as soon as the effect ends. Playback Controls Along the bottom of the effect playback frame are the three playback controls and a progress time indicator. Play Use the play control to start the effect running. As soon as the effect starts the play control will be highlighted in green and the time http://www.lifact.com 275 LightFactory V2 A Guide for Users Reference/Window Overview Effects Playbacks progress will beginning counting. In the case of simple chases the play control is also used to step through the chase. Pause Pausing an effect will stop its execution immediately but keep the position pointer at the current location. If you start the effect again, the effect will continue from this location. At the bottom of the page is a button to pause all active effects. Pressing this is the equivalent of clicking on the pause button of all running effects. Rewind Pressing the rewind button will stop the effect running and reset its position back to the start. If the effect is started again, it will start from the beginning. At the bottom of the page is a button to reset all active effects. Pressing this is the equivalent of clicking on the reset button of all running effects. 276 © 2004 - 2010 Dream Solutions Ltd Reference/Window Overview Macro Editor LightFactory V2 A Guide for Users Macro Editor The macro editor is an enhancement to the command interface and allows you to create a list of commands that are executed in one operation. Note: This is particularly useful if you have a sequence of commands that you use frequently. Creating a macro enables you to activate the sequence in one operation rather than entering each command manually. You can use the macro editor to create new macros or to edit existing ones. Open the “Macro Editor” by clicking on the button at the bottom of the command interface or by pressing F10 on your keyboard. Figure 147: Macro Editor Note: You can create any number of macros, limited only by system resources. To create a macro: 1. Click the “Add” button at the bottom left of the window. 2. The add macro dialog box will appear. Enter a meaningful name and click “OK” to create the macro. If you want to assign a shortcut to the macro you can do so in the same dialog. http://www.lifact.com 277 LightFactory V2 A Guide for Users Reference/Window Overview Macro Editor Figure 148: Macros, Add macro dialog 3. Type the commands for your macro into the window at the righthand side of the macro editor. 4. The “Run” button can be used to execute the macro (or a shortcut if you assigned one). As the macro executes, each line will appear in the command interface window. Deleting a macro can be achieved by clicking on the appropriate row and clicking the “Delete” button. A confirmation dialog will prompt you to confirm the deletion before the macro is removed. To edit the macro name and/or shortcut double click on the row in the macro list. The same dialog as was used to add a macro will be displayed. Additional Commands Macros consist of the same commands that are available in the command window. In addition to these commands, you can also enter comments and an execution delay (sleep). C++ Style Comments To add a line of text that will not be executed, place two back slashes (//) before the text. As the system executes each line, it will ignore lines that begin with these symbols. Sleep The sleep command will cause the software to pause before continuing to execute commands after this line. In the above example (Figure 147 on page 277), the control channel is set to 278 © 2004 - 2010 Dream Solutions Ltd Reference/Window Overview Macro Editor LightFactory V2 A Guide for Users DMX 220 and then set back to 0 after a short delay of 3.5 seconds. Enter the time of the delay in brackets after the commands. Loop & End Loop You can loop a series of commands using the “Loop” and “End Loop” keywords. Loop {number of times} – This command will mark the beginning of the loop and also define how many times LightFactory will perform the loop block. Loop End – This command will mark the end of the loop. All the command between these two commands will execute however many times was specified in the “Loop” command. http://www.lifact.com 279 LightFactory V2 A Guide for Users Reference/Window Overview Raw DMX View Raw DMX View The DMX display is provided as a means to debug the system output by showing the final output values being sent to the DMX hardware. Figure 149: Dimmer Display Window To open the “Raw DMX View” window click on the “Extras” button on the command window and select “Raw DMX view” from the resulting menu. Each of the DMX dimmers is represented as a cell in the above grid. The DMX value is displayed to the right of the dimmer number. Whenever a DMX dimmer has a value greater than 0, it will be highlighted in grey. The first tab in the widow will always display the DMX in state for use in debugging submasters. Click on the “DMX In” tab to see what is being received by the DMX in hardware. 280 © 2004 - 2010 Dream Solutions Ltd Reference/Window Overview Extras LightFactory V2 A Guide for Users Extras In the “Extras” menu you will find a number of useful tools to help with lighting your show. Timecode Monitor The timecode monitor window provides an easy view of the current timecode being read by LightFactory. Figure 150: Timecode monitor Power Meters The power meters provide an approximation of the power usage by your lighting rig. Using the power setting in the dimmer patching for each channel the software can calculate the actual load on each of the power phases. To use the power meters you must supply the maximum power load in the “power” column of the system properties and the dimmer phase (1,2 or 3). If the dimmer phase is left blank then the channel will not contribute to the values displayed in the meters. Figure 151: Power meters Voltage – Set the average voltage used by the power system in your building. For North America this is normally 110V. For most other countries this should be set to 220V. http://www.lifact.com 281 LightFactory V2 A Guide for Users Reference/Window Overview Extras Limit (Amp) – An upper limit on the power available per phase can be set using the “Limit” field. This setting is the limit per phase (not the total limit of all phases). When this is set (above 0) then the software will automatically adjust the grand master to keep the system within this limit. 282 © 2004 - 2010 Dream Solutions Ltd LightFactory Remote Installing LFRemote LightFactory V2 A Guide for Users LightFactory Remote The LightFactory Remote (LFRemote) is a separate application designed to work with Windows Mobile hand held devices. It provides easy access to the features of LightFactory from a hand held remote control. If your device is equipped with wireless network access then this immediately becomes a useful way to control the software from anywhere in your venue. Figure 152: LightFactory Remote The most common practical application of this is to use it as a remote rigging device. You can turn fixtures on and off without having to return back to where LightFactory is setup and running. Note: LFRemote is designed to work with Windows Mobile 5 only and will not run on Windows CE devices or Palm OS devices. Installing LFRemote LFRemote is distributed as a single CAB file for installation on Windows Mobile devices. The CAB file is designed to run within Windows Mobile, and must be transferred to your Pocket PC or smartphone before it can be installed. http://www.lifact.com 283 LightFactory V2 A Guide for Users LightFactory Remote Installing LFRemote Note: For the purposes of this tutorial, we'll install on a Dell Axim X50v Pocket PC, however the same process works for Windows Mobile smartphones. Step 1: Moving the .CAB File to Your Windows Mobile Device Our first step is simply transferring the .CAB file to the Windows Mobile Pocket PC. The file LFRemote.cab can be found on your installation CD or downloaded from the following web address: http://msearancke.fileburst.com/LFRemote.cab To begin, connect the Pocket PC to your Windows PC using a USB cable or cradle. Allow the synchronization process to complete. Inside ActiveSync, click the Explore button on the toolbar: The Explore feature of ActiveSync is very useful; it provides access to the files stored on your Pocket PC or smartphone from Windows. With the Mobile Device screen open on your desktop, left-click on the .CAB file and drag it to the Mobile Device screen, then let go of the mouse button: Step 2: Install the .CAB File's Software Now that the .CAB file has been copied to your Windows Mobile device, we're ready to install the program. On your mobile device click: Start > Programs > File Explorer. If you followed the 284 © 2004 - 2010 Dream Solutions Ltd LightFactory Remote Setting up LightFactory to use LFRemote LightFactory V2 A Guide for Users instructions above and moved the file to the root Mobile Device window, navigate to the My Documents folder: You should see the file you transferred in the My Documents folder. When you find it, tap it with your stylus (or, on a smartphone, highlight the file and hit the OK key). The .CAB file will begin the installation process. Follow the instructions on screen, which may vary from program to program: Your software has now been installed and is ready to use. You will now find the application in the programs section of your mobile device. Setting up LightFactory to use LFRemote There is little or no setup required to run the LightFactory remote with the software. You will need to run the version 1.2 of LightFactory or greater for all functionality of the remote to work. http://www.lifact.com 285 LightFactory V2 A Guide for Users LightFactory Remote LFRemote in a wireless environment Telnet Interface The LFRemote uses the telnet interface in LightFactory to communicate with the software. This option must be turned on to connect with the device. To enable the Telnet interface open the “System Properties” found in the “Options” menu of LightFactory. On the “System Settings” tab is the option – “Enable telnet Interface”. Once checked you can connect to LightFactory through port number 3100 using your remote device. Figure 153: Telnet command interface options Use the “Telnet Port” edit box to set the IP port number that the software will bind to. Unless you have a specific port conflict that will not let you use port 3100 you should leave this at its default value. LFRemote in a wireless environment 286 © 2004 - 2010 Dream Solutions Ltd LightFactory Remote Using LF Remote LightFactory V2 A Guide for Users To setup the remote for wireless use you will need the following equipment: 1. Working Ethernet connection on your LightFactory PC 2. A Wi-Fi (802.11) access point. 3. A windows mobile PDA or Smartphone with a wireless network built in or attached. For detailed instructions for setting up a wireless network please visit: http://www.tomsnetworking.com/2002/10/11/wireless_networking_ntk_ Once you have setup a working wireless network and can connect you mobile device to the network then no further setup is required and the LFRemote will be able to connect to LightFactory. Using LF Remote Find the “LightFactory Remote” program on your mobile device and tap it with your stylus (or, on a smartphone, highlight the file and hit the OK key). After a few seconds the program will start and you will see the LFRemote interface. Connecting When the application first starts all of the buttons will be disabled except for the “Connect” button found in the bottom left corner of the screen. http://www.lifact.com 287 LightFactory V2 A Guide for Users LightFactory Remote Using LF Remote Figure 154: LightFactory Remote (Disconnected) Make sure LightFactory is running and the Telnet interface is enabled. When the software starts you will see a message indicating that the Telnet interface is running. Click on the “Connect” button to connect to a LightFactory system. You will see the following screen appear: Figure 155: LightFactory Remote, Connect Screen 288 © 2004 - 2010 Dream Solutions Ltd LightFactory Remote Using LF Remote LightFactory V2 A Guide for Users In the box labelled “IP address” enter the Internet address of the computer running LightFactory (server). If you do not know the IP address of the LightFactory server open the “Properties” window for the network interface that is connected to the same network. Start > Settings > Network Connections > {Network name} e.g. Start > Settings > Network Connections > Local Area Connection The “Properties” can be accessed by right clicking on the network interface and selecting it from the resulting popup menu. Click on the “Support” tab to view the following window: Figure 156: Network Interface Properties, Support The IP Address is listed just below “Address Type” and is a four numbers separated by a point. Use this number as the address to connect to in LightFactory Remote. The edit box for entering the IP address in LFRemote will show the last entered address when the software starts. You can also use the drop down control to select IP addresses from list. The list will contain all of the IPs entered into the program to date. Next enter the “Port” number if it is different to 3100 on your configuration in LightFactory. 3100 is the default value and should not be changed unless you have another application also using this port. Once you have the LightFactory server IP and Port number entered correctly click on the “Connect” button. The top of the screen will http://www.lifact.com 289 LightFactory V2 A Guide for Users LightFactory Remote Using LF Remote show the word “Connecting…” while the software attempts to communicate with your LightFactory system. Once connected the following screen will return with all of the buttons enabled: Figure 157: LightFactory Remote, Main screen Entering Commands The remote is now ready to accept command to control your lighting system. The syntax for entering commands is exactly the same as the command line interface in LightFactory. See page “Command Interface” on Page 71 for a full details of the command structure. Figure 158: LightFactory Remote, Example Syntax 290 © 2004 - 2010 Dream Solutions Ltd LightFactory Remote Using LF Remote LightFactory V2 A Guide for Users In the above example we have issued a command to set channels 1 though to 5 and 9 through to 15, excluding 12 to DMX value 220. Entering Attribute/Property commands The system also provides some helper functions to make entering the syntax easier. For example if we want to control an attribute of a fixtures such as PAN then we would need to open the keyboard at the bottom of the screen ( ) and type the word “pan”. The LightFactory remote makes this easier by providing quick access to all of the attributes that can be accessed from the command syntax. Clicking on the “Att” button will popup a menu to select the attribute you want. Figure 159: LightFactory Remote, Attribute List Running Cues This functional also works when selecting cues and macros. To run a cue for example the syntax is cue <cue list> <cue number>. As we do not want to remember all of the cue lists in the system the remote interface retrieves this information for us and lists them in a pop up menu. To run a cue from the remote simply click on the “Cue” button and a popup menu will list all of the cue lists available. http://www.lifact.com 291 LightFactory V2 A Guide for Users LightFactory Remote Using LF Remote Figure 160: LightFactory Remote, Cue list Selecting the cue lists from this menu will automatically complete the first 2 parts of the syntax by adding the word “Cue” to the front of the cue list name. In the example above if we selected the cue list “1-05 Push It” then the remote will automatically put into the command line: cue “1-05 Push It” – and then wait for the cue number to be entered. Running Macro’s The same operation can be used for running Macro’s. Clicking on the “Macro” button will pop up a list of macro names found on the LightFactory server. Figure 161: LightFactory Remote, Macro Selection 292 © 2004 - 2010 Dream Solutions Ltd LightFactory Remote Using LF Remote LightFactory V2 A Guide for Users Press the “Execute” key to run the command you have entered on your LightFactory system. Once the command has been executed it will appear above the entry box and indicate if the command was successful or not. If you see the word “Failed” after the command you entered then the syntax was not correct and the system did not do anything. On, Off, +, If any of these keys are pressed with the command line blank (nothing else typed) then they will execute immediately on the currently selected channels. Channels can be selected by entering channel numbers and not entering a values to assign to them. Pressing the + or – key will increase or decrease the channels by the “Scroll wheel” setting in the “System Properties” of LightFactory. BS The BS (Backspace) key is used to correct mistakes made when entering commands into the system. This key will remove the last character of whatever is typed. Shutting Down Before closing down the LightFactory remote you should disconnect from the server using the “Disconnect” button on the bottom left of the screen. Once disconnected the buttons on the remote will become disabled and the button you just pressed will be labelled “Connect”. This button can now be used to connect again or you can close the application by clicking on the small X in the top right hand corner of the screen. http://www.lifact.com 293 LightFactory V2 A Guide for Users Index Index Active, 170, 191 Artnet, 52 Attributes, 15 Aux Dimmer, 253 Back, 70, 133, 193, 217, 263, 264 Behaviour, 185 Brightness, 111 Channel Characteristic, 14 channel display, 77, 112, 138 Channel groups, 18, 128, 167, 179, 211 Channel Groups, 18, 166, 211, 212 channel window, 59, 60, 62, 64, 65, 66, 69, 72, 95, 103, 138, 139, 145, 154, 155, 171, 176, 188, 248 Channels, 13, 22, 61, 73, 131, 145, 153, 180, 201, 212, 235, 293 Chase, 128, 218, 224, 270, 271 CMY, 17 Colour wheel, 16 Command Interface, 20, 25, 26, 36, 59, 71 Contrast, 111 Control Channel, 16 Conventional fixtures, 15 cue, 20, 21, 22, 23, 26, 65, 67, 69, 70, 71, 83, 88, 101, 294 102, 114, 117, 118, 170, 171, 172, 173, 178, 188, 190, 191, 195, 196, 197, 198, 199, 200, 201, 203, 208, 209, 210, 211, 212, 213, 214, 216, 217, 219, 238, 243, 261, 262, 263, 264, 265, 266, 291, 292 Cue Go, 216 cue list, 20, 21, 65, 70, 170, 171, 173, 188, 190, 191, 195, 196, 198, 199, 200, 210, 216, 217, 219, 261, 262, 263, 264, 291, 292 Cue Number, 21, 200, 213 Cue Reset, 217 Cue Stop, 216 Cue Trigger, 22 DBO, 66, 68, 99, 153 Delay, 213 designer, 10 desk channels, 13, 59 Diffusion, 17 Dimmer Patching, 13, 62, 250 Dimmers, 10, 12, 14, 63, 251, 252 DMX, 11, 12, 13, 29, 30, 35, 37, 42, 47, 48, 49, 52, 56, 59, 62, 69, 73, 75, 90, 93, 94, 106, 131, 138, 152, 155, 156, 236, 238, 250, 253, 279, 280, 291 © 2004 - 2010 Dream Solutions Ltd Index Dwell, 214 Edge, 17 Effects, 22, 24, 25, 133, 165, 208, 209, 214, 218, 219, 220, 226, 227, 235, 240, 243, 266, 269 Enttec, 47, 48, 49, 52, 53, 59, 93, 132, 137, 269, 270, 272, 274 Ethernet, 11, 29, 52, 53, 54, 93, 94, 109, 287 External Triggers, 113, 114, 118, 119 fade, 21, 22, 69, 70, 73, 76, 86, 101, 102, 104, 128, 153, 166, 174, 185, 187, 203, 209, 210, 213, 214, 220, 225, 226, 264, 265, 271 Fade In, 213 Fade Out, 214 Fan, 149, 150 fixture control, 154 Fixture Library, 16 Focus, 17 Framing control, 17 FX Library, 165 Gobo, 16 helper control, 155, 156 HTP, 19, 185 Hue, 111 Independent, 19, 186, 269 Intelligent fixtures, 15, 139, 251 http://www.lifact.com LightFactory V2 A Guide for Users Iris, 17 Layout View, 141 LED, 53, 54, 218, 222, 240, 259 LFRemote, 283, 284, 285, 286, 287, 289 lighting control, 10, 11 Line-In, 117 macro, 21, 26, 84, 277, 278, 292 Macros, 26, 56, 57, 278 Matrix, 144, 218, 222, 240, 241, 242, 260, 273 Media, 91, 110, 218, 223, 243, 275 MIDI, 22, 28, 113, 114, 118, 119, 213 Moving Light, 62, 64, 231, 232 OFF, 146 ON, 95, 146 On Level, 95 Palettes, 26, 167, 175, 247 Pan, 16, 156, 157, 232, 238 Park, 146, 152 Patching, 14, 59, 62, 64, 255 Pathport, 52, 93 Pause, 133, 246, 276 Permissions, 126 Play, 243, 246, 275 Print, 42, 189, 256 record, 42, 102, 168, 169, 171, 173, 174 295 LightFactory V2 A Guide for Users Registration, 35, 36, 37, 38, 39, 42, 43, 106, 107 Release, 27, 102, 144, 146, 152 Remote, 283, 287, 288, 289, 290, 291, 292 Saturation, 111 scene, 65, 66, 68, 170 Scenes, 179 Scheduled Tasks, 122 Select All, 189 Select Inactive, 189 Shortcuts, 19, 20, 26, 91, 112, 132, 133, 134, 136, 146, 210, 211, 248, 264 show, 10, 21, 22, 35, 59, 63, 65, 66, 68, 69, 70, 84, 86, 87, 88, 90, 109, 123, 125, 127, 140, 155, 171, 189, 190, 195, 200, 208, 213, 216, 224, 225, 238, 241, 244, 245, 252, 260, 263, 265, 268, 289, 290 SMPTE, 28, 118, 119 Index Stagger, 210, 238, 239, 273 Strobe, 17 Submasters, 179 TBuildT, 19, 185 Telnet, 26, 99, 286, 288 TExclusiveT, 19, 185 Thumb Wheel, 154 Tilt, 16, 156, 157, 238, 253 Timecode, 28, 113, 118, 119, 120, 213, 214 TOverrideT, 18, 185 Tracking, 23 Undo, 152 Universe, 13, 47 Update, 57, 172 USB, 11, 13, 29, 47, 48, 49, 56, 57, 58, 93, 94, 284 Utilise Colour, 111 Video Output Monitor, 110 Visualisation, 107 Volume, 111 Wings, 53, 54, 56, 91, 109 Zoom, 16, 242 Details a Moving Light Wings Wings & Tilt and Submasters (Intelligent Cue Execution) Details a Moving Light Wings Wings Details a Moving Light Wings Wings Details a Moving Light Wings Wings 296 © 2004 - 2010 Dream Solutions Ltd Index LightFactory V2 A Guide for Users Details a Moving Light Wings Wings http://www.lifact.com 297