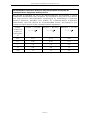
1
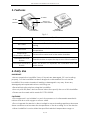
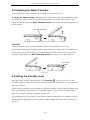
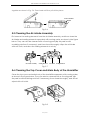
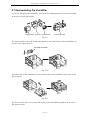
H60 Heated Humidifier User Manual 0123 H60 Heated Humidifier User Manual V1.2 The H60 Heated Humidifier is designed only for use with specific Luna™ E-20A and E-20C Series devices. Do not use the H60 Heated Humidifier with any other devices. The humidifier moistens the air delivered by the Luna™ E-20A and E-20C Series devices. It is for use in the home or hospital / institutional environment. The H60 Heated Humidifier is only used for single patient and must not be re-used on another person. This is to avoid the risk of cross-infection. The H60 Heated Humidifier is not intended for use with a patient whose upper airway has been bypassed. Table of Contents 1. Warning, Caution and Important Tip ............................................................................. 1 2. Symbols............................................................................................................................... 1 3. Features .............................................................................................................................. 2 4. Daily Use ............................................................................................................................. 2 4.1 Connecting, Separating the Humidifier and Main Device ............................ 3 4.1.1 Connecting the Humidifier to the Main Device ................................. 3 4.1.2 Separating the Humidifier from the Main Device ............................... 4 4.2 Filling the Water Chamber .................................................................................. 4 4.2.1 Removing the Water Chamber ............................................................ 4 4.2.2 Overturning the Water Chamber ......................................................... 5 4.2.3 Removing the Water Inlet Cap ............................................................. 5 4.2.4 Filling Water .............................................................................................. 5 4.2.5 Returning the Water Chamber.............................................................. 6 4.3 Emptying the Water Chamber ........................................................................... 7 4.4 Setting the Humidity Level ................................................................................... 7 5. Cleaning............................................................................................................................. 8 5.1 Seperating the Humidifier Top Cover from its Main Body ............................... 9 5.2 Removing the Water Chamber .......................................................................... 9 5.3 Detaching the Air-intake Assembly ................................................................... 9 5.4 Cleaning the Water Chamber ......................................................................... 10 5.5 Cleaning the Air-intake Assembly .................................................................... 11 5.6 Cleaning the Top Cover and Main Body of the Humidifier .......................... 11 5.7 Reassembling the Humidifier ............................................................................. 12 6. Service .............................................................................................................................. 13 7. Specifications .................................................................................................................. 13 8. Disposal............................................................................................................................. 14 9. Traveling with the System ............................................................................................... 14 10. EMC Requirements ....................................................................................................... 15 11. Warranty ......................................................................................................................... 19 H60 Heated Humidifier User Manual V1.2 1. Warning, Caution and Important Tip WARNING! Indicate the possibility of injury to the user or operator. CAUTION! Indicate the possibility of damage to the device. IMPORTANT TIP! Place emphasis on an operating characteristic. Warnings, Cautions, and Important Tips appear throughout this manual as they apply. 2. Symbols Operating Instructions Type BF Applied Part Class II (Double Insulated) AC Power DC Power IP22 ≥ 12.5 mm Diameter, Dripping (15ºtilted) Hot Surface Serial Number of the Product Manufacturer European CE Declaration of Conformity Water Filling Prohibited Here Water Inlet Directional Indicator for Removing the Water Inlet Cap Directional Indicator for Screwing the Water Inlet Cap 1 / 19 H60 Heated Humidifier User Manual V1.2 3. Features Air Outlet Air Inlet Water Level Observation Window Connector Humidifier Separation Button Humidifier Uncover Button Fig. 3-1 Name Air Inlet Function Connect to the outlet of the main device Air Outlet Deliver humidified air to the patient; connect to the air tubing Connector Heat the water in the water chamber and detect the temperature Water Level Observation Window Observe the water level in the water chamber Humidifier Uncover Button Press this button to open the top cover of the humidifier Humidifier Separation Button Press this button to separate the humidifier from the main device 4. Daily Use IMPORTANT! • Never operate the humidifier if any of its parts are damaged, if it is not working properly, or if the humidifier has been dropped or mishandled. Do not use the humidifier if the water chamber is leaking or damaged in any way. Have any damaged parts replaced before continuing use. • Read all instructions before using the humidifier. • Use only with 3B / BMC devices whose instructions specify the use of this humidifier. • Please use the mask which meets ISO17510-2:2009. CAUTIONS! • This equipment is not suitable for use in the presence of a flammable anesthetic mixture with air or with oxygen or nitrous oxide. • Do not operate the device in direct sunlight or near a heating appliance because these conditions can increase the temperature of the air coming out of the device. • When humidifier is used outside the specified ambient temperature range or 2 / 19 H60 Heated Humidifier User Manual V1.2 humidity range, the performance of humidifier will be compromised. • U.S. federal law restricts this device to sale by or on the order of a physician. WARNINGS! • Use the humidifier only for its intended use as described in this manual. • Use only accessories recommended by 3B / BMC. 4.1 Connecting, Separating the Humidifier and Main Device 4.1.1 Connecting the Humidifier to the Main Device Remove the shield from the main device, following the steps below: (1) Overturn the main device and find the buckle slot at the bottom of the main device, as shown in Fig. 4-1. (2) Remove the shield by inserting a flat tool into the buckle slot. Buckle Slot Fig. 4-1 After the shield is removed, place the humidifier and main device near each other as shown in Fig. 4-2. The air outlet of the main device should be targeted to the inlet of the humidifier. Push the two devices together until they click into place. Fig. 4-2 shows their positions before and after connection to each other. Before Connection After Connection Fig. 4-2 CAUTION! • When the main device delivers air and the humidity setting is adjusted, if the indicator lights of the humidifier do not light up, it may be that the humidifier and main device are not connected correctly. 3 / 19 H60 Heated Humidifier User Manual V1.2 4.1.2 Separating the Humidifier from the Main Device Press the Humidifier Separation Button on the humidifier and, at the same time, pull the humidifier and main device apart in opposite horizontal directions, as shown in Fig. 4-3. Humidifier Separation Button Fig. 4-3 Fig. 4-4 CAUTIONS! • Do not move the connected unit upwards or downwards while pulling the devices apart (see Fig. 4-4). It could cause damage to the devices. • Place the shield back on the main device when the humidifier is not in use. 4.2 Filling the Water Chamber 4.2.1 Removing the Water Chamber Press the Humidifier Uncover Button to open the top cover. Hold the front center of the humidifier with your thumb and index finger, and pull the chamber out of the humidifier, as shown in the figure below. Humidifier Uncover Button Fig. 4-5 4 / 19 H60 Heated Humidifier User Manual V1.2 WARNING! • Turn the device off and allow approximately 15 minutes for the heater plate and water to cool. 4.2.2 Overturning the Water Chamber Turn the water chamber over so that it is bottom up, as shown in the figure below. Fig. 4-6 WARNINGS! • Never touch the heater plate unless the humidifier is unplugged and the plate has cooled down. • Fill the water chamber only after it is turned over, otherwise the device could be damaged. 4.2.3 Removing the Water Inlet Cap Turn the water inlet cap counterclockwise so the arrowhead on the cap points to the triangle symbol , and then remove the cap. Water Inlet Cap Water Inlet Cap Fig. 4-7 4.2.4 Filling Water Fill the water chamber with approximately 350 ml of water through the water inlet. Make sure that the water does not exceed the maximum water level line. Observe the water level in the water chamber through the Water Level Observation Window. 5 / 19 H60 Heated Humidifier User Manual V1.2 Water Inlet Cap Maximum Water Level Line 1/4 Maximum Water Level Line Fig. 4-8 WARNING! • Every time before treatment, be sure to drain any residual water out of the water chamber, and ensure the maximum water level line is not submerged by water. CAUTIONS! • Empty the water chamber when the humidifier is not in use. • Distilled water is recommended. 4.2.5 Returning the Water Chamber Put the cap back on the water chamber after it is filled with water. Turn the cap clockwise until the arrowhead on the cap points to the round symbol . Overturn the water chamber and return it to the humidifier. Water Inlet Cap Fig. 4-9 WARNING! • For safety purposes, the filled humidifier must be placed on a flat surface at a level lower than the patient's head when he or she lies down on a bed, so that the condensation flows back to the water chamber rather than remain in the tubing inhibiting breathing. CAUTIONS! • Avoid moving or tilting the humidifier when the water chamber has water in it. • Do not turn the humidifier on without the water chamber installed. • Take precautions to protect furniture from water damage. 6 / 19 H60 Heated Humidifier User Manual V1.2 4.3 Emptying the Water Chamber (1) Remove the water chamber according to instructions in 4.2.1. (2) Empty the water chamber: Separate the main body of the water chamber from the chamber base, and pour any remaining water out of the main body of the water chamber. Undo the Water Chamber Buckle, and open the water chamber as shown below. Water Chamber Buckle Fig. 4-10 CAUTION! • Empty and air-dry the water chamber when the humidifier is not in use. (3) Assemble the water chamber: Place the main body of the water chamber on a level surface, and then insert the chamber base into the main body of the water chamber and fasten the Water Chamber Buckle, as shown in the figure below. Water Chamber Buckle Fig. 4-11 4.4 Setting the Humidity Level After the main device is powered on, turn the knob to turn on or turn off the humidifier and to adjust the humidity level according to instructions on the screen of the main device. There are five humidity levels available, and the number of blue indicator lights that light up is directly proportional to the humidity level. If none of the indicator lights light up, it means that the humidifier is turned off. The temperature of the water in the water chamber maintains a constant set level. Three indicator lights light up when the humidity is adjusted to Level 3, as shown in Fig. 4-12. 7 / 19 H60 Heated Humidifier User Manual V1.2 Humidity Indicator Light Fig. 4-12 CAUTIONS! • Generally speaking, the humidity inside the mask is low when the water temperature is low. • The greater the difference between the temperature inside the air tubing and room temperature is, the more easily condensation occurs inside the tubing. • If there are only a few condensed water droplets inside the tubing in the morning after therapy, it means that the humidity level is proper; if there are lots of condensed water droplets inside the tubing and / or mask, it means that the humidity level is too high and should be set lower; Nasal dryness means that the humidity level is too low and should be set higher. WARNING! • Do not touch the heater plate of the humidifier when it is working, otherwise you may get burned. Turn off the heater plate when the humidifier is not in use. 5. Cleaning Clean the water chamber before first use of the humidifier or at least once every week. If the humidifier has not been in use for a long time, clean the water chamber before reusing it. WARNING! • To avoid electrical shock, disconnect the power cord of the device before cleaning the humidifier. DO NOT immerse the humidifier in any fluids. • The device shall not be serviced or maintained while in use with a patient. • Sterilization of this device and its components other than recommended is not permitted. CAUTIONS! • Do not use solutions containing chlorinated lime, chlorine, or aromatic to clean the device and its accessories. Liquid soap containing the humidifying agent or antimicrobials should not be used in cleaning either. These solutions may harden cleaned materials or reduce their life. • Do not clean or dry the device and its accessories when the temperature is higher than 80°C (176˚F). High temperatures could reduce product life. 8 / 19 H60 Heated Humidifier User Manual V1.2 5.1 Seperating the Humidifier Top Cover from its Main Body Press the Humidifier Uncover Button to lift and open the top cover of the humidifier. Continue to lift the top cover until it seperates completely from the main body of the humidifier, as shown in the figure below. Humidifier Uncover Button Fig. 5-1 5.2 Removing the Water Chamber Pull the water chamber out of the main body of the humidifier horizontally, as shown in the figure below. Fig. 5-2 5.3 Detaching the Air-intake Assembly After the water chamber is removed, detach the air-intake assembly from the main body of the humidifier by pulling it upwards, as shown in the figure below. Air-intake Assembly Fig. 5-3 9 / 19 H60 Heated Humidifier User Manual V1.2 5.4 Cleaning the Water Chamber WARNINGS! • Emptying and cleaning the water chamber daily will help prevent mold and bacteria growth. • Allow the water in the chamber to cool down to room temperature before removing it from the humidifier. CAUTIONS! • Clean the water chamber only after the water in it cools. Make sure that no water enters the main device. • After cleaning, rinse all parts throughly in clean water to make sure that no washing liquid is left; then wipe all parts dry with a lint-free cloth, so as to prevent calcareous accumulations. • Inspect the water chamber for any leak or damage. Replace the water chamber if any damage is present. (1) Opening the Water Chamber: Undo the water chamber buckle and then open the water chamber. Water Chamber Buckle Fig. 5-4 (2) Cleaning the Water Chamber: Wash the two parts of the water chamber, as shown in Fig. 5-5. You may also clean them with a scouring pad (dip the scouring pad in washing liquid if necessary), rinse them throughly, and then wipe them dry with a soft cloth. Fig. 5-5 (3) Assembling the Water Chamber: Place the two parts of the water chamber 10 / 19 H60 Heated Humidifier User Manual V1.2 together as shown in Fig. 5-6. Press hard until they click into place. Water Chamber Buckle Fig. 5-6 5.5 Cleaning the Air-intake Assembly First remove the sealing elements from the air-intake assembly, and then clean the air intake and sealing elements seperately with running water, as shown in the figure below. They can also be cleaned with a scouring pad (dip the pad in mild scrubbing solutions if necessary), and then rinsed thoroughly. Wipe the air intake with soft cloth, and allow the sealing elements to air dry. Air-intake Assembly Sealing Element Air Intake Sealing Element Fig. 5-7 5.6 Cleaning the Top Cover and Main Body of the Humidifier Clean the top cover and main body of the humidifier seperately with running water, as shown in the figure below. They can also be cleaned with a scouring pad (dip the pad in mild scrubbing solutions if necessary), then rinsed thoroughly, and at last wiped with soft cloth. Top Cover Main Body Fig. 5-8 11 / 19 H60 Heated Humidifier User Manual V1.2 5.7 Reassembling the Humidifier (1) Set up the air-intake assembly: First install the sealing elements to the air intake, as shown in the figure below. Sealing Element Air Intake Sealing Element Air-intake Assembly Fig. 5-9 (2) Then install the air-intake assembly back to the main body of the humidifier, as shown in the figure below. Air-intake Assembly Fig. 5-10 (3) Return the water chamber to the main body of the humidifier, as shown in the figure below. Fig. 5-11 (4) Connect the top cover and main body of the humidifier properly, as shown in the figure below. 12 / 19 H60 Heated Humidifier User Manual V1.2 Fig. 5-12 6. Service The humidifier does not require routine servicing. If the humidifier malfunctions, contact your home care provider immediately. Never attempt to open the humidifier’s enclosure. If necessary, contact your local authorized dealer or 3B Medical, Inc. for technical support and documents. 7. Specifications Size Dimensions: 120 mm × 196 mm × 134 mm Weight: < 1 kg Water Capacity: 350 ml at recommended water level Product Use, Transport and Storage Operation Temperature: Humidity: Transport and Storage 5°C to 35°C (41˚F to 95˚F) 15% to 93% Non-condensing Atmospheric Pressure: 760 to 1060 hPa -25°C to 70°C (-13˚F to 158˚F) up to 93% Non-condensing 760 to 1060 hPa Power Requirements (when the heated humidifier is used with the main device.) 100 ~ 240 V AC, 50 / 60 Hz, 2.0 A max. Type of Protection Against Electric Shock Class II Equipment Degree of Protection Against Electric Shock Type BF Applied Part Degree of Protection Against Ingress of Water IP22 Heater Settings 1 to 5 (95˚F to 167˚F / 35°C to 75°C) Maximum Operating Pressure 30 hPa 13 / 19 H60 Heated Humidifier User Manual V1.2 Pressure Drop with Humidifier < 0.4 hPa at 60 LPM flow Humidifier Performance Humidity Output: No less than 10 mg H2O/L Environmental Conditions: Maximum airflow, 35°C, 15% relative humidity Maximum Delivered Gas Temperature < 43°C The Form and the Dimensions of the Patient Connection Port The 22 mm conical air outlet complies with ISO 5356-1 8. Disposal When necessary, dispose of the device and accessories in accordance with local laws and regulations. 9. Traveling with the System Packing the System (1) Remove the water chamber and pour out all water. (2) Return the empty water chamber to the humidifier. (3) Put the humidifier in your carry-on bag. When traveling, the optional carrying case is for carry-on luggage only. The carrying case will not protect the humidifier if it is put through checked baggage. Security Stations For ease at security stations, there is a note on the bottom of the humidifier stating that it is medical equipment. It may be helpful to bring this manual along with you for security personnel. 14 / 19 H60 Heated Humidifier User Manual V1.2 10. EMC Requirements Guidance and manufacturer's declaration - electromagnetic emissions The device is intended for use in the electromagnetic environment specified below. The user of the device should ensure that it is used in such an environment. Compliance Electromagnetic Environment Guidance RF emissions CISPR 11 Group 1 The device uses RF energy only for its internal function. Therefore its RF emissions are very low and are not likely to cause any interference in nearby electronic equipment RF emissions CISPR 11 Class B Harmonic emissions IEC 61000-3-2 Class A Voltage fluctuations / flicker emissions IEC 61000-3-3 Complies Emissions Test The device is suitable for use in all establishments including domestic establishments and those directly connected to the public low-voltage power supply network that supplies buildings used for domestic purposes 15 / 19 H60 Heated Humidifier User Manual V1.2 Guidance and manufacturer's declaration - electromagnetic immunity The device is intended for use in the electromagnetic environment specified below. The user of the device should make sure that it is used in such an environment. Immunity IEC 60601 Test Compliance Electromagnetic Environment Test Level Level - Guidance Electrostatic discharge (ESD) ±6 kV contact ±6 kV contact IEC 61000-4-2 ±8 kV air ±8 kV air Electrical fast transient / burst ±2 kV for power supply lines ±2 kV for power supply lines ±1 kV for input / output lines ±1 kV differential mode ±1 kV for input / output lines ±1 kV differential mode ±2 kV common mode ±2 kV common mode < 5% UT (> 95% dip in UT) for 0.5 cycle < 5% UT (> 95% dip in UT) for 0.5 cycle 40% UT (60% dip in UT) for 5 cycles 40% UT (60% dip in UT) for 5 cycles 70% UT (30% dip in UT) for 25 cycles 70% UT (30% dip in UT) for 25 cycles < 5% UT (> 95% dip in UT) for 5 s < 5% UT (> 95% dip in UT) for 5 s IEC 61000-4-4 Surge IEC 61000-4-5 Voltage dips, short interruptions and voltage variations on power supply input lines IEC 61000-4-11 Floor should be wood, concrete or ceramic tile. If floors are covered with synthetic material, the relative humidity should be at least 30% Mains power quality should be that of a typical home or hospital Mains power quality should be that of a typical home or hospital Mains power quality should be that of a typical commercial or hospital environment. If the user of the device requires continued operation during power mains interruptions, it is recommended that the device be powered from an uninterruptible power supply or from a battery If the pressure deviates more than is indicated in the device specification, it may be necessary to position the device further from sources of 3 A/m 3 A/m power frequency magnetic fields. The power frequency magnetic field should be IEC measured in the intended 61000-4-8 installation location to ensure that it is sufficiently low Note: UT is the AC mains voltage prior to application of the test level. Power frequency (50 / 60 Hz) magnetic field 16 / 19 H60 Heated Humidifier User Manual V1.2 Guidance and manufacturer's declaration - electromagnetic immunity The device is intended for use in the electromagnetic environment specified below. The user of the device should make sure that it is used in such an environment. Immunity IEC 60601 Compliance Electromagnetic Environment Test Test Level Level Guidance Portable and mobile RF communications equipment should be used no closer to any part of the device, including cables, than the recommended separation distance calculated from the equation applicable to the frequency of the transmitter. Recommended separation distance d 1.2 p Conducted RF IEC 61000-4-6 3 Vrms 150 kHz to 80 MHz 3 Vrms Radiated RF IEC 61000-4-3 3 V/m 80 MHz to 2.5 GHz 3 V/m d 1.2 p 80 MHz to 800 MHz d 2.3 p 800 MHz to 2.5 GHz Where P is the maximum output power rating of the transmitter in watts (W) according to the transmitter manufacturer and d is the recommended separation distance in meters (m). Field strengths from fixed RF transmitter, as determined by an electromagnetic site survey, a should be less than the compliance level in each frequency range. b Interference may occur in the vicinity of equipment marked with the following symbol: Note 1: At 80 MHz and 800 MHz, the higher frequency range applied. Note 2: These guidelines may not apply in all situations. Electromagnetic propagation is affected by absorption and reflection from structures, objects and people. a Field strengths from fixed transmitters, such as base stations for radio (cellular / cordless) telephones and land mobile radios, amateur radio, AM and FM radio broadcast and TV broadcast cannot be predicted theoretically with accuracy. To assess the electromagnetic environment due to fixed RF transmitters, an electromagnetic site survey should be considered. If the measured field strength in the location in which the device is used exceeds the applicable RF compliance level above, the device should be observed to verify normal operation. If abnormal performance is observed, additional measures may be necessary, such as re-orienting or relocating the device. b Over the frequency range 150 kHz to 80 MHz, the field strengths should be less than 3 V/m. 17 / 19 H60 Heated Humidifier User Manual V1.2 Recommended separation distances between portable and mobile RF communications equipment and the device The device is intended for use in an electromagnetic environment in which radiated RF disturbances are controlled. The customer or the user of the device can help prevent electromagnetic interference by maintaining a minimum distance between portable and mobile RF communications equipment (transmitters) and the device as recommended below, according to the maximum output power of the communications equipment. Rated maximum output of transmitter 150 kHz ~ 80 MHz 80 MHz ~ 800 MHz 800 MHz ~ 2.5 GHz d 1.2 p d 1.2 p d 2.3 p 0.01 0.12 0.12 0.23 0.1 0.38 0.38 0.73 W 1 1.2 1.2 2.3 10 3.8 3.8 7.3 100 12 12 23 18 / 19 H60 Heated Humidifier User Manual V1.2 11. Warranty 3B Medical, Inc. warrants that this humidifier shall be free from defects of workmanship and materials and will perform in accordance with the product specifications for a period of one (1) year from the date of sale by 3B Medical, Inc. to the dealer. If the product fails to perform in accordance with the product specifications, 3B Medical, Inc. will repair or replace, at its option, the defective material or part. 3B Medical, Inc. will pay customary freight charges from 3B Medical, Inc. to the dealer location only. This warranty does not cover damage caused by accident, misuse, abuse, alteration and other defects not related to material or workmanship. To exercise your rights under this warranty, contact your local, authorized dealers or: 3B Medical, Inc. 21301 US Highway 27 N Lake Wales, FL 33859 T: (863) 226-6285 F: (863) 226-6284 For additional information, please visit our Patient Portal at: www.3bproducts.com icodeconnect.com – Web-based cloud for report generation and storage www.bmc-icode.com – Website for iCode data report retrieval Issue date: January 20, 2015 19 / 19