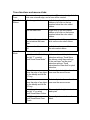
1
Thred User's Manual
http://www.thredworks.com/
REVISED: 11/25/03
©2000 Alfie and Marion McCoskey, 1201 Locust Ave, Shasta Lake, CA 96019
Install Thred in your computer:
Search this document
Thred User's Manual
Fill Types
Border Types
MouseKey Table
Thred Window
Color Bar
Color Ribbon:
Screen colors:
The form data box, also called the form-form:
Minimum Stitch Length:
Stitch Window
Information Boxes
Box Select/Thumbnail Text
Selection Logic Table
Up TO: Off/ON (keypad -)
Pick color:
Select:
Total:
Maximum Stitch Length:
Minimum stitch Length:
Coordinate Window:
Layers:
Information boxes in thumbnail mode
Stitch Editing
Zoom and shift:
Zooming:
Center of Zoom Table:
Shifting:
Setting stitches:
Selecting single stitches:
Selecting groups of stitches:
Rotating:
Command Mode Rotate:
Forms:
Disappearing Forms:
Editing Groups of Form Points:
Interactive Auto Trace:
Tracing monochrome bitmaps:
Tracing 24 bit color bitmaps:
Using the trace control panel:
Changing the bitmap image:
Saving the bitmap:
Hiding the bitmap:
Trace functions and mouse clicks:
UNDERLAY FOR FILLS
Center Walk:
Edge walk:
Underlay:
Form Start:
Form End:
Nudge: (arrow keys + control)
Color Management:
Switch Colors:
Switch Color Values:
Copy Colors:
Insert Color:
Delete Color:
THRED MENUS
FILE:
New:
Opening a file: (O)
Close:
Thumbnails: (T)
Open PCS/DST file:
PES2Card (W+Control)
Insert:
Overlay:
Save: (S+Control)
Save As: (F8)
Loading a bit map:
Save Bit Map:
Hide Bitmap (X+Shift):
Delete Backups:
Locking:
VIEW:
Movie: (I)
Set:
Set Appliqué Color:
Set Background Color:
Set Bitmap Color:
Set Data Check:
Set Default Preferences:
Set Fill at Select:
Set Form Cursor:
Set Grid Mask:
Set Line Border Spacing:
Set Machine File Type:
Set Needle Cursor:
Set Nudge Pixels:
Set PCS Bitmap Save:
Set Point Size:
Set Remove Mark:
Set Rotate Machine File:
Set Warn if Edited:
View Backups:
Zoom Full: (X)
Thread Size:
Show Threads:
Show Threads for selected color:
Design Information: (apostrophe: ‘ )
Retrieve Mark (B+Shift):
About Thred
FORM: (F)
No Form Selected:
Tear Form:
Wave Form:
Daisy form:
Form Preferences:
If you have a form selected:
EDIT:
Center:
Center Horizontal: (Minus - + Shift)
Center Vertical: (Minus - + Control)
Center Both: (Minus –)
Center Entire Design:
Center Forms: (L)
Check Range:
Convert:
Convert to Feather Ribbon: (F + shift)
Convert to Satin Ribbon: (C + shift)
Convert to Bean:
Convert from Bean to Line:
Convert from Stitches to Form:
Copy to Layer:
Crop to Form: (W+Shift)
Delete:
Delete Select: (Delete)
Delete Small stitches:
Delete Large stitches:
Delete Free stitches:
Delete All Stitches:
Delete Knots:
Delete All Forms:
Delete All Forms and Stitches:
Flip:
Flip Horizontal:
Flip Vertical:
Flip Order:
Form Update:
Move:
Move To Start:
Move To Mark: (;)
Move To End:
Move To Layer:
Refill All (J):
Repair Data:
Reset colors:
Retrace:
Retrieve Clipboard Stitches (F4):
Rotate:
Command:
Rotate Again: (Page Up, Page Down)
Rotate And Duplicate:
Rotate And Duplicate Again: (Page Up or Down + Shift)
Select:
Set:
Set design size:
Set Form Zero Point:
Set Knots:
Set Knot at Selected Stitch (K+Cntrl)
Set Order Mark: (Period key .)
Set Zoom Mark at Center: (M+Shift)
Set Zoom Mark at Selected Point: (M+Control)
Set Range Ends for Clipboard Fills:
Set Rotation:
Set Rotation Angle: (R+Control)
Set Rotation Angle from Mark: (R+Shift)
Set Rotation segments: (R)
Set Form Number: (/)
Set Form Color to Stitch Color:
Shrink Clipboard Border:
Snap:
Snap Together: (F2)
Snap to Grid: (S+Shift)
Sort:
Sort Auto: (F3)
Sort by Color then Form: (F3+Shift)
Sort by form: (F3+Control)
Split Form:
Trace:
Find Edges: (H+control)
Hide Bitmap: (X+shift)
Select Colors: (H)
Trace Mode: (T+control)
Show Traced Edges: (right or left mouse click on the stitch window)
Ungroup: ([ left bracket) = First, (] right bracket) = Last
IN: (Z) or (Z + Shift)
OUT: (A) or (X)
Undo: (B) or (Z + Control)
Redo:
ROT (Rotate): (Tab)
PREF (Preferences): (P)
Appliqué Color:
Border Width:
Fill Spacing:
Button Corner Length (Buttonhole Corner Length):
Chain Fill Length:
Chain Fill Position:
Clipboard Offset:
Clipboard Phase:
Fill Angle:
Fill Ends:
Grid Cutoff:
Grid size:
Hoop Type:
Hoop Height:
Hoop Width:
Picot Spacing:
Satin Form Ends:
Satin Underlay:
Small Stitch Size:
Snap-To Size:
Spiral Wrap:
Star Ratio:
Stitch Box Cutoff:
Stitch Length, Maximum :
Stitch Length, User :
Stitch Length, Minimum :
FILL:
Fan Fill:
Feather Fill
Vertical Fill
Horizontal Fill
Angle Fill
Understanding Thred's Vertical, Horizontal and Angle fills:
Where will a fill end?
Clipboard Form Fills:
Clipboard fan fill:
Clipboard vertical fill:
Clipboard horizontal fill:
Clipboard angle fill:
Contour Fill:
Texture Fill:
Retrieving texture fill data from a form
Importing stitches into the texture editor
Border Fills
Line Borders
Bean Borders
Angle Satin
Perpendicular Satin
Appliqué
BH
Clipboard Border:
Clipboard Border, Even:
Picot Borders
Double Borders:
Chain borders:
Unfill:
Add: (End + Control)
Frm+/-: (K)
All:
1-2-3-4:
Help:
Keyboard Shortcuts “Hotkeys”:
Install Thred in your computer:
If you have thrdinst.exe, just put it anywhere on your computer and run it. You
can do that by selecting “Start” on the windows task bar, and then” run”.
Windows will prompt you for the file to run. You can then either type in the
location of the file, or browse for it by hitting the browse button. You can also run
the thrdinst.exe by double clicking on it in the Windows Explorer.
If you are using thred.zip, or you just have the thred.exe file, the following
applies:
•
Thred .exe is a self-contained file, Thred.exe, and doesn't need anything
else to run. Put it in the directory folder of your choice. Find it with
Explorer, right-drag the icon to your desktop. Then you will get a pop up
menu; select "make short cut here" and double click on the icon to start
Thred.
•
If you want to use the help file you will need to install the file, Thred.chm in
the same directory where you have Thred.exe.
To activate Thred.exe so you can save your work, you need to purchase a key
from http://www.thredworks.com/. The key file, Thredkey.bin must be in the
same directory where you have installed Thred.exe.
Search this document
To search this document, tap "Control+F" and then type the word you want to
find into the search field in the Windows Find and Replace box.
Thred User's Manual
Thred’s intelligent zoom and screen navigation features make your routine
digitizing tasks easier than ever before and its variety of creative fills and borders
let you design and use your own fills with a few mouse clicks.
•
Thred’s rotating needle cursor keeps you up to date on the direction of
stitches you’re setting, reducing confusion.
•
You can easily create Thred forms and use fills and border fills for an
almost infinite variety of effects.
•
When you move a form point and change the shape of the form, it is
automatically refilled.
•
In addition to line and free hand forms that you enter point-by-point, you
can automatically create regular polygons, stars, and spirals with any
practical number of sides.
•
Set your preferences to vary the proportions of the stars and spirals-- no
more struggling to get a perfect star, spiral, octagon, or any regular-sided
figure.
•
Work on four different layers so you can easily make outlines, or
superimpose segments on others.
•
View your design as it stitches in slow motion "movies".
•
Select a point and click on "Up To" to have all the stitches beyond the
selection hidden. This allows you to use the arrow keys to watch each
segment stitch at your control.
•
See the way different thread sizes and colors change the look of the
design.
•
Change the length of stitches in a finished design.
•
Refill all the forms in your Thred design to a different stitch density with
one command.
•
Change the colors of your design, the color of the screen background and
the color of the bitmap.
•
Move, rotate, flip, cut and paste, stretch, shrink, or expand a form, groups
of forms, or groups of stitches.
•
Copy forms to several layers and fill the copies with different fills or
borders.
•
Center several stacked forms.
Fill Types
Form Fill
Type
Fan
Feather
Vertical
Horizontal
Angle
Clipboard
Contour
Textured
Description
You can use “Teflon lines”(“D” key) and fan guidelines to control
the spacing of the fan fill to create various fan-like effects. This
feature is one way to create stabilizing underlay quickly. A line
form on which you run “Convert to Satin Ribbon” will be set up
with fan guidelines automatically. If you have your preference
numbers set so the maximum length is longer than the form is
wide, the result will look like satin stitches. To make a curved
line of satin stitches that is not the same width for its entire
length use a line form and “Convert to Ribbon”.
Similar to the fan fill except the lines of stitches can be
controlled in various ways. “Convert to Feather Ribbon” works
like “Convert to Satin Ribbon” except that the resulting form is
automatically filled with the feather fill.
Fills a form with sequenced vertical stitches. You can use the
“Form- Form” to easily control the spacing, size and color of the
stitches.
Similar to the vertical fill.
Similar to the vertical, but you can choose the angle.
Cut or copy some stitches on the Windows clipboard and use
them for a fill.
The fill follows the contour set by the sides of the form. When
you select “Contour”, polygon forms will automatically be
converted to line forms by the program. The ends of the form
will be disconnected, so your shape is not closed anymore.
Like the vertical fill, except the user can use the texture editor to
determine the patter of stitches in the fill.
Border Types
Border Fill
Type
Line
Bean
Angle Satin
Perpendicular
Satin
Appliqué
Clipboard
Clipboard,
Even
BH
Picot
Double
Chain
Description
Fills your form border with a simple line of stitches.
Makes a single line of triple stitches around the selected form.
Makes a satin border with sharp pointed corners, a slightly fanlike appearance, and underlay stitches around your form. The
stitches can be at an angle to the line of the form.
This satin border uses stitches perpendicular to the form lines
with rounded corners and underlay stitches when the stitch
length is longer than 3 mm.
Similar to angle satin, but with an anchoring line of single
stitches used to hold down the applied fabric, which are
separated from the satin stitches by a color stop.
Paste a small number of stitches to your clipboard and use
them for a border.
Same as the clipboard border fill, except Thred stretches or
shrinks the clips to make them come out even.
Creates a border that resembles a buttonhole stitch. There will
be a stitch along the form and one that points away from it.
Very close border spacing makes the stitch along the form too
short. The stitch length on the sides and corners can be
changed to vary the look. Looks like hand appliqué stitches.
Paste a small number of stitches to your clipboard and Thred
will put them on Button Hole stitches around the border of your
form. The Picot border is intended to resemble the tiny knots
made in lace and crochet edging.
Starts at the beginning of a border and sets line stitches to the
end. Then turns around and stitches back over itself.
Sets simple chain stitches around a border.
Thred is a thread editor, written for digitizing designs to be stitched by
embroidery machines. Thred saves files in PCS format, DST and THR format.
You must also have a separate method of sending your designs to the sewing
machine; either software or hardware, whatever is appropriate to the machine.
There are conversion programs that will enable users of other brands of
embroidery machines to convert and use in their machines designs made in PCS
format. Most embroidery machines will stitch a file saved in DST format.
You can use Thred to create a design entirely by setting each stitch individually
with your mouse, or you can use the forms, fills, and border fills to and change
large groups of stitches with a few mouse clicks. Most Thred users seem to use
the forms when they can and set stitches by hand when the form fills won’t do
exactly what they want. To digitize your designs with the minimum of effort, you
should block out the main elements of your design with forms, then arrange the
rest the way you want by sorting and moving the stitches, and hand punching in
the final stitches.
There is an unwritten rule in graphics programs that any action on an object
pointed to by a mouse cursor must be initiated by a mouse click. By ignoring this
rule, Thred gives your mouse a set of virtual keys and lets you do a lot of
different things with a “virtual” mouse click. Usually, you have to use one mouse
click to change the mouse mode, and then another mouse click to do something.
With Thred, you can use a keyboard key in coordination with your mouse to do a
lot of different things with one motion without worrying about modes. The
downside is that you have to remember these keys, but there are not a lot of
them, and we think you will save more than enough time and confusion to make
it worth your while to learn a few simple key codes:
MouseKey Table
These keys are the ones you need to learn. There are more that you might like
to learn in the Hotkey table. The keyboard shortcuts save time you would spend
moving the mouse up to the menu and then back to the screen while you work.
Key
C
D
Delete
E
F
M
Action
Select the stitch closest to the mouse cursor. To deselect, right click
on an empty part of the screen, or hit "Q". Use this when selecting
stitches near form points or the program “wants” to pick the form point
instead of a stitch. You can also turn of the forms using “Frm+/-“.
Draw or delete a satin guideline to control the direction the stitches go
in fan fill. The line will start at the form point closest to the mouse
cursor. When you use “Convert to ribbon” to make “satin” stitches
from a line form, moving the “D” lines will change the angle of the
satin stitches. This is the way to have the greatest control over your
satin stitches, although the satin fills on the menu are easier to use.
If a form, a stitch, or a range of stitches is selected, this command
deletes the selected item. If nothing is selected, it deletes a form
point near the mouse cursor.
Hold the mouse cursor near a form point and hit "E". Then you can
insert multiple form points. Right click elsewhere or hit “Q” to exit this
mode.
Form: If a form is selected, shows the form data box, which we have
also called the form-form. You can change a fill by changing the
entries in the “form data box”. If a form is not selected, “F” shows a
menu of forms to choose from.
“M” Inserts a mark for zooming. When this mark is visible, it will be
the center of zoom in or zoom out. The mark can be deleted by
hitting “Q” or “escape”. “Shift-M” will put a mark in the center of the
screen. “ Control-M” puts a mark at a selected point.
N
Put your cursor on a bitmap, and hit “U”. Thred will show all the
pixels in the bitmap dimmer than the one under the mouse cursor.
See: Trace mode
Q
Deselect stitches and return to move mode
S
Shift the view. The view is shifted so that place under the mouse
cursor when the shift key is hit becomes the new center of the
screen. Move the cursor toward the area you want to see, and hit
“S”.
Space
Hit "space" to enter insert stitch setting mode. Stitches will be “set”,
or go into the stitch order following the selected stitch when you left
click the mouse while in this mode. If no stitch is selected, insert will
be at a stitch under the mouse cursor. If there is no stitch under the
mouse cursor, insert mode will not be entered. If you are in insert
mode, hitting "space" will put you back to move mode. Right click or
hit the “esc” key to quit adding stitches.
U
Put your cursor near the edge of an object on a bitmap, and hit “U”.
Thred will show all the pixels in the bitmap brighter than the one
under the mouse cursor. See: Trace mode
V
Show the four stitches closest to the mouse cursor. Thred draws a
different color and size of box around each stitch so you can tell at a
glance when you have up to four stacked stitches.
W
Hold the mouse cursor near a form point and hit "W". Thred will
insert a form point at the cursor position.
Y
Select a form point near the mouse cursor.
Z, A
“Z” zooms in. “A” zooms out
,
Join two forms. Select one form, then hold the mouse cursor near the
(Comma) point on the second form where you want the forms to be joined and
press the comma "," key.
Thred also makes full use of the left and right mouse buttons. In general, use the
left mouse button to move something, and the right mouse button to select or
drop the selection.
By learning these commands, you can save many mouse clicks while digitizing a
design and minimize the confusion of remembering what mode your mouse is in.
Thred Window
Aside from the menu bar at the top, Thred divides the window into three main
areas.
Window Area
Color Bar and
Information
Boxes
Stitch Window
Color Ribbon
Description
Located on the left of the Thred Window, the three columns
wide Color Bar is used to change Thred colors and sizes. The
information windows below it present information about various
aspects of the design. Some are also controls activated by a
mouse click.
In the middle of the Thred Window, the Stitch Window is used
to edit stitches and forms.
To the right of the Thred Window is the Color Ribbon. The
color ribbon shows you a proportional picture of the stitches in
the sequence they will stitch in your design, starting with the
first stitch at the top, and ending with the last stitch at the
bottom.
Color Bar
The Color Bar is made up of three vertical rows of small boxes seen at the left of
the Thred Window.
Position
Name
Used For:
Left,
Color
Boxes
Ordinal Color,
top color
stitches first
Middle,
Color
Boxes
User Color,
suggested
colors chosen
by designer.
Top stitches
first
Thred Size
Select
These boxes are used to select colors. When you
click on one of the Ordinal Color Boxes, you will see
a cross in the corresponding User Color Box. Any
stitches you create will be in the User Color you have
selected.
These boxes allow the user to define custom colors.
Left-clicking on one of the User Color boxes will
bring up a Windows Color Selection Dialog box. The
colors you select will be saved with your design, both
in the Pfaff (PCS) and Thred (THR) files.
Right,
Number
Boxes
Allow you to select the size of the thread. You can
see your design with the selected thread sizes by
choosing “Show Threads” from the view menu.
Two columns of color boxes placed next to each other show the order of stitching
and the actual color with which you intend to stitch the design. The Ordinal color
bar is on the left. The design will stitch out in the order those colors appear;
Black =1, blue=2, etc. Next to each of those boxes is a User color box which you
can fill using the Windows Color Dialog box. Left-click on the box to bring that
option up on screen and select "define custom colors". Then you may change
the RGB values, or drag the cursor to select custom colors. To change this row
back to the ordinal colors, click “Edit/ Reset colors”. Changing the color in the
box will change the color of the segments of the design that are filled with that
color number.
If you want to change the color of part of the design, select it and then left-click
on the left color box (the ordinal color). This will make the selected stitches turn
that color number. Then the screen will show whatever color you have defined
as that color number and will change if you change the custom color. This lets
you preview colors choices without stitching out the design.
You may also change the color of segments by selecting the form with which the
stitches were made, then hitting the "F" key. A small drop box called the “FormForm” comes on screen with data about those stitches. A left-click on the first
entry, for the type of form, will make it change to the other type of form, and
remove all the fill data, leaving you with a blank form ready to refill. “Undo” it if
that was not what you wanted.
If you left- click on 'border", you will see a drop box with a list of border types. A
left click on one of those will change the border fill to that kind. Border color,
border spacing and border size each have a number box. Click on the current
number and a box appears. If you type a number into the box, the program will
change the border to that color, that spacing or that width, as the case may be.
Hit "enter" to complete the entry. You can also change colors by left clicking on a
color entry and then left clicking on the ordinal color bar. Then you may hit "Q",
"escape", or right-click on another area of the screen to make the drop-box
disappear.
Next to the word "form" the type of form is shown. Left click on that to
automatically cause it to flip to the other possible type. If it started as "Line", it will
become "Polygon", etc. Once it changes to the other type of form, it deletes the
data that was associated with the form. You may hit "Undo", or "Control Z" to
undo that. If you choose to change the fill, you should type in the new choices,
then hit "enter". If you want to make the border of a form a different color than
the interior fill, you must fill it with the fill color, and then go to the "form data box"
and type in the color number of the color you want it to turn. You may need to
"sort" the stitches to get all the segments of each color to stitch in right order. If
you want to edit the stitching order, you may also select an area and then click
on "Edit/Move to/" and choose where it should be. To select the target location,
make a "Mark" by selecting the target stitch and hitting the "."(Period) key., or
select “Edit/Set/Order Mark” from the menu. When you’ve made the mark, then
hit the “;” semicolon key, and the selected stitches will move to the marked place
in the stitching order.
Color Ribbon:
To the right of the Thred Window is the Color Ribbon. The color ribbon shows
you a proportional picture of the stitches in the sequence they will stitch in your
design, starting with the first stitch at the top, and ending with the last stitch at the
bottom.
Function
Description
Select stitch
Right click on the color ribbon. You will see a mark on the
color ribbon and an arrow cursor over the stitch you have
selected.
Move the stitch
selection.
Home
If a stitch is already selected, Moves the
selection to the beginning of the color.
If a stitch is not selected, selects the beginning
stitch in the file
End
If a stitch is already selected, Moves the
selection to the end of the color.
If a stitch is not selected, selects the last stitch
in the file
Select a Range of
Stitches
Left click on the color ribbon to select an entire color.
With a stitch selected, hit home + shift to select a range of
stitches from the selected stitch to the beginning of the
color. Or hit end + shift to select a range of stitches from
the selected stitch to the end of the color.
With a stitch selected, hit home + shift + control to select a
range of stitches from the selected stitch to the beginning
of the design. Or hit end + shift + control to select a range
of stitches from the selected stitch to the end of the design.
Screen colors:
Thred lets you set the background color and the thread colors to any color you
want. We believe most users want this feature, but it does have some
drawbacks. In order to let you see the form lines and other kinds of lines that
may appear on the screen during the course of editing, Thred uses an exclusiveOR technique to write these lines. That means that if any of the lines happen to
be right on top of each other they will disappear. It’s a situation where one plus
one equals zero.
Forms on different layers use a different logic, so you can still see them when
you have two forms from different layers. Forms on different layers will have
different colors. The colors will vary according to how you have your background
color and thread colors set. Since most of the form line goes across the
background color, the background color determines the color of form lines most
of the time.
If you have two forms on the same layer that have all the same points, you won’t
be able to see either one, though you will be able to see any stitches belonging
to the forms. So if your form suddenly disappears from the screen, check to see
if you actually have two just alike on top of each other. You can tell what forms
you have in the design by first hitting “Esc”, to get out of any other functions you
may have put the program into, and then hitting the up arrow key. That will take
you to the first form, and each time you hit the up arrow key again, you will select
the next form. You can see the form number on the left of the screen above the
stitch count number.
We don’t think canceling forms will be a problem, but if you suspect it is
happening in your design, just select any form and use the up and down arrow
keys to select the next or previous form in the form table. The form number will
appear in the select box (above the stitch count number and below “pick color”)
and the form select rectangle will be drawn on your screen. If you see a form
rectangle and no form and you have selected "all" from the Thred menu, then
you probably have two identical forms on the same layer.
Form lines may be more difficult to see on some background colors than others.
A gray color where all the RGB values of the color are the same probably works
best for visibility, but some of us prefer to look at other colors. You can use the
Windows Color box to change the background color at any time. Select
“View/Set/background color”, and when the box with colors comes onscreen,
choose one of the basic colors, the custom colors we made, or make your own
by selecting “Define custom colors”. The same box is used for Bitmap colors. To
change those, select “View/Set/bitmap color”.
The form data box, also called the form-form:
The form data box appears in the stitch window when you select a form and hit
the “F” key or select “form” from the main menu. You can use the form data box
to change properties of the form. The exact content of the form data box will
change depending on the form type, form fill, border fill, etc. In general, you can
click on the right hand side of the form data box to change values, and your
change will immediately be made in the form you have selected, and the form
data box will also change to reflect the new settings you have selected. This box
was called the form-form in previous versions, but we got tired of the joke.
Minimum Stitch Length:
The minimum stitch setting in the form data box may have effects that you may
not expect. If you have missing stitches in your fill, be sure to check this setting.
Setting the value to zero will make sure this setting has no effect.
In version 1.1 we introduced putting a minimum stitch length in each form. If you
want to Thred to behave as in previous versions, you might want to set the
“pref/Stitch Length, Minimum” to zero.
Stitch Window
Your designs will appear in this window. As you make changes they will be
updated. Most of this manual is devoted to describing the stitch window, or items
that interact with the stitch window.
Information Boxes
Box Select/Thumbnail Text
If you left-click on ”Box Select", and then left-drag the cursor from the starting
place to the end of the area you want to select, you will see a box. The select
box function will attempt to select items in the box when you release the left
mouse button. The exact items to be selected vary according to what you
already have selected and what is within the select box.
When stitches are selected, they are always a range of stitches starting with a
first stitch inside the box, and including all stitches connected to the first stitch
that are inside the box. Thred will groups of stitches inside the box, and select
the longest one.
When forms are selected, all forms that are completely within the box are
selected.
If you are setting stitches with the needle cursor or the cross cursor, you need to
click on the “Box Select”, but if you have any other cursor selected, you can just
left click and drag to get the select box.
Selection Logic Table
Already
Selected
Nothing
In the Box
Nothing
Stitches
Forms
Forms and
Stitches
Action
No action
Selects a range starting with the first stitch in the
stitch order that is in the box, and ending with the
last connected stitch that is in the box
Selects all forms completely within the
boundaries of the box
Nothing
Forms
The Selected
Stitch
Stitches
Forms and
Stitches
A range of Nothing
stitches
The Selected
Range
Stitches
A single
stitch
Forms
Forms and
Stitches
Nothing
Stitches
Forms
De-selects the selected stitch
Selects all stitches connected to the originally
selected stitch that are in the box
Selects a range starting with the first stitch in the
stitch order that is in the box, and ending with the
last connected stitch that is in the box
De-selects the selected range
Expands the selected range to the edges of the
select box.
Selects a range starting with the first stitch in the
stitch order that is in the box, and ending with the
last connected stitch that is in the box
Selects the forms
De-selects the selected forms
Selects a range starting with the first stitch in the
stitch order that is in the box, and ending with the
last connected stitch that is in the box
Selects all forms completely within the
boundaries of the box
Up TO: Off/ON (keypad -)
Toggle between "off" and "on" to see or hide the portion of the design that would
come after the selected point. Use the arrow keys to move forward or back. If
you have to edit an area, select the first stitch and turn on the "up to" function.
Then use the right arrow key to watch each stitch, until you reach the stitch you
want to change. The left arrow will move you through the stitches backward
toward the starting stitch. Check to see this is turned off if you have suddenly
“lost” part of your design. It can be a little startling.
Pick color:
Click on "pick color" to show only the stitches of a single color. With "pick color"
selected, you can left-click on the ordinal color boxes (left row) to select another
color. This is another feature that you should check if you have suddenly “lost”
part of your design.
Select:
The "select" box is right below the "pick color" box. If nothing is selected, this
box will be empty. If a stitch is selected, this box will show the stitch number. If a
form is selected, the "select" box will show the form number. If a form point is
selected, the form point number is shown. If multiple forms are selected, the
"select" box will be empty.
Total:
Shows the total number of stitches in your design. For example, you might see
tot 5000, if your design has 5000 stitches.
Maximum Stitch Length:
If nothing is selected, the "maximum stitch length" box shows the longest stitch in
the design. If you have a form or a range of stitches selected, the maximum
stitch box shows the longest stitch in the selected range. You can show this
stitch in the stitch window by right clicking on the maximum stitch box. After right
clicking, use the left arrow to select the next smallest stitch. Use the right and left
arrows to select successively larger or smaller stitches.
Minimum stitch Length:
If nothing is selected, the minimum stitch length box shows the shortest stitch in
the design. If you have a form or a range of stitches selected, the minimum stitch
box shows the shortest stitch in the selected range. You can show this stitch in
the stitch window by right-clicking on the minimum stitch box. After right clicking,
use the right arrow to select the next larger stitch. Use the right and left arrows
to select successively larger or smaller stitches. See “edit/Set/Knots” to learn
how to use this function to check your design for knots.
Coordinate Window:
The x and y coordinates of the selected stitch or form point appears in this
window. If you hold down the shift key and move the mouse cursor the
coordinates of the mouse cursor will appear in the coordinate window
Layers:
The layer of a selected stitch or form appears in this window.
Information boxes in thumbnail mode
When you are viewing thumbnails, the four boxes below the “pick color” box
show the filenames of the four files in the thumbnail windows. To view
thumbnails of your designs, open a design and hit the “T” key. You should see
four boxes showing four of the designs in that directory, assuming there are four
to be shown. Left click on one to open it, or use the up or down arrows to move
through the directory of designs.
Stitch Editing
Thred uses forms to remember most of the stitches in a design, but the user may
want to add stitches. You may want to connect forms with lines of stitches to
minimize jump stitches, or to change individual stitches in the fills made using
“Fill”. Thred keeps track of stitches that are attached to forms and those that the
user enters, but the rules are different for stitches that you put in. Thred tries to
protect your stitches, but there are some situations where that can’t be done with
a reasonable amount of effort. So, if you fill a form and then edit the stitches in
some way, don’t expect to be able to keep your edit after you refill a group of
forms. If you refill one form, Thred will remind you that you have edited stitches,
and you can decide if you want to go ahead.
Zoom and shift:
Zooming and shifting the viewpoint in a zoomed window are two of the most
common operations in digitizing. Thred makes it easy.
Zooming:
The most convenient way to zoom to an area of the design you want to magnify,
is to set a zoom mark by holding the mouse cursor over the desired area of the
design and hitting the “M” key, to mark it. A small cross will appear. Then hit the
“Z” key to zoom in. Hit the “A” key to zoom away. You can also hit the “X” key to
zoom all the way out to the full view of your design.
There are several other ways that Thred determines the center of zoom when
zooming:
Center of Zoom Table:
Condition
Zoom mark set
Stitch Selected
Inserting a stitch
Group of Stitches
Selected.
Form Selected
Form Point
Selected
Group of Forms
Selected.
How Thred determines the new center of zoom
The zoom mark becomes the new center of zoom
The selected stitch becomes the new center of zoom.
If you are inserting a stitch between two stitches already in
the design, the new center of zoom will be between the two
stitches.
The center of the selected group of stitches becomes the
new center of zoom.
The center of the form becomes the new center of zoom.
The form point becomes the new center of zoom.
The center of the group of forms becomes the new center
of zoom.
You can also make a zoom window. Hit “Q” or “Escape” to make sure that
nothing is selected and that there is no zoom mark. Then select “in” from the
Thred menu bar. The mouse cursor will turn into a cross. Then you can left-drag
the mouse cursor to create a zoom window. When you release the left mouse
button, Thred will zoom in to the window you made.
Shifting:
There are many times when you may want to see different parts of the design
without zooming out. In Thred, you can just hold your mouse cursor over the
spot you want to become the new center of zoom and hit the “S” key.
To do the same thing with scroll bars, you must move your mouse to the vertical
scroll bar and drag, and then to the horizontal scroll bar and drag. If the part of
the design is out of the stitch window, things in scroll bar land can be even more
difficult, but using the “S” key repeatedly you can easily move to any part of your
design without ever taking your mouse out of the stitch window.
Thred also has scroll bars for those who prefer them.
Setting stitches:
When Thred begins running, it is ready to set stitches with just a left mouse click.
You should see the vertical needle cursor. The needle cursors are used to
indicate stitch-setting modes.
Needle Cursor
Type
Vertical
Rotating
Mode
How to get the Cursor:
Add to
beginning.
Hold down a “Control” key and hit
“Home”.
Add to end
Select “add” from the main menu bar, or
Hold down a “Control” key and hit “End”.
Insert
Hold the mouse cursor near the stitch you
want to interrupt and hit the “space” bar.
To move stitches instead of setting them, exit the "set stitch" mode by hitting the
"escape" key, the ‘Q” key, or by right-clicking on an empty part of the stitch
window. When you exit the "set stitch" mode the mouse cursor will change from
a needle to an arrow. If you have forms near the place you want to set stitches,
you can turn off the forms temporarily, by hitting "K" or selecting "frm+/-" on the
menu. Turning off the forms makes it easier to set stitches because the program
selects a form point before a stitch point when it has to choose between them.
When you see the arrow, you are in "move" mode. You can then move stitches
by holding the mouse cursor near the stitch and depressing the left mouse
button. While holding the left mouse button down, drag the stitch by moving the
mouse. Release the left mouse button when you have the stitch where you want
it.
There are four ways to get out of move mode and set more stitches:
Space Bar
Hold the mouse cursor near the stitch where you want to insert
more stitches. Hit the "space" bar. You will then see two lines
going to the nearest two stitch points. These lines should be
different colors. The exact colors you see will depend on the
background color you have set. One color will indicate the
stitch to be set, and the other will show a connection to the next
stitch in the stitch order. Left-click to set stitches.
“Home/Control” Hold down a “Ctrl” key and hit the “Home” key. You will see a
line from the mouse cursor to the first stitch in your design.
Left-click to set stitches.
“End/Control”
Hold down a “Ctrl” key and hit the "End" key. You will see a line
from the mouse cursor to the last stitch in your design. Leftclick to set stitches.
Add
Select “add” from the main menu. This works the same as
"End/Control"
You should always be able to exit the stitch mode by hitting "esc"(escape)or “Q”
or by right-clicking on an empty area of the design.
Selecting single stitches:
To select a single stitch, hold your mouse cursor near the stitch you want to
select and right-click. You will see a small arrow showing you the direction of the
stitch. You can use the right and left arrow keys to move to the next stitch or the
previous stitch.
Sometimes it can be difficult to select stitches because they are close to a form
point and Thred will select the form point first. Then you can select the stitch by
holding your mouse cursor near the point you want to select and hitting the “C”
key. Thred will then ignore the form point and select the stitch. (Or turn off the
form, by hitting “frm+/- or the “K” key as described above.)
Sometimes it may be difficult to select the stitch you want because stitches are
right on top of each other. In this situation, you can use the “V” key to get an
idea of how many stitches are stacked. Hold the mouse cursor near the stitches
and hit the “V” key. Thred will draw boxes around the four closest stitches. The
box around the closest stitch will be the smallest, and the box around the farthest
stitch will be the largest. You can move the stitches by left-clicking in the boxes
and dragging.
You may also select single stitches by right-clicking on the color bar. A small
select indicator bar will appear on the color bar, and the stitch select arrow will
appear at the stitch you have selected in the stitch window.
With no stitch selected, you can select the first stitch in your design by hitting the
home key or the last stitch in your design by hitting the end key. If you have a
stitch selected, then the home key will take you to the first stitch in that color and
the end key will take you to the last stitch in that color.
If you have a group of stitches selected, hitting the left bracket key, “[“, will deselect the group and select the first individual stitch in the selected group.
If you have a group of stitches selected, hitting the right bracket key, “]“, will deselect the group and select the last stitch in the selected group.
You can use the bracket keys with the group selects to quickly find the first and
last stitch of a form fill.
You may also select a stitch by entering a number at any time except when you
are entering a number into a dialog box.
Selecting groups of stitches:
One way is to start by selecting a single stitch. Then there are seven basic ways
you can expand your selection to a group of stitches:
“G” key
“Shift/arrow”
“Shift/home”
“Shift/end”
“Shift/rightclick”
“Shift/rightclick” on the
color bar
Box select
Hit the “G” key. This puts you in "group select" mode and fixes
one end of your group selection. Then use the arrow keys to
move the other end.
Hold down a "shift" key and hit an "arrow" key. This has the
same effect as hitting the “G”, but it also moves the unfixed end of
your group selection. You may then use the "arrow" keys with, or
without, the "shift" to further adjust the selection.
Hold down a shift key and hit home. Thred will move the unfixed
end of your selection to the beginning of the color.
Hold down a shift key and hit end. Thred will move the unfixed
end of your selection to the end of the color.
Hold down a "shift" key and right-click near another stitch point.
Thred will group select from you original selection to the stitch
near your right-click. Use the arrow keys to fine-tune your
selection.
Hold down a "shift" key and right-click near another point on the
color bar. Thred will group select from your original selection to
the stitch near your right-click. Use the arrow keys to fine-tune
your selection, while continuing to hold down the Shift key.
Click on the “Box Select” box at the left of your screen directly
under the “pick color” tool. The mouse cursor will change into a
cross. Left-click and drag to draw a box around your originally
selected stitch. Thred will select all stitches inside the box that
are connected to the original stitch.
Select all the stitches in the design using the "A/ Control" key combination, or use
"select all stitches" from the "edit" menu.
Select all of the stitches in any color by left-clicking on the color in the color bar.
Selecting stitches in forms is covered in the Forms section.
Rotating:
Thred offers several ways to rotate the entire design, a form, or a group of
stitches. One set of commands just rotates the selection. The other group of
commands, “Rotate and Duplicate” makes a new copy of the selected items in
the rotated location. Rotate and Duplicate doesn’t work on the entire design. You
can use the “Rotate” command in both an interactive mode and a command
mode.
Access
“rot” from the main menu
bar
“Rotate/Command“ from
the edit menu
“Rotate/Again” from the
edit menu
“Rotate/and Duplicate”
from the edit menu.
Description
Interactive rotate. Allows you to rotate a selection
using a rotate handle.
Command rotate. Allows you to enter rotate angle
in degrees.
Rotates by the previously entered angle.
Creates a new item, the duplicate of the one
selected and rotates it by the entered angle
“Rotate/and Duplicate
Creates a new item the duplicate of that selected
Again” from the edit menu. and rotates it by the previously entered angle.
Page up and down from
the keyboard
Use these commands for hot-key access to rotate
and rotate and duplicate commands.
Command Mode Rotate:
When using command mode rotate you can set a mark to indicate the center of
rotation. If you don’t set the mark, Thred sets the center of rotation at the center
of the rotate selection. For example, if you have the rotate angle set at 60
degrees, and you select a form, and set a mark near the form, then hit the Page
up+Shift key 5 times, you can quickly create a perfect circle of forms centered on
your mark.
Forms:
Forms are used to create, edit, and delete large groups of stitches. The stitches
are created when the forms are filled. The forms are automatically refilled every
time the form is edited. Forms can be used to select, move and delete groups of
stitches.
Although forms are a powerful and useful tool, they are not as clever as a good
digitizer. It is usually best to use forms to get your design set up close to the way
you want it. Then you can sort the design to get adequate sequencing. Then you
might want to copy the design to a new name and either turn off the forms (go to
the menu bar across the top of the screen and click "frm-"), or delete them and
put in your finishing touches. Some designs can be done entirely using forms,
and some users may prefer to do the design entirely without forms using Thred’s
excellent stitch editing capabilities.
Disappearing Forms:
Because forms are drawn so that they can be seen on any color background,
they will become invisible if you put two of them right on top of each other. This
can happen in various ways. You can put forms directly on top of one another by
doing a rotate and copy with a rotation angle of zero. Or you can end up with two
forms on top of one another if you are copying forms to different layers, though
there is some protection from this mishap provided by the fact that forms on
different layers are drawn in slightly different colors.
If you suspect that you have lost a couple of forms, there are three things you
can do to find them.
If you know the approximate location of the lost forms, use the box select to
select the area they are in. When the form is selected, you will be able to see it.
Hit the up or down arrow to select the next form in the sequence.
Hit the apostrophe key or select “Design Information” from the view menu. This
will show the number of forms you have in your design.
Editing Groups of Form Points:
To select a form point, hold the mouse cursor over the form point and hit the ‘Y”
key or hold down the shift key and right-click. With a form point selected, hit the
left or right arrow key, and a range of form points will be selected.
Or you can select one form point and then hold the mouse cursor over another
form point, hold down the shift key, and right-click, and a group of form points will
be selected. This method only works if you want to select less than half the form
points in a form. If you want to select more than that, you need to use the arrow
keys.
Once you have selected a group of form points you can stretch, shrink, move, or
flip horizontally and vertically. You can also put a group of form points on the
clipboard by selecting them and hitting Control-C or Control-X.
Once you have form points on the clipboard, you can paste them into your
design. If you have no form point selected, pasting form points will create a new
form. If you have a form point selected, the pasted form points will be put in the
new form after the selected form point.
Interactive Auto Trace:
Interactive auto trace may help you make forms from bitmaps. The user can load
a bitmap, use auto trace to select parts of the bitmap, and then create a form
from the selected parts of the bitmap.
When using auto trace, it is important to keep in mind the various bitmaps
involved. Originally, a bitmap is located on the hard disk or CD. Then you use
the “Load Bitmap” function to load it into memory. The next step is to select
pixels from the loaded bitmap, which are copied into a select bitmap. The next
step is to draw a line around the edges of the select bitmap. These lines are
copied into an edge bitmap and displayed on the screen. When the edge bitmap
is displayed, you can click near one of the edges, and a Thred will automatically
create a form.
If the bitmap you are working with is large, YOU MAY HAVE TO ZOOM IN to see
the edge bitmap because the windows stretch bits function that Thred uses may
not show all the individual bits.
This sounds a little complicated, and maybe it is, but it all happens very rapidly,
and should become much easier with a little practice. See Also Trace.
Tracing monochrome bitmaps:
Monochrome, black and white bitmaps are the easiest. Just load the bitmap,
then hold down the control key and hit “T”. Left click or right click on the stitch
window to bring up the edge bitmap. YOU MAY HAVE TO ZOOM IN to see the
edge bitmap. Then you can left-click near one of the edges, and the program will
make your forms. If your bitmap is a line drawing, Thred will trace both sides of
the line, and you may have to delete some form points and change the freehand
form to a line form. To change a freehand form to a line form, select the form, hit
the “F” key and click on the first line in the form- form, on the word freehand or
line. Thred will toggle between the two types and will change the selected form
to the type written in the form data box.
If your trace has too few or too many points, change the “len” or “pnts” values in
the two info boxes at the lower left of the Thred window. Too make more points
set the “len” value smaller, or the “pnts” value larger.
Tracing 24 bit color bitmaps:
Color bitmaps have thousands of times more possible combinations than black
and white bitmaps, so it is a little more complicated to trace them, but not
thousands of times more difficult by any means.
To trace a color bitmap, put your mouse cursor near the edge of the object you
want to outline, the hit the ‘U” key. Thred will read the pixel of the bitmap nearest
the mouse cursor, and show you all the pixels that have blue green and red
values greater than the pixel you chose. The rest of the bitmap will be black. If
you want to modify this choice, you can move the mouse cursor and hit “U” again
or you can use the trace control panel, which will appear on the left side of the
Thred screen. When you have selected the bits you want you can left click or
right click on the stitch window, and the edge bitmap will appear, then you can
left click near one of the outlines and Thred will create a form.
You can also put your mouse cursor anywhere on the bitmap and hit the ‘N” key
and Thred will select all the pixels with RGB values less that the pixel near the
mouse cursor. If you do this when you have already hit the “U” key, Thred will
select pixels between the two values.
Using the trace control panel:
The trace control panel appears when Thred is in trace mode and controls which
pixels are selected. The color select ribbons at the top show, and control, the
colors that are selected. Left click on one of these ribbons to set the top of the
selected range, and right click to set the bottom. Hold down the shift key and
click on a color select ribbon to select the entire range of pixels in that color.
Below the color select ribbons are on/off buttons that turn the ribbons on and off.
If the ribbons are turned off they have no effect on the pixels that are selected.
Left clicking on these buttons turns them on and off.
Below the on/off buttons are two rows of number boxes that show the same
information in the color select ribbons, but in numerical form. Left click on these
buttons to change the numbers. The top row of numbers shows the high limit of
color values selected, and the bottom row of numbers shows the low limit.
The following table shows the functions of the seven buttons available in trace
mode. These buttons are below the number boxes
Trace Mode Buttons
len:
Length
When you are creating a form from the edge bitmap,
Thred starts with a pixel close to the mouse cursor. It
then takes each pixel in turn and checks to see how far it
is from the original pixel. If it is further than the number
entered in the length box, it creates a form point. To
change this number, left click on the length box.
pnts:
Point
After Thred has created form points, it deletes those that
are nearly in a straight line. The higher the number in the
point info box, the fewer points will be deleted. Change
this number by left clicking on the box.
find
edges
Find Edges
Similar to the find edges functions in other graphics
programs. It makes the pixels that are most different from
their neighboring pixels brightest. Pixels that are exactly
like all the neighboring pixels will become black.
hide
bmap
Hide/Show
Bitmap
Hides or shows the bitmap.
rst frm Reset Form
pix
Pixels
Finds the pixels in the bitmap under a form line and turns
them black.
sel
colors
Select
Colors
Takes each pixel in turn and checks to see which color is
brightest. Then it deletes the other two colors.
show
edges
Show
Traced
Edges
Shows the traced edges of a bitmap based on the
settings of the trace control panel.
Changing the bitmap image:
Thred provides the ability to change the bitmap image before using the trace
functions. There are three functions that can do this: “reset form pixels” (H), “find
edges” (U+control), and “select colors” (H+control).
Reset form pixels finds the pixels in the bitmap under a form line and turns them
black. You can use this function to make sure that “show traced edges” has
edges at forms you have already created.
“Find edges” is similar to the find edges functions in other graphics programs. It
makes the pixels that are most different from their neighboring pixels brightest.
Pixels that are exactly like all the neighboring pixels will become black. To call
the find edges function, hold down the control key and press “H” select
“edit/Trace/Find edges”, or left click on the “find edges” button in trace mode. Hit
escape to return to the original bitmap.
Each pixel in a 24-bit color bitmap has a blue, red, and green color value.
“Select colors” takes each pixel in turn and checks to see which color is
brightest. Then it deletes the other two colors. This can make the bitmap easier
to trace.
Saving the bitmap:
This function only works when a 24-bit color bitmap is loaded. It saves the
bitmap just as you see it on the screen. You can process the bitmap with Thred,
then save it to disk, and load it into another graphics program. Select “file/Save
bitmap”.
Hiding the bitmap:
You can easily hide the bitmap and show it again by holding down the shift key
and hitting “X”. You can also select “edit/Trace/Hide bitmap”, or select the “hide
bmap” button in trace mode.
Trace functions and mouse clicks:
Create a
Form
Color Select
Ribbon
Enter Trace
Mode
To create a form you must have done “Show traced edges”. Left
click near a traced edge, and a form will be created.
Set the upper limit
Left click on the color select
ribbon or left click on the top
number below the color select
ribbon.
Set the lower limit
Right click on the color select
ribbon or left click on the bottom
number below the color select
ribbon.
Maximize the upper limit
and minimize the lower
limit.
Hold down the shift key and left
click on the color select ribbon.
Turn a color ribbon on or
off.
Left click on the on or off below
the color select ribbon.
There are five ways to enter the trace mode:
Hold down the Control key If the user has set the pixel
selection settings, Thred filters
and hit “T” or select
the bitmap using these settings.
“edit/Trace/Trace Mode”
If the user hasn’ set the pixel
selection settings, Thred
calculates the lower limit for pixel
selection.
Place the mouse cursor
near the edge of an object
on the bitmap and hit the
“U” key.
Selects all pixels brighter than the
one near the mouse cursor.
Place the mouse cursor
near the edge of an object
on the bitmap and hit the
“N” key.
Selects all pixels dimmer than the
one near the mouse cursor.
Hold down the control key
and hit “H” or select
“edit/Trace/Select Colors.
Shows only the brightest color in
each pixel
Hit “H” or select
“edit/Trace/Reset Form
Pixels
Turns all pixels under forms lines
black.
Find edges
Changes the bitmap to highlight the edges of objects. Hold
down the control key and hit “U” or select “edit/Trace/Find
edges”.
Hide/Show
bitmap
Hold down the Shift key and hit “X”, select “edit/Trace/Hide
Bitmap”, or select “file/Hide Bitmap”.
Load bitmap
Select “file/Load Bitmap”.
Reset Form
Pixels
Finds the pixels in the bitmap under a form line and turns them
black.
Save Bitmap
Saves the bitmap as it is shown on the screen. This only works
when you have loaded a 24-bit color bitmap. Select “file/Save
Bitmap”.
Select colors
Shows the primary colors of a bitmap. Hold down the control key
and hit “H” or select “edit/Trace/Select colors”.
Set color
select high
limit
Sets the high limit for a color select ribbon. Pixels less bright
than this limit will be displayed.
Show traced
edges
Shows the traced edges of a bitmap based on the settings of the
trace control panel. To call this function right or left click on the
stitch window while the trace bitmap is showing, or select
“edit/Trace/Show traced edges”. If the bitmap you are working
with is large, YOU MAY HAVE TO ZOOM IN to see the edge
bitmap
UNDERLAY FOR FILLS
Center Walk:
Center walk puts a single line of running stitches in the center of a free-hand
form. If the form has d-lines, the stitches will go from the center of one d-line to
the center of the next. To put center walk in a form, select the form, and then hit
the “F” key. The form data box should appear. Left click on the center walk entry
in the form data box to turn center walk on or off. You can also use update form
to turn center walk on or off for a group of forms.
The underlay color is the same for center walk, edge walk, and underlay.
Edge walk:
Edge walk puts a line of stitches near the edge of a form. The distance of the
stitches from the edge of the form is determined by the indent. You can turn the
edge walk on and off and set the indent using the form data box. If you want the
edge walk to be outside the form put a negative number into the indent. (Put a
minus sign in front of the number) The indent also effects the underlay, and how
Thred retraces its steps when it has “stitched itself into a corner” doing a vertical
or textured fill.
Underlay:
Underlay is an angle fill with square edges and an indent. In most cases the
indent is set so that the underlay doesn’t quite go the edge of the form. You can
turn the underlay on or off using the form data box. You can also use the form
data box to set the indent, spacing, and angle, and color. Select the form and
press “F” to get the form data box.
Fill Start:
Use the form data box data box to set the form start. To get that box, select the
form, and press “F”. This function will change the start of the fill, but it sets a line
of stitches from the point you set to the place where the form fill starts. If the
form is a line form, the stitches will be set along the border of the form. If the
form is freehand, the stitches set from the start point to the start of the fill will be
set along a line that is indented from the edge of the form. The amount of indent
can be set using the indent variable on the form data box.
Fill End:
Select the form, and press “F” to get the form data box data box, and use the
form data box to set the form end. This function will change the end of the fill,
but it does that by setting a line of stitches from the place where the fill ends to
the point you set. If the form is line form, the stitches will be set along the border
of the form. If the form is freehand, the stitches set from the end point to the end
of the fill will be set along a line that is indented from the edge of the form. The
amount of indent can be set using the indent variable on the form data box.
The stitches set by this function will be stitched after the form fill has stitched, but
before the border is stitched.
Nudge: (arrow keys + control)
Nudge length is controlled by the “Nudge” on the preference menu and
“view/Set/Nudge Pixels”. The exact behavior of this function depends on what is
selected. If anything is selected, it is moved by the “Nudge “. If nothing is
selected, the cursor is moved by the nudge pixels.
Color Management:
When you use the “edit/sort” functions, Thred always sorts your design according
to the color order on the color controls on the left of the Thred window. The color
management functions allow you to change the order of these colors. When you
use the color management functions, Thred automatically updates the colors in
the forms and stitches in your design.
Switch Colors:
To switch the order of two colors, put your mouse cursor over one of the color
boxes on the far left of the Thred window. Then hold down the left mouse button
and move your cursor to another one of these color boxes. Thred will switch the
two colors. This function requires you to use only the boxes on the far left of the
screen because the left mouse click on the second column of boxes is used to
define colors. The insert and delete functions will work with either of the two
columns of color boxes.
Use this function when you want to change the sort order of your design. The
stitch ordering won’t change until you use one of the sort functions.
Switch Color Values:
To switch color values hold down the control key and drag the color you want to
switch to the color you want to switch it with. Use this function when you want to
change the sort order and also the colors of your design.
Copy Colors:
Works just like switch colors, except that copy colors makes the two colors the
same. Copy colors by holding down the shift key and dragging the color you
want to copy.
Insert Color:
Hold your mouse cursor over a color box on the left of the Thred window. Hit the
“insert” key. A color will be inserted. You will get an error message if all colors
are in use.
Delete Color:
Hold your mouse cursor over a color box on the left of the Thred window. Hit the
“delete” key. The color under the mouse cursor will be deleted. Thred will not
delete a color that is being used.
THRED MENUS
FILE:
New:
Creates a new file. If the current file has not been save, puts up a message.
Opening a file: (O)
Thred supports the Thred (.THR) file format and two machine file formats, PCS
and DST. When you save your THR file, Thred also saves you file in the
machine file format. To set the Auxiliary file type select “Set” from the view
menu, and then “Machine file type”.
In the top left hand corner of the screen a single left-click on the word "file" brings
a drop box offering to open a "new file" or open an "existing file". You may also
get this box by hitting the “O” key. The "open file" option brings a box with the
"look in" field. Choose the directory where you have saved your design, or the
floppy disk drive (A), or the Compact Disk drive if you are taking the design from
a CD. Note that the "files of type" option can be .pcs, .dst files or .thr. Thred will
open a Pfaff file (.pcs) or a Tajima file (dst). PCD will not open a Thred file
(.thr). If you need to use PCD to load a file into your sewing machine, it must first
be saved as a .pcs file. Thred automatically creates a Thred file and a PCS file
or a DST file depending on the Machine file setting on the view menu. The .thr
file format saves your color choices, forms, and fills information, which PCD, and
DST will not save.
Close:
Closes an open file. If the file has been changed, Thred puts up a message.
Thumbnails: (T)
This function allows you to search for files by looking at small “thumbnail
sketches” of the files. You must hit "Escape" to exit the thumbnail mode. When
you find the file you want, left-click on its thumbnail to load it or right-click to
insert the entire file into your current drawing.
This can be very useful if you don’t happen to recall exactly the name of the file
you are looking for, but do remember what it looked like. To use this function you
must first open a file in the directory of interest using the “file/open” command.
Just make a guess at the file name, and if you don’t happen to get it on the first
try, then select "Thumbnails" from the file menu or hit the “T” key. You will see
the first four Thred files in the directory displayed. Their names will be displayed
in the info boxes on the lower left corner of the screen right below the “pick color”
box. You can then hit the down arrow, up arrow, “page down” or “page up” to
view all the files in the directory. You can also select all the files in the directory
that begin with a certain letter or combination of letters simply by typing the
letters. .
For instance if you had some files named rose1.thr, rose2.thr, rose3.thr, and
rose4.thr, but you weren’t quite sure which rose you wanted to work on, then you
could select "Thumbnails” or hit “T”, then type rose and you would see all four
rose files. If you didn’t happen to have any other files in your directory whose
names started with “ro”, then you could select the roses by just typing “ro”. As
you type the letters to select thumbnails their names will appear under the box
that usually says, “Box select”. The “Box Select” box is on the left of the main
screen under the dual color bars.
If you happened to have 20 different “rose??” files in your directory then you can
go to the thumbnail mode, type “rose” and then use the up and down arrow keys,
or the page up and page down keys to scroll through the rose files until you find
the one you want. Then just left-click on the thumbnail to load the file, or rightclick to insert it into your current design.
Open PCS/DST file:
Opens a PCS or DST file. This menu item will change according to the machine
file type selected.
PES2Card (W+Control)
Calls the PES2Card software. You must have a PES2Card Reader/Writer Box
installed to use this function. Thred saves the file you have loaded, then calls the
PES2Card Software and adds the file to the PES2Card list, so you can write it to
a sewing machine card or floppy. The card and file formats supported depend on
the exact model of the PES2Card you have installed.
Insert:
Select insert to insert a file from the disk into a file that your currently have open
for editing. After you have selected the file to insert, you will see a box in the
Stitch Window. Drag the box to where you want to insert the file and left-click.
The new file will use color information from the file you originally had open.
Overlay:
This command works just like file insert except that the overlaid file is placed at
coordinates 0, 0 in the lower left corner of the stitch window.
Save: (S+Control)
The "Save" and "Save As" options are also found under "File". We encourage
you to save your work frequently. Thred keeps up to four of the most recent
versions you have saved. When you save a file, Thred makes a copy in PCS (or
DST) format and one in THR format. Only the Thred file will have the forms in it.
If you want to use a form to make changes after you have saved as “PCS" in
PCD, you can do it by using "insert file" or the Windows clipboard. If a file
already exists with the chosen file name, Thred renames that file with the
extension ths. If a file called ths already exists, the ths file will be renamed tht, If
a tht file exists it will be renamed thu. You will have up to four backup files of any
given design name. You may remove unneeded back-up copies of your design
or of all the designs in a folder by using the "Delete backups" command, located
under "File".
Since DST files have no color information, when Thred is saving a DST file, it
also makes a file with the same name but with a thw extension. The thw file
contains the color information from the Thred file.
Save As: (F8)
Allows you to select the name and directory, and file type of the file you are
saving.
Loading a bit map:
Thred requires a Windows Bitmap File (.BMP). Any graphics program should
make such a bitmap. Designs may be scanned or drawn in the graphics program
of choice, then saved as Windows bitmaps. The bitmap needs to be in the same
directory as the Thred file you are working on.
If you use a monochrome bitmap, Thred makes the background color the same
as the stitch window background color. You can set the foreground color by
choosing “Set”, then bitmap color from the view menu.
If you use a color bitmap, Thred just loads the colors from the bitmap directly.
Larger bitmaps give better resolution and better registration between the bitmap
and your stitches, but if you make the bitmaps too large your computer may run
out of memory and load them very slowly.
Large bitmaps may also show some spurious colors when not zoomed, because
of the way windows resizes the bitmaps. When you zoom in these spurious
colors will disappear.
If you change the size of your hoop and reload the bitmap, the bitmap and stitch
registration will be lost.
Save Bit Map:
This function only works when you have a 24-bit color bitmap loaded. Thred will
save the bitmap as you see it on the screen.
Hide Bitmap (X+Shift):
Hides or shows the bitmap, but doesn't delete the file. When you finish a design,
you should hide the bitmap.
Remove Bitmap:
Removes the bitmap from the design, but doesn’t delete it from the hard disk.
Delete Backups:
The “Backups for the selected file” option deletes backup files with the same
name as the loaded file.
The “All backups in the selected directory” option deletes all the backup files in
the selected directory. You should do this periodically to avoid accumulating
unwanted data in your directories, which will slow down your computer.
Delete backups does not delete the main Thred (.thr) file that contains your
design.
Locking:
This function allows the user to set or unset the “read only” bit for a file. When
this bit is set, the operating system will not allow the file to be deleted.
VIEW:
Movie: (I)
This function allows you to view the selected design as it stitches. When you
select "Movie", a slider bar appears across the top of the screen. Sliding it to the
left slows the stitching of the design, sliding it to the right speeds it up. If you
select a segment of the design (by double clicking on the color segment in the
right hand color bar, or by right-clicking and holding the shift key, then rightclicking at the end of the desired area), the movie will show only the selected
portion. Hit the "I" key as a shortcut to view the design as a movie. Hit "Q" to
quit the movie.
Set:
Set Appliqué Color:
The appliqué color is always stitched first to hold down the appliqué fabric. It is
only used for appliqué borders. Color 16 is the default appliqué color. To select
another appliqué color, first select a color by left clicking on one of the color
boxes in the upper left of the Thred window. Then select “view/Set/Appliqué
color”. You should get a message telling you that the appliqué color has been set
to the color you selected.
Set Background Color:
This feature uses the Windows color selection box. Select any of the basic
colors, or choose the option define custom colors. When the ”define custom
colors" option is selected, the Windows color bar appears. The user may select
a custom color box to be filled, and then move the cursor to change the selected
color, click to add it to custom color selection, and then click OK. Or simply click
"OK" and the color will be applied, but not saved. The background color will be
saved with the design. The background and bitmap colors are saved in the .INI
file, which can be found and manipulated using the Windows Explorer.
Set Bitmap Color:
The Windows color box drops when you left-click on the Set Color option. You
may select the bitmap color for monochrome bitmaps in the same way as the
background color. See above paragraph.
Set Data Check:
See also, repair data.
If this function is turned on, Thred checks the data for form points, clipboard fills,
d-lines, and texture fills every time the design is changed. These data lists
becoming corrupted caused many of the problems we have encountered in
previous version of Thred. After the data becomes corrupted, it may be several
edits later that the user sees the effects of that corruption. We put in this function
to assist with debugging. The sooner we know when the program has made an
error, the easier it is to eliminate the bug. If you turn this function on, and then
get an error, please write us an email at [email protected] describing what you
were doing when you got the error. If you could also select undo, and then send
us a copy of the design, it would be helpful.
If you turn this function on and load a design from a previous version of Thred,
you may get an error message. Many of these errors are harmless in the sense
that the files only have errors in them that make them a little larger than they
should be. Others are serious because fill data is not there that should be. To if
you get this message you can run “edit/Repair Data”.
Or you can set data check to “Auto Repair”. Then if Thred finds an error in the
data it will just quietly run the “Repair Data” function.
You can also use “Repair Data with Message” which repairs a data error any
time one is found, but prints a message on the screen when that is done.
Set Default Preferences:
Sets all the items on the preference menu to the their default values.
Set Fill at Select:
When Fill at Select is set to “On”, Thred will fill a new form starting right after the
stitch you have selected. If you have no stitch selected, or if Fill at Select is set
to “Off”, Thred will fill a new form at the end of the stitch order. Set Machine File
Type:
Thred will save a machine file in addition to the Thred file. If you wish to use a
Pfaff machine set the Machine file type to “Pfaff PCS”. If you want to use DST
files, set the machine file type to “Tajima DST”.
Set Form Cursor:
The form cursor appears when you are entering a line form or a free hand form.
Box is the default. The box cursor is actually a box with a cross in the middle.
You can also set the cursor to a simple cross.
Set Grid Mask:
The grid is drawn using an exclusive or line so it will show up on any background
color. Exclusive or inverts the selected bits so that if a selected bit is one, it will
be changed to zero, and if it is zero it will be changed to one. The following
settings are available.
Setting
Description
Hex Value
High
This grid is the easiest to see. It has the most
contrast with the background color.
FFFFFF
Medium
A medium contrast grid.
404040
Default
This is the default grid
202020
UnRed
This grid will be easier to see with background colors FF2020
that have a lot, or a little of red in them.
UnBlue
This grid will be easier to see with background colors 20FF20
that have a lot, or a little of blue in them.
UnGreen
This grid will be easier to see with background colors 2020FF
that have a lot, or a little of green in them.
Set Line Border Spacing:
Controls the spacing for line border fill.
Setting
Description
Exact
Each stitch will be the set exactly at the user stitch length from the
preferences menu. But the end stitch in a line segment will be
used to adjust for the fact that most line segments can not be
divided evenly by the user stitch length.
Even
All stitches in a line segment will be the same size, and that size
will be as close as possible to the user stitch length.
Set Machine File Type:
Sets the type of the machine file that is saved every time the user saves a THR
file to Pfaff, PCS or Tajima, DST.
Set Needle Cursor:
Turns the rotating needle cursor on or off. If the needle cursor is turned off, the
cursor becomes a cross when entering stitches.
Set Nudge Pixels:
Sets the pixels nudge (arrow keys + control) moves the cursor when nothing is
selected.
Set PCS Bitmap Save:
If this feature is on, Thred will save the bitmap file name with PCS files. If it is off
Thred will not save the bitmap file name with PCS files.
Set Point Size:
Stitch Point boxes: Sets the size of stitch point boxes.
Form Point Triangles: Sets the size of the form point triangles.
Set Remove Mark:
When this is set to “Q”, the mark will be removed when the user hits the “Q” key
or the “Escape” key. If it is set to “Escape”, the mark will only be removed when
the user hits the “Escape” key.
Set Rotate Machine File:
Rotates the machine file 90 degrees when it is saved. Using this setting, you can
work on a design in a convenient orientation when you need to stitch it out
rotated 90 degrees from that orientation. When rotate machine file is set to on,
Thred will show a message saying the machine file was rotated each time it is
saved.
Set Warn if Edited:
If you manually edit a stitch in a form fill, then refill the form; Thred will give you a
warning. Use this function to turn off that warning. Thred never gives a warning
when you have more than one form selected.
View Backups:
When you select this option, you will see four panels containing thumbnail
sketches of the four backup files in the Thred window. To load one of the
backups, left-click on the pane showing that file.
Zoom Full: (X)
Left-click on "Zoom full" to see the full screen, or use the "X" key to do the same
thing. Click on "In" and left-drag to make a box of the size you wish to view.
Thread Size:
The number set here for the thread size determines how thick the threads appear
on the screen. By selecting different thread size, you can get some idea how the
design will look sewn out in heavier or lighter thread. Choose 30, 40 or 60 gauge
threads. Left-click on "set defaults" to cause the program to revert to the default
thread widths, which are .3 mm for 30 gauge, .2 mm for 40 gauge, .05 mm for 60
gauge.
Show Threads:
Shows you a view representing the thickness of the threads. You may have to
zoom in to see a difference from the normal view. The “show threads” view is
much slower to draw in most machines. Hit “escape” to resume the normal view.
Show Threads for selected color:
Works like “Show Threads”, but only for the currently selected color.
Design Information: (apostrophe: ‘ )
Displays a pop-up window with information about the design. This function can
also be accessed by the “’” (apostrophe) key. The following table shows the
items displayed.
Item
Width
Height
Description
The size of the design is based on all the
stitches in the design. It does not measure
the size of forms
Stitches
The number of stitches in the design.
Forms
The number of forms in the design.
Hoop Width
The current size of the hoop. This can be
set from the “pref” menu
Hoop Height
Created by
The name of the person who originally
created the design
Modified by
The name of the last person to modify the
design.
Retrieve Mark (B+Shift):
Sets the mark to it’s last position.
About Thred
Displays the copyright message.
FORM: (F)
No Form Selected:
You must create a form before you can fill it. To create a form, select "form" on
the tool bar, or hit the "F" key. Select the type of form you want to create.
Choose "Line", "Free Hand", "Regular Polygon", "Star", "Spiral", “Heart”,“Egg”,
“Tear”, “Zig-Zag”, or “Wave”. The letters to the right of the form types indicate
hot keys you can also use to create forms when you have called up the form
menu. If you chose "Line" or "Free Hand'", then you must left-click to create the
points of your form. You need a point every place where the curve of the form
changes. You can insert new points with the "W" key or "E" key. "W" sets one
point. "E" is for setting multiple points. If the points aren't where you need them
to be, left-drag them there, or create new points, using "W" or "E". You can also
delete points with the delete key. You must have the cursor near the point to be
deleted, or use the "Y" key to select the form point in question.
When you want to make a part of the form have no fan or clipboard fill stitches,
you need to make a non-stitch area by moving your mouse cursor near the point
where you want the line to start, then hit the "D" key. Move the cursor to the end
of the line and left-click. A darker line appears. There can be only two of these
non-stitch lines in a form. If you fill, edit and refill, but your fill isn’t what you
expected, check to see that your "D" lines remain where you intended them to
be.
If you choose "regular polygon", "star", "spiral", “Heart”, or “Lens” you will be
prompted for the number of points desired. When you have entered the number
of points, the form is created. Left-click to place the form. Right-click near one
of the form points to select the form. When it is selected a box appears, with
eight points, one on each vertex and one in the middle of each side. You may
move or alter the size by selecting a form point and moving it. Right clicking near
a form point will select it. Move a corner point in to shrink the entire design.
Move a corner point out to grow the entire design. Drag the middle form point to
stretch it in length or width. If you deform your design and regret it, remember
you have the undo button or "control+Z". A form must be selected to fill, unfill, or
refill.
The number you select for the heart or lens form determines the density of the
form points, but does not determine how many form points will be in the form. A
larger number will give more form points and a smaller number will give less.
If you make a line form and select it, then select “edit/convert to ribbon” it will
become a polygon form with “non stick” lines already in place. Fill it with Fan fill
(making sure to have your stitch length preferences set wider than the form) and
it will look like a ribbon.
Tear Form:
If you select the “Tear” form, you will see a dialog box that allows you to set the
parameters of the tear you create with the form. The table below lists the
controls in the dialog box and their effects on the creation of the form.
Tear Dialog Box Controls
Cancel
Closes the dialog box and doesn’t create a form.
Default Tear
Sets up the dialog box to create a default tear.
Default Paisley
Sets up the dialog box to create a default parameter.
Points
Sets the number of points in the form. The form will
actually contain one more point than this value.
Tear Ratio
A higher value in this control will create a longer and
slimmer tear or paisley.
Twist Setup
The twist setup controls turn the tear into a paisley by
“twisting” the tail of the tear.
Twist Step
This is the amount the first points in the tear tail are moved
to the right.
Twist Ratio
After each pair of the points in the tear tail has been
placed, the twist step is multiplied by this ratio. The new
twist step is added to the horizontal position of the next
pair of points in the tear tail.
OK
Closes the dialog box and creates a form.
Wave Form:
The wave form is made by joining pieces of regular polygons. You can choose
the number of points in the polygon, and the start point and end point of the piece
of the polygon you want to use. You can also choose the number of polygons to
join.
Wave Form Dialog Box Controls
Points
Start
End
Waves
Default
Wave
form
Sets the number of points in the polygon used to make the wave
form.
Sets the beginning point of the portion of the polygon.
Sets the last point of the portion of the polygon.
The number of portions of polygons to join together.
Default settings for a wave form.
Daisy form:
The daisy form creates some flower-like shapes, and some that are not
recognizable as flowers at all.
Daisy Form Dialog Box Controls
Petals
Sets the number of petals
Petal Points
Sets the number of points in the outer part of a petal
Mirror
Points
When the mirror petal type is selected, Thred draws a petal as it
would with the curve setting, but only goes up to the mirror point,
and then it starts drawing the same curve backwards. If the mirror
point is more that half of the petal points, the petal will appear to
be split.
Inner Petal
Points
When you have the daisy hole function selected, the inner petal
points set the number of points for each petal.
Center Size
and Petal
Size
The ratio of the center size to the pixel size determines the relative
size of the petals and the center of the daisy. The daisy form will
be the same size regardless of how you set these two items.
Hole
If you check this box, Thred will put a hole in the daisy form.
D-lines
If you check this box, Thred will put d-lines in the daisy form.
Hole Size
Sets the hole size. If the value in this box is less than the sum of
the center size and the petal size, the hole will be smaller than the
petals of the form.
Petal Type
Curve
Curved Petals
Center Point
Petals with a point in their center
Side Point
Petals with a point at their side
Ragged
A daisy form with repeating random shaped petals
Cog
Produces a form that looks like a gear
Mirror
Produces a form that can have split petals. See
mirror points
Reset
Resets the daisy form to default values
Form Preferences:
You can use the preferences menu to control the look of the star and egg forms.
Change the “Star ratio”, “Spiral wrap”, and “Egg ratio” entries on the preferences
menu, and then create a star, spiral, or egg form.
If you have a form selected:
When you hit “F” or select “form”, you will get a box describing the form you have
selected. The exact items in the box will vary with the type of form, and the fills.
In general you can change any item by left-clicking on the box describing that
item. For example, if you see “Border Size” and a box next to it that says “3.00”,
left-click on the “3.00’ and another small box will appear. Type in a new number,
and Thred will automatically refill the form with the new value.
EDIT:
Center:
These functions center forms and selected stitches.
Center Horizontal: (Minus - + Shift)
Centers a form or a group of stitches. If a zoom mark is set aligns the selection
horizontally with the zoom mark. If not zoom mark is set, aligns the selection
with the center of the stitch window.
Center Vertical: (Minus - + Control)
Centers a form or a group of stitches. If a zoom mark is set aligns the selection
vertically with the zoom mark. If not zoom mark is set, aligns the selection with
the center of the stitch window.
Center Both: (Minus –)
Centers a form or a group of stitches. If a zoom mark is set centers the selection
over the zoom mark. If no zoom mark is set, centers the selection over the
center of the stitch window.
Center Entire Design:
Centers the entire design over the center of the stitch window.
Center Forms: (L)
Centers a stack of selected forms on the center point of the bottom form.
Check Range:
This command checks to see that all stitches are within the stitching field of the
selected hoop. Any outside the range are moved to the edge of the stitch
window.
Convert:
Convert to Feather Ribbon: (F + shift)
Works like the “Convert to Satin Ribbon” below, except that the form is
automatically filled with a feather fill.
Convert to Satin Ribbon: (C + shift)
Converts any selected form to a “ribbon” drawn along the outside edge of the
form. Thred automatically inserts guidelines into the form and fills it with fan fill.
Technically, the ribbon form is no different from a similar from created and edited
by hand. After converting the form to a ribbon, you can then proceed to edit the
ribbon just like you would edit any other form. If you fill it with a Fan fill and have
the preferences set for longer stitches than the form’s width, you will get a result
like satin border fill. Sharply curved forms may require editing by hand.
Convert to Bean:
Converts line stitches to bean stitches. If a range of stitches is selected, converts
the stitches in the selected range. If no range of stitches is selected, converts
the entire design.
Convert from Bean to Line:
Converts bean stitches back to simple line stitches. If a range of stitches is
selected, converts the stitches in the range. If a range of stitches is not selected,
converts all stitches in the design. Bean stitches to be converted must be exactly
positioned. If they have been done with a bean border fill or convert to bean,
they will be exactly positioned. If they have been done by hand, you should run
snap together before using this function.
Convert from Stitches to Form:
Converts a selected group of stitches into a line form.
Copy to Layer:
You may work on up to four layers. This allows you to have identical forms with
different fills or borders. To copy to another layer, select a form or a group of
stitches. Then select "copy to layer" and the number of the layer. A form will be
copied along with guidelines and non-stitch lines, but without fill. It arrives at the
new layer unfilled and ready for your next choices.
Crop to Form: (W+Shift)
Deletes all stitch points outside of the selected form.
Delete:
Delete Select: (Delete)
Deletes whatever forms or stitches you have selected.
Delete Small stitches:
Deletes all stitches smaller than the size chosen under “preferences/small stitch
size”. Use this function with care. It deletes stitches below the set minimum
length. It is intended for use primarily with simple line segments, rather than
filled areas. For instance, in a design made in PCD, you might find a section of
B-fill with base line that stitches too tightly to suit you. Stitch length allows you to
select a segment of the design and remove stitches that are too close together.
To alter the default settings, use the “Preferences” menu.
Delete Large stitches:
Puts new stitches in all lines of stitching with stitches farther apart than the
distance set in "Preferences/Maximum stitch length." The program will figure the
distance between the stitches and divide the length into segments as close to the
“user stitch length” as feasible.
Remove small and large stitches is sensitive to what you have selected when
you use the commands:
Selected
Nothing, or multiple
forms
A range of stitches
A form
Actions
Affects all stitches in the design.
Affects only the selected range.
Affects only stitches associated with the selected form.
Delete Free stitches:
Removes stitches not part of a form, such as edited segments or knots.
Delete All Stitches:
Deletes all stitches in the design, and resets all forms to an unfilled state.
Delete Knots:
Deletes knots entered by the “edit/Set/Knots” function. These knots are made of
small stitches all in a line rather than stitches stacked on top of one another as in
version of Thred before 1.025. This command will not delete the stacked knots.
Use “edit/Delete/Small Stitches” for that.
Delete All Forms:
Deletes all forms.
Delete All Forms and Stitches:
Deletes all forms and stitches
Flip:
Flip Horizontal:
Flips selected form or range of stitches. If a point of the form to be moved points
left before using this function, it will point right afterwards.
Flip Vertical:
Flips selected form or range of stitches. If a point of the form to be moved points
up before using this function, it will point down afterwards.
Flip Order:
Makes a form, the points of which were entered in a clockwise order, stitch
counterclockwise, etc. This will change the location of a clipboard border from
inside the form to outside, etc. It can also affect the filling of an angle, horizontal
or vertical fill. In cases where there is a flaw in the fill, try relocating the form zero
point. The form zero point also makes "D" lines troublesome, so it may be
necessary to move the zero point to get a good non-stitch line in a Fan Fill.
Form Update:
Form update allows you to change parameters of several forms at once. Select
the forms you want to change, and then hit the “F” key. The edit menu will open
with form update selected. This function is designed so it can be entirely
operated from the keyboard, if desired. For example to change the maxim fill
stitch length in a number of forms follow the steps in the table below.
Form Update Example—change maximum fill stitch length
1
Select the forms you want to change
2
Hit the “F” key. The edit menu will open with form update selected.
3
Hit the “F” key again. The fill submenu will open.
4
Hit the “M” key. The edit menu will close and message will appear
asking you for the maximum stitch length.
5
Type in the maximum stitch length and hit return, and the maximum
stitch length will be changed in the forms you have selected, and they
will be refilled.
Of course, you can also do this in the usual way with the mouse.
The table below lists the form data you can change.
Form update data
Border
Color
Maximum Stitch Length
Minimum Stitch Length
Stitch Length
Spacing
Center Walk
On
Off
Edge Walk
On
Off
Fill
Angle
Color
Maximum Stitch Length
Stitch Length
Minimum Stitch Length
Spacing
Height
Indent
Underlay
On
Off
Angle
Color
Spacing
Under Stitch Length
Width
Move:
Move To Start:
Moves the selected portion to the start of the stitch order.
Move To Mark: (;)
Moves the selected portion of the design to a move mark. Make a mark by
selecting a stitch and then selecting “set/mark” from the edit menu or hitting the
"." period key. This will mark your spot. You will see a small arrow in the stitch
window pointing in the direction of the selected stitch. Then go to the
"Edit/select/forms" (or stitches, as desired), and select the part to be moved.
Now select “move/to mark” from the edit menu or hit the ";" semicolon key. Your
selection should move to the mark and stitch in that order.
It is also possible to make a mark by placing your cursor over the appropriate
color on the right color ribbon, and right-clicking. Then hit end or home to put the
mark at the end of beginning of that color.
Move To End:
Moves the selected portion to the end of the stitch order.
Move To Layer:
This deletes the selection from the starting layer and copies to the target.
Refill All (J):
Refill all uses the information last entered for the forms, except for the stitch
spacing, which it takes from the preferences you have set. This enables you to
easily change density on all the fills in a design if you don't like your first choices.
Repair Data:
Attempts to repair a design that gives a “Data error” message when
“view/Set/Data Check” is on. The data repaired is: form points, clipboard data, dline data, and texture fill data. We recommend running “edit/Refill All (J)” after
you have used this function. After running refill all, you can see what fills are still
in what forms. Refill all often introduces jump stitches, so you might want to hit
the “B” key to restore your design.
Previous version of Thred introduced errors into the data. Many of these errors
won’t cause any problems except making the design a little larger than it should
be, but some are serious.
Reset colors:
Resets the design colors to the ordinal colors.
Retrace:
Select a range of stitches, then select the retrace function, and Thred will stitch
back over the selected range setting the new stitches exactly on top of the old.
Retrieve Clipboard Stitches (F4):
Retrieve extracts a fill from a form and places it in the clipboard. Select a form by
right-clicking near one of the form points. Then select "Retrieve Clipboard Fill"
from the "Edit" menu. If a form has both a border clipboard fill and a form
clipboard fill, this command will retrieve the border clipboard fill. There is
currently no way to retrieve the form clipboard fill from such a form directly.
However, you can make a copy of the form, delete the border fill, and then apply
this command to get the form fill.
Rotate:
There are two rotate commands you can access from menus. Rotate on the
main menu and this one under the Edit menu. This one allows you to enter
numerical values. See also Rotating.
Command:
Allows you to enter the number of degrees you want to rotate a selected item.
Rotate Again: (Page Up, Page Down)
Rotates by the previously entered angle. “Page up” rotates in a counterclockwise
direction and “Page Down” rotates clockwise.
Rotate And Duplicate:
Creates a new item the duplicate of that selected and rotates it by the entered
angle.
Rotate And Duplicate Again: (Page Up or Down + Shift)
Creates a new item the duplicate of that selected and rotates it by the previously
entered angle. “Page up +Shift” rotates in a counterclockwise direction and
“Page Down + Shift” rotates clockwise.
Select:
To select, left-click on any of the following choices:
All Forms and stitches
Colors: Selects the color where the cursor is resting. You may also select an
entire color range by left-clicking on the right hand color bar. A right-click on the
right hand color ribbon will select an individual stitch. "Control+A" will select the
entire design.
Form stitches
All Stitches (A+control)
Form fill stitches
Form border stitches
Form Appliqué stitches (selects only the simple line stitch under-lay that anchors
the appliqué)
Set:
Set design size:
Brings up the set design size dialog. If the design already has stitches, Thred
loads the dialog with the size of all the stitches in the design. If there are no
stitches, then Thred uses the size of all the forms.
Design size dialog controls
Width
Sets the width of the design
Height
Sets the height of the design
Refill Forms
If this button is activated, Thred refills all the forms in the
design after it changes the size.
Restore Aspect
Used to restore the height/width of the design when the dialog
was opened. If you want to change the size of a design, but
preserve its shape, set the width or the height and then click on
the restore aspect button.
Set Form Zero Point:
The form zero point is indicated by a larger square than the other form nodes,
which are small triangles. The zero point is the point from which the first stitch of
a border fill will begin, unless there is a fill already in the form, in which case the
border begins at the end stitch of the fill. If you choose either kind of satin
border, however, Thred will stitch a single line to the zero point, so that the
border will start and end at the zero point. In a satin fill, the fill will start at the
zero point. Changing the zero point will change the way a fan fill looks. In
vertical or horizontal fill, changing the zero point can improve the fill sequence.
To set the form zero point, put your mouse cursor near the point you want to
become the new zero point. Hit the "Y" key. You should then see a cross at the
point. Go to the edit menu and select "set form zero point". You should see a
larger node box at the zero point of a form.
Set Knots:
Automatically sets knots on any stitch longer than 9 mm. If you want to use this
function for color changes, you should set long stitches between your colors. If
you have “view/Knots” turned on, you will see a small box with a horizontal line
where each knot is set. You can hide the forms using “frm-“ or the “K” key to
make the knots easier to see. See also “edit/Delete/Knots”.
Set Knot at Selected Stitch (K+Cntrl)
Sets a knot at the selected stitch.
Set Order Mark: (Period key .)
Sets a mark for moving stitches in the stitch sequence. See the section on
"move to mark" on under "edit" menu for an explanation of how to re-arrange the
stitch sequence. Note that this mark is different from the zoom mark, which can
only be set by hitting the “M” key.
Set Zoom Mark at Center: (M+Shift)
Sets a zoom mark at the center of the stitch window. “m” plus Shift is a keyboard
shortcut for this command.
Set Zoom Mark at Selected Point: (M+Control)
Sets a zoom mark on a selected form or stitch point. “m” plus Control is the
keyboard shortcut for this command.
Set Range Ends for Clipboard Fills:
This function is designed to eliminate jogs and jags when using clipboard border
fills. Select a range of stitches, and select this function from Edit/Set, and then
paste the stitches to the clipboard. Because the beginning and ending stitches
are at mid-point on the vertical sides of the rectangle that outlines the clipboard
data, you will get a neat clipboard border fill.
Set Rotation:
The Rotation commands set the angle used by “edit/Rotate/Again”,
“edit/Rotate/and Duplicate Again”, and the Page up, Page down hotkey rotate
functions.
Set Rotation Angle: (R+Control)
Sets the rotation angle in degrees “r”+Control is the hotkey for this function.
Set Rotation Angle from Mark: (R+Shift)
Sets the rotation angle in degrees. You must have a form or a group of stitches
selected, and the zoom mark set to use this function. The function measures the
angle made between the mark and the selection, and computes the number of
rotations needed to make a full circle without overlapping.
Set Rotation segments: (R)
Allows you to set the rotation angle by parts of a circle. If you enter 6 here, the
angle will be set to 60 degrees, since the 360 degrees in a circle divided by 6
gives 60 degrees.
Set Form Number: (/)
Sets the form number. All other form numbers will be adjusted so there will be
no gaps in the sequence.
Set Form Color to Stitch Color:
Goes through the entire design and counts colors of the stitches assigned to
each form fill and border. Changes each color to the color of the majority of the
stitches assigned to that form fill or border. If you select stitches using the right
hand color ribbon, for example, and change their color, you can update the form
using this function so that when the form is refilled the color will be the same as
the stitches assigned to the form.
Shrink Clipboard Border:
Only applies to polygon forms already filled with a clipboard border. The function
shrinks the border so that there are no spaces between the elements of the
clipboard fill. This function will change the shape of the form.
Snap:
Snap functions move stitches.
Snap Together: (F2)
Goes through the selected group of stitches one by one and checks if there are
any stitches closer than the length set in "Preferences/snap to" size. Any such
close stitches are moved to be right on top of the first stitch. If nothing is
selected, snap together will do this for the whole file. If something is selected, it
performs the function only on the selected stitches.
Snap to Grid: (S+Shift)
You must select a form, a group of forms, or a group of stitches to use this
function. If you have a form or a group of forms selected, Thred moves the form
points to the nearest form point and then refills the form[s]. If you have a group
of stitches selected, Thred moves the stitches to the nearest form point.
Sort:
Sort Auto: (F3)
Sorts the color to correspond to their place next to the Ordinal colors except for
the appliqué color, which is selected from the "Preferences" menu. In each color
it divides the stitches into segments. Stitches that belong to a form are divided
into border fill and form fill. Stitches not belonging to a form are grouped
together. The sort starts with the first group of stitches and looks for the next
closest group, checking both ends. If it finds it can make a shorter jump stitch it
will reverse the stitching order of a segment, except if the segment is a satin
border or an appliqué border. Appliqué stitches are stitched first of all in a
design that has been sorted.
*Note* Thred may "flip" the order of a group of stitches that are not attached to a
form while sorting the design. This may put hand inserted underlay stitches on
top, rather than on the bottom. You can remedy this by selecting the group of
stitches and then selecting "flip order". When you sort, check for this if you have
removed your forms or manually punched underlay.
Sort by Color then Form: (F3+Shift)
Sorts the stitches by color and then by form number. You can control the order
of the stitching by using “Edit/Set/Form Number”.
Sort by form: (F3+Control)
Sorts the stitches by form number.
Split Form:
Hold the mouse cursor near the form point where you want to split the form and
hit the “Y” key to select the form point.
If the form is a line form, select edit/Split Form, and the form will be split into two
at the selected point.
If the form is a polygon, then there must be an interior satin guideline (d-line) at
the form point you selected in order to split the form.
Trace:
You must have a bitmap loaded to use Thred Interactive Auto Trace functions.
See Interactive Auto Trace.
Find Edges: (H+control)
Makes the pixels that are most different from their neighboring pixels brightest.
Pixels that are exactly like all the neighboring pixels will become black.
Hide Bitmap: (X+shift)
Hides or shows the bitmap.
Select Colors: (H)
Takes each pixel in turn and checks to see which color is brightest. Then it
deletes the other two colors.
Trace Mode: (T+control)
Puts Thred in the trace mode.
Show Traced Edges: (right or left mouse click on the stitch window)
Shows the traced edges of bitmap. If the bitmap you are working with is large,
YOU MAY HAVE TO ZOOM IN to see the edge bitmap.
Ungroup: ([ left bracket) = First, (] right bracket) = Last
This item is for use when you have a group of stitches selected. Selecting “First”
will remove the group selection, and select the individual stitch in the group that
is first in the stitch order. Selecting “Last” will remove the group selection, and
select the individual stitch in the group that is last in the stitch order.
IN: (Z) or (Z + Shift)
A left-click here makes the view zoom in to the selected area or mark. Make a
mark by placing the cursor and hitting the "M" key. The “+” will appear on the
screen and become the center of the zoom. If nothing is selected, you can draw
a box by clicking and dragging, using the left mouse button. The "Z" key zooms,
but it automatically moves to the mouse position if nothing is selected. Remove
the mark by hitting "Q". See Zooming.
OUT: (A) or (X)
A left-click here zooms out. The "A" key does the same. See Zooming.
Undo: (B) or (Z + Control)
This function undoes the last action that changed form or stitch information.
Thred supports sixteen levels of undo.
Redo:
Thred supports sixteen levels of redo.
ROT (Rotate): (Tab)
Select the entire design, the form, group of forms, or stitch area you want to
rotate, then left-click on the "rotate" command, or hit the "Tab" key. You will see
a box over the selected area, with a cross in the center of the box. The cross is
the center of rotation. You can drag the center of rotation anywhere on the
screen, using the left mouse button. To rotate, left drag a spot other than the
center of rotation and a handle will appear. Drag the handle to rotate the
selection to the desired position. The cross is the center of rotation, and you can
drag it to relocate the center. See also: Rotating. Also see Rotate on the Edit
Menu.
PREF (Preferences): (P)
To set preferences, left-click on the entry you want to change. A box will appear
to the right. Type in the new number, and then hit the "enter" key, or right-click
anywhere on the screen. When you finish changing the preferences and want to
make the box disappear, hit "Q", or the "escape" key, or right-click somewhere
else on the screen.
Appliqué Color:
Select the box by left-clicking on it, then left-click on the left hand color box of the
desired color. If you "sort" your design, Thred will put the appliqué color first in
the stitch order. If you want to have an appliqué over another section of the
design, this may not be desirable. You can move the form and/or stitches in the
stitch order, or you can just avoid sorting a design once you have put the
appliqué in the order you want. By default, the appliqué color is number 16 on
the ordinal color bar. If you use that color for a design segment that is not an
appliqué under layer, and then you sort the design, you will need to use "move/
to end" if you want that segment to stitch last.
Border Width:
Set the size in millimeters for the satin, angle satin, appliqué, buttonhole and
clipboard borders. The fill will be centered over the form line. Left- click on the
current entry and a box appears to the right. Type in the number you want, hit
return or right-click anywhere on the screen. For Buttonhole borders, you may
also set the corner length.
Fill Spacing:
Sets the distance between lines of stitching in the fill. A smaller number makes
denser fill; larger numbers make more space between the threads in the fill.
Satin fill tighter than about .28 mm will make the fabric pucker. Other fills may
look sparse at that density unless they have underlay stitches made for them.
Fan Fill with square ends and fill spacing of 2 to 4 mm makes good underlay.
Button Corner Length (Buttonhole Corner Length):
Sets the length of the stitches on the corners of forms filled with
"Fill/border/buttonhole". A star filled this way looks like a snowflake.
Chain Fill Length:
Sets the default length of the chain border fill.
Chain Fill Position:
Sets the default position of the inside and outside corner points of the chain fill.
Clipboard Offset:
Sets the space between the columns of a vertical clipboard fill.
Clipboard Phase:
Sets the phase between the columns of a vertical clipboard fill. If this value is set
to two, the first and second column of the fill will be offset vertically by one half
the height of the clipboard fill. If this value is set to three, the first and second
column will be offset vertically by one third the height of the clipboard fill, and the
first and third column will be offset vertically by two thirds the height of the
clipboard fill.
Fill Angle:
This setting changes the angle of stitching lines in the angle fill.
Fill Ends:
Choose pointed or square ends where a line of Fan fill meets the edge of the
form. To see an example of this, make a form and fill it using a fill spacing of 2.
This makes the lines far enough apart to see the ends clearly. Then select each
option and look at the difference. Square ends make a good underlay for other
fills. Fill the form, press “f” to get the form data box and select underlay there.
You can also make an underlay yourself, by making two sets of fan fill lines
perpendicular to each other, made with preferences set so that the lines are 2
mm apart and the stitch length is 3.5 mm. Square ends are usually preferred for
underlay. This will stabilize and plump up the fill stitches you put over it.
Grid Cutoff:
The grid represents the stitch points. It gives you a visual representation of the
degree of zoom. Smaller grids are only useful at higher levels of magnification,
so the "set grid cutoff " function allows you to tell the program how much
magnification you want before the grid appears. Left-click on grid cutoff, and
enter a number from zero to nine. The current setting will be visible when the
box appears. The number indicates how many times you must hit "Z" or Zoom
"In" to see the grid. If you enter zero the grid will always be visible.
Grid size:
Sets the grid size in millimeters.
Hoop Type:
Thred offers “Pfaff Large Hoop” (120 X115 mm), “Pfaff Small Hoop” (80X80 mm),
“100mm”, or “Custom” hoop size. To set the custom hoop size, enter the length
and width sizes (in millimeters) into the ‘Preferences’ “Custom Hoop Width” and
“Custom Hoop Length” fields. After you have the hoop the size you want, select
“Set Custom”. After you have set the custom hoop size, you can retrieve it any
time by selecting “Custom” from the hoop size menu.
To convert millimeters to inches multiply by 25.4. To convert inches to
millimeters divide by 25.4. Thred will accept hoop sizes for any currently
available home embroidery machines.
When you change the hoop size so that stitches in your design are outside the
currently selected hoop size, Thred will move your design back in the hoop if
possible. If the design is too large for that, Thred will make the hoop size bigger.
If the design is moved, you will see the message “Design re-centered”. If the
hoop size has been changed, Thred changes the hoop size in the preferences to
the new hoop size.
Hoop Height:
Enter the height of the embroidery design you want to make, in millimeters, or the
size of the field your machine will accept. Thred will zoom out to the size you
enter for your custom hoop, so you will get a better view of design details if you
select the minimum size needed.
Hoop Width:
Enter the width of the embroidery design you want to make, in millimeters, or the
size of the field your machine will accept. Thred will zoom out to the size you
enter for your custom hoop, so you will get a better view of design details if you
select the minimum size needed.
Nudge:
Sets the length of the nudge (Arrow keys+ Control).
Picot Spacing:
When you select "Fill/border/picot", this is the setting that will change the spacing
of the picots. See the section on clipboard fills for information about making
usable stitch groups to put on the clipboard. The code for spacing picots adds the
spacing number you enter here to the width of the picot on the clipboard and
divides the horizontal length (width) of the form to determine how many picots it
can fit in. See "fill/border/picot", below.
Satin Form Ends:
Toggle between tapered or blunt ends for perpendicular satin stitch borders. The
length of the distance between the two form points closest to the end of a form
will determine how much it tapers. You should experiment to see this. This
setting also affects the convert to satin ribbon function.
Satin Underlay:
If this feature is on, all newly filled satin and appliqué borders will have an
underlay. If it is off they will have no underlay. You can add or remove underlay
to satin or appliqué borders using the form data box.
Small Stitch Size:
This is the place where you set the value for the “remove/small stitches”
function. This number should be smaller than the stitch spacing or you will
remove the fill stitches from your design. The "remove/small stitches" function is
useful, but should be used carefully. If you do not like the results, use "undo", or
open one of the back-up versions of your file. (Use “View/backups”) If you have
used the “Edit/set/knots” command and then run remove small stitches you will
have to run set knots again. “Set knots” will not set a knot where one already
exists.
Snap-To Size:
Set the size for the "snap to" function here. "Snap to" goes through the selected
group of stitches one by one and checks to see if there are any stitches closer to
it than the length chosen in "Preferences/snap to size". Any such close stitches
are moved to be right on top of the first stitch. If nothing is selected, snap
together will do this for the whole file. If something is selected, it performs the
function only on the selection.
Spiral Wrap:
Set the number of times the arm of the spiral will wrap around the center point.
The box for spiral points, which appears when you select "form/spiral", sets the
number of points in each wrap. Four points makes a squared spiral, three a
triangle, larger numbers will make more nearly circular spirals, etc.
Star Ratio:
Set the ratio between the diameter of the inner section of the star and the outer
points. It must be between .05 and 1. The larger the number you enter, the
shorter the arms of the star will be.
Stitch Box Cutoff:
Left-click to set the number of times you click zoom before you see the small
boxes at each stitch point. A larger number here makes the boxes appear only
at great magnification.
Stitch Length, Maximum :
When Thred is doing a fill, it won’t allow stitches longer than this setting.
Maximum Stitch Length:
Set the size of the maximum stitch you want in your design. To see the length of
a stitch, select it by right-clicking on it. Then look at the left hand corner of yoru
screen, where The length of the selected stitch will appear. You may manually
set stitches larger than this value. You may break up large stitches into smaller
ones on all or part of your design by running "edit/ remove large stitches".
Stitch Length, User :
When Thred fills, this is the stitch length the program will try to maintain.
Stitch Length, Minimum :
The program will insert no stitch smaller than this, but the user may insert smaller
stitches.
FILL:
It is necessary to select a form before you can fill it. Selecting a corner and
dragging it will change a form's shape. Selecting the middle point on a form box
lets you stretch it in one direction. If you stretch a form in one direction and don't
like it, remember that undo will put it back. If you fill a line form with a form fill,
Thred automatically converts it to a polygon form.
Form Fills
Remarks
Fan
Can be controlled with guidelines. Connects the same number of
stitch lines to two form lines. If you stretch one of the lines you
get a “fan” effect.
Feather
Like the fan fill, but with many more options.
Vertical
Fills a form with parallel vertical stitch lines
Horizontal
Fills a form with parallel horizontal stitch lines
Angle
Fills a form with parallel stitch lines at an angle you select from
the preferences menu.
Clipboard
Fills a form with data from the clipboard.
Textured
Similar to the vertical fill except the user can control the stitch
pattern using the texture editor.
Border Fills
Remarks
Line
Puts a simple line of stitches around a form.
Bean
Puts a Bean or triple stitch around a form.
Angle Satin
The Angle Satin fill makes pointed corners.
Perpendicular The Perpendicular Satin uses vertical lines except at the form
Satin
corners, which are rounded.
Appliqué
Similar to the Angle Satin except that it puts two lines of line
stitches around the edge of the form under the satin border. The
line stitches anchor the appliqué.
BH
Button Hole stitch border.
Clipboard
Border
Fills the form border with a repeating pattern of data from the
clipboard.
Clipboard,
Even
Same as the clipboard border fill, except Thred stretches or
shrinks the clips to make them come out even.
Picot
Fills the form border with picots derived from clipboard data
A line form only allows border fills, except for the contour fill. If you try to fill a line
form with one of the area fills, it will automatically be changed to a border fill. If
you try to fill a polygon form with contour fill, it will automatically be changed to a
line form. To use the clipboard fill, you must first put something in the clipboard
by selecting a filled form or a group of stitches and hitting "control+C" or
"control+X". Choose designs to become clipboard borders carefully. They need
to be a moderate size, neither too small, nor too large.
If you put the beginning and ending stitch of the data you are pasting to the
clipboard, you will get a line of stitches around your border. If you put the
beginning and ending stitches to the left and right of the clipboard, you will get a
fill with no line. You can use Set/Range Ends for Clipboard Fills to adjust the
beginning and ending stitches to midpoints of the vertical sides of the rectangle
enclosing the clipboard data. If you have trouble visualizing that, we suggest you
try the function on a selected range of stitches, and you will easily see what it
does. It has the effect of eliminating sideways jags and jogs when using the
clipboard border fill.
Fan Fill:
Create a form by hitting the "F" key, then selecting “Line” or “Free Hand”, and
left-clicking at each point where you need a node, or you can use a "Regular
Polygon", "Star", or “Spiral”. Once you have completed the form, hit "escape" or
"Q" to change to the fill mode. Right-click to select the form and then hit "fill" on
the task bar. You will see a drop box with options.
You can enter a new point in a form by holding your mouse near a point on an
existing form and hitting "W". To enter multiple points, hit "E". You can enter a
guideline in a polygon form by holding your mouse near an existing point and
hitting "D". The guideline will dictate the direction of fill stitches. If there is
already a guideline at that point, it will be deleted, and you need to hit "D" again
to enter another one. A guideline on the form line will cause that section of the
form line to have a "nonstick" surface, so no stitches will be placed there. Two
nonstick sides are the limit on one form.
Delete points in an unselected form by holding your mouse close to the point and
hitting the "delete" key.
You may also apply a border fill to the polygon form by using the same method
you use to apply a border to the line form.
You can area-fill a polygon form with "horizontal"," vertical" or "angle" fills.
Feather Fill
The feather fill, like the fan fill, is controlled by “D” lines. The “Convert to feather
ribbon” works like the “Convert to satin ribbon, except that the resulting form is
automatically filled with the feather fill.
You can set the default values of the feather fill with “edit/Set/Feather defaults”.
There are six types of feather fill. These determine how the lines of stitches are
arranged in the fill.
Feather type
Description: How lines of stitches are varied
Curve
Smooth curve.
Curve2
Smooth on one side, sharp points on the other side.
Line
Straight line.
Ragged
Random.
Ramp
A sawtooth. The lines of stitches form a straight line
going from a minimum value to a maximum value and
back again.
Picket
One group of stitches is a straight line of a maximum
value, and the next group of stitches is a straight line of a
minimum value.
There are four possible ways the fills will connect to the sides of the filled form:
Connection
type
Description
Blend
Uses stitches of two colors. Stitches of the first color
start at one side of the form. Stitches of the other color
start at the other side of the form. The meet somewhere
in the middle, depending on the feather fill type.
Both
Stitches are not connected to either side of the form.
The feather fill type controls the distance from the sides
of the form.
Up
Stitches are connected to the “top” of the form, but not
the bottom. The feather fill type controls the distance of
the stitches from the bottom of the form.
Down
Stitches are connected to the “bottom” of the form, but
not the top. The feather fill type controls the distance of
the stitches from the top of the form.
The combination of the six feather fill types and the four connection types means
that there are twenty-four ways to arrange the feather fill.
To set the feather fill type and the connection type using the form data box,
select a form filled with feather fill, then hit the “F” key (or select “form” on the top
menu), then the form data box will come up and you can change the settings.
You can also use the “feather floor variable to set the minimum stitch length for a
feather fill.
The “Feather up” and “Feather down” have different effects depending on the
feather fill type. The maximum value is 255.
Type
Up
Down
Curve
Sets the number of lines in the
positive half of the curve.
Sets the number of lines in the
negative half of the curve.
Curve2
Sets the number of lines in the
first half of the curve.
Sets the number of lines in the last
half of the curve.
Line
No effect
No effect
Ragged If you set Feather up to zero, the
entire form will be filled with lines
of random length. Otherwise the
“random” sequence will repeat.
“up” sets the number of times
Thred chooses a new value.
Causes the “random” sequence to
go backward and select previous
values.
Ramp
Sets the length of the up part of
the ramp.
Sets the length of the down part of
the ramp.
Picket
Use up and down to set the length of the tall and short parts of the
picket fill.
Vertical Fill
Selecting "Vertical" will fill the form with lines of stitches running vertical to the
form as it is viewed on the screen.
Horizontal Fill
Selecting Horizontal fills the form with lines of stitches running horizontal to the
form as it is viewed on the screen.
Angle Fill
Selecting "Angle" causes the selected form to fill with stitches running at the
angle set under Preferences.
Understanding Thred's Vertical, Horizontal and Angle fills:
Thred uses the same method for all three fills. For the horizontal and angle fills,
the program first rotates the form, then fills them with a vertical fill, and then
rotates them back. It makes the program much simpler, and users only have to
understand how the vertical fill works, since you only need to imagine your form
rotated to understand the angle and horizontal fills.
The vertical fill starts on the left side of the form and continues until it “paints itself
into a corner”, then it makes stitches on top of the stitches already laid down until
it gets to an unfilled area of the form. At the end of the process, it flips the order
of the stitches so that the stitches that were put on top of the previous stitches
are now on the bottom.
This means that for a simple form that can be stitched without backtracking, the
vertical fill will start on the right of the form and end on the left. The horizontal
fill will start on the bottom of the form and end on the top. The angle fill starting
and ending points will vary with the angle.
Some forms are complex enough that the program presently can’t figure out how
to fill them without jump stitches. This is not easy to fix, but if there is enough
interest in Thred to justify the effort we will do it for future versions.
Thred can fill forms with lines that cross.
Predicting how complex forms will fill can be difficult. It is probably easier to fill
the forms and see where the end is and then unfill them if necessary.
Where will a fill end?
This is the way you find out where the last stitch in a fill is:
Select the form.
Using the “select” option from the edit menu select the group of stitches you are
interested in.
You can set the place where a form will start to fill or end the fill.
Edit/Select Menu:
Form Stitches
Form Fill Stitches
Form Border
Stitches
Form
Appliqué Stitches
Selects:
All stitches associated with a form
Only the main fill, not the border fill or
appliqué
Only the border fill
Only the appliqué
After you have done this, hit the “]”, “right-bracket” key and the last stitch in the
previously selected group will be selected and you can see where it is.
Clipboard Form Fills:
As you might expect, the clipboard form fills fill a form with data from the
clipboard. The discussion of how to prepare data for a clipboard fill in Clipboard
border fill also applies to clipboard form fills and picot border fills.
Clipboard fan fill:
The stitches from the clipboard are stretched using the same method used in the
fan fill. You can control the clipboard form fill with guidelines just as in the fan fill.
Clipboard vertical fill:
The stitches from the clipboard are arranged in a regular pattern inside the form.
You can control the spacing between columns of the fill with “Vert Clipboard
Offset” from the preferences menu. You can also set this offset by entering a
number into the “Fill Spacing” on the form data box. This offset can be positive
or negative, so that you can create overlapping fills.
Clipboard horizontal fill:
This one is just like the Clipboard vertical fill except that it is rotated to be
horizontal.
Clipboard angle fill:
Just like the Clipboard vertical fill except rotated by the fill angle.
Contour Fill:
Contour fills create a series of lines of stitches that are parallel to a selected area
of a line form. If you select "fan fill" while a polygon form is selected, Thred will
convert it to a line form, and put in a guideline to select the “active” part of the
form. Contour guidelines are similar to the guidelines of the fan fill except that
there can be only one per form. If you delete the guideline from a form filled with
contour fill, the fill will also be deleted. If you then put in another guideline, the
form will be refilled. If you put in a new guideline in a contour filled form, the old
guideline will be automatically removed. Put in a new guideline by holding the
mouse cursor near a form point and hitting the “D” key. You will see a new
guideline attached to your mouse cursor. Hold the mouse cursor near another
form point and left-click to attach the other end of the guideline.
Texture Fill:
The texture fill editor allows you to control the stitch placement in vertical,
horizontal, or angle fills. You can place stitches individually, using lines, or with
forms.
Select a form; create a fill in the texture editor, then hit one of the fill buttons in
the texture editor box, and the form will be filled. Or you can create a fill in the
texture editor, go back to the stitch editor and edit stitches or create forms, etc.
Then you can enter the texture editor again and your fill will still be there.
Retrieving texture fill data from a form
You can transfer texture fills from a selected form to the texture editor by
pressing the F4 key. The texture editor supports 16 levels of undo.
You can box select stitches in the texture editor and move them, or drag
individual stitches.
Importing stitches into the texture editor
Hold down the shift key, then hold down the left mouse button and drag the
mouse cursor to create a select box enclosing the stitches you want to import.
The stitches will be imported into the texture editor, and the texture editor window
will be opened.
This function works best when the stitches you are trying to import are vertical.
The texture editor does not support zoom.
Texture editor functions and hot keys
Minus “-“
Center form. In the stitch editor, select a form and paste it to the
clipboard. Enter the texture editor and hit “V” to retrieve the form
from the clipboard. Move the mouse until the form is in the
vertical position you want. Then hit the minus key. Thred will
center the form horizontally and set stitches from the form.
Left bracket
“[“
When you have put a form on the clipboard and you are placing
stitches in the texture editor using the form, you can use the “[“
key to make the form smaller.
Right bracket
“]”
When you have put a form on the clipboard and you are placing
stitches in the texture editor using the form, you can use the “]“
key to make the form larger.
A
Angle fill. Use the “A” key to fill a form with a angle textured fill
or hit the “angle” button in the textured fill editor.
B, control-Z
Undo
D, delete
Hold the mouse cursor near the stitch you want to delete or box
select stitches and hit “D” or the delete key.
E
Start a texture editor line. Place the mouse cursor where you
want to start the line. Hit the “E” key, and the texture editor will
place a line of stitches.
E+shift
Enter the texture editor. You can also use “fill/Textured” to enter
the texture editor.
Escape
Exit the texture editor
H
Horizontal fill. Use the “H” key to fill a form with a horizontal
textured fill or hit the “horz” button in the textured fill editor.
N
Redo
Q
Reset texture editor functions
R
Vertical fill. Use the “R” key to fill a form with a vertical textured
fill or hit the “vert” button in the textured fill editor.
V
Place texture editor stitches using a form. In the stitch editor, put
a form on the clipboard by selecting the form and hitting controlC or control-X.
Changing the size and spacing of the texture editor
“hi:”
Stitch window height. Left click on the “hi:” button. A side
window will pop up. Enter the new number and hit return.
“wid:”
Stitch window width. Left click on the “wid:” button. A side
window will pop up. Enter the new number and hit return.
“spc:”
Stitch window spacing. Left click on the “spc:” button. A side
window will pop up. Enter the new number and hit return. After
you have created a fill using a certain spacing and use it to fill a
form, if you the change the fill spacing using the form data box,
the aspect ratio of the fill will be changed.
Border Fills
Line
Bean
Angle Satin
Perpendicular Satin
Appliqué
BH
Clipboard
Clipboard, Even
Picot
Double
Chain
Line Borders
These are simple straight-line stitches. Their length is determined by the "user
stitch length", which you can set under "Preferences".
Bean Borders
Bean Borders are made with a triple stitch, which makes a forward, back, forward
motion, sometimes used for sewing on stretch fabrics. This makes a repeated
stitch each time, so it makes a more defined outline. Bean borders are not as
effective with short stitches. A user stitch length of 3 mm to 4 mm is a
reasonable size. Simple outlines in Bean stitch make effective quilting designs.
Angle Satin
This fill makes satin stitch following the form. The difference between angle
satin and perpendicular satin is in the way they handle corners. Angle satin
corners come to a sharp point, which makes Angle Satin the better choice for
filling a star. However, you can make a mess by making your form nodes too
sharp an angle or too crowded, so if you have an angle fill with a mess on the
corners, zoom in close and move form points until you get a better result. The
width and stitch spacing are set under "Preferences".
Perpendicular Satin
This fill is similar to "Angle Satin" except this border makes curved corners, and
will keep the stitches perpendicular to the form line. This is the satin border to
choose for a form with complex curves. The fill will not extend entirely to the tip
of the form, so you must adjust the form size to make it suit your needs. Choose
"tapered" or "blunt" fill ends in 'Preferences." The number and placement of form
nodes really affect the appearance of this fill, so take time to edit the form well,
using the "W” key to add nodes and the "Y" to select those you wish to remove
by selecting "delete". If the appearance is still not what you want, you can adjust
individual stitches by hitting "Frm-" to turn off the form, and then dragging the
form points, but once you have edited them, do not refill your form or the edit will
be lost. Hit "Frm+" to see the form again. You can delete your form entirely and
leave the stitches, but it is wise to "save as" a new file name first, just in case you
want that exact form again.
Appliqué
This one provides an underlay of simple line stitch, repeated two times, and a
color-stop before the satin stitches. If you place a swatch of fabric over the
hooped fabric before you begin to stitch the pattern, you can cut away the excess
fabric to the single stitch line after the machine stops for the color change, and
the satin border will cover the cut edge. Obviously, you must choose a border
size wide enough to cover and keep the fabric safely anchored. Four millimeters
works fairly well, especially if you use a spray adhesive between the fabric
layers. You can carefully remove the hoop from the machine in order to trim the
appliqué swatch, but do not remove the fabric from the hoop. A layer of watersoluble stabilizer over the appliqué fabric is useful to keep the raw edges from
showing between the satin stitches. If you sort your design, the appliqué line will
sort to the beginning of the file.
BH
This border is a mechanical approximation of the traditional handmade
buttonhole stitch. You can change the settings for "fill spacing", "satin border
size" and "BH corner length" and "Maximum stitch length" under the
"Preferences" menu, and greatly vary the effect. If you want the perpendicular
stitches to be on the other side of the form (pointing in rather, than out) line,
select "Edit/flip/order".
Clipboard Border:
Creates a fill from whatever you have placed on the clipboard.
Preparing a clipboard fill is done most easily in an empty file. It is usually best to
have the beginning stitch of the fill and the ending stitch of the fill in the same
location. This makes a neat looking border for your fill. You will usually want the
beginning and ending stitch to be at the bottom or the top of the fill for a clipboard
border fill, and at the right or left side when you fill a whole form with clipboard
fill. If you want to achieve other effects, you can put the beginning and ending
stitch of the clipboard fill anywhere you like. You may also set knots in the
beginning and ending of the clipboard entry and clip the connecting jump stitches
out.
You can achieve pleasing effects by simply entering a random pattern of stitches,
hitting "control+A" to select them all, and "control+C" to enter them into the
clipboard. Then you need to create a form and fill it with the clipboard fill.
It is convenient to use forms to create the clipboard fill. For example you could
create a 5-pointed star fill to use to create a clipboard border. Starting with a
new file, select "form" from the main menu, or hit the “F” key. Then select "star".
You will be prompted for the number of points for your star. Hit the "5" key. You
can then tap "enter", or right-click somewhere on the stitch area. An outline of
the star will appear at the location of the mouse cursor. Move the star to a
convenient location and left-click. The star form is now entered into the Thred
file. Little boxes will appear on the star indicating the ends of all the lines in the
star.
Right-click on one of the small boxes to select the star. A select box will be
drawn around the star. Select “fill” from the main menu. Then select "border" and
then "bean". Thred will fill in the star with stitches. "Bean" stitches repeat three
times as they stitch out, with a forward, back, forward motion. In order for this to
stitch correctly in a straight line, the end must be opposite the beginning, but for
border fills this isn't desirable.
The star as it is originally drawn is much too big to use for a clipboard fill. You
need to shrink it down, usually until the lines of the star are around two
millimeters in length.
To make the star smaller, you should left-drag a corner of the select box. Near
the lower left corner of the Thred screen you will see two boxes with "min" and
"max" written in them. These boxes tell you the minimum and maximum size of
the stitches in the form you have selected. Because Thred will fill in the form with
stitches as close as possible to the user stitch size set in the preferences, the
boxes may say approximately two millimeters when the sides of the star are
much larger than that. To make sure the sides of the star are actually around
two millimeters in length, shrink the star until the min and max boxes show
numbers less than two.
With the form selected, hit the “Z” key until the star fills the screen. If you wish to
zoom back out one step hit the “A” key. Then drag the corner of the select box
until the "min" and "max" are less than two millimeters. Then drag the corner of
the select box out to make the star larger until the "min" and "max" numbers are
around two.
Now you may want to adjust the stitches in the star so that the beginning and
ending stitch are at the same place. In this case we will put them at the bottom.
Select “frm-“ from the menu or hit the “K” key to hide the form. You need to do
this so you can set a stitch at the form point, otherwise Thred will think you’re
trying to move the form point.
Hit the "home" key. Thred will draw a stitch select box around the first stitch in
the stitch window, which should be at the bottom of the star. Hit the "end" key.
Thred will draw a select box around the last stitch in the stitch window, which
should be to the left and up from the bottom of the star. It is not actually
necessary to do the "home" and "end" key in this case, but it can be useful in
finding the beginning and end stitches when you are trying to create other
clipboard fills.
Hit “F2” or choose “Snap together” from the edit menu to align the stitch you have
placed exactly with the beginning stitch.
Hit "control+A" to select all the stitches, and then "control+X" to put them on the
clipboard. Now you are ready to create a form and fill it with a clipboard border.
Once you have had some practice, you should be able to do this whole
procedure in just a few seconds.
Clipboard Borders are versatile, but you may need practice to have predictable
results. It may be best to use straight- sided forms before you experiment with
curved ones.
A clipboard border fill will differ depending on the number of nodes in the form.
The clipboard border code determines the spacing for the clipboard entry by
dividing the distance between the nodes of the form line by the size of the select
box around the clipboard entry. If the line you are trying to fill is longer than the
clipboard fill is wide, the software determines how many it can fit in and spaces
them evenly. If the distance between the two nodes is not long enough to put a
clipboard entry into, it goes to the next node point and draws an imaginary line
between the two points. Then, it determines if that line is long enough. If it is,
then the program inserts a clipboard entry there.
For example, there could be three points A, B, and C. The line between A and B
is not long enough to fit a clip between the points A, and B. The software then
draws an imaginary line between points A and C, and if this line is long enough
for a clip or clips, then it inserts the clip[s] and starts over with the next point. If
the line between A and C is not long enough for clips, then the software tries the
line between A and D, and continues in this fashion until it reaches the end of the
form.
The best clipboard border fills will be made on simple geometric forms, like
regular polygons, or those with straight sides, but you can use clipboard borders
on any kind of form. If you get irregular spacing, you can move nodes to change
spacing. Sometimes you might get an equal sided figure with different numbers
of clips of the sides. This would be due to floating-point arithmetic errors made
by the computer. The arithmetic precision could be made better, but the file size
increases with precision. The programmer hopes that you would prefer to edit
this border rather than have the entire program run slowly and take up more
memory space.
Clipboard Border, Even:
The even clipboard border tries to fill the border of the form with an even number
of clips. It tries up to 100 different lengths of clip to find the best fit. It may stretch
or shrink the clip slightly. The last clip will be stretched or shrunk to finish out the
form border.
This fill works best on forms without sharp corners.
Picot Borders
The Picot fill combines features of clipboard and buttonhole borders. The
program will place a clip from the Windows clipboard at the tip of a buttonhole
style perpendicular stitch. (Read the sections under "buttonhole" and "clipboard"
to understand those terms.) The "satin border size" must be smaller than the
"maximum stitch length" to use this border fill. "Button corner length", "user stitch
length", "satin border size", and "maximum stitch length" all affect the look of this
border and can be set in the "Preferences" drop box.
Double Borders:
The double border is just like a line border, except that it doubles back on itself,
retracing the same stitch points. If you use this in a line fill, you can make lines
of stitches that start and end on the same point. This is handy for things like
drawing the veins in a leaf.
Chain borders:
The line and open chain are very similar. The line chain has a line of stitches in
the middle, and the open chain does not. Select a form. Then select
“fill/Border/Open Chain”, or “fill/Border/Line Chain”. Then hit “F” or select “form”
to get the form data box and you can change the width, length, or chain position.
If the chain position is between zero and one, you will get something that looks
like a chain stitch. For values greater than one, the effect is a little more unusual,
but still might be useful.
Unfill:
This will remove all fill data associated with the form.
Add: (End + Control)
Clicking on Add allows the user to set stitches at the end of the design. Use
“Home + Control” to add stitches to the beginning of the design. To add stitches
in the middle of the design, hold your mouse cursor near the point where you
want to insert a stitch and hit the space bar.
Frm+/-: (K)
"Minus" hides your forms, "Plus" shows your forms. You may also hide your
stitches by holding down the shift key and selecting frm+/- or hitting “K”.
All:
Select "all" to see all the layers
1-2-3-4:
Select a number to see what is on that layer.
Help:
Select help from the main Thred menu for Thred HTML help.
Keyboard Shortcuts “Hotkeys”:
Thred offers you keyboard shortcuts to minimize keystrokes and mouse
movements. There are several ways to call most functions. In addition to the
toolbar across the screen, you may use the following:
/
<
=
Set the form number of the currently selected form.
Set fill start. Select a form point and the hit “<”.
Shrink a form with a clipboard border so there are no spaces
between the clips.
>
Set fill end. Select a form point and the hit “>”.
A
Zoom out
A+Contrl
Select all stitches
A+Shift
Selects all forms and stitches
Apostrophe
Displays the Design Information Window
B
Undo
B+Cntrl
Redo
B+Shift
Retrieves the zoom mark.
C
Select stitch closest to the mouse position
C+Cntrl
Copy the selected item(s) to the clipboard. Does not work with
“select/all forms and stitches”.
C+Shift
Convert to Satin Ribbon.
Comma
Join two forms together. Select one form, and then hold your
mouse cursor near a form point on the other form and type a
comma. The two forms will be joined together at point 0 on the
first form and the point your cursor is near on second form at the
moment when you hit the comma key. The fill and form type
information of the new form will be taken from the first form
selected.
Comma+Shift Set Fill Start. Select a form point then hold down the shift key
and hit the comma to set the form fill start.
D
Draw or delete a line to control fill angle in satin stitch
D+Shift
Calls the form update menu if you have a form selected
Delete
If the cursor is near a color box on the left of the Thred screen,
that color will be deleted, other wise delete a form, a stitch, a
range of stitches, or a point in a satin stitch form
Down Arrow
If a stitch is selected, moves the selection to the next stitch of a
different kind.
Down Arrow
If a form is selected, moves the selection to the previous form. If
no form is selected, selects the last form. Forms are numbered
as they are entered.
Down+Control Nudge. Moves things down.
E
Insert form points. Hold the mouse cursor near a form point and
hit the “E” key. Left click to set form points. When you are
finished setting form points hit “Q” or escape.
E+shift
End
End+ Cntrl
End+ Cntrl+
Shift
End+ Shift
Escape
F
F+ Shift
F1
F10
F11
F11+Shift
F12
F2
F3
F3+Cntrl
F3+Shift
F4
F5
F6
F7
F8
F9
Forward
Slash /
G
H
H+Control
Opens the texture editor.
If a stitch is selected, “End” changes the selection to the last
stitch in the selected color. If a stitch is not selected, “End”
selects the last stitch in the file.
Allows inserting a stitch at the end of the pattern, same as the
add menu item.
Sets the end of the group select to the end of the pattern
Same as “End”, but also selects a range
Deselect stitches and return to move mode
Form: If a form is selected, shows the form data sheet, if no
forms are selected F shows a menu of possible forms to enter.
If a group of forms are selected, the form update menu is
activated.
Convert to feather ribbon
Help
Activates the main menu
Delete small stitches
Delete large stitches
Exit
Snap Together moves stitches that are close together to the
same point
Sorts colors and forms
Sorts by form
Sorts by color then form
“Retrieve Form Data” If the selected form has a clipboard fill, F4
stores the clipboard fill stitches to the clipboard. If the selected
form has a textured fill, F4 moves the textured fill stitches to the
texture editor.
Refill: The form or forms must be selected
Toggle “View Threads”. Shows approximate thickness of
threads when on.
“Save”
“Save As”
If a stitch is selected, F9 selects the entire color.
Set the form number of the currently selected form.
Marks one end of a range to be selected. A stitch must be
selected before using this function. After hitting the “G” key, the
left or right arrow keys will select a range of stitches.
Reset form pixels. In trace mode, sets all the pixels under a
form line in a bitmap to black.
Select primary colors. In trace modes, show the primary colors
of a bitmap.
H+Shift
Home
Home+
Shift
Home+
Cntrl
Home+
Cntrl+
Shift
I
Insert
Move a zoomed design one screen to the left
If a stitch is selected, “Home” changes the selection to the first
stitch in the selected color. If a stitch is not selected, “Home”
selects the first stitch in the file.
Same as “Home”, but also selects a range.
Insert a stitch at the beginning of the pattern
Sets the beginning of the group select to the beginning of the
pattern.
Run the movie.
To insert a color, hold the mouse cursor near the color box on
the left side of the Thred screen where you want to insert the
color, and hit the insert key.
J
Refill all forms
J+Shift
Move view left one screen
K
Toggle forms on off
K+Alt+Control Set Knots
K+Control
Set knot at selected point
K+Shift
Hide Stitches
Keypad minus Toggles “up to” on and off.
“-“
L
Centers forms over the center point of the first form selected.
Select forms with control and mouse click, or box select.
L+Shift
Delete all stitches
Left arrow
If a stitch is selected, moves the selection to the previous stitch.
If a form point is selected, moves the selection to the previous
form point.
Left arrow
Nudge. Moves things left.
+Control
Left arrow
Same as left arrow when a stitch is selected, but also selects a
+Shift
range of stitches. Moves the form point selection, but does not
select a range of form stitches.
Left Bracket
If you have a form selected, the left bracket key will also select
“[“
the first stitch “owned” by the form. If you have a group of
stitches selected, the left bracket key removes the group select
and leaves the first stitch in the group selected.
Left Bracket
If you have a form selected, hold down the shift key and hit the
“[“+Shift
left bracket key, and the first form point in the form will be
selected.
M
Inserts a mark for zooming at the mouse cursor position. When
this mark is visible, it will be the center of zoom in or zoom out.
The mark can be deleted by hitting ‘Q’ or escape.
M+Control
M+Shift
Minus
Minus
(keypad)
Minus+
Control
Minus+ Shift
N
N+Control
N+Shift
Number keys
O
P
Page down
Page down
+Shift
Page up
Page up
+Shift
Period
Q
Q+Shift
R
Inserts a zoom mark at the currently selected stitch or form
point.
Inserts a mark for zooming at the center of the stitch window.
Centers a selected form or group of stitches. Centers on the
zoom mark is there is one. If not the selected item is moved to
the center of the screen.
Toggles “up to” on and off
Vertical Center
Horizontal Center
To enter trace mode, hold the mouse curser near an object and
hit “N”. Show all pixels dimmer than the pixel under the mouse
cursor.
Open the set design size dialog
Move the view down one page
Use the number keys at any time to select a stitch by number,
unless you are entering a number in a dialog box.
Open a file
Shows the preferences data box
Rotates the selected form or range of stitches in a clockwise
direction by the amount set by “Rotate/Command” from the edit
menu.
Rotates the selected form or range of stitches in a clockwise
direction by the amount set by “Rotate/Command” from the edit
menu. Leaves a copy of the selected form or range of stitches
in the original orientation.
Rotates the selected form or range of stitches in a counter
clockwise direction by the amount set by “Rotate/Command”
from the edit menu.
Rotates the selected form or range of stitches in a counter
clockwise direction by the amount set by “Rotate/Command”
from the edit menu. Leaves a copy of the selected form or
range of stitches in the original orientation. See Rotating
Used to set an order mark for changing the sequence of
stitches.
Deselect stitches and return to move mode
Capture cursor. Sets bits in the stitch window where the cursor
is. This is used for making Thred tutorials based on screen
shots. The next time the stitch window is redrawn the captured
cursor will disappear. The cursor may appear to disappear
when you use this function, but it should be in the captured
bitmap.
Set Rotate Segments
R+Control
R+Shift
R+Shift+Cntrl
Return
Right arrow
Right arrow
+Control
Right arrow
+Shift
Right bracket
“[“+Shift
Right bracket
“]”
S
S+Cntrl
S+Shift
Semicolon
“;”
Space
T
T+Control
T+Shift
Tab
Set Rotate Angle
Set Rotation Angle From Mark. Enters a rotation angle that will
make a complete circle of the selected items
Redraw the screen
Used to terminate entry in dialog boxes.
If a stitch is selected, moves the selection to the next stitch. If a
form point is selected, moves the selection to the next form
point.
Nudge. Moves things right.
Same as right arrow, but also selects a range of points when a
stitch is selected.
If you have a form selected, hold down the shift key and hit the
right bracket key, and the last form point in the form will be
selected.
If you have a form selected, the right bracket key will also select
the last stitch “owned” by the form. If you have a group of
stitches selected, the left bracket key removes the group select
and leaves the last stitch in the group selected.
Shift the view. The view is shifted. When the “S” key is hit, the
mouse cursor position becomes the new center of the screen.
Save the file under its current name
Snap to Grid
Moves a selected group of stitches to the move mark.
Equivalent to the “Edit /move to mark” command from the menu.
Press "space" to enter stitch insert mode. Stitch will be inserted
at the selected stitch. If no stitch is selected, insert will be at the
stitch under the mouse cursor. If there is no stitch under the
mouse cursor, insert mode will not be entered. If you are in
insert mode, hit "space", "Q", or "escape" to get back into move
mode. You can also right-click on an empty part of the stitch
window to get back to move mode.
Enter thumbnail mode. See the description in “Thumbnails”
under the file menu.
Enter Trace Mode. You must have a bitmap loaded.
Retrace over stitches. Select a group of stitches, hold down the
shift key and hit T. Thred will stitch backwards over the stitches
you have selected.
Rotate the current selection.
U
U+Cntrl
U+Shft
Up Arrow
Up Arrow
Up+Control
V
V+Cntrl
W
W+Cntrl
W+Shift
X
X+Cntrl
X+Shift
Y
Z
Z+Cntrl
Z+Shift
To enter trace mode, hold the mouse curser near an object and
hit “U”. Shows all pixels brighter than the pixel under the mouse
cursor.
Finds edges in a loaded bitmap.
Move the view up one page
If a stitch is selected, moves the selection to the previous stitch
of a different kind.
If a form is selected, moves the selection to the next form. If no
form is selected, selects form 0. Forms are numbered as they
are entered.
Nudge. Moves things up.
Show 4 stitches nearest to the mouse cursor.
Paste the clipboard contents
Insert a point in a form. Hold the cursor near the point you want
to select, and hit “W”.
Delete all stitch points outside the selected form
Crop to form. Deletes all stitch points outside the form.
Zoom out to show full screen
If a range of stitches, a form, or a group of forms is selected,
deletes it and pastes it to the clipboard.
Hides or shows the bitmap
Select a form point. Hold the mouse cursor near the point you
want to select and hit "Y".
Zoom in. If the mark is set, the mark becomes the center of
zoom, or if a stitch form is selected, that stitch or form becomes
the center of zoom, otherwise the mouse position determines
the center of zoom. If the mouse cursor is not in the stitch
window, the center of the stitch window becomes the center of
the zoom.
Undo
Zoom all the way in.
Index
1-2-3-4:, 8, 75
About Thred, 42
Add
(End + Control), 74
All:, 75
angle fill, 7, 33, 58, 66, 68, 70
Angle Fill, 66
angle satin, 12, 58, 70
Angle Satin, 12, 63, 70, 71
appliqué, 12, 38, 52, 55, 57, 58, 60, 63, 67, 71
Appliqué, 12, 52, 55, 57, 63, 67, 70, 71
Bean Borders, 70
BH, 12, 63, 70, 71
border fills, 9, 54, 63, 67, 72, 73
Border Fills, 63, 70
border types, 16
Border Types, 12
Border Width:, 58
Box Select/Thumbnail Text, 19
Center Both
(Minus –), 46
Center Entire Design:, 46
Center Forms:, 46
Center Horizontal
(Minus - + Shift), 46
Center of Zoom Table:, 22
Center Vertical
(Minus - + Control), 46
Center Walk:, 32
Center:, 46, 54
Chain borders:, 74
Chain Fill Length:, 58
Chain Fill Position:, 58
Changing the bitmap image:, 30
Check Range:, 47
Clipboard angle fill:, 68
Clipboard Border, Even:, 74
Clipboard Border:, 55, 71
Clipboard fan fill:, 67
Clipboard Form Fills:, 67
Clipboard horizontal fill:, 67
Clipboard Offset:, 58
Clipboard Phase:, 58
Clipboard vertical fill:, 67
Close:, 35
color bar, 15, 16, 24, 25, 26, 35, 38, 52, 58
Color Bar, 15
Color Management:, 33
Color Ribbon:, 17
Command Mode Rotate:, 26
Command:, 52
Contour Fill:, 68
Convert from Bean to Line:, 47
Convert from Stitches to Form:, 47
Convert to Bean:, 47
Convert to Satin Ribbon
(C + shift), 47
Convert:, 47
Coordinate Window:, 21
Copy Colors:, 34
Copy to Layer:, 47
Crop to Form
(W+Shift), 47
Daisy form:, 45
Delete All Forms and Stitches:, 49
Delete All Forms:, 48
Delete All Stitches:, 48
Delete Backups:, 37
Delete Color:, 34
Delete Free stitches:, 48
Delete Knots:, 48
Delete Large stitches:, 48
Delete Small stitches:, 48
Delete:, 48
Design Information
(apostrophe
‘ ), 42
Disappearing Forms:, 27
Double Borders:, 74
Edge walk:, 32
EDIT:, 46
Editing Groups of Form Points:, 27
fan fill:, 7, 67
Fan Fill:, 63
feather fill, 11, 47, 64, 65
Feather Fill, 64
file:, 3, 34, 36
FILE:, 34
Fill Angle:, 58
Fill Ends:, 59
Fill Spacing:, 58
Fill Types, 11
FILL:, 62
Find Edges
(H+control), 56
Flip Horizontal:, 49
Flip Order:, 49
Flip Vertical:, 49
Flip:, 49
FORM
(F), 42
Form End:, 33
Form Preferences:, 46
Form Start:, 33
Form Update:, 49
Forms:, 26, 27, 46, 48
Frm+/(K), 74
Grid Cutoff:, 59
Grid size:, 59
Help:, 75
Hide Bitmap
(X+shift), 56
Hide Bitmap (X+Shift):, 37
Hiding the bitmap:, 30
Hoop Height:, 59
Hoop Type:, 59
Hoop Width:, 60
horizontal fill, 7, 53, 66, 67
Horizontal Fill, 66
If you have a form selected:, 46
Importing stitches into the texture editor, 68
IN
(Z) or (Z + Shift), 57
Information Boxes, 15, 19
Information boxes in thumbnail mode, 21
Insert Color:, 34
Insert:, 36
Install Thred in your computer:, 9
Interactive Auto Trace:, 28
keyboard shortcuts, 13, 76
Keyboard Shortcuts, 76
Keyboard Shortcuts, 76
Layers:, 21
Line Borders, 70
Loading a bit map:, 37
Locking:, 37
Maximum Stitch Length:, 21, 61
Minimum stitch Length:, 21
Minimum Stitch Length:, 18
MouseKey Table, 13
Move To End:, 51
Move To Layer:, 51
Move To Mark
(, 51
Move To Start:, 50
Move:, 50
Movie
(I), 38
New:, 34
No Form Selected:, 42
Nudge
(arrow keys + control), 33
Open PCS/DST file:, 36
Opening a file
(O), 34
OUT
(A) or (X), 57
Overlay:, 36
perpendicular satin, 60, 70
Perpendicular Satin, 12, 63, 70, 71
PES2Card (W+Control), 36
Pick color:, 20
Picot Borders, 74
Picot Spacing:, 60
Redo:, 57
Refill All (J):, 51
Reset colors:, 51
Retrace:, 51
Retrieve Clipboard Stitches (F4):, 51
Retrieve Mark (B+Shift):, 42
Rotate Again
(Page Up, Page Down), 52
Rotate And Duplicate:, 52
Rotate:, 26, 52
Rotating:, 26
Satin Form Ends:, 60
Satin Underlay:, 60
Save As
(F8), 36
Save Bit Map:, 37
Saving the bitmap:, 30
Screen colors:, 17
search this document, 9
Search this document, 9
Select Colors
(H), 56
Select:, 20, 39, 48, 52
Selecting groups of stitches:, 25
Selecting single stitches:, 24
Selection Logic Table, 19
Set Background Color:, 38
Set Bitmap Color:, 38
Set Default Preferences:, 39
Set design size:, 53
Set Fill at Select:, 39
Set Form Color to Stitch Color:, 55
Set Form Cursor:, 39
Set Form Number
(/), 54
Set Form Zero Point:, 53
Set Grid Mask:, 39
Set Knots:, 53
Set Line Border Spacing:, 40
Set Machine File Type:, 39, 40
Set Needle Cursor:, 40
Set Nudge Pixels:, 40
Set Order Mark
(Period .), 54
(Period key .), 54
Set PCS Bitmap Save:, 41
Set Point Size:, 41
Set Range Ends for Clipboard Fills:, 54
Set Remove Mark:, 41
Set Rotate Machine File:, 41
Set Rotation Angle
(R+Control), 54
Set Rotation segments
(R), 54
Set Rotation:, 54
Set:, 38, 53
Setting stitches:, 23
Shifting:, 23
Show Threads for selected color:, 42
Show Threads:, 42
Shrink Clipboard Border:, 55
Small Stitch Size:, 60
Snap Together
(F2), 55
Snap:, 55
Snap-To Size:, 60
Sort by Color then Form
(F3+Shift), 56
Sort by form
(F3+Control), 56
Spiral Wrap:, 61
Split Form:, 56
Star Ratio:, 61
Stitch Box Cutoff:, 61
stitch editing, 27
Stitch Editing, 21
Stitch Length, Maximum :, 61
Stitch Length, Minimum :, 61
Stitch Length, User :, 61
stitch window, 6, 18, 19, 21, 23, 24, 28, 29, 32, 36, 37, 46, 47, 51, 54, 56, 73, 79, 80, 81
Stitch Window, 15, 19, 36
Switch Color Values:, 34
Switch Colors:, 34
Tear Form:, 43
Texture Fill:, 68
The form-form:, 18
Thread Size:, 41
THRED MENUS, 34
Thred User's Manual, 1, 9
Thred Window, 15, 17
Thumbnails
(T), 35
Total:, 21
Trace functions and mouse clicks:, 31
Trace Mode
(T+control), 56
Trace:, 28, 56
Tracing 24 bit color bitmaps:, 28
Tracing monochrome bitmaps:, 28
UNDERLAY FOR FILLS, 32
Underlay:, 33, 60
Undo
(B) or (Z + Control), 57
Unfill:, 74
Up TO
Off/ON (keypad -), 20
Using the trace control panel:, 29
vertical fill, 7, 11, 49, 62, 66, 67, 68
Vertical Fill, 66
View Backups:, 41
VIEW:, 38
Wave Form:, 44
Where will a fill end?, 67
Zoom and shift:, 22
Zoom Full
(X), 41
zooming:, 22
Zooming:, 22