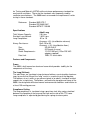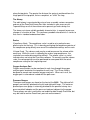
1
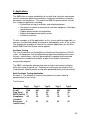
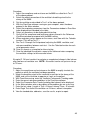
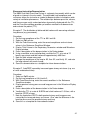
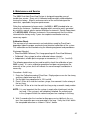
MODEL 5600i Dual Adult PNEUVIEW SYSTEM OPERATION MANUAL Manufactured By: 4717 Talon Court SE Grand Rapids, MI 49512 Tel: (800) 530-9939 or (616) 554-9696 FAX: (616) 554-3067 Email: [email protected] Website: www.michiganinstruments.com Table of Contents INTRODUCTION i 1. Description 1 General Information about the TTL TTL—As compared to typical patients The TTL as Related to Ventilator Testing Standards Specifications Features and Components 2. Setup and Operation 5600i Computer Interface Setup Dual-Lung Simulation Compliance Spring Setting Single-Lung Simulation Measuring Oxygen Concentration in the lung Care of 5600i after Ventilation with Humidified Gases 3. Software Operation Limitation of Liability General Information Software Installation Welcome to PneuView! New Project Display Windows A. Measured Parameters B. Notes C. Graph Test Lung Settings Changing the Test Lung Settings Saving Files Save Project Command Save Data Buffer Begin Save/End Save Trend Testing Setup (From Trend Menu) Begin (From Trend Menu) End (From Trend Menu) Tabulated Data Measure Pressure/Volume and Flow/Volume Loops Reviewing Files 1 2 2 3 3 6 6 6 7 8 9 9 10 10 11 11 11 13 14 14 16 17 18 19 20 21 21 21 22 22 23 23 24 26 28 28 Reviewing a Project File Changing the Graph Window Reviewing Trend Test Files Reviewing Data Tables Printing Files Creating and Saving Templates Export Report Text Files Export Real Time Data Files Other Features of PneuView 29 30 32 34 34 35 37 38 38 4. Applications Ventilator Testing Classroom Instruction/Demonstration 39 39 41 5. Maintenance and Service 42 Calibration Check Model 5600i Leak Test Warranty Agreement Factory Service Policy Requesting Factory Service for Your Model 5600i 42 43 43 44 44 6. Warnings and Cautions 46 7. Storage and Shipping 47 INTRODUCTION The Model 5600i Dual Adult PneuView System (Part Number 15090) combines the unique features of the TTL Training/Test Lung with the data acquisition and processing capabilities of a personal computer. This system was developed to allow the comprehensive evaluation and demonstration of ventilation devices and principles. PneuView is a Windows based software program that serves as the link between the TTL and computer. The interactive environment of multiple, overlapping windows, the combination of pull-down and pop-up menus, provides a user friendly system that will instill confidence and provide a useful lung simulation/data acquisition system. PneuView has many potential applications including: • Ventilator Testing • Product Demonstration • Classroom Instruction • Pulmonary Research • Product Evaluation • Design Engineering • Quality Control ORGANIZATION OF THIS MANUAL This manual has been designed for use as a reference manual. The beginning sections deal with general descriptions and information about the system. Subsequent sections address more specific operations and functions within the PneuView software. Please refer to the Table of Contents for quick and easy reference to the various sections included in this manual. If you have any questions or need technical support, call Michigan Instruments at 1-800-530-9939. 1. Description General Information about the TTL The Model 5600i, Dual Adult TTL is a unique, mechanical simulator of adult human pulmonary mechanics. This instrument is ideal for evaluating and demonstrating mechanical ventilation devices and phenomena. Lungs are simulated using elastomer bellows, with two adult lungs incorporated into the 5600i. The adult lungs hold a residual capacity typical of an adult human lung. Gas is inserted into the adult lungs through a simulated airway. This insertion causes the vertical expansion of the lung, and a corresponding rise of the top plate. A volume scale behind the top plates and pressure gauges on the front of the TTL can be used to visually see the measurements of tidal volume (in mL, airway pressure (in cmH2O), and lung pressure (in cmH2O). Lung compliance is accurately set and adjusted for each lung using a steel alloy spring, which is stretched during inflation of the lung. Airway resistance is simulated by using a fixed-orifice flow resistor. These features of adjustable compliance and resistance allow the TTL to realistically simulate a wide variety of healthy and diseased pulmonary conditions. Several special features add to the versatility of the TTL. Oxygen sensor ports in the top of each lung compartment and auxiliary pressure ports adjacent to each pressure gauge provide sites for the tie-in of related monitoring equipment. The 5600i houses an Electronic Interface Module, which facilitates the transfer of information from the TTL to a personal computer. The module converts pressure signals from the lung and airway of the TTL into digital data. The data is then processed by an appropriate personal computer using our customized PneuView Software. The PneuView program is specifically designed to acquire, interpret, and display data from the TTL. Single breath information to long term trends can be dynamically displayed in real-time, and/or saved for future use. Printed reports of all displayed information may also be easily generated. The PneuView Software portion of this users guide (Section 3) provides complete operating instructions. 1 The TTL—As Compared to Typical Patients The Model 5600i is designed to realistically simulate the mechanics of the adult ventilatory system from upper airway to the lungs. It is NOT a detailed model of actual human anatomy. However, the TTL offers simulation capabilities and versatility not seen in other devices and is useful for a wide variety of applications. The variable lung compliance and airway resistance allows for simulation of both healthy and diseased pulmonary conditions. Table 1 offers some typical values for healthy adults. However, most ventilated patients do not possess these “normal” characteristics. Compliance Resistance Respiratory Rate Tidal Volume I:E Ratio .05 to .10 0.5 to 5.0 10 to 20 3 to 5 1:2 L/cmH2O cmH2O/L/sec Breaths per Minute mL/kg body weight Seconds Table 1 Pulmonary disease is often associated with a change in lung compliance and/or airway resistance. Table 2 shows some of the changes that are typically seen in restrictive and obstructive lung disease. Obstructive Disease Restrictive Disease Examples Asthma Emphysema Bronchitis COPD Airway Neoplasms Pneumonia Pulmonary Fibrosis Kyphoscoliosis Severe Obesity Lung Neoplasms Changes Increased Airway Resistance Increased Total Lung Volumes Decreased Expiratory Flowrates Table 2 Decreased Lung Compliance Decreased Lung Volumes Increased Respiratory Rate The TTL as Related to Ventilator Testing Standards To evaluate the performance of any mechanical ventilating device, a quantitative test lung which dynamically simulates human physiology should be utilized. Testing should take place on every ventilator before it is used in the clinical setting, and periodic testing is needed to ensure that the unit is performing in accordance with established standards and the manufacturer’s specifications. Standards published by the American National Standards Institute (ANSI), the International Organization of Standardization (ISO), and the American Society 2 for Testing and Materials (ASTM) outline minimum performance standards for mechanical ventilators. These are the standards most frequently used by ventilator manufacturers. The 5600i meets or exceeds the requirements set for testing in these standards. Reference: Standard ANSI Z79.7 Standard ISO 5469:1987 Standard ASTM F 1100-90 Specifications Tidal Volume Capacity: Residual Lung Volume: Lung Compliance: Airway Resistance: Size: Weight: Power Requirements: Data Link: Adult Lung 2.0 Liters 1.022 Liters .01 to .10 Accuracy: ±3% (at calibration volumes) Rp 5, 20,or 50 Accuracy: ± 5% (at calibration flows) 20”x25.5”x8.5” 33 Pounds (in case) 12 VDC 500 mA (110 or 220 VAC adaptor supplied) DB9f, PC serial cable Features and Components Frame The 5600i is built around an aluminum frame which provides stability for the components of the lung. The Lung (Bellows) The adult lungs are simulated using elastomer bellows, constrained by aluminum rings to ensure that filling of the “lung” results in a vertical rise of the top plate. The bellows, at rest, retains a gas volume typical of an adult’s functional residual capacity for a single lung. The bellows, secured to the top plate and frame of the 5600i, are designed to withstand normal environmental conditions and inflation to at least 150 mmHg pressure. Compliance Setting The lung compliance is simulated using a precision steel alloy spring stretched between the top plate of the lung and the track on the side of the TTL frame. Lung compliance is adjusted by positioning the spring at various points 3 along the top plate. The greater the distance the spring is positioned from the hinge point of the top plate, the less compliant, or “stiffer” the lung. The Airway The adult airway is constructed by using a hose assembly; various connectors and one of the PneuFlo Airway Resistors included in your accessory kit. Tapered fittings on all of these accessories prevent gas leaks during use. The airway resistance exhibits parabolic characteristics, in regards to pressure change as a function of flow. This nonlinear, parabolic characteristic is similar to that seen in standard endotracheal tubes. Scales Compliance Scale. The compliance scale is used to set a particular compliance value for the lung. This is done by positioning the compliance pointer of the compliance spring directly over one of the calibrated markings on the scale. Volume Scale. The volume scale may be used to measure the volume within each lung. While this scale is calibrated for various lung compliances, the resolution can make data acquisition difficult. The volume scale is a useful indicator when not using the PneuView software. To correctly read the volume scale, the volume pointer must be positioned to correspond with the actual compliance setting for the lung being used. Oxygen Analyzer Port Oxygen concentration can be monitored in each lung through the oxygen analyzer ports located on the top plate of each lung. The 15 mm fitting is designed to accept most common oxygen analyzers. When not in use, the oxygen port is covered and sealed with the port cover. Pressure Gauges Three pressure gauges are found on the front of the 5600i. The right and left gauges are internally plumbed to the left and right adult lungs. The center or proximal pressure gauge is externally plumbed to the proximal airway via a pressure pickoff adaptor and the pressure input port adjacent to the gauge. These gauges are most useful when not acquiring data through PneuView, but may be used to confirm PneuView’s pressure measurements. 4 Auxiliary Pressure Ports Adjacent to each pressure gauge is an auxiliary pressure port, which is internally plumbed to the corresponding gauge. These ports allow other pressure sensing or measuring equipment to be tied into the system. These ports are equipped with a check valve and remain closed until the port is mated with a miniature quick connector. These connectors are included in the accessory kit. Lung Coupling Clip This clip is utilized when one lung is being used to drive the second for spontaneous breathing simulation. 5 2. Setup and Operation To Start: 1. Set the 5600i on a level surface. 2. Remove the top cover of the carrying case (if included with your unit) by unlatching the four clasps on each side. 3. Raise the volume plate scale by grasping the volume scale latch knobs on the bottom of the scale and pull them towards each other. Lift to upright position and release knobs. 4. Open the TTL accessory case. All parts needed to construct the airway are located in this box. 5600i Computer Interface Setup 1. Connect one end of the DB9F serial cable (supplied with unit) into the personal computer. Connect the other end into the serial port located on the back of the 5600i. 2. Attach the power jack into the 5600i (located to the left of the serial port connection) and plug the transformer into an appropriate AC power source. 3. Turn the power switch (located on the front of the unit) to the “on” position. 4. The PneuView Software program must be installed and operational on your personal computer. See PneuView Software setup (Section 3) for complete instructions on software operation. Dual-Lung Simulation 1. Loosen the rest knob (1) on the front of the TTL and insert the rest assembly (2) into the holder. Lock it in place by tightening the knob. 2. Select one PneuFlo resistor to simulate airway resistance and two resistors to simulate lower airway resistance. 3. Connect the upper airway resistor (3) to the proximal (outward-facing) opening on the rest assembly. 4. Connect the 15mm straight connector (4) to the distal (lung) side of the rest assembly. 5. Attach the Y-adaptor (5) to the distal end of the straight connector. 6. Insert the lower airway resistors (6) into the Y-adaptor. 7. Connect one end of the hose assemblies (7) to the lower airway resistors and the other end to the lung inlet ports on the top plates. 8. Attach a single-outlet pressure pickoff adaptor (8) to the proximal end of the upper airway resistor, and connect this adaptor to the proximal pressure input port (9) using the 1/8 inch hosing (10) included with the accessories. Please see Figure 1 for display of Dual-Lung Simulation. 6 6 7 5 4 3 2 8 1 10 9 Figure 1—Dual-Lung Simulation To Set Lung Compliance 1. Loosen the knob on the compliance spring. 2. Grasp the compliance spring and slide the entire mechanism until the pointer is positioned on the desired setting. Lock in place by tightening the knob. Please see Figure 2 for compliance spring setting Figure 2—Compliance Spring Setting 7 Single-Lung Simulation 1. Loosen the rest knob (1) on the front of the TTL and insert the rest assembly (2) into the holder. Lock it in place by tightening the knob. 2. Select a PneuFlo resistor (3) to simulate total airway resistance and connect it to the proximal (outward-facing) opening on the rest assembly. 3. Connect the 15mm straight connector (4) to the distal (lung) side of the rest assembly. Connect one end of the hose assembly (5) into the straight connector and the other end into the lung inlet port in the top plate of the right lung. 4. Attach a single-outlet pressure pickoff adaptor (6) to the proximal end of the resistor. 5. Use the 1/8 inch hose (7) to connect the pressure pickoff adaptor to the proximal pressure input port (8) located to the left of the center gauge. Please see Figure 3 for display of Single-Lung simulation. 5 4 3 6 2 1 7 8 Figure 3—Single-Lung Simulation NOTE: For accuracy and consistency, the compliance spring must be perpendicular to the top plate during use. CAUTION: Changing the compliance setting while ventilating the lung may cause damage to the unit. The TTL may now be ventilated by attaching an appropriate connector from a ventilation device to the airway assembly of the 5600i. 8 Measuring Oxygen Concentration in the Lung 1. Unscrew the oxygen port cover on the top plate of the unit. 2. Place an appropriate oxygen sensor (15 mm fitting) into the adaptor. 3. Replace the cover when finished. Care of the 5600i after Ventilation with Humidified Gases The airway and lungs of the 5600i are constructed of noncorrosive materials. Typical humidification agents such as sterile water or normal saline will not damage the instrument. Any accumulated fluid can be drained out through the drain ports located on the back of the unit. After any fluids are drained from the unit, the 5600i should then be ventilated with dry gas for several minutes. For more information on the use of the TTL with specific chemical agents and medications, contact Michigan Instruments, Inc. 9 3. Software Operation Limitation of Liability Michigan Instruments, Inc. warrants that the PneuView software will conform to the published specifications and documentation, provided that it is used on a computer system for which it is designed. Michigan Instruments also warrants that the supplied distribution disks and documentation are free from defects in materials and workmanship for 90 days after delivery. Michigan Instruments will replace defective disks or documentation at no charge, provided you return the item to Michigan Instruments within 90 days of delivery. Except as provided above, Michigan Instruments makes no warranty or representation, either implied or expressed, with respect to this program or documentation, including their quality, performance, merchantability, or fitness for a particular purpose. Because computer programs are inherently complex and may not be completely free of errors, you are advised to verify your work. In no event will Michigan Instruments be liable for direct, indirect, special, incidental, or consequential damages arising out of the possibility of such damages. In particular, Michigan Instruments is not responsible for any costs including, but not limited to those incurred as a result of lost profits or revenues, loss of use of the PneuView program or computer hardware, loss of data, claims by third parties or for other similar costs. In no case, shall Michigan Instruments’ liability exceed the amount of the purchase price. Copyright Under the copyright laws, neither the documentation nor the software may be copied, photocopied, reproduced, translated, or reduced to any electronic medium or machine-readable form, in part or in whole, without the prior written consent of Michigan Instruments, Inc. Copyright 1999-2001 Michigan Instruments, Inc. 4717 Talon Ct. S.E. Grand Rapids, MI 49512 USA Toll Free: 800-530-9939 TEL: 616-554-9696 FAX: 616-554-3067 email: [email protected] web site: www.michiganinstruments.com Acrobat Reader Copyright 1987-1996 Adobe Systems Incorporated. All rights reserved. Adobe and Acrobat are trademarks of Adobe Systems Incorporated which may be registered in certain jurisdictions. 10 General Information Program Requirements Your computer system must possess the following specifications to guarantee proper operation of PneuView: Minimum Requirements Recommended Requirements •166 MHZ Processor 200 MHZ Processor •32 MB RAM 64 MB RAM •10 MB Hard Disk Space Available 10 MB Hard Disk Space Available •1 Free Serial Port 1 Free Serial Port •640 x 480 16 Color Display 640 x 480 16 Color Display •Windows 9X Operating System CAUTION: Certain screen saver programs, power management, and/or system management utilities may interfere with the continuous acquisition of data through serial ports. Therefore, it is important that such programs and utilities be disabled when running the PneuView system, particularly during trend testing. Technical Support To help ensure maximum performance and productivity from your equipment, PneuView comes with Michigan Instruments’ commitment to total customer satisfaction. If you have a question, please call us at (616) 554-9696, or 1-800530-9939, or e-mail us at [email protected]. Our mailing address: Technical Support – PneuView Michigan Instruments, Inc. 4717 Talon Ct. SE Grand Rapids, MI 49512 USA Please include the following information when you contact Michigan Instruments: •Product name, serial number, and Software Version number of the product. •Computer brand, model, and type of system used with the PneuView Software. Software Installation The enclosed disk provides all of the program files needed to operate PneuView as it interacts with the TTL. Installation instructions are included in the software package. If you have any questions about installation, please call Michigan Instruments, Inc. 11 Welcome to PneuView! To begin the program, click on the PneuView icon on the Windows desktop. The ”Welcome to PneuView!” title screen will appear. The following buttons can be selected to operate the system: New Project: Begins a new project and records data from the test lung in realtime. Select Template: Selects an existing template of specific reference conditions, notes, and display options. Open Project: Opens an existing project of saved files. Working Directory: Allows the user to open existing directories or create new ones. This conforms to Windows file handling structure. Under Select Template, there is a check box titled Connect to Test Lung at Start up. This box should be checked for proper communications with the test lung at start up. However, if the user would want to open existing projects, or create new templates without being connected to the test lung, this box should not be checked. At the bottom of the title screen are three more selections called Communications, Test Lung, and Exit. Communications sets the correct serial communications port for data coming in the computer. Test Lung allows the user to change the lung serial number if using a different TTL. Exit will close the PneuView program. See Figure 1 for PneuView Title Screen display. Figure 1 – PneuView Title Screen 12 New Project Select New Project from the PneuView Title Screen to begin acquiring data from the test lung. The Calibration - Zero Transducers dialog box appears. This box allows the user to calibrate the transducers before acquiring data. See Figure 2 for the Calibration - Zero Transducers dialog box. Figure 2 – Calibration - Zero Transducers Dialog Box To ensure the greatest possible accuracy’s with this program, simply press the Zero All Channels button. (See instructions in the dialog box.) Once the transducers are set at zero, press the close button. The New Project Screen will appear containing three windows: Measured Parameters, Graph, and Notes. Data will appear in the Measured Parameters window and waveforms will appear in the Graph window. Text can be typed into the Notes window. Each window can be sized as desired; enlarged to full screen or minimized. From the New Project window, other features can be accessed such as long term trend testing and tabulated data. All information can be saved by using the standard Windows Save commands found in the File menu. (See Pages 20-21 for instructions on saving files.) Please see Figure 3 for display of New Project screen. 13 Figure 3 – New Project Screen The Acquire button (the green arrow on the tool bar) is used to start acquiring data. To the right of the Acquire button is the Pause button. When New Project is selected from the PneuView Title Screen, the Acquire button will default to the “on” position and begin acquiring data. To pause the display, press the Pause button. To resume the display, press the Pause button again. See Figure 4 for a display of the Acquire button and Pause button. Figure 4 – Acquire button and Pause button NOTE: When Acquire is stopped, (button out) data is no longer being acquired. When restarted, the display begins where it was stopped. When in Pause, data continues to be acquired. When restarted, the data display resumes as if it was never stopped. Display Windows A. Measured Parameters. This window is a display of respiratory parameters as calculated by PneuView. The user has a choice of 41different parameters 14 that can be selected from a pop-up menu. To access the pop-up menu, move the cursor into the Measured Parameter window and right click the mouse. Choose Set Up from the menu in the dialog box. This will open the Select Parameters Window, allowing the user to check the desired parameters. See Figure 5 for the Select Parameters window. Figure 5 – Select Parameters Window Ref is a reference value entered by the user. This is used to compare a value with an actual measured value. The reference value is not necessary for any PneuView calculations and has been provided only for references purposes. Other commands on the menu are Print Preview and Print. (See page 34 for instructions on printing files). On the tool bar is a Parameter Window button. This button will access the Measured Parameters if that window was closed or minimized. See Figure 6 for a display of the Parameter Window button. Figure 6 – Parameter Window Button NOTE: The Select Parameters window can also be accessed by selecting the Parameter Window button, then going to Window on the Menu bar, and selecting Set Up. 15 B. Notes. The Notes window is a text editor and provides capabilities for entering, editing, and saving text. Right clicking the mouse in the notes window can access a menu. The menu commands are File, Edit, Justification, Font, Word Wrap, and Print Notes. Standard sub-menus appear when selecting these commands. See Figure 7 for Notes Window and Menu. Figure 7 – Notes Window and Menu The tool bar contains a Notes button. This button is used to access the Notes if that window was closed or minimized. See Figure 8 for a display of the Notes button. Figure 8 – Notes Button NOTE: The Notes Window can also be accessed by selecting the Notes button, then going to Window on the Menu bar and selecting Set Up. C. Graph. The Graph window is capable of displaying real time graphs 16 (waveforms) of up to three calculated parameters simultaneously. These waveforms are displayed in easy to distinguish colors. The color of a particular waveform will match the color of its corresponding Y-axis at the left of the plot window. The zero axis for each waveform within the plot window will also be indicated by a color coordinated dotted line matching the color of the corresponding waveform. Right clicking the mouse in the graph area will display a menu with the commands Set Up and Print. Choose Print to access the real-time graph and printing options. Choose Set Up to access the Graph Set Up Dialog window. This window allows the user to set up graphs for display along with a time scale and choice of color of the waveform. See Figure 9 for a display of the Graph Set Up Dialog window. Figure 9 – Graph Set Up Dialog window The Graph button on the tool bar is used to access the graphs if that window was closed or minimized. See Figure 10 for a display of the Graph button. Figure 10 – Graph Button NOTE: The Graph Set Up Dialog window can also be accessed by selecting the Graph button, then going to Window on the Menu bar and selecting Set Up. 17 Test Lung Settings The Test Lung settings are displayed on the status bar at the bottom of the New Project screen. To access these settings, double click on the status bar. These settings (which can be adjusted by the user using a pull-down menu) include Lung Compliance, Airway Resistance, Gas Temperature, Barometric Pressure, Gas Reference Conditions, and Communications Port. The Serial Number of the Test Lung is also displayed here. Verify that the serial number of the test lung and the software are the same. Choosing Options – Preferences on the menu bar can also access the Test Lung Settings. NOTE: In order for PneuView to maintain accuracy, it is extremely important that the settings on the test lung (compliance and resistance) match the settings in the PneuView Program. The Gas Reference conditions, Barometric Pressure, and Gas Temperature should also be set as accurately as possible. See Figure 11 for a display of the Test Lung Settings window. Figure 11 – Test Lung Settings window 18 Changing the Test Lung Settings Test Lung S/N -- This should match the serial number on the PneuView software disk. If the serial numbers do not match, check both the test lung and software disk serial numbers. Call Michigan Instruments if you need a new disk(s). Airway Resistance – This is adjusted by the pull-down menu to the right of the Rp value. The choice of Rp5, Rp20, Rp50, Rp200, and Rp500 is selected by the user. NOTE: The airway resistance on the test lung must match the resistance value in the Test Lung Settings window. Lung Compliance -- This is adjusted by the pull-down menu to the right of the Compliance number. The range is adjustable from .01 to .10 L/cmH20. Note: The Lung compliance on the test lung must match the compliance setting in the Test Lung Settings window. Gas Reference Conditions – Again, this is adjusted by the pull-down menu. The following choices are available: ATPX – Ambient Temperature (current gas temperature), barometric Pressure (current barometric pressure) and (X) relative humidity. Data collected from the TTL is collected at ambient (ATPX) conditions. When ATPX is selected as the reference unit, the volumes and flowrates calculated and displayed will represent those that occurred at the TTL under the current ambient conditions. This is the default setting of the PneuView software. ATPD – Ambient Temperature (current gas temperature), barometric Pressure (current barometric pressure) under Dry conditions (0% humidity). ATPS – Ambient Temperature (current gas temperature) and barometric Pressure (current barometric pressure) under Saturated conditions (100% humidity). Since relative humidity has virtually no effect on the calculations within the operating range of the TTL, selection of ATPS will produce the same results as selection of ATPX. BTPS – Body Temperature (98.6°F, 37°C) and Barometric Pressure (760 mmHg. 101.3 kPa) under Saturated conditions (100% Humidity). Selection of BTPS will cause PneuView to display volume and flowrate information after it has been converted to body conditions (98.6°F, 760 mmHg) 19 The information supplied by PneuView will represent that which would have occurred had the gas temperature and barometric pressure been at body conditions. NTPD – Normal Temperature (68°F, 20°C) and barometric Pressure (760 mmHg, 101.3 kPa) under Dry conditions (0% humidity). When NTPD is selected, the calculated and displayed volumes and flowrates will be converted to normal conditions. This requires that the Gas Temperature and Barometric Pressure reference values be entered as accurately as possible for the conversion calculations to be made correctly. The volumes and flowrates displayed will be those that would have occurred had the gas temperature been at normal conditions (68°F, 760 mmHg). STPD – Standard Temperature (32°F, 0°C) and barometric Pressure (760 mmHg, 101.3 kPa) under Dry conditions. (0% humidity). When STPD is selected, the volumes and flowrates calculated and displayed will be those that would have occurred had the gas temperature and barometric pressure been at standard conditions (32°F, 760 mmHg). This requires that the values entered as the Gas Temperature and Barometric Pressure must be entered to represent the ambient conditions as accurately as possible. This will ensure proper calculations and conversions for the displayed volume and flowrate information. The Importance of Test Conditions The test conditions MUST be entered and adjusted before acquiring and saving data. These conditions not only serve as a reference when reviewing data, but are necessary for the proper calculation of volume and flow parameters. When data is saved, the test conditions are saved as a permanent part of the file. Retrieving a template will not change the test conditions, as the original conditions are necessary to generate accurate calculations and waveforms. Saving Files The principle function of the New Project screen is collecting and saving data from the TTL. Digital pressure signals are taken from the TTL every 10 milliseconds. This raw pressure data is analyzed to determine fundamental information such as the beginning and end of breaths, and peak and baseline pressure points. Saving the data allows the user to review and reproduce the displayed breath parameters and graphs as it was originally acquired. 20 PneuView provides three methods of saving up to 30 minutes of this raw pressure data: The Save Project commands in the File menu and toolbar, the Save Data Buffer under the Data menu, and the Begin Save and End Save buttons on the toolbar provide methods of saving the raw pressure data. Save Project Command Files can be saved by selecting the Save Project icon on the toolbar of the New Project Screen, or selecting Save Project or Save Project as from the Menu. Save Project can save all files that are currently running within PneuView, including the Notes files, Tabulated data and the Data file. When Save Project is selected, the Save all Current Project Files dialog box will open and prompt the user for a file name. Once the file is named and saved, a Confirm dialog box appears with The Data Buffer has New Data. Save New Data? Select Yes to save the data file. The Save Data File dialog appears next asking the user to name the file. The same file name will appear as was used in the Save all Current Project Files dialog. The same file name can be used or renamed and saved. The Save Notes File dialog will appear next, followed by the Save Data Table and Notes dialog. Files are saved with a .prj extension. See Figure 12 for Save Project Button. Figure 12 – Save Project Button Save Data Buffer The Data Buffer is a memory buffer, established by PneuView containing the last 30 minutes of data collected from the TTL. Pressure data is collected every 10 milliseconds and 30 minutes worth of the most recent digital pressure data is retained in the buffer. The Data Buffer is initialized every time a New Project is selected, a reference condition has been changed, or after data has been saved. To save data from the data buffer, select Data from the menu, and press Save Data Buffer. A dialog will appear prompting the user to name the file. The files will be saved with a .dat extension. Begin Save/End Save The Begin Save and End Save buttons are located at the top of the New Project screen. When the Begin Save button is selected, PneuView begins and continues saving incoming data until the End Save button is selected. When the End Save button is selected, the user is given the opportunity to save the data 21 segment under a default name or user entered name. If End Save is selected after more than 30 minutes of data has been acquired, only the last 30 minutes will be saved to a file. This is also a data file, and will be saved with a .dat extension. Trend Testing Trend Testing is valuable in analyzing and documenting the performance characteristics of mechanical ventilation and related equipment over a long period of time. With PneuView, trending is available for up to 72 hours. To access the trending environment in PneuView, select the Trend option from the menu bar. A menu appears with Setup, Begin, and End. Setup (From Trend Menu) This initiates the trend test dialog, allowing the user to select conditions and parameters for a trend test. A dialog box called Set up Trend Test appears. The user will set up the Test Name, Test Length, Sample Interval (in minutes), and +/Tolerance (in percent). Pull down menus allow the user to choose the graphed parameters. The user has a choice of up to four different graphs under Initially Graphed Parameters. These can be changed with pull down menus. Also in the set up is a list of measured parameters. The parameters are listed along with the Measured value and Target value. PneuView generates the measured value; the user enters the Target value. After all of the values are selected, choose the OK button at the bottom of the Set up screen. See Figure 13 for display of the Set up Trend Test Dialog Box. Figure 13 – Set up Trend Test Dialog Box. 22 Begin (From Trend Menu) After the set up is completed, the Trend Graph screen is displayed. The user is now ready to begin trending. Choose the Trend command from the menu bar. The commands Set up, Begin, and End appear. Choose Begin to start trending. See Figure 14 for display of the Trend Graph Screen. NOTE: The test lung settings should be entered and adjusted before acquiring and saving data in the Trend mode. Figure 14 -- Trend Graph Screen. End (From Trend Menu) To end the trend, choose the Trend command from the menu bar and click End. This causes a trend test in progress to be terminated before its set duration is complete. The user is prompted to save or abort the test. End is disabled if a trend test is not in progress. Once the test is completed, a dialog box prompts the user to save the data (as default or user selected file name.) Name the project, choose Save, and the file will be saved with a .trd extension. This file can be printed, or reviewed later. 23 Tabulated Data There is a provision to save individual sets of calculated measured parameters as raw data. In PneuView, saving data in this manner is called “Tabulating.” Choose the Tabulate function to take a “snap shot” of the current respiratory parameter values in the Measured Parameters display window. Each time the Tabulate key is pressed, another snap shot is taken and appended to the last snap shot creating a table of respiratory parameters in memory. NOTE: Once the table is saved, no more tabulations can be added to that file. To Tabulate Data: 1. Click on the “T” located on the tool bar. This will open the Data Table window. See Figure 15 for display of the Tabulate button and Figure 16 for display of the Data Table window. Figure 15 – Tabulate Button Figure 16 – Data Table Window 24 2. Data can now be Tabulated, or additional Measured Parameters can be selected with the Setup icon on the data table tool bar. The Select Parameters dialog box will appear and allow the user to select additional parameters. See Figure 17 for the Setup Icon. Figure 17 – Setup Button Right clicking the mouse in the top portion of the data table window and selecting Setup can also access the Select Parameters dialog box. 3. There are three ways to collect tabulated samples: A. Click the Add Sample button on the Data Table tool bar with the mouse. This button is also located on the main tool bar at the top of the screen. See Figure 18 for a display of the Add Sample button. Figure 18 – Add Sample Button B. Press F5 on the keyboard, or C. Right-click the mouse button in the top portion of the Data Table dialog box and select Tabulate. Other functions by the right click include Open, Save As, Clear, Set up, Preview, and Print. There are three other buttons on the tool bar with specific functions. The Clear Table button will clear the data table to allow the user to collect new data. See Figure 19 for the Clear Table button. Figure 19 – Clear Table Button 25 The Hide button puts the data table in the background so the user can easily see the graph table. Pressing the Add Sample button or pressing F5 can still collect samples. See Figure 20 for a display of the Hide button. Figure 20 – Hide Button The last button on the tool bar is the Save button. This will save all tabulated files. See figure 12 on page 21 for the Save button. By right clicking the mouse in the data table notes window, a menu appears with the commands Insert, Edit, Justification, Font, and Word Wrap. This allows the user to add notes after each sample, such as a date/time stamp. NOTE: Test lung settings should be entered and adjusted before acquiring and saving tabulated data. When a sample is collected, the values will be listed as Sample 1. For each sample collected thereafter, the data will be listed as Sample 2, Sample 3, etc. NOTE: No more than 20 samples can be collected in a single table. Selecting the Save button on the Data Table Tool Bar or selecting Save Project or Save Project As from the File menu can save these files. These files are saved with a .tab extension. Measure Choose the Measure function to display continuous flow and high pressure measurement values from the ventilation device. This command is located under the Data menu on the New Project screen. The following measurements can be acquired: Proximal Pressure (cmH2O) Lung Pressure (cmH20) External Pressure (psig) Flow Rate (L/min) CAUTION: The lung hose MUST be disconnected at the proximal airway to prevent overinflation of the lung bellows while measuring continuous flow. 26 Resistance is also selected. Choose Rp 5, Rp 20, Rp 50, Rp 200, or Rp 500 for the appropriate flow rate, listed as follows: Rp 5 140-240 L/min Rp 200 6-14 L/min Rp 20 60-140 L/min Rp 500 0-6 L/min Rp 50 14-60 L/min See Figure 21 for Direct Measurement window. Figure 21 – Direct Measurement Window Pressure/Volume and Flow/Volume Loops Another feature of the PneuView software is the acquisition of Pressure/Volume and Flow/Volume loops. This allows the user to critically examine various modes of ventilation through the TTL. In the PneuView program, loops are referred to PV Graphs (Pressure/Volume graphs) and FV Graphs (Flow/Volume Graphs). To access the PV and FV graphs, select the appropriate icons on the toolbar. See Figure 22 for a display of the PV and FV icons, and Figure 23 for a display of a PV Graph. 27 Figure 22 – Pressure/Volume and Flow/Volume Icons Figure 23 — Pressure/Volume Graph. By right clicking the mouse inside the graph window, a menu will appear with the commands Setup and Print. Setup allows the user to scale the graph for different volumes, flows, and pressures. Also, the user can change the line color or background color of the graph. The Print command gives the user the option of previewing the graph or printing the graph directly from the menu. Reviewing Files Reviewing files allows for the critical examination of saved data files. When data is selected for review, a static display of the entire data set is displayed in the graph window. Special features in this mode allow the user to select specific segments of the data set for closer analysis. 28 Files can be opened from the Open Project area in the PneuView Title Screen or from Open Project… in the file menu in the New Project screen. Once this command is selected, the Open PneuView file(s) window is opened. These files can be opened to review data files, trend data, and tabulated data. See Figure 24 for a display of Open PneuView file(s) window. Figure 24 – Open PneuView file(s) window This window presents a file list and the drive and directory where these files are located. All the files within the named directory are displayed alphanumericicily. Reviewing a Project File When a project file is opened for review, the file name is located at the top left of the screen. A graph will be displayed along with a scroll bar at the bottom of the screen. Any text that was entered at the time of the test will appear in the Notes window. If any tabulated data was taken, the Data Table will appear. See Figure 25 for a display of a reviewed file. 29 Figure 25 – Review File Display The horizontal scroll bar at the bottom of the screen controls the time scale of the data recorded. By holding down the left mouse button with the cursor on the scroll bar, the user can drag the arrow to a specific time of that test. The waveform updates with the time scale. The arrows on the keyboard may also be used to adjust the time scale. The measured parameters can be updated by moving the cursor into the graph display and left click the mouse at various times of the test. Changing the Graph Window The graph window can be changed to display other waveforms such as baseline pressure or lung pressure. To change the Graph window, move the cursor into the graph and right click the mouse. This will open a window with the commands Zoom in, Zoom out, Set up, and Print. Choose Set up to open the Graph Setup dialog box. See Figure 26 on page 30 for the Graph Set up dialog box. 30 Figure 26 – Graph Setup Dialog Box Up to three graphs can be displayed in this program. In Figure 26, Proximal Pressure, Volume, and Flow are the chosen graphs. To change the graph, click the down arrow to display the choice of graphs. When a different graph is chosen, click OK and the graph window will automatically change. Multitudes of colors are available for the user to choose by accessing the Color button. If only one or two graphs are necessary to view, uncheck the Visible box. The Minimum and Maximum scale are adjusted to correspond to the measurement being displayed. The Time Scale will adjust the graph display from 10 seconds up to 30 minutes. When all of the changes are complete in the Graph Setup Dialog box, choose OK to return to the review file display. 31 Zoom in and Zoom Out controls are accessed by choosing the buttons at the top of the screen. See figure 27 for a display of the Zoom buttons. Figure 27 – Zoom In/Zoom Out Buttons Zoom in will give the user a closer look of the data in a graph window. Zoom out will change the graph to allow more data to appear in the window. NOTE: The Zoom controls can also be accessed by moving the cursor into the graph window, right clicking the mouse, and choosing either Zoom in or Zoom out. Reviewing Trend Test Files To review a trend file, go to the Trend command on the menu bar and select Review. A window will open displaying all of the trend files. Choose the file that is to be reviewed. The Trend Test Results window will open and display the results of the test. See Figure 28 for display of the Trend Test Results window. Figure 28 – Trend Test Results Window 32 The Trend Test Results window lists the test name, test length, sample interval, total samples, and test date along with the reference conditions. The Low, Target, and High values correspond to the values that were entered in the Trend Set up. The Minimum, Average, and Maximum are the actual values of the parameters recorded during the test. The Minimum time is the time of the minimum value, and the Maximum time is the time of the maximum value. Review Graphs allow the user to view the entire graph (or graphs) of the trend test. Choose the graph(s) from the pull-down menu and select Create Graph. The graph will appear on top of the Test Results. A horizontal scroll bar at the top left of the graph allows the user to view the entire test. This is accessed by left clicking the mouse on the scale, and sliding the arrow in either direction. A time scale is located at the bottom of the graph that will correspond with the scroll bar. There is also a pull-down time scale menu located to the right of the scroll bar. This will change the time scale on the graph without using the scroll bar. Also, the user can adjust the color of the graphs and background by using the Avg. Color, Back Color, Min Color, and Max Color. See figure 29 for a display of the Trend Graph. Figure 29 – Trend Graph Display 33 On trend graphs, there will be three lines displayed: the maximum value, the average value, and the low value. The default maximum color is red, the default average color is yellow, and the default low color is blue. The user has the option of changing these colors. Reviewing Data Tables To review data tables, choose Review Data Table under the Data command on the menu bar. The Open Data Table window will open and display the saved tabulated data files. After selecting the file for review, the Data Table window appears with the actual tabulated data. See Figure 30 for a display of the Data Table. Figure 30 – Data Table Display This table displays all of the respiratory parameters along with the reference conditions. In the right hand corner of the table is a Hide button. This will move the display into the background so the user can view other functions of the programs. To recall the table, select the Tabulate button on the tool bar. Printing Files To print, choose Print from the file menu. This will allow the user to print a number of reports listed below. Also, the preview command allows the user to view the report before printing. 34 Basic Report – This will print the Measured Parameters, Notes, Graphs, and Reference Conditions from the New Project Screen. Trend Report – This will print the results of a trend test including the graphs, measured parameters, and reference conditions. Data Table Report – This will print the tabulated data, notes, and reference conditions from a data table. Notes Window – Notes are saved with a New Project or a Trend Test and can be printed separately from these files. See Figure 31 for a display of the print commands. Figure 31 – Print Commands From File Menu. Creating and Saving Templates A template is a set of specific Measured Parameters, Graphs, Reference Conditions, and Notes inputted by the user to create a test for a specific ventilator or other application. 35 To create a Template, go to New Project from the PneuView Title Screen. Select the desired measured parameters, graphs, and reference conditions. Type in any notes in the Notes window. After all the changes have been made, go to the Options command on the menu bar and select Save Template. The Save Template File dialog box will appear prompting the user to name the template file. Type in the file name, and select the Save button. Templates are saved with a .pvt extension. See Figure 32 for the Save Template File Dialog Box. . Figure 32 – Save Template File Dialog Box To retrieve a saved template, go to File on the menu bar and select New Project. A dialog box appears asking the user to enter a name for a new project or to select a template. By pressing Select, a list of saved templates will appear. See Figure 33 for the Select Template dialog box. 36 Figure 33 – Select Template Dialog Box Export Report Text Files This function will allow the user to generate a formatted text file containing the PneuView Notes, Tabulated Data and Trend Test Results. The text file is formatted to be both presentable as a readable document and easily assimilated into other databases such as Microsoft applications and other dedicated equipment management database systems. To export this data, go to File on the menu bar, then select Export Report Text File. The Export Test Report to Text File dialog box appears. Select the PneuView file to be exported and where the file should be exported to in the Save In box. Click Save. An information box will appear stating: The report text file: (destination directory and file name will be listed) has been saved. The file will be saved with a .txt extension. 37 Export Real Time Data Files This function allows for the translation of PneuView data files into delimited ASCII text files that should be readable by any text editor, spreadsheet program, or data analysis application. To export this data, go to File on the menu bar, then select Export Real Time Data. The Save Real-Time Data in ASCII Format to… dialog box appears. Select the PneuView file to be exported and where the file should be exported to in the Save In box. Click Save. An information box will appear stating: The text data file (destination directory and file name will be listed) has been saved. The file will be saved with a .txt extension. The application that the PneuView file is being translated for should have the capability to import the delimited format of the PneuView file. All data is translated into rows and columns. Other Features of PneuView High Pressure Port This feature is used to measure pressure from 0-100 psi. The port is located on the right hand side of the unit. The connector is a DISS oxygen connector. The data can only be accessed in PneuView in the measured parameters window, trend tests, and data tables. User Input This feature is designed to allow the user to observe auxiliary inputs from other test equipment such as oxygen sensors, humidity sensors, nitrous oxide sensors, etc. This connection is located on the front of the TTL to the right of the proximal airway gauge. This is a standard BNC connector. The data can be accessed in PneuView in the Measured Parameters window, trend tests, and data tables under User 3 Value, Average User 3, and Peak User 3. 38 4. Applications The 5600i offers a unique combination of versatile lung simulation and comprehensive information gathering and display, including a multitude of respiratory parameters and waveforms. This makes the 5600i the perfect tool for an endless number of applications including: • Performance testing of ventilators and related equipment. • Classroom instruction on mechanical ventilation equipment, techniques, and phenomena. • Product demonstration and evaluations. • Product development and quality control. • Pulmonary research. To offer examples of all the applications for this system would be impossible, as new ones are continually being discovered or developed by users of the system. The following are examples of some of the common applications for which the Model 5600i PneuView System can be applied. Ventilator Testing The Joint Commission on Accreditation of Healthcare Organizations (JCAHO) states, “All equipment shall be calibrated and operated according to the manufacturer’s specifications, and shall be periodically inspected and maintained according to an established schedule as part of the hospital’s preventive maintenance program.” The 5600i is designed to allow performance testing of mechanical ventilators within their range of typical use. Protocols for testing may be stored in PneuView software, allowing routine testing to be performed quickly and consistently. Adult Ventilator Testing Application Example A. The following is a routine test protocol to create a table for documentation of test results. Test Protocol: Test 1 Rate (bpm) 10 Vt (mL) 1000 Flow (Lpm) 80 PEEP (cmH20) 0 Compliance .05 (L/cmH20) Resistance 5 (cmH20/L/sec) Test 2 20 800 60 10 .05 Test 3 20 750 60 20 .02 Test 4 20 500 60 10 .02 Test 5 30 500 40 5 .01 20 20 20 50 39 Procedure: 1. Adjust the compliance and resistance on the 5600i as called for in Test 1 of the above protocol. 2. Attach the patient connection of the ventilator’s breathing circuit to the airway of the 5600i. 3. Set the ventilator as described in Test 1 of the above protocol. 4. With the PneuView software running on your computer, enter the above protocol in the Notes window. 5. Select the respiratory parameters from the Parameters window in PneuView to be displayed and recorded in the table. 6. Select any waveforms to be displayed while testing. 7. Verify that the compliance and resistance values entered in the Reference Conditions window correspond with the 5600i setting. 8. When respiratory values appear on the screen, save them with the Tabulate function. (This will be Test 1.) 9. Run Tests 2 through 5 of the protocol, adjusting the 5600i, ventilator, and reference conditions between each test. Use the Tabulate function for each set of parameter values. 10. Save this format as a template for future testing. 11. Save the tabulated file and print a report of the table and notes comparing the ventilator settings to the measured values. Example B. 24 hour trend test to evaluate an unexplained change in tidal volume after two hours of ventilator use. NOTE: A trend test can be set up to run for up to 72 hours. Procedure: 1. Adjust the compliance and resistance on the 5600i to roughly simulate the patient on which the ventilator had been operating. 2. Attach the breathing circuit of the ventilator in question to the airway of the 5600i, and set the ventilator to operate as it was on the patient. 3. With PneuView running, enter the Ventilator Performance Trending mode. 4. Enter the correct reference conditions in the PneuView software. 5. Select the Parameter Data Trends (including tidal volume) to be displayed. 6. In the Notes window, enter a description of the problem you are assessing. 7. Enter the test setup: Length of Test—24 hours; Interval Time—15 minutes. 8. Enter Begin Test and let the ventilator run 24 hours, without interruption. 9. View the trended data, add notes, save the results, or print a report. 40 Classroom Instruction/Demonstration The 5600i Dual Adult PneuView System is a dynamic lung model, which can be of great assistance in the classroom. The adjustable lung compliance and resistance allows the instructor or student to demonstrate or investigate a wide variety of ventilation phenomena. The relationships between pressure, volume, and flow are more easily understood when dynamically displayed with the TTL, and the PneuView software provides yet another mechanism to demonstrate and evaluate the patient (TTL). Example D. The distribution of delivered tidal volume with worsening unilateral lung disease (e.g. pneumonia). Procedure: 1. Set the lung compliance of the TTL to .05 L/cmH20. 2. Select an Rp5 resistor. 3. With the PneuView running, enter the correct compliance and resistance values in the Reference Conditions Window. 4. Display Tidal Volume in the Respiratory Parameters window and Waveform Display window. 5. Enter a description of the demonstration in the Notes window. 6. Using a ventilator or resuscitation bag, ventilate the TTL at a rate of 12 breaths per minute and tidal volume of approximately .800 liters. 7. Note the tidal volume measured. 8. Change the compliance of the lung to .03, then .02, and finally .01, and note the lung volumes with each change. 9. Save this demonstration as a template for future demonstrations. Example D. AutoPEEP caused by increased upper airway resistance (e.g. use of small endotracheal tube). Procedure: 1. Select an Rp20 resistor. 2. Set the lung compliance at .08 L/cmH2O. 3. With PneuView running, enter the correct conditions in the Reference Conditions window. 4. Display proximal airway pressure and lung pressure in the Waveform Display window. 5. Enter a description of the demonstration in the Notes window. 6. Ventilate the TTL at a rate of 26 BPM and a tidal volume of 1.0 Liters, with a baseline (PEEP) of zero. 7. Note the inadvertent PEEP in both proximal airway and lung pressures caused by the increased airway resistance. Also, note the difference in the baseline pressure of the proximal airway and lung. 8. Save this as a template for future demonstrations. 41 5. Maintenance and Service The 5600i Dual Adult PneuView System is designed to provide years of trouble-free service. Every unit is calibrated and thoroughly checked before leaving the factory. All parts and accessories of the unit are designed for consistent, repeatable, long-term performance. Other than replacement of accessories, the 5600i is NOT intended to be serviced by the customer. If problems develop which cannot be easily corrected by using this manual, please contact Michigan Instruments’ Service Department at 1-800-530-9939. Michigan Instruments also recommends that the unit be returned to the factory every 2 years for complete recalibration and any necessary repairs. Calibration Check The accuracy of all measurements and calculations made by PneuView is dependent upon the proper mechanical and electrical calibration of the system. This calibration can be checked using the following equipment and procedures: Equipment Needed: • PneuView 5600i Software (Test Lung operating with PneuView Software) • Calibrated 1-liter syringe (or other calibrated volume injector) • Independent, reliable pressure gauge or manometer (+/- 1% or .1 cmH20) The following procedure can be used to quickly check the calibration of your 5600i system. It is not a calibration procedure and does not guarantee the accuracy of the system, but it will indicate if a more thorough recalibration is necessary. Procedure—Adult Lung 1. Enter the Calibration mode of PneuView. Displayed pressures for the airway and lung should read zero (0.0). 2. Set the adult lung compliance at .10 L/cmH20. 3. Draw 1.0 liter of air into the insertion syringe, then connect it to the airway of the test lung. 4. Insert the 1.0 liter of air into the adult test lung using a smooth steady motion. NOTE: It is very important that the syringe is empty after injecting air into the test lung. If the syringe is not completely emptied, the remaining air in the syringe will affect the volume and pressure readings in the lung. 5. Wait 2 seconds after the insertion to allow pressure to stabilize in the system, then record the pressure generated in the lung. Verify that it falls within the acceptable tolerance as shown in Table 1, below. 42 6. Repeat these insertions into the lung using the compliance settings shown in Table 1 and verify the pressure generated in the lung falls within acceptable limits. Compliance Setting .10 .01 Pressure Limits 9.7 to 10.3 97.0 to 103.0 Table 1—Adult Lung Calibration Values If the displayed pressures do not fall within the acceptable range for either of the given compliance settings, repeat the insertion to verify that there has been no error in the technique. If the values are still not within the specified ranges, a mechanical adjustment and recalibration of the test lung may be required. Contact Michigan Instruments for details. Model 5600i Leak Test If you suspect an air leak in the test lung, use the following procedure to locate the source of the leak. 1. Assemble the airway for ventilation of the right lung and set the compliance at the .02 position. 2. Enter the Calibration mode of the PneuView program. 3. Inject 1.0 liter of air into the lung through the airway and read the lung pressure. 4. Hold the volume in the lung for 30 seconds, and again read the lung pressure. The pressure should not drop more than 1.0 cmH2O in 30 seconds. 5. Repeat the test using the left lung. If an unacceptable leak exists in your system, and you are unable to locate the source, please contact Michigan Instruments’ Service Department. Warranty Agreement Your Model 5600i Dual Adult PneuView System is warranted by Michigan Instruments, Inc. Grand Rapids, Michigan, to be free of defects in material and workmanship for a period of two (2) years from the date of its receipt by the end purchaser, excluding the diaphragm gauges contained therein. All repairs necessitated by malfunction of this equipment during the warranty period, when in normal use in accordance with instructions provided, will be accomplished at the Michigan Instruments, Inc. factory, without charge other than the cost of transportation to the factory. Michigan Instruments, Inc. undertakes NO LIABILITY HEREUNDER FOR SPECIAL OR CONSEQUENTIAL 43 DAMAGES, or any other expense or liability beyond the furnishing of materials and labor for the repairs covered hereby. The warranty does not cover mars and blemishes, scratches or denting which may result from normal use of this equipment, or malfunctions due to mishandling or damaging accidents. This warranty is VOID unless the equipment to be repaired is returned in the original protective factory carton. If unavailable, the protective carton may be obtained from Michigan Instruments, Inc. If the attached warranty registration card is not returned, the warranty period will begin the date the instrument was shipped from the factory. This warranty is in lieu of all other warranties express or implied, and shall be void as to any products which have been repaired or altered by others, or have been subject to misuse or abuse. The buyer agrees that this written warranty constitutes the entire agreement as to warranties between the parties. Any prior or contemporaneous oral statements which have not been written into this agreement are not binding and this contract shall not be rescinded or modified except by a signed agreement. Factory Service Policy The Model 5600i Dual Adult PneuView System is covered by a limited, two year warranty. Return the registration card promptly to ensure proper registration of your unit and help expedite repairs if they should ever be necessary. Registration is also available online at our website: www.michiganinstruments.com. The Model 5600i is manufactured to very demanding quality standards. It is designed to provide years of trouble free service if proper care is taken in its operation. This instrument should be used and maintained as outlined in this user’s manual. To maintain peak performance, factory service and recalibration is recommended every two years. Requesting Factory Service for Your Model 5600i If you feel that factory service may be required, call the Michigan Instruments’ Service Department at 800-530-9939 Monday through Friday between the hours of 9:00 a.m. and 5:00 p.m. EST. Please have available the model number, serial number, and a description of the problem. Requests for repair parts or any service related questions should also be directed to the Service Department. If your Model 5600i must be returned to Michigan Instruments, please observe the following procedures: A. Use the original carton and packing material. It will provide maximum protection during shipping. If you do not have the original shipping carton, they may be purchased from Michigan Instruments. 44 NOTE: DO NOT USE THE 5600i CASE AS A SHIPPING CONTAINER. It is not designed to withstand the rigorous handling that may occur during shipping. B. Include with the unit: 1. A description of the problem(s). 2. The name and phone number of a contact person. 3. A packing slip listing all of the components being returned. 4. Ship prepaid and insured to: Michigan Instruments, Inc. 4717 Talon Ct. S.E. Grand Rapids, MI 49512 ATTN: Service Department C. Upon receipt, the unit will be evaluated and a repair estimate prepared for approval. Michigan Instruments will contact you with the estimate and wait for approval and purchase order before repairs are started. Repairs will be completed within two weeks from the date of approval. D. All units returned to Michigan Instruments must be evaluated and require a $50.00 evaluation fee plus shipping charges. This fee will be charged if repairs are not authorized and the unit is returned unrepaired. E. All repairs, parts, and labor are warranted for 90 days. New parts have a one year warranty. These warranties are subject to the limitations and conditions of the original warranty, and apply only to those components actually repaired, rebuilt, or replaced. F. A limited number of loaner units are available. Ask for details. G. Terms for repair service: 1. All repairs not covered by warranty are FOB Michigan Instruments, Grand Rapids, MI. Warranty repairs are shipped to the customer at no charge. 2. Payment is net 30 days. 3. Open accounts are subject to credit approval. 45 6. Warnings and Cautions Warning: Explosion Hazard: If this equipment is used to measure flammable anesthetics or other gases, provide adequate ventilation and ensure that no leaks are present in the system that would permit the accumulation of such gases in the electronics enclosure. Warning: Electrical Shock Hazard: When plugged in, 12 V is present within the enclosure of the 5600i. Attachment, removal, and servicing of the Electronic Interface Module should be performed only by Michigan Instruments, Inc. Caution: Operate the 5600i within its specified limits. Over-inflation of the bellows or excessive pressure within the system may cause damage to the bellows, gauges, or transducers. Caution: To prevent damage during shipping and handling, set and lock the compliance springs at the .02 setting on the compliance scale. Caution: Do not sterilize the 5600i. The internal components are not compatible with sterilization techniques. Caution: The 5600i should be turned off and unplugged while moving the unit and between uses. 46 7. Storage and Shipping The Model 5600i Dual Adult PneuView System is shipped to the customer in a specially designed shipping carton. This carton is used to protect the 5600i when not in use, and should be used to transport the unit. If the unit needs to be shipped via United Parcel Service or other carrier, the unit MUST be placed in this carton. (See Factory Service Policy (Page 44) for servicing instructions.) PLEASE SAVE THE SHIPPING CARTON FOR FUTURE USE! Replacement cartons are available for purchase from Michigan Instruments. If a carrying case was purchased with this unit, it is not necessary to remove the 5600i from the case for shipping. However, the carrying case is not meant to be used as a shipping container. If the 5600i is shipped in the case, the carton containing the foam inserts should be used. 47