1
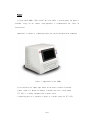
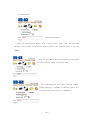
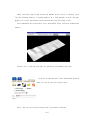
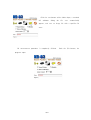
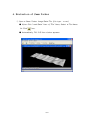
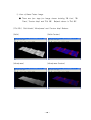
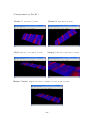
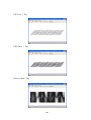
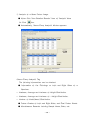
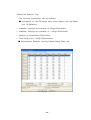
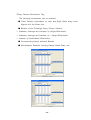
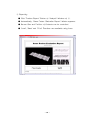
KD03 & CES-SP
User's Manual
Laser Scanner for Measuring Seam Pucker of Fabrics
&
Objective Evaluation Method of Seam Pucker
Using 3-Dimensional Image Analysis and Artificial Intelligence
KD03 Tester (KITECH & D&M SP/WR Tester)
D&M Technology Co., Ltd.
Design & Measurement
1. Introduction
This instrument is to measure and to evaluate the seam pucker of fabrics, which
is composed
of
a laser line scanning part,
a embedded
measurement and evaluation softwares.
Configuration
1. Laser Line Scan Module
(1) Laser source
MicroTek VLM-6515LGP
(2) CCD Camera
Sony XC-75
(3) Frame Image Grabber
Metrox Meteor II
(4) Movement : ServoMotor, De-accelerator
2. Chassis PC (Embedded Industrial PC)
AdvanTech IPC-644
CPU : Intel Pentium
RAM : 128 MByte
TFT LCD Touch Screen Pannel
12.1 inches
3. External port
(1) 1 parallel port (for Printers)
(2) 1 LAN port (for Networking)
(3) 1 USB Port (for Key Board & Mouse)
- 1 -
Pentium PC
and
Power
A single phase 60Hz, 220 V MUST be used. While a general power for home is
available, usage of the power earth-grounded is recommended for safety of
measurement.
Appearance is shown in a following figure and may be changed to be improved.
Figure 1. Appearance of the KD03
A red switch on the upper-right corner of the front is Power On button.
A blue switch is a button to indicate a control status of a servo motor.
TFT LCD is a display equipped with a touch screen.
A mounting plate of a specimen is place in a drawer under the TFT LCD.
- 2 -
2. Placement
When placing and moving the instrument, please pay attention the followings;
1. Place the instrument on a smooth plane.
2. After placing, please control the heights of four corners.
(At the first setting, an engineer of D&M Technology Co. Ltd. installs the
instrument and let an operator know how to use.)
3. Measurement
Power On
When power is supplied to the instrument, push a red button on the upper-right
corner of the front. At a normal state, a light is on and the machine starts working.
The embedded PC controls the functions of KD03, and general PC booting
procedure is processed for 2-3 minutes.
Operating
system
of
KD03
is
Microsoft
Windows
NT
(Workstation).
We
recommend to make a new user account using an user registration procedure of MS
Windows NT. The user ID of the initial account is 'Administrator' and a password is
'dnm'.
※ Notice
Microsoft Windows NT recognizes small and capital letters differently. Therefore, when input the
password, please confirm whether the 'Caps Lock' key is on or not.
Placement of a Specimen Mounting Plate
A specimen mounting plate on which a specimen is placed is put into a drawer
- 3 -
located under the touch screen as shown in Figure 1.
Start of a Measurement Program
At the first setting, a measurem program is installed into the embedded PC of
KD03. The program is 'C:\D&MTechnoloy\KD03\SPWRTester.exe' hyperlinked to the
'KD03.exe' icon on background screen. Please double click the icon, then the program
runs.
※ Notice
After double click the icon, the program automatically contacts with embedded motors and checks if
there are problems or not, and then initiates a laser light source and a CCD. It takes to about 20
seconds for this process. DO NOT double click the program or the icon for preventing the system to be
down.
The initial screen is as follows;
The left side with white background is a control panel of the program and the
right side shows a inner part with a lser beam and a CCD. The right side is
refreshed with every one second.
(1) Calibration
- 4 -
Calibration Button
For the first measurement or After severe environmental changes for the system,
calibration process is necessary.
Click a calibration button, and put
a standard
plate with known sizes into the drawer, and input its known sizes, and carry out
calibration procedure.
※ Notice
When KD03 is produced and placed, calibration was already done. DO NOT calibrate the system
except that for system format and re-installation. If necessary, please contact to D&M Technology Co.
Ltd.
(2) Control of the Laser Lightness
Using a spin button of alaser level, an operator can control the laser lightness
precisely. Generally, the initial state '5' is recommended.
- 5 -
(3) Measurement
Measurement Button
Push the measurement button with a CCD camera shape, and the measuring
process starts. Before measurement, please, check if the specimen plate is put into
KD03.
There are two modes for measurement of seam pucker
and wrinkle. Please, check the current mode.
We recommend to use 'Noise Filtering Option'.
Median filtering is available to eliminate noises of a
measured image and to get its smoothness.
- 6 -
While measuring, process bar located on bottom of the screen is working twice.
The first working indicates a checking process of a CCD position, and the 2nd does
progress of a three dimensional image construction with measuring results.
After completion of measurement, three dimensional image measured automatically
appears.
Default view is slid type and there are wireframe and contour map types.
Push the view button with a three dimensional puckered
shape to view the measured image again.
Please, Do save the measured image into a file before evaluation.
- 7 -
Click the save button with a folder shape, a standard
MS
windows
dialog
for
file
save
automatically
appears, and save an image file with a specific file
name.
All measurement procedure is completely finished.
program stops.
- 8 -
Puch the Exit button, the
4. Evaluation of Seam Pucker
① Open a Seam Pucker Image Data File (file type : *.raw).
● After Click 'Load Data' Item of 'File' Menu, Select a File Name
Or Click
Icon.
● Automatically, Full 3-D View window appears.
- 9 -
② View of Seam Pucker Image
● There are four tags for Image viewer including '3D Line', '3D
Plane', 'Contour Map' and 'Full 3D'.
Default viewer is 'Full 3D'.
< Full 3D > 'Solid Model', 'Wireframe' and 'Contour Map' Buttons.
(Solid)
(Solid-Contour)
(Wireframe)
(Wireframe-Contour)
- 10 -
< Transformation of Full 3D >
(Rotate 1)
(Shift)
Left Button of Mouse
Shift key + Left Button of Mouse
(Default Position)
(Rotate 2)
(Magnify)
Right Button of Mouse
Shift key + Right Button of Mouse
'Default View' Button or 'Default View' Item of '3D View' Menu
- 11 -
< 3D Line > Tag
< 3D Plane > Tag
<Contour Map> Tag
- 12 -
③ Analysis of a Seam Pucker Image.
● After Click 'View Detailed Results' Item of 'Analysis' Menu
Or Click
Icon.
● Automatically, 'Neuro-Fuzzy Analysis' Window appears.
<Neuro-Fuzzy Analysis> Tag
The following informations can be obtained.
● Information of the Followings on Left and Right Sides of a
Specimen.
☞ Maximum, Average and Variance of Height Distribution.
☞ Maximum, Average and Variance of △Height Distribution.
☞ Number of Node(Wave) Distribution.
● Pucker Grades of Left and Right Sides, and Final Pucker Grade
● Miscellaneous Remarks including Sample Name, Date, etc.
- 13 -
<Statistical Analysis> Tag
The following informations can be obtained.
● Information of the Followings along Lines Aligned with the Seam
Line (0 Distance);
☞ Maximum, Average and Variance of Height Distribution.
☞ Maximum, Average and Variance of △Height Distribution.
☞ Number of Node(Wave) Distribution.
☞ Total Height and △Height Distributions.
● Miscellaneous Remarks including Sample Name, Date, etc.
- 14 -
<Fuzzy Pattern Generation> Tag
The following informations can be obtained.
● Fuzzy Pattern Information of Left and Right Sides along Lines
Aligned with the Seam Line.
● Details of the Followings Using 'Choose Pattern';
☞ Maximum, Average and Variance of Height Distribution.
☞ Maximum, Average and Variance of △Height Distribution.
☞ Number of Node(Wave) Distribution.
● Corresponding Neural Network Results.
● Miscellaneous Remarks including Sample Name, Date, etc.
- 15 -
④ Reporting
● Click 'Preview Report' Button of 'Analysis' Windows of ④.
● Automatically, 'Seam Pucker Evaluation Report' Window appears.
● Screen Size and Position of Contents can be controlled.
● 'Load', 'Save' and 'Print' Functions are available using Icons.
- 16 -
Contact Points;
D&M Technology Co., Ltd.
#402, Dong-ik BD, 98
Nonhyun-dong, Kangnam-gu
Seoul, 135-010 Korea
Design & Measurement
(Tel) +82-(0)2-515-1386∼8 (Fax) +82-(0)2-515-1389
(URL) http://www.dnmco.com