1
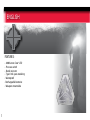
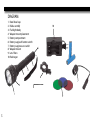
USER MANUAL
H2000 Flashlight
English
ABOUT SIGHTMARK®
Sightmark offers a wide range of products that include red dot scopes, reflex sights,
rangefinders, riflescopes, laser sights, night vision and award-winning flashlights and
boresights. Sightmark products are inspired by military and law enforcement applications.
All products are designed to be the most effective weapon accessories possible.
Sightmark - MAKE YOUR MARK
www.sightmark.com
H2000 Flashlight ........................................................................ 1- 10
To view this manual in other languages go to
www.sightmark.com
English
ENGLISH
FEATURES:
• 2000 lumen Cree® LED
• Pressure switch
• Recoil resistant
• Type II mil-spec anodizing
• Waterproof
• Rechargeable batteries
• Weapons mountable
1
TECHNICAL SPECIFICATIONS
H2000
Bulb type
3x Cree T6 LED
Bezel Diameter
59mm
Output Power
Max 2000 lumens
Battery life
2000 Lumens - 1 hr
1150 Lumens - 2 hr
270 Lumens - 10 hr
Battery type
Finish
Dimensions
2x 18650Li-Ion rechargeable batteries
H2000 INCLUDES:
• Two 18650 Li-Ion rechargeable
batteries
• Recharger
• 3 Filters (green, red, blue)
• Weapons mount
• Pressure pad
Type II anodizing
251x29mm / 25.4mm
(mounting section)
Weight
(includes batteries)
20.5oz
Waterproof rating
IPX-7, submergible to
1m for 1 hr
2
DIAGRAM
1. Bezel head cap
2. Bulb assembly
3. Flashlight body
4. Weapon mount placement
5. Battery compartment
6. Battery cap/push button switch
7. Battery cap/pressure switch
8. Weapon mount
9. Lens filters
10. Recharger
10
6
5
4
3
8
7
2
1
3
9
ABOUT THE SIGHTMARK H2000 FLASHLIGHT
The Sightmark H2000 Flashlight features Cree® LEDs to provide 2000 lumens of light for the most difficult shots or
furthest point in the dark of night. The H2000 Triple Duty Flashlight is constructed with Type II mil-spec anodizing
aircraft grade aluminum for durability and protection against corrosion. The Sightmark H2000 Tactical Flashlight
is equipped with two rechargeable batteries, a battery recharger, a weapon mount, on/off push button, pressure
switch, and three color filters. This product is recoil resistant, waterproof, lightweight and protected by Sightmark’s
limited lifetime warranty. This is the perfect addition to the award winning Triple Duty Series- shooting, hunting,
tactical as well as for camping, hiking, home use and vehicle emergencies.
BATTERIES
The H2000 is powered by two CR18650 rechargeable batteries.
To insert or remove the battery:
1)Rotate the battery cap/switch (6/7) counter clockwise until it sperates from the flashlight body (3).
2) Insert both CR18650 rechargeable batteries into the battery compartment (5), with the positive end first, as
shown on the battery cap.
3) Replace the battery cap/switch (6/7) onto the flashlight body (3). To tighten, rotate the cap/switch clockwise until
fixed firmly. Do not overtighten.
Charging the CR18650 batteries
1) Plug in the recharger into a wall outlet. The LED indicators should turn green.
2) Place the two CR18650 batteries in the recharger according to the polarity indication on the recharger. The LED
indicators should turn red.
3) Once charging is complete, the LED indicators will turn green.
4) Remove the batteries, unplug the recharger and store properly.
NOTE:Charging from full-discharge to full charge takes approximately 5 hours.
4
SWITCH OPERATION
After inserting the batteries, install the desired battery cap/switch.
Push button switch:
1) For momentary operation, press lightly on the rubber button on the back of the switch.
2) For permanent operation, press the rubber button until you hear or feel a “click”, then release.
3) To turn the flashlight off, press the rubber button a second time until you hear or feel a “click”, then release.
4) The Push Button switch has built in various brightness, strobe, and S.O.S. modes. Each on/off cycle will rotate to
the next mode. First mode is 2,000 lumens. Second mode is 1, 150 lumens. Third mode is 270 lumens. Fourth mode
is strobe. Fifth mode is S.O.S. The flashlight will return to 2,000 lumen mode if turned off for at least 20 seconds.
Pressure switch:
1) For momentary operation, press firmly on the pressure pad.
2) To turn the flashlight off, release the pressure on the pressure pad.
5
MOUNTING
Before mounting the flashlight onto your firearm, be sure the firearm
is unloaded and safe to handle.
To mount:
1) Using the Allen wrench, loosen the two screws on the weapon mount’s
(8) ring.
2) Remove the top part of the ring mount and insert the weapon placement (4) portion of the flashlight into the mount’s base ring.
3) Attach the top part of the ring mount and tighten the ring screws. Do
not over tighten.
4) Next, loosen the mounting bolt on the weapon mount using the provided Allen wrench.
5) Position the weapon mount onto your firearm’s base. Due to the size of the flashlight, the head must extend
beyond the end of the quad rail to fit properly.
ATTACHING LENS FILTERS
The H2000 Triple Duty Flashlight includes a blue, red and green lens filter. Green filters provide the best visibility in
a forest or jungle setting while using the lowest light spectrum possible. Red filters help perserve night vision and
assists with varmint hunting without easily being detected by prey. They also assist users with reading maps in low
light conditions. Blue filters are ideal for tracking game, as they assist in illuminating blood trails.
6
To attach the lens filter:
1) Locate the bezel head cap (1) and unscrew counterclockwise until the bezel head cap is removed.
2) Place the preferred lens filter on top of the clear protective lens or fit the filter in the bezel head cap.
3) Screw clockwise the bezel head cap until firmly tight. Do not over tighten.
STORAGE
Make sure that your Sightmark tactical flashlight is securely attached to your firearm before storing, and be sure the
unit is turned off. Remove the battery if the flashlight will be stored for an extended period of time.
MAINTENANCE
The flashlight may be cleaned using a soft cloth and water, or a gun cleaning solvent, when exposed to dirt, dust, or
other residue. Clean the lens using a soft cloth dipped in water or denatured alcohol. To clean residue from contacts,
use a cotton swab dipped in denatured alcohol. Maintain threads and O-rings by applying silicon-based grease to
those areas.
WARNING
Before handling the flashlight, read and understand the contents of your firearm’s manual, and the Sightmark
H2000 flashlight manual. Follow all standard safety precautions and procedures during firearm operation, even
when the flashlight is not in use.
7
• NEVER point the flashlight directly at, or into, an eye. This may cause damage to the eye, or blindness. The
flashlights produce enough light to identify an individual without direct illumination to the face.
• Avoid looking directly into the flashlight’s beam.
• Avoid shining the flashlight into mirrors or other reflective surfaces.
• Avoid hitting or dropping the unit.
• ALWAYS check that the chamber of your weapon is clear before mounting or dismounting the flashlight.
• ALWAYS remove the flashlight when cleaning, or performing other maintenance, on your firearm.
• The flashlight should be tested during periods of non-use to make sure it is still operating properly.
• NEVER place the flashlight bulb side down on a surface while it is turned on. The bulb generates heat that can
damage the unit or the surface it is on.
Failure to follow standard firearm safety precautions and procedures, as well as the above warnings, is dangerous
and may result in serious injury, damage to property, or death.
2000
SIGHTMARK LIMITED WARRANTY
Please visit www.sightmark.com for warranty details and information.
8
www.sightmark.com