1
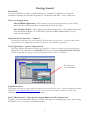
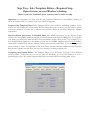
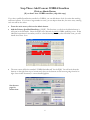
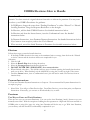
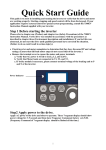
Quick Start Guide
Skim first for content and, then, use as necessary
Big Picture:
Not unlike accounting software, you need to enter certain information into Solo in order to
perform COBRA administration.
You will need to have available information on each one of your health type plans subject to
COBRA, including the contract number, the full contractual rates, and information on how the
COBRA rates are structured.
And, if you have anyone currently enrolled on COBRA, all of their pertinent information,
including their original qualifying event date and reason, mailing address, the names of any family
members enrolled on COBRA, their current COBRA elections, and the last month for which
COBRA premiums were paid.
What’s included in this Guide:
§ How to set up a company, establish settings and enter the COBRA plans and rates.
§ How to use the Solo Template Editor.
§ How to enter any qualified beneficiaries enrolled on COBRA.
§ Graphic orientation to the main administration screen for a COBRA Primary Qualified
Beneficiary (PQB).
§ How to issue notices.
§ How to handle a COBRA election.
1
Getting Started
Install Solo
You can install Solo on either a single workstation, “standard” installation, or a network
installation whereby the data files are placed on a shared network drive. Solo is multi-user.
Solo’s two desktop icons
Solo (COBRA Application) - This is where you set-up your plans/rates, issue notices,
record elections, track premiums, and perform all day-to-day tasks.
Solo Template Editor - This is where you make necessary edits to the sample notices and
other document templates. You DO NOT perform COBRA administration or issue
notices in this module.
Open Solo for the first time – “update”!
You start Solo from the icon on your desktop. The first time you open Solo, you will see the Update
screen. Click on the Update button and Solo will close. You will then re-open Solo.
User Login Screen - process and password
The Login Window will appear each time you open Solo. Unless you change your password security
settings, the User's Name must be affordable (all lower case) and the password must be left blank.
Click on Login and you will go to the Solo Expiration screen. Click on Continue.
The Password
can be left blank
Expiration Screen
Will appear each time you logon until you request a new activation key code. You must submit the current
ID code to [email protected]. If your account is current, you will be issued a code.
Otherwise, you must make arrangement for payment.
Solo’s “Main Screen” – three buttons: Setup, Admin, and the Camera icon
Typically, you will select either Setup or Admin. In Setup, you establish plans, rates, and settings.
In Admin, you do your day-to-day administration.
2
Step One: Setup Button
Global Settings, Plans, and Rates
In Setup, you will work from left to right across the tabs. Pay attention to the RED
FIELDS as they are always required.
Before you start – a note on COBRA rates
COBRA rates can be charged differently than your contractual rates with respect to a spouse or a child
(ren) who elect COBRA without the employee electing or, in the case of a child (ren), without an adult
family member. Therefore, you need to know how your carriers charge for a “single enrollee” that is other
than the ex-employee, i.e. the spouse, a child(ren), or some combination thereof. It is advisable to contact
your carriers or broker and ask them for your COBRA rates for all possible enrollment categories.
•
Company Tab: The green data fields on the top left and the second set of contacts on the
right side of the form are required. All of the other blank fields are optional.
•
Settings Tab: For most employers, the default settings are correct if active coverage ends at the end
of the month and COBRA is always effective on the first of a month. Some exceptions:
•
•
If you are a COBRA TPA, you are the CONTRACT ADMINISTRATOR.
•
If your active coverage ends on the day after the qualifying event, you will need to use the prorate settings on the bottom right.
Admin Tab: This is where you add contact type information that will be displayed on almost
every letter or notice that you will issue. Typically, the Premium Payee Name is the same as the
company name. Information in the red data fields must be completed.
•
Locations Tab (rarely used): Used to establish optional location tracking codes.
•
Vendors Tab: This is where you add the names of your health insurance type companies or
other vendors. Only the two red fields are required. For example, if Regence BlueShield is a vendor,
their Abbreviation will be Regence and their full name will be Regence BlueShield.
•
Contract Tab: This is where you enter your contract, group or policy type number associated
with each Vendor. You will also enter the administration fee load (2% if charged) and the next
3
renewal and rate change dates. Note: The contract type number is generally issued to you by the
Vendor. If you don’t have a number, you can make one up or just enter the name of the Vendor. For
example, if don’t have a contract number for your vision plan, just enter Vision.
•
Plan Setup Tab: Two step process:
Step #1 – Click on the Add button at the bottom left of the screen
This is where you add your COBRA Plan(s), create a Plan Number, and select the closest possible “rate
grouping set” for your COBRA Rates. When selecting the rate grouping set, avoid using Rate Grouping
Five except for age-banded or FSA plans. Refer to the Setup Manual or contact us if you need assistance
due to an unusual rate grouping.
Tip on Rate Groupings: If you have composite rates, select rate grouping one through four. If
the rate grouping isn’t quite right, we can assist you in making some adjustments. If you select the
wrong Rate Grouping, you must delete the entire Plan and start over. How to delete a Plan: from
Utilities on the main menu bar, select Edit Data and, then, Edit Plans. Using the row selector,
select the Plan to be deleted and use the Delete button.
Tip on Assigning Plan Numbers: Sometimes, you have more than one Plan under the same
Vendor Contract. For example, a PPO and a HMO plan. The Plan Number is how each one of
those plans is identified. It will also determine the sequence in which the Plans are displayed on
various screens and reports. So, think about how you would like your Plans to be displayed. For
example, all of your medical plans followed by your dental and vision plan. A good sequence for
Plan Numbers is 100, 200, 300, 400, etc. Example:
Blue Cross PPO
Assigned Plan Number = 100
Blue Cross HMO
Assigned Plan Number = 200
MetLife Dental
Assigned Plan Number = 300
VSP
Assigned Plan Number = 400
Step #2 – This is where you add each plan’s COBRA rates.
• You start by highlighting a plan on the blue screen and, then, clicking on the Add/Edit Rates
button at the bottom right.
• When the Add rates screen opens, you will see an Excel type format on the bottom half with
three sets of columns and your rate grouping categories on the left. The middle set of columns
is for your current rates.
• At the top of the middle set of columns, you check the box next to the date and, then, you
enter the plan’s active rate and Solo calculates the COBRA rate. You can edit the COBRA rate
if the rounding results in a rate different from the one being charged. If you make an error in
the active rate and need to start over, you must delete both the active and the COBRA rate.
4
Step Two: Solo Template Editor – Required Step
Open the icon on your Window’s desktop
(Note: if you have “bundled” plans, you may need to make an edit)
Important: At a minimum, you must open the Solo Template Editor from your Window’s desktop to
allow the template editor to connect to the rest of the Solo program.
Purpose of the Template Editor: In the Template Editor, you can edit the underlying templates for the
notices and other frequently issued letters. Before issuing any notice or letter, you will need to quickly
review the document to make sure it reflects your practices. Refer to the Setup Manual for detailed
instructions.
Plan Enrollment Instructions for Bundled Plans: The default instructions on the Election Form,
indicates that the COBRA qualifiers can pick and choose between the listed COBRA plans. If you bundle
your plans, you will need to make an edit to those instructions on the “Elect Forms”. For example, if you
have multiple Plans displayed on the Election Form but the COBRA Qualifier must elect both medical
and dental, you will need to edit the Election Form to convey those instructions. If you need sample text,
please contact us. How: You will click on the Elect Forms tab and select the company number from the
drop down Company box and, then, you can view, test print, or edit the template text.
Navigating the Template Editor: The Template Editor is in a tab format. Each tab is for a different
notice or letter. From each tab, you can test print the document, go to the edit function, or view a
particular page. Note: We caution against making major text edits without consulting with us first.
5
Step Three: Add Current COBRA Enrollees
Click on Admin Button
(If you don’t have COBRA enrollees, skip this step)
If you have qualified beneficiaries enrolled on COBRA, you can add them to Solo for easier date tracking
and letter issuance. If you have a large number to enter, you can import them but, for most users, entering
each one will be the easiest.
§
§
From the main screen, click on the Admin button.
Add the Primary Qualified Beneficiary (“PQB”). The first time you click on the Admin button, it
will open in the add mode. Enter the PQB’s core data and the initial COBRA qualifying event. If that
individual experienced a secondary events or a Social Security Disability after the initial event, you will
handle those later. Save.
§
The next screen will be the standard “COBRA Switchboard” for the PQB. You will work from the
buttons on the right from top to bottom and, then, on the buttons on the bottom going from left to
right. Later in this document, is a more detailed graphic.
See the next
page for
instructions.
6
Buttons on the right:
§ Personal Data. Largely optional data. With the exception of the assignment of a location code or
building data for a HIPAA Certificate, this information is optional.
§ Family Data. Add any enrolled family members. The form opens to the add mode. You must enter
the first name, relationship, and gender. When done, Save. If you need to enter another dependent,
click on Add.
§ COBRA Qualifying Event. Enter the Qualifying Event date. If you don’t have that date available,
enter the last day of active coverage. When you use your enter or tab key, the other dates are calculated
for you.
§
§
§
DO NOT USE “DESIGN ELECTION NOTICE”.
DO NOT USE “PRINT ELECTION NOTICE”.
DO NOT USE “HIPAA CERTIFICATE”.
Buttons on the bottom:
§ In PQB Status, select Elected or Elected Awaiting Premium from the Response Result drop down
box on the far right of the form. You are not required to enter other dates. Save.
§ In Elections, add their current COBRA Elections. You will use the Add button.
§ DO NOT USE “PAYMENT INSTRUCTIONS” (UNLESS YOU WANT TO ISSUE NEW ONES)
§ In Premium, click on the Add button and enter the last premium received by completing the red
fields. You will need to determine the corresponding COBRA Month for that last payment. The
COBRA month is a number between 1 and 18, 36 or 29. For future payments, you will be able to use
the Auto$ button. If the PQB has elected COBRA but has not paid the initial premium, you will skip
this step.
7
Orientation to Solo's Main COBRA PQB Switchboard
How to Navigate Between Records: Assuming you have entered at least one COBRA Primary
Qualified Beneficiary (“PQB”), every time you open Solo and click on the Admin button, you will open to
this screen. From the SSN drop-down box at the top center, you can switch between COBRA PQBs.
Note: The active employees are found on another switchboard and are not co-mingled with the COBRA
PQBs. You switch between them by using the magnifying glass icon to the left of the SSN.
Find Active Employees, Terminated PQBs, or Sort COBRA Qualifiers
Use the Search Icon (magnifying glass) to the left of the SSN to sort PQBs by status or to switch to Active
Employees or to find a terminated PQB.
Social Security Number as the Key Identifier
The Social Security Number is the “key identifier” and cannot be entered in duplicate. Instead of a SSN,
you can enter any other unique nine- (9) digit identifier. The SSN cannot be edited once entered and saved.
If you make an error, you will need to delete the record and start over. Tip: If a PQB is terminated from
COBRA and later re-hired as active, you will need to delete them after running some key reports.
Click “magnifying glass” to find active
employees, terminated PQBs, or sort entries by
status.
Quick Reference Icons – notepad,
audit trail, snapshot report & print
envelopes or cover sheets.
“Add New” for new Employee
or COBRA Qualifier.
After you “Add
New”, use
these function
boxes to add
the rest of the
data and print
notices.
PQB Status – enter
tracking dates and
change their status.
Use the above function boxes after a COBRA election. Enter the COBRA elections, issue
confirmation letters, payment instructions or coupons & record premiums.
8
Issue an Election Notice by Data Entry – Refer to Manuals for Details
1. Open Solo from the desktop icon and Login.
2. Click on the Admin button.
3. Close the Reminder Reports. You can view a Reminder Report by highlighting one with your
4.
5.
6.
7.
8.
9.
10.
11.
mouse pointer and clicking on the run button. If a listed report has data in it, it will be highlighted and
will have a number to the left of its name.
Click on the Add New button on top left. Enter the SSN, choose the qualifying event from the dropdown box, name, and mailing address. If the PQB had previously been set up as an active employee
for issuance of the General Notice, just enter their SSN and follow the instructions. Save.
Enter any optional Personal Data - necessary if location accounting or for HIPAA Certificates
Enter Family Data - necessary if a dependent is a COBRA Qualifier. The red fields are required.
Solo defaults to the PQBs last name and address. Both can be edited.
COBRA Qualifying Event – enter the Qualifying Event Date and hit your enter key. The rest of the
dates will auto-complete.
Design Election Notice – Open and select the Add button at the bottom of the screen. Highlight
the coverage(s) in effect at the time of the Qualifying Event. Solo will auto-select the other choices.
For example, if you highlight employee and spouse, Solo will select spouse only and employee only.
Print Election Notice. Solo will complete the date printed for you. You choose the number of
copies, whether or not you want a cover page for a window envelope, and click on Print.
If you are not using window envelopes, you can print an envelope from the icon on the top right of
the screen. You may need to try out the two different alignment settings to find the right one.
Finally, just for your interest, open the Letter History Audit Trail paper and pencil icon on the top
right of the screen and see how Solo creates an audit trail.
Issue a General Rights Notice by Data Entry – Refer to Manuals for Details
1. Open Solo from the desktop icon and Login.
2. Click on the Admin button.
3. Close the Reminder Reports. You can view a Reminder Report by highlighting one with your
4.
5.
6.
7.
8.
9.
10.
mouse pointer and clicking on the run button. If a listed report has data in it, it will be highlighted and
will have a number to the left of its name.
Click on the Add New button on top left. Enter the SSN, choose active employee from the dropdown box, name, and mailing address. Save.
Enter any optional Personal Data - necessary if location accounting or to build HIPAA Certificates
data.
Enter Family Data - necessary if a spouse has active coverage. The red fields are required. It is your
choice to add any covered children.
Print General Notice. Solo will complete the date printed for you. You choose the number of
copies, whether or not you want a cover page for a window envelope, and click on Print.
If you are not using window envelopes, you can print an envelope from the icon on the top right of
the screen. You may need to try out the two different alignment settings to find the right one.
Finally, just for your interest, open the Letter History Audit Trail paper and pencil icon on the top
right of the screen and see how Solo creates an audit trail.
If you want to return to the COBRA Qualifiers Screen, click on the Magnifying Glass icon to left of
SSN. When it opens, on the right of the screen, choose “All COBRA” and click OK.
9
COBRA Elections: How to Handle
Procedure Overview
Scenario: You have received a signed election form with or without the premium. You may want
to refer to your COBRA Procedures for guidance.
1. In PQB Status, change the status from “Pending Enrollment” to either “Elected” or “Elected
Awaiting Premium” using the Response Result box on the far right.
2. In Elections, add the final COBRA Elections. See detailed instructions below.
3. In Elections and from the Letters button, issue the Confirmation Letter. See detailed
instructions below.
4. In Payment Instructions, issue Premium Payment Instructions. See detailed instructions below.
If you want to issue coupons, refer to the User’s Manual.
5. When received, record the Initial Premium in Premiums. See detailed instructions below.
Elections
Follow these steps to enter the benefit elections.
1. If the final COBRA election is the same as the terminated active coverage, then click on the “Elected
as Active” button and the elections will be auto-completed for you.
Otherwise,
2. Click on Add.
3. Select the Benefit Plan from the drop-down box.
4. Select the Coverage Class from the drop-down box.
5. DO NOT ENTER THE “ENDS DATE” for a current election.
6. When finished, select Save. The Add box will stay open. Continue entering the benefit plan elections
until you are done. When finished, exit the Add Mode by using the X at the top right of the screen.
7. From the Letters button, issue a Confirmation Letter (you will need to make a few choices from an
interim form).
Payment Instructions
You can issue Premium Payment Instructions or Coupons. We recommend the Payment Instructions for
an employer group.
1. Select Print. You will go to Print Preview first. From Print Preview, you can then print your Payment
Instructions. If necessary, you can save to Word and edit, fax, or email.
Premiums
Two Ways to Enter and Track Premiums
There are two ways you can enter Premiums. You can use the Auto Premium (Auto$)) feature or you can
manually enter them. With the exception of adding the first payment on a PQB who has been enrolled on
COBRA prior to using Solo (page six), using Auto Premium will be the way to go. With Auto Premium,
you can always edit the data that is automatically completed for you.
10
Auto Premium – “Auto$” Button
"Auto Premium" - represented by a dollar sign ($) icon - is located at the bottom right of the Add
Premium window. When clicked, the next premium transaction will be automatically entered. You will
only need to enter a “Check Number” and enter any Comments. Auto Premium is very flexible and you
can edit any of the data categories that have been completed for you. But, you must remember to keep the
COBRA Month in sequence and to enter a unique Check Number.
Click on Auto$ to
enter a Premium
payment. You
can edit the entry.
Initial Premium Entry
The first premium you receive from a PQB will be, in most instances, for multiple COBRA Months.
1. Click on the Add button at the bottom of the Premiums Window.
2. If you want to use the Auto$ function, click on the button at the bottom of the Window. If you want
to manually enter the Premium amount, complete the data categories in red. Save.
3. If the amount received is greater than the amount due, you will enter that amount in the Amount box.
• If the amount received is greater than the Premium Due, you will be asked if you want to disburse
this payment when you click on Save. Click on the OK button. If there is a partial month’s
payment left over, you must Allocate the partial payment.
TIP: If you receive multiple payments for the same COBRA Month, make sure the COBRA month and
month due are the same for both entries.
11