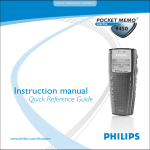
1
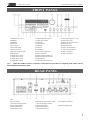
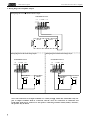
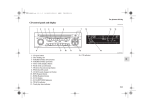
PUBLIC ADDRESS SYSTEM
DVDPLAYER/TUNER/AMPLIFIER
MP7806
MP7812
MP7825
MP7835
Operation Manual
Welcome to enter my PA system. Please read the manual carefully before use to facilitate your better
application of the equipment.
DSPPA Acoustic Technology Co., Ltd.
http://www.DSPPA.com
*
* Public Address System
DVD/Radio/Broadcast Power Amplifier
PRECAUTIONS
l
Do NOT plug the equipment to the grid before connecting the system lines securely.
l
Be sure to connect the equipment to the voltage in accordance with the one required by the equipment;
otherwise, the equipment may be burnt.
l
Since dangerous voltage exists in the equipment, do NOT open the housing to avoid electric shock.
l
When the power switch of the equipment is in “Off” state, the equipment isn’t disconnected completely
from the grid. For safety, please unplug the power cord when the equipment is not used.
l
Do NOT place the equipment in places that are very hot or cold.
l
Please ensure the equipment operates in well-ventilated conditions to avoid overheating the equipment.
l
Please switch off the master power switch when the equipment is not used for long time or when it is cloudy
and moist.
l
Do unplug the power cord to ensure the equipment is disconnected from the grid before removing or
reinstalling any part of the equipment and disconnecting or rewiring any electric plug or other wiring of the
equipment.
l
In case of a failure, the unauthorized non-professional shall not disassemble the housing to maintain, so as
not to lead to an accident or increase the damage degree of the equipment.
l
Do NOT locate any corrosive substance near or on the equipment.
FEATURES
l
All-in-one public address device combining CD/DVD/VCD/MP3/MP4 player, tuner, pre-amplifier and
power amplifier together.
l
Fluorescence digital display, totally-digitalized tactile control.
l
Equipped with USB interface, supports common USB flash disk, mobile hard disk, etc.
l
Phantom power supply for 1-channel Video output, 1-channel AUX input, 4-channel microphone XLR
input, and 4-channel microphone.
l
Built-in chime generator, chime short-circuit toggles output instantly.
l
Chime signal overrides 4-channel microphone signal, CD/DVD/VCD/MP3 player signal, tuner signal
and AUX signal.
1
l
High and low tone control, and volume control available.
l
100V and 70V fixed-voltage output and 4Ω-16Ω fixed-resistance (balanced, not grounded) output.
l
100V fixed-voltage output for 2 zones.
*
* Public Address System
l
DVD/Radio/Broadcast Power Amplifier
FRONT PANEL
1 DVD-Door open/close
2 DVD-Play
3 DVD-Stop
4 DVD-Door
5 Power switch
6 Select DVD mode
7 Select radio mode
8 Select AUX channel mode
9 USB interface
10 Adjust MIC1 volume
11 Adjust MIC2 volume
12 Adjust MIC3 volume
13 Adjust MIC4 volume
Note :
14 Adjust DVD/tuner volume
15 Adjust AUX volume
16 DVD-Next
17 DVD-Previous
18 DVD-FR
19 DVD-FF
20 DVD-Pause
21 Select DVD-repeat mode
22 Select radio-band
23 Radio-search from HF to LF
24 Radio-search from LF to HF
25 Radio-memory
26 Radio-select storage No. 20-1
27 Select radio storage No. 1-20
28 Fluorescent screen
29 Master volume control knob
30 Adjust bass tone
31 Adjust treble tone
32 Zone 1 On/Off indicator
33 Zone 2 On/Off indicator
34 Zone 2 On/Off key
35 Zone 1 On/Off key
When all 5 LED level meters remain lit, sound is distorted. In such case, adjusting each volume control
button till LED 4 and LED 5 flash.
REAR PANEL
1 Fuse AC220V
2 Socket AC220V
3 Zone output wiring terminal
4 Video output terminal
5 AUX input terminal
6 Master power switch
7 Output terminal of amplifier
8 Microphone override/chime output
short-circuit toggle terminal
9 Chime volume knob
10 FM antenna interface
11 AM antenna interface
12 Phantom power supply switch
13 4 microphones interfaces
14 Adjust microphone gain
2
*
* Public Address System
DVD/Radio/Broadcast Power Amplifier
Description of Remote Controller Functions
1)
POWER: Switch On/Off the power supply
2)
[0~9], [+10]: Number keys, [+10] for inputting
32
a number greater than 10
3)
AV/PSCAN: Video output terminal selection
4)
R/L: Switch sound channel
5)
RETURN: Return to chapter or contents
6)
: Direction keys
7)
ENTER: Confirm the operation selected
8)
SETUP: System function settings
28
9)
PLAY: Play key
3
4
27
26
25
24
5
23
1
30
29
2
10) [REV] & [FWD]: FR and FF key
11) TITLE: Select the title/menu of a DVD
31
AV/PSCAN
AUDIO
12) PBC: Open or close the menu of a VCD
13) MENU: Selection key for DVD menu
14) SLOW: Play at lower speed
6
15) REPEAT: Select Repeat mode
7
8
22
9
21
20
10
19
11
12
13
14
18
17
16
15
16) A-B: Repeat fragment
17) VOL-: Volume down
18) VOL+: Volume up
19) [PREV] & [NEXT]: PREV for selecting the
previous chapter or song, NEXT for selecting
the next chapter or song
20) PAUSE: Pause during play
21) STOP: Stop playing
22) ZOOM: Zoom in the image
23) PROG: Prior program for playing songs
according to the preset order
24) AUDIO: Select sound effect
25) ANGLE: Select a different viewing angle
26) TIME: Time-controlled playing, start to play
from the selected start time
27) LANGUAGE: Select a language
28) SUBTITLE: Select subtitle
29) OSD: On screen display, display the play state
30) MUTE: Eliminate or restore the sound
31) OPEN/CLOSE: Eject or inject the room
32) REMOTE TRANSMITTER
3
RC11
*
* Public Address System
DVD/Radio/Broadcast Power Amplifier
SYSTEM WIRING
1. Wiring Diagram of Peripheral Devices
Microphone override /
Chime output short-circuit
toggle signal
External
sound source
AM antenna
FM antenna
TV
AC220V
Zone 1
Zone 2
MIC1
MIC2
MIC3
MIC4
Note:
l
l
Never connect two hot terminals (labeled 4Ω, 70V, 100V) together.
Only choose one pair of output terminals for speaker connection. The connection ways shall be COM-4Ω /
COM-70V / COM-100V.
4
*
* Public Address System
DVD/Radio/Broadcast Power Amplifier
2. Wiring Diagram of Amplifier Output
Wiring diagram of 4 -16Ω fixed-resistance output
SOEAKER OUTPUT
COM
4-16Ω 70V
SPEAKER
Wiring diagram of 70V fixed-voltage output
4-16Ω 70V
100V
MATCHING
TRANS
SPEAKER
Wiring diagram of 100V fixed-voltage output
SOEAKER OUTPUT
SOEAKER OUTPUT
COM
100V
COM
MATCHING
TRANS
4-16Ω 70V
100V
MATCHING
TRANS
MATCHING
TRANS
Note: The connections of 4 output terminals are: COM- (4-16Ω), COM-70V, COM-100V. Only one
pair of output terminals shall be connected, and the wires for connection of COM-70V and
COM-100V shall not be connected to the speaker connecting terminal COM-(4-16Ω); otherwise,
the speaker may be burnt.
5
*
* Public Address System
DVD/Radio/Broadcast Power Amplifier
Operating Instructions
Since the equipment features sound source memory after shut-down, it keep the sound source state before the last
shut-down. “POWER” switch can only be used after the master power switch “AC POWER” on the rear panel is On.
Master power switch “AC POWER” shall not be frequently switched. In case the power is switched off, wait for half a
minute before switching on again.
Scroll display “WELCOM” is on the screen after start-up. After 10 seconds, the equipment accesses to the sound
source state set before the last shut-down.
Adjust the master volume control knob “VOLUME” (11) as well as the treble and bass tone knobs “BASS”,
“TREBLE” (9 & 10) on the front panel to obtain suitable public address sound; use the knob “MUSIC” (14) on the
panel to adjust the volume of DVD or tuner.
DVD Mode
The DVD mode supports music files in formats of DVD, Super VCD, VCD, MP3, MP4, CD, etc, and the machine in
this mode has the function of video output.
1.
47
48
Ø Ultra strong compatibility with discs
discs in
in
49 VCD,
formats of DVD, super VCD,
VCD,
VCD, CD,
CD,
MP3, MP4, MP3+JPEG,
MP3+JPEG, PICTURE-CD,
PICTURE-CD,
50
CD-R, etc.
51
controller as example for basic operation methods
of the DVD mode we introduce to the user.
Characteristics of DVD Mode
Caution: when various functional operations are
performed in DVD mode, a prompt of “ ” on
the screen indicates that the operations the
user performs currently fail or are denied by
the machine.
52
for
Ø Digital image adjusting technology
technology
for
53
adjusting the acutance, brightness,
contrast,
chroma and saturation of the image.
54
2.
2.
55forwarding,
Ø Having functions of multi-step
multi-step
forwarding,
56 play,
multi-step rewind, advanced slow
play, slow
slow
57
reverse, step,
step,replay
replay
and
programming
and programming play.
play.
58
Ø Selection among multiple languages
and
Ø captions,
Selection with
among
multiple
languages
and
functions
of angular
selection,
59
captions,
with functions
picture
enlarging,
etc. of angular selection,
60
picture enlarging, etc.
Ø Full compatibility with PAL/NTSC system.
61 system.
Ø Full compatibility with PAL/NTSC
Select DVD Mode
62
Select DVD Mode
63
Please press the ‘DVD’ key in program
selection
64 theselection
Please
press
the
‘DVD’
key
in
program
keypads of this machine to convert
working
keypads
machine
to convert
the working
mode
of of
thethis
device
into the
DVD65mode.
At this
mode the
of the
device
into the
DVD66
mode.
this
time,
startup
picture
appears
on
the At
screen.
67
time,
the
startup
picture
appears
on
the
screen.
This indicates that the user can perform the next
68
This indicates that the user can perform
the next
operation.
69
operation.
The operation in DVD mode can70be performed
The operation
in DVD
modeoncan
performed
through
functional
keypads
the71be
panel
of this
through functional
on thecontroller.
panel of this
machine
and also keypads
the remote
By
72
machine the
and remote
also thecontroller
remote 73
controller.
contrast,
can
make By
the
contrast, more
the remote
controller
can make the
operation
convenient
and flexible.
74
operation more convenient and flexible.
75by remote
Therefore, we mainly take operations
Therefore, we mainly take operations by remote
When this machine plays MP3 programs, this
device will illuminate a blue round point ‘●’to
indicate a carry if the number of chapters
exceeds 99.
3.
Play Discs
Applicable to DVD/Super VCD/VCD/CD/MP3/
MP4 Disc
Press the
key at the right of the disc cabin,
and then the fluorescent screen (screen) displays a
word “OPEN” and the machine pops up the disc
tray. Press the
key once again after you load a
disc. The fluorescent screen (or screen) displays
“CLOSE” and the machine retracts the disc tray;
or press the “OPEN/CLOSE” keypad on the
remote controller and the disc tray automatically
pops up. When you put the disc in the disc tray,
please put it in with keeping the tag surface
upwards. Then press the “OPEN/CLOSE” keypad
on the remote controller, the tray automatically
retracts and the machine begins to read the disc
and automatically recognize the format of the disc
to display it on the screen.
6
*
* Public Address System
DVD/Radio/Broadcast Power Amplifier
Caution
1. When the machine plays some discs, you need to press the PLAY key on the
remote controller and then the machine can begin to play them.
2. Please do not push or pull the disc cabin with force by your hands to avoid the
DVD mechanism from being damaged.
51
52
Ø In normal playing state, press the
key
the
key or
or
key on the remote controller
53
and
and the
the
54
machine pauses playing.
55
key and the
Ø Then press the
the machine
machine is
is
56
restored to the normal playing state.
57
STOP:
58
Ø When the machine works in normal
normal playing
playing
key and59the machine
state, press the
machine
escapes to the startup picture60to enter
enter the
the
61this machine
STOP-bound state. At this time,
machine
62 when the
automatically memorizes the point
the
63
displays
machine stops playing. The screen
screen
displays
In state of
characters “Stop-bound”. 64
of
Stop-bound, press the PLAY 65key and
and this
this
machine will continue to play66
the disc
disc from
from
the original stop point. Then,
the
screen
screen
67
displays characters “Restore Play”.
68
69
playing
Ø When the machine works in normal
normal
playing
key without 70
break for
state, press the
for two
two
times and the machine escapes71to the
the startup
startup
picture to enter the STOP state.72At this
this time,
time,
73 will
key and the machine
press the
will play
play
the disc from the beginning. 74
“MENU” key can enter the program option
menu for disc.
4. PAUSE:
PAUSE:
5.
6.
7.
7
75
Volume Control:
76
Mute Playing
77
When a program is normally played,
press the
the
78 press
and
“MUTE” key on the remote controller
79
and the
the
“MUTE” key
screen displays “MUTE”. Press the80
key
once again and the audio output of the machine
machine is
is
81
restored.
82
Volume Control
83
Pressing the “VOL+” and “VOL-”
84keypads
keypads can
can
adjust the output volume of this machine.
85
86
Menu Playing
87
Applicable to DVD/Super VCD/VCD
88
Ø When the machine plays discs in formats
formats of
of
super VCD and VCD2.0, pressing
the “PBC”
“PBC”
89 the
keypad can enable or disable the
90 function
function of
of
menu playing. In the state of91enabling
enabling the
the
function of menu playing, 92pressing the
the
“RETURN” key in playing process
return
93 can return
to the program option menu of the disc.
94
discs are
areplayed,
played,
pressing
Ø When
When DVD
DVD discs
pressing
the the
Using
in the option menu can
select different chapters. You can press the
“ENTER” key or
key to start playing, and
also can directly choose to play corresponding
chapters using numeral keys.
8.
Time-Selecting Playing
Ø For DVD discs, press the “TIME” key and the
screen displays: Title 01/04 Chapter 001/026
Time 00:45. In the display of this screen, you
can use the ,
keys to move the cursor
and then use numeral keys to change the
numbers of the title, chapter or time of the
section you want to play, and then press the
“ENTER” key.
Ø For VCD discs, press the “TIME” key and the
screen displays: chapter 02/11 PBC TIME 00:
00: 45. In the display of this screen, you can
use the ,
keys to move the cursor and
then use numeral keys to change the numbers
of the title or time of the section you want to
play, and then press the “ENTER” key.
Ø For CD/MP3 discs, press the “TIME” key and
the screen displays: chapter 02/11 PBC TIME
00: 00: 45. In the display of this screen, you
can use the ,
keys to move the cursor
and then use numeral keys to change the
numbers of the title or time of the section you
want to play, and then press the “ENTER” .
9.
Skip Playing:
key to
Ø In the playing process, press the
select the next chapter or chapter and the
screen displays “NEXT
”.
Ø In the playing process, press the
key to
select the next chapter or chapter and the
screen displays “NEXT
”.
10. Rapid Playing:
Ø Press the forward key
and the machine
plays the disc at a higher speed forward.
Continuously press the
key and this
machine search forward at the following
several different speeds:
Forward Χ2
Forward Χ4
Forward Χ8
Forward Χ20
Play
*
* Public Address System
DVD/Radio/Broadcast Power Amplifier
key and50the
ØØ Press
Press the
the REW
REW
the machine
machine
continuously
backward.
continuously plays
plays the
the disc
disc
backward.
51
Continuously
Continuously press:
press:
Fastreverse Χ20
Fastreverse Χ2
Fastreverse Χ4
Fastreverse Χ852
53
Play
54
Caution: No
No sound
sound is
is output
output in
in the
the state
state of
of Rapid
Rapid
Caution:
55 machine to
Playing. If you want to restore the
Playing. If you want to restore the machine to
the normal
normal playing
playing state,
state, then
then 56
press the
the
the
press
key.
key.
57
11.
Slow
Playing
11. Slow Playing
58
In the
thethe
"SLOW"
key key
and
In
the playing
playingprocess,
process,press
press
"SLOW"
the
machine
will
enter
the
state
of
SLOW
59
and the machine will enter the state of SLOW
PLAYING. Press
Press the
the “SLOW”
“SLOW” key
key60without
without break
break
PLAYING.
and
the
machine
plays
discs
at
a
slow
speed
in
the
61
and the machine plays discs at a slow speed in the
following
several
different
modes.
62
following several different modes.
63 Slow forward
Slow forward
Slow forward
Slow forward
Slow forward
Slow forward
1/3
64 Slow forward
1/4
1/5
Slow forward
1/2
1/3
1/5
1/4
1/2
65
Slow forward
Slow forward
Play
66
Slow
forward
Slow forward
Play
1/6
1/7
671/6
1/7
Caution: No
No audio
audio is
is output
output in
in the
the state
state
of SLOW
SLOW
68 of
Caution:
PLAYING.
If
you
want
to
restore
the
machine
69
PLAYING. If you want to restore the machine
to the
the normal
normal playing
playing state,
state, press
press the
the
key.
to
key.
70
12. Replay
Replay
12.
71
Ø
When
the
machine
plays
discs
in formats
formats of
of
Ø When the machine plays discs72in
DVD/super
VCD/VCD/CD,
pressing
the
73
DVD/super VCD/VCD/CD, pressing the
“REPEAT” key
key can
can select
select different
different
repeated
74
“REPEAT”
repeated
playing
modes,
including
chapter
or
song
75
playing modes, including chapter or song
replay
and
title
or
full
disc
replay.
76
replay and title or full disc replay.
77
Replay: [off]
Replay: [title]/[full disc]
Replay: [chapter]/[song]
Replay: [off]
Replay: [chapter]/[song]
Replay:
78 [title]/[full disc]
79
80the format of
Ø When the machine plays discs in
Ø When the machine plays discs in
the format of
81
MP3, the Replay mode includes four states,
MP3, the Replay mode includes four states,
namely, single song replay, list82
replay and full
namely, single song replay, list replay and full
disc replay.
disc replay.
83
Replay: [off]
Replay: [off]
Replay: [song replay]
Replay: [song replay]
Replay: [list replay]
Replay: [list replay]
84
Replay: [full disc replay]
Replay: [full disc replay]
85
Caution: Discs in formats of super VCD and
Caution: Discs in formats of super
VCD and
VCD2.0 cannot be replayed in86the state of
VCD2.0
cannot
be
replayed
in
the
state of
menu playing.
87
menu playing.
13. Programming Playing:
88
13. Programming Playing:
Warning: The programming playing
89 cannot be
Warning:
applied to The
discsprogramming
in the format playing
of MP3.cannot be
applied to discs in the format of MP3.
90
This function is applicable to disks in formats
This
function
is applicable to disks
91 in formats
of super
VCD/VCD/CD.
of super VCD/VCD/CD.
92 press the
Ø In the state of PLAY or STOP,
Ø In the state of PLAY or STOP,
press the
“PROG” key to enter the93programming
“PROG”
key
to
enter
the
programming
editing menu shown by the following
figure.
94
editing
menu
by the
The user
canshown
arrange
the following
order in figure.
which
The
user are
canplayed
arrange
the order
in which
chapters
according
to his
or her
chapters are played according to his or her
favorites.
favorites.
Program
1[––] 5[––]
9[––] 13[––]
2[––] 6[––] 10[––] 14[––]
3[––] 7[––] 11[––] 15[––]
Play
Cleanup
Ø Press
four arrow keys to move
among the programming serial numbers and
directly press the numeric key to set up the
play list. After editing the play sequence,
select the "Play" option of the screen and
press the "ENTER" key to confirm. the screen
will display "Programming Play" typeface. If
you need to cancel the programming, select
the "Clean Up" option and press the
"ENTER" key to exit from the programming
menu.
For DVD with Multiple Titles and Sections
In play or halt state, press the “PROG” key to
enter the program-editing menu. users can edit
the title and play sequence of the section
according to their preference. Input the
numeric characters representing the title in the
“T” corresponding place and output the
numeric characters representing the section in
the “C” corresponding place. It’d better to
place the cursor to select the “Play” option
and then to press the “ENTER" key. It is
shown as follows:
Program
T C
0 1 :0 2
T C
T C
T C
––:–– ––:–– ––:––
––:–– ––:–– ––:–– ––:––
––:–– ––:–– ––:–– ––:––
––:–– ––:–– ––:–– ––:––
Play
Cleanup
14. Track Selection
Applicable to VCD/CD disk
For VCD disk, Pressing the “R/L” key will result
in the following change:
Track: [Stereo]
Track: [Left Track]
Track: [A/sing right]
Track: [Right Track]
Track: [A/sing left]
8
*
* Public Address System
DVD/Radio/Broadcast Power Amplifier
49
50
51
When
playing
DVD
disk,
press
"ANGLE"
keytoto
When playing DVD disk, press "ANGLE"
key
52
53angle.
select
scenes with
with different
different shooting
shooting
angle.Angle
Angle
select scenes
54
switching
switching as
as follows:
follows:
55
56Angle
Angle
4/44/4
Angle
Angle
1/41/4
Angle
Angle
2/42/4
Angle
Angle
3/43/4
15.
15. Angle
Angle Selection:
Selection:
Applicable
Applicable to
to the
the DVD
DVD disk
disk
57
58
59
Notes:
This function
function isis only
only applicable
applicable
the
Notes: This
toto the
60
DVD
disk
which
has
shot
from
only
few
DVD disk which has shot from
61 only few
different
angle. The
The angle
angle switching
switching number
number
different angle.
62and its effect
depends
on
the
disk
production
depends on the disk production and its effect
subjects
subjects to
to the
the actual
actual effect.
effect.
63
64
16.
16. Subtitle
Subtitle Selection:
Selection:
65
Applicable
Applicable to
to DVD/Super
DVD/Super VCD
VCD Disk
Disk
66
Press
the “SUBTITLE"
“SUBTITLE" key
key to
to select
select
thesubtitle
subtitle
Press the
67 the
class
the users
users need.
need. Every
Every time
time you
you press
press the
the
class the
68
selection
key, itit is
is switching
switching one
one title,
title,the
thescreen
screen
selection key,
will
code.
will display
display the
the selected
selected subtitle
subtitle language
language
code.
69
17.
Language
Selection
17. Language Selection
70
Applicable
Applicable to
to DVD/Super
DVD/Super VCD
VCD Disk
Disk
71
Press
"LANGUAGE" key
key to
to select
select
thelanguage
language
Press "LANGUAGE"
72the
users
need.
Every
time
you
press
the
selection
key,
users need. Every time you press the selection key,
73the screen will
it
is
switching
one
kind
of
language,
it is switching one kind of language, the screen
display
the language
code.code.
will display
the language
74
18. Picture
18.
Picture Zoom-In
Zoom-In
75
When playing the disk, press the “ZOOM” key, the
When playing
press
the 76
“ZOOM”
key,
playing
picture the
willdisk,
zoom
in. Press
the “ZOOM”
the
playing
picture
will
zoom
in.
Press
the
key continuously to select picture of
size,
77different
“ZOOM”
key
continuously
to
select
picture
of
the screen will change as follows:
different size, the screen will change78as follows:
Zoom-in22
Zoom-in
Zoom-in:
Zoom-in:
off
off
Zoom-in33
Zoom-in
Zoom-in44
Zoom-in
Zoom-in
Zoom-in
1/4
1/4
Zoom-in
79 Zoom-in
1/2
1/2
80
Ø For VCD disk, press the “OSD” key during
playing, the screen will display the list,
playing status and time information. Press the
“OSD” key again, the screen display will
close.
Ø For CD/MP3 disk, press the “OSD” key for
the first time during playing, the screen will
display the list and time information. Press the
“OSD” key again, the screen display will
close.
20. MP3 Playing
The screen will appear an operation menu during
MP3 disk playing, it is shown as follows (of
which the displaying contents depends on the
disk):
①
②
③
④ ⑤
① Catalog Window: Displaying current path.
② File Window: Displaying files of the current
path.
Zoom-in
Zoom-in
角度
4/4
角度
4/4
1/3
1/3
81
82
Use
arrow
keys
to
move
the zoom-in
Use
arrow keys to move
83 the zoom-in
picture
up,
down,
left
and
right
so
as
picture up, down, left and right so as toto enjoy
enjoy
different parts
parts of
of the
the picture.
picture.
84
different
19. Screen
19.
Screen Display
Display
85
Ø For DVD disk, press the “OSD"
86 key during
Ø For
DVD for
disk,thepress
“OSD"
key during
playing
firstthe
time,
the
87 screen will
playing
for
the
first
time,
the
screen
will
display the title, section information
and
88
display
the
title,
section
information
playing time of the disk. Press the “OSD”and
key
playing
of the
disk.the
Press
the
key
89 “OSD”
for thetime
second
time,
screen
will display
for
the second
time,
screen
will display
language,
subtitle
andthe
angle.
Press
90 the “OSD”
language,
subtitle
and
angle.
Press
the “OSD”
key for the third time, the screen
91 display will
key
for
the
third
time,
the
screen
display
will
close.
92
close.
Ø For super VCD disk, press the93
“OSD” key for
Ø For
VCD during
disk, press
the “OSD”
key for
94
thesuper
first time
playing,
the screen
will
the
first
time
during
playing,
the
screen
display the list, playing status and time will
display the list, playing status and time
9
information. Press the “OSD” key again, the
screen will display the language and subtitle
information of the disk.
③ Scroll Bar Window: Indicating the place
where the current files of file window are.
④ MP3 Play Icon
⑤ Play Icon of JEPG Picture.
The up and down arrow key and “ENTER” key
can be used to select the catalog during playing
the MP3 disk. The play list of catalog can be
selected with the same way to be played.
21. System Setup:
Press the "SETUP" key to enter the "System
Setup" setting interface, which is shown in
following figure. Users can set up the television
system, screen protection, video output, screen
picture scale, etc.
*
* Public Address System
DVD/Radio/Broadcast Power Amplifier
47
48
49
50
51 “Television
Ø Television System: Select the
System” option and press the “ 52” key to enter
the lower menu. According53to different
requirements, press the “
”54key to select
different television systems. The
55 systems for
selections are: NTSC, PAL 56
60, PAL and
Automatic 4 types.
57
Ø Television
System: Select
Screen Protection:
Select the
the“Television
“Screen
58
System”
option
and
press
the
key
to enter
Protection” option, press the " 59"
the lower
lowermenu.
menu.
According
to
different
The screen protection can be
60
requirements,
key“on”
to select
set as “on” andpress
“off”,the
if select the
when
different
television
systems.
The
systems
the machine is in halt or still-picture
state,for
it
61
selections
are:theNTSC,
60, state.
PAL and
will later enter
screen PAL
protection
62
Automatic 4 types.
63
Ø Video Output: Select the "Video
Output"
64
Ø Screen
Protection:
Select
the
“Screen
option and press the “ ” key to enter
the
65 key to enter
Protection”
option,
press
the
lower menu. Press the “
” key to select
the
lower menu.
screen
protection
can be
different
video The
output
forms
to
66according
set
as
“on”
and
“off”,
if
select
the
“on”
when
various requirements, the form for selection
67
the
is in halt or TV-RGB,
still-picture
state, it
are:machine
Video Component,
P-SCAN
68 state.
will
later
enter
the
screen
protection
YPBPR, PC-VGA, S-VIDEO 5 types.
69
Ø Video Output: Select the "Video
Output"
Ø Screen Picture Scale: Select70the “Screen
option and press the
key to enter the lower
Picture Press
Scale”the
option and
the " different
" key to
menu.
keypress
to select
71
enter
the
lower
menu.
Press
the
“
”
key to
video output forms according to various
select
different
screen
picture
scale
72
according
requirements, the form for selection are: Video
to various requirements,
the forms
for
Component,
TV-RGB, P-SCAN
YPBPR,
73
selections
are:
3PS,
4:
3LB
and16:
9
three
PC-VGA, S-VIDEO 5 types.
types. Picture Scale: Select74the “Screen
Ø Screen
Picture Setup:
Scale” option and press75
the
key to
22. Language
enter the lower menu. Press the
key to
76
Press
the "SETUP"
key and
" " key
enter the
select
different screen
picture
scaletoaccording
"Language
Setup"
setting
interface,
which
is
77 forms for
to various requirements, the
shown
as
follows.
Users
can
set
up
the
options
of
selections are: 3PS, 4: 3LB and16: 9 three
78
picture
display language, audio language,
subtitle
types.
language, menu language:
79
22. Language Setup:
Ø Picture Display Language: Select
“Picture
80 to enter
Press the "SETUP" key and
key
the
Display
Language”
option
and
press
"
" key
"Language Setup" setting interface,
which
is
to enter
its submenu,
types
of81
language
shown
as follows.
Users can
set up
the
optionsfor
of
selection
English,
German,
82
picture
displayare:
language,
audioChinese,
language,
subtitle
Spanish,
French
and
Portugal
6
languages.
language, menu language:
83
Ø
Audio
language:
Select
the
“Audio
Language”
Ø Picture Display Language: Select
“Picture
84 to enter
option
and
press
the
“
”
key
its
Display Language” option and press
key
submenu.
The
languages
for
selection
are:
85
to enter its submenu, types of language for
Chinese,
Japanese,Chinese,
French, German,
Spanish,
selection English,
are: English,
86
Portugal,
Latin
and
German
8
languages.
Spanish, French and Portugal 6 languages.
Ø
Audio language: Select the
Language” option and press the
enter its
Ø
Subtitle language: Select the "Subtitle
Language" option, Press the
key to enter
its submenu, the setting values for selection
are: Chinese, English, Japanese, French,
Spanish, Portugal, German and Latin.
Ø Menu language: Select the "Menu Language"
option, Press the
key to enter its submenu.
The setting values for selection are: Chinese,
English, Japanese, French, Spanish, Portugal,
German and Latin.
Notes: setup of the picture displaying language,
audio language, subtitle language, menu
language needs disk support.
23. Video Setup
Press the “SETUP” key and
key to enter the
“Language Setup” setting interface, which is
shown in the following figure: Users can set up
the brightness, contrast, color tone, saturation
option of the picture.
Brightness, Contrast, Color tone, Saturation
Select any one of the “Brightness”, “Contrast”,
“Color Tone”, “Saturation” options and press the
key to enter its submenu. Press the
key
and
key to regulate the setting values.
“Audio
key to
10
*
* Public Address System
DVD/Radio/Broadcast Power Amplifier
Radio and
收音及其他播放模式
other broad cost mode
1. Zone Control
2 100V fixed-voltage output interfaces are provided for the equipment to connect 2 zones.
After secure connection of wires, Zone On/Off keys (34 & 35) of two zones on the front panel can be used for
switching On/Off the zones. When one of the keys is pressed down, the corresponding zone is on, and the
corresponding indicator (32 or 33) is on; when the key is released, the corresponding zone is off, and the
corresponding indicator is off.
2. Radio
Press “TUNER” key to access to radio mode, and the equipment will select built-in tuner as the sound source. If
the sound source was selected at the last shut-down, the equipment will access to radio state at the current
start-up, and the corresponding indicator is on. “TUNER” will be displayed for 1 second on the screen, and the
equipment will return to the received band, preset memory frequency or non-preset memory frequency at the last
use of radio sound source. At this moment, the following operations can be performed to the radio sound source:
Ø
Band selection: Press BAND key to switch between FM and AM bands.
Ø
Auto station search: Press and hold the DOWN or UP key for over 1 second, and the equipment will
automatically search for stations towards high frequency or low frequency, and the frequency displayed on the
screen will continuously flash. When a station is found, the frequency on the screen stops flashing, and the
current frequency found will be displayed on the screen. When the found signal is stereo signal and is strong
enough, “STEREO” sign will be lit on the screen; otherwise, the sign won’t be lit or flash.
Ø
Manual station search: Slightly press the DOWN or UP key (held for not more than 1 second), and the equipment
will step once (50kHz per step for FM, and 9kHz per step for AM) towards high frequency or low frequency, and
the corresponding frequency will be displayed on the screen. Manual station search is suitable for searching a
station of which signal is weak.
Ø
Station Storage: After a station is found, the station can be stored to the preset station storage No. by followings:
Press MEMO key, and “MEM” sign and a preset storage No. “CHXX” will flash on the right top corner of the
screen. Press M-DOWN or M-UP key to select one of the storage Nos. from CH10 to CH20, and then press the
MEMO key again to store the station found to the storage No.. After that, press M-DOWN or M-UP key to call
the station of the storage No.
3. External Sound Source
When an external sound source is necessary, please use the AUX interface. Press “AUX” key, and the
corresponding indicator will be lit and the AUX channel will be on. Sound sources like CD player, DVD player,
tuner and cassette can be connected to the AUX input terminal.
4. Operating Instructions for Microphone
Since a phantom power supply is provided for the equipment, microphones of different types can be used: both
dynamic and condenser microphones can be used. When the phantom power supply is switched to “PHANTOM”
position, a condenser microphone is available; when the phantom power supply is switched to “MIC” position, a
dynamic microphone is available.
To avoid strong feedback, please adjust the microphone volume down through the microphone volume knob on
the front panel before plugging the microphone. Since all microphones adopt XLR interface, please check the
direction when connecting. The gain of the microphone can be adjusted through “GAIN” knob for the best voice
11
*
* Public Address System
DVD/Radio/Broadcast Power Amplifier
effect.
“PRIORITY” terminal on the rear panel for microphone features Mute function when a short-circuit signal is
inputted. (Except chime signal), other signals can be suppressed by the signal from the four microphones. When
“PRIORITY” terminal is shorted, both chime and microphone feature Mute function of the same priority. If the
volume of chime is minimized, microphone signal can be outputted individually. The Mute function can be
canceled by canceling the short-circuit signal.
5. Built-in Chime Generator
Chime signal of the equipment can be outputted by short-circuit toggle through “PRIORITY” terminal on the
rear panel. Short-circuit once, and the chime signal will be outputted once. If another chime signal is desired,
cancel the current short-circuit and short the “PRIORITY” terminal again. The output volume of chime can be
adjusted by “CHIME VOL” knob. Since chime features overriding function, it is suitable for forced insertion.
Packing List
MP78 series product
1 set
Power cord
1 pcs.
AM antenna
1 pcs.
FM antenna
1 pcs.
Audio line
1 pcs.
User’s Manual
1 copy
Warranty Card
1 copy
4-position terminal
2 pcs.
2-position terminal
1 pcs.
Specifications
DVD/MP3/CD Section Specifications
Frequency response
20Hz-20kHz (±3dB)
Signal to Noise Ratio
98dB
Dynamic range
90dB
THD
0.005%
Wow & Flutter
Under the limited level
TUNER Section
AM
Sensitivity
50dBμ
Wave Band
522kHz-1620kHz
Band width
6kHz
Signal to Noise Ratio
60dB
12
*
* Public Address System
DVD/Radio/Broadcast Power Amplifier
FM
Sensitivity
52dBμ
Wave Band
87.0MHz-108.0MHz
Band width
15kHz
Signal to Noise Ratio
65dB
Amplifier
Model
MP7806
MP7812
MP7825
120W
250W
MP7835
Rated output
60W
350W
Output regulation
From full-load to no-load, less than 3dB.
Output method
4-16Ω balanced output, 70V & 100V fixed-voltage outputs
Zone output
Zones 1 and 2: 100V
Auxiliary output
0dBV
MIC1, 2, 3 & 4: 600Ω, 2.5mV-500mV, balanced
Input
AUX: 10kΩ, 250mV(±50mV), unbalanced
Frequency response
MIC: 100Hz-15kHz (±3dB)
AUX: 40Hz-20kHz (±3dB)
Phantom power supply voltage 48(±2V)
Harmonic distortion
< 0.5% (1kHz, 1/3 rated power)
Line S/N (4Ω output)
70dB
72dB
76dB
77dB
Microphone S/N (4Ω output)
70dB
72dB
76dB
77dB
Bass: ±10dB (100Hz)
Tone adjustment
Treble: ±10dB (10kHz)
Protection
AC fuse, DC output protection, and overload protection
Mute
MIC1 input overrides other inputs (attenuated by 0 to -30dB)
Power supply
AC220-240V/50-60Hz
Power consumption
120W
Outer Packing Size (mm)
(L×W×H)520×500×235
Unit Size (mm)
(L×W×H)430×400×132
Gross weight
15.5kg
Net weight
13kg
250W
500W
650W
17kg
19.8kg
21.6kg
14.5kg
17.3kg
19.1kg
Specifications are subject to change without notice
DSPPA Acoustic Technology Co., Ltd.
13