1
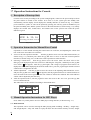
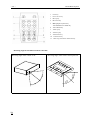
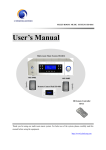
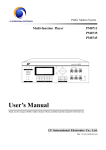
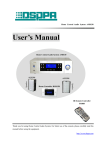
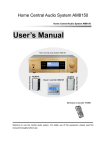
LY International Electronics Co., Ltd
Home Music System HS6813
User’s Manual
Home Music System HS6813
Speaker Unit
Speaker Unit
Remote Control Pad HS30R
Infrared Remote Controller HS21
Welcome use our Home Music System. For better use of the system, please read the manual carefully
before use.
Contents
※ Overview ................................................................................................................................................... 1
1. Introduction to Home Music System.................................................................................................. 1
2. System Features.................................................................................................................................. 1
※ Descriptions of Console ............................................................................................................................ 2
1. Descriptions of Front Panel ................................................................................................................ 2
2. Description of Rear Panel................................................................................................................... 3
※ System Wiring Diagram ............................................................................................................................ 5
1. Console Wiring Example.................................................................................................................... 5
2. Typical Zone Wiring Example............................................................................................................ 5
※ Operation Instructions for Console ........................................................................................................... 6
1. Description of Start-up State .............................................................................................................. 6
2. Operation Instruction for Manual Zone Control................................................................................. 6
3. Manual Operation Instructions for MP3 Player.................................................................................. 6
3.1
Mode Selection................................................................................................................ 6
3.2
Time Display ................................................................................................................... 7
3.3
Song Selection................................................................................................................. 7
4. Manual Operation Instructions for Tuner ........................................................................................... 7
4.1
Band Selection................................................................................................................. 7
4.2
Radio Station Search ....................................................................................................... 7
4.3
Storing a Radio Station.................................................................................................... 8
4.4
Mute Mode ...................................................................................................................... 8
4.5
Calling a Radio Station Channel ..................................................................................... 8
※
※
※
※
5. Timer Programming ........................................................................................................................... 8
5.1
Timer Setting ................................................................................................................... 8
5.2
Time Adjustment ........................................................................................................... 10
5.3
Copying a Timing Point ................................................................................................ 11
5.4
System Setting............................................................................................................... 11
Function Description for Infrared Remote Controller............................................................................. 11
Wiring Method for Remote Control Pad ................................................................................................. 13
Description for File Format Applications of USB Flash Disk................................................................. 13
Precautions ............................................................................................................................................ 15
1
Safety Operation............................................................................................................................... 15
2 After-sales Service............................................................................................................................ 15
※ Packing List............................................................................................................................................. 16
※ Specifications .......................................................................................................................................... 16
1. MP3 Player ....................................................................................................................................... 16
2. AM/FM Tuner .................................................................................................................................. 16
3. Timer ................................................................................................................................................ 17
4. Comprehensive Specifications ......................................................................................................... 17
* LY *
※
Home Music System
Overview
1. Introduction to Home Music System
HS6813 Home Music System is a set of ideal modern Home Music System combining not only all
functions of traditional home hi-fi, but also: 1. Timing point. i.e. Enables the presetting of a
special timing point and specific task executed at the timing point. For example, the alarm clock
can be set to wake you up on time; the bell can be set to remind your kids of going to school; Fresh
and melodious background music can be heard the moment you enter your house after your busy work;
when you listen to background music in your room and the news starts on TV, you can enjoy the news
on time without walking out of your room. You can preset all these items on the system within only
several minutes, and the system can execute what you set automatically. 2. Different music programs
for different rooms simultaneously. For example, while the aged and the young have different music
tastes, the aged can enjoy traditional opera program in their room while the young can enjoy pop
music in their room, and TV program can be watched in sitting room while the TV program can be
listened to in kitchen or bathroom. All that can be executed synchronously.
In addition, the system features an important function which allows the console to be controlled in a
room. For example, by operating the remote control pad in the room, you can select the program
content played by console and adjust the volume and tone level of the room.
The console of this set of system is integrated with MP3 player, tuner, zone selector, timer, pre- and
rear amplifiers, and equipped with input interfaces for four peripheral sound source equipment (DVD,
PC, TV, and AUX), MP3 OUT and TUNER OUT auxiliary output interfaces, 6 stereo output channels
for connecting to 6 zones, 6 remote control data interfaces for connecting to the remote control pads of
6 zones. So, interactive bi-direction control is formed across the console and remote control pads to
offer you great ease of use.
2. Console Features
● Features modern multi-function Home Music System.
● Built-in MP3 player and tuner.
● With USB interface equipped, the console supports music files in MP3 format from flash
disk, MP3 player, portable hard disk, card reader, etc..
● FM and AM bands for tuner.
● External DVD audio input interface, PC audio input interface, TV audio input interface,
auxiliary audio input interface, MP3 audio output interface, and tuner audio output
interface which are all connected through RCA plugs.
● With 6 independent stereo output channels connecting to 6 zones, the volume and tone of
the zones can be adjusted respectively.
● Different sound sources can be distributed in 6 zones simultaneously.
● Console control and remote control available.
● Timing control is available for the 2 built-in sound sources and 4 external sound sources, up
to 100 timing points can be edited and the timing points are repeated weekly.
● The start time of the timing point can be set to second.
● 1 channel of 220V timing control output power for peripheral sound source available.
1
* LY *
Home Music System
※ Descriptions of Console
1. Descriptions of Front Panel
1: Power indicator
On when the power is on, off when the power is off. The indicator is yellow when the console is under
standby state; otherwise, it is green.
2: Power button
The power is on when the button is pressed down, and the power is off on the contrary.
3 and 6: key switches for 6 zones.
4: Timer setting switch
Access to the timer setting interface by pressing the key slightly.
5: Zone setting switch
Access to zone management interface by pressing the key slightly.
7: AM/FM key for tuner
8: Operation key for radio station storage of tuner
9: Mono/Stereo key for tuner; Stop key for MP3 program.
10: Mute key for tuner; Pause/Play key for MP3 program.
11: Operation key for tuning to the next stored tuner radio station; operation key for playing the next
desired MP3 program.
12: Operation key for tuning to the previous stored tuner radio station; operation key for playing the
previous desired MP3 program.
13: USB interface
You can insert USB flash disk, portable hard disk or card reader into here.
14: MP3 setting switch
Access to the MP3 setting interface by pressing the key slightly.
15: Tuner setting switch
Access to the tuner setting interface by pressing the key slightly.
16: LCD display screen
Displays all operation states and setting operation interfaces of the console.
17: Jog dial
The jog dial can be used to search a radio station frequency while tuner mode; can be used to search a
program, select and confirm the circulation mode while MP3 mode; can be used to point to, and select
the desired item and confirm the present operation result while timer setting mode; and can be used to
point to the item, access to the zone control interface, operate each item and confirm the present
operation result while zone control mode.
Key Function Forced switching:
2
* LY *
Home Music System
Forced switching can be carried out by function keys on the console while in primary menu (interface).
For example, to switch to MP3 mode, you can press “MP3” key while in TUNER state; in case of
pressing “TIMER” key, you can access to timer setting interface; by pressing “ZONE” key or one of
the 6 zone keys, you can access to the zone state display interface (equipment system main interface).
The interfaces which can be switched to are as shown in the figure below:
PC
TUNER
DVD
AM/FM tuner
BAND FM Signal
TV
MP3
PC
MP3 Player
Mode Play All
03 \0 1
00 :00 00 :00
Overriding directory,
please wait…
MEMO 40
100.45MHz
MONO
Operation Selection
Timer Setting
Adjust Time
Copy Timing
System Setting
Exit
2. Description of Rear Panel
1) DVD audio input interface
Audio output interface for connecting to a DVD player.
2) PC audio input interface
Audio output interface for connecting to a PC.
3) TV audio input interface
Audio output interface for connecting to a TV.
4) Auxiliary audio input interface
Interface for connecting to a random sound source equipment, such as player, tuner, etc..
5) MP3 audio signal output interface
Interface for connecting to an amplifier or an audio monitor.
6) Tuner audio signal output interface
Interface for connecting to an amplifier or an audio monitor.
7) Audio output interface for zone L channel
Interface for connecting to a zone enclosure. Pay attention to the polarity while connecting.
8) Audio output interface for zone R channel
Interface for connecting to a zone enclosure. Pay attention to the polarity while connecting.
3
* LY *
Home Music System
9) Power input interface AC220V
Please connect the power cord to the console securely before connecting it to the power grid.
10) FM antenna interface
Input impedance is 75Ω. Interface for connecting to the provided FM antenna or the wired TV
network.
11) AM antenna interface
For connecting to the provided AM antenna.
12) Data exchange interface
Data exchange between 6 zone remote control pads and console, one interface corresponds to one
zone.
13) Power output socket for timer.
4
* LY *
Home Music System
1. Console Wiring Example
FM antenna
AM antenna
Tape player
Amplifier
TV
DVD player
2. Typical Zone Wiring Example
R channel
L channel
R channel
L channel
1st zone
Zone 1 to Zone 6
6th zone
5
* LY *
Home Music System
※ Operation Instructions for Console
1. Description of Start-up State
Connect wires securely according to the system wiring diagram, connect to the power and press down
the power button to switch on the console. If no zone is on, the system gets into standby state
automatically, and the display screen displays the standby interface (as shown in Fig. 1-1), and the
power indicator is yellow. A zone can be opened by pressing one zone key (such as ZONE2 key) on
the panel in standby state, and the system accesses to the main interface (as shown in Fig. 1-2), namely
displays the On/Off state, sound source, and volume state of the present zone while the power
indicator is green.
2006.10.01
-
SUN
DVD
Off
8:35:16
Next timing point: MON. 8: 00: 00
Off
Off
(Fig. 1-1)
Off
Off
(Fig. 1-2)
2. Operation Instruction for Manual Zone Control
Operations to a zone include selecting the sound source for each zone, and adjusting the volume and
tone of the zone. Procedures are as follows:
Access to the zone operation interface Turn the jog dial to select one zone while main interface (as
shown in Fig. 2-1), and then press down the jog dial once to access to the zone control operation
interface (as shown in Fig. 2-2). Set the items of the opened zone in this interface.
Selecting a sound source Turn the jog dial to move the cursor (Note: the cursor refers to the
dark-grey icon displayed by the item.) to the box following the “Program”, and then press the jog dial
once when a icon appears. Turn the jog dial again, and 6 kings of program sound sources are
displayed in turn. When displaying the desired sound source, press the jog dial again and the selected
sound source is assigned to the zone.
Volume adjustment Turn the jog dial to move the cursor to the adjusting slider behind the “VOL”
and press the jog dial once. When a icon appears, turn the jog dial clockwise or counterclockwise to
move the slider to the left or right while the zone volume is increased or reduced. The treble and bass
volume can be adjusted by the same way.
After the operations above, turn the jog dial to move the cursor to the “Yes” box, press the jog dial
once to confirm and exit.
The other zones can be controlled according to the method above.
Off
Off
DVD
Off
(Fig. 2-1)
Off
Off
Zone 01 control
Pro.
VOL
DVD
Bass
Trebl
Yes
(Fig. 2-2)
3. Manual Operation Instructions for MP3 Player
Press “MP3” key on the panel to access to MP3 player setting interface (as shown in Fig. 3-1).
3.1 Mode Selection
This operation can be used for selecting the MP3 playing mode including “All Play”, “Single Play”
and “Single Repeat”. “Play All” mode is to play all music file stored in the memory in order; “Single
6
* LY *
Home Music System
Play” mode is to play the presently selected song only; “Single Repeat” mode is to play the presently
selected song repeatedly.
The setting method is: turn the jog dial to move the cursor to the box behind the “Mode”, press the jog
dial. When a icon appears, turn the jog dial to select, confirm and exit after selection.
3.2 Time Display
As shown in Fig. 4-1, the first “00:00” represents the time progress of the presently played song, the
following “00:00” represents the total time of the presently played song.
3.3 Song Selection
As shown in Fig. 3-1, move the cursor to “ 03 / 01 ” box, press the jog dial and turn it to select. The
digits of the first box represents the directory, (for example, if “03” is selected, the 3rd directory in the
USB flash disk is selected), and the digits of the following box represents the song No. in the directory,
and the name of the song is displayed behind the box. While selecting a song, please pay attention to
the indication at the bottom of the screen, where “No USB flash disk, please insert a USB flash disk.”
represents that no USB flash disk is inserted into the USB interface or the inserted USB flash disk
can’t be identified, and where “USB flash disk has been inserted, please wait…” represents that a USB
flash disk has been inserted and can be accessed to; When there is no song in the USB flash disk, “No
song in the directory, please select another directory.” is indicated when the directory is selected, and
then it will to another directory and display the name of song in the directory automatically.
Exit the MP3 setting interface by pressing other function key after setting.
” and “
” keys on panel while manual MP3 control, use “
”
You can select a song by “
key to play or pause, and use remote control pad and infrared remote controller to operate. For details,
please refer to the User’s Manual and key function description.
AM/FM tuner
MP3 player
Mode Play All
00 :00 00 :00
BAND FM Signal
03 \0 1 One thousand and one nights
(Fig. 3-1)
MEMO 40
100.45MHz
MONO
(Fig. 4-1)
4. Manual Operation Instructions for Tuner
Press “TUNER” key on the panel to access tot eh tuner setting interface (as shown in Fig. 4-1), where
the wave band, radio station channel, sound channel, etc. of the tuner can be set.
4.1 Band Selection
Selection between AM and FM can be switched by pressing the “BAND” below the display screen on
the panel. And can be switched by pressing AM/FM key on remote control pad and infrared remote
controller. The frequency scope of AM band is 522KHz-1620KHz; and the one of FM band is
87.00MHz-108.00MHz.
4.2 Radio Station Search
Press the “
” and “
” keys below the display screen on the panel to search the next or the
previous radio station No. as to call the stored radio station. You can also use the jog dial to search
radio station. Turn the jog dial clockwise and the frequency is increased, namely, the system searches
towards the high frequency band continuously. In case a radio station is found, a black indication bar
as shown in Fig. 4-1 is displayed behind the “Signal”. The indication bar will be widened when the
signal gets stronger; and be narrowed when the signal gets weaker. Turn the jog dial for a circle
quickly, the system will access to automatic search state. In case a radio station channel or the highest
7
* LY *
Home Music System
frequency band is reached, the system will stop; Turn the jog dial clockwise, the system searches
towards the low frequency band, and the signal display and automatic search operation are the same.
4.3 Storing a Radio Station
You can press “MEMO” key together with the “
” or “
” key to store up to 40 radio station
successively or at random regardless of manual or automatic radio station search. While storing a radio
station, the memory No. behind the “MEMO” on the screen will flash by pressing “MEMO” key once.
Press “
” or “
” key to select the memory No. and press “MEMO” key again to store the found
radio station channel to the present memory No..
4.4 Mute Mode
” key on the panel, the “ ” icon turns into “
” icon (as shown in Fig. 4-2) which
Press the “
indicates that the tuner is in mute mode. When the timing point is reached, the system executes the
preset content of the timing point. Press the “
” key again to cancel mute mode.
AM/FM tuner
BAND FM Signal
MEMO 40
100.45MHz
Mute
mode
of the
tuner
MONO
(Fig. 4-2)
4.5 Calling a Radio Station Channel
A stored radio station channel can be called at timing point. The operation method can be referred to
the description of timing point setting.
A stored radio station channel can be called directly by remote control pad and infrared remote
controller. The operation method can be referred to the description of keys of each remote controller.
5. Timer Programming
Pressing the “TIMER” key on the panel, the system will access to the timer programming state, and
the screen will display the main interface for timer programming (as shown in Fig. 5-1), of which
timer setting, time adjusting, copying timing, and system setting can be programmed.
5.1 Timer Setting
Turn the jog dial to move the cursor to the “Timer Setting”, press the jog dial once to access to the
timer setting interface (as shown in Fig. 5-1-1), and turn the jog dial set each item in timer setting.
5.1.1 Weekday Setting:
Turn the jog dial to move the cursor to “Weekday” and press down the jog dial. When a icon
appears, turn the jog dial to call the desired weekday (such as Wednesday) and press the jog dial to
confirm and exit.
5.1.2 Adding a New Timing Point:
Adjust the date of “Weekday” to a weekday (such as Monday), all information of the 1st timing point
will be displayed at the other items of the interface. If there is no display at the other items (as shown
in Fig. 5-1-2), the day has no timing point. For programming a timing point, click “Add” first and set
each item. In case a timing point exists and an additional timing point is necessary, please click “Add”
first, and then program the other information of the timing point. The number of the newly added
timing point is always behind all the previously set timing points of the same day. However, the timing
point will be executed according to the time priorities of the timing points automatically.
5.1.3 Number Item Setting:
Turn the jog dial to move the cursor to the digit box behind the “Number”, and press the jog dial once.
When a icon appears behind the box, turn the jog dial again to call the desired digit, and press the
8
* LY *
Home Music System
jog dial once to confirm and exit.
5.1.4 Power Supply Setting:
This operation is for timer control of the power output socket (item 13 of page 3) on the rear panel,
which supplies the other equipment with AC220V power. When the power supply is set as “On”,
power is outputted from output socket the moment the timing point is reached; when the power supply
is set as “Off”, no power is outputted form output socket the moment the timing point is reached; when
it is set as “…”, the last setting is kept. The setting method and number item setting are the same.
5.1.5 Time Setting:
This item is for setting the start time of a timing point, which can be set to second in 24-hour system.
The setting method and number item setting are the same.
5.1.6 Ring Setting:
This item is for setting the ring type of the timing point including “1”, “2”, “3” and “-”. “1” is “1 3 5
1” note; “2” is “1 5 3 1” note; “3” is “1 5 1 5” note; and “-” is no ring. While setting, turn the jog dial
to move the cursor to the “Ring” and press the jog dial once. After a
icon appears, turn the jog dial
again to select, and press the jog dial to confirm and exit after selection.
5.1.7 Timer Setting for MP3 Song:
Turn the jog dial to move the cursor to “MP3 Setting”, and then press the jog dial once to access to the
MP3 timer setting interface (as shown in Fig. 5-1-3), where 3 songs can be selected for MP3 player at
timing point. “00/00” represents the played song, where the first two digits represent the directory
where the song is in, and the following two digits represent the number of the song in the directory. If
the directory is set as “00”, no directory is set; if the song is set as “00”, no song is selected.
Move the cursor to the digit display box, and then press the jog dial once. When a
icon appears
behind the digit box, turn the jog dial among “Repeat Off”, “Repeat” and “Play in Order”. This item is
used to control the playing priorities of the selected 3 songs.
After all operation above, click “Yes” to confirm and exit the MP3 timer setting interface.
The MP3 program set in each timing point is only available to the corresponding timing point. When
the next timing point is reached, the system will execute according to the next timing point, and the
setting of the next timing point will overwrite the MP3 setting at the present timing point; if the next
timing point has no setting to the MP3, the MP3 has no operation when the next timing point is
reached.
5.1.8 TUNER Timer Setting:
Turn the jog dial to move the cursor to “TUNER Setting”, press the jog dial once to access to TUNER
timer setting interface (as shown in Fig. 5-1-4), and select the band and channel of the TUNER in this
interface:
Move the cursor to the box behind the “BAND” and press the jog dial once. When a
icon appears,
turn the jog dial to select, and press again to confirm and exit. Operate the “CH” according to the
method above.
SAT. NO. 001 Power On
Time 08 : 10 : 00 Ring --
Operation Selection
Timer Setting
Adjust Time
Copy Timing
System Setting
MP3 Setting TUNER Setting Zone Setting
Exit
Add
Del
(Fig. 5-1)
SAT.
NO.
Del
Back
(Fig. 5-1-1)
MP3 Timer Setting
Power
:
:
Ring
Time
MP3 Setting TUNER Setting Zone Setting
Add
Delete the whole day
Delete the whole day
(Fig. 5-1-2)
Back
Please select the directory and No. of the song:
1 05 \12
Repeat
2 00 \06
Repeat On
3 07 \00
Yes
(Fig. 5-1-3)
9
* LY *
Home Music System
Note: “…” in band selection represents the default setting, “Stop” represents that the TUNER
program will be stopped when the timing point is reached.
Both AM band and FM band have 40 selections in channel selection, and their numbers represent the
memory Nos. of the radio station channels. When operating the TUNER manually, the received
frequency of the radio station is stored in the memory No. Timer setting operation is just to call the
radio station frequency stored while manual operation.
And click “Yes” to confirm and exit after setting.
5.1.9 Zone Setting:
Turn the jog dial to move the cursor to “Zone Setting”, and press the jog dial to access to the zone
timer setting interface (as shown in Fig. 5-1-5), where a zone can be selected and the volume, program
and ring of the zone can be set.
Zone Timer Setting
TUNER Timer Setting
BAND
CH
FM
01
Zone
Pro.
Yes
(Fig. 5-1-4)
No
02
MP3
VOL
Ring
Defaul
On
Yes
(Fig. 5-1-5)
Zone selection Turn the jog dial to move the cursor to the digit box behind “Zone”, press the jog
again when a
icon appears behind the box, turn the jog dial to select, and press the jog dial again
to confirm and exit.
Volume adjustment Operations of the item can be referred to the description of “Volume adjust” of
zone control in page 5.
Program selection
Assign a sound source for a zone according to the above-mentioned operation
method for selecting a zone. “…” represents the default setting, “Off” represents that the zone will be
off when the timing point is reached. This operation is to select sound source for the present zone. 6
sound sources are provided for the system, and each zone can use one kind of sound source
simultaneously and also use different sound source. In case MP3 and TUNER sound sources are
selected, the zone will be in mute state when the setting operations described in 5.1.7 and 5.1.8 of page
8 hasn’t been done to the MP3 and TUNER, and the timing point is reached; when MP3 or TUNER is
playing a program before the timing point is reached and nothing is set to the MP3 or TUNER by the
timing point, MP3 and TUNER will not stop playing the program.
Ring setting This operation is to set the On/Off state of the ring for a timing point. Turn the jog dial
to move the cursor to the box behind the “Ring”, turn the jog dial to select, and press the jog dial once
to confirm and exit after selection.
Default Press the jog dial once to the default setting, and the present state is the same as the last
state executed.
Click “Yes” to confirm the operation above after setting, and exit from the zone timer setting interface
to the timer setting interface.
5.1.10 Deleting: This operation is to delete a present timing point.
5.1.11 Deleting all: This operation is to delete all timing points of the selected day (such as Wednesday).
5.2 Time Adjustment
Turn the jog dial in “Operation Selection” interface to move the cursor to “Adjust Time”, press the jog
dial to access to the operation interface for adjusting time (as shown in Fig. 5-2), turn the jog dial to
move the cursor to the desired time digit item, and press the jog dial once when the digit is displayed
reversely. When a icon appears, turn the jog dial to change the digit, and press the jog dial again to
confirm and exit. Set the other items according to the method above, move the cursor to “Yes” and
10
* LY *
Home Music System
press the jog dial once to confirm the present operation and exit from the “Adjust Time” interface after
setting; or move the cursor to “No”, and press the jog dial to cancel the present operation and exit from
the “Adjust Time” interface.
5.3 Copying a Timing Point
Turn the jog dial in “Operation Selection” interface to move the cursor to “Copy Timing”, and press
the jog dial once to access to operation interface for copying a timing point (as shown in Fig. 5-3),
where all timing points of a day (such as Monday) can be copied to the day or days shown in n√ box,
so that the timing points of the day or days are the same. Operations are as follows:
06
10
Copy Timing
09
Copy the timing points of whole MON. to:
No
MON.
Adjust Time
Yes
2× 3× 4× 5× 6× S×
The former timing point
will be overwritten
06 : 10 : 09
Yes
No
(Fig. 5-3)
(Fig. 5-2)
Turn the jog dial to move the cursor to the selected “Weekday”, and press the jog dial once. When a
icon appears, turn the jog dial to select, and press the jog dial once to confirm and exit.
Turn the jog dial to move the cursor to the “ n× ” box, and press the jog dial. When the former “×”
changes into “√”, the day is selected. “×” represents that no copy will be made “√” represents that
copy will be made.
Click “Yes” to confirm the present operation and exit from the Copy Timing interface after operations;
or click “No” to cancel the present operation and exit from the Copy Timing interface.
5.4 System Setting
Turn the jog dial to “System Setting” in “Operation Selection” interface, and press the jog dial to
access to the System Operation interface (as shown in Fig. 5-4). Set the backlight state (including
AUTO and ON) of the screen and time span for timing point ring in this interface. Operations are as
follows:
Turn the jog dial to move to the box behind the “Backlight”, and press the jog dial once. When a
icon appears, press the jog dial again to switch between “On” and “AUTO”. Press the jog dial again to
confirm and exit after selection. When setting as “AUTO”, the backlight is off if no action is taken
within 20 seconds. By the same way, you can set the time span for timing point ring within 03 to 99
seconds.
Click “Yes” to confirm and exit after setting.
System Setting
AUTO
On
Backlight AUTO
Ring will be executed for 06 s
Yes
No
(Fig. 5-4)
※ Function Description for Infrared Remote Controller
Tips: When operating the console by infrared remote controller, only the manual control functions of
the 1st zone, MP3 player and tuner can be controlled.
When controlling MP3 and tuner, select a sound source for MP3 or tuner first, and press any blue key
to access to state operation interface of MP3 or tuner; press the “AM/FM” key on infrared remote
controller to access to the state operation interface of tuner under any sound source state.
11
* LY *
Home Music System
1 Power key
2
Volume selection key
3
4
5
Bass up key
6
7
8
9
10
11
Tuner AM/FM key
Bass down key
MP3 player Play/Pause key
Tuner FM stereo or mono key
Treble up key
Volume up key
Volume down key
Treble down key
MP3 song select/Tuner channel call key
Receiving angle for the infrared remote controller
Receiving angle of the remote control pad is 90º
45°
Receiving angle of the console is 90º
45°
12
* LY *
Home Music System
※ Wiring Method for Remote Control Pad
The console should be connected to the remote control pad through twisted pair, and the wiring
method is as shown in figure below.
The connectors of the two ends
should be one to one
Connect to the
remote control
pad interface on
the console
Connect to the
P3 socket of
remote control
pad
Tips: The operation description of the remote control pad can be referred to the User's Manual of
HS30R (remote control pad).
※ Description for File Format Applications of USB Flash Disk
1.
The system supports the USB interfaces of USB flash disks, mobile hard disks and USB card
readers (referred to as USB memory), and only supports music files in MP3 format up to
320KBPS, so that the music files in other formats can’t be played. In case a song can’t be
played, check whether the file is suitable.
2.
Supports file system, such as FAT12, FAT16 and FAT32.
3.
For improving the operation speed and optimizing the management, it is recommended that you
should only store MP3 songs in the USB flash disk or mobile hard disk without files in other
formats, and delete any irrelative directory and file as to improve the read/write speed and
speed for editing a timing point.
4.
Maximum 99 primary directories can be established in the root directory, maximum 99 songs
can be stored in each directory, and maximum 99 songs can be stored in the root directory. Do
not add a secondary directory with songs in a primary directory; otherwise, the song in the
subdirectory can’t be read. You can store a song in your USB flash disk by the 3 following
methods:
Establish no directory, and store all songs in the root directory as to select a song conveniently.
But, only 99 songs can be stored. Be careful to select the song in root directory. For selecting
the directory, select directory 00.
13
* LY *
Home Music System
01.MP3
02.MP3
USB memory
99.MP3
Store all songs in primary directories as to store songs by classification. Maximum 99×99
songs can be stored.
01.MP3
02.MP3
Directory 1
99.MP3
USB memory
01.MP3
02.MP3
Directory 99
99.MP3
Store songs both in the root directory and primary directories. Maximum 99+99×99 songs can
be stored.
01.MP3
02.MP3
Directory 1
99.MP3
01.MP3
02.MP3
USB memory
Directory 99
99.MP3
01.MP3
99.MP3
14
* LY *
※
1
Home Music System
Precautions
Safety Operation
Please don’t insert the power plug of the equipment into the power network before connecting the
system properly.
It should be ensured that the voltage provided for the equipment is completely same with the
voltage required by the equipment; otherwise, there may be risk of damaging the equipment.
Please don't open the shell without authorization to prevent electric shock.
The machine isn't disconnected from the power network completely when the power switch of the
equipment is at "off" status. For safety, please pull out the power plug from the socket when the
equipment is out of use.
Please don't settle the equipment at a place with over cold or overheat.
It is required to ensure a good ventilation working condition for the equipment to prevent overheat
during operation and damage of machine due to a high temperature.
The master power supply switch should be turned off in very damp weather or when the device is
not to be used for a long time.
It is required to pull out the power plug from the socket and to ensure the equipment fully
disconnect from the power network before disassembling or re-assembling any part of the
equipment, disconnecting or re-connecting any electric appliance or other connections.
When the equipment is found with a failure, the non-professional personnel without authorization
should not open the shell for repairing to prevent accidental event.
Don’t place any corrosive chemical substance around or on the top of equipment.
2
After-sales Service
For the quality problems occurred in the operations complying with rules in the User’s Manual,
our company will provide free of charge guarantee service for one year (including free
replacement of part) from the date of purchase
To obtain these guarantee services, consumer should present the Card of Guarantee, and sales
invoice as credential.
The following conditions don’t belong to the guarantee:
(1) Product damage caused by wrong installation, application or handling.
(2) Product damage caused by abnormal conditions such as over voltage or extreme humidity,
etc.
(3) Product damage caused by the accidents from force majeure.
(4) The number of product on the shell has been altered or removed.
(5) The product has been repaired or modified by the unauthorized personnel.
Please keep the User’s Manual and Card of Guarantee properly.
As to the terms or precautions not mentioned in the User’s Manual, please contact the distributor
or visit the web page of our company: http://www.lyintlcorp.com.
15
* LY *
Home Music System
※ Packing List
Model HS6813
3-core power cord (AC220V/10A)
1.5m 2-2 RCA cable
FM antenna
AM antenna and antenna mounting
User’s Manual
Quality Certificate
Warranty Card
1set
1pcs.
1pcs.
1pcs.
1set.
1copy
1copy
1copy
※ Specifications
1. MP3 Player
Item
Specifications
File type compatible
MP3 format, code rate<320kbps
Memory device type compatible
Compatible to most USB interfaces of mobile disks
Frequency response
20Hz-20kHz
THD
<0.2%
2. AM/FM Tuner
Item
AM
FM
16
Specifications
Receiving frequency range
522kHz-1620kHz
Sensitivity
52dBμ
S/N
35dB
Band pass
6kHz
THD
0.2%
Receiving frequency range
87.0MHz-108.0MHz
Sensitivity
18dBμ
S/N
75dB for mono, 70dB for stereo
Band pass
15kHz
THD
0.6%
Stereo crosstalk
35dB
* LY *
Home Music System
3. Timer
Item
Specifications
Programmable control power supply
1 channel (real-time mains voltage)
Socket capacity
220V, 2A
Time system
24-hour system
Programmable timing number
600 points for each day, not repeat in a whole week
Programmable items for a zone
Programmable ring type
a.
Zone On/Off
b.
Sound source selection
c.
Volume control
d.
Treble and bass control
e.
MP3 play control
f.
AM/FM control
g.
Ring On/Off
3 types
4. Comprehensive Specifications
Item
Zone quantity
6 zones, 2 channels and a amplifier for each zone
Zone remote communication interface
Audio
specifications
Specifications
RS-485, CAT-5 for wiring
Input sensitivity
250mV±25mV
Input resistance
>10kΩ
Zone output power
20W/4Ω
Frequency response
20Hz-20kHz(±0.5dB)
THD
<0.2%, 1/3 rated output power at 1kHz
Output regulation
<3dB (from full-load to no-load)
Tone control
S/N
Bass: ±10dB/100Hz
Treble: ±10dB/10kHz
>76dB
Power supply
AC220V/50-60Hz
Power consumption
<200W
Fuse
AC220V/F2A
Dimensions
485×88×345mm
NW
10kg
Dielectric strength test
3500V between each pole of the power supply and
housing/input/output terminal
The specifications above are subject to change without further notice.
http://www.lyintlcorp.com
17