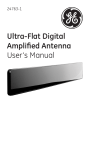
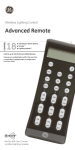
1
45600
1
Wireless Lighting Control
Remote Manual
18
• Individual Z-Wave devices
• Groups
• Lighting scenes
2
INTRODUCTION
Thank you for purchasing the GE SmartHome™ Remote. Your home control
network can include up to 232 Z-Wave enabled devices. This remote allows you
to control up to 18 individual Z-Wave devices with one easy-to-use, compact unit.
You can also set up and control up to 18 groups of lights as well as 18 scenes for
task or mood lighting. Each group can include up to 232 Z-Wave devices and
each scene can include up to 32 Z-Wave devices. Lights can be included in
multiple groups. Scenes can include lights from different groups.
Battery Use And Safety
• Use only fresh batteries of the required size and recommended type.
• Do not mix old and new batteries or different types of batteries.
• If you do not plan to use the remote for an extended period, remove the batteries.
They can leak chemicals that can destroy electronic parts.
• Dispose of old batteries promptly and properly. Do not burn or bury them.
Groups can include
up to 232 devices
Please note: The terms “Device”, “Node” and “Light” all refer to an individual
Scenes can include
up to 32 devices
Z-Wave enabled device in your home control network and are interchangeable
within the context of these instructions.
Add a node, group or scene can also be referred to as include a node, group
or scene. Remove a node, group or scene can also be referred to as Exclude a node,
group or scene.
In order to control the lights, they must be Z-wave enabled and you must first add
them to your home network. To add a device to your home network without assigning
it to a specific number key, perform the following steps:
1. Press and hold SETUP until both the red and green LEDs blink twice.
2. Press ADD once. (Red LED blinks once)
3. Press LIGHT once. (Red LED blinks once)
4. Press LIGHT again. (Green LED blinks rapidly)
5. Press the button on the device so that it sends its information to the remote and
Compatible with all Z-WAVE products.
DELETING A DEVICE (LIGHT / NODE) FROM YOUR NETWORK
To reset a device to its factory default, you must delete it from the network. To
delete the device from your network, perform the following steps:
1. Press and hold SETUP until both the red and green LEDs blink twice.
2. Press DELETE once. (Red LED blinks once)
3. Press LIGHT once. (Green LED blinks rapidly)
4. Press and release the button on the device so that it sends its information to the
remote and receives information from the remote.
5. When the green LED blinks twice, you have successfully deleted the device from
your home network.
NOTE: If the red LED emits one long, steady blink, you have pressed an invalid key or the device
has not been successfully deleted from your home network. Repeat steps 1-5 if this occurs.
CONTROLLING INDIVIDUAL LIGHTS (DEVICES / NODES)
You can control a light to turn on or off, or change its brightness level. The
operation of a specific device varies by product. Refer to the manual for that
device to learn its specific operation.
1. Press and release the LIGHT key to put the remote into “Individual Light Control”
mode. (Red LED blinks once) The remote will stay in this mode until either the
Group or Scene mode is activated.
2. Select the light you want to control.
(Press and release SHIFT to control lights 10 through 18.)
Turning a Light On or Off
• To turn a light on, press and release the ON key for less than one second. The
green LED will blink once.
• To turn a light off, press and release the OFF key for less than one second. The
green LED will blink once.
Setting a Light’s Brightness Level
• To make a light brighter, press and hold the ON key for more than one second.
(Green LED blinks rapidly)
NOTE: If the red LED emits one long, steady blink the remote has not successfully
communicated with the device. Repeat steps 1-2 if this occurs.
SETTING UP AND CONTROLLING A GROUP
You can create a collection of devices (lights / nodes) that you can control as a
group. You can set up a maximum of 18 groups. Each group can contain up to
232 devices.
Adding a Device (Light / Node) to a Group
To add a device to a group, perform the following steps:
1. Press and hold SETUP until both the red and green LEDs blink twice.
2. Press ADD once. (Red LED blinks once)
3. Press GROUP once. (Red LED blinks once)
4. Press a digit (1-9) for the group you wish to add the device to. Press SHIFT and
the digit (1-9) if you are adding a devices to groups 10 through 18. (Green LED
blinks rapidly)
5. Press the button on the device so that it sends its information to the remote and
receives information from the remote.
6. When the green LED blinks twice, you have successfully added the device to
your group.
NOTE: If the red LED emits one long, steady blink, you have pressed an invalid key or the
device has not been successfully added to your group. Repeat steps 1-6 if this occurs.
Removing a Device (Light / Node) from a Group
1. Press and hold SETUP until both the red and green LEDs blink twice.
2. Press REMOVE once. (Red LED blinks once)
3. Press GROUP once. (Red LED blinks once)
4. Press a digit (1-9) for the group you wish to remove the device from. Press SHIFT
and the digit (1-9) if you are removing a device from groups 10 through 18.
(Green LED blinks rapidly)
5. Press the button on the device you wish to remove.
6. When the green LED blinks twice, you have successfully removed the device
from your group.
NOTE: If the red LED emits one long, steady blink, you have pressed an invalid key or the
device has not been successfully removed from your group. Repeat steps 1-6 if this occurs.
NOTE: If the red LED emits one long, steady blink, you have pressed an invalid key or the
device has not been successfully added to your remote. Please make sure the remote is
within two feet of the device and try again.
ADDING A DEVICE (NODE / LIGHT) TO THE NETWORK
INSTALLING BATTERIES
Three “AAA” Alkaline batteries (not included) are required.
NOTE: If the red LED emits one long, steady blink, you have pressed an invalid key or the device
has not been successfully removed from your remote control. Repeat steps 1-5 if this occurs.
You can add a maximum of 18 lights to your remote so that they can be
controlled individually. Adding a device to your remote also adds it to your
network. If the device number you are trying to add is already associated with
another device, the previous information is lost.
To add a device to your remote, perform the following steps:
1. Press and hold SETUP until both the red and green LEDs blink twice.
2. Press ADD once. (Red LED blinks once)
3. Press LIGHT once. (Red LED blinks once)
4. Press a digit (1-9) for the device location you wish to add. Press SHIFT and the
digit (1-9) if you are adding devices 10 through 18. (Green LED
blinks rapidly)
5. Press the button on the device so that it sends its information to the remote
and receives information from the remote.
6. When the green LED blinks twice, you have successfully added the device to
your remote control.
NOTES ON NETWORK MANAGEMENT:
For best results, please read and perform all the remaining instructions before
using the remote. Keep this guide for future reference.
• To dim the light, press and hold the OFF key for more than one second. (Green
LED blinks rapidly)
ADDING A LIGHT (DEVICE / NODE) TO YOUR REMOTE
NOT FOR USE WITH MEDICAL OR LIFE SUPPORT EQUIPMENT
Z-Wave enabled devices should never be used to supply power to, or control
the On/Off status of medical and/or life support equipment
NOTE: This product can be operated in one Z-Wave network with Z-Wave certified devices
from other manufacturers and/or other applications. The different listening nodes within
the network can act as repeaters regardless of vendor.
5
receives information from the remote.
6. When the green LED blinks twice, you have successfully added the device to
your home network.
7. The device can now be added to Groups and/or Scenes.
NOTE: If the red LED emits one long, steady blink, you have pressed an invalid key
or the device has not been successfully added to your home network. Please
make sure the remote is within two feet of the device and try again.
To Install Batteries:
1. Open the battery compartment cover (located on the back of the remote).
2. Note the + and - polarity symbols inside the battery compartment.
3. Insert the batteries, making sure their polarity matches the symbols in the
compartment.
4. Replace the cover.
NOTE: When the red LED blinks 5 times after a key press, you must replace the
batteries. The remote retains all its user settings while replacing the batteries.
If this remote is used as the primary controller, you must use it to create your
control network. You can use multiple remote controls with your Z-Wave lighting
control network, however, only one remote will act as the primary controller. The
primary controller must be used to add or delete devices (lights / nodes) from your
network. All other remotes are considered secondary and can be used to create
groups and/or scenes and control your lighting however secondary remotes
cannot add or delete devices from your control network.
4 from your remote control.
3
CAUTION
6
REMOVING AN INDIVIDUAL DEVICE (LIGHT / NODE) FROM YOUR REMOTE
1. Press and hold SETUP until both the red and green LEDs blink twice.
2. Press REMOVE once. (Red LED blinks once)
3. Press LIGHT once. (Red LED blinks once)
4. Press a digit (1-9) for the device location you wish to remove. Press SHIFT and
the digit (1-9) if you are removing devices 10 through 18.
5. When the green LED blinks twice, you have successfully removed the device
7
Deleting a Group
1. Press and hold SETUP until both the red and green LEDs blink twice.
2. Press DELETE once. (Red LED blinks once)
3. Press GROUP once. (Red LED blinks once)
4. Press a digit (1-9) for the group you wish to delete. Press Shift and the digit (1-9)
if you are deleting groups 10 through 18.
5. When the green LED blinks twice, you have successfully deleted the group from
your home network.
NOTE: If the red LED emits one long, steady blink, you have pressed an invalid key or the group
has not been successfully removed from your home network. Repeat steps 1-5 if this occurs.
Controlling a Group
To control a Group, perform the following steps:
1. Press GROUP once to put the remote into “GROUP Control” mode. (Red LED
blinks once) The remote will stay in this mode until either the Light or Scene
mode is activated.
2. Press the digit key for the group you wish to control (1-9). Press SHIFT and the
digit (1-9) if you are controlling groups 10 through 18. The green LED will
blink once.
NOTE: If the red LED emits one long, steady blink, the remote has not successfully
communicated with the devices in the group. Repeat steps 1-2 if this occurs.
SETTING UP SCENES
A scene is a single device or group of devices that can be preset to turn to a
previously specified setting (for example, brightness level). Scenes are ideal for
task or mood lighting. You can set up a maximum of 18 scenes, containing up to
32 devices per scene. Scenes can include lights from different groups.
Adding a Light (Device / Node) to a Scene
1. Press and hold SETUP until both the red and green LEDs blink twice.
2. Press ADD once. (Red LED blinks once)
3. Press SCENE once. (Red LED blinks once)
4. Press a digit (1-9) for the scene you wish to add the device to. Press SHIFT and
the digit (1-9) if you are adding devices to scenes 10 through 18. (Green LED
blinks rapidly)
5. Press the button on the light you are adding. (Green LED pauses briefly, blinks
once and then resumes blinking rapidly, indicating that the remote is pending
the setup of the bright/dim setting on the device.)
6. Adjust the brightness level on the device within 30 seconds (refer to the manual
for the device)
7. Press SCENE. The green LED stops blinking.
8. When the green LED blinks twice, you have successfully added the device to a
scene.
NOTE: If the red LED emits one long, steady blink, you have pressed an invalid key or the
device has not been successfully added to the scene. Repeat steps 1-7 if this occurs.
Removing a Light (Device / Node) from a Scene
1. Press and hold SETUP until both the red and green LEDs blink twice.
2. Press REMOVE once. (Red LED blinks once)
3. Press SCENE once. (Red LED blinks once)
4. Press a digit (1-9) for the scene you wish to remove the device from. Press SHIFT
and the digit (1-9) if you are removing devices from scenes 10 through 18.
(Green LED blinks rapidly)
5. Press the button on the device that you wish to remove.
6. When the green LED blinks twice, you have successfully removed the device
from the scene.
NOTE: If the red LED emits one long, steady blink, you have pressed an invalid key or the
device has not been successfully removed from the scene. Repeat steps 1-6 if this occurs.
Deleting a Scene
1. Press and hold SETUP until both the red and green LEDs blink twice.
2. Press DELETE once. (Red LED blinks once)
3. Press SCENE once. (Red LED blinks once)
4. Press a digit (1-9) for the scene you wish to delete. Press SHIFT and the digit
(1-9) if you are deleting scenes 10 through 18.
5. When the green LED blinks twice, you have successfully deleted the scene from
your home network.
NOTE: If the red LED emits one long, steady blink, you have pressed an invalid key or the
scene has not been successfully deleted. Repeat steps 1-5 if this occurs
8
9
CONTROLLING SCENES
To control a scene, perform the following steps:
1. Press SCENE once. (Red LED blinks once) The remote will stay in this mode until
either the Light or Group mode is activated.
2. Press the digit key for the scene you wish to control (1-9). Press SHIFT and the
digit (1-9) if you are controlling scenes 10 through 18. The green LED
blinks once.
NOTE: If the red LED emits one long, steady blink, the remote has not successfully
communicated with the devices in the scene. Repeat steps 1-2 if this occurs.
Turning All Devices (Lights / Nodes) On or Off
To turn all devices on or off, perform the following steps:
1. Press ALL once. (Red LED blinks once)
2. Press either ON or OFF. Any ON or OFF button can be pressed. The green LED
blinks once.
NOTE: If the red LED emits one long, steady blink, you have pressed an invalid key or the
All-On/All-Off command was not successful. Repeat steps 1-2 if this occurs.
Deleting Devices (Lights / Nodes) from All Control
If desired, specific devices can be setup to ignore the All-On and All-Off
commands.
1. Press and hold SETUP until both the red and green LEDs blink twice.
2. Press DELETE once. (Red LED blinks once)
3. Press ALL once. (Green LED blinks rapidly)
4. Press the button on the device that you wish to remove from All Control.
5. The green LED blinks twice. You have successfully deleted the device from All
Control.
NOTE: If the red LED emits one long, steady blink, the device has not been successfully
deleted from the group. Repeat steps 1-5 if this occurs.
Adding Devices (Lights / Nodes) to All Control
The factory default setting for GE Z-Wave devices is to be included in All-On and
All-Off control. The following section should only be needed if the device has been
deleted from All Control.
12
1. Place the two remotes near each other.
2. Press and hold SETUP until both the red and green LEDs blink twice.
3. Enter 9 6 7 on the numeric keypad.
4. Put the source remote into programming mode so that it sends its information
to the GE SmartHome™ remote, as well as receives information from this
remote.
5. When the green LED blinks twice, you have successfully transferred the
information.
6. Add devices, groups, and scenes to the new remote as needed.
NOTE: If the red LED emits one long, steady blink, the information has not been successfully
transferred. Repeat steps 1-6 if this occurs.
RECOVERING NETWORK INFORMATION
To have your remote recover network information, perform the following steps:
1. Press and hold SETUP until both the red and green LEDs blink twice.
2. Enter 9 6 1 on the numeric keypad.
3. When the green LED will blink twice. You have successfully recovered network
information.
NOTE: If the red LED emits one long, steady blink, the information has not been successfully
recovered. Repeat steps 1-3 if this occurs.
RESETTING YOUR NETWORK
You can reset your network to clear all device and Z-Wave network information.
To reset your network, perform the following steps:
1. Press and hold SETUP until both the red and green LEDs blink twice.
2. Enter 9 6 9 on the numeric keypad.
3. When the green LED blinks twice, you have successfully reset network
information.
4. Reset all individual devices as instructed in the section on deleting devices from
the network
NOTE: If the red LED emits one long, steady blink, the network has not been successfully
reset. Repeat steps 1-3 if this occurs.
10
1. Press and hold SETUP until both the red and green LEDs blink twice.
2. Press ADD once. (Red LED blinks once)
3. Press ALL once. (Green LED blinks rapidly)
4. Press the button on the device you wish to include.
5. When the green LED blinks twice, you have successfully added the device to
all control.
NOTE: If the red LED emits one long, steady blink, the device has not been successfully added
to the group. Repeat steps 1-5 if this occurs.
NOTES ABOUT COPYING INFORMATION TO OR FROM THE REMOTE CONTROL:
Create Secondary Controller, Primary Controller Shift and Controller Copy Receipt
are all methods used in the process of Replication. Please refer to the respective
sections for Create Secondary Controller, Primary Controller Shift and Controller
Copy for instructions on how to replicate to and/or from the remote.
CREATE SECONDARY CONTROLLER
SENDING DEVICE AND NETWORK INFORMATION TO A SECONDARY REMOTE
You can add a secondary remote to your network, and copy your primary remote’s
device and network information to it. To send device and network information to a
secondary remote, perform the following steps:
1. Place the two remotes near each other.
2. Press and hold SETUP on the primary GE SmartHome™ remote until both the red
and green LEDs blink twice.
3. Enter 9 6 6 1 on the numeric keypad. (Either on/off)
4. Refer to the user manual for the secondary remote for programming
information. See the following section on “Copying Network/Device
Information” if the target remote is a GE SmartHome remote. Put the target
(secondary) remote into programming mode so that it sends its information to
the primary remote, as well as receives information from that remote. The
primary remote then copies the network and device information to the new
secondary remote.
5. When the green LED blinks twice, you have successfully transferred the
information.
13
FCC NOTICE
This device complies with Part 15 of the FCC rules. Operation is subject to the
following two conditions: (1) this device may not cause harmful interference, and
(2) this device must accept any interference received, including interference that
may cause undesired operation.
If this equipment does cause harmful interference to radio or television reception,
which can be determined by turning the equipment off or on, the user should:
• Relocate or reorient the TV or radio antenna
• Increase the separation between the device and the receiver.
Any changes or modifications to the equipment without JASCO’s express consent
will void the user’s right to operate this equipment.
FCC ID: MG345600
WARRANTY
JASCO Products warrants this product to be free from manufacturing defects for a
period of two years from the original date of consumer purchase. This warranty is
limited to the repair or replacement of this product only and does not extend to
consequential or incidental damage to other products that may be used with this
product. This warranty is in lieu of all other warranties, expressed or implied.
Some states do not allow limitations on how long an implied warranty lasts or
permit the exclusion or limitation of incidental or consequential damage, so the
above limitations may not apply to you. This warranty gives you specific rights,
and you may also have other rights which vary from state to state. If the unit
should prove defective within the warranty period, return prepaid with dated
proof of purchase to:
JASCO Products Company
10 E Memorial Rd.
Oklahoma City, OK 73114
11
6. Add devices, groups, and scenes to the new secondary remote as needed.
NOTE: If the red LED emits one long, steady blink, the information has not been successfully
transferred. Repeat steps 1-5 if this occurs.
SENDING NETWORK INFORMATION TO A SECONDARY REMOTE
You can add a secondary remote to your network, and transfer your primary
remote’s network information to it. To transfer network information to a
secondary remote, perform the following steps:
1. Place the two remotes near each other.
2. Press and hold SETUP until both the red and green LEDs blink twice.
3. Enter 9 6 6 2 on the numeric keypad.
4. Put the target (secondary) remote into programming mode so that it sends its
information to the primary remote, as well as receives information from the
remote. The primary remote then copies the network information to the new
secondary remote. Refer to the user manual for the secondary remote for more
information.
5. When the green LED blinks twice, you have successfully transferred the
information.
6. Add devices, groups, and scenes to the new secondary remote as needed.
NOTE: If the red LED emits one long, steady blink, the information has not been successfully
transferred. Repeat steps 1-5 if this occurs.
PRIMARY CONTROLLER SHIFT (TRANSFER)
You can transfer all of your remote’s information to another remote, so it becomes
the new primary remote. You can do this in two ways: either transferring all
information, or just transferring network information.
Transferring All Network and Remote Information
1. Place the two remotes near each other.
2. Press and hold SETUP until both the red and green LEDs blink twice.
3. Enter 9 6 8 1 on the numeric keypad.
4. Put the target (new primary) remote into programming mode so that it sends its
information to the source (old primary) remote, as well as receive information
14
from the old primary remote. The source remote then transfers the network
and device information to the new primary remote. Refer to the user manual
for the new primary remote for more information.
5. When the green LED blinks twice, you have successfully transferred the
information.
6. The source remote is converted into a secondary remote and can not be used
to add or delete devices from the network.
7. Add devices, groups, and scenes to the new primary remote as needed.
NOTE: If the red LED emits one long, steady blink, the information has not been successfully
transferred. Repeat steps 1-6 if this occurs.
Transferring Only Network Information
1. Place the two remotes near each other.
2. Press and hold SETUP until both the red and green LEDs blink twice.
3. Enter 9 6 8 2 on the numeric keypad.
4. Put the target (new primary) remote into programming mode so that it sends its
information to the source (old primary) remote, as well as receive information
from the old primary remote. The source remote then transfers the network
information to the new primary remote. Refer to the user manual for the new
primary remote for more information.
5. When the green LED blinks twice, you have successfully transferred the
information.
6. The source remote is converted into a secondary remote and can not be used
to add or delete devices from the network.
7. Add devices, groups, and scenes to the new primary remote as needed.
NOTE: If the red LED emits one long, steady blink, the information has not been successfully
transferred. Repeat steps 1-6 if this occurs.
COPYING NETWORK AND/OR DEVICE INFORMATION TO THIS REMOTE
This allows a second remote to receive information from the first remote and to
become a new primary or secondary remote.
15
Compliance with IC Rules AND Regulations
IC: 6924A-45600
Jasco Products Company
Model: 45600
"Object is subject to the following two conditions:
(1) this device may not cause interference, and (2) this device must
accept any interference, including interference that may cause
undesired operation of the device."
WARNING!
• RISK OF FIRE
• RISK OF ELECTRICAL SHOCK
• RISK OF BURNS
Exercise extreme caution when using Z-Wave devices to control appliances.
Operation of the Z-Wave device may be in a different room than the controlled
appliance, also an unintentional activation may occur if the wrong button on the
remote is pressed. Z-Wave devices may automatically be powered on due to timed
event programming. Depending upon the appliance, these unattended or
unintentional operations could possibly result in a hazardous condition. For these
reasons, we recommend the following:
1. Assign Z-Wave controlled appliances to device numbers 10 – 18 on the GE remote. The
likelihood of unintentionally turning on the appliance will be reduced significantly because
the “Shift” button will need to be pressed before pressing device numbers 10-18.
2. Z-Wave devices controlling appliances should be removed from “All” control setting.
Instructions on how to do this are included in the manual for your GE remote.
3. Do Not include Z-Wave devices in Groups or Scenes if they control appliances.
4. Do Not use Z-Wave devices to control electric heaters or any other appliances which may
present a hazardous condition due to unattended or unintentional or automatic power
on control.
Wireless Range:
This device complies with the Z-Wave standard of open-air, line of sight transmission distances of 65 feet. Actual performance in a home depends on the number of
walls between the remote controller and the destination device, the type of
construction and the number of Z-Wave enabled devices installed in the control
network. Every Z-Wave enabled device acts as a signal repeater and multiple
devices result in more possible transmission routes which help eliminate “RF
dead-spots”.
Things to consider regarding RF range:
• Each wall or obstacle (i.e.: refrigerator, big screen TV, etc.) between the remote
and the destination device will reduce the maximum range of 65 feet by
approximately 25-30%.
• Brick, tile or concrete walls block more of the RF signal than walls made of
wooden studs and plasterboard (drywall).
• Wall mounted Z-Wave devices installed in metal junction boxes will suffer a
significant loss of range (approximately 20-25%) since the metal box blocks a
large part of the RF signal.
For questions:
e-mail [email protected]
or call technichal support at 1-800-654-8483
is a trademark of the
General Electric Company
and is used under license to
Jasco Products Company LLC,
10 E Memorial Rd.,
Oklahoma City, OK 73114.
www.jascoproducts.com
Made in China
Hecho en China
45600-2 © JASCO 2009
Z-Wave is a registered US trademark or Zensys A/S
Z-Wave enabled
devices should never
be used to supply
power to, or control
the On/Off status of
medical and/or life
support equipment.
Z-Wave home control networks
are designed to work properly
alongside 802.11 wireless
computer networks, Bluetooth and
other 2.4GHz or 5.8GHz devices.
Some baby cams, wireless video
devices and older cordless phones
using the 900MHz frequency range
may cause interference and limit
the Z-Wave functionality.