1
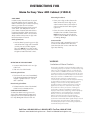
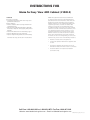
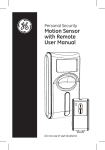
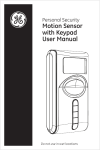
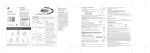
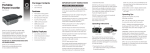
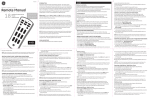
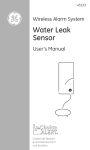
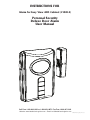
INSTRUCTIONS FOR
Alarm for Easy View AED Cabinet (#18214)
Personal
Security
Personal
Security
Deluxe Door Alarm
eluxeDoorAlarm
D
UserManual
User Manual
Call Free 1.800.848.1633 or 1.888.HCL-INTL Fax Free 1.800.447.2923
Website: www.HealthCareLogistics.com • Email: [email protected]
© Health Care Logistics, Inc. 2009
INSTRUCTIONS FOR
DeluxeDoorAlarm
Alarm for Easy View AED Cabinet (#18214)
Keypad Controlled
Home/
Away
Switch
Alarm/
Chime
Switch
INSTALLINGBATTERIES
The keypad controlled door alarm requires
three (3) AAA Alkaline batteries (not
included).
Magnet
Indicator
Light
Toinstallthebatteries:
1. Remove screw from battery
compartment door located on back
of the unit. Slide off the door in the
direction of the arrow.
Keypad
Learn
button
Screws
LEARN
Doublesided tape
Battery Compartment
Mounting Plate
LowBatteryIndicator
The alarm unit has a low battery circuit.
When the batteries reach a low level, the
indicator light will flash slowly. Average
battery life for typical usage is up to one
year.
CREATINGYOURPERSONALALARMCODE
The keypad allows you to set a personal
-digit code for arming and disarming the
alarm.
1. Remove screw from battery
compartment door located on back
of the unit. Slide off the door in the
direction of the arrow.
2. Press the LEARN button.
3. The red light on the front of the alarm
will blink for 1 seconds. During this
time, input your -digit code. A beep
will confirm each input.
Learn
The unit will flash a
button
green light 3 times to
confirm the new -digit
code has been saved.
. Replace cover and
secure screw.
2. Insert three (3) AAA
batteries noting the
polarity diagram
inside the battery
compartment.
3. Replace door and
secure screw.
INSTALLATION
1. Select desired location for alarm.
The alarm is designed to mount to
the door frame or to the door itself.
Use either the provided screws (for
permanent mounting) or double-sided
tape (for temporary mounting). The
recommended location is the back of
the door, with the magnet mounted to
the door frame. Mounting the alarm
to the door ensures that the alarm
will not be damaged by opening and
closing the door.
LEARN
Recommended Mounting Method
Alternate Mounting Method
Call Free 1.800.848.1633 or 1.888.HCL-INTL Fax Free 1.800.447.2923
Website: www.HealthCareLogistics.com • Email: [email protected]
© Health Care Logistics, Inc. 2009
Double-sided tape
INSTRUCTIONS FOR
Mounting Plate
Alarm
Alarm for Easy View
AED Cabinet (#18214)
Do not apply firm pressure until
location is final.
NOTE: When mounting to a door
frame, the mounting plate mounts
off-center to the left or right in order
to position alarm closest to the edge
of the door.
Note that the magnet may be
mounted to either side of the alarm as
long as the arrows line up.
3. Using double-sided tape, lightly
attach the magnet to the opposite
edge next to the alarm. Line up the
arrows of the alarm and the magnet.
Ensure the distance between the two
pieces is 1/2” or less. To test the gap
distance, slide the ALARM/CHIME
switch to CHIME and open the door. If
chime sounds, then the gap distance
is correct. If it does not sound, move
either the alarm or magnet closer so
that gap distance is 1/2” or less.
Distance must be less than 1/2”
IMPORTANT: Whether mounting
to the door or door frame, the gap
distance between the alarm and
magnet must be 1/2” or less.
2. Attach the mounting plate to the
back of the alarm. Peel the protective
covering from one side of the
double-sided tape and then apply to
mounting plate. Remove protective
covering from the back side of the
double-sided tape and lightly mount
the alarm in the desired position.
Make sure the surface you are
mounting to is clean and dry. For best
results, clean the mounting surface
with a mixture of 0% isopropyl
alcohol and 0% water.
. Once you have confirmed the correct
positioning of the magnet and alarm, 10
lift the alarm off the mounting plate
and apply firm pressure directly to the
plate itself. Once secured, reattach the
alarm to the mounting plate.
. Apply firm pressure to the magnet to
secure its position as well.
OPERATINGINTHEALARMMODE
1. Locate ALARM/CHIME switch on right
side of the alarm unit.
Double-sided tape
Mounting Plate
Alarm
Do not apply firm pressure until
location is final.
NOTE: When mounting to a door
2. Slide switch to ALARM position.
3. Choose HOME or AWAY on the left side
of the alarm unit.
HOMEMODE
In HOME mode, the alarm will sound
when the gap between the alarm and the
magnet is greater than 1/2” (i.e. the door
is opened).
Call Free 1.800.848.1633 or 1.888.HCL-INTL Fax Free 1.800.447.2923
Website: www.HealthCareLogistics.com • Email: [email protected]
© Health Care Logistics, Inc. 2009
INSTRUCTIONS FOR
Alarm for Easy View
AED Cabinet (#18214)
11
AWAYMODE
In AWAY mode, there will be a second
exit delay before the unit is armed. The
alarm’s indicator light will flash red quickly,
alerting you that the unit has been
activated and has begun the -second
count down. The delay allows time for
you to leave the protected area without
triggering the alarm. When returning to
the protected area, there is a 30 second
delay to allow time to enter -digit code
before the alarm will sound.
ArmingtheAlarm:
1. Arm the alarm by pressing your -digit
code. When the digit code is entered
correctly the unit will flash a green
light once. NOTE: if the digit code is
entered incorrectly, the unit will sound
a higher tone and flash red 3 times.
12
DisarmingtheAlarm:
1. Enter your -digit code to disarm the
alarm. When the fourth digit of your
code is entered, the unit will respond
with two tones and will flash a green
light twice.
2. Enter the correct code anytime after
the alarm has sounded to deactivate.
NOTE: When testing, a cloth can be
used to cover the alarm to reduce risk
of hearing damage.
IncorrectCode
If an incorrect code is entered, the unit will
sound a louder beep and will flash red 3
times. Re-enter the correct code after the
light stops flashing.
1
13
OPERATINGINTHECHIMEMODE
1. Locate ALARM/CHIME switch on right
side of unit.
2. Slide switch to CHIME mode.
ActivatingtheChime:
1. The chime will now sound immediately
if the distance between the alarm and
magnet is greater than 1/2” (i.e. the
door is opened).
DeactivatingtheChime:
1. To deactivate the chime slide ALARM/
CHIME switch to ALARM position.
CAREANDMAINTENANCE
To clean the alarm housing, use a soft
cloth slightly dampened with water and
wipe dry. Do not use chemical agents as
this may damage and discolor the unit.
WARNING
Limitations of Alarm Products
This product should be tested periodically to make sure
it is working properly. The product, if used properly, may
reduce the risk of burglary, robbery, or other adverse
events. However, JASCO is not an insurer, this product
is neither insurance nor a guarantee that such an event
will be prevented, and users should protect themselves
with proper insurance. JASCO makes no representation
that this product cannot be compromised or
circumvented, that it will provide an adequate warning,
or that it will prevent any personal injuries, property
damage, or other losses. Like any alarm product,
including expensive commercial systems, it may be
bypassed, it is subject to compromise, and it may
fail to warn for a variety of reasons, including, but
not limited to: improper installation or positioning;
improper maintenance; tampering; dead or improperly
installed batteries; sensing limitations; component
failures; receivers; for infrared products, intrusions
may be outside of a product’s designed range
and certain environmental conditions may impact
performance and audible alarm signals may be outside
of hearing range, muted by doors, walls, and floors,
unheard by deep sleepers or the hearing-impaired, or
overwhelmed by other sounds.
Call Free 1.800.848.1633 or 1.888.HCL-INTL Fax Free 1.800.447.2923
Website: www.HealthCareLogistics.com • Email: [email protected]
© Health Care Logistics, Inc. 2009
INSTRUCTIONS FOR
Alarm for Easy 1
View AED Cabinet (#18214)
WARNING
Risk of personal injury
• Prolonged exposure to alarm siren may cause
permanent hearing loss
Battery Warning
• Remove batteries before storing the Alarm for
extended periods
• Batteries may leak harmful liquids or ignitable
materials or explode causing injury and product
damage
• Do not mix old and new or other battery types
• Replace all batteries at the same time
• Replace fully discharged batteries immediately
For indoor use only; do not use in wet locations.
This Jasco product comes with a 0 day limited
warranty. Please contact Customer Service at
00--3 between :30AM—:00PM CST or via our
website (www.jascoproducts.com) if the unit should
prove defective within the warranty period.
1
NOTE: This equipment has been tested and found
to comply with the limits for a Class B digital device,
pursuant to Part 1 of the FCC Rules. These limits are
designed to provide reasonable protection against
harmful interference in a residential installation. This
equipment generates, uses and can radiate radio
frequency energy and, if not installed and used in
accordance with the instructions, may cause harmful
interference to radio communications. However, there
is no guarantee that interference will not occur in a
particular installation. If this equipment does cause
harmful interference to radio or television reception,
which can be determined by turning the equipment
off and on, the user is encouraged to try to correct the
interference by one or more of the following measures:
• Reorient or relocate the receiving antenna.
• Increase the separation between the equipment and
receiver.
• Connect the equipment into an outlet on a circuit
different from that to which the receiver is connected.
• Consult the dealer or an experienced radio/TV
technician for help.
is a trademark of the General Electric Company and
is used under license to Jasco Products Company LLC,
10 E. Memorial Road, Oklahoma City, OK 311.
11
/1/200
Call Free 1.800.848.1633 or 1.888.HCL-INTL Fax Free 1.800.447.2923
Website: www.HealthCareLogistics.com • Email: [email protected]
© Health Care Logistics, Inc. 2009