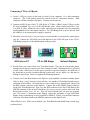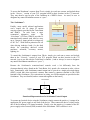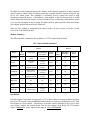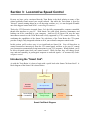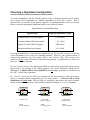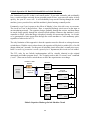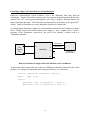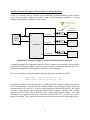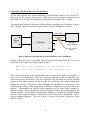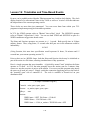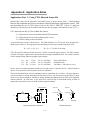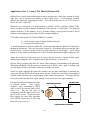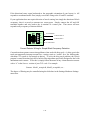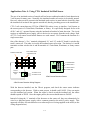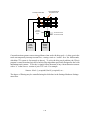
1
The CTI Model Railroad Control System User's Guide Version 6.1.0 CTI Electronics P.O. Box 9535 Baltimore, MD. 21237 www.cti-electronics.com Email: [email protected] Technical Support: [email protected] Copyright 2014, CTI Electronics. All rights reserved. 2 Table of Contents Introduction . . . . . . . . . . . . . . . . . . . . . . . . . . . . Section 1. Installing CTI . . . . . . . . . . . . . . . . . . . . . Introducing the Train Brain . . . . . . . . . . . . . . . . Hooking Up Your CTI System . . . . . . . . . . . . . . Checking Out Your CTI System . . . . . . . . . . . . . Troubleshooting . . . . . . . . . . . . . . . . . . . . . . Section 2: Using CTI . . . . . . . . . . . . . . . . . . . . . . . Lesson 1: Building Railroads . . . . . . . . . . . . . . . Lesson 2: Running Railroads . . . . . . . . . . . . . . . Lesson 3: Fully Automatic Operation . . . . . . . . . . . Lesson 4: Using Quick-Keys . . . . . . . . . . . . . . . Variations on a Theme: The Train-Brain Module Family . . Section 3: Locomotive Speed Control . . . . . . . . . . . . . . . Introducing Smart-Cab . . . . . . . . . . . . . . . . . . . Lesson 5: Interactive Train Control Using Smart-Cab . . . . Lesson 6: Automatic Train Control Using Smart-Cab . . . . Maximizing Smart-Cab Performance . . . . . . . . . . . . Section 4: Controlling Signals . . . . . . . . . . . . . . . . . . . Introducing the Signalman . . . . . . . . . . . . . . . . . . Choosing a Signalman Configuration . . . . . . . . . . . . Lesson 7: Hooking Up The Signalman . . . . . . . . . . . Lesson 8: Controlling Signals from TCL . . . . . . . . . . . Section 5: Controlling Switches . . . . . . . . . . . . . . . . . . . Lesson 9: Dual-Coil Solenoid-Based Switch Control . . . . . Slow-Motion Switch Control: Introducing the YardMaster . . Lesson 10: Hooking Up & Using The YardMaster. . . . . . . Section 6: Programming Tips . . . . . . . . . . . . . . . . . . . . . Lesson 11: Introducing Variables . . . . . . . . . . . . . . . . Lesson 12: WHILE-DOs . . . . . . . . . . . . . . . . . . . . Lesson 13: Designing Your Own Control Panels . . . . . . . Lesson 14: Advanced Programming Concepts . . . . . . . . . Lesson 15: A Closer Look at Sensors . . . . . . . . . . . . Lesson 16: Timetables and Time-Based Events . . . . . . . . Lesson 17: Cab Control . . . . . . . . . . . . . . . . . . . . Lesson 18: Reversing Loops . . . . . . . . . . . . . . . . . . Lesson 19: Creating Random Events . . . . . . . . . . . . . Lesson 20: Sound . . . . . . . . . . . . . . . . . . . . . . . Lesson 21: Odds and Ends . . . . . . . . . . . . . . . . . . Section 7: Digital Command Control (DCC) . . . . . . . . . . . Using CTI with DCC. . . . . . . . . . . . . . . . . . . . . . . Train Identification (Transponding and RFID) . . . . . . . . . Appendix A: App Notes . . . . . . . . . . . . . . . . . . . . . . 3 5 7 8 12 16 18 19 20 24 26 30 32 39 39 43 45 47 49 49 51 52 57 63 63 70 73 78 78 83 85 107 129 134 136 142 144 145 149 152 152 160 173 4 The CTI User's Manual Introduction: Welcome to the world of computer controlled model railroading and CTI. By combining the decision-making power of the PC with the monitoring and control capability of the "Train Brain", the CTI system delivers a level of performance and prototypical realism never before imaginable. Your CTI system will add exciting new dimensions to your model railroad. This manual contains all the information you’ll need to get the most out of CTI computer control. So please take the time to read through it carefully. What Is CTI ? The CTI system is a new approach to model railroading that makes controlling your layout fast, easy, and fun. With CTI you can interface your entire model railroad to any Windows compatible computer. Tangled wires and overcrowded control panels are a thing of the past. You can now control every aspect of your layout automatically from a state-of-the-art control console displayed in full color on your PC screen. The CTI system transforms your personal computer into a sophisticated monitoring and control center, linked electronically to remote sites (called "Train Brains") located throughout your layout. CTI’s software running on the PC communicates with these sites many times each second, to monitor and control the operation of your model railroad. Train Brains are a simple, yet highly versatile family of remote control and sensing devices that works with all gauges, AC or DC. Their built-in sensors can be used to detect the location of trains anywhere on your pike, while their remotely-controlled outputs can manage the operation of trains, switches, signals, sound-units, lights, accessories, and much, much more. The Train Brains’ versatility lies in their onboard microprocessor, which allows each Train Brain to communicate with CTI's software running on the PC. Together, the pair form a powerful computer control system, able to tackle your railroad’s most demanding remote control needs. But discrete control and sensing is just the beginning. With CTI, you can also have precise control over your locomotives' speed, direction, momentum, and braking - all from your PC. Control your trains interactively from the CTI control panel, or let the PC control them automatically. Your engines can change speed, stop, and start smoothly in response to signals, make station stops, or run according to timetables, all under computer control. The CTI system has been engineered to be remarkably easy to use. All hardware and software is included. With no electronics to build and no software to write, you can have your CTI system up and running in minutes. All electrical connections simply plug right in. And CTI interfaces directly to your PC's external COM or USB port, so no changes to your computer are necessary. 5 The CTI system is completely modular. You'll buy only as much control capability as you need. And the system is easy to expand as your model railroad grows. Any number of CTI’s control modules can be combined in any way to suit the needs of your model railroad. The CTI system is a single, fully integrated, and cost effective solution to model railroad computer control. We believe that the CTI system represents the most flexible, the most affordable, and the most "user-friendly" model railroad control system ever produced. And our users agree. How to Use this Manual: This User's Manual is divided into seven sections. Section 1 will get you quickly up and running. You'll learn the details of the Train Brain, and see how easy it is to install and check out your CTI system. Section 2 introduces the CTI software. You'll learn how to run your model railroad using CTI's powerful operating system, "TBrain", and how to program the operation of your layout using CTI's innovative Train Control Language (TCL). In Section 3 you'll discover the capabilities of the SmartCab. You'll learn to dispatch trains from your PC using the CTI control panel, and to make your locomotives respond to trackside signals automatically, under computer control. Section 4 illustrates the use of CTI’s Signalman module: the fast, easy, and affordable way to control trackside signals, crossing gates, traffic lights, etc. -- all automatically from your PC. Section 5 introduces CTI’s Switchman and YardMaster modules that make computerized turnout control quick, painless, and remarkable affordable. Section 6 reveals even more features of the CTI system. You'll get numerous tips and suggestions, and tackle many of the most common control problems using CTI. Finally, you'll learn to create interactive control panel displays custom designed for your model railroad. Section 7 describes the use of the CTI system as part of a DCC-operated layout. Experience truly is the best teacher. That's why we'll frequently use examples throughout this manual to demonstrate important features of CTI. We recommend that you work through each example on your own. We have kept each one simple, generally requiring little more than a simple loop of track and very minimal wiring. So try them! We bet you’ll even find them fun. Some lessons also suggest one or more follow-up exercises for you to try on your own. These supplemental examples will give you a chance to practice what you've just learned. In all cases, the follow-up exercises use the same wiring as the main lesson, so they require very little effort. So, without further ado, let's get started. 6 Section 1: Installing CTI In this section you'll learn to set up and perform the initial checkout of the hardware components of your CTI system. When finished, your CTI system should be fully operational. System Requirements: The CTI system is designed to work with all IBM-PC or compatible computers meeting the following minimum configuration: Memory: Operating System: Monitor: I/O: Sound: 128 Mega-Bytes Microsoft Windows XP/7/8 Super-VGA color monitor or higher One serial (COM) or USB port Sound-Blaster compatible sound card (optional) The CTI software is designed to work best with your PC’s display set to a screen resolution of at least 800 x 600 pixels, and 24-bit or higher “True Color” color mode selected. These settings can all be adjusted using the Windows Control Panel tool if necessary. Installing the CTI Software: To install the CTI software, place the CTI Installation Disk into your CD-Rom drive and from the Windows desktop select Start-Run. At the Open: prompt, type: x:\setup (where ‘x’ is the letter of your CD-Rom drive). Click OK, and follow the onscreen instructions. That’s all there is to it. If you’d like to create a shortcut to your CTI software on your Windows desktop, simply right click on any open space on the desktop, and select New-ShortCut from the pop-up menu. Browse to C:\Program Files (x86)\TBrain\tbrain.exe. Click Next. Then click Finish. Now you’re ready to roll. Software Authorization: The CTI software, as shipped (or downloaded via Internet), runs in “Demo” mode. Demo mode provides full functionality, however, after 10 minutes the program will cease communicating with the CTI network. (At that point, you can continue working offline, or restart the program.) To authorize normal operation, select Settings-Software Authorization from the program’s main menu, enter the authorization code printed on the back of the CD case, then click OK. From now on, the software will run normally when started. (For those who downloaded the software via the Internet, authorization codes are available from CTI Electronics. The software, with unlimited Version 6 upgrades, costs $49.95. E-Mail [email protected] for details.) 7 Introducing the "Train Brain": Before installing your CTI hardware, it will help to become a bit more familiar with the Train Brain board itself. You may wish to have a Train Brain handy for reference. But first, a word of caution. Like all electronics containing integrated circuits, the Train Brain board can be damaged by exposure to ESD (electrostatic discharge). Your Train Brain board was delivered in a protective anti-static bag. We recommend that you store it there until ready for use. Handle the board by the edges - avoid touching its integrated circuits. Keep plastic, vinyl, and styro-foam away from your work area. With those few words of warning out of the way, let’s take a brief tour around the Train Brain. The block diagram below portrays the Train Brain's five primary functions. We'll look at each one individually. For reference, orient the Train Brain board so that its modular "telephone" style connectors lie near the top of the PC board. Power Supply PC Communications Sensors Microprocessor Controls Sensitivity Adjust “Train Brain” Module and Block Diagram Microprocessor: Model Railroading has entered the space age! Each Train Brain board comes equipped with its own onboard microprocessor to handle communications with the PC, manage the four control relays, monitor the four sensor ports, and let you know how things are going. You can tell a lot about the function of your Train Brain board simply by watching its onboard LED. It’s your microprocessor's way of letting you know what it’s doing. We'll decipher what the LED signal means when we install and check out the CTI system. The microprocessor is located near the lower middle section of the Train Brain board. It is a complete, stand-alone computer that contains a CPU, ROM, RAM, and I/O all in a single integrated circuit. 8 PC Interface: The greatest innovation of the CTI system is its interface between your model railroad and the PC. The flexibility that's available through your personal computer gives CTI a huge advantage over conventional "hard-wired" control schemes. Interfacing any number of Train Brains to your personal computer is easy (you'll be doing it in just a few minutes). The Train Brain uses inexpensive, easy-to-install, "plug-in" telephone cords to connect to the PC. Using these connections, the Train Brain exchanges control and status information with the PC hundreds of times every second. The connections to the computer are in the upper middle portion of the board. These two connectors allow any number of Train Brains to connect to the PC. (Since you'll be installing your CTI system momentarily, we won't dwell on the subject any more here.) Controllers: Each Train Brain board is equipped with 4 rugged, high capacity control relays, located from top to bottom along the left-hand side of the board. You can think of these as single-pole-doublethrow (SPDT) switches that you can control remotely from the PC. The SPDT switch configuration is a simple, yet highly versatile one, that's applicable to a wide range of control operations. Here are just a few: COM NO NC “Normally Off ” Switch COM NO COM NC “Normally On” Switch NO NO NC NC Output Selector COM Input Selector SPDT Switch Configurations You can access the 3 connection points of each SPDT switch using the terminals located along the left-hand edge of the Train Brain board. Note that the designation of each connector is written next to it on the surface of the PC board. "NC" (normally closed) indicates the terminal that’s connected to the switch's COMMON input when no power is applied to the relay coil. "NO" (normally open) designates the terminal that’s connected to the switch's COMMON input when the relay coil is energized. To connect a device to the controller, simply insert the wires into the openings on the side of the connector strip. Then screw down the retaining screws on the top of the connector until the wires are secured. DON'T OVERTIGHTEN !!! A little pressure goes a long way. 9 Sensors: Each Train Brain board is equipped with 4 sensor ports located along the right side of the board. Again, notice that each sensor connector is labeled on the surface of the PC board. These sensors are most commonly used to detect the location of trains and the pressing of pushbuttons by the operator, but with a little imagination you'll think up a wide variety of additional applications. (For example, how about a motion detector to turn on your railroad whenever someone approaches the layout, or a photo-detector to automatically turn on the street and house lights in your layout whenever the room lights dim.) The Train Brain's sensors are designed to detect the flow of current from pin A to pin B on the sensor connector. The Train Brain supplies its own current for this purpose. NEVER connect any source of current to the sensor pins. The sensitivity of each of the Train Brain’s sensor ports may be individually adjusted using the potentiometer located just behind the terminals of each port as shown in the figure below. Precise sensitivity adjustment is seldom necessary. For most applications, a mid-range setting should work just fine. Less Sensitive More Sensitive Sensitivity Adjust Sensor Port Connector A B Adjusting Train Brain Sensor Port Sensitivity The Train Brain's sensor ports are compatible with a wide variety of sensing devices. Acceptable sensors include magnetic reed switches, IR photo-transistors, CdS photocells, Halleffect switches, current detection sensors, TTL compatible logic gates, and manual switches. A variety of inexpensive, highly reliable, and easy-to-use sensor kits which connect directly to the Train Brain's sensor ports that are ideal for use in detecting trains, are available from CTI Electronics. We recommend that you try them first. For ardent "do-it-yourselfers", Lesson 15 takes a more detailed look at the Train Brain's sensor ports, and describes interfacing to an infrared sensor built from parts available at Radio Shack. If you're in doubt whether your sensors are compatible with the Train Brain, or if you need more information on connecting alternative sensors, contact us at CTI. We'd be happy to help. 10 Power Supply: The Train Brain requires a power supply in the range of 9 to 12 Volts D.C. Maximum power supply current draw occurs when all relays are on, and is about 150 milliamps. Power enters the Train Brain board through the power supply jack located in the upper right-hand corner of the PC board. CTI Electronics sells an inexpensive U.L. approved power supply which mates directly with this connector. For those who wish to provide their own power source, the Train Brain board is shipped with the appropriate power plug to mate with the Train Brain's power supply jack. You will need to connect your power supply to this plug. The outer conductor is GROUND (-). The inner connector is 12 Volts (+). Don't get it backwards!!! The Train Brain has an onboard voltage regulator to convert your raw power supply to the precise +5.0 Volts that its integrated circuits require. Nevertheless, the power you supply must be "clean", i.e. it must always remain within the 9 to 12 Volt range, without any voltage "dropouts”. 11 Hooking Up Your CTI System: Now that you're a little more familiar with the Train Brain board, it’s time to begin installing your CTI system. The entire process involves just a few simple steps. We recommend connecting the CTI network to the PC with power turned off. CTI can connect to your computer using either its external serial port (often referred to as a COM port) or on more modern PCs, via a Universal Serial Bus (USB) port. The installation procedure differs slightly for each of the two methods, so just following the instructions for the interface you’ll be using below. Then proceed to the next section of the User’s Guide, where we’ll check out your newly installed CTI system. Connecting CTI to a COM port: 1) Locate the COM port connector on the back of your computer. This will be a 9 pin "male" connector resembling the one shown below. Some computers may be equipped with multiple COM ports. You may choose any one. 2) Connect the COM port adapter supplied with your CTI system to the PC's COM port. 3) Mount the Network Diplexer on your layout at a location that’s convenient for connecting to your PC. Connect the YELLOW port of the diplexer to the COM port adapter using one of the modular phone cords provided. CTI TX COM Port Connector COM Port Adapter RX Network Diplexer 4) Decide where you wish to locate your Train Brain boards. They may be conveniently placed throughout your layout, wherever you desire computer control. Mounting holes are provided at each corner of the board. Use the spacers provided to prevent damage to the underside of the board and to prevent accidental shorting against nails, screws, staples, etc. that may be lurking on your layout. Don't over-tighten the mounting hardware. 5) Connect your Train Brain boards to the diplexer, using standard 4-conductor modular phone cable, to form a “ring” network as shown below. Any number of Train Brain boards may be connected in this fashion. All connectors are color coded for easy identification. Begin with 12 the RED (output) connector on the diplexer. Connect this to the GREEN (input) connector on the first Train Brain board. Next, wire the RED connector of the first Train Brain to the GREEN connector of the second Train Brain. (As you go, you may wish to label each Train Brain board in order, as #1, #2, etc. This will come in handy later on when you program your CTI system.) Continuing in this fashion, connect the remainder of your Train Brain boards, always remembering to wire from RED to GREEN. Finally, wire the RED connector of the last Train Brain board to the GREEN connector on the diplexer jack. That's all there is to it. When you're finished, your Train Brain boards should form a closed loop, as shown below. Note: Even if you’re only installing a single Train Brain, it's essential to complete the loop. If you decide to add additional Train Brain boards in the future, simply unplug any one of the existing connections, and then reconnect with the new board added to the string to form a bigger loop. Train Brain Train Brain To CTI Modules Train Brain From CTI Modules Modular Phone Cords CTI Diplexer Serial Port Adapter (To COM Port) A COM Port-based CTI Network 13 Train Brain Connecting CTI to a USB port: 1) Locate a USB port socket on the back (or front) of your computer. It’s a thin rectangular connector. (The USB symbol should be printed on the PC somewhere nearby.) Most computers will have multiple USB ports. You may choose any one. 2) Connect the BLUE port of the CTI USB Bridge (CTI Part # TB016) to the USB port on the PC using a standard Type A-to-Type B USB interface cable. (Don’t confuse this with a “Type A-to-Mini-B” cable, which has a tiny, fragile connector style commonly used for connecting small handheld devices like digital cameras.) The USB Bridge derives power directly from the USB bus, so no separate power supply is required. 3) Mount the Network Diplexer on your layout at a location that’s convenient for connecting to your PC. Connect the YELLOW port of the diplexer to the YELLOW port on the CTI-toUSB Bridge using one of the modular phone cords provided. CTI TX USB Ports on PC CTI-to-USB Bridge RX Network Diplexer 4) Decide where you wish to locate your Train Brain boards. They may be conveniently placed throughout your layout, wherever you desire computer control. Mounting holes are provided at each corner of the board. Use the spacers provided to prevent damage to the underside of the board and to prevent accidental shorting against nails, screws, staples, etc. that may be lurking on your layout. Don't over-tighten the mounting hardware. 5) Connect your Train Brain boards to the diplexer, using standard 4-conductor modular phone cable, to form a “ring” network as shown below. Any number of Train Brain boards may be connected in this fashion. All connectors are color coded for easy identification. Begin with the RED (output) connector on the diplexer. Connect this to the GREEN (input) connector on the first Train Brain board. Next, wire the RED connector of the first Train Brain to the GREEN connector of the second Train Brain. (As you go, you may wish to label each Train Brain board in order, as #1, #2, etc. This will come in handy later on when you program your CTI system.) Continuing in this fashion, connect the remainder of your Train Brain boards, always remembering to wire from RED to GREEN. Finally, wire the RED connector of the last Train Brain board to the GREEN connector on the diplexer jack. That's all there is to it. When you're finished, your Train Brain boards should form a closed loop, as shown below. 14 Note: Even if you’re only installing a single Train Brain, it's essential to complete the loop. If you decide to add additional Train Brain boards in the future, simply unplug any one of the existing connections, and then reconnect with the new board added to the string to form a bigger loop. Train Brain Train Brain To CTI Modules Type A Modular Phone Cords Type B Train Brain Train Brain From CTI Modules CTI Diplexer USB USB Bridge Bridge USB Cable (Type A-to-Type B) A USB-based CTI Network The next time the PC is powered up, Windows should announce that newly installed plug-andplay hardware has been detected. The new hardware should be identified as a “CTI-to-USB Bridge”. If you get such an indication, then the bridge board has successfully established communications with the PC. The LED on the CTI USB Bridge should change from Red to Yellow. Yellow indicates that the board has established communications with the PC, but is not currently exchanging data with the CTI network. We’ll change that shortly, as we check out the CTI system hardware. 15 Checking Out Your CTI System: Now it’s time to check out your CTI network. Begin by applying power to each of the Train Brain boards. See the description of the Train Brain's power supply requirements in the Installation section above, if you have any questions. You can tell a lot about the Train Brain by watching the LED located near the center of the board. Soon after power is applied, the LED should light. That means the Train Brain board has successfully powered up, checked itself out, and is ready to begin communicating with the PC. Verify that all Train Brain boards are behaving this way. If not, recheck the power supply. If a voltmeter is available, verify that the voltage is between 9 and 12 volts D.C. If you are using your own supply, verify that it has been wired correctly. Once all Train Brain boards are powered up and operational, its time to check out their communications with the PC. To do so, simply click on the TBrain icon on your desktop (if you created one), or select Start-Programs-Tbrain. The first time you run the TBrain program, you’ll need to tell it where your CTI network is installed. To do so, click on Settings-Network Settings on the main menu. The Network Settings Pop-Up Window In response, a “Network Settings” pop-up screen appears. Point-and-click to select the COM port where you’ve connected CTI (or choose CTI USB Bridge if you’re connected that way). You may also choose to have TBrain begin communications with the network automatically whenever the program is started by selecting the appropriate “Startup” option button. The remaining options are, in general, best left at their default settings. Click OK to activate your selections and return to TBrain’s main screen. Tbrain lets you know what it’s doing using the Status Bar, located along the bottom of the screen. The “Network Status” pane should now read “Offline, Halted”. Go “online” be selecting 16 “Network-Online” from TBrain’s main menu, or by clicking on the “Online” (lightbulb) button on the toolbar. Hopefully, the Network Status pane now reads “Online, Halted”. If so, your PC is already successfully communicating with your Train Brain network. Select “Network-Show Modules” from TBrain’s main menu. The display should reflect the number and type of CTI modules you have installed. If so, congratulations are in order. You're now ready to move on to Section 2, where you'll learn to put your CTI system to work. At this point, it might be worth noticing the LEDs on your Train Brain boards. They should now be flashing rapidly. Each time they do, the Train Brains and your PC have successfully communicated If, on the other hand, things haven't gone quite so smoothly, the next section will hopefully shed some light on the problem, and get you back on track. 17 Troubleshooting: When something goes wrong with the Train Brain network, your first objective is to isolate the problem. A set of diagnostic tests is available under the “Network-Troubleshoot” menu item to assist you in locating and identifying connectivity problems. First, click the “Run Troubleshooter” button, then follow the onscreen instructions. This test continually pings the network. While the test is running, use the Train Brain's LED as a troubleshooting guide. As the PC pings the modules, their LEDs will begin flashing once per second. Follow along the network wiring beginning at the “TX” (transmit) port on the network diplexer, and examine the behavior of each board's LED. If you come to a point where an LED isn't flashing, or is behaving differently than earlier ones, check that board and its connections for possible problems. The problem could be with the board, its power supply, or the network cable entering that module. Here are some other thoughts based on past experience: Go back over your wiring to make sure you've always wired from RED to GREEN. Make sure your wiring forms a closed loop as shown in the Installation section. If you supplied your own phone cords, look closely at their connectors. Some inexpensive phone cords come with only 2 out of the standard 4 wires installed. The Train Brain needs all 4 wires to work properly. And make sure the cables are constructed as modular “telephone” cables rather than “data” cables. (See the App Note on the CTI website for instructions on making your own network cables.) Remove each suspect board from the network by disconnecting its modular phone cords. Now try powering up the board again. If the LED lights, the power supply and the Train Brain board are probably okay, and the problem is most likely in the wiring. If the LED doesn’t light at all, check the power supply voltage and polarity. It should be around +12 Volts D.C. If the network behaves intermittently, make sure the power supply you are using is "clean", and always remains between +9 and +12 Volts. Never share a Train Brain power supply with a noisy load (such as a motor). In general, train transformers make poor power supplies for computer equipment, because they lack sufficient output filtering. Try adding a capacitor across the power supply's output (be sure to observe polarity), or consider using a regulated power supply. Once you've isolated the problem and exhausted all other possibilities, if you suspect the Train Brain board is at fault, just send it back to us at CTI Electronics. We'll fix or replace it free of charge during the warranty period, or for a nominal fee if the warranty has expired. Provide any information you can about the problem. Remember to keep the protective anti-static bag your board was shipped in, in case you need to return it. Place the board in its anti-static bag and pack securely in a rigid container. 18 Section 2: Using CTI In this section, you'll learn to run your model railroad using the CTI system. Incorporating the PC into your model railroad will provide you with an incredible amount of flexibility. With CTI, your PC can respond interactively to your commands, or can handle the mundane chores associated with running your layout (e.g. signaling and block control) for you, completely automatically. To be able to run your model railroad, the PC must first be taught what to do. To make programming the operation of your model railroad quick and easy, CTI Electronics invented "TCL", the Train Control Language. TCL is not a complicated computer language. It uses a simple set of English language-based commands to describe the operation of your railroad. Using this description, the CTI system learns to run your layout. Later, we’ll introduce TBrain’s powerful Graphical-User-Interface (GUI) tools, which turn your PC into a true Centralized Traffic Control (CTC) facility. You’ll learn to build realistic CTC screens that portray train locations, block occupancy, signal and switch status in full color, all updated in real-time based on sensor reports sent back from your layout. These CTC screens will also serve as interactive control tools, responding to the click of a mouse to throw switches, route trains, set signals, whatever ! But now we’re getting ahead of ourselves. As with all new things, it’s best to start out simply. Our first step is to learn some TCL. And there's no better way to do that than to jump right in and try out some examples. Mastering the following few lessons will make you an expert. These examples were purposely designed to be very simple; some may even seem nonsensical. They are solely intended to help you learn to use CTI with the least amount of effort. You will then be able to apply these concepts to real-world situations on your model railroad. We highly recommend that you take the time to work through each example. To do so, you’ll need a single Train Brain board connected to your PC as described in the Installation section above, a simple loop of track, and a train. So without further ado, let’s get started learning TCL. Note: In the TCL program examples below, italics are used to represent “keywords”, i.e. words that have a specific meaning in the TCL language. Normal text refers to items that the user is free to choose. 19 Lesson 1: Building Railroads In the following lessons you’ll learn to build, test, and run “railroads”. A “railroad”, in this context, is the set of information that describes the operation of your layout to TBrain. As a first example, this lesson illustrates how to make your layout respond to your commands entered at the PC. In this simple case, we'll use the Train Brain to control the operation of a single device, a train. Using these same techniques, you'll then be able to control any aspect of your railroad using commands that you define. So let’s begin … To create a new railroad, select File-New Railroad from TBrain’s main menu. Now we’ll write the TCL program that defines the operation of our layout. Tbrain includes a built-in text editor where you can create, modify, and view your TCL programs. To invoke it, select Tools-TCL Editor from TBrain’s main menu, or click on the “Write TCL” (pencil) toolbar button. A blank “TCL Editor” screen appears. It’s here that we’ll write our TCL program. Let's assume that we want the train to run whenever we type "GO" at the keyboard. When we type "STOP", we want it to stop. When we type "PAUSE", we want the train to stop, wait 5 seconds, and then continue on its way again. Shown below is a simple TCL program that teaches the CTI system to respond to these commands. This TCL file is included as C:\Program Files\Tbrain\Lesson1", but we suggest you try creating it yourself to become familiar with using TCL and the TCL editor. { A Simple TCL Program } Controls: Actions: WHEN DO train, spare, spare, spare $command = GO train = ON “train” 1 WHEN DO $command = STOP train = OFF WHEN DO $command = PAUSE train = OFF, wait 5, train = ON Train Brain Controller NO NC To Train Transformer Wiring Diagram for Lesson #1 20 Tbrain’s TCL Editor has the “feel” of a standard text editor. While creating the TCL program for Lesson 1, experiment with the Cut, Copy, Paste, Find, and Replace features in TBrain’s Edit menu. It’s also worth spending a few minutes learning some of the shortcut keys and toolbar buttons for each of these functions to help make your editing quick and easy. Once you’ve finished entering your TCL program, you can save it by selecting “Save Railroad” (or “Save Railroad As”) from TBrain’s File menu. When saving, give the railroad a meaningful name like “My Lesson1”. (Railroad files, by convention, end with a “.tcl” filename extension. You don’t need to include the “.tcl” extension when you specify your railroad’s name. Tbrain will take care of that automatically.) Once it’s saved, you’ll be able to load this railroad again at any time in the future by selecting “Open Railroad”, or by choosing it from the “Recent File” list in TBrain’s File menu. A Closer Look at a TCL Program: Now that you’ve typed it in, let’s take a closer look at our TCL program. TCL programs consist of one or more sections. The program above is made up of two sections, named "Controls:" and "Actions:". In TCL, section names always end in a colon ":". We use the Controls: section to give each of the Train Brain's controllers a meaningful name. In this example, we’re only using the first of our Train Brain's four controllers. Since it's being used to start and stop a train, that's what we've named it. The remaining 3 controllers on our Train Brain board are unused, as indicated by the corresponding "spare" entries in the Controls list. In TCL, a few simple rules govern controller names. Names can be up to 16 characters in length, and must begin with a letter. This first letter may be followed by any combination of letters, numbers, or the underscore character "_". Each controller name must be unique. In our TCL program, we list the controllers in the order that they occur on our Train Brain boards. The first name listed corresponds to controller #1 on Train Brain #1. The second name listed refers to controller #2 on Train Brain #1, etc. Since there are four controllers on each Train Brain, the fifth name listed corresponds to controller #1 on Train Brain #2, and so forth. The order in which controllers are listed is important because that's how CTI forms an association between your meaningful name and a physical controller in your Train Brain network. That's also why any unused controllers must be designated as "spare". This allows CTI to keep track of precisely which controller corresponds to which name. (If you’re ever in doubt as to which names correspond to which physical controllers, use the Network-Show Modules menu item to see where TBrain thinks each controller name is located.) With the controllers aptly named, we're ready to move on to the "Actions" section of the TCL program. It's here that you’ll tell TBrain how to run your layout. As you can see, the Actions section of a TCL program consists of a series of statements of the form: 21 " WHEN <these conditions exist> DO < these actions> " Each WHEN-DO statement describes one aspect of the operation of your railroad. It's the one and only statement you'll need to know to become an expert TCL programmer. Let’s look at our program's first WHEN-DO statement a bit more closely: WHEN $command = GO DO train = ON In TCL, the $command keyword refers to your commands entered at the keyboard. Thus, our first WHEN-DO statement says, "When I type "GO", turn on the train". Recall that in the Controls section, we defined "train" to mean controller #1 on our Train Brain board. As a result, typing "GO" causes controller #1's relay to close, providing power to the train. Conversely, our program's second WHEN-DO statement: WHEN $command = STOP DO train = OFF opens control relay #1, removing power from the train, when "STOP" is entered at the keyboard. It's important to note that the conditions following a WHEN and the actions following a DO need not be limited to single items. In TCL, any combination of conditions or actions are equally valid. For example, our program's third WHEN-DO includes a list of three actions: WHEN $command = PAUSE DO train = OFF, WAIT 5, train = ON As we've already learned, train = OFF causes the train to come to a stop. The second action, WAIT 5, is something new. As its name implies, the WAIT command causes execution of the remaining items in the DO list to be delayed by the number of seconds specified (in this case, 5). WAIT times may be specified to an accuracy of 1/100th of a second. For example, to cause a delay of five and one-quarter seconds the corresponding WAIT command would be: WAIT 5.25 Once 5 seconds have elapsed, the third action restores power to the train, and this WHEN-DO statement is complete. This capability to chain together a list of operations allows complex action sequences to be carried out in response to a single command from the keyboard. Well, that's our first TCL program. That's all it takes to program the operation of your model railroad. You're simply describing, in "structured" English, how you want your layout to work. (Admittedly, we wouldn’t really control a train with a simple on or off control. Nor would we want to have to type in commands to make our railroad do something. We’ll learn better techniques later. This first lesson is just intended to get us rolling – our equivalent to the “Hello World” program often used as the first step in learning a new programming language.) 22 A few more points are worth mentioning: TCL is not "case sensitive". Upper and lower case letters are treated exactly alike. You can (and certainly should) place comments throughout your TCL program to improve its readability. Anything between the single quotation mark (‘) and the end of a line is interpreted as a comment. Similarly, anything between a pair of curly brackets, even if it extends across multiple lines, is a comment. For example: WHEN $command=STOP DO train=OFF ’This text is a comment. {This text is a comment that extends across multiple lines.} The layout of your TCL program is unimportant. You can place multiple commands on a single line, or spread them out. Whatever looks best to you is fine. Adopt a style you like, and stick with it. For example, the following are all perfectly acceptable forms of the same thing: 1) WHEN $command = STOP 2) WHEN $command = STOP DO train = OFF 3) WHEN $command = STOP DO train = OFF DO train = OFF Summary: In this lesson, you have learned the following: How to write TCL programs using TBrain's TCL program editor. How to program the operation of CTI using a series of WHEN-DO statements. How to control your layout from keyboard commands entered at the PC. Recommended Practice Exercises: Try adding a new command called "STEP" to the TCL program we just created, which causes a stopped train to start, run for 4 seconds, and then stop. Use the Train Brain's remaining 3 controllers to operate additional devices (sound units, signals, lights, etc.) and write TCL code to control them via commands entered at the PC. In the next lesson, you'll learn to run your model railroad using your TCL program. 23 Lesson 2: Running Railroads Now that you've created your TCL program, it’s time to put it to work on your railroad. If you haven’t exited from TBrain since you entered your TCL program in Lesson 1, we suggest that you do (by selecting Exit from the File menu), in order to get a feel for opening existing railroad files. Be sure you’ve saved your work before exiting. (If you haven’t, TBrain will remind you to do so.) Run the TBrain program again, and choose Open Railroad from the File menu. Find and open the railroad file you saved in Lesson 1. (It’s name should also appear in the “Recent Files” list in the File menu. You can also open it by clicking on it there.) If you open TBrain’s TCL Editor again, the code you typed in Lesson 1 should reappear. Now we’re ready to run your TCL program. (Well, almost.) First, let’s find out how to locate and correct any errors that will inevitably find their way into your TCL programs. (If you’re not a good typist, you may have some unintentional errors already, but if not, let’s create one.) In the first WHEN-DO statement, misspell the controller name “train” as “trane”, i.e. WHEN $command = Go Do trane = On Now, try to run your TCL program by selecting Run from TBrain’s Railroad menu, or by simply clicking on the Green “Run” icon on TBrain’s toolbar. Before it runs your TCL program, TBrain first makes sure it understands everything. When you try to run this version of your TCL code, a pop-up window will appear with an error message that reads something like: Can’t recognize trane in line 7 This was obviously due to our spelling error. To locate the problem, simply click on the error message in the pop-up window. You’ll be immediately transported to the location in your TCL program where TBrain encountered something it couldn’t understand, with the error highlighted in your TCL code. Simply make the necessary corrections, and try running the program again. This time, TBrain will hopefully find everything to its liking, and the execution of your TCL program should begin. (If not, you’ve made some errors of your own. Repeat the above procedure for each error message until your TCL program is error free.) Check the “Network Status” pane on TBrain’s status bar. It should now read “Online, Running”. That means the network is communicating normally, and that TBrain is now running your TCL program. (If the status pane indicates “Offline”, you probably didn’t select the “go online at startup” option in TBrain’s “Network Settings” window in Lesson 1. You can go online manually by clicking the “Online” toolbar button (or by selecting Network-Online on TBrain’s main menu). 24 Before we try out each of the commands we’ve created to control our train, take a few minutes to poke around in some of TBrain’s other menus. Tbrain’s View menu lists a number of items that are useful for controlling and monitoring the operation of your railroad. The most important ones will be the CTC panels, but we’ll examine those later. For now, select Controllers from the View Menu. A “Controls” window appears. Recall that in our TCL program, we defined a single controller, named “Train”, which was the first controller on our Train Brain board. The remaining controllers were designated as “spare”. Each of these controllers is shown in the “Controls” window. The “lighted” pushbutton next to each controller name represents its current state. At this point all should be green (Off). Try clicking one of the pushbuttons. The button’s color should change to red (On), and you should hear a “click” from your Train Brain board as its control relay activates. Click the controller’s button again. The Train Brain’s controller deactivates and its pushbutton returns to green. Now we're finally ready to try out that first TCL program. Recall that we defined the commands GO, STOP, and PAUSE to control the operation of our train. Try typing GO. Notice that as you type, your command appears in the “Command” pane of TBrain’s status bar. Now press <ENTER>. Tbrain accepts your input and in response, executes the WHEN-DO statement that accompanied the "GO" command. Tbrain sends the appropriate control to the Train Brain board to close the relay, and the train should begin on its way. Notice that in the Controller window the indicator for “Train” is now red, signaling that it has been activated. Next try the STOP command. The train should come to a halt and the indicator for the train's controller should return to Green. Use GO to restart the train, then try PAUSE. The train should stop, wait 5 seconds, and start again, just like you told it in TCL. Try typing in a command other than the three we defined. The message Unknown Command momentarily appears in TBrain’s status bar. Next, halt the execution of your TCL by using the Halt (red square) toolbar icon. Now try one of the three commands again. Note that nothing happens. Restart your TCL program and TBrain will again respond to your commands. So that's your first TCL program. You're well on your way to mastering the art of computercontrolled model railroading. Summary: In this lesson, you have learned: How to open an existing railroad in the TBrain program. How to monitor and manually activate controllers using the Control window How to run your TCL programs using TBrain. Recommended Practice Exercises: Try running any supplemental practice exercises you created in Lesson 1. 25 Lesson 3: Fully Automatic Operation Thus far, you've learned how to control the operation of your model railroad interactively from your PC using keyboard commands that you create. In this lesson you'll learn to take the next big step: having the PC control your layout automatically. To illustrate the point we'll create an automated station stop. Each time the train arrives at the station it will stop. After 10 seconds, two whistle blasts will blow to signal its departure and the train will leave the station. To automate the operation, we'll use the second half of our Train Brain board; its sensor ports. The Train Brain's sensor ports are ideal for detecting trains. A variety of sensor kits (including magnetic, infrared, light-sensitive, and current-detecting sensors) are available from CTI. Here we'll consider a magnetic sensor (part number TB002-M). The detector's two leads connect directly to one of the Train Brain's sensor ports. The detector is then positioned at an appropriate point along the track. The actuator is placed on the train, beneath an engine or piece of rolling stock. When the actuator passes over the detector, the Train Brain's sensor is activated. Actuator Magnet 1 cm (0.4”) Max. Wire To Sensor Port A Wire To Sensor Port B Correct positioning of the actuator and detector are the keys to reliable operation. The actuator should pass directly over the detector, within a distance of 1 cm (0.4 inches). When installing the detector on a new layout, it may be completely hidden in the ballast beneath the track. When retrofitting into existing trackwork, the detector may be installed from above. It's tiny size makes it nearly invisible. On N gauge layouts, it may be necessary to remove the center of a few ties to provide adequate coupler clearance. The Train Brain's sensor ports are also compatible with a wide variety of other sensor types. If you're interested in trying alternative sensors with the Train Brain, now may be a good time to refer ahead to Lesson 15. (This example will work equally well with other sensor types.) Before we begin programming our station stop, take a few minutes to experiment with the sensor and actuator. Run the TBrain program, go online, and select Sensors from the View menu. 26 Note the state of the sensor indicators, which at this point should all be off (green). Connect the two leads of the reed-switch detector to the A and B inputs of one of the sensor ports on your Train Brain board (it doesn't matter which of the two leads gets connected to A and which to B). Now note the state of the sensor display as you bring the actuator towards the detector. When the two are in close proximity the sensor display should indicate that the Train Brain's sensor has been activated. Next position the detector along a section of track and install the actuator magnet beneath a piece of rolling stock. For this simple test, a piece of tape should suffice to hold it in place. Pass the car back and forth over the detector and note whether the PC's sensor display activates. Experiment with the detector and actuator positioning until the detector trips reliably. Once you're satisfied with the detector positioning, its time to write the TCL program to perform our automatic station stop. Shown below is an example of TCL code that will do the job. It is included as C:\Program Files\Tbrain\Lesson3". { An Automated Station Stop } Controls: station_stop, whistle, spare, spare Sensors: at_station, spare, spare, spare Actions: WHEN DO at_station = TRUE station_stop = ON, wait 10, whistle = PULSE 2, wait 1, whistle = PULSE 2, station_stop = OFF Wiring Diagram for Lesson #3 27 There are a few features in this TCL program that you haven't seen before. The first is a new section, called "Sensors:”. It serves the same purpose as the Controls: section. It lets us give each of the Train Brain's sensors a meaningful name. The same rules governing controller names also apply here. And just like for controllers, sensor names must be listed in the order in which they occur on your Train Brain boards. Here, we just need one sensor, to detect when the train has arrived at the station. Much of the remainder of the program should look familiar. You've seen the format of the WHEN-DO statement before, when you used it to accept your commands from the keyboard. Now you'll use it again, to check for the arrival of the train at the station. Sensors can trigger events automatically by including them as a condition in a WHEN-DO statement. In TCL, activated sensors are defined as TRUE. Inactive sensors are defined as FALSE. Our station stop's WHEN clause looks like this: WHEN at_station = TRUE This statement tells TBrain to monitor the state of the Train Brain's first sensor (which we've named "at_station"). As the train reaches the station, the sensor is activated (i.e. it becomes TRUE), and the WHEN condition is satisfied. That causes TBrain to begin executing the list of commands following the DO. As a result of the first two commands in the list: station_stop =ON, WAIT 10, the train stops and waits for 10 seconds. Notice that turning the "station_stop" controller on causes the train to stop. That's because we've wired the track power to the "normally closed" side of the SPDT switch. Activating the relay breaks this connection, stopping the train. The next command: whistle = PULSE 2 is something new. But, actually, it’s nothing more than a shortcut. "PULSING" the whistle controller for 2 seconds is exactly the same as doing the following: whistle = ON, WAIT 2, whistle = OFF The PULSE command turns the indicated controller on for the number of seconds specified, and then turns it off again. 28 A second later, another PULSE command activates the whistle again. Having blown two whistle blasts to signal its departure, the final command allows the train to leave the station. As with the WAIT command, PULSE times can be controlled to an accuracy of 1/100th of a second. For example, to produce a quarter second pulse, the appropriate command would be: PULSE 0.25 Let's try this program. Run TBrain and open this TCL program using Open Railroad from the Files menu. Start your train equipped with the actuator. The train should proceed normally around the track. Now start your TCL program using the Run toolbar button. From now on, every time that the train reaches the station it will stop, wait for 10 seconds, the whistle will blow, and the train will depart. And it will all happen automatically! Summary: In this lesson, you have learned the following: How to install sensors on your layout and connect them to the Train Brain. How to check the state of a sensor in a TCL program. How to make your PC monitor and run your model railroad automatically. Recommended Practice Exercises: Try connecting a manual SPST switch to another of the Train Brain's sensor ports, and write TCL code to blow three whistle blasts whenever the switch is pressed. 29 Lesson 4: Using Quick-Keys In Lesson #1, you learned to define keyboard commands that allow interactive control of your layout. Once you've created a significant number of commands, you'll soon discover two drawbacks to that technique. First of all, you must remember each of the commands. Second, you must type them every time you want to use them. That can certainly get tiresome during a long operating session. Fortunately, there's an easier way - "Quick-Keys". Quick-Keys are "soft" keys that appear on your CTI control screen. Quick-Keys are designed to respond to your PC's mouse. Anything that you can do by typing in a command at the keyboard, you can also do with a click of the mouse on a Quick-Key. Quick-Keys eliminate typing, and their function can be displayed right on the key, so there's nothing to remember. To illustrate using Quick-Keys, we'll return to the example of Lesson #1, where we defined keyboard commands "GO", "STOP", and "PAUSE" to control the operation of a train. We'll tackle the same problem again, this time using Quick-Keys. (The same wiring used in Lesson #1 can be used here.) The TCL program listing below illustrates how to create Quick-Keys and use them in WHENDO statements. It’s included as C:\Program Files\Tbrain\Lesson4". { A Simple Example of Quick-Keys } Controls: train, spare, spare, spare Qkeys: throttle, pause Actions: WHEN throttle = LEFT DO train = ON WHEN throttle = RIGHT DO train = OFF WHEN pause = LEFT DO train = OFF, wait 5, train = ON 30 The first step in using Quick-Keys is to name each of the keys as you want them to appear on your CTI control panel. That’s the purpose of the "QKeys:" section of the TCL program. Quick-Key names must begin with a letter, which can be followed by any combination of letters, numbers, or the underscore character "_". Try to limit Quick-Key names to 8 characters or less, so their name will fit entirely on the key. Once named, Quick-Keys can be used as a condition in a WHEN-DO statement. The possible values of a Quick-Key are "LEFT", "RIGHT", and "CENTER". These values correspond to the buttons on your PC's mouse. For example, clicking the left mouse button when the mouse cursor is positioned over a Quick-Key causes that Quick-Key to take on the value LEFT. (The value "CENTER" is only defined for systems with a 3-button mouse. If you have a mouse with 2 buttons, use only the values LEFT and RIGHT.) With those definitions in mind, the function of the TCL program listed above should become clear. Clicking the left mouse button while positioned over the Quick-Key named "throttle" will cause the train to run. Clicking the right mouse button while positioned over throttle will cause the train to stop. Clicking the left button on the "pause" key will cause a running train to stop for 5 seconds, then resume running. Try out this program in TBrain. Load the program and start it running, then select Quick-Keys from the View menu. Notice that the first two Quick Key buttons are labeled with the names that we assigned to them in the Quick-Keys section of our TCL program. Position the mouse cursor over the Quick-Key labeled "throttle". Click the left mouse button. The train should start running. Click throttle again, this time using the right mouse button. The train should stop. Start the train again, and try clicking on "pause". This simple example illustrates how easy Quick-Keys are to define and use. Employ QuickKeys for all your most commonly used commands. Try to develop a consistent "style", for example, LEFT button to turn things on, RIGHT button to turn things off. Summary: In this lesson, you have learned the following: How to create Quick-Keys and use them as a condition in WHEN-DO statements. How to access and use Quick-Keys from within TBrain. Recommended Practice Exercises: Add an additional Quick-Key called "Step" which performs the same function as the "Step" command you defined in Lesson #1. 31 Variations On a Theme: (The Train-Brain Module Family) The original Train Brain’s versatile combination of control and sensing capabilities make it a great choice for automating almost any aspect of your model railroad. After 15 years in service, it still remains a workhorse of our product line. (You just can’t improve upon a classic!) But some applications naturally require more control than sensing, while others need more sensing than control. And automating a typical model railroad may involve controlling anything from a tiny LED-based signal head drawing a few milliamps to a G-gauge dual-motored engine pulling a lighted passenger train drawing several amps. Fortunately, there’s a whole family of Train-Brain modules that let you tailor the CTI network to your application. In this section, we’ll take a brief look at the other members of the CTI module family. Then, in later sections, we’ll examine the use of these modules as we tackle some realworld model railroad control applications. The “Dash-8”: The “Train Brain-8”, or “Dash-8” for short (CTI Part #TB008), is an all-control version of the Train Brain. It features eight high-capacity 10 Amp SPDT relay controllers, identical to those on the original Train Brain. High current, high voltage, AC power? No problem. Whatever you can imagine to control, the Dash-8 is up to the task. To control the Dash-8’s relays from Tbrain, simply give each one a name, and include them in the “Controls:” section of your TCL program, based on their location in the CTI network. They may then be used as part of the condition in a WHEN clause, or as a data source in a DO. As always, be sure to designate any unused Dash-8 controllers as “spare”. PC PC Communications Communications Microprocessor Microprocessor Controls Controls Dash-8 The “Watchman”: Conversely, the “Watchman” (CTI Part #TB010) is an all-sensing version of the Train Brain. It features 8 sensors. The Watchman’s sensor ports are identical to those of the original Train-Brain. As with the Train Brain, the sensitivity of each of the Watchman’s sensor ports may be individually adjusted using the tweaking potentiometer located just behind the terminals of each port. 32 PC PC Communications Communications Sensors Sensors Microprocessor Microprocessor Sensitivity Adjust Watchman To access the Watchman’s sensors from Tbrain, simply give each one a name, and include them in the “Sensors:” section of your TCL program based on their location in the CTI network. They may then be used as part of the condition in a WHEN clause. As usual, be sure to designate any unused Watchman sensors as “spare”. The “Switchman”: PC PC Communications Communications Frankly, many model railroad applications won’t require the 10 Amps of current carrying capacity provided by the Train Brain and Dash-8. In such cases, a more economical alternative exists. The “Switchman” (CTI Part #TB013) provides 16 transistor-based controls each rated to carry up to 2 Amps (4 Amps pulsed) at voltages up to 28V D.C. With built-in protection for use when driving inductive loads, it’s the ideal choice for controlling dual-coil switch machines, solenoids, accessory motors, lighting, etc. Microprocessor Microprocessor Switch Switch Machine Machine Controls Controls Switch Power SwitchMan Circuit Circuit Protection Protection To control the Switchman’s outputs from TBrain, simply give each one a name, and include them in the “Controls:” section of your TCL program, based on their location in the CTI network, just as you did with the Train Brain’s controls. (And as always, be sure to designate any unused Switchman controllers as “spare”.) Because the Switchman’s transistor-based controls work a bit differently from the electromechanical relays found on the Train Brain, let’s spend a few moments to take a closer look. Functionally, each Switchman control output can be viewed as a single-pole-single-throw (SPST) switch that when activated, connects that control’s connector terminal to the GND terminal of the Switchman. [For convenience in wiring, two GND terminals are provided on the Switchman. They are identical, and are connected together on the board.] PC Controlled Control Output Common GND Functional Representation of a Switchman Control Output To operate an electrical device using the Switchman, simply connect the positive (+) output of an appropriate DC power supply to one lead of the device. Then connect the device’s other lead to one of the Switchman’s 16 control terminals. Finally, wire the negative (-) terminal of the DC power supply to the Ground (GND) terminal of the Switchman. That’s all there is to it. 33 Then, to activate the device simply set the corresponding Switchman control equal to “On” (or “Pulse” the control) just as with a Train Brain control. The Switchman will then turn on the corresponding transistor, closing the switch to complete the circuit, and activating the device being controlled. Setting the Switchman control equal to “Off” will turn off the transistor, opening the circuit, and deactivating the device. Any combination of supply voltages may be used to power multiple devices controlled by the same Switchman. Simply connect the (-) terminals of each of the supplies to one of the GND terminals on the Switchman. The figure below illustrates two devices, each powered by a different supply voltage connected to the Switchman. Switchman A 12V Device 12V 12VDC DC Power Power Supply Supply 1 16 2 15 3 14 4 13 5 12 6 11 + 7 10 - 8 9 + An 18V Device 18V 18VDC DC Power Power Supply Supply GND GND Connecting DC-Powered Devices to the Switchman Note: The Switchman can control devices powered by voltages up to 28 Volts DC at up to 2 Amps per device (4 Amps pulsed). However, total instantaneous current through any one board should not exceed 10 Amps. (Lesson 9 illustrates the use of the Switchman to control dual-coil solenoid-based switch machines, so we’ll be seeing it again there.) Note: Because the Switchman employs transistors as its switch elements, never connect the (+) voltage from an external power supply to the Switchman, and never use it to control an AC powered device. Only the (-) terminal of a DC power supply should be connected to the Switchman’s GND terminals. 34 The “Sentry”: The Sentry (CTI Part #TB014) is CTI’s most affordable sensing solution. It features 16 easy-touse sensor ports on a single, compact PC board. The sensitivity of each port is preset, eliminating the adjustment potentiometers of the Train Brain and Watchman. The result is the most inexpensive train detection solution available today. Despite its low cost and compact size, the Sentry features all of the sophisticated features of the Train Brain, including high-speed sampling, digital noise filtering, and latch-till-read sensor activity reporting. PC PC Communications Communications Sensors Sensors Microprocessor Microprocessor Sentry To access a Sentry’s sensors in Tbrain, give each one a name, including them in the “Sensors:” section of your TCL program based on their location in the network. They may then be used as part of the condition in a WHEN clause. As usual, designate any unused sensors as “spare”. Electrically, the Sentry’s sensor ports are identical to those on the Train Brain, but there are a few physical differences. While the Train Brain provides individual ‘B’ terminals for each sensor port, the Sentry employs a common ‘B’ terminal. (For wiring convenience two ‘B’ terminals are provided. They are connected together on the board.) Simply wire each sensor’s B connection to a common B terminal on the Sentry. The “Signalman”: The sophisticated signaling hardware available today presents specific control requirements beyond the simple on/off control provided by the modules we’ve examined thus far. Since a typical signaling network can easily involve tens or even hundreds of individual signal lights, it’s important to find an approach to signal automation that minimizes cost. The Signalman module (CTI Part # SM001) is just the answer. PC PC Communications Communications SignalMan Microprocessor Microprocessor Yellow Hue Adjust Signal Signal Controls Controls Power Power Supply Supply Brightness Adjust The Signalman works with all popular signal technologies, including common-anode LEDs, common-cathode LEDs, bipolar LEDs, and incandescent bulbs. And because it is specifically designed to exploit the flexibility available through computer control, it can implement any signaling protocol at a cost well below that of conventional “hard-wired” signal control products. 35 Since we’ll be examining the Signalman in great detail in the later section on automated signaling, we’ll wait to take a closer look at the Signalman until then. The “YardMaster”: Switches are an essential part of every model railroad, and a natural candidate for computer control. CTI’s YardMaster control module makes that task quick, easy, and remarkably affordable. PC PC Communications Communications Microprocessor Microprocessor The “YardMaster” (CTI Part #TB015) provides 16 SPDT solid-state controls, optimized to drive stall motor switch machines. Each YardMaster can control up to 16 turnouts, and is compatible with all popular slow-motion switch machines (e.g. Tortoise and SwitchMaster) and single-coil solenoid driven machines (e.g Kato and LGB). Switch Switch Machine Machine Controls Controls Switch Power YardMaster Circuit Circuit Protection Protection With built-in thermal protection to guard against overheating, and clamp diodes to protect against the voltage transients that occur when driving inductive loads such as the solenoids and motors found in switch machines, the YardMaster can handle all of your railroad’s switching needs. A later section of the User’s Guide is dedicated to the important task of controlling turnouts. There we’ll be examining the YardMaster in much more detail, so we’ll hold off on any further discussion of the topic until then. The “SmartCab”: And of course, how can we forget those trains. CTI’s SmartCab (CTI Part #SC001) is a fully computer-controlled throttle that provides automated speed, direction, and momentum control of DC operated trains. PC PC Communications Communications SmartCab supplies a fully regulated DC output, controllable in 100 digital steps. It continually monitors its output, maintaining output voltage to within 0.1% regardless of variations in load. 36 Overload Overload Protection Protection Microprocessor Microprocessor Smart Cab Power PowerSupply Supply Conditioning Conditioning Digitally DigitallyControlled Controlled Voltage VoltageAdjust Adjust Direction Direction Control Control We think it's worth comparing SmartCab's features to the throttles employed in other computer control systems, which consist of nothing more than a simple transistor, turned quickly on and off to vary motor speed. This technique is commonly used to control the speed of high horsepower industrial motors. Unfortunately, when applied to the tiny motors used in model trains (which lack sufficient torque), it causes vibration, noise, overheating, and premature motor wear. Its only advantage is that it's cheap. We think you'll be quite surprised at how much better your engines perform when run by the SmartCab. Since we’ll be looking at automated train control in the very next section, we’ll take a much closer look at the SmartCab there. Module Summary: The following table summarizes the capabilities of CTI’s control module family. CTI Control Module Summary Controls Sensors Controls per Module Control Type Maximum Current/Voltage Per Control Cost per Control Sensors per module Adjustable Sensitivity? Cost per Sensor Train Brain 4 SPDT Relay Switch 10 Amps 120 Volts $12.50 4 Yes $7.50 Dash-8 8 SPDT Relay Switch 10 Amps 120 Volts $12.50 0 NA NA Switchman 16 SPST Transistor Switch to Ground 2 Amps 28 Volts $5.63 0 NA NA YardMaster 16 SPDT Transistor Switch to V+/V- 1 Amp (pulsed) 18 Volts DC $5.00 0 NA NA Signalman 16 SPST Transistor Switch to Ground 0.5 Amps 12 Volts $4.38 0 NA NA Watchman 0 NA NA NA 8 Yes $7.50 Sentry 0 NA NA NA 16 No $4.38 SmartCab 1 Variable Voltage 2.5 Amps 20 Volts NA 0 NA NA Module Installation: Like the original Train Brain, just plug any of CTI’s other control or sensing modules anywhere into your CTI network using an additional module phone cord, always remembering to wire from Red (output) to Green (input). Any number of modules can be combined in any way to meet your layout’s control and sensing needs. Just like the original Train Brain, all CTI modules require a filtered DC power supply in the range of +9 to +12 Volts DC. 37 Which Modules Are Right For My Model Railroad? Confused? Don’t be! In general there are few wrong answers when it comes to choosing a CTI module for a particular application. Our modules are very flexible, and most functions can be performed by more than one. CTI’s Train-Brain module family is merely designed to provide the best combination of price and performance to allow you to automate your model railroad at the most affordable price possible. To help you decide which modules are best suited to your railroad’s needs, we’ve put together the following “quick-reference” chart. We’ll also see each of the module types put to use in the real-world examples that follow later in this user’s guide. Medium Duty Control Heavy Duty Control LED-based signals Crossing flashers and other warning lights Medium-current dual-coil switch machines (up to 3 Amps) Single-coil switch machines Slow motion stall-motor switch machines Low-current/low voltage layout lighting Crossing Gates Small DC motors, DC solenoids (under 28V, 2 Amps) High current dual-coil switch machines (over 3 Amps) Large DC motors, DC solenoids (over 28V or 2 Amps) AC motors, solenoids High current layout lighting (> 2 Amps) Cab Control Reversing Loops Train Detection Pushbutton monitoring SmartCab Sentry YardMaster Watchman Incandescent lamp-based signals Sensing Analog Signalman Light Duty Control Switchman Application Dash-8 Train Brain CTI Module Applications “Quick Reference” Guide DC Train Speed Control = This module is the most cost effective way to perform the specified function = This module will perform the specified function, but there is a less expensive way available 38 Section 3: Locomotive Speed Control By now we hope you're convinced that the Train Brain is the ideal solution to many of the control problems found around your model railroad. But while the Train Brain is great for "discrete" control (turning things on or off, throwing switches, etc.), it is not designed to handle one of the biggest control tasks of all - controlling locomotives! That's why CTI Electronics invented Smart Cab, the fully programmable, computer controlled throttle that interfaces to your PC. With Smart Cab, train speed, direction, momentum, and braking can all be controlled by your computer. And best of all, Smart Cab uses the same interconnect network as the Train Brain and is fully supported by CTI's control software. By combining the capabilities of the Smart Cab with those of the Train Brain, the CTI system provides a single, fully integrated solution to all of your railroad's computer control needs. In this section, you'll see how easy it is to install and use Smart Cab. You will learn how to control locomotives interactively from the CTI control panel, and how to let your PC control your locomotives automatically using instructions in your TCL programs. When finished, you’ll be able to dispatch trains from your control console. While en route, they will change speed, stop, and start smoothly, in prototypical response to trackside signals - all automatically under computer control. Introducing the "Smart Cab": As with the Train Brain, it is best to begin with a quick look at the Smart Cab board itself. A block diagram of the Smart Cab is shown below. PC PC Communications Communications Overload Overload Protection Protection Microprocessor Microprocessor Smart Cab Power PowerSupply Supply Conditioning Conditioning Digitally DigitallyControlled Controlled Voltage VoltageAdjust Adjust Direction Direction Control Control Smart Cab Block Diagram 39 Smart Cab takes the raw D.C. output of any toy train transformer, and using its onboard microprocessor, digitally controls and conditions the power supplied to your locomotive based upon commands received from the PC. With digital control, precise speed selection, prototypical momentum, ultra-low speed operation, direction control, and braking can all be managed by your PC. Smart Cab will turn any inexpensive toy transformer into a computer-controlled throttle that outperforms many of the highest priced train power packs available today. We'll begin by taking a brief "walking tour" around the Smart Cab. You may wish to have a Smart Cab board handy as we go through this description. As with the Train Brain, observe ESD precautions when handling the Smart Cab board. For reference, position the board so that its modular "telephone" style connectors are located to the lower left. Many of the components on the Smart Cab will be familiar to Train Brain users, since both boards share a number of common features. Since these functions were already discussed when we introduced the Train Brain, here we'll concentrate on those items unique to the Smart Cab. Microprocessor: The Smart Cab's microprocessor plays the biggest role in controlling locomotive operation. The microprocessor handles communications with the PC, automatically manages speed changes to simulate the prototypical effects of momentum, oversees the function of the digitally controlled voltage adjustment unit, and selects output voltage polarity for direction control. The microprocessor and its PC interface occupy the lower left-hand quarter of the board. Digitally Controlled Voltage Adjust: The "Digital Voltage Adjustment" unit (DVA) occupies the lower right-hand quarter of the board. Under control of Smart Cab's microprocessor, the DVA performs locomotive speed control; providing precise output voltage selection in 100 distinct steps. The DVA, when commanded, also maintains an idling voltage for use with systems employing current detection. To optimize performance with a variety of model railroad gauges, the maximum output voltage supplied by the Smart Cab is adjustable using the "tweaking" potentiometer located near the center of the PC board. To change this setting, see "Maximizing Smart Cab Performance" later in this section. Of course, the output of the Smart Cab will always be limited by the voltage supplied by your transformer even if the maximum voltage adjustment is set to a higher value. Direction Control: Under command from the Smart Cab's microprocessor, the "Direction Control Unit" automatically regulates output voltage polarity to control the direction of the locomotive. Onboard safeguard logic will automatically bring a moving train to a full stop before carrying out a direction change request from the PC. The direction control unit is located near the top righthand side of the Smart Cab board. 40 Power Generation & Conditioning: The Smart Cab’s "power conditioning unit" (PCU) generates the actual voltage supplied to your locomotive. The PCU continually monitors Smart Cab's output voltage, and responds instantly to maintain a constant output voltage, independent of changes in load. Automatic overload protection and thermal shutdown circuitry are included in its design. The PCU employs a state-of-the-art, high-efficiency voltage regulator, occupying the upper half of the board. The PCU produces a smooth, continuous DC waveform. This is in marked contrast to other systems whose “throttle” consists of nothing more than a simple transistor turned quickly on-and-off to “chop” the DC waveform. You’ll be surprised how much smoother, quieter, and cooler your engines run with the Smart Cab (and as a result, how much longer they last). The PCU’s heatsinks may feel warm during operation. This is perfectly normal. Natural convection cooling is used to dissipate heat, so locate the Smart Cab board so as to ensure adequate ventilation. If the power module gets too warm it will automatically shut down. If the heatsink feels unusually hot, you are overloading the unit. If so, see "Maximizing Smart Cab Performance" later in this section. Digital Power Supply: In addition to the power supplied for use by the locomotive, the Smart Cab board requires a separate power supply dedicated to its onboard digital computer. This "digital" supply enters the Smart Cab through the black power supply jack located in the lower left-hand corner of the PC board. As with the Train Brain, this power supply should be in the range of +9 to +12 Volts D.C. The same low cost, U.L. approved power supply available from CTI for use with the Train Brain is also compatible with the Smart Cab. For those who wish to supply their own power source, the Smart Cab board is shipped with the appropriate power supply plug to mate with Smart Cab's power jack. You'll need to hook up your power supply to this plug. The outer conductor is GROUND (-). The inner connector is 12 Volts (+). Always double check your wiring!!! Hooking Up Your Smart Cab: Now that you're a bit more familiar with the Smart Cab board, it's time to install it in your CTI system. Smart Cab uses the same PC interface wiring as the Train Brain. Any combination of Train Brains and Smart Cabs may be connected to the PC. The boards can be wired in any order. Since we've already discussed the details of hooking up the CTI system to your PC, we'll merely provide a bit of review here. (See "Hooking up your CTI System" in Section 1 for the full story.) The example below shows a simple CTI system consisting of two Smart Cabs and two Train Brains. The order in which things get connected doesn't matter. Just remember to connect whatever boards you use to form a closed loop, always being sure to wire from RED to GREEN. 41 Train Brain Train Brain SmartCab Modular Phone Cords SmartCab CTI Diplexer To PC A CTI System Using Train Brains and Smart Cabs That's all it takes to interface your Smart Cab to the PC. Next, it's time for the power supply wiring to the transformer and track. Raw train-related power enters the Smart Cab through the blue “IN +/-” terminals located near the upper left-hand corner of the board. Wire the D.C. output of any toy train transformer to these terminals. The polarity of the input voltage matters. Smart Cab won’t be damaged if the voltage is reversed; it simply won’t operate. If that’s the case, just flip the direction switch on the train transformer supplying the raw power, or swap the two wires entering the Smart Cab. The voltage applied to the " IN" terminals should not exceed 25 Volts D.C. Now all that's left to do is to connect the output of the Smart Cab to your track. The output of the Smart Cab is found on blue "OUT A/B" terminals on the right-hand side of the board. Simply wire one of the two outputs to each rail of your track. That's it!!! Your Smart Cab is ready for action. In the next lesson, we'll check out the operation of the Smart Cab, and see how easy it is to control your trains interactively from the PC. Note: As with conventional train power supplies, if multiple Smart Cabs are used to run more than one train on the same track in a common grounded layout, each Smart Cab must be powered by a separate transformer. 42 Lesson 5: Interactive Train Control Using Smart-Cab In this section, you'll put the Smart Cab board to work controlling your trains. In order to check out the Smart Cab, we'll begin by trying some interactive control using the mouse. This example assumes that we've set up a rudimentary system consisting of one Train Brain board and one Smart Cab board connected to the PC. If your system differs, simply make the appropriate changes to the TCL program examples we'll be using. In order to communicate with the Smart Cab, we'll first need a simple TCL program like the one shown below. { A Very Simple Smart Cab Program } Controls: spare, spare, spare, spare Sensors: spare, spare, spare, spare SmartCabs: cab1 As you already know, the "Controls:" and "Sensors:" sections refer to the Train Brain board in our rudimentary CTI system. For now, they're not being used at all, and are listed as "spare". (We'll be using them in the next lesson, when we demonstrate automatic Smart Cab control.) In your TCL programs, the "SmartCabs:" section tells the CTI system how many Smart Cab boards are installed and gives each one a meaningful name. As we've already mentioned, Train Brains and Smart Cabs can be intermixed in any way in your CTI network. In the "SmartCabs:" section, you list the Smart Cabs, in the order that they appear in your CTI network. It doesn't matter if there are Train Brains located between them. Like everything else in the TCL language, Smart Cab names must be 16 characters or less, and must begin with a letter, which may be followed by any combination of letters, numbers, or the underscore character "_". Here we've given our only Smart Cab the name "cab1". Now it's time to try out that Smart Cab. Enter the above railroad file using the TCL editor (or open the existing copy at C:\Program Files\Tbrain\Lesson5. Now, check out TBrain’s View menu. You should find that the throttles selection is now enabled (a result of declaring one or more Smart Cabs in your TCL program). Select Throttles from the View menu. A single on-screen Smart Cab throttle should appear, with the name of our Smart Cab, “cab1”. Turn on the train transformer that's connected to the Smart Cab, and turn its speed control all the way up to full power. (The train shouldn't move.) 43 Then, using the mouse, grab and drag the “Speed” slider on the onscreen throttle, sliding it slowly upward to bring the train to a gradual start. The train should respond and begin moving as power is increased to the Smart Cab. You can also enter a numerical speed setting at the keyboard (from 0 to 100) by first clicking in the text box below the slider control. Bring the train to a comfortable cruising speed, then enter a speed of 0, this time using the keyboard (simply type 0, then press <ENTER>). The train comes to an abrupt halt. Bring the train up to cruising speed again. Then enable the adjustable momentum feature by sliding the “Inertia” slider upward. (The farther up the slider is moved, the more simulated inertia is applied.) For now, select a midrange setting. Select a Speed of 0 again. This time, the train comes to a smooth stop. That's the Smart Cab's built-in momentum feature simulating the inertia of a real train. Bring the train up to speed again. Now, try the Brake feature by clicking the Brake button using the mouse. The button signals that the brake is applied and the train should glide to a smooth stop. Release the brake, by clicking the brake button again. The train will speed up smoothly and resume its previous cruising speed. Braking is a convenient way to stop the train without having to change its throttle setting. Experiment with using the Direction buttons to reverse the direction of the train. You can even try reversing the train while it's in motion. Safeguard logic built into the Smart Cab will automatically bring the train to a full stop before changing direction. Finally, bring the train to a stop. That's how easy it is to use the Smart Cab. 44 Lesson 6: Automatic Train Control Using Smart-Cab In the previous lesson, we controlled the Smart Cab interactively. But that's only half the story. Your Smart Cab can also be controlled automatically by instructions in your TCL program. All of the abilities to control speed, direction, momentum and braking that you've exercised using the onscreen throttle are also available in TCL. To illustrate, we'll revisit our earlier example of an automated station stop. This time we'll implement it more realistically using the Smart Cab. In this case, we'll define a Quick Key that lets us get things rolling. Then we'll use one of our Train Brain's sensors to detect the train's arrival at the station. Using TCL, we'll instruct the Smart Cab to bring it to a smooth stop, automatically. Then, after a 10 second station stop, the Smart Cab will automatically throttle up, and the train will pull smoothly away from the station. TCL code to do the job is shown at the end of this lesson. It’s also available at C:\Program Files\Tbrain\Lesson6. It’s a simple matter to control Smart Cabs using WHEN-DO statements in a TCL program. The When-DO statement to control Smart Cabs takes this general form: When … Do <Smart Cab name>.<Smart Cab property> = <value> Smart Cab properties and their allowed values are: Speed Direction Brake Momentum For example: 0 to 100 FORWARD, REVERSE ON, OFF 0 to 7 cab1.speed = 100 cab1.direction = FORWARD cab1.brake = ON cab1.momentum = 4 When multiple Smart Cab properties are to be changed simultaneously, a shorthand notation is also available. It takes the form: <Smart Cab name>= <speed> ( <control options> ) As before, speed may be any value between 0 and 100. Available choices for each Smart Cab control option are given in the following list: Direction: FORWARD, REVERSE Momentum: MOMENTUM_0, MOMENTUM_1, MOMENTUM_2, MOMENTUM_3, MOMENTUM_4, MOMENTUM_5, MOMENTUM_6, MOMENTUM_7 Brake: BRAKE_ON, BRAKE_OFF 45 Any control options must be listed after the speed selection (if there is one), and must be enclosed in parentheses, "( )". A speed value need not be specified, nor is a value required for every control option. Fields that are not specified will maintain their current values. Here are some examples: cab1 = 50 (FORWARD) cab1 = 20% (MOMENTUM_2) cab1 = (BRAKE_ON) {select speed, direction } {decrease to 20% of current speed, low momentum} {activate brake, no change to throttle setting } With these few examples as a starting point, the function of this lesson's TCL program should be clear. First, the Quick-Key labeled "RUN" lets us get the train throttled up to cruising speed (by clicking the LEFT mouse button), and lets us bring the train to a halt (by clicking the RIGHT mouse button) when we're through. (Of course, we could already do all that using the Smart Cab "pop-up" window. Defining a Quick-Key just serves to make things a bit more convenient.) The third WHEN-DO is our automated station stop. It uses the Train Brain's "at_station" sensor to detect the arrival of the train. In response to its arrival, the DO clause applies the brake on the Smart Cab, bringing the train to a smooth stop. After pausing at the station for 10 seconds, the brake is released and the train throttles back up to cruising speed. That's all it takes to control your locomotives in TCL. The functions of the Train Brain and Smart Cab are fully integrated; the Train Brain's sensors can be used to automatically control the function of the Smart Cab. Many once tricky train control operations are now easy. Your trains can now respond prototypically to trackside signals, without miles of complicated wiring. The whole job can now be done automatically by your computer - and Smart Cab, of course. { An Example of Automated Smart Cab Control } Controls: spare, spare, spare, spare Sensors: at_station, spare, spare, spare SmartCabs: cab1 Qkeys: run Actions: WHEN run = LEFT DO cab1 = 50 (FORWARD, MOMENTUM_4, BRAKE_OFF) WHEN run = RIGHT DO cab1 = 0 (MOMENTUM_4) WHEN at_station = TRUE DO cab1.brake = ON, wait 10, cab1.brake = OFF 46 Maximizing Smart Cab Performance Setting Output Voltage Range: Because it’s completely digital, the Smart Cab requires no adjustments. However, to optimize its performance for use with a variety of model railroad gauges, a voltage range selection potentiometer is provided on the PC board. This adjustment allows the user to determine the output voltage range that the Smart Cab will supply. The Smart Cab always provides 100 distinct voltage steps from its minimum to maximum outputs. By setting the maximum output voltage to the highest voltage your trains require, you'll be guaranteed that all 100 settings are available for use by your locomotives. None will be wasted on voltages that run your trains faster than you want them to be run. Setting the maximum voltage adjustment is easy. Here's all you need to do: 1) Locate the adjustment potentiometer located near the center of the PC board. 2) Using a small flat-bladed screwdriver, carefully turn the adjustment screw counterclockwise as far as it will go. This reduces the Smart Cab's maximum output voltage to its lowest possible value. 3) Next, turn on the transformer feeding the Smart Cab, and using a Smart Cab pop-up throttle, select the maximum speed setting of 100. 4) Slowly begin turning the adjustment screw clockwise. The output voltage of the Smart Cab should begin to rise. Stop when the train reaches the highest speed you'll ever want to run. Your Smart Cab is now optimized to your railroad's operation. All 100 command steps are now available for use with your locomotive. Controlling Idling Voltage: For use in systems employing current detection sensors, the Smart Cab may be commanded to maintain a small idling voltage at a throttle setting of ‘0’, so that a stopped train may still be detected by the current sensor. This feature may be enabled/disabled using the SettingsHardware Settings menu item in the Tbrain program. Check the “Maintain Idling Voltage” checkbox to enable the idling voltage feature, and uncheck the checkbox to turn off the idling voltage feature. 47 Diagnosing Performance Problems Under normal use, Smart Cab should work fine with all D.C. operated gauges, from Z through G. In rare circumstances, a few minor adjustments may be required. These are summarized below. Problem: Some of my ‘Z’ or ‘N’ gauge engines "creep” slowly at a speed setting of 0. Solution: For layouts using current detecting sensors, Smart Cab may be commanded to maintain an "idling" voltage at a speed setting of 0. Be sure this feature is turned off when not using current sensing. (See “Idling Voltage” in the previous section.) Even with the idling voltage disabled, a small residual voltage of around 1.2V is present at the rails. This may be sufficient to barely start some Z and N Gauge engines when pulling no load. If this occurs, the problem can be eliminated by installing a pair of diodes between the Smart Cab and your track as shown below. 1N5400 or equivalent To Train Transformer Smart Cab Problem: The Smart Cab repeatedly shuts down. Solution: Smart Cab contains three separate protection circuits, each capable of shutting down its output. These are: short circuit, over-current, and over-temperature protection. If a derailment or other short occurs, the Smart Cab will detect the resulting power surge, and protect itself, and your trains, by temporarily shutting down. Once the problem is corrected, Smart Cab will automatically come back on-line. Because of the Smart Cab’s high-efficiency regulator design, overheating should never occur under normal use. If shutdowns occur on a regular basis, it may be a sign of an intermittent short somewhere on your layout. Watch to see if the shutdown always occurs with the train at or near the same location. If the Smart Cab’s heatsinks seem unreasonably warm, check the input voltage at the IN +.- connector. The Smart Cab’s regulator operates most efficiently with an input voltage of around 15 to 20 Volts D.C. (Never apply greater than 25 Volts D.C to the POWER IN input.) 48 Section 4: Controlling Signals Automated signaling is a natural candidate for computer control on model railroads, just as on real ones. The CTI system’s unique combination of sensing and control features makes it easy to implement prototypical, fully automated signaling operations on any model railroad. But with so many signal lights to control, cost has often limited the amount of automated signaling the average model railroader can afford. That’s why CTI invented the “Signalman”, the fast, easy, affordable way to implement fully automated, computerized signaling operations. In contrast to the profusion of hard-wired, “single-function” signal control products on the market, the Signalman has been specifically designed to exploit the flexibility that’s available only through computer control. The Signalman works equally well with block, searchlight, and positional signals. It’s also ideal for controlling grade crossing flashers, traffic lights, warning beacons, airport runways, etc. Anywhere a signal light is required, the Signalman can do the job. It works with all signal technologies, including common-anode LEDs, common-cathode LEDs, bipolar LEDs, and incandescent bulbs. Introducing the Signalman: In this section, you’ll see how easy it is to implement prototypical signaling operations that are run automatically by your PC. As always, it’s best to begin with a brief look at the Signalman board itself. A block diagram of the Signalman is shown below. SignalMan PC PC Communications Communications Microprocessor Microprocessor Signal Signal Controls Controls Yellow Hue Adjust Power Power Supply Supply Brightness Adjust Signalman Block Diagram 49 Microprocessor: The Signalman’s versatility is achieved through the use of a powerful onboard microprocessor that communicates with the PC, via the CTI network, to accept and interpret signaling commands sent by your TCL programs. This flexibility allows the Signalman to work with any signaling scheme, since no specifics of signaling protocol are designed into the Signalman board itself. It’s also how we’ve been able to make signal control so affordable. Rather than build complex signaling logic using expensive, “hard-wired” electronic circuitry, all signaling decisions can now be centralized, and performed much more affordably, under software control (just like on real railroads) by the TBrain program. Signal Controllers: The Signalman provides 16 general-purpose control circuits, each independently programmable from the PC. The Signalman’s controls are accessed via the terminal strip located along the bottom of the board. The numerical designation of each controller is indicated next to its connector terminal on the PC board. In contrast to the Train Brain’s powerful 10 Amp relays, the Signalman’s control circuits are optimized for “small signal” applications (e.g. controlling LEDs and bulbs); jobs where the Train Brain’s high capacity relays would be wasted. Each of the Signalman’s controllers is designed to operate a single signal lamp. Power Supply: The Signalman’s power supply serves two functions. First, it converts raw input power supplied by the user to the precise +5 Volts required by the Signalman’s microprocessor. Second, it generates an adjustable voltage (available at the V+/V- terminals), useful for powering signals. On all LED-oriented Signalman boards, this output voltage is fixed at a value appropriate for powering LEDs. On Signalman boards intended for use with incandescent bulbs (which have widely varying voltage requirements), the output voltage may be adjusted over a range from 1.5V to 12V, using the onboard potentiometer. This voltage should be set to a value appropriate for your brand of incandescent signals before wiring them to the Signalman. Raw power enters the Signalman through the black power supply jack located along the top of the board. This raw supply must be filtered, and should be in the range of +9 to +12 Volts DC. The same power supply available from CTI for use with the Train Brain is also compatible with the Signalman. Just plug it in, and you’re ready to go. For those who wish to supply their own power source, the Signalman is shipped with the appropriate power supply plug to mate with the power jack. You’ll need to hook your power supply to this plug. The outer conductor is GROUND(-). The inner connector is 12 Volts (+). Always double check your wiring before applying power. 50 Choosing a Signalman Configuration To ensure compatibility with the virtually endless variety of signaling products on the market, four versions of the Signalman are available (identifiable by their part # suffix). Each is optimized for use with one of four general “families” of signaling hardware. Refer to the chart below to select the appropriate Signalman model for use with your signals. Signal Hardware Compatibility Chart Signal Family Required Signalman Version Common-anode LED-based signals (-CA suffix) Common-cathode LED-based signals (-CC suffix) Bipolar (2 lead) LED-based signals (-BP suffix) Incandescent lamp-based signals (-IC suffix) Your signal manufacturer’s documentation should tell you all you need to know to select the correct Signalman for use with your signaling hardware. However, one common source of confusion surrounds the use of the terms “bipolar” and “bicolor” LED. These devices each contain a red and a green LED housed inside the same package. The difference lies in the way these two LEDs are connected. In a true “bipolar” device, the red and green LEDs are connected in opposite directions (see the figure below). The polarity of the voltage applied to the device determines which LED is illuminated. A bipolar LED is easily identified by its two leads. It should be controlled using the “-BP” version of the Signalman. In a “bicolor” device, the two LEDs are connected in the same direction, either in commonanode or common-cathode configuration (see the figure below). A bicolor LED is easily identified by its three leads. Bicolor LEDs are electrically equivalent to any other commonanode or common-cathode device, and should be controlled using the -CA or -CC Signalman. Red Red Red Green Green Green “Bipolar” LED 2 leads Use -BP Signalman “Bicolor LED” (Common Cathode) 3 leads Use -CC Signalman 51 “Bicolor LED” (Common Anode) 3 leads Use -CA Signalman Lesson 7: Hooking Up Your Signalman Now it’s time to install your Signalman into your CTI system. The Signalman uses the same PC interface as all of our other modules, so hooking it up should be a breeze. Since we’ve already described the details of interfacing the CTI system to your PC, we won’t dwell on the subject in much detail here (see “Hooking Up Your CTI System” in Section 1, if you’d like more details). As with all CTI modules, simply install your Signalman board(s) anywhere into your CTI network using the modular phone jacks located near the upper left corner of the circuit board. Remember to connect your CTI boards to form a closed loop, always wiring from RED to GREEN. That’s all there is to it. An example of a simple CTI network consisting of Train Brain and Signalman modules is shown below: Train Brain Train Brain Signalman Modular Phone Cords Signalman CTI Diplexer To PC A CTI System Using Train Brains and SignalMen Next, you’ll wire your signals to the Signalman. To hook up your signals, simply consult the wiring instructions for the appropriate version of the Signalman given in the following illustrations. Once wired, the control of signals from within your TCL program will be completely independent of the type of signaling hardware used. As a first experiment, we recommend you hook up just a single signal. Once you have things wired, jump ahead to the section entitled “Controlling Your Signals from TCL”. 52 Wiring Common-Anode (CA) LED-based Signals: This is a common form of LED-based multi-light “block” signal. In the CA configuration, the anode (+) terminal of all of the signal’s LEDs are wired together (usually within the signal unit itself), and connected to a positive voltage. Each signal light is controlled by connecting/disconnecting its cathode (-) terminal to/from Ground. To control common-anode signals, use the “-CA” version of the Signalman, and follow the wiring diagram shown below: SignalMan (-CA Version) V+ ‘n’ ‘n+1’ ‘n+2’ R G Y Common Anode Controllers Separate Cathodes Common-Anode LED-based Signal Wiring Wiring Common-Cathode (CC) LED-based Signals: This is also a common form of LED-based multi-light block signal. In the CC configuration, the cathode (-) terminal of all of the signal’s LEDs are wired together (usually within the signal unit itself), and connected to Ground. Each signal light is controlled by connecting/disconnecting its anode (+) terminal to/from a positive voltage. To control common cathode signals, use the “-CC” version of the Signalman, and follow the wiring diagram shown below: SignalMan (-CC Version) V‘n’ ‘n+1’ ‘n+2’ R G Y Common Cathode Controllers Separate Anodes Common-Cathode LED-based Signal Wiring Wiring Bipolar (BP) LED-based Signals: 53 This is a common form of LED-based searchlight signal. It is easily identifiable because it has only two wire leads. In the BP configuration, signal color (red or green) is controlled by the polarity of the voltage presented across the signal’s two leads. A good approximation to a yellow signal aspect may be achieved by rapidly switching between the two voltage polarities. To control bipolar LED-based signals, use the “-BP” version of the Signalman, and follow the wiring diagram shown below: SignalMan (-BP Version) ‘n’ R Controllers ‘n+1’ G Bipolar LED-based Signal Wiring Wiring Incandescent (IC) Lamp-based Signals: This is also a fairly common form of multi-light block signal. Since it employs light bulbs rather than LEDs, higher current is typically required than in similar LED-based implementations. To control an incandescent signal, use the “-IC” Signalman, and follow the wiring diagram shown below: SignalMan (-IC Version) V+ Controllers R G Y ‘n’ ‘n+1’ ‘n+2’ Incandescent Lamp-based Signal Wiring 54 Using an External Supply to Power Incandescent Lamps: The Signalman’s built-in supply is rated for a maximum output current of 1 Amp, more than adequate for powering most LED- and grain-of-wheat lamp-based signaling hardware. However, for signals using larger, more power hungry incandescent bulbs, higher current may be required to drive signals under worst-case conditions. During operation, note the temperature of the Signalman’s heatsink. If it seems unreasonably hot, you’re probably placing too high a current demand on the Signalman’s voltage regulator. (The Signalman’s power supply has built-in current limiting and thermal shutdown protection.) Using a lower voltage supply to the Signalman will reduce the amount of heat that must be dissipated by its regulator. If the regulator still seems overloaded, a separate, external power supply may be used to power the signal lamps. To use an external supply, simply wire the common lead of the signal(s) to the (+) terminal of the external supply, and wire the (-) terminal of the external supply to the V- terminal of the Signalman, as shown below. The remaining leads of the signals connect as usual to the Signalman’s controllers: SignalMan VExternal Power Supply + R G Y N N+1 N+2 External Power Supply Wiring with Incandescent Bulbs Note: When an external supply is used to power signals, power must still be supplied to the Signalman (via its black power supply jack) to provide power to its microprocessor. 55 Heatsink Installation: Before powering up your Signalman board(s), install the heatsink supplied with each of the boards using the mounting hardware provided. The heatsink should be attached to the voltage regulator located next to the board’s power supply jack near the upper left-hand corner of the PC board. Heatsink Nut Lock Washer Bolt Voltage Regulator Heatsink Mounting Procedure Adjusting Signal Brightness: Signal brightness may be adjusted at any time by using the Tbrain program’s “SettingsHardware Settings” menu item. Simply position the “Signal Brightness” slider bar to achieve the desired brightness. Note that when using the incandescent version of the Signalman, the voltage applied to the signals (and therefore, the maximum signal brightness) is determined by the setting of the Signalman’s onboard voltage adjustment potentiometer. The software controlled brightness adjustment within Tbrain then yields a lamp intensity that is a percentage of this maximum value. Power-up Signal State: After initial power-up, or following a reset, the Signalman places all signal controllers in the OFF state, i.e. no signal lamps illuminated. Your TCL code can then initialize the signals, as desired, to configure the initial state of your railroad operations. 56 Lesson 8: Controlling Your Signals Using TCL Now that your signals are wired, it’s time to start controlling them automatically from your TCL programs. To illustrate, we’ll consider a simple example using a Signalman to control a collection of signals: a 3-color block signal portraying track status, a 2-color signal indicating the direction of a turnout, a grade crossing flasher, and a blinking warning beacon. The wiring for our simple example is illustrated below. This example assumes the use of Common Anode signal hardware. Your wiring may differ slightly (refer to the wiring instructions in the previous section). V+ V- “block1” Y 1 2 3 “sidingA” R G 4 5 “crossing” 6 7 “beacon” 9 Signalman R G 10 11 12 13 14 15 16 8 Typical Signalman Wiring Example As usual, we’ll begin by giving each of our signals a meaningful name. This is accomplished using a new “Signals:” section of our TCL program. In addition to naming our signals, we’ll also need to let TBrain know how many controllers each signal uses. To do so, simply list the number of controllers, between braces, following the signal’s name. For our example above, the “Signals:” section of our TCL program might be: Signals: block1(3), sidingA(2), crossing(2), beacon(1), spare[8] Note that we’ve only used 8 of our Signalman’s 16 controllers. As with the Train Brain’s controllers and sensors, we must designate any unused signal controllers as “spare”. This lets TBrain keep precise track of which signals are wired to which of the Signalman’s controllers. 57 Programming Signals Using “Color Identifiers”: With each of our signals named, we can now control them just as we would any other TCL entity, by making them a destination in the action clause of a WHEN-DO. TCL provides several mechanisms that facilitate working with signals. The simplest, and most often used, are the “color identifiers”: “RED”, “GREEN”, and “YELLOW”. A signal may be controlled simply by setting it equal to the desired color in a WHEN-DO statement. For example: WHEN block3_occupied = TRUE DO block3 = RED, block2 = YELLOW, block1 = GREEN The Signalman responds to color identifier commands as follows: Setting a signal equal to “RED” activates the first controller to which that signal is wired. For instance, in our example, setting signal “block1” (wired to Signalman controllers #1, 2, 3) equal to RED activates controller #1. Setting a signal equal to “GREEN” activates the second controller to which that signal is wired (controller #2 in the case of signal “block1” above). Setting a signal equal to “YELLOW” activates the third controller to which that signal is wired (controller #3 in the case of signal “block1” above). This makes the wiring rules quite simple: For 2-color signals: 1) Wire the RED signal light to any Signalman controller. 2) Wire the GREEN light to the next higher numbered controller. For 3-color signals: 1) Wire the RED signal light to any Signalman controller. 2) Wire the GREEN light to the next higher numbered controller. 3) Wire the YELLOW light to the next higher numbered controller. 58 Blinking Signal Aspects: Any of the lamps in our signal may be made to blink using the color identifiers RED_BLINK”, “GREEN_BLINK”, and “YELLOW_BLINK. For example: WHEN … DO block1 = RED_BLINK {produce blinking red aspect} The blink rate of the signals may be adjusted at any time using the “Blink Rate” slider control in the “Signals” section of Tbrain’s “Settings-Hardware Settings” menu item. Compound Signal Aspects: Using the color identifiers, it’s also possible to activate more than one signal light simultaneously. Just list all desired colors, in any order, separated by a dollar sign ‘$’. For example: WHEN … DO block1 = RED$YELLOW_BLINK WHEN … DO block1 = RED$GREEN$YELLOW {red over blinking yellow} {turn on all signal lamps} To turn off all the lights of a multi-colored signal, use the keyword “OFF”. For example: WHEN … DO block1 = OFF {turn off all signal lamps} 59 Programming Signals Using “Signal Indicator Strings”: Color names are great for use with multi-colored signals, but they don’t make much sense when used with positional signals, crossing flashers, etc., where all signal lamps are the same color. Another easy method for assigning a value to a signal in TCL is called a “signal indicator string”. A signal indicator string tells TBrain which signal lamps should be activated (and which should be turned off) by “graphically” illustrating the desired signal aspect. For example, to control our crossing gate flasher, we might write: WHILE at_crossing = TRUE DO flasher = “*-”, wait 1, flasher = “-*”, wait 1 Here, we’ve used a signal indicator string to alternately flash each light of the crossing flasher once per second. An asterisk ‘*’ in the string indicates that a lamp should be lit, while a dash ‘-‘ indicates that it should be turned off. A ‘/’ in the string indicates that a lamp should be blinked. The number of characters between the quotes of the signal indicator string should always equal the number of Signalman controllers used by the signal being controlled. The string reads left to right, with the leftmost character representing the lowest numbered Signalman controller. With that in mind, it should be fairly easy to see that the following sets of TCL action statements will have identical results: block1 block1 block1 block1 = = = = RED GREEN YELLOW RED_BLINK is the same as is the same as is the same as is the same as block1 block1 block1 block1 = = = = “*--“ “-*-“ “—-*“ “/--“ Controlling Discrete Signal Lights: When a signal uses only a single Signalman controller, any of the same methods used to activate Train Brain controllers may be used to control the signal. For example, WHEN … DO WHEN … DO WHEN … DO beacon = ON beacon = OFF beacon = PULSE 0.25 { Turn the light on } { Turn the light off } { Flash the light } These simple techniques are all it takes to control signals from your TCL program. 60 Controlling Bipolar and Bicolor LED-based Signals: The previous discussion tells you everything you’ll need to know to control any style of signal from a TCL program, but a few additional points are worth mentioning when working with bipolar (2-lead) and bicolor (3-lead) LED-based signals. Although the signal contains only red and green LEDs, and uses only two Signalman controllers, you can still set it equal to YELLOW. For bipolar or bicolor LED-based signals, the Signalman will automatically create the yellow signal aspect by toggling rapidly between the red and green states to synthesize the yellow color. For example: Signals: sig1(2) { a single searchlight signal using a bipolar LED } WHEN … DO sig1 = RED WHEN … DO sig1 = GREEN WHEN … DO sig1 = YELLOW { set voltage polarity to light red LED } { set voltage polarity to light green LED } { alternate voltage polarities to create synthetic yellow } By default, when synthesizing yellow, the Signalman uses a color mix in which the green LED is lit 66% of the time, and the red LED is lit 33% of the time. This creates a very effective approximation to pure yellow for most bipolar LEDs. However, actual results will vary, depending on the relative red and green luminous intensities and wavelengths of the LEDs used in your brand of signals. You may wish to experiment with different color mixes to achieve the best results. Yellow hue can be adjusted using the “Yellow Tint” slider control in the Signals section of TBrain’s Settings-Hardware Settings menu item. Moving the slider to the left increases the amount of red in the color mix, while moving it to the right increases the amount of green. 61 Checking Out Your Signals Here’s a simple TCL program to check out your signal wiring. We’ve assumed you’ve wired a 3-color signal as indicated in the wiring instructions above. (Note: If you’ve used a bicolor LED based signal, change the 3 to 2 and 13 to 14 ein the Signals: section, since your signal only consumes two Signalman outputs.) QKeys: R, G, Y Signals: sig1(3), spare[13] Actions: WHEN R = LEFT DO sig1 = RED WHEN G = LEFT DO sig1 = GREEN WHEN Y = LEFT DO sig1 = YELLOW Just click on the appropriate Quick-Key to produce the desired signal aspect. The code should work with any signal type. If the signal doesn’t follow the correct color sequence, or if more than one light is illuminated at the same time, check the wiring of the signal’s control leads to the Signalman’s controllers. Many signal manufacturers regrettably don’t color code their wires, so it’s often hard to tell which is which. If the signal is too bright or too dim, adjust the Signal Brightness slider control in the Signals section of Tbrain’s Settings-Hardware Settings menu item. If the signals don’t seem to work at all, make sure they are the correct type for use with the Signalman board you are using. Other “Signaling” Applications: In the above discussion, we’ve concentrated on railroad related signaling. But to the Signalman, a signal is just a collection of lights. Use your imagination, and you’ll come up with lots of other applications for the Signalman. The real world is full of illuminated visual indicators, and reproducing these in miniature can really bring a model railroad to life. TCL makes controlling signals so easy, there’s virtually no limit to the effects you can achieve. Here are just a few: Airport guidance lights that flash in sequence to guide planes toward the runway Blinking warning beacons atop communications towers, water towers, etc. Marquis signs with chaser lights at circuses/carnivals/movie theaters, etc. Traffic lights that sequence regularly on a timed basis Flashers on police/fire equipment, tow trucks, school busses, etc. Blinkers at construction sights Campfires that flicker randomly (using a random number generator to control the LED) 62 Section 5: Controlling Switches Switches are an essential part of every model railroad, and a natural candidate for computer control. Because controlling turnouts is such an important aspect of computerized Central Traffic Control, we’ve dedicated an entire section of the User’s Guide to the topic. A seemingly endless array of switch control hardware exists today in a wide variety of physical designs, and with electrical current requirements ranging anywhere from a few milliamps all the way up to several amps. As a result, there’s no one simple answer to the question “How should I control my switch machines?” In this lesson, we’ll begin by illustrating the simple control of a dual-coil, solenoid-driven switch using the controllers found on CTI’s Switchman, Train-Brain, or Dash-8 modules. In the following lesson, we’ll examine the CTI’s YardMaster control module. There, we’ll see how to operate other types of switch control hardware such as single-coil solenoid and stallmotor driven switch machines. In a later lesson, we’ll learn to integrate the control of the physical switch machines on our layout with our CTC panel’s graphical user interface, through a simple point-and-click of their image on our on-screen track schematic. But for now, let’s begin with the basics … Lesson 9: Dual-Coil Solenoid-Based Switch Control Thus far, all of our examples have dealt in one way or another with turning things ON or OFF. Trains either move or sit still, whistles either blow or are silent. Switches, however, are different. They need to exist in one of three different states: 1) Moving from open to closed. 2) Moving from closed to open. 3) Idle, remaining in their current state. So how can we produce three states using controllers that can only be turned on or off? The solution is simple: use two controllers. With that in mind, let’s write a TCL program to control a single switch using a Quick-Key. Such a program is shown below. A wiring diagram for use with dual-coil solenoid switch machines is also shown. (This example uses the solid-state controllers found on the Switchman, but the relays on the Train-Brain or Dash-8 work just as well.) Here's how things work. One controller is wired to the “open” control lead of the switch machine. The other controller is wired to the “close” control lead of the switch machine. The common lead of the switch machine is wired to the (+) output of the DC power supply. Finally, the (-) lead of the DC supply is wired to the common (GND) input of the Switchman. 63 To move the switch, the TCL code simply pulses one of the two controllers. This completes the circuit through the corresponding switch machine coil, and the turnout moves into the desired position. The appropriate duration for the pulse command that supplies the power will depend upon the type of switches you use. A value between 0.1 and 0.25 seconds works well for most switch machines. Experiment with your switches to find the optimal pulse time. As a general rule, dual-coil solenoid-based machines are the “power hogs” of switch control. Some dual-coil machines are downright brutish. For example, switch machines from Atlas and NJI have coil resistances as low as 4 and 2 Ohms, respectively. At 12 Volts, that corresponds to current surges of 3 and 6 Amps needed to throw a switch! But you needn’t worry. The solidstate controllers on the Switchman and the electro-mechanical relays of the Train-Brain and Dash-8 were specifically designed to tackle these heavy inductive loads. + 12V 12V DC DC Power Power Supply Supply GND - Dual Coil Switch Machine “open” 1 Open Switchman Controller Common “close” OK to use Train-Brain controllers here, too 2 Close Switchman Controller { A Simple Switch Control Program } Controls: open, close QKeys: switch Actions: WHEN switch = LEFT DO WHEN switch = RIGHT DO open = PULSE 0.1 close = PULSE 0.1 Basic Wiring Diagram and TCL Code Example for Throwing a Dual-Coil Switch 64 Optimized Switch Control: We’ve now learned to use two controllers to operate a turnout. But that approach could get rather expensive if your layout has many switches. Fortunately, we can do much better. Here, we’ll learn to cut our cost nearly in half; by throwing turnouts using just a single controller per switch machine. To illustrate, we'll consider a simple yard ladder with 4 sidings, and create keyboard commands to automatically route each siding to the mainline. (A track diagram for the yard is shown below.) “Time-Sharing”: The optimization technique we’ll be using is called “time-sharing”. The trick here is to think "backwards" from the way we did above. This time, instead of wiring two controllers to the “open” and “close” direction control lines of each switch machine, we’ll now wire a single controller to each switch machine’s common power lead. Then we’ll wire the open and close control leads of all of our switches to a single Train Brain controller. Our switch machines will then “time share” this single direction controller. To throw a particular switch, we’ll simply set the shared direction control relay for the desired throw direction, and then pulse the power control lead of the chosen switch machine. A wiring diagram and TCL code to control our yard ladder using time-sharing are shown below. In this case, we’ve implemented the circuit with the Train Brain’s relay-based controllers so that new users can build it using the Starter Kit. However, the circuit can be constructed more costeffectively using the Switchman’s solid-state controllers. We’ll see how in a moment. Note that in the time-sharing circuit, "blocking" diodes are required in the path from the direction controller to each turnout coil to prevent current flow via the "sneak paths" that result from multiple solenoid coils being wired in parallel. (For your convenience, the diodes used in this circuit are available from CTI. See the “Accessories” page of our catalog. They can also be found at any electronics store or mail-order supply house.) Siding D Siding C Switch #3 Switch #2 To Mainline Siding B Switch #1 Siding A Automated Yard Ladder Example Track Layout 65 “direction” NC + 1 12V 12V Filtered Filtered DC DC Train Brain Controller NO “power1” NC 2 - Train Brain Controller NO Dual Coil Switch Machines Open Common Close “power2” NC 3 Train Brain Controller NO Open Common Close “power3” NC 4 Train Brain Controller NO Open Common Close (Note: Diodes are required to eliminate sneak paths through parallel turnouts.) Controls: direction, power1, power2, power3 Actions: WHEN $command = A DO direction = OFF, wait 0.1, power1 = PULSE 0.1 WHEN $command = B DO direction = ON, wait 0.1, power1 = PULSE 0.1, power2 = PULSE 0.1 WHEN $command = C DO direction = ON, wait 0.1, power1 = PULSE 0.1, power3 = PULSE 01, wait 0.1, direction = OFF, wait 0.1, power2 = PULSE 0.1 WHEN $command = D DO direction = ON, wait 0.1, power1 = PULSE 0.1 wait 0.1 direction = OFF, wait 0.1, power2 = PULSE 0.1 , power3 = PULSE 0.1 “Time-Sharing” Wiring Diagram and TCL Code Example 66 The time-sharing circuit can be implemented much more cost-effectively by using the Switchman for our power controls, as shown in the circuit below. “direction” NC + NO Train-Brain Controller 12V 12V DC DC Power Power Supply Supply Dual Coil Switch Machines “power1” Open - Common Close Switchman Controller “power2” Open Common Close Switchman Controller “power3” Open Common Close Switchman Controller “Time-Sharing” Wiring Diagram using Switchman Power Controls In the circuit above, a single Train-Brain controller is still needed to route the + voltage to the Open or Close side of the switch machines. If none is available, we can implement an “allSwitchman” solution by adding an external relay (e.g. CTI part #TB007) as shown below. Auxiliary SPDT Relay Module CTI Part # TB007 + 12V 12V Filtered Filtered DC DC 12V “direction” - CTL Switchman Controller COM NO NC Dual Coil Switch Machines “power1” Open Common Close Switchman Controller “power2” Open Common Close Switchman Controller “power3” Open Common Close Switchman Controller “Time-Sharing” Wiring Diagram using Switchman Controls + External Relay 67 Failsafe Operation Of Dual-Coil Solenoid Driven Switch Machines: One limitation of your PC is that it can’t smell smoke! If you make a mistake, and accidentally leave a switch machine activated for an extended period of time, your nose will realize it fairly quickly, but your PC never will. It will obediently keep current flowing through the switch machine, just as you asked it to, until the machine’s plastic housing eventually melts. Fortunately, even if you’re prone to the effects of Murphy’s Law, this risk is easy to overcome. The circuit we’ll use is shown below. Here, a capacitor-discharge circuit serves as the input to our timesharing network. The capacitor charges gradually through the resistor, and then dumps its stored charge quickly through the selected switch machine whenever that machine’s power controller is closed. Once that charge is depleted, virtually all current stops flowing. As a result, we’re guaranteed to limit current flow through the switch machine to a safe momentary pulse, regardless of what we do in TCL. The only limitation of this approach is that the capacitor must be allowed to recharge between switch throws. With the circuit values shown, the capacitor will be back to within 99% of its full charge within just 2 seconds. For the peace of mind this circuit offers, that’s a small price to pay. In the “an ounce of prevention is worth a pound of cure” department, this circuit is a real winner. The TCL code for our failsafe implementation will be virtually identical to the original automated yard ladder program above. We’ll simply need to add a 2 second “wait” command (“wait 2”) between successive switch throws to allow the capacitor time to recharge. 100 Ohm 5 Watt Resistor Train Brain Controller + 12V 12V DC DC Power Power Supply Supply “direction” 4700 uF 25V Capacitor “power1” Dual Coil Switch Machines Open - Common Close Switchman Controller “power2” Open Common Close Switchman Controller “power3” Open Common Switchman Controller Close Failsafe Capacitor-Discharge Switch Machine Circuit 68 Summary: In this lesson, you have learned the following: How to use Train Brain or Switchman controllers to activate a switch track. How to control switch tracks from a TCL program. How to optimize the control of N turnouts, using N+1 controllers. Techniques for making switch operation failsafe Recommended Practice Exercises: Add a "non-derailing" feature to this TCL program that automatically throws each switch ahead of an oncoming train, whenever the switch is in the improper direction. 69 Slow-Motion Switch Control: Introducing the “YardMaster” In the previous lesson we learned how to control a dual-coil switch machine using two Train Brain or Switchman controllers. We then cut our cost in half by using the “time-sharing” technique to control turnouts with just a single controller per switch machine. While that approach worked well for dual-coil switch machines, what about single-coil solenoid machines (such as those from Kato and LGB) and slow-motion stall motor machines (like those from Tortoise or SwitchMaster)? There’s a CTI solution for those, too. It’s called the “YardMaster”. Designed especially to operate stall-motor and single-solenoid switch machines, the YardMaster makes turnout control remarkably affordable - under $5 per switch. The Yardmaster is compatible with all popular brands of stall-motor and single-solenoid switch control hardware. We’ll begin with a brief introduction to the YardMaster, and then look at some circuits and TCL code ideas for controlling each of these styles of switch machines using the YardMaster. A block diagram of the YardMaster is shown below. PC PC Communications Communications Switch Switch Machine Machine Controls Controls Microprocessor Microprocessor Switch Power YardMaster Circuit Circuit Protection Protection YardMaster Block Diagram 70 Switch Machine Controllers: The YardMaster provides 16 switch machine control outputs, each independently programmable from the PC. The YardMaster’s control circuits are accessed via the terminal strips located along the left and right sides of the board. The numerical designation of each controller is indicated next to its connector on the PC board. In contrast to the simple On/Off controls found on the Train Brain and Switchman, each of the Yardmaster’s output circuits is a dual-transistor “totem-pole” driver. You can think of each output as a single-pole-double-throw (SPDT) switch, providing a remotely controllable connection from the output terminal to either the positive (V+) or negative (V-) input terminals of the Yardmaster. Each of the YardMaster’s outputs is rated to drive a momentary load of up to 1 Amp, and a continuous load of up to 0.2 Amps. PC Controlled V+ V- NC Control Output NO Functional Representation of a YardMaster Control Output Circuit Protection: Each YardMaster output provides thermal protection to guard against overheating, and clamp diodes to protect against the voltage transients that occur when driving inductive loads such as the solenoids and motors found in switch machines. Power Supply: The Yardmaster requires two power supplies. The first provides the power needed to drive the module’s digital logic circuits. As with all CTI boards, this power enters the YardMaster through the black power supply jack located near the upper right-hand corner of the board. This power supply must be filtered, and should be in the range of +9 to +12 Volts DC. The same power supply available from CTI for use with all of our other modules is also compatible with the YardMaster. Just plug it in, and you’re ready to go. For those who wish to supply their own power source, the YardMaster is shipped with the appropriate power supply plug to mate with the power jack. You’ll need to hook your power supply to this plug. The outer conductor is GROUND(-). The inner connector is 12 Volts (+). Always double check your wiring before applying power. 71 The YardMaster’s second power supply is used to drive the switch machines themselves. The proper choice of voltage will vary depending upon your brand of switch machines and how you connect them to the YardMaster, but in general, around 12 to 15 Volts D.C. is appropriate. (Don’t go any higher than 18 Volts D.C.) This power supply enters the Yardmaster through the V+ and V- terminals located at the top of the left-hand connector strip. A few words of warning are in order. Many model railroaders will be accustomed to using the “accessory” voltage output of their train transformer to power their switch machines. This A.C. voltage is incompatible with the integrated circuits used by the YardMaster. Likewise, even the D.C. output of most train transformers is incompatible with the YardMaster, since that voltage is seldom more than a rectified copy of the raw A.C. sine wave. Apply only a filtered D.C. power supply to the YardMaster’s V+/V- inputs, and be sure to wire it in the proper polarity: positive voltage to V+, ground to V-. A wide variety of low-cost filtered D.C. power supplies exist. Examples include CTI’s own TB003-C (see the “Accessories” page of our catalog) or Radio Shack’s Part #22-504. Any electronics store will sell a good quality, reasonably priced, filtered 12V D.C. supply. If you’re not sure that your DC power source is sufficiently filtered, simply connect one or more good-sized capacitors (e.g. 4700 uF) across its outputs. Be sure to observe correct polarity, and choose capacitors rated for at least 1.5 times the output voltage of the supply. ! Unfiltered DC Power Supply + Observe Polarity and Voltage Ratings V+ YardMaster - V- Filtering an Unfiltered Power Supply Output Choose a power supply rated to handle the worst-case total current draw for the maximum number of switch machines you’ll be throwing simultaneously (or, better yet, write your TCL code to throw switches sequentially to reduce the burden on the power supply). The YardMaster itself will draw about an additional 80 mA from this supply. (And remember that most stall motor machines draw more power when stalled than when moving.) While their voltages are similar, it’s best to use separate power supplies for the switch machines and the YardMaster’s digital logic. The power supply noise that results from driving heavy inductive loads makes it a bad design practice to reuse that same supply to drive digital circuits that require a pristine power supply voltage. 72 Lesson 10: Hooking Up & Using The YardMaster Now it’s time to install your YardMaster into your CTI system. The YardMaster uses the same PC interface as all of our other modules, so hooking it up should be a breeze. Since we’ve already described the details of interfacing the CTI system to your PC, we won’t dwell on the subject in much detail here (see “Hooking Up Your CTI System” in Section 1, if you’d like more details). As with all CTI modules, simply install your YardMaster board(s) anywhere into your CTI network using the modular phone jacks located near the upper left corner of the circuit board. Remember to connect your CTI boards to form a closed loop, always wiring from RED to GREEN. That’s all there is to it. An example of a simple CTI network consisting of Train Brain and YardMaster modules is shown below: Train Brain Train Brain YardMaster Modular Phone Cords YardMaster CTI Diplexer To PC A CTI System Using Train Brains and YardMasters Next, you’ll wire your turnouts to the YardMaster. To hook up your turnouts, simply consult the appropriate wiring instructions for the style of switch machines you’ll be using given in the following illustrations. As a first experiment, we recommend that you hook up just a single turnout. And because in this application incorrect wiring (or a mistake in your TCL code) can result in power being continuously supplied to a switch machine, until you verify correct operation, we recommend that you keep one hand on the On/Off switch of your switch machine power supply, just in case. 73 Controlling Single-Coil Solenoid Driven Switch Machines: Single-coil solenoid-based switch machines work a bit differently than their dual-coil counterparts. Single-coil machines employ a pair of permanent magnets housed inside the same solenoid coil. D.C. current passing through the coil creates a magnetic field that attracts one magnet and repels the other. Throw direction is determined by the polarity of the applied D.C. voltage. Single-coil machines are easily identifiable by their two control leads. A wiring diagram illustrating a single coil switch machine connected to the Yardmaster is shown below. Simply connect the switch machine power supply’s + and – outputs to the V+ and Vterminals of the Yardmaster, respectively, and each of the machine’s control leads to a YardMaster controller. “OpenSwitch” 1 V+ 12V 12V Filtered Filtered DC DC “CloseSwitch” 2 YardMaster 3 B Single Coil Switch Machine ... V- A 16 Basic Connection of a Single-Coil Switch Machine to the YardMaster To throw the switch, simply pulse one of the two YardMaster controllers connected to the switch machine. For example, to control the turnout using a Quick-Key, we could write: Controls: OpenSwitch, CloseSwitch, spare[14] QKeys: Open, Close Actions: When Open = Left Do OpenSwitch = Pulse 0.1 When Close = Left Do CloseSwitch = Pulse 0.1 74 Optimized Control Of Single-Coil Solenoid Driven Switch Machines: If cost is a concern, using a variation on the traditional capacitor-discharge switch machine circuit, we can control a single-coil machine using a single Yardmaster controller. A wiring diagram illustrating this technique is shown below. ! Capacitor 1 V+ V- Single Coil Switch Machines A B A 2 B ... YardMaster “Direction2” ... 12V 12V Filtered Filtered DC DC “Direction1” Observe Polarity and Voltage Ratings A 16 “Direction16” B Optimized Connection of Single-Coil Switch Machines to the YardMaster A second advantage of this approach is that it is failsafe, thanks to the capacitor, which serves as a hardware-based timing element. Even if we make a mistake, regardless of what we do in TCL, current flow through the switch machine is limited to a safe, short pulse. Now, we can operate our switch machine simply by turning its controller On or Off: When Open = Left Do Direction1 = On When Close = Left Do Direction1 = Off Experiment to find the best capacitor value. A standard 4700 uF capacitor should work well for most switch machines. If the switch fails to throw reliably, try increasing the input voltage (up to a maximum of 18 Volts D.C.), or add a second capacitor in parallel with the first. Be careful to observe correct polarity when wiring the capacitors and to choose a capacitor with a voltage rating at least 50% above that produced by your switch machine power supply. (For your convenience, the capacitors used in this circuit are available from CTI. See the “Accessories” page of our catalog. They can also be found at any electronics store or mail-order supply house.) 75 Controlling Stall Motor Driven Switch Machines: As their name implies, slow motion stall-motor switch machines employ a low current D.C. motor to move the turnout’s switch points. The direction of motor rotation (and therefore the throw direction of the switch) is determined by the polarity of the applied D.C. voltage. A wiring diagram showing a stall motor switch machine connected to the Yardmaster is shown below. Simply connect each of the machine’s control leads to a YardMaster controller. 1 V+ V- 2 YardMaster “CloseSwitch” 3 ... 9V 9V Filtered Filtered DC DC “OpenSwitch” 16 A B Stall Motor Switch Machine 330 Ohm 1/4 Watt Resistor Basic Connection of a Stall Motor Switch Machine to the YardMaster Because stall motors can be “left running” after the turnout moves into position, the TCL code to control the switch using our QuickKey simply becomes: When Open = Left Do OpenSwitch = On, CloseSwitch = Off When Close = Left Do OpenSwitch = Off, CloseSwitch = On [Note: The resistor shown in the wiring diagram above is optional, but highly recommended. It serves two very useful functions. First, since stall motor machines are left on continuously, the resistor reduces the current draw of the switch machine while the points are held for extended periods in their stalled position, thereby keeping the YardMaster and switch machine both running nice and cool. Second, the resistor eliminates the possibility of a short circuit in the switch machine wiring possibly damaging the YardMaster’s output circuit as well as the switch machine. Unfortunately, the terminal strips commonly sold by many hobby suppliers to facilitate wiring to Tortoise machines do not mate accurately with the connecting fingers on the Tortoise machine. A slight physical misalignment between the terminal strip and the Tortoise machine’s edge connector results in a dead-short circuit between power and ground. (We’ve seen this happen repeatedly.) The cost of about 2 cents for the resistor is therefore a great insurance policy.] 76 Optimized Control Of Stall Motor Driven Switch Machines: If cost is a concern, using the circuit shown below, we can control a stall-motor switch machine using a single Yardmaster controller. “Direction1” 1 9V 9VFiltered FilteredDC DC 2 B A B “Direction2” ... YardMaster A 9V 9VFiltered FilteredDC DC 16 ... V+ Stall Motor Switch Machines “Direction16” A B VResistors are 330 Ohm, 1/4 Watt Optimized Connection of Stall Motor Switch Machines to the YardMaster In this case, the TCL code to control our switch simply becomes: When Open = Left Do Direction1 = On When Close = Left Do Direction1 = Off Summary: In this lesson, you have learned the following: How to wire stall motor and single-coil solenoid switch machines to the YardMaster. How to control switch machines from a TCL program via the YardMaster Optimization techniques for controlling multiple turnouts using the YardMaster. Methods for making switch operation failsafe. Recommended Practice Exercises: Wire one of your turnouts to the YardMaster and experiment with controlling it interactively using a Quick-Key. Try using the optimization and failsafe technique appropriate for your chosen style of switch machines. 77 Section 6: Programming Tips In this section, we'll introduce some additional features of the TCL language. Then we'll look at several examples illustrating how to attack some of the most common model railroad control problems using the CTI system. Finally, we'll show how to design sophisticated control panel displays specifically tailored to your railroad's operations. Lesson 11: Introducing Variables In earlier lessons you learned to control the operation of your layout interactively from the keyboard and to run your layout automatically using sensors. These two techniques provide an almost endless variety of control possibilities. However, you'll soon find applications that demand more sophisticated control. That control is available in TCL through the use of "variables". In this lesson we'll show you how to use variables to greatly expand the capability of your TCL programs. Variables are storage locations that reside within your TCL program. Unlike controllers and sensors, they have no hardware counterparts. Nonetheless, they are powerful tools, indeed. Variables can be used to remember past events. They can be used to count, or perform arithmetic and logical operations. They can be set equal to TRUE or FALSE, can hold a numerical value, or can even be set equal to a text string. Variables give your TCL programs an entirely new dimension. Let’s illustrate the use of variables with a simple example. We'll return yet again to our automated station stop. We already know how to stop the train automatically each time it approaches the station. But while this may indeed be a remarkable piece of computer control, it could become a bit monotonous, particularly on a smaller layout where station stops would be quite frequent. Suppose we wish to selectively enable and disable our station stop feature. Unfortunately, our sensor is designed to detect the train every time it passes the station. How can we make our TCL program only respond to selective ones? The solution, of course, is to use variables. Let's make a small change to the station stop program we introduced in Lesson 3. (No wiring changes are needed.) For simplicity, we'll use a Train Brain controller to stop the train when it arrives at the station. (Of course, the station stop could be implemented more realistically using a SmartCab.) The revised TCL program is shown below. 78 { A Revised Automatic Station Stop } Controls: station_stop, whistle, spare, spare Sensors: at_station, spare, spare, spare Qkeys: stop Variables: should_stop Actions: WHEN stop = LEFT DO should_stop = TRUE WHEN stop = RIGHT DO should_stop = FALSE WHEN at_station = TRUE, should_stop = TRUE DO station_stop = ON, wait 10, whistle = PULSE 2, wait 1, whistle = PULSE 2 station_stop = ON The most notable difference between this version of the program and our original station stop is the addition of a new section, entitled "Variables:”. This section allows us to give each of TCL's built-in storage locations a meaningful name. The rules for naming variables are the same as those for sensors and controls. In this case, we need only one variable, which we’ve called "should_stop". The first two WHEN- DO statements of our revised TCL program let us set "should_stop" to TRUE or FALSE using a Quick-Key. In other words, we can use the variable to remember whether or not we want the train to stop when it arrives at the station. The third WHEN-DO looks very much like that of our original station stop, with one very important exception: the addition of a second condition in the WHEN clause: WHEN at_station = TRUE, should_stop = TRUE DO ... Now the train will only stop if it is detected at the station AND we have requested that it stop by setting the variable "should_stop" equal to TRUE. Otherwise, even though the train is detected at the station, it will simply continue on its way. This ability to chain together multiple conditions allows complex decisions to be made by TBrain. Any number of conditions, each separated by a comma (or if you prefer, by the word ‘AND’), may be grouped within a WHEN clause. In order for the corresponding DO clause to be executed, all of the specified conditions in the group must be satisfied. Furthermore, any number of such condition groups may be combined using the TCL "OR" operator within a WHEN clause. The corresponding DO clause will then be executed whenever any one of the condition groups is TRUE. 79 For example, let’s suppose we wish to have the train stop at the station as described above. In addition, we would like to be able to force a station stop, regardless of the state of the variable should_stop, by using a Quick-Key called "OVERRIDE". Finally, we would like to be able to stop the train at any time using a command called "BRAKE". An appropriate WHEN-DO statement might be the following: WHEN at_station = TRUE AND should_stop = TRUE OR at_station = TRUE AND override = LEFT OR $command = BRAKE DO station_stop = ON Try running the station stop program above using TBrain. It is included at C:\Program Files\Tbrain\Lesson11. Use the STOP Quick-Key which we've created to enable and disable automatic station stops. More on Variables: In the previous example we learned how to assign a value to a variable and how to use the variable's value as part of the condition in a WHEN-DO statement. Before leaving our station stop example, let’s look at more ways we can use variables to add punch to our TCL programs. We'll again address the issue of controlling automatic station stops, but take a slightly different approach. Instead of requiring the user to decide whether or not the train should stop at the station, let’s leave the operation fully automated. This time, we'll say that the train should stop automatically every 10th time it arrives at the station. We'll obviously need a way to count the number of times the train has passed the station. Therein lies another application of variables. Consider the TCL program listing below: { Yet another automated station stop } Controls: station_stop, whistle, spare, spare Sensors: at_station, spare, spare, spare Variables: count Actions: WHEN at_station = TRUE DO count = + WHEN count = 10 DO station_stop = ON wait 10, whistle = PULSE 2, wait 1,whistle = PULSE 2 station_stop = OFF count = 0 80 Compare the WHEN-DO statements of this version of the program with those of Lesson 3. Notice that the "WHEN at_station = TRUE" condition no longer results in a station stop. Instead, its DO clause looks like this: DO count = + The plus sign "+" is a predefined TCL operator which means "add one to what's on the other side of the = sign", in this case, the variable “count.” (There's a complementary "-" minus sign operator, too.) Thus, count gets incremented every time the at_station sensor is triggered. In other words, the variable count is keeping track of how many times the train has passed the station. The second WHEN-DO statement looks very much like the WHEN-DO of our original station stop program. Only this time, the WHEN condition requires that the variable count be equal to 10. Therefore, the tenth time the train passes the station, the train will stop, as desired. One more important point. Note that at the end of the second WHEN-DO, the program sets count back to zero, so it can again begin counting to 10. Otherwise, it would just keep incrementing upwards to 11, 12, etc., and the train would never stop at the station again. Still More on Variables: Before leaving the subject, we'll mention a few more handy features of variables. When using variables as WHEN conditions, an additional set of "comparison operators" is available in TCL, above and beyond the traditional "=" we've used thus far. These additional operators (<, <=, >, >=, <>) are illustrated in the examples below: WHEN count < 10 WHEN count >= 7 WHEN count <> 5 { condition is satisfied whenever count is less than 10 } { condition is satisfied whenever count is greater than or equal to 7 } { condition is satisfied whenever count is not equal to 5 } Comparison operators can be combined to test a variable for a range of values. For example: WHEN count > 5, count < 10 { condition is satisfied when count = 6, 7, 8, or 9 } A set of arithmetic operators (+, -, *, /, #) is available for manipulating variables as part of the action in a DO clause. These operators are illustrated in the following examples. (For the purpose of illustration, assume the variable "var1" initially has the value 10.) WHEN ... DO var1 var1 var1 var1 var1 = = = = = 5+ 3* 54/ 6# { var1 = { var1 = { var1 = { var1 = { var1 = 81 10 + 5 = 15 } 15 * 3 = 45 } 45 - 5 = 40 } 40 / 4 = 10 } 10 "modulo" 6 = 4 } A set of logical operators (&, |, ^, ~) is available for manipulating variables as part of the action in a DO clause. These operators are illustrated in the following examples. WHEN ... DO var1 = 4 & var1 = 3 | var1 = 8^ var1 = var2~ { var1 = var1 AND 4 } { var1 = var1 OR 3 } { var1 = var1 XOR 8 } { var1 = NOT var2 } Variables can interact with one another, as well as with Train Brain controllers, sensors, signals, and SmartCabs, as part of the condition in a WHEN or the action in a DO. For example: WHEN var1 < var2 DO var3 = var4 var5 = var6 * var7 = cab1.speed cab1.speed = var7 { copy the value stored in var4 into var3 } { multiply var5 by the value stored in var6 } { copy the speed setting of cab1 into var7 } { copy var7 into the speed setting of smartcab1 } Enough Already !!! Wow! We've hastily introduced many applications of variables in this lesson. It's not important that you master the more "esoteric" uses of variables at this point. In fact, you may never need some of them. For now, simply keep in mind that they exist, and that they can help rescue you from some of the more tricky control problems that you may encounter in the future. Summary: In this lesson, you have learned the following: How to create variables and use them in a WHEN-DO statement. How to use TCL's arithmetic and logical operators to change the value of a variable. How to use TCL's comparison operators to test the value of a variable. How to chain together multiple conditions in a WHEN clause. . Recommended Practice Exercises: Add an additional WHEN-DO statement to the station stop program that blows one long whistle blast whenever the train arrives at the station, but does not stop. 82 Lesson 12: WHILE-DO's By now you're probably quite familiar with the use of the WHEN-DO statement to control the operation of your layout using TCL. In this section, we'll look a bit more closely at the behavior of the WHEN-DO, and introduce its twin, the WHILE-DO statement. Although we've used WHEN-DO statements repeatedly, there's one aspect of their use that we've taken for granted until now -- exactly how they're triggered. We know that the actions in the WHEN-DO begin executing as soon as all of the conditions in its WHEN clause are satisfied. But what happens once the list of actions is complete? If all the conditions listed in the WHEN clause are still satisfied, will the WHEN-DO statement execute again? The answer is "No". That's because WHEN-DO statements are "edge-triggered". They detect the transition from their conditions being not satisfied to being satisfied, and won't trigger again until another such transition occurs. That's a fortunate thing! Consider, for example, the previous lesson, where we used a sensor to count the number of times a train passed the station. The small fraction of a second that the train was positioned over the sensor is a virtual eternity to your PC. It could have executed the WHEN-DO statement that counted sensor triggerings many, many times. And to make matters worse, the number of counts at each detection would have been dependent on the speed of the train. Clearly, things would have been a mess. But because of the edge-triggered logic built into the WHEN-DO, we don't need to worry about such things. We can take it for granted that the counter will trigger once-and-only-once each time the sensor is activated. But are there times when we'd like to have our WHEN-DO statement retrigger if its conditions remain met? Certainly. Consider, for example, an automated grade crossing. Obviously, we'd like the gate to remain lowered and the crossbucks to remain flashing all the "while" the train is positioned in the crossing. That’s exactly the purpose for the "WHILE-DO" statement. In contrast to the WHEN-DO's edge-sensitive nature, WHILE-DO's are "level-sensitive". As long as it's conditions remain true, a WHILE-DO will repeatedly continue to execute. The syntax of a WHILE-DO looks just like that of a WHEN-DO. To illustrate using the WHILE- DO, and to contrast its behavior with the WHEN-DO, we'll look at the problem of alternately flashing the two signal lights on the crossbuck at our grade crossing. To avoid the need to do any wiring, here we'll just use a Quick-Key to simulate our grade crossing. But feel free to go ahead and implement the real thing if you like. Try running the TCL example below. It’s included on your distribution disk as "lesson12.tcl". In this example, we've defined a Quick-Key to simulate our grade crossing, and we've created two statements to control our flashers. The WHEN-DO version will respond to the LEFT mouse button, and the WHILE-DO will respond to the RIGHT. 83 Click on the CROSSING Quick-Key with the left mouse button and hold the button down to simulate the train remaining in the crossing for a few seconds. By watching the View-Controls window, or by listening to the clicking of the Train Brain's relays, its obvious the WHEN-DO flashes each light only once. As we’ve learned, that's just as expected for a WHEN-DO, but unfortunately, not proper behavior for a grade crossing. Now try the same experiment using the right mouse button. As long as you hold the button down, the warning lights continue to flash alternately. That's the level sensitive behavior of the WHILE-DO retriggering its list of actions for as long as you hold down the mouse button. { A WHEN vs. WHILE Example } Controls: flasher1, flasher2 Qkeys: crossing Actions: WHEN crossing = LEFT DO flasher1 = PULSE 1, flasher2 = PULSE 1 WHILE crossing = RIGHT DO flasher1 = PULSE 1, flasher2 = PULSE 1 In some circumstances, you may wish to have a set of actions that simply repeat forever. To help out in these cases, a special form of the WHILE-DO statement exists, the ALWAYS-DO. As its name implies, the DO clause of an ALWAYS-DO simply replays forever. To illustrate, here's an ALWAYS-DO statement that will cause a light (e.g. an aircraft warning beacon) to blink forever: ALWAYS DO beacon = pulse 1, wait 2 Summary: In this lesson, you have learned the following: The "edge sensitive" nature of WHEN-DO statements. The "level sensitive" nature of WHILE-DO statements. A special case of the WHILE-DO, the ALWAYS-DO 84 Lesson 13: Designing Your Own Control Panels Once you gain some experience using CTI and develop your own applications for computer control, you'll certainly want a control panel that's tailored to your model railroad's operation. In our final lesson, we'll learn to use TBrain's Graphical-User-Interface (GUI) tools to build custom control panels specifically designed for your layout. Then we’ll introduce the powerful graphics features built into the TCL language, which turn your PC into a true Centralized Traffic Control (CTC) facility. You’ll learn to automate realistic CTC screens that portray train locations, block occupancy, signal and switch status in full color, all updated in real-time based on sensor reports sent back from your layout. These CTC screens will also serve as interactive control tools, responding to the click of a mouse to throw switches, route trains, set signals, whatever ! In creating your own control panels, TBrain’s “CTC Panel” screens serve as your blank canvas. Up to four CTC Panels are available. Each is accessible through TBrain’s View menu. Activate one of the CTC panels using the View CTC Panel menu. Note that it consists of a blank grid, which by default is 50 columns wide by 50 rows deep. (At lower screen resolutions, not all grid squares are visible at one time. Scroll bars allow moving up/down and right/left through the display.) We can tailor the number of rows and columns in the grid, the size of the grid squares, and give the CTC panel a meaningful title using the Settings-CTC Panels menu item. But for now, the defaults will suffice. Each grid location is identified by an (x,y) coordinate pair. The upper-lefthand grid square is at coordinate (x,y) = (1,1). The upper-righthand grid square is (x,y) = (50,1). The bottom righthand grid square is at coordinate (x,y) = (50, 50). Within this viewport, we’ll build our CTC panel. Our first job is to enter our track schematic. To do so, we’ll need to activate TBrain’s track toolkit, by selecting “Schematic Editor” from the “Tools” menu (or click on the Track Builder menu button). Laying Track: Activate the “Schematic Editor” in TBrain’s Tools menu. Tbrain responds by displaying a popup toolbar containing a variety of track templates for straight track, curved track, turnouts, and signals (directly akin to the familiar sectional track available for model railroads). Using this modular track "toolkit", you’ll construct your track layout in schematic form. To “activate” a track type, simply click on its image on the toolbar. (The “active” track tool is portrayed as a “depressed” pushbutton in the toolkit.) Then move your mouse to the desired location in the CTC panel and click to “lay down” the selected track type. You can keep clicking to place the currently selected track type into as many grid squares as desired. To change to a new track type, simply click on a different track template in the toolbar. 85 Note: Execution of your TCL program must be halted to allow the CTC panel to be edited. Changing/Erasing Existing Grid Squares: If you need to change the track in a particular grid square to a different track type, simply select the new track type from the toolkit, and click it into place on the desired grid square. The old track section in that square will be replaced by the new track type. To remove an existing track section from a grid square, select the “Eraser” tool in the toolkit, then click on the desired grid square(s) to remove the existing track section(s). Defining Track Blocks: You’ll probably want to divide your track schematic into separate track blocks, just as your real layout is constructed, so you’ll be able to use your CTC panel display to portray block occupancy. Tbrain recognizes any discontinuity in the track schematic as a block boundary. Several end-ofblock track icons are provided for this purpose. In addition, you can insert a block boundary at any location on the schematic using the block-boundary tool in the track toolkit. Select the block boundary tool from the toolkit, then simply click at the desired location(s) on the track schematic. A small block boundary symbol will appear. To remove an existing block boundary simply click on it again with the block boundary tool selected. Once block boundaries are defined, if you desire, they can be made invisible using the SettingsHide Block Boundaries menu item. Selecting Foreground/Background Colors: You can change the color of track sections at design time, as well as change them while your TCL program is running (e.g. to portray block ownership). To change track colors now, select the “color” tool from the toolkit, and select the desired track color from the pop-up color palette. All future track sections will be drawn in the newly selected color. To change the color of an existing track section, simply click on it while the “Color” tool is activated. The track section will be redrawn in the newly selected color. To change the color of an entire track block, hold down the Shift key while clicking on any track section within that block. In response, the entire track block will be redrawn in the newly selected color. The “Color” tool can also be used to change the background color of the CTC panel. Simply select the desired color using the color tool, then click on any empty grid square on the CTC panel. The background color of the CTC panel will change to the newly selected color. 86 Pushbuttons: Pushbuttons can be placed on the schematic in the same way that track sections are laid down by activating the “Pushbutton” tool in the toolkit. Likewise, the color of the button can be set at design time using the “color” tool, and can be changed during operation by your TCL program. Signals: Signals can be placed at any point along the track schematic using one of the “Signal” tools from the toolkit. When placed, they will be displayed with all signal lights dimmed. Later, using TCL code, you’ll be able to activate any combination of signal lights to portray any signal aspect. Text: Text can be placed on the schematic to label sidings, switches, etc. Text is placed by activating the “Text” tool in the toolkit. Then each time you click in a grid square, you’ll be prompted to input the text, and be given the option to select it’s font, size, and alignment. The color of each text item can be controlled at design time using the Schematic Editor’s “color tool” just as with regular track sections. The color of text can also be changed while your layout is running, using instructions in your TCL program. Note, however, that the textual content of a static text item is fixed, and can’t be changed during operation of your layout. Later we’ll learn about a special type of text, called “message” text, whose content can be changed at any time using instructions in your TCL program. Use static text for things that won’t change (siding/turnout numbers, pushbutton labels, etc.) while using message text to communicate changing layout conditions. Pictures: Graphics images can be placed on the schematic to portray user-defined controls, structures, landforms, etc. Pictures are placed by activating the “Picture” tool in the toolkit. Then each time you click in a grid square, you’ll be prompted to select an image filename. Virtually all popular graphics file formats (.bmp, .jpg, .gif, etc) are supported. 87 Inserting and Deleting Columns and Rows: As you build you CTC panels, you may find times when you need to insert an additional column or row (or once you’re finished, you may decide you’d like to delete some columns or rows). The toolkit has buttons that allow you to do just that. Simply select the appropriate tool, then click on the CTC panel at the point where you’d like to add or remove a column or row. The CTC panel will be updated, and if you’ve already written TCL code, TBrain will ask if you’d like to have it automatically update any column and row references in your TCL program to account for the changes you’ve made to the CTC panel. Getting Your Hands Dirty: A long drawn out explanation of the “Schematic Editor” tools will never measure up to the value of some hands-on experience. Therefore, we highly recommend that you jump right in and experiment by laying down a simple track layout. Be sure to include multiple track blocks, as well as some turnouts, signals, and pushbutton switches, since we’ll be showing how to control them in TCL shortly. Try changing the colors of track blocks, placing text, using the eraser tool, etc. Once you’ve completed your example track schematic, save your work by selecting “Save Railroad” from the “File” menu. 88 Automating CTC Panels: With your track schematic entered and saved, the next step will be to automate the items on your track diagram to portray changing layout conditions from within your TCL program. Let’s begin by throwing some turnouts. Assume we want to close a turnout on our layout by clicking on its on-screen image with the left mouse button and open it by clicking on its onscreen image with the right mouse button. And of course, we’ll want the turnout’s on-screen image to change to portray the state of the physical turnout on the layout. Here’s how to do it: Responding to Mouse Events: Before we get to the specific issue of throwing turnouts using a mouse click, we first need to address the more general issue of how to respond to “mouse events” in TCL. A “mouse event” is defined as a click of the left or right mouse button while the mouse cursor is positioned inside one of our CTC panels. TCL provides two built-in entities that make this very easy. They are: “$LeftMouse” and “$RightMouse”. As their names imply these entities correspond to the left and right buttons of your mouse. Anytime you click on a grid square in a CTC panel, TBrain automatically sets the corresponding TCL mouse entity equal to the coordinates of that grid square. CTC coordinates are three dimensional (x,y,z). X refers to the horizontal axis column coordinate (1 to 50) of the mouse click. Y corresponds to the vertical axis row coordinate (1 to 50) of the mouse click. Z corresponds to the number of the CTC panel in which the click occurred (1 to 4). As an example, lets say the user clicks the left mouse button on the grid square located at column 3 and row 2 on CTC panel 1. Tbrain responds by setting the TCL entity $LeftMouse equal to (3,2,1). As a result, we can simply test for this value as a condition in a WHEN clause: When $LeftMouse = (3,2,1) Do … That’s all it takes to respond to mouse events in TCL. In some cases, we may want to know if the user clicked anywhere within a range of grid squares. Suppose we have a track block which runs horizontally from (x,y)=(5,3) to (x,y)=(10,3) on CTC panel #1. We can test if the user clicked anywhere on that track block as follows: When $LeftMouse = (5-10,3,1) Do … This technique can be extended in all dimensions. For example, if we wanted a WHEN-DO that triggered whenever the user clicked on any grid square on any CTC panel, we could write: When $LeftMouse = (1-50,1-50,1-4) Do … 89 Throwing Turnouts: We now know how to respond to mouse events on our CTC panels. Next, we’ll need to learn how to update a turnout image on the screen in response to that mouse click. That’s easy, too, since TCL provides a built-in “$Switch” action statement that, when included in the actions of a WHEN-DO, does the whole job. The format of a switch statement is: $Switch (x,y,z) = <switch state> (x,y,z) here is hopefully self explanatory. It refers to the CTC panel coordinates of the onscreen switch we want to throw. As with our mouse click, x refers to the column position (1 to 50) of the turnout, y refers to its row position (1 to 50), and z refers to the CTC panel number (1 to 4). <Switch state> determines the throw direction of the switch. <Switch state> can be any valid TCL value (including the name of another TCL entity). The throw direction of a switch is determined according to the following rules: Setting a switch to the value “Off” or “False”, or 0 will throw the image to the straight (non-diverting) aspect. Setting a switch to the value “On” or “True” or 1 causes the switch image to throw to the curved (diverting) aspect. Setting a switch to any other value will draw the image in its default state (i.e. no throw position indicated). (The TCL keyword “$Unthrown” can be used to redraw a switch in its default state.) Armed with this information, we now know everything we need to throw our turnout by clicking on it with the mouse. But first, let’s introduce one more feature that makes the job even easier. We need to specify the (x,y,z) coordinates of the switch’s grid square in TCL to let TBrain know which switch image to throw. But how do we figure out its grid location. That’s pretty simple for grid squares near the upper-lefthand corner of the CTC panel (we can just visually count them). But the problem admittedly gets a bit harder as we move further and further into the grid. Fortunately, we won’t have to count. While in “edit” mode (i.e. when your TCL program is not running), the <x,y,z> grid coordinate of the mouse’s position on a CTC panel is shown on TBrain’s status bar at the bottom of the screen. We can simply position the mouse over the desired grid square, and then type these values into our TCL code. Alternatively, we can let TBrain’s TCL editor do the job for us. Note that in TBrain’s Edit menu there’s an item called “Insert Grid Position”. We can use this feature to automatically insert the required coordinates directly into our TCL code. For example, lets say we’re writing our switch control WHEN-DO. We now know how to respond to mouse clicks in TCL, so we write: WHEN $LeftMouse = 90 But now we need to fill in the grid coordinates of our turnout image. Rather than count by hand, we can simply select Insert Grid Position from the Edit menu, and then click on the desired grid square on the CTC panel. In response the TCL editor automatically calculates the required grid coordinates, and fills them in for us in our TCL code. For example, it might change the above text to: WHEN $LeftMouse = (15,10,1) Having done so, we can immediately fill in the rest of our WHEN-DOs to control our turnout: WHEN $LeftMouse = (15,10,1) WHEN $RightMouse = (15,10,1) Do $Switch (15,10,1) = On Do $Switch (15,10,1) = Off That’s it. Now, whenever we click on the turnout, it’s image will throw on the CTC panel. (Of course, we’ll also want to add action statements to the above WHEN-DO’s to handle the throwing of the physical turnout on our layout, but we already know how to do that.) Try this technique on one or more of the turnouts on your sample track schematic. Be sure to check out the Insert Grid Position feature of the TCL editor. Then run your TCL program, and try clicking on the turnouts on the CTC panel, and see them throw in response to your mouse clicks to portray the state of the corresponding physical switch in your layout. Controlling 3-Way Switches: Tbrain’s schematic editor toolkit also includes a variety of 3-way switches. These are controlled with the same $Switch statement we used above to program our 2-way switch. We’ll just need to be able to command an additional throw direction. Three-way switches can be controlled using the following rules: Setting a 3-way switch to the value 0 will throw the image to the straight (nondiverting) aspect. Setting a 3-way switch to the value 1 causes the switch image to throw to the lefthand curved aspect. Setting a 3-way switch to the value 2 causes the switch image to throw to the righthand curved aspect. Setting a 3-way switch to any other value will draw the image in its default state (i.e. no throw position indicated). (The TCL keyword “$Unthrown” can be used to redraw a switch in its default state.) 91 Controlling 4-Way Switches: Tbrain’s schematic editor toolkit also includes a set of 4-way (double-slip) switches. These are controlled with the same $Switch statement we used above to program our other switches. We’ll just need to be able to command an additional throw direction. Four-way switches can be controlled using the following rules: Setting a 4-way switch to the value 0 will throw the image to the horizontal (or vertical) through aspect. Setting a 4-way switch to the value 1 causes the switch image to throw to the diagonal through aspect. Setting a 4-way switch to the value 2 or 3 causes the switch image to throw to either of its two diverging aspects. Setting a 4-way switch to any other value will draw the image in its default state (i.e. no throw position indicated). (The TCL keyword “$Unthrown” can be used to redraw a switch in its default state.) Using Onscreen Turnouts as Conditions in TCL: The state of an onscreen turnout icon may be used as a condition in a TCL When-Do statement. The format is the same as the $Switch action statement. For example: When $Switch(2,2,1) = On Do … 92 Controlling Signals: Now that you’ve learned how to control turnouts, controlling signals on your CTC screen will seem like a piece of cake. TCL provides a built-in “$Signal” action statement to tackle that job as part of a When-Do. The format of a signal statement is: $Signal (x,y,z) = <signal state> From here on in, things should begin to look familiar. (x,y,z) refers to the CTC panel coordinates of the signal we want to throw. The value of <signal state> indicates the desired signal aspect. Tbrain’s schematic editor toolkit provides two styles of signals, termed “fixed” and “addressable”. The same “$Signal” action statement is used to control both. Controlling “Fixed” Signals: Fixed signals (those which are shown superimposed on a track section in the schematic editor toolkit) correspond to the common “three-aspect” red-yellow-green signal heads found on most layouts. Using the $Signal action statement, you can control each of the signal’s three lamps from within your TCL program The <signal state> of a fixed signal can be any valid TCL value, but the most common ones will be a combination of the “color identifiers”, Red, Green, and Yellow. Setting a fixed signal equal to one of these values will illuminate the corresponding lamp of the signal on the CTC screen. For example, the TCL statement: When … Do $Signal (10,5,1) = Green would illuminate the green lamp (and turn off the red and yellow lamps) of the fixed signal at grid location (10,5,1). Any combination of lamps may be commanded by including each desired color in the <signal state> value separated by a ‘$’. For example, to light all lamps on the signal we might write: When … Do $Signal (10,5,1) = Red$Yellow$Green Signalman users will note that this is identical to the syntax used for controlling signals with the Signalman. In fact, it’s perfectly acceptable to use the name of a Signalman signal as the <signal state> in a TCL $Signal statement. In that case, the on-screen image will automatically reflect that of the physical signal on the layout. For example: When … Do $Signal (10,5,1) = sig1 (Here, sig1 is assumed to be a physical signal defined in the Signals: section of your TCL program. See Section 4, “Introducing the Signalman” for more details on the Signalman.) 93 Controlling “Addressable” Signals: Fixed signals are adequate for nearly all CTC signaling applications. But with the ever-growing availability of more sophisticated and prototypical signaling hardware, many model railroads have switched to more complex signaling schemes. In that case, you may wish to have a bit more flexibility in your on-screen CTC signal indicators as well. That capability is provided through the use of “addressable” signal indicators. The schematic editor toolkit provides a set of addressable signals with 1, 2, 3, 4, 6, 8 and 9 signal lamps. As we learned above, fixed signals, by definition, have one red, one yellow, and one green lamp. These lamps colors are fixed. The user has only the ability to selectively turn each of these fixed-color lamps on or off. Addressable signals, in contrast, allow the user to control the color of each lamp from within their TCL program, enabling the creation of virtually any signal lamp configuration. In addition, the color of the signal head itself can be selected at design time using the Color tool in the schematic editor toolkit. This allows the color-coding of signals, thereby facilitating the visual association of a signal with a given track on the CTC panel. Addressable signals are controlled using the same $Signal statement we introduced above. However, due to their increased programmability, the <signal state> of an addressable signal demands a bit more flexibility. The <signal state> of an addressable signal is specified using a “signal control string”. A “signal control string” is a collection of characters enclosed between double quotes. Each character of the string controls one of the lamps on the signal head. Acceptable characters for use in a signal control string are: R G Y W * x … … … … … … … Sets the corresponding lamp to Red Sets the corresponding lamp to Green Sets the corresponding lamp to Yellow Sets the corresponding lamp to White Turns off the corresponding lamp (colors it dark gray) Makes the corresponding lamp invisible Makes no change to the corresponding lamp (leaves it set to its current state) Each lamp of an addressable signal head has an associated “lamp number”. The N’th character of the signal control string controls the N’th lamp on the targeted signal head. For example, a TCL code statement to control an addressable 3-lamp signal might be: When ... Do $Signal (5,5,1) = "RYG" This code would set the signal's 1st lamp to Red, the 2nd to Yellow and the 3rd to Green. The number of characters in the control string must equal the number of lamps on the targeted signal head. The figure below indicates the lamp numbers for each style of addressable signal head. A representative signal aspect for each signal is shown, along with a signal control string that would program the signal to that aspect. 94 Addressable Signal Lamp Numbers and Representative Signal Control Strings [Note: For simple Red/Green/Yellow block signaling on the CTC panel, TBrain also provides a set of easy-to-use “absolute-permissive” signaling icons that can share a CTC grid panel square with any track segment. These are controlled using TCL’s “sprite” related action statements. See “Introducing Sprites” below.] Using Onscreen Signals as Conditions in TCL: The state of an onscreen signal icon may be used as a condition in a When-Do statement. The format is the same as the $Signal action statement. For example: When $Signal(2,2,1) = Red Do … ‘testing a fixed signal When $Signal(3,3,2) = “RYG” Do … ‘testing an addressable signal 95 Re-Coloring Track Images On-the-Fly: Color is probably the most important visual tool for quickly portraying changing layout conditions to a human operator. TCL provides a full set of built-in functions that make it easy to change the color of on-screen images in response to physical events taking place on your layout. The first of these is the “$Color Track” action statement, which takes the form: $Color Track (x,y,z) = <color value> As usual, (x,y,z) refers to the CTC panel grid location of the track section to be re-colored. <Color value> indicates the desired color of the track section. TCL recognizes several of the most common colors by name: These include: BLACK, WHITE, GRAY, RED, GREEN, BLUE, YELLOW, BROWN, and PURPLE. These can be used directly in the Color Track command. For example: When … DO $Color Track (x,y,z) = Blue However, your PC has the ability to display over 16 million colors. And all are available in TCL. Since it would obviously be impossible to come up with a unique name for each one, the TCL Editor includes an “Insert Color Code” feature (available in TBrain’s Edit menu) that lets you choose from a visual sampler of each available color. Simply pick from the color palette that appears as a result of selecting the Insert Color Code tool, and the TCL editor will automatically insert the corresponding “color code” into your TCL program. The color code may look like a rather meaningless sequence of numbers and letters. To TBrain it indicates the relative intensity of the PC’s three primary colors (Red, Green, and Blue), from which all other 16 million colors are produced. It’s important to note that despite its name, the “$Color Track” statement can control the color of any onscreen image (including pushbuttons and text), not just that of a track section. For example, “$Color Track” could be used to implement “lighted” pushbutton switches, whose color portrays information about the physical item the switch controls. For instance, if we placed a pushbutton symbol at grid location (10,5,1) on our CTC panel, we could write: When $LeftMouse = (10,5,1) Do $Color Track (10,5,1) = Green { Turn the button Green } When $RightMouse = (10,5,1) Do $Color Track (10,5,1) = Red { Turn the button Red } 96 Re-Coloring Track Blocks: The “$Color Track” command is quite useful, but more often than not, we’ll be interested in changing the color of an entire track “block” (for example, to indicate block ownership/block occupancy) rather than of that of an individual track section. We could, of course, change the color of a block by writing a “$Color Track” statement for every track section in the block, but fortunately, there’s a much more humane way. TCL provides a built-in action statement called “$Color Block”, which does the entire job automatically. The format of the “$Color Block” statement is quite similar to that of “$Color Track”, i.e. $Color Block (x,y,z) = <color value> Here, (x,y,z) refer to the CTC screen grid coordinates of any track section within the track block. When the “$Color Block” statement executes as part of a When-Do, TBrain will move out in all directions from the specified coordinate, re-coloring all track sections comprising that block. Using Onscreen Track Color as a Condition in TCL: The color of an onscreen track segment (or any other displayable entity, such as a pushbutton icon) may be used as a condition on a When-Do or If-Then-Else statement. The format is the same as the $Color action statement. For example: When $Color(2,2,1) = Blue Do … When $Color(3,3,2) = RGB_FF00FF Do … Going “Retro”: Users modeling the pre-computer era can exploit all of the advantages of PC-control while remaining true to the prototypical operation of the time. Your onscreen CTC panels can employ the levers and pushbuttons found on a traditional Union Switch & Signal CTC machine. These tools can be found by clicking the “US&S” button on the schematic editor toolkit. They include a switch lever, signal level, and code start button. These lever icons differ a bit from the track items we’ve seen so far. Due to their large physical size they occupy more than one grid square. To be precise, they each consume a 3 column by 4 row area of the CTC panel. To place them on the CTC panel, simply select the icon from the toolkit and click the desired grid square location of their upper-left corner. Adding Lever Numbers: Levers on a US&S CTC machine were traditionally numbered sequentially, left to right; odd numbers for switches and even numbers for signals. To add a number to a lever, just click on the 97 upper center area of the lever’s faceplate. A pop-up window will appear allowing you to enter a number, which will be placed on the faceplate. Automating Levers: In the old days, the track schematic on the CTC panel was seldom more than a static illustration. Turnout position and signal status were instead indicated by the position of the control levers and their corresponding indicator lamps. TBrain’s US&S levers work that way, too. To automate their onscreen appearance we’ll employ the same $Switch command we used to automate the turnout icons in our modern-era CTC panels. To illustrate, let’s say we want to throw our switch levers to the left when we click on their left side using the mouse, and to the right when we click on their right side. For a lever whose upper-lefthand corner is located at grid square (5,5,1), code to do that might look something like: When $LeftMouse = (5,6-7,1) Do $Switch(5,5,1) = Off When $LeftMouse = (7,6-7,1) Do $Switch(5,5,1) = On This will cause the lever to move to the left or right, and illuminate the corresponding indicator lamp, when we click on its left or right side with the left mouse button. (Setting a lever to Off moves it to the left “normal” position. Setting it to On moves it to the right, or “reverse” position.) Signal levers are automated in the same way, except that their levers have three positions. The left-hand position traditionally set the signal to allow train movement to the left on the CTC panel. The right-hand position set the signal to allow train movement to the right. The center position set signals in both directions to red. Code to automate a signal lever placed at (5,5,1) might look something like: When $LeftMouse = (5,6-7,1) Do $Switch(5,5,1) = 0 When $LeftMouse = (6,6-7,1) Do $Switch(5,5,1) = 1 When $LeftMouse = (7,6-7,1) Do $Switch(5,5,1) = 2 The current position of a switch or signal lever can be tested using the value of $Switch(x,y,z). “Code Start” Buttons: On the prototype US&S CTC panel, the selected turnout and signal positions were not commanded until the operator pressed the “code start” button located below the levers on the CTC panel, and the corresponding indicator lamps did not light until feedback was received from the physical plant that the commanded physical state had been reached. TBrain’s US&S levers can mimic this operation as well. The $Switch command for switch levers includes aspects for controlling the levers and lamps independently. The illustrations below show the available aspects for switch and signal levers. 98 0 (Off) 1 (On) 2 3 -1 ($Unthrown) $Switch(x,y,z) = <signal aspect value> for US&S Switch Levers 0 1 2 3 4 5 $Switch(x,y,z) = <signal aspect value> for US&S Signal Levers The example below illustrates the control of switch and signal levers and the transmission of the commands using the code start button. Here, the switch lever is assumed to be located at grid square (1,1,1) , the signal lever (1,5,1) and the code start button (2,10,1). 'move the switch lever When $LeftMouse = (1,1-4,1) Do $Switch(1,1,1) = 2 When $LeftMouse = (3,1-4,1) Do $Switch(1,1,1) = 3 'move When When When the signal $LeftMouse $LeftMouse $LeftMouse lever = (1,5-8,1) Do $Switch(1,5,1) = 3 = (2,5-8,1) Do $Switch(1,5,1) = 4 = (3,5-8,1) Do $Switch(1,5,1) = 5 'respond to the code start button When $LeftMouse = (2,10,1) Do If $Switch(1,1,1) = 2 Then $Switch(1,1,1) = 0 EndIf If $Switch(1,1,1) = 3 Then $Switch(1,1,1) = 1 EndIf If $Switch(1,5,1) = 3 Then $Switch(1,5,1) = 0 EndIf If $Switch(1,5,1) = 4 Then $Switch(1,5,1) = 1 EndIf If $Switch(1,5,1) = 5 Then $Switch(1,5,1) = 2 EndIf 'add actions to control the physical turnout and signal here Of course, we’ll also want to add the action statements to configure the physical turnout and signal on the layout. We can add those actions directly into the When-Do for the code start button. 99 Panning CTC Panels: In cases where the entire track schematic is too large to be viewed onscreen in its entirety, the user can manually pan around the track schematic at any time using the slider controls located along the right and bottom edges of the CTC panel. Panning may also be performed automatically from within a TCL program. For example, when a train travels into a region of the track schematic that is currently offscreen, the CTC panel can automatically pan to follow the train into the newly occupied region of the track schematic. Auto-panning is accomplished using the $Pan(x, y, z) action statement, which causes grid square (x, y) to be positioned at the upper-lefthand corner of the window occupied by CTC panel z. For example: When Block4_Occupied = True Do $Pan(20,20,1) 100 Introducing “Sprites”: At this point, we’re able to draw a realistic schematic of our track layout. We know how to make it respond to mouse clicks, and how to update it in real-time to portray the ownership of track blocks, the position of turnouts, and the state of signals on our layout. But one very important aspect of our CTC panel is still missing… What about the trains? As with a prototypical CTC panel, we’d also like to be able to portray the locations of trains (as determined by reports sent back by our sensors) as they move about the layout. We can, and in this section you’ll learn how. There’s one important aspect of trains that makes handling them a bit different … they move! Fortunately, TBrain provides an additional set of graphical entities and associated TCL language commands specifically designed for use with moving objects on our CTC panels. Borrowing a term from the computer graphics world, these entities are generically called “sprites”. Sprites can be drawn anywhere on your CTC panel screen. They can be made to change color, to disappear, to reappear, and to move. These features make them ideally suited to tackling the job of portraying the locations of trains as they move about your layout. All work with sprites is done from within your TCL program, using a small set of sprite-oriented action statements. These statements look very similar to those you’ve encountered already when working with the static track entities earlier. The first of these is the “$Draw Sprite” action statement which takes the form: $Draw Sprite (x,y,z) = <Sprite Name> in <Color Value> As always, (x,y,z) refers to the column (1 to 50), row (1 to 50), and panel number (1 to 4) of the CTC screen on which the sprite is to be drawn. <Sprite Name> can be selected from one of the sprites available in TBrain. These are: Loco_East, Loco_West, Loco_North, Loco_South, Train_East, Train_West, Train_North, Train_South, Sig_Absolute_East, Sig_Absolute_West, Sig_Absolute_North, Sig_Absolute_South, Sig_Permissive_East, Sig_Permissive_West, Sig_Permissive_North, Sig_Permissive_South, Arrow_East, Arrow_West, Arrow_North, Arrow_South, Caution1, Caution2, Caution3, Caution4, Square, Circle, Triangle, Lock You can type the desired sprite’s name directly into your TCL code, but the TCL editor also has a built-in feature that will take care of the job for you, so you won’t need to remember the name of each sprite. It’s called “Insert Sprite Name”, and is found in TBrain’s Edit menu. When activated, you’ll get a pop-up window showing a graphical representation of each available sprite. Simply click on its image, and the code name for the selected sprite will be inserted into your TCL code automatically. 101 <Color value> specifies the color in which the sprite should be drawn. Color values for sprites follow the same rules as those for track sections. You can use the name of one of the recognized common colors, or you can insert a color code using TBrain’s “Insert Color Code” tool in the Edit menu. For example, the code to draw a sprite in a track block whenever a train is detected in that block might look something like: When block1_sensor = True Do $Draw Sprite (10,5,1) = Train_East in Blue Re-Coloring Sprites: You now know how to draw a sprite at any grid coordinate on your CTC panel. Once it’s drawn, you can also change its color at any time. That’s handled by the “$Color Sprite” action statement which takes the form: $Color Sprite (x,y,z) = <Color value> Color values for sprites follow the same rules as those for track sections. You can use the name of one of the recognized common colors, or can insert a color code using TBrain’s “Insert Color Code” tool in the Edit menu. Moving Sprites: Trains won’t sit still for very long, and you’ll soon need to update your CTC panel to portray their new locations. This can be easily accomplished using the “$Move Sprite” action statement, which takes the form: $Move Sprite (x1, y1, z1) (x2, y2, z2) Here (x1, y1, z1) refers to the current location of the sprite and (x2, y2, z2) refers to the desired new location of the sprite. The “arrow” operator is formed using a combination of the “minus sign” (to the right of the zero ‘0’ key on your keyboard) followed by the “greater than” sign, (to the left of the “question mark” key on your keyboard). In response, TBrain removes the sprite from its current location and places it at the new location, in the same color that it had before it was moved. Erasing Sprites: Sometimes, you’ll want to remove a sprite from the CTC panel without redrawing it somewhere else. That’s handled using the “$Erase Sprite” statement which takes the form: $Erase Sprite (x,y,z) 102 Message Text: While it’s said that a picture is worth a thousand words, there are still times when a textual message displayed on the CTC panel is the best way to convey information to the human operator. One final form of “sprite” is designed to do just that. We learned earlier to place static text on the CTC screen. While we can change the color of that text at any time using the $Color Track statement, we can’t change what that text says. A “message” sprite on the other hand allows us to display a textual message that can be changed at any time to communicate changing layout conditions. Message text can be displayed by a When-Do in your TCL program using the “$Draw Message” action statement, which takes the basic form: $Draw Message (x,y,z) = “message text” By now, you’re quite familiar with the meaning of the coordinate position (x, y, z). “Message text” consists of any combination of printable characters and spaces surrounded by double quotes. The text between the quotes will be displayed at the specified grid coordinates when the Message statement executes. For example: When at_station = True Do $Draw Message (10,10,1) = “The train has arrived !!!” The text color, font face, font size, and text alignment can all be controlled using the more general form of the $Draw Message command: $Draw Message (x,y,z) = <message text> In <Color> Using <Font Controls> For example: $Draw Message(3,2,1) = “Hello” In Red Using ”Arial$10” The above action statement displays the message “Hello” in red Arial 10 point text. We’ve already used the <Color> control with graphical sprites above. It works just the same with message sprites. Use the name of one of the recognized common colors, or insert a color code using TBrain’s “Insert Color Code” tool in the Edit menu. The “font controls” string is something new. It consists of a group of control fields, each separated by the ‘$’ character, and collectively enclosed between double quotes. The first control field (the only one of which is mandatory) is the font name, which must be specified precisely as the font is named in Windows. The next field is an optional font size. In addition, Bold and Italic fields may be added to further control the font face. Placement of the message text may be controlled by a 2-character text alignment field, which takes one of the values UL (upper left), UC (upper center), UR (upper right), CL (center left), CC (center center), CR (center right), LL (lower left), LC (lower center), LR (lower right). For example: 103 $Draw Message(3,2,1) = “Hello World ” In Blue Using ”Courier$12$Bold$Italic$UL” displays its “Hello World” message in blue using an italicized, bold, 12-point Courier font beginning in the upper left corner of grid square (3,2,1) Since entering the font control string can be an error prone process, TBrain provides a failsafe shortcut found under the “Edit-Insert Font Control” menu item. Using this method, TBrain automatically fills in the font control of a $Draw Message statement at the current cursor location in the TCL Editor window. Referencing TCL Entities in a Message: The current value of a variable (or any other TCL entity) can be printed in a message by preceding the entity’s name by the ‘@’ symbol in the message text. For example to display the current value of variable var1, we might write: When … Do $Draw Message (10,10,1) = “The value of var1 = @var1” If a variable currently holds a text string, that string can be included within a message by preceding the variable’s name by “@%” symbol. For example: If cab1.direction = Forward Then var1 = “Eastbound” Else var1 = “Westbound” EndIf $Draw Message(5,5,1) = “The train is traveling @%var1” Manipulating Message Text: Messages are just a specific form of sprite. As a result, the commands available for use with other sprites, i.e. $Color Sprite, $Move Sprite, $Erase Sprite will work with messages as well. To change the text content of a message, it isn’t necessary to erase the old text first. Simply set the sprite equal to the new text, and the old text will be automatically replaced by the new. “Do-It-Yourself” Sprites: If none of TBrain’s built-in sprites suit your needs, user-defined graphics may be drawn on the CTC panels from within a When-Do using the $Draw Picture action statement, which takes the general form: $Draw Picture (x,y,z) = “image filename” 104 Virtually all graphics image file formats are supported (e.g .bmp, .gif, .jpg). Be sure to include the full pathname to the image file if it’s not in the same directory as the TBrain program, and to enclose the filename between double quotes, for example: When … Do $Draw Picture (x,y,z) = “C:\My Documents\My Pictures\My Sprite.bmp” The image contained in the specified graphics file will be drawn on CTC panel z, with its upper left-hand corner located at grid coordinate x, y. To allow fine tuning of the position of the image within a CTC panel grid square, the $Draw Picture statement uses non-integral x and y grid coordinate values. For example: $Draw Picture (1.5, 2.5, 3) = “My Image.bmp” places the upper left-hand corner of the image at the middle of the grid square (1,2) of panel #3 $Move Picture and $Erase Picture action statements are also available. These have the same TCL language format as, and behave similarly to, the $Move and $Erase commands for use with the standard sprite symbols described earlier. Note: Because TBrain has no knowledge of the size of your picture, the $Erase Picture action requires the full CTC panel to be redrawn. While this happens nearly instantaneously on newer systems, users of older PCs may visually perceive the delay. Since sprite graphics are typically small, occupying only a single grid square, an alternate $Erase SmallPicture action statement is available to quickly erase user-defined sprite images that occupy only a single grid square. When creating your own sprites, it will help to know that CTC panel grid squares are 25 by 25 pixels when the large grid is selected, and 15x15 pixels for small grid, including the horizontal and vertical grid lines. The default background color for the CTC panel is the standard Windows XP background color: Red=236, Green=233, Blue=216. Drawing Transparent Images: Computer graphics are, by definition, rectangular. However, it would be convenient to have at our disposal the means to draw objects of arbitrary shape on our CTC panels without disturbing the surrounding CTC panel’s background. Of course, we could include our irregularly shaped object as part of a larger rectangular image, but in that case, we’d need to “hard-code” our CTC panel’s background color into the image itself, precluding its use on multiple CTC panels which may have different background colors, as well as the sharing of the image with other users, who may prefer a different color background. Fortunately, TBrain provides a more elegant solution. Here, it’s best to illustrate with a simple example. Suppose we’d like to draw a red and white striped “donut” shaped object on our CTC panel. While the donut is round, our image file is rectangular. In this case, we’d like to have the 4 corner regions of our rectangular image drawn in the CTC panel’s background color. In addition, we’d like to look through the donut hole and see the CTC panel’s background. How can we do that without knowing the color of the CTC panel background? We’ll use two new TCL action statements: 105 $Draw And_Picture (x, y, z) = “image filename” $Draw Or_Picture (x, y, z) = “image filename” Drawing images containing transparent regions is a 2-step process. First, we’ll use the $Draw And_Picture statement to prepare our CTC panel to accept the new image. As its name implies, $Draw And_Picture logically “and’s” each pixel of the image with the underlying pixel already on the screen (instead of simply replacing the existing pixel, as $Draw Picture did). Our image file in this case will be a black and white “silhouette” of our donut; black where the donut will be and white everywhere else. Such an image is shown on the left below. Since a black pixel and’ed with any color yields a black pixel and a white pixel and’ed with any color yields a pixel of that same color, this action has the net effect of drawing a black donut on the screen, while leaving the surrounding region (in this case, the four corners around the donut and the region seen through the donut hole) unchanged. With that done, we’re half way there. Next, we’ll use the $Draw Or_Picture statement, which logically “or’s” each pixel of the new image with the underlying pixel on the screen. This time our image file contains our striped donut on a black background, as shown on the right below. Since black or’ed with any color produces that same color, this has the effect of changing the black donut we just drew to a red and white striped one, while leaving the surrounding region unchanged. Donut image for use with $Draw And_Picture Donut image for use with $Draw Or_Picture The net result: we’ve drawn an object of arbitrary shape onto the CTC panel without affecting the surrounding region. And we did it without knowing the color of that surrounding region. That’s All Folks: We’ve quickly introduced a lot of information in this lesson. Tbrain’s graphics tools will allow you to implement prototypical CTC displays of your layout. Hands-on experimentation is the key to learning to use these tools effectively. 106 Lesson 14: Advanced Programming Concepts The TCL language statements you’ve learned thus far are all many users will ever need to control their model railroad. However, for those who would like to take their TCL programs “to the next level”, TCL also provides many of the features found in more powerful “higher order” programming languages. We’ll take a look at some of them in this lesson. If …Then … Else Statements: We’ve seen how the actions in a When-Do statement are executed once the conditions in the statement’s When clause are satisfied. However, there may be times when we would like some of these actions to be conditionally executed, or to select from a variety of possible actions, based on other circumstances. These capabilities are provided by TCL’s “If…Then…Else” statement. In it’s simplest form, the syntax of the If … Then statement is: When <conditions> Do <actions> If <conditions> Then <actions> EndIf <actions> In it’s more general form, the If … Then … Else statement’s syntax is: When <conditions> Do <actions> If <conditions> Then <actions> ElseIf <conditions> Then <actions> ElseIf <conditions> Then <actions> … Else <actions> EndIf <actions> The keywords If, Then, and EndIf are mandatory as part of all If statements. Optionally, any number of ElseIf clauses, as well as a final Else clause may also be included. 107 The syntax for specifying conditions in an If clause (as well as in an Else or ElseIf clause) is the same as that for a When clause. If the conditions are met, the actions following the Then keyword are executed. If the conditions are not met, the actions within the Then clause are skipped. Looping: Once a When-Do statement is triggered, there may be situations when it is desired that some or all of its actions repeat a given number of times, or indefinitely until some other condition is met. That capability is provided by the Until … Loop statement. This statement takes the form: When <conditions> Do <actions> Until <conditions> Loop <actions> EndLoop <actions> The actions between the Loop and EndLoop keywords will repeat as long as the conditions in the Until clause remain met. (Note: The loop conditions are evaluated at the top of the loop. Thus, if the conditions are not met the first time the Until…Loop statement is encountered, the actions within the loop will not execute at all, and execution will continue at the first action following the EndLoop keyword.) While executing a loop, TBrain suspends execution of the loop once per loop iteration to communicate with the CTI network modules, update sensor and control states, and service any other executing When-Do statements. This can cause a loop with many iterations to take considerable time to complete. In some circumstances, it may be desired to have a loop execute atomically, i.e. without being interrupted after each loop iteration. TBrain provides this capability through the Until… QuickLoop statement. In this case the entire loop is executed to completion before TBrain takes any other actions. It’s up to the programmer to employ this QuickLoop feature with caution. For example, if a user coding error results in an infinite loop, that’s precisely what will occur. There are also some seemingly innocuous TCL constructs that will hang a quick-loop. For example, the TCL code: Until Sensor1 = True QuickLoop <actions> EndLoop will never terminate, since once in the loop, TBrain is never given the opportunity to interrupt the loop to communicate with the network to receive updated sensor data, as the Until ... Loop does after each loop iteration. Thus, when using QuickLoop, it is essential that the condition needed to terminate loop execution be achieved through actions within the loop itself. For example, the following loop might be useful for quickly initializing the states of all turnouts on the layout at startup: 108 When $Reset=True Do I = 0 Until I = NumTurnouts QuickLoop Turnout[I] = Off I = I + 1 EndLoop Waiting: Once a When-Do statement is triggered, there may be situations when it is desired that the execution of some or all of its actions be postponed until some external condition exists. That capability is provided by the Wait Until statement. This statement takes the form: When <conditions> Do <actions> Wait Until <conditions> Then <actions> Execution of all actions following the Wait Until statement will be postponed until the conditions in the Wait Until clause are met. Arrays: Any CTI entities (controllers, sensors, signals, Smartcabs, or variables) may be declared as arrays. An array is a related contiguous group of objects of the same type (e.g. controllers). To declare an array, simply give it a name followed (between square brackets) by the number of items in the array. For example: Controls: Light_Bulb[16] declares a group of 16 consecutive Train Brain controllers, collectively given the name Light_Bulb. Each member of an array may then be accessed by specifying it’s position (or “index”) in the array. In TCL, array member indices begin with 0. Thus, the individual members of the array defined above would be named Light_Bulb[0], Light_Bulb[1], … and Light_Bulb[15]. So why bother? Couldn’t we have just given each controller the name directly? Well, yes. But actually by using arrays, we save more than just a bit of typing. To see why, let’s imagine we want to write code to blink each of our 16 bulbs in sequence. We could of course write things out longhand. For example: Always Do Light_Bulb[0] = Pulse 1 Light_Bulb[1] = Pulse 1 109 Light_Bulb[2] = Pulse 1 Light_Bulb[3] = Pulse 1 Light_Bulb[4] = Pulse 1 Light_Bulb[5] = Pulse 1 Light_Bulb[6] = Pulse 1 Light_Bulb[7] = Pulse 1 Light_Bulb[8] = Pulse 1 Light_Bulb[9] = Pulse 1 Light_Bulb[10] = Pulse 1 Light_Bulb[11] = Pulse 1 Light_Bulb[12] = Pulse 1 Light_Bulb[13] = Pulse 1 Light_Bulb[14] = Pulse 1 Light_Bulb[15] = Pulse 1 But there’s a more elegant way: Always Do Index = 0 Until Index = 16 Loop Light_Bulb[Index] = Pulse 1 Index = + EndLoop Here, we’ve used a variable (named Index) to indicate which member of the array we want to pulse. By incrementing that variable each time through our loop, we don’t need to exhaustively call out each member of the array. Constants: The TCL compiler understands a variety of pre-defined values (e.g. True, False, On, Off), numbers, and text strings. However, humans can always use some help in making their TCL code more understandable to other humans (and to themselves when they try to read code they wrote a year ago). Many programming languages provide the means to declare human-friendly, user-defined constants that can help make programs easier to understand. TCL is no exception. In the Constants: section of your TCL program, you can declare and assign a value to constants of your own choosing. Then you can use them in your TCL code to make it easier to understand what your code is doing. Any value that can be understood by TCL can be declared as a constant. For example: Constants: Diverging = On Occupied = True NORAC_Rule281 = “*---*-“ Number_of_Blocks = 8 110 Then the more meaningful constant’s name can be used in your TCL code wherever the less meaningful value would have applied. For example: When Block1 = Occupied Do Switch1_Direction = Diverging Signal3 = NORAC_Rule281 This version of code is much more meaningful than the generic equivalent: When Block1 = True Do Switch1_Direction = On Signal3 = “*---*-“ 111 Indirect Addressing: The TBrain program assigns every entity in the CTI system (controllers, sensors, signals, SmartCabs, and variables) a memory location, or "address" in PC memory, where that entity's value is stored. When we access the entity as part of the action in a DO or the condition in a WHEN, we are in reality accessing this memory location. We can set a variable equal to the address of an entity by using the "address of" operator '&'. For example, the statement: WHEN ... DO var1 = &controller1 sets the value stored in var1 equal to the address of controller1. In that case, we say var1 "points to" controller1. Once such an assignment is made, controller1 may be accessed "indirectly" via the pointer. To do so, we'll use the "pointer to" operator '*'. For example: WHEN ... DO *var1 = ON activates controller1. The expression *var1 may be read as "the entity pointed to by var1". The above WHEN-DO has the same effect as if we had written: WHEN ... DO controller1 = ON This technique of accessing an entity through a pointer is known as "indirect addressing". Operating on Pointer Variables: Address "arithmetic" is allowed on pointer variables. Most often you'll use the '+' and '-' operators. Assume we've set var1 to point to controller1 using the '&' operator as illustrated above. Then the statement: WHEN ... DO var1 = + would cause var1 to point to controller2. (Assuming, of course, that "controller2" is the name of the next sequential controller following "controller1"). In general, adding ‘N’ to a pointer variable causes it to point to the entity ‘N’ away from the one to which it currently points. When performing address arithmetic on complex data structures like SmartCabs and DCC engines, ‘++’ and --‘ operators are also available. (These are more fully described in the Applications Note on the use of TCL’s Indirect Addressing operators on our website.) Where Are Pointer Variables Allowed: In general, anywhere that an entity name is required, it's perfectly acceptable to substitute a "pointer to" instead. That includes the actions in a DO clause and the conditions in a WHEN clause. Thus the statement: WHEN *var1 = *var2 DO *var3 = *var4 is perfectly legal. 112 Accepting User Input: At times, it may be useful to query the operator for information. Such interaction with the operator may be performed from within a When-Do using TCL’s $Query action statement. The $Query statement causes Tbrain to display a pop-up box on the screen containing an informative prompt to the user, and providing a context-sensitive means for the user to respond to that prompt. The user’s response is then returned in a TCL entity which may be processed using TCL action statements. The appearance and functionality of the query box are controlled using a text string that accompanies the $Query command in the TCL code. Let’s illustrate using a simple example. Say our layout is a loop of track with a 3-train passing siding. At startup, we’ll ask the operator which of the 3 trains he would like to run. (Here we’ll assume TCL code has already been written to route a particular train onto the mainline based on a variable named TrainSelect.) All we’ll then need is a means for the operator to set the value of the TrainSelect variable at startup. Here’s some TCL code that does just that using the $Query command: When $Reset = True Do $Query “1 $ Which train shall I run? $ SantaFe $ B&O $ PRR” Wait Until $QueryBusy = False Then TrainSelect = $QueryResponse Now, when our TCL program runs (or anytime we hit the reset button), a query box will be displayed on the screen. Its appearance will be defined by the contents of the text string (enclosed in double quotes) that accompanies the $Query statement in our TCL code above. Let’s look at what the text string in our example contains. The first item in the string is the number ‘1’. This tells TBrain to create a “type 1” query box. This type of query box presents the user with a number of buttons. As soon as the operator clicks one of those buttons, the query window closes, and an indication of the button the user clicked is returned in TCL. The next field of our string (fields are separated from one another by the dollar sign ‘$’ character) is the text Which train shall I run? This is the prompt that will be displayed to the user. The remaining fields (each, as usual, separated from its neighbors by a ‘$’) define the buttons that will appear in our query box. Here, we’ve specified three button fields: SantaFe$B&O$PRR. As a result, our query box will contain 3 buttons, imprinted with the names SantaFe, B&O, and PRR. Once the query box has been displayed, we’ll typically want the execution of the When-Do statement that created it to suspend momentarily, pending a response for the user. We can tell when the user has made his selection by using a built-in TCL entity named $QueryBusy. $QueryBusy is automatically set equal to True whenever a query box is displayed, and automatically returns to False once that query window is closed. As a result, we can use the value of $QueryBusy as the condition in a Wait-Until action statement to delay execution of the remaining actions in our When-Do until the user makes his choice, i.e. : Wait Until $QueryBusy = False Then 113 At that point, we’ll want to set our TrainSelect variable based on his decision. Again, we’ll rely on a built-in TCL entity, this time named $QueryResponse. When a query box is closed, $QueryResponse is automatically set equal to a valuable corresponding to the operator’s input. In our ‘type 1’ query box, this value indicates the button that the operator has pressed. A value of 0 indicates the user selected the leftmost button (the one labeled SantaFe in our example). Proceeding left to right, a value of 1 tells us the operator selected the next button (labeled B&O in this case). A value of 2 means the operator chose the third button (which we labeled PRR). For our purposes in this example, we just need to copy this value into variable TrainSelect, with the simple assignment: TrainSelect = $QueryResponse [However, $QueryResponse is just another TCL entity, so in a more complicated example, feel free to operate on it in any way allowed in TCL.] A ‘type 2’ message box again provides a prompt and a series of clickable buttons. However, in this case, the user may select any combination of the buttons (instead of just one). Then, when the user clicks the ‘OK’ button (placed in the query box automatically by Tbrain) the box closes, and a value indicating the combination of buttons pressed by the user is placed in the $QueryResponse entity. In this case, that value is a bitmask, with a bit representing the state of each of the buttons. A ‘1’ indicates that the corresponding button was pressed, a ‘0’ indicates that it was not. Most often, our TCL code will then need to test each bit in the bitmask, and take some action if a particular bit is set. To make that task easy, TBrain also provides an array of TCL entities called $QueryBit[ ]. Following a user’s response to a type 2 $Query, $QueryBit[0] will be True if the leftmost button was pressed (and False if it was not), $QueryBit[1] will be True if the next button was pressed, etc. This makes it a simple matter for our TCL code to test the state of each button. As an example, consider a signaling application in which IR sensors are located at the boundaries between track blocks to detect the entry and exit of trains into and out of blocks. In this case, at startup we’d need a way to initialize signal states (assuming that at that time trains are located completely within track blocks, and therefore not triggering any sensors). A type-2 operator query provides a simple way to do this. The following TCL code shows such an implementation for a representative 8-block section of mainline. Here, we’ve queried the operator using a type-2 query box. Our prompt asks the user to tell us which blocks are occupied, and we’ve provided 8 buttons (labeled 0 through 7) which he can click to tell us. As before, we’ll wait for the user to respond to our query (by monitoring the value of $QueryBusy), and then process his response (returned to us in the $QueryBit array). We’ll use a loop to examine the values one at a time, and set an array of variables named BlockOccupied[] to values corresponding to the states of each of the buttons as set by the operator. 114 When $Reset = True Do $Query “2$Click on any blocks containing trains$0$1$2$3$4$5$6$7” Wait Until $QueryBusy = False Then I = 0 Until I = 8 Loop Block_Occupied[I] = $QueryBit[I] I = + EndLoop A ‘type 3’ query box allows the operator to enter a numeric value. In this case, the control string of the $Query command consists simply of the ‘3’ type select field and a query prompt. No button fields are required since Tbrain will automatically include the numeric data entry field and an ‘OK’ button in the query box. For example: When $Reset = True Do $Query “3$How many trains will be running?” Wait Until $QueryBusy = False Then NumberOfTrains = $QueryResponse A ‘type 4’ query box allows the operator to select one entry from a list box containing a userspecified collection of items. The control string of the $Query command consists of the ‘4’ type select field and a query prompt, followed by the list of text items used to populate the list box. Once the operator selects an entry from the list box, $QueryResponse is set equal to the position in the list of the selected item (the first item being at position 0). This functions much like a ‘type 1’ query, except that the items are now presented as a list rather than as a collection of push buttons. For example: When $Reset = True Do $Query “4 $ Which train shall I run? $ SantaFe $ B&O $ PRR” Wait Until $QueryBusy = False Then TrainSelect = $QueryResponse A ‘type 5’ query box is useful on DCC-operated layouts. It allows the operator to select one entry from a list box containing the names of all engines and consists currently defined in the DCC Fleet Roster. (See the “Digital Command Control” section of the User’s Guide for more information on using TBrain with DCC-operated layouts.) In this case, the control string of the $Query command consists of the ‘5’ type select field, a query prompt, and an optional “filter” string indicating which type(s) of roster items should appear. TBrain will automatically populate the list box with the names of all corresponding items in the DCC Fleet Roster. Once the operator selects an entry from the list box, $QueryResponse holds a pointer to the corresponding DCC engine. For example: 115 When $Reset = True Do Query “5$Select a DCC train to run” Wait Until $QueryBusy = False Then EnginePointer = $QueryResponse *EnginePointer.Speed = 50 In some cases, the user may wish to only populate the list box with particular type(s) of roster items. The ability is controlled through the optional filter string. Each filter consists of a 2character code as follows: IM: Add “included” motorized roster entities to the list box EM: Add “excluded” motorized roster entities to the list box IF: Add “included” function-only roster entities to the list box EF: Add “excluded” function-only roster entities to the list box For example, to display all active motorized roster items, the code might be: Query “5$Select a DCC train to run$IM” Filter codes may be combined in any way. If no filter string is included, all roster items will be added to the list. Thus, including no filter string is equivalent to: Query “5$Select a DCC train to run$IMEMIFEF” Notes: Type 1 and Type 2 query boxes can have from 1 to 30 buttons. TBrain will automatically size and arrange the buttons based on their number. Type 4 and Type 5 query boxes impose no limit on the number of items in their list box. Multiple queries may be made in the same When-Do or in multiple When-Do’s. If the possibility exits for multiple $Query statements to execute concurrently in multiple When-Do statements, then each $Query action should be preceded by a Wait-Until $QueryBusy = False statement. This ensures that only one query box will appear onscreen at a time, eliminating the potential for confusion over which $QueryResponse value is associated with which $Query. If the user closes a query box without making a selection, $QueryResponse will be set to -1 to indicate that no selection was made. 116 Subroutines: As you automate the operation of your railroad, you’ll inevitably encounter situations in which you find your TCL program performing the same kinds of operations over-and-over again. For example, if your layout has 50 turnouts, you’ll want TCL code to control each one. Every copy of this code will likely be virtually identical to the rest, distinguished only by the controller names to which it refers. While it’s perfectly acceptable to write 50 separate copies of the same code to throw a turnout, TCL provides a much more humane solution: “subroutines”. As in other programming languages, in TCL, a subroutine is a piece of code to perform some specific, useful task that can be borrowed (aka “called”) by multiple users, whenever they need to perform that task. Subroutines can shrink the size of your TCL program, save you from having to write and debug similar code multiple times, and make your program much easier to read and maintain. To illustrate the use of subroutines in TCL, let’s look in more detail at the example we alluded to above. Assume we have a simple CTC panel with 5 turnouts, and that we want to open/close a turnout each time we click on its image on the CTC screen using the left/right mouse button. Normally, this would require us to write 10 separate copies of the sequence of TCL actions to control a switch and update its image on the CTC panel. But with a subroutine, we can reduce the number of copies of that code to just one. Consider the following TCL program: Controls: SwitchDirection, SwitchPower[5] Actions: SUB Throw_Switch(SwitchToThrow, ThrowDirection, CTC_Coordinate) SwitchDirection = ThrowDirection, WAIT 0.1, SwitchPower[SwitchToThrow] = PULSE 0.25, WAIT 0.1, SwitchDirection = OFF, $Switch(CTC_Coordinate) = ThrowDirection ENDSUB When When When When When When When When When When $LeftMouse $RightMouse $LeftMouse $RightMouse $LeftMouse $RightMouse $LeftMouse $RightMouse $LeftMouse $RightMouse = = = = = = = = = = (5,5,1) (5,5,1) (5,6,1) (5,6,1) (5,7,1) (5,7,1) (5,8,1) (5,8,1) (5,9,1) (5,9,1) Do Do Do Do Do Do Do Do Do Do Throw_Switch(0, Throw_Switch(0, Throw_Switch(1, Throw_Switch(1, Throw_Switch(2, Throw_Switch(2, Throw_Switch(3, Throw_Switch(3, Throw_Switch(4, Throw_Switch(4, 117 On, Off, On, Off, On, Off, On, Off, On, Off, (5,5,1)) (5,5,1)) (5,6,1)) (5,6,1)) (5,7,1)) (5,7,1)) (5,8,1)) (5,8,1)) (5,9,1)) (5,9,1)) In the above TCL program, a single subroutine performs all of the actions necessary to control a turnout and update its image on the CTC panel. This general-purpose subroutine is “called” by one of the program’s ten When-Do statements anytime the user clicks on the image of a turnout on the CTC panel. To tailor the subroutine for use with a particular turnout and throw direction, the calling WhenDo “passes” three parameters to the subroutine: the array index of the turnout to be thrown, the direction in which it should be thrown, and the grid coordinates of its image on the CTC panel. Armed with that information, the subroutine throws the selected physical turnout in the desired direction, and updates its onscreen image to portray it’s new orientation. Once the subroutine’s actions are complete, execution resumes at the next action statement in the calling When-Do. (In this particular case, there’s nothing left for the When-Do statement to do, and its execution ends.) Let’s examine more formally the statements needed to create and use subroutines. First, each of our subroutines must be “declared”. To do that, we’ll use the TCL “SUB” statement, which takes the general form: SUB SubroutineName (Param1, Param2, …) <actions> ENDSUB The SUB keyword signals the beginning of a subroutine declaration. It is followed by a unique name for the subroutine we’re about to create. Next, a list of names for the parameters passed to our subroutine is given; enclosed in parentheses, with each name separated by a comma. [Occasionally, a subroutine may not require any parameters at all. In that case, an empty set of parentheses is required, e.g. SUB MySubWithNoParams() Next, a set of TCL action statements form the body of the subroutine. Collectively, these define the functions performed by the subroutine. Any statements that can be placed in the Do clause of a When-Do can also be used in a subroutine. Finally, the TCL keyword ENDSUB denotes the end of the subroutine declaration. Subroutines may be declared anywhere in the Actions: section of a TCL program. However, a subroutine’s declaration must be made prior to the first use of that subroutine by a When-Do statement, so that the subroutine is known to the compiler when a call to it is encountered. Once a subroutine is declared, it may be “called” from a When-Do statement (or from another subroutine) by including its name as part of that When-Do’s list of actions, as shown below: When <conditions> Do <actions> SubroutineName (Param1, Param2, …) <more actions> 118 The subroutine’s name is followed by a list of values to be passed to it as parameters; again, enclosed in parentheses with each value separated by a comma. (If the subroutine receives no parameters an empty set of parentheses is required.) A value passed to a subroutine may be any valid TCL identifier, including predefined TCL keywords (e.g. On, Off, True, False), numeric values, user-defined constants, entity names (controls, sensors, signal names, etc.), text strings, CTC panel coordinates, etc. When the subroutine call is encountered, execution of the calling When-Do moves to the first action statement in the referenced subroutine. Once the subroutine has completed, execution resumes at the next action (if any) following the subroutine call. Subroutine Calling Rules: A When-Do may call multiple subroutines, and subroutines may call other subroutines. Because TCL is a multi-tasking language, in which multiple When-Do statements execute concurrently, it is possible for two or more When-Do’s to desire access to the same subroutine simultaneously. In this case, TBrain automatically arbitrates between the conflicting requests. If a subroutine is currently “owned” by a When-Do, execution of any additional When-Do’s that attempt to call that same subroutine are temporarily suspended at the point of the call. Their execution resumes once the subroutine is again available for use. Generally, this behavior is transparent to the user, but it should be kept in mind when writing subroutines that take a significant amount of time to execute (i.e. those containing long wait or pulse statements). In such cases, there may be a delay between the call to the subroutine and its execution if, at the time of the call, the subroutine is already owned by another user. For this same reason, TCL subroutines are non-recursive (i.e. a subroutine may not call itself), since it is already “owned” at the time of the second call. An attempt to call a subroutine recursively is flagged as an error by the compiler. When-Do execution automatically resumes at the action statement following a subroutine call once the subroutine’s ENDSUB statement is reached. However, there may be instances when multiple points of return from within a subroutine are desired. This ability is provided via the RETURN keyword which when encountered anywhere in a subroutine causes execution to resume at the next action statement in the calling When-Do. For example: SUB MySub() <actions> If <conditions> Then RETURN EndIf <more actions> If <conditions> Then RETURN EndIf <still more actions> ENDSUB 119 Passing Parameters By Value vs. By Reference TCL follows the ‘C’ language convention of passing parameters to subroutines by value. This means that the subroutine receives a temporary local copy of the values passed to it rather than the address of the original global entity itself. Thus, subroutines cannot directly alter the value of entities passed to them as parameters by value; they can only manipulate their own private copy. When it is desired that a subroutine alter the state of a global TCL entity passed to it as a parameter, the entity must be passed by reference. This is achieved by passing the address of that entity to the subroutine (using TCL’s ‘&’ “address-of” operator), and using the pointer-to (‘*’) operator in the assignment actions to that entity in the subroutine. For example, consider the following two TCL programs; both intended to blink one of four lightbulbs in response to the activation of a corresponding sensor. The code on the left is incorrect. Since, in this case, the light bulb controllers are passed to the subroutine by value, the subroutine only receives a copy of the current state of that controller, and therefore, lacks the knowledge needed to alter it. The code on the right will function correctly. By passing the subroutine the address of the lightbulb’s controller by reference, the subroutine is now able to control it. Sensors: S1, S2, S3, S4 Controls: LB1, LB2, LB3, LB4 Actions: Sensors: S1, S2, S3, S4 Controls: LB1, LB2, LB3, LB4 Actions: SUB Blink(LightBulbToBlink) LightBulbToBlink = Pulse 1 ENDSUB SUB Blink(LightBulbToBlink) *LightBulbToBlink = Pulse 1 ENDSUB When When When When When When When When s1=True s2=True s3=True s4=True Do Do Do Do Blink(LB1) Blink(LB2) Blink(LB3) Blink(LB4) s1=True s2=True s3=True s4=True Do Do Do Do Blink(&LB1) Blink(&LB2) Blink(&LB3) Blink(&LB4) Local Variables: Some subroutines may benefit from having access to a set of their own local variables. While we could, of course, clutter up the Variables: section of our TCL program by defining numerous global variables intended only for use privately within our various subroutines, it is more appropriate to allocate these private, local storage locations as part of the subroutine itself. Such local variables may be created by appending their names to the subroutine declaration’s parameter list. For example, the following code randomly chooses the direction of a turnout when the turnout is clicked using the left mouse button. In this case, we only need to pass two parameters to our subroutine; the array index of the turnout, and its location on the CTC panel grid. These values are passed to the subroutine into its local variables SwitchNum and CTC_Coordinate. The subroutine declaration then allocates a third local variable “CoinToss” for use within the subroutine. The subroutine chooses a switch direction by first randomly setting this local variable to either 0 or 1. 120 Controls: SwitchDirection, SwitchPower[5] Actions: SUB HeadsOrTails(SwitchNum, CTC_Coordinate, CoinToss) CoinToss = $Random, CoinToss = 2#, SwitchDirection = CoinToss, SwithPower[SwitchNum] = Pulse 0.25, SwitchDirection = Off, $Switch(CTC_Coordinate) = CoinToss ENDSUB When When When When When $LeftMouse $LeftMouse $LeftMouse $LeftMouse $LeftMouse = = = = = (5,5,1) (5,6,1) (5,7,1) (5,8,1) (5,9,1) Do Do Do Do Do HeadsOrTails(0,(5,5,1)) HeadsOrTails(1,(5,6,1)) HeadsOrTails(2,(5,7,1)) HeadsOrTails(3,(5,8,1)) HeadsOrTails(4,(5,9,1)) Up to 32 local variables may be declared by each subroutine. Within subroutines, local variable names take precedence over global variables of the same name. For example, any actions within the subroutine above referring to variable CoinToss will affect only the local variable even if a global variable with the same name exists. TBrain’s Internal Number Formats: TBrain’s variables are stored as 32-bit signed integers, and TBrain’s arithmetic operators (+, -, *, /) yield integral results. But in some situations it may be useful to employ non-integral values. We’ve already seen one such instance when we specified time delays in Pulse and Wait statements (e.g. “Pulse 0.25”). In such cases, TBrain allows the use of finite-precision real operands. Numbers containing a decimal point (e.g. 12.34) are interpreted by TBrain as real numbers. TBrain stores real operands differently from integral operands, so it is important to understand that the values 10.0 (a real operand) and 10 (an integer operand) are not synonymous to Tbrain. Real data is stored internally to a precision of +/- 0.005. A set of arithmetic operators (+., -., *., /.) is available for use in performing real arithmetic. (A decimal point after the functional operator symbol instructs TBrain to perform the calculation using the real number format. In $Message, $Status, and $Log statements, real operands may be printed by preceding their names with the ‘@.’ symbol in the text string. For example, $Status = “The value of real variable var1 = @.var1” 121 Using Multiple PCs: Larger layouts may benefit from having their operation controlled by multiple PCs. For example, a yardmaster at each major staging area might manage local switching operations from a dedicated PC-based control console, handing off trains to a Centralized Traffic Control operator, himself working at his own PC, once traffic is ready to depart onto the mainline. As each operator carries out his own control duties, there will be times when that operator needs to communicate with one or more of his peers. CTI makes multi-computer control easy - copies of the TBrain program running on multiple PCs can communicate directly with one another. Communication takes place over your existing wired or wireless Ethernet network connection. Most existing multi-computer control systems employ a simplistic client-server control paradigm, in which all layout control is performed by a single “server” PC, based on requests from several “client” computers. This creates a bottleneck, since the server PC is doing all the work, while the clients do virtually nothing. Instead, CTI uses a more modern distributed peerto-peer approach. That way, each PC can have its own CTI network, controlling its own part of the layout. This distributes the workload more evenly among the multiple “peer” computers. But communications need not be limited to PCs. Using TBrain’s built-in peer-to-peer communications technology, handheld Smartphone throttle Apps, portable tablet PCs, and network-enabled DCC systems can all be integrated seamlessly into the operation of your model railroad. CTI Modules CTI Modules CTI Modules Walkaround WiFi Throttles Wireless Router DCC System Portable Tablet PCs 122 If you haven’t already done so, to allow your devices to communicate with one another, you’ll need to first set up your PC network. Nowadays, this has become a fairly easy plug-&-play operation. The process varies somewhat between versions of Windows, so we won’t dwell on the subject here; leaving that task to Microsoft. [On the Windows desktop, press the F1 key to invoke Windows Help, enter “network” as the search term, and let Windows guide you through the setup process.] As part of your network setup, each networked PC will be given a unique network “name”. TBrain will use those names to route communications between PCs. In addition to the PC’s name, each copy of TBrain will be assigned a “port” number. This serves to distinguish the communications performed by TBrain from other communications taking place concurrently over the network. This setup is performed using TBrain’s Tools-Multi-PC LAN menu item. Here you’ll enter the names of up to 8 networked PCs and give each a port number. (TBrain defaults to using port # 1000. You can simply accept the default, or change it if the default selection conflicts with other programs.) The Tools-Multi-PC LAN setup procedure must be performed at each PC and the name and port number assigned to a given PC must be known at each PC. An example network configuration is shown below. In this example, three PCs named “CTC”, “Yard1”, and “Yard2” are defined. In addition, a Smartphone throttle App and a DCC system are also present in the network. 123 That’s all the setup that’s required. We can now begin communicating between PCs in our TCL programs. To do so, we’ll just need one new TCL actions statement: $Send <destination PC> and three TCL entities: $IOData, $InBufLen, $OutBufLen To facilitate moving data between PCs, TBrain provides a built-in bidirectional file buffer, accessible via the TCL entity $IOData. $IOData functions as a “first-in-first-out” (FIFO) buffer used to queue data prior to being output to, or after being input from, another PC. To send data to a copy of TBrain running on another PC, we first queue it in the $IOData FIFO buffer. Then we use the $Send action statement to move the contents of the buffer to another PC. $Send takes one argument - the name of the PC we’re sending the data to (enclosed in quotes). For example, the following When-Do writes the contents of three variables to the computer named CTC. When … Do $IOData = Var1, $IOData = Var2, $IOData = Var3, $Send “CTC” ‘place 3 variable values into the FIFO buffer ‘then send the buffer contents to CTC The $Send action statement does all of the work. The current contents of the $IOData transmit buffer on the source PC appear almost instantly in the $IOData receive buffer of the destination PC. The TCL program being executed by the copy of TBrain running on the destination PC detects the arrival of data by examining the $InBufLen TCL entity. Normally equal to zero, $InBufLen increments automatically each time a data value arrives over the network. A non-zero value in $InBufLen thus serves as the condition to trigger a When-Do statement to read, interpret, and process the incoming data. For example, the following When-Do executed on PC1 would read the three values sent by the When-Do statement above: When $InBufLen >= 3 Do Var1 = $IOData, ‘read 3 values into var1, var2, var3 Var2 = $IOData Var3 = $IOData $InBufLen automatically decrements each time we read a value from the buffer. Thus, it would return to zero after the three reads are performed by the above When-Do. Care should be exercised when data can arrive asynchronously or from multiple sources. In that case, $IOData may contain the data from more than one $Send statement at the same time. In such a situation, the above When-Do would never execute again, since after the first three reads $InBufLen never drops below 3, allowing the When-Do to retrigger. In such cases, it is better to process the entire content of the $IOData buffer using a statement like: 124 When $InBufLen > 0 Do Until $InBufLen = 0 Loop ‘put code to read and process the $IOData buffer here EndLoop (There is a similar $OutBufLen entity whose value indicates the number of entries in the output side of the sender’s $IOData buffer waiting to be sent. Its value increments by 1 each time we move a piece of data into of the buffer from another TCL entity, and is reset to zero when we send data to another PC file from the buffer.) Using this simple technique, using messages defined by the user, virtually any interaction between PCs is possible. (See the separate App Note on multi-PC operations for a more thorough example of multi-PC peer-to-peer layout operation) DCC in a Multi-PC Environment: Using DCC in a multiple-computer environment presents some challenges, since the DCC system is connected to only one PC. Fortunately, TBrain handles this situation for us automatically. In the Tools-Multi-PC LAN menu item, check the radio button next to the PC hosting the DCC command station. (This selection must be made on all PCs in the network.) Now, when a non-host PC performs an action targeting a DCC entity (engine, consist, or accessory decoder), that command is forwarded via the peer-to-peer network connection to the DCC host PC. The host then outputs the command to the DCC command station for processing. An exception to this rule occurs if the DCC system is itself network capable. (Currently, that only applies to XpressNet-based command stations connected via to the Ethernet network via the Lenz LI-USB-Ethernet interface. In that case, each peer PC can address the DCC system directly, so uncheck the DCC Host checkbox on all PCs. Using SmartPhone Throttle Apps: A number of 3rd-party apps are now available to turn your SmartPhone into a convenient wireless handheld throttle. Currently, TBrain supports the WiThrottle app (for iOS-based phones) and EngineDriver (for Android-based phones). Both apps are available for purchase from their phone’s respective app stores. To use the apps with TBrain, first turn the phone app’s “Automatic Network Config” option off. Then under the “Config” item on the app, enter the IP address and port # of the PC with which the phone should communicate (these can be found under that PC’s Tools-Multi-PC LAN menu item). Most often, this will be the DCC Host PC, but if another PC is chosen, TBrain will automatically route the commands sent from the handheld on to the DCC Host. When the app is started, TBrain will upload a copy of the DCC roster to the phone. Just select an engine from the roster, move the throttle’s speed slider, and TBrain will do the rest. 125 File I/O: Data may be read from or written to files from within a TCL program. To do so, we’ll use three TCL actions statements: $Read, $Write, $Append and three TCL entities: $FileData, $ReadBufLen, $WriteBufLen To facilitate moving data to and from files, TBrain provides a built-in bidirectional file buffer, accessible via the TCL entity $FileData. $FileData functions as a “first-in-first-out” (FIFO) buffer used to queue data prior to being written to, or after being read from, a file. To write data to a file, we first queue it in the $FileData FIFO buffer. Then we use the $Write action statement to move the contents of the buffer to the file. For example, the following When-Do writes the contents of three variables to a file. When … Do $FileData = Var1, $FileData = Var2, $FileData = Var3, $Write “MyFile.dat” ‘place the variable values into the FIFO buffer ‘then write the buffer contents to the file The $Write action statement creates the file named in its argument (enclosed between double quotes) if it does not already exist, and clears any prior file contents if it does. In some circumstances, we may want to add the new data to a previously existing file without destroying its prior contents. This is accomplished using the $Append action statement. If the named file previously exists, $Append adds the contents of the $FileData buffer to the end of any existing data in the file. Reading data from a file works in reverse. We first use the $Read action statement to move the file contents into the $FileData buffer, then we move the buffer contents to their final destinations. For example, the following When-Do reads three values from a file, placing them into variables Var1, Var2, and Var3. When … Do $Read “MyFile.dat” Var1 = $FileData, Var2 = $FileData Var3 = $FileData ‘read the file contents into the FIFO buffer ‘then move them into var1, var2, var3 Sometimes we may not know a priori how much data was in the file we’ve read. In that case, we can use the TCL entity $ReadBufLen. The value of $ReadBufLen always reflects how much data is in the read side of the $FileData buffer. Its value is set equal to the number of values 126 read when we use $Read to move data from a file into the buffer, and decreases by 1 each time we move a piece of data out of the buffer into another TCL entity. For example, the following When-Do reads the contents of a file of unknown length into a variable array. When … Do I = 0 $Read “MyFile.dat” Until $ReadBufLen = 0 Loop Var[I] = $FileData I = + EndLoop (There is a similar $WriteBufLen entity whose value indicates the number of entries in the write side of the $FileData buffer waiting to be written to file. Its value increments by 1 each time we move a piece of data into of the buffer from another TCL entity, and is reset to zero when we write data to a file from the buffer.) The $FileData buffer is limited to 1024 entries. Any attempt to write or read more data once the buffer depth has reached 1024 will be ignored. (Break longer writes into multiple shorter ones, using $Append to perform each smaller write.) Writing Text Strings to Files: Consider the action statements below. $FileData = “Hello” $Write “MyFile.dat” After executing these statements, we might expect to find the word “Hello” stored in the file. But surprisingly, we’d instead find a rather meaningless number. That’s because in TBrain, the “value” of a string is actually equal to a pointer into a memory heap where the sequences of characters contained in all of our text strings are stored by the compiler. If we want to write the text itself to a file, simply follow the source operand with a percent sign character ‘%’ For example: $FileData = “Trains Are Fun.”% Var1 = “Yes, They Are.” $FileData = Var1% $Write “MyFile.dat” In this case, we’ve used the ‘%’ to indicate that TBrain should write the actual text string. As a result, we’d find two sentences in the file, as desired. 127 Reading Text Strings From Files: Text strings may also be read from files. When a text string (enclosed in quotes) is encountered in the file during a $Read, space is allocated for the string in the memory heap, the string is placed at that location in the heap, and a pointer to that location is placed in the $FileData buffer. The string (or more precisely the pointer to it) can later be moved from the buffer to a variable, and used as any normal TCL text string. For example, if the file “myfile.dat” contains: “This is a string” “So is this” Then we could, for example, write: $Read “MyFile.dat” Var1 = $FileData Var2 = $FileData $Draw Message(3,2,1) = Var1 $Status = Var2 128 Lesson 15: A Closer Look at Sensors Sensors play an important role in automating the action on model railroads. They are the eyes and ears of your control system. Unfortunately, there are nearly as many opinions as to what constitutes the "perfect" sensor for model railroading as there are model railroaders. For that reason, the Train Brain's sensor ports have been designed to be general purpose in nature. You'll find that they are quite flexible, and can interface directly to a wide variety of sensors. The purpose of this section is to describe the electrical characteristics of the Train Brain's sensor ports, so they'll be easy to interface to your favorite sensor. As an example, we'll then describe hooking up the Train Brain to an infrared emitter/detector. A simplified schematic diagram of a Train Brain sensor port is shown below. Here, for the purpose of illustration, a generic sensor is modeled as a simple SPST switch. When the switch is open it presents a high electrical impedance, so no current can flow from pin A to pin B on the sensor connector. As a result, the input to the TTL inverter is pulled to a logic "1" by the resistor tied to +5 Volts. In that case, the output of the inverter is logic "0", and the sensor is read as "FALSE". If the switch is closed, a low impedance path is created between pins A and B of the sensor connector. This connects the input of the TTL inverter to GROUND (logic "0"). Now the output of the inverter switches to a logic "1", and the sensor is read as "TRUE". +5 Volts Train Brain Board Sensor Port Connector Sensor To Microprocessor A B 1: Sensor = TRUE 0: Sensor = FALSE Train Brain Sensor Port Schematic 129 As such, a Train Brain "sensor" is defined as any device that alternately presents a high or low electrical impedance across the inputs of the Train Brain sensor port, in response to some external stimulus. Many devices exhibit this characteristic, and may be used as sensors. Examples include manual switches, magnetic reed switches, photo-transistors, CdS photocells, Hall-Effect switches, thermistors, TTL logic gates, motion detectors, pressure sensors, etc. To illustrate the point, let's interface the Train Brain's sensor port to an infrared photodetector. This is a popular choice for detecting trains on model railroads. An infrared transmitter (photodiode) is positioned on one side of the track. An infrared receiver (phototransistor) is positioned on the opposite side. As long as light from the photodiode reaches the phototransistor, the transistor conducts, providing a low impedance path between its collector and emitter. As the train passes, it breaks the light beam. With no infrared light hitting the phototransistor, it stops conducting, and presents a high impedance between its collector and emitter. From this description, it's clear that the phototransistor meets the definition of a Train Brain "sensor". Photodetectors are inexpensive, and very reliable. While CTI sells an infrared detector, for the do-it-yourselfers among us, we'll use parts readily available at Radio Shack to illustrate the design and construction of a Train Brain infrared sensor. The Radio Shack part numbers are 276-143C (photodiode) and 276-145 (phototransistor). The circuit below is all that's required. Sensor Port Connector R = 3 Ohms A Train Brain Board Vin 1.5V B 276-143C 276-145 Train Brain Photodetector Interface In this case, the 1.5 Volt power supply was chosen for convenience (a D-Size battery). Any D.C. supply voltage may be used; simply change the value of the current limiting resistor according to the input voltage. (Be sure to observe resistor wattage ratings when using higher supply voltages.) Radio Shack specifies an operating current of 100 milli-amps for their photodiode. In that case, the current limiting resistor's value can be calculated using Ohm's Law as follows: R = ( Vin - Vphotodiode ) / ( Iphotodiode ) = (Vin - 1.2 Volts) / (0.1 Amps) In our case, Vin equals 1.5 Volts, so R turns out to be 3 Ohms. 130 Next, we need to be sure that the impedance change of the phototransistor, as it switches from light to dark, is adequate to trigger the Train Brain's sensor port. To reliably detect the state of the sensor the Train Brain requires valid "logic levels" at the input of the sensor port. These are: Logic 0: < 1.0 Volts Logic 1: > 2.0 Volts Collector-Emitter Voltage (Volts) The graph below shows the voltage measured across the phototransistor as the distance between the transmitter and receiver is increased. These results show the phototransistor voltage to remain in the valid logic "0" region up to a distance of about 9.5 inches. 4 3 2 1 Detection Threshold (1.0V) 2 4 6 8 10 12 14 16 Separation (inches) Measured Phototransistor Voltage vs. Transmitter/Receiver Separation TCL Programming with PhotoSensors: Now that we've interfaced our photosensor to the Train Brain, programming it in TCL warrants some discussion, since the characteristics of photodetectors necessitate some special handling. The most noticeable difference with photodetectors is that they work "backwards". They detect light (and so, respond as TRUE) whenever the train isn't present. A passing train breaks the light beam, switching the sensor to FALSE. We can simply take this "negative logic" into account when writing TCL code. For example, here's a simple program that can be used to test our photodetector circuit: Controls: c1 131 Sensors: light_detected Actions: WHEN light_detected = FALSE DO c1 = Pulse 0.25 Alternatively, we can let TBrain handle the negative logic for us. By following the sensor’s name with a ‘~’ in the Sensors: section, we can tell TBrain to automatically reverse its polarity. Thus, the following TCL code would produce exactly the same result as that shown above: Controls: c1 Sensors: light_detected~ Actions: WHEN light_detected = TRUE DO c1 = Pulse 0.25 Sensor Port Filtering: A second nuisance with photodetectors can occur when the gaps between train cars pass the sensor. The gaps momentarily re-establish the light beam, causing the sensor to re-trigger. If a WHEN-DO statement associated with the sensor has run to completion, the gap will cause it to execute again. In fact, all physical sensors suffer from some type of false-alarm mechanism. Magnetic reed switches suffer from mechanical “switch-bounce”, which can lead to multiple detections per switch closure. Current detection sensors suffer from intermittent loss of contact between the train’s wheels and the rails resulting from dirty track, making it appear as though the train has momentarily “vanished”. Fortunately, TBrain's sensor algorithms have built-in filtering logic that can recognize each of these “real-world” situations, and reject the false alarms they can cause. To activate the appropriate filter you'll just need to tell TBrain what type(s) of sensors you’re using. To do so, simply follow the names of each sensor in the Sensors: section of your TCL program with the corresponding “filter identifier”. Tbrain will then apply the appropriate filter algorithm to the raw reports arriving from each physical sensor. The “filter identifiers” are as follows: Magnetic sensor: Infrared sensor: Photocell: Current detector: … TBrain applies switch-bounce filter … TBrain applies car-gap filter … TBrain applies car-gap filter … TBrain applies dirty track filter (no identifier) * (asterisk) * (asterisk) # (number sign) For example, the following TCL code declares 4 sensors (2 magnetic, one IR or photocell, and one current detector). Sensors: sensor1, sensor2, sensor3*, sensor4# 132 Adjusting Sensor Filter Thresholds: You can tailor the amount of filtering that TBrain applies to its raw sensor reports for each of the above filter mechanisms using the slider controls accessed via the Settings-Hardware Settings menu. Moving a slider to the left decreases the amount of rejection the corresponding filter applies, while moving the slider to the right increases the amount of rejection. Adjustment of these filter thresholds is seldom if ever necessary. However, the capability exists if required. Adjusting Sensor Port Sensitivity: The value of the pull-up resistor on the sensor port determines its sensitivity. The higher the resistance, the more sensitive the sensor port becomes. The Train Brain and Watchman modules provide a sensitivity adjustment potentiometer on each sensor port. (The sensor ports on the Sentry module are fixed.) Adjustment is seldom critical. A mid-range setting generally works just fine. However, if adjustments are necessary, simply tweak the sensor port’s adjustment knob until the sensor trips reliably, as shown in the figure below: Less Sensitive More Sensitive Sensitivity Adjust Sensor Port Connector A B Adjusting Train-Brain and Watchman Sensor Port Sensitivity As a rule, it’s best to use the least sensitive adjustment setting that will cause the sensor to trigger reliably. The higher the sensitivity adjustment is set, the more susceptible the sensor port becomes to noise-induced false alarms. 133 Lesson 16: Timetables and Time-Based Events By now you've probably noticed that the TBrain program has a built-in clock display. The clock display consists of a conventional "time-of-day" clock as well as a "session" clock that indicates the elapsed time of the current operating session. These clocks are more than just ornamental. You can access them from within your TCL programs to implement prototypical timetable operations. In TCL, the $TIME operator refers to TBrain's "time-of-day" clock. The $SESSION operator refers to TBrain's "elapsed time" clock. You can use both $TIME and $SESSION as part of a WHEN condition to trigger time-based events. The $time and $session operators are accurate to +/- 1 second. Both specify time in 24-hour military format. Thus, using $time, 15 seconds after half past two in the afternoon would be indicated by: 14:30:15 (Using $session, this same time specification would represent 14 hours, 30 minutes and 15 seconds into your current operating session !!!) Prior to their use in a WHEN clause, both the $time and $session clocks may be initialized as part of the action in a DO clause, allowing simulated time-of-day operations. Here's a simple program that uses timetables. A Quick-Key named "start" initializes the $time operator to 12 noon. At 12:01 the train promptly leaves the station, runs for 5 minutes, then comes to a stop the next time it arrives at the station. You can try out this program using nearly the same set up used in Lesson 3. Simply switch the connection supplying power to the track to the "normally open" side of controller #1. The code is available as lesson16.tcl on your distribution disk. { A Simple Timetable Program } Controls: train, spare, spare, spare Sensors: at_station, spare, spare, spare QKeys: start Actions: WHEN start = LEFT DO $time = 12:00:00 WHEN $time = 12:01 DO train = ON WHEN time >= 12:06, at_station = TRUE DO train = OFF 134 You'll think up lots of imaginative uses for TCL's timekeeping features. For example, how about using timetables to run a regularly scheduled interurban service. Or use it to automatically control your layout lighting to provide natural day/night transitions. Timetables can add an interesting challenge to operating sessions. Try managing your freight switching operations interactively, while TBrain "runs interference" by injecting regularly scheduled mainline passenger traffic automatically !!! Scheduling Periodic Events Using Timers: Tbrain's $time and $session clocks provide a convenient means to implement automatic timetable operations. For example, let’s consider a light rail commuter service that runs continuously, with departures every 10 minutes. Using the $time operator alone, we could write: WHEN $time = 00:00:00 WHEN $time = 00:10:00 WHEN $time = 00:20:00 WHEN ... WHEN $time = 23:50:00 DO train = ON DO train = ON DO train = ON DO train = ON But clearly, there must be a better approach. Fortunately, TCL allows us to transfer data back and forth between TBrain's clock operators and TCL's variables. Thus, the wide assortment of arithmetic operators that are available for use with variables may be applied to TBrain's clocks. Consider TCL's modulo operator "#". Recall that "A modulo B" is equal to the remainder when the number B is divided into the number A. Thus, whenever A is a multiple of B, the remainder is zero, i.e. A mod B = 0. Now, consider the following TCL code: ALWAYS DO var1 = $time, var1 = 00:10:00# { copy time-of-day clock into variable var1 } { test if clock is at a 10 minute interval } WHEN var1 = 00:00:00 DO { if so, var1 will be zero … start train } train = ON Variable "var1" continually monitors the value of clock operator $time. Using the modulo function, the value of $time is checked for a ten minute boundary (by dividing 10 minutes into the current value of $time, and testing for a zero remainder). The second WHEN-DO then turns on the train every 10 minutes, as desired. This technique can be used to schedule a wide variety of periodic events. 135 "Fast-Clocking": Tbrain's clock operators can speed up real-time to implement a "scale-time" appropriate to any model railroad scale. The speed-up ratio may be set using the Settings-Fast Clock item on Tbrain’s main menu. For example, to produce a scale-time which is 10 times faster than realtime, simply move the FastClock slider control to the value 10. Tbrain's clocks will now operate at a rate 10 times faster than real-time. (Any ratio up to 500x may be produced in this manner.) Precise Measurement of Time: Sometimes we may wish to measure time intervals to a resolution finer than the 1-second granularity afforded by the $time and $session operators. TBrain provides a time measurement called $StopWatch, that’s accurate to 1/100th of a second. $StopWatch counts time continuously while TBrain is running. The value of $StopWatch may be copied to a variable for further processing, or may be operated on directly using any of TBrain’s arithmetic operators. In TCL, $StopWatch may be treated as a real operand indicating time in seconds, or as an integral operand indicating time in hundredths of seconds. As an example, the following TCL code calculates the scale speed of an HO train in miles per hour by measuring the time taken to travel between two sensors spaced 5 feet apart. Sensors: Enter_SpeedTrap, Exit_SpeedTrap Variables: Speed Constants: Distance = 60.0 ‘length of speed trap in inches Actions: When Enter_SpeedTrap = True Do $StopWatch = 0 Wait Until Exit_SpeedTrap = True Then Speed = Distance, Speed = $StopWatch/. Speed = 4.94*. $Status = "Speed = @.Speed MPH" ‘zero the stop watch ‘calculate speed in inches/sec ‘convert to HO scale miles/hour ‘print the train’s speed Note: The conversion factor from true inches per second to scale miles per hour for various model railroad scales is as follows: O: 2.73, OO 4.32, HO: 4.94, N: 9.09 136 Scheduling Calendar-Based Events: TBrain is also aware of time on a broader scale via a series of calendar-based TCL entities, named $Day, $Date, $Month, and $Year, defined as follows: $Day: Integer corresponding to the day of the week 1 = Sunday, 7 = Saturday $Date: Integer 1 through 31, corresponding the current day of the month $Month: Integer, corresponding to the month of the year; 1 = January, 12 = December $Year: Integer representing the calendar year These entities are initialized from your PC’s system clock when TBrain begins executing (or whenever TBrain’s Reset button is pressed). In addition, each of these entities may be set to any point in time via the actions in a When-Do statement. Once set, these entities may be used as the conditions in a When-Do statement to schedule calendar-based events. For example: When At_Station = True, $Day > 1, $Day < 7 Do ‘only stop at this station on weekdays Engine1.brake = On The calendar entities are automatically updated each time TBrain’s internal $Time entity strikes midnight; progressing at a rate determined by to the current $FastClock setting in Tbrain. Summary: In this lesson, you have learned the following: How to set and read TBrain's clock functions from within a TCL program. How to use the $time and $session operators to trigger time-based events. How to precisely measure time intervals using the $stopwatch function. How to use the clock operators to schedule periodic events. How to perform “fast-clocking”. How to perform calendar-based events. Recommended Practice Exercises: Change the TCL code in the example above to run the interurban service at ten minute intervals during rush hour (6-9 AM, 4-7 PM) on weekdays, and at 30 minute intervals otherwise. [Hint: use TCL's "variable comparison" operators] 137 Lesson 17: Cab Control In this lesson, we'll look at using CTI to control the operation of multiple trains running on the same track, using a technique known as cab control. In cab control, the trackwork is divided into a number of electrically isolated track blocks. A separate, dedicated throttle is assigned to each train traveling on the mainline. Each throttle is electronically routed to follow its train as it moves from block to block, providing seamless, independent speed control of each engine. Traditionally, cab control has been too complicated to implement automatically, instead requiring constant operator intervention to manually switch cabs into and out of blocks and to brake trains as they approach traffic ahead. Since the CTI system integrates the functions of the Train Brain and SmartCab, computerized cab control is now easy to implement with virtually no additional wiring. Throttles can be routed to follow their assigned engines and trains will glide to smooth prototypical stops as they approach other traffic - all automatically. In this simple example, we'll consider two trains sharing a common four block mainline. The techniques described here may then be easily extended to accommodate any number of blocks or trains. We'll need two SmartCabs to serve as the throttles for our two engines, and one Train Brain to manage power routing to our four blocks. The wiring needed to implement our cab control design in shown in the figure below. “a_cab” NO NC Train Brain Controller 1 To Block A Insulated Rail “a_sensor” Block A “b_cab” NO NC “cab1” Smart Cab Train Brain Controller 1 To Block B Insulated Rail “c_cab” V OUT “b_sensor” Direction of Travel Block D Block B NO Train Brain NC Controller “cab2” Smart Cab 1 To Block C Insulated Rail Block C “d_cab” V OUT NO NC Train Brain Controller 1 To Block D Insulated Rail To Common Rail 138 “d_sensor” “c_sensor” The cab control "algorithm" we'll be implementing may be stated as follows: When a train enters a new block: 1) Flag the new block as "occupied", and flag the block just cleared as "vacant". 2) If the block ahead is "occupied": Apply the brake on the cab assigned to this block. 3) If the block ahead is "vacant" (or as soon as it becomes vacant): a) Release the brake on the cab assigned to this block. b) Change the cab assignment of the block ahead. Working through a few test cases should convince you that this sequence of operations maintains a buffer zone between trains, and routes each throttle ahead of its assigned train as it moves from block to block. TCL code that performs this algorithm is shown at the end of this lesson. (This code assumes the use of IR or photocell sensors at the transition between each pair of blocks.) Of course, the speed and momentum of either train can still be controlled manually at any time, via the pop-up throttle display corresponding to that train's assigned cab, on the TBrain control screen. Using this TCL program, TBrain will take care of all necessary power routing and traffic control for you automatically. Whenever traffic is detected ahead, a train will come to a smooth stop, and will return to its currently selected speed once the track ahead has cleared. On startup, the algorithm needs to learn the starting location of each train. This can be accomplished interactively using keyboard commands or Quick-Keys, or if current detection sensing is used, the code can find the starting location of each train itself, automatically. For our simple example, we’ll just assume that operation begins with the trains in block A and B. In that case, the following initialization is all that’s required. Variable "cabctl_ready" is used to flag the start of operations. Like all variables, it equals FALSE when TBrain begins running, or after a reset.) WHEN $Reset = True DO a_occupied = TRUE, b_occupied = TRUE, c_occupied = FALSE, d_occupied = FALSE, { Initialize block occupancy flags } a_cab = ON, b_cab = OFF { Assign cabs … lead train gets lower numbered cab } 139 Controls: a_cab, b_cab, c_cab, d_cab Sensors: a_sensor*, b_sensor*, c_sensor*, d_sensor* SmartCabs: cab[2] Variables: a_occupied, b_occupied, c_occupied, d_occupied Actions: WHEN a_sensor = TRUE DO a_occupied = TRUE, d_occupied = FALSE If b_occupied = TRUE Then cab[a_cab].brake = ON EndIf Wait Until b_occupied = False Then cab[a_cab].brake = OFF b_cab = a_cab WHEN b_sensor = TRUE DO b_occupied = TRUE, a_occupied = FALSE If c_occupied = TRUE Then cab[b_cab].brake = ON EndIf Wait Until c_occupied = False Then cab[b_cab].brake = OFF c_cab = b_cab WHEN c_sensor = TRUE DO c_occupied = TRUE, b_occupied = FALSE If d_occupied = TRUE Then cab[c_cab].brake = ON EndIf Wait Until d_occupied = False Then cab[c_cab].brake = OFF d_cab = c_cab WHEN d_sensor = TRUE DO d_occupied = TRUE, c_occupied = FALSE If a_occupied = TRUE Then cab[d_cab].brake = ON EndIf Wait Until a_occupied = False Then cab[d_cab].brake = OFF a_cab = d_cab 140 { Step 1 for block A} { Step 2 for block A} { Step 3a for block A} { Step 3b for block A} { Step 1 for block B} { Step 2 for block B} { Step 3a for block B} { Step 3b for block B} { Step 1 for block C} { Step 2 for block C} { Step 3a for block C} { Step 3b for block C} { Step 1 for block D} { Step 2 for block D} { Step 3a for block D} { Step 3b for block D} Summary: In this lesson, you have learned the following: How to implement a fully automated cab control scheme using CTI. Recommended Practice Exercises: Create a TCL program that operates the cab control system for trains running in the other direction. Add the necessary TCL code to the above program segment to initialize the cab control system interactively, handling trains starting in any blocks. Change the above program for use with current detection sensors, and add code to find the locations of train automatically on start-up. [Note: The “Application Notes” page of our website has several examples (with thorough explanations) illustrating cab control systems using current detection sensors, and for systems with more than two trains.] 141 Lesson 18: Reversing Loops Reversing loops need a mechanism for detecting the arrival of a train in the loop, and in response, throwing the turnout and reversing the track polarity in time for the train’s return to the mainline. As such, they are natural candidates for automated computer control. The wiring diagram below shows just how easy it is to implement an automated reversing loop. In contrast to simple block wiring, in reversing loops both rails must be insulated at each entry/exit point of the loop. Two controllers are used to provide automatic polarity control for the mainline track. TCL code to handle the job is shown below. It’s really quite simple. When a train is detected inside the loop, the code uses the two Train Brain controllers to reverse the polarity of the mainline in preparation for the train’s reentry. To avoid cluttering the diagram, we haven’t shown the wiring to control the turnouts. (The wiring and TCL code to control turnouts are included in another lesson.) Note, however, that there’s no need for independent control of the two turnouts at each end. Since they must always operate in tandem, you can control both using the same Train Brain controller. Controls: polarity1, polarity2 Sensors: in_loop1, in_loop2 When in_loop1 = TRUE DO polarity1 = On { Set mainline polarity for return from loop1 } polarity2 = Off { Add code here to automatically throw turnouts if desired } When in_loop2 = TRUE DO polarity1 = Off { Set mainline polarity for return from loop2 } polarity2 = On { Add code here to automatically throw turnouts if desired } 142 Insulated Rail Joiners (both rails) Train-Brain Sensor “in_loop1” Train-Brain Sensor “in_loop2” C Train-Brain Controller A B “Polarity2” NC NO NO “Polarity1” C B NC A Direction of Travel Train-Brain Controller Direction of Travel A Smart Cab or Manual Throttle A B Wiring Diagram for Reversing Loop Control B Summary: In this lesson, you have learned the following: How to implement a fully automated reversing loop. Recommended Practice Exercises: Add actions statements to the WHEN-DO’s in the above TCL program to automatically control the turnouts at each end of the mainline. 143 Lesson 19: Creating Random Events One of the great advantages of computer control is its “repeatability”. Ask a computer to do something a million times, and it will do it exactly the same way every time. In model railroading for instance, we definitely want to stop a train every time there’s traffic ahead, or lower a crossing gate every time a train approaches. By letting a computer take care of these mundane chores, we don’t have to worry. They’ll always get done, and they’ll always be done right. But at a higher level, such repeatability can quite frankly get a bit boring. Real life has a way of factoring in the unexpected. To make our layouts truly lifelike, we can, if we choose, factor some uncertainty into our TCL programs. The first thing we’ll need is a random number generator. Fortunately, the TBrain program has one built-in, which we can access from TCL using the $RANDOM keyword. Random numbers can be used as a condition in a WHEN clause, or as a data source in a DO. $RANDOM returns a random value between 0 and 65535. In many cases, you’ll probably want to limit the random number to a particular range of values. To produce a random number between 0 and ‘n’, simply use the random number generator in conjunction with the modulo operator ‘#’. To illustrate, suppose we’d like the PC to randomly throw a turnout each time a train approaches, based on the flip of a coin. Appropriate TCL code might be: WHEN at_turnout = TRUE DO { When the train approaches the turnout … } coin_toss = $RANDOM, { Pick a random number } coin_toss = 2#, { Convert it to a “heads” (0) or “tails” (1) value } switch_direction = coin_toss, { Throw the turnout based on the coin flip } switch_power = PULSE 0.25 This simple technique can be used to generate a wide variety of random events on your model railroad. Use it to randomly configure routes, dispatch trains, sequence house lights, whatever. So try giving your layout a mind of its own. It’s fast, easy, and fun. Summary: In this lesson, you have learned the following: How to initiate random events on your model railroad. How to randomly choose 1 of ‘N’ possible outcomes 144 Lesson 20: Sound We all invest countless hours to make our model railroads look like the real thing. But for all our efforts, our trains still glide silently down the track, past cities and towns that, while meticulously detailed, never raise as much as a whisper. It takes sound to give these motionless scenes the animated quality needed to seem real. Sound can truly bring a model railroad to life. If only you could have a library of hi-fidelity sounds (diesel horns, steam whistles, air brakes, crossing bells, track clatter, station announcements, whatever!!!) that can be accessed instantly and played in full synchronization to the action taking place on your railroad. Now you can! Tbrain can control your PC’s multimedia resources in response to instructions in your TCL program. Any sound you can imagine can now be played automatically, synchronized to the action taking place on your layout. It just takes a single line of TCL code. More on that in a moment. But first, let’s examine TBrain’s integrated multimedia tools. They can be found under the Tools menu. There you’ll find two items, named “Multimedia 1 and 2”. Open one of them (they’re identical). You’ll now see a window that looks like a conventional media player. In fact, that’s exactly what it is. Pop in an audio CD and click on the multimedia tool’s playlist button. Choose a CD track, hit the play button, and enjoy some music. You can also browse to, and play, multimedia files on your disc drive. In fact, you can even sit back and watch a DVD! But the real power of TBrain’s multimedia tools lies in the fact that they can be controlled from within your TCL programs, through the $SOUND action statement. The $SOUND statement supports two sources of sounds: disk-resident sound files and CD audio disks. As a first example, the TCL code to play a “.wav” file might be: WHEN at_crossing = TRUE DO $SOUND = “bell.wav” { Ring bell on approach to crossing } Here, $SOUND refers to Tbrain’s multimedia tools. $SOUND is set equal to is a text string containing the name of the sound file you wish Tbrain to play. (The filename should always be enclosed within double quotes.) Tbrain supports virtually all popular sound file formats. Note: If the sound file is not located in the same directory as the Tbrain program, you’ll need to specify its full path in the filename, e.g. $SOUND = “C:\My Sounds\bell.wav”. If Tbrain can’t find the sound file, TCL program execution simply continues with the next action statement. Using the $SOUND statement, you can also play a track of an audio compact disk. For example: WHEN at_station = TRUE DO $SOUND = $CDTRACK 5 { Play arrival announcement } Here, $CDTRACK 5 tells TBrain to play track #5 of the audio disk currently in the CD drive. 145 Playing Sounds Repeatedly: A $Sound statement may optionally be followed by the $REPEAT keyword, which tells Tbrain to play the selected sound file or CD track repeatedly. This technique is particularly useful for playing sounds that are generally long in duration, but which are made up of a simple sound “snippet” which is repeated many times. For example, to ring a warning bell while a train is in a grade crossing, we could use a sound file that might be several minutes in length (and therefore consumes a large amount of disk memory). Alternatively, we could use a very short sound file consisting of a single bell “ding”, which is played over and over using the $REPEAT keyword. For example: WHEN at_crossing = TRUE DO $SOUND = “bell.wav” $Repeat Of course, we’ll now need a way to turn off the repeating bell sound once the train has cleared the crossing. This is accomplished by setting $SOUND equal to TCL’s OFF keyword. For example: WHEN at_crossing = FALSE DO $SOUND = OFF { Stop bell after train clears crossing } Note: The OFF keyword can also be used at any time to terminate a sound before it runs to normal completion. Mixing Sounds: It’s possible to simultaneously mix sounds from two audio CDs, two sound files, or an audio CD and a sound file. (It’s for this reason that Tbrain provides two identical multimedia tools.) For example, the following TCL code starts our warning bell sound effect as the train nears the crossing, playing it repeatedly until the train has safely passed. It then superimposes a whistle blast (in this example, presumably on track #4 of our sound effects CD), as the train approaches the crossing. WHEN at_crossing = TRUE DO $Sound = “bell.wav” $Repeat, Wait 5, $Sound = $CDTrack 4 { As train approaches crossing … } {Start bell sound, repeat it till train has passed } WHEN at_crossing = FALSE DO $SOUND = OFF { Once train clears crossing … } { Turn off repeating bell sound } { Blow a warning whistle blast as train nears } Tbrain allocates sound tasks to its two multimedia tools on an “as-needed” basis. If a $Sound command is executed, and Multimedia Tool #1 is currently idle, then the sound will be played in tool #1. If tool #1 is busy, then the sound will be played in tool #2. Alternatively, the user can target a specific multimedia tool using the $SOUND1 and $SOUND2 commands. For example: 146 WHEN at_crossing = TRUE DO $Sound1 = “bell.wav” $Repeat, $Sound2 = $CDTrack 4 { As train approaches crossing … } { Play crossing bell on tool #1 } { Play whistle blast on tool #2 } When mixing sounds, it may be desired to turn off one sound without affecting the playing of the other. The following methods are available for turning off sounds: $Sound = OFF { Turns off all sounds } $Sound1 = OFF { Turns off only the sound playing on tool #1 } $Sound2 = OFF { Turns off only the sound playing on tool #2 } $Sound = CDOFF { Turns off only sounds coming from an audio CD track } $Sound = WAVOFF { Turns off only sounds coming from sound files } Determining Multimedia Tool Status: At times, it may be helpful to know if either of TBrain’s multimedia tools is busy. We can do that using the two built-in TCL entities $Sound1Busy and $Sound2Busy. As their names imply, each equals True if the corresponding multimedia tool is currently busy playing a sound and False if it is not. As an example, suppose we’d like to continually play some background music, randomly selected from a set of ten “.mp3” files stored on disk, named “Sound1.mp3” through “Sound10.mp3”. Here’s a TCL action statement that will do just that: WHEN $Sound1Busy = False Do Var1 = $Random, Var1 = 10#, Var1 = + { Generate a random number from 1 to 10 } $Sound1 = “[email protected]” { Play the randomly selected sound file } The Internet is an excellent resource for finding train related sound files, collected by railfans worldwide, that are usually available for free download. There are also a number of excellent sound-effects CDs featuring a wide variety of train-related sounds. So put some new life into your old model railroad. With $Sound, it’s fast, easy, and fun. -----------------------------------------------------------------------------------------------Note: TBrain’s multimedia-related functions employ the Windows Media Player ActiveX control. This control is a standard part of all Windows Operating System versions ‘98 and later. TBrain supports version 8, 9, 10, and 11 of the Windows Media Player (WMP). TBrain will determine the version of WMP on your system, and adjust itself accordingly. If your system’s WMP is older than version 8, Tbrain will let you know. In that case, you can download a free upgrade to a newer version from the MicroSoft website. (A link on the “Downloads” page of the CTI website will take you straight there.) We recommend using Version 12 on Windows 7, Version 10 or 11 on XP systems, and Version 9 on Windows ’98 systems. If you experience problems getting multimedia to work using the Windows Media Player, you may wish to try TBrain’s integrated media controls (which don’t rely on WMP). You can make 147 that choice using the Settings-MultiMedia menu item. TBrain’s integrated media controls employ an older legacy sound driver used in earlier versions of TBrain, before WMP existed. It lacks the fancy graphics of the media player, and is limited to playing audio CDs and .wav audio files, but due to its simplicity, has a high probability of working on virtually all versions of Windows. 148 Lesson 21: Odds and Ends Using Tbrain's Simulator Feature: The TBrain program provides a simulator feature that allows checking out your TCL code before using it on your layout. In fact, you don't even need a CTI network installed, so you can run it on any PC. Simulator mode is activated using the “Simulate” item in TBrain’s “Railroad” menu. In simulator mode, sensor activation can be simulated by clicking on the sensor indicator in the “Sensors” window (select “Sensors” in the “View” menu to activate the sensor screen). In addition, while in Simulate mode, sensors may be the target of the actions in a TCL When-Do statement, allowing simulated operational scenarios to be constructed and played back via TCL. (During live operation, sensors cannot be assigned values via TCL, since their values are tied directly to the states of the physical sensors on the layout. TCL-based assignments to sensors made during non-simulated operation are ignored.) In response to a simulated sensor activation, your TCL code's WHEN-DO statements will respond just as though an actual sensor triggering had occurred on your layout. All controllers, SmartCabs, signals, and user display functions will operate normally. Taking a Break: Sometimes reality gets in the way, and we need to shut down our layouts. On such occasions, TBrain can save away the current state of your layout, and restore it later when you power-up again. To do so, you’ll simply need to use the “Archive” and “Restore” items in TBrain’s Railroad menu. Archiving stores the current state of all hardware entities (Train Brain controllers, SmartCabs, and Signalman outputs), TCL variables, and CTC screens to disk. Restoring does just the opposite. It returns all hardware entities, variables, and CTC panels back to their most recently archived state. (You can also have TBrain do this for you automatically each time you enter and exit the program by checking the “Restore Previous Session’s Railroad State” checkbox in the SettingsAutoload Settings menu item.) You can also restore TBrain’s screen settings (CTC panel locations, throttles, etc.) by checking the “Restore Previous Session’s Screen Settings” checkbox in the Settings-Autoload Settings menu item. That way, once you have your CTC panel setup just the way you like it, you’ll never have to do it again. 149 Resetting: At start-up, or whenever the operator presses the System Reset button on TBrain’s control panel, TBrain turns off all hardware controllers and initializes all variables to the value 0. Occasionally, in your TCL code, you may want to initialize some controllers or variables to a different state. To make this easy, Tbrain provides a built-in entity named $Reset, that is automatically set momentarily to True whenever a reset occurs. That way, your TCL program can perform all desired initialization using a When-Do statement whose When clause looks like the following: When $Reset = True Do … Emergency Stop: When the user presses the Emergency Stop button on TBrain’s control panel, TBrain brings all SmartCabs and DCC throttles to an immediate stop, with no momentum. At times, you may want TBrain to take additional actions in the case of an emergency. To make this easy, Tbrain provides a built-in entity named $Emergency, which is automatically set to True whenever the Emergency Stop button is activated. That way, your TCL program can perform any desired actions in a single-When-Do statement whose When clause looks like the following: When $Emergency = True Do … $Emergency remains set to True until the user releases the Emergency Stop button. $Emergency is then automatically cleared to False. You can also declare an emergency from within your TCL program. If your program detects an unexpected event or condition, you can bring all of your trains to an immediate halt by setting $Emergency equal to True as part of the actions in a When-Do statement. Your code must later set $Emergency to False to return to normal operation. Status Bar Messages: You may have noticed that TBrain occasionally displays momentary messages in the “status bar”, located along the lower-righthand border of the TBrain window. You can also use this area of the screen to display messages from within your TCL program using the built-in TCL entity “$Status”. $Status can be set equal to a quoted text string (or to a variable previously set equal to a text string) as part of the action in a When-Do statement. For example: When at_station = True Do $Status = “The train has arrived !!!” The current value of a variable (or any other TCL entity) can be printed in a message by preceding the entity’s name by the ‘@’ symbol in the message text. For example, to display the current value of variable var1, we might write: 150 When … Do $status = “The value of var1 = @var1” Activity Log: TBrain provides an “Activity Log” (accessible via the View-Activity Log menu item) that can be used to monitor the execution of your TCL program, TBrain’s communications with the CTI network, and the system’s real-time performance. This information is mainly used during debugging. The Settings-Activity Log menu item may be used to select the items to be logged. You can also write information to the activity log using actions within your TCL program using the built-in TCL entity $Log. $Log can be set equal to a quoted text string (or to a variable previously set equal to a text string) as part of the action in a When-Do statement. For example: When at_station = True Do $Log = “The train has arrived !!!” The current value of a variable (or any other TCL entity) can be printed in a message by preceding the entity’s name by the ‘@’ symbol in the message text. For example to display the current value of variable var1, we might write: When … Do $Log = “The value of var1 = @var1” 151 Section 7: Digital Command Control (DCC) Digital Command Control (DCC) uses instructions, sent electrically via the rails to special purpose “decoders” installed in each engine, to control the operation of trains. This is in contrast to “conventional” locomotive control, in which the voltage level to the track itself is varied to control the train’s operation. DCC makes it very easy to control the operation of multiple trains running on the same track. No block wiring is required, and any number of trains can be run simultaneously. National Model Railroad Association (NMRA) sponsored industry standards define the operation of DCC-based equipment, ensuring the interoperability of hardware from various manufacturers. Using CTI with DCC CTI’s powerful TBrain model railroad operating system provides direct, fully integrated support for DCC. DCC hardware and the CTI system can now be joined, working in tandem as a seamless, integrated system. Your command control system can respond automatically to CTI's sensors, and work in partnership with CTI's affordable control modules. Command control owners can use their DCC system to do what it does best - run trains, while using CTI to costeffectively control switches, signals, sound, etc. - the entire integrated system operated automatically by CTI's powerful control software. The integration of DCC with CTI’s family of powerful control and sensing modules now makes it easy to automate the operation of a DCC-based layout. Many tricky control operations, that were simply impossible to perform with DCC alone, are now a breeze. DCC-operated trains can make station stops, respond prototypically to trackside signals, run according to scheduled timetables, and much more, all under the full control of your PC - and CTI of course. At CTI, we realized there was no real advantage to marketing yet another DCC system in an already crowded market (requiring existing DCC users to fork over more hard-earned dollars for yet another command station). Therefore, we've instead opted to work closely with existing DCC manufacturers to integrate support for their DCC hardware into our TBrain control software. Our DCC-ready software supports the following DCC systems: Atlas DigiTrax EasyDCC (CVP Products) Lenz Lionel TMCC Marklin Digital North Coast Engineering Roco Wangrow Each of these systems is well-suited to use in a PCcontrolled operating environment. Collectively, they provide our users with a wide range of choices in price and performance. In this lesson, we’ll show how easy it is to add computer-automated operation to any DCC-based layout. So let’s get started. 152 Note: The following discussion assumes some basic familiarity with DCC. For an excellent overview of DCC, we recommend "Digital Command Control" by Ames, Friberg, and Loizeaux (ISBN 91-85496-49-9). Also, fully read the user’s manual that came with your DCC system. Setting Up Your DCC System: If you’re just getting started with DCC, begin by hooking up your DCC system, following the installation instructions that came with your command station. One of the big advantages of DCC is that it requires very little wiring. The setup procedure is straightforward, and the installation of a basic setup should take just a few minutes. Note: Some DCC command stations provide a built-in PC interface. Others require an add-on interface module. The table below summarizes these requirements. However, the DCC market place evolves rapidly, so be sure to consult the documentation from your DCC manufacturer for the most detailed and up to date information. DCC System Lenz, Atlas, Roco NCE Power House Pro NCE Pro Cab Easy DCC DigiTrax COM Port Interface USB Interface Ethernet LI-101F LI-USB/LI-USB-Ethernet LI-USB-Ethernet < built in> 3 party USB-to-COM adapter <not supported> <not supported> ProCab-USB interface <not supported> < built in> 3 party USB-to-COM adapter <not supported> rd rd LocoBuffer II LocoBuffer-USB <not supported> rd <not supported> rd <not supported> Lionel TMCC < built in> 3 party USB-to-COM adapter Wangrow System One < built in> 3 party USB-to-COM adapter Once your DCC hardware is installed, you’ll need to tell Tbrain which DCC system you’re using and to which of your PC’s interface ports it’s connected. To do so, select the DCC-System Setup item from Tbrain’s main menu. Make the appropriate selections and you’ll be ready to roll. Creating Your DCC Fleet Roster: The first step in automating the operation of your DCC system is to create the database that TBrain will use to control your fleet of DCC-equipped engines. TBrain’s built-in fleet roster tool makes the process quick and painless. To begin, select the DCC-Engine Data item from Tbrain’s main menu. In response, TBrain opens its fleet roster tool, which for the moment contains only an empty list box and some buttons. Click on the New button to add a new engine to the fleet. TBrain opens its “engine data editor” worksheet, where you’ll give the new engine a meaningful name and specify its DCC address and decoder parameters. 153 At a minimum, you’ll need to specify a name for the engine as well as its decoder’s DCC address, address width, and speed resolution. Engine names must begin with a letter, which can be followed by any combination of letters, numbers, and the underscore character ‘_’. Choose a name that will make the engine easily identifiable, for example, its road name and running board number, e.g. CSX9308, PRR2332, etc. In addition, you can program the appearance and behavior of the control buttons that will appear when an onscreen throttle is assigned to this engine. For each button, you can choose which of the DCC decoder’s “function” outputs will be controlled, and select a mnemonic picture to be displayed on the button. Once you’re finished setting up the engine, click OK. The editor worksheet closes, and the name of your newly defined engine appears in the list box of your fleet roster. You can continue adding more engines using the New button. To change the setup of an existing engine, select the engine by clicking on its name in the list box. Then click the Edit button. 154 You’ll return to the editor worksheet where the current settings for this engine will be shown. Make any desired changes, then click OK to update the database. An existing engine may be removed from the fleet by selecting it from the list box, then clicking the Delete button. (TBrain will ask you to confirm the engine’s removal.) For your initial testing, just add a few engines to the fleet database. You can add the rest later. Your fleet database will be saved when you exit TBrain, or you can save it now using the FileSave Railroad menu item. (When making a large number of changes, it’s always advisable to save your work periodically.) Interactive Control of DCC-Equipped Engines: With you DCC-equipped engines entered into the fleet roster, TBrain now has all the information it needs to run your trains. So let’s put those DCC-equipped engines to work. In this section, we'll begin by trying some interactive control using the mouse. To do so, we’ll need an onscreen throttle. You can get one using TBrain’s DCC-New Throttle menu item, or by using the New DCC Throttle button on the TBrain toolbar. Once your onscreen throttle appears, you’ll first need to assign it to an engine. To do so, click on the list box near the top of the throttle. A drop-down window appears containing the names of the engines you’ve placed in your fleet. Simply select an engine from the list, and the new throttle will now be assigned to that engine. (If you defined the appearance of the throttle’s control buttons for this engine during your initial fleet roster data entry, you should now see the mnemonic pictures you’ve chosen displayed on each button.) With your DCC system powered up and the selected engine on the track, you should now be able to run your train. Using your mouse, grab and drag the throttle’s speed slider slowly upwards. In response, TBrain will send the necessary commands to your engine’s decoder and your train should begin to move. Bring the engine up to a smooth cruising speed, and then try the Brake button to bring it to a stop. Click the Brake button again to release the brake. Experiment with the Inertia control slider to simulate the effects of the weight of a real train as it starts and stops. Try the direction control buttons to reverse the train. Exercise any buttons you defined to operate the decoder’s function controls (lights, sound, smoke, etc.) Finally, bring the train to a stop. That's how easy it is to run your trains using DCC and CTI. Automatic Control of DCC-Equipped Engines: In the previous section, we learned to control our DCC-equipped engines interactively. But that's only half the story. Your DCC system can also be controlled automatically by instructions in your TCL program. 155 All of the abilities to control speed, direction, momentum and braking that you've exercised using the onscreen throttle are also available in TCL. To illustrate, we'll revisit our earlier example of an automated station stop. This time we'll implement it more realistically using the DCC system. In this case, we'll define a Quick Key that lets us get things rolling. Then we'll use one of our Train Brain's sensors to detect the train's arrival at the station. Using TCL, we'll instruct the DCC system to bring it to a smooth stop. Then, after a 10 second station stop, the DCC system will instruct the engine to throttle up, and the train will pull smoothly away from the station. TCL code to do the job is shown at the end of this lesson. (This example assumes we have a DCC-equipped engine named “engine1”.) As this example shows, it’s a simple matter to control DCC-equipped engines using WHEN-DO statements in a TCL program. The syntax of the WHEN-DO statement used to control DCC-equipped trains takes the general form: When … Do <engine name>.<engine property> = <value> The available choices for engine properties, and their allowed values are: Property Allowed Values Speed 0 to 127, 0 to 28, 0 to 14 (depending on decoder’s speed steps) Direction Forward, Reverse Brake On, Off Momentum 0 to 127 FL On, Off, Pulse ‘n’ F1, F2, … F28 On, Off, Pulse ‘n’ User1, User2, User3 User-defined For example: When … Do CSX_9250.Speed = 100 When … Do PRR_2332.Direction = Reverse When … Do ATSF_123.FL = On { Set speed of CSX_9250 to 100 } { Set direction of PRR_2332 to reverse } { Turn on headlight of ATSF_123} With these few examples as a starting point, the function of this lesson's TCL program should be clear. First, the Quick-Key labeled "RUN" lets us get the train throttled up to cruising speed (by clicking the LEFT mouse button), and lets us bring the train to a halt (by clicking the RIGHT mouse button) when we're through. (Of course, we could already do all that using an onscreen throttle. Defining a Quick-Key just serves to make things a bit more convenient.) The third WHEN-DO is our automated station stop. It uses the Train Brain's "at_station" sensor to detect the arrival of the train. In response to its arrival, the DO clause applies the brake on the DCC-equipped engine, bringing the train to a smooth stop. After pausing at the station for 10 seconds, the brake is released and the train throttles back up to cruising speed. 156 That's all it takes to control your DCC-equipped locomotives in TCL. The functions of your CTI system and DCC command station are now fully integrated; the Train Brain's sensors can be used to automatically control the function of your DCC-equipped engines. { An Example of Automated DCC-Equipped Engine Control } Controls: spare, spare, spare, spare Sensors: at_station, spare, spare, spare Qkeys: run Actions: WHEN run=LEFT DO engine1.momentum = 50 engine1.direction = Forward engine1.speed = 100 WHEN run=RIGHT DO engine1.speed = 0 WHEN at_station=TRUE DO engine1.brake = On, wait 10, engine1.brake = Off 157 Forming Consists: Using DCC, trains headed by a multi-engine lash-up can be controlled as a single entity using a technique known as “consisting”. (Note: To use Tbrain’s consisting feature, the decoders of all engines in the lash-up must support the NMRA DCC standard’s “advanced consisting” feature.) TBrain’s “Consists” tool makes working with consists quick and easy. Let’s give it a try. Select Tbrain’s DCC-Consists menu item. You now have a window that looks just like the fleet roster we used earlier to create our fleet of DCC-equipped engines. Click New to form a new consist. We again have an “editor” worksheet that looks much like the one we used to describe our standalone engines. This worksheet, however, has a new area for defining the makeup of the consist. As with single engines, your consist will need a name and a unique DCC address. On the right side of the consist editor you’ll find a list box containing all available members of your fleet roster (i.e. all engines that are not already members of a consist). To add an engine to the new consist click on its name in the list box to select it, then click again in the desired location in the consist. The engine is moved from the “available” list to its new place in the consist. You’ll also need to specify the orientation (forward or backward) of each engine in the consist To remove an engine from the consist, simply reverse the above process. Click on the engine name in the consist, then click anywhere in the “available engines” list box to return the engine to the pool of available motive power. Once the consist is configured, click the Activate button to program the decoders in the selected engines to switch to “consist mode”. (Note: All engines in the consist must be standing still on the track with the DCC system operational for this programming to occur. You can define consists at any time, but you’ll need to activate them before the consist definition takes effect.) Once activated, all members of the consist will now respond in unison to commands sent to the consist’s DCC address. To illustrate, create a new DCC throttle and click its list box. The list should now include the name of your newly defined consist. Select it as the item to be controlled by this throttle. When you move the speed slider control all members of the lash-up should now respond in unison. Members oriented in the forward direction should move forward and members oriented in the backward direction should now move in reverse. To disband an active consist select the desired consist in the “Consists” window’s list box, then use the Disband button to deactivate it. (Tbrain will ask you to confirm the deactivation.) Tbrain will then de-program the decoders in all members of the consist to return them to singleengine operation. (Again, all engines in the consist must be on the track at a speed setting of 0, with the DCC system operational for this de-programming to occur.) To add or drop individual members to/from an existing consist, select the consist from the “Consists” window’s list box, then click the Edit button. Make any desired changes using the consist editor, then click Activate to program the decoders for the new configuration. 158 Controlling DCC-based Accessory Decoders: Tbrain can also control DCC accessory decoders. As with DCC-based engines, the DCC-based accessories must first be added to the DCC database using Tbrain’s DCC-Accessories menu item. It works much like the database editors used for engines and consists. For each accessory, you’ll need to specify a name, a DCC address, and select one of the eight outputs defined for each accessory decoder address. Once defined, DCC-based accessory decoders can be controlled using any of the techniques used to program conventional CTI controllers, for example: When … Do My_DCC_Accesory = On When … Do My_DCC_Accesory = Off When … Do My_DCC_Accesory = Pulse 1 The only confusing part of defining DCC accessories is figuring out which DCC address and control output to enter for a given decoder output. This confusion stems from the fact that while the NMRA DCC spec strictly defines the naming convention for accessory decoder outputs, virtually all DCC manufacturers ignored it. By spec, a DCC-decoder, provides (up to) 8 distinct control outputs (all residing at the same DCC address). Each output is controlled by one of the eight bits in the control byte sent to that address. In general, since accessory decoders are often used for controlling switch machines, most DCC systems treat decoder outputs in pairs. What is called “Accessory #1" on most DCC handhelds corresponds to DCC Address 0/Decoder Outputs 1 and 2. “Accessory 2" corresponds to DCC Address 0/Decoder Outputs 3, 4. "Accessory 3" = DCC Address 0/Decoder Outputs 5, 6; “Accessory 4" = DCC Address 0,/Decoder Outputs 7, 8. When we get to "Accessory 5", we've used up all 8 outputs at DCC address 0, so we just move to the next address: "Accessory 5" = DCC Address 1/Decoder Outputs 1, 2; "Accessory 6" = DCC Address 1/Decoder Outputs 3, 4; etc, etc, It's a bit confusing at first, but fortunately, once you get it set up, from then on you'll refer to things by their more meaningful TBrain names, so the confusion factor goes away. For example, to control a switch machine, we might define two TBrain entities: the first called Switch1_Diverging at DCC Address 0/Control Output 1 and Switch1_Through at DCC address 0/Control Output 2. Then in our TCL code, we’ll write things like: When … Do Switch1_Diverging = On When … Do Switch1_Through = On 159 'open switch #1 'close switch #1 Train Identification (Transponding and RFID) Despite (or more correctly, “As a result of …”) its decidedly “high-tech” nature, one aspect of DCC actually makes it harder to control your decoder-equipped engines using your PC. To illustrate, consider the station stop example we’ve used repeatedly throughout this User’s Guide to illustrate automated train control. Recall that in our lesson on controlling conventional locomotives, our TCL code for a station stop looked something like this: When at_station = True Do cab1.brake = On, wait 10, cab1.brake = Off Now on the surface, the TCL code we just introduced to implement the same station stop for a decoder-equipped engine looked nearly identical: When at_station = True Do engine1.brake = On, wait 10, engine1.brake = Off So what’s the problem? Well, there’s one important point we’ve failed to consider. What happens when we change engines? With conventional engines, that never mattered. Any conventional engine placed on the track will respond in exactly the same way. That’s because on a conventional layout we’re actually controlling the SmartCab, not the engine. But in DCC, things are different. Here we’re controlling the engine itself. Put another engine on the track, and the TCL code above, although it executes just as before, will have no effect. The new engine, with its own DCC address, will completely ignore our command telling engine1 to stop. We have a couple of obvious options. First, we could reprogram our new engine to give it the same DCC address as the old one prior to placing it in service. Second, we could rewrite our TCL code to use the name of the new engine. (Neither of these alternatives is very attractive.) In this lesson, we’ll examine two more palatable alternatives: “transponding” and “RFID”. DCC Transponding: The “3rd generation” DCC decoders now hitting the market have been designed to address this train identification problem. These new decoders include a bidirectional communications capability, allowing them to respond to an inquiry from the command station with a “beacon” identifying their engine. That way, when a train is detected at the station, Tbrain will know which engine it is, and can create a command specifically addressed to that engine to stop it. Akin to the VHS/BetaMax rivalry of the 1970s, two versions of this beacon technology have emerged. The first, introduced by DigiTrax, is generically termed “transponding”. The second, developed by Lenz, is known as “RailComm”. Sadly, the two approaches are incompatible. After years of dragging its heels, the NMRA has finally made a decision, adopting the later approach as the DCC industry-standard. Each method has its share of advantages and disadvantages. In the end, will one win out over the other? Only time will tell. Either way, TBrain will support both systems. Currently, TBrain includes built-in support for DigiTrax 160 transponding, which is the more mature technology. (Since the NMRA only recently adopted RailComm as a DCC standard, no command stations are yet available to take advantage of it. As soon as these products enter the market, we’ll add support for them as well.) Wiring up transponders isn’t quite as simple as the DCC manufacturers like to make it out to be. The technique will vary manufacturer to manufacturer, so consult your particular DCC system’s documentation for details on how to install and configure its beacon capabilities. Fortunately, once that task is complete, TBrain will make working with beacons easy, and things will look and feel the same, regardless of which beacon system your layout employs. To learn to use beacons in TBrain, let’s consider a simple example. As usual, it will be our automated station stop. We’ll be rewriting the TCL code to take advantage of beacons, enabling it to work for any DCC engine currently arriving at the station. Generally, a transponder-equipped layout will be divided into a number of electrically isolated track blocks, and each block will include its own beacon transponder. That way when multiple trains are running on the same mainline, we’ll be able to know not only which trains are operating, but also where each train is located. But for this simple example, we’ll need just one transponder connected to the track block where our station is located. To get started, we’ll need to give TBrain some information about our beacon transponder. We do that by opening the DCC-Beacons menu item, and clicking the “New Beacon” button. There we’ll give our beacon an alphanumeric name, e.g. StationBeacon. Since this is a real physical beacon, we’ll click the “Hardware” option button in the “Beacon Type” box (more on virtual “Software” beacons later). Defining this as a hardware beacon enables the Beacon ID text box. Each hardware beacon has a unique ID number that you defined when you set up your transponder following the directions for your DCC system. Enter that identifier in the Beacon ID text box. Then click OK. Our new beacon now appears in the Beacon Name list box on the left side of the DCC-Beacons window. (If you’re not sure of your beacon’s ID number, TBrain can help. Just check the Auto-Learn checkbox next to the Beacon ID text box. Then drive any transponder equipped engine into the track block containing the beacon transponder. When it detects the train, the transponder will send a report to TBrain. From the contents of the report, TBrain will learn the transponder’s ID and enter that value for you automatically in the Beacon ID box.) Now, open an onscreen throttle, select the engine you’ll be running from the throttle’s dropdown box, and start the train moving toward the station. As the train enters the track block containing the transponder, keep an eye on the Beacon Value list box in the DCC-Beacons window. The value of our beacon should soon update and display the name of the train. That means your DCC system’s transponding hardware and TBrain are communicating, and TBrain now knows which train is approaching the station. Armed with that knowledge, and a small change we’ll soon be making to the TCL code for our station stop, TBrain will then be able to stop it. 161 As you’ll recall, our original DCC station stop example looked like this: When at_station = True Do engine1.brake = On, wait 10, engine1.brake = Off We didn’t like that approach because the name of our train was embedded in our TCL code. Change to a new engine, and we’d need to change our TCL. What we’d really like is a way to access our engine indirectly, using the value of our StationBeacon beacon. Since the beacon identifies which train is near the station, our TCL code would then work for any train. Consider the following: When At_Station = True Do *StationBeacon.Brake = On, Wait 10, *StationBeacon.Brake = Off This is the new “beaconized” version of our station stop. Note that in this code, the name of our engine is nowhere to be found. Instead, we see the name of our beacon, preceded by TCL’s “*” pointer-to operator. Thus, the target of our When-Do’s actions will be the TCL entity currently “pointed to” by the TCL entity StationBeacon. That should give you a hint. Functionally, beacons in TBrain are TCL “pointers”. Whenever a DCC transponder reports that it has detected a train entering its track block, TBrain automatically points that transponder’s beacon to the TCL data structure of the engine that replied to the transponder. As such, we can use the beacon to access that engine indirectly using TCL’s “pointer-to” operator. [If you aren’t yet familiar with TCL’s “*” pointer-to operator, see the discussion on pointers in the “Advanced Programming Concepts” section of the User’s Guide. If you’re still not comfortable with the concept, there’s also an App Note on the CTI website that gives the subject a more in-depth look.] The important point here is that the name of our engine no longer appears in the actions of our When-Do statement. Because we’re accessing the engine indirectly, via a beacon, the code will work the same for any engine we place on the track. Feel free to prove it to yourself by running the same experiment using a different engine. In addition to applying the brake, we can, of course, control any of the engine’s properties indirectly via a beacon. For example: *MyBeacon.Speed = 50 ‘change speed of the engine pointed to by MyBeacon *MyBeacon.Direction = ~ ‘change direction of the engine pointed to by MyBeacon *MyBeacon.FL = On ‘activate headlight on the engine pointed to by MyBeacon 162 Radio Frequency Identification (RFID): One drawback of DCC transponding is that it entails the use of complicated block wiring; the one thing DCC was invented to eliminate in the first place. It also requires the installation of new transponder-equipped decoders into all locomotives. This can make it difficult and expensive to incorporate transponding into an existing model railroad. Fortunately, there’s another alternative. During the years in which transponding was being developed and debated by the NMRA, something interesting happened: a revolutionary new technology emerged. Developed independently of model railroading, radio-frequency identification (or RFID, for short) uses radio waves to transfer data from an electronic “tag”, attached to an object, to a “reader”, for the purpose of identifying and tracking the object. The RFID tag includes a tiny radio transmitter and receiver. An RFID reader transmits an encoded radio signal to interrogate the tag. The tag receives the message and responds with its identification information. RFID is now used in many applications. A tag can be affixed to any object to manage inventory, collect tolls, identify people, animals, etc. But for our immediate purposes, it can also be used to identify trains. As you can tell from its description, RFID solves very much the same problem as DCC transponding. But RFID has a number of significant advantages. All of the complicated block wiring and decoder installation required to use DCC transponding are gone. In fact, RFID requires no wiring at all. Installation simply involves placing the tag on the train and the reader near the track. And because it has gained such widespread acceptance, its cost is amazingly low. RFID tags can be purchased nowadays for under $1. CTI Electronics has designed an RFID reader (CTI Part # TB017) especially suited to model railroad applications. The module contains a fully integrated 125 KHz RFID tag reader and antenna. The reader interfaces directly to the CTI network. Simply position the reader near the track, connect it into the CTI network, and your TCL program can instantly identify any train that passes by the reader. Physically, CTI’s RFID module consists of two small printed circuit boards connected via ribbon cable. The “network” PCB contains the circuitry associated with the CTI network as well as the module’s power supply connection. The “reader” PCB contains the RFID circuitry and antenna. Tag Detect LED Power Supply (9 to 12V DC) CTI Network Connection Ribbon Cable RFID Antenna And Reader Electronics Network PCB 163 Installation is quite simple. But before proceeding, the most important “up front” decision will be to select the mounting location of the reader PCB on the layout and the mounting location of the tags on the trains, so give this some thought before installing the module. The tag must pass within 1 to 2 inches of the reader for reliable detection, so the two decisions go hand-in-hand. Reader Installation on the Layout: Under the track, beside the track, or over the track are all possible options for mounting the reader. This choice in turn determines how tags will be attached to your engines. Mounting the reader beneath the track, with the tag mounted on the undercarriage of the train will be the most common configuration, so let’s examine that situation in a bit more detail. The easiest under-track mounting method places the reader PCB under the layout flush with the underside of the benchwork, with the track passing overhead on the topside of the benchwork. This approach will work well in situations where the combined thickness of the bench surface, sound deadening layer (e.g. homasote) and roadbed allow the tag to pass within close enough proximity to the reader to allow detection. In situations where this is not the case, mounting the reader PCB on top of the benchwork will be the preferred solution. This approach is illustrated in the figure below. Here, the reader PCB is placed directly beneath the trackwork in a gap in the roadbed. The ribbon cable passes through a hole drilled in the benchwork to the network PCB mounted beneath the benchwork. After ballasting the reader will be completely hidden. Ribbon cable connection to network PCB beneath layout Tag detect LED Tag Installation on the Train: RFID tags come in a wide variety of shapes and sizes, from as large as a credit card to as small as a grain-of-rice. CTI sells tags in sizes convenient for N, HO, and O gauge trains. But feel free to experiment with tags you purchase yourself. Tags are widely available and are dirt cheap. Just be sure to use “125 KHz” tags. In general, the best rule of thumb is to choose the largest tag possible for a given engine. A larger tag usually means a larger antenna, which equates to increased detection range. 164 Tag positioning can best be described as an art rather than a science. Steam engines and tenders generally offer the most “nooks and crannies” in which to mount an RFID tag. In contrast, the undercarriage on most diesel and electric engines is flat and rides very close to the rails. To make matters worse, most manufacturers use the belly of the diesel engine body as the location for a ballast weight. Being a solid block of metal, the ballast weight can interfere with the RF communications between the reader and tag if the tag is mounted there. Try to find a mounting location on the engine in which the tag will pass directly over the center of the reader. The angle between the tag and reader greatly affects antenna performance. For most button-shaped tags the face of the reader and the flat surface of the tag should pass parallel to one another. For most capsule-shaped tags, the two should pass perpendicular to one another. Button Tag Capsule Tag In the end, experimentation is the key to finding the optimum mounting location for each engine. Try different tag positions and tag styles, using the “tag detect” LED on the reader PCB as a guide to know when the reader is communicating reliably with the tag. Once you’ve decided on the best mounting location for your situation, installation is straightforward. Connect the reader and network PCBs using the supplied ribbon cable as shown in the photo above. The RFID module requires a power supply in the range of 9 to 12 Volts D.C. the same as all other CTI modules. Power enters through the power supply jack located on the network PC board. The reader connects to the CTI network using the same PC interface as all CTI modules. Simply install your RFID reader(s) anywhere into your CTI network using the modular phone jacks located on the network board. Remember to connect your CTI boards to form a closed loop, always wiring from RED to GREEN. (see “Hooking Up Your CTI System” in Section 1, if you’d like more details). RFID Tag ID Codes: Once a tag is installed on a train, the identification code reported by that tag must be associated with that train. To do so, we’ll use the RFID Tag textbox in the Engine Data worksheet for this engine. (Use the DCC-Engine Data menu item to open the Engine Data worksheet for a new or existing engine.) 165 The identification code reported by the tag will be a 10-digit sequence of numbers and/or letters. Often, no documentation is supplied with an RFID tag, so its ID code will be unknown. To learn a tag’s ID, run the train carrying the tag past any RFID reader (or simply swipe the tag past the reader by hand.) When TBrain receives a report from a tag it doesn’t recognize, it displays the tag’s identification code (followed by a question mark) in the Beacon Value list box for that RFID beacon. You can manually enter that value in the RFID Tag field of the associated engine’s Engine Data worksheet. Or you can let TBrain do the work for you. Simply select the RFID reader displaying the unknown ID code in the Beacon Name list box, then select the engine’s name in the Fleet Roster list box. In response, TBrain will fill in the tag’s ID code in the RFID Tag text box of this engine’s Engine Data worksheet. From then on, when this tag is detected, TBrain will display the name of its engine as the Beacon Value for this RFID beacon and point the beacon at the engine’s TCL data structure. Using the RFID reader in TCL: Next, we’ll add the TCL code necessary to use our RFID reader. As usual, we’ll begin by giving each of our RFID reader modules a meaningful name. This is accomplished using a new “RFID:” section of our TCL program. For example: 166 RFID: Reader1, Reader2, Reader3 Then, once we start our TCL program running, each of our readers shows up automatically, by name, in the DCC-Beacons menu item (just like DCC transponder beacons). Functionally, each RFID reader is a TCL beacon, pointing to the engine it has detected. As was the case with DCC transponder beacons, when a train carrying an RFID tag passes the reader, TBrain “points” the RFID reader’s beacon to that train. The train can then be controlled using the RFID beacon and TCL’s “*” pointer-to operator. As such, RFID beacons behave just like DCC transponder beacons. For example, the following When-Do statement implements our station stop using an RFID reader. As you can see, it is identical to the station stop example using a DCC transponder. When At_Station = True Do *Reader1.Brake = On, Wait 10, *Reader1.Brake = Off Solving Performance Problems: In most cases, the reader will perform well with no “extra effort” required. In rare cases, the performance of the RFID reader can be adversely affected by external RF interference. The primary source of such interference on a train layout is the DCC signal itself. If you experience a significant difference in detection range when the track is powered vs. unpowered, then the DCC signal may be the culprit. Some simple techniques can help in this case. First, keep all DCC power busses and power feeds at least 12 inches away from the reader. If that doesn’t do the trick, create a small insulated track block 2 to 3 inches long with its own power feed surrounding the reader. The benefit of this block is that while the tag is positioned over the reader, the engine will be drawing power from the track ahead of and behind the reader and the track directly around the reader will be electrically quiet. 167 “Software Beacons”: Beacons are powerful tools for automating a DCC layout. But for most of us, it will be too expensive to equip every block on our layout with a transponder or RFID reader. Not to worry. In addition to supporting hardware beacons, Tbrain also includes a “soft-beacon” feature that, combined with a bit of TCL programming, is just as effective as true hardware beacons. With “soft-beacons” we can create “virtual” transponders that can be used to track the location of locomotives as they travel on the layout, even if not every block has a transponder. They even work if none of our engines are transponder-equipped. Using Soft-Beacons with Transponder-Equipped Engines: To illustrate the use of soft beacons, imagine we have a five block mainline loop. One block, say block “A”, is fed by a staging yard, and is transponder-equipped. Our remaining blocks, B, C, D, and E, have no transponders; only simple block occupancy sensors. Many different engines can reside in the yard, and as we put those engines into service on the mainline, we’ll want to track their locations around the layout. We’ll also want to implement automatic collision avoidance, keeping trains a safe distance from other traffic as they move along the mainline. Of course, as we’re writing our TCL code, we have no way of knowing what trains those will be. So naturally, we’ll want to write it in a way that uses beacons to tell us. To get started, we’ll need to create five beacons, one for each track block. As before, we’ll use the “New Beacon” button in the DCC-Beacons window. We’ll name our first beacon BeaconA. Since this is our transponder-equipped track block, we’ll check the “Hardware” beacon checkbox and enter the transponder’s beacon ID. Then click OK. (If using RFID beacons, we can skip this step, since Tbrain will create the BeaconA RFID beacon for us automatically.) Next we’ll create four more beacons, BeaconB, BeaconC, BeaconD, and BeaconE. For each of these, we’ll check the “Software” beacon checkbox, since these are our detection-only track blocks. Now we have our five beacons correctly set up and ready to roll. As was the case in our earlier station stop example, when a train exits the staging yard onto the mainline, the transponder or RFID reader in block A will detect it and send a report to TBrain. In response, TBrain will automatically update BeaconA to point to that train. But what about the remaining blocks that aren’t transponder-equipped, instead having a simple block occupancy sensor? For each of those blocks we’ll achieve the same functionality as our hardware beacon with a single line of TCL code. Since a beacon is a TCL entity just like any other, we can assign it a value as part of the action in a When-Do. For instance: When SensorB = True Do BeaconB = BeaconA In this statement, when the block occupancy sensor in block B detects a train entering block B from block A, we copy the value of block A’s beacon (our hardware beacon) into the beacon for block B (a soft beacon). As a result, BeaconB now points to the DCC engine currently 168 occupying block B. It’s just as if block B had been transponder-equipped. Then, we’ll simply do the same for each of our remaining track blocks, for example: When SensorC = True Do BeaconC = BeaconB Next we’ll add TCL code to stop a train as it enters a new block if traffic is present in the block ahead. Here’s a representative When-Do statement for one of our blocks, in this case, block B: When SensorB = True Do BeaconB = BeaconA If SensorC = True Then *BeaconB.Brake = On Wait Until SensorC = False Then *BeaconB.Brake = Off EndIf ‘ ‘ ‘ ‘ ‘ ‘ When a train enters block B Copy block B’s beacon from block A If there’s traffic ahead in block C stop the train that’s in block B wait for the traffic ahead to clear then allow this train to proceed All the When-Do’s for blocks B through E will look the same. To prove it, here’s the When-Do for the next block, block C. When SensorC = True Do ‘ BeaconC = BeaconB ‘ If SensorD = True Then ‘ *BeaconC.Brake = On ‘ Wait Until SensorD = False Then ‘ *BeaconC.Brake = Off ‘ EndIf When a train enters block C Copy block C’s beacon from block B If there’s traffic ahead in block D stop the train that’s in block C wait for the traffic ahead to clear then allow this train to proceed But what about block A? Being transponder-equipped, the When-Do for block A will be a bit different. In that case, when a train enters block A, there’s no need to copy a beacon value using a TCL statement. The hardware transponder or RFID reader will identify the train itself, and Tbrain will update block A’s beacon automatically. In fact, we don’t even need an occupancy sensor for block A. The transponder fills that role, too. Here’s a look at the When-Do for block A. When BeaconA <> 0 Do ‘ If SensorB = True Then ‘ *BeaconA.Brake = On ‘ Wait Until SensorB = False Then ‘ *BeaconA.Brake = Off ‘ EndIf When a train enters block A If there’s traffic ahead in block B stop the train that’s in block A wait for the traffic ahead to clear then allow this train to proceed Here, we’ve detected the presence of a train in block A by using the fact that block A’s beacon has a non-zero value. Here’s why that works: When a transponder sends TBrain a detection report, TBrain points that block’s beacon at the engine currently in the block, thereby making the beacon’s value non-zero. Once the train moves into another block, TBrain automatically returns the vacated block’s beacon value to zero. In that way, a non-zero beacon value serves to indicate the presence of traffic in the block, while a zero-valued beacon indicates the block is vacant. 169 Using Soft Beacons With Non-Transponder-Equipped Engines: As we’ve seen above, soft beacons mimic the behavior of hardware beacons. In fact, they can even be used to implement beaconing with non-transponder equipped locomotives. Let’s reconsider the example we just introduced that used one transponder and 4 soft beacons to automate a 5 block mainline loop fed by a staging yard entering the mainline via block A. This time, we’ll tackle the problem using only soft beacons and engines with no transponders. For blocks B through E, things will work exactly the same as before. But this time, block A will be just a bit different. Having an occupancy detector, block A will still know when a train enters it. But without a transponder, it will no longer be able to learn which train that is. So in this case, we’ll need a way to set the value of its soft-beacon. To do so, let’s create an additional beacon, called “YardBeacon”. When the dispatcher clears a train to enter the mainline, he’ll point YardBeacon at that train before releasing it from the yard. A “Type 5 User Query” (see “Accepting User Input” in the “Advanced Programming Concepts” section of the User’s Guide) would be a good way to allow the dispatcher to select the train to be cleared onto the mainline. For example, when the dispatcher throws the turnout to route the staging yard onto the mainline, TBrain can automatically ask which train is being cleared, and set the value of YardBeacon to point to it. Recall that a type 5 query presents the operator a listbox containing all the engines in the DCC fleet, and returns a pointer to the selected DCC item, making it a perfect means to manually initialize a beacon. Here’s some TCL code to do just that. (SwitchDirection is assumed to be the name of the controller for the staging yard’s turnout onto the mainline. It’s set to True to switch the yard into block A, and False to switch block E into block A.) When SwitchDirection = True Do Query “5$Select a train to be cleared onto the mainline” Wait Until $QueryBusy = False Then YardBeacon = $QueryResponse Alternately, the job can be done right from the DCC-Beacons window. Simply select YardBeacon by clicking on its name in the Beacon Name list box on the left side of the screen. On the right, you’ll see the Trains list box showing all the engines and consists in your DCC Fleet roster. Select the name of the engine being cleared onto the main by clicking on its name in the Trains list box. Instantly, YardBeacon’s value is set to point to the selected engine (as shown in the Beacon Value list box). As the train enters the mainline, the occupancy sensor in block A will detect it. At that point, we’ll want to copy the value of YardBeacon into BeaconA. But what about trains already on the mainline loop, reentering block A from block E? In that case, when we detect a train entering block A we’d want to copy BeaconE into BeaconA. Thus, when a train enters block A we’ll need to know where the train came from to determine which of the two beacons to copy into BeaconA. The direction of the turnout provides us with a simple way to determine that. 170 Here’s a look at the When-Do for block A: When SensorA = True Do If SwitchDirection = True Then BeaconA = YardBeacon Else BeaconA = BeaconE EndIf If SensorB = True Then *BeaconA.Brake = On Wait Until SensorB = False Then *BeaconA.Brake = Off EndIf ‘ When a train enters block A ‘ If it came from the yard ‘ Copy block A’s beacon from the yard ‘ Otherwise ‘ Copy block A’s beacon from block E ‘ ‘ ‘ ‘ If there’s traffic ahead in block B stop the train that’s in block A wait for the traffic ahead to clear then allow this train to proceed Un-assigning Beacons: TBrain automatically un-assigns a beacon (i.e. sets its value to 0) whenever a train is interpreted as having vacated that beacon’s track block. Specifically, a beacon is set to zero when: a) another transponder reports that the train has moved into an adjacent track block, or b) a TCL action statement assigns the same value to another beacon TBrain does not un-assign a beacon as the result of a “train departure” report from a transponder. This serves as a failsafe mechanism, since the apparent departure may be due to a derailment or intermittent track contact, which falsely causes a block to appear vacant. TBrain requires positive acknowledgement of the movement of a train into an adjacent block (using one of the two methods described above) before it will declare an earlier block as unoccupied. A beacon currently pointing to a train may be unassigned manually using the Clear Beacon button in the DCC-Beacons window. Simply select the beacon from the Beacon Name list, and then click the Clear Beacon button. All beacons may be cleared using the Clear All Beacons button. Beacons may also be unassigned automatically as part of the actions in a When-Do statement by setting the beacon equal to the TCL “Off” keyword, or the numeric value 0. For example: When SensorX = False Do BeaconX = Off {Unassign beacon once train departs} Displaying Beacon Values on CTC Panels: The name of the train currently pointed to by a beacon may be displayed on a CTC panel by “@ referencing” the beacon’s name in a $Draw Message TCL action statement. For example, the TCL statement: When SensorX = True Do $Draw Message (5,5,1) = “@BeaconX” would print the name of the train currently occupying block X at CTC panel coordinates (5,5,1). 171 If a beacon is currently unassigned, an @ reference to it in a $Draw Message statement will print an empty string. Remembering Beacon Values at Shut Down: If you use Tbrain’s Archive/Restore Layout feature, TBrain will remember where each train stopped when you last turned off the layout, and will restore the beacons for those locations the next time you start up. If you’ve moved or changed the trains since then, simply reinitialize the beacons manually for the new starting locations and new trains before you start things running. 172 Appendix A: Application Notes Applications Note 1: Using CTI’s Infrared Sensor Kit Infrared (IR) sensors are an inexpensive and reliable means to detect moving trains. A train passing between the transmitter and receiver breaks the infrared light beam, triggering the sensor. This note describes the use of CTI’s Infrared Sensor Kit (Part # TB02-IR). (Lesson 15 details the interfacing of IR sensors to the Train Brain and describes how to program with infrared sensors in TCL.) CTI’s Infrared Sensor Kit (CTI Part #TB002-IR) contains: 1) a high intensity, narrow beamwidth infrared LED transmitter 2) a high photosensitivity infrared phototransisor receiver 3) a current limiting resistor assortment A typical IR sensor circuit is shown below. The LED transmitter in CTI’s sensor kit is designed for a diode current of 40 mA. The appropriate current limiting resistor may be found using Ohms’ Law: R = (VIN - VLED) / ILED … R = (VIN - 1.2 Volts) / 0.04 Amps CTI’s IR sensor kit contains resistor values for a variety of common supply voltages. For other voltages, calculate R using the equation above and choose the next higher standard resistor. Be careful to observe resistor wattage ratings when using higher input voltages. For: Vin = 5 Volts For: Vin = 9 Volts For: Vin = 12 Volts Use: R 100 Ohms Use: R 200 Ohms Use: R 300 Ohms (Brown-Black-Red) (Red-Black-Red) (100 Ohms + 200 Ohms in series) Be sure not to mix up the transmitter and the receiver (the receiver is the blue device). And be careful to observe correct polarity when wiring the circuit (see schematic). The sensor kit should work well for transmitter-receiver separations up to 6 inches. At longer distances, care must be taken to aim the transmitter directly at the receiver. Be wary when using IR sensors in areas which receive direct sunlight or which have strong incandescent lighting, both of which emit significant infrared radiation. In such cases, it may help to use electrical tape or heat-shrink tubing to form an opaque tube around the receiver to shield it from incidental radiation. Train Brain Board R Clear Lens Blue Lens Longer Lead Longer Lead Sensor Port Connector A Vin B B Transmitter Typical Infrared Sensor Schematic Receiver Infrared Components 173 A Applications Note 2: Using CTI’s PhotoCell Sensor Kit Photocells are a simple and reliable means to detect moving trains. Since they respond to visible light, they can use normal room lighting as their signal source. A train passing overhead shadows the photocell, triggering the sensor. This note describes the use of CTI’s Photocell Sensor Kit (Part # TB02-PC). Photocells are constructed of a photoconductive material, usually Cadmium Sulfide (CdS), whose electrical resistance changes dramatically with exposure to visible light. The photocell supplied with the CTI kit exhibits a 10-to-1 resistance change, varying from less than 2 K in moderate room lighting to greater than 20 K in complete darkness. CTI’s Photocell Sensor Kit (CTI Part #TB002-PC) contains: 1) a wide dynamic range Cadmium Sulfide photocell 2) a sensor port biasing resistor To install the photocell, drill two small holes 1/8 inch apart and insert the photocell’s leads down through the benchwork. Wire one lead to the A input of a Train Brain sensor port and the other to the B input. (It doesn’t matter which lead gets connected to which input.) Avoid letting ballast cover the window of the photocell, as this will reduce the amount of light striking the cell. Adjust the sensitivity of the senor port to ensure that the detector responds reliably under ambient light conditions. (See “Adjusting Sensor Port Sensitivity” in Lesson 15.) Run the TBrain program and check the sensor status indicator corresponding to the photocell. With light striking the cell, the sensor port should read as TRUE. Pass a piece of rolling stock over the photocell and verify that the sensor port switches to FALSE. Under low light conditions the photocell resistance may not drop sufficiently to transition the sensor port into the TRUE state when no train is present. In that case, install the resistor supplied with the sensor kit across the A and B inputs of the sensor port connector. This helps bias the sensor port toward the detection region, making it more sensitive to low light conditions. Functionally, photocells behave the same as infrared sensors. They employ “negative” logic, responding as TRUE when a train is not present, and FALSE when it is. They are also prone to retriggering when the gaps between cars pass over the sensor. To prevent these false triggers, the same filter algorithm used with IR sensors may be used with photocells (see Lesson 15). Optional Biasing Resistor Train Brain Board A Sensor Port B Typical PhotoSensor Schematic 174 Applications Note 3: Using CTI’s Current Detection Sensor Kit Current detection is an excellent means to determine train location in layouts using block wiring. A current detecting sensor responds to the presence of the finite resistance of a train’s motor (or conductive wheelsets) in an isolated track block. One sensor is required for each block. Since the current detector is an all-electronic device, it requires no visible sensors on the layout (as in infrared sensing) and required no actuators mounted on engines (as in magnetic sensing). CTI’s current detector (CTI Part #TB002-CD) extends this concept by also sensing a train’s direction of travel. This capability makes it ideally suited to use in automating signaling systems, where knowledge of not only block occupancy, but also direction of travel is important. Each of CTI’s current sensor circuit boards features two such sensors. We’ll examine the function of a single sensor here. The current detector circuit requires no additional power supply, since it derives its own power from the track voltage. It requires a minimum track voltage of 1.5 Volts to guarantee detection. Note that the SmartCab maintains an idling voltage of 1.5 Volts for just this purpose (so that a stopped train or abandoned rolling stock can still be detected as occupying the block). The current detector’s “line” terminals (designated ‘L1’ and ‘L2’ on the PC board) are wired in series between the isolated rail of the track block and the power source (see below). The detector’s ‘AE’ (eastbound) and ‘AW’ (westbound) terminals are wired to the ‘A’ terminals of two Train-Brain, Watchman, or Sentry ports. The ‘B’ terminal is wired to the corresponding ‘B’ terminals of those same sensor ports. Train’s Motor Completes Circuit From Track Power Current Detection Logic To Track Power L2 AE, AW, B (To Sensor Ports) L2 To Isolated Rail B To Sensor Port #1,2 B AW To Sensor Port #2 A AE To Sensor Port #1 A L1 To Track Power L1 Current Detection Sensor (1 of 2 Identical Sensors Shown) Current Detection Wiring Diagram With the current detector installed, run the TBrain program, and check the sensor status indicators corresponding to the current detector. With no train present, both should read FALSE. Drive an engine into the isolated block. Once the engine’s wheels have entered the block, one of the two sensors should respond as TRUE. Bring the engine to a stop and change direction. Bring the train up to speed again. This time other sensor should now respond as TRUE. When the engine vacates the block both sensors should return to FALSE. 175 If the directional sense seems backwards to the geographic orientation of your layout (i.e. AE responds to westbound traffic flow) simply reverse the wiring to the L1 and L2 terminals. If your application does not require direction of travel sensing, but simply the detection of block occupancy, there’s no need to consume two sensor ports. Simply connect the AE and AW terminals together and wire both to the A terminal of a sensor port. That sensor will now respond to any occupancy of that track block. L2 To Isolated Rail B To Sensor Port B AW To Sensor Port A AE L1 To Track Power Current Detector Wiring for Simple Block Occupancy Detection Current detection systems can run into problems when used with dirty track. (A dirty spot in the track can temporarily interrupt current flow, causing a train to “vanish” for a few milliseconds, which the CTI system is fast enough to detect.) To solve the dirty track problem, the TBrain program’s sensor detection logic has a built-in filter algorithm specifically designed to deal with intermittent track contact. To invoke it, simply follow the name of any current detection sensors with a “#” in the Sensors: section of your TCL code. For example: Sensors: block1_occupied#, block2_occupied#, etc… The degree of filtering may be controlled using the slider bars in the Settings-Hardware Settings menu item. 176 Applications Note 4: Using CTI’s Insulated 3rd-Rail Sensor The use of an insulated section of outside rail has been a traditional method of train detection in 3-rail layouts for many years. Normally, the insulated outside rail section is electrically neutral. However, when a train is present in the insulated track section, its metal wheels electrically short the insulated rail section to the opposite outside rail, thereby providing power to the insulted rail. CTI’s 3-rail current detector (CTI Part #TB002-3R) makes it easy to interface 3-rail layouts to the sensors ports of a Train Brain, Watchman, or Sentry. It is specifically designed for use with all D.C. and A.C. operated layouts using the insulated rail method of train detection. The circuit requires no additional power supply, since it derives its own power from the track voltage. Each of CTI’s 3-rail sensor circuit boards features two such sensors. We’ll examine the function of a single sensor here. One of the detector’s “line” terminals (designated ‘L1’ and ‘L2’ on the PC board) is wired to the track’s center rail. The other is wired to the insulated outer rail section. The detector’s A and B terminals are then wired to the A and B terminals of a Train Brain, Watchman, or Sentry sensor port. Insulated Outside Rail Current Detection Logic Train’s Metal Wheel Completes Circuit L To Insulated Rail A To Sensor Port A B To Sensor Port B L To Center Rail To Sensor Port A To Sensor Port B 3-Rail Current Detection Sensor 3-Rail Current Detection Wiring Diagram With the detector installed, run the TBrain program, and check the sensor status indicator corresponding to the detector. With no train present, it should read FALSE. Drive an engine over the insulated rail section. When the engine’s wheels reach the insulated rail, the sensor should respond as TRUE. Once the engine passes, the sensor should return to FALSE. Instead of wiring the ‘L’ terminals of the detectors to the center rail, they may alternatively be wired to a dedicated power supply with a common ground to the track’s power supply. This approach will allow for train detection even when no power is being supplied to the train (see the wiring diagram below). 177 Insulated Outside Rail Current Detection Logic Train Power Supply Train’s Metal Wheel Completes Circuit To Sensor Port A To Sensor Port B Sensor Power Supply Current detection systems can run into problems when used with dirty track. (A dirty spot in the track can temporarily interrupt current flow, causing a train to “vanish” for a few milliseconds, which the CTI system is fast enough to detect.) To solve the dirty track problem, the TBrain program’s sensor detection logic has a built-in filter algorithm specifically designed to deal with intermittent track contact. To invoke it, simply follow the name of any current detection sensors with a “#” in the Sensors: section of your TCL code. For example: Sensors: block 1_occupied#, block2_occupied#, etc… The degree of filtering may be controlled using the slider bars in the Settings-Hardware Settings menu item. 178 Applications Note 5: Using CTI’s DCC Block Occupancy Sensor Kit CTI’s DCC block occupancy sensor (CTI Part #TB002-DCC) is specifically designed for use on DCC-based layouts. Conventional current sensors use the voltage drop across a diode as a means to detect current flow. This produces a discontinuity at the zero-crossing point of the DCC waveform, distorting the DCC signal, and making it more difficult for the engine’s decoder to correctly interpret commands. CTI’s sensor employs a current sense transformer as its sensing element, completely eliminating sensor-induced distortion of the DCC waveform. To use the sensor, simply pass one track lead through the hole in the sense transformer on its way from the DCC booster to the track block’s insulated rail. Insulated Rail DCC Booster The detector’s ‘A’ and ‘B’ terminals are then wired to the ‘A’ and ‘B’ inputs of a Train-Brain, Watchman, or Sentry sensor port. To Sensor Port A To Sensor Port B A B DCC Block Occupancy Sensor Wiring Diagram The detector requires no power supply. The number of times the track lead is looped through the transformer determines its sensitivity. More loops make the detector more sensitive. Example illustrating 3 loops through transformer To Isolated Rail From Booster In most cases, one or two loops through the transformer are sufficient to ensure reliable detection. Using too many loops may allow a short circuit on the layout to damage the detector, by allowing high current to flow through the transformer. Experiment to find the minimum number of loops needed for your model railroad gauge, but do not exceed the maximum number of turns given in the table. The block occupancy detector is sensitive enough to reliably detect a resistance of several Kohms (e.g. resistive wheelsets). However, under some circumstances, this super-sensitivity may also allow it to detect unwanted signals (e.g. absorbent ballast in humid weather or the capacitance across the rails of a long track block). Connections To Sensor Port DCC Block Occupancy Sensor Booster’s Max Output Current Max Number of Loops 3 Amps 5 5 Amps 4 10 Amps 2 De-sensitizing Resistor Locations Sensor 1 Sensor 2 If false triggering occurs, the detector may be made less sensitive by installing resistors in the locations shown. The lower the value of the resistor, the less sensitive the detector becomes. Begin by trying a value around 50K Ohms and decrease the resistance until any false triggering ceases. Do not use values below 1 K Ohm. CTI 179 A1 B A2 TB2 DCC With the block occupancy detector installed, run the TBrain program, and check the sensor status indicator corresponding to the detector. With no train present, it should read FALSE. Drive an engine into the isolated block. Once the engine’s wheels have entered the block, the sensor should respond as TRUE. When the engine vacates the block the sensor should return to FALSE. Current detection systems can run into problems when used with dirty track. (A dirty spot in the track can temporarily interrupt current flow, causing a train to “vanish” for a few milliseconds, which the CTI system is fast enough to detect.) To solve the dirty track problem, the TBrain program’s sensor detection logic has a built-in filter algorithm specifically designed to deal with intermittent track contact. To invoke it, simply follow the name of any current detection sensors with a “#” in the Sensors: section of your TCL code. For example: Sensors: block1_occupied#, block2_occupied#, etc… The degree of filtering may be controlled using the slider bars in the Settings-Hardware Settings menu item. 180 On Your Own Well, that’s about it. In the few examples we've covered in this User's Guide, you've been introduced to all the techniques you'll need to know to get the most out of your CTI system. These examples were purposely kept rather simple to make it easy to learn to use CTI with the least amount of effort. But you should now be able to build upon these simple techniques to create a sophisticated computer-controlled model railroad. As with all new things, practice (and patience) truly do make perfect. So we encourage you to experiment with CTI on your layout. Start out simple, and then just keep going !!! Through our newsletter, the "Interface" we periodically publish applications notes highlighting new and interesting techniques, answer questions, introduce new products, etc. Your purchase of a CTI system automatically qualifies you for a free subscription. Our Web-site, at www.cti-electronics.com features up to the minute news on future product releases, software updates, application notes, and a helpful "tip-of-the-week" feature. We highly recommend that you join the “CTI User’s Group”, an online forum for the exchange of ideas and information related to the CTI system. You’ll be able to meet and correspond with other CTI users, exchange applications ideas, ask questions, chat online, and a whole lot more. It’s hosted by Yahoo, and it’s absolutely free. Just go to www.yahoo.com, click on ‘Groups”, and then follow the simple instructions to join. Our group’s name is “cti_users”. Be sure to let us know how you use CTI. (you can E-Mail us at [email protected]) Your feedback is important to us. If you have a suggestion on ways to improve our products, or a capability you'd like to see incorporated, by all means pass your ideas along. Many of the features of the CTI system were suggested by our users. And if there's ever something you're confused about, or if there's a question you need answered, just let us know. We're always happy to help. Online technical support is available at [email protected]. We've yet to find a problem that couldn't be solved. So good luck. Enjoy the world of computer control. And most of all, "Happy Railroading" !!! CTI Electronics 181