Download Creator (Creation Date)

Transcript
Space Details
Key:
VDI3
Name:
Sun Virtual Desktop Infrastructure
Description:
Securely access a virtual desktop from nearly any client on the network.
Creator (Creation Date):
stephanielewellen (Feb 02, 2009)
Last Modifier (Mod. Date):
stephanielewellen (Feb 02, 2009)
Available Pages
•
•
•
•
About VDI
Getting Started - VDI Demo
Planning the Installation
Release Notes
•
VDI Patches
•
Supported Configurations
•
Deployment Guide
•
Installing
Testing the VMware Infrastructure Setup
•
•
•
Installing the VDI Core
Configuring the VDI Core
How to Configure Sun VDI for an Evaluation Environment
•
How to Configure Sun VDI for a Production Environment
•
•
•
How to Configure a Remote MySQL Database
Reconfiguring the VDI MySQL Cluster
How to do a Rolling Restart of Your MySQL Cluster
•
•
How to Prevent Unrestricted SQL Node Joins
MySQL Cluster Reconfiguration Scenarios
•
Backing Up the VDI Configuration
•
•
•
Checking VDA Services
How to Check the Core Service
•
How to Check the Database Service
•
•
How to Check the Admin GUI Service
•
The vda Command
vda Command Usage
•
vda Command Usage Examples
•
How to Check the RDP Broker Service
•
Using the CLI
The Man Page for the vda Command
•
•
•
•
•
•
•
The vda-config Command
The vda-db-status Command
The vda-install Command
The vda-migrate Command
The vda-service Command
The vda Subcommands
Document generated by Confluence on Jun 24, 2009 06:55
Page 1
•
•
•
•
•
•
•
The vda-webadmin Command
•
Setting Up a Storage Server
How to Set Up a Solaris Storage Server
•
How to Set Up an OpenSolaris Storage Server
•
How to Set Up a Sun Storage 7000 Unified Storage System
•
Setting Up a Sun xVM VirtualBox Server
Defining Virtual Machine Templates in Sun xVM VirtualBox
Setting Up a VMware ESX Server
Setting Up a VMware vCenter Server
Defining Virtual Machine Templates in VMware vCenter
•
Upgrading
•
How to Create Desktop Pools
Removing the VDI Core
•
Administering
How to Access the Admin GUI
•
How to Create Desktop Providers
•
How to Create Desktop Providers for an xVM VirtualBox Platform
•
How to Create Desktop Providers for a VMware Infrastructure Platform
•
•
•
•
Importing Virtual Machines
How to Import Virtual Machines for an xVM VirtualBox Platform
•
How to Import Virtual Machines for a VMware Infrastructure Platform
•
How to Enable Cloning in Pools
How to Enable Cloning for an xVM VirtualBox Platform
•
How to Enable Cloning for a VMware Infrastructure Platform
•
How to Set Up a User Directory
Active Directory Integration
•
How to Set up Kerberos Authentication
•
How to Set Up Public Key Authentication
•
•
•
•
•
•
•
•
LDAP Integration
How to Set Up Anonymous Authentication
•
How to Set Up Simple Authentication
•
How to Set Up Secure Authentication
•
Customizing the LDAP Filters and Attributes
User Directory Settings
•
How to Add Users to Pools
How to Associate Tokens to Users
How to Create Automated Administration Scripts
VDI Default Configuration
Adapting Sun Ray Software
Sun Ray Administration GUI
•
Sun Ray Computing Model
•
•
Sun Ray Kiosk Session
Document generated by Confluence on Jun 24, 2009 06:55
Page 2
•
•
•
•
•
Setting Up Sun Secure Global Desktop Software
Understanding the RDP Broker
Accessing Desktops with a Sun Ray DTU
Accessing Desktops with SGD Web Access
•
Accessing Desktops with Microsoft RDC
•
Can I install a full Demo without user directory integration?
Disabling Client Authentication
•
Troubleshooting and FAQs
Can I convert a VDI Demo into a clustered VDI Production environment?
•
•
•
•
•
•
•
•
•
•
•
•
•
•
•
•
•
•
•
•
•
•
•
•
•
•
•
•
•
•
Can I set up a Demo of VDI 3 on one machine?
Can I use OpenSolaris instead of Solaris 10 Update 7 for my single host Demo?
Can I use PKI instead of Kerberos for authentication to an Active Directory?
Can I use wild cards in token names to represent a group of DTUs in order to assign these
DTUs to a pool?
Does the MySQL database store all SRS-related configuration?
Does the VirtualBox swap space really have to be the same as the memory?
Do I need to configure SRS separately in VDI 3?
End-users are not able to log into their Windows desktop.
End-users cannot access their virtual machines.
How do I configure DHCP in VDI 3?
How do I configure the audio for VirtualBox hosted virtual machines?
How do I make a desktop available to a user at all times in VDI 3?
How do I specify USB redirection for Sun Ray?
How do I use VMware virtual machines with multiple network adapters?
How is desktop assignment in VDI 3 different than in VDI 2?
I am unable to get a MS RDC connection on my VMware virtual machine.
I cannot log into the Admin GUI.
I can start a virtual machine from the VirtualBox GUI, but it will not start from the VDI Admin
GUI.
I get a blank screen after successfully logging into the Admin GUI.
I have created a new pool in my VMware desktop provider and virtual machines are not
created automatically.
I have free memory on my ZFS storage host, but my VirtualBox virtual machines will not start
due to a lack of memory.
In my VMware desktop pool, new virtual machines are created automatically, but they are
not made available.
Is it possible to assign MS Terminal Server to users?
Is the Demo configuration a supported configuration?
Is VMware ESXi a supported virtualization platform?
Jobs don't finish even after canceling them using the Admin GUI.
Kerberos authentication to Active Directory works for a while and then stops.
There is an error when I add a VirtualBox host to a desktop provider.
The Sun Ray DTU is cycling and cannot connect to a virtual machine.
Document generated by Confluence on Jun 24, 2009 06:55
Page 3
•
•
•
•
•
•
•
•
•
•
•
•
•
•
•
•
The system is not reacting as expected.
The VirtualBox host is crashing unexpectedly.
The VirtualBox software never finishes installing due to an error.
The VirtualBox Web Service cannot be contacted.
The VMware virtual machine cloning process is not operating as expected.
The window displaying the VMware-hosted virtual desktop is freezing.
Unused VMware virtual machines are not being recycled.
Users cannot log into their desktops using their User Principal Name (UPN), or email address.
Users do not show up in the Admin GUI in the Users and Groups section.
vda command reports that VDI is not running although cacaoadm and vda-db-status say it is.
VDI database doesn't start during an Evaluation configuration.
What are the differences between SRS in VDI 2 and VDI 3?
What is the difference between Personal and Flexible desktop assignments?
When I start a desktop I get this error - No suitable hosts to start a desktop for Desktop
Provider sunvdi-demo.
Which versions of JRE are supported?
Why does my VMware virtual machine have an invalid IP address or cannot be pinged?
•
JavaOne and VDI Success Story
Document generated by Confluence on Jun 24, 2009 06:55
Page 4
About VDI
This page last changed on Jun 11, 2009 by stephanielewellen.
About VDI
Features of VDI 3
Sun VDI 3.0 now includes the following features:
Support for a wide variety of virtual desktop operating systems (XP, Vista, 2000, OpenSolaris, Ubuntu).
Built-in virtualization (Sun xVM VirtualBox for VDI) or VMware Infrastructure.
Integration with OpenSolaris and Sun Unified Storage Systems.
Better support for VMware, allowing for larger deployments.
Support for Active Directory.
Users can have multiple virtual desktops and choose which one they want to access.
Built-in support for RDP clients, meaning nearly any client device can connect directly to a Sun VDI Software server
without installing any software on the client.
• Streamlined and simplified installation.
•
•
•
•
•
•
•
Architecture
Sun Virtual Desktop Infrastructure 3.0 (VDI) is made up of three main components layers - a virtualization platform, the Sun
VDI Core, and a desktop access client.
Document generated by Confluence on Jun 24, 2009 06:55
Page 5
Virtualization Platform
The basis for the architecture is the virtualization platform. In addition to creating and storing virtual machines the
hypervisor provides the core functionality needed for virtual desktop management like starting, stopping, and snapshotting
virtual machines. Sun VDI 3.0 supports the Sun xVM VirtualBox and VMware Virtual Infrastructure 3 virtualization platforms.
Sun VDI Core
The central component of the Sun VDI is the Sun VDI Core. The VDI Core provides all the functionality needed to build
and manage large scale virtual machine deployments. In addition to its management capabilities, the VDI Core is also
responsible for the brokering of virtual desktops on behalf of desktop access clients.
By integrating with Active Directory, the VDI Core is able to provide support for assignment of virtual desktops to existing
users and groups within an organization. The VDI Core configuration data and runtime information is stored in a MySQL
database which may be shared across multiple VDI Core instances on the network. This ensures access to the VDI Core even
in failover scenarios.
Desktop Access
There are three distinct mechanisms supported for access to virtual desktops.
Sun Ray Thin Client Access - In this case, a custom Sun Ray Software Kiosk Session is initiated when a user inserts a token
card into a Sun Ray thin client. This session uses the Sun VDI Core to request access to a virtual desktop on behalf of the
user. Once a virtual desktop has been assigned to the user, a Remote Desktop Protocol (RDP) connection to the desktop is
established for the session using the Sun Ray Windows Connector.
Secure Web Access with SGD - In this case, the browser is used to initiate a Sun Secure Global Desktop Software (SGD)
session. SGD, in turn, uses the VDI Core's RDP redirection capability to establish a connection to an assigned virtual desktop.
RDP Client Access - (RDP redirection must be supported on the client side to use this mechanism). As with the previous
case, the VDI Core's redirection capability is used to establish a connection to an assigned virtual desktop.
Document generated by Confluence on Jun 24, 2009 06:55
Page 6
Getting Started - VDI Demo
This page last changed on Jun 24, 2009 by stephanielewellen.
Contents
• Installing the Software
° System Requirements
•
° 1. Install the operating system.
° 2. Configure the ZFS storage.
° 3. Install the virtualization platform.
° 4. Install the VDI Connection Broker (aka VDI Core).
° 5. Apply the VDI 3 Patch 1.
° 6. Configure VDI for Evaluation.
• Creating Virtual Machine Templates
° 1. Create a new virtual machine using the VirtualBox GUI.
•
° 2. Install an operating system in the virtual machine.
° 3. Install the VirtualBox Guest Additions.
• Manage Desktops with the VDI Web Administration
• Access a Desktop (as an End-User)
• Congratulations!
Getting Started - VDI Demo
The following information describes how to install and configure the VDI components (connection broker, virtualization
platform, and storage) on a single host. A single host VDI setup is great for demoing and evaluation, but cannot support a
large deployment.
The VDI Demo configuration is not a supported production environment configuration. For more
information about supported production environment VDI configurations, please see the Supported
Configurations page.
You can also make a multi-host demo version of VDI, but you will have to refer mainly to the Installing document. In this
case, the system requirements will be less strict than what this page describes, see the Supported Software tables in the
Release Notes. Also refer to Supported Configurations to learn more about which hardware configurations will and will not
work. When configuring the VDI Core software, make sure to choose the Evaluation configuration, see Step 6 below for
more details.
Installing the Software
System Requirements
It is recommended to perform the installation on a physical machine ("bare metal"). Installing the VDI software in a virtual
machine may work but is not officially supported.
The machine must meet the following requirements:
• x86 CPU
• At least 4 GB memory RAM
• At least 32 GB disk space - it is recommended to use a system with two disks so that the Solaris OS uses on one disk
and the ZFS storage uses the other (see below).
Refer to the VDI 3 Release Notes for more details.
1. Install the operating system.
•
•
•
•
You must use Solaris 10 Update 7 (64-bit) as the operating system.
Install the operating system on the first disk.
You should perform a default installation using either UFS or ZFS as the file system.
We recommend adapting the default partition layout:
Document generated by Confluence on Jun 24, 2009 06:55
Page 7
°
°
°
All of the VDI components will be installed under /opt - ensure that sufficient disk space is available here.
Swap space must be equal to or greater than the physical memory - if you have 4 GB memory, your swap space
must also be 4 GB or more.
Templates for virtual machines will be stored under /var/tmp - you should reserve enough disk space for
storing at least one or two virtual machine images.
Refer to the Solaris documentation for more details.
2. Configure the ZFS storage.
Sun VDI 3 (in combination with VirtualBox) uses the ZFS filesystem to create snapshots of virtual machine disk images or
to clone/replicate virtual machine disks. The interaction with ZFS is handled automatically and is completely encapsulated
within VDI. However, initially you must setup the ZFS storage (more precisely a ZFS storage pool aka zpool).
• As previously mentioned, the second disk should be configured as ZFS storage. Simply trigger the following
command as root user:
# zpool create VDI <name of second disk>
(In this case, the name of the zpool is 'VDI', but you can also use any other name in your setup. If you do not know the
name of your second disk, you can look it up using the format or fdisk command.)
• ZFS uses any memory available (up to the limit) for a so-called ARC cache. This can cause issues in a demo setup,
because VDI may falsely report that there is not enough memory for starting up any virtual machine. To resolve this
issue, adapt the max value used for the ARC cache.
For example, to restrict the memory to 2GB, add the following line in /etc/system:
set zfs:zfs_arc_max = 2147483648
• Enable the SMF service for iSCSI access (iSCSI target daemon) with the command:
svcadm enable svc:/system/iscsitgt:default
3. Install the virtualization platform.
For the demo installation we will use Sun VirtualBox as the virtualization platform.
• You must use the VirtualBox archive (vbox_2.0.zip) that is bundled with Sun VDI 3. This archive includes Sun
VirtualBox 2.0.8 together with an installation script (vb-install) that automates the necessary configuration steps.
• As root user, unzip the VirtualBox archive and execute the installation:
# unzip vbox_2.0.zip
# cd vbox_2.0
# ./vb-install
The installation script installs the VirtualBox packages and starts up the VirtualBox web service. In addition, the Apache web
server (bundled with Solaris 10) will be configured to act as SSL proxy for the VirtualBox web service.
4. Install the VDI Connection Broker (aka VDI Core).
• As root user, unzip the VDI archive and execute the installation:
Document generated by Confluence on Jun 24, 2009 06:55
Page 8
# unzip vda_3.0_amd64.zip
# cd image
# ./vda-install
After accepting the license agreement, the installation process begins, and all VDI components are installed. These
components include:
•
•
•
•
•
•
•
•
Sun Ray Server Software
Sun Ray Connector for Windows Operating Systems
Sun VDI Core
MySQL Database
Web Administration
Apache Tomcat
RDP Broker
Sun Ray Kiosk session scripts
• After successful installation reboot your machine.
# reboot
5. Apply the VDI 3 Patch 1.
• Download VDI 3 patch 1 (141482-01) from sunsolve.
• Install the patch on your system. As root user, trigger the following command:
# patchadd /var/spool/patch/141482-01
6. Configure VDI for Evaluation.
As root user execute the vda-config script and choose the "0 Evaluation Sun VDI Host" configuration type:
# /opt/SUNWvda/sbin/vda-config
Now you've successfully installed and configured your VDI demo! For the remaining steps, use the VDI and VirtualBox
administration tools.
Creating Virtual Machine Templates
After installing the software, you should prepare a couple of virtual machines that will later be assigned to users. This
is a two step process: first, create virtual machines using tools from the VirtualBox virtualization platform. Then, import
the prepared virtual machines into Sun VDI. The imported virtual machines can either be assigned to users or can act as
templates for cloning additional machines.
VirtualBox provides some management tools for creating new virtual machines, which were installed on your demo
machine when vb-install was executed. If you prefer to prepare and test virtual machines on a separate machine, for
example using your laptop, then you can also download a compatible VirtualBox 2.0.8 version for your preferred operating
system from here.
The following steps assume that you are running the VirtualBox tool directly from your demo machine.
Document generated by Confluence on Jun 24, 2009 06:55
Page 9
1. Create a new virtual machine using the VirtualBox GUI.
• As root startup the Sun VirtualBox GUI
# /opt/VirtualBox/VirtualBox
1. You can safely ignore the notification that a newer VirtualBox version is available.
2. Click New to launch the New Virtual Machine wizard.
3. The wizard will guide you through virtual machine creation.
Be sure to choose the appropriate hard-disk and RAM space for the desired configuration (4 GB hard-disk and
384 MB RAM are recommended).
For more information about virtual machine system requirements, refer to Chapter 3: Starting out with xVM
VirtualBox in the Sun xVM VirtualBox User Manual.
2. Install an operating system in the virtual machine.
At this point you have an empty virtual machine, equivalent to a PC without an OS installed. The next step is to choose the
boot medium for the OS and install it.
1.
2.
3.
4.
5.
Select the newly created virtual machine and click Settings.
Open the Advanced tab in the Settings GUI.
Ensure that CD/DVD-ROM is set as the first boot device.
Select the CD/DVD-ROM option in the left panel of the Settings dialog.
Check the Mount CD/DVD Drive checkbox.
a. Select the Host CD/DVD Drive radio button to install the OS from the CD-ROM drive.
b. Select the ISO Image File radio button, with the appropriate path, to install the OS from a previously
downloaded ISO file.
6. Click OK to save the changes and close the Settings GUI.
At this point the new virtual machine must be started to trigger the OS installation.
7. Select the new virtual machine and click Start.
8. Follow the installation prompts, or seek further installation details from the OS manufacturer.
3. Install the VirtualBox Guest Additions.
After the OS is installed, the Sun VirtualBox Guest Additions must be installed.
1. With the virtual machine running and fully booted, click the Devices menu, then select Install Guest Additions.
This will launch the xVM VirtualBox Guest Additions installer inside the virtual machine.
2. Install the Guest Additions according to the instructions in the wizard and reboot when asked.
3. Install all additional software for the desired virtual machine template.
If you plan to take advantage of the Windows Sysprep functionality, then you also need to install the Sysprep tool into your
virtual machine. However, for a first demo setup we recommend to NOT execute the Sysprep tool, because it is hard to
later detect any errors in this area. Instead, you should first become familiar with Sun VDI and then create a Sysprep-ed
virtual machine in a later stage.
Please refer to Defining Virtual Machine Templates in Sun xVM VirtualBox for further details.
Manage Desktops with the VDI Web Administration
To manage desktops and users in VDI, refer to the following pages (these are also listed under Step 1 of Administering):
1.
2.
3.
4.
5.
6.
7.
8.
Access the Web Administration GUI.
Create desktop providers.
Create desktop pools.
Import virtual machine templates into the VDI Core.
Clone the virtual machine templates.
Set up a user directory.
Add test users to desktop pools.
Associate tokens to the test users.
Document generated by Confluence on Jun 24, 2009 06:55
Page 10
Access a Desktop (as an End-User)
There are three VDI-compatible options for desktop access software: Sun Ray Software, Sun Secure Global Desktop
Software, and Microsoft RDC Software.
Sun Ray software is automatically installed with the VDI Core installation, and is covered under the VDI demo licensing.
To read more about how to adapt Sun Ray software, and access a desktop as and end-user with a Sun Ray DTU, use the
following links:
• Adapting Sun Ray Software
• Accessing Desktops with a Sun Ray DTU
For desktop SGD, and MS RDC information, refer to Steps 2-3 of Administering.
Congratulations!
You should have a fully functional VDI Demo. If you have run into problems setting up VDI, please look for answers in some
of the following places:
• Troubleshooting and FAQs
• The VDI Forum
Document generated by Confluence on Jun 24, 2009 06:55
Page 11
Planning the Installation
This page last changed on Jun 19, 2009 by stephanielewellen.
Planning the Installation
This section outlines the minimum requirements for a standard VDI 3 configuration. We recommend that you read the
following pages for more information about supported software and VDI deployment options:
• Release Notes
• Supported Configurations
• Deployment Guide
System Requirements for a Standard Configuration of Sun VDI
Sun VirtualBox Virtualization Platform
The VirtualBox setup requires three VDI hosts, one VirtualBox host, and one storage host. The Sun VDI 3.0 Software is
installed on the VDI hosts, and Sun VirtualBox for VDI is installed on the VirtualBox host. The storage host is used to store
the virtual disks of the desktops which run on the VDI host.
You can use any x86 host (even your laptop) to create a VirtualBox virtual machine which will be used by Sun VDI as a
template for the desktops. Templates must be created in VirtualBox for VDI (version 2.0.8), which is available on the VDI
download page.
Requirements for two desktops with 512 MB memory and a 10 GB disk each:
Host
CPU
Memory
Disk space
Three VDI hosts
all x86 or all SPARC
CPU
2 GB
1 GB
• Solaris 10
Update 6 (64bit)
• Solaris 10
Update 7 (64bit)
VirtualBox host
x86 CPU
2 GB
1 GB
• Solaris 10
Update 6 (64bit)
• Solaris 10
Update 7 (64bit)
Storage host
x86 CPU
1 GB
32 GB
• Solaris 10
Update 7
• OpenSolaris
2008.11
• OpenSolaris
2009.06
• 7000 Series
2008.Q4.2.1
(1.0.5)
• 7000 Series
2008.Q4.2.0
(1.0.4)
Document generated by Confluence on Jun 24, 2009 06:55
System
Page 12
• 7000 Series
2008.Q4.1.1
(1.0.3)
• 7000 Series
2008.Q4.1.0
(1.0.2)
• 7000 Series
2009.Q2
Releases
Refer to the Deployment Guide for an in-depth discussion of hardware requirements for production deployments.
Sun VDI 3 embedded database hosts need to be of the same architecture.
Sun VDI 3 core with embedded database requires (at least) VDI hosts to be of the same architecture either
all x86 or all SPARC. See the Release Notes for more details.
VMware Infrastructure Virtualization Platform
The VMware setup requires at least three VDI hosts, one VMware vCenter host, and one VMware ESX host. Most VDI
deployments will probably require and additional storage host. All required VDI components (VDI Core) are installed on the
VDI hosts. The VMware vCenter host and the VMware ESX host are used to maintain the virtual machines. We recommend
that you set up the system from scratch to avoid problems.
Requirements for 2 desktops with 512 MB memory and a 10 GB disk each:
Host
CPU
Memory
Disk space
System
Three VDI hosts
all x86 or all SPARC
CPU
2 GB
1 GB
• Solaris 10
Update 6 (64bit)
• Solaris 10
Update 7 (64bit)
VMware vCenter host
x86 CPU
2 GB
1 GB
• VMware
VirtualCenter
2.5 (Update
1, 2, 3, 4)
supported
hosts
VMware ESX host
x86 CPU
2 GB
32 GB
• VMware ESX
Server 3.5
(Update 1, 2, 3,
4)
• VMware
vSphere (ESX
4.0)
The required number of VDI hosts and ESX hosts as well as their CPU and memory complement vary with the number of
virtual machines you want to support. For further information on sizing and an exact list of compatible ESX hosts refer to
the sizing documentation and the hardware compatibility lists at www.vmware.com.
Sun VDI 3 embedded database hosts need to be of the same architecture.
Sun VDI 3 core with embedded database requires (at least) VDI hosts to be of the same architecture either
all x86 or all SPARC. See the Release Notes for more details.
Document generated by Confluence on Jun 24, 2009 06:55
Page 13
Release Notes
This page last changed on Jun 18, 2009 by stephanielewellen.
Contents
•
•
•
•
•
•
•
•
•
Package Software
Patches
Third-Party Software
Supported Software
° VDI Core Host Operating Systems
° Virtualization Platforms
° Storage Servers
° Desktop Guest Systems
Known Issues and Limitations
° Solaris hosts must have adequate swap space. (Bug ID 1225025)
° Memory for ARC cache should be restricted to a lower limit when using ZFS on S10u7. (Bug ID 6844780)
° Desktops cannot use 'Host Networking' unless xVM VirtualBox has been configured to run as root. (Bug ID
6839450)
° During log-off, xVM VirtualBox desktops do not go into idle state when settings are 'Host Networking WinRDP'. (Bug ID 6837283)
° VDI Host Overload (Bug ID 6810444)
° Using the VDI CLI in parallel with the Admin Web GUI. (Bug ID 6770476)
° Limitations with VDI hosts running on SPARC. (Bug ID 6812848)
° Sun Open Storage fails after a software update. (Bug ID 6826006)
° OpenSolaris Update causes SSH to the storage box to fail. (Bug ID 6812829)
° vb-install script fails to install xVM VirtualBox package. (Bug ID 6814023)
° Cloned virtual machines have lower resolution than the xVM VirtualBox virtual machine templates. (Bug ID
6815380)
° Migrating large numbers of pools from VDI 2.0 to 3.0 fails. (Bug ID 6819562)
° Importing VDI 2.0 data into VDI 3.0 fails if pool's recycle policy is 'Destroy'. (Bug ID 6818383)
Reporting Problems and Providing Feedback
Further Information
Release Notes
These notes contain important information about the Sun VDI Core at the time of revenue release, including requirements
and supported platforms as well as issues and workarounds. Be sure to read this document before you begin using Sun VDI
3.
Package Software
The VDI 3.0 software package includes the following components:
• Sun Virtual Desktop Infrastructure Software 3.0, including
° Sun VDI Core
° Sun Ray Server Software 4.1 (SRSS)
° Sun Ray Connector for Windows OS, Version 2.1 (SRWC)
• Sun VirtualBox for VDI 3.0 (Solaris 10 x86 only)
• Additional software
° Sun Secure Global Desktop 4.41 (SGD)
° Sun VirtualBox for VDI 3.0 (additional platforms for creating desktop templates)
Patches
The first patch for VDI 3 was released on May 30. The patch addresses many of the bugs listed below - for more details see:
VDI Patches.
Document generated by Confluence on Jun 24, 2009 06:55
Page 14
Third-Party Software
Sun VDI 3 includes software originating from third parties that is subject to GPL/LGPL, or CDDL licenses. The corresponding
source code is available via the links below:
• TopLink Essentials (licensed under CDDL) is a persistence API used by Sun VDI core.
The library source code is available at: http://download.java.net/javaee5/v2ur2/promoted/source/glassfish-v2ur2-b04src.zip
• Sun xVM VirtualBox for VDI contains modified GPL code.
The source code is available at: http://download.virtualbox.org/virtualbox/2.0.8/VirtualBox-2.0.8-OSE.tar.bz2
Supported Software
This section includes support tables for VDI Core host operating systems, virtualization platforms, storage servers, desktop
guest systems, and Java Runtime Environments. For more about VDI Support, see Supported Configurations.
VDI Core Host Operating Systems
VDI Host OS
Supported in VDI 3
Solaris 10 Update 6 SPARC and x86 (64-bit)
X
Solaris 10 Update 7 SPARC and x86 (64-bit)
X
Virtualization Platforms
Virtualization
Software
Supported in VDI 3
VirtualBox
Virtualization
Platforms
VMware
Infrastructure
Virtualization
Platforms
Not Supported
Sun VirtualBox for
VDI (VirtualBox 2.0.8)
X
X
All other VirtualBox
Versions
X
VMware
VirtualCenter 2.5
(Update 1, 2, 3, 4)
X
X
VMware ESX server
3.5 (Update 1, 2, 3, 4)
X
X
VMware vSphere (ESX
server 4.0)
X
X
Storage Software
Supported in VDI 3
VirtualBox
Virtualization
Platforms
VMware
Infrastructure
Virtualization
Platforms
Not Supported
Solaris 10 Update 7
X
X
X
Storage Servers
Document generated by Confluence on Jun 24, 2009 06:55
Page 15
OpenSolaris 2008.11
X
X
X
OpenSolaris 2009.06
X
X
X
Sun Unified Storage
Series 7000:
X
X
X
Desktop OS
Supported in VDI 3
VirtualBox
Virtualization
Platforms
VMware
Infrastructure
Virtualization
Platforms
Not Supported
Windows XP SP2 and
higher
X
X
X
Windows Vista
Enterprise
X
X
X
Windows 2000
X
X
Ubuntu 8.10
X
X
OpenSolaris 2008.11
X
X
• 2008.Q4.2.1
(1.0.5)
• 2008.Q4.2.0
(1.0.4)
• 2008.Q4.1.1
(1.0.3)
• 2008.Q4.1.0
(1.0.2)
• 2009.Q2
Desktop Guest Systems
Known Issues and Limitations
Solaris hosts must have adequate swap space. (Bug ID 1225025)
Solaris hosts running xVM VirtualBox must have swap space equal to, or greater than the host's physical memory size. For
example, 16GB physical memory would require at least 16GB swap. This can be configured during a Solaris 10 install by
choosing a 'custom install' and changing the default partitions.
For existing Solaris 10 installs you will need to create a swap image file on the local filesystem and mount it. The swap file
image size should be: Physical Memory - Current Swap = Additional Swap Required. For example, 16GB physical memory 1GB = 15GB of additional swap required. To add the swap to your system:
For ZFS:
# zfs create -V 16gb _<ZFS volume>_/swap
# swap -a /dev/zvol/dsk/_<ZFS volume>_/swap
To have the swap mounted after a reboot, add the following line to /etc/vfstab:
Document generated by Confluence on Jun 24, 2009 06:55
Page 16
/dev/zvol/dsk/_<ZFS volume>_/swap - - swap - no -
For UFS:
# mkfile 15g /path/to/swap.img
# swap -a /path/to/swap.img
To have the swap mounted after a reboot, add the following line to /etc/vfstab:
/path/to/swap.img - - swap - no -
Memory for ARC cache should be restricted to a lower limit when using ZFS on S10u7. (Bug ID 6844780)
When all VDI components (VDI host, xVM VirtualBox host, and ZFS storage) are installed on a single box (x86 platform,
running S10u7), xVM VirtualBox will not be able to start any desktops.
Cause - ZFS uses any memory available (up to the limit) for an ARC cache. If other programs try to access the memory, ZFS
should release it. Unfortunately, VDI evaluates the memory before trying to start a virtual machine and recognizes that not
enough memory is available to start the virtual machine. Full details are available here http://www.solarisinternals.com/wiki/
index.php/ZFS_Evil_Tuning_Guide#ARCSIZE.
Solution - The memory for the ARC cache can be limited to a max value by adding an entry in /etc/systems file.
For example, to restrict the memory to 2GB, in /etc/system add:
set zfs:zfs_arc_max = 2147483648
It has been verified that keeping this value to as low as 512MB and importing a file of 2.7G will work as desired.
Desktops cannot use 'Host Networking' unless xVM VirtualBox has been configured to run as root. (Bug ID 6839450)
Virtual machines cannot be started with host networking unless the xVM VirtualBox web service runs as root.
During log-off, xVM VirtualBox desktops do not go into idle state when settings are 'Host Networking - WinRDP'. (Bug ID
6837283)
Desktop never go to the idle state and remain in used state forever and hence do not get recycled.
VDI Host Overload (Bug ID 6810444)
In case you see a blank page when login in to the administration ui it's likely that database problems are the root cause.
You may for instance see "Error 157" in the database log files in '/var/opt/SUNWvda/mysql-cluster' of the primary or one of
your secondary hosts.
Cause- When using the VDI MySQL Cluster database, the first two VDI secondary hosts run the MySQL Cluster data nodes in
addition to a MySQL SQL node, SRSS, SRWC, VDI, etc. MySQL Cluster is sensitive to resource shortages. The expected load
to the MySQL Cluster data nodes is small, so the MySQL processes should be able to cope under typical loading. However, if
you have too many Sun Ray sessions on each of the first two Sun Ray secondaries, you may see this error.
Solution- Check the load on the concerned hosts and if it is high, reduce the load on this host e.g. by reducing the number
of SRSS sessions hosted. Restart the SQL node running on the concerned host
Document generated by Confluence on Jun 24, 2009 06:55
Page 17
Using the VDI CLI in parallel with the Admin Web GUI. (Bug ID 6770476)
Using the vda CLI to modify some data, while having an Admin Web UI session running, might generate errors in the Web
Admin UI and log you out. At following login, the Web Admin UI will be working fine again.
Limitations with VDI hosts running on SPARC. (Bug ID 6812848)
• Only one storage is supported with Solaris SPARC VDI hosts.
• The 'duplicate' action fails with Solaris SPARC VDI hosts.
Cause- Sun VDI 3.0 does not support copying one iSCSI volume to another iSCSI volume via Java in Solaris SPARC VDI hosts.
Sun Open Storage fails after a software update. (Bug ID 6826006)
• Do not update the software of a Sun Open Storage after it has been added to VDI 3.0. Any management action of
VDI 3.0 fails afterwards.
OpenSolaris Update causes SSH to the storage box to fail. (Bug ID 6812829)
After doing a 'pkg image-update' on an OpenSolaris host used for xVM VirtualBox storage, VDI can no longer SSH to the
box. The following error is seen:
Caused by: com.jcraft.jsch.JSchException: Algorithm negotiation fail
at com.jcraft.jsch.Session.receive_kexinit(Session.java:510)
at com.jcraft.jsch.Session.connect(Session.java:285)
at com.sun.vda.service.vbox.SshServer.executeCommand(SshServer.java:331)
... 40 more
Normal SSH via the command line continues to work fine.
Cause- Changes have been made to how the sshd negotiates the ciphers between version 101b and 108 of OSOL.
Solution- We require the customer to use the release version of OSOL 2008.11 (101b). Any upgrades are not supported and
need to get clearance from us first.
A fix in this particular case is to activate the 'Ciphers' line in /etc/ssh/sshd_config and to restart the ssh service.
vb-install script fails to install xVM VirtualBox package. (Bug ID 6814023)
If you uninstall xVM VirtualBox and want to reinstall it, the installation may fail.
Cause- Some xVM VirtualBox processes may still remain even after removal.
Solution- Reboot the xVM VirtualBox host to kill any remaining processes.
Cloned virtual machines have lower resolution than the xVM VirtualBox virtual machine templates. (Bug ID 6815380)
The cloned VM has a blurry desktop image because it has a lower (8-bit) resolution compared to the original (32-bit) virtual
machine.
Migrating large numbers of pools from VDI 2.0 to 3.0 fails. (Bug ID 6819562)
Sometimes when migrating two or more pools from VDI 2.0 to VDI 3.0 the first pool will succeed and the next ones will fail.
Cause- A misconfiguration in the vda-migrate tool.
Solution- It is recommended not to migrate several pools simultaneously from VDI 2.0 to VDI 3.0 (a patch for this issue will
be available soon).
Importing VDI 2.0 data into VDI 3.0 fails if pool's recycle policy is 'Destroy'. (Bug ID 6818383)
Cause- The "Recycling Policy" value 'destroy' in VDI 2.0 became 'delete' for VDI 3.0.
Solution- Edit the exported text properties file ('migrate_svdc_1.?'). It should be located in the directory which was used
to export previous Sun VDI data. Find all the lines which end with "pool.recyclepolicy=Destroy" and modify them to
"pool.recyclepolicy=Delete".
Document generated by Confluence on Jun 24, 2009 06:55
Page 18
Reporting Problems and Providing Feedback
To report a bug in the software, please send an email to the VDI Team
If you are reporting a bug, please provide the following information where applicable:
• Description of the problem, including the situation, where the problem occurs, and its impact on your operation.
• Machine type, operating system version, browser type and version, locale and product version, including any patches
you have applied, and other software that might be affecting the problem.
• Detailed steps on the method you have used, to reproduce the problem.
• Any error logs or core dumps.
Further Information
You may also be interested in these related release notes:
•
•
•
•
Sun Ray Server Software 4.1 Release Notes - http://docs.sun.com/app/docs/doc/820-3774
Sun Ray Windows Connector 2.1 Release Notes - http://docs.sun.com/app/docs/doc/820-3777
Sun Secure Global Desktop 4.41 Release Notes - http://docs.sun.com/app/docs/doc/820-4905
Sun xVM VirtualBox 2.0.8 for VDI - http://download.virtualbox.org/virtualbox/vboxvdi3download.html
Document generated by Confluence on Jun 24, 2009 06:55
Page 19
VDI Patches
This page last changed on Jun 08, 2009 by phanieellentest.
VDI Patches
The information below provides an overview of the patching available for all VDI versions. Use the links from the patch ID
numbers to access the official patch documentation on SunSolve.
VDI Patch Strategy
• Patches for the VDI Core will be released as patches for the VDI 3 product.
• Patches for included Sun Ray technology will be released as the part of the Sun Ray product.
In general it is recommended to run on the latest patch level, even though it might not be important to VDI 3. The
most recent patch was announced here.
• Changes to VirtualBox will NOT be delivered as patches.
If bug fixes are required, a new minor version of VirtualBox qualified for VDI 3 will be released. As a result, VirtualBox
must be reinstalled on the virtualization host.
• Changes to the storage platform are not driven or controlled by the VDI team.
Therefore the VDI team needs to qualify a new firmware for the Unified Storage systems as well as updates to
OpenSolaris. The VDI team will announce which future versions are supported or by when. So, be a bit careful in this
area.
VDI 3 Patch 1
The first patch for VDI 3 was released on May 30. The patch is available for both x86 and SPARC platforms:
• x86 - 141482-01
• SPARC - 141481-01
The patch includes the following features:
•
•
•
•
S10 U7 support - Allows you to build a demo/POC on a single box including VirtualBox and storage.
VMware vSphere 4 support - VDI 3 runs against VMware vCenter 4
Support of the latest Unified Storage firmware
Performance improvements in the Admin GUI
The patch corrects the following bugs listed in the Release Notes:
1.
2.
3.
4.
5.
Limitations with VDI hosts running on SPARC. (Bug ID 6812848)
Sun Open Storage fails after a software update. (Bug ID 6826006)
OpenSolaris Update causes SSH to the storage box to fail. (Bug ID 6812829)
Migrating large numbers of pools from VDI 2.0 to 3.0 fails. (Bug ID 6819562)
Importing VDI 2.0 data into VDI 3.0 fails if pool's recycle policy is 'Destroy'. (Bug ID 6818383)
VDI 2 Patch 1 (Revision 5)
The fifth revision of VDI 2 Patch 1 was released on April 29. The patch is available for the following packages:
•
•
•
•
Linux packages - 127561-05
Solaris 10 packages on x86 - 127560-05
Solaris 10 packages on SPARC - 127559-05
Windows packages - 138482-05
Document generated by Confluence on Jun 24, 2009 06:55
Page 20
Supported Configurations
This page last changed on Jun 18, 2009 by stephanielewellen.
Contents
•
•
•
•
•
•
Supported Configurations for Sun Virtualbox Virtualization Platforms
Supported Configurations for VMware Infrastructure Virtualization Platforms
All on One Host
VirtualBox on Primary Host
Primary Host Virtualized
Explicitly Unsupported Configurations
Supported Configurations
The following information outlines the supported and unsupported configurations for a Sun VDI 3 deployment in a
production environment. For more information about supported software versions, please refer to the Release Notes.
Supported Configurations for Sun Virtualbox Virtualization Platforms
Configuration Type
Minimum No. of Machines
Standard VirtualBox Configuration
5
All on One Host
1
VirtualBox on Primary Host
4
Supported Configurations for VMware Infrastructure Virtualization Platforms
Configuration Type
Minimum No. of Machines
Standard VMware Configuration
6
Primary Host Virtualized
5
Sun VDI Support Information
• Some VDI configurations are Explicitly Unsupported Configurations.
• In order to download the VDI 3 Patches, you must have (at minimum) a Sun Basic Service support
plan. For more information about Sun Service support plans, see the Sun Services site.
• VMware software is not included as part of the Sun VDI Software 3 package, therefore a Sun Support
contract will not cover VMware-related issues. For VMware coverage, you will need an additional
support plan. For more information about Sun Service plans for VMware, see the Sun Services for
VMware site.
All on One Host
In the All on One Host configuration, everything (VDI connection broker, VirtualBox virtualization platform, and storage)
run on one physical host. Please note that the requirement for this deployment option is to run Solaris 10 Update 7 on this
host. Concerning the database, you would have a locally installed MySQL Server (with an InnoDB engine) and connect to it
selecting the remote database option during VDI 3 configuration. This kind of deployment offers zero redundancy, meaning
it is one big Single Point of Failure.
Document generated by Confluence on Jun 24, 2009 06:55
Page 21
The VDI support contracts only cover a VDI configuration with an embedded MySQL database. The All
on One Host configuration uses a locally installed MySQL database with a InnoDB engine, which must be
configured as a remote database. Therefore, if you want support service for the database component of
the All on One Host configuration, you must purchase an additional MySQL service contract. For more
information, see the MySQL Support page.
VirtualBox on Primary Host
In the VirtualBox on Primary Host configuration, the Sun VDI 3 Primary node and one of your VirtualBox hosts share one
physical machine. Make sure the shared host has enough capacity to deal with these two roles at the same time. For more
information about sizing VirtualBox configurations, see the Deployment Guide.
Document generated by Confluence on Jun 24, 2009 06:55
Page 22
Primary Host Virtualized
In the Primary Host Virtualized configuration, the Sun VDI 3 Primary node runs in a virtual machine hosted by a VMware
Infrastructure virtualization platform. Running the MySQL Cluster completely in a virtualized environment is not supported.
Given the fact that the MySQL Cluster management node (or Primary node) requires only little resources, the MySQL team
has agreed that it is an acceptable and supported scenario to run it in a virtual machine. The two VDI 3 Secondary hosts
running the MySQL Cluster data nodes nevertheless need to run on bare metal.
Document generated by Confluence on Jun 24, 2009 06:55
Page 23
Explicitly Unsupported Configurations
• Virtualized VDI Core
In a Virtualized VDI Core configuration, the Sun VDI 3 Primary and two Secondary nodes could be hosted in virtual
machines--this may work for some deployments, but it is explicitly unsupported! Sun VDI 3 core with embedded
database provides High-Availability out of the box, which requires network and I/O response times that cannot be
guaranteed in virtualized environments. Customers who rely on a fully virtualized environment will need to use a
configuration utilizing an external database. However, there is one exception for the Primary VDI Core node. This
node can be virtualized with the embedded database, as long as it is not used for delivering sessions to users. For
more information about virtualizing the MySQL database, see the MySQL FAQs.
• Mixed Endian Cluster Nodes
In a Mixed Endian Cluster Nodes configuration, the Sun VDI 3 Primary and two Secondary nodes could be hosted on
machines with dissimilar CPU types (a mix or x86 and SPARC). For a Sun VDI 3 Core with embedded database, the
management node (Primary VDI node) and first two data nodes (Secondary VDI nodes) used in the cluster must have
the same architecture (all x86 or all SPARC). That is, all machines hosting nodes must be either big-endian or littleendian, and you cannot use a mixture of both. Any additional nodes added (since they are just MySQL client nodes
and not part of the data cluster) can be either architecture. For more information about mixed Endian MySQL nodes,
see the MySQL Limitations.
• VDI Demo
The VDI Demo configuration cannot be supported as a production environment VDI deployment, because the
embedded database configuration does not comply with MySQL standards. We do, however, encourage customers to
try VDI Demo configuration to evaluate the new features before committing to a larger deployment. See the Getting
Started - VDI Demo page for step-by-step information about installing and configuring a Demo setup. If you run into
any problems, you can always consult the VDI Forum or check the Troubleshooting and FAQs.
Document generated by Confluence on Jun 24, 2009 06:55
Page 24
Deployment Guide
This page last changed on Apr 28, 2009 by stephanielewellen.
Deployment Guide
This chapter provides guidelines for the design of the hardware architecture for VDI 3 deployments with VirtualBox. The
information provided here is derived from a sizing test with 1000 desktops which were running a script to simulate an
office workload (for closer details see the 'Appendix' chapter). The workload is different for every single installation and
relatively small changes in the usage patterns can have noticeable effects on the hardware requirements. Therefore it is a
good practice to size every deployment individually. This guide provides cornerstones for such efforts.
The hardware environment for a VDI 3 deployment typically looks like this:
Every (production) deployment consists of one primary VDI core server and at least two secondary VDI core servers to
provide redundancy. The VDI core servers host a clustered MySQL database for the VDI data (optional remote databases
are supported), route information between clients and desktops, and provide the broker functionality which delivers the
desktops to the clients. The VirtualBox servers run the virtual machines which provide the desktops. The storage(s) provide
the virtual disks which are interpreted as physical disks by the operating systems running within the virtual machines. The
iSCSI protocol is used to transfer the disk data between the VirtualBox servers and the storages. That iSCSI data creates a
major part of the total network traffic of a VDI system (for a closer discussion see the 'Storage' chapter).
Other consumers of network bandwidth worth mentioning are the clients of VDI 3 (Sun Rays, RDP clients and the Sun
Secure Global Desktop). The clients connect to the VirtualBox servers via the VDI core servers. In case of a Sun Ray client,
which uses the ALP protocol to transfer the desktop graphics, the VDI core servers convert the RDP protocol received by
the VirtualBox servers to the ALP protocol. So there is one data stream for each client connection between the client, the
VDI core server and the VirtualBox server. RDP clients, like the windows connector (uttsc), connect to the VDI core server
Document generated by Confluence on Jun 24, 2009 06:55
Page 25
which in turn uses the 'RDP redirect' feature to instruct the clients to connect to the VirtualBox servers directly as there is
no need to translate the RDP protocol. In this case there is a data stream between the soft client and the VirtualBox server.
The texts behind the bold terms are rules of thumb for calculating the according resource requirements.
VDI Core Servers
The primary VDI core server requires a dual-core CPU and 2 GB of memory. As long as the VDI services are not configured
on that server (which is not recommended) these hardware requirements do not change with the number of running
desktops.
The secondary VDI core server requirements for the number of cores and memory size varies with the number of running
desktops supported, as well as the required network bandwidth. The bandwidth also varies with the content displayed.
The numbers given below are typical for office work. Displaying videos or web pages with flash content can multiply the
required bandwidth.
Number of cores = number of running desktops / 20
Example: Two secondary VDI core servers with 8 CPUs and 4 cores per CPU can serve 2 * 8 * 4 * 20 = 1280 running
desktops
Memory size [MB] = number of desktops * 110 MB + 2048 MB
Example: Two secondary VDI core servers with 64 GB of memory can serve (2 * 64 * 1024 MB - 2 * 2048 MB) / 110 MB =
1154 running desktops
Network bandwidth [Mb/s] = number of running desktops * 0.15 [Mb/s]
Example: One secondary VDI core server with one 1 Gb Ethernet interface can serve 1024 / 0.15 Mb/s = 6827 running
desktops
Please refer also to the Complete Sun Ray Server Sizing Guide
VirtualBox Servers
VDI 3 supports any server running Solaris 10u6 to host VirtualBox.
Number of cores = number of running desktops / 4
Example: A server with 8 CPUs and 4 cores per CPU can support up to 8 * 4 * 4 = 128 running desktops
Memory size [MB] = number of running desktops * memory size of a desktop * 1.2 + 1024 MB
Example: A server with 64 GB of memory can support 64 * 1024 MB - 1024 MB / (512 MB * 1.2) = 105 running desktops of
512 MB in size
A rule of thumb for VirtualBox servers is: "A server with 32 cores and 64 GB of memory supports 100 desktops." While the
CPU power of the server chosen for the examples above allows to support 128 desktops it is not advisable to increase the
memory size to do so. At least 20% of the available CPU power should be available as security margin.
Network bandwidth [Mb/s] = storage network bandwidth / number of VirtualBox servers
For a closer discussion of the network bandwidth see the chapter 'Storage'.
100+ VMs: If you want to run more than 100 VMs on a single VirtualBox server you need to increase the SYSV semaphores
on the VirtualBox server. You need to set the number of available semaphores to the number of VMs you intend to run
including a security margin for other processes. To set the SYSV semaphores for 1000 VMs type as root:
prctl -r -n project.max-sem-ids -v 1024
projmod -s -K "project.max-sem-ids=(priv,1024,deny)" user.root
Document generated by Confluence on Jun 24, 2009 06:55
Page 26
The first line changes the available semaphores for the current process, the second line makes this a permanent system
setting for the 'root' user. If the VBoxSVC process is run by another user add a user.myuser line to the /etc/project file and
change the second line accordingly.
The maximum number of virtual machines on a single VirtualBox server is 1023.
Storage
VDI 3 supports any Sun Storage 7000 Unified Storage System and any server running the OpenSolaris 2008.11 operating
system.
The recommended disk layout is RAID 10 (mirrored sets in a striped set; ZFS stripes the data automatically between multiple
sets). It is called 'Mirrored' by the 7000 series. While this disk layout uses 50% of the available disk capacity for redundancy
it is faster than RAID 5 for intense small random read/writes which is the typical access characteristic for iSCSI.
The storages provide the virtual disks which are accessed by VirtualBox via iSCSI. iSCSI is a CPU-intensive protocol therefore
the number of cores of the storage are a decisive factor for its performance which makes the x7410 the best-suited solution
for heavy-duty installations as it can be equipped with up to 16 cores. Other important factors are the memory size (cache),
the number of disks and the available network bandwidth.
The network bandwidth is very volatile and determined by the relation of desktops starting up (peak network bandwidth)
and desktops that have cached the application(s) in use (avarage network bandwidth). Starting a VM creates a network
load of 150 MB which needs to be satisfied in ~30 seconds. If many desktops are started at the same point in time the
requested network bandwidth may exceed 1 Gb/s (if the CPUs of the storage can handle the load created by the iSCSI
traffic). This senario is typical for shift-work companies. In such a case it is recommended to set the "Pool / Cloning /
Machine State" option to "Running" which keeps the desktops always running and therefore decouples the OS boot from
the login of a user. Another option is to trunk several interfaces as a cheap way to provide more than 1 Gb/s bandwidth via
one IP. It is also possible to use Jumbo Frames to speedup iSCSI connections. Jumbo Frames need to be configured for all
participants of the network (storages, VirtualBox servers and switches) and it is important to note that Jumbo Frames are
not standardized so there is a risk of incompatibilities.
Typically there is no shortage of disk space. VDI 3 in combination with VirtualBox uses the 'sparse' volume feature of ZFS
which allows to allocate more space for volumes than physically available as long as the actual data written does not exceed
the capacity of the storage. This feature in combination with the fact that cloned desktops reuse unchanged data of their
templates results in a very effective usage of the available disk space. In this light the calculation for disk space below is a
worst-case scenario assuming that all volumes are completely used by data which differs from the template.
Number of cores = number of virtual disks in use / 200
Example: A x7210 storage with 2 CPUs and 4 cores per CPU can serve up to 2 * 4 * 200 = 1600 virtual disks
Memory size. The more the better as the free memory can be used as disk cache which reduces the access time
Average Network bandwidth [Mb/s] = number of virtual disks in use * 0.032 Mb/s
Example: A x7210 storage with one Gigabit Ethernet interface can serve up to 1000 / 0.032 = 31250 virtual disks
Peak Network bandwidth [Mb/s] = number of virtual disks in use * 40 Mb/s
Example: A x7210 storage with one Gigabit Ethernet interface can serve up to 1000 / 40 = 25 virtual disks
Disk space [GB] = number of desktops * size of the virtual disk [GB]
Example: A x7210 storage with a capacity of 46 TB can support 46 * 1024 GB / 2 / 8 GB = 2944 8 GB disks in a RAID 10
configuration
Helpful Hints
• The graphic performance of desktops is better without background images.
• Avoid processes which generate constant or, even worse, burst disk I/O, as for example the indexing service of MS
Windows or virus scanners with a scheduled scan every Friday at 9 pm.
Document generated by Confluence on Jun 24, 2009 06:55
Page 27
Appendix
The script used during the sizing tests starts a sequence of applications generating a workload which is aligned with the
'heavy worker' workload as defined in VMware's 'VDI server sizing and scaling':
1.
2.
3.
4.
5.
6.
7.
Start PowerPoint. Load a massive presentation and browse the slides. Close PowerPoint.
Start Internet Explorer. Browse three different Web pages. Close Internet Explorer.
Start Command Prompt. Do a directory listing.
Start PowerPoint. Load a massive presentation and browse the slides. Close PowerPoint.
Start Excel. Open an Excel sheet. Close Excel.
Start PowerPoint. Load a massive presentation and browse the slides. Close PowerPoint.
Start Word. Type a small document. Close Word.
Document generated by Confluence on Jun 24, 2009 06:55
Page 28
Installing
This page last changed on Jun 17, 2009 by thomaspfohe.
Installing
1. Review the System Requirements
Check the VDI System Requirements to determine what equipment you will need.
2. Obtain the Sun VDI Software
To download a copy of the Sun VDI software, go to sun.com.
To download VDI 3 Patch 1:
• x86 platforms
• SPARC platforms
3. Set Up a Virtualization Platform
VDI 3 enables you to set up one or more virtualization platforms. You can set up xVM VirtualBox or VMware Infrastructure
platforms (or both).
Sun xVM VirtualBox
1. Set Up a Storage Server
• How to Set Up a Solaris Storage Server
• How to Set Up an OpenSolaris Storage Server
• How to Set Up a Sun Storage 7000 Unified
Storage System
2. Set Up a Sun xVM VirtualBox Server
3. Define Virtual Machine Templates
VMware Infrastructure
1.
2.
3.
4.
Set Up a VMware ESX Server
Set Up a VMware vCenter Server
Define Virtual Machine Templates
Test the VMware Infrastructure Setup
4. Install and Configure the VDI Core
The VDI Core is the central management layer between the virtualization platform and the desktop access clients.
1. Install the VDI Core
2. Configure the VDI Core
• How to Configure Sun VDI for an Evaluation Environment
• How to Configure Sun VDI for a Production Environment
• How to Configure a Remote MySQL Database
• Reconfiguring the VDI MySQL Cluster
° How to do a Rolling Restart of Your MySQL Cluster
° How to Prevent Unrestricted SQL Node Joins
° MySQL Cluster Reconfiguration Scenarios
• Backing Up the VDI Configuration
• VDI Default Configuration
Optional Tasks
• Patch VDI 3
• Check VDA Services
° How to Check the Core Service
° How to Check the Database Service
° How to Check the Admin GUI Service
° How to Check the RDP Broker Service
• Upgrade from VDI 2 to VDI 3
Document generated by Confluence on Jun 24, 2009 06:55
Page 29
• Remove the VDI Core
Document generated by Confluence on Jun 24, 2009 06:55
Page 30
Testing the VMware Infrastructure Setup
This page last changed on Apr 03, 2009 by stephanielewellen.
Testing the VMware Infrastructure Setup
It is highly recommended to test the configuration made so far, before setting up the remaining Sun VDI components. A
quick manual test consists of cloning a virtual machine using the desired template and customization specification followed
by a remote access to the cloned virtual machine via RDP:
Steps
1. Open the Virtual Infrastructure Client.
2. Right-click on the desired template and select Deploy Virtual Machine from this Template.
a. The wizard will ask you to specify a name for the new VM - select the desired host/cluster and datastore with
sufficient free space.
b. On the Guest Customization step, select the Customize Using an Existing Customization Specification option,
then choose the customization specification you just created from the list.
c. Review your selections, and click Finish to begin cloning.
3. After the cloning has finished, select the new virtual machine and power it on.
After some time you should see its IP address and hostname appear in the Virtual Infrastructure Client. Make sure
that it has a unique IP address and that the hostname corresponds to the virtual machine name.
4. On the VMware vCenter server, open a Remote Desktop Connection by clicking Start > All Programs > Accessories >
Communications > Remote Desktop Connection.
a. In the Remote Desktop Connection window, enter the IP address of the newly cloned virtual machine, and click
Connect.
b. If everything is configured correctly, a full-screen remote desktop session to your virtual machine should be
displayed.
Previous
Page
Defining
Virtual
Machine
Templates
in VMware
vCenter
Document generated by Confluence on Jun 24, 2009 06:55
Up One Page
Level
Installing
Page 31
Installing the VDI Core
This page last changed on Jun 08, 2009 by stephanielewellen.
Installing the VDI Core
The VDI Core can be installed on an x86 or SPARC platform running Solaris 10 Update 6 (64-bit). It is important to note that
when you are choosing to use the embedded MySQL Cluster database all of your hosts need to be of the same architecture
either x86 or SPARC. If you have an xVM VirtualBox virtualization platform, the VDI Core and xVM VirtualBox may share the
same host.
Steps
1. Become root user:
$ su
2. Unzip the VDI archive on the VDI server:
# unzip vda_3.0_amd64.zip
or
# unzip vda_3.0_sparc.zip
3. Go to the image directory:
# cd image
4. Execute the installation.
The files will be installed to /opt/SUNWvda/.
# ./vda-install
The installation script displays the text of the Sun Software License Agreement and prompts you to accept its terms
and conditions. After the license confirmation, the installation process begins, and all VDI components are installed.
These components include:
Sun Ray Server Software
Sun Ray Connector for Windows Operating Systems
Sun VDI Core
MySQL Database
Web Administration
Apache Tomcat
RDP Broker
Sun Ray Client
On completion, the installation script will indicate the path of the installation log file. All installation log files
are stored in the directory /var/sadm/install/logs.
5. Reboot the VDI server:
•
•
•
•
•
•
•
•
Document generated by Confluence on Jun 24, 2009 06:55
Page 32
# reboot
Up One Page
Level
Installing
Document generated by Confluence on Jun 24, 2009 06:55
Next Page
Configuring the
VDI Core
Page 33
Configuring the VDI Core
This page last changed on Jun 17, 2009 by stephanielewellen.
Configuring the VDI Core
Configuring the VDI Core for a Production Environment provides high availability and the required level of performance for
medium to bigger deployments. For the Production Setup a minimum of three VDI hosts is required in order to guarantee
high-availability: a Primary host, and two Secondary hosts.
• How to Configure Sun VDI for a Production Environment
• How to Configure a Remote MySQL Database
Additional VDI Configuration Options
If you have an expert understanding of MySQL and would like to reconfigure or back up the VDI MySQL Cluster, please
refer to the following sections:
• Reconfiguring the VDI MySQL Cluster (Optional)
• Backing Up the VDI Configuration (Optional)
Previous
Page
Installing the
VDI Core
Document generated by Confluence on Jun 24, 2009 06:55
Up One Page
Level
Installing
Next Page
Checking VDA
Services
Page 34
How to Configure Sun VDI for an Evaluation Environment
This page last changed on Apr 03, 2009 by stephanielewellen.
How to Configure Sun VDI for an Evaluation Environment
It is only recommended to use the Evaluation Setup for demo and showcase setups.
Steps
1. Go to the installation directory:
cd /opt/SUNWvda/sbin
2. Execute the configuration script:
./vda-config
3. Choose the 0 Evaluation Sun VDI Host configuration type.
At the end of the configuration script you will be given a path of the configuration log file. Or, on Solaris platforms, you
can find it at /var/adm/log/vda-config.<date and time>.log
For the evaluation setup no password will be set for the MySQL database.
To set a password use the following script: /opt/SUNWvda/mysql/bin/mysqladmin --defaultsfile=/etc/opt/SUNWvda/my.cnf password <new password>.
Up One Page
Level
Configuring the
VDI Core
Document generated by Confluence on Jun 24, 2009 06:55
Next Page
How to
Configure
Sun VDI for
a Production
Environment
Page 35
How to Configure Sun VDI for a Production Environment
This page last changed on Jun 17, 2009 by stephanielewellen.
How to Configure Sun VDI for a Production Environment
To configure VDI 3 for a production environment, you need to set up a minimum of one physical Primary Host and two
physical Secondary Hosts.
Before you Begin
If your VDI installation will consist of more than 20 secondary hosts, add more [ MYSQLD ] sections to the
end of the file '/etc/opt/SUNWvda/config.clustered.ini'.
Steps
1. Configure the Primary Sun VDI Host.
a. Go to the installation directory:
cd /opt/SUNWvda/sbin
b. Execute the configuration script:
./vda-config
Read VDI Default Configuration for more information about the configuration script.
c. Choose the 1 Primary Sun VDI Host configuration type.
d. Specify an administrator password.
This is the password that will be used to secure the MySQL database.
e. Specify a cluster signature.
This password will be used to encrypt messages that will be exchanged among the Sun Ray hosts forming a
Fail-Over-Group (FOG). This password must be the same on all hosts that will be added to the multi-host group.
It needs to be at least 8 characters long.
f. Choose whether to use the MySQL Cluster database bundled with VDI 3.0 or connect to a remote MySQL
database.
• If you choose to use the MySQL Cluster, you must specify the DNS names of your first two secondary
hosts, which will also run the MySQL Cluster data nodes.
• If you choose to connect to a remote MySQL database, the remote database must be MySQL 5.0 or
higher with InnoDB or MySQL Cluster 6.2.15 or higher.
On completion, the configuration script will indicate the path to the configuration log file. This will be /
var/adm/log/vda-config.<date and time>.log.
The configured primary host cannot host Sun Ray sessions nor run the VDI Service.
It just serves as a primary in the Sun Ray FOG and as the management node of the
MySQL Cluster database if the VDI MySQL Cluster database option has been chosen
during configuration. In order to turn it into a fully-fledged VDI host (which is not
recommended) you would have to run vda-config a second time after the first two
secondaries have been configured.
2. Configure the Secondary Sun VDI Hosts.
Always wait until the configuration of one Secondary host has completed before configuring the
next one.
You may spoil the MySQL Cluster otherwise.
3. Go to the installation directory:
Document generated by Confluence on Jun 24, 2009 06:55
Page 36
cd /opt/SUNWvda/sbin
4. Execute the configuration script:
./vda-config
a. Select the 2 Secondary Sun VDI Host configuration type and specify an administrator password.
b. Specify a cluster signature.
Must be the same as for the primary host.
c. Specify the maximum number of users to be hosted.
d. Specify the user ID range start.
This information is useful to avoid user ID conflicts and to comply with company regulations regarding user
IDs.
e. Enter the DNS names of the primary host and the secondary host you are configuring.
f. Choose whether to use the MySQL database of the Sun VDI cluster or connect to a remote MySQL database.
This selection must be the same as for the primary host.
• If you choose a remote MySQL database, you will need to provide some additional information about the
database host and users.
Up One Page
Level
Configuring
the VDI Core
Document generated by Confluence on Jun 24, 2009 06:55
Next Page
How to
Configure
a Remote
MySQL
Database
Page 37
How to Configure a Remote MySQL Database
This page last changed on Apr 03, 2009 by stephanielewellen.
How to Configure a Remote MySQL Database
As an alternative to the VDI MySQL Cluster database, it is possible to use a remote MySQL database. This needs to be a
MySQL version 5.0 (or higher) or a MySQL Cluster version 6.2.15 (or higher). You can use either the 32-bit or the 64-bit
version. It is important that a transactional storage engine is available, which will usually be InnoDB or NDB.
VDI MySQL Cluster database vs. Remote MySQL Database
Sun VDI allows you to either make use of the MySQL Cluster database that is bundle with the software or
is able to integrate into an existing MySQL database. The first option requires almost no knowledge of SQL
databases in general and MySQL in particular. It is well suited for small to medium deployments. For larger
deployments, if a MySQL database exist already or if specific security related requirements exist choosing
the remote MySQL database option more likely the right choice. Find details on the remote database
configuration below.
Steps
1. Configure the Primary Sun VDI Host.
a. See Configure the Primary Sun VDI Host Steps 1-3 above.
b. Choose 2 Remote Database.
i. Specify the DNS name of your MySQL server.
ii. Specify the port on which your MySQL server is listening.
iii. Specify a privileged database administrator. This user needs to have the privileges to create databases
and add users. If you do not have such a user yet follow the instructions below How to Create a
Privileged Database User in order to add one.
iv. Specify the password for the database administrator that you have specified.
v. Specify whether you want to connect to your MySQL server via SSL or not.
vi. Specify the name of the VDI database that will be created or just accept the default 'vda'.
vii. Specify the name of a user that will be associated with and used to access the VDI database. Alternatively
you can simply accept the default 'vdadb'.
viii. Specify a password for the VDI database user.
2. Configure the Secondary Sun VDI Hosts.
a. Follow Configure the Secondary Sun VDI Hosts Steps 1-5 above.
b. Choose 2 Remote Database.
i. Specify the DNS name of your MySQL server.
ii. Specify the port on which your MySQL server is listening.
iii. Specify whether you want to connect to your MySQL server via SSL or not.
iv. Specify the name of your VDI database which has been specified when configuring your Primary Sun VDI
host.
v. Specify the name of the user that has access to the VDI database. This is the user you have specified
when configuring your Primary Sun VDI host (the default is 'vdadb').
vi. Specify the password for your VDI database user.
• How to Create a Privileged Database User
You may want to set up a privileged database user who has, among other things, the privileges to create databases
and other users.
Use the 'mysql' command line tool to enter the mysql interactive mode as root. Then execute the following
statements (replace '<user>' and '<password>' accordingly):
GRANT ALL PRIVILEGES ON *.* TO '<user>'@'localhost' IDENTIFIED BY '<password>' WITH GRANT OPTION;
GRANT ALL PRIVILEGES ON *.* TO '<user>'@'%' IDENTIFIED BY '<password>' WITH GRANT OPTION;
For more information, follow the instructions outlined by MySQL in Adding New User Accounts to MySQL.
Document generated by Confluence on Jun 24, 2009 06:55
Page 38
Previous
Page
How to
Configure
Sun VDI for
a Production
Environment
Document generated by Confluence on Jun 24, 2009 06:55
Up One Page
Level
Configuring the
VDI Core
Next Page
Reconfiguring
the VDI MySQL
Cluster
Page 39
Reconfiguring the VDI MySQL Cluster
This page last changed on Apr 03, 2009 by stephanielewellen.
Reconfiguring the VDI MySQL Cluster
The following tips and procedures require a profound knowledge of the VDI configuration in general and
the MySQL Cluster database configuration in particular.
Be sure have have this level of knowledge before continuing. Familiarize yourself with MySQL Cluster.
Detailed information can be found in the official MySQL documentation MySQL Cluster Overview. Failures
made when executing the following procedures may seriously spoil your VDI installation or make it
completely unusable.
When the MySQL Cluster database option has been chosen during the VDI configuration a MySQL Cluster database will
be installed under the hood. It has been mentioned already that for this option at least three physical hosts are required
each of which will assume a different role from the perspective of the MySQL Cluster database. A detailed overview about
MySQL Cluster node types and core concepts can be found here: MySQL Cluster Core Concepts. In particular there will
exist:
1.
2.
3.
4.
A Primary hosts which runs the MySQL Cluster Management node
The 1st Secondary which runs the first MySQL Cluster data node as well as a SQL node
The 2nd Secondary which runs the second MySQL Cluster data node as well as a SQL node
Further Secondaries which will run a SQL node each
This is a rather static MySQL Cluster configuration consisting always only of one Management node, two Data nodes and
up to 99 SQL nodes. Besides that several compromises have been made favoring ease of installation and configuration over
absolute security. Find detailed information about security related aspects in conjunction with MySQL Cluster here: MySQL
Cluster Security Issues. Several reasons may exist forcing you to adapt the MySQL Cluster database setup for instance:
• Security, you want to make the MySQL Cluster installation more secure
• Scalability/Fail-safety, you want to increase the level of fail-safety of the MySQL Cluster database by adding more Data
nodes
• Error recovery, one of your hosts suffers from an outage and a new or another hosts need to take over his role e.g.
one of your Data node hosts is broken which is a dangerous situation as in that moment you lack fail-safety (one
Data node alone doesn't provide fail-safety). In a situation like this you are maybe forced to promote one of your
other secondary hosts to be a Data node.
What follows are some procedures that can be followed in order to do some reconfigurations to the MySQL Cluster
configuration none of which is support out-of-the-box by the 'vda-config' script. Most of these reconfiguration procedures
imply a complete outage of the system. Be aware also that you have to comply with the MySQL Cluster rules regarding
reconfiguration as published here Performing Rolling Restart of MySQL Cluster.
• How to do a Rolling Restart of Your MySQL Cluster
• MySQL Cluster Reconfiguration Scenarios
• How to Prevent Unrestricted SQL Node Joins
Previous
Page
How to
Configure a
Remote MySQL
Database
Document generated by Confluence on Jun 24, 2009 06:55
Up One Page
Level
Configuring the
VDI Core
Next Page
Backing
Up the VDI
Configuration
Page 40
How to do a Rolling Restart of Your MySQL Cluster
This page last changed on Apr 03, 2009 by stephanielewellen.
How to do a Rolling Restart of Your MySQL Cluster
Be sure to comply with the MySQL Cluster rules regarding reconfiguration as published here: Performing Rolling Restart of
MySQL Cluster.
Steps
1. Stop the vdadb:core service on the Primary host.
Execute svcadm disable vda:/application/database/vdadb:core. Verify that it has been stopped by
executing svcs svc:/application/database/vdadb:core (this can take a couple of minutes). You should
see an output similar to this one:
STATE
disabled
STIME FMRI
Dez_09 svc:/application/database/vdadb:core
2. Start the vdadb:core service again on the Primary host.
Execute svcadm enable svc:/application/database/vdadb:core. This makes the new MySQL Cluster
configuration effective. Verify that the service has been started by executing svcs svc:/application/
database/vdadb:core (again, this may take a couple of minutes). You should see an output similar to this one:
STATE
online
STIME FMRI
Dez_09 svc:/application/database/vdadb:core
3. Stop your first data node.
Execute svcadm disable svc:/application/database/vdadb:core on your first Secondary host. Verify
that is has been stopped by executing svcs svc:/application/database/vdadb:core (this can take a
couple of minutes).
STATE
disabled
STIME FMRI
Dez_09 svc:/application/database/vdadb:core
4. Once the data node has been stopped, start it again.
Execute svcadm enable svc:/application/database/vdadb:core and wait until it has been started
(again, this might take a couple of minutes). Verify that the service has been started by executing svcs svc:/
application/database/vdadb:core. You should see output similar to this one:
STATE
online
STIME FMRI
Dez_09 svc:/application/database/vdadb:core
5. Repeat the last two steps on your second Secondary host.
6. Stop the SQL node on every secondary host.
Execute svcadm disable svc:/application/database/vdadb:sql. Verify that is has been stopped by
executing svcs svc:/application/database/vdadb:sql (this can take a couple of minutes).
STATE
STIME
FMRI
Document generated by Confluence on Jun 24, 2009 06:55
Page 41
disabled
Dez_09 svc:/application/database/vdadb:sql
7. Start the SQL node on every secondary host.
Execute svcadm enable svc:/application/database/vdadb:sql. Verify that is has been started by
executing svcs svc:/application/database/vdadb:sql (this can take a couple of minutes).
STATE
online
STIME FMRI
Dez_09 svc:/application/database/vdadb:sql
Up One Page
Level
Reconfiguring
the VDI MySQL
Cluster
Document generated by Confluence on Jun 24, 2009 06:55
Next Page
MySQL Cluster
Reconfiguration
Scenarios
Page 42
How to Prevent Unrestricted SQL Node Joins
This page last changed on Apr 03, 2009 by stephanielewellen.
How to Prevent Unrestricted SQL Node Joins
The default MySQL Cluster configuration allows up to 20 SQL nodes joining the MySQl Cluster. In security sensitive
environment however one might want to prevent unrestricted SQL node joins. This is just one step toward a more secure
MySQl Cluster configuration other steps can be taken by following the suggestions from the official MySQL site MySQL
Cluster Security Issues. Restricting SQL nodes from joining the MySQL Cluster will be accomplished by changing the file
/etc/opt/SUNWvda/config.ini on the Primary VDI host. At the end of this file there are a couple of [ MYSQLD ]
sections. For every SQL node that wants to join the MySQL Cluster there has to exist a free [ MYSQLD ] slot. For VDI every
Secondary host (and the Primary if configured to serve sessions as well) runs its own SQL node hence one [ MYSQLD ] slot
has to exist for every Secondary and the Primary in case. Restricted access of SQL nodes will be accomplished by exactly
specifying the hosts that are allowed to join. Augment the [ MYSQLD ] slots in your /etc/opt/SUNWvda/config.ini
file like this:
...
[MYSQLD]
HostName=<ip_or_dns_of_the_host_running_an_sql_node>
...
Please follow the existing convention in this file regarding the use of IPs vs. host names. Mixing of IPs and host names in /
etc/opt/SUNWvda/config.ini is not allowed. Remove all unnecessary [ MYSQLD ] slots. Example: Imagine you have 3
secondary hosts with the the following host names: my-1st-secondary, my-2nd-secondary, my-3rd-secondary.
Initially your /etc/opt/SUNWvda/config.ini will look like this:
...
[MYSQLD]
[MYSQLD]
[MYSQLD]
[MYSQLD]
[MYSQLD]
[MYSQLD]
[MYSQLD]
...
[MYSQLD]
Change it to look like this:
...
[MYSQLD]
HostName=my-1st-secondary
[MYSQLD]
HostName=my-2nd-secondary
[MYSQLD]
HostName=my-3rd-secondary
Previous Page
Document generated by Confluence on Jun 24, 2009 06:55
Up One Page
Level
Page 43
MySQL Cluster
Reconfiguration
Scenarios
Document generated by Confluence on Jun 24, 2009 06:55
Reconfiguring
the VDI MySQL
Cluster
Page 44
MySQL Cluster Reconfiguration Scenarios
This page last changed on Apr 03, 2009 by stephanielewellen.
MySQL Cluster Reconfiguration Scenarios
The following table show the different host types from the perspective of the MySQL Cluster database and the possible
transformation from one type to another. The following terms will be used:
•
•
•
•
Non-VDI host - a host which is not yet a VDI host e.g. a completely new host
Primary-Management host - the host which is running the MySQL Cluster Management node
Secondary-Data host - a secondary host which is running one of the MySQL Cluster data nodes as well as a SQL node
Secondary-SQL host - a secondary host which is running a SQL node only
From/To
Non-VDI host
Primary-Management
host
Secondary-Data host
Secondary-SQL host
Non-VDI host
-
From Non-VDI to
Primary-Management
host
From Non-VDI to
Secondary-Data host
From Non-VDI to
Secondary-SQL host
Primary-Management
host
From PrimaryManagement to NonVDI host
-
From PrimaryManagement to
Secondary-Data host
From PrimaryManagement to
Secondary-SQL host
Secondary-Data host
From Secondary-Data
to Non-VDI host
From SecondaryData to PrimaryManagement host
-
From Secondary-Data
to Secondary-SQL
host
Secondary-SQL host
From Secondary-SQL
to Non-VDI host
From SecondarySQL to PrimaryManagement host
From Secondary-SQL
to Secondary-Data
host
-
From Non-VDI to Primary-Management host
This reconfiguration implies a complete outage of the system.
1. Prepare your new Primary-Management host by Installing the VDI Core and configuring it as Primary VDI host
according to Configuring the VDI Core.
2. Prepare your two Secondary-Data hosts.
a. Stop the vdadb:core service by executing
svcadm disable svc:/application/database/vdadb:core
b. Stop the vdadb:sql service by executing
svcadm disable svc:/application/database/vdadb:sql
c. If your original Primary-Management host is still running, un-configure it now by executing /opt/SUNWvda/
sbin/vda-config -u.
d. On both Secondary-Data hosts edit /etc/opt/SUNWvda/my.cnf exchange the ip address of the original
Primary-Management host with that of your new one.
e. Edit /etc/opt/SUNWvda/vdadbconnection.properties and exchange the ip address of the original
Primary-Management host with that of your new one.
f. On both Secondary-Data hosts change the svc:/application/database/vdadb:core SMF
configuration by executing svccfg -s svc:/application/database/vdadb:core setprop
config/ndbd_connectstring = astring:
g. Refresh the svc:/application/database/vdadb:core SMF service description: svcadm refresh
svc:/application/database/vdadb:core
h. Check that your svc:/application/database/vdadb:sql SMF service is in 'disabled' state. Start it
again by executing svcadm enable svc:/application/database/vdadb:core (this can take a
couple of minutes).
Document generated by Confluence on Jun 24, 2009 06:55
Page 45
i. Start the svc:/application/database/vdadb:sql SMF service again by executing svcadm enable
svc:/application/database/vdadb:sql.
From Non-VDI to Secondary-Data host
This reconfiguration implies a complete outage of the system.
1. Stop the Data node as well as the SQL node on your two Secondary-Data hosts (or the remaining one in case one
data node is broken etc.). On all Secondary-SQL hosts stop the SQL node.
a. On your Secondary-Data hosts execute svcadm disable svc:/application/database/vdadb:core.
Wait until the service has been stopped (this can take a couple of minutes). Verify that it has been stopped by
executing svcs svc:/application/database/vdadb:core (this can take a couple of minutes). When
the service has been stopped correctly you will see something similar to this:
STATE
disabled
STIME FMRI
Dez_09 svc:/application/database/vdadb:core
b. On your Secondary-Data as well as on all Secondary-SQL hosts stop the SQL node by executing svcadm
disable svc:/application/database/vdadb:sql. Wait until the service has been stopped (this
can take a couple of minutes). Verify that it has been stopped by executing svcs svc:/application/
database/vdadb:sql. When the service has been stopped correctly you will see something similar to this:
STATE
disabled
STIME FMRI
Dez_09 svc:/application/database/vdadb:sql
2. On your Primary host stop the svc:/application/database/vdadb:core service by executing svcadm
disable svc:/application/database/vdadb:core. Wait until the service has been stopped. Verify that the
service has been stopped by executing svcs svc:/application/database/vdadb:core. When the service
has been stopped correctly you will see something similar to this:
STATE
disabled
STIME FMRI
Dez_09 svc:/application/database/vdadb:core
3. On your Primary host:
a. Change the file /etc/opt/SUNWvda/config.ini and exchange the ip/hostname of the data node that you
want to retire with that of the new one.
Be sure not to mix hostnames and ip addresses in this file! Follow the existing convention in this file.
b. Start the svc:/application/database/vdadb:core service again by executing svcadm enable
svc:/application/database/vdadb:core. Wait a couple of minutes and check that the service has
been started correctly again by executing svcs svc:/application/database/vdadb:core. When the
service has been started correctly you will see something similar to this:
STATE
online
STIME FMRI
Dez_09 svc:/application/database/vdadb:core
4. On your remaining "old" Secondary-Data host:
a. Start the data node again by executing svcadm enable svc:/application/database/vdadb:core.
Wait until the service has been started (this can take a couple of minutes). Verify that it has been started by
executing svcs svc:/application/database/vdadb:core (this can take a couple of minutes). When
the service has been started correctly you will see something similar to this:
Document generated by Confluence on Jun 24, 2009 06:55
Page 46
STATE
online
STIME FMRI
Dez_09 svc:/application/database/vdadb:core
b. Start the SQL node again by executing svcadm enable svc:/application/database/vdadb:sql.
Wait until the service has been started (this can take a couple of minutes). Verify that it has been started by
executing svcs svc:/application/database/vdadb:sql (this can take a couple of minutes). When
the service has been started correctly you will see something similar to this:
STATE
online
STIME FMRI
Dez_09 svc:/application/database/vdadb:sql
5. Configure your new Secondary-Data host by simply executing /opt/SUNWvda/sbin/vda-config
6. On your Secondary-SQL hosts start the SQL node again by executing svcadm enable svc:/application/
database/vdadb:sql. Wait until the service has been started (this can take a couple of minutes). Verify that it
has been started by executing svcs svc:/application/database/vdadb:sql (this can take a couple of
minutes). When the service has been started correctly you will see something similar to this:
STATE
online
STIME FMRI
Dez_09 svc:/application/database/vdadb:sql
From Non-VDI to Secondary-SQL host
As long as there are still free [ MYSQLD ] slots on the Primary available you can add a new SQL node by simply following
the steps outlined here: Installing the VDI Core and Configuring the VDI Core.
From Primary-Management to Non-VDI host
1. Un-configure your Primary-Management host.
2. Configure a new Primary-Management host using the instructions above.
From Primary-Management to Secondary-Data host
1. Convert the Primary-Management host to a Non-VDI host using the instructions above.
2. Now configure the host to run as a Secondary-Data host following these instructions.
From Primary-Management to Secondary-SQL host
1. Convert the management node to a nothing node using the instructions above.
2. Now configure the host to run an SQL node using these instructions.
From Secondary-Data to Non-VDI host
1. Un-configure the Secondary-Data host by executing /opt/SUNWvda/sbin/vda-config -u.
2. Setup a new Secondary-Data host using the instructions above.
From Secondary-Data to Primary-Management host
1. Un-configure the Secondary-Data by executing /opt/SUNWvda/sbin/vda-config -u.
2. Setup a new Secondary-Data host follow the instructions above.
Document generated by Confluence on Jun 24, 2009 06:55
Page 47
3. Un-configure your existing Primary-Management host following these instructions
4. Reconfigure your former Secondary-Data host as a Primary-Management hosts following these instructions.
From Secondary-Data to Secondary-SQL host
1. Unconfigure the data node by executing /opt/SUNWvda/sbin/vda-config -u.
2. Set up a new data node using these instructions.
3. Convert the new data node into an SQL node using the instructions above.
From Secondary-SQL to Non-VDI host
1. Unconfigure the SQL node by executing /opt/SUNWvda/sbin/vda-config -u.
From Secondary-SQL to Primary-Management host
1. Unconfigure the SQL node by executing /opt/SUNWvda/sbin/vda-config -u.
2. Replace your existing management node by the unconfigured SQL node using these instructions.
From Secondary-SQL to Secondary-Data host
1. Unconfigure your data node by executing /opt/SUNWvda/sbin/vda-config -u.
2. To setup a new data node, use the instructions above.
Previous
Page
How to do a
Rolling Restart
of Your MySQL
Cluster
Document generated by Confluence on Jun 24, 2009 06:55
Up One Page
Level
Reconfiguring
the VDI MySQL
Cluster
Next Page
How to Prevent
Unrestricted
SQL Node Joins
Page 48
Backing Up the VDI Configuration
This page last changed on Apr 03, 2009 by stephanielewellen.
Backing Up the VDI Configuration
The use of MySQL Cluster for the VDI configuration implies a high level of fail-safety already which reduces the need
for backups as a means for disaster recovery. Find further details about this topic in the official MySQL documentation.
Nevertheless there may exist reasons for creating backups of the VDI configuration. Creating a backup of the VDI MySQL
Cluster database is relatively easy accomplished. Detailed steps on how to do this can be found in the official MySQL
documentation under the section Online Backup of MySQL Cluster. When following the steps outlined there the backup
files of your VDI configuration database will reside in '/var/opt/SUNWvda/mysql-cluster/BACKUP' on each of your first two
secondary hosts which are running the MySQL Cluster data nodes. You can save these directories aside and restore the VDI
database from this backup later in time.
Please keep in mind that flexible desktop assignments existing at the time when the backup will be created
might not be valid anymore when the VDI configuration has to be restored from this backup. This may
lead to some unexpected side effects. For this reason you should consider replication as an alternative
to regularly taken backups. Master-Slave replication is supported with the MySQL Cluster version coming
along with VDI. Find details on the topic here: MySQL Cluster Replication
Previous Page
Reconfiguring
the VDI MySQL
Cluster
Document generated by Confluence on Jun 24, 2009 06:55
Up One Page
Level
Configuring the
VDI Core
Page 49
Checking VDA Services
This page last changed on Apr 03, 2009 by stephanielewellen.
Checking VDA Services
It is important to know how to check the status of the different services provided by Sun VDI. Most services run under the
control of the Solaris Service Management Facility (SMF).
•
•
•
•
How to Check the Core Service
How to Check the Database Service
How to Check the Admin GUI Service
How to Check the RDP Broker Service
Previous
Page
Configuring the
VDI Core
Document generated by Confluence on Jun 24, 2009 06:55
Up One Page
Level
Installing
Next Page
Removing the
VDI Core
Page 50
How to Check the Core Service
This page last changed on Apr 03, 2009 by stephanielewellen.
How to Check the Core Service
Starting with Sun VDI 3, the main VDI Core service now runs as a module within the Common Agent Container (cacao). This
Java-based agent is an integrated part of Solaris 10 and is already used in a wide range of Sun products. If you encounter
any issues, you should first check the status of the agent as well as the status of the VDI Core service module.
To check the status of the Common Agent Container execute as root:
# cacaoadm status
or alternatively use the Solaris Service Management Facility:
# svcs svc:/application/management/common-agent-container-1:default
To check the status of the VDI Core service module (deployed within the agent):
# cacaoadm status com.sun.vda.service_module
Log messages will appear in the Common Agent Container log file at:
# /var/cacao/instances/default/logs/cacao.0
Log messages at error or warning level will also be forwarded to the syslog daemon.
Up One Page
Level
Checking VDA
Services
Document generated by Confluence on Jun 24, 2009 06:55
Next Page
How to Check
the Database
Service
Page 51
How to Check the Database Service
This page last changed on May 07, 2009 by tino-rachui.
How to Check the Database Service
Sun VDI Core uses a MySQL database which is configured within the Sun VDI services or remotely. To ensure that the
database service is up and running:
# /opt/SUNWvda/sbin/vda-db-status status
If not configured remotely, the database service runs under the Solaris Service Management Facility. Depending on the
selected configuration, the status of the database service can also be checked as explained below.
In an Evaluation Environment
# svcs svc:/application/database/vdadb:sql
In a Production Environment
On a Primary host or on the specified Secondary hosts A and B (i.e. first and second data nodes), the status of the database
service engine can be checked using:
# svcs svc:/application/database/vdadb:core
Also, on any Secondary host:
# svcs svc:/application/database/vdadb:sql
The corresponding log files can be located at:
# /var/svc/log/application-database-vdadb:core.log
# /var/svc/log/application-database-vdadb:sql.log
Previous Page
How to Check
the Core Service
Document generated by Confluence on Jun 24, 2009 06:55
Up One Page
Level
Checking VDA
Services
Next Page
How to Check
the Admin GUI
Service
Page 52
How to Check the Admin GUI Service
This page last changed on Apr 03, 2009 by stephanielewellen.
How to Check the Admin GUI Service
To check the status of the Admin GUI:
# /opt/SUNWvda/sbin/vda-webadmin status
The corresponding log file can be located at:
# /var/opt/SUNWvda/log/webadmin0.log
Previous Page
How to Check
the Database
Service
Document generated by Confluence on Jun 24, 2009 06:55
Up One Page
Level
Checking VDA
Services
Next Page
How to Check
the RDP Broker
Service
Page 53
How to Check the RDP Broker Service
This page last changed on Apr 03, 2009 by stephanielewellen.
How to Check the RDP Broker Service
The RDP broker service supplied by Sun VDI 3.0 also runs under the Solaris Service Management Facility. To ensure that the
RDP broker service is running:
# svcs svc:/application/rdpbroker:default
The log file for the RDP broker service can be located at:
# /var/svc/log/application-rdpbroker:default.log
Previous Page
How to Check
the Admin GUI
Service
Document generated by Confluence on Jun 24, 2009 06:55
Up One Page
Level
Checking VDA
Services
Page 54
Using the CLI
This page last changed on Mar 23, 2009 by stephanielewellen.
Using the CLI
The following sections provide detailed information about the usage, subcommands, and examples of VDI CLI commands.
You can also see examples of the man page associated with each command.
Command
Description
vda-install
Installation / Uninstallation of Sun VDI
vda-config
Configuration / Unconfiguration of Sun VDI
vda-migrate
Migration of settings and data from a previous version of
Sun VDI
vda-webadmin
Management of the Web server hosting the Sun VDI Web
Administration
vda
Administration of Sun VDI
vda-db-status
Status of the Sun VDI database service
vda-service
Management of the Sun VDI service
Document generated by Confluence on Jun 24, 2009 06:55
Page 55
The Man Page for the vda Command
This page last changed on Mar 31, 2009 by stephanielewellen.
The Man Page for the vda Command
Sun VDI 3.0
vda(1M)
NAME
vda - administer Sun Virtual Desktop Infrastructure
SYNOPSIS
/opt/SUNWvda/sbin/vda [-? | --help]
/opt/SUNWvda/sbin/vda [-V | --version]
/opt/SUNWvda/sbin/vda <subcommand> [-? | --help]
/opt/SUNWvda/sbin/vda <subcommand> [options] [operands]
DESCRIPTION
The vda command may be used to administer Sun Virtual Desktop Infrastructure. Support is included for common administration tasks such as the creation and management of desktop
providers and pools of desktops, the assignment of desktops
to users and groups, and monitoring the state of the virtualization platform.
In all cases, vda executes an action on a Sun Virtual Desktop Infrastructure system object. Examples of such objects
are user, group, pool, desktop etc. The action to be executed is identified by a subcommand where the subcommand
name is composed of the relevant object type and the name of
the action to be performed, separated by a hyphen (-).
/opt/SUNWvda/sbin/vda [-? | --help]
This command lists all the subcommands.
/opt/SUNWvda/sbin/vda [-V | --version]
This command displays the version information.
/opt/SUNWvda/sbin/vda <object>
This command lists the subcommands that apply to the
specified object type.
/opt/SUNWvda/sbin/vda <subcommand> [-? | --help]
This command displays the detailed usage of the subcom-
Document generated by Confluence on Jun 24, 2009 06:55
Page 56
mand.
Sun Virtual Desktop InLasttchange: 03/11/09ration
Sun VDI 3.0
1
vda(1M)
/opt/SUNWvda/sbin/vda <subcommand> [options] [operands]
This command executes the action specified by the subcommand, options and operands. Options and operands
depend on each subcommand, the detailed description of
options and operands for a subcommand can be obtained by
/opt/SUNWvda/sbin/vda <subcommand> [-? | --help].
Objects
user
Users and groups from the user directory
group
Local groups of users that are not pre-defined
in the user directory
directory Active Directory or LDAP server where user
information is stored
token
Smart cards identifiers for users in a Sun Ray
environment
pool
Collection of desktops
desktop
Desktops managed by Sun VDI
provider
job
Desktop providers that encapsulate the details
of the underlying virtualization technology
Action executed in the background
settings
Global settings that apply to the Sun VDI system
Generic Actions
list
Lists all the objects
show
Shows the detailed properties/status of an
object
setprops
Sets the properties of an object
Document generated by Confluence on Jun 24, 2009 06:55
Page 57
Sun Virtual Desktop InLasttchange: 03/11/09ration
Sun VDI 3.0
getprops
vda(1M)
Gets the properties of an object
add
Adds an object
create
Creates an object
remove
delete
2
Removes an object
Deletes an object
Example of Subcommands
user-show
Shows the desktops available for a
user
group-create
token-setprops
pool-list
desktop-delete
Creates a new local group with the
specified properties
Edits the properties of the token
Lists all pools
Deletes the desktops
provider-vc-create
Creates a new VMware VirtualCenter
desktop provider
provider-disable-host Disables the hosts for the xVM VirtualBox desktop provider. Disabled
hosts are not used for automated
cloning.
Refer to http://wikis.sun.com/display/VDI3/Home for a complete list of available subcommands and their usage.
OPTIONS
The following options are supported:
-x, --parseable
Document generated by Confluence on Jun 24, 2009 06:55
Page 58
the -x option displays information in a parseable format, as
Sun Virtual Desktop InLasttchange: 03/11/09ration
Sun VDI 3.0
3
vda(1M)
a list of lines of colon ':' separated fields. The -x option
is available for the list, show, search, desktops subcommands.
EXIT STATUS
Exit Code
Status
0
Successful completion
1
An error occurred
2
Invalid command line options or arguments were
specified
EXAMPLES
Example 1 Creating a Desktop Provider
The following example creates a VMware VirtualCenter desktop
provider:
example% /opt/SUNWvda/sbin/vda provider-vc-create -p
name="VC provider",host=my.vc.com,username=Administrator
The following example creates a xVM VirtualBox desktop provider with two hosts and one storage:
example% /opt/SUNWvda/sbin/vda
name="VB provider
provider-vb-create
-p
example% /opt/SUNWvda/sbin/vda provider-add-host -p
host=my.first.vb.com,port=443,username=root "VB provider"
example%
/opt/SUNWvda/sbin/vda
provider-add-host
-p
Document generated by Confluence on Jun 24, 2009 06:55
Page 59
host=my.second.vb.com,port=443,username=root "VB provider"
Sun Virtual Desktop InLasttchange: 03/11/09ration
Sun VDI 3.0
4
vda(1M)
example% /opt/SUNWvda/sbin/vda provider-add-storage -p
host=my.zfs.com,username=root,zfspool=vda_zfspool "VB provider"
Example 2 Creating a Pool
The following example creates a pool for storing xVM VirtualBox templates:
example%
/opt/SUNWvda/sbin/vda
pool-create
-p
name="Templates",provider="VB
provider",assignmenttype=personal
example% /opt/SUNWvda/sbin/vda pool-vb-import -p vdiimage=template.vdi,xml-configuration=golden-master.xml Templates
The following example creates a pool for cloning 30 desktops
from VMware VirtualCenter. First list the templates from the
VirtualCenter, and select one of them:
example% /opt/SUNWvda/sbin/vda provider-list-templates "VC
provider"
NAME
XP-Template
XPClone
ID
vm-134
vm-629
PATH
[Datacenters, ADatacenter, vm]
[Datacenters, ADatacenter, vm]
example% /opt/SUNWvda/sbin/vda pool-create -p name="VC
pool",provider="VC
provider",template=vm-134,preferredsize=30,free-size=5,max-size=35,power-state=on,assignmenttype=flexible,recycle-policy=reuse,idle-timeout=2
example% /opt/SUNWvda/sbin/vda pool-start "VC pool"
Document generated by Confluence on Jun 24, 2009 06:55
Page 60
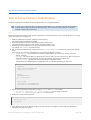
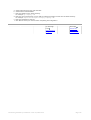
Sun Virtual Desktop InLasttchange: 03/11/09ration
Sun VDI 3.0
5
vda(1M)
Example 3 Configuring the User Directory
The following example configures a LDAP directory using simple authentication, the default 389 port, a fallback LDAP
server, and no restriction on the base DN:
example% /opt/SUNWvda/sbin/vda directory-add -p authtype=simple,hosts=my.ldap.com;secondary.ldap.com,username='"cn=Administrator,ou=people,dc=my,dc=company,dc=com"'
The following example configures an Active Directory using
Kerberos authentication:
example% /opt/SUNWvda/sbin/vda directory-add -p authtype=kerberos,addomain=my.company.com,username=Administrator
Example 4 Assigning Pools and Desktops to Users
The following example assigns the user "John Smith" to the
pool "VC pool". Once complete, John Smith will be dynamically assigned a desktop from the VC pool each time he logs
in.
example% /opt/SUNWvda/sbin/vda user-assign -p "VC pool"
"cn=John Smith,ou=people"
The following example lists the desktops in the pool "Static
pool" and permanently assigns one of them to the user "Mary
O'Leary". Each time Mary O'Leary logs in, she will get the
same desktop.
example% /opt/SUNWvda/sbin/vda pool-desktops "Static pool"
NAME
ID
MACHINE STATE
WindowsXP0001
80
Running
WindowsXP0002
81
Powered Off
STATUS
DN
Used
cn=John Smith,ou=people
Available -
Document generated by Confluence on Jun 24, 2009 06:55
Page 61
Sun Virtual Desktop InLasttchange: 03/11/09ration
Sun VDI 3.0
6
vda(1M)
example% /opt/SUNWvda/sbin/vda user-assign -d WindowsXP0002
moleary
Example 5 Listing the Desktops and Pools Assigned to a User
The following example lists all the desktop and pools
assigned to "Mary O'Leary" in the order they apply to her.
example% /opt/SUNWvda/sbin/vda user-show moleary
SEE ALSO
vda-db-status (1M), vda-service (1M)
NOTES
Find
more
information
http://wikis.sun.com/display/VDI3/Home.
Sun Virtual Desktop InLasttchange: 03/11/09ration
at
7
Document generated by Confluence on Jun 24, 2009 06:55
Page 62
The vda Command
This page last changed on Mar 31, 2009 by stephanielewellen.
The vda Command
The vda command, /opt/SUNWvda/sbin/vda, is used for administration tasks at the CLI level. Nearly all administration
tasks that are performed via the Web Administration GUI can also be performed using the vda command. The vda
command also provides advanced usage of VDI administration that is not available from the Admin GUI.
The vda command information has been broken up into the following sections.
Content
Description
Command Usage
General information about the vda command
Subcommand Usage
Detailed information about using the vda subcommands
Examples
Examples of vda command usage
Man Page
The man page for the vda command
Information about creating bulks of tokens with and creating automated administration scripts is available in Administering
VDI 3.0.
Document generated by Confluence on Jun 24, 2009 06:55
Page 63
vda Command Usage
This page last changed on Jun 15, 2009 by katell.
vda Command Usage
Command
/opt/SUNWvda/sbin/vda
Usage
Sun Virtual Desktop Infrastructure Administration
Usage: vda <subcommand>
-?, --help:
-V, --version:
Print this help list
Display the version
User Subcommands:
user-search:
Search for users/groups in the user directory that
match the specified search criteria
user-show:
Show the desktops available for the user
user-desktops:
Show the desktops assigned to the user
user-assign:
Assign users to pools or desktops
user-unassign:
Unassign users from pools or desktops. If no pool or
desktop is specified, all assignments are removed
from the users
user-defaultdesktop: Make the desktop the default desktop for the user
user-personaldesktop: Make the desktop a personal desktop for the user
Custom Groups Subcommands:
group-list:
List all custom groups
group-create:
Create a new local group with the specified
properties
group-delete:
Delete the custom group
group-getprops:
List the properties of the custom group
group-setprops:
Edit the properties of the custom group
group-show:
Show the pools assigned to the custom group
group-assign:
Assign custom groups to pools
group-unassign:
Unassign custom groups from pools. If no pool is
specified, all assignments are removed from the
custom groups
Token Subcommands:
token-search:
Search for tokens that match the search criteria
token-create:
Create a new token (smart card id)
token-remove:
Remove the specified tokens from the system
token-getprops:
List the properties of the token
token-setprops:
Edit the properties of the token
token-unsetprops:
Remove the properties of the token
token-show:
Show the desktops available for the token
token-desktops:
Show the desktops assigned to the token
token-assign:
Assign tokens to pools or desktops
token-unassign:
Unassign tokens from pools or desktops. If no pool
or desktop is specified, all assignments are removed
from the tokens
Pool Subcommands:
pool-list:
List all pools
Document generated by Confluence on Jun 24, 2009 06:55
Page 64
pool-create:
pool-delete:
pool-getprops:
pool-setprops:
pool-resetprops:
Create a new pool with the specified properties
Delete the pools and their desktops
List the properties of the pool
Edit the properties of the pool
Reset the properties of the pool to their default
value
pool-unsetprops:
Unset the properties of the pool
pool-show:
Show detailed information about the pool
pool-desktops:
List all desktops from the pool
pool-vb-import:
Import xVM VirtualBox desktops into the pool
pool-vc-import:
Import VMware VirtualCenter desktops into the pool
pool-start:
Start automatic cloning of desktops for the pools
pool-stop:
Stop automatic cloning of desktops for the pools
pool-enable:
Enable users to connect to flexible desktops from
the pools
pool-disable:
Disable users from connecting to flexible desktops
from the pools
pool-create-sysprep: Create a Sysprep file for the pool. Valid only for
xVM VirtualBox pools
Desktop Subcommands:
desktop-delete:
Delete the desktops
desktop-show:
Show detailed properties for the desktops
desktop-template:
Convert the desktops to templates. Valid for xVM
VirtualBox desktops only
desktop-start:
Start the desktops
desktop-stop:
Stop the desktops
Desktop Provider Subcommands:
provider-list:
List all desktop providers
provider-vb-create:
Create a new xVM VirtualBox desktop provider
provider-vc-create:
Create a new VMware VirtualCenter desktop provider
provider-delete:
Delete the desktop providers
provider-vb-getprops: List the properties of the xVM VirtualBox desktop
provider
provider-vb-setprops: Edit the properties of the xVM VirtualBox desktop
provider
provider-vc-getprops: List the properties of the VMware VirtualCenter
desktop provider
provider-vc-setprops: Edit the properties of the VMware VirtualCenter
desktop provider
provider-show:
Show detailed information about the desktop provider
provider-list-hosts: List all hosts for the xVM VirtualBox desktop
provider
provider-add-host:
Add a host to the xVM VirtualBox desktop provider
provider-remove-host: Remove the hosts from the xVM VirtualBox desktop
provider
provider-enable-host: Enable the hosts for the xVM VirtualBox desktop
provider. Enabled hosts are used for automated
cloning
provider-disable-host: Disable the hosts for the xVM VirtualBox desktop
provider. Disabled hosts are not used for automated
cloning
provider-list-storage: List all storages for the desktop provider
provider-add-storage: Add a storage to the xVM VirtualBox desktop provider
provider-remove-storage: Remove the storage from the xVM VirtualBox desktop
provider
provider-list-templates: List the templates for the desktop provider
provider-list-unmanaged: List the desktops from the VMware VirtualCenter that
are not managed by any desktop provider
User Directory Subcommands:
directory-add:
Add the user directory configuration to the system
directory-remove:
Remove the user directory configuration from the
system
directory-getprops:
List the properties of the user directory
Document generated by Confluence on Jun 24, 2009 06:55
Page 65
directory-setprops:
Edit the properties of the user directory
directory-show:
Show the configuration details for the user
directory
Global Settings Subcommands:
settings-getprops:
List global settings
settings-setprops:
Edit global settings
settings-resetprops: Reset global settings to their default value
Job Subcommands:
job-list:
List the existing jobs
job-show:
Show the job details
job-wait:
Wait until the job ends
Each subcommand has its specific options and arguments. Specify --help after the
subcommand name to display its usage.
Document generated by Confluence on Jun 24, 2009 06:55
Page 66
vda Command Usage Examples
This page last changed on Mar 31, 2009 by stephanielewellen.
vda Command Usage Examples
Topic Jump List
•
•
•
•
•
Creating a Desktop Provider
Creating a Pool
Configuring the User Directory
Assigning Pools and Desktops to Users
Listing the Desktops and Pools Assigned to a User
Creating a Desktop Provider
The following example creates a VMware VirtualCenter desktop provider:
example% /opt/SUNWvda/sbin/vda provider-vc-create -p name="VC provider",host=my.vc.com,username=Administrator
The following example creates a xVM VirtualBox desktop provider with two hosts and one storage:
example% /opt/SUNWvda/sbin/vda provider-vb-create -p name="VB provider
example% /opt/SUNWvda/sbin/vda provider-add-host -p host=my.first.vb.com,port=443,username=root "VB provider"
example% /opt/SUNWvda/sbin/vda provider-add-host -p host=my.second.vb.com,port=443,username=root "VB provider"
example% /opt/SUNWvda/sbin/vda provider-add-storage -p host=my.zfs.com,username=root,zfspool=vda_zfspool "VB provider"
Creating a Pool
The following example creates a pool for storing xVM VirtualBox templates:
example% /opt/SUNWvda/sbin/vda pool-create -p name="Templates",provider="VB provider",assignment-type=personal
example% /opt/SUNWvda/sbin/vda pool-vb-import -p vdi-image=template.vdi,xml-configuration=golden-master.xml Templates
The following example creates a pool for cloning 30 desktops from VMware VirtualCenter. First list the templates from the
VirtualCenter, and select one of them:
example% /opt/SUNWvda/sbin/vda provider-list-templates "VC provider"
NAME ID PATH
XP-Template vm-134 [Datacenters, ADatacenter, vm]
XPClone vm-629 [Datacenters, ADatacenter, vm]
example% /opt/SUNWvda/sbin/vda pool-create -p name="VC pool",provider="VC provider",template=vm-134,preferred-size=30,\
free-size=5,max-size=35,power-state=on,assignment-type=flexible,recycle-policy=reuse,idle-timeout=2
example% /opt/SUNWvda/sbin/vda pool-start "VC pool"
Document generated by Confluence on Jun 24, 2009 06:55
Page 67
Configuring the User Directory
The following example configures a LDAP directory using simple authentication, the default 389 port, a fallback LDAP
server, and no restriction on the base DN:
example% /opt/SUNWvda/sbin/vda directory-add -p auth-type=simple,hosts=my.ldap.com;secondary.ldap.com,\
username='"cn=Administrator,ou=people,dc=my,dc=company,dc=com"'
The following example configures an Active Directory using Kerberos authentication:
example% /opt/SUNWvda/sbin/vda directory-add -p auth-type=kerberos,addomain=my.company.com,username=Administrator
Assigning Pools and Desktops to Users
The following example assigns the user "John Smith" to the pool "VC pool". Once complete, John Smith will be dynamically
assigned a desktop from the VC pool each time he logs in.
example% /opt/SUNWvda/sbin/vda user-assign -p "VC pool" "cn=John Smith,ou=people"
The following example lists the desktops in the pool "Static pool" and permanently assigns one of them to the user "Mary
O'Leary". Each time Mary O'Leary logs in, she will get the same desktop.
example% /opt/SUNWvda/sbin/vda pool-desktops "Static pool"
NAME ID MACHINE STATE STATUS DN
WindowsXP0001 80 Running Used cn=John Smith,ou=people
WindowsXP0002 81 Powered Off Available example% /opt/SUNWvda/sbin/vda user-assign -d WindowsXP0002 moleary
Listing the Desktops and Pools Assigned to a User
The following example lists all the desktop and pools assigned to "Mary O'Leary" in the order they apply to her.
example% /opt/SUNWvda/sbin/vda user-show moleary
Document generated by Confluence on Jun 24, 2009 06:55
Page 68
The vda-config Command
This page last changed on Mar 20, 2009 by katell.
Command
/opt/SUNWvda/sbin/vda-config
Usage
Usage: vda-config OPTIONS
Configures the Sun Virtual Desktop Infrastructure product.
If no OPTIONS are specified, the command will perform
a full interactive configuration of this product.
The accepted values for OPTIONS are:
-h
-u
-w
Display this help list.
Unconfigures all components of this product.
Configures only the web administration user interface
of the Sun Virtual Desktop Infrastructure.
Man Page
Sun Virtual Desktop Infrastructure Commands
vda-config(1)
NAME
vda-config - Sun Virtual Desktop Infrastructure configuration tool
SYNOPSIS
/opt/SUNWvda/sbin/vda-config [-u] [-w] [-h]
DESCRIPTION
The vda-config command line tool will be used to configure
or unconfigure the Sun Virtual Desktop Infrastructure. If
no OPTIONS are specified, the command will configure the Sun
Virtual Desktop Infrastructure.
OPTIONS
-u Unconfigure Sun Virtual Desktop Infrastructure.
-w
-h
Configures only the web administration user interface
of the Sun Virtual Desktop Infrastructure.
Prints a usage message for this command.
Document generated by Confluence on Jun 24, 2009 06:55
Page 69
EXIT STATUS
The following exit values are returned:
0
Success
1
Failure
ATTRIBUTES
See attributes(5) for descriptions of the following attributes:
____________________________________________________________
|
Attribute Type
|
Attribute Value
|
| Availability
| SUNWvda-service
|
| Interface Stability
| Uncommitted
|
|_____________________________|_____________________________|
SEE ALSO
Sun VDI 3.0
Last change: 03/11/09
1
Document generated by Confluence on Jun 24, 2009 06:55
Page 70
The vda-db-status Command
This page last changed on Mar 20, 2009 by katell.
Command
/opt/SUNWvda/sbin/vda-db-status
Usage
Usage: vda-db-status OPTIONS
Shows a detailed status of the Sun Virtual Desktop Infrastructure Database service.
The accepted values for OPTIONS are:
-h
-s
-x
-i
Display this help list.
Displays a short version of the status.
Displays the status without headers.
Displays information about the current configuration.
Man Page
Sun Virtual Desktop Infrastructure Administration
vda-db-status(1M)
NAME
vda-db-status - Sun Virtual Desktop Infrastructure Service
database status tool
SYNOPSIS
/opt/SUNWvda/sbin/vda-db-status [-i] [-x] [-s] [-h]
DESCRIPTION
The Sun Virtual Desktop Infrastructure Service database
status tool displays information about the current database
configuration and the status of the Sun Virtual Desktop
Infrastructure Service database.
OPTIONS
-i Displays information about the current database configuration.
-x
Display the status without a header.
-s
Display a short version of the database status.
Document generated by Confluence on Jun 24, 2009 06:55
Page 71
-h
Print a usage message
EXIT STATUS
The following exit values are returned.
0
Success
non zero
Failure
ATTRIBUTES
See attributes(5) for descriptions of the following attributes:
____________________________________________________________
|
Attribute Type
|
Attribute Value
|
| Availability
| SUNWvda-db-status
|
| Interface Stability
| Uncommitted
|
|_____________________________|_____________________________|
SEE ALSO
vda-config(1M), vda-service(1M)
Sun VDI 3.0
Last change: 03/11/09
1
Document generated by Confluence on Jun 24, 2009 06:55
Page 72
The vda-install Command
This page last changed on Mar 20, 2009 by katell.
Command
/opt/SUNWvda/sbin/vda-install
Usage
Usage: vda-install OPTIONS
Installs the Sun VDI product.
If no OPTIONS are specified, the command will perform
a full installation of this product.
The accepted values for OPTIONS are:
-h
-u
Display this help list.
Uninstalls all components of this product.
Man Page
Sun Virtual Desktop Infrastructure Commands
vda-install(1)
NAME
vda-install - Sun Virtual Desktop Infrastructure installation tool
SYNOPSIS
/opt/SUNWvda/sbin/vda-install [-u] [-h]
DESCRIPTION
The vda-install command line tool will be used to install or
uninstall Sun Virtual Desktop Infrastructure. If no OPTIONS
are specified, the command will perform a full installation
of the Sun Virtual Desktop Infrastructure.
OPTIONS
-u Uninstalls Sun Virtual Desktop Infrastructure.
-h Prints a usage message for this command.
EXIT STATUS
The following exit values are returned:
0
Success
1
Failure
Document generated by Confluence on Jun 24, 2009 06:55
Page 73
ATTRIBUTES
See attributes(5) for descriptions of the following attributes:
____________________________________________________________
|
Attribute Type
|
Attribute Value
|
| Availability
| vda-install
|
| Interface Stability
| Uncommitted
|
|_____________________________|_____________________________|
SEE ALSO
vda-config(1M)
Sun VDI 3.0
Last change: 03/11/09
1
Document generated by Confluence on Jun 24, 2009 06:55
Page 74
The vda-migrate Command
This page last changed on Mar 20, 2009 by katell.
Command
/opt/SUNWvda/sbin/vda-migrate
Usage
Usage: vda-migrate OPTIONS
Migrates settings and data from a previous version of Sun Virtual Desktop Infrastructure
The accepted values for OPTIONS are:
-e [/path/to/directory]
Exports data from an older version of Sun Virtual Desktop Infrastructure 3.0.
Execute only while the old version is still installed and configured.
This is the default option.
-i /path/to/directory
Imports data to Sun Virtual Desktop Infrastructure 3.0 from an older version.
Execute only after the new version is installed and configured.
-h
Display this help list.
Man Page
Sun Virtual Desktop Infrastructure Administration
vda-migrate(1M)
NAME
vda-migrate - Sun Virtual Desktop Infrastructure Settings
and data migration utility
SYNOPSIS
/opt/SUNWvda/sbin/vda-migrate
/opt/SUNWvda/sbin/vda-migrate -e [</path/to/directory>]
/opt/SUNWvda/sbin/vda-migrate -i </path/to/directory>
/opt/SUNWvda/sbin/vda-migrate -h
DESCRIPTION
The Sun Virtual Desktop Infrastructure migration utility
provides a way to export and import data and settings from a
previous version to a current version of Sun Virtual Desktop
Infrastructure.
Document generated by Confluence on Jun 24, 2009 06:55
Page 75
OPTIONS
-e [</path/to/directory>]
Exports data from an older version of Sun Virtual
Desktop Infrastructure. This option should only be
executed while the old version is still installed and
configured. The exported data is stored in the given
directory; if no directory is supplied,
/var/opt/SUNWvda/backup is used. This is the default
option.
-i </path/to/directory>
Imports data to Sun Virtual Desktop Infrastructure
from an older version. This option should onle be
executed after the new version is installed and configured. The imported data is read from a the supplied directory.
-h
Print a usage message
ATTRIBUTES
See attributes(5) for descriptions of the following attributes:
____________________________________________________________
|
Attribute Type
|
Attribute Value
|
| Availability
| SUNWvda-db-status
|
| Interface Stability
| Uncommitted
|
|_____________________________|_____________________________|
Sun VDI 3.0
Last change: 03/11/09
1
Sun Virtual Desktop Infrastructure Administration
vda-migrate(1M)
SEE ALSO
vda-config(1M), vda-service(1M)
Sun VDI 3.0
Last change: 03/11/09
2
Document generated by Confluence on Jun 24, 2009 06:55
Page 76
The vda-service Command
This page last changed on Mar 20, 2009 by katell.
Command
/opt/SUNWvda/sbin/vda-service
Usage
Usage: vda-service SUBCOMMAND
or: vda-service OPTIONS
Manages the Sun Virtual Desktop Infrastructure service.
The accepted values for SUBCOMMAND are:
start Starts the service
stop Stops the service
restart Stop followed by start
status Display status of service
The accepted values for OPTIONS are:
-h
Display this help list.
Man Page
Sun Virtual Desktop Infrastructure Administration
vda-service(1M)
NAME
vda-service - Sun Virtual Desktop Infrastructure Service
administration tool
SYNOPSIS
/opt/SUNWvda/sbin/vda-service start
/opt/SUNWvda/sbin/vda-service stop
/opt/SUNWvda/sbin/vda-service restart
/opt/SUNWvda/sbin/vda-service status
/opt/SUNWvda/sbin/vda-service -h
DESCRIPTION
The Sun Virtual Desktop Infrastructure Service is responsible for brokering desktop sessions on behalf of client
applications. vda-service may be used to control the service.
SUBCOMMANDS
Document generated by Confluence on Jun 24, 2009 06:55
Page 77
The following subcommands are supported.
start Start the service
stop Stop the service
restart
Restart the service
status
Query and print the service status
OPTIONS
-h Print a usage message
EXIT STATUS
The following exit values are returned.
0
Success
non zero
Failure
ATTRIBUTES
See attributes(5) for descriptions of the following attributes:
Sun VDI 3.0
Last change: 03/11/09
1
Sun Virtual Desktop Infrastructure Administration
vda-service(1M)
______________________________________________________________________
|
Attribute Type
|
Attribute Value
|
| Availability
| SUNWvda-service
|
| Interface Stability
| Uncommitted
|
|_____________________________|_____________________________|
SEE ALSO
vda-config(1M), vda-webadmin(1M)
Sun VDI 3.0
Last change: 03/11/09
2
Document generated by Confluence on Jun 24, 2009 06:55
Page 78
The vda Subcommands
This page last changed on Jun 15, 2009 by katell.
Detailed Usage of the Subcommands
user
user-search
Search for users/groups in the user directory that match the specified search
criteria
Usage:
vda user-search [-x | --parseable] [<searchfilter>]
-?, --help
Print this help list
Options:
-x, --parseable
Display output suitable for programmatic parsing.
Operand:
<searchfilter>
The search filter criteria
'*' denotes mandatory parameters.
user-show
Show the desktops available for the user
Usage:
vda user-show [-x | --parseable] <userId>
-?, --help
Print this help list
Options:
-x, --parseable
Display output suitable for programmatic parsing.
Operand:
*<userId>
The DN or userid of the user
'*' denotes mandatory parameters.
user-desktops
Show the desktops assigned to the user
Usage:
vda user-desktops [-x | --parseable] <userId>
Document generated by Confluence on Jun 24, 2009 06:55
Page 79
-?, --help
Print this help list
Options:
-x, --parseable
Display output suitable for programmatic parsing.
Operand:
*<userId>
The DN or userid of the user
'*' denotes mandatory parameters.
user-assign
Assign users to pools or desktops
Usage:
vda user-assign [-p <pool1>,<pool2> | --pool=<pool1>,<pool2>] [-d
<desktop1>,<desktop2> | --desktop=<desktop1>,<desktop2>]
<userId1> <userId2>
-?, --help
Print this help list
Options:
-p <pool1>,<pool2>, --pool=<pool1>,<pool2>
The name of the pools
-d <desktop1>,<desktop2>, --desktop=<desktop1>,<desktop2>
The id of the desktops
Operand:
*<userId1> <userId2>
The DN or userid of the users to assign
'*' denotes mandatory parameters.
user-unassign
Unassign users from pools or desktops. If no pool or desktop is specified, all
assignments are removed from the users
Usage:
vda user-unassign [-p <pool1>,<pool2> | --pool=<pool1>,<pool2>] [-d
<desktop1>,<desktop2> | --desktop=<desktop1>,<desktop2>]
<userId1> <userId2>
-?, --help
Print this help list
Options:
-p <pool1>,<pool2>, --pool=<pool1>,<pool2>
The name of the pools the users should be unassigned
from
-d <desktop1>,<desktop2>, --desktop=<desktop1>,<desktop2>
The id of the desktops the user should be unassigned
from
Operand:
*<userId1> <userId2>
The DN or userid of the users to unassign
Document generated by Confluence on Jun 24, 2009 06:55
Page 80
'*' denotes mandatory parameters.
user-defaultdesktop
Make the desktop the default desktop for the user
Usage:
vda user-defaultdesktop <desktopId>
-?, --help
Operand:
*<desktopId>
Print this help list
The id of the desktop which should be made default.
This should be a desktop assigned to a user
'*' denotes mandatory parameters.
user-personaldesktop
Make the desktop a personal desktop for the user
Usage:
vda user-personaldesktop <desktopId>
-?, --help
Operand:
*<desktopId>
Print this help list
The id of the desktop which should be made personal.
This should be a desktop assigned to a user with a
flexible assignment
'*' denotes mandatory parameters.
group
group-list
List all custom groups
Usage:
vda group-list [-x | --parseable]
-?, --help
Options:
-x, --parseable
Print this help list
Display output suitable for programmatic parsing.
'*' denotes mandatory parameters.
Document generated by Confluence on Jun 24, 2009 06:55
Page 81
group-create
Create a new local group with the specified properties
Usage:
vda group-create [-p <prop1>=<value1>,<prop2>=<value2> |
--property=<prop1>=<value1>,<prop2>=<value2>]
-?, --help
Print this help list
Options:
*-p <prop1>=<value1>,<prop2>=<value2>, --property=<prop1>=<value1>,<prop2>=<value2>
The list of properties that define the group
Properties:
*name=<name>
The name of the custom group
comment=<comment>
The comment for the custom group
search-filter=<search-filter>
The LDAP search filter which defines the users in this
group
If a property value contains a comma (','), use the double-quoting syntax for
the value, such as <prop>='"<value>"' (single-quote ' followed by double-quote "
to open, double-quote " followed by single quote ' to close).
'*' denotes mandatory parameters.
group-delete
Delete the custom group
Usage:
vda group-delete <group-name1> <group-name2>
-?, --help
Print this help list
Operand:
*<group-name1> <group-name2>
The name of the custom group to delete
'*' denotes mandatory parameters.
group-getprops
List the properties of the custom group
Usage:
vda group-getprops [-p <prop1>,<prop2> | --properties=<prop1>,<prop2>]
Document generated by Confluence on Jun 24, 2009 06:55
Page 82
<group-name>
-?, --help
Print this help list
Options:
*-p <prop1>,<prop2>, --properties=<prop1>,<prop2>
The list of properties to get
Properties:
comment
search-filter
The comment for the custom group
The LDAP search filter which defines the users in this
group
Operand:
*<group-name>
The name of the custom group
'*' denotes mandatory parameters.
group-setprops
Edit the properties of the custom group
Usage:
vda group-setprops [-p <prop1>,<prop2> | --properties=<prop1>,<prop2>]
<group-name>
-?, --help
Print this help list
Options:
*-p <prop1>,<prop2>, --properties=<prop1>,<prop2>
The list of properties to set
Properties:
name=<name>
The new name for the custom group
comment=<comment>
The comment for the custom group
search-filter=<search-filter>
The LDAP search filter which defines the users in this
group
Operand:
*<group-name>
The name of the custom group
'*' denotes mandatory parameters.
group-show
Show the pools assigned to the custom group
Usage:
vda group-show [-x | --parseable] <group-name>
-?, --help
Options:
-x, --parseable
Print this help list
Display output suitable for programmatic parsing.
Document generated by Confluence on Jun 24, 2009 06:55
Page 83
Operand:
*<group-name>
The name of the custom group
'*' denotes mandatory parameters.
group-assign
Assign custom groups to pools
Usage:
vda group-assign [-p <pool1>,<pool2> | --pool=<pool1>,<pool2>] <group-name1>
<group-name2>
-?, --help
Print this help list
Options:
*-p <pool1>,<pool2>, --pool=<pool1>,<pool2>
The name of the pools
Operand:
*<group-name1> <group-name2>
The name of the custom group to assign
'*' denotes mandatory parameters.
group-unassign
Unassign custom groups from pools. If no pool is specified, all assignments are
removed from the custom groups
Usage:
vda group-unassign [-p <pool1>,<pool2> | --pool=<pool1>,<pool2>] <group-name1>
<group-name2>
-?, --help
Print this help list
Options:
-p <pool1>,<pool2>, --pool=<pool1>,<pool2>
The name of the pools the custom groups should be
unassigned from
Operand:
*<group-name1> <group-name2>
The name of the custom group to unassign
'*' denotes mandatory parameters.
Document generated by Confluence on Jun 24, 2009 06:55
Page 84
token
token-search
Search for tokens that match the search criteria
Usage:
vda token-search [-x | --parseable] [<search-criteria>]
-?, --help
Options:
-x, --parseable
Print this help list
Display output suitable for programmatic parsing.
Operand:
<search-criteria>
The search criteria to be matched to the token id or
the user associated to the token
'*' denotes mandatory parameters.
token-create
Create a new token (smart card id)
Usage:
vda token-create [-p <prop1>=<value1>,<prop2>=<value2> |
--prop=<prop1>=<value1>,<prop2>=<value2>] [-f <token-file> |
--file=<token-file>] [-w | --write]
-?, --help
Print this help list
Options:
-p <prop1>=<value1>,<prop2>=<value2>, --prop=<prop1>=<value1>,<prop2>=<value2>
The list of properties that define the token
-f <token-file>, --file=<token-file>
A CSV file containing the properties of the tokens to
be created. Format of the file is: <token-id> <comment>
<userid>
-w, --write
Overwrite existing tokens, option to be used with the
token-file option
Properties:
*token-id=<token-id> The token id
user=<user>
The DN or userid of the user associated to the token
comment=<comment>
The comment for the token
If a property value contains a comma (','), use the double-quoting syntax for
the value, such as <prop>='"<value>"' (single-quote ' followed by double-quote "
to open, double-quote " followed by single quote ' to close).
'*' denotes mandatory parameters.
Document generated by Confluence on Jun 24, 2009 06:55
Page 85
token-remove
Remove the specified tokens from the system
Usage:
vda token-remove <tokenId1> <tokenId2>
-?, --help
Print this help list
Operand:
*<tokenId1> <tokenId2> The id of the tokens to remove
'*' denotes mandatory parameters.
token-getprops
List the properties of the token
Usage:
vda token-getprops [-p <prop1>,<prop2> | --properties=<prop1>,<prop2>]
<tokenId>
-?, --help
Print this help list
Options:
*-p <prop1>,<prop2>, --properties=<prop1>,<prop2>
The list of properties to get
Properties:
user
comment
Operand:
*<tokenId>
The user associated to the token
The comment for the token
The id of the token
'*' denotes mandatory parameters.
token-setprops
Edit the properties of the token
Usage:
vda token-setprops [-p <prop1>=<value1>,<prop2>=<value2> |
--properties=<prop1>=<value1>,<prop2>=<value2>] <tokenId>
-?, --help
Print this help list
Options:
*-p <prop1>=<value1>,<prop2>=<value2>, --properties=<prop1>=<value1>,<prop2>=<value2>
The list of properties to set
Properties:
user=<user>
The DN or userid of the user associated to the token
Document generated by Confluence on Jun 24, 2009 06:55
Page 86
comment=<comment>
The comment for the token
token-id=<token-id> A new token id for the token
If a property value contains a comma (','), use the double-quoting syntax for
the value, such as <prop>='"<value>"' (single-quote ' followed by double-quote "
to open, double-quote " followed by single quote ' to close).
Operand:
*<tokenId>
The id of the token
'*' denotes mandatory parameters.
token-unsetprops
Remove the properties of the token
Usage:
vda token-unsetprops [-p <prop1>,<prop2> | --properties=<prop1>,<prop2>]
<tokenId>
-?, --help
Print this help list
Options:
*-p <prop1>,<prop2>, --properties=<prop1>,<prop2>
The list of properties to unset
Properties:
user
comment
Operand:
*<tokenId>
The user associated to the token
The comment for the token
The id of the token
'*' denotes mandatory parameters.
token-show
Show the desktops available for the token
Usage:
vda token-show [-x | --parseable] <tokenId>
-?, --help
Print this help list
Options:
-x, --parseable
Display output suitable for programmatic parsing.
Operand:
*<tokenId>
The id of the token
'*' denotes mandatory parameters.
Document generated by Confluence on Jun 24, 2009 06:55
Page 87
token-desktops
Show the desktops assigned to the token
Usage:
vda token-desktops [-x | --parseable] <tokenId1> <tokenId2>
-?, --help
Options:
-x, --parseable
Print this help list
Display output suitable for programmatic parsing.
Operand:
*<tokenId1> <tokenId2> The id of the token
'*' denotes mandatory parameters.
token-assign
Assign tokens to pools or desktops
Usage:
vda token-assign [-p <pool1>,<pool2> | --pool=<pool1>,<pool2>] [-d
<desktop1>,<desktop2> | --desktop=<desktop1>,<desktop2>]
<tokenId1> <tokenId2>
-?, --help
Print this help list
Options:
-p <pool1>,<pool2>, --pool=<pool1>,<pool2>
The name of the pools
-d <desktop1>,<desktop2>, --desktop=<desktop1>,<desktop2>
The id of the desktops
Operand:
*<tokenId1> <tokenId2> The id of the tokens to assign
'*' denotes mandatory parameters.
token-unassign
Unassign tokens from pools or desktops. If no pool or desktop is specified, all
assignments are removed from the tokens
Usage:
vda token-unassign [-p <pool1>,<pool2> | --pool=<pool1>,<pool2>] [-d
<desktop1>,<desktop2> | --desktop=<desktop1>,<desktop2>]
<tokenId1> <tokenId2>
Document generated by Confluence on Jun 24, 2009 06:55
Page 88
-?, --help
Print this help list
Options:
-p <pool1>,<pool2>, --pool=<pool1>,<pool2>
The name of the pools the tokens should be unassigned
from
-d <desktop1>,<desktop2>, --desktop=<desktop1>,<desktop2>
The id of the desktops the token should be unassigned
from
Operand:
*<tokenId1> <tokenId2> The id of the tokens to unassign
'*' denotes mandatory parameters.
pool
pool-list
List all pools
Usage:
vda pool-list [-x | --parseable]
-?, --help
Options:
-x, --parseable
Print this help list
Display output suitable for programmatic parsing.
'*' denotes mandatory parameters.
pool-create
Create a new pool with the specified properties
Usage:
vda pool-create [-p <prop1>=<value1>,<prop2>=<value2> |
--properties=<prop1>=<value1>,<prop2>=<value2>]
-?, --help
Print this help list
Options:
*-p <prop1>=<value1>,<prop2>=<value2>, --properties=<prop1>=<value1>,<prop2>=<value2>
The list of properties that define the pool
Properties:
*name=<name>
The name to identify the pool
*provider=<provider> The name of the desktop provider for this pool
comment=<comment>
The comment for the pool
template=<template> The id of the template to use to automatically populate
this pool
name-pattern=<name-pattern>
The naming pattern to use for new cloned desktops. The
pattern is composed of a prefix and a '0' for each
Document generated by Confluence on Jun 24, 2009 06:55
Page 89
digit of the sequential number
system-preparation=<system-preparation>
The system prepartion to use for cloned desktops. For
VMware VirtualCenter pools, specify a custom spec name.
For xVM VirtualBox pools, specify a filepath to a
Sysprep file.
preferred-size=<preferred-size>
The desired number of desktops in the pool
free-size=<free-size> The minimum number of available desktops in the pool
max-size=<max-size> The maximum number of desktops the pool can contain
power-state=<power-state>
The power state of a desktop after cloning or
recycling. Default is 'off'. Possible values are 'on',
'off', 'suspended'
assignment-type=<assignment-type>
The assignment policy for this pool. Default is
'flexible'. Possible values are 'personal' and
'flexible'
idle-timeout=<idle-timeout>
The time a machine remains suspended before being made
available (in minutes). Default is 120 minutes
synchronous-cloning=<synchronous-cloning>
The maximum number of parallel desktop cloning jobs.
Default is 5
recycle-policy=<recycle-policy>
The action to take when recycling desktops. Default is
'snapshot'. Possible values are 'snapshot', 'reuse',
'delete'
network-interface=<network-interface>
The type of network interface for xVM VirtualBox pool,
NAT or Host Interface. Possible values are 'nat' or
'host'. Valid only for xVM VirtualBox pools
desktop-protocol=<desktop-protocol>
The type of desktop protocol for xVM VirtualBox pools,
only valid if the network interface is Host Interface.
Possible values are 'virtualbox' or 'windows' rdp
connector. Valid only for xVM VirtualBox pools
If a property value contains a comma (','), use the double-quoting syntax for
the value, such as <prop>='"<value>"' (single-quote ' followed by double-quote "
to open, double-quote " followed by single quote ' to close).
'*' denotes mandatory parameters.
pool-delete
Delete the pools and their desktops
Usage:
vda pool-delete [-f | --force] [-d | --delete-desktops] <pool1> <pool2>
-?, --help
Print this help list
Options:
-f, --force
Delete the pool even if one of the desktops/templates
are in use
-d, --delete-desktops Delete the desktops also from backend
Operand:
*<pool1> <pool2>
The name of the pools to be deleted
Document generated by Confluence on Jun 24, 2009 06:55
Page 90
'*' denotes mandatory parameters.
pool-getprops
List the properties of the pool
Usage:
vda pool-getprops [-p <prop1>,<prop2> | --properties=<prop1>,<prop2>] <name>
-?, --help
Print this help list
Options:
*-p <prop1>,<prop2>, --properties=<prop1>,<prop2>
The list of properties to get
Properties:
comment
The comment about the pool
assignment-status
Whether desktop assignments from the pool are enabled
or disabled. Possible values are 'enabled' and
'disabled'
assignment-type
The assignment policy for this pool. Possible values
are 'personal' and 'flexible'
cloning-status
Whether desktop cloning is for this pool is enabled or
disabled. Possible values are 'enabled' and 'disabled'
template
The name of the template used to automatically populate
this pool
system-preparation-status
Whether system preparation is applied to cloned
desktops for this pool
system-preparation
The system prepartion used for cloned desktops. For
VMware VirtualCenter pools, a custom spec name. For xVM
VirtualBox pools, a Sysprep file
power-state
The power state of a desktop after cloning or
recycling. Possible values are 'on', 'off', 'suspended'
name-pattern
The naming pattern to use for new cloned desktops. The
pattern is composed of a prefix and a '0' for each
digit of the sequential number
preferred-size
The desired number of desktops in the pool
free-size
The minimum number of available desktops in the pool
max-size
The maximum number of desktops the pool can contain
recycle-policy
The action to take when recycling desktops. Possible
values are 'snapshot', 'reuse', 'delete'
idle-timeout
The time a machine remains suspended before being made
available (in minutes)
synchronous-cloning The maximum number of parallel desktop cloning jobs
preferred-storage
The list of storages used when the pool creates new
desktops. Valid only for VMware VirtualCenter pools
network-interface
The type of network interface for xVM VirtualBox pool,
NAT or Host Interface. Possible values are 'nat' or
'host'. Valid only for xVM VirtualBox pools
desktop-protocol
The type of desktop protocol for xVM VirtualBox pools,
only valid if the network interface is Host Interface.
Possible values are 'virtualbox' or 'windows' rdp
connector. Valid only for xVM VirtualBox pools
Operand:
*<name>
The name of the pool
'*' denotes mandatory parameters.
Document generated by Confluence on Jun 24, 2009 06:55
Page 91
pool-setprops
Edit the properties of the pool
Usage:
vda pool-setprops [-p <prop1>=<value1>,<prop2>=<value2> |
--properties=<prop1>=<value1>,<prop2>=<value2>] <name>
-?, --help
Print this help list
Options:
*-p <prop1>=<value1>,<prop2>=<value2>, --properties=<prop1>=<value1>,<prop2>=<value2>
The list of properties to set
Properties:
name=<name>
The name to identify the pool
comment=<comment>
The comment about the pool
assignment-type=<assignment-type>
The assignment policy for this pool. Possible values
are 'personal' and 'flexible'
template=<template> The id of the template used to automatically populate
this pool
system-preparation-status=<system-preparation-status>
Whether system preparation is applied to cloned
desktops for this pool. Possibles values are 'enabled'
or 'disabled'
system-preparation=<system-preparation>
The system prepartion used for cloned desktops. For
VMware VirtualCenter pools, a custom spec name. For xVM
VirtualBox pools, a Sysprep file.
power-state=<power-state>
The power state of a desktop after cloning or
recycling. Possible values are 'on', 'off', 'suspended'
name-pattern=<name-pattern>
The naming pattern to use for new cloned desktops. The
pattern is composed of a prefix and a '0' for each
digit of the sequential number
preferred-size=<preferred-size>
The desired number of desktops in the pool
free-size=<free-size> The minimum number of available desktops in the pool
max-size=<max-size> The maximum number of desktops the pool can contain
recycle-policy=<recycle-policy>
The action to take when recycling desktops. Possible
values are 'snapshot', 'reuse', 'delete'
idle-timeout=<idle-timeout>
The time a machine remains suspended before being made
available (in minutes).
synchronous-cloning=<synchronous-cloning>
The maximum number of parallel desktop cloning jobs
preferred-storage=<preferred-storage1>;<preferred-storage2>
The list of storages used when the pool creates new
desktops. Semi-colon ';' separated list of storage IDs,
the IDs can be found using the provider-list-storage
command. Valid only for VMware VirtualCenter pools
network-interface=<network-interface>
The type of network interface for xVM VirtualBox pool,
NAT or Host Interface. Possible values are 'nat' or
'host'. Valid only for xVM VirtualBox pools
desktop-protocol=<desktop-protocol>
Document generated by Confluence on Jun 24, 2009 06:55
Page 92
The type desktop protocol for xVM VirtualBox pools,
only valid if the network interface is Host Interface.
Possible values are 'virtualbox' or 'windows' rdp
connector. Valid only for xVM VirtualBox pools
If a property value contains a comma (','), use the double-quoting syntax for
the value, such as <prop>='"<value>"' (single-quote ' followed by double-quote "
to open, double-quote " followed by single quote ' to close).
Operand:
*<name>
The name of the pool
'*' denotes mandatory parameters.
pool-resetprops
Reset the properties of the pool to their default value
Usage:
vda pool-resetprops [-p <prop1>,<prop2> | --properties=<prop1>,<prop2>] <name>
-?, --help
Print this help list
Options:
*-p <prop1>,<prop2>, --properties=<prop1>,<prop2>
The list of properties to reset
Properties:
assignment-type
power-state
name-pattern
recycle-policy
idle-timeout
The assignment policy for this pool
The power state of a desktop after cloning or recycling
The naming pattern to use for new cloned desktops
The action to take when recycling desktops
The time a machine remains suspended before being made
available
synchronous-cloning The maximum number of parallel desktop cloning jobs
network-interface
The type of network interface for xVM VirtualBox pool,
NAT or Host Interface. Valid only for xVM VirtualBox
pools
desktop-protocol
The type desktop protocol for xVM VirtualBox pools,
only valid if the network interface is Host Interface.
Valid only for xVM VirtualBox pools
Operand:
*<name>
The name of the pool
'*' denotes mandatory parameters.
pool-unsetprops
Unset the properties of the pool
Usage:
vda pool-unsetprops [-p <prop1>,<prop2> | --properties=<prop1>,<prop2>] <name>
-?, --help
Print this help list
Document generated by Confluence on Jun 24, 2009 06:55
Page 93
Options:
*-p <prop1>,<prop2>, --properties=<prop1>,<prop2>
The list of properties to unset
Properties:
template
Operand:
*<name>
The id of the template used to automatically populate
this pool
The name of the pool
'*' denotes mandatory parameters.
pool-show
Show detailed information about the pool
Usage:
vda pool-show [-x | --parseable] <pool>
-?, --help
Print this help list
Options:
-x, --parseable
Display output suitable for programmatic parsing.
Operand:
*<pool>
The name of the pool
'*' denotes mandatory parameters.
pool-desktops
List all desktops from the pool
Usage:
vda pool-desktops [-x | --parseable] <pool>
-?, --help
Print this help list
Options:
-x, --parseable
Display output suitable for programmatic parsing.
Operand:
*<pool>
The name of the pool
'*' denotes mandatory parameters.
Document generated by Confluence on Jun 24, 2009 06:55
Page 94
pool-vb-import
Import xVM VirtualBox desktops into the pool
Usage:
vda pool-vb-import [-p <prop1>=<value1>,<prop2>=<value2> |
--properties=<prop1>=<value1>,<prop2>=<value2>] <pool>
-?, --help
Print this help list
Options:
*-p <prop1>=<value1>,<prop2>=<value2>, --properties=<prop1>=<value1>,<prop2>=<value2>
The list of properties that define the desktop
Properties:
*vdi-image=<vdi-image> The name of the disk image file for this desktop. The
file must be in '/var/tmp'.
*xml-configuration=<xml-configuration>
The name of the XML configuration file for this
desktop. The file must be in '/var/tmp'.
If a property value contains a comma (','), use the double-quoting syntax for
the value, such as <prop>='"<value>"' (single-quote ' followed by double-quote "
to open, double-quote " followed by single quote ' to close).
Operand:
*<pool>
The name of the pool where desktops are imported
'*' denotes mandatory parameters.
pool-vc-import
Import VMware VirtualCenter desktops into the pool
Usage:
vda pool-vc-import [-d <desktop1>,<desktop2> | --desktop=<desktop1>,<desktop2>]
<pool>
-?, --help
Print this help list
Options:
*-d <desktop1>,<desktop2>, --desktop=<desktop1>,<desktop2>
The UUID if the desktops to import
Operand:
*<pool>
The name of the pool where desktops are imported
'*' denotes mandatory parameters.
pool-start
Start automatic cloning of desktops for the pools
Document generated by Confluence on Jun 24, 2009 06:55
Page 95
Usage:
vda pool-start <name1> <name2>
-?, --help
Print this help list
Operand:
*<name1> <name2>
The name of the pools
'*' denotes mandatory parameters.
pool-stop
Stop automatic cloning of desktops for the pools
Usage:
vda pool-stop <name1> <name2>
-?, --help
Print this help list
Operand:
*<name1> <name2>
The name of the pools
'*' denotes mandatory parameters.
pool-enable
Enable users to connect to flexible desktops from the pools
Usage:
vda pool-enable <name1> <name2>
-?, --help
Print this help list
Operand:
*<name1> <name2>
The name of the pools
'*' denotes mandatory parameters.
pool-disable
Disable users from connecting to flexible desktops from the pools
Usage:
vda pool-disable <name1> <name2>
-?, --help
Print this help list
Operand:
*<name1> <name2>
The name of the pools
Document generated by Confluence on Jun 24, 2009 06:55
Page 96
'*' denotes mandatory parameters.
pool-create-sysprep
Create a Sysprep file for the pool. Valid only for xVM VirtualBox pools
Usage:
vda pool-create-sysprep [-p <prop1>=<value1>,<prop2>=<value2> |
--properties=<prop1>=<value1>,<prop2>=<value2>] <name>
-?, --help
Print this help list
Options:
*-p <prop1>=<value1>,<prop2>=<value2>, --properties=<prop1>=<value1>,<prop2>=<value2>
The list of properties to use to create the Sysprep
file
Properties:
admin-password=<admin-password>
The Windows Administrator password
*key=<key>
The Windows license key
workgroup=<workgroup> The Windows workgroup name
domain=<domain>
The Windows domain name
domain-admin=<domain-admin>
The Windows domain Administrator name
domain-password=<domain-password>
The Windows domain Administrator password
If a property value contains a comma (','), use the double-quoting syntax for
the value, such as <prop>='"<value>"' (single-quote ' followed by double-quote "
to open, double-quote " followed by single quote ' to close).
Operand:
*<name>
The name of the pool
'*' denotes mandatory parameters.
desktop
desktop-delete
Delete the desktops
Usage:
vda desktop-delete [-f | --force] [-r | --remove-vc] <desktop1> <desktop2>
-?, --help
Print this help list
Options:
-f, --force
Delete the pool even if one of the desktops/templates
are in use.
-r, --remove-vc
Delete the desktops also from VMware VirtualCenter
Document generated by Confluence on Jun 24, 2009 06:55
Page 97
Operand:
*<desktop1> <desktop2> The id of the desktops to delete
'*' denotes mandatory parameters.
desktop-show
Show detailed properties for the desktops
Usage:
vda desktop-show <desktop1> <desktop2>
-?, --help
Print this help list
Operand:
*<desktop1> <desktop2> The id of the desktops
'*' denotes mandatory parameters.
desktop-template
Convert the desktops to templates. Valid for xVM VirtualBox desktops only
Usage:
vda desktop-template [-u | --undo] <desktop1> <desktop2>
-?, --help
Options:
-u, --undo
Print this help list
Convert the templates back to desktops
Operand:
*<desktop1> <desktop2> The id of the desktops to convert
'*' denotes mandatory parameters.
desktop-start
Start the desktops
Usage:
vda desktop-start <desktop1> <desktop2>
-?, --help
Print this help list
Operand:
*<desktop1> <desktop2> The id of the desktops to start
'*' denotes mandatory parameters.
Document generated by Confluence on Jun 24, 2009 06:55
Page 98
desktop-stop
Stop the desktops
Usage:
vda desktop-stop <desktop1> <desktop2>
-?, --help
Print this help list
Operand:
*<desktop1> <desktop2> The id of the desktops to stop
'*' denotes mandatory parameters.
provider
provider-list
List all desktop providers
Usage:
vda provider-list [-x | --parseable]
-?, --help
Options:
-x, --parseable
Print this help list
Display output suitable for programmatic parsing.
'*' denotes mandatory parameters.
provider-vb-create
Create a new xVM VirtualBox desktop provider
Usage:
vda provider-vb-create [-p <prop1>=<value1>,<prop2>=<value2> |
--properties=<prop1>=<value1>,<prop2>=<value2>]
-?, --help
Print this help list
Options:
*-p <prop1>=<value1>,<prop2>=<value2>, --properties=<prop1>=<value1>,<prop2>=<value2>
The list of properties that define the desktop provider
Properties:
*name=<name>
The name for the desktop provider
comment=<comment>
The comment for the desktop provider
Document generated by Confluence on Jun 24, 2009 06:55
Page 99
If a property value contains a comma (','), use the double-quoting syntax for
the value, such as <prop>='"<value>"' (single-quote ' followed by double-quote "
to open, double-quote " followed by single quote ' to close).
'*' denotes mandatory parameters.
provider-vc-create
Create a new VMware VirtualCenter desktop provider
Usage:
vda provider-vc-create [-p <prop1>=<value1>,<prop2>=<value2> |
--properties=<prop1>=<value1>,<prop2>=<value2>]
-?, --help
Print this help list
Options:
*-p <prop1>=<value1>,<prop2>=<value2>, --properties=<prop1>=<value1>,<prop2>=<value2>
The list of properties that define the desktop provider
Properties:
*name=<name>
*host=<host>
port=<port>
The name for the desktop provider
The hostname of the VMware VirtualCenter host
The port to connect to the VMware VirtualCenter host.
The default is 443
*username=<username> The username to authenticate to the VMware
VirtualCenter host
password=<password> the password to authenticate to the VMware
VirtualCenter host
comment=<comment>
The comment for the desktop provider
If a property value contains a comma (','), use the double-quoting syntax for
the value, such as <prop>='"<value>"' (single-quote ' followed by double-quote "
to open, double-quote " followed by single quote ' to close).
'*' denotes mandatory parameters.
provider-delete
Delete the desktop providers
Usage:
vda provider-delete <provider1> <provider2>
-?, --help
Print this help list
Operand:
*<provider1> <provider2> The name of the desktop providers to delete
'*' denotes mandatory parameters.
Document generated by Confluence on Jun 24, 2009 06:55
Page 100
provider-vb-getprops
List the properties of the xVM VirtualBox desktop provider
Usage:
vda provider-vb-getprops [-p <prop1>,<prop2> | --properties=<prop1>,<prop2>]
<provider>
-?, --help
Print this help list
Options:
*-p <prop1>,<prop2>, --properties=<prop1>,<prop2>
The list of properties to get
Properties:
comment
The comment for the desktop provider
Operand:
*<provider>
The name of the desktop provider
'*' denotes mandatory parameters.
provider-vb-setprops
Edit the properties of the xVM VirtualBox desktop provider
Usage:
vda provider-vb-setprops [-p <prop1>=<value1>,<prop2>=<value2> |
--properties=<prop1>=<value1>,<prop2>=<value2>]
<provider>
-?, --help
Print this help list
Options:
*-p <prop1>=<value1>,<prop2>=<value2>, --properties=<prop1>=<value1>,<prop2>=<value2>
The list of properties to edit
Properties:
name=<name>
The new name for the desktop provider
comment=<comment>
The comment for the desktop provider
If a property value contains a comma (','), use the double-quoting syntax for
the value, such as <prop>='"<value>"' (single-quote ' followed by double-quote "
to open, double-quote " followed by single quote ' to close).
Operand:
*<provider>
The name of the desktop provider
'*' denotes mandatory parameters.
Document generated by Confluence on Jun 24, 2009 06:55
Page 101
provider-vc-getprops
List the properties of the VMware VirtualCenter desktop provider
Usage:
vda provider-vc-getprops [-p <prop1>,<prop2> | --properties=<prop1>,<prop2>]
<provider>
-?, --help
Print this help list
Options:
*-p <prop1>,<prop2>, --properties=<prop1>,<prop2>
The list of properties to read from the desktop
provider
Properties:
host
port
username
certificate
comment
Operand:
*<provider>
The hostname of the VMware VirtualCenter host
The port to connect to the VMware VirtualCenter host.
The username to authenticate to the VMware
VirtualCenter host
The certificate for the VMware VirtualCenter server
The comment for the desktop provider
The name of the provider
'*' denotes mandatory parameters.
provider-vc-setprops
Edit the properties of the VMware VirtualCenter desktop provider
Usage:
vda provider-vc-setprops [-p <prop1>=<value1>,<prop2>=<value2> |
--properties=<prop1>=<value1>,<prop2>=<value2>]
<provider>
-?, --help
Print this help list
Options:
*-p <prop1>=<value1>,<prop2>=<value2>, --properties=<prop1>=<value1>,<prop2>=<value2>
The list of properties to edit for the desktop provider
Properties:
name=<name>
host=<host>
port=<port>
The name for the desktop provider
The hostname of the VMware VirtualCenter host
The port to connect to the VMware VirtualCenter host.
The default is 443
username=<username> The username to authenticate to the VMware
VirtualCenter host
password=<password> The password to authenticate to the VMware
VirtualCenter host
password-prompt
Prompt for the password to authenticate to the VMware
VirtualCenter host
certificate=<certificate>
Indicate to update the certificate for the VMware
VirtualCenter host. Possible value is 'update'
comment=<comment>
The comment for the desktop provider
Document generated by Confluence on Jun 24, 2009 06:55
Page 102
If a property value contains a comma (','), use the double-quoting syntax for
the value, such as <prop>='"<value>"' (single-quote ' followed by double-quote "
to open, double-quote " followed by single quote ' to close).
Operand:
*<provider>
The name of the desktop provider
'*' denotes mandatory parameters.
provider-show
Show detailed information about the desktop provider
Usage:
vda provider-show <provider>
-?, --help
Print this help list
Operand:
*<provider>
The name of the desktop provider
'*' denotes mandatory parameters.
provider-list-hosts
List all hosts for the xVM VirtualBox desktop provider
Usage:
vda provider-list-hosts [-x | --parseable] <provider>
-?, --help
Print this help list
Options:
-x, --parseable
Operand:
*<provider>
Display output suitable for programmatic parsing.
The name of the desktop provider
'*' denotes mandatory parameters.
provider-add-host
Add a host to the xVM VirtualBox desktop provider
Usage:
vda provider-add-host [-p <prop1>=<value1>,<prop2>=<value2> |
--properties=<prop1>=<value1>,<prop2>=<value2>]
<provider>
Document generated by Confluence on Jun 24, 2009 06:55
Page 103
-?, --help
Print this help list
Options:
*-p <prop1>=<value1>,<prop2>=<value2>, --properties=<prop1>=<value1>,<prop2>=<value2>
The list of properties that define the host
Properties:
*host=<host>
port=<port>
The hostname
The port for the SSL connection to the host. Default is
443
sshport=<sshport>
The port for the SSH connection to the host. Default is
22
*username=<username> The username to authenticate to the host
password=<password> The password to authenticate to the host
If a property value contains a comma (','), use the double-quoting syntax for
the value, such as <prop>='"<value>"' (single-quote ' followed by double-quote "
to open, double-quote " followed by single quote ' to close).
Operand:
*<provider>
The name of the desktop provider
'*' denotes mandatory parameters.
provider-remove-host
Remove the hosts from the xVM VirtualBox desktop provider
Usage:
vda provider-remove-host [-h <host1>,<host2> | --host=<host1>,<host2>]
<provider>
-?, --help
Print this help list
Options:
*-h <host1>,<host2>, --host=<host1>,<host2>
The list of hosts to remove from the desktop provider
Operand:
*<provider>
The name of the desktop provider
'*' denotes mandatory parameters.
provider-enable-host
Enable the hosts for the xVM VirtualBox desktop provider. Enabled hosts are used
for automated cloning
Usage:
vda provider-enable-host [-h <host1>,<host2> | --host=<host1>,<host2>]
<provider>
-?, --help
Print this help list
Document generated by Confluence on Jun 24, 2009 06:55
Page 104
Options:
*-h <host1>,<host2>, --host=<host1>,<host2>
The list of hosts to enable
Operand:
*<provider>
The name of the desktop provider
'*' denotes mandatory parameters.
provider-disable-host
Disable the hosts for the xVM VirtualBox desktop provider. Disabled hosts are
not used for automated cloning
Usage:
vda provider-disable-host [-h <host1>,<host2> | --host=<host1>,<host2>]
<provider>
-?, --help
Print this help list
Options:
*-h <host1>,<host2>, --host=<host1>,<host2>
The list of hosts to disable
Operand:
*<provider>
The name of the desktop provider
'*' denotes mandatory parameters.
provider-list-storage
List all storages for the desktop provider
Usage:
vda provider-list-storage [-x | --parseable] <provider>
-?, --help
Options:
-x, --parseable
Operand:
*<provider>
Print this help list
Display output suitable for programmatic parsing.
The name of the desktop provider
'*' denotes mandatory parameters.
provider-add-storage
Add a storage to the xVM VirtualBox desktop provider
Document generated by Confluence on Jun 24, 2009 06:55
Page 105
Usage:
vda provider-add-storage [-p <prop1>=<value1>,<prop2>=<value2> |
--properties=<prop1>=<value1>,<prop2>=<value2>]
<provider>
-?, --help
Print this help list
Options:
*-p <prop1>=<value1>,<prop2>=<value2>, --properties=<prop1>=<value1>,<prop2>=<value2>
The list of properties that define the storage
Properties:
*host=<host>
The hostname of the storage server
port=<port>
The port to connect to the storage. Default is 22.
*username=<username> The username to authenticate to the storage
password=<password> The password to authenticate to the storage
*zfspool=<zfspool>
The name of the ZFS pool to use on the storage
If a property value contains a comma (','), use the double-quoting syntax for
the value, such as <prop>='"<value>"' (single-quote ' followed by double-quote "
to open, double-quote " followed by single quote ' to close).
Operand:
*<provider>
The name of the desktop provider
'*' denotes mandatory parameters.
provider-remove-storage
Remove the storage from the xVM VirtualBox desktop provider
Usage:
vda provider-remove-storage [-h <host> | --host=<host>] [-z <zfspool> |
--zfspool=<zfspool>] <provider>
-?, --help
Print this help list
Options:
*-h <host>, --host=<host>
The hostname of the storage server
*-z <zfspool>, --zfspool=<zfspool>
The name of the ZFS pool of the storage
Operand:
*<provider>
The name of the desktop provider
'*' denotes mandatory parameters.
provider-list-templates
List the templates for the desktop provider
Usage:
vda provider-list-templates [-x | --parseable] <provider>
Document generated by Confluence on Jun 24, 2009 06:55
Page 106
-?, --help
Options:
-x, --parseable
Operand:
*<provider>
Print this help list
Display output suitable for programmatic parsing.
The name of the desktop provider
'*' denotes mandatory parameters.
provider-list-unmanaged
List the desktops from the VMware VirtualCenter that are not managed by any
desktop provider
Usage:
vda provider-list-unmanaged [-x | --parseable] <provider>
-?, --help
Options:
-x, --parseable
Operand:
*<provider>
Print this help list
Display output suitable for programmatic parsing.
The name of the desktop provider
'*' denotes mandatory parameters.
directory
directory-add
Add the user directory configuration to the system
Usage:
vda directory-add [-p <prop1>=<value1>,<prop2>=<value2> |
--property=<prop1>=<value1>,<prop2>=<value2>]
-?, --help
Print this help list
Options:
*-p <prop1>=<value1>,<prop2>=<value2>, --property=<prop1>=<value1>,<prop2>=<value2>
The list of properties that define the user directory
Properties:
*auth-type=<auth-type> The type of authentication to be used. Possible values
are 'anonymous', 'simple', 'secure', 'kerberos', and
'publickey'
hosts=<hosts1>;<hosts2> The host name or IP address and port number of the LDAP
server, separated by a colon ':'. The port number may
be omitted, if so, 389 is the default for anonymous and
simple authentication, 636 is the default for secure
authentication. May be a semi-colon ';' separated list
Document generated by Confluence on Jun 24, 2009 06:55
Page 107
of hosts. Property required with anonymous, simple and
secure authentication
basedn=<basedn>
The base DN to restrict the part of the directory used
to search for users. Valid only with anonymous, simple
and secure authentication
addomain=<addomain> The Active Directory domain name. Valid only for
kerberos and publickey authentication
username=<username> The username to authenticate to the user directory
with. Required with simple, secure and kerberos
authentication
password=<password> The password to authenticate to the user directory
with. Required with simple, secure and kerberos
authentication
If a property value contains a comma (','), use the double-quoting syntax for
the value, such as <prop>='"<value>"' (single-quote ' followed by double-quote "
to open, double-quote " followed by single quote ' to close).
'*' denotes mandatory parameters.
directory-remove
Remove the user directory configuration from the system
Usage:
vda directory-remove [-f | --force]
-?, --help
Options:
-f, --force
Print this help list
Force removal of the user directory configuration when
the user directory is in use, because some users are
assigned to desktops or associated to tokens
'*' denotes mandatory parameters.
directory-getprops
List the properties of the user directory
Usage:
vda directory-getprops [-p <prop1>,<prop2> | --properties=<prop1>,<prop2>]
-?, --help
Print this help list
Options:
*-p <prop1>,<prop2>, --properties=<prop1>,<prop2>
The list of properties to get
Properties:
auth-type
hosts
The type of authentication to be used. Possible values
are 'anonymous', 'simple', 'secure', 'kerberos', and
'publickey'
The host name or IP address and port number of the LDAP
server, separated by a colon ':'. May be a semi-colon
Document generated by Confluence on Jun 24, 2009 06:55
Page 108
basedn
addomain
username
';' separated list of hosts
The base DN to restrict the part of the directory used
to search for users. Valid only with anonymous, simple
and secure authentication
The Active Directory domain name. Valid only for
kerberos and publickey authentication
The username to authenticate to the user directory
with. Required with simple, secure and kerberos
authentication
'*' denotes mandatory parameters.
directory-setprops
Edit the properties of the user directory
Usage:
vda directory-setprops [-p <prop1>,<prop2> | --properties=<prop1>,<prop2>]
-?, --help
Print this help list
Options:
*-p <prop1>,<prop2>, --properties=<prop1>,<prop2>
The list of properties to set
Properties:
*auth-type=<auth-type> The type of authentication to be used. Possible values
are 'anonymous', 'simple', 'secure', 'kerberos', and
'publickey'
hosts=<hosts1>;<hosts2> The host name or IP address and port number of the LDAP
server, separated by a colon ':'. The port number may
be omitted, if so, 389 is the default for anonymous and
simple authentication, 636 is the default for secure
authentication. May be a semi-colon ';' separated list
of hosts. Property required with anonymous, simple and
secure authentication
basedn=<basedn>
The base DN to restrict the part of the directory used
to search for users. Valid only with anonymous, simple
and secure authentication
addomain=<addomain> The Active Directory domain name. Valid only for
kerberos and publickey authentication
username=<username> The username to authenticate to the user directory
with. Required with simple, secure and kerberos
authentication
password=<password> The password to authenticate to the user directory
with. Required with simple, secure and kerberos
authentication
'*' denotes mandatory parameters.
directory-show
Show the configuration details for the user directory
Usage:
Document generated by Confluence on Jun 24, 2009 06:55
Page 109
vda directory-show
-?, --help
Print this help list
settings
settings-getprops
List global settings
Usage:
vda settings-getprops [-p <prop1>,<prop2> | --property=<prop1>,<prop2>]
-?, --help
Print this help list
Options:
*-p <prop1>,<prop2>, --property=<prop1>,<prop2>
The list of global settings to read
Properties:
clientauthentication Determines whether clients are authenticated
vbox.connect.timeout Connection timeout to the xVM VirtualBox web service,
in milliseconds
vbox.request.timeout Request timeout to the xVM VirtualBox web service, in
milliseconds
ldap.user.object.filter LDAP filter used to identify objects of type user
ldap.user.search.filter LDAP filter used to search for users according a search
criteria. Searches for users can be done using the
user-search command or in the web administration
console. $SEARCH_STRING is the placeholder for the
search criteria
ldap.user.member.attributes
List of comma separated LDAP attributes on a user
object storing the groups the user is a member of
ldap.userid.attributes List of comma separated LDAP attributes storing the
userid value for user objects. This is used to find a
user given its userid
ldap.group.object.filter
LDAP filter used to identify objects of type group
ldap.group.search.filter
LDAP filter used to search for groups according a
search criteria. Searches for groups can be done using
the user-search command or in the web administration
console. $SEARCH_STRING is the placeholder for the
search criteria
ldap.group.member.attributes
List of comma separated LDAP attributes on a group
object storing the users member of the group
ldap.group.short.attributes
List of comma separated LDAP attributes on a group
object storing the information for short membership
ldap.container.object.filter
LDAP filter used to identify objects of type container.
Containers can be selected as root for custom group
filters in the web administration console
ldap.container.search.filter
LDAP filter used by the web administration console to
search for containers according a search criteria, when
Document generated by Confluence on Jun 24, 2009 06:55
Page 110
selecting a root for a custom group filter.
$SEARCH_STRING is the placeholder for the search
criteria
ldap.default.attributes List of LDAP separated attributes loaded in the cache
when looking up an object
'*' denotes mandatory parameters.
settings-setprops
Edit global settings
Usage:
vda settings-setprops [-p <prop1>=<value1>,<prop2>=<value2> |
--property=<prop1>=<value1>,<prop2>=<value2>]
-?, --help
Print this help list
Options:
*-p <prop1>=<value1>,<prop2>=<value2>, --property=<prop1>=<value1>,<prop2>=<value2>
The list of global settings to edit
Properties:
clientauthentication=<clientauthentication>
Determines whether clients are authenticated. Possible
values are 'enabled' and 'disabled'
vbox.connect.timeout=<vbox.connect.timeout>
Connection timeout to the xVM VirtualBox web service,
in milliseconds
vbox.request.timeout=<vbox.request.timeout>
Request timeout to the xVM VirtualBox web service, in
milliseconds
ldap.user.object.filter=<ldap.user.object.filter>
LDAP filter used to identify objects of type user
ldap.user.search.filter=<ldap.user.search.filter>
LDAP filter used to search for users according a search
criteria. Searches for users can be done using the
user-search command or in the web administration
console. $SEARCH_STRING is the placeholder for the
search criteria
ldap.user.member.attributes=<ldap.user.member.attributes>
List of comma separated LDAP attributes on a user
object storing the groups the user is a member of
ldap.userid.attributes=<ldap.userid.attributes>
List of comma separated LDAP attributes storing the
userid value for user objects. This is used to find a
user given its userid
ldap.group.object.filter=<ldap.group.object.filter>
LDAP filter used to identify objects of type group
ldap.group.search.filter=<ldap.group.search.filter>
LDAP filter used to search for groups according a
search criteria. Searches for groups can be done using
the user-search command or in the web administration
console. $SEARCH_STRING is the placeholder for the
search criteria
ldap.group.member.attributes=<ldap.group.member.attributes>
List of comma separated LDAP attributes on a group
object storing the users member of the group
ldap.group.short.attributes=<ldap.group.short.attributes>
List of comma separated LDAP attributes on a group
Document generated by Confluence on Jun 24, 2009 06:55
Page 111
object storing the information for short membership
ldap.container.object.filter=<ldap.container.object.filter>
LDAP filter used to identify objects of type container.
Containers can be selected as root for custom group
filters in the web administration console
ldap.container.search.filter=<ldap.container.search.filter>
LDAP filter used by the web administration console to
search for containers according a search criteria, when
selecting a root for a custom group filter.
$SEARCH_STRING is the placeholder for the search
criteria
ldap.default.attributes=<ldap.default.attributes>
List of LDAP separated attributes loaded in the cache
when looking up an object
If a property value contains a comma (','), use the double-quoting syntax for
the value, such as <prop>='"<value>"' (single-quote ' followed by double-quote "
to open, double-quote " followed by single quote ' to close).
'*' denotes mandatory parameters.
settings-resetprops
Reset global settings to their default value
Usage:
vda settings-resetprops [-p <prop1>,<prop2> | --property=<prop1>,<prop2>]
-?, --help
Print this help list
Options:
*-p <prop1>,<prop2>, --property=<prop1>,<prop2>
The list of global settings to reset
Properties:
clientauthentication Determines whether clients are authenticated
vbox.connect.timeout Connection timeout to the xVM VirtualBox web service,
in milliseconds
vbox.request.timeout Request timeout to the xVM VirtualBox web service, in
milliseconds
ldap.user.object.filter LDAP filter used to identify objects of type user
ldap.user.search.filter LDAP filter used to search for users according a search
criteria. Searches for users can be done using the
user-search command or in the web administration
console. $SEARCH_STRING is the placeholder for the
search criteria
ldap.user.member.attributes
List of comma separated LDAP attributes on a user
object storing the groups the user is a member of
ldap.userid.attributes List of comma separated LDAP attributes storing the
userid value for user objects. This is used to find a
user given its userid
ldap.group.object.filter
LDAP filter used to identify objects of type group
ldap.group.search.filter
LDAP filter used to search for groups according a
search criteria. Searches for groups can be done using
the user-search command or in the web administration
console. $SEARCH_STRING isthe placeholder for the
search criteria
Document generated by Confluence on Jun 24, 2009 06:55
Page 112
ldap.group.member.attributes
List of comma separated LDAP attributes on a group
object storing the users member of the group
ldap.group.short.attributes
List of comma separated LDAP attributes on a group
object storing the information for short membership
ldap.container.object.filter
LDAP filter used to identify objects of type container.
Containers can be selected as root for custom group
filters in the web administration console
ldap.container.search.filter
LDAP filter used by the web administration console to
search for containers according a search criteria, when
selecting a root for a custom group filter.
$SEARCH_STRING is the placeholder for the search
criteria
ldap.default.attributes List of LDAP separated attributes loaded in the cache
when looking up an object
'*' denotes mandatory parameters.
job
job-list
List the existing jobs
Usage:
vda job-list [-x | --parseable]
-?, --help
Print this help list
Options:
-x, --parseable
Display output suitable for programmatic parsing.
'*' denotes mandatory parameters.
job-show
Show the job details
Usage:
vda job-show [-x | --parseable] <job>
-?, --help
Options:
-x, --parseable
Operand:
*<job>
Print this help list
Display output suitable for programmatic parsing.
The id of the jobs
'*' denotes mandatory parameters.
Document generated by Confluence on Jun 24, 2009 06:55
Page 113
job-wait
Wait until the job ends
Usage:
vda job-wait [-t <timeout> | --timeout=<timeout>] <job>
-?, --help
Print this help list
Options:
-t <timeout>, --timeout=<timeout>
Timeout in seconds to wait
Operand:
*<job>
The id of the job
'*' denotes mandatory parameters.
Document generated by Confluence on Jun 24, 2009 06:55
Page 114
The vda-webadmin Command
This page last changed on Mar 20, 2009 by katell.
Command
/opt/SUNWvda/sbin/vda-webadmin
Usage
Usage: vda-webadmin SUBCOMMAND
or: vda-webadmin OPTIONS
Manages the Web server hosting the Sun Virtual Desktop Infrastructure Web Administration.
The accepted values for SUBCOMMAND are:
start Starts the server
stop Stops the server
restart Stop followed by start
status Display status of server
enable Enable the server to start at system boot
disable Disable the server from starting at system boot
The accepted values for OPTIONS are:
-h
Display this help list.
Man Page
Sun Virtual Desktop Infrastructure Administration
vda-webadmin(1M)
NAME
vda-webadmin - Sun Virtual Desktop Infrastructure Web
Administration tool
SYNOPSIS
/opt/SUNWvda/sbin/vda-webadmin start
/opt/SUNWvda/sbin/vda-webadmin stop
/opt/SUNWvda/sbin/vda-webadmin restart
/opt/SUNWvda/sbin/vda-webadmin status
/opt/SUNWvda/sbin/vda-webadmin enable
/opt/SUNWvda/sbin/vda-webadmin disable
/opt/SUNWvda/sbin/vda-webadmin -h
DESCRIPTION
Document generated by Confluence on Jun 24, 2009 06:55
Page 115
The Sun Virtual Desktop Infrastructure Web Administration
tool allows administrators control and configure the brokering of desktop sessions. vda-webadmin may be used to control
the web administration service used by the tool.
SUBCOMMANDS
The following subcommands are supported.
start Start the service
stop Stop the service
restart
Restart the service
status
Query and print the service status
enable
Enable the service to start at system boot
enable
Disable the service from starting at system boot
OPTIONS
-h Print a usage message
EXIT STATUS
The following exit values are returned.
0
Success
Sun VDI 3.0
Last change: 03/11/09
1
Sun Virtual Desktop Infrastructure Administration
vda-webadmin(1M)
non zero
Failure
ATTRIBUTES
See attributes(5) for descriptions of the following attributes:
____________________________________________________________
|
Attribute Type
|
Attribute Value
|
| Availability
| SUNWvda-admin
|
| Interface Stability
| Uncommitted
|
|_____________________________|_____________________________|
SEE ALSO
vda-config(1M), vda-service(1M)
Sun VDI 3.0
Last change: 03/11/09
2
Document generated by Confluence on Jun 24, 2009 06:55
Page 116
Setting Up a Storage Server
This page last changed on Jun 16, 2009 by thomaspfohe.
Setting Up a Storage Server
A Sun xVM VirtualBox virtualization platform requires a storage server to house the virtual machines.
The following servers can be used as storage by VDI 3.0:
• Any Sun Storage 7000 Unified Storage System (the 7210 or 7410 are best suited for production)
• Any server running the OpenSolaris 2008.11 operating system (best suited for demo purposes)
There are storage limitations with SPARC VDI hosts.
Please see the Release Notes for more information.
• How to Set Up a Sun Storage 7000 Unified Storage System
• How to Set Up an OpenSolaris Storage Server
• How to Set Up a Solaris Storage Server
Up One Page
Level
Installing
Document generated by Confluence on Jun 24, 2009 06:55
Next Page
Setting Up a Sun
xVM VirtualBox
Server
Page 117
How to Set Up a Solaris Storage Server
This page last changed on Jun 18, 2009 by thomaspfohe.
How to Set Up a Solaris Storage Server
Each virtual disk is represented by a ZFS volume. The ZFS volumes are stored in a ZFS pool and accessed by xVM VirtualBox
via iSCSI. The management of the ZFS volumes is done by Sun VDI 3.0 and requires ssh root access to the ZFS storage
server and a ZFS pool on that ZFS storage server.
A Solaris storage server requires the following preparation:
Steps
1. Install the operating system.
Install Solaris 10 update 7. The Solaris installer offers you the option to use UFS or ZFS for the root file system. It is
recommended that the storage server contains multiple disks and the other disks are exclusively used for the VDI ZFS
pools. In that case either of the two choices is fine. If there is only one disk available choose ZFS.
2. Enable root access.
To enable root access:
a. Edit the file /etc/ssh/sshd_config and change the line PermitRootLogin no to PermitRootLogin
yes
b. Restart the SSHD service to implement the changes you made to the sshd_config file:
# svcadm restart ssh
3. Create a ZFS pool.
Creating a pool is an optional action. The Solaris installer has already created a pool named 'rpool' if 'ZFS' has been
selected during installation. This pool contains the root file systems and can also be used by Sun VDI 3.0. Creating a
dedicated pool is recommended to separate the Sun VDI 3.0 data from the OpenSolaris/Solaris file systems.
To create a ZFS pool, use the following command:
# zpool create <pool name> <disk1> <disk2> <disk3> ...
4. Enable iSCSI access.
Execute the following CLI command as root on the Solaris storage server:
# svcadm enable svc:/system/iscsitgt:default
Previous Page
How to Set Up
an OpenSolaris
Storage Server
Document generated by Confluence on Jun 24, 2009 06:55
Up One Page
Level
Setting Up a
Storage Server
Page 118
How to Set Up an OpenSolaris Storage Server
This page last changed on Jun 18, 2009 by thomaspfohe.
How to Set Up an OpenSolaris Storage Server
Each virtual disk is represented by a ZFS volume. The ZFS volumes are stored in a ZFS pool and accessed by xVM VirtualBox
via iSCSI. The management of the ZFS volumes is done by Sun VDI 3.0 and requires ssh root access to the ZFS storage
server and a ZFS pool on that ZFS storage server.
The ZFS storage host must be an x86 platform running OpenSolaris 2008.11 (64-bit). The ZFS server requires the following
preparation.
Steps
1. Install the operating system.
Install OpenSolaris 2008.11. We highly recommend to install the release version (101b). The OpenSolaris installer
offers you the option to create a user. It is important to create such a user during the installation process otherwise
several steps of the configuration will fail.
2. Enable root access.
To enable root access:
a. Log into the ZFS storage host. If you are working remotely, use the newly-created user account:
$ ssh <username>@<ZFS_Storage_Host>
b. Become superuser:
$ su
c. Transform the root role to the root user:
# rolemod -K type=normal root
d. Edit the file /etc/ssh/sshd_config and change the line PermitRootLogin no to PermitRootLogin
yes
e. Restart the SSHD service to implement the changes you made to the sshd_config file:
# svcadm restart ssh
3. Create a ZFS pool.
Creating a pool is an optional action. The OpenSolaris/Solaris installer has already created a pool named 'rpool'. This
pool contains the OpenSolaris/Solaris file systems and can also be used by Sun VDI 3.0. Creating a dedicated pool is
recommended to separate the Sun VDI 3.0 data from the OpenSolaris/Solaris file systems.
To create a ZFS pool, use the following command:
# zpool create <pool name> <disk1> <disk2> <disk3> ...
4. Install the iSCSI packages.
Document generated by Confluence on Jun 24, 2009 06:55
Page 119
Install the iSCSI packages on the storage server. You can add the packages from the command line of the storage
server (Internet connectivity is required):
pkg install SUNWiscsi
pkg install SUNWiscsitgt
5. Enable iSCSI access.
Execute the following CLI command as root on the Solaris storage server:
# svcadm enable svc:/system/iscsitgt:default
Previous Page
How to Set Up a
Sun Storage 7000
Unified Storage
System
Document generated by Confluence on Jun 24, 2009 06:55
Up One Page
Level
Setting Up a
Storage Server
Page 120
How to Set Up a Sun Storage 7000 Unified Storage System
This page last changed on Apr 03, 2009 by stephanielewellen.
How to Set Up a Sun Storage 7000 Unified Storage System
Sun VDI 3 supports the Sun Storage 7110, 7210 and 7410 Unified Storage Systems. A Sun Unified Storage System requires
the following preparation:
Steps
1. Set up the system.
Follow the instructions provided by the "Quick Setup" manual of the Sun Unified Storage System.
2. Update the Sun Unified Storage System Software.
Updating the Sun Unified Storage System Software is an optional action. We recommend to update the system to
version ak-2008.11.20.1.0,1-1.5 or higher. This version contains important performance features.
3. Create a project.
Creating a project is an optional action. There is always a project called 'default' which can be used by Sun VDI 3.
Do not update the software of a Sun Storage 7000 Unified Storage System after it has been added to VDI
3.
Please see the Release Notes for more information.
Up One Page
Level
Setting Up a
Storage Server
Document generated by Confluence on Jun 24, 2009 06:55
Next Page
How to Set Up
an OpenSolaris
Storage Server
Page 121
Setting Up a Sun xVM VirtualBox Server
This page last changed on Jun 08, 2009 by stephanielewellen.
Setting Up a Sun xVM VirtualBox Server
The xVM VirtualBox server should be an x86 platform running Solaris 10 Update 6 (64-bit).
Before You Begin
Make sure that the Solaris swap space is adequate, otherwise your installation will fail.
Solaris hosts running xVM VirtualBox must have swap space equal to, or greater than the host's physical
memory size. See the Release Notes for detailed information.
Steps
1. Obtain the root user:
$ su
2. Unzip the VirtualBox archive:
# unzip vbox_2.0.zip
3. Change to the expanded directory:
# cd vbox_2.0
4. Execute the installation:
# ./vb-install
Previous Page
Setting Up a
Storage Server
Document generated by Confluence on Jun 24, 2009 06:55
Up One Page
Level
Installing
Next Page
Defining
Virtual Machine
Templates in Sun
xVM VirtualBox
Page 122
Defining Virtual Machine Templates in Sun xVM VirtualBox
This page last changed on Jun 08, 2009 by stephanielewellen.
Defining Virtual Machine Templates in Sun xVM VirtualBox
Sun VDI presents users with easy access to their virtual desktops, instances of any desktop operating system, executed in
a virtual machine. You can manually create virtual machines, or you can configure Sun VDI to create, or clone additional
virtual machines automatically from a template.
Before You Begin
After executing the Sun xVM VirtualBox for VDI 3 installer, you can create your first virtual machine. To simplify the
installation, it is recommended that you use the installation of Sun xVM VirtualBox for VDI 3 (described in the previous
section) to create the first virtual machine template.
You can also install a Sun xVM VirtualBox for VDI locally (on your laptop), and create virtual machines there. Make sure to
download xVM VirtualBox version 2.0.8.
Steps
1. Launch the Sun xVM VirtualBox GUI.
# /opt/VirtualBox/VirtualBox
a. Click New to launch the New Virtual Machine wizard.
b. The wizard will guide you through virtual machine creation.
Be sure to choose the appropriate hard-disk and RAM space for the desired configuration (4 GB hard-disk and
384 MB RAM are recommended).
For more information about virtual machine system requirements, refer to Chapter 3: Starting out with xVM
VirtualBox in the Sun xVM VirtualBox User Manual.
2. Install the operating system.
At this point you have an empty virtual machine, equivalent to a PC without an OS installed. The next step is to
choose the boot medium for the OS and install it.
a. Select the newly created virtual machine and click Settings.
b. Open the Advanced tab in the Settings GUI.
c. Ensure that CD/DVD-ROM is set as the first boot device.
d. Select the CD/DVD-ROM option in the left panel of the Settings dialog.
e. Check the Mount CD/DVD Drive checkbox.
i. Select the Host CD/DVD Drive radio button to install the OS from the CD-ROM drive.
ii. Select the ISO Image File radio button, with the appropriate path, to install the OS from a previously
downloaded ISO file.
f. Click OK to save the changes and close the Settings GUI.
At this point the new virtual machine must be started to trigger the OS installation.
g. Select the new virtual machine and click Start.
h. Follow the installation prompts, or seek further installation details from the OS manufacturer.
3. Install the xVM VirtualBox Guest Additions.
After the OS is installed, the xVM VirtualBox Guest Additions must be installed.
a. With the virtual machine running and fully booted, click the Devices menu, then select Install Guest Additions.
This will launch the xVM VirtualBox Guest Additions installer inside the virtual machine.
b. Install the Guest Additions according to the instructions in the wizard and reboot when asked.
c. Install all additional software for the desired virtual machine template.
4. Install System Preparation (recommended).
If you later want to take advantage of desktop cloning, then it is often necessary to customize the identity and
domain settings of Windows XP after a clone has been created from a template. This can be automated using
Sysprep. However, the virtual machine that should be used as template must be prepared following the steps below:
a. Download the appropriate Sysprep CAB from Microsoft and unpack the contents into the directory C:
\Sysprep
- Windows XP Service Pack 2 Deployment Tools.
- Windows XP Service Pack 3 Deployment Tools.
b. Execute Sysprep. This will shutdown the virtual machine.
Document generated by Confluence on Jun 24, 2009 06:55
Page 123
# C:\Sysprep\sysprep.exe \-mini \-reseal \-quiet \-activated
If you plan on using Sysprep for cloned virtual machines, always test your configuration first. For example,
if your virtual machines will be joining a Windows domain ensure that the template can be manually added
to the domain. In doing so any DNS or other potential problems can be rectified early on. Detecting the
root cause of failures during Sysprep can be tedious so ensure things work correctly with the template first!
Previous Page
Setting Up a Sun
xVM VirtualBox
Server
Document generated by Confluence on Jun 24, 2009 06:55
Up One Page
Level
Installing
Page 124
Setting Up a VMware ESX Server
This page last changed on Apr 03, 2009 by stephanielewellen.
Setting Up a VMware ESX Server
VMware ESX server is a Linux-based appliance that provides a virtualization layer abstracting CPU resources, storage, and
memory of a physical host into multiple virtual machines.
To install the software, just power on the host machine with the VMware ESX Server CD in the CD drive. If available, you can
also use remote management applications such as the Integrated Lights Out Manager (ILOM) (available with the Sun Fire
x4100 server) to drive the installation.
During installation, you can safely rely on the suggested default settings.
After installation, make sure that you can access the VMware ESX server through the VMware Virtual Infrastructure Client
and that the license is set properly.
For full details see Installing ESX Server in the VMware ESX Server 3 and VirtualCenter Installation Guide.
Up One Page
Level
Installing
Document generated by Confluence on Jun 24, 2009 06:55
Next Page
Setting Up a
VMware vCenter
Server
Page 125
Setting Up a VMware vCenter Server
This page last changed on Apr 03, 2009 by stephanielewellen.
Setting Up a VMware vCenter Server
VMware vCenter provides central management of several ESX servers. It installs on a physical or virtual Windows machine.
For quick evaluation you can simply install it on a virtual machine inside your ESX server. The guest OS can be Microsoft
Windows XP or Microsoft Windows Server 2003 with 1 GB of RAM and an 8 GB hard-disk.
For full details, see Installing VMware Infrastructure Management in the VMware ESX Server 3 and VirtualCenter Installation
Guide.
Steps
Once VMware vCenter is installed, complete the following configuration steps:
1. Add the VMware ESX server as a managed host.
In VMware vCenter select the datacenter where the host will be added. In the menu bar go to Inventory > Datacenter
> Add Host, and follow the instructions.
2. Install the Windows System Preparation Tools for Windows XP.
They can be downloaded from Microsoft here:
• Windows XP Service Pack 2 Deployment Tools.
• Windows XP Service Pack 3 Deployment Tools.
Extract the Sysprep tools from the CAB into the directory:
C:\Documents and Settings\All Users\VMWare\VMWare VirtualCenter\sysprep\xp
For further instructions see Appendix B Installing the Microsoft Sysprep Tools in the VMware Basic System
Administration Guide.
Sun VDI takes advantage of the web services API provided by the VMware Infrastructure SDK to communicate
(via HTTPS) with VMware vCenter. Thus, make sure that:
• VMware vCenter's Webaccess component is installed and configured.
• Port 443 (HTTPS) is enabled in any firewall that may be active on the system.
As a simple test, point your Web browser to https://<localhost>/mob. If everything works correctly, you
will have access to the VMware Infrastructure SDK browser (after providing the VMware Admin user name and
password).
The previous version of Sun VDI required the installation of a Virtual Desktop Connector agent on the
VMware vCenter host. Starting with Sun VDI 3, this step is no longer necessary.
Previous Page
Setting Up a
VMware ESX
Server
Document generated by Confluence on Jun 24, 2009 06:55
Up One Page
Level
Installing
Next Page
Defining
Virtual Machine
Templates in
VMware vCenter
Page 126
Defining Virtual Machine Templates in VMware vCenter
This page last changed on Apr 03, 2009 by stephanielewellen.
Defining Virtual Machine Templates in VMware vCenter
Sun VDI presents users with easy access to their virtual desktops, typically instances of Microsoft Windows XP executed in
a virtual machine. You can manually create virtual machines, or you can configure Sun VDI to create, or clone additional
virtual machines automatically from a template.
Steps
1. Create a virtual machine with Microsoft Windows XP.
It is assumed that the process of creating virtual machines is already largely known. So, only a few important settings
are highlighted. For full details see Creating Virtual Machines in VMware Basic System Administration.
Follow these recommendations:
• Use Microsoft Windows XP SP3 as the baseline. The license must be a volume license.
• Define one disk. It should be as small as possible, for example, 4 GB is a good size. The size impacts system
performance and overall storage consumption.
• RAM also should be as small as possible (384 MB is recommended).
• A single CPU should be enough.
• One network interface is needed. It should be configured for DHCP. Ensure that the virtual machine gets a valid
IP after powering on.
2. Install the VMware Tools.
Once you have created a virtual machine with Microsoft Windows XP installed on it, install VMware Tools. VMware
Tools is a suite of utilities that enhances the performance of the virtual machine's guest operating system and
improves management of the virtual machine. Installing VMware Tools in the guest operating system is vital.
The installation can be easily triggered from within the VMware Virtual Infrastructure Client (VIC): Right‐click the
virtual machine and choose Install VMware Tools. For additional details see Installing and Upgrading VMware Tools in
VMware Basic System Administration.
3. Enable Remote Desktop Access.
RDP is the main access method to the Microsoft Windows XP desktop. By default, this access method is disabled and
rejected through the firewall. To enable remote desktop access, launch VMware's Virtual Infrastructure Client, with
your virtual machine still powered on and logged in, then follow these steps:
a. Open a console for the VM.
b. In the console, click the virtual machine's Start button.
c. Right-click on My Computer in the start menu, and select Properties.
d. In the System Properties window, select the Remote tab.
e. Under Remote Desktop, check the box marked Enable Remote Desktop on this computer so that this item is
selected.
f. Make sure that the desired users have been granted remote access rights.
g. Click OK to save the settings and close the dialog.
Before you try to connect to a virtual desktop remotely, ensure that no firewall blocks the remote access:
Make sure that port 3389 is enabled in any firewall that may be active on the system.
4. Install the Sun VDI Tools.
Sun VDI 3.0 has a tools component notifies the VDI service when a desktop is in use and handles RDP connections
when the guest OS initiates Standby. The VDI Tools must be installed on the guest operating system for recycling
to work correctly and so that the RDP connection is correctly closed when the virtual machine goes into Standby or
Suspend mode.
a. Locate the vda-tools.msi installer file in the directory where you unzipped the VDI archive.
The vda-tools.msi is located in the ./image/vda_3.0/Windows/Packages/ subdirectory. Copy the
installer to the desired VM.
b. Within the VM's console double-click the installer and follow the prompts to complete installation.
The default target location for the VDI Tools on Windows is C:\Program Files\Sun\Virtual Desktop
Access\Tools.
c. The VM services list should now contain a new service named Sun VDI Tools, running and set to start
automatically.
5. Configure power management.
An unused virtual desktop is treated like a laptop that is unplugged to save power; it is suspended automatically
to release all its CPU and memory consumption. Suspending virtual machines also affects how they are recycled. A
virtual machine will be recycled if it is has been suspended for longer than the recycling idle timeout period, even if
the user has not logged out of the machine.
Document generated by Confluence on Jun 24, 2009 06:55
Page 127
The Power Options for Microsoft Windows XP play an important role in the suspend behavior of the VM. The timeout
before a virtual machine goes into standby should be set to an appropriate value.
a. Open the Virtual Infrastructure Client.
b. Select the desired virtual machine and open the console.
c. Log into the virtual machine.
d. Go to Start > Control Panel. Open Power Options.
e. Set the System Standby time to the desired value.
f. Verify that the guest OS actually enters standby as configured.
Virtual machines should be configured to be suspended when the OS goes into standby. This is enabled in
VMware vCenter.
g. Open the Virtual Infrastructure Client.
h. Right-click on the desired virtual machine and go to Edit Settings
i. Go to Options > Power Management, select Suspend the Virtual Machine.
6. Create a virtual machine template.
You can clone additional virtual machines manually, or let Sun VDI clone them automatically from a template. Any
existing virtual machine can be converted into a template:
a. Open the Virtual Infrastructure Client.
b. Right‐click the desired virtual machine and power down the machine.
c. From the commands area or the pop-up menu, click Convert to Template
For additional details see Chapter 13: Working with Templates and Clones in VMware Basic System
Administration.
There is typically the need to customize the identity and network settings of the Windows XP after a clone has
been create from a template. This can be achieved using a Customization Specification:
d. Open the Virtual Infrastructure Client.
e. Click Edit from the menu above the tool bar and select Customization Specifications...
f. Click the New icon in the Customization Specification Manager to start the wizard.
g. On the first wizard step, choose Windows as the target virtual machine OS, and give the specification a name
and description.
h. The following steps ask the standard Windows installation questions and should be completed to correspond
with your requirements, with the exception of the following:
• Computer Name: Make sure that the Use the Virtual Machine Name item is selected. If not, you may end
up with duplicate hostnames.
• Windows License: Enter your Windows XP serial number. The Include Server License Information item
should be left unchecked.
• Networking: Make sure the interface is configured for DHCP. If not, your cloned virtual machines will not
have unique IP addresses and will not work with Sun VDI 3.0.
i. After completing the wizard and saving your customization specification, close the Customization Specification
Manager.
For additional details see Chapter 14: Customizing Guest Operating System in VMware Basic System
Administration.
Previous Page
Setting Up a
VMware vCenter
Server
Document generated by Confluence on Jun 24, 2009 06:55
Up One Page
Level
Installing
Next Page
Testing the
VMware
Infrastructure
Setup
Page 128
Upgrading
This page last changed on May 07, 2009 by stephanielewellen.
Upgrading
Configured settings from Sun VDI 2.0, including a VMware vCenter and its corresponding virtual machines and pools, can
be stored and used once again after Sun VDI 3.0 has been installed and configured.
Sun VDI 3.0 provides a command line tool to preserve the data and settings from Sun VDI 2.0.
Sun VDI 2.0 = Sun VDC 1.0
Sun VDI 2.0 is also known as Sun VDC 1.0 - this can cause confusion. VDI refers to the complete layered
software solution, while VDC refers to only the management software component.
If you are currently running the Sun VDI 2.0 software, release in March 2008, you can upgrade to VDI 3.0
using the following procedure.
Steps
1. Extract data and settings from Sun VDI 2.0.
If Sun VDI 2.0 is still installed and configured, and the Sun VDI 3.0 bits are already available, use vda-migrate to
export the data:
<MEDIA-DIR>/Supplemental/vda-migrate -e </path/to/directory>
The data will be exported to the specified directory.
Sun VDI 2.0 was found on the server.
+ Storing data...
Data exported to directory '/var/opt/SUNWvda/backup'
A log file is created with detailed information. When vda-migrate finishes it indicates the location of the log file.
In Solaris platforms it can be located at '/var/adm/log/vda-migrate.<date and time>.log'.
For more information about the vda-migrate command see its usage page.
2. Remove Sun VDI 2.0.
Refer to the Sun Virtual Desktop Connector 1.0 Installation and Administration Guide.
3. Install Sun VDI 3.0.
Refer to Step 4: Install and Configure the VDI Core in the Installing information.
4. Import the data and settings into Sun VDI 3.0.
Later on, the exported data should be imported with the vda-migrate command, this time called in the Sun VDI
3.0 installation directory.
VDI must be configured before the data can be imported.
In order to import data, Sun VDI 3.0 must have been previously installed and configured.
It's also recommended to import the data before any other action takes place on a Sun VDI host, (i.e.
before adding a desktop provider, or performing another administrative task).
/opt/SUNWvda/sbin/vda-migrate -i </path/to/directory>
Import data from Sun Virtual Desktop Infrastructure 2.0 ([y]/n)?
Document generated by Confluence on Jun 24, 2009 06:55
Page 129
Creating Desktop Providers
+ virtual.center...
Enter port for VC host virtual.center [443]:
Creating Pools
+ pool.A...
Restoring Pool Assignments
+ Importing desktop /datacenter/vm/vda-dyn-pool.A/vmA01...
+ Importing desktop /datacenter/vm/vda-dyn-pool.A/vmA02...
+ pool.B...
Restoring Pool Assignments
+ Importing desktop /neid.Datacenter/vm/vmB11...
Restoring non-assigned Desktops
+ Creating Personal pool for 'virtual.center'...
+ Importing desktop /datacenter/vm/vmC31...
+ Importing desktop /datacenter/vm/vmD41...
The data from Sun Virtual Desktop Infrastructure 2.0 has been imported into Sun VDI 3.0.
A log file is created with detailed information and can be used to track eventual errors. The log file can be located at
'/var/adm/log/vda-migrate.<date and time>.log'.
For more information about the vda-migrate command see its usage page.
5. Upgrade the VDI Tools.
The VDI tools are installed on the desktop guest OS and are necessary for recycling to work properly and to handle
RDP connections when the guest OS enters standby. VDI 3.0 introduces some improvements which are incompatible
with previous versions of the tools. If you are importing desktops from a previous version of VDI, the tools need to
be upgraded.
a. Go Control Panel > Add or Remove Programs. Remove 'Sun Virtual Desktop Connector Tools'.
b. Install the new version of the VDI tools. Instructions can be found here.
Document generated by Confluence on Jun 24, 2009 06:55
Page 130
Removing the VDI Core
This page last changed on Apr 03, 2009 by stephanielewellen.
Removing the VDI Core
Uninstall and un-configure the VDI Core:
# /opt/SUNWvda/sbin/vda-install -u
Previous Page
Checking VDA
Services
Document generated by Confluence on Jun 24, 2009 06:55
Up One Page
Level
Installing
Page 131
Administering
This page last changed on Jun 11, 2009 by stephanielewellen.
Administering
1. Manage Virtual Desktops Using the VDI Web Administration or Using the CLI
The Sun VDI Web Administration (Admin GUI) provides an interface for managing virtual machine assignments in the VDI
Core and monitoring the state of the hypervisor in the virtualization layer. The Sun VDI Core can also be controlled via a
command line interface (CLI) - see Using the CLI for more information.
1. Access the Admin GUI
2. Create Desktop Providers
• How to Create Desktop Providers for an xVM VirtualBox Platform
• How to Create Desktop Providers for a VMware Infrastructure Platform
3. Create Desktop Pools
4. Import Virtual Machines
• How to Import Virtual Machines for an xVM VirtualBox Platform
• How to Import Virtual Machines for a VMware Infrastructure Platform
5. Enable Cloning in Pools
• How to Enable Cloning for an xVM VirtualBox Platform
• How to Enable Cloning for a VMware Infrastructure Platform
6. Set Up a User Directory
• Active Directory Integration
° How to Set up Kerberos Authentication
° How to Set Up Public Key Authentication
• LDAP Integration
° How to Set Up Anonymous Authentication
° How to Set Up Simple Authentication
° How to Set Up Secure Authentication
• Customizing the LDAP Filters and Attributes
• User Directory Settings
7. Add Users to Pools
8. Associate Tokens to Users
• How to Create Automated Administration Scripts
2. Set Up Virtual Desktop Access Software
VDI 3.0 enables you to set up one or more client access method. Choose Sun Ray Software, Sun Secure Global Desktop
Software, or Microsoft Remote Desktop Connection (or a combination).
Sun Ray Software
• Adapting Sun Ray Software
° Sun Ray Administration
GUI
° Sun Ray Computing
Model
° Sun Ray Kiosk Session
Sun Secure Global Desktop Software
• Setting Up Sun Secure Global
Desktop Software
Microsoft Remote Desktop
Connection
• Understanding the RDP Broker
• VDI Default Configuration
3. Access a Desktop as an End-User
See what an end-user sees when they log into their desktop using each one of the supported client access devices.
Document generated by Confluence on Jun 24, 2009 06:55
Page 132
Sun Ray Software
• Accessing Desktops with a Sun
Ray DTU
Sun Secure Global Desktop Software
• Accessing Desktops with SGD
Web Access
Document generated by Confluence on Jun 24, 2009 06:55
Microsoft Remote Desktop
Connection
• Accessing Desktops with
Microsoft RDC
Page 133
How to Access the Admin GUI
This page last changed on Apr 07, 2009 by stephanielewellen.
How to Access the Admin GUI
Use the VDI Web Administration to manage virtual desktops.
Steps
1. Go to http://<server name>:1800 (or http://localhost:1800 if remote administration has been disabled).
2. You must use root user credentials.
You will be re-directed to https and the browser will ask you to accept the security certificate. After confirmation, you
should get the login screen.
Up One Level
Administering
Document generated by Confluence on Jun 24, 2009 06:55
Next Page
How to Create
Desktop
Providers
Page 134
How to Create Desktop Providers
This page last changed on Apr 07, 2009 by stephanielewellen.
How to Create Desktop Providers
Desktop providers encapsulate the details of the underlying virtualization platform. Since VDI 3 is compatible with both
VMware Virtual Infrastructure and Sun xVM VirtualBox virtualization platforms, there are two types of desktop providers.
At a minimum, you must configure one desktop provider before you can continue with the creation of pools. There is no
limitation to the number of providers the system can manage. At any time you can configure additional providers.
• How to Create Desktop Providers for an xVM VirtualBox Platform
• How to Create Desktop Providers for a VMware Infrastructure Platform
Previous Page
How to Access
the Admin GUI
Document generated by Confluence on Jun 24, 2009 06:55
Up One Page
Level
Administering
Next Page
How to Create
Desktop Pools
Page 135
How to Create Desktop Providers for an xVM VirtualBox Platform
This page last changed on Apr 07, 2009 by stephanielewellen.
How to Create Desktop Providers for an xVM VirtualBox Platform
Follow the steps below to set up an xVM VirtualBox desktop provider.
Steps
1. Select the Desktop Providers category in the left sidebar.
2. Select New in the Sun xVM VirtualBox Desktop Providers overview.
This will activate the New Desktop Provider for Sun xVM VirtualBox wizard that allows you to add multiple xVM
VirtualBox hosts as well as multiple xVM VirtualBox storage servers.
3. Enter the host name (or IP address) and administrator credentials for the xVM VirtualBox host server.
4. Select the Select Existing Hosts option, in Step 2, when you are finished.
5. In Step 3, enter the host name (or IP address) and administrator credentials for the xVM VirtualBox storage server (a
host running the recommended OpenSolaris version).
Again, it is possible to configure multiple xVM VirtualBox storage servers.
6. Select the Select Existing Storage option, in Step 3, when you are finished.
7. Verify or change the desktop provider name and add comments, in Step 4.
8. Once you click Finish the new desktop provider will appear in the VDI Admin GUI. You can now view the provider
details, including CPU and memory utilization, and it is possible to add or remove additional xVM VirtualBox hosts or
storage servers as needed.
Up One Page
Level
How to Create
Desktop
Providers
Document generated by Confluence on Jun 24, 2009 06:55
Next Page
How to Create
Desktop
Providers for
a VMware
Infrastructure
Platform
Page 136
How to Create Desktop Providers for a VMware Infrastructure Platform
This page last changed on Apr 07, 2009 by stephanielewellen.
How to Create Desktop Providers for a VMware Infrastructure Platform
Follow the steps below to set up a VMware Infrastrucure desktop provider.
Steps
1. Select the Desktop Providers category in the left sidebar.
2. Select New in the VMware VirtualCenter Desktop Providers overview.
This will activate the New Desktop Provider for VMware VirtualCenter wizard.
3. Enter the name (or IP address) and administrator credentials for the VMware vCenter.
4. Verify or change the Desktop Provider name and add comments, in Step 4.
5. Once you click Finish the new desktop provider will appear in the Admin GUI. You can now view the VMware vCenter
resource details, including datacenters, VMware clusters, and datastores.
In Sun VDI 2.0 it was possible to limit the used VMware vCenter resources to specific VMware datacenters.
This kind of resource restriction will now happen as part of the pool configuration.
Previous Page
How to Create
Desktop
Providers for an
xVM VirtualBox
Platform
Document generated by Confluence on Jun 24, 2009 06:55
Up One Page
Level
How to Create
Desktop
Providers
Page 137
How to Create Desktop Pools
This page last changed on Apr 29, 2009 by stephanielewellen.
How to Create Desktop Pools
Sun VDI 3 organizes desktops in pools. A pool is just a collection (or container) of desktops. Typically you will create
different pools for different types of users. For example, the engineering team, in your company, might have different
desktop requirements than the marketing department.
When changing pool settings from NAT networking to Host Networking + Windows RDP, existing desktops
that are running must be stopped and restarted or else subsequent user requests for these desktops will
fail.
This issue occurs because existing, running desktops will be using NAT and will not have a public IP
address. After the pools settings have been changed, subsequent requests for that desktop will attempt to
access the desktop via the private (and unaccessible) NAT IP.
Steps
1. Select the Pools category in the left sidebar.
2. Click New in the All Pools overview.
This will activate a New Pool wizard.
3. In Step 2, select a desktop provider from the drop-down menu, and choose a pool type.
• Dynamic pools are filled with cloned flexible desktops. If you choose the Dynamic Pool type, the desktops in
the pool will be temporarily assigned to users; they will be recycled each time the user logs out. This pool type
is considered dynamic because the user-desktop assignments are often changing.
• Growing pools are filled with cloned personal desktops. If you choose the Growing Pool type, the desktops
in the pool will be permanently assigned to users; the user can log in and out without losing their desktop
settings. The desktops are not recycled.
• Manual pools are initially empty. They are filled manually by importing personal desktops. The Manual Pool
type should be used if cloned desktop assignment is not an option.
4. In Step 3, select None as template.
5. In Step 4, specify a name for the pool.
6. Once you click the Finish a new empty pool will appear in the Pools overview.
Previous
Page
How to Create
Desktop
Providers
Document generated by Confluence on Jun 24, 2009 06:55
Up One Page
Level
Administering
Next Page
Importing
Virtual
Machines
Page 138
Importing Virtual Machines
This page last changed on Apr 29, 2009 by stephanielewellen.
Importing Virtual Machines
A pool will be empty (has no desktops) after initial creation. You can now manually add existing desktops (virtual machines)
to your pool using the VDI Admin GUI. The procedure will differ depending on the virtualization platform.
• How to Import Virtual Machines for an xVM VirtualBox Platform
• How to Import Virtual Machines for a VMware Infrastructure Platform
Previous Page
How to Create
Desktop Pools
Document generated by Confluence on Jun 24, 2009 06:55
Up One Page
Level
Administering
Next Page
How to Enable
Cloning in Pools
Page 139
How to Import Virtual Machines for an xVM VirtualBox Platform
This page last changed on Apr 29, 2009 by stephanielewellen.
How to Import Virtual Machines for an xVM VirtualBox
Platform
Sun VDI takes advantage of the ZFS file system which vastly improves the performance of desktop deployment. As a first
step you must import the desktop to the storage:
If you plan to use desktop cloning (described in the next section), then the virtual machine should have been prepared
with Sysprep before importing. Strictly spoken the Sysprep step can be omitted depending on how you finally deploy your
guest Operating Systems running inside your virtual machines but you will almost certainly require Sysprep if you have a
Microsoft Active Directory based network and want your Windows machines to join successfully.
Copy the XML config file and VDI disk image file of an existing xVM VirtualBox machine to the /var/tmp directory on the
host where Sun VDI has been executed (VDI host).
Importing snapshots of virtual machines is not supported.
Steps
The following examples use the xVM VirtualBox default paths.
1. Shut down your virtual machine.
2. Copy the XML file:
# scp ~/.VirtualBox/Machines/<VM name>/<VM name>.xml root@<VDC host>:/var/tmp
3. Copy the VDI image:
# scp ~/.VirtualBox/VDI/<VM name>.vdi root@<VDC host>:/var/tmp
If you have insufficient space in /var/tmp you can copy both files to another location on the host
and create a symbolic link.
# ln -s /<path to files>/<VM name>.xml /var/tmp/
# ln -s /<path to files>/<VM name>.vdi /var/tmp/
4.
5.
6.
7.
In the Admin GUI open the Pools tab, then select the previously created empty pool.
Select the Desktops tab, and click Import. An import dialog will be displayed.
Select the correct XML and VDI files, and click OK.
The virtual machine will be imported as a background job. Imports can take long periods of time (> 10minutes), so
please be patient.
After the virtual machine has been imported successfully, it will show up in the Desktops tab of the Pools page (a page
refresh might be necessary).
Document generated by Confluence on Jun 24, 2009 06:55
Page 140
Up One Page
Level
Importing Virtual
Machines
Document generated by Confluence on Jun 24, 2009 06:55
Next Page
How to Import
Virtual Machines
for a VMware
Infrastructure
Platform
Page 141
How to Import Virtual Machines for a VMware Infrastructure Platform
This page last changed on Apr 29, 2009 by stephanielewellen.
How to Import Virtual Machines for a VMware Infrastructure
Platform
VMware vCenter manages the virtual machines (VM) that have been executed on the configured VMware ESX server. You
can use any existing VM and import it into the previously created pool. The VDI Core will just create a corresponding entry
for the VM in its database - no physical copying is done here. The VM will not be altered in any way.
Steps
1. In the Admin GUI open the Pools tab, then select the previously created empty pool.
2. Select the Desktops tab, and click Import. An import dialog will be displayed.
3. The dialog will display the available VMs in the VirtualCenter hierarchy - you can select individual VMs, or folders. In
the latter case, all the VMs under this folder will be selected for the import.
4. Click on OK to import the VMs into the VDI Core database.
VMs which are already imported into the VDI Core cannot be selected for import. Templates can also not
be imported as they will be handled specially - see the next section dealing with desktop cloning.
After the virtual machine(s) has been imported successfully, it will show up in the Desktops tab of the Pool page (a page
refresh might be necessary).
Previous Page
How to Import
Virtual Machines
for an xVM
VirtualBox
Platform
Document generated by Confluence on Jun 24, 2009 06:55
Up One Page
Level
Importing Virtual
Machines
Page 142
How to Enable Cloning in Pools
This page last changed on Apr 29, 2009 by stephanielewellen.
How to Enable Cloning in Pools
Filling a desktop pool manually is cumbersome and inefficient for large desktop numbers. Thus Sun VDI 3.0 can also clone
desktops as needed from a template (or golden master).
For each pool, you can specify:
Preferred Size: The initial number of desktops that should be cloned
Free desktops: How many desktops must be available (unassigned) for other users - the system will clone new desktops, if
necessary, to keep enough desktops available for new users.
Maximum Size: The maximum number of desktops
Power State: The desired state of the desktop after cloning has completed or after a desktop has been recycled given the
recycle policy is not Delete Desktop.
Recycle Policy: What should happen if the desktop is no longer in use by the assigned user?
Reset to Snapshot: The desktop will be reverted to its initial state before becoming available to another user.
Reuse Desktop: The desktop will be handed over, as is, to the next user.
Delete Desktop: The desktop will be destroyed - it is used one-time only.
• How to Enable Cloning for an xVM VirtualBox Platform
• How to Enable Cloning for a VMware Infrastructure Platform
Previous Page
Importing Virtual
Machines
Document generated by Confluence on Jun 24, 2009 06:55
Up One Page
Level
Administering
Next Page
How to Set Up a
User Directory
Page 143
How to Enable Cloning for an xVM VirtualBox Platform
This page last changed on Apr 07, 2009 by stephanielewellen.
How to Enable Cloning for an xVM VirtualBox Platform
Cloning is the fastest and most efficient way to populate a pool. Use the steps below to enable cloning in a pool.
Steps
1. In the Admin GUI open the Pools tab, then select the previously created pool.
2. Select the Desktop tab.
3. Select the imported virtual machine that you want to use as the template. From the actions drop-down menu select
Convert to Template.
4. Select the Desktop Cloning tab.
This tab allows you to control most of the pool configuration options. For additional options see the User Assignment
tab.
5. Select the template from the Template drop-down menu.
6. Check Apply System Preparation if Sysprep has been executed on your template.
If System Preparation is checked you must also create a System Preparation File using the link below. In the System
Preparation pop-up, specify whether cloned desktops should join a Windows Workgroup or Domain.
7. Specify Preferred Size, Free Desktops, and Maximum Size (start with lower numbers at the beginning - you can
increase them at any time).
8. Check Enable Automatic Cloning.
9. Click Save.
Cloning can take up to a minute to start, after which you will see 'clone jobs' beginning to appear in the Jobs window. To
access the Jobs window, click the Jobs Running link in the top-left of the Admin GUI. After a clone job has been finished
successfully, the new desktop will show up in the Desktops tab of the Pool page (a page refresh might be necessary).
Where do my VirtualBox Desktops Live?
Powered Off Desktops
Powered off desktops reside in two places in the VDI environment, the database and the storage. The VDI database
contains all desktop configuration information to register the desktop on a host and the storage host contains the desktops
hard disk data.
Powered off desktop are typically* not associated or registered on any VirtualBox host. This allows VDI to select the best
suited host on every start of a desktop. This helps ensure a spread of desktops across available VirtualBox hosts minimizing
resource usage on each.
*In some rare circumstances a desktop maybe left registered and powered off on a VirtualBox host. Desktops in this state
for more than a couple of minutes can safely be deleted from the VirtualBox host if necessary as the configuration is stored
in the VDI database and all data on a storage host. When manually unregistering a desktop from VirtualBox ensure that you
also unregister the desktops disk image.
Running Desktops
Running desktops are registered and started on a single VirtualBox host. The VirtualBox host that a desktop is running on
can be determined using the 'Desktop Summary' page in the VDI UI. A running desktop is connected directly to the storage
host.
Up One Page
Level
How to Enable
Cloning in Pools
Document generated by Confluence on Jun 24, 2009 06:55
Next Page
How to Enable
Cloning for
a VMware
Infrastructure
Platform
Page 144
How to Enable Cloning for a VMware Infrastructure Platform
This page last changed on Apr 07, 2009 by stephanielewellen.
How to Enable Cloning for a VMware Infrastructure Platform
Cloning is the fastest and most efficient way to populate a pool. Use the steps below to enable cloning in a pool.
Steps
1. In the Admin GUI open the Pools tab, then select the previously created pool (or any other empty pool).
2. Select the Resources tab.
3. Select your preferred storage for newly cloned virtual machines. Per default, all available storage may be used (for
each clone the VDI Core will select the storage with the most available disk space).
4. Select the Desktop Cloning tab.
5. Select the preferred template from the Template drop-down menu (the drop-down menu will list all templates that
are available in the VMware vCenter).
6. Check Apply System Preparation, and specify which customization spec should be used if needed.
7. Specify Preferred Size, Free Desktops and Maximum Size (start with lower numbers at the beginning, you can always
increase them at any time).
8. Check Enable Automatic Cloning.
9. Click Save.
Cloning can take up to a minute to start, after which you will see 'clone jobs' beginning to appear in the Jobs window. To
access the Jobs window, click the Jobs Running link in the top-left of the Admin GUI. After a clone job has been finished
successfully, the new desktop will show up in the Desktops tab of the Pool page (a page refresh might be necessary).
Previous Page
How to Enable
Cloning for an
xVM VirtualBox
Platform
Document generated by Confluence on Jun 24, 2009 06:55
Up One Page
Level
How to Enable
Cloning in Pools
Page 145
How to Set Up a User Directory
This page last changed on Jun 08, 2009 by katell.
How to Set Up a User Directory
Typically the user information is already stored in an Active Directory or LDAP server. Before you can assign users to
desktops, you must configure the desired Active Directory/LDAP server and the VDI Core.
• Active Directory Integration
To be used when integrating with Microsoft Active Directory.
• LDAP Integration
To be used when integrating with other types of LDAP directories or to quickly set up a demo with Active Directory.
If you need to install your own directory, you may choose OpenDS. Some directions to set it up for VDI can
be found here.
If you have an expert understanding of user directory integration and would like to optimize VDI for your user directory,
please refer to the sections below:
• Customizing the LDAP Filters and Attributes
• User Directory Settings
Previous
Page
How to Enable
Cloning in Pools
Document generated by Confluence on Jun 24, 2009 06:55
Up One Page
Level
Administering
Next Page
How to Add
Users to Pools
Page 146
Active Directory Integration
This page last changed on Jun 08, 2009 by katell.
Active Directory Integration
Active Directory integration is the recommended choice for production platforms integrating with Microsoft Active
Directory.
The users from the Active Directory can be used for desktop and pool assignments and will be able to access desktops from
VDI. On top of this basic feature, Active Directory integration offers the following functionalities:
1. Active Directory integration allows to access all the users from a forest and use those users for desktop and pool
assignments.
This means that the users from the different sub-domains of the forest will be able to access desktops from VDI.
2. Active Directory integration allows computer entries to be removed from the Active Directory when cloned desktops
are deleted by the VDI Core.
When a Windows desktop (cloned by VDI) joins a domain (through Sysprep), this will typically create a new computer
entry in the Active Directory. Configuring VDI with Kerberos Authentication will allow VDI to remove the computer
entries from the Active Directory, when deleting unused desktops. This avoids having computer entries piling up in
the Active Directory while the matching desktops have long been destroyed.
Active Directory integration requires additional configuration (Kerberos configuration and time synchronization) on the VDI
host. If you just want to quickly set up a demo with an Active Directory, it should be more straight-forward to use LDAP
Integration.
Kerberos Authentication
Kerberos Authentication is the typical choice when integrating with Microsoft Active Directory.
• How to Set up Kerberos Authentication
Public Key Authentication
Public Key authentication should be used to integrate with Microsoft Active Directory when the domain controller requires
LDAP signing. (http://support.microsoft.com/kb/935834).
• How to Set up Public Key Authentication
Up One Page
Level
How to Set Up a
User Directory
Document generated by Confluence on Jun 24, 2009 06:55
Next Page
LDAP Integration
Page 147
How to Set up Kerberos Authentication
This page last changed on Jun 11, 2009 by katell.
How to Set up Kerberos Authentication
Follow the steps below to configure Kerberos Authentication for your Active Directory.
To get the full functionality offered by Kerberos Authentication, it is necessary to provide the credentials
of a user that has 'write' access to the Active Directory. This user will be used to read users and delete
computer entries from the directory.
Steps
Kerberos Authentication requires some specific configuration on the Active Directory server and VDI host prior to setting
up the user directory in the Admin UI:
1. Kerberos authentication must be enabled in Active Directory.
It should already be enabled as the default.
2. Ensure that each Active Directory domain has a global catalog server.
Configure a domain controller in each domain as a global catalog server.
3. Synchronize the time between the VDI server and Active Directory server.
For example, use ntpdate <my.windows.host>
4. Edit the system default Kerberos configuration file (/etc/krb5/krb5.conf on Solaris OS platforms) on the VDI
server.
At a minimum, the Kerberos configuration file must contain the following sections:
• [libdefaults] - this sets defaults for Kerberos authentication. You must set the default_realm and
default_checksum.
• [realms] - this sets the KDCs for each Kerberos realm. A realm can have more than one KDC. The entry for
each KDC has the form hostname:port. The port can omitted if the default, port 88, is used.
• [domain_realm] - this maps Active Directory domains to Kerberos realms.
The following is an example Kerberos configuration file for a domain containing just one server:
[libdefaults]
default_realm = MY.COMPANY.COM
default_checksum = rsa-md5
[realms]
MY.COMPANY.COM = {
kdc = my.windows.host
}
[domain_realm]
.my.company.com = MY.COMPANY.COM
my.company.com = MY.COMPANY.COM
5. You can check that Kerberos works fine by using nslookup and kinit. For example:
• # nslookup -query=any _gc._tcp.my.company.com must resolve the domain
• # kinit -V [email protected] must succeed
6. Restart the Common Agent Container:
cacaoadm stop --force
cacaoadm start
7. In the Admin GUI, go to the Settings category and User Directory subcategory, and click Add User Directory to
launch the User Directory wizard:
Document generated by Confluence on Jun 24, 2009 06:55
Page 148
a. Select Active Directory Type, and click Next.
b. Select Kerberos Authentication.
c. Enter the domain for the Active Directory
For example: my.company.com
d. Enter the user principal name of a user that has sufficient privileges to write into the Active Directory.
For example: super-user or [email protected]
e. Enter the password for that user.
f. Click Next to review your choices before completing the configuration.
Up One Page
Level
Active Directory
Integration
Document generated by Confluence on Jun 24, 2009 06:55
Next Page
How to Set
Up Public Key
Authentication
Page 149
How to Set Up Public Key Authentication
This page last changed on Jun 08, 2009 by katell.
How to Set Up Public Key Authentication
Public Key Authentication requires some specific configuration on the Active Directory server and VDI host prior to setting
up the user directory in the Admin GUI.
Steps
1. Follow the configuration steps 1 to 5 described for Kerberos Authentication
2. Creating a client certificate for each of the VDI host.
The VDI keystore for the client certificate is located at /etc/opt/SUNWvda/sslkeystore and the password is
changeit.
a. Generating a key pair (private/public key) for the client certificate.
• on the VDI host, log in as superuser (root) and use keytool to generate the key pair in the VDI
keystore.
/usr/java/jre/bin/keytool -genkey -keyalg rsa \
-keystore /etc/opt/SUNWvda/sslkeystore \
-storepass changeit -keypass changeit \
-alias <your_alias>
b. Generating a Certificate Signing Request (CSR) for client certificate.
• on the VDI host, use keytool to generate the certificate request.
/usr/java/jre/bin/keytool -certreq \
-keystore /etc/opt/SUNWvda/sslkeystore \
-storepass changeit -keypass changeit \
-alias <your_alias> \
-file <certreq_file>
The alias must be the same as the alias used when generating the key pair. Aliases are case-insensitive.
c. Creating the certificate.
• Copy the CSR file to the server hosting the Active Directory.
• Using Internet Explorer, go to "http://localhost/certsrv".
• Log in.
• On the Microsoft Certificate Services page, click Request a certificate.
• On the Request a Certificate page, click advanced certificate request.
• On the Advanced Certificate Request page, click Submit a certificate request by using a base-64-encoded
CMC or PKCS #10 file, or submit a renewal request by using a base-64-encoded PKCS #7 file.
• On the Submit a Certificate Request or Renewal Request page, paste the contents of the CSR into the
Saved Request text box or browse to the CSR file.
• Select an appropriate template from the Certificate Templates list. (Administrator is recommended).
• Click Submit.
• On the Certificate Issued page, ensure Base 64 encoded is selected and click Download certificate chain.
• Save the certificate file.
d. Importing the certificate on the VDI host.
• Copy the certificate file to the VDI host.
• Import the certificate into the VDI keystore
/usr/java/jre/bin/keytool -import \
-keystore /etc/opt/SUNWvda/sslkeystore \
-storepass changeit -keypass changeit \
-trustcacerts -file <certificate_file> \
Document generated by Confluence on Jun 24, 2009 06:55
Page 150
-alias <your_alias>
3. Restart the Common Agent Container:
cacaoadm stop --force
cacaoadm start
4. Configuring the user directory in VDI Admin GUI.
In the Admin GUI, go to the Settings category and User Directory subcategory, and click Add User Directory to
launch the User Directory wizard:
a. Select Active Directory Type, and click Next.
b. Select Public Key Authentication.
c. Enter the domain for the Active Directory.
For example: my.company.com
d. The following step shows the SSL certificates of the Active Directory servers. Click Next to permanently accept
the certificates.
e. Click Next to review your choices before completing the configuration.
Previous Page
How to Set
up Kerberos
Authentication
Document generated by Confluence on Jun 24, 2009 06:55
Up One Page
Level
Active Directory
Integration
Page 151
LDAP Integration
This page last changed on Jun 08, 2009 by katell.
LDAP Integration
LDAP Integration allows to integrate with one Active Directory server or one LDAP server in a straight-forward way, without
the need for extra configuration.
The users from the Active Directory or LDAP server can be used for desktop and pool assignments and will be able to
access desktops from VDI.
LDAP Integration offers three security levels for authentication: anonymous, simple, and secure.
Anonymous Authentication
Anonymous Authentication is useful for demo when the directory supports it.
It is offered to enable you to set up a quick integration with an LDAP server for demo purposes. Anonymous Authentication
may only be chosen if your LDAP server supports anonymous authentication.
It is not recommended to select Anonymous Authentication on production platforms.
Active Directory does not support Anonymous Authentication.
• How to Set Up Anonymous Authentication
Simple Authentication
Simple Authentication is the demo solution for Active Directory and the typical choice for other LDAP directories.
Simple Authentication is the recommended choice for production platforms integrating with LDAP directories other than
Active Directory.
Simple Authentication also allows you to set up a quick integration with an Active Directory server for demo purposes.
If integrating with Active Directory, it is not recommended to select Simple Authentication on production platforms as a
better integration can be achieved using Kerberos Authentication.
• How to Set Up Simple Authentication
Secure Authentication
Use Secure Authentication to secure connections over SSL, when the directory supports it.
Choose Secure Authentication to integrate with an LDAP directory secured by SSL.
It is not possible to integrate with an Active Directory using Secure Authentication.
• How to Set Up Secure Authentication
Previous Page
Active Directory
Integration
Document generated by Confluence on Jun 24, 2009 06:55
Up One Page
Level
How to Set Up a
User Directory
Next Page
Customizing the
LDAP Filters and
Attributes
Page 152
How to Set Up Anonymous Authentication
This page last changed on Apr 07, 2009 by stephanielewellen.
How to Set Up Anonymous Authentication
Use the steps below to set up anonymous authentication.
Steps
In the Admin GUI, go to the Settings category and User Directory subcategory, and click Add User Directory to launch the
User Directory wizard:
1. Select LDAP Type, and click Next.
2. Select Anonymous Authentication.
3. Enter the hostname or IP address, and port number, of the LDAP server. 389 is the default port number used by most
LDAP servers.
4. Enter the base DN of the LDAP server. Specifying a base DN is optional. It allows you to restrict the part of the LDAP
directory used to search for users.
For example: cn=Users,dc=my,dc=company,dc=com
5. Click Next to review your choices before completing the configuration.
Up One Page
Level
LDAP Integration
Document generated by Confluence on Jun 24, 2009 06:55
Next Page
How to Set
Up Simple
Authentication
Page 153
How to Set Up Simple Authentication
This page last changed on Jun 08, 2009 by katell.
How to Set Up Simple Authentication
Use the steps below to set up simple authentication.
It is necessary to provide the credentials of a user that has 'read' access to the user directory. This user will
be used to read user information from the directory.
Steps
In the Admin GUI, go to the Settings category and User Directory subcategory, and click Add User Directory to launch the
User Directory wizard:
1. Select LDAP Type, and click Next.
2. Select Simple Authentication.
3. Enter the hostname or IP address, and port number, of the LDAP server. 389 is the default port number used by most
LDAP servers.
4. Enter the base DN of the LDAP server. Specifying a base DN is optional. It allows you to restrict the part of the LDAP
directory used to search for users.
For example: cn=Users,dc=my,dc=company,dc=com
5. Enter the user name. It must be the fully distinguished name (DN) of a user that has sufficient privileges to search the
LDAP directory.
For example: cn=super-user,cn=Users,dc=my,dc=company,dc=com.
If integrating with an Active Directory, you may use the user principal name for the user. For example: super-user
or [email protected].
6. Enter the password for the user.
7. Click Next to review your choices before completing the configuration.
Previous Page
How to Set Up
Anonymous
Authentication
Document generated by Confluence on Jun 24, 2009 06:55
Up One Page
Level
LDAP Integration
Next Page
How to Set
Up Secure
Authentication
Page 154
How to Set Up Secure Authentication
This page last changed on Jun 08, 2009 by katell.
How to Set Up Secure Authentication
Use the steps below to set up secure authentication.
It is necessary to provide the credentials of a user that has 'read' access to the user directory. This user will
be used to read user information from the directory.
Steps
In the Admin GUI, go to the Settings category and User Directory subcategory, and click Add User Directory to launch the
User Directory wizard:
1. Select LDAP Type, and click Next.
2. Select Secure Authentication.
3. Enter the hostname or IP address, and port number, of the LDAP server. 636 is the default port number used by most
SSL secured LDAP servers.
4. Enter the base DN of the LDAP server. Specifying a base DN is optional. It allows you to restrict the part of the LDAP
directory used to search for users.
For example: cn=Users,dc=my,dc=company,dc=com
5. Enter the user name. It must be the fully distinguished name (DN) of a user that has sufficient privileges to search the
LDAP directory.
For example: cn=super-user,cn=Users,dc=my,dc=company,dc=com.
6. Enter the password for the user.
7. The following step shows the SSL certificate of the LDAP server. Click Next to permanently accept the certificate.
8. Review your choices before completing the configuration.
Previous Page
How to Set
Up Simple
Authentication
Document generated by Confluence on Jun 24, 2009 06:55
Up One Page
Level
LDAP Integration
Page 155
Customizing the LDAP Filters and Attributes
This page last changed on Jun 24, 2009 by katell.
Customizing the LDAP Filters and Attributes
VDI uses various LDAP filters and attribute lists to look up and interpret the data stored in the user directory.
VDI comes with some LDAP filters that are suitable for demos with Active Directory or Sun Directory Server. But these
filters might be incompatible with other types of directories such as OpenLDAP or eDirectory and would then need to be
modified.
For production, it is always recommended to customize those filters to match most closely the schema definition of the
directory.
How to Edit the Filters
This section explains how to edit those filters, and the values recommended per type of directory.
The LDAP filters are specified as global settings using the vda CLI command:
/opt/SUNWvda/sbin/vda settings-getprops
/opt/SUNWvda/sbin/vda settings-setprops
Example
Listing the LDAP filter used to identify objects of type user and the LDAP filter used to search for users according a search
criteria:
example% /opt/SUNWvda/sbin/vda settings-getprops -p ldap.user.object.filter,ldap.user.search.filter
ldap.user.object.filter:
(&(|(objectclass=user)(objectclass=person)(objectclass=inetOrgPerson)(objectclass=organizationalPerson))(!
(objectclass=computer)))
ldap.user.search.filter:
(|(cn=$SEARCH_STRING)(uid=$SEARCH_STRING)(mail=$SEARCH_STRING))
Customizing the LDAP filter used to search for users according a search criteria, for Active Directory:
example% /opt/SUNWvda/sbin/vda settings-setprops -p ldap.user.search.filter='"(|(cn=\$SEARCH_STRING)(uid=\
$SEARCH_STRING)(mail=\$SEARCH_STRING))"'
Settings updated.
example% /opt/SUNWvda/sbin/vda settings-getprops -p ldap.user.search.filter
ldap.user.search.filter:
(|(cn=$SEARCH_STRING)(uid=$SEARCH_STRING)(mail=$SEARCH_STRING))
Default LDAP Filters and Attributes
Global Setting Name
Description
Default Value
ldap.user.object.filter
LDAP filter used to identify objects of
type user
(&(|(objectclass=user)
(objectclass=person)
(objectclass=inetOrgPerson)
(objectclass=organizationalPerson))
(!(objectclass=computer)))
Document generated by Confluence on Jun 24, 2009 06:55
Page 156
ldap.user.search.filter
LDAP filter used to search for
users according a search criteria.
Searches for users can be done
using the user-search command or
in the web administration console.
$SEARCH_STRING is the place holder
for the search criteria
(|(cn=$SEARCH_STRING)
(uid=$SEARCH_STRING)(mail=
$SEARCH_STRING))
ldap.userid.attributes
List of comma separated LDAP
attributes storing the userid value
for user objects. This is used to find a
user given its userid
uid,sAMAccountName
ldap.user.member.attributes
List of comma separated LDAP
attributes on a user object storing the
groups the user is a member of
memberof,primaryGroupID
ldap.group.object.filter
LDAP filter used to identify objects of
type group
(|(objectclass=group)
(objectclass=groupofnames)
(objectclass=groupofuniquenames))
ldap.group.search.filter
LDAP filter used to search for
groups according a search criteria.
Searches for groups can be done
using the user-search command or
in the web administration console.
$SEARCH_STRING is the place holder
for the search criteria
(|(dc=$SEARCH_STRING)
(o=$SEARCH_STRING)(ou=
$SEARCH_STRING)
(cn=$SEARCH_STRING)(uid=
$SEARCH_STRING)(mail=
$SEARCH_STRING))
ldap.group.member.attributes
List of comma separated LDAP
attributes on a group object storing
the users member of the group
member,uniquemember
ldap.group.short.attributes
List of comma separated LDAP
attributes on a group object
storing the information for primary
group membership. Primary group
membership is specific to Active
Directory.
primaryGroupToken
ldap.container.object.filter
LDAP filter used to identify objects
of type container. Containers can be
selected as root for custom group
filters in the web administration
console
(|(objectclass=domain)
(objectclass=organization)
(objectclass=organizationalUnit)
(objectclass=container))
ldap.container.search.filter
LDAP filter used by the web
administration console to search for
containers according a search criteria,
when selecting a root for a custom
group filter. $SEARCH_STRING is the
place holder for the search criteria
(|(cn=$SEARCH_STRING)
(dc=$SEARCH_STRING)(ou=
$SEARCH_STRING))
ldap.default.attributes
List of comma separated LDAP
attributes loaded in the cache when
looking up an object. It should
contain all the attributes used in the
other filters and attribute lists.
dc,o,ou,cn,uid,mail,member,uniquemember
sAMAccountName,primaryGroupToken,primar
Document generated by Confluence on Jun 24, 2009 06:55
Page 157
Recommended Values with Active Directory
Global Setting Name
Description
Recommended Value with Active
Directory
ldap.user.object.filter
LDAP filter used to identify objects of
type user
(&(objectclass=user)(!
(objectclass=computer)))
ldap.user.search.filter
LDAP filter used to search for
users according a search criteria.
Searches for users can be done
using the user-search command or
in the web administration console.
$SEARCH_STRING is the place holder
for the search criteria
(|(cn=$SEARCH_STRING)
(sAMAccountName=
$SEARCH_STRING))
ldap.userid.attributes
List of comma separated LDAP
attributes storing the userid value
for user objects. This is used to find a
user given its userid
sAMAccountName,userPrincipalName
ldap.user.member.attributes
List of comma separated LDAP
attributes on a user object storing the
groups the user is a member of
memberof,primaryGroupID
ldap.group.object.filter
LDAP filter used to identify objects of
type group
(objectclass=group)
ldap.group.search.filter
LDAP filter used to search for
groups according a search criteria.
Searches for groups can be done
using the user-search command or
in the web administration console.
$SEARCH_STRING is the place holder
for the search criteria
(cn=$SEARCH_STRING)
ldap.group.member.attributes
List of comma separated LDAP
attributes on a group object storing
the users member of the group
member
ldap.group.short.attributes
List of comma separated LDAP
attributes on a group object
storing the information for primary
group membership. Primary group
membership is specific to Active
Directory.
primaryGroupToken
ldap.container.object.filter
LDAP filter used to identify objects
of type container. Containers can be
selected as root for custom group
filters in the web administration
console
(objectclass=container)
ldap.container.search.filter
LDAP filter used by the web
administration console to search for
containers according a search criteria,
when selecting a root for a custom
group filter. $SEARCH_STRING is the
place holder for the search criteria
(cn=$SEARCH_STRING)
ldap.default.attributes
List of comma separated LDAP
attributes loaded in the cache when
cn,member,memberof,sAMAccountName,prima
Document generated by Confluence on Jun 24, 2009 06:55
Page 158
looking up an object. It should
contain all the attributes used in the
other filters and attribute lists.
Recommended Values with Sun Directory Server
Global Setting Name
Description
Recommended Value with Sun
Directory Server
ldap.user.object.filter
LDAP filter used to identify objects of
type user
(objectclass=person)
ldap.user.search.filter
LDAP filter used to search for
users according a search criteria.
Searches for users can be done
using the user-search command or
in the web administration console.
$SEARCH_STRING is the place holder
for the search criteria
(|(cn=$SEARCH_STRING)(uid=
$SEARCH_STRING))
ldap.userid.attributes
List of comma separated LDAP
attributes storing the userid value
for user objects. This is used to find a
user given its userid
uid
ldap.user.member.attributes
List of comma separated LDAP
attributes on a user object storing the
groups the user is a member of
memberof
ldap.group.object.filter
LDAP filter used to identify objects of
type group
(objectclass=groupofuniquenames)
ldap.group.search.filter
LDAP filter used to search for
groups according a search criteria.
Searches for groups can be done
using the user-search command or
in the web administration console.
$SEARCH_STRING is the place holder
for the search criteria
(cn=$SEARCH_STRING)
ldap.group.member.attributes
List of comma separated LDAP
attributes on a group object storing
the users member of the group
uniquemember
ldap.group.short.attributes
List of comma separated LDAP
attributes on a group object
storing the information for primary
group membership. Primary group
membership is specific to Active
Directory.
empty
ldap.container.object.filter
LDAP filter used to identify objects
of type container. Containers can be
selected as root for custom group
filters in the web administration
console
(|(objectclass=domain)
(objectclass=organizationalUnit))
ldap.container.search.filter
LDAP filter used by the web
administration console to search for
containers according a search criteria,
when selecting a root for a custom
(|(dc=$SEARCH_STRING)(ou=
$SEARCH_STRING))
Document generated by Confluence on Jun 24, 2009 06:55
Page 159
group filter. $SEARCH_STRING is the
place holder for the search criteria
List of comma separated LDAP
attributes loaded in the cache when
looking up an object. It should
contain all the attributes used in the
other filters and attribute lists.
dc,ou,cn,uid,uniquemember,memberof
Global Setting Name
Description
Recommended Value with OpenDS
ldap.user.object.filter
LDAP filter used to identify objects of
type user
(objectclass=person)
ldap.user.search.filter
LDAP filter used to search for
users according a search criteria.
Searches for users can be done
using the user-search command or
in the web administration console.
$SEARCH_STRING is the place holder
for the search criteria
(|(cn=$SEARCH_STRING)(uid=
$SEARCH_STRING))
ldap.userid.attributes
List of comma separated LDAP
attributes storing the userid value
for user objects. This is used to find a
user given its userid
uid
ldap.user.member.attributes
List of comma separated LDAP
attributes on a user object storing the
groups the user is a member of
memberof
ldap.group.object.filter
LDAP filter used to identify objects of
type group
(objectclass=groupofuniquenames)
ldap.group.search.filter
LDAP filter used to search for
groups according a search criteria.
Searches for groups can be done
using the user-search command or
in the web administration console.
$SEARCH_STRING is the place holder
for the search criteria
(cn=$SEARCH_STRING)
ldap.group.member.attributes
List of comma separated LDAP
attributes on a group object storing
the users member of the group
uniquemember
ldap.group.short.attributes
List of comma separated LDAP
attributes on a group object
storing the information for primary
group membership. Primary group
membership is specific to Active
Directory.
empty
ldap.container.object.filter
LDAP filter used to identify objects
of type container. Containers can be
selected as root for custom group
filters in the web administration
console
(|(objectclass=domain)
(objectclass=organizationalUnit))
ldap.default.attributes
Recommended Values with OpenDS
Document generated by Confluence on Jun 24, 2009 06:55
Page 160
ldap.container.search.filter
LDAP filter used by the web
administration console to search for
containers according a search criteria,
when selecting a root for a custom
group filter. $SEARCH_STRING is the
place holder for the search criteria
(|(dc=$SEARCH_STRING)(ou=
$SEARCH_STRING))
ldap.default.attributes
List of comma separated LDAP
attributes loaded in the cache when
looking up an object. It should
contain all the attributes used in the
other filters and attribute lists.
dc,ou,cn,uid,uniquemember,memberof
Recommended Values with Open LDAP
Global Setting Name
Description
Recommended Value with Open LDAP
ldap.user.object.filter
LDAP filter used to identify objects of
type user
It is mandatory to remove (!
(objectclass=computer)) from
the default filter. Recommended is
(objectclass=person)
ldap.user.search.filter
LDAP filter used to search for
users according a search criteria.
Searches for users can be done
using the user-search command or
in the web administration console.
$SEARCH_STRING is the place holder
for the search criteria
(|(cn=$SEARCH_STRING)(uid=
$SEARCH_STRING))
ldap.userid.attributes
List of comma separated LDAP
attributes storing the userid value
for user objects. This is used to find a
user given its userid
uid
ldap.user.member.attributes
List of comma separated LDAP
attributes on a user object storing the
groups the user is a member of
memberof
ldap.group.object.filter
LDAP filter used to identify objects of
type group
(objectclass=groupofnames)
ldap.group.search.filter
LDAP filter used to search for
groups according a search criteria.
Searches for groups can be done
using the user-search command or
in the web administration console.
$SEARCH_STRING is the place holder
for the search criteria
(cn=$SEARCH_STRING)
ldap.group.member.attributes
List of comma separated LDAP
attributes on a group object storing
the users member of the group
member
ldap.group.short.attributes
List of comma separated LDAP
attributes on a group object
storing the information for primary
group membership. Primary group
membership is specific to Active
Directory.
empty
Document generated by Confluence on Jun 24, 2009 06:55
Page 161
ldap.container.object.filter
LDAP filter used to identify objects
of type container. Containers can be
selected as root for custom group
filters in the web administration
console
???
ldap.container.search.filter
LDAP filter used by the web
administration console to search for
containers according a search criteria,
when selecting a root for a custom
group filter. $SEARCH_STRING is the
place holder for the search criteria
???
ldap.default.attributes
List of comma separated LDAP
attributes loaded in the cache when
looking up an object. It should
contain all the attributes used in the
other filters and attribute lists.
cn,uid,member,memberof
Recommended Values with Novell eDirectory
Global Setting Name
Description
Recommended Value with Novell
eDirectory
ldap.user.object.filter
LDAP filter used to identify objects of
type user
It is mandatory to remove (!
(objectclass=computer)) from
the default filter. Recommended is
(objectclass=user)
ldap.user.search.filter
LDAP filter used to search for
users according a search criteria.
Searches for users can be done
using the user-search command or
in the web administration console.
$SEARCH_STRING is the place holder
for the search criteria
(|(cn=$SEARCH_STRING)(uid=
$SEARCH_STRING)(givenName=
$SEARCH_STRING))
ldap.userid.attributes
List of comma separated LDAP
attributes storing the userid value
for user objects. This is used to find a
user given its userid
givenName,cn,uid
ldap.user.member.attributes
List of comma separated LDAP
attributes on a user object storing the
groups the user is a member of
groupMembership
ldap.group.object.filter
LDAP filter used to identify objects of
type group
(|(objectclass=group)
(objectclass=groupofnames)
(objectclass=groupofuniquenames))
ldap.group.search.filter
LDAP filter used to search for
groups according a search criteria.
Searches for groups can be done
using the user-search command or
in the web administration console.
$SEARCH_STRING is the place holder
for the search criteria
???
ldap.group.member.attributes
List of comma separated LDAP
attributes on a group object storing
the users member of the group
member,uniquemember
Document generated by Confluence on Jun 24, 2009 06:55
Page 162
ldap.group.short.attributes
List of comma separated LDAP
attributes on a group object
storing the information for primary
group membership. Primary group
membership is specific to Active
Directory.
empty
ldap.container.object.filter
LDAP filter used to identify objects
of type container. Containers can be
selected as root for custom group
filters in the web administration
console
(objectclass=organizationalUnit)
ldap.container.search.filter
LDAP filter used by the web
administration console to search for
containers according a search criteria,
when selecting a root for a custom
group filter. $SEARCH_STRING is the
place holder for the search criteria
???
ldap.default.attributes
List of comma separated LDAP
attributes loaded in the cache when
looking up an object. It should
contain all the attributes used in the
other filters and attribute lists.
cn,uid,givenName,groupmembership,member
How the LDAP Filters are Used
Searching for Users and Groups
The administration tools (web-GUI or CLI) allow to search for users and groups in order to assign them to desktops or
pools.
The search logic works as the following:
• the filter used to search for users is: (&<ldap.user.object.filter><ldap.user.search.filter>))
• the $SEARCH_STRING placeholder is replaced by *criteria* where criteria is the string typed in the web-GUI
search field.
• same applies for groups, using the group filters.
• search is performed for users first, then for groups
Requesting a Desktop for a User
When requesting a desktop for a user, VDI first needs to find the user DN that matches the user id before resolving the
pool/desktop assignments for the user DN. If client authentication is enabled, then the user id attribute is also used for
authentication.
The attributes used to match the user id are defined in ldap.userid.attributes.
Resolving Group Membership
Group membership is resolved using the attributes defined in ldap.user.member.attributes and
ldap.group.member.attributes.
Nested group depth is limited to 3.
VDI also resolves Primary Group membership which is Active Directory specific. The attributes used for resolving primary
group membership are defined in ldap.group.short.attributes and ldap.user.member.attributes.
Document generated by Confluence on Jun 24, 2009 06:55
Page 163
LDAP Cache
In order to improve the performance and reduce the load on the user directory, the user and group entries retrieved by
VDI are cached. Entries in the LDAP cache time out after 10 minutes.
It is not possible at the moment to change the LDAP cache timeout neither to flush the cache.
Previous Page
LDAP Integration
Document generated by Confluence on Jun 24, 2009 06:55
Up One Page
Level
How to Set Up a
User Directory
Next Page
User Directory
Settings
Page 164
User Directory Settings
This page last changed on Apr 07, 2009 by stephanielewellen.
User Directory Settings
User directory settings are configured in the Admin Web UI in the Settings category and User Directory subcategory.
Defining the User Directory
The instructions to define the user directory are described in Active Directory Integration and LDAP Integration.
Only one user directory can be defined.
Changing the Security Level
It is possible to change the security level for the connections to the user directory:
1. go to the LDAP or Active Directory tab (depending on the user directory type)
2. click the Edit button for the Security Level, to launch the wizard
3. switch to another security level and modify the other settings if necessary, such as the port, the username and the
password
4. click Next to review your choices before completing the configuration update.
It is only possible to switch to a security level within the same type of user directory, LDAP or Active Directory. If you want
to switch between LDAP and Active Directory, you have to remove the user directory and add it again.
In the case of LDAP connection type, it is not possible change the security level if additional hosts have been defined (see
Adding Fallback Hosts).
Changing the Credentials
When using Kerberos, Simple or Secure authentication, it is possible to update the credentials used for opening the
connection to the user directory:
1.
2.
3.
4.
go to the LDAP or Active Directory tab (depending on the user directory type)
click the Edit button for the Security Level, to launch the wizard
edit the username and the password as necessary
click Next to review your choices before completing the configuration update.
Updating the Server SSL Certificates
When using Public Key or Secure authentication, if the SSL certificate for the server has been changed, you need VDI to use
the new certificate:
#go to the LDAP or Active Directory tab (depending on the user directory type)
#click the Edit button for the Security Level, to launch the wizard
#do not change any of the existing settings if you only want to update the server certificates
1. the following step shows the SSL certificates of the servers. Click Next to permanently accept the certificates.
2. click Next to review your choices before completing the configuration update.
Adding Fallback Hosts
When using the LDAP type of connection, it is possible to have additional LDAP hosts that would be used as a fallback in
the case the connection to the main host is failing.
The additional LDAP hosts must be the replica of the main host. The connection to the fallback hosts will be open using the
same security level, same port, same base DN and same credentials as for the main host.
Document generated by Confluence on Jun 24, 2009 06:55
Page 165
The list of LDAP hosts can be found in the LDAP tab. Hosts can be added, removed and their order can be changed.
Removing the User Directory
The button to remove the user directory can be found on the LDAP or Active Directory tab.
If some assignments have been registered using some data (users or groups) from the user directory, a warning will be
poped up and a confirmation is asked. If you confirm, the user directory will be removed, but it will leave VDI in a broken
state where the users will not be able to access to their desktop. If you add the settings to the same directory again, even
using a different security level, the assignments will still be valid and the user will be able to access their desktop again.
Previous Page
Customizing the
LDAP Filters and
Attributes
Document generated by Confluence on Jun 24, 2009 06:55
Up One Page
Level
How to Set Up a
User Directory
Page 166
How to Add Users to Pools
This page last changed on Apr 07, 2009 by stephanielewellen.
How to Add Users to Pools
It is now time to assign your users to desktops. You can either assign a user to a specific desktop, or you can assign a user
(or user group) to a desktop pool. In the latter case, the Sun VDI Core will automatically assign any available desktop from
the pool to the user, once the user requests a desktop.
Steps
1.
2.
3.
4.
5.
Select the Users tab and Users and Groups entry in the left sidebar.
Search for a known user in the User Directory (you can specify user name or user ID).
Click on the user's name, and then select the Assignment tab in their profile.
In the Pool Assignments space, click the Add button.
Highlight the desired pool(s) and click OK to assign the user.
Previous Page
How to Set Up a
User Directory
Document generated by Confluence on Jun 24, 2009 06:55
Up One Page
Level
Administering
Next Page
How to Associate
Tokens to Users
Page 167
How to Associate Tokens to Users
This page last changed on Apr 08, 2009 by stephanielewellen.
How to Associate Tokens to Users
In a Sun Ray environment, users will take advantage of smart cards (tokens) to initiate a session on a Sun Ray thin client
(DTU). With VDI 3, you can associate a token to a user (it is also possible to assign desktops directly to specific tokens).
Once tokens have been created, they can be assigned to Pools and Desktops.
How to Associate Tokens Using the Admin GUI
1.
2.
3.
4.
Select the Users tab and Users and Groups entry in the left sidebar.
Search for a known user in the User Directory.
Click on the user's name, and then select the Token tab in their profile.
In the Tokens table, click the New button.
It is possible to manage (create, search, delete) tokens by using the Tokens entry in the Users tab.
5. Enter the ID of the new token (e.g. Payflex.500d9b8900130200) and if desired an additional comment in the pop-up
window, and click OK.
Token IDs can be copied directly from the SRSS Admin GUI (see the Tokens tab and display Currently
Used Tokens).
Users can also be associated to existing tokens. To do this, select Add in the user's Tokens table and search for the desired
token.
How to Create Bulks of Tokens Using the vda CLI Command
It is possible to create a number of tokens at once using the token-create subcommand.
The token-create subcommand can take an input file containing the tokens to create and the user associated with the
token if needed.
Usage
Options:
-f <token-file>, --file=<token-file>
A CSV file containing the properties of the tokens to
be created. Format of the file is: <token-id> <comment>
<userid>
-w, --write Overwrite existing tokens, option to be used with the
token-file option
The format of the token file is CSV with the following values:
• token-id: the id of the smart card, this value is mandatory.
• comment: a comment about the token that can be used as a user friendly description of the token. This value maybe
empty.
• userid: the user id of a user from the user directory, to be associated with the token. This value maybe empty.
Example
The following example shows a valid csv file for token creation and uses the file to create the tokens and their association
to users.
example% cat /tokens.csv
Document generated by Confluence on Jun 24, 2009 06:55
Page 168
mo12.345,"token for Mary O'Leary",moleary
js46.23,"token for user John Smith",jsmith
x34.45,"token without any associated user",
example% /opt/SUNWvda/sbin/vda token-create -f /tokens.csv
example% /opt/SUNWvda/sbin/vda token-search
NAME USER DN
mo12.345 Mary O'Leary cn=Mary O'Leary,ou=people
js46.23 John Smith cn=John Smith,ou=people
x34.45 - -
Previous Page
How to Add
Users to Pools
Document generated by Confluence on Jun 24, 2009 06:55
Up One Page
Level
Administering
Next Page
How to Create
Automated
Administration
Scripts
Page 169
How to Create Automated Administration Scripts
This page last changed on Apr 08, 2009 by stephanielewellen.
How to Create Automated Administration Scripts
The /opt/SUNWvda/sbin/vda CLI can be used in scripts for automated administration.
Reading the Return Code
The /opt/SUNWvda/sbin/vda returns the following exit codes:
• 0: Successful completion
• 1: An error occurred
• 2: Invalid command line options or arguments were specified
Parsing the Output of the CLI
A number of subcommands support a parseable option so that the output is formatted for easy parsing: as a list of lines of
colon-separated (':') fields.
The syntax of the option is:
-x, --parseable
Display output suitable for programmatic parsing.
Jump List of Subcommands
•
•
•
•
•
•
•
•
•
•
•
•
•
•
•
•
•
•
•
user-search
user-show
user-desktops
group-list
group-show
token-search
token-show
token-desktops
pool-list
pool-show
pool-desktops
provider-list
provider-show
provider-list-hosts
provider-list-storage
provider-list-templates
provider-list-unmanaged
job-list
job-show
user-search
Search for users/groups in the user directory that match the specified search criteria.
Parseable Output: list of lines with the following values separated by a colon (':').
Value
Document generated by Confluence on Jun 24, 2009 06:55
Data Format
Page 170
Name of the user/group
string
Kind of object
User / Group
DN of the user/group
string
user-show
Show the desktops available for the user.
Parseable Output in the case of a user: list of lines with the following values separated by a colon (':').
Value
Data Format
Pool Name
string
Desktop Name
string
Desktop Id
integer
Kind of Assignment
User / Token <token> / Group <group_name> /
Custom Group <group_name>
Parseable Output in the case of a group: list of lines with the following values separated by a colon (':').
Value
Data Format
Pool Name
string
user-desktops
Show the desktops assigned to the user.
Parseable Output: list of lines with the following values separated by a colon (':').
Value
Data Format
Desktop Name
string
Desktop Id
integer
Pool Name
string
Type of Assignment
flexible / personal
Is Default Desktop
true / false
group-list
Lists all custom groups.
Parseable Output: list of lines with the following values separated by a colon (':').
Value
Document generated by Confluence on Jun 24, 2009 06:55
Data Format
Page 171
Custom Group Name
string
group-show
Show the pools assigned to the custom group.
Parseable Output: list of lines with the following values separated by a colon (':').
Value
Data Format
Pool Name
string
token-search
Search for tokens that match the search criteria.
Parseable Output: list of lines with the following values separated by a colon (':').
Value
Data Format
Token
string
Name of the Associated User
string
DN of the Associated User
string
token-show
Show the desktops available for the token.
Parseable Output: list of lines with the following values separated by a colon (':').
Value
Data Format
Pool Name
string
Desktop Name
string
Desktop Id
integer
Kind of Assignment
User / Token / Group <group_name> / Custom
Group <group_name>
token-desktops
Show the desktops assigned to the token.
Parseable Output: list of lines with the following values separated by a colon (':').
Value
Data Format
Desktop Name
string
Desktop Id
integer
Document generated by Confluence on Jun 24, 2009 06:55
Page 172
Pool Name
string
Type of Assignment
flexible / personal
Is Default Desktop
true / false
pool-list
List all pools.
Parseable Output: list of lines with the following values separated by a colon (':').
Value
Data Format
Pool Name
string
Type of Desktop Assignment
Personal / Flexible
Number of Desktops
integer
Desktop Provider Name
string
pool-show
Show detailed information about the pool.
Parseable Output: one line with the following values separated by a colon (':').
Value
Data Format
Assignment Status
Enabled / Disabled
Type of Desktop Assignment
Personal / Flexible
Desktop Provider Name
string
Cloning Status
Enabled / Disabled
Template
None / string
Number of Cloning Jobs
integer
Number of Available Desktops
integer
Number of Assigned Desktops
integer
Total Number of Desktops
integer
pool-desktops
List all desktops from the pool.
Parseable Output: list of lines with the following values separated by a colon (':').
Value
Data Format
Desktop Name
string
Document generated by Confluence on Jun 24, 2009 06:55
Page 173
Desktop Id
long
Machine State
Running / Powered Off / Suspended / Unknown
Desktop State
Available / Used / Idle / Unresponsive /
Reserved / Template
Name of Assigned User
string
DN of Assigned User
string
Is It a Template (displayed only for Virtual Box pools)
yes / no
provider-list
List all desktop providers.
Parseable Output: list of lines with the following values separated by a colon (':').
Value
Data Format
Desktop Provider Name
string
Total Number of Desktops
integer
Number of Used Desktops
integer
CPU Usage
xx% (x.x GHz/MHz)
Memory Usage
xx% (x.x GB/MB)
Storage Usage
xx% (x.x GB/MB)
provider-show
Show detailed information about the desktop provider.
Parseable Output: one line with the following values separated by a colon (':').
Value
Data Format
Server
string
Datacenters
comma separated strings
Pool Names
comma separated strings
followed by a list of lines with the following values separated by a colon (':').
Value
Data Format
Host Name
string
CPU Usage
xx% (x.x GHz/MHz)
Memory Usage
xx% (x.x GB/MB)
Document generated by Confluence on Jun 24, 2009 06:55
Page 174
provider-list-hosts
List all hosts for the xVM VirtualBox desktop provider.
Parseable Output: list of lines with the following values separated by a colon (':').
Value
Data Format
Host Name
string
Status
Enabled / Disabled
CPU Usage
xx% (x.x GHz/MHz)
Memory Usage
xx% (x.x GB/MB)
Number of Desktops
integer
provider-list-storage
List all storage servers for the desktop provider.
Parseable Output: list of lines with the following values separated by a colon (':').
Value
Data Format
Storage Name
string
ZFS Pool
string
Capacity
xxx.x GB
Usage
xx.x GB
Number of Desktops
integer
provider-list-templates
List the templates for the desktop provider.
Parseable Output: list of lines with the following values separated by a colon (':').
Value
Data Format
Template Name
string
Template Id
long
provider-list-unmanaged
List the desktops from the VMware VirtualCenter that are not managed by any desktop provider.
Parseable Output: list of lines with the following values separated by a colon (':').
Value
Document generated by Confluence on Jun 24, 2009 06:55
Data Format
Page 175
Desktop Name
string
Desktop Id
long
job-list
List the existing jobs.
Parseable Output: list of lines with the following values separated by a colon (':').
Value
Data Format
Job Title
Cloning Desktop <desktop_name> / Recycling
Desktop <desktop_name> / Starting Desktop
<desktop_name> / Powering Off Desktop
<desktop_name> / Shutting Down Desktop
<desktop_name> / Restarting Desktop
<desktop_name> / Deleting Pool <pool_name> /
etc.
Target of the Job
string
Status of the Job
Queued / Running / Completed / Failed /
Cancelling / Cancelled
Id of the Job
integer
job-show
Show the job details.
Parseable Output: one line with the following values separated by a colon (':').
Value
Data Format
Job Title
Cloning Desktop <desktop_name> / Recycling
Desktop <desktop_name> / Starting Desktop
<desktop_name> / Powering Off Desktop
<desktop_name> / Shutting Down Desktop
<desktop_name> / Restarting Desktop
<desktop_name> / Deleting Pool <pool_name> /
etc.
Target of the Job
string
Status of the Job
Queued / Running / Completed / Failed /
Cancelling / Cancelled
Start Time
hh:mm:ss
End Time
hh:mm:ss
Job Details
string
Previous Page
Document generated by Confluence on Jun 24, 2009 06:55
Up One Page
Level
Page 176
How to Associate
Tokens to Users
Document generated by Confluence on Jun 24, 2009 06:55
Administering
Page 177
VDI Default Configuration
This page last changed on Jun 10, 2009 by stephanielewellen.
VDI Default Configuration
This is an overview of the configuration actions which occur during VDI configuration (via script 'vda-config'). Actions are
shown according to VDI component and the used command lines.
The configuration actions shown here don't necessarily happen in chronological order.
Sun Ray Server Software (SRSS)
Configures basic SRSS settings:
/opt/SUNWut/sbin/utconfig
• Administrator password
• Server for a FOG
• FOG's signature
Configures SRSS Web Administration:
/opt/SUNWut/lib/support_lib/srwa_config update
•
•
•
•
Tomcat's home directory
http ports (1660, 1661)
Webservice's user name(utwww)
Remote access (enabled)
Configures Kiosk user accounts:
/opt/SUNWkio/bin/kioskuseradm create -l utku -g utkiosk -i auto -u-c
Replicates from Primary to Secondary hosts:
/opt/SUNWut/lib/utrcmd -n/opt/SUNWut/sbin/utreplica -p -a
/opt/SUNWut/sbin/utreplica -s
Enables LAN access:
/opt/SUNWut/sbin/utadm -L on
Allows root user access:
/opt/SUNWut/sbin/utadminuser -a root
Document generated by Confluence on Jun 24, 2009 06:55
Page 178
/opt/SUNWut/sbin/utadminuser -d admin
Additionally, the following line is commented out in the file /etc/pam.conf :
# utadmingui auth sufficient \/opt\/SUNWut\/lib\/pam_sunray_admingui.so.1
Sets Kiosk Session value to vda:
/opt/SUNWut/sbin/utkiosk -i session -f
Sets Kiosk Policy for both card users and non-card users:
/opt/SUNWut/sbin/utpolicy -a [-g] -z both -k both -m
Sun Ray Windows Connector (SRWC)
Enables SRWC if the Kiosk and LAN settings succeed:
/opt/SUNWuttsc/sbin/uttscadm -c
VDI Core
Creates RDP Broker SMF service:
svc://application/rdpbroker
Configures VDA webservice:
• Ports are configured (1800 / 1801)
• webuser is set to noaccess
• Remote access is enabled
Stops CACAO:
cacaoadm stop -f
Sets java and file-encoding flags:
cacaoadm set-param java-flags=-Xms4M -Xmx256M -Dcom.sun.management.jmxremote -Dfile.encoding=utf-8
Starts CACAO:
Document generated by Confluence on Jun 24, 2009 06:55
Page 179
cacaoadm start
Sets CACAO to start at boot:
cacaoadm enable -i default
Document generated by Confluence on Jun 24, 2009 06:55
Page 180
Adapting Sun Ray Software
This page last changed on Apr 08, 2009 by stephanielewellen.
Adapting Sun Ray Software
Sun VDI 3 supports different desktop access mechanisms. End-users have the choice to use existing Windows PC client
devices or they can step up to the energy efficient thin clients from Sun (also known as Sun Ray DTUs). Sun Ray Software
(including Sun Ray Server Software and Sun Ray Connector for Windows Operating Systems) is automatically installed and
configured as part of the Sun VDI core installation.
• Sun Ray Computing Model
• Sun Ray Administration GUI
• Sun Ray Kiosk Session
VDI 3 now authenticates users each time they sign in. If you would prefer to disable client authentication, refer to the
following link:
• How to Disable Client Authentication
Up One Page
Level
Administering
Document generated by Confluence on Jun 24, 2009 06:55
Next Page
Setting Up
Sun Secure
Global Desktop
Software
Page 181
Sun Ray Administration GUI
This page last changed on Apr 08, 2009 by stephanielewellen.
Sun Ray Administration GUI
The Sun Ray administration GUI is configured and accessible on each Sun VDI host. This allows easy modification of Sun Ray
configuration settings such as Kiosk session parameters (see following section).
Steps
1. Go to http://<server name>:1660.
2. You will be re-directed to https and the web browser will ask you to accept the security certificate. After
confirmation, you should get the login screen.
3. You must login as super user ("root") with corresponding password.
Sun VDI 3 does not use the default "admin" user account that is normally configured as part of the Sun Ray
Software installation.
Previous Page
Sun Ray
Computing
Model
Document generated by Confluence on Jun 24, 2009 06:55
Up One Page
Level
Adapting Sun
Ray Software
Next Page
Sun Ray Kiosk
Session
Page 182
Sun Ray Computing Model
This page last changed on Apr 08, 2009 by stephanielewellen.
Sun Ray Computing Model
Sun Ray DTUs have no local disks or locally installed applications or operating systems and are therefore considered
stateless. This makes them easy to exchange, inexpensive to maintain, and extremely secure. Sun Ray DTUs connect to
the next available Sun VDI host using the Appliance Link Protocol (ALP). To ensure uninterrupted service, several Sun VDI
hosts are automatically configured as a Sun Ray failover group, so that whenever a server goes down, the affected DTUs
automatically re-connect to the next available Sun VDI server in the failover group.
The Sun Ray architecture uses tokens (authentication keys) to associate a desktop session with a user. Typically, the token is
presented on a smart card that the user inserts into the DTU's card reader. If a session associated with that token is already
running on any Sun VDI server, the DTU is automatically redirected to that server, and the user's most recent session is
displayed. While the session continues to reside on the server, it appears to follow the user from one DTU to another. This
functionality, called hotdesking or session mobility, enables users to access their desktops from different locations, using
any DTU on their network.
More information around Sun Ray can be found in the Sun Ray Software documentation.
Up One Page
Level
Adapting Sun
Ray Software
Document generated by Confluence on Jun 24, 2009 06:55
Next Page
Sun Ray
Administration
GUI
Page 183
Sun Ray Kiosk Session
This page last changed on Apr 08, 2009 by stephanielewellen.
Sun Ray Kiosk Session
Sun Ray Software is typically used to serve standard UNIX desktop sessions. However, other session types can be easily
supported taking advantage of the Sun Ray Kiosk mode. Sun VDI 3 comes with a predefined Kiosk session (called Sun
Virtual Desktop Access - VDA) that uses the Sun Ray Windows Connector to establish a remote desktop protocol (RDP)
connection to a virtual machine.
A Sun Ray Kiosk session is initiated when a user inserts a smart card into a Sun Ray DTU. The new session will first bring up
a login dialog asking for user name and password (and optionally a Windows domain). This type of authentication can be
disabled if required (see Disabling Client Authentication).
Sun VDI 3 does not require the usage of smart cards. Per default the Kiosk session is enabled for smart
card and non-smart card access.
After successful authentication, the system will contact the Sun VDI service to determine the desktops assigned to the
logged in user. If multiple desktops are available, the user will get a desktop selection dialog. Once the user has selected
a desktop, the Sun Ray Windows Connector will startup and connect to the virtual machine running the desktop (see DTU
Access).
Supported Kiosk Session Parameters
The appearance and behavior of the Kiosk session can be configured via a number of session parameters. These parameters
can be split up into two groups: Settings specific for the VDA session (affecting the desktop selector dialog), and settings
specific for the Sun Ray Windows Connector (aka uttsc) (affecting the quality of the RDP connection). The general syntax is:
<specific settings for desktop selector> -- <uttsc specific settings>
Desktop Selector Settings
Per default the login/desktop selector dialog will take advantage of the Java Runtime Environment located under /usr/
java. However, an alternative path can be specified using the "-j" option. We recommend to use Java 6 for the dialog to get
better locale support and to take advantage of the latest improvements in the Java Swing area.
Other Kiosk parameters set default values for the input fields or hide/display certain UI elements in the dialog.
-n (--no-desktop-selector) - Disables the desktop selector completely.
-d (--default-domain)
- Allows to preset domain input field.
-l (--list-of-domains) - Preset the domain selector pulldown, e.g. -l vdatest.germany,qa.ireland
-t (--timeout)
- Specifies the timeout applied after login (seconds)
-j (--java-home)
- Path to JRE (defaults to /usr/java) used by the selector dialog.
-o (--no-domain-field) - Always hide domain input field.
-w (--show-password-field) - Always show password field
Disabling the desktop selector
If you disable the desktop login/selector dialog with the "-n" option, then users have no possibility to enter
their password prior to accessing a desktop. Thus if you disable this dialog, you must also disable the client
authentication at the same time - see Disabling Client Authentication.
Document generated by Confluence on Jun 24, 2009 06:55
Page 184
Windows Connector (uttsc) Settings
See the uttsc man page for a complete listing of the supported parameters. The list below is just an extract of the settings
to illustrate the configuration options.
-r sound:[low|high|off] - Disable sound redirection from the server to the client or change the quality of
transmitted sound. The sound quality in terms of bits per second can be specified.
A "low" quality transmits 8khz and a "high" quality does 22.2 khz. By default, High
quality sound is enabled.
-A color depth
- Sets the colour depth for the connection (8, 15, 16 or 24).
The colour depth may be limited by the server configuration in which case
the server configuration is honored.
-E window-attribute
- Enable window attributes from the defined set. The available set of options which
can be enabled are:
wallpaper, fullwindowdrag, menuanimations, theming,
cursorshadow, cursorsettings.
Keeping these attributes disabled improves display performance especially over lower
bandwidth networks. Multiple -E options can be specified for more than one attribute
if required.
Adapting Kiosk Session
Kiosk session settings can be easily adapted via the Sun Ray Admin GUI:
Steps
1.
2.
3.
4.
5.
Login to the Sun Ray Admin GUI.
Switch to the Advanced tab.
Afterwards select the Kiosk Mode sub-tab.
Click on Edit to modify the configuration settings.
Enter the desired settings in the Arguments field.
For example:
-d vdatest -j /usr/java6 -- -E wallpaper -E theming
6. Click on OK to save the new settings.
If you want to adapt the default locale of login/desktop selection dialog, put in the desired locale in the
Locale input field of the Kiosk settings.
Perform a Cold Restart
The new settings will become active for every newly created Kiosk session. If you want to enforce the settings for existing
sessions also, then you can perform a cold Sun Ray services restart. This will terminate all existing sessions and will create
new Kiosk sessions as necessary.
Users will notice an outage and will also be forced to re-login into their desktop sessions again, if you
perform a cold Sun Ray services restart.
Steps
1.
2.
3.
4.
Switch to the Servers tab.
Select all servers in your Sun VDI environment.
Click on Cold Restart to initiate the Sun Ray services restart.
This operation can take up to several minutes.
Document generated by Confluence on Jun 24, 2009 06:55
Page 185
Previous
Page
Sun Ray
Administration
GUI
Document generated by Confluence on Jun 24, 2009 06:55
Up One Page
Level
Adapting Sun
Ray Software
Next Page
Disabling Client
Authentication
Page 186
Setting Up Sun Secure Global Desktop Software
This page last changed on Apr 08, 2009 by stephanielewellen.
Setting Up Sun Secure Global Desktop Software
Sun VDI can be also used with Sun Secure Global Desktop software (SGD) 4.41.
Steps
1. Install SGD 4.41.
For detailed instructions, see the Sun Secure Global Desktop Software 4.41 Collection.
The mechanism for accessing desktops via Sun Secure Global Desktop has changed since Sun VDI 2.
The 'My Desktop' Application Object and corresponding expect script is no longer required for Sun
VDI 3.
2. Replace the SGD Terminal Service Client.
The default SGD Terminal Service Client (ttatsc) does not support RDP redirection as required by the Sun VDI Core.
Thus, you need to replace this binary with an updated version included in the Sun VDI Core installation.
Replace the default SGD Terminal Services Client provided by SGD (found at /opt/tarantella/bin/bin/
ttatsc) with the version provided by the Sun VDI RDP Broker (found at /opt/SUNWrdpb/supplemental/
ttatsc/<Installation_Platform>/ttatsc).
3. Create a Windows Application Object.
You need to create a Windows application object to offer users an easy way to access the desktops managed by Sun
VDI. This can be done using the tarantella CLI or using the SGD Administration console.
For example, to create a full screen kiosk Windows application using the SGD command line enter the following
command:
# /opt/tarantella/bin/tarantella object new_windowsapp --name ".../_ens/o=applications/cn=Sun VDI Desktop" \
--width 1200 --height 1000 --maxinstances 1 --login windows.exp --displayusing kiosk --maximize true
Assign the new Application Object to the users that need to access a Sun VDI Desktop.
By default, all the users are assigned to the Applications group so an easy way to do so is to add the newly created
application object to the Applications group:
# /opt/tarantella/bin/tarantella object add_member --name ".../_ens/o=applications/cn=Applications" \
--member ".../_ens/o=applications/cn=Sun VDI Desktop"
Creating the Application Object and adding the object to the Applications group can also be done via the
SGD Administration Console. Please see the SGD documentation for more details on adding Application
Objects to SGD.
Security Considerations
Sun VDI 3 now authenticates users each time they sign into their desktop. If you would prefer to disable this feature, please
see Disabling Client Authentication.
Previous Page
Document generated by Confluence on Jun 24, 2009 06:55
Up One Page
Level
Next Page
Page 187
Adapting Sun
Ray Software
Document generated by Confluence on Jun 24, 2009 06:55
Administering
Understanding
the RDP Broker
Page 188
Understanding the RDP Broker
This page last changed on Apr 08, 2009 by stephanielewellen.
Understanding RDP Broker
Sun VDI 3 includes a built-in RDP broker that allows easy desktop access leveraging the Remote Desktop Protocol (RDP).
This way users can take advantage of existing RDP clients (for example, the remote desktop connection in Windows XP) for
accessing desktops.
How Does it Work?
1. The RDP client first contacts the Sun VDI RDP broker (passing over any information like username, password, etc).
2. The RDP broker will then contact the VDI service on behalf of the client and will ask to startup the desired desktop.
3. The VDI service will first verify the username/password combination (if client authentication is enabled on the VDI
service side - that is the default, see Disabling Client Authentication).
4. If authentication succeeds, the corresponding desktop will be started up and the VDI service returns the IP and
optionally RDP port of the virtual machine (VM) running the desktop.
5. This information is used by the RDP broker to construct an RDP Server Redirection Packet containing either:
• the VM host/IP address as the server to redirect to (if using Windows RDP, as done for VMware Infrastructure 3)
• or a routing token containing encoded IP address and RDP port information (if using the VirtualBox RDP (aka VRDP))
The latter is necessary, because VRDP does not use the standard Windows RDP port. Thus the RDP broker needs to hand
back both the IP and the RDP port information. For details of the routing token encoding, see the 'Routing Token Format'
section of 'Session Directory and Load Balancing Using Terminal Server'.
Finally this RDP redirection packet is sent back to the RDP client and the client will redirect accordingly.
Supported RDP Clients
RDP clients that support all the above mentioned mechanism and that have been tested with Sun VDI are:
• the Microsoft terminal services client (aka remote desktop connection) as included in Windows XP and Windows Vista
• the Sun Ray Connector for Windows OS (aka uttsc)
• the SGD terminal services client (aka ttatsc, using the updated version delivered as part of Sun VDI)
Other clients may work, but have not been tested by QA.
Security Considerations
Sun VDI 3 now authenticates users each time they sign into their desktop. If you would prefer to disable this feature, please
see Disabling Client Authentication.
Previous Page
Setting Up
Sun Secure
Global Desktop
Software
Document generated by Confluence on Jun 24, 2009 06:55
Up One Page
Level
Administering
Page 189
Accessing Desktops with a Sun Ray DTU
This page last changed on Apr 08, 2009 by stephanielewellen.
Accessing Desktops with a Sun Ray DTU
The following screenshots illustrate how to access a desktop from an end-user perspective using Sun Ray thin clients
(DTUs).
Using the Desktop Login/Selector Dialog
Starting with Sun VDI 3 all users must authenticate themselves before getting access to any desktops. Also new is the
possibility to select between multiple desktops. This behavior can be configured (see Using Sun Ray Software).
Steps
1. Log into Sun VDI.
Insert a smart card (token) that has been assigned to a pool, or a desktop directly (as described before) into a Sun
Ray DTU that is connected to a Sun VDI host. It should display a login screen, after a short while. You must provide
your user name and password (and optionally a Windows domain).
Sun VDI 3 does not require the usage of smart cards. Per default desktop access is enabled for smart
card and non-smart card usage.
2. Select a desktop or pool.
After successful authentication, the system will determine the desktops (and pools) assigned to you. If multiple
desktops are available, you will get a desktop selection dialog. The selection screen will be skipped, if there is only
one desktop available to you.
You will be automatically logged out, if you do not select a desktop within three minutes (the default
timeout).
3. Work with the desktop.
Document generated by Confluence on Jun 24, 2009 06:55
Page 190
Once you have selected a desktop, the Sun Ray Connector for Windows OS will startup and will display your desktop.
At any time you can disconnect from your desktop by moving your mouse up to the top of the screen. A remote
desktop pulldown menu will appear. Hitting the "X" from the menu will disconnect you from the current desktop
session and the desktop selection menu (or the login screen) will appear again.
There is also a Disconnect button available in the Windows start menu, for desktops connected via
Windows RDP. Desktops connected via VirtualBox RDP (VRDP) will not offer this button.
Using the Default Desktop
The desktop login/selector dialog can be completely disabled with the "-n" Kiosk session option (see Using Sun Ray
Software). In this setup users are always connected to their default desktop without the need to pass any other Sun VDI
dialogs. This behavior is similar to previous Sun VDI versions.
If you disable the desktop login/selector dialog, users have no possibility to enter their password prior to
accessing a desktop. Thus to make this setup work, you must also disable the Sun VDI client authentication
- see Disabling Client Authentication.
Steps
1. Start the desktop.
Insert a smart card (token) that has been assigned to a pool, or a desktop directly (as described before) into a Sun
Ray DTU that is connected to a Sun VDI host. Sun VDI will determine the assigned default desktop and will start it up
if necessary. During that time a wait screen is displayed.
Sun VDI 3 does not require the usage of smart cards. Per default desktop access is enabled for smart
card and non-smart card usage.
2. Log into the desktop.
Document generated by Confluence on Jun 24, 2009 06:55
Page 191
It is good practice, if desktops are configured to always present their own login screen before displaying the actual
desktop content. This way authentication is still required, but it is now performed on the guest OS level.
In this example you will get the standard Windows login screen. Depending on your guest OS configuration you must
enter user name/password (and potentially the Windows domain).
3. Work with the desktop.
Once you have successfully logged in you will get your desktop content displayed. The behavior is the same as for a
standard Windows PC.
Up One Page
Level
Administering
Document generated by Confluence on Jun 24, 2009 06:55
Next Page
Accessing
Desktops with
SGD Web
Access
Page 192
Accessing Desktops with SGD Web Access
This page last changed on Apr 08, 2009 by stephanielewellen.
Accessing Desktops with SGD Web Access
• Log into the SGD webtop (with URL http://<ssgd_server>/) as the user who has been assigned the pool/desktop.
• The Windows Application Object that you created (see The Virtual Desktop Access Layer section) should appear in
the list of applications on the left-hand side. Clicking the Application Object should ask for user credentials and then
launch a Windows session for the user on the assigned desktop.
Previous Page
Accessing
Desktops with a
Sun Ray DTU
Document generated by Confluence on Jun 24, 2009 06:55
Up One Page
Level
Administering
Next Page
Accessing
Desktops with
Microsoft RDC
Page 193
Accessing Desktops with Microsoft RDC
This page last changed on Apr 08, 2009 by stephanielewellen.
Accessing Desktops with Microsoft RDC
Sun VDI 3 includes a built-in RDP broker that allows easy desktop access leveraging the Remote Desktop Protocol (RDP).
This way users can take advantage of existing Windows PCs for accessing desktops. There is typically no need to install any
additional software on your PC. Both Windows XP and Windows Vista provide out of the box the necessary functionality.
The following screenshots illustrate how to access a desktop from an end-user perspective using Windows XP.
Steps
1. Open a remote desktop connection.
a. Click on Start > All Programs > Accessories > Remote Desktop Connection.
b. In the dialog, specify as Computer the name, or IP address of the host running Sun VDI 3.
c. Specify the user name, and optionally Windows domain. Click Connect.
d. A popup dialog will come up asking for the user password. Enter the password and click OK.
e. After a while, the desktop should be displayed, and be ready to use.
The remote desktop connection on your computer might be configured for performance
optimization. Thus certain elements like desktop background, theming, menu and window
animations might not be displayed in your setup. You can easily adapt these settings (see
Experience tab of the remote desktop connection) to meet your personal requirements.
2. Access a specific desktop or pool.
If multiple desktops are assigned to a user, then Sun VDI will connect to the default desktop (which can be defined
using the Sun VDI Admin GUI).
Alternatively, it is possible to specify the desired desktop or pool when opening the remote desktop connection. Just
enter the user name, followed by the pool name, and the optional desktop ID using the following syntax:
<username>::pool=<poolname>[,desktop=<desktopId>]
It is usually sufficient to just specify the pool name. However, if you have multiple desktops assigned from the same
pool, you must specify both the pool name and the desktop ID.
Desktop identifiers can be listed via the Sun VDI administration CLI executing /opt/SUNWvda/sbin/
vda user-desktops <username>
Document generated by Confluence on Jun 24, 2009 06:55
Page 194
If you frequently switch between various desktops, then it is convenient to store the remote desktop connection
settings for each desktop in an RDP file (see Connection Settings > Save As). You can then create shortcuts to these
files allowing you to initiate a connection via a simple mouse double-click.
Previous Page
Accessing
Desktops with
SGD Web Access
Document generated by Confluence on Jun 24, 2009 06:55
Up One Page
Level
Administering
Page 195
Disabling Client Authentication
This page last changed on Apr 08, 2009 by stephanielewellen.
Security Considerations
Starting with Sun VDI 3, all users must authenticate themselves before getting access to any desktop. Typically users will
be asked for a user name/password combination (and optionally a Windows domain). The VDI service will then contact
the user directory for the verification of the provided user credentials. If authentication succeeds the connection to the
desired desktop will be established - otherwise it will be denied. The user name/password will also be forwarded to the
guest OS running the desktop - this way users get automatically logged into their desktop without the need to potentially
pass another login screen.
For Sun VDI 3 automatic login will work for Windows RDP only - forwarding of user credentials does not
work yet for VRDP and non-Windows OS.
Authentication on the VDI service level can be disabled if desired. However, special care needs then to be taken on the
users' desktops setup to not open unwanted security holes. For example, it is good practice, if desktops are configured
to always present their own login screen before displaying the actual desktop content. This way authentication is still
required, but it is now performed on the guest OS level only. This setup also allows to take advantage of more advanced
authentication techniques that are not supported out of the box by the VDI service.
For security reasons it is recommended to leave authentication always enabled, unless the simple user
name/password authentication does not satisfy your requirements.
Enabling/Disabling Authentication
You can use the VDA administration CLI to configure, if authentication should be performed by the VDI service.
To check the currently configured authentication policy:
# /opt/SUNWvda/sbin/vda settings-getprops -p clientauthentication
To enable authentication (the default):
# /opt/SUNWvda/sbin/vda settings-setprops -p clientauthentication=Enabled
To disable authentication:
# /opt/SUNWvda/sbin/vda settings-setprops -p clientauthentication=Disabled
Up One Page
Level
• Adapting
Sun Ray
Software
• Setting Up
Sun Secure
Document generated by Confluence on Jun 24, 2009 06:55
Page 196
Global
Desktop
Software
• Accessing
Desktops
with
Microsoft
RDC
Document generated by Confluence on Jun 24, 2009 06:55
Page 197
Troubleshooting and FAQs
This page last changed on Jun 24, 2009 by stephanielewellen.
Troubleshooting and FAQs
This page displays a categorical view of VDI Troubleshooting and FAQs. Some questions will be shown in more than one
category. We are constantly updating this page based on VDI Forum questions!
Database
Can I convert a VDI Demo into a clustered VDI Production environment?
Does the MySQL database store all SRS-related configuration?
I get a blank screen after successfully logging into the Admin GUI.
VDI database doesn't start during an Evaluation configuration.
Desktops and Desktop Pools
How do I make a desktop available to a user at all times in VDI 3?
How is desktop assignment in VDI 3 different than in VDI 2?
What is the difference between Personal and Flexible desktop assignments?
I have created a new pool in my VMware desktop provider and virtual machines are not created automatically.
In my VMware desktop pool, new virtual machines are created automatically, but they are not made available.
Networking
How do I configure DHCP in VDI 3?
The window displaying the VMware-hosted virtual desktop is freezing.
I am unable to get a MS RDC connection on my VMware virtual machine.
How do I use VMware virtual machines with multiple network adapters?
Why does my VMware virtual machine have an invalid IP address or cannot be pinged?
RDP and SGD
Can I install a full Demo without user directory integration?
Sun Ray Software and DTU
What are the differences between SRS in VDI 2 and VDI 3?
Do I need to configure SRS separately in VDI 3?
The Sun Ray DTU is cycling and cannot connect to a virtual machine.
How do I specify USB redirection for Sun Ray?
Can I use wild cards in token names to represent a group of DTUs in order to assign these DTUs to a pool?
Does the MySQL database store all SRS-related configuration?
How do I configure DHCP in VDI 3?
Document generated by Confluence on Jun 24, 2009 06:55
Page 198
Supported Software and Configurations
Which versions of JRE are supported?
Is it possible to assign MS Terminal Server to users?
Is the Demo configuration a supported configuration?
Is VMware ESXi a supported virtualization platform?
Storage
Does the VirtualBox swap space really have to be the same as the memory?
I have free memory on my ZFS storage host, but my VirtualBox virtual machines will not start due to a lack of memory.
When I start a desktop I get this error - No suitable hosts to start a desktop for Desktop Provider sunvdi-demo.
User Directory
Users cannot log into their desktops using their User Principal Name (UPN), or email address.
Kerberos authentication to Active Directory works for a while and then stops.
Can I use PKI instead of Kerberos for authentication to an Active Directory?
Users do not show up in the Admin GUI in the Users and Groups section.
Users
End-users are not able to log into their Windows desktop.
End-users cannot access their virtual machines.
Users do not show up in the Admin GUI in the Users and Groups section.
VDI Admin GUI
I cannot log into the Admin GUI.
I get a blank screen after successfully logging into the Admin GUI.
Jobs don't finish even after canceling them using the Admin GUI.
There is an error when I add a VirtualBox host to a desktop provider.
I can start a virtual machine from the VirtualBox GUI, but it will not start from the VDI Admin GUI.
Users do not show up in the Admin GUI in the Users and Groups section.
VDI Demo
Can I set up a Demo of VDI 3 on one machine?
Can I convert a VDI Demo into a clustered VDI Production environment?
Is the Demo configuration a supported configuration?
VDI database doesn't start during an Evaluation configuration.
Can I install a full Demo without user directory integration?
Document generated by Confluence on Jun 24, 2009 06:55
Page 199
VDI Services
The system is not reacting as expected.
vda command reports that VDI is not running although cacaoadm and vda-db-status say it is.
Jobs don't finish even after canceling them using the Admin GUI.
VirtualBox Virtualization Platform
The VirtualBox software never finishes installing due to an error.
The VirtualBox host is crashing unexpectedly.
The VirtualBox Web Service cannot be contacted.
Does the VirtualBox swap space really have to be the same as the memory?
I have free memory on my ZFS storage host, but my VirtualBox virtual machines will not start due to a lack of memory.
How do I configure the audio for VirtualBox hosted virtual machines?
There is an error when I add a VirtualBox host to a desktop provider.
I can start a virtual machine from the VirtualBox GUI, but it will not start from the VDI Admin GUI.
When I start a desktop I get this error - No suitable hosts to start a desktop for Desktop Provider sunvdi-demo.
Virtual Machines
End-users cannot access their virtual machines.
Unused VMware virtual machines are not being recycled.
The VMware virtual machine cloning process is not operating as expected.
How do I configure the audio for VirtualBox hosted virtual machines?
I am unable to get a MS RDC connection on my VMware virtual machine.
How do I use VMware virtual machines with multiple network adapters?
Why does my VMware virtual machine have an invalid IP address or cannot be pinged?
VMware Virtualization Platform
I have created a new pool in my VMware desktop provider and virtual machines are not created automatically.
Unused VMware virtual machines are not being recycled.
The VMware virtual machine cloning process is not operating as expected.
Is VMware ESXi a supported virtualization platform?
In my VMware desktop pool, new virtual machines are created automatically, but they are not made available.
The window displaying the VMware-hosted virtual desktop is freezing.
I am unable to get a MS RDC connection on my VMware virtual machine.
How do I use VMware virtual machines with multiple network adapters?
Why does my VMware virtual machine have an invalid IP address or cannot be pinged?
Document generated by Confluence on Jun 24, 2009 06:55
Page 200
Can I convert a VDI Demo into a clustered VDI Production environment?
This page last changed on Jun 17, 2009 by stephanielewellen.
Can I convert a VDI Demo into a clustered VDI Production environment?
Yes. While configuring the multi-host Production setup, run vda-config on all hosts (one Primary and two Secondaries).
On one of the Secondary hosts you may restore the data.
Back up the database:
On the Demo (or Evaluation) host, execute:
/opt/SUNWvda/mysql/bin/ndb_mgm
at the ndb_mgm prompt, execute:
START BACKUP
Check if a directory 'BACKUP' was created at the location /var/opt/SUNWvda/mysql-cluster.
Do a restore into the cluster:
Perform vda-conig -u, it should ask for restoring this backup. Run vda-config on all hosts (one Primary and two
Secondaries). Save the backup as /var/opt/SUNWvda/mysql-cluster/BACKUP on the Secondary server. Execute the
following command on the same host:
/opt/SUNWvda/mysql/bin/ndb_restore -b <backup #> -n <nodeid #> -r - - backup_path=<path>
For further reference, see the Backing Up the VDI Configuration page.
Document generated by Confluence on Jun 24, 2009 06:55
Page 201
Can I install a full Demo without user directory integration?
This page last changed on Jun 24, 2009 by stephanielewellen.
Can I install a full Demo without user directory integration?
Sun VDI 3 allows to assign desktops to users and/or tokens (smart cards). The user information must always come from
an LDAP (or Active Directory) server. There is currently no possibility to take advantage of local system accounts (Unix
accounts). As a consequence a demo setup normally requires a user directory. This allows to test the full VDI 3 functionality
for accessing desktops, for example using an RDP client or using Sun Ray DTUs.
The Sun Ray functionality also supports the usage of smart cards. You can assign desktops to specific smart cards (tokens)
and you can configure the system to display a desktop by just inserting a smart card into a Sun Ray DTU (without asking for
any user name). In such a setup a user directory is no longer mandatory. However, keep in mind that this limits you to test
the Sun Ray functionality only. You will not be able to access desktops from an RDP client.
If you want to test the RDP broker functionality included in Sun VDI 3, then you must assign desktops to users and
therefore must take advantage of LDAP (or Active Directory). This means that you have to configure an LDAP server,
afterwards search for the user in the Sun VDI Admin tools and then assign either a pool or a desktop to this user.
Desktops/pools are internally assigned to LDAP user DNs. If you are using an RDP client, you must specify a user name
(and potentially a corresponding password). Sun VDI translates this user name into a user DN and will then bring up the
corresponding desktop.
Full Background:
1. The RDP client contacts the VDI RDP broker and passes over any user name, credentials and domain information (if
specified).
2. The RDP broker triggers an internal VDA client CLI called 'vda-client'. This CLI encapsulates the communication of
any client with the VDA service. The vda client will request the start of a desktop for the provided user name (if
authentication is enabled, the provided credential information will be verified first).
3. The VDA service will look up the LDAP DN for the provided user name.
4. It will then figure out the desktop assignments for this user DN.
5. Based on determined information one desktop will be picked up and started.
6. The IP and RDP port of the virtual machine is handed back to the vda-client CLI.
7. The RDP broker uses this information to redirect the RDP client to the IP/RDP port of the virtual machine.
8. The RDP client connects to the virtual machine.
Document generated by Confluence on Jun 24, 2009 06:55
Page 202
Can I set up a Demo of VDI 3 on one machine?
This page last changed on Jun 12, 2009 by stephanielewellen.
Can I set up a Demo of VDI 3 on one machine?
Yes! We encourage new users to set up a VDI demo to get comfortable with the software before installing a production
environment setup. See Getting Started - VDI Demo for VDI demo system requirements and step-by-step installation and
configuration instructions.
Document generated by Confluence on Jun 24, 2009 06:55
Page 203
Can I use OpenSolaris instead of Solaris 10 Update 7 for my single host Demo?
This page last changed on Jun 24, 2009 by stephanielewellen.
Can I use OpenSolaris instead of Solaris 10 Update 7 for my single host Demo?
OpenSolaris may be used as storage platform hosting the ZFS pool used by VDI 3. However, the core parts of VDI 3
CANNOT be installed on OpenSolaris.
The information on the Getting Started - VDI Demo page focuses on simplicity - everything (connection broker, storage,
virtualization backend) is installed on a single machine. The VDI 3 install and configuration scripts (e.g. vda-install,
vda-config, vb-install, vb-config), will work for the Solaris 10 platform only. The scripts require some libraries
and tools under certain paths that do not exist (or exist under different paths) in OpenSolaris. This could be made to work
on OpenSolaris, but it would require a lot of manual adaptations. That's why , for the moment, we require Solaris 10 for
the VDI 3 installation and do not support OpenSolaris for installing the core VDI parts. Update 7 is required because several
fixes in the ISCSI area went into this update.
The requirement of 64-bit is caused by the MySQL cluster database version shipped with VDI 3 (we only include the 64-bit
version of the MySQL cluster in VDI 3).
Document generated by Confluence on Jun 24, 2009 06:55
Page 204
Can I use PKI instead of Kerberos for authentication to an Active Directory?
This page last changed on Jun 24, 2009 by stephanielewellen.
Can I use PKI instead of Kerberos for authentication to an Active Directory?
You can certainly use PKI authentication and it should offer the same features (including removing computers from the
Active Directory) as Kerberos authentication.
Document generated by Confluence on Jun 24, 2009 06:55
Page 205
Can I use wild cards in token names to represent a group of DTUs in order to assign these DTUs to a
pool?
This page last changed on Jun 24, 2009 by stephanielewellen.
Can I use wild cards in token names to represent a group of DTUs in order to assign these DTUs to a pool?
No, tokens in VDI don't allow wild cards. Instead, you can create tokens in bulk and have them associated to users by using
the vda CLI as described on the How to Associate Tokens to Users page. Then you can make pool assignments based on
existing groups of users in your user directory, or groups you would define especially for VDI using Custom Groups.
Document generated by Confluence on Jun 24, 2009 06:55
Page 206
Does the MySQL database store all SRS-related configuration?
This page last changed on Jun 22, 2009 by stephanielewellen.
Does the MySQL database store all SRS-related configuration?
No, all SRS-related configuration is stored in the LDAP-based SRS datastore.
Document generated by Confluence on Jun 24, 2009 06:55
Page 207
Does the VirtualBox swap space really have to be the same as the memory?
This page last changed on Jun 22, 2009 by stephanielewellen.
Does the VirtualBox swap space really have to be the same as the memory?
Yes, because of a long standing Solaris bug, all the memory that the VirtualBox virtual machines use is double accounted
(but not actually used). This means that if you stay with 64GB of swap on your system, as soon as you start enough virtual
machines to consume 64.1GB of memory, Solaris will think it has no memory left and stop forking processes, causing it to
hang or crash.
See the Release Notes for more information.
Document generated by Confluence on Jun 24, 2009 06:55
Page 208
Do I need to configure SRS separately in VDI 3?
This page last changed on Jun 22, 2009 by stephanielewellen.
Do I need to configure SRS separately in VDI 3?
A separate installation of SRS is not necessary in VDI 3. In fact, we require that SRSS and SRWC are NOT installed/
configured when starting the VDI 3 installation. The SRSS/SRWC parts are automatically setup as part of the VDI 3 install/
configuration script.
Document generated by Confluence on Jun 24, 2009 06:55
Page 209
End-users are not able to log into their Windows desktop.
This page last changed on Jun 12, 2009 by stephanielewellen.
End-users are not able to log into their VMware provided Windows desktop.
Verify that the users are configured for remote access and are allowed to perform a remote access.
Document generated by Confluence on Jun 24, 2009 06:55
Page 210
End-users cannot access their virtual machines.
This page last changed on Jun 12, 2009 by katell.
End-users cannot access their virtual machines.
1. On a terminal trigger the following command:
/opt/SUNWvda/lib/vda-client -p `cat /tmp/vdaservice.port` -m <test user>
2. If things work as expected, then the vda-client will trigger the startup of the corresponding Virtual Machine and
should return an IP (e.g. 10.16.46.208) or DNS name (e.g. argus-load5-ham) for accessing the user's desktop. If the
RDP port differs from the default, then it will be appended to the IP/DNS name (e.g. 10.16.46.208:49259 or argusload5-ham:49259)
3. With that information it should now be possible to establish an RDP connection to the desktop.
4. If no IP or DNS name is returned by vda-client, VDI might have some trouble resolving the user ID in the user
directory. To check that, change the log level of cacao to ALL as described in the cacao troubleshooting.
5. in the cacao log file /var/cacao/instances/default/logs/cacao.0, look for entries of the type
FINEST: userId=<test user> -> DN=<dn>
6. if <dn> is null, that means that no user matching the user id <test user> was found in the user directory. It would
then be necessary to customize the list of attributes ldap.userid.attributes to match the directory schema as
explained in Customizing the LDAP Filters and Attributes.
7. if <dn> is not null, that means that the user matching the user id <test user> was correctly found in the user
directory.
Document generated by Confluence on Jun 24, 2009 06:55
Page 211
How do I configure DHCP in VDI 3?
This page last changed on Jun 22, 2009 by stephanielewellen.
How do I configure DHCP in VDI 3?
First, install and configure VDI using vda-install and vda-config as described on the Installingpages. This will also
install SRS and configure the SRS fail-over group and Kiosk settings. You can then adapt things as needed using the typical
SRSS commands. For example, use utadm -a <interface name> to configure a dedicated interconnect for the Sun
Ray DTUs. This will also ask you for the desired DHCP settings.
Document generated by Confluence on Jun 24, 2009 06:55
Page 212
How do I configure the audio for VirtualBox hosted virtual machines?
This page last changed on Jun 17, 2009 by stephanielewellen.
How do I configure the audio for VirtualBox hosted virtual machines?
If you change a virtual machine's configuration (i.e. audio) via the VDI GUI, the changes will not take effect until the virtual
machine has been unregistered/re-registered on a VirtualBox host. Simply restarting the virtual machine from within will
not result in this behavior. To force the unregister/register choose either 'Power Off' or 'Shutdown' from the VDI GUI and
then a 'Start'.
Document generated by Confluence on Jun 24, 2009 06:55
Page 213
How do I make a desktop available to a user at all times in VDI 3?
This page last changed on Jun 24, 2009 by stephanielewellen.
How do I make a desktop available to a user at all times in VDI 3?
Make sure the user's desktop has a personal assignment instead of a flexible assignment. For more about desktop
assignment types, see: What is the difference between Personal and Flexible desktop assignments?
Document generated by Confluence on Jun 24, 2009 06:55
Page 214
How do I specify USB redirection for Sun Ray?
This page last changed on Jun 17, 2009 by stephanielewellen.
How do I specify USB redirection for Sun Ray?
You can adapt the Kiosk session parameters using the Sun Ray Admin GUI as described on the Sun Ray Kiosk Session
page. Add the desired drive mapping after any other uttsc specific settings: <specific settings for desktop
selector> - <any other uttsc specific settings> -r disk:<drive name>=<path>
Document generated by Confluence on Jun 24, 2009 06:55
Page 215
How do I use VMware virtual machines with multiple network adapters?
This page last changed on Jun 12, 2009 by stephanielewellen.
How do I use VMware virtual machines with multiple network adapters?
See Sun VDI: How to use virtual machines with multiple network adapters.
Document generated by Confluence on Jun 24, 2009 06:55
Page 216
How is desktop assignment in VDI 3 different than in VDI 2?
This page last changed on Jun 24, 2009 by stephanielewellen.
How is desktop assignment in VDI 3 different than in VDI 2?
The previous release of VDI (Sun VDI 2/VDC 1) uses a slightly different terminology. A desktop with static assignment is
owned by a user (similar to personal in Sun VDI 3). A dynamic or temporary desktop is only temporarily owned by the user
(similar to flexible in Sun VDI 3).
In VDI 2, all desktops that are part of a pool must be dynamic, and static desktops are not part of a pool. In VDI 3 you can
choose if the pool is filled with personal or flexible desktops.
For more about desktop assignment and pool types in VDI 3, see: What is the difference between Personal and Flexible
desktop assignments?
Document generated by Confluence on Jun 24, 2009 06:55
Page 217
I am unable to get a MS RDC connection on my VMware virtual machine.
This page last changed on Jun 12, 2009 by stephanielewellen.
I am unable to get a MS RDC connection on my VMware virtual machine.
1. Verify that it has been enabled in the Remote tab of the System Properties dialog.
If this is enabled, the issue probably has to do with your network settings.
2. Verify that the virtual machine's subnet can be reached from the Windows machine from which you run the Remote
Desktop Connection client.
If you have set up a private network for your virtual machines, it might not be accessible from a machine not on that
network.
Document generated by Confluence on Jun 24, 2009 06:55
Page 218
I cannot log into the Admin GUI.
This page last changed on Jun 12, 2009 by stephanielewellen.
I cannot log into the Admin GUI.
This is most likely an issue with cacao or the vda service
1. If the VDI host runs into a virtual machine, check that the machine has enough RAM
2. Check the status of cacao and the vda service as described in The system is not reacting as expected.
3. Try restarting the service:
/opt/SUNWvda/sbin/vda-service restart
Document generated by Confluence on Jun 24, 2009 06:55
Page 219
I can start a virtual machine from the VirtualBox GUI, but it will not start from the VDI Admin GUI.
This page last changed on Jun 24, 2009 by stephanielewellen.
I can start a virtual machine from the VirtualBox GUI, but it will not start from the VDI Admin GUI.
VirtualBox doesn't check for available memory before starting a virtual machine. When a virtual machine is started, ZFS
releases cache to free up memory for it.
In contrast, VDI always checks for available memory before starting a virtual machine to ensure the host does not become
over-committed. Unfortunately if ZFS cache has consumed most of the memory VDI will not attempt to start the virtual
machine. The workaround for this is to limit the ZFS ARC cache, see the Release Notes for more information.
Document generated by Confluence on Jun 24, 2009 06:55
Page 220
I get a blank screen after successfully logging into the Admin GUI.
This page last changed on Jun 12, 2009 by stephanielewellen.
I get a blank screen after successfully logging into the Admin GUI.
This is most likely an issue with the MySQL database
1. Try restarting the service
/opt/SUNWvda/sbin/vda-service restart
2. If problem persists, you need to troubleshoot the MySQL database:
If you are using the VDI MySQL Cluster database, it is important to know that MySQL Cluster is quite demanding
regarding physical resources, this specifically concerns CPU power, RAM and network bandwidth. The MySQL Cluster
data nodes need to be connected via at least 100Mbps networks, preferable Gbps. The first thing to check is always
if the network connectivity is provided and the load on the secondary hosts especially the first two secondary hosts
which are hosting the MySQL data node process is ok.
Execute:
/opt/opt/SUNWvda/sbin/vda-db-status
to see if the MySQL Cluster management node and the two data nodes are running. Furthermore check on the
concerned host the SQL node is running by executing:
svcs svc:/application/database/vdadb:sql
If everything is fine you should see somthing similar to this:
STATE STIME FMRI
online Mrz_18 svc:/application/database/vdadb:core
In case the SQL node is not running start it by either executing:
svcadm enable svc:/application/database/vdadb:core
or
svcadm clear svc:/application/database/vdadb:core.
If none of this helps have a look at the MySQL log files for possible root causes for your database problems. You'll find the
log files on the Primary hosts in /var/opt/SUNWvda/mysql-cluster. On the Secondary hosts you'll find the database
log files in /var/opt/SUNWvda/mysql-cluster and /var/opt/SUNWvda/mysql.
Information about the MySQL Cluster log file format can be found in the official MySQL documentation MySQL Cluster Log
Messages.
Document generated by Confluence on Jun 24, 2009 06:55
Page 221
I have created a new pool in my VMware desktop provider and virtual machines are not created
automatically.
This page last changed on Jun 12, 2009 by stephanielewellen.
I have created a new pool in my VMware desktop provider and virtual machines are not created automatically.
• You have not defined a template for the pool. Make sure that your pool configuration points to a virtual machine or
template.
• There is not enough disk space available to create copies of the template.
Document generated by Confluence on Jun 24, 2009 06:55
Page 222
I have free memory on my ZFS storage host, but my VirtualBox virtual machines will not start due to
a lack of memory.
This page last changed on Jun 22, 2009 by stephanielewellen.
I have free memory on my ZFS storage host, but my VirtualBox virtual machines will not start due to a lack of memory.
The ZFS ARC cache is eating up the memory. See the Release Notes for information about limiting the ARC cache usage.
Document generated by Confluence on Jun 24, 2009 06:55
Page 223
In my VMware desktop pool, new virtual machines are created automatically, but they are not made
available.
This page last changed on Jun 12, 2009 by stephanielewellen.
In my VMware desktop pool, new virtual machines are created automatically, but they are not made available.
1. Verify that you still have enough disk space for your virtual machines.
Depending on the recycle policy settings for your pool before a newly created virtual machine is made available for
users, a snapshot is taken. This operation requires sufficient disk space.
2. Verify that the RDP port (typically 3389) of the Windows guest OS instance is open.
Before a newly created virtual machine is made available, the Virtual Desktop Connector verifies whether RDP
communication can be established to the virtual machine. The following issues might prevent a successful test:
• The virtual machine is on a private network and cannot be accessed by the Virtual Desktop Connector. Verify
your network configuration.
• Remote access is disabled on the Windows guest OS.
• Firewall settings of the Windows guest OS do not allow RDP connections.
Document generated by Confluence on Jun 24, 2009 06:55
Page 224
Is it possible to assign MS Terminal Server to users?
This page last changed on Jun 04, 2009 by stephanielewellen.
Is it possible to assign MS Terminal Server to users?
MS Terminal Server support is not included in VDI 3, but it is being considered for future releases. In the meantime, you can
work within the VDA session script. For example, you can forward unknown tokens to your TS environment.
Document generated by Confluence on Jun 24, 2009 06:55
Page 225
Is the Demo configuration a supported configuration?
This page last changed on Jun 17, 2009 by stephanielewellen.
Is the Demo configuration a supported configuration?
The VDI Demo configuration cannot be supported as a production environment VDI deployment, because the embedded
database configuration does not comply with MySQL standards. We do, however, encourage customers to try VDI Demo
configuration to evaluate the new features before committing to a larger deployment. See the Getting Started - VDI Demo
page for step-by-step information about installing and configuring a Demo setup. If you run into any problems, you can
always consult the VDI Forum or check the Troubleshooting and FAQs.
For information about supported VDI configurations for a production environment, see the Supported Configurations page.
Document generated by Confluence on Jun 24, 2009 06:55
Page 226
Is VMware ESXi a supported virtualization platform?
This page last changed on Jun 17, 2009 by stephanielewellen.
Is VMware ESXi a supported virtualization platform?
Yes, VMware ESXi is a supported virtualization platform, but if problems occur they need to be verified first on bare ESX.
Document generated by Confluence on Jun 24, 2009 06:55
Page 227
Jobs don't finish even after canceling them using the Admin GUI.
This page last changed on Jun 12, 2009 by stephanielewellen.
Jobs don't finish even after canceling them using the Admin GUI.
You can force to abort all active jobs:
1. Verify that the vda service is running.
2. Enter the following command in the shell:
/opt/SUNWvda/mysql/bin/mysql --defaults-file=/etc/opt/SUNWvda/my.cnf -D vda -u root -p -e "UPDATE t_job SET status =
'CANCELED', endtime = NOW() WHERE status IN ('RUNNING','QUEUED','CANCELLING') AND type <> 'DESTROY_POOL'"
3. If asked for a password, either enter the Admin password that you have chosen during the installation (for a multihost setup) or just hit enter (for an evaluation setup).
Document generated by Confluence on Jun 24, 2009 06:55
Page 228
Kerberos authentication to Active Directory works for a while and then stops.
This page last changed on Jun 18, 2009 by stephanielewellen.
Kerberos authentication to Active Directory works for a while and then stops.
A temporary solution for this issue is to run the following on each VDI server:
kinit -V [email protected]
Troubleshooting
This might be:
1. A time synchronization issue.
Make sure the domain controllers and the VDI servers are connecting to the same NTP server.
2. A Kerberos configuration issue.
Make sure the Kerberos configuration file (/etc/krb5/krb5.conf) contains the libdefaults section and sets
the default_realm and default_checksum as in the following example:
[libdefaults]
default_realm = MY.COMPANY.COM
default_checksum = rsa-md5
[realms]
MY.COMPANY.COM = {
kdc = my.windows.host
}
[domain_realm]
.my.company.com = MY.COMPANY.COM
my.company.com = MY.COMPANY.COM
Document generated by Confluence on Jun 24, 2009 06:55
Page 229
There is an error when I add a VirtualBox host to a desktop provider.
This page last changed on Jun 12, 2009 by stephanielewellen.
There is an error when I add a VirtualBox host to a desktop provider.
Several errors can occur when adding a VirtualBox host and will result in possible error alerts on either the 'Specify Host' or
'Verify Certificate' wizard steps.
Specify Host Step
After entering the host details and clicking, the next two actions happen:
• Resolve hostname (if used)
• Fetch the SSL and SSH certificates
An error on this page can be related to DNS problems resolving the hostname or issues contacting the host.
1. Verify that all information entered is correct including SSH and SSL ports. The SSL port refers to the port Apache 2 is
listening on.
2. Verify that the VDI host can resolve the host by using 'nslookup <hostname>' from a shell on the VDI host.
3. If the name can be resolved, verify that the host is running, and SSH and Apache 2 have started successfully. This can
be checked as follows:
# svcs svc:/network/http:apache2
# svcs svc:/network/ssh:default
Both commands should indicate that the service is 'Online'. If a service is marked as 'maintenance', try resetting it using:
# svcadm clear <service_frmi>
Verify Certificate Step
After reviewing the certificates and clicking Finish/Next, an error here indicates that the VirtualBox web service cannot be
contacted or may not be running.
Verify that the service is online:
# svcs svc:/application/virtualbox/webservice:default
If the service is in maintenance mode, clear the service and check the status again:
# svcadm clear svc:/application/virtualbox/webservice:default
If the service is offline, enable it using:
# svcadm enable svc:/application/virtualbox/webservice:default
Document generated by Confluence on Jun 24, 2009 06:55
Page 230
The Sun Ray DTU is cycling and cannot connect to a virtual machine.
This page last changed on Jun 12, 2009 by stephanielewellen.
The Sun Ray DTU is cycling and cannot connect to a virtual machine.
1. Verify that you have a virtual machine available to connect to.
2. Verify that remote access is correctly configured on your guest operating system.
3. Verify that the VDI Core host can communicate with either your vCenter or your VirtualBox host.
The firewall on the vCenter server might be blocking the communication.
The user name or password might be incorrect.
4. Verify that the VMware tools are installed on the Windows guest OS.
Document generated by Confluence on Jun 24, 2009 06:55
Page 231
The system is not reacting as expected.
This page last changed on Jun 12, 2009 by stephanielewellen.
The system is not reacting as expected.
A restart of the vda service is recommended:
Restart the Common Agent Container:
cacaoadm stop --force
cacaoadm start
You may want to inspect the Common Agent Container (cacao) log file located at:
/var/cacao/instances/default/logs/cacao.0
In order to change the level of debugging information in the cacao log file for the vda service, before restarting cacao,
execute:
cacaoadm set-filter -p com.sun.vda.service=ALL
To check the status of cacao execute:
cacaoadm status
To check the status of the vda service:
cacaoadm status com.sun.vda.service_module
Document generated by Confluence on Jun 24, 2009 06:55
Page 232
The VirtualBox host is crashing unexpectedly.
This page last changed on Jun 12, 2009 by stephanielewellen.
The VirtualBox host is crashing unexpectedly.
The host may have run out of memory - the threshold for the crash is determined by the amount of swap space configured.
Solaris hosts running VirtualBox must have swap space equal to, or greater than the host's physical memory size. For
example, 16GB physical memory would require at least 16GB swap. This can be configured during a Solaris 10 install by
choosing a 'custom install' and changing the default partitions.
For existing Solaris 10 installs you will need to create a swap image file on the local filesystem and mount it. The swap file
image size should be: Physical Memory - Current Swap = Additional Swap Required. For example, 16GB physical memory 1GB = 15GB of additional swap required. To add the swap to your system:
# mkfile 15g /path/to/swap.img
# swap -a /path/to/swap.img
To have the swap mounted after a reboot, add the following line to /etc/vfstab:
/path/to/swap.img - - swap - no -
Document generated by Confluence on Jun 24, 2009 06:55
Page 233
The VirtualBox software never finishes installing due to an error.
This page last changed on Jun 24, 2009 by cbas.
The VirtualBox software never finishes installing due to an error.
If you are installing VirtualBox, you may get the following error in the console:
## Executing postinstall script.
Configuring VirtualBox kernel modules...
VirtualBox Host kernel module unloaded.
devfsadm: driver failed to attach: vboxdrv
Warning: Driver (vboxdrv) successfully added to system but failed to attach
can't load module: No such device or address
## Aborting due to attach failure.
## Configuration failed. Aborting installation.
pkgadd: ERROR: postinstall script did not complete successfully
Installation of <SUNWvbox> partially failed.
This error is typically seen when previous versions of VirtualBox are still installed. Try removing VirtualBox (./vb-install
-u). Then verify that the following packages have been removed:
• SUNWvbox
• SUNWvboxkern
Reboot, then try the installation again.
Document generated by Confluence on Jun 24, 2009 06:55
Page 234
The VirtualBox Web Service cannot be contacted.
This page last changed on Jun 12, 2009 by stephanielewellen.
The VirtualBox Web Service cannot be contacted.
The VDI 3 installer runs a check to be sure that the Apache 2 packages are installed on the Solaris platform. If the Apache
2 packages are not installed, and the check does not notify you, the VirtualBox web service cannot be contacted, and you
will not be able to continue with installation. In this case, you should install the Apache 2 packages and try the VirtualBox
installation again.
Document generated by Confluence on Jun 24, 2009 06:55
Page 235
The VMware virtual machine cloning process is not operating as expected.
This page last changed on Jun 12, 2009 by stephanielewellen.
The VMware virtual machine cloning process is not operating as expected.
To determine whether a new virtual machine is ready for use, the VDI Core tries to open an RDP connection to it. In certain
cases, especially if you use a customized VM template for Vista, RDP can become available before the build process has
completed; however, a virtual machine made available before the build process has completed cannot be used.
The following procedure describes how to set up a customized virtual machine template VMware customization specs
to correct this problem. It requires that RDP is disabled in the virtual machine template and that RDP is not blocked by a
firewall when cloning is completed.
Preparations for manual Sysprep for Windows XP (Step 3) and Vista VMs (Step 4) are also included.
1. Disable RDP by making sure the Remote Desktop checkbox on the Remote section of the System Preference dialog
on the Windows Control Panel is unchecked.
If you are using the Windows Firewall, make sure that the Remote Desktop item is checked under
Firewall Exceptions.
2. Create a registry file called enableRdp.reg at C:\ with the following content:
REGEDIT4
[HKEY_LOCAL_MACHINE\SYSTEM\CurrentControlSet\Control\TerminalServer]
"fDenyTSConnections"=dword:00000000
The enableRdp.reg file is used at the end of the Sysprep process to enable RDP in the Windows registry.
3. For Windows XP manual Sysprep, include the following under Additional Commands in the Setup Manager tool:
regedit /s C:\enableRdp.reg
The Setup Manager tool is used to create answer files for Sysprep.
4. For Windows Vista manual Sysprep and customization specs, create a batch file called SetupComplete.cmd in the
%WINDIR%\Setup\Scripts directory with the following content:
regedit /s C:\enableRdp.reg
Windows Vista looks for %WINDIR%\Setup\Scripts\SetupComplete.cmd and executes it at the end of every
setup process, including Sysprep. The default setting for %WINDIR% is C:\Windows.
Document generated by Confluence on Jun 24, 2009 06:55
Page 236
The window displaying the VMware-hosted virtual desktop is freezing.
This page last changed on Jun 12, 2009 by stephanielewellen.
The window displaying the VMware-hosted virtual desktop is freezing.
If you suspend or power down your virtual machine without first closing the RDP connection, the guest OS dies, but the
RDP connection remains active. The result is a non-responsive window displaying the last known state of your Windows
session. The following steps show how to set the Run VMware Tools Scripts panel on both the Virtual Infrastructure Client
and the guest OS to avoid this problem.
1. Configure the Run VMware Tools Scripts panel on the Virtual Infrastructure Client.
a. Select Edit Settings of a particular VM to bring up the Virtual Machine Properties page.
b. Click the Options tab.
c. Select VMware Tools.
This is where you can modify the behavior of the Power Controls (Start, Stop, Suspend, and Reset).
d. Next to the Power Off switch (red rectangle), select Shut Down Guest.
This allows the guest OS to shut down gracefully when the Power Control button is pressed.
e. In the Run VMware Tools Scripts panel, check the Before Powering Off checkbox.
2. Repeat steps a. through e. above to configure the Run VMware Tools Scripts panel on the guest OS.
3. Modify the poweroff-vm-default.bat script on the guest OS.
The install location on the guest OS, typically C:\Program Files\VMware\VMware Tools, contains the
following default scripts:
poweroff-vm-default.bat
poweron-vm-default.bat
resume-vm-default.bat
suspend-vm-default.bat
4. Add tsdiscon.exe to the poweroff-vm-default.bat script.
The poweroff-vm-default.bat script is the first to execute when the VM is powered off from the VMware
Infrastructure Client. It now calls tsdiscon.exe, which closes all open RDP connections.
Document generated by Confluence on Jun 24, 2009 06:55
Page 237
Unused VMware virtual machines are not being recycled.
This page last changed on Jun 12, 2009 by stephanielewellen.
Unused VMware virtual machines are not being recycled.
1. Verify that the Power Options on the Windows guest OS have been configured to go into standby when it is idle.
2. Verify that the VMware Tools and the Virtual Desktop Connector Tools are installed and running on the Windows
guest OS.
Check the Windows Event Log for any problems with the tools.
If you imported desktops from a previous version of VDI, verify that the desktop is using the latest version of the VDI
tools. Open the desktop console, go to Control Panel > Add or Remove Programs. Open the support information for
Sun VDI Tools. The version number should be 3.0.0.
3. Verify that the virtual machine is configured to suspend when it is in standby.
Check the virtual machine settings (Options/Power management), and make sure that the Suspend the Virtual
Machine item is selected.
4. Verify that the Windows guest OS actually enters standby and the virtual machine suspends when the machine is not
in use.
If you experience problems with the standby feature in Windows XP, see http://www.terranovum.com/
projects/energystar/ez_gpo.html. EZ GPO includes a group policy for power options.
Document generated by Confluence on Jun 24, 2009 06:55
Page 238
Users cannot log into their desktops using their User Principal Name (UPN), or email address.
This page last changed on Jun 17, 2009 by stephanielewellen.
Users cannot log into their desktops using their User Principal Name (UPN), or email address.
Users should be able log into Active Directory with the user name [email protected], where example.com is different
than the Active Directory domain. The default LDAP settings only allow the user to log in with their Windows username (the
sAMAccountName). You need to change the LDAP user ID attributes to include the UPN. You can do this with the following
command:
vda settings-setprops -p ldap.userid.attributes='"uid,sAMAccountName,userPrincipalName"'
You need to include both sAMAccountName and userPrincipleName in this order. This is because the user ID
attributes are both used for looking up the DN and for authentication. So userPrincipleName is used to look up the
DN, and sAMAccountName is used internally for authentication.
This also requires VDI 3 Patch 1 to be installed.
Document generated by Confluence on Jun 24, 2009 06:55
Page 239
Users do not show up in the Admin GUI in the Users and Groups section.
This page last changed on Jun 12, 2009 by katell.
Users do not show up in the Admin GUI in the Users and Groups section.
It might be necessary to customize the LDAP filters ldap.user.object.filter and ldap.user.search.filter as
described in Customizing the LDAP Filters and Attributes, especially if the user directory is OpenLDAP or Novell eDirectory.
Document generated by Confluence on Jun 24, 2009 06:55
Page 240
vda command reports that VDI is not running although cacaoadm and vda-db-status say it is.
This page last changed on Jun 17, 2009 by stephanielewellen.
vda command reports that VDI is not running although cacaoadm and vda-db-status say it is.
If you run the /opt/SUNWvda/sbin/vda command, and:
1. You are getting the error message, "This command cannot be used because Sun Virtual Desktop Infrastructure is not
running on this server",
2. cacaoadm and vda-db-status show that VDI is running fine,
look in your /etc/hosts file to see if you have an IPv6 localhost there. Comment that out and try to run the vda
command again.
Document generated by Confluence on Jun 24, 2009 06:55
Page 241
VDI database doesn't start during an Evaluation configuration.
This page last changed on Jun 12, 2009 by stephanielewellen.
VDI database doesn't start during an Evaluation configuration.
Installing VDI 3 Patch 1 will solve this problem.
If you do not intend to install VDI 3 Patch 1, change the value 'NoOfFragmentLogFiles' from 300 to 16 in /etc/opt/
SUNWvda/config.local.ini. Then configure again.
Document generated by Confluence on Jun 24, 2009 06:55
Page 242
What are the differences between SRS in VDI 2 and VDI 3?
This page last changed on Jun 22, 2009 by stephanielewellen.
What are the differences between SRS in VDI 2 and VDI 3?
The main change between SRS in VDI 2 and VDI 3 is the installation/configuration experience. In VDI 2 you had to manually
install and configure the various pieces of software (SRSS, SRWC, and VDC) and the whole process was complex and errorprone (at least for customers new to SRS and VDI). Thus we tried to simplify things for VDI 3 and offer a single out-of-thebox experience for installation and configuration.
In VDI 3, there is no need anymore to install SRSS and SRWC manually before installing the VDI Core. Instead, everything
is installed automatically using a single installation script (vda-install). We also offer a configuration script (vdaconfig) that configures the various pieces for common usage scenarios. It is still possible to adapt or fine tune things later
using the usual SRSS commands.
There have been no changes to the SRS product itself. SRS still uses its own LDAP-based datastore for storing configuration
settings specific to SRS. However, the VDI Core (formerly called VDC) now takes advantage of a full-blown MySQL database
for storing settings specific to VDI (including desktop pool settings, desktop assignments, etc.). In VDI 2, these settings were
stored in the SRS datastore, but this created several issues. In VDI 3, the read/write cycles/frequency are higher compared
to VDI 2 and thus an LDAP based datastore was no longer the best suitable choice.
Document generated by Confluence on Jun 24, 2009 06:55
Page 243
What is the difference between Personal and Flexible desktop assignments?
This page last changed on Jun 24, 2009 by stephanielewellen.
What is the difference between Personal and Flexible desktop assignments?
• Personal Assignment: Desktops which have been personally assigned to users are owned by these users (similar to the
personal computers under their desks). Thus they will never be recycled and will never become available for other
users. (However, an administrator can explicitly remove the assignment and re-assign a desktop to a different user.)
• Flexible Assignment: Desktops which have been flexibly assigned are temporarily owned by users. Once users log out
of their desktops or their desktops are no longer in use, they will be recycled and become available for other users.
As part of the recycle process the desktop assignment will be removed.
Personal assignments are created when you select a specific desktop in the VDI Admin GUI and assign it explicitly to a user.
If you assign a user (or a group of users) to a pool, the desktop assignments are created on demand the first time the user
requests a desktop (or connects to a desktop). The type of assignment (personal or flexible) depends on the pool settings.
You can configure this individually for each pool on the Pool - Settings subcategory (see the Desktop Assignment section).
In addition to the assignment type, you can also specify how each pool is filled with desktops. Here you have the choice to
manually import desktops, or to clone desktops automatically from a specified template (see the Cloning subcategory).
When you create a new pool we provide default settings for the assignment and cloning configurations. For convenience,
the pool wizard offer "Manual", "Dynamic", and "Growing" pool types which only differ in their default settings. You can
change the pool settings at any point. The pool type is not stored anywhere - it just defines the initial pool settings and is
offered as a shortcut. The main differences in the pool types are as follows:
• Dynamic pool: Desktops are cloned from a template. Flexible desktop assignment is the default.
• Growing pool: Desktops are cloned from a template. Personal desktop assignment is the default.
• Manual pool: Cloning disabled (you have to manually fill this pool via importing desktops). Personal desktop
assignment is the default.
Recycling of desktops will only happen for flexibly assigned desktops. This is independent from the desktop provider.
For the moment recycling only works when Windows is used as the guest operating system for the
desktop. Non-Windows guests (such as Ubuntu or OpenSolaris) are supported by VirtualBox but not
recycled. The VirtualBox Guest Additions for these platforms do not provide the functionality needed for
recycling (the information about logged in/out users). This will be addressed in the next release of VDI.
Document generated by Confluence on Jun 24, 2009 06:55
Page 244
When I start a desktop I get this error - No suitable hosts to start a desktop for Desktop Provider
sunvdi-demo.
This page last changed on Jun 24, 2009 by cbas.
When I start a desktop I get this error - No suitable hosts to start a desktop for Desktop Provider <ProviderName>.
The error 'No suitable hosts to start a desktop for Desktop Provider <ProviderName>.' indicates that there were no hosts
with sufficient memory in your desktop provider.
1. Check the available memory on your hosts using the VDI UI under the DesktopProvider->Hosts tab.
2. If host memory usage is higher than expected it's possible that ZFS is consuming the memory for cache. See the
Release Notes for information about limiting the ARC cache usage.
Document generated by Confluence on Jun 24, 2009 06:55
Page 245
Which versions of JRE are supported?
This page last changed on Jun 18, 2009 by stephanielewellen.
Which versions of JRE are supported?
Java Runtime Environments 1.5 and 1.6 are supported with the most recent version of VDI.
Document generated by Confluence on Jun 24, 2009 06:55
Page 246
Why does my VMware virtual machine have an invalid IP address or cannot be pinged?
This page last changed on Jun 12, 2009 by stephanielewellen.
Why does my VMware virtual machine have an invalid IP address or cannot be pinged?
1. Verify that your networking interface is properly configured for your ESX server in the Virtual Infrastructure Client.
2. If the network interface is properly configured for your ESX server:
Verify that the network adapter is enabled in the template and is connected to the correct network.
Verify that there is a properly configured DHCP server with enough leases running on the subnet your virtual
machine will run on.
See the VMware documentation, available online at http://www.vmware.com/support/pubs/vi_pubs.html
Document generated by Confluence on Jun 24, 2009 06:55
Page 247
JavaOne and VDI Success Story
This page last changed on May 28, 2009 by mmprove.
New URL!
Please go to* http://wikis.sun.com/display/DesktopVirtualization/Sun+VDI+for+JavaOne *instead.
Cannot resolve external resource into attachment.
Abstract
The JavaOne Conferenceis one of the most popular developer conferences around the globe. Over the last couple of years
conference participants got access to email and browser through Sun's Ultra Thin Clients, Sun Ray and the Solaris desktop.
This year participants are offered a choice of different desktops ranging from OpenSolaris 2009.06 over Windows 7 RC to
Ubuntu 8.10. All desktops are accessed through Sun Ray's hosted by Sun's recently released desktop virtualization product
Sun VDI 3(VDI - Virtual Desktop Infrastructure) and Sun's Unified Storage platform.
Introduction
The JavaOne conference expects each year about 7000 participants. Each participant has the opportunity to access the
internet through the public conference WiFi or through terminals at various spots around the conference. These terminals
are actually Sun's Ultra Thin Clients, called Sun Rays. Each participant simply needs to use his conference badge and inserts
it into one of the terminals in order to obtain a session with internet access. This has been the common practice since years.
This year the underlying technology is different as the participants get access to a variety of different desktops such as
OpenSolaris 2009.06, Windows 7 RC and Ubuntu 8.10.
During the whole conference week participants will own this selection of desktops. Each desktop is completely isolated
and acts as a Virtual PC. Every time the user inserts his card, he gets access to the same selection of desktops that has
been assigned at first use. Based on the card information participants will get also access to personalized information, such
as their conference schedule. So a level of customization is applied to each desktop. Participants are also able to switch
between desktops.
In total the trade show group has to manage about 21000 desktops. This is a new dimension in virtual desktop
management. It is a challenge in terms or management of the sheer amount of desktops as well as handling the storage
capacity needed to host 21000 virtual desktop images with an average amount of 10GB per individual image. This sums up
to a total of 210 TB.
Sun VDI 3 actually uses a number of intelligent techniques to simplify the management. First of all Sun VDI 3 doesn't
actually run all the desktops in parallel. It only runs those desktops that are currently used by participants. As there are
about 150 Sun Ray terminals around the conference, there are only about 150-200 desktops in use at a time. The way this is
organized is quite simple. When a user inserts his conference badge and selects a certain desktop, the desktop is started or
resumed from a previous usage. When a user finally removes his card, the desktop(s) being in use are suspended, meaning
they are stopped and their current state is stored to disk. This behavior reduces the total requirement for CPU and memory
quite dramatically.
A similar efficient approach is used on the storage side. Instead of creating 21000 full disk images in advance, Sun VDI 3
just populates 3 desktops images fully on the storage side. One image per desktop type: OpenSolaris, Windows or Ubuntu.
The images are used as templates. Based on these templates there are a couple of thousand sparse desktop clones created
for each template. These clones reference their template and grow only when participants start using their desktops. This
cloning technique is based on capabilities of the Solaris filesystem ZFS and are exposed by the recently announced Unified
Storage Systems. If you want to find out more about the architecture of Sun VDI 3, you should start reading here.
Architecture
For the conference we have been using a relatively small setup compared to the number of desktops to be hosted, that
focuses on responsiveness of the desktops, sized for an upper limit of 400 to 500 hundred desktops running at the same
time. As stated above, we expect a load of 150-200 hundred desktops due to the limitation of having just 150 Sun Ray
terminals.
Cannot resolve external resource into attachment.
Document generated by Confluence on Jun 24, 2009 06:55
Page 248
The illustration above shows the general architecture. It misses just the terminals that are connected through a private
interconnect with the 3 VDI core servers, responsible for the session handling. Here we are using 3 x4600, each with 4 CPUs
and 16GB memory. This is well enough for the session handling and virtual desktop management.
The virtualization layer is equipped with 5 x4450 servers, each 4 CPUs, 6 cores per CPU and 64MB of memory. These servers
will run VirtualBox hosting the virtual desktops. Each of these virtualization hosts will be able to handle about 100 desktops.
And finally we are using 3 7210 Unified Storage servers. From the capacity point of view, each server can handle more
than thousand desktops. However, for the conference we need a maximum of throughput, as desktops will be started and
suspended very frequently, which is not a common usage pattern for an enterprise customer. Therefore we have added
more headroom on the storage side.
The solution has been built to provide a good level of availability. Both the session and the virtualization layer can tolerate
host failures. A failure of a storage host will lead into a loss of the virtual desktop image. The user would get a new image
on a different storage host. This is acceptable for a conference. But for an enterprise deployment you would need to
cluster the storage backend. A solution with a clustered 7410 Unified Storage system is more appropriate in this case.
If you want to find out more about how to deploy and size Sun VDI 3, please have a look into our deployment guide.
Summary
The Sun VDI deployment for JavaOne demonstrates the capabilities of a highly integrated and flexible virtual desktop
management system. It leverages at it's best the power of the underlying hardware and focuses on the administration and
configuration of the backend. The clients are completely stateless and are not managed as such. All administration happens
in the backend. Sun VDI 3 provides users with a choice of desktops on the one hand, while reducing the complexity on the
backend quite dramatically with it's 3-tier self-contained approach (session, virtualization, storage).
Find out more:
•
•
•
•
•
•
Sun VDI 3 Product Page: http://www.sun.com/solutions/vdi/index.jsp
Sun VDI 3 Product Documenation: http://wikis.sun.com/display/VDI3/Home
Sun VDI User Forum: http://forums.sun.com/forum.jspa?forumID=992
VirtualBox: http://www.virtualbox.org/
Unified Storage: http://www.sun.com/storage/disk_systems/unified_storage/
OpenSolaris: http://opensolaris.org/
Get it
•
•
•
•
Sun VDI 3: http://www.sun.com/software/vdi/get.jsp
VirtualBox: http://www.virtualbox.org/wiki/Downloads
Unified Storage Simulator: http://www.sun.com/storage/disk_systems/unified_storage/resources.jsp
OpenSolaris: http://opensolaris.org/os/TryOpenSolaris/
Document generated by Confluence on Jun 24, 2009 06:55
Page 249