1
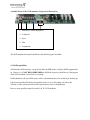
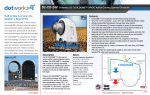
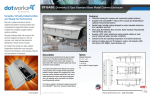
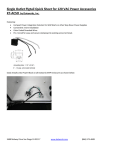
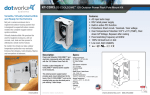
Dotworkz NVR
Series
User Manual
Rev 1.26
The information in this User’s Manual has been carefully reviewed and is believed to be
accurate. The vendor assumes no responsibility for any inaccuracies that may be contained in
this document, makes no commitment to update or to keep current the information in this
manual, or to notify any person or organization of the updates. Please Note: For the most upto-date version of this manual, please see our web site at www.dotworkz.com.
Dotworkz Systems reserves the right to make changes to the product described in this manual
at any time and without notice. This product, including software, if any, and documentation may
not, in whole or in part, be copied, photocopied, reproduced, translated or reduced to any
medium or machine without prior written consent.
IN NO EVENT WILL DOTWORKZ SYSTEMS BE LIABLE FOR DIRECT, INDIRECT,
INCIDENTAL, SPECIAL, SPECULATIVE OR CONSEQUENTIAL DAMAGES
ARISING FROM THE USE OR INABILITY TO USE THIS PRODUCT OR
DOCUMENTATION, EVEN IF ADVISED OF THE POSSIBILITY OF SUCH DAMAGES.
IN PARTICULAR, DOTWORKZ SYSTEMS SHALL NOT HAVE LIABILITY FOR ANY
HARDWARE, SOFTWARE, OR DATA STORED OR USED WITH THE PRODUCT,
INCLUDING THE COSTS OF REPAIRING, REPLACING, INTEGRATING,
INSTALLING OR RECOVERING SUCH HARDWARE, SOFTWARE, OR DATA.
Any disputes arising between manufacturer and customer shall be governed by the laws of San
Diego County in the State of California, USA. The State of California, County of San Diego shall
be the exclusive venue for the resolution of any such disputes. Dotworkz Systems’ total liability
for all claims will not exceed the price paid for the hardware product.
FCC Statement: This equipment has been tested and found to comply with the limits for a Class
A digital device pursuant to Part 15 of the FCC Rules. These limits are designed to provide
reasonable protection against harmful interference when the equipment is operated in a
commercial environment. This equipment generates, uses, and can radiate radio frequency
energy and, if not installed and used in accordance with the manufacturer’s instruction manual,
may cause harmful interference with radio communications. Operation of this equipment in a
residential area is likely to cause harmful interference, in which case you will be required to
correct the interference at your own expense.
California Best Management Practices Regulations for Perchlorate Materials: This Perchlorate
warning applies only to products containing CR (Manganese Dioxide) Lithium coin cells.
“Perchlorate Material-special handling may apply. See
www.dtsc.ca.gov/hazardouswaste/perchlorate”
WARNING: Handling of lead solder materials used in this product may expose
you to lead, a chemical known to the State of California to cause birth defects and
other reproductive harm.
Unless you request and receive written permission from Dotworkz Systems, you may not copy
any part of this document. Information in this document is subject to change without notice.
Other products and companies referred to herein are trademarks or registered trademarks of
their respective companies or mark holders.
Copyright © 2008 by Dotworkz Systems All rights reserved.
Contact Information
Dotworkz Systems
3688 Midway Dr.
San Diego, Ca 92110
Phone: +1 (866) 575.4689
Fax: +1 (619) 639.9914
[email protected] for information
[email protected] for support issues
www.dotworkz.com
Quang Trinh
Senior Systems Engineer
619.270.8407
[email protected]
Visit our new online University for videos,
tutorials, and resources for our products @
http://www.dotworkz.com/dotworkz_university/
Introduction
1-1 Available Ports on the backside of the Mini-NVR
1
PS2 ports for mouse & keyboard
2
Serial
3
VGA
4
2 Gigabit NIC
5
4 USB ports
6
Analog Audio
7
Available Ports of the NVR machine (SMB)
Available Ports of the NVR machine (Corporate & Enterprise)
1. PS2 ports for mouse & keyboard
2. 2 USB ports
3. Serial
4. VGA
5. 2 Gigabit NIC
The NVR machine back panel should have the following ports available.
2-1 RAID capabilities
All Dotworkz NVR machine, except for the Mini & SMB Series, will have RAID support built
in. However, it is NOT RECOMMENDED to RAID the system or Hard Drives if the purpose
of the NVR machine is used for live recording.
RAID should only be used if the arrays will be a destination source for archiving or backing up.
It has been tested that RAID on a destination source for Live Recording will reduce the
efficiency of the system and will result in performance issues or degradations.
Here are some possible setups for both 1U & 2U NVR machines
1U NVR Machine (JBOD should be used for Live Recording, RAID for Archiving)
NVR
HD Drive 0
HD Drive 1
HD Drive 2
HD Drive 3
Redundant
Default
JBOD
JBOD
JBOD
JBOD
NO
JBOD
RAID 0
Striping
RAID 0
Striping
RAID 0
Striping
NO
JBOD
JBOD
RAID 1
Mirror
RAID 1
Mirror
YES
JBOD
RAID 5
RAID 5
RAID 5
YES
Config. 1
Config. 2
Config. 3
2U NVR Machine (JBOD should be used for Live Recording, RAID for Archiving)
HD Drive 0
HD Drive 1
HD Drive 2
HD Drive 3
HD Drive 4
HD Drive 5
HD Drive 6
HD Drive 7
JBOD
JBOD
JBOD
JBOD
JBOD
JBOD
JBOD
JBOD
JBOD
RAID 0
RAID 0
RAID 0
JBOD
RAID 0
RAID 0
RAID 0
JBOD
RAID 1
RAID 1
RAID 1
JBOD
RAID 1
RAID 1
RAID 1
JBOD
RAID 5
RAID 5
RAID 5
NVR
Redundant
Default
NO
Config. 1
NO
Config. 2
YES
Config. 3
YES
JBOD
RAID 5
RAID 5
RAID 5
Any RAID configuration outside of the default factory settings of the NVR machine is done
manually by the customer. Default configurations are set by Dotworkz Systems and offer the
best optimized performance.
To RAID you current configuration, follow the steps under Intel Matrix Storage. For NVR
Enterprise and Custom machines follow the RAID setup for 3Ware RAID controller.
2-2 RAID (Intel Matrix Storage Manager) applies to NVR Corporate machine (1U)
The Operating System (OS) typically Windows Server 200X series is installed on the Hard Drive
residing in port 0 of the HD drive bays unless a custom configuration was requested by
customer.
This leaves Port 1, 2, &3 open for RAID0, RAID1, or RAID5.
RAID O Stripping (striped disks) distributes data across several disks in a way which gives
improved speed and full capacity, but all data on all disks will be lost if any one disk fails.
RAID 1 Mirroring (mirrored disks) could be described as a backup solution, using two
(possibly more) disks that each store the same data so that data is not lost as long as one disk
survives. Total capacity of the array is just the capacity of a single disk. The failure of one drive,
in the event of a hardware or software malfunction, does not increase the chance of a failure nor
decrease the reliability of the remaining drives (second, third, etc).
RAID 5 (striped disks with parity) combines three or more disks in a way that protects data
against loss of any one disk; the storage capacity of the array is reduced by one disk.
RAID Setup
1. Reboot the NVR machine
2. After the Bios has run through its testing procedures hit Ctrl + I to enter Intel Matrix
Storage Manager Utility.
3. Reminder that port 0 is typically where the OS is installed on. Please do not select
port 0 Hard Drive as one of the disk for new RAID 0 volume.
4. Follow the Instructions on pg. 18 setting up a RAID volume in the Intel Matrix Storage
Manager User Manual 7.0
2-3 RAID (3Ware RAID (Hardware dedicated)) applies to NVR Enterprise machine (2U)
The Operating System (OS) typically Windows Server 200X series is installed on a dedicated 74
GB OS Hard Drive residing in the NVR machine. All Hard Drives in the HD drive bays from
port 0 to 7 are for Live Recording and Archiving only.
RAID O Stripping (striped disks) distributes data across several disks in a way which gives
improved speed and full capacity, but all data on all disks will be lost if any one disk fails.
RAID 1 Mirroring (mirrored disks) could be described as a backup solution, using two
(possibly more) disks that each store the same data so that data is not lost as long as one disk
survives. Total capacity of the array is just the capacity of a single disk. The failure of one drive,
in the event of a hardware or software malfunction, does not increase the chance of a failure nor
decrease the reliability of the remaining drives (second, third, etc).
RAID 5 (striped disks with parity) combines three or more disks in a way that protects data
against loss of any one disk; the storage capacity of the array is reduced by one disk.
RAID Setup
1. Reboot the NVR machine
2. After the Bios has run through its testing procedures hit Ctrl + 3 to enter 3Ware Raid
Utility.
3. Follow the Instructions on pg. 23 setting up a RAID volume in the 3Ware 9650SE-16ML
RAID Controller Manual.
3-1 System Startup
The Dotworkz NVR Series machines have been setup with a custom script that allows the
machine to boot up automatically once power is applied.
**Warning, Please plug in all connectors (mouse, keyboard, VGA, & network cable) before
plugging in the power cable to a grounded outlet or UPS**
The NVR will boot up automatically and login into Windows XP or Server 20xx Operating
System. The default account that the machine logs into automatically is:
Username: NVR
Password: Dotworkz
The auto login is scripted in the machine so that in the event of a power failure the system will
turn on and login automatically once power is re-applied. The Dotworkz NVR machine is an
“open platform” system which allows for the functioning of any NVS, Network Video Software,
which is compatible with a Windows OS. The NVR machine has been optimized for popular
NVS programs from Milestone, Sony, Axis, and ONSSI software. These popular programs often
run as a service in a Windows environment and will automatically run after a reboot or power up
of the NVR machine.
The NVR machine is pre-loaded with 30-day Trial versions of Milestone, Sony Real Shot
Manager, Axis Camera Station, and ONSSI tier level software. There are shortcuts on the
desktop that will link to the installation of each specific trial software available.
**Please note that only one instance of a Milestone or ONSSI software can be installed at
one time. Because both Milestone and ONSSI uses the same architecture for their
software, you will have to choose one version to run as a trial at a time. The removal of the
software has to be done prior to installing different version software from Milestone or
ONSSI**
The NVR machine also comes pre-loaded with IP camera finding software from Sony, Axis,
Canon, Toshiba, Panasonic, and IQInvision. These IP utilities can be found in the program files.
3-2 Utilizing 2 NIC cards
The NVR machine comes with 2 Gigabit NIC cards. The optimal setup for the NVR machine is
to have one NIC card connect to a dedicated VLAN where the IP Cameras reside on and the
other NIC card is connected to a network or VLAN that clients will use to access the server or
has Internet access on.
1. You should static address the NIC card with the connection to the VLAN of the IP
cameras.
2. Make sure not to enter a default gateway for the NIC card for this VLAN the IP cameras
are on.
a. Ex. IP address 10.1.1.1, subnet 255.255.0.0, default gateway blank.
b. The reason for leaving the default gateway blank is because there is an
assumption that the other NIC card will connect to an existing network that does
include a gateway for Internet access.
3. Now connect an Ethernet cable to the 2nd NIC card and connect the other end to the
VLAN of the network that has an Internet connection.
a. I assume that you have already obtained a static IP address under the subnet of the
existing VLAN that has an Internet Connection.
b. Ex. 192.168.1.254 , subnet 255.255.255.0 , default gateway 192.168.1.1
4. The reason for this NIC configuration is because the NVR server is acting as a bridge
between the two separate VLANs or subnet.
a. For example clients on the 192.168.1.x subnet will not be able to see the IP
cameras but instead will only see the NVR machine. This type of VLAN setup
assures better network flow and security.
3-3 Remote Tech Support
In the instance that you may need tech support on the NVR machine, Dotworkz Systems has
installed a remote agent on all of our NVR machines. In order to activate the agent, the NVR
machine needs to be able to access the Internet. Verify Internet access by opening up a browser
and navigating to a public website. Once Internet connectivity is confirmed, contact our support
team in the Contact Page and we will have one of our tech support agents log into the NVR
remotely and help you through any issues you might have.