1
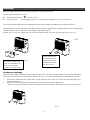
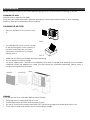
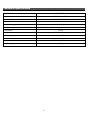
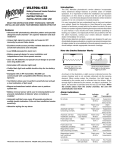
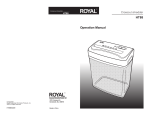
OPERATION MANUAL
DEHUMIDIFIER
CFO-45E
Before use
Caution!
y Always keep the unit in vertical position.
y Leave the unit to stand for one hour before connecting to the mains supply after transport or when it has been tilted
(e.g. during cleaning).
y Keep all foreign objects away from the air intake or output openings.
y The mains supply must conform to the specification shown on the rating plate at the back of the unit.
y If the supply cord is damaged, it must be replaced by an approved service representative or a similar qualified
person in order to avoid a hazard.
y Never use the plug to start and stop the unit. Always use switch on the control panel.
y Before moving the unit, first switch off, then unplug and empty the water tank.
y Don't use bug sprays or other flammable cleaners on the unit.
y Never pour or spray water over the unit.
y THIS APPLIANCE IS NOT INTENDED FOR USE BY PERSONS (INCLUDING CHILDREN) WITH REDUCED PHYSICAL , SENSORY OR
MENTAL CAPABILITIES, OR LACK OF EXPERIENCE AND KNOWLEDGE , UNLESS THEY HAVE BEEN GIVEN SUPERVISION OR
INSTRUCTION CONCERNING USE OF THE APPLIANCE BY A PERSON RESPONSIBLE FOR THEIR SAFETY. CHILDREN SHOULD BE
SUPERVISED TO ENSURE THAT THEY DO NOT PLAY WITH APPLIANCE.
IMPORTANT!
Do not use this unit at ambient temperatures below 5oC, to prevent the possibility of a heavily ice up evaporating
coil.
Please take time to read this manual carefully before use and save it for future reference.
2
Where to position
Excess moisture will travel throughout
your home, in the same way that
cooking smells waft to every room in
the house. For this reason, the
dehumidifier should be positioned, so
that it can draw this moist air towards
it from all over the home.
Alternatively, if you have a serious
problem in one area you can begin
by positioning the dehumidifier close
to this area and later moving it to a
more central point.
When positioning the dehumidifier,
ensure that it is placed on a level
surface and that there is a minimum of
10 cm (4") of space on either side of
the unit to allow for efficient airflow.
This dehumidifier is fitted with castors for
extra mobility, if you move the unit, it
should first be switched off and the
water tank emptied.
3
We do not recommend the use of an
extension lead, so please try to ensure
that the unit is sufficiently close to a
fixed mains socket. If it is necessary to
use am extension lead, please ensure
the diameter of the wires of the cable
is at least 1 mm2.
When the dehumidifier is in operation,
outside doors and windows should be
closed when necessary for most
efficient use .
Parts
Front
1.
Control panel
2.
Air outlet
3.
Front plate
Rear
4.
Air inlet/filter
5.
Handle
6.
Rear plate
7.
Drain hole for continuous drainage
8.
Water tank
9.
Caster
10. Power cable
Assembly of the filters
4
Operation
Control panel
1.
2.
3.
4.
5.
6.
7.
Humidity selection button
Speed (ventilation) button
Display window
Temperature display button
ON/OFF button
Humidity indicator
High speed indicator
8.
9.
10.
11.
Low speed indicator
Timer
Water full indicator
ON/OFF indicator
Operation
1.
2.
3.
4.
5.
6.
7.
Plug the unit into a correct mains socket. (Please refer to the rating label at the rear of the unit.)
Press button ON/OFF to turn on the unit. The compressor will start to work in continuous mode. (Ionizer
(optional) will start running automatically.)
Press button HUMI to set the room humidity you need: continuous de-humidifying , 40%, 50%, 60% or
70%. (When the room humidity is under 35%, the display will show ‘LO’ and if the room humidity is over
95%, it will show ‘HI’.)
Press the speed button to choose the ventilation speed, high or low.
Press the temperature button to display the room temperature. It will revert to display the room humidity
after 12 seconds.
Press the timer button to set up the time for turn on/turn off (1~24hr). The unit will be continuous
de-humidifying without timer setting.
To turn off the unit, press button ON/OFF again.
5
Drainage
While the water tank is full, the compressor will stop for self-protection and:
water full indicator will turn into red.
z
The water full indicator
will turn into red.
z
The unit will buzz. * For stopping the buzz, you may press the ON/OFF button to turn off the unit
To move the water tank, pull it out squarely from the unit by using the handle at the water tank. (FIG.1)
After empting the water tank, place the water tank into space. Make sure it is properly positioned, in order for the
'water full' sign to go out and your dehumidifier is operating. (FIG.2)
Please note, in case, the water tank has not been positioned well, the water full indicator will turn into red.
FIG.2
To move the water tank,
pull it out squarely from
the unit by using the
handle at the water tank.
FIG. 1
As the water tank is
full or has not been
positioned well, the
water level window
will turn into red.
Continuous drainage
When the dehumidifier is operated at very high humidity levels, the water tank will require more frequent drainage. In
this situation, it may be more convenient to set the unit up for continuous drainage with the following procedures:
1.
2.
Connect the drain hole with a water tube of inner diameter 12mm. (FIG.3) * Please note the water tube is not
supplied with the unit.
Ensure the water will always drain away freely and the tube will remain in right place.
* Note! In very cold weather conditions, precautions should be taken to prevent the water tube from freeing.
FIG.3
6
Maintenance
Always unplug the unit from the mains before carrying out any maintenance or cleaning of the unit.
CLEANING THE BODY
Use soft cloth to wipe the unit clean.
Don't ever use volatile chemicals, gasoline, detergents, chemically treated clothes, or other cleansing
solutions. These all could possibly hurt the cabinet.
CLEANING THE AIR FILTER
y
Remove the filter from the unit back. (FIG.
4)
FIG.4
y
For washable filter-Use a vacuum cleaner
or tap the filter lightly for easy cleaning. If
the filter is particularly dirty, use warm
water with a small amount of medium
strength. (FIG.5)
FIG. 5
y
y
y
Make sure the filter is completely dry before replacing.
Do not expose the filter to sunlight.
For active carbon filter - This filter is not washable. Its life span is variable and depends on the ambient
conditions where the appliance is used. The filter should be checked periodically (about every 6
months) and replaced if necessary.
STORAGE
If not use the unit for an extended period of time. Please:
y
y
y
y
Turing the unit off, unplug and tidy AC cord.
Completely empty the water tank and wipe it clean.
Put the AC cord into the empty water tank (FIG.7) and then put pack the water tank into the unit.
Cover the unit and store where it will not receive direct sunlight.
7
Trouble shooting
THE UNIT DOES NOT OPERATE:
y Is the unit plugged in?
y Is the house electricity on?
y Is the room temperature below 5oC or above 35oC? If so, then it is out of the working range of the
unit.
y Ensure the ON/OFF switch is turned on.
y Check the water tank is positioned properly in the unit and it is not full.
y Make sure the air inlet and outlet are not obstructed.
THE UNIT SEEMS TO DO NOTHING:
y Is the filter dusty, contaminated ?
y Is the air intake or outlet blocked up?
y Is the room humidity already quite low?
THE UNIT SEEMS TO DO LITTLE:
y Are too many windows or doors open?
y Is there something in the room producing lots of humidity?
THE UNIT IS TOO NOISY:
y Check whether the unit is sitting on a level surface.
THE UNIT IS LEAKING:
y Make sure the unit is in good shape.
y If you are not using continuous drainage, make sure the rubber plug (at the bottom of the unit) is in its
position,
8
Technical specification
Model no.
CFO-45E
Power supply
220–240 V~, 50 Hz
Test condition
DB 30 °C, RH 80 %
Dehumidification capacity
45 liters / day
Power /Ampere consumption *
830 W / 3,8 A
300 m3 / h.
Air volume (max.)
Compressor
Rotary
Refrigerant
R410a / 0,3 kg
Working range
5 ~ 35 °C
Water tank
4L
Size (W x H x D)
515 x 510 x 238 mm
Netto weight
18,5 kg
9
NOTE CONCERNING PROTECTION OF ENVIRONMENT
This product must not be disposed of via normal household waste after its service life, but must be taken to a
collection station for the recycling of electrical and electronic devices. The symbol on the product, the
operating instructions or the packaging indicate such disposal procedures. The materials are recyclable in
accordance with their respective symbols. By means of re-use, material recycling or any other form of
recycling old appliances you are making an important contribution to the protection of our environment.
Please ask your local council where your nearest disposal station is located.
INFORMATION CONCERNING USED REFRIGERANT MEDIUM
This unit is containing fluorinated gases included in the Kyoto protocol. The maintanance and the liquidation
must be carried out by qualified personel.
Type of refrigerant: R410A
The composition of the cooling medium R410A: (50% HFC-32, 50% HFC-125)
The quantity of the refrigerant: please see the unit label. Hermetically sealed system.
The value GWP: 2088
GWP = Global Warming Potential
In case of quality problem or other please contact your local supplier or authorized service center.
Emergency number: 112
PRODUCER
Producer: SINCLAIR CORPORATION Ltd., 1-4 Argyll St., London W1F 7LD, UK, www.sinclair-eu.com
This product was manufactured in China (Made in China).
REPRESENTATIVE AND TECHNICAL SUPPORT
NEPA spol. s r.o.
Purkyňova 45
612 00 Brno
Czech Republic
Tel.: +420 800 100 285
www.nepa.cz
10