1
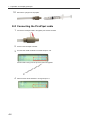
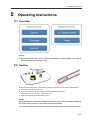
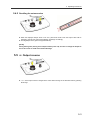
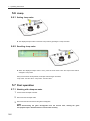
Important Information Important Information This product is authorized for laboratory research use only, not medical product. The product has not been qualified or found safe and effective for any human or animal diagnostic or therapeutic application. Uses for other than the intended use may be a violation of applicable law. The PicoPipet is an electronic ultra-small-pipetting device that has an electroosmotic pump in its pipette part. The special pump can easily control microfluidic flows without pulsation. This manual provides instructions for proper setup and operation of the 1-CONTHR-3 PicoPipet Controller and its components. i Table of Contents Table of Contents Important Information ............................................................................................. i Table of Contents ................................................................................................... ii 1 Checking the Package ................................................................................ 1-1 2 Related Products ......................................................................................... 2-1 3 Part Names................................................................................................... 3-1 4 Preparation of PicoPipet pipette part ......................................................... 4-1 5 4.1 Overview ............................................................................................................. 4-1 4.2 Preparing the silicone tube ................................................................................. 4-1 4.3 Flushing the PicoPipet pipette part ..................................................................... 4-1 4.4 Connecting the PicoPipet cable .......................................................................... 4-4 Operating Instructions ................................................................................ 5-1 5.1 Overview ............................................................................................................. 5-1 5.2 Suction ................................................................................................................ 5-1 5.3 Discharge ............................................................................................................ 5-2 5.4 Zero set ............................................................................................................... 5-2 5.4.1 Setting a new zero value ................................................................. 5-2 5.4.2 Recalling the set zero value ............................................................ 5-3 5.5 +/- Output reverse ............................................................................................... 5-3 5.6 Jump ................................................................................................................... 5-4 5.7 5.6.1 Setting Jump value .......................................................................... 5-4 5.6.2 Recalling Jump value ...................................................................... 5-4 Post operation ..................................................................................................... 5-4 5.7.1 ii Washing with ultrapure water .......................................................... 5-4 6 Specifications .............................................................................................. 6-1 7 Warranty ....................................................................................................... 7-1 1 1 Checking the Package Checking the Package (1) x 1-CONTHR-3 PicoPipet controller Accessories (1) x PicoPipet cable (1) x Power adapter and power cord (1) x Instruction Manual (this manual) 1-1 2 2 Related Products Related Products PicoPipet pipette part It is connected to the PicoPipet controller through the PicoPipet cable. This pipette has a special electroosmotic pump that makes it possible to precisely control microfluidic flows without pulsation. Cat # Description 1-PPD-SP PicoPipet pipette part Silicone tubing It is for the connection between the PicoPipet pipette part and a glass micropipette. The tubing needs to be cut into a 1.5-cm piece before use. The inner diameter is 0.8 mm and the outer diameter is 4 mm. Cat # Description 1-ST-D Silicone tubing, 1.5 m Glass micropipettes The glass micropipette is connected to the PicoPipet pipette part through the silicone tube. Straight shape for dishes/microscope slides . Cat # Description 1-GS15-10 10 pcs glass micropipettes, straight shape, tip ID 15 um 1-GT30-10 10 pcs glass micropipettes, straight shape, tip ID 30 um 1-GT50-10 10 pcs glass micropipettes, straight shape, tip ID 50 um 1-GT75-10 10 pcs glass micropipettes, straight shape, tip ID 75 um 2-1 2 Related Products S shape for multiple-well plates/PCR tubes . Cat # Description 1-GT30S-5 5 pcs glass micropipettes, S shape, tip ID 30 um 1-GT50S-5 5 pcs glass micropipettes, S shape, tip ID 50 um 1-GT75S-5 5 pcs glass micropipettes, S shape, tip ID 75 um L shape for microdevices or micro liquid applying/spotting . Cat # Description 1-GS15L-10 10 pcs glass micropipettes, L shape, tip ID 15 um 1-GT30L-10 10 pcs glass micropipettes, L shape, tip ID 30 um 1-GT50L-10 10 pcs glass micropipettes, L shape, tip ID 50 um 1-GT75L-10 10 pcs glass micropipettes, L shape, tip ID 75 um PicoPipet holders The PicoPipet holder is for holding the pipette part and being attached to a manipulator. The light weight helps precise manipulations by a manipulator. The position of the pipette part can be flexible because the angle of holding the pipette part can be changed freely. There are three different holder lentghs; 40 mm, 80 mm, and 150 mm. The 15 mm version has a clamp for fixing the holder to a manipulator. 2-2 Cat # Description 1-PPH4 PicoPipet holder 40 mm 1-PPH8 PicoPipet holder 40 mm 1-PPH415-1 PicoPipet holder 150 mm with clamp 2 Related Products Joystick manipulator The joystick manipulator is a manual control micromanipulator that has a joystick bar to intuitively operate the PicoPipet pipette part at XY axis. The brass bracket part enables the manipulator shape to be flexibly changed according to the microscope environment. Cat # Description 1-XYZJ-2 Joystick manipulator Joystick manipulator with lens/condenser mounting clamp This includes a clamp that can fix the joystick manipulator on the lens/condenser of user's microscope like the picture below. The available outer diameter of the lens/condenser is 40-70 mm. Compared with the magnetic stand kit (the next item), it saves space and allows easy setting up. Cat # Description 1-VADB-2 Joystick manipulator with lens/condenser mounting clamp 2-3 2 Related Products Joystick manipulator with magnetic stand kit This includes poles, a magnetic stand and an iron mat that are for the use of the joystick manipulator with user's microscope. Compared with the lens/condenser mounting clamp, the manipulator can be positioned flexibly. A place for the iron mat (250 mm x 200 mm) is needed next to the microscope. Cat # Description 1-VADB-2 Joystick manipulator with lens/condenser mounting clamp Zrobo z axis automatic control device Zrobo is a device that controls z-axis movements of the PicoPipet pipette part automatically. A manipulator can be attached to the horizontal bar of the Z robo. 4 different heights can be saved and recalled by touching the buttons on the control panel. During the use of the PicoPipet, the pipette part need to be moved to fixed heights repeatedly. The Zrobo is used to significantly reduce this troublesome manual-z-axis work. The customers who already have the MPP-200A/200B/100 can add the Zrobo to their system and combine the Zrobo with it. 2-4 Cat # Description 1-TKRK-B1 Zrobo z axis automatic control device 2 Related Products Compass video microscope The Compass is a video microscope that works by a unique pattern-projection method. The images of transmissive objects like cells can be high-contrast and 3D-shape views under the simple optical system. With the PicoPipet, you can conveniently transfer a cell from one container to another while monitoring the process on the screen. The total mafnification is 52x-425x (similar to microscope objective 20x). Cat # Description 3-OMN-N1 Compass video microscope Compass Z Zrobo-mounted video microscope The Zrobo motor that enables automatic z-axis movements is mounted on the Compass video microscope. The height of the PicoPipet pipette part can be automatically changed to the intended height by touching the button on the control panel. (If you have the Compass, it can be upgraded to the Compass Z.) Cat # Description 3-OMN-Z1 Compass Z Zrobo-mounted video microscope 2-5 3 3 Part Names Part Names PicoPipet Controller Top Power connector 1. Zero set button Display 2. Step select button 3. Jump set button 5. Knob small 4. Knob large 1. Zero set button The current Output (voltage) can be set as a new zero value and added to the Offset value. 2. Step select button The Output (voltage) increment of Knob large can be changed. (0.05→0.01→ 0.001) 3. Jump set button The displayed Output (voltage) value can be saved as Jump value. 4. Knob large The Output (voltage) value can be changed by turning the knob. *Fine adjustment (0.05/0.01/0.001) +/- Output (voltage) can be reversed by pressing the knob. 5. Knob small The Output (voltage) value can be changed by turning the knob. *Coarse adjustment (0.25) The Output (voltage) value can be changed to the set zero value by pressing the knob. The Output (voltage) value can be changed to Jump value by pressing the knob when the Output (voltage) value is zero. Display A. Output (voltage) step B.Offset value C.Output (voltage) value A. Output (voltage) step The current Output (voltage) increment. The increment can be selected from 0.05, 0.01 and 0.001 B.Offset value The distance from the default zero value of Output (voltage). C.Output (voltage) value The current Output (voltage) value that indicates a distance from the set zero value of Output (voltage). 3-1 3 Part Names PicoPipet Controller Rear PicoPipet cable connector 3-2 Power switch Sound volume control 4 4 Preparation of PicoPipet pipette part Preparation of PicoPipet pipette part 4.1 Overview The PicoPipet pipette part must be connected to the PicoPipet controller to do the experiment. Before starting the experiment, please follow the steps below: 4.2 Preparing the silicone tube 1 Prepare a 1.5 cm-long piece of the 1-ST-D silicone tubing by cutting out the tubing. 4.3 Flushing the PicoPipet pipette part The residual water and air inside the pipette part need to be flushed out with fresh ultrapure water using a luer lock syringe.. The special pump part inside the pipette needs to be filled with fresh ultrapure water. 1 Prepare the included luer lock syringe or a commercial luer lock syringe (e.g. BD 309657 3mL syringe, Terumo SS-02LZ 2.5mL syringe) and fill the syringe with ultrapure water. 4-1 4 Preparation of PicoPipet pipette part 2 Take out the pipette part from the pipette box. PicoPipet cable connector Reservoir cap 3 Remove the reservoir cap. 4 Connect the syringe to the pipette part. 5 Push the plunger to push out the residual water and air completely in the pipette part and fill the pipette part with fresh ultrapure water. Until air bubbles in the pipette disappear thoroughly, keep pushing the plunger. You may see water coming from the PicoPipet cable connector as well as the tip of the pipette, but it is not a problem. Leave it until pushing out the residual water and air in the pipette. 4-2 4 6 Connect the cut silicone tube to the tip of the pipette. 7 Push the plunger to push out water and air until they come out. 8 Connect the glass micropipette to the silicone tube. 9 Push the plunger to push out water and air until they come out. Preparation of PicoPipet pipette part 4-3 4 Preparation of PicoPipet pipette part 10 Remove the syringe from the pipette. 4.4 Connecting the PicoPipet cable 1 Connect the PicoPipet cable to the pipette part and the controller. 2 Power on the PicoPipet controller. 3 Turn the Knob small clockwise to increase Output to +30. Confirm water coming from the tip of the glass micropipette. 4 4-4 Press the Knob small clockwise to change Output to 0. 4 5 Preparation of PicoPipet pipette part Set the pipette on the PicoPipet holder. PicoPipet holder 6 Adjust the position of the tip of the glass micropipette to focus the microscope. [NOTE] Lower the position of the tip of the glass micropipette enough to attach to the bottom. 4-5 5 5 Operating Instructions Operating Instructions 5.1 Overview [NOTE] Before pipetting the target, suction culture media/buffer for 1 minute at Output -10 (= 1-2µL) to avoid the target being in ultrapure water. 5.2 Suction Decrease the Output value on the display by turning Knob large or Knob small counterclockwise The Output range is from -30 to +30. The Output increment can be changed by pressing the Step select button. Knob large: 0.05, 0.01 or 0.001 Knob small: 0.25 A beep sounds when the Output value is minus. [NOTE] During waiting time (leaving the PicoPipet without power off), be sure to change the Output to the set zero value (see 5.4.2 on this manual) to avoid extra suction. The suctioned targets/liquid going into the pump in the pipette may cause damage to the pump. 5-1 5 Operating Instructions 5.3 Discharge Increase the Output value on the display by turning Knob large or Knob small clockwise The Output range is from -30 to +30. The Output increment can be changed by pressing the Step select button. Knob large: 0.05, 0.01 or 0.001 Knob small: 0.25 5.4 Zero set 5.4.1 Setting a new zero value Small flow in the glass micropipette can arise at the default zero value of Output.. To achieve the best flow for stopping the target, the Output value should be adjusted. 5-2 1 2 Pick up the target. 3 Press the Zero set button. Then the current Output will be set as a new zero value and added to the Offset value, and the values on the display change accordingly. Turn Kob large clockwise or counterclockwise to stop the target in the glass micropipette. It would be better not to stop the target completely but let the target suctioned just a little. 5 Operating Instructions 5.4.2 Recalling the set zero value When the displayed Output value is not zero, press Knob small. Then the Output value will be changed to the set zero value and the display will change accordingly. The target/liquid in the glass micropipette will stop. [NOTE] During waiting time (leaving the PicoPipet without power off), be sure to change the Output to the set zero value to avoid extra suction/discharge. 5.5 +/- Output reverse + or - at the Output value is changed to the other without change of the absolute value by pressing Knob large. 5-3 5 Operating Instructions 5.6 Jump 5.6.1 Setting Jump value The displayed Output value is saved as Jump value by pressing the Jump set button. 5.6.2 Recalling Jump value When the displayed Output value is zero, press the Knob small. Then the Output value will be changed to Jump value. Every time the Knob small pressed, the Output value changes as follows; Jump value - set zero value - Jump value - set zero value... 5.7 Post operation 5.7.1 Washing with ultrapure water 1 Power off the PicoPipet controller 2 Disconnect the PicoPipet cable. 3 Disconnect the silicone tube and the glass micropipette. [TIPS] When disconnecting the glass micropipette from the silicone tube, rotating the glass micropipette helps it detached from the silicone tube smoothly 5-4 5 Operating Instructions 4 Connect the syringe to the pipette part. 5 Push the plunger to push out the residual water/medium/buffer and air in the pipette part and fill the pipette part with ultrapure water. Until air bubbles in the pipette disappear, keep pushing the plunger. 6 Cover with the reservoir cap Reservoir cap 7 Put the pipette part back into the pipette box. 5-5 6 6 Specifications Specifications Flow Rate 1 nL/min to 10 µL/min with PicoPipet pipette part Output Voltage Settings Knob large: 0.05 / 0.01 V increments Knob small: 0.25 V increments Zero set +/- polarity reverse Jump set Output Voltage Range -30 to +30 V Input Rating Power adapter: AC100-240V 50/60Hz Operating Environment Temperature: 5-40℃, Humidity: 80%RH Max (Non-condensing) Dimensions 187 (W) x 124 (D) x 46 (H) mm Weight 0.3 kg 6-1 7 Warranty 7 Warranty Limited warranty for products Nepa Gene Co., Ltd., warrants that its products, as delivered, shall conform to its specification and be free of defects in materials and workmanship when used in accordance with their intended use. This warranty is limited to twenty-four (24) months from the product’s original date of shipment from Nepa Gene Co., Ltd.. The warranty for non-durable products is limited to thirty (30) days from the product’s original date of shipment from Nepa Gene Co., Ltd.. Further, this warranty dose not apply to modifications made to the products by the customer, or damage to products resulting from modifications or repairs effected by customer or other personnel not authorized by Nepa Gene Co., Ltd. to perform such work. This warranty shall not apply to damage resulting from (I) loss or damage in transit, (II) unreasonable use, (III) customer’s negligence, or (IV) accident. Nepa Gene Co., Ltd. reserves the right to examine the alleged defective goods in order to determine whether the warranty is applicable. Limited warranty and disclaimer Nepa Gene Co., Ltd. warrants that all services supplied hereunder will be performed in a workmanlike manner, except for the express warranties provided to customer under the above “limited warranty for products”, Nepa Gene Co., Ltd. makes no other warranties or conditions, expressed or implied, as to the services or parts supplied hereunder, and Nepa Gene Co., Ltd. expressly disclaims all warranties or conditions of merchant-ability or fitness for a particular use. Limitation of liability Nepa Gene Co., Ltd. liability under this agreement is limited to the expense of providing product repair, neither Nepa Gene Co., Ltd. nor its employees or agents shall be liable for indirect, special, incidental, or consequential damages, including without limitation, business interruption, loss of profits or loss of revenues, loss of wages or injury to persons, property or customers. Furthermore, Nepa Gene Co., Ltd. categorically states that the sole and exclusive remedy for nonconforming goods shall be replacement of defective goods or, at Nepa Gene’s option, refund of the purchase price to customer. The parties acknowledge that the price of Nepa Gene Co., Ltd.’s products would be much greater if Nepa Gene Co., Ltd. undertook more extensive liability. Any action by customer for any alleged breach of the warranty stated in this section must be brought to the attention of Nepa Gene Co. Ltdl within 90 calendar days after the end of the warranty period. Notice: Products returned to Nepa Gene Co., Ltd. for repair or replacement shall be received prepaid. If found not to be defective under the terms of warranty a charge will be made for repair or replacement and freight costs will be at customer’s expense. Specifications are subject to change without notice. For this reason and at its sole discretion, Nepa Gene Co., Ltd. reserves the right to upgrade products during a repair process. Prices for out of warranty repairs are subject to change without notice. 7-1 Contact Area Distributor Address Canada USA Bulldog Bio, Inc. One New Hampshire Ave, Suite 125, Portsmouth, NH 03801, USA China Hua Yue Enterprise Holdings Ltd. phone: +1-603-570-4248 fax: +1-603-766-0524 483, Xingnan Road, Nancun, Panyu,Guangzhou, 511442 phone:+86-20-34821111 fax:+86-20-34820098 Europe Sonidel Limited 32 Tonlegee Drive Cameron Park Raheny Dublin 5, Republic Ireland phone: +353-1-4434358 Germany Xceltis GmbH fax: +353-1-6865462 Im Tal 12, 74909 Meckesheim, Germany phone: +49-6226-972418 fax: +49-6226-972419 India Medi Analytika India Pvt. Ltd 6, Adyar Bridge road, Adyar, Madras - 600 020, India phone: +91-44-2446 0988 Israel Almog Diagnostic fax: +91-44-2446 3931 P.O Box 349, Shoham, 73142, Israel phone: +972-3-977-3390 fax: +972-3-977-3391 Korea Bio-Medical Science Co., Ltd. BMS Bldg., 22 Yeoksam-ro 7 gil, Gangnam-ku, Seoul 135-936, Korea phone: +82-(0)2-3471-6500 Singapore Insta BioAnalytik Pte, Ltd. fax: +82-(0)2-3471-7001 21 Biopolis Road, #03-01 Nucleos 138567 Singapore phone: +65-6515-0110 fax: +65-6515-0220 Taiwan Bio-East Technology Co., Ltd. 9F., No.21 Fu-Kor Rd. Shi-Lin, Taipei, 111, Taiwan phone: +886-2-2831-3061 Nepa Gene Co., Ltd. 3-1-6 Shioyaki, Ichikawa, Chiba, 272-0114, Japan Phone: +81-(0)47-306-7222 Fax: +81-(0)47-306-7333 Email: [email protected] 1-CONTHR-3 PicoPipet Controller Instruction Manual 20150521 fax: +886-2-2831-6374