1
Succendo
™
502 / 2000 Series User Manual 1.2
OD2200UME01-1.2
IMPORTANT NOTICE
No portion of O2Micro specifications/documents or any of its subparts may be reproduced in any
form, or by any means, without prior written permission from O2Micro.
O2Micro and its subsidiaries reserve the right to make changes to their documents and/or
products or to discontinue any product or service without notice, and advise customers to obtain
the latest version of relevant information to verify, before placing orders, that information being
relied on is current and complete. All products are sold subject to the terms and conditions of
sale supplied at the time of order
acknowledgement, including those pertaining to warranty,
patent infringement, and limitation of liability.
O2Micro warrants performance of its products to the specifications applicable at the time of sale
in accordance with O2Micro's standard warranty. Testing and other quality control techniques
are utilized to the extent O2Micro deems necessary to support this warranty. Specific testing of
all parameters of each device is not necessarily performed, except those mandated by
government requirements.
Customer acknowledges that O2Micro products are not designed, manufactured or intended for
incorporation into any systems or products intended for use in connection with life support or
other hazardous activities or environments in which the failure of the O2Micro products could
lead to death, bodily injury, or property or environmental damage ("High Risk Activities").
O2Micro hereby disclaims all warranties, and O2Micro will have no liability to Customer or any
third party, relating to the use of O2Micro products in connection with any High Risk Activities.
Any support, assistance, recommendation or information (collectively, "Support") that O2Micro
may provide to you (including, without limitation, regarding the design, development or
debugging of your circuit board or other application) is provided "AS IS." O2Micro does not make,
and hereby disclaims, any warranties regarding any such Support, including, without limitation,
any warranties of merchantability or fitness for a particular purpose, and any warranty that such
Support will be accurate or error free or that your circuit board or other application will be
operational or functional. O2Micro will have no liability to you under any legal theory in
connection with your use of or reliance on such Support.
COPYRIGHT © 2006, O2Micro International Limited
Table of Content
1. Introduction ................................................................................................. 1
1.1 Typical Deployment Models ....................................................................... 2
1.2 Succendo’s Access Control Model ............................................................. 5
1.3 The Hardware ............................................................................................. 6
1.4 Connecting Succendo to the LAN.............................................................. 9
1.5 Some default settings .............................................................................. 11
1.6 Setting up Succendo for remote access .................................................. 12
2. The Administration Interface ...................................................................... 13
2.1 Main Screen ............................................................................................. 13
2.2 The Menu Bar .......................................................................................... 14
3. System Configuration.................................................................................... 19
3.1 System >> Interface ................................................................................. 20
3.2 System >> Information ............................................................................ 22
3.3 System >> Security .................................................................................. 22
3.4 System >> Update .................................................................................... 25
3.5 System >> HA ........................................................................................... 27
3.6 System >> Backup ................................................................................... 32
3.7 System >> Tools ....................................................................................... 33
3.8 System >> License ................................................................................... 33
3.9 System >> Custom ................................................................................... 34
3.10 System >> SetTime ................................................................................ 35
3.11 System >> NAT ....................................................................................... 35
3.12 System >> Virtual Service ..................................................................... 36
4. Managing the Administrator Accounts............................................................. 37
4.1 Managing Accounts.................................................................................. 37
4.2 Locked Accounts ...................................................................................... 42
5. Certificate Management................................................................................. 43
5.1 Local CA ................................................................................................... 43
5.2 Trusted CA ............................................................................................... 45
5.3 Gateway Certificates ................................................................................ 46
5.4 Certificate Request .................................................................................. 49
5.5 Protection Key .......................................................................................... 50
6. Authentication Servers .................................................................................. 51
6.1 Adding new authentication server .......................................................... 52
6.2 Managing existing authentication server ............................................... 56
7. User Management ........................................................................................ 59
7.1 Managing User Groups ............................................................................ 59
7.2 Managing Users ....................................................................................... 62
7.3 Managing Locked Users ........................................................................... 68
8. Service Management ..................................................................................... 69
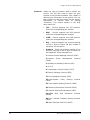
8.1 Adding a new service ............................................................................... 69
8.2 Service List ............................................................................................... 72
8.3 Client Applications .................................................................................. 76
8.4 Service Type ............................................................................................. 78
8.5 IP Host ...................................................................................................... 80
9. Role Management......................................................................................... 81
9.1 Adding a new role .................................................................................... 82
10. Log Management .......................................................................................... 83
10.1 Configuring Log options ........................................................................ 83
10.2 Query for logs ........................................................................................ 85
11. System Monitoring and Control ...................................................................... 89
11.1 Monitor >> Monitoring Item .................................................................. 89
11.2 Monitor >> Online User ......................................................................... 90
11.3 Monitor >> System Chart ...................................................................... 91
11.4 Monitor >> Service Chart ...................................................................... 95
11.5 Monitor >> Top N ................................................................................... 96
12. Client Policies............................................................................................... 97
12.1 Client Policy Rules ................................................................................. 97
12.2 Client Policy ......................................................................................... 100
13. Access Restriction List................................................................................. 103
13.1 Adding a new ARL ................................................................................ 105
13.2 Querying for ARL ................................................................................. 106
14. Network Connection.................................................................................... 107
14.1 Succendo NC Operation ...................................................................... 108
14.2 IP Pools ................................................................................................. 108
14.3 VPN Users ............................................................................................ 110
14.4 Configure NC Environment ................................................................. 111
14.5 NC Accessible Services ........................................................................ 112
14.6 Roles ..................................................................................................... 112
15. Shell Commands ........................................................................................ 113
15.1 Monitor mode ....................................................................................... 113
15.2 Normal mode ........................................................................................ 119
15.3 Configure mode .................................................................................... 126
Appendix A: End-User Remote Access................................................................. 129
1
Chapter
Introduction
Succendo SSL-VPN is a SSL-based clientless secure remote access
solution. Remote users, using Succendo, can access the company’s
internal network via the Internet securely. This is done by utilizing
technology such as user verification and authentication via
authentication servers, role-based access control, and data
encryption to protect the network and to provide protection while
user access and use internal network services. With the SSL/TLS
protocol, Succendo ensures that data are encrypted adequately to
prevent eavesdropping.
As a SSL-based VPN, Succendo supports a wide range of TCP/UDP
based application programs such as web applications, ftp, tftp,
telnet, terminal server, VNC, File sharing, SSH, HTTPS, Oracle,
Exchange/Outlook , Lotus Notes, and MySQL. Succendo also
supports a wide range of port-ranged application programs.
Besides deploying an internal user verification database, Succendo
utilizes authentication servers such as Windows AD, LDAP, and
Radius for an integrated user management system, thus simplifying
system administration. User authentication methods include the use
of username/password, one-use password token, authentication
certificates and image code.
Succendo 502/2000 User Manual 1.2
1
Chapter 1: Introduction
1.1 Typical Deployment Models
There are typically three models when deploying Succendo. All data
streamed from the Internet are required to go through Succendo’s
security process before accessing the enterprise’s intranet. This
prevents attacks such as eavesdropping, replay, illegal login, etc.,
while providing access authentication and control measures.
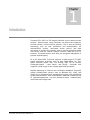
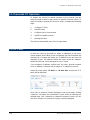
1.1.1 Typical Remote Access Model
Succendo provides a remote access solution to enterprises. Mobile
users are able to access the Intranet via any connection to the
Internet. Succendo’s SSL tunnel secures all such transmissions.
Furthermore, Succendo supports the use of various authentication
servers such as Radius, Windows AD and LDAP etc, facilitating the
convenience of the deployment of Succendo with the enterprise’s
existing authentication system. The figure below demonstrates this
model.
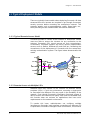
1.1.2 Remote Access via Multiple ISPs
Different users may connect to the Internet via different service
providers (ISPs). In such an environment, accessing a single point
on Succendo from different ISPs may result in the instability of the
network. Even though Succendo’s intelligent client-end system is
able to sustain the network link quality over slow and unstable links,
this function does not activate for applications that have strict
requirements on the network environment.
To resolve this issue, administrators can configure multiple
interfaces on Succendo, each interface connecting to a different ISP.
Coupled with Succendo’s intelligent client-end function, this ensures
2
Succendo 502/2000 User Manual 1.2
Chapter 1: Introduction
that clients connecting via the different ISPs enjoy a good network
application experience. Please refer to Chapter 3, Section 3.1 for
information on setting up interfaces.
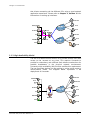
1.1.3 High Availability Model
The aim of a remote access solution is to provide remote users with
access to the Intranet at any time. This requires Succendo to
provide for redundancy and sufficient fault-tolerant mechanisms for
possible breakdowns in the physical network environment.
Succendo’s high availability (HA) function satisfies this requirement.
The two Succendo devices can be working in active-active mode or
active-passive mode. The diagram below represents a HA
deployment of Succendo.
Succendo 502/2000 User Manual 1.2
3
Chapter 1: Introduction
Under HA, the two Succendo devices can automatically synchronize
with each other and realize the swapping and restoration of their
status according to conditions such as the network’s usability and
the device’s current status etc. Under the active-active mode,
Succendo also provides a load-balancing mechanism. Succendo’s
HA mode equips the enterprise’s remote access solution with high
availability, hence allowing mobile users to access the resources in
the Intranet at all times. Please refer to Chapter 3, Section 3.5
for information on setting up the HA function.
4
Succendo 502/2000 User Manual 1.2
Chapter 1: Introduction
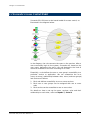
1.2 Succendo’s Access Control Model
Succendo SSL-VPN uses a role-based model for access control, as
illustrated in the diagram below:
In the diagram, the role connects the users to the services. After a
user successfully login to the system, Succendo will, based on the
user name, determine the user’s role and determine the kind of
resources available to the user according to his roles.
Essentially, a role defines the user or user group’s accessibility to a
particular service or application. We can summarize the m-m
(many-to-many) relationship between roles, users (and user groups)
and services as follows:
1. Each role defines accessibility to one or more services
2. Each user or user groups can be assigned with one or more
roles
3. Each service can be accessible to one or more roles.
For details on how to set up the users, services, roles and their
relationship to each other, refer to Chapter 7, 8 and 9.
Succendo 502/2000 User Manual 1.2
5
Chapter 1: Introduction
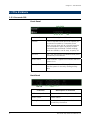
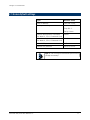
1.3 The Hardware
1.3.1 Succendo 502
Front Panel
Interface
Description of Function
Console
A RS232 standard serial port that enables you
to connect Succendo to a computer (from
which you can then call up a console program
such as Window’s Hyper Terminal) to issue
Command Line commands. Default settings:
baud rate 9600b/s, one bit stop, no parity bit.
FE0-FE3
FE0 - FE3 are the four 10/100M Ethernet ports
provided by Succendo502.
Power status
Power indicator. Lighted LED indicates that the
system is on.
Storage Status
Read/Write indicator. Blinking LED indicates
that the system is currently reading/writing
data.
Back Panel
Interface
6
Description of Function
AC Power Input Socket
Power socket for voltage of 110~230V.
Power Switch
Power switch.
Cooling Fan
Cooling fans to help reduce the heat
produce by the device.
Succendo 502/2000 User Manual 1.2
Chapter 1: Introduction
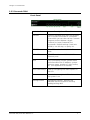
1.3.2 Succendo 2000
Front Panel
Interface
Description of Function
Console
A RS232 standard serial port that enables
you to connect Succendo to a computer
(from which you can then call up a console
program such as Window’s Hyper
Terminal) to issue Command Line
commands. Default settings: baud rate
9600b/s, one bit stop, no parity bit.
FE0-FE3
FE0 - FE3 are the four 10/100M Ethernet
ports.
GE0-GE1
GE0-GE1 are the two 10/100/1000M
Ethernet ports.
LCD
The LCD displays current system status
and information like IP address, system
resource usage, number of users online,
etc. (See Appendix A for details)
LCD Control Keys
Used for navigating the menu options in
the LCD.
Power status
Power indicator. Lighted LED indicates that
the system is on.
Storage Status
Read/Write indicator. Blinking LED
indicates that the system is currently
reading/writing data.
Succendo 502/2000 User Manual 1.2
7
Chapter 1: Introduction
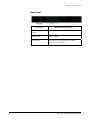
Rear Panel
Interface
8
Description of Function
AC Power Input
Socket
Power socket for voltage of 110~230V.
Power Switch
Power switch.
Cooling Fan
Cooling fans to help reduce the heat
produce by the device.
Succendo 502/2000 User Manual 1.2
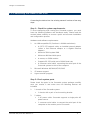
Chapter 1: Introduction
1.4 Connecting Succendo to the LAN
Connecting the device into the existing network involves a few easy
steps.
Step 1: Check for system requirements
To start configuring and running the Succendo system, you must
have the following software and hardware ready. Please read the
content below carefully to ensure a quick and accurate installation
and configuration process.
Hardware and software requirements:
1.
An IBM-compatible PC (Pentium II 400MHz and above)
•
A CAT 5 UTP network cable, an installed network adaptor
(either a fast Ethernet adaptor or a Gigabit Ethernet
adaptor)
•
Minimum 256M system RAM
•
Minimum 40M hard-disk space
•
A mouse, an SVGA monitor
•
Supports RS-232 serial port of 9600 Baud rate
•
A crossover serial cable, connecting the serial port of the
Succendo system to that of the computer
2.
Microsoft Windows 98/2000/NT/XP/2003
3.
IE browser support
4.
Hyper terminal program
Step 2: Check system parts
Please check the parts in the Succendo system package carefully
once you receive it and make sure the following devices are
included:
1.
1 chassis of the Succendo system
•
2.
Succendo 502/2000 User Manual 1.2
1 chassis with a pair of rack mounting bracket
5 cables
•
1 AC power cable: Succendo supports a single point AC
power source
•
1 crossover serial cable: to connect the serial port of the
computer to the monitor port of Succendo
9
Chapter 1: Introduction
3.
•
2 CAT 5 standard network cable: to connect Succendo to
your HUB or switch
•
1 CAT 6 crossover network cable: to connect the network
port of the computer directly to the control network port
of the Succendo system
This user manual
Step 3: Connect the Succendo system to the computer,
power sources and LAN
This section explains the preparations you must complete before
running the Succendo system, which include checking the power
source and control cable connection.
1.
Check and connect the power source
The Succendo system only supports AC input of wide
voltage range, with the specification of 115~230V 50/60Hz
full range.
2.
Connect the Succendo system to the computer using the
serial cable
Connect the RS232 port of the Succendo system to the
serial port of the computer using the serial cable in the
accessories in order to control the Succendo system.
Please fasten the fasteners of the serial port connector to
avoid contact failure.
3.
Connect the Succendo system to the computer using the
network cable. In general connect the ETH0 of Succendo to
your control computer Ethernet port.
4.
Start up the system
After you have done the above steps, switch on the system.
10
Succendo 502/2000 User Manual 1.2
Chapter 1: Introduction
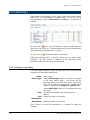
1.5 Some default settings
Type
Default value
Eth0 IP address
192.168.1.100
Serial port setting
Baud rate: 9600
Stop Bit: 1
Parity: None
Default administrator username
(for Web UI, SSH, Command Line)
admin
Default administrator password
(for Web UI, SSH, Command Line)
admin
Default SSL port
443
Default SSL protocol
SSL3.0/TLS1.0
Tips: Be sure to change the administrator password once
you login successfully!
Succendo 502/2000 User Manual 1.2
11
Chapter 1: Introduction
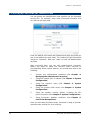
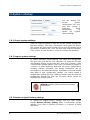
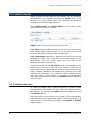
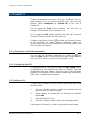
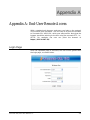
1.6 Setting up Succendo for remote access
You can access the administration web interface via the Succendo
service URL. For example, enter https://Succendo-IP/admin/ and
you will see the login page.
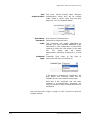
Enter the default User Name and Password and enter the Code you
see in the Additional Image Code. The Credential Type field should
remain as “Password”. Now click “Login” to enter the Administrator
interface.
After successful login, you can start administrating Succendo.
Before you begin to setup the system’s users, services or
corresponding access control policies, you should take note of the
following:
1.
Change your administrator password (See Chapter 4:
Managing the Administrator Accounts).
2.
Setup the network port IP address (See Chapter 3: System
Configuration).
3.
Setup the system’s
Configuration).
4.
Setup the system’s DNS server (See Chapter 3: System
Configuration).
5.
Setup the system’s security options, including the SSL
protocol versions (See Chapter 3: System Configuration).
6.
Setup Succendo’s gateway certificate (See Chapter 5:
Certificate Management).
route
(See
Chapter
3:
System
Once you have done the above steps, Succendo is ready to provide
remote access services for your company.
12
Succendo 502/2000 User Manual 1.2
2
Chapter
The Administration Interface
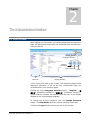
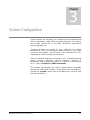
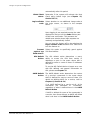
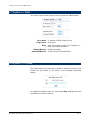
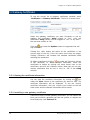
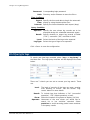
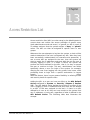
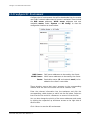
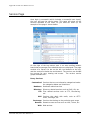
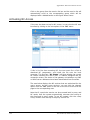
2.1 Main Screen
After logging on to Succendo, you will be greeted with the welcome
page. All options and menu items are accessible from the menu bar
found on the left.
Language Selector
Change
Password
Online Help
Menu Bar
Logout
Display Window
If this is your first login to the system, the monitoring page will be
displayed; otherwise, it will be the last configuration page you
accessed before your previous logout.
Clicking any of the Language Selector buttons - <English>, <简
体中文> (simplified Chinese) or <繁體中文> (traditional Chinese) –
would instantly translate the interface and the text in the Display
Window to the corresponding language.
To change the account password, click the Change Password
button. The Help Button provides context sensitive online help.
Clicking the Logout button will log you out of the system.
Succendo 502/2000 User Manual 1.2
13
Chapter 2: The Administration Interface
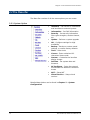
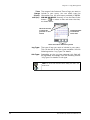
2.2 The Menu Bar
The Menu Bar consists of all the menu options you can access:
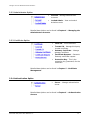
2.2.1 System Option
•
Interface – Set various IP information
and interfaces to external system.
•
Information – Set DNS information
•
Security – Set security information
like crypto strengths, session timeout,
etc.
•
Update – Perform a system upgrade
•
HA – Configure settings for high
availability
•
Backup – Backup or restore saved
settings, or restore factory defaults
•
Tools – Other tools
•
License - Enter authorized 16characters license code
•
Custom – Customize the interface
display images
•
SetTime – Set system date and
timezone
•
NC Configure – Setup the network
environment for Network Connection
access
•
NAT – Setup NAT
•
Virtual Service – Setup virtual
services
Detailed descriptions can be found in Chapter 3 – System
Configuration.
14
Succendo 502/2000 User Manual 1.2
Chapter 2: The Administration Interface
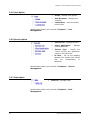
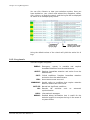
2.2.2 Administrator Option
•
Account – Manage administrator
accounts
•
Locked Admin – View and unlock
locked accounts
Detailed descriptions can be found in Chapter 4 – Managing the
Administrator Accounts.
2.2.3 Certificate Option
•
Local CA – Local certificate
•
Trusted CA – Manage third-party
trusted certificate
•
Gateway Certificate – Manage
gateway certificate
•
Certificate Request – Generate
Gateway certificate request
•
Protection Key - This is the
protection key (password) for the
certificate
Detailed descriptions can be found in Chapter 5 - Certificate
Management.
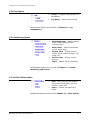
2.2.4 Authentication Option
•
Server – Manage authentication
server
Detailed descriptions can be found in Chapter 6 – Authentication
Servers.
Succendo 502/2000 User Manual 1.2
15
Chapter 2: The Administration Interface
2.2.5 User Option
•
Group – Manage user groups
•
User Accounts – Manage user
accounts
•
Locked User – View and unlock
locked users
Detailed descriptions can be found in Chapter 7 – User
Management.
2.2.6 Service Option
•
Service List – Manage services
•
Client Application – Manage
client applications
•
Service Type – Specify the
various service and application
types for the client-end
•
IP Host – Set up the mapping
between the Intranet host names
with
the
corresponding
IP
addresses
Detailed descriptions can be found in Chapter 8 – Service
Management.
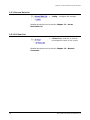
2.2.7 Role Option
•
Role List – Manage Roles
Detailed descriptions can be found in Chapter 9 – Role
Management.
16
Succendo 502/2000 User Manual 1.2
Chapter 2: The Administration Interface
2.2.8 Log Option
•
Config – Configure Log settings and
parameters
•
Log Query – Search and view logs
Detailed descriptions can be found in Chapter 10 – Log
management.
2.2.9 Monitoring Option
•
Monitoring Item – Display various
status and parameters of the
running system
•
Online User – View and terminate
current online users
•
System Chart – Display various
system charts (memory usage, CPU
usage, etc)
•
Service Chart – Display current
services
•
Top N – Display Top N information
Detailed descriptions can be found in Chapter 11 – System
Monitoring and Control.
2.2.10 Client Policy Option
•
Rule – Rules that decides whether
the system should perform a host
check or cache clear
•
Policy – Policies are made up of
Rules
Detailed descriptions can be found in Chapter 12 – Client Policies.
Succendo 502/2000 User Manual 1.2
17
Chapter 2: The Administration Interface
2.2.11 Access Rule List
•
Config – Configure ARL settings
Detailed descriptions can be found in Chapter 13 – Access
Restriction List
2.2.12 IP Pool List
•
IP Pool List – Add the IP Pools to
be assigned to users for NC access
Detailed descriptions can be found in Chapter 14 – Network
Connection
18
Succendo 502/2000 User Manual 1.2
3
Chapter
System Configuration
System options are necessary for configuring an environment and
various parameters under which Succendo operates. The options
here include setting the IP and DNS information, determining
system upgrades, etc.
Succendo provides two forms of user interfaces for system
configuration. One is a web-based interface which you can access
using any web browser, and the other is via command line (CLI)
supported on console through the serial port.
There are several important commands in CLI, including restoring
factory settings, specifying internal Ethernet interface IP
information, and setting the system’s run mode. For more details
on CLI, refer to Chapter 15 Shell Commands.
This chapter will describe the various system options accessible
through the web-based interface. These options are accessible by
clicking the “System” menu item on the Menu Bar, and then click
the sub-menu items.
Succendo 502/2000 User Manual 1.2
19
Chapter 3: System Configuration
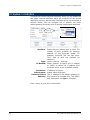
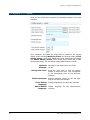
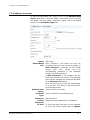
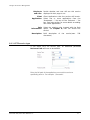
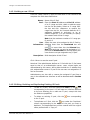
3.1 System >> Interface
Succendo has several Ethernet interfaces which can be divided into
two types: internal interfaces which are connected to the internal
application servers; and external interfaces which are connected to
external clients. You can configure the IP address, net mask,
default gateway and static route of internal and external interfaces.
Interface:
Type:
IP Method:
IP Address:
Subnet mask:
Interface Default
Gateway:
Select the port (named eth0 to ethN. The
number of ports available for selection
depends on the Succendo model. For
example, Succendo 502 has four ports.
Thus, eth0 to eth3 are available for
selection.)
Select “Internal”, “External”
Select “Manual” to specify the IP address
or “DHCP” to obtain the IP address from
the DHCP server on an accessible network
IP address of the port
Subnet mask of the port
The IP address of the default gateway for
this interface for multiple ISPs. This field is
only displayed if the Type is “External”.
Click <Save> to save the IP information.
20
Succendo 502/2000 User Manual 1.2
Chapter 3: System Configuration
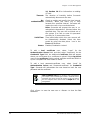
3.1.1 Adding IP Pool
If you have selected “Internal”, you will notice an additional <Pool>
button appear on the right of the interface.
Clicking the <Pool> button will allow you to define the IP Pool for
the interface:
Enter the Start IP address, the End IP address and the subnet
mask into the respective text boxes. Click <Add> to add this IP
Pool, or <Return> to return to the previous screen without saving.
Note: IP addresses must belong to the same network segment as the
port address or you will not be able to add the pool.
Also, the port’s IP address must not be within the range of addresses
defined in an IP address object.
3.1.2 Adding more Static Routes
The list on the lower part of the main interface is a list of static
routes added. You can add more routes by entering the
Destination IP address; Subnet mask and Gateway address into
the respectively text boxes, then click <Add> to add the route.
Succendo 502/2000 User Manual 1.2
21
Chapter 3: System Configuration
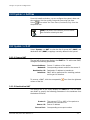
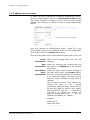
3.2 System >> Information
The top part of this screen displays information about the system’s
interfaces such as type and status.
You can also decide whether users can or cannot access the SSH or
the Gateway. This is done by toggling start or stop (the option
which is not hyperlinked represents the current status) for the
respective access means.
If services use the domain name of the application server, you can
tell Succendo the location of the DNS servers so that the domain
name can be resolved. Once the configuration page appears, type
in the Hostname, Domain, Primary DNS IP address and
Secondary DNS IP address accordingly. Click <Save> to save the
settings.
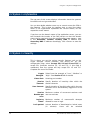
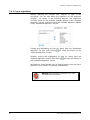
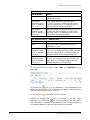
3.3 System >> Security
This is where you set the various security features such as the
crypto strength, various timeouts, lock period etc. On the
configuration page, select “Accept SSL V2 and V3 and TLS” to
accept SSL protocols versions V2, V3 and TLS. If this field is
unselected, then the system will only accept SSL V3 and TLS.
Complete the rest of the fields:
Crypto
Strength:
Listen Port:
Listening port number
Session
Timeout:
Specify duration of inactivity after which the
session timeouts
User timeout:
Specify duration of inactivity after which the user
timeouts and is automatically logged out of the
system
Session
Number per
user:
Maximum number of concurrent sessions each
user can activate
Login try
times:
Lock period:
22
Select from the strength of “Low”, “Medium” or
“High”. See Section 3.3.1 for details
Maximum number of unsuccessful
allowed for user to login
attempts
Lockout duration of deactivated or locked users
(in
minutes).
Users
will
be
unlocked
Succendo 502/2000 User Manual 1.2
Chapter 3: System Configuration
automatically after this period
Global Check
status:
Determine if the system will activate the Host
Check policy before login (see Chapter 12,
Section 12.2.1)
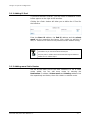
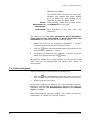
Login validate
code:
Select whether to use additional image code at
the Login screen, as shown in the example
below:
Users logging in are required to enter the code
displayed in the box into the Code field as part
of their user verification. This prevents the
middle-man attacks where login requests are
randomly and periodically issued.
You can turn this feature off by de-selecting the
Login validate code checkbox here. Select it to
turn the feature on
Prevent
against ‘syn
flood attack’:
Select this option to specifically guard against
SYN flood attacks
ARL Default
Action:
The ARL default action determines a user’s
ability to access the VPN from certain IP
addresses or port in the event where ARL is
defined for none or some of these IP addresses
and ports
To see the ARL Default Action’s impact on a user
with ARL defined, and general information on
ARL, please see Chapter 13
AACR Default
Action:
The AACR default action determines the nature
of a service’s commands in the event where
AACR is defined for none or some of them (For
details on defining AACR for a service, refer to
Chapter 8, Section 8.2.4)
If no AACR defined for a service at all, all its
commands are defaulted to “Permitted”,
regardless of what is defined here in the AACR
Default Action
If AACR is defined for some of the commands in
a service, then those without an AACR will follow
what is set here in the AACR Default Action
Succendo 502/2000 User Manual 1.2
23
Chapter 3: System Configuration
3.3.1 Crypto algorithms
Besides selecting the strength (low, medium or high) of the
encryption, you can also select the algorithm for the particular
strength.
As shown in the following diagram, the algorithms
currently active for the strength selected appears in the “Selected
Algorithm” list box, and the inactive but available algorithms appear
in the “Unselected Algorithm” list box.
Clicking and highlighting an item (or items) from the “Unselected
will move the item(s) to the
Algorithm” list box, then clicking
“Selected Algorithm” list box.
Likewise, clicking and highlighting an item (or items) from the
“Selected Algorithm” list box, then clicking
the “Unselected Algorithm” list box
will move the item(s) to
Alternatively, simply double-click an item to move it from one list to
the other. Click <Save> to save any modifications.
Warning: Wrong selection of algorithms may cause
Succendo to be inaccessible.
24
Succendo 502/2000 User Manual 1.2
Chapter 3: System Configuration
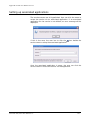
3.4 System >> Update
You can update the system with new upgrade packages via FTP,
HTTP or uploading from the local hard drive.
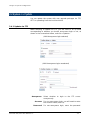
3.4.1 Update via FTP
When selecting to update via FTP, you will have to fill up fields
corresponding to whether you choose anonymous login or not, as
shown in the screenshots below, and click <Update>:
(With Anonymous login selected)
(With Anonymous login unselected)
Anonymous:
Select whether to login to the FTP server
anonymously
Account:
For non-anonymous login, you will need to enter
the account name (user ID)
Password:
For non-anonymous login, enter the password
Succendo 502/2000 User Manual 1.2
25
Chapter 3: System Configuration
corresponding to the account name above
Host:
The IP address of the FTP server. Include port
number if necessary
Update File:
The name of the file to download. Include the full
path of the file
3.4.2 Update via HTTP
For update via HTTP, complete the required fields and click <Update>:
Host:
Update File:
The IP address of the HTTP server
The name of the file to download. Include the full
URL path of the file
3.4.3 Update via Upload
You can type in the filename
(its full path) into the text box
directly, or click <Browse …>
to select the file from a
“Choose File” dialog box. Then
click <Update> to update with
the file.
26
Succendo 502/2000 User Manual 1.2
Chapter 3: System Configuration
3.5 System >> HA
Succendo comes with a High Availability (HA) feature using either dual
standby or dual load mechanisms.
First, select the HA work mode. (Note: If HA is activated, both
Succendo devices must be working in the same HA mode.) There are 3
modes you can select from:
1. None: Do not activate HA
2. AP: Activate dual standby mode. One server will become the
“master” while the other is the “slave”
When AP is the selected HA work mode, you must configure the Float
IP. Remote clients will use this IP address to access services on the
“master” server. In AP mode, the Float IP must be the same for both
the “master” and the “slave” servers so that client connections will not
be disrupted when the “slave” takes over as the “master” in the event
of a failure. Configure the Float IP by filling up the fields:
Interface:
IP Address:
Succendo 502/2000 User Manual 1.2
The interface through which services are
remotely accessed
IP address for the interface. Note: This address
must be identical for both Succendo servers
27
Chapter 3: System Configuration
working together in HA mode
Subnet
mask:
IP address’s subnet mask
3. AA: Activate dual load mode. In this mode, both servers are
providing services to clients.
When a client attempts to access a service, it compares the network
load of both servers and the status of the connection between the
client machine and the servers. The client then determines which
server has a better availability status to access the service from.
The client initially connects only to 1 server and obtains the address of
the other server from this initial server. Hence, the IP address and the
port number of each server must be configured on the other. This is
configured as the Map IP. When both servers are behind a firewall, the
Map IP is the translated external address of the server. In the absence
of a firewall, the Map IP is the direct external IP address of the server.
Configure the Float IP by filling up the fields:
Interface:
IP Address:
Port:
The interface through which services are
remotely accessed
IP address for the interface. Note: This address
must be different for the two Succendo servers
working together in HA mode
The interface port number
After selecting the HA working mode, configure the other settings as
shown below.
28
Succendo 502/2000 User Manual 1.2
Chapter 3: System Configuration
Setting:
Current status:
Current HA status of this server
(active/inactive)
Peer status:
HA status of the peer HA server
(active/inactive)
Secret Key:
Encryption key used to encrypt data
transmitted by the HA server. Note:
Both HA servers must have the same
secret key
Interface:
Interface used to communicate with
the peer HA server
Local IP
Succendo 502/2000 User Manual 1.2
Local IP address of the HA interface
29
Chapter 3: System Configuration
address:
Peer IP
address:
Peer server’s interface IP address
Hello Interval:
Interval of time between sending
Hello messages (seconds)
Hello Number:
If the server does not receive Hello
messages consecutively for this
number of times, the server will
deduce that the peer server is down
and changes the peer status to
“inactive”. If this is a “slave” server in
AP
mode,
the
server
will
automatically change to become the
“master” server.
Note: This value must be identical
for both HA servers
Check Points - System checks to be performed by the server to
determine its status and inform the peer server accordingly. There
are three checks available for selection: Process, Interface and
Ping
Process:
Interface:
Interval:
Time interval between each system
process check (seconds)
Number:
Inform the peer server if the number
of process checks that detected
process failure reaches this number.
If the peer server is the “slave” under
AP mode, the peer server will
automatically change to the “master”
status
Interval:
Time interval between checks on
interface working status (seconds)
Select the interfaces to check by
moving the interfaces from the
“Unselected” list to the “Selected” list
and vice versa
Ping:
30
Number:
Inform the peer server if the number
of interface checks that detected
interface down status reaches this
number. If the peer server is the
“slave” under AP mode, the peer
server will automatically change to
the “master” status
Interval:
Time interval between the sending of
ping packets (seconds)
Number:
Inform the peer server when the
number of times ping replies were
Succendo 502/2000 User Manual 1.2
Chapter 3: System Configuration
not received equals to this number.
If the peer server is the “slave” under
AP mode, the peer server will
automatically change to the “master”
status
Target IP:
Target IP address to ping. Click
<Add> to add multiple target ping IP
addresses. Click <Remove> to
remove an IP address from the
target list
3.5.1 HA Synchronization
When the two devices working in HA are first activated in AP, the
slave device will perform an initial synchronization with the master
device. In AA mode, the device that was activated later will perform
the initial synchronization with the device activated earlier. The
initial synchronization ensures that both devices have the same
configuration state upon activation
After the initial synchronization, either device can perform
synchronization with the other. Hence, any changes on the slave
device can also be synchronized to the master device and vice
versa.
The following settings will not be synchronized:
•
System device name;
•
Software version;
•
License;
•
Customized settings in “System >> Custom”;
•
NAT information;
•
HA parameters;
•
Log contents;
•
Interface settings and interface route information;
•
Monitoring contents other than “Online User”
All settings other than the above listed will be synchronized
between the two devices.
Succendo 502/2000 User Manual 1.2
31
Chapter 3: System Configuration
3.6 System >> Backup
You can backup the
current
system
configuration into your
local disk, restore a
previously
saved
configuration,
or
restore
the
original
factory settings.
3.6.1 Export system settings
Click the <Export> button to save the current system settings into
the local memory. Then click <Download> when given the option.
The system will then further prompt you to save the settings into a
file named “sysbackup.bin” (you can also enter another filename).
Click <Save> to save the file or <Cancel> to abort the operation.
3.6.2 Import system settings
To import previously saved settings, first select the configuration
file from your local disk by click <Browse> (or enter the full path
and filename directly into the text box), then click <Import>. After
a confirmation prompt appears, click <OK> to continue to import or
<Cancel> to abort importing. Note that all current configurations
including address, password and license information will be
overwritten by the imported settings. As different Succendo models
may differ in their configuration settings, you cannot import a
configuration backup file from a different model. Note also that the
configuration backup file from one Succendo device cannot be
imported into another device.
Warning: Importing settings would restart the device
automatically.
3.6.3 Restore original factory settings
To restore the original factory settings, click the <OK> button
besides Restore Factory Setting. After a confirmation prompt
appears, click <OK> to continue to restore, or <Cancel> to abort
the action.
32
Succendo 502/2000 User Manual 1.2
Chapter 3: System Configuration
3.7 System >> Tools
This menu item contains various tools to assist the Administrator.
IP or Host:
Ping Count:
Ping:
Restart Device:
PowerOff Device:
IP address or DNS name to ping
Ping count
Click this button to ping the IP address or
DNS name specified above
Restart Succendo
Switch off the Succendo device
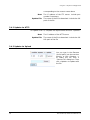
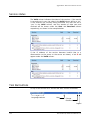
3.8 System >> License
The page indicates the maximum number of authorize users for this
license and the license ID (as shown in the example screenshot
below).
To update the license, enter the new license Key obtained from the
manufacturer and click <Save>.
Succendo 502/2000 User Manual 1.2
33
Chapter 3: System Configuration
3.9 System >> Custom
Here you can upload and customize the displayed images on the user
interface.
Click <Browse> and select the image files to upload for the various
display areas including Welcome picture (at the login page), Client
banner picture (what users would see in their client-end home page)
and Admin banner picture (what admin users would see in their
admin home page). The remaining customizable features include:
Welcome
Message:
Background Color:
Enter the color code or click the palette
button to select the color. This corresponds
to the background color of the end-user
interface
Bulletin Message:
Bulletin message shown on the top right
area of the end-user interface
Client Default
Language:
Admin Default
Language:
34
Message to be displayed on the login
screen
Default language for the end-user interface
Default language
interface
for
the
administrative
Succendo 502/2000 User Manual 1.2
Chapter 3: System Configuration
3.10 System >> SetTime
From this interface window, you can configure the system’s date and
time settings. Set the system Date and time using the Date
. Then select the Time Zone (Continent/City) from the
Picker
drop down box.
Note: In the Date Picker interface, you must set the
time first before selecting the date.
3.11 System >> NAT
Select “System >> NAT” to view the list of source NAT (SNAT) and
destination NAT (DNAT) mappings currently defined in the system.
3.11.1 Source NAT
The top half of the screen displays the SNAT list. To add a new SNAT,
configure the following parameters
Source Address:
Netmask:
Destination IP:
Interface:
Source IP address of the packet
Corresponding network mask for the source IP
Destination IP address to translate to
SNAT will be performed for matching packets
arriving at this interface
To remove a SNAT, click the corresponding
column of the list.
icon from the rightmost
3.11.2 Destination NAT
The bottom half of the screen displays the DNAT list. You can add a
new DNAT by specify the following parameters in the textboxes from
the bottom of the list.
Protocol:
Source IP:
Source Port:
Succendo 502/2000 User Manual 1.2
The protocol (TCP or UDP) of the packet to
perform the translation on
Source IP address
Corresponding source port number
35
Chapter 3: System Configuration
Destination IP:
Destination Port:
Destination IP address of the packet to
perform the translation on
Corresponding destination port number
Click <Add> to add the new DNAT mapping. To remove a DNAT, click
the corresponding
icon from the rightmost column of the list.
3.12 System >> Virtual Service
To protect the Intranet’s server information of servers providing
services that can be remotely accessed, you can setup virtual service
on Succendo. This function is similar to destination network address
translations with the added functionality of being able to perform SSL
encryption.
To add a new virtual service, specify the following parameters in the
textboxes from the bottom of the list:
Port:
Destination IP:
Destination Port:
Use SSL:
Virtual port number of the service
Actual IP address of server providing this
service
Corresponding port number of the service
Select whether to use SSL encryption
Click <Add> to add the new virtual service. To remove a virtual
service, click the corresponding
icon from the rightmost column of
the list.
Note: When defining ports for NAT or Virtual Service,
the port number must not be the same as Succendo’s
reserved ports (1-22) or the SSL listening port (default
443)
36
Succendo 502/2000 User Manual 1.2
4
Chapter
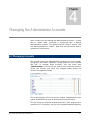
Managing the Administrator Accounts
Here is where you can manage the administrator accounts – to add,
edit or delete them. Succendo is configured with a default
administrative account. The default account name is “admin” and
the default password is “admin”. Note that you will not be able to
remove this root account.
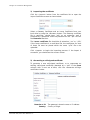
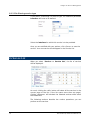
4.1 Managing Accounts
You should create a few administrative accounts to suit your needs,
giving each one admin capability, limited based on their function
and role. To manage these accounts, click the menu item
“Administrator” on the menu bar, and click the sub menu items to
access the function you need. The diagram below shows the
Account management screen.
The screen displays a list of accounts created, hyperlinked account
names and buttons for ease of performing various functions.
This list shows the accounts created previously. Each page shows a
maximum of 10 accounts, and you can navigate between pages by
Succendo 502/2000 User Manual 1.2
37
Chapter 4: Managing the Administrator Accounts
clicking on the page hyperlink at the bottom right corner of the
screen.
The list itself contains the account names, their corresponding
icon) and edit (the
descriptions, and the option to delete (the
icon) the account. To add a new account, click <Add>.
Clicking the <All> button will select all the accounts displayed on
the current page (if the list spans more than one page). Clicking
<Reverse> will unselect selected accounts and select unselected
accounts.
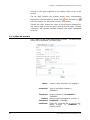
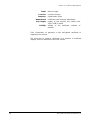
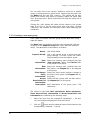
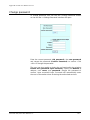
4.1.1 Add new account
Click <Add> to add a new administrator account. The add account
screen will be displayed, as shown below:
Name:
Credential:
Type of verification (default is
“PASSWD”)
Password:
Account password (if Credential is
“PASSWD”)
Confirm
Password:
Retype account password to confirm (if
Credential is “PASSWD”
Certificate:
38
Account name. Username for logging in.
Select the certificate file to use for this
admin
account
(if
Credential
is
“CERTIFICATE”)
Succendo 502/2000 User Manual 1.2
Chapter 4: Managing the Administrator Accounts
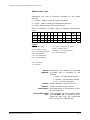
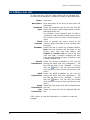
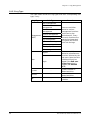
Administrator Type:
Determines the type of functions available for this admin
account:
1. System – able to access all system functions
2. Config – able to access all configuration functions
3. Audit –able to access all the log functions
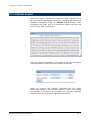
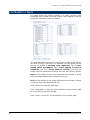
Here’s a summary of admin rights of different administrator
type:
Sys Admin Cert Auth User
System RW
RW
Config RW
R
R
R
RW RW RW
Audit
Svc
Role
Log
Monitor
Client
Policy
ARL
R
R
R
R
R
R
RW
RW
R
RW
RW
RW
RW
R
Legend:
Sys – System options
Log Config – Configuring Log Option
Admin – Admin accounts
Monitor – Monitors option
Cert – Certificate Management
Client Policy – Policy Management
Auth - Authentication
ARL – ARL Management
User – User Management
Role – Role Management
RW – Read-Write
R – Read only
Access
Method:
Determines the method of accessing
Succendo that is available to this
account:
1. https – via web-based interface
2. console – via the device console
3. ssh – via SSH connection
Status:
Timeout:
Succendo 502/2000 User Manual 1.2
Enable, disable or lock the account
Session timeout for this account
Description:
Brief description of the account (a max.
of 128 characters)
Access Restriction
List:
These are ARL that were created earlier
(see Chapter 13 on details of ARL).
Select the ARL from the “Unselected
ARL” list into the “Selected ARL”
39
Chapter 4: Managing the Administrator Accounts
Once you are done, click <Save> to create and save the new
password account.
To create a Certificate account, select “CERTIFICATE” from the
Credential field and upload the Certificate via the <Browse…>
button.
4.1.2 Edit existing account
There are two ways to view and edit an existing account.
•
Click the
icon corresponding to the account name you
want to edit. The icon is found under the “Edit” column in
the account list.
•
Directly clicking the hyperlinked account name.
Using either method will bring up the account configuration window.
After editing the information, click <Save> to save the modification,
or <Reset> to undo the changes.
Note: The Credential field will not be editable when
editing existing accounts.
4.1.3 Delete existing account
To delete an account, click the
icon corresponding to the
account name you want to delete. The icon is found under the
“Delete” column in the account list. A confirmation dialog box will
pop up to confirm your deletion.
You can also select multiple accounts by clicking the check box next
to them, and click <Remove> to delete them en masse.
40
Succendo 502/2000 User Manual 1.2
Chapter 4: Managing the Administrator Accounts
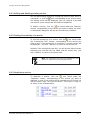
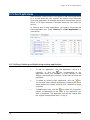
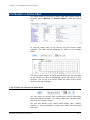
4.1.4 Query for accounts
The default listing when you first access the account page lists all
existing accounts in the database (divided into pages, if there are
more than 10 existing accounts). To narrow down the list to show
specific accounts, you can use the <Query> button.
Type the name of the account you want to view and click <Query>.
The system will search through the database and list the accounts
matching the name you typed.
Using this feature, you can query for multiple accounts with similar
names easily. The query system does not accept wild card
character (e.g. “*” and “?”). If the text box is blank when you click
<Query>, the entire list of accounts in the database will be
displayed.
Note that the system will also search for accounts whose user name
contains the phrase you typed in the query box. For example,
typing “tes” into the text box and click <Query>, the system will
yield accounts such as “test1”, “test2”, “test3” etc.
Succendo 502/2000 User Manual 1.2
41
Chapter 4: Managing the Administrator Accounts
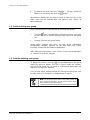
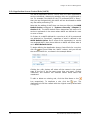
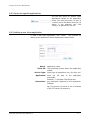
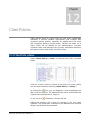
4.2 Locked Accounts
Admin accounts can be locked for two reasons: they are locked by
administrators (by manually changing the Status field of the
account), or by the system (after user exceeded the maximum
number of unsuccessful login attempts).
Click “Administrator >> Locked Admin” to see a list of admin
accounts that are currently locked:
Name shows the account name of the locked user
Lock Time shows the date and time of the user’s last unsuccessful
login attempt before being locked out, or the date and time the
user was manually locked by another administrator.
Lock Information shows the IP address from where the user was
attempting to login from. If the user was locked manually by the
administrator, then the column shows the user name of the
administrator who locked the user.
Check the checkbox in the Sel/UnSel column corresponding to the
locked user in the list or click the <All> button to select all the
users in the current page of the list (if the list spans more than one
page). Clicking <Reverse> will unselect the selected users while
selecting the unselected. The <Refresh> button updates the list
while the <Query> button allows you to search for locked admin
users based on the account name. See Section 4.1.4 for details on
query for users.
4.2.1 Unlocking the users
To unlock the admin users, select the users by clicking in their
corresponding check boxes, and then click the <Unlock> button.
Alternatively, just change the Status value when editing the user
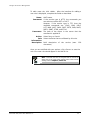
(see Section 4.1.2)
Note that admin users locked by the system will be automatically
unlocked when their locked period expires. The locked period for all
users can be set in the Security settings. (See Chapter 3, Section
3.3 for details).
42
Succendo 502/2000 User Manual 1.2
5
Chapter
Certificate Management
Certificates for SSL-VPN gateway can be generated by Succendo, or
by importing from a third party. Succendo also supports end user
certificate verification via third party trusted certificate chain. There
are several ways to get CRL based on the third party trusted
certificate. We will first look at how to add a Local CA.
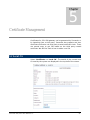
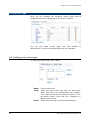
5.1 Local CA
Select “Certificate >> Local CA”. The details of the current local
CA used by the system are displayed in the top half of the screen.
Succendo 502/2000 User Manual 1.2
43
Chapter 5: Certificate Management
To generate a new local CA, complete the following fields in the bottom
half of the screen. Note that only one local CA is saved in the system at
any time.
Country:
State:
Location:
Company:
Department:
Common Name:
Key Length:
Country where the Succendo server is situated
Name of the state
Specific location name
Organization name
Certificate user department
Publicly known name of this certificate
Length of the security key (1024/2048/4096)
Click <Generate> to generate the local CA. A display window
appears when the local CA is successfully generated. Click
<Return> to return to the local CA interface.
44
Succendo 502/2000 User Manual 1.2
Chapter 5: Certificate Management
5.2 Trusted CA
Trusted CA represents the issuer CA of user certificates. You can
setup whether or not to trust the possible issuer CAs using this
function. Select “Certificate >> Trusted CA” to see a list of
Trusted CA.
You can toggle the Trust column between “Yes” and “No”, to
indicate if the certificate is to be trusted or not.
You can toggle the CRL column between “Yes” and “No” to instruct
Succendo to check or ignore the CRL of this CA.
icon under the “Remove” column
To delete a certificate, click the
of the certificate. To delete multiple certificates, select the
certificates by clicking the check boxes next to the certificates, and
click the <Remove> button.
5.2.1 Viewing the certificate information
You can view the certificate information by clicking the
icon
under the View column of the certificate you want to view. You can
click the <CRL> button to see the CRL information, if any.
5.2.2 Configuring the CRL
To configure the CRL, click the icon under the CRL Config column
corresponding to the certificate you want to configure. From the
configuration page that appears, select the type of CRL and select
whether the information will be retrieve automatically periodically.
Click <Get> to upload the information.
5.2.3 Adding a CA
To add a new certificate, click the <New> button and then follow
the steps below:
1.
Click the <Browse> button to select the certificate file from
the local drive you want to import.
2.
Select whether to include CRL by selecting the checkbox
beside CRL
3.
Enter descriptions, if any.
4.
Click the <Import> button to start the importing process.
If the import is successful, you will see the import success page.
Succendo 502/2000 User Manual 1.2
45
Chapter 5: Certificate Management
5.3 Gateway Certificates
To see the current list of gateway certificates installed, select
“Certificate >> Gateway Certificate”. The list is as shown here:
Select the gateway certificate you want Succendo to use by
toggling the certificate’s Using column to “Yes”. Only one
certificate’s Using column can be toggled to “Yes” at any time –
the rest must remain as “No”.
icon under the Update column to regenerate the selfClick the
sign certificate.
Clicking the <All> button will select all the certificates in the
current page of the list (if the list spans more than one page).
Clicking <Reverse> will unselect the selected certificates while
selecting the unselected.
icon under the “Remove” column
To delete a certificate, click the
of the certificate. To delete multiple certificates, select the
certificates to delete by clicking the check boxes next to the
certificates, and click the <Delete> button. Note that you can only
remove certificates that are not in use (i.e. “No” in the Using
column).
5.3.1 Viewing the certificate information
You can view the certificate information by clicking the
icon
under the View column of the certificate you want to view. The
certificate information will be displayed. To see the Issuer’s
certificate information, click the <Issuer Cert> button at the left
hand corner and the relevant information will be shown.
5.3.2 Installing a new gateway certificate
There are 3 ways to install gateway certificates: you can import one
from your local disk, generate one from the system, or request one
from third-party (see Section 5.4)
46
Succendo 502/2000 User Manual 1.2
Chapter 5: Certificate Management
1) Importing the certificate
Click the <Import> button from the certificate list to open the
Import Certificate screen as shown below:
Select a Gateway Certificate and an Issuer Certificate from your
local drive by using the <Browse> button. The Gateway certificate
file in particular, should have “.pfx” as an extension, and is
protected by a password. Enter the password for the “.pfx” file into
the Password text box.
The Issuer certificate file should be of extension “.cer” or “.p7b”
If the issuer certificate is a multi-level CA, the certificates for each
of these CA must be placed within the same “.p7b” file to be
uploaded.
Click <Import> to begin the importing process. If the import is
successful, you should see the success screen.
2) Generating a self-signed certificate
To generate a new self-signed certificate, or to regenerate an
existing self-signed certificate (denoted by a “self” in the From
column) with a new set of data, click the <Generate self-sign
certificate> button.
Domain or IP:
Country:
Succendo 502/2000 User Manual 1.2
The gateway’s domain name or IP address
Country of origin
47
Chapter 5: Certificate Management
State:
Location:
Company:
Department:
Key Length:
Validity:
State of origin
Location of origin
Organization name
Certificate user company department
Length of the security key (select from
1024, 2048 or 4096)
Validity of
months)
the
certificate
(number
of
Click <Generate> to generate a new self-signed certificate or
regenerate an old one.
The third way to install a certificate is to perform a certificate
request, which is described in the next section.
48
Succendo 502/2000 User Manual 1.2
Chapter 5: Certificate Management
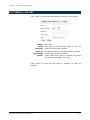
5.4 Certificate Request
There are 3 steps to request for a certificate. Step 1 requires you to
fill up the certificate request information (which is identical to the
Gateway information fields in Section 5.3.2 above). After
completing the fields, click the <Generate> button and the next
screen shows Step 2 and Step 3:
Copy the request information in the text box for your third-party
certificate server to request for the required certificates.
When you receive the Gateway Certificate and the Issuer
Certificate, import the files into the system in Step 3 to complete
the request. If the import is successful, you will see a message
indicating that the certificate is uploaded successfully.
Succendo 502/2000 User Manual 1.2
49
Chapter 5: Certificate Management
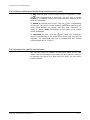
5.5 Protection Key
Select “Certificate >> Protection Key” to set the private key protected password. Note that
this private key is used for all Succendo gateway and local CA certificates. Complete the
required fields (enter the New Protection Key and retype it in Confirm Protection Key).
Click <Save> to save the new key.
50
Succendo 502/2000 User Manual 1.2
6
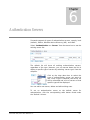
Chapter
Authentication Servers
Succendo supports 4 types of authentication servers, namely, local
(default), Radius, Windows Active Directory (AD), and LDAP.
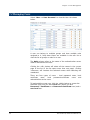
Select “Authentication >> Server” from the menu bar to see the
existing server list:
The default list will show all existing authentication servers,
regardless of the type. However, you can narrow down the list to
display a specific type of servers by selecting “server type” from the
drop box.
Click on the drop down box to select the
type of authentication server you want to
see. Once a type is selected, the server list
will be refreshed and a list of servers of that
specific type will be displayed.
You can add a new server, delete and edit existing ones.
To set an authentication server as the default server for
authentication, click the corresponding radio button found under
the “Default” column.
Succendo 502/2000 User Manual 1.2
51
Chapter 6: Authentication Servers
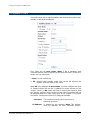
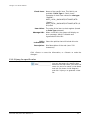
6.1 Adding new authentication server
To add a new server, first select a server type from the drop down
box. The current page will be refreshed automatically, displaying
the list of servers matching the type selected. Click the <Add>
button. If a “local” server type is selected, the local server
configuration screen will be displayed instead (see Section 6.1.4).
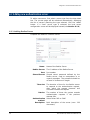
6.1.1 Adding Radius Server
Complete the fields for a Radius Server:
Name:
Radius Server:
Port:
Shared Secret:
The IP address of the Radius Server
Port number
Shared
Radius
unpack
at least
secret password defined by the
server, used to encapsulate or to
messages. The password should be
16 characters in length
Time Out:
The duration of time for the Radius server
to respond to the authentication request,
after which the request timeouts and
Succendo resends the request
Retries:
The number of times the system resends
authentication requests if the previous
attempt fails.
Authentication
method:
Description:
52
Name of the Radius Server
Select either PAP or CHAP
Brief description of the server (max. 128
characters)
Succendo 502/2000 User Manual 1.2
Chapter 6: Authentication Servers
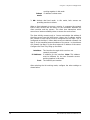
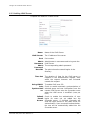
6.1.2 Adding LDAP Server
Complete the fields for a LDAP Server:
Name:
LDAP Server:
Port:
Name of the LDAP Server
The IP address of the server
Port number
Admin
Username:
Administrator’s username used to log onto the
LDAP Server
Admin
Password:
The corresponding admin password
Base DN:
Time Out:
The point where the search begins in the
directory
The duration of time for the LDAP server to
respond to the authentication request, after
which the request timeouts and Succendo
resends the request
Using LDAPS:
To enable LDAP over SSL
Auto
Synchronizati
on:
Check to enable automatic synchronization of
selected group and user information from the
remote LDAP server onto the Succendo server
when the LDAP server is modified. (once per
hour)
Default
Permit
Access:
Check to enable the authentication of user
logins for users not yet added into the
Succendo server. If checked, Succendo will
send the login entries to the LDAP server for
authentication. Upon successful authentication,
the user will be automatically added into the
Succendo server.
Succendo 502/2000 User Manual 1.2
53
Chapter 6: Authentication Servers
If unchecked, the user’s login will fail even if
his username and password are correct
Description:
Brief description of the server (max. 128
characters)
Click <Save> to add the server once all parameters are specified.
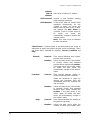
6.1.3 Adding AD Server
Complete the required fields for an AD Server:
Name:
Domain:
Active Directory
Server:
Domain name of the server
The IP address of the server
Admin
Username:
Administrator username for logging onto the
AD Server
Admin
Password:
The corresponding admin password
Base DN:
The point where the search begins in the
directory
Time Out:
The duration of time for the AD server to
respond to the authentication request, after
which the request timeouts and Succendo
resends the request
Authentication
Method:
54
Name of the AD Server
Select from NTLM, NTLMv2 or LDAP:
If LDAP is selected, the account and login
account downloaded from the AD server is
the AD user’s display name; if NTLM or
NTLMv2
is
selected,
then
what
is
downloaded is the AD user’s account
Auto
Synchronization:
Check to enable automatic synchronization
of selected group and user information from
the remote AD server onto the Succendo
server when the AD server is modified.
(once per hour)
Default Permit
Access:
Check to enable the authentication of user
logins for users not yet added into the
Succendo server. If checked, Succendo will
send the login entries to the AD server for
authentication.
Upon
successful
authentication, the user will be automatically
added into the Succendo server.
Succendo 502/2000 User Manual 1.2
Chapter 6: Authentication Servers
If unchecked, the user’s login will fail even if
his username and password are correct
Description:
Brief description of the server (max. 128
characters)
Click <Save> to add the server once all parameters are specified.
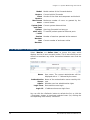
6.1.4 Configuring Local Server
Password Minimum
length:
Minimum number of characters for the
password
Password Maximum
length:
Maximum number of characters for the
password
Default Credential:
Succendo 502/2000 User Manual 1.2
Select the default authentication
method from the drop down menu
55
Chapter 6: Authentication Servers
6.2 Managing existing authentication server
6.2.1 Editing the Servers’ parameters
There are two ways to view and edit an existing server.
•
Click the
icon corresponding to the server name you want to
edit. The icon is found under the “Edit” column of the server list.
•
Directly click the server name.
Using either method brings up the server information configuration
window. After editing the information, click <Save> to save the
modification, or <Reset> to undo the changes.
Tips: You can also retrieve the user account information
(without password information) from the authenticating server
by clicking the <Download user> button (Note that this option
is only available for LDAP and Windows AD server).
6.2.2 Downloading User Information
From the server edit interface, click <Download user> to download
user and user group information (not including user passwords) from
the selected server. (This function is only available for LDAP and AD
servers).
A tree structure user interface will be displayed. From the tree, select
the users and user groups to download. Click <Save> to begin the
download or <Reset> to undo the selections.
In the LDAP/AD server user tree displayed, organization units,
container and user groups that were downloaded previously will be
shown as selected. When you re-select the users from the tree, the
following will be performed:
•
Users in previously selected organization units and containers
that are not selected currently will be deleted
•
Previously selected groups that are not selected currently will be
deleted
The selected nodes will be downloaded into Succendo.
56
Succendo 502/2000 User Manual 1.2
Chapter 6: Authentication Servers
•
All users in the selected organization units and containers will be
added into Succendo with organization units and containers
added as user groups. The group name will be
“ou_authentication” server name_ou(container) name. For
example, if the authentication server is “testserver”, ou name is
“testou” then the group name on Succendo will be
“ou_testserver_testou”. If the organization unit contains other
organization units, containers or groups, the users under these
groups will also be added into Succendo accordingly
•
Selected groups will be added directly into Succendo along with
all the user members in the group. If the group name is
“testgroup” and the server name is “testserver”, then the group
name added into Succendo will be “testserver_testgroup”
Note: When downloading containers that contain groups into
Succendo, the relationship between the users and the groups
may not be correctly added into Succendo. This is not a
system error and simply involves the details of the AD
container concept realization. Exporting the AD content’s LDIF
file will show the same result. This error is only present for the
AD container.
Succendo supports the “NTLM”, “NTLMv2” and “LDAP” protocols on AD
servers. When using the LDAP protocol for the AD server, the
downloaded account name is the user’s display name on the AD server.
When using the NTLM or NTLMv2 protocols, the downloaded account
name is the user account name on the AD server.
LDAP users can use either their common name (CN) or UID when
being authenticated by the system. Note that regardless of which
attribute is used to login to the system, the user is assigned with the
same authorizations. When the account is downloaded onto Succendo,
the username is stored according to the user’s CN.
6.2.3 Synchronizing User Accounts
From the server edit interface, click <Sync Accounts> to manually
begin the synchronization of Succendo and the remote authentication
server. Note: This function is only available for LDAP and AD servers.
Synchronization of selected organization units, containers, groups and
users between the two servers includes:
•
Succendo 502/2000 User Manual 1.2
Renaming of the authentication server configured in Succendo
(Groups from the authentication server will also be renamed).
57
Chapter 6: Authentication Servers
•
Deletion, moving and renaming of containers and organization
units.
•
Deletion, moving and renaming of groups (DN value will also be
modified).
•
Creation, deletion, moving (if the user was added to or removed
from a group) and renaming of users (DN value will also be
modified).
6.2.4 Deleting an existing server
To delete a server, click the
icon corresponding to the server
name you want to delete. The icon is found under the “Delete”
column of the server list. A confirmation dialog box will pop up to
confirm your deletion.
You can also select multiple servers by clicking the check box next
to them, and click <Remove> to delete them en masse. Note: you
must first remove the users and user groups assigned to the
authentication server before you can delete the server.
58
Succendo 502/2000 User Manual 1.2
7
Chapter
User Management
Management of the end-users accessing the VPN through Succendo
is achieved in two levels: managing them as a user group or as
individual users. Succendo supports a role-based access control
model for managing users’ and user groups’ rights to access the
system resources. Roles define the services which the users or user
groups has access to. For details on how to add and manage roles,
see Chapter 9. An illustration of the m-m (many to many)
relationship between roles, users and services can be found in
Chapter 1, Section 1.2.
Each user group is made up of one or more users and each user
can belong to multiple user groups.
7.1 Managing User Groups
You can create User groups to group users with identical roles and
functions together. This eliminates the need to manage users
individually when it comes to assigning roles and rights, deleting
users en masse, etc.
Select “User >> Group” to view the User Group List shown below:
A user group can have multiple roles and policies assigned to it.
Drop down boxes are available in the user group list to view the list
of roles or policies for a user group.
Succendo 502/2000 User Manual 1.2
59
Chapter 7: User Management
You can make use of the <Query> button to search for a specific
group or groups based on group name. Simply type the name into
the Name text box and click <Query>. The system will list user
groups with names that match or partially match the name field
here. Querying with a blank name field will yield the entire list of
user groups.
Clicking the <All> button will select all the names in the current
page of the list (if the list spans more than one page). Clicking
<Reverse> will unselect the selected names while selecting the
unselected.
7.1.1 Creating a new user group
Click <Add> to create a new user group and the New User Group
page will appear.
The Name field is mandatory while the rest are optional (with the
exception of the Superior Group field, which will have a default
value). The description of the fields is as follows:
Name:
User Group name
Superior Group:
This is the parent group to which the user
group belongs. The user group will inherit
role information from the superior group.
User
Information:
Select the existing users (created with the
“User Accounts” option, see Section 7.2)
to be placed in this group.
Role
Information:
Select the existing roles (created with the
Role option, see Chapter 9) to be assigned
to this group
Client Secure
Policy
Information:
Select the client secure policies (created in
the Client Policy option, see Chapter 12) for
this group
Access
Restriction List
Information:
Select the ARL (create with the ARL option,
see Chapter 13) for this group
Description:
Brief description of the group (max. 128
characters)
The values for the fields User Information, Role Information,
Client Secure Policy Information and Access Restriction List
Information are selected by the following steps:
60
i.
Select the item from the respective “Unselected …” list box.
You can selected multiple items from the list box
ii.
button and the selected items will be placed in the
Click the
corresponding “Selected …” list box.
Succendo 502/2000 User Manual 1.2
Chapter 7: User Management
iii.
To remove the items from the “Selected …” list box, select the
items to be removed, and click the
button
Alternatively double-click an item to move it from one list to the
other. Once you are satisfied with your options, click <Save> to
save the group.
7.1.2 Edit existing user group
There are two ways to view and edit an existing user group.
•
Click the
icon corresponding to the group name you want
to edit. The icon is found under the “Edit” column of the group
list.
•
Directly click the user group name.
Using either method will bring up the group information
configuration window, identical to the Add New User Group
interface, except that the fields are populated.
After editing the information, click <Save> to save the modification,
or <Reset> to undo the changes.
7.1.3 Delete existing user group
To delete an account, click the
icon corresponding to the group
name you want to delete. The icon is found under the “Delete”
column of the group list. As usual, a confirmation dialog box will
pop up to confirm your deletion.
You can also select multiple groups by clicking the check box next
to them, and click <Remove> to delete them en masse.
Note: You will not be able to delete a user group if there are
users assigned to the group. You will need to remove all the
users from the group before deleting it.
Succendo 502/2000 User Manual 1.2
61
Chapter 7: User Management
7.2 Managing Users
Select “User >> User Accounts” to view the User List shown
below:
A user can belong to multiple groups and have multiple roles
assigned to it. Drop down boxes are available in the user list to
view the list of groups or roles for a user.
The Auth column refers to the name of the authentication server
used to authenticate the user.
Clicking the <All> button will select all the names in the current
page of the list (if the list spans more than one page). Clicking
<Reverse> will unselect the selected names while selecting the
unselected.
There are four types of users – local password users, local
certificate
users,
local
password+certificate
users
and
authentication server users.
To begin adding a new user, click the <Add> button to access the
Add User Page. You can add a local user (which can be a
Password, a Certificate or a Password+Certificate user) and a
non-local user.
62
Succendo 502/2000 User Manual 1.2
Chapter 7: User Management
7.2.1 Adding a local user
To add a local password user, select “Local” for the Authentication
Server field (this is also the default value when you first access
this page), and then select “Password” (again, this is the default
value) for the Credential Type field.
Name:
Upload Name
File:
User name
Click <Browse…> and select the text file
containing the list of user names to upload. If
With Password is selected, the file should
contain
both
user
names
and
the
corresponding password in the following
format: Username password
If With Password is not selected, the file
should only contain user names. The uploaded
users will be assigned the password specified
in the Password field below.
Note that each entry in the file should begin
on a new line. This option is only available for
local password users.
Authentication
Server:
Credential
Type:
Select “Password” for password users
Password:
User password
Confirm
Password:
Retype the user password for confirmation
IP Pool:
Succendo 502/2000 User Manual 1.2
Select Local for local users
IP Pool from which the user is to be assigned
an IP for NC access. Please refer to Chapter
63
Chapter 7: User Management
14, Section 14.1 for information on adding
IP Pools
Timeout:
The duration of inactivity before Succendo
automatically disconnects the user
Reauthentication:
Check to enable and specify the time interval
(minutes). When the user’s log in time
exceeds this specified interval, Succendo will
require the user to be re-authenticated
Note: Succendo will prompt the user to reauthenticate themselves 3 minutes before the
specified time. The user will be kicked out of
the system if he fails to enter his password
correctly for 3 consecutive times
Valid Time:
Status:
Time period after which this user account will
be automatically disabled. Select the time
period by using the date picker icon in the
From and To boxes
Enabled, Disabled or Locked
To add a local certificate user, select “Local” for the
Authentication Server field, and then select “Certificate” for the
Credential Type field. An additional Certificate field will appear
where you can browse for a certificate to upload. Select zip packet
next to the certificate field to upload multiple certificates within a
zip file. Complete the other fields as above.
To add a local password+certificate user, select “Local” for
Authentication Server and “Password+certificate” for Credential
Type. Succendo will authenticate the user based on both the user
password and the certificate.
Note: Credential Type field is related to role management.
For example, if the credential type of roleA is certificate, then a
password user cannot access the services in this role even if
he was assigned roleA. Please refer to chapter 9 on role
management.
Click <Save> to save the new user or <Reset> to clear the field
textboxes.
64
Succendo 502/2000 User Manual 1.2
Chapter 7: User Management
7.2.2 Adding a non-local user
To add a user that is verified by an external authentication server,
select an authentication server for the Authentication Server field.
The servers available for selection are the ones you have already
defined. See Chapter 6 for details on how to setup authentication
servers.
Once you selected an authentication server, simply fill in the
various fields as shown in the diagram to the left. The configuration
of each field is similar to Section 7.2.1 above.
The rest of the fields to fill in after determining the type of user, are:
Group
Information:
Select which existing group the user will
belong to
Role
Information:
Select the existing roles (created with the
Role option, see Chapter 9) to be assigned
to this user
Client Secure
Policy
Information:
Select the client secure policies (created in
the Client Policy option, see Chapter 12) for
this user. All selected policies are related by
a “or” relation by default. This means that as
long as 1 policy is fulfilled, the user check is
satisfied.
You can add or remove “and” relations by
clicking the [add-] or [del--] buttons
respectively. Select the policy name from the
list and click [add-] to add an “and” relation
below this policy. Click the “----“ relation line
and [del--] to remove the relation. All
policies enclosed within the ------ line are
related by the default “or” relation.
Example:
McAfee 8.0.0
Norton Anti Virus
---------------------------
Succendo 502/2000 User Manual 1.2
65
Chapter 7: User Management
Windows auto update
This indicates that the user end must have
windows auto update and either McAfee
8.0.0 or Norton Anti Virus running on his
computer to satisfy the policy check.
Access
Restriction List
Information:
Select the ARL (create with the ARL option,
see Chapter 13) for this user
Description:
Brief description of the user (max. 128
characters)
The values for the fields User Information, Role Information,
Client Secure Policy Information and Access Restriction List
Information are selected through the following steps:
i.
Select the item from the respective “Unselected …” list box.
You can selected multiple items from the list box
ii.
button and the selected items will be placed in the
Click the
corresponding “Selected …” list box.
iii.
To remove the items from the “Selected …” list box, select the
items to be deleted and click the
button
Alternatively, double-click an item to move it from one list to the
other. Once you are satisfied with your options, click <Save> to
save the user.
7.2.3 Edit existing user
There are two ways to view and edit an existing user.
•
Click the
icon corresponding to the user name you want to
edit. The icon is found under the “Edit” column of the user list.
•
Directly click the user name.
Using either method will bring up the user information window,
identical to the Add New User interface, except that the fields are
populated, and the fields Authentication Server and Credential
Type are disabled.
After performing the necessary editing, click <Save> to save the
modification, or <Reset> to undo the changes.
66
Succendo 502/2000 User Manual 1.2
Chapter 7: User Management
7.2.4 Duplicate existing user
To duplicate a user, click the
button corresponding to the user
name you want to duplicate. The duplicated user will have the same
name as the user name being duplicated, but prefixed with the
word “Copy # of”, where # is the number of copies currently
existing. For example, duplicating the user name “Ricky” once
would yield a new user named “Copy 0 of Ricky”. Note that all
duplicated users’ status begins with “Disabled” - you will need to
enable it manually if you want it to be active.
The
icon is found under the “Duplicate” column of the user list.
7.2.5 Delete existing user
To delete a user, click the
icon corresponding to the user name
you want to delete. The icon is found under the “Delete” column of
the user list. As usual, a confirmation dialog box will pop up to
confirm your deletion.
You can also select multiple users by clicking the check box next to
them, and click <Remove> to delete them en masse.
7.2.6 Querying for existing users
You can narrow down the user list to view users from specific
groups, user name or those verified by specific authentication
servers. This is done by entering the full or partial group name or
user name into the text boxes, and/or selecting the server name
from the drop down box as shown in the diagram below:
Any combination of criteria can be formed, as long as you have at
least one query criteria. Click <Query> to generate the search
results.
Succendo 502/2000 User Manual 1.2
67
Chapter 7: User Management
7.3 Managing Locked Users
Users can be locked for two reasons: by administrators (by
manually changing the Status field of the user), or by the system
(after user exceeds the maximum number of unsuccessful login
attempts or violates certain security policies). To view the locked
users, select “Users >> Locked User” and the list will be
displayed as follows:
Name shows the locked user’s account name.
Authentication Server shows the name of the authentication
server that authenticates the user.
Lock Time shows the date and time of the user’s last unsuccessful
login attempt before being locked out, or the date and time the
administrator changed the user’s status to LOCKED.
Lock Information shows the IP address where the user was
attempting to login from. If the user was locked manually by the
administrator, then the column shows the name of the
administrator who locked the user.
7.3.1 Unlocking the users
To unlock one or more users, first select them by clicking the check
box besides the user name, and then click the <Unlock> button.
The list will be refreshed and will display the remaining locked users.
Note that users locked by the system will be automatically unlocked
when their locked period expires. The locked period for all users is
set in the Security settings. (See Chapter 3, Section 3.3 for
details)
7.3.2 Querying for locked users
You can narrow down the locked user list to view users from
specific groups, user name or those verified by specific
authentication servers. This is done by entering the full or partial
group name or user name into the text boxes, and/or selecting the
server name from the drop down box, which is similar to how you
would query for existing users. Click <Query> to generate the
search results.
68
Succendo 502/2000 User Manual 1.2
8
Chapter
Service Management
Accesses to services in Succendo are entirely determined by roles.
Users, or users in a user group, must have the correct role or roles
assigned to them before they can access the services. You can
setup the kind of service a specific role can access (see Chapter 9),
or the kind of role or roles that can access the service, right here in
Service Management. An illustration of the m-m (many-to-many)
relationship between roles, users and services can be found in
Chapter 1, Section 1.2.
8.1 Adding a new service
Select “Service >> Service List” from the Menu Bar to access the
Service List (refer to Section 8.2 for details), click <Add> to add a
new service. The Add new Service interface will be displayed.
Complete the fields as described below:
Name:
Service name
Application
Server:
The application server where the service is
found. This is either an IP address, a name,
name@IP, IP1-IP2, IP/netmask or any
Access
Method:
Select whether the service is accessible via proxy
or NC. Please refer to Chapter 14 for details on
providing NC services.
Service
Type:
The service type, including vnc, ftp, Exchange
etc.
Group:
Select the group the service type belongs to. The
services displayed at the client end will be
categorized according to this group.
Succendo 502/2000 User Manual 1.2
69
Chapter 8: Service Management
Protocol:
Select the type of protocol used to access the
service. You will also need to enter the port
number in the text box available. Click <Add> to
add that port information to the service. You can
then continue to add more ports into the service
information, or remove them by clicking
<Remove>. The various options in the drop
down menu are:
•
TCP – Service supports the TCP protocol.
Enter the corresponding port number
•
UDP – Service supports the UDP protocol.
Enter the corresponding port number
•
ICMP – Service supports the ICMP protocol.
Enter the corresponding port number
•
Any – Service supports any protocol working
on the IP layer or above. No port number is
necessary for this option.
•
Protocol – Enter the protocol number of the
protocol, working on the IP layer or above, to
be supported. Some examples are:
1-Internet Control Message Protocol (ICMP)
2-Internet
(IGMP)
Group
Management
Protocol
3-Gateway to Gateway Protocol (GGP)
4-IP in IP
6-Transmission Control Protocol (TCP)
8-Exterior Gateway Protocol (EGP)
17-User Datagram Protocol (UDP)
35-Inter-Domain
(IDPR)
Policy
Routing
Protocol
45-Inter-Domain Routing Protocol (IDRP)
46-Resource Reservation Protocol (RSVP)
47-Generic Routing Encapsulation (GRE)
54-NBMA
(NHRP)
Next
Hop
Resolution
Protocol
88-Cisco Internet Gateway Routing Protocol
(IGRP)
89-Open Shortest Path First (OSPF)
70
Succendo 502/2000 User Manual 1.2
Chapter 8: Service Management
Display to
end user:
Decide whether end user will see this service
displayed in their page or not
Client
Application:
Client Applications that the service will launch.
Select one or more applications from the
“Unselected …” list box to the “Selected …” list
box. See later section for more details on adding
new Client Applications
Role
Information:
Select the existing roles (created with the Role
option, see Chapter 9) that can access this
service
Description:
Brief description
characters)
of
the
service(max.
128
8.1.1 HTTP service type
If you select HTTP for service type, an additional parameter
Resource Path will have to be defined.
Enter the full path of the application you want this service to
specifically point to. For example: “\succendo”.
Succendo 502/2000 User Manual 1.2
71
Chapter 8: Service Management
8.1.2 File-Sharing service type
If you select “FileSharing” for service type, an additional parameter
Interface will have to be defined.
Select the interface for which this service is to be provided.
Once you are satisfied with your options, click <Save> to save the
service. Your new service should appear in the Service List.
8.2 Service List
When you select “Service >> Service List”, the list of services
will be displayed:
As usual, clicking the <All> button will select all the services in the
current page of the list (if the list spans more than one page).
Clicking <Reverse> will unselect the selected services while select
the unselected.
The following sections describe the various operations you can
perform on the services.
72
Succendo 502/2000 User Manual 1.2
Chapter 8: Service Management
8.2.1 Editing and deleting existing service
You can edit existing service by clicking the Service name, which is
icon corresponding to the service name.
a hyperlink, or click the
The editing screen will be displayed, and it is identical to the Add
new service screen except that the fields are populated.
icon found under the “Remove”
To delete a service, click the
column, corresponding to the service you want to delete. As usual,
a confirmation dialog box will pop up to confirm your deletion.
8.2.2 Testing Connectivity of a service
To test the connectivity of a service, click the
icon found under
the “Connectivity Test” column, corresponding to the service you
want to test. If the connectivity is successful, a success screen will
be displayed – just click <Return> to return to the Service List.
However if the connectivity test fails, you will see the failure screen
informing you that the test has failed, and the reason why. Just
click <Return> to return to the Service list.
Note: The connectivity test cannot be performed for UDP
services, IP range services and port range services.
8.2.3 Duplicate a service
To duplicate a service, click the
icon found under the
“Duplicate” column, corresponding to the service you want to
duplicate. A copy of the service will be inserted into the Service List
with the name “copy <#><service name>” (first copy is “copy 0”)
as shown in the example below:
Succendo 502/2000 User Manual 1.2
73
Chapter 8: Service Management
8.2.4 Application Access Control Rule (AACR)
The AACR (Application Access Control Rule) are rules applicable to
service commands, determining whether they can be performed or
not. For example if the AACR for the FTP command DELE is “Deny”,
then the user assigned with this AACR will not be allowed to delete
any files while performing FTP.
Note that the adding of AACR here can have an effect on the AACR
Default Action configured in “System>>Security” (Chapter 3,
Section 3.3). The AACR default action determines the nature of a
service’s commands in the event where AACR are defined for none
or some of them.
So if there is no AACR defined for a service at all, all its commands
are defaulted to “Permitted”, regardless of what is defined in the
AACR Default Action. But if some of the commands in a service
are assigned AACR, then those without an AACR will follow what is
set in AACR Default Action.
To begin defining the Application Access Control Rule for a service,
icon found under the “AACR” column, and you will see
click the
the service’s AACR list, as shown in the example below:
Clicking the <All> button will select all the names in the current
page of the list (if the list spans more than one page). Clicking
<Reverse> will unselect the selected names while select the
unselected.
To edit or delete an existing rule, click the Rule Name or the
icon. The
icon respectively. To duplicate a rule, click the
duplicated rule will be created with the original name prefixed with
a “Copy of”.
74
Succendo 502/2000 User Manual 1.2
Chapter 8: Service Management
To add a new rule, click <Add>. After the interface for adding a
new rule is displayed, complete the fields as described:
Name:
Command:
AACR name
If the service type is HTTP, the commands you
can select are either GET or POST.
However, if the service type is FTP, then the
available commands are: CDUP, CWD, DELE,
LIST, MKD, NLST, PASV, PORT, RETR, RMD, RNFR,
RNTO, SMNT, STOR, and STOU.
Parameter:
Action:
Role
Information:
Description:
The path of the object in the server that the
command is applied to
Select Deny or Permit
Select the Roles that are affected by this rule
Brief description
characters)
of
the
service
(max.
128
Once you are satisfied with your options, click <Save> to save the
rule. Your new rule should appear in the AACR List.
Note: Commands that are not assigned with an AACR will
follow what is set in the AACR Default Action in the Security
Settings (refer to Chapter 3, section 3.3)
Succendo 502/2000 User Manual 1.2
75
Chapter 8: Service Management
8.3 Client Applications
When defining a service there is an option to add client applications
to it, so that when the user accesses the service, they effectively
launch the application. An example would be a file exchange service
where a FTP client software is launched when the user select the
service.
To create a pool of client applications, you need to first access the
Client Application List. Select “Service >> Client Application” to
view the list:
8.3.1 Editing, Deleting and Duplicating existing applications
•
To edit an application, click the application, which is a
icon corresponding to the
hyperlink, or click the
application name. You will open a screen identical to the
Adding a new application interface, except that the fields are
populated.
76
•
icon.
To delete an existing client application, click the
You can also select multiple applications (selecting the check
boxes besides the names) and then click <Delete> to delete
en masse.
•
icon under the “Duplicate”
To duplicate an item, click the
column corresponding to the name of the application you
want to duplicate. The duplicated item will be created with
the original name prefixed with a “Copy of”
Succendo 502/2000 User Manual 1.2
Chapter 8: Service Management
8.3.2 Query for specific applications
You can also query for specific client
applications based on the application
name. Just enter the name (or part of
a name) and to the Name text box (as
shown in the diagram) and click
<Query> to generate a new list.
8.3.3 Adding a new client application
To add a new client application, click <Add>. The interface for
adding a new application will be displayed as shown below:
Name:
Application name
Client OS:
The Operating System where the application
resides
Service Type:
Select type of application (vnc, ftp, http, etc)
Application:
Enter the full
executable.
path
of
the
application
Example: C:\Program Files\ftp\ftp.exe
Parameters:
Any parameter required by the application.
Example:
ftp://%s where %s points to the IP address
of the FTP server to connect to
Succendo 502/2000 User Manual 1.2
77
Chapter 8: Service Management
8.4 Service Type
Here, you can configure the necessary service types used to
categorize the services displayed on the client’s interface.
You can only select service types that were defined
administrators. System pre-defined types are not selectable.
by
8.4.1 Adding a new service type
To add a new service type, click <Add>.
Name:
Ports:
Group:
78
Service type name
Select the service port type from the drop down
menu and enter the corresponding port number.
Click <Add> to add the port number to the list in the
box below. Select a port and click <Remove> to
delete it from the list
Select the group this service type will belong to
Succendo 502/2000 User Manual 1.2
Chapter 8: Service Management
8.4.2 Editing, Deleting and Duplicating existing service types
To edit a service type, click the type, which is a hyperlink, or click
icon corresponding to the type. You will open a screen
the
identical to the Adding a new service type interface, except that the
fields are populated.
icon corresponding
To delete an existing service type, click the
to the type. You can also select multiple applications (selecting the
check boxes besides the names) and then click <Remove> to
delete en masse. Note: Pre-defined service types in the system
cannot be deleted.
icon under the “Duplicate”
To duplicate an item, click the
column corresponding to the name of the service type you want to
duplicate. The duplicated item will be created with the original
name prefixed with a “Copy of”
8.4.3 Querying for specific service types
You can also query for specific service types based on the type
name. Enter the full name in the Name text box and click <Query>
to generate the search list. Note that this query will not return
partial matches.
Succendo 502/2000 User Manual 1.2
79
Chapter 8: Service Management
8.5 IP Host
In order to allow the convenient recognition of the various
application servers, you can add the mapping between IP addresses
and host names in this interface.
From the bottom of the list, there are two ways to add new IP hosts
as detailed below.
1. Type in the IP address and hostname and click <Add>.
2. Create a txt file on the local machine with IP addresses and
hostnames mapped accordingly in the file. Click <Browse…>
and select the file. Click <Import> to import the file into the
system
8.5.1 Removing a IP Host
From the Remove column in the list, click the
icon to remove
the corresponding IP host mapping. You can also select multiple IP
host mappings (selecting the check boxes beside IP Address) and
click <Remove> to delete en masse.
8.5.2 Querying for specific IP Hosts
You can also query for specific IP Hosts based on the host name.
Enter the full name in the Name text box and click <Query> to
generate the search list.
80
Succendo 502/2000 User Manual 1.2
9
Chapter
Role Management
Succendo supports a role-based access control model for defining
users’ and user groups’ rights in accessing the system’s services.
Each user or user group can have multiple roles assigned to it,
while each role can also be assigned to multiple users or user
groups.
An illustration of the m-m relationship between roles, users and
services can be found in Chapter 1, Section 1.2.
Select “Role >> Role List” from the Menu Bar to view the list of
existing Roles.
Querying for specific roles
You can also query for specific roles based on the role name. Enter
the full name in the Name text box and click <Query> to generate
the search list. Note that this query will not return partial matches.
Succendo 502/2000 User Manual 1.2
81
Chapter 9: Role Management
9.1 Adding a new role
To add a new role, click the <Add> button and the Add New Role
interface will be displayed. Complete the fields as described below:
Name:
Role name
Description:
Brief description of the role (no more than 255
characters)
Credential
Type:
Select the credential type for the role. This will
affect the service access authorization of users
belonging to this role.
For example, If the credential type of roleA is
“certificate”, then password userB cannot access
the services in this role even if userB belongs to
roleA.
Block
Internet:
Check to prohibit the user’s access to the
Internet when connected to the Intranet over
Succendo
Schedule:
Enable the role to utilize the schedule feature.
Note that the schedule will be based on the
server’s time zone and time setting (see
Chapter 3, Section 3.10 on how to set time
zone and time). Therefore changing the time
zone and time setting will have an impact on the
schedule defined here.
Service
Information:
Select the services accessible by this role (by
picking the items from the “Unselected …” list
box and put them in the “Selected …” list box
button. You can also just double
with the
click the item to move it from one list box to the
other.)
AACR
Information:
Select the AACR accessible by this role (by
picking the items from the “Unselected …” list
box and put them in the “Selected …” list box
button. You can also just double
with the
click the item to move it from one list box to the
other.)
Group
Information:
Select the user groups that will be assigned with
this role
User
Information:
Select the users that will be assigned with this
role
Click <Save> to save the information, or <Reset> to undo the
changes.
82
Succendo 502/2000 User Manual 1.2
Chapter
10
Log Management
All administrators’ and users’ activities can be logged for auditing
purpose, as well as for monitoring system resources and
troubleshooting abnormalities. The details of the log will be
described in the section “Querying for logs” in this chapter. But first,
there are some log options you will want to configure.
10.1 Configuring Log options
Select “Log >> Configure” at the Menu Bar to access the Log
option screen shown below:
Maximum
log entries:
Maximum number of log entries you want to be
recorded into the Succendo flash disk (you can
define an integer from 5000 to 20000)
End user
access log:
Select to record information on users’ access to
services
Log auto
export
config:
Select to enable the auto export of log files. Click
<Detail> to configure the various associated
parameters. Please refer to Section 10.1.1
below for details.
Succendo 502/2000 User Manual 1.2
83
Chapter 10: Log Management
Syslog
server:
Syslog
server2:
IP address of the first Syslog server, where the
logs will be kept
IP address of the second Syslog server
Click <Save> to save the current settings or <Reset> to reset the
parameters to the system default values (No Syslog server,
maximum log entries set at 5000). You can also export the current
logs into a locally stored file by clicking <Export>. To clear the
current logs, click <Clear>.
10.1.1 Automatic Export of Logs
Click <Detail> on the interface to configure the various parameters
such as the location to export the logs to, the type of logs to export
and auto export schedule. The interface is shown below:
Remote ftp server configure
84
IP address:
IP address of the remote FTP server to export the
file to
User name:
Login user name for the FTP server
Succendo 502/2000 User Manual 1.2
Chapter 10: Log Management
Password:
Path:
Corresponding login password
Directory and/or filename to store the file to
Time Configure
Export
Time:
Interval:
Specify the time and date to begin the automatic
export by using the date picker icon.
Specify the interval between each export (days)
Query Condition
Operator:
Specify the user whose log records are to be
exported during this scheduled automatic export.
Result:
Specify whether to export log records of failed
(“Fail”), successful (“OK”) activities or both
Level:
Log Type:
Select the levels of the logs to be exported
Select the type of logs to be exported
Click <Save> to save the configuration.
10.2 Query for logs
To search and view logs recorded, select “Log >> Log Query” at
the Menu Bar. The Log Query interface will be displayed as shown
below:
There are 7 criteria you can set to narrow your log search. These
are:
Level:
The level of severity of the logs you want, ranging
from Warning to Critical. See the section “Log
Levels” below for more details
Result:
To include logs that indicates a “OK” (successful
operation), “Fail” (failed operation) or both
Show:
Operator:
Succendo 502/2000 User Manual 1.2
Select the number of log items to display (10-200)
Username of the user whom you would like to
search his or her activities recorded. Select
precision to avoid returning partial name matches
in the query results
85
Chapter 10: Log Management
Time
Range
(From)
and (to):
The range of the Date and Time of logs you want to
include in your query. You can either type the
information into the text boxes provided (in YYYYMM-DD HH:MM:SS format), or use the Date Picker
) to select a date and enter the time,
button (
as shown below:
Click the arrows
to select the
previous or next
month
Click hyperlink
to select the
exact date
Enter the time in hh:mm:ss format
Log Type:
The type of logs you want to include in your query.
This can be one of the four types available. See the
following section “Log Types” for details
Sub Type:
Depending on the Log type selected, this field will
be populated accordingly. See the following section
“Log Types” for details on sub type
Note: You must enter the time before setting the date in the
Date Picker
86
Succendo 502/2000 User Manual 1.2
Chapter 10: Log Management
You can click <Reset> to clear your selection anytime. Once you
have decided on your criteria and entered the respective values,
click <Query> to begin the search, and the log list will be displayed
as shown in an example query below:
Select the page
number to go to from
the drop down menu
Click to go to
specific page
Using the default values of the criteria will yield the entire list of
logs.
10.2.1 Log Levels
There are 8 types of log level:
EMERG:
Emergency, system is unstable and requires
immediate attention from the administrator
ALERT:
Requires immediate attention and action from the
administrator
CRIT:
Critical conditions. Requires immediate attention
and action from the administrator
ERR:
WARNING:
NOTICE:
HA:
INFO:
DEBUG:
Succendo 502/2000 User Manual 1.2
An erroneous event occurred
Usually refers to conditions that require attention
before it deteriorates into critical
Normal but significant conditions
Records
HA
activities
synchronization
such
as
automatic
Informational messages
Detailed debug information that is useful for the
technical support to analyze the logs in the event of
a system failure
87
Chapter 10: Log Management
10.2.2 Log Type
The table below shows the Log types and their corresponding subtype, if any:
Log Type
Sub Type
Remarks
User management
Administrator
management
Certificate
management
Management
(MGT)
Service management
Role management
Log management
System monitoring
System management
These are activities
related to various
management functions
carried out by the
Administrators. Every
time such functions are
selected and operated,
the system will record
them into the logs.
Client policy
ARL management
These are activities
related to miscellaneous
functions initiated by the
end users. Note that this
activities will only be
logged if the End user
access log option is
toggled (see Section
10.1)
Logout
User
Login
88
System
-
System initiated or
related activities
Service
-
Service initiated or
related activities
HA
-
HA initiated or related
activities
Succendo 502/2000 User Manual 1.2
Chapter
11
System Monitoring and Control
Succendo provides tools to help you monitor the system’s resources and other aspect of system
usage. This chapter will describe and explain the various charts and information.
11.1 Monitor >> Monitoring Item
This is a general information page, a quick summary of system
usage, number of users, session, etc. Select “Monitor >>
Monitoring Item” to view this information page:
CPU usage:
The
CPU’s
current
activity
represented by a percentage
and
usage,
Memory
usage:
The percentage of Random Access Memory
(RAM) currently used by the system
Disk usage:
The percentage of hard disk space currently used
by the system
Succendo 502/2000 User Manual 1.2
89
Chapter 11: System Monitoring and Control
Model:
Model number of the Succendo device
Version:
Current build of Succendo
Client
Version:
Version of the client end component and ActiveX
Max license
users:
System Date
and Time:
Uptime:
eth0, eth1,
… ethN:
Maximum number of users as granted by the
current license
Current system data and time
How long Succendo has been up
TX and RX packets speed of Ethernet ports
Session
Number:
Number of sessions spawned at the moment
User
Number:
Current number of end-users online
11.2 Monitor >> Online User
Select “Monitor >> Online User” to access this page, which
displays the list of users currently online. This is also where you can
choose to terminate any online connection between users and the
system.
Name:
User name. The current administrator will be
displayed with a “*” followed by the name.
Authentication
Server:
Name of the authentication server used by this
user
Admin:
Login Time:
Login IP:
Whether user has administrative rights
Date and time user login
IP address where user login from
You can click the <Refresh> button to refresh the list, or click the
<Terminate> button to terminate selected users (by clicking the
corresponding check boxes) connection.
90
Succendo 502/2000 User Manual 1.2
Chapter 11: System Monitoring and Control
You can also further view the session information of a non-admin
user by clicking the hyperlinked user name. Below is an example of
the session information of an online user:
From here you can click <Refresh> to refresh the information, or
click the <Terminate> button to terminate selected sessions (by
clicking the corresponding check boxes). The column names are
very much self-explanatory.
11.3 Monitor >> System Chart
This page shows a series of charts displaying in details the various
usage patterns of the CPU, RAM, Disk space, etc. Note that each
chart displays three values, and the line in blue indicates the
maximum value recorded at the corresponding time, the yellow line
indicates the minimum value recorded at the corresponding time.
The colored areas in green indicate the average value of the
collected data for the corresponding time interval.
11.3.1 CPU Usage
This chart shows the combined daily CPU usage of all connected
CPUs in the system based on percentage use versus time at 2-hour
intervals. To view the chart for individual CPUs, click <Detail> from
the top of the chart.
Succendo 502/2000 User Manual 1.2
91
Chapter 11: System Monitoring and Control
11.3.2 Memory Usage
This chart shows the daily RAM usage based on percentage use
versus time at 2-hour intervals.
11.3.3 Disk Usage
This chart shows the daily Disk usage based on percentage use
versus time at 2-hour intervals.
11.3.4 Active session Usage
This chart shows the number of active sessions based on the
number of concurrent sessions versus time at 2-hour intervals.
92
Succendo 502/2000 User Manual 1.2
Chapter 11: System Monitoring and Control
11.3.5 Active users Usage
This chart shows the number of active users based on the active
users online versus time at 2-hour intervals.
11.3.6 eth port’s TX package speed
The top chart shows the daily eth port’s TX package speed (at bit/s)
based on the speed versus time at 2-hour intervals. The bottom
chart shows the daily eth port’s RX package speed (at bit/s) based
on the speed versus time at 2-hour intervals. The statistics
displayed in the 2 charts is the combined statistics collected from
all ports in the system.
To view the individual port’s charts, click <Detail> above the TX
chart. An example of the chart for Ethernet port 0 is shown below,
with the TX statistics in yellow and the RX statistics in blue.
Succendo 502/2000 User Manual 1.2
93
Chapter 11: System Monitoring and Control
11.3.7 Query for charts from other date
You can query for charts showing information from other dates and
times. Just select a date from the date picker (in the Date Picker
interface, remember to set the time first before selecting the date)
and click the <Query> button.
You can also decide if the charts would display daily, weekly,
monthly or yearly information. Select your option from the drop
down box.
11.3.8 Data collection interval
By default, Succendo collects the statistical data for the above
charts in a 5 minute interval. To change this interval, select the
time from the drop down menu (between 1 to 5 minutes) and click
<Save>. To not collect the data, select 0 Minute from the drop
down menu and click <Save>.
94
Succendo 502/2000 User Manual 1.2
Chapter 11: System Monitoring and Control
11.4 Monitor >> Service Chart
This page shows the amount of traffic flow each service used at
intervals. Select “Monitor >> Service Chart” to view the Service
List:
To see the usage chart of the service, click the service name
hyperlink. The chart will be displayed, as shown in the example
below:
The chart shows amount of traffic generated by the service based
on the amount of traffic (in Megabytes) versus the time in 2-hour
intervals. Just on top of the chart shows the name of the server
which the service originates.
11.4.1 Query for chart from other date
You can query for service chart showing the service information
from other dates and times. Just select a date from the date picker
and click the <Query> button.
You can also decide if the charts would display daily, weekly,
monthly or yearly information. Select your option from the drop
down box.
Succendo 502/2000 User Manual 1.2
95
Chapter 11: System Monitoring and Control
11.5 Monitor >> Top N
This page shows top ranking entities in 4 areas: services most
requested, users stayed online the longest, users logging in and out
frequently, and heavy users of services.
For each individual area you can specify the number of top entries
you want to see in that area. For example you can specify to see
the top 10 entries in Services most requested, Top 5 users
stayed online the longest, Top 7 users logging in and out
frequently, and Top 3 heavy users of services. Just enter an
integer into the respective text boxes and click the <Query> button.
Deny at the bottom of the screen represents the number of times
users have been denied from accessing a service
Error at the bottom of the screen represents the number of times
erroneous user logins were carried out.
Click <Reset> to reset the TopN data.
Click <Download> to save the Top N statistics on the current page
into a txt file into the local storage.
Click <Print> to print the Top N statistics on the current page.
96
Succendo 502/2000 User Manual 1.2
Chapter
12
Client Policies
Client policies exist to ensure that the end users’ workstation
maintains a secured network environment and complies with
corporate security policies, especially for mobile users and users
who frequently perform remote-access. Policies are made up of
Rules, which can be defined by the administrators. Currently
Succendo check and maintain the end users’ workstation based on
two types of rules: Host Check and Cache Clean.
12.1 Client Policy Rules
Select “Client Policy >> Rule” to view the list of rules, as shown
below:
Click the <Policy> button to switch to the Policy List screen (which
can also be accessed by selecting “Client Policy >> Policy”)
icon, you can duplicate a rule immediately and
By clicking the
add it into the Rule list. The duplicated rule will be created with the
original name prefixed with a “Copy of”.
Or you can click
to delete a rule from the list.
Editing the existing rule is done by clicking on the rule name
hyperlink. The edit screen is identical to the Add New rule interface
except that the fields are populated.
Succendo 502/2000 User Manual 1.2
97
Chapter 12: Client Policies
12.1.1 Adding a new Rule
Click the <Add> button to open the Add New rule interface, and
complete the fields described below:
98
Name:
Rule name (Note that the rule name will be made
know to the user when there is a violation)
OS Type:
Operating System – currently select from Windows
2000, Windows XP, Windows 2003 or Windows All
Check
Type:
Define the type of check to be made with this rule.
Select Host Check, which check various aspect of
the users’ workstation; or Cache Clean, which
clears the local cache of the workstation.
Rule Type:
Depending on the Check Type selected, you can
specify which aspect of check to perform or which
part of the cache to clear.
•
Regfold - Register folders
•
Regkey – Register Keys
•
File – Client-end file
•
Service –Client service
•
Driver – Client-end driver
•
Process – Client-end process
•
Module – Client-end module
•
Patch Level – Windows’ patch level
•
Port – Client-end port
•
File version – Version of software used to
create/modify the file on the client-end
•
Clean cookie – clear the cache cookies
•
Clean file – clear temporary internet files
and web history files
•
Clean temp – clear temp files (as defined
in the environment variable %temp%)
•
Clean user credentials & auto-complete –
this clears any user credentials from
previous authentication, and clears all
cache in auto-complete features found in
text boxes
•
Delete directory – deletes the data stored
in the directory during the connection
Succendo 502/2000 User Manual 1.2
Chapter 12: Client Policies
Check Item:
Name of the specific item. This field is not
available if Rule Type is “Patch Level”.
Examples of check item values for rule type:
“Regfold” –
HKEY_LOCAL_MACHINE\SOFTWARE\INTEL
“Regkey” –
HKEY_LOCAL_MACHINE\SOFTWARE\INTEL\IG
DI\install
Item Value:
Message URL:
Policy
Information:
Description:
The value of the item to check against (based
on Rule Type selected)
When a rule fails, the system will display an
error message, which is clickable and
hyperlinked to this URL.
Select the policies that will include this rule
Brief description of the rule (max. 128
characters)
Click <Save> to save the information, or <Reset> to undo the
changes...
12.1.2 Query for specific rules
You can also query for specific rules
based on the rule name. Just enter the
name (or part of a name) to the Name
text box (as shown in the diagram)
and click <Query> to generate a new
list.
Succendo 502/2000 User Manual 1.2
99
Chapter 12: Client Policies
12.2 Client Policy
Client policies are defined by their type and the rules they include.
Each policy can be defined by multiple rules. To see the list of
existing policies, select “Client Policy >> Policy” to see the list of
policies:
icon, you can duplicate a policy immediately and
By clicking the
add it into the Policy list. The duplicated policy will be created with
the original name prefixed with a “Copy of”.
Or you can click
to delete a policy from the list.
Editing the existing policy is done by clicking on the policy name
hyperlink. The edit screen is identical to the Add New policy
interface except that the fields are populated.
12.2.1 Adding a new Policy
Click the <Add> button to open the Add New Policy interface and
complete the fields described below:
Name:
Policy Type:
Policy name
Select Before Login, where the policy is assigned
to the user before login – the policy will be
enforced during and after user login. This Policy
Type will be active only when the “Global Check
Status” is enabled (see Chapter 3, Section 3.3).
Select After Login, where it is enforced after the
user login.
Time:
The duration between each enforcement of
policies
Rule
Information:
Select the rules for this policy
Description:
Brief description of the policy
Click <Save> to save the information, or <Reset> to undo the
changes.
100
Succendo 502/2000 User Manual 1.2
Chapter 12: Client Policies
12.2.2 Query for specific policies
You can also query for specific policies
based on the policy name. Just enter
the name (or part of a name) to the
Name text box (as shown in the
diagram) and click <Query> to
generate a new list.
Succendo 502/2000 User Manual 1.2
101
Chapter 12: Client Policies
102
Succendo 502/2000 User Manual 1.2
Chapter
13
Access Restriction List
Access restriction lists (ARL) are rules setup by the Administrator to
narrow down and restrict the access privileges of specific users
(both administrators and end-users). In general, an ARL is a pair of
IP address and port that the system assigns a “deny” or “permit”
action. The ARL can then be assigned to specific users or user
groups.
Whenever the user attempts to log into the system, a check will be
made to determine if the user is assigned any ARL, after they have
been successfully authenticated (via username and password). If
one or more ARL are assigned to the user, then the system will
start to match the IP addresses and ports with the one the user is
currently logging in from. If a match is found, the system will
perform the action defined for the ARL, that is, to deny or permit
the user to continue to login. This way, administrator can define
specifically where a user can login to the system, for example,
denying the user from logging into the system from home, while
permitting them to login from a specific workstation in remote
branch
office.
With this feature, there is even greater flexibility in tailoring access
and security levels for specific users.
Adding the ARL to a user can have an effect on the ARL Default
Action configured in “System >> Security” (Chapter 3, Section
3.3). The ARL default action decides the action to be taken if the
user is logging in from IP addresses and ports that are not defined
in an ARL (if ARL was assigned to the user). If there is no ARL
defined for a user at all, they can have access to the system from
any IP addresses, via any port, regardless of what is defined in the
ARL Default Action. The following table best illustrates the
concept:
Succendo 502/2000 User Manual 1.2
103
Chapter 13: Access Restriction List
ARL Default Action = DENY
ARL Defined?
Effect
None
User can access the system from any IP
addresses or ports
ARL=DENY
defined for port
eth0, IP address
220.11.6.5
User cannot access the system from
220.11.6.5 at eth0, neither can he access
from any other port or IP addresses due to
the ARL Default Action being DENY.
ARL=PERMIT
defined for port
eth0, IP address
220.11.6.5
User can access the system from 220.11.6.5
at eth0, but will be unable to access from
any other port or IP addresses due to the
ARL Default Action being DENY.
ARL Default Action = PERMITTED
ARL Defined?
Effect
None
User can access the system from any IP
addresses or ports
ARL=DENY
defined for port
eth0, IP address
220.11.6.5
User cannot access the system from
220.11.6.5 at eth0, but will be able to access
from any other port or IP addresses due to
the ARL Default Action being PERMITTED.
ARL=PERMIT
defined for port
eth0, IP address
220.11.6.5
User can access the system from 220.11.6.5
at eth0, and will also be to access from any
other port or IP addresses due to the ARL
Default Action being PERMITTED.
To see the current list of ARL, select “ARL >> Configure” at the
Menu Bar.
icon, you can duplicate a rule immediately and
By clicking the
add it into the ARL list. The duplicated rule will be created with the
original name prefixed with a “Copy of”
Or you can click
to delete a rule from the list.
Editing the existing ARL is done by clicking on the ARL name
icon corresponding to the ARL name.
hyperlink, or clicking the
The edit screen is identical to the Add New ARL interface (shown in
the diagram below) except that the fields are populated.
104
Succendo 502/2000 User Manual 1.2
Chapter 13: Access Restriction List
13.1 Adding a new ARL
Click <Add> to access the Add New ARL interface shown below:
Name:
Entry
Interface:
Sourc IP:
Sourc Mask:
Action:
ARL name
The type of port through which a user can
access the Succendo interface
IP address which the rule would deny or permit
Subnet mask of the IP address
Select which action (deny or permit) the system
will perform according to this rule
Click <Save> to save the new Rules or <Reset> to undo the
changes.
Succendo 502/2000 User Manual 1.2
105
Chapter 13: Access Restriction List
13.2 Querying for ARL
You can make use of the <Query> button at the ARL list screen to
search for a specific ARL(s) based on the ARL name.
Simply type the name into the
Name text box and click
<Query>.
The system will generate a list of ARLs with names that match or
partially match the name field here. Querying with a blank name
field will yield the entire list of ARLs. Note that any leading white
spaces before a name will be automatically removed from the
search phrase.
106
Succendo 502/2000 User Manual 1.2
Chapter
14
Network Connection
Being a SSL-VPN, Succendo primary offers the remote access of webenabled applications to the end-users. This model is sufficient in
providing web-based applications to partners and most employees.
However, other staff members such as IT personnel may require
access to the entire IP network so as to be able to carry out their
duties. Succendo can be configured to monitor and provide access to
all internal network resources through the Network Connection (NC)
access model.
You can configure the NC settings to be deployed in the following ways:
1.
Single direction access from the NC client to the application
servers
2.
Bidirectional access from the NC client to the application servers
and vice versa
3.
Proxy client to NC client such as connecting IT administrators to
the NC client to provide technical support when needed
4.
Securing connections internally by transferring data between the
internal application server and Succendo via the secured NC
tunnel
5.
Connection between 2 peer NC clients
Succendo 502/2000 User Manual 1.2
107
Chapter 14: Network Connection
14.1 Succendo NC Operation
To enforce the security of remote accesses to the Intranet, you can
setup Succendo to allow or deny access to specific resources via NC. To
setup Succendo to provide NC service to clients, complete the following
steps.
1.
Configure IP Pools
2.
Add VPN Users
3.
Configure the NC environment
4.
Add NC accessible services
5.
Manage the roles
The sections below detail each of the 5 steps above.
14.2 IP Pools
IP pools are used by Succendo to assign IP addresses to NC user’s
virtual network cards. When a user successfully logs into Succendo and
activates NC, Succendo will assign an IP address to the user from his
assigned IP pool. This address will be the user’s virtual NIC address.
Note that each user can be assigned to only 1 IP pool.
If the assigned IP address conflicts with the user’s physical network
card’s IP address, Succendo will re-assign an IP address to the user.
Select the menu option “IP Pool >> IP Pool List” and the list of IP
pools will be displayed.
Click <All> to select all IP pools displayed on the current page. Clicking
<Reverse> will select the unselected IP pools while un-selecting the
selected ones. Click <Remove> to delete all selected IP pools. You can
also click <Empty> to remove all IP pools currently displayed.
108
Succendo 502/2000 User Manual 1.2
Chapter 14: Network Connection
14.2.1 Adding a new IP Pool
Click the <Add> button to open the Add New IP Pool interface and
complete the fields described below:
Name:
Pool:
Name of the IP Pool
Enter the Start IP address and End IP address
of an IP range and click <Add> to add the range
into the list box below. Select an IP range from
the box and click <Remove> to remove the
range from the list. As Succendo defaults all IP
addresses assigned to end-user’s to be of
network length 32, it is not necessary to specify
the network mask of the IP range.
Note that the maximum number of IP range per
IP pool is 6.
User
Information:
Select the users to be assigned to this IP Pool by
selecting them from the Unselected box and
to move them into the Selected box.
click
Note that each user can only be assigned to 1 IP
pool and the Unselected box will only display the
users that are not yet assigned to any IP pool.
Description:
Brief description of this IP Pool
Click <Save> to save the new IP pool.
Note that if the administrator defines an IP Pool with the IP Pool name
equal to that of an authentication server, users, whose logins are
authenticated by this server, will be able to obtain an IP address from
this authentication server’s IP pool if the user was not assigned an IP
Pool on Succendo.
Administrators can also edit or remove the assigned IP pool from a
user in the edit/add user interface as will be demonstrated in Section
14.2.
14.2.2 Editing, Deleting and Duplicating Existing IP Pools
•
To edit an IP pool, click the hyperlinked name, or the
icon
corresponding to the pool. You will open an interface identical
to the one allowing you to add new IP pool, except this time
the fields are populated.
•
To delete an existing IP pool, click the
to the IP pool.
•
icon under the “Duplicate”
To duplicate an IP Pool, click the
column corresponding to the name of the pool you want to
duplicate. The duplicated item will be created with the original
name prefixed with a “Copy of”
Succendo 502/2000 User Manual 1.2
icon corresponding
109
Chapter 14: Network Connection
14.2.3 Querying for specific IP Pools
You can also query for specific IP pools based on the name. Enter
the full or partial name in the Name text box and click <Query> to
generate the search list.
14.3 VPN Users
Setup the users that are able to activate NC access remotely through
Succendo. Select “User >> User Accounts” from the menu and the
list of currently existing users will be displayed. Either click <Add> to
add a new NC user or edit an existing user to enable NC access for by
assigning the users IP Pools. In the IP Pool field on the interface,
select the appropriate IP Pool from the drop down menu (displaying
the list of IP Pool names configured in Section 14.1).
Please refer to Chapter 7, Section
adding/editing of user accounts.
7.2 for details on the
Note:
The IP Pools must not contain any IP addresses currently
existing in the network.
Configure static routes on the application server gateways to
ensure that application server data to addresses in these IP
pools can be routed to Succendo.
110
Succendo 502/2000 User Manual 1.2
Chapter 14: Network Connection
14.4 Configure NC Environment
Configure the NC environment that will be downloaded into the remote
user’s VNIC network tables when NC access is activated. These include
the DNS server addresses, WINS server addresses and user
reachable routes. Select “System >> NC Config” to view the
configuration interface as shown below:
DNS Server:
DNS server addresses to be used by the clients
WINS Server:
WINS server addresses to be used by the clients
Route:
Reachable routes (IP and network mask) to be
added to the client’s route table.
These domains ensure that users’ accesses to the corresponding
network area are sent to Succendo via the NC network card.
Enter the relevant information into the textboxes and click the
corresponding <Add> button to add it into the list below. Select an
item from the list and click <Remove> to remove it from the list.
You can also change the priority of the server addresses and routes
by clicking the respective up and down arrows to the right side of
each list box.
Click <Save> to save the NC environment.
Succendo 502/2000 User Manual 1.2
111
Chapter 14: Network Connection
14.5 NC Accessible Services
Add the NC services to be accessible remotely. Select “Service >>
Service List” from the menu and click <Add>
Select Access Method to be “NC” and configure the remaining fields
accordingly. Refer to Chapter 8, Section 8.1 for details on adding
services.
14.6 Roles
Succendo authorizes user’s access to services via the management of
roles. Hence, it is necessary to add the roles needed for NC accesses.
Select “Role >> Role List” from the menu and click <Add> to add a
new role. Please refer to Chapter 9 for details on role management
and configuration.
112
Succendo 502/2000 User Manual 1.2
Chapter
15
Shell Commands
Shell commands can be entered when you connect Succendo (via
the serial port) to a console (example, the Hyper Terminal software
in Windows). Once you enter into the console screen, press CTRL-C
to enter into Monitor Mode. You can start entering the commands
at the “Monitor>” prompt.
There are 3 modes where you can run the shell commands: Monitor
Mode, Normal Mode and Configure Mode. The same function or
command may work differently, and have different purpose and
applications under different mode.
15.1 Monitor mode
The Monitor Mode is essentially a recovery mode while Succendo
start-up. Under this mode, Succendo can only provide basic system
protection functions – no SSL-VPN functions are available.
To enter into Monitor Mode, press CTRL-C when the screen displays
the message “Press ‘Ctrl-C’ to enter monitor” during system startup. Once the system successfully enters Monitor mode, you will see
the “Monitor>” prompt cursor blinking on the display.
#Command list (Applicable for monitor v1.05-e):
erase
delete data
exit
exit
interface
configure interface
ip
IP information
no
delete a configure
ping
send echo message
reload
reload system
restore
restore system
show
show system information
update
update core or software
Succendo 502/2000 User Manual 1.2
113
Chapter 15: Shell Commands
?
Command
string
?
Function
Under any mode, when a “?” is typed after a
command, the monitor will display the
parameters or sub-commands available for this
command.
Example
Monitor>interface ?
Commands:
Eth0
Interface eth0
Eth1
Interface eth1
<tab>
Command
string
<Tab> (as in pressing the TAB key on the
keyboard)
Function
Under any mode, pressing the TAB key after
typing a part of a command word would either
list out a list of shell commands that is similar
to the partial word, or complete the partial
word if there is only one command word that
resembles the partial word.
Example
Monitor>inte <TAB>
Monitor>interface
114
Succendo 502/2000 User Manual 1.2
Chapter 15: Shell Commands
erase
Command
string
erase all | data
Function
Delete all data, or just delete configuration file
and log
Example
Erase user data
Monitor>erase data
Erase all data
Monitor>erase all
Note
Erase All will erase Succendo’s program data.
The system will not be able to start unless a
system upgrade is done. Use Erase All only if
you are about to do a system upgrade or to do
a re-installation.
Erase would erase configuration settings and
clears the logs (thus restoring to factory
default).
Regardless of whether you are using erase data
or erase all, the user setting for SSL VPN will
be discarded. This includes IP address, route
settings, administrator settings, user and user
group information and role information. Ensure
there is a backup for this information before
using this command.
exit
Command
string
exit
Function
Exit from monitor
Note
Using the hotkey <CTRL-C> has the same
effect.
interface
Command
string
Interface ethX ip A.B.C.D M.M.M.M
Function
Setting ip address of a ethernet port
Example
Monitor>interface eth0 ip 1.1.1.1
255.255.255.0
Succendo 502/2000 User Manual 1.2
115
Chapter 15: Shell Commands
Command
string
Interface ethX up|down
Function
Switch the ethernet port on or off
Example
To switch off the ethernet port::
Monitor>interface eth1 down
To switch on the ethernet port:
Monitor>interface eth1 up
ip
Command
string
Ip route A.B.C.D M.M.M.M A.B.C.D
Function
Establish static routes
Example
Monitor>ip route 1.1.1.1 255.255.255.255
218.201.10.120
no
Command
string
No ip route A.B.C.D M.M.M.M
Function
remove existing static routes
Example
Monitor>no ip route 1.1.1.1 255.255.255.255
ping
Command
string
Ping A.B.C.D
Function
Ping destination IP address
Example
Monitor>ping 86.18.1.1
!!!!!
5 packets transmitted, 5 packets received
reload
116
Command
string
reload
Function
Reload system
Note
Reloading the SSL VPN would severe all
services.
Succendo 502/2000 User Manual 1.2
Chapter 15: Shell Commands
restore
Command
string
Restore admin | setting
Function
Restore the administrator’s (“admin”) default
settings, excluding ARL and description setting,
or restore factory default settings.
Note
When factory default settings are restored, all
user-defined settings will be lost.
The restore admin command will restore all
factory default settings for the system default
administrator other than settings for ARL and
description.
show
Command
string
show interface ethX |<cr>
Function
Show information of a ethernet port
Example
Monitor>show inter eth1
ip: 86.48.1.6
up
hw: 00:0e:2e:2d:80:66
Command
string
show ip route
Function
show IP routing table
Example
Monitor>show ip route
Network
Netmask
86.48.0.0
255.255.0.0
0.0.0.0
Succendo 502/2000 User Manual 1.2
0.0.0.0
state:
Route
eth1
86.48.1.1
117
Chapter 15: Shell Commands
update
Command
string
Update monitor | system HOST www|ftp
{username password} FILE
Function
Update monitor or system file from HOST, using
www or ftp
Example
Update the monitor via WWW:
Monitor>update monitor 211.23.14.175 www
monitor-v1.05d.bin
Update the monitor via anonymous FTP login:
Monitor>update monitor 211.23.14.175 ftp
anonymous a monitor-v1.05d
Update the monitor via FTP user login:
Monitor>update monitor 211.23.14.175 ftp
admin admin monitor-v1.05d.
Update the system via WWW:
Monitor>update system 211.23.14.175 www
d3p4.bin
Update the system via anonymous FTP login:
Monitor>update system 211.23.14.175 ftp
anonymous a d3p4.bin
Update the system via FTP user login:
Monitor>update system 211.23.14.175 ftp
admin admin d3p4.bin
118
Succendo 502/2000 User Manual 1.2
Chapter 15: Shell Commands
15.2 Normal mode
If the system start-up normally, it will be in Normal Mode where all
SSL-VPN services are activated. Under this mode, you can
configure basic system parameters.
#Command list:
configure
turn on configuration commands mode
exit
exit from current EXEC mode
generate
generate new local certificate
ping
send echo message
poweroff
switch off the system
reload
reload the system
restore
restore the system
show
show running system information
traceroute
send echo message
update
who
update software
show all login users
?
Command
string
?
Function
Under any mode, when a “?” is typed after a
command, the monitor will display the parameters
or sub-commands available for this command.
Example
Succendo# show ?
Commands:
interface Interface configuration commands
ip
version
Succendo 502/2000 User Manual 1.2
Internet protocol configure command
software version
119
Chapter 15: Shell Commands
<tab>
Command
string
<Tab> (as in pressing the TAB key on the
keyboard)
Function
Under any mode, pressing the TAB key after typing
a part of a command word would either list out a
list of shell commands that is similar to the partial
word, or complete the partial word if there is only
one command word that resembles the partial
word.
Example
Succendo# conf <TAB>
Succendo# conf terminal
configure
Command
string
configure terminal
Function
Enter configure mode
exit
Command
string
exit
Function
Exit from shell
generate
120
Command
string
generate local certificate
Function
Generates a new local certificate
Example
Succendo# generate local certificate
Succendo 502/2000 User Manual 1.2
Chapter 15: Shell Commands
ping
Command
string
Ping WORD | <CR>
Function
Ping destination DNS name or IP address
Ping <CR> (Extended ping – you will be guided
to set a few parameters before the system does
the ping)
Example
Normal ping command:
ssl_vpn# ping FTPServer.806lab.com (DNS name
or IP address)
Press key (ctrl + shift + 6) interrupt it.
Sending 5, 76-byte ICMP Echos to 192.168.1.2,
timeout is 2 seconds:
!!!!!
Success rate is 100% (5/5). Round-trip
min/avg/max=0/0/1 ms.
Extended ping command:
ssl_vpn# ping
Target IP address or hostname: 192.168.1.2
(must specify destination IP address)
Repeat count [5]: 12 (number of ping packets,
default 5)
Datagram size [76]: 78 (ping size, default 76
characters)
Timeout in seconds[2]: 3 (Timeout, default 2
seconds)
Source address [not specify]: 192.168.2.2
(specify source address. Default is address not
specify)
Press key (ctrl + shift + 6) interrupt it.
Sending 12, 78-byte ICMP Echos to 192.168.2.2,
timeout is 3 seconds:
!!!!!!!!!!!!
Success rate is 100% (12/12). Round-trip
min/avg/max=0/0/1 ms.
Succendo 502/2000 User Manual 1.2
121
Chapter 15: Shell Commands
poweroff
Command
string
poweroff
Function
Power off the system, if it supports APM
(advanced power management)
reload
Command
string
reload
Function
Reload system
restore
122
Command
string
restore setting
Function
Restore to factory setting (after restore, you
should reload system)
Note
After restoration, the IP address will be restored to
factory default’s 92.168.1.100, the administrator
user name and password restored back to default
“admin” and “admin” respectively, and all other
settings are lost.
Succendo 502/2000 User Manual 1.2
Chapter 15: Shell Commands
show
Command
string
show interface ethX | <cr>
Function
Show ethernet port(s) information
Example
Shows a specific port information
ssl_vpn# show interface eth1
eth1:
IP Type: Manual
Flags: (0x1043) UP
Internet address: 211.23.16.15
Netmask: 255.255.0.0
Ethernet address: 00:30:18:a3:43:f3
Shows all ports’ information
ssl_vpn# show interface
eth0:
IP Type: Manual
Flags: (0x1043) UP
Internet address: 86.18.1.15
Netmask: 255.255.0.0
Ethernet address: 00:0e:2e:2d:cf:0b
eth1:
IP Type: Manual
Flags: (0x1043) UP
Internet address: 211.23.16.15
Netmask: 255.255.0.0
Ethernet address: 00:30:18:a3:43:f3
Command
string
show ip route
Function
show IP routing table
Example
ssl_vpn# show ip route
Destination
Netmask
Gateway
86.48.0.0
255.255.0.0
211.23.0.120
211.23.0.0
86.18.0.0
0.0.0.0
Succendo 502/2000 User Manual 1.2
255.255.0.0
255.255.0.0
0.0.0.0
eth1
eth0
211.23.254.254
123
Chapter 15: Shell Commands
Command
string
show license
Function
show the device’s license information
Example
Succendo# show license
System license information:
ID: e21d25beb490d844
Key: --License users: 25
Command
string
Show running
Function
Prints the system operation configuration
information
Example
Succendo# show running
System version information:
System: Succendo 3.2 (Build test)
20061114120636
Client: build20061114120745
hostname Succendo
interface eth0 ip 86.18.33.10 255.255.0.0
interface eth1 ip 86.48.33.10 255.255.0.0
interface eth2 ip 0.0.0.0 0.0.0.0
interface eth3 ip 86.88.33.10 255.255.255.255
ssl encrypt strength medium
ssl port 443
Command
string
Show version
Function
show software version
Example
ssl_vpn# show version
System version information:
System: Succendo3.0.0 (Build 9)
20051216142037
Client: build20051216142051
124
Succendo 502/2000 User Manual 1.2
Chapter 15: Shell Commands
traceroute
Command
string
Traceroute HOST
Function
Trace the hops on route to the destination host.
Example
Succendo# traceroute 86.18.1.1
Press key (ctrl+shift+6) interrupt it.
Tracing the route to 86.18.1.1, min ttl = 1, max
ttl = 30.
1 86.18.1.1
6.561ms
2.270ms
1.474ms
update
Command
string
Update system HOST www | ftp {username
password} FILE
Function
Update system using www or ftp
Example
Update via WWW:
update system 211.23.4.175 www d3p4.bin
Update via anonymous FTP login:
update system 211.23.4.175 ftp d3p4.bin
Update via FTP user login:
update system 211.23.4.175 ftp d3p4.bin
warmghost 810427
who
Command
string
who
Function
Show all login users on shell
Example
ssl_vpn# who
Line
User
Host
Idle
Total
---------------------------------------------vty0
Succendo 502/2000 User Manual 1.2
admin
211.23.4.9
00:00:00
00:27:29
125
Chapter 15: Shell Commands
15.3 Configure mode
Configure Mode is part of the Normal Mode. To enter this mode,
type “configure” and press ENTER while you are in Normal Mode.
Under this mode, you can configure the system’s network-related
information such as IP address, route, etc.
#Command list:
end
exit from configuration mode
exit
exit from current EXEC mode
hostname
configure host name of local machine
interface
interface configuration commands
ip
internet protocol configure command
no
negate a command or set its defaults
ssl
Configure ssl related parameters
end / exit
Command
string
end
Function
Return to normal mode
exit
hostname
Command
string
Hostname NAME
Function
Set hostname
Example
ssl_vpn(config)# hostname Succendo3
Succendo3(config)#
Note
126
First character of the name must be an alphabet,
and the name must not be longer than 64
characters.
Succendo 502/2000 User Manual 1.2
Chapter 15: Shell Commands
interface
Command
string
Interface ethX ip A.B.C.D M.M.M.M
Function
Setting ethernet port ip address manually or as
DHCP client
Example
Set port address manually:
Interface ethX ip dhcp
ssl-vpn(config)# interface eth0 ip 86.48.1.15
255.255.0.0
Set port to retrieve address from DHCP
ssl-vpn(config)# interface eth0 ip dhcp
Command
string
Interface ethX up | down
Function
Switch the ethernet port on or off
Example
To switch off the port:
ssl-vpn(config)# interface eth0 down
To switch on the port:
ssl-vpn(config)# interface eth0 up
ip
Command
string
ip route A.B.C.D M.M.M.M A.B.C.D
Function
Establish static routes
Example
ssl-vpn(config)# ip route 20.0.0.0 255.255.255.0
211.23.0.120
no
Command
string
No interface ethX ip {dhcp}
Function
remove existing port address
Example
Remove existing port address that has been set
manually:
ssl-vpn(config)# no interface eth0 ip
Remove existing port address that has been set
using DHCP:
ssl-vpn(config)# no interface eth0 ip dhcp
Succendo 502/2000 User Manual 1.2
127
Chapter 15: Shell Commands
Command
string
No ip route A.B.C.D M.M.M.M
Function
remove existing static routes
Example
ssl-vpn(config)# no ip route 20.0.0.0 255.255.255.0
218.200.10.120
ssl
128
Command
string
ssl encrypt strength high | medium | low
Function
Configure SSL encryption strength, either High,
Medium or Low
Example
succendo(config)# ssl encrypt strength medium
Command
string
ssl port XXX
Function
Configure the ssl port number
Example
Succendo(config)# ssl port 443
Note
The default ssl port number is TCP443
Command
string
ssl protocol accept sslv2
Function
Configure the ssl version
Example
Succendo(config)# ssl protocol accept sslv2
Note
If this command is used, Succendo will be able to
support sslv2, sslv3 and tlsv1. Otherwise, Succendo
will only support sslv3 and tlsv1
no ssl protocol accept sslv2
Succendo 502/2000 User Manual 1.2
Appendix A
Appendix A: End-User Remote Access
With a standard web browser, end-users can login to the network
via Succendo from anywhere. The first step is to point the browser
to Succendo SSL VPN’s URL, which was setup earlier. Note that the
browser should be pointing to the URL using the secured HTTP, i.e.,
HTTPS. For example, the user can point the browser to
https://211.10.167.35/
Login Page
Once the requested page is retrieved, the user will be greeted with
the login page, as shown below:
Succendo 502/2000 User Manual 1.2
129
Appendix A: End-user Remote Access
User
authentication:
User Name:
Password:
Code:
Credential
Type:
The users should already been informed
authentication server they will be verified
under. Select a server name from the drop
down box, as in the example below:
User name for Password users
Password for Password Users
This parameter will appear depending on
whether you have included Additional Code
verification in your configuration. Users will be
required to enter the code shown in the code
box.
This
image
code
will
contain
alphanumeric characters including 0-9, a-f and
A-F.
Credential Type refers to the
verification the users are subject to.
type
of
If the domain is selected as “Certificate”, the
User Name and Password fields will be
disabled as the users need not enter them.
Note that if the certificate user has been
assigned a re-authentication password, the
user can choose to login via either password or
certificates.
User can then click <Login> to login, or click <Cancel> to close the
browser instead.
130
Succendo 502/2000 User Manual 1.2
Appendix A: End-user Remote Access
Service Page
Once login is successful (which includes a successful host check),
the user will see the service page. This page will show all the
services available to the users, as you have set them up. An
example of the page is shown below:
On the right of the top banner area is an auto-scrolling bulletin
board where messages from administrators are displayed. The page
consists of a Server List bar on the left, tool buttons on the top,
and the service list below the tool buttons. The services are divided
into groups for easy viewing and access. The various service
groups available are:
Proxy Services
Customized
Database
Database related services
Directory
Directory related services such as LDAP, AD, etc.
File
Files related services such as FTP, file-sharing,
etc.
Mail
Services that deals with mails, such as HTTP
mails, Exchange, etc.
Portrange
Remote
Web
Succendo 502/2000 User Manual 1.2
Services that are not otherwise categorized under
the categories below are listed here
Services that belong to the particular port range
Remote access services such as VNC, Telnet, etc.
Web services
131
Appendix A: End-user Remote Access
Click on the group from the service list bar and the service list will
automatically scroll to the corresponding group which will be
displayed with a bolded border as the figure above shows.
Activating NC Access
If the user has been set up for NC access, he can view the NC user
interface by clicking on the sub options in the “NC” menu.
If this is his first time accessing NC, the user must first <Click to
download NC component> and install the file onto the local
computer. The first box (“NC Status”) will then display the current
NC status including the user’s VNIC IP address assigned and it’s
connection status, the status of the gateway and whether any DNS
or WINS server addresses have been downloaded from Succendo.
The area below displays the NC services that are authorized for the
user’s access. As with proxy services, you can click the relevant
option from the “NC” menu in the bar on the left to auto-scroll the
page to the corresponding area.
Note that if a particular service can be accessed both in proxy and
NC mode, then the system automatically executes the service at
the client-end in proxy mode. To use NC instead, click the <Stop
Proxy> button from the top of the proxy service list.
132
Succendo 502/2000 User Manual 1.2
Appendix A: End-user Remote Access
Setting up associated applications
The services names are all hyperlinked. User can click the name to
access the service via an associated application. If an associated
application for the service is not defined, an error message will be
displayed:
If this is the case, the user has to click the
service name to setup the associated application.
icon beside the
Once the associated application is setup, the user can click the
service name to access the service via the application.
Succendo 502/2000 User Manual 1.2
133
Appendix A: End-user Remote Access
Service status
The Valid column indicates the status of the services. If the service
is currently not in use, the value in the Valid column will be a “no”.
If the services are currently being accessed, the user will see a
“yes” in the Valid column, and the amount of data sent and
received will be shown under the Sent and Received column
respectively, as shown in the example below:
If the IP address of the service becomes invalid (due to a
disconnection to the server or the server are down), a red E will
appear under the Valid column:
Tool Bar buttons
On top of the service list is the tool bar with various commands.
Language selector
User
Change
Password
Logout
134
Succendo 502/2000 User Manual 1.2
Appendix A: End-user Remote Access
Change password
To change password, user can click the “Change Password” button
on the tool bar. A Change Password interface will open:
Enter the current password (old password), the new password
and retype the password (Confirm Password) to confirm. Click
<OK> to change the password.
The user can also enable a single-sign on functionality by selecting
Enable PIA (password input assistant). Specify his Domain ip
address, user name, and password. Retype the password to
confirm. Upon successful login, Succendo will automatically enter
the user’s information when accessing the authorized services.
Succendo 502/2000 User Manual 1.2
135
Appendix A: End-user Remote Access
136
Succendo 502/2000 User Manual 1.2
Index
A
Administrator function
adding new account 37
AA Mode 27
editing, deleting 39
AACR
list of accounts 36
Default Action 22
locked accounts 41
Defining 73
unlocking 41
Access Control
querying 40
role-based model, See Role 5
See AACR
Access Restriction List
adding new ARL 102
configuring, editing 101
types of administrators 38
AP Mode 26
Application association, See End user remote access
ARL, See Access Restriction List
Authentication Servers
default action 22
AD server protocols 55
definition 100
adding
querying 103
LDAP 51
Administration
RADIUS 50
Login 12
Windows AD 52
main screen 13
delete 56
change password 13
download user info 54
language selector 13
list of 49
logout 13
local server 53
online help 13
set default 49
menu bar options
synchronizing accounts 55
system, See System function
administrator, See Administrator function
C
certificate, See Certificate
authentication, See Authentication Servers
Certificates
user, See Users
Local CA 42
service, See Service
Trusted CA 44
role, See Role
Gateway
log, See Logs
list of 45
monitoring, See System monitoring
import 46
client policy, See Client policies
generate self-signed 46
access rule list, See ARL
request from third party 48
IP pool list, See IP Pool
protection key 48
Succendo 502/2000 User Manual 1.2
137
Change password
High Availability
administrator 13
deployment model 3
end-user 130
Load Balancing, See AA Mode
Client Policies
Setting up HA
AP mode 26
Rules
AA mode 27
adding, editing 96
Synchronization 30
check type 96
list of rules 95
type 96
Crypto Algorithms, See Crypto Strength
Crypto Strength 21, 23
D
I
IP Pool, See Network Connection Access Model
L
Deployment Models
typical 2
multiple ISP 2
Load Balancing, See AA Mode
Logs
automatic export 82
High Availability 3
levels 85
Duplicating
log options, configuring 81
ARL 101
querying 83
client applications 75
type 86
IP pools 106
service 72
serviced type 77
users 65
M
Multiple ISP
deployment 2
Setting up multiple interfaces 2, 19
E
End user remote access
application association 128
change password 130
N
Network Connection Access Model
login page 124
accessible services 109
NC access 127
configuring NC environment 108
service page 126
deployment
service status 129
single direction access 104
tool bar 129
bidirectional access 104
proxy client to NC client 104
H
secured NC tunnel 104
peer to peer 104
138
Succendo 502/2000 User Manual 1.2
file-sharing 71
IP Pools
list of 105
adding 76
adding 106
editing, deleting, duplicating 77
editing, deleting, duplicating 106
querying 75
query 107
setting up VPN users 107
roles 109
Shell commands
monitor mode 110
erase 111
virtual network cards 105
exit 112
R
interface 112
ip 112
Recovery, See Shell commands, monitor mode
no 113
Role
ping 113
access control model 5
reload 113
adding, editing 80
restore 113
in user groups 58
show 113
in local, non-local user 63
in NC 109
update 114
normal mode 115
in service 70
configure 116
role list 79
exit 116
querying 79
generate 116
ping 116
S
poweroff 117
reload 117
Service
restore 117
AACR 73
show 118
adding 68
traceroute 120
client applications
update 120
adding 75
editing, deleting, duplicating 75
who 120
configure mode 121
querying 75
end 121
duplicating 72
exit 121
editing, deleting 72
hostname 121
IP Host
interface 121
adding 78
ip 122
removing, querying 78
no 122
list of 71
testing connectivity 72
type
ssl 123
SSL protocols
configuring 21
http 70
Succendo 502/2000 User Manual 1.2
Succendo
139
default settings 11
via Upload 25
Virtual Service 35
deployment, See deployment models
hardware description 6
System Monitoring 87
connecting to LAN 9-10
collection interval 92
parts checklist 9
online users 88
system requirements 9
query based on dates 92, 93
setting up for service 12
service charts 93
System function
system usage, summary 88
Backup
system charts
Exporting settings 31
active session usage 90
Importing settings 31
active users usage 91
Restore settings 31
CPU Usage 89
Custom 33
disk usage 90
HA, See High Availability
eth port’s package speed 91
Information
memory usage 90
Top N chart 94
DNS Servers 21
Interface
configure 19
U
IP Pools 20
Static routes 20
License
License Key 32
Users
adding new user
local user 61
non-local user 63
NAT
Source NAT 34
auth column 60
Destination NAT 34
credential type 61
Security
Login Validate Code 22
editing, deleting duplicating 65
groups
AACR Default Action 22
adding 58
ARL Default Action 22
editing, deleting 59
Crypto Algorithm, See Crypto Strength
list of 57
Set Time
Date Picker 34
Tools
Ping 32
Update
via FTP 24
superior group 58
locked users 66
querying 67
unlocking 66
re-authentication 62
upload list of users 61
via HTTP 25
140
Succendo 502/2000 User Manual 1.2