1
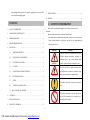
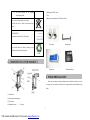
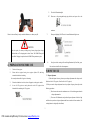
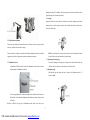
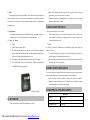
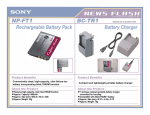
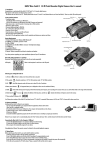
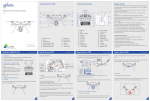
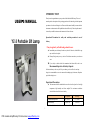
INTRODUCTION
USER’S MANUAL
Thank you and congratulations on your purchase of this Hand-held Slit Lamp. This user’s
manual provides a description of the operating procedure of this unit along with the important
precautions to be observed during its use. Please read this manual carefully to assure that this
instrument can demonstrate its full capabilities and used effectively. Please keep this manual
in an easily accessible location near the instrument for future reference.
Operational Precautions for safety and accident prevention in use of
battery
YZ-3 Portable Slit Lamp
If any irregularity or fluid leakage should occur:
★
Immediately move the battery further away from fire. Otherwise, leaked fluid or gas
may catch fire and explode.
★
If battery fluid got into your eye, rinse it off with clean water and see your doctor at
once.
★
If your body or clothes should be contaminated with batter fluid, wash it out.
Recommended practice of battery disposal:
A lithium ion battery can be recycled. If a power battery you have will not be used any
longer,it is recommendable to cover its contacts with insulating tape (for instance, cellophane
tape) before taking it to us.
Operational Precautions
★
The instrument should be installed and/or stored in a dust free place free from high
temperatures, high humidity and direct sunlight. The environment conditions
described below should be observed strictly:
In Operation
In Storage
Environmental temperature
10℃ to 40℃
-15℃ to 60℃
Relative humidity
30% to 75%
10 to 95%
★
1
PDF created with pdfFactory Pro trial version www.pdffactory.com
Be careful about where the instrument is to be installed, to keep it from accidentally
being unplugged during operation. If it should be unplugged, be sure to turn off the
9.
SPECIFICATIONS………………………………………………………………………8
power switch before plugging again.
10. PACKING………………………………………………………………………………..8
1. SAFETY CONSIDERATION
CONTENTS
1.
SAFETY CONSIDERATION……………………………………………………………1
2.
COMPONENTS OF THE PRODUCT……………………………………………..……3
3.
PRIOR PREPARATION…………………………………………………………………4
4.
PREPARATION BEFORE USE…………………………………………………………4
5.
HOW TO USE…………………………………………………………………..……......5
Please read this User Manual thoroughly to ensure safe and correct use of the
instrument.
★ General definitions of safety symbols are indicated below
In the symbol for this operation manual and product, in order to use a product correctly,
various symbols indication is given.Please read the text after understanding the
following contents well.
Indication
Definition
5.1.
DIOPTER ADJUSTMENT……………………………………………….….....5
The word “WARNING” is intended to alert the user to
5.2.
PUPIL-DISTANCE ADJUSTMENT…………………………….……………..5
extremely important instructions, procedures, or
5.3.
ILLUMINATION CONTROL……………………………….…………………5
5.4.
FOCUSING……………………………………………………….………….....6
The word “CAUTION” is intended to alert the user to
5.5.
SLIT OPERNING AND SHUTTING RING…………………………………...6
special instructions, procedures or conditions, which
5.6.
ILLUMINATION ANGLE……………………………………………………...6
5.7.
FILTER…………………………………………………….……………………7
5.8.
CHANCE OF MAGNIFICATION…………………………………….……….7
5.9.
ABOUT CHANGE OF A BATTERY……………………………………………..7
conditions which, if not correctly followed, could
WARNING
CAUTION
result in equipment failure personal injury or death.
may cause personal injury or equipment failure.
This symbol calls attention to an action that must be
done.
This symbol calls attention to an action that must not
6.
AFTER USE……………………………………………………………………………..7
7.
DAILY MAINTENANCE……………………………………………………………….7
8.
FOR SAFETY OPERARION……………………………………………………………8
be done. The instruction for the prohibited act is
associated with this symbol.
2
PDF created with pdfFactory Pro trial version www.pdffactory.com
Do not short-circuit the polarities of the battery pack with
a metal object such as wire.
WARNING
At no time attempt to remodel or disassemble this product.
When you do not use it for a long period of time, please
Damage to the product or personal injury will result.
pull out and keep a battery from product. Since product is
Since it is a product for ophthalmology, please do not
in a standby state, very little current flows and a battery is
operate it other than people with special knowledge.
exhausted.
Damage to the product or personal injury will result.
Avoid storage or use of the product under the following
conditions:
1)
In an environment where the temperature
falls below +10℃ or exceeds +35℃.
2)
CAUTION
Where noxious gases or are pollutants are
present.
Please do not deal with product violently.
It becomes the causality of failure.
When this product breaks down, or when bad conditions
3)
High humidity environment.
4)
Where water drop environment.
5)
Where dust sand grit may occur.
6)
Where there oil fumes or greasy substances
are emitted.
arise, please inform a dealer immediately.
7)
It will become the causality of an accident if it continues
Where there are atmospheric concentrations
of salt.
using it in the condition of having broken down.
8)
When smoke comes out or the burning smell occurs,
Near gas generation areas and places where
dust accumulates.
please extract a battery from a product immediately.
9)
When abnormalities, like there is a nasty smell during
Do not expose to strong vibrations (areas of
battery charge occur, please stop charging it and pull out a
seismic activity) and sudden shocks (this
power supply plug from a plug socket.
includes transportation) etc.
10) A place with the tilt angle of do degrees or
more.
11) The place exposed to direct sunlight.
3
PDF created with pdfFactory Pro trial version www.pdffactory.com
12) The
place
exposed
to
the
6. Illumination ON/OFF switch
radiated
7. Grip
electromagnetic field.
8. Battery accommodation part (704V 680mA Li-ion)
Please do not touch optical parts with a finger.
It becomes the cause by which an observation image
worsens.
LED RADIATION
Do not state into beam Class 2 LED product.
16X eyepiece
focusing target
Please discard lithium ion battery according to the
regulations of a local self-governing body.
Li -ion
2. COMPONENTS OF THE PRODUCT
Carrying case
Lithium Ion Battery
3. PRIOR PREPARATION
Please take out a main part, a diopter adjustment bar, a forehead rest, a battery, etc. from
a carrying case. Next, please insert a battery in the main part battery accommodation section
firmly.
1. Forehead rest
2. Slit opening and shutting ring
3. Filter rotation
4. Illumination control
5. Eyepiece
4
PDF created with pdfFactory Pro trial version www.pdffactory.com
5)
The check of illumination light
6)
Please turn a slit opening-and-closing ring clockwise, and open a slit to the
maximum.
Unless it is inserted firmly, it may be unable to illuminate, or a battery may fall.
7)
Please push a lighting ON/OFF switch. A round illumination light is seen.
CAUTION
When the capacity of a battery is falling, using a battery charger, please charge
beforehand and use. The charging time is about 2 hours. The CHARGE lamp will
start to blink. Charging is complete when the CHARGE lamp continues to glow.
8)
4. PREPARATION BEFORE USE
1)
The check of an eyepiece
2)
Please check an eyepiece loosing in an eyepiece cylinder 10X, and being
Next, please check rotating a filter and being illuminated by Non-filter, green,
bule and conversion filter for color temperature.
5) HOW TO USE
5.1. Diopter Adjustment
mounted in it that there is nothing.
1) When the diopter is known, please carry out diopter adjustment with a diopter scale.
It is correctly unobservable if eyepiece is loosening.
3)
Please check that there is no dirt, such as a fingerprint, on the eyepiece surface.
(Black scale is for 10X eyepiece, Green Scale is for 16X eyepiece).
4)
In case of 16X eyepiece are used, please take out the 10X eyepiece from
2) When you attach a diopter adjustment bar and you adjust a diopter, please adjust in the
binocular before attaching the 16X eyepieces.
following procedures:
① Please loosen and remove the attachment screw of a forehead support and attach
a diopter adjustment bar.
② Please turn ON illumination, and perform diopter adjustment of both of right
and left so that you observe a diopter adjustment bar from an ocular and a focus matches.(The
working distance is designed by about 80mm)
5
PDF created with pdfFactory Pro trial version www.pdffactory.com
illumination switch ON. In addition, when battery capacity has decreased, it blinks, and the
light will be put out if it becomes less than 6V.
5.4. Focusing
Apply the forehead rest to the patient’s forehead, then loosen the clamping control while
observing the eye with the eyepiece and move the slit lamp itself forward or backward to
focus on the subject part.
5.2. Pupil-distance adjustment
Please rotate the lens-barrel of the binocular section, and when you see an eyepiece part with
both eyes, adjust the PD to become one image.
When not visible to one image, it is possible that the diopter adjustment can not be performed
◆ Since the forehead rest is executed with a spring, even if the slit lamp itself drawn
appropriately. In this case, please perform a diopter adjustment once again.
forward, it will not leave the forehead of the patient easily.
5.5. Slit opening and closing ring
Turn the slit opening and closing ring to adjust the slit width. When turn this ring
5.3. Illumination control
A illumination ON/OFF switch is turned ON, illumination control volume is turned,
clockwise, slit open, and turn it counterclockwise, slit will be closed.
and the quantity of illumination is adjusted.
5.6. Illumination angle
Hold the slide ring with fingers and move it right or left, illumination angle +/-30
degrees available.
If it turns to right-hand side, it will become bright, and it will become dark if it turns to
left-hand side. In the maximum illumination, the illuminance without a filter is about
10,000 luxs.
◆ Turn on LED at the upper left of illumination control volume at the time of the
6
PDF created with pdfFactory Pro trial version www.pdffactory.com
2) Please remove a battery, when you do not use it for a long period of time, and keep a
5.7. Filter
By rotating a filter, G(Green), B(Cobalt blue), O(conversion filter for color temperature),
product in the carrying case of exclusive use carefully.
and those without a Non filter can be chosen as an illumination system. Please use properly
3) When the display lamp of remaining battery level blinks, please remove a battery
according to the use of observation. A color temperature change filter serves as illumination
from main body and charge a battery.
near daylight color.
7) DAILY MAINTENANCE
1) An eyepiece and objective lens cover glass
5.8. Magnifications
Two magnifications available for this hand-held slit lamp by exchanging the eyepiece.
When clean off the surface of an eyepiece and/or objective lens cover glass, please
Standard eyepiece 10X and 16X packed together with this instrument.
use lens paper or soft cloth, if it has fingerprint or fatty oil, mist lens paper or soft
5.9. Charge
of
cloth with alcohol to clean off.
battery
2) Mirror
1)
Battery
2)
Type of adapter for charge: MH-53
By viewing, the mirror for illumination of the illumination output section checks the
3)
The first use and when you do not use it for a long time, please be
sure to charge before using. About two hours charge at empty level.
existence of a crack.
Cleaning of dart, please use lens paper or soft cloth. If it has fingerprint or fatty oil,
mist lens paper or soft cloth with alcohol to clean off.
(charge time is changed due to remaining power level)
4)
The adapter for charge can be supplied from AC100 -240V power supply.
5)
The CHARGE lamp will start to link during charge. Charging is complete when
3) Please check that the operation like each part is smooth. Please consult with a dealer,
when fault is discovered in an operation.
the CHARGE lamp continues go glow.
8) FOR SAFETY OPERATION
1)
After the completion of charge should remove a battery from a battery charger promptly.
Keep in mind the charge state of 2 hours or mor that there is risk of overcharge.
2) About 300 charge or more is possible for a battery. The number of recharger is
changed due to the remaining battery level. A battery life can be extended by charging,
after remining battery level has decreased if possible.
9) TECHNICAL SPECIFICATIONS
Battery and Charger
Microscope
6) AFTER USE
1) After use should clean a main body and should keep it cleanly.
7
PDF created with pdfFactory Pro trial version www.pdffactory.com
Eyepiece
10X and 16X
Objective lens
1X
Total magnification
10X and 16X
Diopter adjustment
±5D
Eyepiece 16X…………………………………………………………………………….1 set
Visual field
10mm
Diopter adjustment bar
Pupil Distance adjustment
50-75mm(at eyepiece 10X)
Li-ion Battery…………………………………………………………………………….2 pcs
55-70mm(at eyepiece 16X)
Battery charger……………………………………………………………………………1 pc
86.55mm
Forehead rest
Working distance(W.D.)
…………………………………………………………………1 pc
……………………………………………………………………………1 pc
Carrying case………………………………………………………………………………1 set
Illumination
Slit width
0-¢10mm
User manual………………………………………………………………………………..1 pc
Slit aperture
¢1mm, ¢3mm, ¢5mm,¢10mm
★ THE CONTENTS OF THIS USER MANUAL MAY BE CHANGED WITHOUT PRIOR
Filter
Cobalt blue, Green, Color temperature conversion frilter
Illumination angle
On the level circumference 30 degree
Light source
High brightness white LED
NOTICE.
Battery
Type
Rechargeable lithium-ion battery
Rated capacity
7.4V/680mAh
Operation time
About
2
hours(at
full
charge
with
maximum
illumination)
Battery Charger
Rated input
AC 100-240V 50/60Hz
Charging output
DC 804V/600mA
General
Dimension
159mm(W)x 107mm(D)x231mm(H)
Weight
About 700g
Type of protection against
Internal Battery type
electric shock
Degree
of
protection
Type B
against electric shock
10) PACKING
Hand-held slit lamp
……………………………………………………………………1 set
8
PDF created with pdfFactory Pro trial version www.pdffactory.com
9
PDF created with pdfFactory Pro trial version www.pdffactory.com
PDF created with pdfFactory Pro trial version www.pdffactory.com
PDF created with pdfFactory Pro trial version www.pdffactory.com
-1-
PDF created with pdfFactory Pro trial version www.pdffactory.com