1
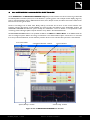
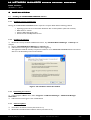
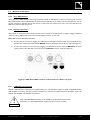
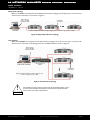
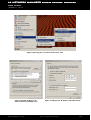
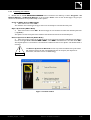
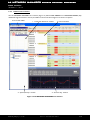
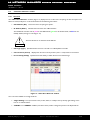
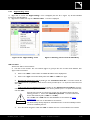
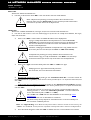
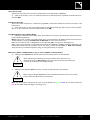
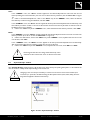
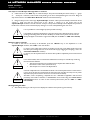
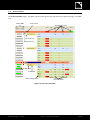
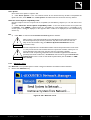
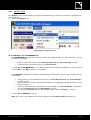
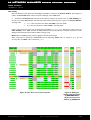
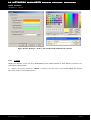
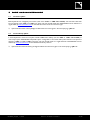
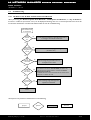
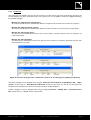
LA NETWORK MANAGER
REMOTE CONTROL SOFTWARE
USER MANUAL
VERSION 1.1.0.45
www. l-a c ou sti cs. co m
LA NETWORK MANAGER REMOTE CONTROL SOFTWARE
User Manual
VERSION 1.1.0.45
NETMAN_UM_E N_1.1.0.45
ww w .l -ac ous ti cs . co m
2/42
NETMAN_UM_E N_1.1.0.45
w w w .l-ac ous ti cs .c o m
3/42
LA NETWORK MANAGER REMOTE CONTROL SOFTWARE
User Manual
VERSION 1.1.0.45
1
CONTENTS
1
CONTENTS
2
2.1
2.2
2.3
INTRODUCTION
5
Welcome to L-ACOUSTICS.......................................................................................................................................... 5
Sources for LA NETWORK MANAGER software ........................................................................................................... 5
How to read this manual............................................................................................................................................... 5
3
SYSTEM CONCEPT
6
4
LA NETWORK MANAGER SOFTWARE
7
5
5.1
INSTALLATION
8
Installing the LA NETWORK MANAGER software.......................................................................................................... 8
5.1.1
Computer system requirements .................................................................................................................... 8
5.1.2
Installing the software ................................................................................................................................... 8
5.1.3
Uninstalling the software............................................................................................................................... 8
5.1.4
Software updates.......................................................................................................................................... 8
Network considerations ............................................................................................................................................... 9
5.2.1
The L-NET Network.................................................................................................................................... 9
5.2.2
Physical connections ..................................................................................................................................... 9
5.2.3
L-NET Network topologies........................................................................................................................... 9
Managing IP Addresses ............................................................................................................................................... 11
5.3.1
Introduction............................................................................................................................................... 11
5.3.2
PC IP Address setup ................................................................................................................................... 11
5.3.3
Unit IP Addresses setup .............................................................................................................................. 13
5.2
5.3
6
6.1
6.2
6.3
6.4
6.5
6.6
4
OPERATION
14
Quick start ................................................................................................................................................................ 14
6.1.1
Virtual and Physical Systems ........................................................................................................................ 14
6.1.2
Offline and Online Modes............................................................................................................................ 14
6.1.3
Launching the software ............................................................................................................................... 15
6.1.4
Software user interface ............................................................................................................................... 16
‘‘Units Over Network’’ window.................................................................................................................................. 18
6.2.1
Overview................................................................................................................................................... 18
6.2.2
‘‘Right Clicking’’ menu................................................................................................................................. 19
6.2.3
‘‘PRESET’’ and ‘‘CONFIG’’ menus................................................................................................................ 22
‘‘System/Groups’’ window .......................................................................................................................................... 23
Control window......................................................................................................................................................... 25
6.4.1
Monitoring the system ................................................................................................................................ 26
6.4.2
Offline and Online System management ....................................................................................................... 27
‘‘Contour EQ’’ windows ............................................................................................................................................. 28
Command toolbar...................................................................................................................................................... 30
6.6.1
Overview................................................................................................................................................... 30
6.6.2
‘‘File’’ menu ............................................................................................................................................... 30
6.6.3
‘‘Network’’ menu ....................................................................................................................................... 31
6.6.4
‘‘View’’ menu ............................................................................................................................................. 32
6.6.5
‘‘Options’’ menu......................................................................................................................................... 33
6.6.6
‘‘?’’ menu ................................................................................................................................................... 36
7
7.1
7.2
7.3
CARE AND MAINTENANCE
37
Firmware update........................................................................................................................................................ 37
Preset Library update ................................................................................................................................................. 37
Troubleshooting......................................................................................................................................................... 38
7.3.1
No Units or not all Units could be found on the Network.............................................................................. 38
7.3.2
Conflict list................................................................................................................................................. 39
8
SPECIFICATIONS
40
9
GLOSSARY
41
NETMAN_UM_E N_1.1.0.45
ww w .l -ac ous ti cs . co m
4/42
2 INTRODUCTION
2.1
Welcome to L-ACOUSTICS
Thank you for purchasing an L-ACOUSTICS sound system. Each system can be remote controlled using the LACOUSTICS® LA NETWORK MANAGER Software within the L-ACOUSTICS® L-NET Network.
This manual contains important information on installing the L-NET Network and operating the LA NETWORK
MANAGER software. Read this manual carefully in order to become familiar with these procedures.
As part of a continuous evolution of techniques and standards L-ACOUSTICS reserves the right to change the
specifications of the product and the content of this manual without prior notice. Please check the L-ACOUSTICS
internet website @ www.l-acoustics.com on a regular basis for latest update.
If the software does not work correctly or if information is needed, please contact an approved L-ACOUSTICS
distributor. In order to obtain the address of the nearest distributor go to the internet website @ www.lacoustics.com.
2.2
Sources for LA NETWORK MANAGER software
The L-ACOUSTICS® LA NETWORK MANAGER Remote Control Software is a freeware. It is downloadable
from the web site @ www.l-acoustics.com / technical support / LA Network Manager.
2.3
How to read this manual
Many specific terms are employed throughout this manual. When needed, please refer to the Glossary part 9 for
definition.
Throughout this manual both following symbols are often used:
The ARROW symbol notifies a procedure description.
!
The IMPORTANT symbol notifies an important recommendation of use.
IMPORTANT
The users who are familiar with network cabling and set up procedures can directly consult the ‘‘Quick Start’’ section
6.1.
NETMAN_UM_E N_1.1.0.45
w w w .l-ac ous ti cs .c o m
5/42
LA NETWORK MANAGER REMOTE CONTROL SOFTWARE
User Manual
VERSION 1.1.0.45
3 SYSTEM CONCEPT
CONCEPT
From a PC Windows®-operating system the L-ACOUSTICS® LA NETWORK MANAGER Remote Control
Software provides network control and monitoring of up to 253 L-ACOUSTICS® LA4 and/or LA8 Amplified
Controllers within the L-ACOUSTICS® L-NET Network.
The L-ACOUSTICS® LA4 and LA8 Amplified Controllers (called ‘‘Units’’) are at the heart of the L-ACOUSTICS
integrated system approach. They offer cutting edge loudspeaker Amplification, DSP, Network Control, and
comprehensive System Protection in single ergonomic packages.
The proprietary L-ACOUSTICS® L-NET Network allows to easily configure multiple Ethernet network topologies
using CAT5e STP cables (or higher categories) and standard RJ45 connectors. The use of a universal Ethernet switcher
is recommended for specific network topologies.
The Figure 1 shows all L-ACOUSTICS loudspeaker systems in relation with their dedicated Units. The Units are
controlled by the LA NETWORK MANAGER software within the L-NET network:
KIVA
115XT HiQ
KILO
12XT
LA4
ARCS
8XT
ETHERNET SWITCHER
SB118
LA NETWORK MANAGER
dV-DOSC
V-DOSC
LA8
KUDO
SB218
dV-SUB
SB28
Figure 1: L-ACOUSTICS loudspeaker systems within the L-NET Network
NETMAN_UM_E N_1.1.0.45
ww w .l -ac ous ti cs . co m
6/42
4 LA NETWORK MANAGER SOFTWARE
The L-ACOUSTICS® LA NETWORK MANAGER Software provides network control and monitoring of both LA4
and LA8 amplified controllers (Units) from a PC Windows®-operating system. The multiple window display (Figure 2)
gives an overall visualization of the L-NET Network status, Units, Groups of Units, and all the information related to the
control and monitoring of the Units.
Access to all settings such as Mute, Gain, Delay, Polarity, and Preset can be done via the remote software user
interface. Contour EQ settings are also available for quick and easy tonal balance of the loudspeaker systems. LA
NETWORK MANAGER also features system standby and initialization control in addition to comprehensive visual
monitoring of the audio signal paths and quick detection of any faults in the attached Network.
LA NETWORK MANAGER features two possible workflows: the Offline and Online Modes. In the Offline Mode the
user can configure a system before connecting to a Network. In the Online Mode a system can be sent to or retrieved
from the synchronized Network, and the software provides real time control of each Group and Unit in the Network.
Command toolbar
‘‘Units Over Network’’ window
‘‘System/Groups’’ window
Control window
‘‘Contour EQ’’ window
Figure 2: The LA NETWORK MANAGER user interface
NETMAN_UM_E N_1.1.0.45
w w w .l-ac ous ti cs .c o m
7/42
LA NETWORK MANAGER REMOTE CONTROL SOFTWARE
User Manual
VERSION 1.1.0.45
5 INSTALLATION
5.1
5.1.1
Installing the LA NETWORK MANAGER software
Computer system requirements
Running the LA NETWORK MANAGER software requires a computer fitted with the following material:
•
•
•
•
5.1.2
Operating system: Minimum Microsoft® Windows® XP® or Mac equivalent (with a PC emulator)
RAM: Minimum 512 Mo
Monitor: 800 x 600, 24 bits, color
Network card: 100 Mbps Ethernet card
Installing the software
Download and unzip the latest installation file version, say ‘‘Install LA Network Manager 1.1.0.44.zip’’ for
example.
Run the ‘‘Install LA Network Manager 1.1.0.44.exe’’ file.
Follow the instructions given in the installation wizard (Figure 3).
The application installs all necessary components needed to run LA NETWORK MANAGER software as well as a
shortcut in the PC desktop to launch the software.
Figure 3: The installation wizard first window
5.1.3
Uninstalling the software
In the computer ‘‘Start’’ menu, select “Programs – LA Network Manager – LA Network Manager
Uninstaller”.
Follow the instructions given in the uninstall wizard.
5.1.4
Software updates
Uninstall the old software version (see section 5.1.3).
Download and install the latest software version (see section 5.1.2).
NETMAN_UM_E N_1.1.0.45
ww w .l -ac ous ti cs . co m
8/42
5.2
Network considerations
5.2.1
The L-NET Network
The proprietary L-NET Network uses a high speed data transfer of 100 Mbps for real-time monitoring and control of
each individual Unit (LA4 or LA8 amplified controller) within a Network of up to 253 Units. Connecting the PC to a set
of Units requires to physically connect the devices to each other (see sections 5.2.2 and 5.2.3) and to allocate an IP
Address for each one (see section 5.3).
5.2.2
Physical connections
The physical connections between the PC and the Units is achieved with CAT5e STP (or higher category) cables of
maximum 100 m / 328 ft length, each one fitted with a RJ45 connector on each side.
Note: STP stands for Shielded Twisted Pair.
Connect the PC to a Unit by plugging one cable side into the RJ45 connector socket of the PC Ethernet card
and the other cable side into the Unit’s L-NET IN connector socket (located on the rear panel: see Figure 4).
Connect a first Unit to a second one by plugging one cable side in the first Unit’s L-NET OUT connector
socket and the other cable side in the second Unit’s L-NET IN connector socket (see Figure 4).
Figure 4: L-NET IN and OUT connector sockets located on a Unit’s rear panel
5.2.3
L-NET Network topologies
Multiple L-NET Network topologies such as Daisy Chain, Star, and Hybrid are quickly and easily configurable allowing
total flexibility in achieving the required system architecture. The Star and Hybrid Network topologies require the
addition of a 100 Mbps universal Ethernet Switcher.
!
If the Auto MDI/MDIX functionality is not available in the PC Network Card and/or
the Switcher, a crossed cable between the PC and the first Unit is necessary.
IMPORTANT
NETMAN_UM_E N_1.1.0.45
w w w .l-ac ous ti cs .c o m
9/42
LA NETWORK MANAGER REMOTE CONTROL SOFTWARE
User Manual
VERSION 1.1.0.45
Daisy Chain topology
Based on the series connecting scheme the Daisy Chain Network topology is the simplest way to connect the PC
and the Units to each other, as it is shown in Figure 5:
RJ45 connector
on the 100 Mbps
PC Ethernet Card
LA NETWORK
MANAGER
L-NET RJ45
connectors
Solely use CAT5e STP cables (or higher category) with a maximum length of 100 m / 328 ft.
Figure 5: Daisy Chain Network topology
Star topology
Based on the parallel connecting scheme the Star Network topology is the most common way to connect the PC
and the Units to each other. This topology requires a 100 Mbps Switcher as shown in Figure 6:
RJ45 connector
on the 100 Mbps
PC Ethernet Card
LA NETWORK MANAGER
100 Mbps Ethernet
Switcher
L-NET RJ45
connectors
Solely use CAT5e STP cables (or higher category) with
a maximum length of 100 m / 328 ft.
Figure 6: Star Network topology
!
The parallel connecting scheme reduces the risk of Network failure: even if
the connection between the Switcher and a particular Unit fails the other
Units remain connected to the Switcher.
IMPORTANT
NETMAN_UM_E N_1.1.0.45
ww w .l -ac ous ti cs . co m
10/42
Hybrid topology
The Hybrid Network topology is a mix between the Daisy Chain and the Star topologies, e.g. a mix between the
series and parallel connecting schemes, as shown in Figure 7:
RJ45 connector
on the 100 Mbps
PC Ethernet Card
LA NETWORK
MANAGER
100 Mbps
Ethernet
Switcher
L-NET RJ45
connectors
Solely use CAT5e STP
cables (or higher category)
with a maximum length of
100 m / 328 ft.
Figure 7: Hybrid Network topology
Managing IP Addresses
5.3
5.3.1
Introduction
It is possible to connect up to 253 Units to a master PC running LA NETWORK MANAGER within the proprietary LNET Network. In order to identify and communicate each device (PC or Unit) uses an IP Address.
An IP Address is a unique address of the Internet Protocol (IP) standard. The usable L-NET IP Addresses are of the
form 192.168.1.
, where is taken between 1 and 254.
L-ACOUSTICS recommends using the last available IP Address (192.168.1.254) for the PC Network Card. The other
IP Addresses between 192.168.1.1 and 192.168.1.253 can be allocated to the Units in the L-NET Network.
5.3.2
PC IP Address setup
Set the PC TCP/IP Address by following the procedure below:
In the computer “Start” menu, select “Settings – Network Connections – Local Area Connection”
(Figure 8).
Right click on ‘‘Local Area Connection’’ and select ‘‘Properties’’ in the menu.
In the ‘‘Local Area Connection Properties’’ window, double click on ‘‘Internet Protocol (TCP/IP)’’
(Figure 9).
In the ’’Internet Protocol properties (TCP/IP)’’ window, select ‘‘Use the following IP address’’ and
type in the IP address = 192.168.1.254 (recommended) and the Subnet mask = 255.255.255.0 (Figure
10).
Click ‘‘OK’’ and close all remaining windows.
Note: Fast and easy management of multiple IP Addresses (to switch between L-NET and Internet, for example) is
possible using free software available on the web.
NETMAN_UM_E N_1.1.0.45
w w w .l-ac ous ti cs .c o m
11/42
LA NETWORK MANAGER REMOTE CONTROL SOFTWARE
User Manual
VERSION 1.1.0.45
Figure 8: Selecting the ‘‘Local Area Connection’’ item
Figure 9: Double clicking on the
‘‘Internet Protocol (TCP/IP)’’ item
NETMAN_UM_E N_1.1.0.45
Figure 10: Filling in the IP Address and Subnet mask
ww w .l -ac ous ti cs . co m
12/42
5.3.3
Unit IP Addresses setup
Each Unit’s IP Address is typically of the format 192.168.1.
. To modify the value of the last 3 digits (the other
digits are fixed and cannot be changed) follow the procedure below:
On the Unit front panel, press the Encoder Wheel.
Select the NETWORK ADDRESS menu page by rotating the Encoder Wheel and press the OK key or the
Encoder Wheel.
Select the desired value from 1 to 253 (recommended) by rotating the Encoder Wheel.
!
The selected IP Address must be different from
those of the PC and other Units.
IMPORTANT
Press the OK key or the Encoder Wheel to validate the setting.
Reboot the Unit: switch the Unit off by pressing the ‘‘On/Off switch’’, wait 30 sec for the turn-off sequence
to be completed and restart the Unit.
!
The new IP Address won’t be effective until the Unit
has been rebooted.
IMPORTANT
NETMAN_UM_E N_1.1.0.45
w w w .l-ac ous ti cs .c o m
13/42
LA NETWORK MANAGER REMOTE CONTROL SOFTWARE
User Manual
VERSION 1.1.0.45
6 OPERATION
6.1
Quick start
6.1.1
Virtual and Physical Systems
A System is a set of Units (L-ACOUSTICS® LA4 and/or LA8 amplified controllers) arranged into Groups*, and
featuring:
• For each Unit: the IP Address*, Unit Type*, Preset*, and Unit Parameters* (Mute, Gain, Delay, and
Polarity settings for each of the 2 Input and 4 Output Channels).
• For each Group: the Group Parameters* (mute, gain, delay, and contour EQ settings) uniformly allocated to
all Units in the Group.
Two System types exist:
•
The Virtual System is the System edited in the LA NETWORK MANAGER user interface when the PC is not
synchronized with the L-NET Network.
•
The Physical System is the System composed of a set of Units physically connected to the L-NET Network
(including the IP Addresses, selected Presets, Unit and Group Parameters each Unit memory contains).
* Refer to the Glossary chapter 9 for a definition of the labeled terms.
6.1.2
Offline and Online Modes
The System displayed in the software user interface, called the Current System, can be managed within two possible
workflows:
•
In the Offline Mode the PC running LA NETWORK MANAGER is not synchronized with the L-NET
Network. The Current System is a Virtual System.
In this mode the user can create/modify the Virtual System in advance with no need to be present at the event
issue.
•
In the Online Mode the PC running LA NETWORK MANAGER is synchronized with the L-NET Network:
the data displayed on the software user interface (IP Addresses, selected Presets, Unit and Group Parameters)
are those of the Units of the Physical System. They are transmitted and modified within the Full Duplex* data
transfer protocol.
In this mode the user can control the Physical System before and during the event performance.
The Online Mode is activated when a System is sent to or retrieved from the Network (see section 6.6.3).
* Refer to the Glossary chapter 9 for a definition of the labeled terms.
NETMAN_UM_E N_1.1.0.45
ww w .l -ac ous ti cs . co m
14/42
6.1.3
Launching the software
Double click on the LA NETWORK MANAGER shortcut located on the desktop, or select “Programs – LA
Network Manager – LA Network Manager” in the computer ‘‘Start’’ menu. A new window (Figure 12) prompts
the user to select between three possible ways to edit a system:
Create an Offline System (Offline Mode)
Select this function. Click ‘‘OK’’.
The software user interface gets empty so that a new Virtual System can be built Unit by Unit.
Open a System File (Offline Mode)
Select this function. Click ‘‘OK’’. Browse through the new window and select the desired System File
(‘‘*.system’’).
The System stored in the System File is loaded in the software and becomes the Virtual System.
Retrieve System from Network (Online Mode)
Select this function. Select the IP Address range to be scanned through the L-NET Network by filling in
the two rectangles ‘‘from 192.168.1.
to ’’, where is chosen between 1 and 253. Click ‘‘OK’’.
The Physical System is retrieved from the Network and becomes the Current System. The Online Mode is
activated.
!
The Retrieve System from Network function only works if a Network is synchronized
with the PC and if the PC and units IP Addresses are correctly set (see chapter 5 for
instructions, and section 7.3 for troubleshooting).
IMPORTANT
Figure 11: Launch window
NETMAN_UM_E N_1.1.0.45
w w w .l-ac ous ti cs .c o m
15/42
LA NETWORK MANAGER REMOTE CONTROL SOFTWARE
User Manual
VERSION 1.1.0.45
6.1.4
Software user interface
The LA NETWORK MANAGER user interface (Figure 12) features four windows and a Command toolbar (fully
detailed through the sections 6.2 to 6.6) for Offline or Online overall management of the Current System.
5. Command toolbar
1. ‘‘Units Over Network’’ window
2. ‘‘System/Groups’’ window
3. Control window
4. ‘‘Contour EQ’’ window
Figure 12: LA NETWORK MANAGER user interface
NETMAN_UM_E N_1.1.0.45
ww w .l -ac ous ti cs . co m
16/42
The following procedure features an overview of how to create and manage a System (Virtual or Physical) using the LA
NETWORK MANAGER software:
1. ‘‘Units Over Network’’ window (list of the Units)
Fast create, delete, or modify the Units (IP Address, Unit Type, Preset) composing the System by left and
right mouse clicking operations (see section 6.2).
2. ‘‘System/Groups’’ window (list of the Groups and attached Units)
Fast form the Groups and assign Units to each one by dragging and dropping Units from the ‘‘Units Over
Network’’ window (see section 6.3).
3. Control window (Unit and Group Parameter settings)
Fast set the Group Parameters (apply for all Units in the selected Group) and the Unit Parameters (apply
only for the selected Unit) by mouse clicking operations.
The Group Parameters are the Mute, Gain, Delay, and contour EQ parameters (see step #4). The Unit
Parameters are the Mute, Gain, Delay, and Polarity parameters. The Gain and Delay parameters have their
Group and Unit values summed in the ‘‘Abs.’’ columns that show absolute values.
In the Online Mode, this window provides real-time monitoring and control of each Group and Unit status
(including audio signal path and faults) (see section 6.4).
4. ‘‘Contour EQ’’ windows (Quick tonal balance for each Group)
For each group a selectable ‘‘Contour EQ’’ window allows fast intuitive 5+1 band contour EQ settings
(mouse click and drag operations) (see section 6.5). 5 filters are fixed frequency filters and 1 filter is a
parametric EQ filter.
5. Command Toolbar (File and Network functionalities, user options)
Feature System file, Network, and software option menus (see section 6.6).
NETMAN_UM_E N_1.1.0.45
w w w .l-ac ous ti cs .c o m
17/42
LA NETWORK MANAGER REMOTE CONTROL SOFTWARE
User Manual
VERSION 1.1.0.45
6.2
‘‘Units Over Network’’ window
6.2.1
Overview
The ‘‘Units Over Network’’ window (Figure 13) displays the list of the Units composing the Current System and
allows to create/modify them. In this window features the following information:
•
Unit Number (No.) Counts the Units composing the System.
•
IP Address (Addr.)
Identifies the Unit within the L-NET Network.
The IP Address cell color code is: pink for the Offline Mode, green for the Online Mode, and blue for the
Standby Mode (see Figure 13 and Figure 14).
!
The Unit Number is not linked to the IP Address.
IMPORTANT
•
Unit Type (Type)
•
Current Preset (Preset) Displays the name and memory location (from 1 to 99) of the Current Preset.
•
Preset Family (Family) Specifies the Preset Family to which the Current Preset belongs.
Specifies whether the Unit is an LA4 or an LA8 amplified controller.
Figure 13: ‘‘Units Over Network’’ window
Two menus are available to manage the Units:
•
‘‘Right Clicking’’ menu (see section 6.2.2): create, delete, or modify a Unit by directly right clicking on the
Unit or on a blank location.
•
‘‘PRESET’’ and ‘‘CONFIG’’ toolbars (see section 6.2.3): Online manage the presets in the Physical Units.
NETMAN_UM_E N_1.1.0.45
ww w .l -ac ous ti cs . co m
18/42
6.2.2
‘‘Right Clicking’’ menu
Right click on a Unit: the ‘‘Right Clicking’’ menu is displayed (see Unit #1 in Figure 14). All the selectable
functions are described below.
Right click on a blank cell: only the ‘‘Add new Units…’’ function is displayed.
Figure 14: The ‘‘Right Clicking’’ menu
Figure 15: Selecting a Preset from the LA4 Library
Add new Units…
This function adds a new Virtual Unit.
Left click on this function. The new window (Figure 15) prompts the user to select the IP Address, Unit
Type, and Current Preset:
Click on the ‘‘Addr.’’ cell and select an available IP Address in the displayed list.
Click on the ‘‘Type’’ cell to alternatively select the ‘‘LA4’’ or ‘‘LA8’’ Unit Type.
Directly load a Preset from a file by clicking on the ‘‘Load Preset from file…’’ function: browse for
the desired Preset File (‘‘*.preset’’), select the user memory location (from 1 to 10) for the new Preset, and
click ‘‘OK’’.
or
Load a Preset from the OEM Preset Library by clicking on the ‘‘Select Preset from Library’’ function:
select the desired Preset among the list, select the user memory location (from 1 to 10) for the new Preset,
and click ‘‘OK’’.
If the list does not exist or is the wrong one the user may load the Library File prior
selecting a Preset: click on the ‘‘Load Library from file…’’ function and browse
for the desired Library File (‘‘*.LA4’’ or ‘‘*.LA8’’).
The ‘‘*.LA4’’ and ‘‘*.LA8’’ files are downloadable from the web site @ www.lacoustics.com.
An LA8 OEM Preset can not be loaded into an LA4 Unit.
IMPORTANT
The Preset Family directly depends on the loaded Preset. It is set automatically and thus
cannot be modified by the user.
!
Once the whole changes are made click ‘‘OK’’ to validate and return to the software user interface.
NETMAN_UM_E N_1.1.0.45
w w w .l-ac ous ti cs .c o m
19/42
LA NETWORK MANAGER REMOTE CONTROL SOFTWARE
User Manual
VERSION 1.1.0.45
Delete Unit
This function deletes the selected Unit.
Left click on this function. Click ‘‘OK’’ in the new window: the Unit will be deleted.
!
When a Physical Unit pertaining to a Group has been disconnected from the
Network when using the ‘’Delete Unit’’ function the Group and Unit Parameters
(see section 6.4) remain active into the Physical Unit.
IMPORTANT
Modify Unit…
This function modifies the IP Address, Unit Type, and/or Current Preset of the selected Unit.
Left click on this function. In the new window (Figure 15) the user can modify the IP Address, Unit Type,
and/or Current Preset:
Click on the ‘‘Addr.’’ cell and select an available IP Address in the displayed list.
Trying to modify the IP Address of a Physical Unit from the LA NETWORK
MANAGER user interface forces the Unit to disconnect from the Network: the
Current Unit will become a Virtual Unit and the new IP Address will not be
stored into the Physical Unit.
Therefore, modifying the IP Address of a Physical Unit is only possible from the
IMPORTANT
Unit’s front panel user interface (see the ‘‘LA4’’ or ‘‘LA8’’ user manual).
!
!
If a Physical Unit pertaining to a Group has been disconnected from the
Network when trying to modify its IP Address in the ‘’Addr.’’ cell, the Group
and Unit Parameters (see section 6.4) remain active into the Physical Unit.
IMPORTANT
Click on the ‘‘Type’’ cell to alternatively select the ‘‘LA4’’ or ‘‘LA8’’ Unit Type.
!
Modifying the Unit Type will automatically cancel the
Current Preset, thus a new Preset has to be loaded.
IMPORTANT
Directly load a Preset from a file by clicking on the ‘‘Load Preset from file…’’ function: browse for
the desired Preset File (‘‘*.preset’’), select the user memory location (from 1 to 10) for the new Preset, and
click ‘‘OK’’.
or
Load a Preset from the OEM Preset Library by clicking on the ‘‘Select Preset from Library’’ function:
select the desired Preset among the list, select the user memory location (from 1 to 10) for the new Preset,
and click ‘‘OK’’.
If the list does not exist or is the wrong one, the user may load the Library File prior
selecting a Preset: click on the ‘‘Load Library from file…’’ function and browse
for the desired Library File (‘‘*.LA4’’ or ‘‘*.LA8’’).
The ‘‘*.LA4’’ and ‘‘*.LA8’’ files are downloadable from the web site @ www.lacoustics.com.
An LA8 OEM Preset can not be loaded into a LA4 Unit.
IMPORTANT
The Preset Family directly depends on the loaded Preset. It is set automatically and
thus cannot be modified by the user.
!
Note: The ‘‘Right Clicking’’ m enu allows to load presets that are stored in the PC. On the contrary, the
‘’PR ESET’’ and ‘’CONFIG’’ m enus (section 6.2.3) allows to load presets that are stored in the Physical Unit.
Once the whole changes are made click ‘‘OK’’ to validate and return to the software user interface.
NETMAN_UM_E N_1.1.0.45
ww w .l -ac ous ti cs . co m
20/42
Store Preset to file…
This function stores the Current Preset of a selected Unit into a Preset File (‘‘*.preset’’).
Click on this function. In the new window browse for the desired directory, keyboard the Preset File name,
and click ‘‘OK’’.
Load Preset from file…
This function loads a Preset from a Preset File (‘‘*.preset’’). This Preset will become the Current Preset in the
selected Unit.
Select this function. In the new window browse for the desired Preset File, select the user memory location
(from 1 to 10) in which the new Preset will be loaded, click ‘‘OK’’.
Lock Unit Hardware Keys (Online Mode)
Clicking on this function alternatively locks and unlocks the front panel commands (even the Mute function)
for the selected Physical Unit.
Notes: This function is useful in the Online Mode, but it can be activated in the Offline Mode and then be sent to
the Physical System using the ‘‘Send System To Network’’ function (see section 6.6.3).
When a Unit is locked a ‘‘key’’ is displayed in the corresponding ‘‘No.’’ cell (see Unit #2 in Figure 14).
When trying to press any keys on a locked Unit front panel, the ‘‘DISPLAY LOCKED’’ message is displayed on the
LCD screen and the action has not effect, even for the ‘‘Mute’’ function (see the ‘‘LA4’’ or ‘‘LA8’’ user manual).
This prevents any unintentional operation during an event performance, for example.
Disconnect (Online to Offline Modes) / Try to connect (Offline to Online Modes)
Clicking on the ‘‘Disconnect’’ function disconnects the selected Unit from the Network.
!
When a Physical Unit pertaining to a Group has been disconnected from the
Network by using the ‘’Disconnect’’ function the Group and Unit Parameters (see
section 6.4) remain active into the Physical Unit.
IMPORTANT
Clicking on the ‘‘Try to connect’’ function connects the selected Unit to the Network.
!
When using the ‘‘Try to connect’’ function the Physical Unit becomes the Current Unit
and the Virtual Unit Parameters are overwritten.
IMPORTANT
Note: The Unit mode is indicated by the color of the IP Address cell: green or blue for the Online Mode and
pink for the Offline Mode (see Figure 13 and Figure 14).
NETMAN_UM_E N_1.1.0.45
w w w .l-ac ous ti cs .c o m
21/42
LA NETWORK MANAGER REMOTE CONTROL SOFTWARE
User Manual
VERSION 1.1.0.45
6.2.3
‘‘PRESET’’ and ‘‘CONFIG’’ menus
Only available in the Online Mode the ‘‘PRESET’’ and ‘‘CONFIG’’ menus feature the same three functions: ‘‘Load’’,
‘‘Store’’, and ‘‘Name’’. They modify respectively the Current Preset, its memory location, and its name, into the
selected Physical Units. They apply either for one Unit in the ‘‘PRESET’’ menu or for all the synchronized Units in
the ‘‘CONFIG’’ menu.
Load list
Store list
Name list
Figure 16: ‘‘PRESET’’ and ‘‘CONFIG’’
menus
Figure 17: ‘‘Load’’, ‘‘Store’’, and ‘‘Name’’ lists
in the Unit#1 ‘‘PRESET’’ menu
Load
In the ‘‘PRESET’’ menu, the ‘‘Load’’ function applies for the selected Physical Unit and loads a Preset taken from
the Preset Library stored in the Unit (see the ‘‘Load list’’ in Figure 17). The selected Preset will become the
Current Preset.
Click on the desired Physical Unit, click on the ‘‘Load’’ key in the ‘‘PRESET’’ menu, select the desired
Preset among the edited list, and click ‘‘YES’’.
In the ‘‘CONFIG’’ menu, the ‘‘Load’’ function applies for all the synchronized Physical Units simultaneously. For
each Unit, the Preset is taken from one of its 10 User Memory Locations (#1 to #10 of the ‘‘Load list’’ in Figure
17). The User Memory Location number is common to all Units but the selected Preset is particular to each Unit
and can be different from one to another.
Click on the ‘‘Load’’ key in the ‘‘CONFIG’’ menu, select the desired User Memory Location number, click
‘‘YES’’.
!
IMPORTANT
In both menus the ‘‘Load’’ function only works when the selected Preset and the
Current Preset are pertaining to the same Preset Family. On the contrary case (including
for empty memories) a conflict list is displayed for each concerned Physical Unit (see the
Troubleshooting section 7.3).
Loading a new Preset the Family of which is different from the Current Preset’s one must
be done by directly on the Physical Unit’s front panel.
NETMAN_UM_E N_1.1.0.45
ww w .l -ac ous ti cs . co m
22/42
Store
In the ‘‘PRESET’’ menu, the ‘‘Store’’ function applies for the selected Physical Unit and stores the Current
Preset (including the Unit Parameters) into one of its 10 User Memory Locations (see the ‘‘Store list’’ in Figure
17).
Click on the desired Physical Unit, click on the ‘‘Store’’ key of the ‘‘PRESET’’ menu, select the desired
User Memory Location among the edited list, and click ‘‘YES’’.
In the ‘‘CONFIG’’ menu, the ‘‘Store’’ function applies for all the synchronized Physical Units simultaneously. The
User Memory Location number is common to all Units but the Current Preset is particular to each Unit and can
be different from one to another.
Click on the ‘‘Store’’ key of the ‘‘CONFIG’’ menu, select the desired User Memory Location, click ‘‘YES’’.
Name
In the ‘‘PRESET’’ menu, the ‘‘Name’’ function applies for the selected Physical Unit and renames one of its User
Memory Location (from #1 to 10: see the ‘‘Name list’’ in Figure 17).
Click on the desired Unit, click on the ‘‘Name’’ key of the ‘‘PRESET’’ menu, keyboard the new name in the
new window, click ‘‘OK’’.
In the ‘‘CONFIG’’ menu, the ‘‘Name’’ function applies for all the synchronized Physical Units simultaneously.
The name and the User Memory Location number are common to all Units.
Click on the ‘‘Name’’ key of the ‘‘CONFIG’’ menu, keyboard the new name, click ‘‘OK’’ and ‘‘YES’’.
!
Renaming a Preset does not change the Preset Family name.
A Preset can be renamed even if it is not the Current Preset.
IMPORTANT
6.3
‘‘System/Groups’’ window
The ‘‘System/Groups’’ window (Figure 18) contains a list of the Groups composing the System. In this window the
user can create or modify the Groups and assign Units to each one.
!
Assigning a Unit to a Group is necessary to monitor and control it in the Control window (see
section 6.4). In particular, this allows setting the Group Parameters (Mute, Gain, Delay, Contour
EQ) that are applied to all Units of the Group.
IMPORTANT
Group tree icon
Figure 18: The ‘‘System/Groups’’ window
NETMAN_UM_E N_1.1.0.45
w w w .l-ac ous ti cs .c o m
23/42
LA NETWORK MANAGER REMOTE CONTROL SOFTWARE
User Manual
VERSION 1.1.0.45
Two ways to create Groups and assign Units to each one
Click N times on the ‘‘Add’’ key to create N Groups. They will automatically be named ‘‘Group 1’’, ‘‘group
2’’ … ‘‘Group N’’. If wanted, rename each one by clicking on its name and keyboarding the new name. Drag and
drop each Unit from the ‘‘Units Over Network’’ window to the desired Group.
Drag and drop a Unit to the empty ‘‘System/Groups’’ window: a Group is automatically created and named
‘‘Group 1’’. Drag and drop the second Unit to the ‘‘Group 1’’ Group or to the empty area of the
‘‘System/Groups’’ window: in the last case the ‘‘Group 2’’ Group is automatically created. Repeat the procedure
for all Units. If wanted, rename each Group by clicking on its name and keyboarding the new name.
!
IMPORTANT
It is not possible to create subgroups (Groups within a Group).
It is possible to check if a Physical Unit is part of a Group and to identify its Group name by
pressing and holding either the IN A or IN B key on the Unit front panel. The name of the
Group will appear at the bottom right of the LCD (see the ‘‘LA4’’ or ‘‘LA8’’ user manual).
Deleting a Unit or a Group
Click on the Unit or the Group to be deleted, press the ‘‘Delete’’ key on the keyboard or in the
‘‘System/Groups’’ window, click ‘‘YES’’ in the new window.
!
IMPORTANT
!
IMPORTANT
!
IMPORTANT
In order to move a Unit from a Group to another one the user must delete the Unit from the
first Group and reassign the Unit to the second Group (by dragging and dropping it from the
‘‘Units Over Network’’ window).
In the Unit, the Group Parameters of the first Group will be replaced by those of the second
Group.
In the Online Mode, when a Unit has been deleted from a Group or if the Group containing
the Unit has been deleted:
• The Group Parameters are cancelled into the Physical Unit while the Unit
Parameters remain active (see section 6.4).
• The Outputs are muted on the Physical Unit.
Consider a Physical Unit in the Standalone Mode. If some Group Parameters remain active in
it, they cannot be seen and accessed via the front panel user interface, and they are not preset
dependent (they will remain the same even if a new Preset is loaded).
Therefore, when recuperating a Physical Unit for a Standalone application that has been
previously used within a Network, L-ACOUSTICS recommends using the CLEAR GROUP
PARAMETERS function in order to clear all Group Parameters (see the ‘‘LA4’’ or ‘‘LA8’’
user manual).
Showing/hiding the Units
Alternatively clicking on a Group tree icon displays or hides the Units pertaining to this Group.
NETMAN_UM_E N_1.1.0.45
ww w .l -ac ous ti cs . co m
24/42
6.4
Control window
The Control window (Figure 19) allows overall monitoring and control of the Current System through a removable
tree.
Meter LEDs
Group name
Group Parameters
Unit tree icon
Group tree icon
Preset name
IP Address
Channel assignment
Unit Parameters
Figure 19: The Control window
NETMAN_UM_E N_1.1.0.45
w w w .l-ac ous ti cs .c o m
25/42
LA NETWORK MANAGER REMOTE CONTROL SOFTWARE
User Manual
VERSION 1.1.0.45
6.4.1
Monitoring the system
The user can display or hide information by alternatively clicking on the tree icons: by default only the maroon
Group Bars are visible. Clicking on the Group tree icon adds the blue Unit Input Channel Bars, and clicking on the Unit
tree icon adds the green Unit Output Channel Bars (Figure 19).
Note: The Group and Unit Bar colors can be modified (see the ‘‘Settings…’’ menu in section 6.6.5).
The available information is the following:
•
Each Group is displayed along with its Name and Group Parameters (Mute, Gain, Delay, Contour EQ). For
each Group, a ‘‘Contour EQ’’ window is selectable by clicking on the ‘‘CONTR.’’ key in the Group Bar (see
section 6.5).
•
Each Unit is displayed along with the Current Preset, IP Address, and for each Channel (2 x in, 4 x out) the
Channel assignment and the Unit Parameters (Mute, Gain, Delay, Polarity).
Note: The A and B Input Channels are labeled IN_A and IN_B respectively, or UNUSED if not used. The 4
Output Channels are labeled ‘‘
_
’’ where the first 2 digits indicate the kind of transducer to be connected
to the corresponding Output Channel (LF, MF, HF for Low, Mid, Hi frequency transducers respectively, SB for
subwoofer, SR for reversed subwoofer in cardioid applications, PA for passive enclosure), and the last digit
indicates which Input Channel the Output is driven by (A or B when the Output is driven by Input A or B
respectively).
•
The Group and Unit Parameter values are cumulative for the Gain and Delay parameters. The cumulate values
are shown in the ‘‘GAIN Abs.’’ and ‘‘DELAY Abs.’’ columns.
•
In the Online Mode, real time audio signal path and faults for each Channel of each Unit is given by the Meter
LEDs (‘‘Load, Signal, -25, -10, -5, Clip, Limit, Fault’’) described below (please refer to the ‘‘LA4’’ or
‘‘LA8’’ user manual for additional information):
LOAD The green ‘‘Load’’ LED is lit when a speaker is connected at the corresponding Unit Output
Channel and when the Output power reaches at least 2 W. Example: In Figure 19 a speaker is
connected to the SB118_60 Unit Output Channel #3.
SIGNAL The green ‘‘Signal’’ LED is lit when a signal is detected at the corresponding Unit Channel
(Input or Output). Example: In Figure 19 a signal is detected at the SB118_60 Unit Output Channel #3.
dB The green “-25, -10, -5 dB” LEDs are lit when the Unit Channel voltage (Input or Output)
reaches respectively 25, 10, or 5 dB below the maximum level. Example: In Figure 19 the SB118_60
Unit Output Channel #3 signal reaches 5dB below the maximum level.
CLIP The red ‘‘Clip’’ LED is lit when the Channel voltage (Input or Output) reaches the maximum
level. Example: In Figure 19 the SB118_60 Unit Output Channel #1 signal reaches the clip level. The
‘‘Clip’’ LED in the Group Bar is also lit.
LIMIT The yellow ‘‘Limit’’ LED indicates that the L-DRIVE, Fuse Protect, or Temperature
protection is active. The signal is attenuated.
When the limited Channel returns to nominal state the protection automatically gets off and the Unit
returns to normal operating state.
Example: In Figure 19 the SB118_60 Unit Output Channel #1 signal reaches the limiter threshold. The
‘‘Limit’’ LED in the Group Bar is also lit.
FAULT The red ‘‘Fault’’ LED indicates whether one or several Input or Output Channels on the
Unit are no longer operational because of a DC Error, Power Failure, or DSP Error.
When the faulty component returns to nominal state the protection automatically gets off and the Unit
returns to normal operating state.
Example: In Figure 19 the SB118_60 Unit is in faulty state (the LED located at the right of the A Input
Channel LEDs is lit). The ‘‘Fault’’ LED in the Group Bar is also lit.
NETMAN_UM_E N_1.1.0.45
ww w .l -ac ous ti cs . co m
26/42
6.4.2
Offline and Online System management
The Control window allows the user to modify in advance (Offline) or real-time monitor (Online) the Group and Unit
Parameters of the Current System.
Group Parameters
The Group Parameters are the Mute, Gain, Delay, and Contour EQ parameters located in the maroon Group Bar.
They apply for all Units in the selected Group.
Alternatively clicking on the ‘‘MUTE’’ key mutes (red color) or unmutes (grey color) all Output Channels.
Example: In the Figure 19 all Output Channels of the KUDO Group are muted.
Click on the ‘‘GAIN’’ cell and keyboard the Gain value: the Gain value is uniformly modified for all Output
Channels.
Example: In the Figure 19 all Output Channel Gain values of the SUB Group are increased by 3.5dB.
Modify the Delay value in the same way as for the Gain value by clicking on the ‘‘DELAY’’ cell.
Clicking on the ‘‘CONTR.’’ key edits the ‘‘Contour EQ’’ window for the selected Group.
Contour EQ setting will be discussed in section 6.5.
!
IMPORTANT
!
IMPORTANT
If a Physical Unit pertaining to a Group has been disconnected from the Network because the
PC has shut down, a cable has been removed, or the ‘’New System’’ (section 6.6.2),
‘’Delete Unit’’, ‘’Modify Unit’’, or ‘’Disconnect’’ (section 6.2.2) function has been used,
the Group Parameters remain active into the Physical Unit.
On the contrary, when using the ‘’Delete’’ function in the ‘’System/Groups’’ window
(section 6.3) the Group parameters are cancelled.
Consider a Physical Unit in the Standalone Mode. If some Group Parameters remain active in
it, they cannot be seen and accessed via the front panel user interface, and they are not preset
dependent (they will remain the same even if a new Preset is loaded).
Therefore, when recuperating a Physical Unit for a Standalone application that has been
previously used within a Network, L-ACOUSTICS recommends using the CLEAR GROUP
PARAMETERS function in order to clear all Group Parameters (see the ‘‘LA4’’ or ‘‘LA8’’
user manual).
Unit Parameters
The Unit Parameters are the Mute, Gain, Delay, and Polarity parameters located in the green and blue Unit Bars,
respectively for Input and Output Channels. They only apply for the selected Channel.
Alternatively clicking on the ‘‘MUTE’’ key mutes (red color) or unmutes (grey color) the selected Channel.
This function is only available for the Output Channels.
Example: In the Figure 19 the unit of IP Address #1 in the SUB Group has Output Channels 1 and 3 unmuted and
Output Channels 2 and 4 muted.
Click on the ‘‘GAIN’’ cell and keyboard the Gain value: the Gain value is modified for the selected Channel.
Example: In the Figure 19 the Unit of IP Address #1 in the SUB Group has Output Channels 1 and 3 Gain value
increased by 2dB. Thus, adding the Group (3.5dB) and Unit Gain (2dB) values results in a total of 5.5dB in the
‘‘GAIN Abs.’’ column.
Modify the Delay value in the same way as for the Gain value by clicking on the ‘‘DELAY’’ cell.
Alternatively clicking on the ‘‘POLARITY’’ key sets the polarity at 0° (+ sign, grey color) or 180° (- sign,
red color).
Example: In the Figure 19 the Unit of IP Address #1 in the SUB Group has Output Channels 1 and 3 set at 180°,
and the Output Channels 2 and 4 set at 0°.
!
If a Physical Unit pertaining to a Group has been disconnected from the Network because the
PC has shut down, a cable has been removed, or the ‘’New System’’ (section 6.6.2),
‘’Delete Unit’’, ‘’Modify Unit’’, ‘’Disconnect’’ (section 6.2.2), or ‘’Delete’’ (section 6.3)
function has been used, the Unit Parameters remain active into the Physical Unit.
IMPORTANT
NETMAN_UM_E N_1.1.0.45
w w w .l-ac ous ti cs .c o m
27/42
LA NETWORK MANAGER REMOTE CONTROL SOFTWARE
User Manual
VERSION 1.1.0.45
6.5
‘‘Contour EQ’’ windows
Clicking on the ‘‘CONTR.’’ key of a Group Bar in the Control window edits the corresponding ‘‘Contour EQ’’
window for this Group: the corresponding ‘‘CONTR.’’ key is colored in green, the other remain colored in gray.
Example: Figure 20 shows the ‘‘Contour EQ’’ window for the KUDO Group.
The ‘‘Contour EQ’’ window features a 5+1 band contour EQ setting tool applying uniformly for all Units pertaining to
the selected Group. One filter is a parametric EQ filter and the other 5 filters are fixed frequency filters. Therefore, the
‘‘Contour EQ’’ tool is dedicated to loudspeaker tonal balance but not to room equalization.
Those three IIR (Infinite Impulse Response) and three FIR (Finite Impulse Response) filters can be set by modifying the
values in the Filter menu or by directly dragging the corresponding curves into the Curve window. Validating or
resetting the values is done using the Command and Contour menus.
The Curve window features the magnitude transfer function (in dB) in the frequency domain (Hz, logarithm scale) for
each filter (thin curves) and for the resulting filter (thick red curve). The magnitude scale is settable using the Scaling
cursors.
Command menu
Magnitude (dB)
IIR filters
Filter menu
Curve window
Contour menu
FIR filters
Scaling cursors
Frequency (Hz)
Figure 20: ‘‘Contour EQ’’ window
Filter #1 (IIR)
60Hz fixed frequency IIR filter (LF domain): applies for subwoofers.
In the Filter menu, click on the ‘‘OFF’’ key in the ‘‘BAND #1’’ column, select ‘‘ON’’: a blue cross labeled
‘‘1’’ is edited at the position ‘‘60Hz’’ into the Curve window. Set the gain to the desired value (between -15dB
and +6dB) by directly dragging the cross up and down (or by clicking on the ‘‘GAIN/CR’’ key in the ‘‘BAND
#1’’ column, keyboarding and validating the value).
NETMAN_UM_E N_1.1.0.45
ww w .l -ac ous ti cs . co m
28/42
Filter #2 (IIR)
160Hz fixed frequency IIR filter (LF domain).
In the Filter menu, click on the ‘‘OFF’’ key in the ‘‘BAND #2’’ column, select ‘‘ON’’: a blue cross labeled
‘‘2’’ is edited at the position ‘‘160Hz’’ into the Curve window. Set the gain to the desired value (between -15dB
and +6dB) by directly dragging the cross up and down (or by clicking on the ‘‘GAIN/CR’’ key in the ‘‘BAND
#2’’ column, keyboarding and validating the value).
Filter #3 (IIR)
Frequency and Q factor-settable IIR filter: magnitude response frequency settable between 100Hz and 1.5 kHz,
and Q factor settable between 1 and 10 (the higher the Q factor value is, the narrower the filtering bandwidth is).
In the Filter menu, click on the ‘‘OFF’’ key in the ‘‘BAND #3’’ column, select ‘‘ON’’: a blue cross labeled
‘‘3’’ is edited into the Curve window. Set the frequency and the Gain (between -15dB and +10dB) to the desired
values by directly dragging the cross left and right or up and down (or by respectively clicking on the ‘‘FREQ’’ or
‘‘GAIN/CR’’ key in the ‘‘BAND #3’’ column, keyboarding and validating the value). Set the Q factor value by
clicking on the ‘‘Q/ORD’’ key in the ‘‘BAND #3’’ column, keyboarding and validating the value.
Filter #4 (FIR)
1.5-5 kHz fixed frequency band FIR filter (high MF domain).
This filter corresponds to the blue cross located at the position ‘‘2.5 kHz’’ into the Curve window. Set the
Gain to the desired value (between -15dB and +6dB) by directly dragging the cross up and down. Validate the
setting by clicking on the ‘‘APPLY’’ key of the Command menu (or click on the ‘‘CANCEL’’ key to retrieve the
old setting).
Filter #5 (FIR)
5-12 kHz fixed frequency band FIR filter (HF domain).
This filter corresponds to the blue cross located at the position ‘‘7.5 kHz’’ into the Curve window. Set the
Gain to the desired value (between -15dB and +6dB) by directly dragging the cross up and down. Validate the
setting by clicking on the ‘‘APPLY’’ key of the Command menu (or click on the ‘‘CANCEL’’ key to retrieve the
old setting).
Filter #6 (FIR)
12-30 kHz fixed frequency band FIR filter (HF domain).
This filter corresponds to the blue cross located at the position ‘‘20 kHz’’ into the Curve window. Set the
gain to the desired value (between -15dB and +6dB) by directly dragging the cross up and down. Validate the
setting by clicking on the ‘‘APPLY’’ key of the Command menu (or click on the ‘‘CANCEL’’ key to retrieve the
old setting).
Contour menu
Click on the ‘‘X’’ key in the Contour menu, click on the ‘‘Apply’’ key in the Command menu: all filter
settings will be cancelled.
Scaling cursors
Click on the top or bottom Scaling Cursor to set the magnitude interval to be displayed on screen:
from [-3 ; +3] to [-120 ; +120] dB.
NETMAN_UM_E N_1.1.0.45
w w w .l-ac ous ti cs .c o m
29/42
LA NETWORK MANAGER REMOTE CONTROL SOFTWARE
User Manual
VERSION 1.1.0.45
6.6
Command toolbar
6.6.1
Overview
The Command toolbar features System File management, Network connection, software option menus, and
information upon the software.
Figure 21: The Command toolbar
6.6.2
‘‘File’’ menu
The ‘‘File’’ menu provides System File management.
Click on the ‘‘File’’ key.
Figure 22: The ‘‘File’’ menu
New System
Edits a new System by choosing between three possible ways: creating (Offline), opening (Offline), or retrieving
(Online).
Click ‘‘New System’’, follow the instructions given in section 6.1.3.
!
IMPORTANT
This function automatically cancels all eventually prior edited Current System.
If a Physical Unit pertaining to a Group has been disconnected from the Network when using
the ‘’New System’’ function the Group and Unit Parameters (see section 6.4) remain active
into the Physical Unit.
Open System
Edits a System that was previously stored in a file. Editing is possible in both Offline and Online Modes.
Click ‘‘Open System’’, browse for a System File (‘‘*.system’’), click ‘‘OPEN’’.
!
When a Current System is already active, opening a System File is only possible if the System
stored in it is compatible (see the Glossary chapter 9) with the Current System.
If both Systems are not compatible a conflict list is edited (see the Troubleshooting section 7.3).
IMPORTANT
NETMAN_UM_E N_1.1.0.45
ww w .l -ac ous ti cs . co m
30/42
Store System
Stores the Current System to a System File.
Click ‘‘Store System’’. In the new window browse for the desired directory location and keyboard the
System File name, click ‘‘SAVE’’: the ‘‘name.system’’ file will be saved into the chosen directory location.
Check for current System compatibility to file
Checks if a System stored in a System File is compatible (see the Glossary chapter 9) or not with the Current
System.
Click ‘‘Check for current System compatibility to file’’. In the new window browse for a System File
(‘‘*.system’’), click ‘‘OPEN’’: if both systems are compatible the ‘‘The loaded system is compatible to the
current system’’ message is displayed, in the opposite case a conflict list is displayed (see the Troubleshooting
section 7.3).
Exit
Click ‘‘Exit’’ to close the LA NETWORK MANAGER application software.
!
When working in the Online Mode all synchronized Physical Units will be disconnected,
but the Group and Unit parameters (see section 6.4) will remain active into each one.
They can be retrieved later using the ‘‘Retrieve System From Network’’ function
(see section 6.6.3).
IMPORTANT
!
IMPORTANT
6.6.3
Consider a Physical Unit in the Standalone Mode. If some Group Parameters remain active
in it, they cannot be seen and accessed via the front panel user interface, and they are not
preset dependent (they will remain the same even if a new Preset is loaded).
Therefore, when recuperating a Physical Unit for a Standalone application that has been
previously used within a Network, L-ACOUSTICS recommends using the CLEAR GROUP
PARAMETERS function in order to clear all Group Parameters (see the ‘‘LA4’’ or ‘‘LA8’’
user manual).
‘‘Network’’ menu
The ‘‘Network’’ menu provides System transfer management between the software and the Network.
Click on the ‘‘Network’’ key.
Figure 23: The ‘‘Network’’ menu
NETMAN_UM_E N_1.1.0.45
w w w .l-ac ous ti cs .c o m
31/42
LA NETWORK MANAGER REMOTE CONTROL SOFTWARE
User Manual
VERSION 1.1.0.45
Send System to Network…
Sends the Virtual System into the networked Physical Units.
Click ‘‘Send System to Network…’’. In the new window click ‘‘YES’’: the Physical System is scanned. In
the second new window click ‘‘OK’’: the Virtual System will be loaded into the connected Physical Units and the
old Physical System will be overwritten, the new Physical System will become the Current System as the Online
Mode will be activated.
!
IMPORTANT
The ‘‘Send System to Network…’’ function works only if:
• A Network is synchronized with the PC and the PC and Units IP Addresses
are evenly set (see part 5 for instructions, and section 7.3 for troubleshooting).
• The Virtual System is compatible (see the Glossary chapter 9) with the Physical
System (if both Systems are not compatible a conflict list is edited: see the
Troubleshooting section 7.3).
Retrieve System from Network…
Retrieves the Physical System for it to become the Current System. The Online Mode is activated.
Click on the ‘‘Retrieve System from Network…’’ function, click ‘‘YES’’.
!
The ‘‘Retrieve System from Network…’’ function only works if a Network is
synchronized with the PC and if the PC and units IP Addresses are correctly set (see chapter
5 for instructions, and section 7.3 for troubleshooting).
This function automatically cancels all eventually prior edited Current System.
IMPORTANT
6.6.4
‘‘View’’ menu
The ‘‘View’’ menu allows showing/hiding the Unit and Group Parameters in the Control window (see section 6.4).
Click on the ‘‘View’’ key.
Figure 24: The ‘‘View’’ menu
Expand Tree
Clicking on the ‘‘Expand Tree’’ function displays the whole available information (Groups and Units
Parameters) for monitoring the System.
Collapse Tree
Clicking on the ‘‘Collapse Tree’’ function hides the Unit Parameters.
NETMAN_UM_E N_1.1.0.45
ww w .l -ac ous ti cs . co m
32/42
6.6.5
‘‘Options’’ menu
The ‘‘Options’’ menu provides software user interface accessibility settings, maintenance operations, and Physical Unit
state management.
Click on the ‘‘Options’’ key.
Figure 25: The ‘‘Options’’ menu
Go to USER Mode / Go to ENGINEER Mode…
The ENGINEER Mode is dedicated to System creation and installation before the event performance. All the
functions are accessible to:
•
•
create or modify a System setup in the ‘‘Units Over Network’’ and ‘‘System/Groups’’ windows,
modify the Group and Unit Parameters in the Control window.
Click ‘‘Go to ENGINEER Mode…’’. If a password has been set: keyboard the password in the new window
and click ‘‘OK’’, click ‘‘OK’’ in the second new window.
The USER Mode is dedicated to the Online operations before and during a live show. The accessible functions
are restricted:
•
•
•
•
creating a System is not possible and the access to the ‘‘Units Over Network’’ and ‘‘System/Groups’’
windows is denied,
opening a System from a file is only possible if this System is compatible (see the Glossary chapter 9) with
the Current System,
only the authorized Group and Unit Parameters are accessible in the Control Window: accessibility is
set in the ENGINEER Mode (see the ‘‘Edit Visibility’’ function),
returning to the ENGINEER Mode can be locked by password (see the ‘‘Settings…’’ function).
Click ‘‘Go to USER Mode’’ function.
Note: The current mode is labeled on the extreme right part of the Command toolbar (see Figure 12).
NETMAN_UM_E N_1.1.0.45
w w w .l-ac ous ti cs .c o m
33/42
LA NETWORK MANAGER REMOTE CONTROL SOFTWARE
User Manual
VERSION 1.1.0.45
Edit visibility
Sets each Group and Unit Parameter accessibility (accessible or locked) in the Control window. The settings are
made in the ENGINEER Mode and the restrictions will apply in the USER Mode.
Activate the ENGINEER Mode (see the function above). Position the mouse cursor on ‘‘Edit Visibility’’. In
the new menu click ‘‘User Level’’: the Parameter cells will be colored in green or gray in the Control Window
(see Figure 26):
• Green color: the parameter will be accessible in the User Mode.
• Gray color: the parameter will be locked in the User Mode.
Click on each Parameter cell to set the Parameter accessibility (green or gray). Position the mouse cursor on
‘‘Edit Visibility’’, click ‘‘Off’’. Activate the USER Mode (see the function above): accessible Parameters will be
displayed and locked Parameters will be hidden (see Figure 27).
Notes: Each accessibility setting uniformly apply for all Units of all Groups.
When a parameter is locked by L-ACOUSTICS the corresponding ‘‘EXT’’ cell it is colored in gray. On the
contrary case, the ‘‘EXT’’ cell it is colored in green.
(a)
Figure 26: The ‘‘User Level’’ Control window
NETMAN_UM_E N_1.1.0.45
ww w .l -ac ous ti cs . co m
(b)
(c)
Figure 27: Hiding the
Output Channel polarity:
(a) ENGINEER Mode,
(b) User Level Control
window, (c) USER Mode
34/42
Lock Hardware Keys
Position the mouse cursor on the ‘‘Lock Hardware Keys’’ function. In the new menu click on the ‘‘Lock all
Units’’ or ‘‘Unlock all Units’’ function to respectively lock or unlock the front panels of all Physical Units in the
Network.
Notes: This function is useful in the Online Mode but can be set in advance in the Offline Mode and then be sent
to the Physical System using the “Send System To Network’’ function (see section 6.6.3).
When a Unit is locked a ‘‘key’’ is displayed in the corresponding ‘‘No.’’ cell (see Unit #2 in Figure 14).
If trying to press any keys on a locked Unit front panel the ‘‘DISPLAY LOCKED’’ message is displayed on the LCD
screen and the action has not effect, even for the ‘‘Mute’’ function (see the ‘‘LA4’’ or ‘‘LA8’’ user manual). This
feature prevents any unintentional operation during an event performance, for example.
Power Standby (Online Mode)
Position the mouse cursor on the ‘‘Power Standby’’ function. In the new menu click on the ‘‘All Units
Power up’’ or ‘‘All Units standby’’ function to respectively put all the Physical Units in the Operating or
Standby Mode.
Notes: Each Unit state is indicated by the color of its IP Address cell in the ‘‘Units Over Network’’ window
(see section 6.2): the green color stands for the Operating Mode, the blue color stands for the Standby Mode.
When a Physical Unit is in the Standby Mode the four ‘‘Load’’ LEDs lit (on both the LCD screen and software
interface) and the message ‘‘Standby Mode’’ is displayed on the LCD screen (see the ‘‘LA4’’ or ‘‘LA8’’ user
manual).
Update (Online Mode)
Updates the Firmware or the Preset Library for the selected Physical Units (see sections 7.1 and 7.2 respectively).
Settings…
Sets the background color for the different branches of the tree (Groups, Units, Input and Output Channels) in
the Control window (see section 6.4).
Click ‘‘Settings…’’. In the ‘‘Settings’’ window (Figure 28), click on the desired background color in the
‘‘Tree Colors’’ menu. In the ‘‘Color’’ window (Figure 28), set the desired color and click ‘‘OK’’. Click
‘‘OK’’ a second time in the ‘‘Settings’’ window.
Sets the Engineer Password for the ENGINEER Mode to be locked when trying to switch from USER Mode to
ENGINEER Mode (the USER Mode is also activated when launching the software). In that way the user cannot
modify the Current System (see the beginning of section 6.6.5).
Click ‘‘Settings…’’. In the ‘‘Settings’’ window (Figure 28), enter the desired password in the ‘‘Setup
Engineer Password’’ menu and click ’’Set’’. In the ‘‘Confirm with old Password!’’ window (Figure 28),
enter the old password and click ‘‘OK’’. Click ‘‘OK’’ in the new window. Click ‘‘OK’’ In the ‘‘Settings’’
window.
!
Do not to forget the password as it will not be removed
even if uninstalling the software.
IMPORTANT
NETMAN_UM_E N_1.1.0.45
w w w .l-ac ous ti cs .c o m
35/42
LA NETWORK MANAGER REMOTE CONTROL SOFTWARE
User Manual
VERSION 1.1.0.45
Figure 28: The ‘‘Settings’’, ‘‘Color’’, and ‘‘Confirm with old Password!’’ windows
6.6.6
‘‘?’’ menu
Displays the software version and the L-ACOUSTICS internet website address for latest Software, Firmware, and
Preset Library files download.
Click on the ‘‘?’’ key. Click on the ‘‘About…’’ function in the new menu: a new window displays the required
information. Click on this window to close it.
NETMAN_UM_E N_1.1.0.45
ww w .l -ac ous ti cs . co m
36/42
7 CARE AND MAINTENANCE
7.1
Firmware update
Each Physical Unit is managed by a Firmware (refer to the ‘‘LA4’’ or ‘‘LA8’’ user manual). Two Firmware Files exist
and correspond to the ‘‘LA4’’ and ‘‘LA8’’ Unit Types. The user should check the L-ACOUSTICS internet website on a
regular basis @ www.l-acoustics.com for the latest Firmware version for each Unit Type.
7.2
Upload the desired Firmware package and follow the instructions given in the accompanying ‘’.pdf’’ file.
Preset Library update
In each Physical Unit is stored a complete onboard OEM Preset Library (see the ‘‘LA4’’ or ‘‘LA8’’ user manual) to
cover all principal L-ACOUSTICS loudspeaker system configurations. Two Preset Library Files exist and correspond to
the LA4 (‘‘*.LA4’’) or LA8 (‘‘*.LA8’’) Unit Type. The user should check on a regular basis the L-ACOUSTICS internet
website @ www.l-acoustics.com for the latest Preset Library versions.
Upload the desired Preset Library package and follow the instructions given in the accompanying ‘’.pdf’’ file.
NETMAN_UM_E N_1.1.0.45
w w w .l-ac ous ti cs .c o m
37/42
LA NETWORK MANAGER REMOTE CONTROL SOFTWARE
User Manual
VERSION 1.1.0.45
7.3
7.3.1
Troubleshooting
No Units or not all Units could be found on the Network
When performing the ‘‘Retrieve System From Network’’, ‘‘Send System To Network’’, or ‘‘Try To Connect’’
functions a conflict list (see section 7.3.2) can be displayed indicating that one or several expected Units cannot be
found within the Network. The flowchart below assists the user for troubleshooting:
No Units or not all
Units could be found
on the Network
Devices
switched
on?
No
For each device (Unit, Switcher), check that power switch is
on, AC plug is connected, AC outlet works
Yes
Network
Topology and
cabling scheme
correct?
No
Check for correct Network Topology and cabling scheme
(see section 5.2.3)
Yes
All
CAT5e STP cables
connected?
No
Connect each CAT5e STP cable on both
sides: the orange and green LEDs must lit on
each RJ45 connector socket
Yes
IP Address
correct on
each device?
No
Each device (PC, Units) has to be identified within the Network by
its IP Address in the format 192.168.1.XXX (see section 5.3).
The last 3 digits are chosen between 1 and 254 and must be
different for each device.
L-ACOUSTICS recommends the Address 254 for the PC and the
Addresses 1 to 253 for the Units.
Yes
IP scanning
range correct?
No
In the launch window (see section 6.1.3),
enter IP scanning range containing all the
Physical Unit IP Addresses
Yes
Contact local distributor for
service
The keys for interpretation of the flowchart are the following:
Symptom
NETMAN_UM_E N_1.1.0.45
Question
Remedy
ww w .l -ac ous ti cs . co m
Comment
38/42
7.3.2
Conflict list
Two Systems are compatible if they are formed of the same number of Units with each corresponding pair having the
same IP Address, Unit Type, and Preset Family. If two Systems are not compatible a conflict list is displayed featuring
four possible messages:
Message #1: ‘‘Not found in actual system!’’
Some Units (identified by their IP Addresses) defined in the System File cannot be found in the Current System.
Message #2: ‘‘Not found in file system!’’
Some Units (identified by their IP Addresses) defined in the Current System cannot be found in the File System.
Message #3: ‘‘Wrong Unit Type!’’
Two Units of same IP Address are found in both Current System and System File but their Unit Types do not
match (LA4 vs LA8).
Message #4: ‘‘Wrong Family!’’
Two Units of same IP Address and same Unit Type are found in both Current System and System File but their
Preset Families do not match.
Figure 29: The four messages of the ‘‘Conflict list’’ window: #1 and #2 (top), #3 (middle), #4 (bottom)
The above messages can be displayed when using the ‘‘Check for current System compatibility to file’’, ‘‘Open
system’’ (section 6.6.2), or ‘‘Send System to Network’’ (section 6.6.3) function. For the last one the System File
stands for the Virtual System and the Current System stands for the Physical System.
Conflict messages can also be displayed when using the ‘‘Try to Connect’’, ‘‘Modify Unit’’, ‘‘Load Preset from
File’’ (section 6.2.2), or ‘‘Load’’ (section 6.2.3) function.
NETMAN_UM_E N_1.1.0.45
w w w .l-ac ous ti cs .c o m
39/42
LA NETWORK MANAGER REMOTE CONTROL SOFTWARE
User Manual
VERSION 1.1.0.45
8 SPECIFICATIONS
Microsoft® Windows® XP® minimum,
or Mac equivalent (with a PC emulator)
RAM
Minimum 512 Mo
Monitor
800 x 600, 24 bits, color
Network Card
100 Mbps Ethernet card
Network cabling
CAT5e STP (maximum 100m/328ft length) or upper category
Units
L-ACOUSTICS® LA4 and LA8 amplified controllers
(Units of different Unit Types can be connected within the L-NET Network)
Switcher (for Star or Hybrid topologies) Minimum 100 Mbps with Auto MDI/MDIX functionality
Operating system
NETMAN_UM_E N_1.1.0.45
ww w .l -ac ous ti cs . co m
40/42
9 GLOSSARY
Compatible Systems Two Systems formed of the same number of Units with each corresponding pair featuring the
same IP Address, Unit Type, and Preset Family.
Current Preset
Preset loaded in a Unit.
Current System System displayed in the LA NETWORK MANAGER user interface. The Current System can be
either a Physical System or a Virtual System.
Current Unit
Unit displayed in the LA NETWORK MANAGER user interface.
Daisy Chain topology
Series-based Network cabling scheme (see section 5.2.3).
Firmware Program installed in a Physical Unit. The Firmware manages the whole Unit internal components (LCD
screen display, preset flash memory, Ethernet path, DSP, Switch Mode Power Supply: refer to the ‘‘LA4’’ or ‘‘LA8’’
user manual).
Firmware File Executable file named ‘‘run.exe’’ containing Physical Unit Firmware program source. Two firmware
file exist for both the LA4 and LA8 Units. The user should check on a regular basis the L-ACOUSTICS internet website
@ www.l-acoustics.com for the latest Firmware versions.
Full Duplex
Group
Network protocol featuring bi-directional data transmission between the PC and the connected Units.
Set of Units sharing the same Group Parameters.
Group Bar Horizontal graphic bar (colored in maroon in Figure 19) located in the Control window for Group
Parameter visualization and settings.
Group Parameters Mute, Gain, Delay, and Contour EQ parameters applying for all Units of a selected Group. The
Group Parameters can be set in the selected Group Bar (colored in maroon in Figure 19) located in the Control
window.
When selecting the Contour EQ parameters in the Group Bar, an additional window is displayed allowing for 5+1 band
equalization settings that apply uniformly for all Units of the Group (see section 6.5). 5 filters are fixed frequency filters
and 1 filter is a parametric EQ filter.
Hybrid topology
Network cabling scheme mixing the Daisy Chain and Star topologies (see section 5.2.3).
Input Channel Connection of the Unit to the Sound Source. Two Input Channels are available on each Unit: IN A
and IN B (see the ‘‘LA4’’ or ‘‘LA8’’ user manual). The Input Channels are modeled by the Input Channel Bars
(colored in blue in Figure 19) in the Control window.
IP Address The IP Address is a unique Internet Protocol Address to identify each device (PC or Unit) within the
Network. The L-NET usable IP Addresses are of the form 192.168.1., where is taken between 1 and 254.
L-NET Network Set of Physical Units synchronized with a PC running LA NETWORK MANAGER using CAT5e STP
cables. Communication between the devices (PC and Units) is based on the Ethernet protocol at a speed of 100 Mbps.
Three Network topologies are available: Daisy Chain, Star, and Hybrid.
Network
See L-NET Network.
Network Card
PC peripheral device for physical connection to Network.
OEM Memory Location Allocated space in a Physical Unit’s flash memory to store a factory Preset (see the ‘‘LA4’’
or ‘‘LA8’’ user manual). 89 OEM Memory Locations are available in each Unit (labeled from 11 to 99).
NETMAN_UM_E N_1.1.0.45
w w w .l-ac ous ti cs .c o m
41/42
LA NETWORK MANAGER REMOTE CONTROL SOFTWARE
User Manual
VERSION 1.1.0.45
Offline Mode PC running workflow in which the PC is not synchronized with the L-NET Network (as opposed to
the Online Mode). The Current System is a Virtual System. In this mode the user can create/modify the Virtual System
in advance with no need to be present at the event issue.
Online Mode PC running workflow is in which the PC is synchronized with the L-NET Network (as opposed to the
Offline Mode). The data displayed on the software user interface (IP Addresses, selected Presets, Unit and Group
Parameters) are those of the Physical Units, and are transmitted within the Full Duplex protocol. In this mode the user
can control the Physical System before and during the event performance. The Online Mode is activated when a System
is sent to or retrieved from the Network (see section 6.6.3).
Output Channel Connection of the Unit to the Sound System. Four Output Channels are available on each Unit:
from OUT 1 to OUT 4. The Output Channels are modeled by the Output Channel Bars (colored in green in Figure 19)
in the Control window.
Physical System System composed of a set of Physical Units connected to the L-NET Network (including the IP
Addresses, selected Presets, Unit and Group Parameters each Unit memory contains).
Real Unit (as opposed to the Virtual Unit): L-ACOUSTICS® LA4 or LA8 amplified controller.
Physical Unit
Preset
EQ settings stored in a Unit for driving a specific Sound System connected to the Unit.
Preset Family
Preset File
Set of Presets driving the same types of Sound Systems.
Computer file containing a Preset. A Preset File features the extension ‘‘*.preset’’.
Preset Library
Set of Presets.
Preset Library File Computer file containing a Preset Library. Two Preset Library Files exist and correspond to the
two Unit Types: they feature the respective extensions ‘‘*.LA4’’ and ‘‘*.LA8’’.
Sound Source Device to be connected to the Input Channels of an amplified controller, feeding this last with the
low voltage sound signal to be equalized and amplified.
Sound System
Set of loudspeaker enclosures.
Standalone Mode
Physical Unit operating state in which the Unit is not synchronized with Network.
Standby Mode Physical Unit state in which the Unit is synchronized with Network but does not operate (as
opposed to the Operating Mode).
Star topology
Parallel-based Network cabling scheme including a Switcher (see section 5.2.3).
System Set of Units arranged into Groups, each Unit featuring its IP Address, Unit Type, Preset, Unit Parameters,
and Group Parameters.
System File
Computer file containing a System. A System File features the extension ‘‘*.system’’.
Switcher Universal Ethernet device used within a Star or Hybrid topology to connect the Units in parallel within the
L-NET Network.
Unit System basic component, identified by its IP Address and featuring Unit Type, Current Preset, and Unit
Parameters. A Unit can be either a Virtual Unit or a Physical Unit. A Physical Unit’s flash memory can also contain a
Group name and some Group Parameters (see the ‘‘LA4’’ or ‘‘LA8’’ user manual).
Unit Bar Horizontal graphic bar (colored in blue or green in Figure 19) located in the Control window giving access
to the Unit Parameter visualization and settings.
Unit Type
LA4 or LA8. Specifies the L-ACOUSTICS amplified controller model.
NETMAN_UM_E N_1.1.0.45
ww w .l -ac ous ti cs . co m
42/42
Unit Parameters Mute, Gain, Delay, and Polarity parameters applying for the Input or Output Channels of a
selected Unit. Some Unit Parameters can be locked by L-ACOUSTICS. The accessible Unit Parameters can be set in
the selected Unit Bars (colored in blue and green in Figure 19) located in the Control window.
User Memory Location Allocated space in a Physical Unit’s flash memory to store a user modified Preset (see the
‘‘LA4’’ or ‘‘LA8’’ user manual). 10 User Memory Locations are available in each Unit (labeled from 1 to 10).
Virtual System
with Network.
Virtual Unit
Network.
System displayed in the LA NETWORK MANAGER user interface while the PC is not synchronized
Unit displayed in the LA NETWORK MANAGER user interface when the PC is not synchronized with
Operating Mode Physical Unit state in which the Unit is synchronized with Network and is operating or ready for
operation (as opposed to the Standby Mode).
WST® Wavefront Sculpture Technology: set of 5 technical criteria to be followed when arraying several enclosures in
order to result in homogeneous modular sound field.
NETMAN_UM_E N_1.1.0.45
w w w .l-ac ous ti cs .c o m
43/42
LA NETWORK MANAGER REMOTE CONTROL SOFTWARE
User Manual
VERSION 1.1.0.45
NETMAN_UM_E N_1.1.0.45
ww w .l -ac ous ti cs . co m
44/42
Document reference: NETMAN_UM_EN_1.1.0.45
_________________
© Copyright 2007 by L-ACOUSTICS
Parc de la Fontaine de Jouvence, 91462 Marcoussis cedex, France
_________________
Printed on recycled paper
Distribution date: October 03, 2007
NETMAN_UM_E N_1.1.0.45
w w w .l-ac ous ti cs .c o m
45/42