1
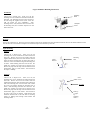
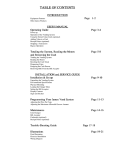
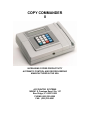
COPY COMMANDER
II
INCREASING COPIER PRODUCTIVITY
AUTOMATIC CONTROL AND RECORD KEEPING
MANUFACTURED IN THE USA
ACCOUNTOR SYSTEMS
16W361 S. Frontage Road, Ste. 107
Burr Ridge, IL 60527-5830
PHONE:(630) 325-9200
FAX: (630) 325-9201
TABLE OF CONTENTS
Section 1 Introduction . . . . . . . . . . . . . . . . . . . . . . . . . . . . . . . .
1
Section 2 How Do I Get Started? . . . . . . . . . . . . . . . . . . . . . . .
2
Section 3 Installation Instructions . . . . . . . . . . . . . . . . . . . . . . .
3
3.1
3.2
Connecting Copy Commander to Your Copier . . . . . . . . . . . .
Programming Using The Manager Menu . . . . . . . . . . . . . . . .
Section 4 Manager Functions . . . . . . . . . . . . . . . . . . . . . . . . . .
4.1
4.2
4.3
4.4
4.5
4.6
4.7
Account Add . . . . . . . . . . . . . . . . . . . . . . . . . . . . . . . . . . . . . .
Account Edit/Delete/Lockout . . . . . . . . . . . . . . . . . . . . . . . . . .
Print Report . . . . . . . . . . . . . . . . . . . . . . . . . . . . . . . . . . . . . . .
Clear Totals . . . . . . . . . . . . . . . . . . . . . . . . . . . . . . . . . . . . . . .
Set Date . . . . . . . . . . . . . . . . . . . . . . . . . . . . . . . . . . . . . . . . . .
Set Time . . . . . . . . . . . . . . . . . . . . . . . . . . . . . . . . . . . . . . . . . .
Setup Menu . . . . . . . . . . . . . . . . . . . . . . . . . . . . . . . . . . . . . . . .
Section 5 Using Your Copy Commander . . . . . . . . . . . . . . . . . . .
5.1
5.2
5.3
3
4
5
6
6–7
7
7
7
7
8–9
10
Display. . . . . . . . . . . . . . . . . . . . . . . . . . . . . . . . . . . . . . . . . . . .
Keypad Access . . . . . . . . . . . . . . . . . . . . . . . . . . . . . . . . . . . . . .
Card Access . . . . . . . . . . . . . . . . . . . . . . . . . . . . . . . . . . . . . . . .
10
10
10
Section 6 Taking Monthly Readings . . . . . . . . . . . . . . . . . . . . . . .
11
6.1
6.2
6.3
Manual Method . . . . . . . . . . . . . . . . . . . . . . . . . . . . . . . . . . . . . .
Setting The Cost Per Copy . . . . . . . . . . . . . . . . . . . . . . . . . . . . .
Printer Method . . . . . . . . . . . . . . . . . . . . . . . . . . . . . . . . . . . . . . .
11
12
12
Section 7 Technical Information and Service . . . . . . . . . . . . . . . ..
13
7.1
7.2
7.3
13
13
13, 17
Calling In a Service Call . . . . . . . . . . . . . . . . . . . . . . . . . . . . . . . .
Changing Copiers . . . . . . . . . . . . . . . . . . . . . . . . . . . . . . . . . . . . .
Mounting Bracket . . . .. . . . . . . . . . . . . . . . . . . . . . . . . . . . . . . . . .
Section 8 Programming Quick Sheet . . . . . . . . . . . . . . . . . . . . . . .
8.1
8.2
14
User Code Worksheet . . . . . . . . . . . . . . . . . . . . . . . . . . . . . . . . . .
Setup Worksheet . . . . . . . . . . . . . . . . . . . . . . . . . . . . . . . . . . . . . .
15
16
Mounting Bracket …………………………………………………………………….
17
Warranty
Warranty And Service Address………………………………… Back Page
i.
SERIAL NUMBER: ________________________________
SECTION 1:
INTRODUCTION
Congratulations on your decision to use the Copy Commander!
If you have never used a copy accounting system before, you will be pleased with the
control it will give you over the use of the copier. You may also be surprised when you
get the information from your first months readings. Your volume will probably be
reduced, and you may be surprised to discover that certain persons or departments are
making a much larger number of copies than previously thought.
The Copy Commander was designed for each control and usage of the copier, taking a
minimal amount of time and effort to manage.
PLEASE READ THROUGH THIS MANUAL
COMPLETELY BEFORE USING YOUR
COPY COMMANDER
WARNING: UNIT IS NOT USER REPAIRABLE
DO NOT OPEN – NO SERVICEABLE PARTS
CONTACT YOUR DEALER FOR SERVICE
–1–
SECTION 2:
HOW DO I GET STARTED?
Before installing the Copy Commander, it's best to first make a list of people,
departments and others who will be using your copier.
Here are answers to some questions you might have:
WHAT IS A USER CODE?
A "User Code" consists of up to 10-digits. For example, a 4-digit number that could
serve as an Account is 2345.
WHY DO I NEED A USER CODE NUMBER?
A User Code Number is used for people/employees who will have access to the copier.
If someone attempts to make copies without a proper User Code Number, the copier
will not operate.
WHERE DO I USE THE USER CODE NUMBER?
To use the User Code Number (like our 2345 example), you enter that number on the
Copy Commander's keypad, much like you would use a telephone.
HOW DO I GET A LIST OF USER CODE NUMBERS?
User Code Numbers are created by you. For Example:
2345 for John
1 for Mary
85023 for Department 7
Keep in mind that any of the User Code Numbers can be added, and old ones deleted,
more about how to do that later. Once entered, the Copy Commander will sort the
numbers and store them numerically.
–2–
SECTION 3:
3.1
INSTALLATION INSTRUCTIONS
CONNECTING THE COPY COMMANDER TO YOUR COPIER.
1. Somewhere on your copier will be an interface port or connector to which the Copy
Commander will be attached. Generally, the interface port to the connector is
located on either the right or left side of the machine -- near the top. Since the
location of this plug varies from copier to copier, it is best to ask your copier service
provider to locate it for you. You may have to remove a copier panel to access this
control port receptacle. We may have included specific instructions on how to find it
with these materials. You might also consult the copier's user manual.
2. Once the interface port has been located, the rest is easy. BEFORE YOU DO
ANYTHING, MAKE SURE THE COPIER IS TURNED OFF AND IS UNPLUGGED.
3. Follow the installation instructions, which are included specifically for your copier.
These instructions will be found in the box. Once the unit has been interfaced to the
copier, go on to Item #4.
4. Place the Copy Commander where it will be most convenient for users, but will not
interfere with the operation of the copier.
5. Connect the Copy Commander's black power cube to a 120 volt electric outlet,
probably the same one to which the copier is connected. If the copier is still
unplugged, you should plug it back into the outlet.
Contact your copier vendor to see if the copier has to be programmed to activate the
control port.
–3–
3.2
PROGRAMMING USING THE MANAGER MENU.
One of the features of the Copy Commander is the Manager Menu, which activates all
of the special management functions and allows the person responsible for the Copy
Commander to program in User Code Numbers, keep them up–to–date, change the
data contained in accounts, use the portable printer, and perform record keeping
functions, etc. Generally, we suggest that only a limited number of persons have
access to the Copy Commander's password, so that system security will be at a
maximum.
You are now ready to program your Copy Commander! Programming simply means
adding user code numbers so the Copy Commander will allow access by persons or
departments who are authorized to use the copy machine. Programming the Copy
Commander is so easy, it's a lot like using a telephone.
NOTE: The Copy Commander does not have to be connected to the copier to be
programmed. It can be unplugged for two months with a fully charged battery without
any memory loss.
In Section 2, we discussed making a list of User Code Numbers that will be used by
people who are authorized to use the copier. It you don't yet have a list, you can use
our examples to become familiar with programming the Copy Commander. These
examples can be easily deleted later.
Please take the time to make a copy of the work sheet in the back of this manual and fill
out these sheets at this time. If you do not have a User Code list, please follow the
example.
EXAMPLE:
USER CODE NUMBER
2345
1
85023
NAME
John
Mary
Department 7
Again, the Copy Commander does not need to be connected to the copier to program it,
so go ahead and plug it in and try the examples at your desk.
To get into the Manager Menu, press the Red Arrowed
Key then the Blue Up
Arrow
Menu Key. There is no manager password need to get into the Manager
Menu the first time you use the Copy Commander. We suggest that when you start
putting in your parameters, you select a manager code number, which is easy to
remember, and write it down in a couple of places.
If you change your Manager Code, it is a good idea to write your MANAGER CODE
here __________________. That allows someone else to use the management
functions if you are unavailable.
–4–
SECTION 4:
MANAGER FUNCTIONS
Manager Function Definitions:
To enter into any function, press the Enter key when the function you desire is on
display. To exit, back to the Manager Menu press the Clear key, sometimes several
times. If you press this key too many times, it will go back to the first manager function.
When you enter a function the Copy Commander will beep. When you exit the function,
it will beep twice. Press the Blue Menu Key to view the next function option.
MANAGER MENU:
Account Add
Account Edit/Delete
Print Report
Clear Totals
Set Date
Set Time
Setup Menu
–
–
–
–
–
–
–
–
–
–
–
–
–
–
–
Inactivity Timeout
Latency Timeout
Count Up/Down
Per Copy Cost
Session Copy Limit
Report Settings
Secure Entry
Verify Account
Key Entry Sound
Key Board Active
Card Reader Active
Network Number
Machine Number
Manager Password
Exit to Manager Menu
Exit Manager Mode
–5–
4.1 ACCOUNT ADD
Use this function to manually add your user code list into the Copy Commander. The
Copy Commander will automatically put your user code number in numerical order. It
will beep twice to signal that the account is accepted. The screen will display "Cannot
Add – Account Exists", if you try to put in the same number twice. Remember, you can
use from 1 to 10 digits, simply type in the user code number and press "ENTER".
If using mag-stripe cards, swipe the card mag-stripe down to the right. Repeat this step
for each mag-stripe card.
To Enter Account Code Numbers,
Enter Manager Menu, Enter Account Add, Enter Code Number, Press ENTER
(confirming beep will follow). Repeat this step until all codes are entered.
When you are finished, press "CLEAR" to get back to the Manager Menu. Use the
Blue
Down arrow Menu button to EXIT Manager Menu and press ENTER. The
Copy Commander is now programmed and ready to use.
4.2
ACCOUNT EDIT/DELETE/ + Lockout
This function allows you make changes to user code accounts which are already
programmed into your Copy Commander.
TO EDIT
Enter Account Edit/Delete
1.
Enter the User Code Number and press "ENTER".
This takes you to that account. You can go up or down from that account by
simply pressing the up or down arrows. "LAST Account" message will appear
when you reach the end of the entered accounts. "FIRST Account" message will
appear when the beginning of the entered account is reached.
2.
To Edit the specific account press "ENTER" AGAIN.
The word <<EDIT>> appears next to the account number and the curser appears
under the number of copies. If you want to reset the account to 0 (zero) or
change the number of copies, simply type in the new copy number and press
"ENTER".
–6–
4.2
ACCOUNT EDIT/DELETE/ + Lockout Cont.
TO DELETE
1.
Use the
Menu Keys to select the user code to delete.
2.
Record the data.
3.
Press the Green Arrow
. A question will come on the screen.
“Delete This Account?”
"No"
Use the Menu Arrow for "No" and
Menu Arrow for "Yes"
To delete, choose Yes and press the "Enter" Key.
TO LOCKOUT
1.
Use the
Menu Keys to select the user code to delete.
2.
To lockout a user code account, press the Red Arrow
Key.
3.
To unlock a user code account, press the Red Arrow
Key Again.
4.3
PRINT REPORT
To print a report, press "Enter". The printer function will automatically send the print
data to the parallel port located on the right side of the Copy Commander. This is a
standard Parallel port, 25-pin connector.
4.4
CLEAR TOTALS
Reset copy counts zero. "Yes" Blue Up Arrow Key, "No" Blue Down Arrow Key.
Default is "No". Choice is "Yes" or "No".
Note: if VALIDATE is set to NO, clears-out all code numbers and copies.
4.5
SET DATE
Press Enter, display will show "Enter Date" use the Menu arrow keys to change the
month. Use the Green and Red Arrow Keys to move the curser to the number that
you want to change, and then enter in the correct number. Press "ENTER" Key
when completed. For the year 2000 enter 100.
4.6
SET TIME
Press Enter, "Enter Time" is displayed. Use the Green and Red Arrow Key to
change value. For AM press Blue up Menu Key, for PM press Blue down Key.
–7–
4.7
SET UP MENU
Use the Blue
A series of parameters usually done only once at setup.
Menu Keys to toggle the settings.
A.
INACTIVITY TIME OUT Factory set to 30 seconds.
The time the Copy Commander will automatically shutoff, displaying time and
date if no count pulses are received from as little as 1 second to 999 seconds.
Also allows settings to accommodate the copies where the duplex copy is
made (a double count). This further allows you to customize your automatic
shutoff for your type of machine and your workload. The range is 1 to 9999
seconds (2hours 45minutes max).
B.
LATENCY TIMEOUT
Factory set to 5 seconds.
Feature is used to keep the count pulse line open to an account after it has
been disabled. This allows for slower copiers to record the copies to the right
accounts. Set this to zero if using Debit mode.
The range is 1 to 99 seconds.
C.
COUNT UP/DOWN
(Factory set to "YES")
NOTE: ALL CODE NUMBERS WILL OPERATE IN THE MODE YOU SET
• Up Count is Credit Mode, accumulates totals as copies are run.
• Down Count is Debit Mode, you set the number to limit the number of
copies that can be made under each account number. As each makes their
copies the quantity is subtracted from the total you entered. When this
quantity is used up, and zero for the number of copies, the Copy Commander
will disable the copier so no further copies can be made.
Setting the count up/down function, your choice is "Yes" or "No".
UPCOUNT: Press Blue
Menu Key,
DOWNCOUNT:
Menu Key (NO)
1) Press the Blue
2) Set the Latency time out to zero.
3) Set a value to each code number
EXAMPLE:
35 copies in John's Account, 75 copies in Mary's and 1,500 copies in Dept 7.
Enter Manager Menu: Enter Account EDIT/DELETE
1.
Press "Enter" again to access first account
2.
Press "Enter" then type in Copy Amount
3.
Press "Enter" to record the copy amount
4.
Press Menu to step up to the next account code.
Repeat steps 2–4 until programming is complete.
D.
PER COPY COST
Factory set to .000.
This feature is used with a printer. Range of .000 to 999.
-8-
E.
SESSION COPY LIMIT Factory set to 0.
This will limit the user each time they enable the copier to the number of copies
you set this feature for. It will then disable the copier for that copy session. If set for
0, allows infinite copying. Range of 0 to 9999
F.
REPORT SETTINGS
Factory set to NO.
Show inactive account? – Yes or No? The default is "No". "Yes" will print out all
accounts in the Copy Commander. For economy printout, use "No", to print only
accounts with copy count data. Choice is "Yes" or "No".
G.
SECURE ENTRY
Factory set to NO.
Changes display to *** (asterisk) as the user enters in their code numbers.
Choice is "Yes" or "No".
H.
VERIFY ACCOUNT Factory set to YES.
Yes, requires each code number to be validated to the list in memory. No, will store
any code number entered into memory (auto entry). NOTE: If NO, then when
CLEAR TOTALS is used, all code and copies are cleared from memory.
Choice is "Yes" or "No".
I.
KEY ENTRY SOUND
Factory set to YES.
Yes, enables the sound to the keyboard for each time a key is pressed.
Choice is "Yes" or "No".
J.
KEYBOARD ACTIVE
Factory set to YES – Enabled.
Yes, enables the keyboard for users. Choice is "Yes" or "No".
K.
CARDREADER ACTIVE Factory set is YES – Enabled.
Yes, enables the card reader. Choice is "Yes" or "No".
L.
NETWORK NUMBER
Factory set to 1.
Used Only with CCNET Software. Assign a network number in a LAN connection.
M.
MACHINE NUMBER
Factory set to 1.
Used with CCNET Software, assign a machine number within a LAN network.
Range is 1 to 32.
N.
MANAGER PASSWORD Factory set to NONE.
The manager password has a range of 1 to 10 digits. To clear out an old number
press Clear, then enter the new password code number, followed by "Enter".
O.
EXIT TO MANAGER MENU
Press "ENTER" to exit back to the Manager Menu.
–9–
SECTION 5:
5.1
USING YOUR COPY COMMANDER
DISPLAY.
The display on the Copy Commander will show the time to the left of the display
including AM or PM, hour, minute and seconds. To the right of the display is the
date, with the day of the week on top and the month, day, year on the bottom.
5.2
KEYPAD ACCESS.
To make copies, the user simply enters his authorized account number on the Copy
Commander's keypad and presses "ENTER". When an authorized account number
is entered, the display will show the total number of copies made to date to the left of
the display, to the right the current copies made, and the copier is ready to make
copies. As more copies are made, they are added to both totals on display.
If the account number is not authorized (not programmed in the Copy Commander)
the Copy Commander's display will immediately go back to the time and date display
and give a long beep.
When finished making copies, the user presses the “CLEAR” key, and the display
will display “Waiting For Copier”. Then it will display the time and date screen.
Now it is ready for the next user. If the CLEAR key is not pressed, the Copy
Commander has entered the automatic shut–down mode, (Inactivity Time Out, page
8 sec 4.7.A) and will shut–down. During the last minute, the beep will occur. If a
copy is made before the beep, the timer will be reset. If not, the Copy Commander
will automatically shut down.
5.3
CARD ACCESS.
There are several types of cards the Copy Commander can be modified for, ie: Bar
Code, Proximity Card, Mag Stripe. The standard that is supplied is the Mag Stripe.
The Mag Stripe card is swiped on the right side of the Copy Commander, magnetic
strip down and to the right. Insert the card with a steady even force.
You can order additional cards through your dealer. There may be a minimum
purchase required, so take into account your future needs.
– 10 –
SECTION 6: TAKING MONTHLY READING
At the end of a period, usually a month, the person responsible for the Copy
Commander will obtain a summary of the number of copies made under each
account, and, where the cost per copy function is being used, the total cost of
those copies. This can be done either manually with our portable printer or a
laptop computer.
**The manual method does not show the per copy cost.**
6.1
MANUAL METHOD.
Establish some sort of reporting method. This may simply be a sheet of lined
paper on which the data is recorded, or it may be a form you or your accounting
department may have generated. It has been our experience that the simpler,
the better.
1.
Enter Manager Menu: Enter Account EDIT/DELETE
2.
Press "Enter" Key to view the first code number
3.
4.
Record Data
Press Blue
Menu Key to view next user code number.
5.
Repeats steps 3 and 4 to record all accounts.
6.
After all the copy totals have been recorded, clear the data to start the
next period by using the clear totals function. WARNING: Make sure that
all of your data from the previous period has been properly recorded
before you clear all of the copy count data.
7.
8.
Press Clear Key twice
Press Menu Key to CLEAR TOTALS is on display
9.
Press Enter Key
10.
Press Menu
11.
Press Enter
Key to confirm
– 11 –
6.2 SETTING COST PER COPY.
You may want to establish a cost for each copy made. The Copy Commander can
keep a record of both the number of copies made and the cost of those copies. The
multiplier for the cost per copy can go out to 1/10 of a cent. The range is .001 to .999
dollars.
6.3 PRINTER METHOD.
1.
First, check the portable printer. Make sure it has an adequate amount of
printer paper.
2.
Connect the supplied parallel cable to the printer and to the Copy Commanders
25 pin parallel connector located on the right side of the unit.
3.
Plug the printer’s power cube in and turn the printer on.
4.
Enter into the Manager Menu: Print Report
5.
Press Enter Key on the keypad. The printer will automatically start printing all
of the data from the Copy Commander.
Once the printer has stopped printing, turn the printer off and disconnect it from
the Copy Commander.
Enter Manager Menu: Press Blue Arrow
once to get Clear Total option.
Press Enter. Press
to Yes. Press Enter to clear.
Press
to Exit and then press the Enter button.
6.
– 12 –
SECTION 7:
7.1
TECHNICAL INFORMATION AND SERVICE
CALLING IN A SERVICE CALL.
Accountor Systems' number for service calls is (630) 325-9200.
Request the Service Department. You will also need to provide this information.
1.
Purchase Date:
__________________________
2.
The Model Number of your Copy Commander: _______________________
3.
The Serial Number of your Copy Commander: _______________________
4.
Your Name and Phone Number (and extension): ______________________
5.
Company Name:
______________________________
Company Address: ______________________________
6.
Copier Type: ___________________________________
7.
What problems your Copy Commander is experiencing:
__________________________________________________________________
__________________________________________________________________
With this information, our Service Technicians can determine if a service call is actually
needed or if you can solve the problems yourself with a few simply instructions.
7.2
CHANGING COPIERS.
If at a later date you change copiers, there are a couple of things you should be aware of. If your
change is the same manufacturer and model as the one your Copy Commander is installed on, you
should simply get your dealer to reinstall it on the new machine. There may be a small charge for
installation. If the copier is a different make/and or model, you may need a different interface cable
and there would be an additional charge for the cable as well as the installation.
7.3
Mounting Bracket (See Page 17)
To use the metal bracket ,
1) Remove front center screw.
2) Remove plastic stand form unit.
3) Attach bracket to the larger end of the plastic stand.
4) Reattach and tighten front screw.
– 13 –
SECTION 8:
PROGRAMMING QUICK SHEET
Enter "Manager Menu"
,
, Enter. (right arrow, up arrow)
ENTER NEW ACCOUNT:
1.
Press Enter on "Account Add"
2.
Enter User Code Number then press Enter Key
3.
Repeat step 2 for each account code number
EDIT/DELETE CODE NUMBER:
1.
Press Enter on "Account Edit/Delete"
2.
Enter User Code Number then Enter
– to Edit Copy Count, press Enter and enter in the new value or
clear to zero, then enter.
Key, then Menu
key followed by enter.
– to Delete press Green
_ to Lock out press the Red
key, press again to unlock.
PRINT–OUT WITH PRINTER:
1.
Plug cables from Copy Commander to printer
2.
Turn on printer
3.
Enter "Manager Menu select: Printer Report"
4.
Press Enter
5.
When finished select in "Manager Menu: Clear Totals" Press Enter
MANUAL READINGS:
1.
Enter "Manager Menu:" Enter "Account EDIT/DELETE"
2.
Press Enter
3.
Record Data
4.
Press Menu
5.
Repeat steps 3 & 4 for all accounts. At the end of the list the Copy
Commander will display "Last Account"
6.
Press Clear twice
7.
Press Menu
8.
9.
Press Menu
Press Enter
to "Clear Totals" then Enter
for "Yes"
To enter into Manager Menu:
(Enter Manager Code), Enter
– 14 –
8.1:
USER CODE WORK SHEET
Enter into Manager Menu; press Enter on Account Add, unit will beep once.
Step 1: Enter code number (range 1–10 digits) then press Enter, Unit will beep twice.
Step 2: Repeat step 1 for all code numbers.
ACCOUNT CODE LIST
USER CODE
ASSIGNED TO
DATE
___________
_____________
______
____________________
___________
_____________
______
____________________
___________
_____________
______
____________________
___________
_____________
______
____________________
___________
_____________
______
____________________
___________
_____________
______
____________________
___________
_____________
______
____________________
___________
_____________
______
____________________
___________
_____________
______
____________________
___________
_____________
______
____________________
___________
_____________
______
____________________
___________
_____________
______
____________________
___________
_____________
______
____________________
___________
_____________
______
____________________
– 15 –
COMMENTS
8.2:
SETUP WORK SHEET.
Inactivity Time Out _______
DEFAULT
30 Sec
RANGE
1–9999 Sec
Latency Time Out
5 Sec
1–99 Sec
Count Up or Down _______
Yes/Up
Up/Down
Cost Per Copy
.000
0–99.9 Cents
Session Copy Limit _______
0
0--9999
Report Settings _______
(Prints Activity Only)
No
Yes/No
Security Entry
_______
(No Displays Users #, Yes Displays *)
No
Yes/No
Verify Account _______
Yes(verify)/No(auto entry)
Yes
Yes/No
Key Entry Sound
Yes
Yes/No
Yes
Yes/No
Card Reader Active _______
Yes
Yes/No
Network Number
1
Keyboard Active
Machine Number
_______
_______
_______
_______
_______
_______
Manager Password ______________
1
1 – 32 Units
None
1 – 10 Digits
Copy Commander Model: ________________________________
Copier Model Number: __________________ Serial Number: ________________
Copier Dealer Contact: __________________________________
Copier Dealer Phone Number: ____________________________
– 16 –
Copy Commander Mounting Instructions
Wall Mount
Mounting
Base
Unscrew the L shaped cover. With cover off, the
mounting base can be slid down and removed from the
main unit. The mounting base then can be secured to
the wall using the supplied screws (Note: insure the
wall can support the copy commander).
After
mounting base to wall, slide the main unit back onto
the mounting base, then re-install L shaped cover and
fasten with screw.
L-Shaped
Cover
Desk Top
Unscrew the L shaped cover. With cover off, the mounting bracket can be slid down and removed from the main unit. Reverse the bracket and slide it back
onto the main unit. Re-install the L shaped cover and the unit is placed on the desk top with a tilt.
Copier Mounting
Method 1
Unscrew the L shaped cover. With cover off, the
mounting base can be slid down and removed from the
main unit. Remove the screws and washers from the
supplied metal bracket, alien the metal bracket with the
larger end of the mounting base as shown below and reinsert the screws and washers through the mounting base
as shown. Slide mounting base back onto the unit. Reinstall the L shaped cover and secure it with the screw.
Remove the paper from the tape on the bottom side of the
metal bracket, apply to a clean surface. This could be on
the copier or tabletop.
Metal
Bracket
Mounting
Base
Method 2
Unscrew the L shaped cover. With cover off, the
mounting base can be slid down and removed from the
main unit. Remove the screws and washers from the
supplied metal bracket, alien the metal bracket with larger
end of the mounting base as shown below and re-insert
the screws and washers through the mounting base as
shown. Slide mounting base back onto main unit. Reinstall the L shaped cover and secure it with the screw.
Remove the paper from the tape on the bottom side of the
metal bracket, apply to a clean surface. This could be on
the edge of the copier or tabletop. Metal bracket then
should be fastened with 2 nuts and bolts to mounting
surface by drilling holes through metal bracket and
mounting surface.
Metal
Bracket
Nut & Bolt
Desk top
or copier
top
mounting
surface
- 17 -
WARRANTY AND LIABILITY CONTRACT
By issuing a Purchase Order or contracting with Accountor Systems to carry out the supply of products,
clients are accepting the terms of this Warranty and Liability Contract.
This document states the warranty and liability offered by Accountor Systems on any products we manufacture or
services we provide for our clients.
Accountor Systems shall not be liable for any direct, indirect and/or consequential damages or losses, including loss of use,
revenue, profit incurred by the client, its customers and/or any third party as a result of the use of the work carried out by
Accountor Systems for the client, including any loss resulting from equipment failure or malfunctions, design or programming
errors or any other use of the work carried out in this contract. The client specifically waives any claim or recourse it may have
against Accountor Systems in any of the above instances.
When Accountor Systems is manufacturing equipment, the equipment to be manufactured will be an exact replication of
previously manufactured product, or the prototype, unless specified otherwise by the client, in writing.
Accountor Systems warrants all parts of new equipment for one year, from date of invoice or if warranty card is on file, from date
on card, against DEFECTIVE MATERIAL OR WORKMANSHIP, but not against damage caused by accident, abuse, faulty
installation, or improper operation.
Accountor Systems will repair, or at its option, replace without charge, F.O.B. factory, defective parts returned to its factory,
transportation charges prepaid. Accountor Systems obligation under this warranty is limited to repair or replacement as stated
herein and does not include the return shipping charges.
Any changes in design or improvements added to the line of equipment shall not create any obligation to install same on
equipment previously sold and delivered to the client.
Any unauthorized alteration of, or addition to, articles of the contractors manufacture voids this warranty.
Equipment returned for Warranty repair must be accompanied by a copy of the Bill of Sale as verification of
Purchase date. Equipment returned without a Bill of Sale will be charged to the customer at the normal repair
rates.
Accountor Systems
16W361 S. Frontage Road
Ste. 107
Burr Ridge, IL 60527-5830
Phone: 800-229-8765
Fax: 630-325-9201