1
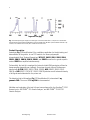
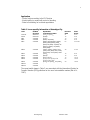
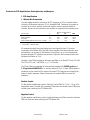
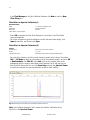
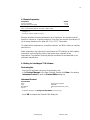
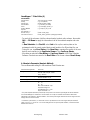
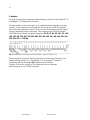
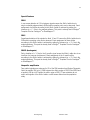
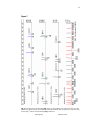
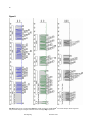
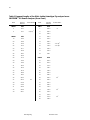
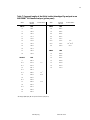
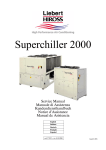
Animaltype Pig PCR Amplification Kit
Features and Benefits
Animaltype Pig is the sole commercially available test kit for fast and reliable
genotyping of pigs. It includes eleven tetranucleotide markers (see table 1). For the
most important breeding stocks German Large White (LW), German Landrace (GL), and
“Piétrain” (Pi) the combined Power of Exclusion (cPE) of these STR-Systems is
equivalent or even better then the 15 dinucleotide STRs recommended for Germany or
Austria (see table 2).
Table 1. Animaltype Pig Tetranucleotide STR Markers
Locus*
387A12F
S0655
SBH1
SBH2
SBH4
SBH10
SBH13
SBH18
SBH19
SBH20
SBH22
SBH23
Chromosomal Mapping
12p14-15
7p11
1p13
3p16-17
6q35
9p11-13
13q46-47
16q23
17q12-14
18q13-23
Xp24
X, Y (gonosomal)
* Manuscripts for publication of Loci SBH1-23 in preparation; for 387A12F see Kiuchi et al. (2002); for S0655
see Renard et al. (2001)
Table 2. Combined Power of Exclusion of STR Markers
German Large White (LW), German Landrace (GL), and “Piétrain” (Pi)
Multiplex
11-4- STRs Biotype
15-2- STRs*
cPE total
0,9992
0,9965
cPE GL
0,9997
0,9965
cPE LW
0,9987
0,9988
cPE Pi
0,9998
0,9978
* Nechtelberger et al. (2001)
Animaltype Pig offers basically and essentially technical advantages:
Genotyping of tetranucleotide marker with the Animaltype Pig PCR Amplification Kit
guaranties definite peaks (see Fig.1). Moreover, the test kit includes primers for
amplification of the gender-specific marker Amelogenin (SBH23). Finally, Animaltype
Pig is provided with an Allelic Ladder that allows standardisation of different
laboratories.
2
fragment size [bp]
Fig. 1 The electropherogram displays the advantages of tetranucleotide-STRs in comparison to dinucleotide
STRs. A: S0005 (Dinucleotide STR); B: SBH13 (Tetranucleotide STR); C: SBH7 (Tetranucleotide STR with 2-bp
insertion; not included in the test kit). RFU: relative fluorescence units
Product Description
Animaltype Pig PCR Amplification Kit is a multiplex-application for kinship testing and
determination of the gender. In one PCR reaction, the eleven polymorphic
tetranucleotide Short Tandem Repeats loci 387A12F, S0655, SBH1, SBH2, SBH4,
SBH10, SBH13, SBH18, SBH19, SBH20, and SBH22 as well as the gender-specific
marker SBH23 are amplified simultaneously.
Preferentially, the test kit is employed for fast and reliable DNA genotyping of blood or
tissue samples (especially ear cartilage). One primer for each locus is fluorescencelabelled with 6-FAM (SBH2, SBH18, SBH4, S0655), HEX (SBH23, SBH20, SBH1,
SBH10) or NED (SBH13, 387A12F, SBH22, SBH19) whereas a well-balanced intensity
of all signals was elaborated for the primer mix.
The detection limit of Animaltype Pig PCR Amplification Kit is less about 1 ng
genomic DNA. The use of 1-10 ng DNA is recommended.
Validation and evaluation of the test kit have been performed for the GeneAmp® 9700
thermal cycler, ABI PRISM® 310 Genetic Analyzer, and ABI PRISM® 3100/3130
Genetic Analyzer.
Animaltype Pig
December 2007
3
Application
- Proof of origin according to the EU-Directive
- Kinship testing in context with control of breeding
- Status of inbreeding for herd book populations
Table 3. Locus-specific Information of Animaltype Pig
387A12F
S0655
SBH1
SBH2
SBH4
GenBank®
Accession
AB059041
AJ251829
submitted
submitted
submitted
SBH10
submitted
SBH13
SBH18
SBH19
SBH20
submitted
submitted
submitted
submitted
SBH22
SBH23 Y
SBH23 X
submitted
submitted
submitted
Locus
Repeat Motif
of the Reference Allele
[TTCT]2 CT [TTCT]19
[GGAA]12
[CTTT]13
[AGAA]24 AA [AGAA]
[GAAA]2 GGAA [GAAA]2 A [GAAG]7
[GAAA] [GAAG] [AAAG] [AGAG]5
[AAAG]6 AA [AAAG]4 A [AAAG]3 AA
[AAAG]4 A [AAAG]21 AG [AAAG]3
AGAG [AAAG]2
[TAGA]15 [CAGA]12 [TAGA]7 TACA
[TAGA] TACA [TAGA] TACA [TAGA]2
TACA [TAGA]2 TACA [TAGA]2 CAAA
[TATC]15
[AGGA]15
[GTCT]4 [ATCT]10
[CTTT]14 CTTC [CTTT]2 CTTC
[CTTT]2 CTTC [CTTT]3
[ATAG]6 ATG [ATAG]11 ATG [ATAG]3
-
Reference
Allele
21
12
13
25
64
Allele
Range
9-21
5-22
7-18
6-34
47.3-66.1
48
31-50
15
15
14
24
8-18
9-23
10-16
19-49
20
18-28
The repeat motifs shown in Table 3 are concordant with the International Society for
Forensic Genetics (ISFG) guidelines for the use of microsatellite markers (Bär et al.,
1997).
Animaltype Pig
December 2007
4
Content
Animaltype Pig PCR Amplification Kit (100 Reactions)
Nuclease-free Water
Reaction Mix D
Primer Mix
DNA polymerase
Control DNA DL157
DNA Size Standard 550
Allelic Ladder
3.0 mL
500 μL
250 μL
40 μL
10 μL
25 μL
10 μL
Ordering Information
Animaltype Pig
Animaltype Pig
Animaltype Pig
Animaltype Pig
25
100
400
1000
Reactions
Reactions
Reactions
Reactions
Cat. No.
Cat. No.
Cat. No.
Cat. No.
11-12110-0025
11-12110-0100
11-12110-0400
11-12110-1000
Storage
Store all components at –20°C and avoid repeated thawing and freezing. Primer Mix
and Allelic Ladder must be stored protected from light. The DNA samples and postPCR reagents (Allelic Ladder and DNA Size Standard) should be stored separately from
the PCR reagents. The expiry date is indicated on the kit cover.
Quality Assurance
The content of Biotype® test kits is subjected to an intensive quality assurance of the
Biotype Diagnostic GmbH. The quality of test kits is controlled continuously in order to
document the unrestricted usability. For questions regarding the quality assurance,
please feel free to contact us.
Animaltype Pig
December 2007
5
Additional Required Reagents
In order to use the Biotype® PCR Amplification Kit additional reagents are needed. We
strongly recommend the application of the following products:
Reagent
Hi-Di™ Formamide, 25 mL
Matrix Standards (DS-30)
for ABI PRISM® 310 Genetic Analyzer and
ABI PRISM® 377 DNA Sequencer
Matrix Standards (DS-30)
for ABI PRISM® 3100/3130
and ABI PRISM® 3700/3730
Qiagen DNeasy® Blood & Tissue Kit,
50 Preparations
Supplier
Applied Biosystems
Order Number
4311320
Applied Biosystems
401546 and 402996 (NED)
Applied Biosystems
4345827
Qiagen
69504
Trademarks and Patents
ABI PRISM®, GeneScan®, Genotyper®, GeneMapper™ and Applied Biosystems are
registered trademarks of Applied Biosystems Inc.
6-FAM, HEX, NED, ROX, POP-4, and Hi-Di are trademarks of Applied Biosystems Inc.
GeneAmp® is a registered trademark of Roche Molecular Systems.
The PCR is under patent law. Patentees are Hoffmann-La Roche Inc. and F. HoffmannLa Roche (Roche).
DyeEx™ and DNeasy® are registered trademarks of Qiagen.
Warning and Safety Instructions
The PCR Amplification Kit contains the following potentially hazardous chemical:
Kit Component
Primer Mix, Reaction Mix
and Allelic Ladder
Chemical
sodium azide NaN3
Danger
toxic if swallowed, develops toxic gases
when it gets in contact with acids
For the Material Safety Data Sheet (MSDS) of all Biotype® products, please contact us.
For MSDS of additional reagents to be needed, please contact the corresponding
manufactures.
Animaltype Pig
December 2007
6
Content
1. PCR Amplification.......................................................................................... 7
1.1 Master Mix Preparation ........................................................................... 7
1.2 Master Mix Preparation ........................................................................... 8
2. Electrophoresis using the ABI PRISM® 377 DNA Sequencer............................. 9
2.1 Polyacrylamide-Gel (5%).......................................................................... 9
2.2 Sample Preparation................................................................................. 9
2.3 Setting for GeneScan® Software ............................................................ 10
3. Electrophoresis using the ABI PRISM® 310 Genetic Analyzer ......................... 11
3.1 Matrix Generation.................................................................................. 11
3.2 Sample Preparation............................................................................... 14
3.3 Setting for GeneScan® Software ............................................................ 14
3.4 Analysis Parameter ............................................................................... 15
4. Electrophoresis using the ABI PRISM® 3130/3130xl Genetic Analyzer ............ 16
4.1 Spectral Calibration / Matrix Generation.................................................. 16
4.2 Sample Preparation............................................................................... 19
4.3 Setting for GeneMapper™ ID Software .................................................. 19
4.4 Analysis Parameter (Analysis Method) .................................................... 21
5. Analysis...................................................................................................... 22
5.1 Controls................................................................................................ 24
5.2 Fragment Lengths and Alleles................................................................ 24
6. Interpretation of Results............................................................................... 30
Animaltype Pig
December 2007
7
Protocols for PCR Amplification, Electrophoresis, and Analysis
1. PCR Amplification
1.1 Master Mix Preparation
The table below shows the volumes of all PCR reagents per 25 μL reaction volume
including a DNA sample volume of 3.0 μL (template DNA). Determine the number of
reactions to be set up, positive control and negative control reactions should be
included. Add one or two reactions to this number to compensate the pipetting error.
Volume in [μL]
Nuclease-free Water
Reaction Mix D*
Primer Mix
Multi Taq2 DNA Polymerase (hot start, 2.5 U/μL)
Volume of Master Mix
1
14.1
5.0
2.5
0.4
22.0
Number of PCR-Reactions
10
25
141.0
352.5
50.0
125.0
25.0
62.5
4.0
10.0
220.0
550.0
100
1410.0
500.0
250.0
40.0
2200.0
* contains Mg2+, dNTP Mix, BSA
All components should be mixed (vortex) and centrifuged for about 10 s before
preparation of the Master Mix. The DNA volume applied to the assay depends on its
concentration. An increase of DNA volume to more than 5 μL is not recommended,
because potential PCR inhibitors may interfere. Adjust the final reaction volume with
Nuclease-free Water to 25 μL.
Generally, store DNA templates in Nuclease-free Water or in diluted TE buffer (10 mM
Tris HCl, pH 8.0 and 1 mM EDTA), e. g. 0.1x TE buffer.
The Primer Mixes are adjusted for balanced peak heights with 30 PCR cycles and
1-10 ng Control DNA DL157 in a reaction volume of 25 μL. If more DNA template is
introduced, higher peaks will be expected for small PCR fragments and relatively low
peaks for larger fragments. Reduce the amount of template DNA to correct this
imbalance.
Positive Control
For the positive amplification control, dilute the Control DNA DL 157 to 1-10 ng in the
appropriate volume. Instead of the template DNA pipette the diluted Control DNA into a
reaction tube containing the PCR Master Mix.
Negative Control
For the negative amplification control, pipette Nuclease-free Water instead of template
DNA into a reaction tube containing the PCR Master Mix.
Animaltype Pig
December 2007
8
1.2 Master Mix Preparation
In order to activate the Multi Taq2 DNA Polymerase and to prevent the formation of
non-specific amplification products, perform a “hot start“ PCR reaction.
Standard Method
recommended for all DNA samples
Temperature
94°C
94°C
60°C
72°C
70°C
10°C
Time
4 min (hot start for Activation of the Multi Taq2 DNA Polymerase)
20 s
30 Cycles
40 s
30 s
60 min
∞
hold
Animaltype Pig
December 2007
9
2. Electrophoresis using the ABI PRISM® 377 DNA Sequencer
For general instructions on instrument setup, matrix generation and application of the
GeneScan® analysis Software, please read the ABI PRISM ® 377 DNA Sequencer
User’s Manual. Electrophoresis by using the GeneScan® Software is described below.
For the combined application of the four fluorescent dyes 6-FAM, HEX, NED, and ROX
(also called DS-30) the use of the virtual Filter Set D is allocated. Generally, the Filter
Sets A and F are suitable, too. Prior to any analysis of DNA fragment size a matrix with
the appropriate four fluorescent dyes has to be generated for the instrument.
Appropriate matrix standards can be purchased from Applied Biosystems.
2.1 Polyacrylamide-Gel (5%)
Composition
Urea
30% Acrylamide / bisacrylamide solution (29:1)
10x TBE buffer
Water
Filtrate and degas solution
10% Ammonium persulfate
TEMED
Use glass plates with a spacing of 36 cm
Amount/Volume
21.0 g
8.4 mL
6.0 mL
20.0 mL
350 μL
15 μL
2.2 Sample Preparation
Composition
Hi-Di™ Formamide / Blue Dextran
DNA Size Standard 550 (ROX)
PCR product (diluted if necessary) or Allelic Ladder
- 3 min denaturation at 95°C
- cooling at 4°C
- apply 1.5 μL sample to the gel
Animaltype Pig
Volume
1.8 μL
0.2 μL
1.0 μL
December 2007
10
2.3 Setting for GeneScan® Software
Plate Check Module D
PreRun Module "GS PR 36D - 1200"
Run Module "GS Run 36D - 1200"
Matrix D (6-FAM, HEX, NED, ROX)
Standard SST550 (ROX)
Programming of the Run Module for Biotype® Test Kits
(6-FAM / HEX / NED / ROX)
- Open program "377 Collection"
- Open File - New - GeneScan Run
- Select the module "GS Run 36D -1200" in the run window
- Click at the sheet symbol in the run window
- Use the following settings:
Parameter
Voltage
Current
Power
Collection time
Gel temperature
Laser power
Setting
3000 V
50.0 mA
150 W
3.0 h
51°C
40.0 mW
Animaltype Pig
Save the module in the field „Save Copy“
December 2007
11
3. Electrophoresis using the ABI PRISM® 310 Genetic Analyzer
For general instructions on instrument setup, matrix generation and application of the
GeneScan® or GeneMapper™ ID Software, please read the ABI PRISM ® 310 Genetic
Analyzer User’s Manual. Electrophoresis by using the GeneScan® Software is
described below.
For the combined application of the four fluorescent labels 6-FAM, HEX, NED, and
ROX (also called DS-30) the use of the virtual Filter Set D is allocated. Generally,
Filter Sets A and F are suitable, too.
Material
Capillary
Polymer
Buffer
47 cm / 50 μm (green)
310 Genetic Analyzer POP-4
10x Genetic Analyzer Buffer with EDTA
3.1 Matrix Generation
Prior to any analysis of DNA fragment size a matrix with the appropriate four
fluorescent labels has to be generated. Suitable matrix standards can be purchased
from Applied Biosystems.
Dye Color
Blue (B)
Green (G)
Yellow (Y)
Red (R)
Matrix Standard
6-FAM
HEX
NED
ROX
Order Number
Applied Biosystems, 401546
Applied Biosystems, 401546
Applied Biosystems, 402996
Applied Biosystems, 401546
To generate useful matrix files, it is necessary to perform four electrophoresis runs with
the matrix samples (PCR fragments labelled with 6-FAM, HEX, NED and ROX). The runs
have to be done under the same conditions like for the samples and the Allelic Ladders
of the Biotype® test kit.
Matrix sample
Composition
Hi-Di™ Formamide
Matrix Standard 6-FAM
Volume
12.5 μL
1.0 μL
Matrix sample 2
Hi-Di™ Formamide
Matrix Standard HEX
12.5 μL
1.0 μL
Matrix sample 3
Hi-Di™ Formamide
Matrix Standard NED
12.5 μL
1.0 μL
Matrix sample 4
Hi-Di™ Formamide
Matrix Standard ROX
12.5 μL
1.0 μL
Matrix sample 1
- 3 min denaturation at 95°C
- cooling at 4°C
- for analysis: load the samples on the tray
- Create a Sample Sheet and enter sample designation
Animaltype Pig
December 2007
12
Injection List for Matrix Generation
Injection list
Module File
GS STR POP-4 (1 mL) D
Matrix File
NONE
Size Standard*
NONE
Injection [s]
5
Injection [kV]
15.0
Run [kV]
15.0
Run [°C]
60
Run Time [min]
24
* prepare Matrix Standards always without DNA Size Standard (ROX)
Analysis of the Matrix Samples
- Open GeneScan® or GeneMapper™ ID Software
- FILE → NEW → PROJECT (open current run folder) → ADD SAMPLE FILES
- Click a single matrix sample in the column SAMPLE FILE
- Mark SAMPLE → RAW DATA
- Review the matrix samples for a flat baseline beyond the primer peak. There
should be at least five peaks with peak heights about 400-4000 (Y) in every
matrix sample (optimal range: 1000-3000), as shown in Fig. 2
▼ 3400 Data Points (X)
6400▼
Fig. 2 Electropherogram with Raw Data of the Matrix Standard 6-FAM
- Select analysis range with flat baseline
- Re-inject the matrix sample if necessary
- Note start and end value (Data Points) of the analysis range,
e. g. start value 3400, end value 6400
- Calculate the difference value, e. g. 6400-3400 = 3000 Data Points
Animaltype Pig
December 2007
13
Generation of a New Matrix
- FILE → NEW → MATRIX, as shown in Fig. 3
Fig. 3 Select Matrix Samples
- Import matrix samples for all dyes (B, G, Y, R)
- Enter „Start At“ value, e. g. 3400
- Enter difference value at Points, e. g. 3000
- Select OK to calculate the new matrix, as shown in Fig. 4
Fig. 4 New Matrix Biotype
- Save in the Matrix Folder: FILE → SAVE AS, e. g. Matrix Biotype
Matrix Check
Please check the new matrix with current samples.
- FILE → NEW → PROJECT (open run folder) → ADD SAMPLE FILES
- Select sample(s) in the column SAMPLE FILE
- SAMPLE → INSTALL NEW MATRIX (open matrix folder and select new matrix)
- Re-Analyse your samples
With the new matrix there should be no pull-up peaks between the dye panels
(B, G, Y, R).
Animaltype Pig
December 2007
14
3.2 Sample Preparation
Composition
Hi-Di™ Formamide
DNA Size Standard 550 (ROX)
prepare 12 μL of the mix (Formamide + DNA Size Standard) for all samples
add 1 μL PCR product (diluted if necessary) or Allelic Ladder
- 3 min denaturation at 95°C
- cooling at 4°C
- for analysis: load the samples on the tray
Volume
12.3 μL
0.2 μL
Signal Intensities
In order to increase the intensity of signals:
- Reduce the volume of the DNA Size Standard 550 (ROX); the peaks of the Size
Standard should be about 500 relative fluorescent units (RFU)
- Purify the PCR products with DyeEx™ 2.0 Spin Kit, Qiagen (63204)
3.3 Setting for GeneScan® Software
- Create a Sample Sheet and enter sample designation
Injection List
Module File
Matrix File
Size Standard
Injection [s]*
Injection [kV]
Run [kV]
Run [°C]
Run Time [min]**
GS STR POP-4 (1 mL) D
z. B. Matrix Biotype
z. B. SST550_50-500bp
5
15.0
15.0
60
28
* Apart from standard setting, the injection time may be between 1 and 10 s depending on the type of sample.
If blood samples with very high signal intensities are to be recorded, a shorter injection time may be selected.
For samples with low DNA content an injection time up to 10 s may be necessary.
** Depending on the analysis conditions, the Run Time for Animaltype Pig was modified in order to analyze
lengths of fragments up to 500 bp.
Animaltype Pig
December 2007
15
3.4 Analysis Parameter
The recommended analysis parameters are:
Analysis Range
Start: 2000
Stop: 10000
Baseline: Checked
Multicomponent: Checked
Smooth Options: Light
Peak Amplitude Thresholds
B:* Y:*
G:* R:*
Min. Peak Half Width: 2 pts
Polynorminal Degree: 3
Peak Window Size: 11 pts**
Min: 50
Max: 550
Local Southern Method
None
Data Processing
Peak Detection
Size Call Range
Size Calling Method
Split Peak Correction
* The peak amplitude threshold (Cutoff value) corresponds to the minimum peak height that will be detected
from the GeneScan® or GeneMapper™ ID Software. Thresholds are usually 50-200 RFU and should be
determined individually by the laboratory. Recommendation: The minimal peak height should be three times
higher then the background noise of the baseline.
** Sometimes, point alleles (i. e. alleles with at least 1 bp difference to the next integer allele) like 387A12F
allele 13 and 13.1 or 16 and 16.1 can not be distinguished. For improved peak detection, minimize the Peak
Window Size further on.
Animaltype Pig
December 2007
16
4. Electrophoresis using the ABI PRISM® 3130/3130xl Genetic Analyzer
For detailed instructions on instrument setup, spectral calibration, or application of the
ABI PRISM® Data Collection Software and the GeneMapper™ ID Software, refer to the
ABI PRISM ® 3130/3130xl Genetic Analyzers Getting Started Guide. Electrophoresis by
using the GeneMapper™ ID Software is described below.
The 4-Capillary-System is named ABI 3130 (before ABI 3100-Avant), the 16-CapillarySystem is named ABI 3130xl (before ABI 3100).
For the combined application of the four fluorescent labels 6-FAM, HEX, NED, and
ROX (also called DS-30) the utilization of the Dye Set D is allocated.
Material
Capillary
Polymer
Buffer
3130 capillary array, 36 cm
3130 POP-4 polymer
10x Genetic Analyzer Buffer with EDTA
4.1 Spectral Calibration / Matrix Generation
Prior to any analysis of DNA fragment size a spectral calibration with the four florescent
labels 6-FAM, HEX, NED and ROX has to be generated for each analyzer. The spectral
calibration creates a matrix to correct the overlapping of fluorescence emission spectra
of the dyes.
Performing a spectral calibration can be divided into the following tasks:
- Choosing and setting up the Spectral Calibration Standards
- Loading the standards on the 96-well reaction plate (per capillary one sample)
- Creating the instrument protocol for performing spectral calibration
(Protocol Manager)
- Define the plate assembly within the plate editor (Plate Manager)
- Performing a spectral calibration run and reviewing data
Animaltype Pig
December 2007
17
Setting up the Spectral Calibration Standards
Example for 4 Capillaries/ABI 3130
Composition
Volume
Hi-Di™ Formamide
47.5 μL
Matrix Standard
2.5 μL
- 3 min denaturation at 95°C
- cooling at 4°C
- for analysis, load 10 μL of the Matrix Standard into a 96-well reaction plate, well A1-D1
Example for 16 Capillaries/ABI 3130xl
Composition
Volume
Hi-Di™ Formamide
190 μL
Matrix Standard
10.0 μL
- 3 min denaturation at 95°C
- cooling at 4°C
- for analysis, load 10 μL of the Matrix Standard into a 96-well reaction plate, well A1-H1 and A2-H2
Performing Spectral Calibration Run
- Insert the 96-well plate on the autosampler tray
- In the Protocol Manager of the Data Collection Software click New in the window
Instrument Protocol to open the Protocol Editor dialog box
Instrument Protocol for Spectral Calibration
Protocol Editor
Name
Type
Dye Set
Polymer
Array Length
Chemistry
Run Module
e. g. Spectral36_POP4_DS30
SPECTRAL
D
POP4
36
Matrix Standard
Spect36_POP4_1
- Select OK to complete the Protocol Editor dialog box
Animaltype Pig
December 2007
18
- In the Plate Manager of the Data Collection Software click New to open the New
Plate Dialog box
Plate Editor for Spectral Calibration (I)
New Plate Dialog
Name
Application
Plate Type
Owner Name / Operator Name
e. g. Spectral_DyeSet D_Date
Spectral Calibration
96-Well
…
- Select OK to complete the New Plate dialog box. A new table in the Plate Editor
opens automatically
- For further analyses for spectral calibration use with the same plate setting, click
Import, select the .xml file and click Open
Plate Editor for Spectral Calibration (II)
Column
Sample Name
Priority
Instrument Protocol 1
Type name for the matrix samples
e. g. 100
Spectral36_POP4_DS30 (setting described before)
- For each of the columns, click the column header to select entire column, then select
Edit → Fill Down to apply the information to all of the selected samples, and enter OK
- In Run Scheduler click Find All, select link to link up the reaction plate on the
autosampler with the newly created plate record (position A or B) and start the run
- View Pass/Fail Status after the run in the Event Log and open the Spectral Viewer
to review and evaluate the spectral calibration profile for each capillary
Fig. 5 Electropherogram with Raw Data of the Matrix Standard for DS-30
Note: If all capillaries passed the test, activate this Spectral Calibration file for
Dye Set D in the Spectral Viewer.
Animaltype Pig
December 2007
19
4.2 Sample Preparation
Composition
Hi-Di™ Formamide
DNA Size Standard 550 (ROX)
prepare 12 μL of the mix (Formamide + DNA Size Standard) for all samples
add 1 μL PCR product (diluted if necessary) or Allelic Ladder
- 3 min denaturation at 95°C
- cooling at 4°C
- for analysis: load the samples on the tray
Volume
12.3 μL
0.2 μL
Because injections proceed simultaneously for all capillaries, four samples must be
pipette for analysis on 4-capillary analysers. If less then four samples are analysed, fill
up the empty positions on the plate with 12 μL Hi-Di™ Formamide.
For reliable allelic assignment on 4-capillary analysers, one Allelic Ladder per capillary
should be run.
Room temperature may influence the performance of PCR products on multi-capillary
instruments, so that shoulder peaks or split peaks occur especially at low
temperatures. Pay attention to keeping ambient conditions as recommended by the
instrument manufacturer.
4.3 Setting for GeneMapper™ ID Software
Performing Run
- Insert the 96-well plate prepare on the autosampler tray
- In the Protocol Manager of the Data Collection Software click New in the window
Instrument Protocol to open the Protocol Editor dialog box
Instrument Protocol
Protocol Editor
Name
Type
Run Module*
Dye Set
Run36_POP4_DyeSet D
REGULAR
HIDFragmentAnalysis36_POP4_1
D
* for detailed description see Setting of the Run Module on the next page
- Select OK to complete the Protocol Editor dialog box
Animaltype Pig
December 2007
20
Previous to the first run, it is necessary to edit the Run Module as follows:
- In the Module Manager of the Data Collection Software click New to open the Run
Module Editor dialog box
Run Module (24min_50-500bp)
Run Modul Editor
Oven Temperature [°C]
Poly Fill Volume
Current Stability [μA]
PreRun Voltage [kV]
PreRun Time [s]
Injection Voltage [kV]
Injection Time [s]*
Voltage Number of Steps
Voltage Step Interval
Data Delay Time [s]
Run Voltage [kV]
Run Time [s]**
Value
60
4840
5
15
180
3.0
5
40
15
1
15.0
1440
* Apart from standard settings, the injection time may range between 1 and 20 s depending on the type of
sample. If samples with very high signal intensities are to be recorded, a shorter injection time may be selected.
For samples with low DNA content an injection time up to 20 s may be necessary.
** Depending on the analysis conditions, the Run Time for Animaltype Pig was modified in order to analyze
lengths of fragments up to 500 bp.
- Click Save As and enter the name of the new module (e. g. 24min_50-500bp) and
enter OK
- Click Close to exit the Module Editor
Previous to every run, it is necessary to compile the plate as follows:
- In the Plate Manager of the Data Collection Software click New to open the New
Plate Dialog box
GeneMapper™ Plate Editor (I)
New Plate Dialog
Name
Application
Plate Type
Owner Name / Operator Name
e. g. Plate_DyeSet D_Date
select GeneMapper Application
96-Well
…
- Select OK to complete the New Plate dialog box. A new table in the Plate Editor
opens automatically
Animaltype Pig
December 2007
21
GeneMapper™ Plate Editor (II)
Column Name
Sample Name
Priority
Sample Type
Size Standard
Panel
Analysis Method
Snp Set
User-defined 1-3
Results Group 1
Instrument Protocol 1
Type name for the samples
e. g. 100 (Default)
Sample or Allelic Ladder
e. g. SST550_50-500bp
e. g. Animaltype_Panels_v1
e. g. Analysis_HID_3130
(select results group)
Run36_POP4_DyeSet D (setting typed before)
- For each of the columns, click the column header to select entire column, then select
Edit → Fill Down to apply the information to all of the selected samples and enter
OK
- In Run Scheduler click Find All, select link to link up the reaction plate on the
autosampler with the newly created plate record (position A or B) and start the run
- During the run, view Error Status in the Event Log or examine the quality of the raw
data for each capillary in the Capillaries Viewer or the Cap/Array Viewer
- View data as overview in Run History or Cap/Array Viewer of the Data Collection
Software. Run data are saved in the Run Folder of the former chosen Result Group
4.4 Analysis Parameter (Analysis Method)
The recommended settings in the worksheet Peak Detector are:
Peak Detection Algorithm
Ranges
Smoothing and Baselining
Size Calling Method
Peak Detection
Advanced
Analysis: Partial Range
Start Pt: 2000; Stop Pt: 10000
Sizing: All Sizes
Smoothing: Light
Baseline Window: 51 pts
Local Southern Method
Peak Amplitude Thresholds
B:* Y:*
G:* R:*
Min. Peak Half Width: 2 pts
Polynominal Degree: 3
Peak Window Size: 11 pts**
Slope Thresholds: 0.0
* The peak amplitude threshold (Cutoff value) corresponds to the minimum peak height that will be detected
from the GeneMapper™ ID Software. The thresholds are usually 50-200 RFU and should be determined
individually by the laboratory. Recommendation: The minimal peak height should be three times higher then the
background noise of the baseline.
** Sometimes, point alleles (i. e. alleles with at least 1 bp difference to the next integer allele) like 387A12F
allele 13 and 13.1 or 16 and 16.1 can not be distinguished. For improved peak detection, minimize the Peak
Window Size further on.
Animaltype Pig
December 2007
22
5. Analysis
For general instructions on automatic sample analysing, please read the GeneScan® or
GeneMapper™ ID Software User’s Manual.
The determination of the exact lengths of the amplified products depends on the type
of device, on the conditions of electrophoresis, as well as on the DNA Size Standard
used. Due to the complexity of some STR loci, the size determination should be based
on evenly distributed points of references. Thus, please use the DNA Size Standard
550 (ROX) with the following lengths of fragments: 50, 60, 70, 80, 90, 100, 120, 140,
160, 180, 190, 200, 220, 240, 260, 280, 300, 320, 340, 360, 380, 400, 425, 450,
475, 500, 525 and 550 bp.
Fig. 6 Electropherogram of the DNA Size Standard 550 (ROX), Lengths of Fragments in bp
Allele designation of analyzed samples should be carried out either manually or with
suitable analysis software, e. g. GeneMapper™ ID or Genotyper® Software in
combination with the Animaltype Pig Template File from Biotype.
Template Files can be received as free downloads from our homepage
(www.biotype.de) or as CD-ROM on request.
Animaltype Pig
December 2007
23
Special Features
SBH4
In rare cases deviation of 0.6 bp between signals versus the Allelic Ladder due to
single nucleotide polymorphisms (SNPs) within repeating units can be observed. Exact
assignment of all alleles according to the Allelic Ladder is achieved by setting the
tolerance to +/- 1.0 bp in the analysis software. This point is already fixed in Biotype®
Template Files for Genotyper® or GeneMapper™.
SBH1
Sometimes deviation of the signals for allele 14 and 15 versus the Allelic Ladder due to
SNPs within repeating units can be observed. Exact assignment of these alleles
according to the Allelic Ladder is achieved by setting the tolerance to +/- 2.0 bp in the
analysis software. This point is already fixed in Biotype® Template Files for Genotyper®
or GeneMapper™.
SBH23 (Amelogenin)
Rarly, deviation of + 1.0 bp for the X-specific signal versus the Allelic Ladder due to an
insertion of a base can be observed. Exact assignment of the X-specific allele
according to the Allelic Ladder is achieved by setting the tolerance to +/- 2.0 bp in the
analysis software. This point is already fixed in Biotype® Template Files for Genotyper®
or GeneMapper™.
Unspecific amplificates
Two artefact signals were observed in 6% of the DNA samples from Biotype Diagnostic
GmbH at position 294 bp in 6-FAM between the allelic ranges of SBH18 and SBH4 and
at position 298 bp in HEX within the allelic region of SBH1. These artefacts do not
match with signals of the Allelic Ladder or with known alleles from the population
study.
Animaltype Pig
December 2007
24
5.1 Controls
The Control DNA DL157 of the PCR Amplification Kit represents the following alleles:
Table 4. Allele Determinations of Animaltype Pig
Locus
387A12F
S0655
SBH1
SBH2
SBH4
SBH10
SBH13
SBH18
SBH19
SBH20
SBH22
SBH23
Control DNA
DL157
13/21
9/12
14/16
22/33
56/62
48/49
13/15
12/14
14/14
32/39
20/23
Y/X
5.2 Fragment Lengths and Alleles
Table 5 to table 7 display the values for fragment lengths of individual alleles that
refer to the DNA Size Standard 550 (ROX). All analyses have been performed on an
ABI PRISM® 310 Genetic Analyzer with POP-4 polymer. Different analysis instruments,
DNA Size Standards or polymers might result in different lengths of fragment. These
Data could serve as approximate allele sizes for the creation of a new analysis
template. In order to balance instrument-specific deviations further fine tuning of the
equipment should be done by measuring sample fragments of known lengths. In
addition, a visual alignment with the Allelic Ladder is recommended.
Scaling
Horizontal: 75-505 bp
Vertical: Depending on signal intensity
Animaltype Pig
December 2007
- 25 -
DNA Size Standard 550 (ROX)
SBH22
387A12F
SBH20
SBH23
SBH13
SBH2
SBH18
SBH1
SBH4
SBH19
SBH10
SO655
Figure 7
Fig. 7 Electropherogram of the Animaltype Pig using 2 ng Control DNA DL157. Analysis was done on an ABI
PRISM® 310 Genetic Analyzer with the DNA Size Standard 550 (ROX). Allele assignment was performed using
the Genotyper® Software and the Animaltype Pig Template File.
Animaltype Pig
September 2006
26
Figure 8
Fig. 8 Electropherogram of the Animaltype Pig Allelic Ladder analysed on an ABI PRISM® 310 Genetic Analyzer. Allele assignment
was performed using the Genotyper® Software and the Animaltype Pig Template File.
Animaltype Pig
December 2007
27
Table 5. Fragment Lengths of the Allelic Ladder Animaltype Pig analysed on an
ABI PRISM® 310 Genetic Analyzer (Blue Panel)
Allele
Size [bp]
Further Alleles*
ABI 310
Allele
Size [bp]
ABI 310
SBH2
6-FAM
SBH4
6-FAM
6
84.0
47.3
317.4
322.7
21
22
24
25
139.2
143.2
49.1
a
23
151.0
50.1
51.3
154.9
53
327.3
332.6
337.2
Allele
Size [bp]
Further Alleles*
ABI 310
S0655
6-FAM
±1.0 bpb
5
416.6
±1.0 bp
b
6
420.6
±1.0 bp
b
7
424.7
±1.0 bp
b
9
432.5
±1.0 bp
b
10
436.8
b
11
440.8
Remarks
26
158.9
54
341.5
±1.0 bp
27
163.0
55.1
347.6
±1.0 bpb
12
445.2
349.1
±1.0 bp
b
13
449.4
±1.0 bp
b
14
453.8
±1.0 bp
b
15
458.1
b
16
462.2
28
29
30
167.1
56
171.3
57
175.5
58
353.0
357.0
31
179.7
59
360.7
±1.0 bp
32
183.9
60
364.6
±1.0 bpb
17
466.5
368.4
±1.0 bp
b
18
470.8
±1.0 bp
b
22
487.6
b
33
34
188.0
192.2
61
a
35
62
372.2
64
380.2
±1.0 bp
SBH18
6-FAM
65.1
385.8
±1.0 bpb
9
214.4
66.1
389.7
±1.0 bpb
11
222.5
12
226.6
13
230.8
14
235.0
15
239.2
16
243.5
17
247.3
18
251.3
19
255.2
20
259.2
21
263.2
22
267.1
23
271.0
Animaltye Pig
December 2007
28
Table 6. Fragment Lengths of the Allelic Ladder Animaltype Pig analysed on an
ABI PRISM® 310 Genetic Analyzer (Green Panel)
Allele
Size [bp]
ABI 310
Allele
Size [bp]
ABI 310
SBH23
HEX
SBH1
HEX
Y
83.4
7
283.8
X
93.4
9
292.0
10
296.0
Further Alleles*
X (94.4)b
Further Alleles*
8a
SBH20
HEX
11
300.0
19
136.0
12
304.2
20
139.9
13
308.4
21
143.6
14
312.6
±2.0 bpb
22
147.3
15
316.8
±2.0 bpb
23
151.1
16
320.9
24
154.8
17
324.9
25
159.7
18
329.1
26
163.6
28
171.2
SBH10
HEX
29
175.5
31
363.5
30
179.5
32
367.5
31
183.5
33
371.5
32
187.5
34
375.7
33
191.6
35
379.9
34
195.6
36
383.9
35
199.4
37
388.0
36
203.3
38
392.0
37
207.3
40
400.0
39
214.8
41
404.0
40
218.6
42
408.0
41
222.6
43
412.0
43
230.6
44
415.8
49
254.1
46
423.8
47
427.8
48
431.8
50
439.8
38a
Animaltype Pig
39a
45a
49a
December 2007
29
Table 7. Fragment lengths of the Allelic Ladder Animaltype Pig analysed on an
ABI PRISM® 310 Genetic Analyzer (yellow panel)
Allele
Size [bp]
ABI 310
Allele
Size [bp]
ABI 310
SBH13
NED
SBH22
NED
8
98.7
18
291.7
9
102.8
19
295.7
10
107.0
20
299.7
11
111.2
22
307.7
12
115.6
23
311.7
13
119.9
23.3
314.7
24a
14
124.2
24.3
318.7
25a, 25.3a
15
128.5
28
332.3
27.3a
16
132.7
17
136.9
SBH19
NED
18
140.9
10
386.5
11
390.7
12
394.7
13
399.0
14
403.0
387A12F
NED
9
205.4
Further Alleles*
a
10.1
210.3
11
12.1
218.3
15
407.0
13
221.4
16
411.0
13.1
222.4
14.1
226.6
14a
15
229.8
15.1a
16
234.0
16.1
235.0
17
238.2
18
242.2
19.1
247.2
20
250.2
21
254.2
17.1a
* a. Biotype (DNA pool), b. see Special Features (chapter 5)
Animaltye Pig
December 2007
Further Alleles*
30
6. Interpretation of Results
As mentioned above, post PCR analysis and automatic allele allocation with
suitable analysis software ensure a precise and reliable discrimination of
alleles.
Pull-up Peaks
If peak heights are outside the linear detection range (>3000 RFU) or if an
incorrect matrix has applied, pull-up peaks can occur at positions of a specific
peaks in all colour channels. In order to avoid pull-up peaks, peak heights
should not exceed more than 3000 RFU.
Stutter Peaks
Appearance of stutter peaks depends on the sequence of the repeat structure
and on the number of alleles. n-4 peaks are due to a loss of a repeat unit
during amplification of tetranucleotide STR motives caused by slippage effects
of the Multi Taq2 DNA Polymerase. Interpretation of those peaks should be
done in accordance with the Template Files of the Genotyper® and
GeneMapper™ ID Software.
Template-independent Nucleotide Addition
The terminal transferase activity of Multi Taq2 DNA Polymerase leads to the
addition of an adenosine residue preferentially at the 3’-end of amplified DNA
fragments. Incomplete extension is responsible for double peaks, resulting
from the absence of the terminal adenosine residue. The artefact peak is one
base shorter than expected (-1 peaks). All Biotype® primers are designed to
minimize these artefacts. In addition, the final extension step of 70°C for 60
minutes is included to the PCR protocol in order to reduce formation of
artefacts. Peak height of the artefact correlates with the amount of DNA. Every
laboratory should determine their own thresholds for analysis of the peaks.
Animaltye Pig
December 2007
31
References
Bär W, Brinkmann B, Budowle B, Carracedo A, Gill P, Lincoln P, Mayr
W, Olaisen B (1997) DNA recommendations. Further report of the DNA
Commission of the ISFH regarding the use of short tandem repeat systems. Int.
J. Legal Med. 110: 175-176.
Kiuchi S, Inage Y, Hiraiwa H, Uenishi H, Yasue H (2002) Assignment of
280 swine genomic inserts including 31 microsatellites from BAC clones to the
swine RH map (IMpRH map). Mamm. Genome 13: 80-88.
Nechtelberger D, Kaltwasser C, Stur I, Meyer JN, Brem G, Mueller M,
Mueller S (2001) DNA microsatellite analysis for parentage control in Austrian
pigs. Anim Biotechnol 12: 141-144.
Renard C, Vaiman M, Chiannilkulchai N, Cattolico L, Robert C, Chardon
P (2001) Sequence of the pig major histocompatibility region containing the
classical class I genes. Immunogenetics 53: 490-500.
Animaltye Pig
December 2007
32
Notes
Animaltye Pig
December 2007