1
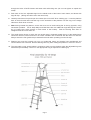
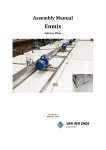
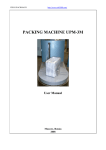
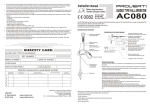
Contents
Section 1
Section 2
Section 3
Section 4
Section 5
Section 6
Section 7
Section 8
Safety working at height.
Hi-Step package contents & parts identification.
Assembly.
Operation.
Maintenance.
Extender package contents & parts identification.
Extender assembly.
Trolley fitting.
Section 1
Safety working at height
Work at height carries with it the risk of serious injury or death. The Henchman Hi-Step is designed to
optimize safety and stability in operations working at height where there is not necessarily a level, flat or hard
surface. Like any height access equipment, careful attention should be paid to use the Hi-Step properly, with
good sense and only as advised by the manufacturer so as to minimize the inherent risks involved.
Before climbing, always:
1.
• Consider the risks of the job in hand and choose the most suitable equipment for safely tackling that
•
•
•
•
•
•
•
job. Can the job be done from ground level?!
Read the user manual – if necessary as a reminder.
Read the safety warning label on the unit – if necessary as a reminder.
Check the unit for any signs of excessive wear or damage. Do not use if damage suspected.
Ensure that each extending leg is secured with an R clip.
Ensure that all bracing bars are secured at both ends by nuts and are locked straight.
Check that all 4 feet are in full contact with the ground and platform is stable.
Step back to check platform is level.
2.
Only use replacement parts from Henchman Ltd when required. If parts have become damaged, do not
try to bend them into shape and do not use makeshift parts for replacements.
3.
When setting the Hi-Step on sloping or uneven ground, firstly adjust the extending legs to keep the
platform level and stable; then screw each of the feet in or out so that they are in complete contact with
the ground surface. Not more than (40mm) or 1.5” of thread should be showing. If more adjustment is
necessary, slide the leg itself to the next pin hole.
4.
Never mount the Hi-Step unless it is fully assembled.
5.
Do not allow children on the Hi-Step – nor give them the opportunity to climb up. If necessary, store the
Hi-Step in the folded position.
6.
Never more than one person at a time on the Hi-Step. Not more than 150kg of combined operator and
tooling weight on the platform.
7.
Do not in any way modify the Henchman yourself. The Hi-Step range is tightly engineered to meet safety
and stability requirements. “Foreign” parts may endanger the integrity of the product.
Page 1
Section 2
Hi-Step contents & parts identification
Section 3
Assembly of the Hi-Step
Tools required - Two 17mm spanners, one 13mm spanner.
1. Unpack and identify all contents. See ʻSection 2 - Box Contents & Parts Identificationʼ
2. Slide (no tools required) the connector rails onto the stubs on the right hand long vertical - according to
the colour coding on the rails and down the long verticals. They click over the popping buttons on the
stubs.
3. Attach left hand long vertical to the other end of the connector rails. All 'buttons' should be cleanly
popped into the holes on the rails. This now makes up the wider ʻhedge sideʼ frame.
4. Remove nuts and bolts from top of the ladder frame. Locate the hedge side frame into the brackets at
the top of the ladder frame. The wide base of the hedge-side frame should point upwards with the lugs
on the inside, so that all lugs on both frames are pointing towards each other. Re-insert the bolts
Page 2
through the holes of BOTH frames and fasten with self-locking nuts (do not over tighten or squash the
metal).
5. Push each of the four adjustable legs into the tubular ends of the base of each frame, and fasten with
large R clips. (All legs should be set to the same hole).
6. Carefully stand the unit up and open the frames (the unit is NOT fit for climbing yet). Lower the platform
deck to the horizontal and locate the lugs on the underside of the platform over the rung on the hedge
side frame. Push down to locate.
7. After having located the platform, secure the loose end of each bracing bar to the lug opposite, using
nut/washer provided. For Hi Steps Major and Maxi there are two additional single bracing bars, below
the ʻHʼ bracing bar, which fastens on each frame of the Hi-Step. Push the bracing bars down to
straighten them and ʻlockʼ them out.
8. The small circular hoops to which the rear guard strap is fastened toward the top of the ladder frame
should be removed, turned around so as to face outwards and re fastened with the same nut and bolt.
Always ensure the rear guard strap is fastened both ends when operating from the Hi Step.
9. Platform lugs must be located over rung on hedge-side frame and bracing bars straightened and
secured before use each time. Remove bracing bars only when folding the platform to move it or store it.
10. The removable 2 rung access ladder is required to climb onto the platform when the adjustable legs are
extended beyond halfway. Place it on the appropriate rung as required for climbing up.
Page 3
Section 4
Operation
The Hi-Steps are similar to a stepladder – but are designed, by use of the 4 adjustable extending legs and
feet, to keep you level and stable, and therefore safe on sloping and uneven ground.
1. Each of the 4 legs adjusts by pulling out or pushing in and securing with a large R clip. There are 9 holes
on the leg, and two on the main frame sleeve. Adjustments smaller than 75mm (or 3”, the hole distance
on the legs) can be made by using the alternate hole on the main frame (a 40mm or 1.5”adjustment).
Final small adjustments are made by screwing the feet in or out. Don't screw the foot out more than
40mm or 1.5”. These leg adjustments are made to keep the platform stable and level, and to alter the
platform height.
2. Check all R clips are in place before climbing. Check platform is level and stable before mounting.
3. When the legs are fully extended, hook the 2 rung access ladder onto the most appropriate rung of the
ladder frame – to provide easier access.
Page 4
4. Moving the Hi-Steps is best done:
• Short distances - by “walking it” on the 2 front legs; see brochure/website.
• Longer distances - by folding it and carrying it, or by carrying it horizontally from inside, unfolded “like a
pair of suitcases”.
• Any distance - by using the trolley. See brochure/website.
5.# For storage like a step-ladder;
•
•
•
•
Remove extender if fitted.
Latch platform at vertical.
Release bracing bars in their centers.
Fold two frames together.
• Remove legs from mainframe (if leaving in, keep well lubricated).
• Stand up or hang on wall.
Section 5
Maintenance
1. The Hi-Step range products are tightly engineered in order to provide stability and safety. Be careful
therefore not to dent or twist the aluminum out of shape. Seek replacements from Henchman Ltd if
damage occurs.
2. Check the whole unit for any signs of damage before each use.
3. Do not try to force back into place or fix any damaged part. Seek advice or replacement part from
Henchman Ltd only.
4. Keep the extending legs and all threads clean. Keep the legs and threads well lubricated to ensure
smooth running up and down the sleeve, especially before storing for any length of time.
5. Store the Hi-Step products under cover in winter. Do not let the tubular sleeves fill with water and turn to
ice which may crack the tubes.
6. Keep inner part of telescopic Extender bracing bars well lubricated, particularly when putting away for
storage.
Page 5
Section 6
Extender package contents
& parts identification
Section 7
Extender assembly
1. Lay the Hi-Step on its side on the ground and take out the legs (keep the bracing bars attached and
locked straight.
2. Insert the 2 hedge side pole section extender legs with lugs pointing inwards and towards each other.
Fasten with R clips. Do the same with the extender ladder section with lugs pointing inwards. Secure
with R clips.
3. Re-insert the 4 original adjustable legs (with 9 holes) into the new extender frame work. Secure these
legs with R clips near the halfway point, all at the same hole.
4. Attach both ends of the 6 adjustable telescopic bracing bars to the lugs on the extender framework. Two
bracing bars cross each other on the left side of the unit, the right side and the hedge side. 4 bracing
bars are identical (for the sides), 2 are shorter (for the hedge side). Secure one end of each with wing
nuts and washers. When all are fitted, extend each one until button pops into the suitable hole for your
model (as indicated on the product). To check fitted correctly the extender pole section should follow on
in a straight line from the main frame. Carefully stand the Hi-Step upright.
Page 6
Section 8
Trolley fitting - The Trolley (wheels) fit on the Hi-Step with or without an Extender.
Step 1 - Your Trolley is ready for use without any assembly needed.
Step 2 - Put to one side the removable, two runged ladder. Lift Trolley onto lower rung of the ladder – the
# #
vertical bar locates onto the second rung the ladder frame, and secure with pins and R clips.
Step 3 - The unit is now ready for transporting. Lean over on to wheels, to wheel to the next position.
www.henchman.co.uk
Henchman Ltd. Manor Farm, Hannington, Tadley, Hampshire, RG26 5TZ
Tel: 01635 299 847 Fax: 01635 299 024
Page 7