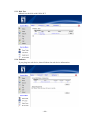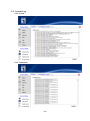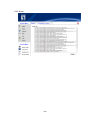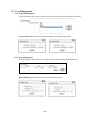
1
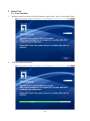
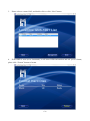
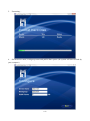
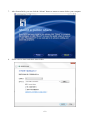
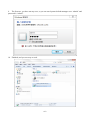
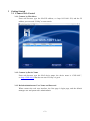
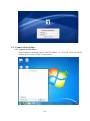
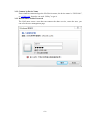
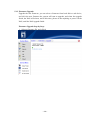
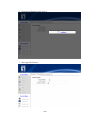
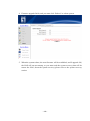
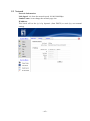
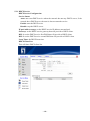
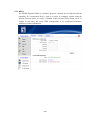
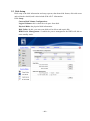
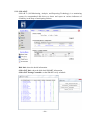
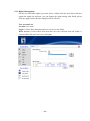
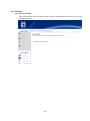
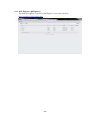
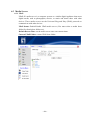
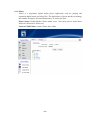
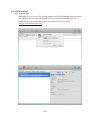
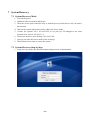
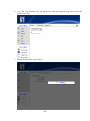
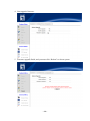
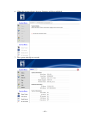
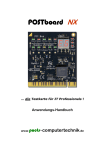
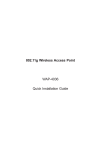
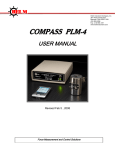
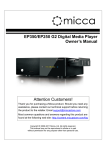
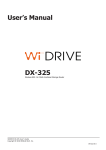
LevelOne
GNS-1001
1-Bay Gigabit Network Storage
User Manual
V1.0
Table of Content
1 Installation Hard Disk .................................................................................................................................... 1
2 Initial NAS ...................................................................................................................................................... 2
2.1 Easy Installer ............................................................................................................................................... 2
3 Getting Started .............................................................................................................................................. 7
3.1 Connect Web Control ................................................................................................................................. 7
3.1.1 Connect by IP Address.............................................................................................................................. 7
3.1.2 Connect by Device Name ......................................................................................................................... 7
3.1.3 Default Administrator User Name and Password .................................................................................... 7
3.2 Connect Share Folder ................................................................................................................................. 8
3.2.1 Connect by IP Address.............................................................................................................................. 8
3.2.2 Connect by Device Name ......................................................................................................................... 9
3.2.3 Default Share Folder Password ................................................................................................................ 9
4 System Status .............................................................................................................................................. 10
4.1 System Status............................................................................................................................................ 10
4.1.1 System Information ................................................................................................................................ 10
4.1.2 Network Information ............................................................................................................................. 10
4.1.3 Service Information ................................................................................................................................ 10
4.1.4 Change Language ................................................................................................................................... 11
5 Setup ........................................................................................................................................................... 12
5.1 System Setup ............................................................................................................................................ 12
5.1.1 System .................................................................................................................................................... 12
5.1.2 Data/Time............................................................................................................................................... 13
5.1.3 Firmware Upgrade ................................................................................................................................. 14
1
5.2 Network .................................................................................................................................................... 17
5.2.1 DHCP Service .......................................................................................................................................... 18
5.2.2 DDNS ...................................................................................................................................................... 19
5.3 Disk Setup ................................................................................................................................................. 20
5.3.1 Setup ...................................................................................................................................................... 20
5.3.2 S.M.A.R.T. ............................................................................................................................................... 21
5.3.3 Disk Test ................................................................................................................................................. 22
5.3.4 Enhance .................................................................................................................................................. 22
5.4 System Log ................................................................................................................................................ 23
5.4.1 System .................................................................................................................................................... 23
5.4.2 Connection ............................................................................................................................................. 23
5.4.3 Event....................................................................................................................................................... 24
5.5 User Management .................................................................................................................................... 25
5.5.1 Folder Management ............................................................................................................................... 25
5.5.2 User Management.................................................................................................................................. 25
5.5.3 Rights Management ............................................................................................................................... 26
5.6 Default ...................................................................................................................................................... 27
5.6.1 Reset to Default...................................................................................................................................... 27
6 Service ......................................................................................................................................................... 28
6.1 Share Folder .............................................................................................................................................. 28
6.1.1 Service Management ............................................................................................................................. 28
6.1.2 Web Explorer (QuiXplorer) ..................................................................................................................... 29
6.2 FTP Server ................................................................................................................................................. 30
2
6.2.1 Service Management ............................................................................................................................. 30
6.2.2 Anonymous Management ...................................................................................................................... 30
6.3 Media Server............................................................................................................................................. 31
6.3.1 UPnP ....................................................................................................................................................... 31
6.3.2 iTunes ..................................................................................................................................................... 32
6.4 BT Download............................................................................................................................................. 33
6.4.1 Transmission .......................................................................................................................................... 33
7 System Recovery ......................................................................................................................................... 34
7.1 System Recovery Mode ............................................................................................................................ 34
7.2 System Recovery Step by Step.................................................................................................................. 34
Default Settings
IP Address
User Name
Password
192.168.1.254
admin
admin
3
1
Installation Hard Disk
(Fig. 1)
(Fig. 4)
(Fig. 2)
(Fig. 5)
(Fig. 3)
(Fig. 6)
1. Remove the Hard Disk holder from the casing, loose 2 screws on the back & bottom. (Fig.
1)
2. Take out the inside Hard Disk Holder. (Fig. 2)
3. Insert the Hard Disk to the Hard Disk Holder. (Fig. 3)
4. Fasten the HDD to the holder from 2 sides with 2 screws each side. (Fig. 4)
5. Install the Hard Disk holder back to the casing. (Fig. 5)
6. Fasten the Hard Disk holder to the casing with 2 screws on the back & bottom. (Fig. 6)
~1~
2
Initial NAS
2.1 Easy Installer
1.
Welcome to the LevelOne NAS Easy Installer, please click “Next” to start initial NAS.
2.
Scan the NAS from network.
~2~
3.
Please select a current NAS, and double click or click “Next” button.
4. If the HDD is new (never formatted), it will show HDD information and ask you to format,
please click “Format” button to format.
~3~
5.
Formatting…
6. Set the device name, workgroup name and public share quota. (the system will show default by
your computer)
~4~
7.
After format finish, you can click the “Mount” button to mount a remote disk to your computer.
8.
Select a device letter and check share folder.
~5~
9. The first one, you have not any user, so you can used system default manager user: “admin” and
password is “admin”.
10. Finished, and you can easy to used.
~6~
3
Getting Started
3.1 Connect Web Control
3.1.1 Connect by IP Address
From web browser type the NAS IP address, ex. http://192.168.1.254, and the IP
address you can used “Utility” to auto search.
3.1.2 Connect by Device Name
From web browser type the NAS device name, the device name is “GNS-1001”,
ex. http://GNS-1001, that also can used “Utility” to get it.
3.1.3 Default Administrator User Name and Password
When connect the web user interface, the first page is login page, and the default
manager user and password is admin/admin.
~7~
3.2 Connect Share Folder
3.2.1 Connect by IP Address
From windows command type the NAS IP address, ex. \\192.168.1.254, and the IP
address you can used “Utility” to auto search.
~8~
3.2.2 Connect by Device Name
From windows command type the NAS device name, the device name is “GNS-1001”,
ex. \\GNS-1001, that also can used “Utility” to get it.
3.2.3 Default Share Folder Password
The NAS must create a user that can connect the share service, create the user, you
can refer the user management page.
~9~
4 System Status
4.1 System Status
The first page is show the NAS’s information, and the left frame is main menu that include
system setup and system service, and the content’s top is the sub function, click this can
change the different function.
4.1.1 System Information
About the device name, group name, the NAS date/time, firmware version and default
language.
4.1.2 Network Information
This block will to show the NAS IP address and the mac address.
4.1.3 Service Information
This block will to show the NAS service status, the “ON” that mean the service is
startup and ready, if it showing “OFF” that mean the service is stop.
~ 10 ~
4.1.4 Change Language
In this page, you can change the web user interface language by language draw-down
list, click and select a language.
~ 11 ~
5 Setup
5.1 System Setup
The system setup includes the system, network, DHCP service, date/time and firmware
upgrade.
5.1.1 System
System Information:
Device Name: the NAS device name.
Group Name: the NAS workgroup name.
SSL Service Status: if enable this service, the page will used HTTP + SSL, like
https://
Administrator Settings:
This can change the NAS administrator password, and set the web user interface idle
time, the idle time will logout user when the user never to operate the web over the
idle time.
Power Management:
Click the reboot button will reboot this NAS.
~ 12 ~
5.1.2 Data/Time
This NAS is without RTC (real-time clock), so you must set the date & time when you
start up the NAS, or you enable the NTP (Network Time Protocol) that will auto
synchronize the date & time from internet.
Manual: manual setting the date & time.
Auto:
Daylight Saving Time: used daylight save time.
Time Zone: select a time zone.
NTP Server: select a NTP server or add a new NTP server, and you also can edit or
delete a NTP server.
~ 13 ~
5.1.3 Firmware Upgrade
Upgrade the new firmware, you can select a firmware from local disk or usb device,
and click the new firmware the system will start to upgrade, and when the upgrade
finish, the NAS will reboot, and in this time, please do not anything or power off the
NAS, until the NAS upgrade finish.
Firmware Upgrade Step by Step:
1. Select a firmware file, and click it
~ 14 ~
2. System load firmware and verify it.
3. Start upgrade firmware
~ 15 ~
4. Firmware upgrade finish, and you must click “Reboot” to reboot system.
5. When the system reboot, the new firmware will be availabled, and if upgrade fail,
the NAS will can not startup, so you must used the system recovery that will be
restore the NAS, about the system recovery please refer to the system recovery
section.
~ 16 ~
5.2 Network
Network Information:
Link Speed: it is show the network speed 10/100/1000 Mbps.
Jumbo Frame: it can change the network page size.
IP Address
This block will set the ip is by dynamic (from DHCP) or static (by user manual
setting).
~ 17 ~
5.2.1 DHCP Service
DHCP Service Configuration:
Service Status:
Auto: auto start DHCP service when the network has not any DHCP server, if the
network has a DHCP server, the auto is does not start the service.
Enable: start the DHCP server.
Disable: stop the DHCP server.
IP pool address range: set the DHCP service IP address start and end.
Gateway: set the DHCP service gateway that will provide to DHCP client.
DNS 1: set the DHCP service first DNS that will provide to DHCP client.
DNS 2: set the DHCP service second DNS that will provide to DHCP client.
Lease Time: the DHCP lease time.
DHCP Client List:
This will show DHCP client list.
~ 18 ~
5.2.2 DDNS
The DDNS (Dynamic DNS) is a method / protocol / network service that provides the
capability for a networked device, such as a router or computer system using the
Internet Protocol Suite, to notify a Domain Name System (DNS) name server to
change, in real time, the active DNS configuration of its configured hostnames,
addresses or other information.
~ 19 ~
5.3 Disk Setup
Disk setup is the disk information and setup operate, that about disk format, disk raid create
and raid mode rebuild, and it also include S.M.A.R.T. information.
5.3.1 Setup
Current Disk Volume Configuration:
Logical Volumes: this is show the real space from disk.
Physical Disks: the physical disk information.
Disk Utility: In this, you can create disk raid or delete and repair disk.
HDD Power Management: if enable the power management the HDD will able to
enter standby mode.
~ 20 ~
5.3.2 S.M.A.R.T.
S.M.A.R.T. (Self-Monitoring, Analysis, and Reporting Technology) is a monitoring
system for computerhard disk drives to detect and report on various indicators of
reliability, in the hope of anticipating failures.
Disk Info: show the detial information.
S.M.A.R.T. Info: show the disk detail SMART information.
S.M.A.R.T Testing Crontable: set the SMART verify schedule.
~ 21 ~
5.3.3 Disk Test
Manual test the disk with S.M.A.R.T.
5.3.4 Enhance
If you plug-in a usb device, that will show the usb device information.
~ 22 ~
5.4 System Log
5.4.1 System
5.4.2 Connection
~ 23 ~
5.4.3 Event
~ 24 ~
5.5 User Management
5.5.1 Folder Management
In this block you can create a folder to NAS, and it also can edit and delete the folder.
Access mode: that mean this folder will share for everyone or personal.
5.5.2 User Management
In this block you can create a user to NAS, and it also can edit and delete the user
Quota Setting: that mean this user can used disk space size.
~ 25 ~
5.5.3 Rights Management
Set the user and folder rights, you must select a folder, then the user block will auto
update the rights list, and now, you can change the rights setting, after finish, please
click the apply button, then the changed will be effective.
User Account List:
Account: user name
Login: if select allow that mean this user can access the folder.
Write Access: if select allow that mean this user can read and write the folder, if
select disallow this user have only read rights.
~ 26 ~
5.6 Default
5.6.1 Reset to Default
This will reset this NAS to factory default, and the user and data will be loss, so please
backup these first.
~ 27 ~
6 Service
6.1 Share Folder
6.1.1 Service Management
Service Status: Enable / Disable share folder service.
Master browser: Enable / Disable master browser.
Oplocks option: Enable / Disable the opportunistic lock.
Archive option: Enable / Disable the network recycle bin.
Notes:
Oplock: An opportunistic lock, or oplock, is a mechanism that is designed to allow
clients to dynamically alter their buffering strategy in a consistent manner in order to
increase performance and reduce network use. The network performance for remote
file operations may be increased if a client can locally buffer file data, which reduces
or eliminates the need to send and receive network packets. For example, a client may
not have to write information into a file on a remote server if the client confirms that
no other process is accessing the data. Likewise, the client may buffer read-ahead data
from the remote file if the client confirms that no other process is writing data to the
remote file.
~ 28 ~
6.1.2 Web Explorer (QuiXplorer)
The web file Explorer is power by QuiXplorer, so you can visit it by:
http://quixplorer.sourceforge.net/
~ 29 ~
6.2 FTP Server
6.2.1 Service Management
Service Status: Enable/Disable FTP Server.
Service port: set the FTP service port.
PASV mode port range: set PASV mode port range.
Upload transfer Rate: set upload transfer speed.
Download transfer Rate: set download transfer speed.
6.2.2 Anonymous Management
Allow Anonymous FTP Access: Enable/Disable anonymous.
Anonymous FTP Access: set anonymous rights, read lony or read/write.
Upload Transfer Rate: set anonymous upload transfer speed.
Download Transfer Rate: set anonymous download transfer speed.
~ 30 ~
6.3 Media Server
6.3.1 UPnP
UPnP AV media server is a computer system or a similar digital appliance that stores
digital media, such as photographs, movies, or music and shares these with other
devices. These media servers use the Universal Plug and Play (UPnP) protocols to
communicate with other devices.
UPnP Status: Enable/Disable UPnP media server. (You must select a media share
folder first from below folder tree).
Default Rescan Time: set the media server auto scan content timer.
Current UPnP Folder: current UPnP share folder.
~ 31 ~
6.3.2 iTunes
iTunes is a proprietary digital media player application, used for playing and
organizing digital music and video files. The application is also an interface to manage
the contents on Apple's iPod and iPhone lines, as well as the iPad.
iTunes Status: Enable/Disable iTunes media server. (You must select a media share
folder first from below folder tree).
Current UPnP Folder: current iTunes share folder.
~ 32 ~
6.4 BT Download
6.4.1 Transmission
BitTorrent is a peer-to-peer file sharing protocol used for distributing large amounts of
data. BitTorrent is one of the most common protocols for transferring large files.
And this service we used transmission, more information you can refer:
http://www.transmissionbt.com/
~ 33 ~
7 System Recovery
7.1 System Recovery Mode
1. Turn off the power.
2. Hold down the reset button and keep it.
3. Then turn on the power and also keep it, until the power led become to red, can release
these button.
4. Wait for the system led become to blue, that is the rescue mode.
5. Current, the system's IP is 192.168.1254, so set your pc's IP changed to the same
network class, such as 192.168.1.1.2.
6. Then in the browser, enter the http://192.168.1.254.
7. And you can enter the rescue mode of the web page.
8. Then follow below steps to restore the system
7.2 System Recovery Step by Step
1. Login recovery mode, the default username and password is admin/admin.
~ 34 ~
2. Copy the new firmware into the usb device, and into upgrade page, then select the
firmware bin file.
3. System load firmware and verify it.
~ 35 ~
4. Start upgrade firmware.
5. Firmware upgrade finish, and you must click “Reboot” to reboot system.
~ 36 ~
6. When the system reboot, the new firmware will be availabled.
7. The system already to rescued.
~ 37 ~