1
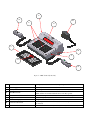
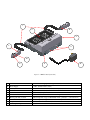
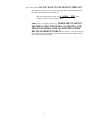
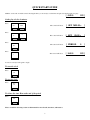
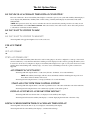
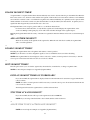
Scoreboard Operator’s Instructions
MPC Control
Misc.
Shot
Time
Time Out Timer
Start
Clear
Set
Penalty Penalty
Edit
Insert
Time
Alternate Time
Control
Penalty Penalty
On
Clear
Off
Time
On
Home
Goal
Home
Penalty
Home
Shots
Time
Off
Guest
Goal
Guest
Penalty
Guest
Shots
Options
Yes
Confirm
Horn
No
Cancel
Model Code 871
Hockey
7
8
9
4
5
6
1
2
3
Home
Score
Blank
0
Guest
Score
Chronometer
(Time of Day)
Some features on the keyboard overlay may not be included on the particular model being operated.
Since 1934
Retain this manual in your permanent files
7/16/2009
135-0066
These Instructions are for the Following Models:
LED models:
LED models:
Incandescent models:
4707
4710
4711
4730
4750
4755
4760
4765
9710
4507
4510
4510-D
4511
4511-D
4530
4550
4550-D
4555
4555-D
4560
4565
4570
4620
4621
4625
9510
9515
4407
4410
4411
4430
4440
4445
4450
4455
4460
4465
9410
Thank You
Thank You for choosing NEVCO. We appreciate your business.
The following instructions will help you become familiar with the operation and features of the scoreboard system.
Please take a few minutes to study this manual, and to practice with the control.
If you ever have any questions or comments, please call or email us.
— IN USA —
— IN CANADA —
NEVCO, Inc.
301 East Harris Avenue
Greenville, IL 62246-2151 USA
NEVCO, ULC
107 Forestview Rd., P.O. Box 2629
Orillia, ON L3V 7C1 Canada
Telephone: 618-664-0360
Fax: 618-664-0398
TOLL-FREE 800-851-4040
Toll Free: 800-461-8550
Fax: 705-325-8891
(From all 50 states and Puerto Rico)
Website: www.nevco.com
Email: [email protected]
A
D
F
B
G
C
H
I
E
D
Figure 1 – MPC Control (front view)
A.
B.
C.
MPC Control
Power Supply
Overlay
D.
Hand Held Switch
E.
F.
G.
3 character Model Code location
Keypads
16 character display
H.
Power On / Off switch
I.
Jack for hand held switch
Can operate scoreboards for a wide range of sports and features.
9 V DC (included with the control)
Fits on top of control to label the keys (included with system)
A TCS-5 time control switch is included with each control.
Other switches are included with the accessories they operate.
This code sets up the control for your scoreboard model and sport
Left and Right (20 keys each)
Bright LED for better visibility
Removes power from the control only (does NOT turn power off to
scoreboard)
One on each side of control (use either jack for any Hand Held switch)
J
C
K
A
L
O
M
N
P
B
Figure 2 – MPC Control (rear view)
A.
B.
C.
J.
K.
L.
MPC Control
Power Supply
Overlay
Coiled Cord
Socket for coiled cord
LED test indicator
Universal – to change sports, change the Overlay and enter the new Model Code.
9 V DC (included with control)
For your scoreboard model (included with system)
Stretches to over 4 ft. (included with switch)
Makes it easy to replace the cord
Verifies that the Hand Held switch is working
M.
N.
Remote push button switch
Remote rocker switch
Function depends on type of Hand Held switch (on TCS-5 – sounds the horn)
Function depends on type of Hand Held switch (on TCS-5 – controls the time)
O.
P.
Output to scoreboard
Jack for power input
BNC connector for coax cable (use either or both as needed)
9 V DC
TABLE OF CONTENTS
START UP PROCEDURE ............................................................................................................ 1
START WHERE TURNED OFF LAST?........................................................................................ 1
GO TO A BOOKMARK?............................................................................................................... 1
ENTER YOUR MODEL CODE .................................................................................................... 1
QUICK START GUIDE ................................................................................................................ 3
SET THE PLAY CLOCK .................................................................................................................... 3
KEYBOARD FUNCTIONS .......................................................................................................... 4
OPTIONS...................................................................................................................................... 11
SET OPTIONS CHART ................................................................................................................. 11
THE SET OPTIONS MENU .......................................................................................................... 12
TROUBLESHOOTING CHART .............................................................................................. 15
GLOSSARY.................................................................................................................................. 16
MY BOOKMARK PROGRAM CHART .................................................................................. 18
APPENDIX (CHRONOMETER) ............................................................................................... 19
EXAMPLE................................................................................................................................ 21
Set The Chronometer ............................................................................................................ 21
APPENDIX (SEGMENT TIMER) ............................................................................................. 23
EDITING THE SEGMENT TIMER ........................................................................................ 24
Review the Segment List........................................................................................................ 24
Add A Segment to the List ..................................................................................................... 24
Shorten the Segment List ...................................................................................................... 25
Change the Length of a Segment.......................................................................................... 25
EXAMPLES.............................................................................................................................. 26
Act like an INTERVAL HORN............................................................................................. 26
Practice Drills ........................................................................................................................ 27
Typical Soccer Application.................................................................................................... 28
Pre-Match Protocol for College Volleyball .......................................................................... 29
TROUBLESHOOTING CHART ..................................................................................................... 30
MY SEGMENT TIMER LIST ................................................................................................ 31
START UP PROCEDURE
When you turn the control on, the traveling display prompts you to “START WHERE TURNED OFF LAST?”, “GO TO A
BOOKMARK?”, or “ENTER YOUR MODEL CODE”. Answer YES, NO, or enter the 3 character model code on the
overlay.
NOTE: Make sure the proper overlay for the scoreboard and sport or special function is in place on the control.
START WHERE TURNED OFF LAST?
If a power failure happens during a game, press YES to resume from the point the power failed. The control can detect
when power is failing and save the current data. (If the time was running when the power failed it will continue running as
soon as power is restored).
NOTE: Intended for recovery from a power failure only. To start a new game, enter the model code or go to a bookmark.
GO TO A BOOKMARK?
A bookmark makes a quick efficient way to start a new game or practice drill. If a bookmark has been saved for this
activity, answer YES to the bookmark question. The control will prompt for the “BOOKMARK #”. Press the number of the
bookmark you want to use (1 to 5). The control will load the configuration and data it had in it at the time the bookmark
was saved.
ENTER YOUR MODEL CODE
To start a new game or procedure, be sure the proper overlay is installed on top of the control. Enter the 3 character model
code located near the top center of the overlay.
NOTE: If your control does not have wireless capability:
The name of the Sport [
HOCKEY ] will be displayed briefly, then, the question DO YOU
WANT TO USE PENALTY TIME OUT? (answer YES if you want to be able to stop the penalty
timers from counting while the main time continues to count, or NO to force the penalties to always count when the
main time counts. Then the time and the direction it will count [
scoreboard(s) will turn on.
0:00.0
DN ] will be displayed, and the
NOTE: If your control does have wireless capability:
The name of the Sport [
The control will ask “DO
HOCKEY ] will be displayed briefly.
YOU WANT TO OPERATE WIRELESS?”
If you answer NO:
The control will ask “DO
YOU WANT TO USE PENALTY TIME OUT?”
Press YES if you want to be able to pause the penalty timers while the main time runs.
Press NO to disable the Penalty Time Out key..
The time and the direction it will count [ 0:00.0
displayed, and the scoreboard(s) will turn on.
DN ] will be
If you answer YES:
The control will prompt [ SELECT A GROUP ] then display the first group that is
set up in the control. To see the next group name, press NO. When the desired group name is
being displayed press YES.
1
The control will ask “DO
YOU WANT TO USE PENALTY TIME OUT?”
Press YES if you want to be able to pause the penalty timers while the main time runs.
Press NO to disable the Penalty Time Out key.
The time and the direction it will count [ 0:00.0
displayed, and the scoreboard(s) will turn on.
DN ] will be
NOTE: If the control displays the message “THERE
ARE NO GROUPS
DEFINED IN THIS SYSTEM KEY. TO CREATE A NEW
GROUP USE MODEL CODE 618 WITH THE SYSTEM
KEY MANAGEMENT OVERLAY”, then, turn the control off and follow
the instructions that came with the System Key Management Overlay with model code
618 to set up the groups as needed.
2
QUICK START GUIDE
With the scoreboard on and the control showing the time, you are ready to set the time and period for the first period of play.
[ 0:00.0
DN ]
Set the play clock to 8 minutes
Press
Set
Time
The control will show
[ SET MM:SS.s
]
0
8
The control will show
[ SET
]
Yes
The control will show
[ PERIOD
0
1
The control will show
[ 8:00.0
DN ]
Press
08:SS.s
Press
]
Press
You are now ready for the game to begin.
To start the clock
Press
Time
On
To stop the clock
Press
Time
Off
To silence the Auto Horn at the end of the period
Press
Time
Off
Please consult the following sections of this manual for more details, functions, and features.
3
KEYBOARD FUNCTIONS
Use the YES key to respond to questions and to confirm data input.
Yes
Use the NO key to respond to questions and to cancel an operation.
No
Set
Use the SET key ahead of a function key to initiate the direct entry mode or to change the settings in OPTIONS,
CHRONOMETER, and TIME OUT TIMER, or to set the TIME, and other features. (For more details see
the description for the function.)
Press the HORN key to sound the scoreboard horn. Release the key to stop the horn.
Horn
The horn automatically sounds when the timer counts down to zero. (Auto Horn)
NOTE: The duration of the horn is limited to 4 seconds.
Press SET then HORN to disable or enable the AUTO HORN.
The control will prompt [
AUTO HORN ? (Y/N) ]. The default setting is auto horn on.
Press the OPTIONS key to see a scrolling report of the current system settings.
Options
Press SET then OPTIONS to change the system configuration.
NOTE: See the section on OPTIONS for more details.
4
Time Out Timer
Start
There are 10 TIME OUT Timers available. Timer 0 is preset to 30 seconds with a warning horn at 10
seconds.
Press TIME OUT TIMER START.
The display will prompt. [_TIMER_#__(0-9)?___]
When you enter the desired number, the preset Time Out Time is displayed on the control, and on
the scoreboard if set to do so, and begins counting down. When only the warning time remains, a
warning horn sounds briefly (if set up). When the timer reaches zero, the horn sounds briefly again
and the time begins counting up on the control. Any time the Main Time is turned on, the Main
Time is restored to the display(s) and the Time Out Timer is canceled.
Press SET, then TIME OUT TIMER START to set up a TIME OUT TIMER.
The display will prompt [__TIMER_#__(0-9)?___] Enter the number of the timer to
set up or overwrite. The control will prompt. [__SET____MM:SS____] Enter the total
length for the time out. The control will ask “DO
YOU WANT TO USE TIME
OUT WARNING HORN?” If you answer YES the control will prompt
[__SET____MM:SS____] Enter the warning time.
The control will ask “DO
YOU WANT TO DISPLAY TIME OUT ON
SCOREBOARD?”
Time Out Timer
Clear
Press TIME OUT TIMER CLEAR to cancel the currently active portion of the Time Out Time.
(If the warning horn has not yet sounded, it will sound and the timer will continue from the
warning time).
5
Chronometer
(Time of Day)
Pressing the CHRONOMETER key will cause the Time of Day to be displayed on the control. This key can
be enabled so that when pressed it also displays the Time of Day on the scoreboard. NOTE: Pressing the TIME
key or turning the time on will return to displaying the Main Time.
Pressing SET, then CHRONOMETER will enter the set up mode. The questions asked will depend on
your system and its current configuration.
NOTE: Some scoreboard models do not support all settings or options.
Questions that the control may ask include:
DO YOU HAVE AN AUXILIARY TIME DISPLAY CONNECTED?
(NOTE: Auxiliary Time Display models include: 9410, 9510, 9405and 9505).
DO YOU WANT TO DISPLAY CHRONOMETER TIME ON AUXILIARY
TIME DISPLAY?
ENABLE CHRONOMETER KEY TO PUT CHRONOMETER TIME ON
SCOREBOARD?
[__KEY__ENABLED__]
DISABLE CHRONOMETER KEY?
[__KEY__DISABLED__]
SET CHRONOMETER?
[__SET_HH:MM:SS____]
NOTE: Once set, the accuracy of the Chronometer is maintained even while the control is turned off and
disconnected.
TURN CONTROL OFF BUT LEAVE CHRONOMETER TIME
DISPLAYED? (Allows the control to be turned off, disconnected, and stored away in a safe location, while
the scoreboard or auxiliary time display, or both, continues to display a running “time of day” clock.)
DISPLAY CHRONOMETER TIME ON ALL DISPLAYS? (Scoreboard(s)
and auxiliary time display(s))
Follow the prompts. NOTE: If the display goes blank turn the control off to complete the process.
DISPLAY CHRONOMETER TIME ON AUXILIARY TIME
DISPLAY? (Auxiliary time display only)
Follow the prompts. NOTE: If the display goes blank turn the control off to complete the process.
NOTE: For more help and examples see Appendix (Chronometer)
6
Time
On
Time
Off
Press TIME ON To start the main time.
Press TIME OFF to stop the main time.
NOTE: The Time On and Time Off keys may also control other timers in the configuration.
NOTE: The Time On and Time Off keys are disabled if the hand held time control switch is plugged in to
the control.
NOTE: To make these two keys active again, turn the control power off, disconnect the hand held time
control switch, and restart the control. You may use “START
WHERE TURNED OFF
LAST”, if you wish.
Press TIME to recall the main time to the display. If other timers are in use, successive key presses will toggle
Time
among the main time and the other timers.
Press SET TIME to enter the Time and Period setting mode. The control will prompt
[__SET__MM:SS.s_____]
Enter the Minutes, Seconds, and Tenth Second as needed. Press YES to accept the time
entered.
NOTE: Letters that have not been replaced with numbers will be replaced with
zeros.
NOTE: Pressing NO will allow you to back up to make corrections or to abort without changing
the time.
The control will prompt [___PERIOD______0___]
Enter the Period number or press NO to exit without changing the current data.
Home
Score
Press HOME SCORE to enter the home score ADD mode.
The control might prompt [__HOME_______25+__]. In this example the current Home Score
is 25 and the “+” indicates that the control is ready to add to the current score. Enter a single digit number
or press NO or YES or another function key to abort and leave the score unchanged.
NOTE: You cannot subtract from a score. To correct a mistake use the SET key, then the HOME or
GUEST SCORE key and directly enter the correct score (up to 199).
Guest
Score
GUEST SCORE works the same way.
7
Misc.
Shot
Time
If you are using shot clocks, you can set the shot time to a specified number without affecting the
original preset value.
Press SET then MISC. SHOT TIME to enter this special mode.
The control will prompt [__SHOT_TIME__SS__]. Enter the special shot time, then press YES
to confirm and send the new shot time to the shot clocks, or press NO to abort without changing the data.
8
Press SET then HOME PENALTY to set up a penalty.
Home
The control will prompt [_PEN
to cancel, or YES to confirm.
Penalty
MM:SS
The control will prompt [_H.PLAYER
Guest
_]. Enter the penalty time (up to 19:59). Press NO
#
_]. Enter the 2 digit player number (_0 to 99).
Penalty
GUEST PENALTY works the same way.
Press HOME PENALTY to recall the first home penalty to the control.
Home
1:25 15_]. In this example home penalty 1 has 1 minute and 25
The control might show [_H 1
seconds remaining on player number 15. Each time you press HOME PENALTY, the next home penalty
on the list will be recalled to the display on the control. After the last penalty on the list has been viewed,
the list starts over.
Penalty
NOTE: To exit, press YES, NO, or any function key.
Guest
Penalty
GUEST PENALTY works the same way.
NOTE: While a penalty is displayed on the control, it can be modified with any of the three following keys:
Penalty
Insert
Penalty
Edit
Press PENALTY INSERT to insert a penalty ahead of the displayed penalty.
The control will prompt [_INSERT
(Y-N)
Press NO to cancel, or YES to confirm.
The control will prompt [_PEN MM:SS
Press NO to cancel, or YES to confirm.
_]. Enter the penalty time (up to 19:59).
The control will prompt [_H.PLAYER
99).
_]. Enter the 2 digit player number (_0 to
#
Press PENALTY EDIT to edit the displayed penalty.
The control will prompt [_
EDIT (Y-N)
Press NO to cancel, or YES to confirm.
The control will prompt [_PEN MM:SS
Press NO to cancel, or YES to confirm.
Penalty
Clear
_]. Enter the penalty time (up to 19:59).
Press PENALTY CLEAR to clear the displayed penalty.
The control will prompt [_
CLEAR (Y-N)
9
Press NO to cancel, or YES to confirm.
Penalty
On
Off
Press PENALTY ON OFF to toggle the penalty counters between run or stop.
The control will show [_PENALTY
TIME OFF_] or [_PENALTY TIME ON_].
NOTE: The PENALTY ON OFF key is active only if you answered YES to “USE PENALTY TIME OUT” when
the control was started.
Home
Goal
Press HOME GOAL to toggle the indicator on or off.
The control will show [_H.GOAL__
___ON_ _] or
[_H.GOAL__ ___OFF_ _].
Guest
NOTE: Each time the HOME GOAL Key is pressed, the status of the indicator changes.
Goal
GUEST GOAL works the same way.
Home
Shots
Guest
Press HOME SHOTS to enter the Home Shots ADD mode.
The control might prompt [__H.SHOTS _____8+__]. In this example the current Home Shots is
8 and the “+” indicates that the control is ready to add to the current total. Enter a single digit number or
press NO or YES or another function key to abort and leave the data unchanged.
NOTE: You cannot subtract, but you can use the SET key first, then directly enter the correct total (up to
99).
Shots
GUEST SHOTS works the same way.
10
OPTIONS
Many options are available for modifying the way the scoreboard system works. The questions the control will ask
and their order depends on the current system and settings. Pressing the OPTIONS key starts a scrolling report of
the current system settings. This report will continue to repeat until a key is pressed. To change a setting, press SET
OPTIONS and use the YES (confirm) and NO (cancel) keys to work your way through a series of questions that is
based on your system and available options. When all questions have been asked, the control returns to normal
operating mode.
Note: press a function key to abort the set options mode early.
Set Options Chart
Do You Have An
Auxiliary Time Display
Connected? (this question
may not always be
asked)*
Switch to (Dim or
Bright)?
Y
N Next Available Question
Y
Changes rightness level of
Scoreboard
N Next Available Question
Y
Start and Stop with
Hand Held Switch?
Y
SET HH:MM:SS
N
Y Aux Timer To Count Down?
Use Aux Timer?
Start and Stop with
N Hand Held Switch?
Y
Display Aux Timer on Auxiliary
Time Display? **
Y
SET MM:SS
N
N
N Next Available Question
Display Chronometer on
Auxiliary Time Display
**
Y
N Next Available Question
Y
Y SET MM:SS
Enable Segment Timer?
Another Segment?
Y
N
SET MM:SS
Display Segment
Timer on
Scoreboard?
Y
Displays Segment Timer instead of
main time
N
Displays Main time with Interval
Horn
Stop Time at Each
Segment?
Y
Waits for time on
N
Runs continuously
N Next Available Question
Y
Change Direction of Main
Clock?
Y
Do You Want Clock to Stop
at Specified Time?
N
SET MM:SS
Next Available
Question
N Next Available Question
Y
Disable Tenth Sec?
N Next Available Question
End Of Period To Turn Off Upon Setting The Time? (or) End Of Period To Stay On Until Time Is Started?
Y/N
Y Bookmark #?
Set a Bookmark?
N Normal Operation Mode
* NOTE: This question is asked only once for each time the control is started fresh by entering a model code. It may
be asked from SET OPTIONS or from SET CHRONOMETER. The control needs to know this information in order
to know what other questions to ask and how certain data should be handled.
** Questions will be asked only if you indicated that you have an Auxiliary Time Display connected.
11
The Set Options Menu
DO YOU HAVE AN AUXILIARY TIME DISPLAY CONNECTED?
The control will need to know if an auxiliary time display is connected as part of your system. The Auxiliary Time Display is
used to display time (Main Time, Auxiliary Time or Time of Day). Auxiliary Time Display models include: 9410, 9510,
9405 and 9505.
NOTE: This question is asked only once for each time the control is started fresh by entering a model code. It may be ask
from SET OPTIONS or from SET CHRONOMETER. The control needs to know this in order to know what other questions
to ask and how certain data should be handled.
DO YOU WANT TO SWITCH TO DIM?
OR
DO YOU WANT TO SWITCH TO BRIGHT?
Answering YES will toggle the brightness level of the scoreboard.
USE AUX TIMER?
OR
SET AUX TIMER?
OR
TURN AUX TIMER OFF?
The control has a built in auxiliary timer that can be used for many purposes. It can be configured to count up or down and it
can run continuously or only when the main time is running. It can be displayed on the control by pressing the time key twice
in succession. It can also be configured to display on an auxiliary time display if one is part of your system. Some uses for the
auxiliary timer include timing field or facility usage, or it can be used to determining how far into a game a certain event
happened.
AUX TIMER TO COUNT DOWN?
Answering YES will setup the timer to count down (99 hours: 59 minutes: 59 seconds maximum).
NOTE: The auxiliary time display will show hours and minutes until the remaining time drops below an
hour, then it will show minutes and seconds.
Answering NO will setup the timer to count up (59 minutes: 59 seconds maximum).
START AND STOP WITH TIME CONTROL SWITCH?
Answering YES will setup the timer to start and stop with the action of the same switch that controls the main time.
Answering NO will setup the timer to run continuously regardless of the switch position.
DISPLAY AUX TIME ON AUXILIARY TIME DISPLAY?
Answering YES will cause the aux time to be displayed on the auxiliary time display.
Answering NO will cause the auxiliary time display to continue displaying the main time or the time of day.
DISPLAY CHRONOMETER TIME ON AUXILIARY TIME DISPLAY?
Answering YES will cause the time of day to be displayed on the auxiliary time display.
Answering NO will allow the auxiliary time display to continue without change.
12
ENABLE SEGMENT TIMER?
A segment timer is a separate internal timer that automatically resets itself to the next time in a pre-determined list. When the
time counts down to zero, the horn sounds and the next segment of time in the list is loaded and it continues to run. When the
end of the list is reached, it starts over with the first segment and continues indefinitely. It is primarily used for practice drills.
An Interval Horn is a horn that sounds every time the main time is evenly divisible by the interval time. Its primary use is to
signal when little league hockey teams should rotate to the court.
The Segment Timer can be set up for practice drills or to work like an interval horn.
For interval horn, enable the timer, set only the first segment, and do NOT display the segment timer on the
scoreboard. During normal game play, a horn will sound each time the length of the segment elapses.
Enabling the Segment Timer will allow entry of the time for segment 01. Enter the minutes and seconds as desired then press
YES.
ADD ANOTHER SEGMENT?
There can be as many as 40 segments in the segment list. When the end of the list is reached, the segment timer
starts over with segment 01.
or
DISABLE SEGMENT TIMER?
Disabling the segment timer clears all segments and returns to normal operation.
NOTE: If you will want to use this configuration again, be sure a bookmark has been saved before disabling.
NOTE: If the segment timer has been displayed on the scoreboard, to return to normal operation it is necessary to turn the
control power off and start fresh with a model code or from a bookmark.
or
EDIT SEGMENT TIMER?
The edit option allows you to review the segment list, shorten the list, extend the list, or change a segment’s time.
NOTE: For more help and examples see Appendix (Segment Timer)
DISPLAY SEGMENT TIMER ON SCOREBOARD?
If you answer YES, the segment time is displayed instead of the main time and is started and stopped with the time
control switches.
NOTE: To return to normal operation it will be necessary to turn the control power off and start fresh with a model
code or from a bookmark.
Answering NO will cause the segment timer to act like an interval horn.
STOP TIME AT EACH SEGMENT?
If you answer YES, the time will stop at each segment and wait for TIME ON.
NOTE: If you are using a hand held time control switch, turn the switch off, then on.
or
ALLOW TIME TO RUN AFTER EACH SEGMENT?
NOTE: For more help and examples see Appendix (Segment Timer)
13
CHANGE DIRECTION OF MAIN CLOCK?
Toggles the direction the main clock runs.
CLOCK TO STOP AT SPECIFIED TIME?
A stop time may be set when the timer direction is changed to up count. When the clock reaches the stop time, the
clock stops and the auto horn will sound if enabled.
If you answer YES, you are prompted for the stop time. Follow the prompts.
DISABLE .1 SEC. SHIFT TIMER?
During the last minute of count down time, the scoreboard switches to displaying the seconds and tenths of seconds.
Press YES if you want to turn off this feature.
NOTE: Once disabled the only way to restore it is to restart the control and enter the model code or go to a bookmark.
END OF PERIOD TO TURN OFF UPON SETTING THE TIME?
OR
END OF PERIOD TO STAY ON UNTIL TIME IS STARTED?
Allows you to choose when the EOP indicator will turn off.
SET A BOOKMARK?
A bookmark is like a picture or snapshot of all the data and configuration settings in the control. When you go to a bookmark,
the control is restored to where it was at the time the bookmark was saved.
Bookmarks can be edited by going to the bookmark, making the changes needed, then saving the bookmark again using the
same bookmark number or a different one.
Five separate bookmarks are available and each can be reused as desired.
If you try to save to a used bookmark, you will be warned and given a chance to abort the procedure.
NOTE: A bookmark cannot be saved while a timer is running.
14
TROUBLESHOOTING CHART
Problem
Cause
Solution
Cannot Save a Bookmark
Time is running
Turn time off before saving a bookmark
Horn does not sound when time has
expired
Auto horn is turned off
Enable the auto horn (SET HORN YES)
Timer counts in wrong direction
Timer direction is set wrong
Use SET OPTIONS to change timer
direction
Cannot subtract from score
Score keys will add only
Use SET then score key and enter the
correct score directly
Time is counting but the period is wrong
Wrong period entered during setting time
Press SET TIME NO and enter the correct
period number
Cannot clear Time Out Timer from
scoreboard without sounding horn (teams
are ready to play)
Clearing the Time Out Timer forces it to
drop to the warning time which sounds the
warning horn
Before the game, set up another Time Out
Timer that does not have a warning time
and does not display on scoreboard. --interrupt the unneeded Timer with this one
and then clear it.
Main clock is counting up.
Tenth second will not show when main
time is counting up
Tenth second has been disabled
The control must be turned off and then
restarted
Time is above one minute
Be patient
CHRONOMETER will not display on
scoreboard when I press
CHRONOMETER
CHRONOMETER key is not enabled
Use SET CHRONOMETER to enable it
Aux time is displayed on the auxiliary
time display, but it is not counting
Hours and minutes are being displayed.
The display will change only once each
minute
Minutes and seconds will be displayed
during the last hour of remaining time
The Penalty Timers are Not Running
The Penalty Timers have been turned off
Press the Penalty On Off key
The End Of Period indicator does not turn
off when I set the time for the next period
EOP indicator is set to remain on until the
time switch is turned on
Use SET OPTIONS to change this setting
Tenth second does not show on scoreboard
If the problem persists please contact the Nevco Service Department.
800-851-4040
15
GLOSSARY
ALTERNATE TIME CONTROL SWITCHES (keys): Located on the keypad, these 2 keys, TIME ON
and TIME OFF, may be used instead of the Hand Held Time Control Switch.
NOTE: These 2 keys are inactive while the Hand Held Time Control Switch is plugged in. To enable them,
turn the control off, unplug the Hand Held Switch and restart the control. You may use “Start Where Left off
Last” if you wish.
AUTO HORN: Sounds for a minimum of 2 seconds when the main time has expired or reached the stop time.
(Can be disabled from the control)
AUX TIMER: An auxiliary timer, separate from the main timer, that can be configured to count up or down and to start and
stop with the time control switch or run continuously. It can be viewed on the control (press the time key twice) or on
an AUXILIARY TIME DISPLAY. Some uses for the aux timer include timing field or facility usage, or determining
how far into a game a certain event happened.
AUXILIARY TIME DISPLAY: Consisting only of a timer, it can display the main time, the AUX TIME or
the Chronometer (Time of Day Clock). Auxiliary Time Display models include: 9410, 9510, 9405 and 9505.
BATTERY: Battery powered memory saves the settings and data in the control in case of power failure. It also
maintains the accuracy of the CHRONOMETER when the control is unplugged.
BEEPER: Confirms each key press and alerts operator when a special event such as time expired or an Entry Error
has occurred.
BOOKMARK: Saves the current control settings and data so it can be easily recalled later. (5 Bookmarks are
available)
BRIGHTNESS LEVEL: The scoreboard can be set to bright or dim for best viewing. Indoor scoreboards
default to bright; outdoor scoreboards default to dim.
CHRONOMETER: Time of Day Clock. Once the correct time has been set, the accuracy of the Chronometer is
maintained even while the control power is unplugged. During normal operation, the Chronometer can be
displayed on the control by pressing a single key. This key can be armed so that when pressed, the Time of
Day is also displayed on the scoreboard.
NOTE: Pressing the TIME key or turning the time on will return the main time to the display(s).
DISPLAY: A 16 character display on the control prompts the operator for input and can monitor the scoreboard
data.
ENTRY ERROR: A visual and audible warning that an invalid action was attempted. Its normal duration is 2
seconds however you may interrupt it and continue immediately.
16
HAND HELD TIME CONTROL SWITCH: A hand held switch with a coiled cord that plugs into either
side of the control. When connected, the alternate time control switches (keys) are disabled. (Makes it easier
for another person to control the main time or sound the horn).
INTERVAL HORN: A horn that sounds repeatedly at preset intervals throughout the game. Its primary use is to signal
when little league hockey teams should rotate to the court. The Interval Horn has been replaced by a more versatile
SEGMENT TIMER. (See Segment Timer)
MODEL CODE: A 3 character code found on the OVERLAY that when entered into the control, sets up he
control for a particular scoreboard model and sport or special function.
OPTIONS: Settings that determine how the scoreboard system operates.
OVERLAY: A flat plastic panel that fits over and around the keys on the control. Tabs at the top and bottom hold it in
place. Each overlay provides the proper labeling for each key and a three character Model Code. A brief set of
operating instructions is printed on the back of each overlay; you may make copies if you desire. When you want to
change to a different sport, install the correct overlay and enter the new Model Code.
SEGMENT TIMER: Sometimes called Practice Timer, it allows a list of time segments to be programmed into
the control. The list can then be used for a practice routine or drill. When started, the first segment on the list
is loaded into the main timer and starts counting down. When zero is reached, the horn sounds and the next
segment is loaded and begins counting down with no intervention needed.
NOTE: The Segment Timer has replaced the Interval Horn and can mimic it exactly.
SUB HORN: When armed, waits until the main time has been stopped, then sounds automatically to alert the
officials that a player is waiting to be substituted into the game.
TENTH SECOND SHIFT TIMER: Automatically shifts from displaying minutes and seconds to seconds
and tenths of seconds during the last minute of count down time. (May be disabled if desired)
TIME OUT TIMER: Programmable for different time out lengths and with optional warning horn and an option
to display the Time Out time remaining on the scoreboard. (Ten different time out timers are available. Timer
0 is preset to 30 seconds with a warning horn at 10 seconds and is not displayed on scoreboard.)
17
My Bookmark Program Chart
Bookmark # 1
Model Code _______________
Bookmark # 2
Model Code _______________
Bookmark # 3
Model Code _______________
Bookmark # 4
Model Code _______________
Bookmark # 5
Model Code _______________
18
Appendix (Chronometer)
(Time of Day)
A CHRONOMETER (Time of Day Clock) is built into the control. Once set, it will maintain its accuracy even
while the control is turned off or disconnected from power. During normal operation the Time of Day can be recalled to the
display on the control by pressing a single key, the Chronometer key. The Chronometer key can be enabled so that when
pressed, the Time of Day will also be displayed on the scoreboard(s).
NOTE: Pressing the TIME key or turning the time on will return to displaying the Main Time.
Pressing Set,
then Chronometer will initiate the set up mode. While in this mode, you can:
1.
Specify whether or not the Time of Day will be displayed on the Auxiliary Time Display, if one is connected.
2.
Enable or disable the Chronometer key so that pressing it will display the chronometer on the scoreboard. (the
default is to display the Time of Day on the control only)
3.
Set the Time of Day Clock.
4.
Allow the control to be turned off, disconnected, and stored away in a safe location, while the scoreboard or
auxiliary time display, or both, continues to display a running “time of day” clock.
NOTE: Some scoreboard models do not support all settings or options.
Questions that the control may ask include:
DO YOU HAVE AN AUXILIARY TIME DISPLAY CONNECTED?
(NOTE: Auxiliary Time Display models include: 9410, 9510, 9405 and 9505).
DO YOU WANT TO DISPLAY CHRONOMETER TIME ON AUXILIARY TIME
DISPLAY?
ENABLE CHRONOMETER KEY TO PUT CHRONOMETER TIME ON
SCOREBOARD?
[__KEY__ENABLED__]
or
DISABLE CHRONOMETER KEY?
[__KEY__DISABLED__]
SET CHRONOMETER?
[__SET_HH:MM:SS____]
19
Appendix
(Chronometer)
TURN CONTROL OFF BUT LEAVE CHRONOMETER TIME DISPLAYED? (Allows the
control to be turned off, disconnected, and stored away in a safe location, while the scoreboard or auxiliary time display, or
both, continues to display a running “time of day” clock.)
DISPLAY CHRONOMETER TIME ON ALL DISPLAYS? (Scoreboard(s) and auxiliary time
display(s))
Display will go blank. Turn control off.
DISPLAY CHRONOMETER TIME ON AUXILIARY TIME DISPLAY? (Auxiliary time
display only)
Display will go blank. Turn control off.
20
Appendix
(Chronometer)
EXAMPLE
To Set The Chronometer:
A. Set the Chronometer to 12:00:00
Do The Following Steps:
1.
Press SET --- then CHRONOMETER.
2.
The control will ask --- DO
CONNECTED?
YOU HAVE AN AUXILIARY TIME DISPLAY
--- (Answer this question appropriately.)
NOTE: This question is asked only once for each time the control is started fresh by entering a model code.
It may be ask from SET OPTIONS or from SET CHRONOMETER. The control needs this information in
order to know what other questions to ask and how certain data should be handled. Auxiliary Time Display
models include: 9410, 9510, 9405 and 9505.
3. The control will ask --- DO
YOU WANT TO DISPLAY CHRONOMETER TIME ON
AUXILIARY TIME DISPLAY? --- (Press No).
NOTE: This question will only be asked if you answered yes to “DO YOU HAVE AN AUXILIARY TIME
DISPLAY CONNECTED?”
ENABLE CHRONOMETER KEY TO PUT
CHRONOMETER TIME ON SCOREBOARD? --- (Press No).
4.
The control will ask ---
5.
The control will ask ---
SET CHRONOMETER?
[__SET_HH:MM:SS___]
--- (Press Yes).
--- (Enter the hours, minutes, and seconds).
NOTE: The time is based on a 12 hour clock.
[__Y/N_12:00:00___]
--- (Press Yes).
NOTE: It usually takes the control about 2 seconds to process and
actually set the internal clock after Yes is pressed.
21
Appendix (Segment Timer)
(MPC-6 and MPCW-6 Rev. 2.5 or later)
The SEGMENT TIMER can be configured to act like an Interval Horn, or configured for practice drills with multiple unique
timed segments. You can choose to have the time stop at the end of each segment or run continuously. Up to 40 segments each
up to 99 minutes and 59 seconds can be set. After the last set segment expires, the series starts over. The segment list can be
reviewed, shortened, lengthened, or a segments time changed. Segment timer information is included when a bookmark is
saved.
NOTE: See the examples at the end of this section for more help.
To configure as an Interval Horn, use only one segment, set it to a multiple of 30 seconds (example 0:30, 01:00, 01:30
etc.), and do not display on scoreboard. The main time will be displayed and the segment timer will function like an interval
horn. (The horn will sound repeatedly, based on the time set in the segment).
NOTE: Using more than 1 segment or setting to a time other than a multiple of 30 seconds may yield unexpected results.
The Segment Timer is configured from the SET OPTIONS menu and uses the following questions and prompts:
ENABLE SEGMENT TIMER?
(Press Yes to enter the segment timer set up mode) or (No to skip segment
timer questions).
[ SEG 01 MM:SS ] (Enter the minutes and seconds for segment 01 then press Yes).
ADD ANOTHER SEGMENT? (Press Yes to add another or No to end the list).
DISPLAY SEGMENT TIMER ON SCOREBOARD?
(Answer No to continue displaying the main
time; the Segment Timer will act like an Interval Horn), or (Answer Yes to display each segment as it counts down)*.
STOP TIME AT EACH SEGMENT?
(Loads the next segment and waits for the “TIME ON” button to be
pressed)**.
NOTE: If you want to return to normal scoreboard operation, press SET OPTIONS and answer Yes to the following question:
DISABLE SEGMENT TIMER?
(Clears all segments and returns to normal operation)*.
*NOTE: To return to normal operation after the segment timer is displayed on the scoreboard, the control must be turned off
and restarted by entering a model code or going to a bookmark.
**NOTE: If using the hand held time switch, turn the switch to the off position, then to the time on position to start the next
segment running.
23
Appendix
(Segment Timer)
EDITING the SEGMENT TIMER
The Segment Timer list can be reviewed lengthened, shortened, or a segment’s time changed.
To Review the Segment List:
1. Press SET --- then OPTIONS
2.
Answer questions as desired
3.
When the control asks ---
EDIT SEGMENT TIMER? --- (Press Yes)
[ EDIT01 12:34 Y/N ] (The control displays the word “EDIT”, the segment number “01”, and
the segment time “12:34”, and the prompt “Y/N”) the control is asking if
you want to edit the segment. --- (press No)
[ EDIT02 23:00 Y/N ]
4.
(Each time you press no, the next segment in the list is displayed.)
After all segments have been reviewed the control will display ---
ADD ANOTHER SEGMENT?
5.
--- (Press No) (Exits the edit mode)
Answer the remaining questions as desired and return to normal operating mode.
To Add A Segment to the List:
1. Press SET --- then OPTIONS
2.
Answer questions as desired
3.
When the control asks ---
EDIT SEGMENT TIMER? --- (Press Yes).
[ EDIT01 12:34 Y/N ] (The control displays the word “EDIT”, the segment number “01”, and
the segment time “12:34”, and the prompt “Y/N”) the control is asking if
you want to edit the segment. --- (press No).
[ EDIT02 23:00 Y/N ]
4.
(Each time you press no, the next segment in the list is displayed)
After all segments have been reviewed the control will display ---
ADD ANOTHER SEGMENT?
--- (Press Yes). (Enters the time setting mode)
7.
[ SEG 03 MM:SS ] (Example: press 0, press 1, press 3) (1 minute 30 seconds).
[ SEG 03 01:3S __] (Press Yes). (Adds the new segment to the list).
ADD ANOTHER SEGMENT? (Press No) (or press Yes to add another)
8.
Answer the remaining questions as desired and return to normal operating mode.
5.
6.
NOTE: Segments can only be added to the end of the list. They cannot be inserted into the middle.
24
Appendix
(Segment Timer)
To Shorten the Segment List:
1. Press SET --- then OPTIONS.
2.
Answer questions as desired
3.
When the control asks ---
EDIT SEGMENT TIMER? --- (Press Yes).
[ EDIT01 12:34 Y/N ] (The control displays the word “EDIT”, the segment number “01”, and
the segment time “12:34”, and the prompt “Y/N”) the control is asking if
you want to edit the segment. --- (press No).
[ EDIT02 23:00 Y/N ]
[ EDIT03 05:00 Y/N ]
(Each time you press No, the next segment in the list is displayed).
(When the control is displaying the first segment past where the list
should end --- (press Yes)***.
4.
5.
6.
7.
[ SEG 03 MM:SS ]
[ SEG 03 0M:SS ]
(Press 0) (0 minutes and 0 seconds).
(Press Yes). NOTE: A segment set to zero time marks the end of the segment
list and will cause it to start over with segment 01. All subsequent segments are cleared.
ADD ANOTHER SEGMENT?
--- (Press No). (Exits the edit mode).
Answer the remaining questions as desired and return to normal operating mode.
***NOTE: You can only mark a new end of list. You cannot randomly remove segments.
To Change the Length of a Segment:
1. Press SET --- then OPTIONS.
2.
Answer questions as desired
3.
When the control asks ---
EDIT SEGMENT TIMER? --- (Press Yes).
[ EDIT01 12:34 Y/N ] (The control displays the word “EDIT”, the segment number “01”, and
the segment time “12:34”, and the prompt “Y/N”) the control is asking if
you want to edit the segment. --- (Press No).
[ EDIT02 23:00 Y/N ]
[ EDIT03 05:00 Y/N ]
(Each time you press No, the next segment in the list is displayed).
(When the control is displaying the segment you want to change --(Press Yes).
5.
[ SEG 03 MM:SS ] (Press 0, press 5, press 3) (5 minutes ands 30 seconds).
[ SEG 03 05:3S ] (Press Yes to accept and move to the next segment).
6.
[ EDIT04 15:00 Y/N ]
7.
ADD ANOTHER SEGMENT?
8.
Answer the remaining questions as desired and return to normal operating mode.
4.
(You may now choose whether or not to edit this segment).
--- (Press No). (Exits the edit mode).
.
25
Appendix
(Segment Timer)
EXAMPLE
To Configure the Segment Timer to sound a horn at a predetermined interval (Act
like an INTERVAL HORN):
A. Sound a horn at 1 minute 30 second intervals.
Make the following settings:
1. Press SET --- then OPTIONS.
2.
Answer questions as desired.
3.
When the control asks ---
6.
ENABLE SEGMENT TIMER? --- (Press Yes).
[ SEG 01 MM:SS ] (Press 0, press 1, press 3) (1 minute 30 seconds).
[ SEG 01 01:3S ] (Press Yes). NOTE: Only significant digits are required.
ADD ANOTHER SEGMENT? (Press No)
7.
DISPLAY SEGMENT TIMER ON SCOREBOARD?
8.
STOP TIME AT EACH SEGMENT?
9.
Answer the remaining questions as desired and return to normal operating mode.
4.
5.
(Press No).
(Press No).
NOTE: Using more than 1 segment or setting to a time other than a multiple of 30 seconds may yield unexpected
results.
26
Appendix
(Segment Timer)
EXAMPLE
To configure the Segment Timer for the following practice drills:
Segment #
01
02
03
04
05
06
Duration
5 minutes
10 minutes
5 minutes
45 seconds
10 minutes
4 minutes
Drill
Stretching
Shoot around
Lay-ups
Regroup
Run laps
Cool down
Make the following settings:
1. Press SET --- then OPTIONS.
2.
Answer questions as desired.
3.
When the control asks ---
4.
5.
6.
7.
8.
9.
10.
11.
12.
13.
14.
15.
16.
17.
18.
ENABLE SEGMENT TIMER? --- (Press Yes).
[ SEG 01 MM:SS ] (Press 0, press 5) (5 minutes).
[ SEG 01 05:SS ] (Press Yes). NOTE: Only significant digits are required.
ADD ANOTHER SEGMENT? (Press Yes).
[ SEG 02 MM:SS ] (Press 1). (10 minutes).
[ SEG 02 10:SS ] (Press Yes). NOTE: Only significant digits are required.
ADD ANOTHER SEGMENT? (Press Yes).
[ SEG 03 MM:SS ] (Press 0, press 5) (5 minutes).
[ SEG 03 05:SS ] (Press Yes). NOTE: Only significant digits are required).
ADD ANOTHER SEGMENT? (Press Yes).
[ SEG 04 MM:SS ] (Press 0, press 0, press 4, press 5). (45 seconds).
[ SEG 04 00:45 ] (Press Yes). NOTE: Only significant digits are required.
ADD ANOTHER SEGMENT? (Press Yes).
[ SEG 05 MM:SS ] (Press 1). (10 minutes).
[ SEG 05 1M:SS ] (Press Yes). NOTE: Only significant digits are required.
ADD ANOTHER SEGMENT? (Press Yes).
21.
[ SEG 06 MM:SS ] (Press 0, press 4). (4 minutes).
[ SEG 06 04:SS ] (Press Yes). NOTE: Only significant digits are required.
ADD ANOTHER SEGMENT? (Press No).
22.
DISPLAY SEGMENT TIMER ON SCOREBOARD?
23.
STOP TIME AT EACH SEGMENT?
19.
20.
(Press Yes).
(Press No).
24. Answer the remaining questions as desired and return to normal operating mode.
NOTE: You may want to set a BOOKMARK. (Saves current configuration and data for quick start up)
27
Appendix
(Segment Timer)
EXAMPLE
For a typical Soccer application:
A.
B.
C.
D.
E.
Main clock counts up.
Total length of game is 90 minutes.
Clock stops and horn sounds at end of first half (45 minutes).
Second half resumes with clock starting at 45 minutes.
When clock reaches 90 minutes, clock stops and horn sounds.
Make the following settings:
1. Press SET --- then OPTIONS.
2.
Answer questions as desired.
3.
When the control asks ---
4.
5.
6.
7.
8.
9.
10.
11.
12.
ENABLE SEGMENT TIMER? --- (Press Yes).
[ SEG 01 MM:SS ] (Press 4, press 5). (45 minutes).
[ SEG 01 45:SS ] (Press Yes). NOTE: Only significant digits are required.
ADD ANOTHER SEGMENT? (Press No).
DISPLAY SEGMENT TIMER ON SCOREBOARD?
STOP TIME AT EACH SEGMENT? (Press Yes).
(Press No).
CHANGE DIRECTION OF MAIN CLOCK? (Press Yes).
CLOCK TO STOP AT SPECIFIED TIME? (Press Yes).
[ SET MM:SS ] (Press 9). (90 minutes).
[ SET 9M:SS ] (Press Yes). NOTE: Only significant digits are required.
13. Answer the remaining questions as desired and return to normal operating mode.
SET then TIME then NO) --- this will leave the time unchanged (0:00)
up count ---- the display will show [ PERIOD
0 ] ( press 1).
UP ]
The control will show [ 0:00
14. To set the period to 1 --- (Press
NOTE: This would be a good place to set a BOOKMARK. (Saves current configuration for quick start up)
When the first half ends --- the clock will stop and the segment horn will sound.
SET then TIME then NO)
45:00 ---- the display will show [ PERIOD
1 ] (Press 2).
The control will show [ 45:00
UP ]
To get ready for the second half --- (Press
To start the second half --- ( Press TIME
ON).
--- this will leave the time unchanged,
NOTE: If you are using the hand held switch, turn it off then on.
When the game time expires, the clock will stop and the horn will sound.
28
Appendix
(Segment Timer)
EXAMPLE
To configure the Segment Timer for a Pre-Match Protocol for College Volleyball:
Segment #
01
02
03
04
05
06
Duration
Activity
41 minutes
Court available for shared warm-up and coin toss
04 minutes
Visiting team court
04 minutes
Home team court
05 minutes
Visiting team court
05 minutes
Home team court
01 minutes
Team huddle / Announcements
Match begins with national anthem & introductions
NOTE: Consult the rules that govern your level of play.
Make the following settings:
1. Press SET --- then OPTIONS.
2.
Answer questions as desired.
3.
When the control asks ---
4.
5.
6.
7.
8.
9.
10.
11.
12.
13.
14.
15.
16.
17.
18.
ENABLE SEGMENT TIMER? --- (Press Yes).
[ SEG 01 MM:SS ] (Press 4, press 1). (41 minutes).
[ SEG 01 41:SS ] (Press Yes). NOTE: Only significant digits are required.
ADD ANOTHER SEGMENT? (Press Yes).
[ SEG 02 MM:SS ] (Press 0), (press4). (4 minutes).
[ SEG 02 04:SS ] (Press Yes). NOTE: Only significant digits are required.
ADD ANOTHER SEGMENT? (Press Yes)
[ SEG 03 MM:SS ] (Press 0, press 4). (4 minutes).
[ SEG 03 04:SS ] (Press Yes). NOTE: Only significant digits are required.
ADD ANOTHER SEGMENT? (Press Yes).
[ SEG 04 MM:SS ] (Press 0, press 5). (5 minutes).
[ SEG 04 05:SS ] (Press Yes). NOTE: Only significant digits are required.
ADD ANOTHER SEGMENT? (Press Yes).
[ SEG 05 MM:SS ] (Press 0, press 5). (5 minutes).
[ SEG 05 05:SS ] (Press Yes). NOTE: Only significant digits are required.
ADD ANOTHER SEGMENT? (Press Yes).
21.
[ SEG 06 MM:SS ] (Press 0, press 1). (1 minute).
[ SEG 06 01:SS ] (Press Yes). NOTE: Only significant digits are required.
ADD ANOTHER SEGMENT? (Press No).
22.
DISPLAY SEGMENT TIMER ON SCOREBOARD?
23.
STOP TIME AT EACH SEGMENT?
19.
20.
(Press Yes).
(Press No).
24. Answer the remaining questions as desired and return to normal operating mode.
NOTE: You may want to set a BOOKMARK. (Saves current configuration and data for quick start up)
29
Appendix
(Segment Timer)
Troubleshooting Chart
Problem
Cause
Solution
I get tired of setting up my
segment timer.
Not using a Bookmark
When I Disable the segment
timer I lose all its settings.
When the segment timer is
disabled, all segments and
settings are cleared.
The control does not ask if I want
to disable segment timer.
This question is not asked if the
segment timer is displayed on the
scoreboard.
The control must be turned off and started fresh by entering
a model code or going to a bookmark.
I cannot insert a segment
This is not allowed.
Use the edit feature to change the segment times and add
more segments as needed. Be sure to resave the Bookmark.
I cannot remove a segment
This is not allowed.
Use the edit feature to change the segment times. Setting a
segment to 00:00 marks the end of the segment list. Be sure
to resave the Bookmark.
I cannot restart a segment
No you cannot restart a segment.
You can change the segment’s currently displayed time. As
soon as it expires, the next segment in the list is loaded.
(The original time remains unchanged.)
The time is not set to stop at each
segment.
Set the timer to stop at each segment. When a segment
expires, the horn will sound, the next segment will be
loaded, and the time will stop. When everyone is ready,
press Time On.
No extra segments have been set
up for time between drills.
Set up an extra segment, for time to get ready, for each drill.
When all segments have expired,
the segment timer automatically
starts over with segment 01.
Set up an extra segment or two at the beginning or end of
the segment list. Set these segments to a short amount of
time. The extra horns will alert of the list end.
The drills are fine, but we need
time to get ready for the next
drill.
I cannot tell when all the
segments have expired.
Set up the timer as needed, then from the Set Options menu,
save a Bookmark. When you start the control, answer Yes to
Go To A Bookmark.
If the problem persists please contact the Nevco Service Department.
800-851-4040
30
Appendix
(Segment Timer)
MY SEGMENT TIMER LIST _____________________
Segment #
Duration
Drill
31