1
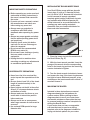
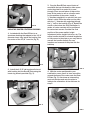
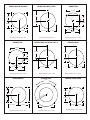
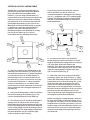
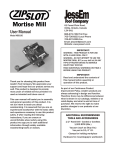
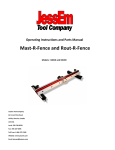
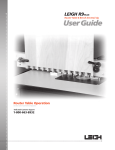
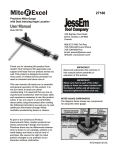
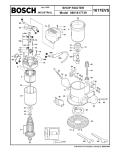
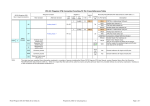
Rout R Plate
User Manual
Model #03100
61 Forest Plain Road
Orillia, Ontario, Canada
L3V 6H1
Toll Free: 1-866-272-7492
Local: 705-726-6145
Fax: 705-327-0295
Email: [email protected]
Website: www.jessem.com
Thank you for choosing this product from
JessEm Tool Company. We appreciate your
support and hope that our product serves you
well. This product is designed to provide
many years of reliable service provided it is
used as intended and taken care of.
This user manual will assist you in assembly
and general operation of this product. It is
not our intent to teach you about
woodworking. It is assumed that you are an
experienced woodworker with the basic skills
and experience necessary to use this product
safely. If after reading the following
instructions, if you are unsure or
uncomfortable about safely using this
product we urge you to seek additional
information through widely available
woodworking books or classes.
Suggested Router Bit Speeds
Bit Diameter
1” (25mm)
1-1/4” - 2” (30-50mm)
2-1/4” - 2-1/2” (55-65mm)
3” - 3-1/2” (75-90mm)
Max. Speed
24,000 RPM
18,000 RPM
16,000 RPM
12,000 RPM
IMPORTANT!
Read and understand the contents of
this manual before assembly or
operation of this product.
As part of our Continuous Product
Improvement Policy, JessEm products are
always advancing in design and function.
Therefore there may be differences between
what is shown in our catalogs, website or at
retail display and what is sold at time of
purchase. We reserve the right to make
positive changes to our products at our
discretion.
INSTALLING THE TAB-LOC INSERT RINGS
IMPORTANT SAFETY PRECAUTIONS
! Before operating any router read and
understand all safety instructions in
the owner’s manual that came with
the router.
! If you do not have a manual, contact
the manufacturer and obtain one
before using any power tool.
! Always wear eye protection in
compliance with ANSI safety
standards when operating any power
tool.
! Always use proper guards and safety
devices when operating power tools
and machinery.
! Carefully check router bits before
each use. Do not use if damage or
defect is suspected.
! Do not exceed the recommended
RPM for any router bit.
! Do not wear loose clothing or jewelry
that may catch on tools or
equipment.
! Unplug the tool or machine when
mounting or making any adjustments
to mechanical performance.
Your Rout-R-Plate comes with two phenolic
insert rings, (1) with a 2” diameter bit hole
and (1) with a 1-3/8” diameter bit hole which
is also recessed to accept a standard
template guide bushing. Additional ring sets
are available with different diameter predrilled holes and/or no pre-drilled holes for
creating your own custom centerhole
diameters. See your JessEm distributor for
these and other accessories.
FIG. 1
1. Place the insert ring into the centerhole of
the Rout-R-Plate (Fig. 1).
2. With the insert wrench provided, insert the
prongs of the wrench into the corresponding
holes in the insert ring and turn the insert ring
counter clockwise to tighten.
ROUTER SAFETY PRECAUTIONS
! Never force the bit or overload the
router beyond the expectations of the
tool.
! Be sure that at least 3/4 of the shank
length is inserted securely in the
router collet.
! Never bottom out the bit in the collet.
Allow 1/8” clearance between shank
and bottom of collet.
! Always make sure the fence on your
router table is locked into position
before each use.
! Always rout in two or more passes
when large amounts of stock must be
removed.
! Use reduced RPM speeds for large
diameter bits.
3. Turn the insert wrench clockwise to loosen
and remove the ring. If the insert ring becomes
too tight to loosen with hand pressure, a tap
clockwise on the insert wrench with a block of
wood will loosen it.
MOUNTING THE ROUTER
Included in these instructions are several
diagrams showing the bolt patterns for
various routers. Before refering to these
diagrams check to see if your router has a
removeable sub-base or base plate that can
be removed and then used as a template for
drilling the Rout-R-Plate.
If your router does not have a removeable
sub-base that can be used as a drilling
template refer to the diagrams included for
laying out the hole pattern for your router.
FIG. 2
USING THE ROUTER CENTERING BUSHING
1. Included with the Rout-R-Plate is an
aluminum bushing that adapts to the 1-3/8”
diameter insert ring. Install the bushing into
the center of the 1-3/8” insert rin (Fig. 2).
3. Prop the Rout-R-Plate up on blocks of
wood with the top side down to allow space
under the plate for a router bit to pass
through. Place a small piece of tape at the
base of the router to use as a locator mark
for the position of the router. Install a
½”diameter straight bit or spiral bit into your
router’s collet. Place the router on the plate
with the ½” diameter bit projecting through
the ½” hole in the bushing (Fig. 4). Rotate the
router so that when the final installation is
made, all router controls will be positioned
for convenient access. Consider the final
position of the power switch, height
adjustment knobs, height lock lever, etc. The
router handles should be oriented lengthwise
or kitty corner to the plate or you may wish to
remove the handles entirely for easy
insertion and removal of the plate into the
tabletop.
FIG. 3
2. Install the 1-3/8” tab-loc phenolic insert
with bushing into the Rout-R-Plate using the
insert ring wrench provided (Fig. 3).
FIG. 5
4. With the router positioned to your
satisfaction, use a pencil to trace an outline
around the base of the router onto the RoutR-Plate (Fig. 5). Also draw an intersecting
mark on the tape and onto the plate to
indicate the orientation of the sub-base for
step 5.
FIG. 4
FIG. 6
5. Remove the router and then remove the
sub-base from the bottom of the router. Then
take the sub-base and center it within the
circle you traced onto the Rout-R-Plate and
also line up the intersecting lines on the tape
and the plate to acheive the correct
orientation of the router (Fig. 6).
JESSEM TOOL LIMITED WARRANTY
All JessEm products are warranted to be free
from defects in material and workmanship.
JessEm will repair or replace any product which
upon inspection proves to be defective for a
period of (1) year from dated receipt and proof
of purchase. All warranty claims should be
made direct to JessEm Tool Company. Contact
JessEm for a warranty claim return authorization
and instructions to proceed. The consumer is
responsible for shipping costs to return product
to JessEm Tool Company. We will repair or
replace the product at our discretion and
JessEm Tool will return shipment to you at no
charge.
6. Transfer the router mounting holes onto
the Rout-R-Plate. Drill the holes and then
counter sink holes on the top side of the
plate so the bolt heads are below the surface
of the top plate.
Note: You may need to use longer bolts to
accommodate the thickness of the insert
plate. Most of the bolt sizes are indicated in
the diagrams on the following pages. Try a
local hardware store or auto parts store for
the hardware you need.
WARRANTY LIMITATIONS
This warranty does not cover:
! Repairs or alterations made or attempted by
anyone other than JessEm Tool Company or
an authorized JessEm service professional.
! Normal wear and tear
! Abuse, misuse or neglect.
! Improper care or maintenance.
! Continued use after partial failure.
! Products that have been modified in any way.
! Products used with improper accessories.
! Premature thread wear due to adjusting
height with electric or cordless drill.
FOLLOWING ARE DIAGRAMS SHOWING THE HOLE PATTERNS FOR SEVERAL
POPULAR ROUTERS. YOU CAN USE THESE DIAGRAMS AS AN ALTERNATIVE IF THE
PREVIOUS INSTRUCTIONS ARE NOT APPLICABLE TO YOUR ROUTER
BOSCH 1611 & 1615
FEIN RT-1800
BOSCH 1619
2-15/32"
BOSCH 1613 & 1450
2-3/8"
2-61/64
Plate Center
1-11/32"
1-11/64"
2-61/64
Plate Center
Plate Center
19/32
1-11/64"
1-11/32"
2-17/64
2-17/64
2-11/64
2-25/64"
Mounting Screws: 6mm x 20mm
1-17/64
2-11/64
2-15/32"
Mounting Screws: 4mm x 16mm
BOSCH 1604 & 1617EVS
DEWALT 610 & ELU 2721
DEWALT 615
3-11/32
2-1/2
1-59/64
1-23/64
Plate Center
Plate Center
Plate Center
1-15/64
1-23/64
1-59/64
2-11/64
1-59/64
1-59/64
1-43/64
2-1/32
2-11/64
3-45/64
Mounting Screws: 4mm x 16mm
DEWALT 621
Mounting Screws: #8-32 x 3/4”
Mounting Screws: 4mm x 16mm
DEWALT 624, 625 & ELU 3337-9
FREUD Ft2000
3-21/32
2-61/64
2-45/64
1-19/64
Plate Center
Plate Center
Plate Center
19/32
1-5/32
1-19/64
Kit Part No: PMD4-416
2-17/64
1-13/16
1-31/32
2-1/16
2-17/64
2-1/16
3-25/32
Mounting Screws: 4mm x 16mm
HITACHI M12V
Mounting Screws: 6mm x 16mm
HITACHI TR12
Mounting Screws: 6mm x 16mm
MAKITA 3612B, 3600
90 Typ
1-43/64
1-13/16
Plate Center
/32
3-5
1-13/16
2-37/64
Plate Center
Plate Center
s
diu
ra
1-43/64
2-37/64
1-43/64
1-43/64
approx. 4-29/64
Mounting Screws: 5mm x 16mm
Mounting Screws: 5mm x 16mm
Mounting Screws: 4mm x 16mm
MAKITA 3621BR & C
PORTER CABLE 100, 536, 690,
691, 692, 693
MILWAUKEE
90 Typ
120 Typ
1-13/16
Plate Center
Plate Center
Plate Center
us
adi
/4 r
2-3
ius
rad
/16
2-5
1-13/16
2-61/64
2-61/64
approx. 4-1/64
approx. 3-57/64
Mounting Screws: 4mm x 16mm
Mounting Screws: #8-32 x 3/4”
PORTER CABLE 518, 520, 7518,
7519, 7538, 7539
Mounting Screws: #10-24 x 3/4”
RYOBI RE-600 NEW
RYOBI 180
1-15/32
Plate Center
Plate Center
us
adi
/8 r
2-7
1-15/32
2-1/8
2-3/64
approx. 4-1/16
Mounting Screws: 5mm x 18mm
RYOBI RE-600 OLD, 500, 501
2-1/8
Mounting Screws: 5mm x 16mm
SEARS - 3 HOLE
Mounting Screws: 8mm x 20mm
SEARS - 3 HOLE
2-1/8
90 Typ
1-47/64
Plate Center
Plate Center
Plate Center
ius
ad
1-47/64
4r
3/6
4
2
s
adiu
16 r
2-9/
approx. 4-21/32
2-21/64
2-21/64
approx. 3-39/64
Mounting Screws: 4mm x 16mm
CUTTING A HOLE IN A CUSTOM TABLE
If you do not have the necessary bit or do not
wish to purchase one, we do offer a premachined template for routing the hole with the
use of ½” straight bit and a 3/4” template guide
bushing. The Routing Template is item #03003
and can be purchased through any authorized
JessEm distributor.
MP
CLA
JessEm offers a solid phenolic table top premachined to accept the Rout-R-Plate, Mast-RPlate, Rout-R-Lift FX and our Mast-R-Lift.
However, if you are using a Rout-R-Plate in a
custom table you need to machine the port in the
table top to accept the Rout-R-Plate. Following
are instructions to do so. Keep in mind that the
Rout-R-Plate dimensions are the same as our
Mast-R-Lift and Rout-R-LiftFX should you decide
to upgrade to a precision height adjustment
system in the future. We also offer a premachined template (item #03003) for routing
the hole in your table top if you are not
comfortable with the following instructions
CLA
MP
CLA
MP
MP
CLA
CL A
MP
MP
CLA
CLA
MP
MP
CLA
MP
CLA
CLA
MP
CLA
MP
MP
CLA
FIG. 7
1. Begin by positioning the Rout-R-Plate on the
table top in the exact location you prefer it to be
installed. Then position two “L” shaped templates
you can fabricate from 3/4” MDF, plywood or
particleboard so they surround the plate on all
four sides (Fig. 7). Leave no more than 1/4” gap
at the corners. Clamp the “L” shaped brackets
securely to the table top or use double sided
carpet tape. Be sure the placement of the clamps
does not interfere with routing the inside hole in
the table top.
2. Once your desired position of the Rout-R-Plate
has been secured by the template jig you can
remove the Rout-R-Plate from the table top.
3. You will need a 1-1/2” diameter pattern bit to
achieve the 3/4” radius on the corners of the
Rout-R-Plate. Several bit manufacturers offer this
bit as a mortising/planer bit with top bearing and
a 5/8” cutting length. You will be routing a groove
approximately 13/32” deep (slightly deeper than
the plate thickness of 3/8”) to allow a slight
excess of depth for plate leveling.
FIG. 8
4. You will need to remove the material in
several passes for safety and a clean cut result.
Begin by adjusting the cutting depth for making a
1/8” deep pass around the inside of the
template. Then adjust the cutting depth another
1/8” deeper to take it down to 1/4” overall. Then
adjust the cutting depth to slightly more than
3/8” for the final pass (Fig. 8).
5. Now remove the inner opening in the table
top using a jigsaw. You want to leave a ½” ledge
around the inside bottom edge of the hole for the
Rout-R-Plate to sit on. Draw a cutting line ½ inch
inside the outer edge of the groove you cut in
step 4. Drill a starting hole anywhere within the
waste area to start the jigsaw blade. Cut around
the entire perimeter along your cut line to remove
the center section and create the port for the
router to go through. This completes the process
of cutting the port for the Rout-R-Plate.
Before removing the routing template, check the
fit of the Rout-R-Plate in the new opening. If it is
too tight you can adjust one of the sections of the
template and re-rout where necessary or you can
sand the edge of the Rout-R-Plate to achieve your
desired fit. If too loose you can affix tabs/shims
along the inside edge of the opening to achieve
you desired fit.
Other Products From
JESSEM TOOL COMPANY
Mast R Lift Excel II ™
Mast R Lift™ II
Model # 02202
Model #02120
Rout R Lift™ II
Model # 02310
Clear Cut Stock Guides
Model # 04215
Tools That Make A Difference!
www.jessem.com