1
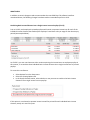
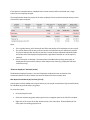
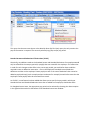
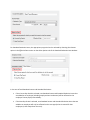
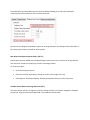
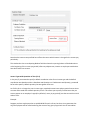
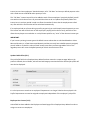
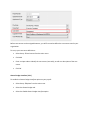
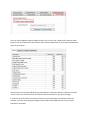
BEFORE INSTALLING THE UPGRADE
It is essential that you make backup copies of all your existing employer files before you install any
upgrade to Intercode Payroll. This will ensure that your original payroll information can be restored in
the unlikely event that the upgrade process fails to complete successfully.
Once you have copies of your existing employer files stored in a safe location you are ready to install the
upgrade.
HOW TO INSTALL THE NEW VERSION OF INTERCODE PAYROLL
There is no need to un-install your current version of Intercode Payroll before installing a newer version.
The newer version will automatically replace your current version during the installation process.
Go to the Downloads page on the Intercode web site (www.intercode.co.za/downloads.php) and click
on the link marked Download Now.
When asked whether you would like to Run or Save the file select Save. This will open a new window
allowing you to specify the location on your computer’s hard drive where you would like to save the file.
Select Desktop and then click Save.
You will now see a File Download window showing the progress of the file download. Once the file
download has been completed you can close all open windows and disconnect from the internet.
Ensure that Intercode Payroll has been closed then go to your Desktop, locate the installation file you
just downloaded and double-click the file to start the installation process. Follow the on-screen
instructions to complete the installation process.
Once the installation process has been completed, open Intercode Payroll again and select Help About from the main menu. Ensure that you product version is now V3.1. If you product version is not
V3.1 please contact the Intercode support desk for assistance.
NEW SARS EASY-FILE SOFTWARE
As of today (01 July 2008) the new SARS Easy-File software is available for download from the SARS EFiling web site (www.sarsefiling.gov.za) as well being available on CD from your local SARS branch office.
Today also marks the opening of the 2008 filing season. Employers have 60 days (unit 29 August 2008)
to submit their tax certificate information together with the new IRP501 reconciliation to SARS using the
new Easy-File software program.
Intercode Payroll V3.1 includes all the necessary updates that are required in order for you to generate
and submit your electronic tax certificate files using the new Easy-File software.
The process for generating you tax certificate files is largely unchanged from a user perspective, and in
short involves the following steps:
1. Generate your electronic tax certificate file for the 2008 tax year (IRP5.08) from Intercode
Payroll exactly as you have done in the past.
2. Download and install the Easy-File software from the SARS web site, if you have not done so
already.
3. From within the Easy-File software program, select the Import Payroll File function and select
the file you want to import (the IRP5.08 that was generated from Intercode Payroll).
4. Follow the instructions in the Easy-File user manual (available from the SARS web site) in order
to reconcile and submit your tax certificate information to SARS.
5. Once your tax certificate information (together with your IRP501 reconciliation) has been
submitted to SARS using the Easy-File software you can print your employee tax certificates and
hand them to your employees. This can be done either from Intercode Payroll (as was done in
the past), or can now also be done from within the Easy-File software.
Note on printing certificates:
Employers who wish to produce the “official-looking” tax certificates with the new 3D barcodes may
prefer to print their tax certificates from within the Easy-File software. Whether you choose to print
your tax certificates from within Intercode Payroll or from within the Easy-File software is entirely up to
you, however it makes no real difference in the end as the printed tax certificates are no longer
submitted to SARS anyway, and are purely for the employee’s own reference.
From the above process it is clear that the new Easy-File software is primarily a delivery-vehicle for
submitting your electronic tax certificate information to SARS over the internet, instead of submitting it
to a SARS office on a CD as was done in the past. Note however that employers who do not have
internet connections or who are not registered for E-Filing can still submit the encrypted tax certificate
file produced by the Easy-File software to a SARS branch office on CD.
Under no circumstances may the un-encrypted electronic tax certificate file produced by Intercode
Payroll be submitted to a SARS branch office directly. This file is intended for the sole purpose of
importing information into Easy-File.
Changing Tax Certificate Information in the Easy-File Software Program
For whichever reason, SARS has decided to allow employers to modify tax certificate information once it
has been imported into the Easy-File software program, before the information is then submitted to
SARS. Please note that though this may seem like an easy way to correct tax certificate information that
was incorrectly captured on your payroll, making such changes inside the Easy-File software program
will result in the information that you have on your payroll being different from the information that is
actually submitted to SARS. For this reason, we do not recommend making changes to your tax
certificate information once it has been imported in the Easy-File software program. If any changes to
your tax certificate information are required, you should rather make the necessary changes in the
payroll and then generate a new electronic tax certificate file (containing the correct information) from
Intercode Payroll. This new file can then be re-imported into the Easy-File software program.
Easy-File Product Support
The SARS Easy-File software is accompanied by a user manual that can be downloaded from the SARS
web site. Please note that Intercode is not the developer of the Easy-File software program (this
program was developed by SARS), and as such we cannot provide you with product support relating the
use of the Easy-File software.
For assistance with using the Easy-File software program, please contact your local SARS branch office.
WHAT’S NEW
In addition to certain changes made to accommodate the new SARS Easy-File software interfaces
mentioned above, the following changes have been made to Intercode Payroll since V3.0.
Combining Basic Income Elements into a Single Income Item on Payslips (V3.0.3)
Prior to V3.0.3, each employee’s printed payslip would contain a separate income item for each of the
individual income elements that made up the employee’s total basic salary or wage for the relevant pay
period (see example below) .
As of V3.0.3, you can now choose to either continue printing the income items on employee payslips in
this manner, or to combine these individual basic income elements into a single income item on printed
payslips.
To access this new feature:
•
•
•
Select Options from the Setup menu.
Select the Printing Options tab.
In the Payslip Content section, select whether or not you want to combine the basic income
elements into a single income item on payslips.
If this option is not selected, a separate income item will be printed for each individual basic income
element, exactly as it was in the past.
If this option is selected however, individual basic income elements will be combined into a single
income item on employee payslips.
The example below shows the payslip of the same employee from the previous example above, but this
time with this option selected:
Note:
•
•
•
This is a global setting, and if selected it will affect the payslips of all employees on your payroll.
This option affects only the way in which the basic income elements are reflected on payslips.
The payroll administrator will still see the basic income elements reflected individually under
the Income tab of the Employee Payslip window, regardless of whether or not this option is
selected.
Even if this option is selected, it is automatically overridden when printing the payslips of
employees who have no basic salary or basic wage income items (e.g. employees who earn
commission only).
“Reinstate Employee” Renamed (V3.0.4)
The Reinstate Employee function in the main Employees window has been renamed to Clear
Termination Details in order to better communicate what this function actually does.
New Report: Period Recon (By Tax Class) (V3.0.4)
A New report has been added to the Payroll section to print payroll reconciliations (by tax classification)
for individual pay periods and/or pay groups.
To access this report:
•
Go to the Payroll section.
•
Select the relevant pay group and pay period in the navigation pane to the left of the window.
•
Right-click in the centre of the Pay Periods section, then select Print Period Recon (By Tax
Class) from the resulting pop-up menu.
This report has the exact same layout as the Monthly Recon (By Tax Class) report, but only contains the
payroll information in respect of the currently selected pay group and/or pay period.
Standard Income and Deductions: Effective Date (V3.0.5)
Historically, any additions made to the Standard Income and Standard Deductions of an employee would
only be reflected in the next pay period (or payslip) that was created for the employee. This meant that
in order for such changes to take effect in the current pay period, you would often have to add the
required income or deduction items twice – first on the employee’s standard income/deduction
definitions and then on the employee’s latest payslip as well. In the case of deductions that cannot be
added to payslips directly (such as employee loan instalments for example) it would often mean that the
employee’s latest payslip had to be recreated from scratch.
As of V3.0.5, a new feature has been added that allows you to specify the pay period in which new
Standard Income and Standard Deduction items that are added to an employee, should take effect.
For Standard Income items, the appropriate pay period can be selected by choosing the relevant option
in the Effective Date section at the bottom of the Standard Income Item window:
For Standard Deduction items, the appropriate pay period can be selected by choosing the relevant
option in the Effective Date section on the Other Options tab of the Standard Deduction Item window:
In the case of both Standard Income and Standard Deductions:
•
If the Current Pay Period is selected, new Standard Income and Standard Deduction items that
are added to an employee (including employee loan instalments) will be reflected on the
employee’s latest payslip immediately.
•
If the Next Pay Period is selected, new Standard Income and Standard Deduction items that are
added to an employee will only be reflected on the next payslip that is created for that
employee (as has always been the case).
Note:
The Current Pay Period option will only be enabled if:
-
an income or deduction item of the same type does not already exist on the employee’s latest
payslip, and;
-
the employee’s latest pay period is still open
Leave Entitlement Type per Employee (V3.0.5)
Prior to V3.0.5, the Entitlement Type used to calculate employees’ entitlements to a specific leave types
could only be selected globally on the Leave Type Definition. Even though the actual entitlement (the
number of leave days per cycle) could be specified per employee, the method used to calculate the
entitlement could not. In other words, the Entitlement Type that was selected on the leave type would
be used to calculate the leave entitlements of all employees on your payroll.
However, in certain instances it is desirable to have to ability to specify different Entitlement Types for
individual employees. You may for instance want to calculate the leave entitlements of your weekly paid
employees based on the number of hours that the employees actually worked, while specifying the
leave entitlements of your monthly paid employees as a fixed number of days per cycle, regardless of
the number of hours worked.
As of V3.0.5 the Entitlement Type of each individual employee’s leave cycles can now be specified
independently of the default entitlement type of leave type definitions to which the leave cycles are
linked. This means that you can now have certain employees whose leave entitlements are specified as
a Fixed Number of Days per Cycle, and other employees whose entitlements are dynamically Calculated
Based on Time Worked.
To change the Entitlement Type of a leave cycle for an individual employee:
•
Go to the Employees section.
•
Double-click on the relevant employee to open the Employee Details window.
•
On the left-hand side of the Employee Details window, select Leave Cycles.
•
Double-click on the leave cycle for the relevant leave type to open the Leave Cycle Details
window.
•
Select the Entitlement and Accrual tab.
•
Tick the option to Use Custom Leave Entitlements.
The Entitlement Type drop-down box will then be enabled, allowing you to select the method for
calculating the leave entitlement of the relevant employee.
Note that if you change the Entitlement Type of an existing employee, the change will only take effect in
the next pay period that is created for the employee.
New Report: Employee Payment History (V3.0.5)
A New report has been added to the Employee Reports menu that shows a summary of all payslips that
have ever been issued to an employee, sorted in chronological order.
To access this report:
•
Go to the Employees section.
•
Select the relevant employee by clicking on his/her name (single click only).
•
Select Reports Employee Reports Employee Payment History from the main menu.
Variable Interest Rates on Savings and Loans (V3.1)
The rate at which interest is charged or earned on savings and loans can now be changed for individual
pay periods, using the new Interest Rate field in the Deduction Item window.
Note that the interest rate specified here affects the rate at which interest is charged in the current pay
period only.
This window also has a new Opening Balance field that shows the opening balance of the deduction as
at the beginning of the current pay period, before any adjustments, interest or employee contributions
have been taken into account.
Income Types with Quantities of Zero (V3.1)
In the past, if you wanted to specify a default contribution value for an income type and the default
contribution was based on either a Base Rate and Quantity or a Fixed Amount and Quantity, you would
be forced to specify a default quantity that was greater than zero.
As of V3.1 this is no longer the case. Income types, standard income items and pay period income items
can now all be saved with a default quantity of zero. This allows you to specify income items that you
want to appear on an employee’s payslip by default (in every in pay period), but that start with an initial
value of zero.
Example:
Suppose you have employees who are paid R100.00 for each call-out, but there is no guarantee that
any/all employees will be called out during the course of any given pay period. You can now add an
income item to these employees’ Standard Income, call it “Call Outs” and set up a default payment value
with a fixed amount of R100.00 and a quantity of zero.
This “Call Outs” income item will then be added to each of these employees’ paysips by default, but will
start with an initial value of zero. All you would then have to do is to update the quantity field of this
income item in each pay period in order to reflect the number of times that the employee was called
out, after which the income value will be calculated automatically.
If an employee had no call-outs during a specific pay period, you could simple leave the quantity as zero.
The income item will still be shown on the employee’s payslip (with a value of zero), which then also
allows the employee to see whether or not he/she was paid for any “units” of the relevant income type.
IMPORTANT:
If you have any existing income types with default income values that are calculated based on a Base
Rate and Quantity or a Fixed Amount and Quantity and that currently have a default quantity assigned,
you will need to re-check the value of these income items after you have upgraded to V3.1 as the
upgrade process will re-set the default quantity of all such income items to zero.
Updated Job Profiles (V3.1)
The Job Profile field in the Employee Setup Wizard has been moved to a separate page. When a job
profile is selected, the Job Grade, Job Level and Job Category associated with the selected job profile will
now also be displayed.
It is also important to note that an employee’s Department is no longer linked to the employee’s Job
Profile. Departments can now be assigned to employees independent of the employee’s job profile.
Employee Cost Centres (V3.1)
A New field has been added to the Employment Details page of the Employee Setup Wizard in order to
assign cost centres to employees.
Before cost centres can be assigned however, you will first need to define the cost centres used in your
organisation.
To set up your cost centre definitions:
•
Select Setup Cost Centres from the main menu.
•
Click Add.
•
Enter a unique code to identify the cost centre (cost code), as well as a description of the cost
centre.
•
Click OK.
General Ledger Interface (V3.1)
To enable the General Ledger Interface option on your payroll:
•
Select Setup Options from the main menu.
•
Select the General Ledger tab.
•
Select the Enable General Ledger Interface option.
Once you have enabled the general ledger interface, you can click the Transaction/GL Account Codes
button to set up the debit and credit account codes associated with each of the income and deductions
types on your payroll.
Note that each income type, deduction type and employer contribution has both a debit and a credit
account code, since each transaction will affect at least two accounts in your general ledger.
In order for the information in the Payroll Journal report and the Payroll Journal Export File to be
accurate, you must set up the general ledger account codes associated with each of your payroll
transactions accurately.
Notes:
•
General ledger account codes are applicable only to income types that have a cash value. Fringe
benefits for example are excluded, since there is no actual movement of funds.
•
General ledger account codes can have a maximum length of 8 characters, and may contain
numeric characters only.
ACB Export Feature Has Moved (V3.1)
The ACB Export button that used to be located on the toolbar at the top of the Payroll window has been
moved to a drop-down menu button (still in the same location).
In future, first click the Export button to display the drop-down menu, and then select ACB Payment File
from the drop-down menu.
This change will allow for the future inclusion of additional export features that will all be accessible
from the same location.
Export: Payroll Journal File (V3.1)
A New export option has been added to the Export drop-down menu button on the toolbar at the top of
the Payroll window in order to export an electronic payroll journal file from your payroll. This file can
then be imported into your accounting system at the end of each pay period.
The electronic file that is generated contains the same information as the Payroll Journal report, with
the only difference being that it contains only the totals per general ledger account code.
Note:
•
The Payroll Journal File export option will only be available if you have enabled the General
Ledger Interface option on your payroll.
•
The only export format that is currently supported is for Pastel Accounting ™. Additional layouts
will be added in the near future.
•
By default, the payroll journal file is exported in CSV format, so it can be previewed in Microsoft
Excel if required.
REPORTS
Employee Details Report (V3.1)
The Employee Details report (Reports Employee Reports Employee Details) now includes fields to
show an employee’s cost centre as well as equity group.
Payroll Journal (V3.1)
A New Payroll Journal report has been added to show the total values of income, deductions and
employer contributions grouped by general ledger account codes. This report can be used to update the
general ledger at the end of each pay period.
To access this report:
•
Go to the Payroll section.
•
Select the relevant pay group and pay period in the navigation pane to the left of the window.
•
Right-click in the centre of the Pay Periods section, then select Print Payroll Journal from the
resulting pop-up menu.
Note:
•
This report can only be printed for one pay group and/or pay period at a time. If you have more
than one pay group on your payroll, the report must be printed for each pay group individually.
•
This report will only be available if you have enabled the General Ledger Interface option on
your payroll.
BUG FIXES
Under certain circumstances the IRP5 validation routine would incorrectly produce a warning message
stating that the combined total of codes 4101 and codes 4102 did not match the total of code 4103. This
error was caused by inconsistencies relating to the rounding of fractional cents in the IRP5 export file
and has now been resolved (V3.0.2).
For employees who are 65 years or older, the IRP5 validation routine would incorrectly produce a
warning message stating that the value of code 4025 (tax deductible medical aid contributions) could
not be greater than the value of code 4486 (medical aid capped amount). However, this rule should not
have been applied to employees who are 65 years or older, and this has now been fixed (V3.0.3).
The new database system that was introduced in V3.0 also introduced a bug that caused the deduction
contributions of certain employee’s to be excluded from the Beneficiary Payment Amounts report if the
relevant employee’s total monthly contribution amounted to less than one Rand. This issue has been
resolved (v3.0.3).
Attempting to delete future-dated leave records from an employee’s Pending Leave would sometimes
cause an error message (Record Not Found) to be displayed. This issue has now been resolved (V3.0.6).
When printing the UI19 report, the employer’s PAYE reference number would not be printed on the
report if the employer type was defined as a Small Business Corporation. This has now been resolved
(V3.0.6).
The validation routine used to validate PAYE reference numbers has been updated to include reference
numbers starting with “700”. Previously these numbers would have been flagged as being invalid
(V3.0.6).
End of Release Notes
If you have any questions regarding the features included in this release, or if you have any trouble
installing the upgrade, please contact the Intercode support desk on 0861 113523 for assistance.
Kind regards,
Intercode Business Solutions