1
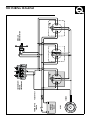
REV 003
nautical equipment evolution
CHAIN COUNTER
CHC 1202 M
GB
User’s Manual
CHAIN COUNTER CHC 1202 M
GB
INDEX
Pag. 4
CHARACTERISTICS AND INSTALLATION
Pag. 5
INSTALLATION - Installing the laps sensor
Pag. 6
INSTALLATION - Installing the magnet - Installing the sensor
Pag. 7
INSTALLATION - Installing the chain counter
Pag. 8
INSTALLATION - Panel-mounting - Installing the chain counter behind the panel
Pag. 9
INSTALLATION - Electric connections
Pag. 10
INSTALLATION - Installing the terminals
Pag. 11
INSTALLATION - Chain counter calibration
Pag. 12
CHAIN COUNTER OPERATION - Main window
Pag. 13
CHAIN COUNTER OPERATION - Windlass electric drive
Pag. 14
CHAIN COUNTER OPERATION - Monitoring
Pag. 15
SETTING THE CHAIN COUNTER - The structure of the menus
Pag. 16
SETTING THE CHAIN COUNTER - Settings menu - Counter reset / Functions
Pag. 18
SETTING THE CHAIN COUNTER - Settings menu - Personal set
Pag. 19
SETTING THE CHAIN COUNTER - Settings menu - Date and time
Pag. 20
SETTING THE CHAIN COUNTER - Settings menu - Language / Calibration
Pag. 22
SETTING THE CHAIN COUNTER - Settings menu - Automatic calibration
Pag. 23
SETTING THE CHAIN COUNTER - Settings menu - Utility
Pag. 25
SETTING THE CHAIN COUNTER - Settings menu - CAN configuration
Pag. 26
SYSTEM ERRORS AND FAULTS
Pag. 29
MAINTENANCE - TECHNICAL DATA
GB
CHARACTERISTICS AND INSTALLATION
CHAIN COUNTER CHC 1202 M
Our vast experience in the world of sailing has allowed us to design and develop the chain counter
CHC 1202 M whose performance is widely superior to those of similar instruments available on
today’s market. The chain counter CHC 1202 M allows the windlass to be activated to get the anchor
aweigh or lower the anchor providing the exact measure of the chain lowered.
Other important advantages which the chain counter offers, are:
• Simple user-friendly interface.
• Information displayed in 5 different languages.
• Automatic lowering function.
• Up alarm function.
• Chain speed displayed.
• Supply voltage displayed.
• Equipped with clock/calendar.
• Depth of chain lowered shown in meters or feet.
• Graphic LCD display screen that can be easily read at various angles.
• Backlight display screen with 8 brightness levels.
• 8 different display contrast levels can be set.
• Automatic display contrast compensation according to environmental temperature.
• Universal power supply (12/24Vdc).
• Backlight illuminated function keys.
• CAN BUS interface for data transfer.
• Capable of operating in a wide range of ambient temperatures.
• Water-proof housing
• Can be installed behind the panel.
INSTALLATION
BEFORE ATTEMPTING TO USE THE CHAIN COUNTER CAREFULLY READ AND BECOME FAMILIAR
WITH THE CONTENTS OF THIS USER’S MANUAL. IF IN DOUBT, CONTACT YOUR NEAREST DEALER
OR QUICK® CUSTOMER SERVICE.
The Quick® chain counter has been designed and constructed solely for the tasks and purposes
given in this User’s manual. Quick® company shall not be held responsible for any direct or indirect
property damage caused by inappropriate use of the chain counter, incorrect installation or possible
errors present in this manual.
THE OPENING OF THE CHAIN COUNTER BY UNAUTHORIZED PERSONNEL MAKES THE
WARRANTY VOID.
THE PACKAGE CONTAINS: chain counter (and cover) - laps sensor kit - snap-on connector (to be
used for connection to output terminals) - 150 ohm terminator - gasket - stud bolts and nuts for
mounting - drilling templates - warranty card - this user’s manual.
4
INSTALLATION
GB
INSTALLING THE LAPS SENSOR
Chain counter installation takes place in three steps: installation of the laps sensor on the windlass,
mounting of the chain counter and electrical connections.
Quick® windlasses
All Quick® windlasses come with a laps sensor suitable for use with chain counter CHC 1202 M.
Other windlasses
In order for the chain counter to measure the exact length of the chain, it has to count the number of
revolutions completed by the gear that drives the chain (gypsy). A laps sensor kit is supplied with the
chain counter. This kit includes a cylindrical magnet, a magnetic field sensor and two plastic adaptors
to be used to secure the sensor in place. The magnet is to be secured to the gypsy while the magnetic sensor is to be fixed to the windlass base.
The standard installation procedure is described below. Unfortunately we cannot describe a procedure applicable to all types of situation. Adapt this procedure to satisfy your own individual requirements.
EXAMPLES OF LAPS SENSOR INSTALLATION
vertical windlasses
1
MAGNET
2
SENSOR
3
ADAPTOR
4
ADAPTOR
1
Max. 10 mm
3
2
horizontal windlasses
± 20°
Max. 10 mm
1
2 4
Ideal
installation
2
Maximum
removal
5
GB
INSTALLATION
INSTALLING THE MAGNET
Take the gypsy off the windlass (consult the user’s manual that deals with the windlass). Find the
spot most suitable for the magnet housing based on the following criteria:
• The magnet should not be installed in an area that the chain passes through (outer areas).
• The location should be preferably made in the area where the gypsy is thickest (in order not to
weaken the structure).
• Regarding horizontal windlasses, make sure it is located near the edge of the gypsy.
• Regarding vertical windlasses, make certain the sensor is installed on the base at the circumference “traced” by the magnet.
• The magnet can protrude from the gypsy; make certain it does not interfere with the base or sensor.
• The magnet should be as close to the sensor as possible.
Once the hole has been drilled, glue the magnet inside it. Make sure the glue covers the part of the
magnet still visible. Use glue designed for metals, resistant to brackish ambients and capable of withstanding temperatures ranging from –30 to +80 °C. Generally speaking, epoxy-based bi-component
glues satisfy these requirements.
Several magnets can be installed on the same gypsy to increase the precision with which the chain
counter reads (not provided). Place any additional magnets around the same circumference equally
spaced apart.
INSTALLING THE SENSOR
Locate the most suitable position to secure the sensor to the base according to the following criteria:
• The sensor should not be installed in an area that the chain passes through.
• If holes are made in the base, make sure they do not interfere with normal operation, do not
weaken the structure or cause lubricant to flow out (windlasses with oil-bathed gears).
• Regarding vertical windlasses, make certain the sensor can be installed on the base at the circumference “traced” by the magnet.
• The magnet should be as close to the sensor as possible.
Use the plastic adaptors provided to secure the sensor. Use a sheath to protect the sensor cables.
Once installed, make sure the laps sensor works properly. Place the gypsy so that the magnet is
aligned with the sensor and check electrical continuity between the two sensor cables. When the
magnet is moved away from the sensor electrical continuity should no longer be present.
6
INSTALLATION
GB
INSTALLING THE CHAIN COUNTER
The standard installation procedure is described below.
Unfortunately we cannot describe a procedure applicable to all types of windlasses.
Adapt this procedure to satisfy your own individual requirements.
Find the spot most suitable for the chain counter based on the following criteria:
• The chain counter should be in a position where the operator can easily read it.
• Choose a clean, smooth and flat surface.
• The operator must be able to access the chain counter from the back for installation and maintenance.
• Enough space should be present behind the spot selected where the back of the chain counter
and connectors are to be placed (space for the entire chain counter if installed behind the panel).
• The back of the chain counter should be protected against humidity or water contact.
• Pay careful attention when drilling holes in the panels or parts of the boat. These holes must not
weaken the boat framework or cause cracks.
• When installing the chain counter off the panel, the maximum allowable thickness of the surface is
20 mm (with the stud bolts provided).
• When installing the chain counter behind the panel the maximum allowable thickness of the surface is 4 mm.
The chain counter meets standard EMC (electromagnetic compatibility).
In any case correct installation is fundamental in order not to affect its performance or interfere with
operation of instruments found near it.
For this reason the chain counter must be at least:
•
•
•
•
•
25 cm away from the compass.
50 cm away from any radio receivers.
1 m away from any radio transmitters (except for SSB).
2 m away from any radio transmitters SSB.
2 m away from the path of the radar beam.
7
GB
INSTALLATION
Panel-mounting
Once the mounting position has been selected, follow
the directions given below:
• Place the drill template (provided) on the surface
where the chain counter will be installed.
• Mark the center of each hole.
• Drill the holes for the stud bolts with a 5 mm twisted
drill.
• Drill the hole for the back of the chain counter with
a 56 mm diameter milling cutter.
• Remove the template and any cutting burrs present
at the holes.
• Screw the stud bolts into the back of the chain
counter.
• Put the gasket in place on the chain counter.
• Put the chain counter into place.
• Tighten the two nuts provided to secure the chain
counter to the panel.
Installing the chain counter behind the panel
Once the position of the chain counter has been selected, follow the steps given below:
• Take off the chain counter frame as shown in the
figure below.
• Put the drilling template (provided) in the area
where the chain counter will be installed.
• Mark the center of each hole.
• Drill the holes for the side keys with a 10 mm twisted
drill.
• Drill the hole for the middle key with a 7 mm twisted
drill.
• Make the rectangular opening for the chain
counter’s display screen.
• Remove the template and any cutting burrs present
at the holes.
• Secure the chain counter to the panel with two
brackets (not provided).
• Make sure the chain counter’s keys move in a
trouble-free manner (they should not be obstructed
or get stuck).
8
INSTALLATION
GB
ELECTRIC CONNECTIONS
The chain counter meets standard EMC (electromagnetic compatibility). In any case correct installation is fundamental in order not to affect its performance or interfere with operation of instruments
found near it.
For this reason the chain counter must be at least:
• 1 m away from cables that transmit radio signals (except for SSB radio transmitters).
• 2 m away from cables for SSB radio transmitter signals.
Follow the safety precautions and directions given below when making the electrical circuit of the
chain counter:
• Turn on power to the chain counter only after having effected and verified that all the electric
connections are correct.
• Use the snap-on connectors provided to connect the cables to the chain counter.
• Install a switch to turn on and shut off the chain counter; make sure the switch is in a position that
can be easily reached so that, in the event of an emergency, the chain counter can be quickly shut
off.
• Install a 4A fast fuse in the chain counter’s power supply line.
• The cross-section of the solenoid/reversing solenoid unit and chain counter’s power supply cables
should be adequately sized according to the length of the cables.
• Do not run the chain counter on power delivered from the motors’ batteries.
• Use an unscreened cable with twisted pair (cross-section area 0.25/ 0.35 mm2 AWG 22/24, impedance 100/150 ohm) for the data interface connection (CANH and CANL signals).
• The data cable should not be more than 100 meters long.
• The boat’s electrical system should allow other switches to operate the windlass.
THE WIRING DIAGRAM
UP
SOLENOID UNIT/
REVERSE
SOLENOID UNIT
WINDLASS
OPERATE SWITCH
DOWN
UP
POWER SUPPLY
SWITCH
DOWN
FUSE
4A FAST
CA
NL
CAN H
UP
DOWN
R
SO
SEN
CA
NL
R
SO
SEN
CAN H
CA
NL
R
SO
SEN
UP
DOWN
150
CAN H
150
BATTERY
12/24 V
UP
DOWN
GYPSY
SENSOR
9
GB
INSTALLATION
INSTALLING THE TERMINALS
In order for data to be correctly transmitted when several chain counters are employed, terminator
(150 ohm) must be installed.
The terminator should be connected between signals CANH and CANL of the first and last chain
counter included in the network, as illustrated in the figure below:
150
CA
NL
R
SO
SEN
CA
NL
R
SO
SEN
CA
NL
R
SO
SEN
1
CAN H
CAN H
CAN H
CA
NL
CAN H
R
SO
SEN
UP
DOWN
UP
DOWN
UP
DOWN
2
UP
DOWN
3
4
150
UP
DOWN
19
INSTRUMENTS
FROM 5 TO 16
UP
DOWN
18
Do not install the terminator if just one chain counter is used.
10
CA
NL
R
SO
SEN
CA
NL
R
SO
SEN
CA
NL
R
SO
SEN
20
CAN H
CAN H
CAN H
CAN H
CA
NL
R
SO
SEN
UP
DOWN
UP
DOWN
17
INSTALLATION
GB
CHAIN COUNTER CALIBRATION
Before using the chain counter, either the manual or automatic calibration procedure has to be effected.
The calibration procedure consists of setting the following data: unit of measurement used by the
chain counter, lenght of chain unwound each gypsy lap and number of magnets installed on the gypsy.
To calibrate, go to menu CALIBRATION or AUTO CALIBRATE (see chapter SETTING THE CHAIN COUNTER).
MULTIPLE CHAIN COUNTERS
The chain counter is equipped with a CAN BUS data interface that allows several chain counters to be
connected and information to be exchanged (CAN network).
A MASTER/SLAVE network structure is used, i.e. there is only one main chain counter (MASTER) and all
the other chain counters are secondary (SLAVE). The network must have at least one MASTER chain
counter.
The task of the MASTER chain counter is to align the length of the chain lowered and operating parameters of all the SLAVE chain counters. The MASTER therefore is used as a reference for all the other
SLAVE chain counters.
If a parameter in a menu for a SLAVE chain counter is modified, the change is actually made to the
MASTER chain counter that will automatically update all the SLAVE chain counters (except for menu
PERSONAL SET, UTILITY and CAN CONFIG that cointain particular functions and parameters for every
single chain counter not shared in network with the other chain counters).
The MASTER chain counter should be on even if the commands to the windlass are transmitted from
SLAVE chain counters or other windlass operation switches.
If the MASTER chain counter should malfunction, one of the SLAVE chain counters can be set up as the
MASTER.
Before using the chain counters on the CAN network, make sure the MASTER and SLAVE settings of all
the chain counters are correct and that the network works in a trouble-free manner.
11
GB
CHAIN COUNTER OPERATION
CHAIN COUNTER OPERATION
Three elements are employed between user and counter interface:
A GRAPHIC DISPLAY SCREEN, CONTROL KEYS AND BUZZER.
The display screen shows the measure of chain lowered, state of the
chain counter along with other information.
The control panel comes with three keys. The two largest keys are used to
move the anchor up (5,UP key) or down (6,DOWN key), move within the
system menus or modify the value of parameters.
The middle key (=SELECT) is used to select the monitoring mode, go to the system menus or confirm
parameters.
The buzzer signals when the keys have been pressed or when it is necessary to call the user’s
attention. Use the switch on the power supply line to turn the chain counter on and off.
When the chain counter is turned on, the following window is displayed for a few seconds:
CHC1202M
S/N :
XXXXX/YYZZ
Where XXXXX is the serial number, YY is the week of production and ZZ
is the year the chain counter was produced.
When the chain counter is turned on the first time, the menu used to
select the language in which messages are displayed appears. The
selected language can be changed later on.
MAIN WINDOW
Once the initialization procedure has been completed, the main window is displayed:
State line
Icon area
Count line
Monitor line
WED
JAN
Measure unit area
This window is divided into the following sections:
Count line
The length of the chain lowered is shown in this area.
Measure unit area
The unit of measurement currently being used is shown in this area. The values may be displayed in
“M” for meters and “FT” for feet.
State line
Messages regarding the state of the chain counter or faults detected are shown here.
Icon area
The icons regarding the state of the chain counter or faults detected are shown here.
Monitor line
The following information may be displayed here, depending on the selections made by the user: date
and time, supply voltage and chain speed.
12
CHAIN COUNTER OPERATION
GB
WINDLASS ELECTRIC DRIVE
Getting the anchor aweigh
To get the anchor aweigh press key 5 (UP). Hold the key pressed until
the anchor reaches the desired position and then release it.
While moving up, the chain counter displays a window similar to the one
shown below:
CHAIN UP
SPEED
82 M / M
It is also possible to get the anchor aweigh with an other electric control.
The chain counter will measure the length of the chain lowered in any case.
Lowering the anchor
To lower the anchor press key 6 (DOWN). Hold the key pressed until the
anchor reaches the desired position and then release it.
While moving down, the chain counter displays a window similar to the
one shown below:
CHAIN DOWN
SPEED
82M / M
It is also possible to lower the anchor with an other electric control. The chain
counter will measure the length of the chain lowered in any case.
Automatic down function
This function can be used only if it was previously set and activated on the FUNCTIONS\AUTO DOWN
menu (see chapter SETTING THE CHAIN COUNTER).
ATTENTION: regular operation of the windlass has to be checked when moving down automatically
To lower the anchor automatically to the set depth, press keys = (SELECT) and 6 (DOWN) simultaneously for more then three seconds. Once
the procedure has started, both keys can be released.
The chain counter will lower the anchor to the set depth.
While moving down automatically, the chain counter displays a window
similar to the one shown below:
AUTO DOWN
SPEED
82 M / M
The automatic lowering procedure can be interrupted by pressing any key of the chain counter from
which the procedure was activated, by activating the up function from an external device (from another chain counter or other control) or by shutting off the chain counter.
13
GB
CHAIN COUNTER OPERATION
Free fall
At times the anchor may have to be lowered by wanting the windlass to free fall (without electrical
command).
The chain counter will measure the length of the chain lowered under these circumstances as well. A
window similar to the one shown below appears during free fall:
FREE FALL
SPEED
82 M / M
MONITORING
The information shown on the monitor line can be changed by pressing and releasing key =
(SELECT) in less than one second.
The following data can be displayed: date and time, supply voltage and chain speed.
The date and time are stored even when the chain counter is shut off (it is equipped with a buffer
battery).
The precision of the supply voltage reading is ± 2% while the chain speed reading is ±1% accurate.
STOP
MON
30 SEP
15:32
STOP
BATTERY
12.8V
STOP
SPEED
14
0 M/M
SETTING THE CHAIN COUNTER
GB
SETTING THE CHAIN COUNTER
The chain counter has a several functions that can be personalized to satisfy user’s requirements. To go to the setting menu, press and release key =
(SELECT) for more than 3 seconds. As soon as the key is released a window
similar to the one shown below is displayed:
SETTINGS
COUNTER RESET
FUNCTIONS
PERSONAL SET
DATE AND TIME
LANGUAGE
CALIBRATION
Use keys 5 and 6 (UP and DOWN) to select the data items within the menu.
The data item that has been currently selected appears in reverse. Use key =
(SELECT) to confirm the selected data item.
The following data items are provided on the settings menu, with the MASTER chain counter present
on the network:
DATA ITEM
SYNTHETIC DESCRIPTION
COUNTER RESET
FUNCTIONS
PERSONAL SET
DATE AND TIME
LANGUAGE
CALIBRATION
AUTO CALIBRATE
UTILITY
CAN CONFIG
EXIT
Measure of chain lowered reset.
Automatic down and up alarm setting.
Chain counter personalization: contrast, back-lighting, light delay, key beep
System date and time setting
Language used for system messages
Chain counter calibration: unit of measurement, number of magnets installed, gypsy lap
Automatic chain counter calibration
Various chain counter controls
MASTER/SLAVE setting if more than one chain counter is used
Chain counter set-up menu exit
The structure
of the menus
COUNTER RESET
FUNCTIONS
UP ALARM
AUTO DOWN
PERSONAL SET
DATE AND TIME
LANGUAGE
CONTRAST
LIGHT
LIGHT DELAY
KEY BEEP
ENGLISH
ITALIANO
FRANCAIS
DEUTSCH
ESPANOL
CALIBRATION
AUTO CALIBRATE
UTILITY
SET MEASURE
GYPSY LAP
MAGNETS NUMBER
SENSOR TEST
LCD TEST
CLOCK BATTERY
SW VERSION
CAN CONFIG
SET DEFAULT
CHECK FLASH
CHECK EEPROM
EXIT
CAN MESSAGE
15
GB
SETTING THE CHAIN COUNTER
If a SLAVE chain counter is being used without the MASTER in the CAN network, the following “reduced” settings menu will be displayed:
SETTINGS
PERSONAL SET
UTILITY
CAN CONFIG
EXIT
These submenus have particular parameters and functions for every
single counter which can not be shared with other chain counters
present on the CAN network.
COUNTER RESET
SETTINGS MENU - COUNTER RESET
Use this option to reset the measure of chain lowered.
This option is to be used during installation or when the chain counter’s reading does not match the actual length of the chain lowered.
When this data item is selected, the following window is displayed:
ARE YOU SURE?
YES
NO
YES or NO can be selected.
Used to select the values available.
Confirm entry and go back to SETTINGS menu.
FUNCTIONS
UP ALARM
AUTO DOWN
EXIT
SETTINGS MENU - FUNCTIONS
Use this option to activate and set the up alarms and automatic
down. The sub-menu of the FUNCTIONS option is shown below:
Used to select the data items in the sub-menu.
Press this key to go to the menu shown in REVERSE; if used to EXIT
the system goes back to the SETTINGS menu.
SETTINGS MENU - FUNCTIONS - UP ALARM
Use this option to set or disable the up alarm. This function stops the anchor from moving up and
informs the user when the length of the chain lowered is less than the set value.
ATTENTION: the up alarm function is active only by using a chain counter CHC 1202 M controls when the anchor moves up. It does not function if the anchor is moved up by any other
remote control or a switch.
ATTENTION: the chain counter is not able to compensate for mechanical inertia of the windlass (the gypsy can rotate upward direction as soon as the command has been inactivated).
Take this factor into consideration when setting the up alarm value.
ATTENTION: the alarm is displayed only once, if the chain measure lowered than the alarm
threshold.
16
SETTING THE CHAIN COUNTER
GB
ATTENTION: leven if the up alarm is enabled, the user must always pay careful attention and
make sure the anchor is correctly pulled up.
Examples of the windows used for the up alarm are shown below:
UP ALARM
SET VALUE:
OFF
UP ALARM
SET VALUE:
1.0 M
default: OFF
If the unit of measurement is set to METERS , the settable values are
OFF, 1.0M, 1.5M, 2.0M, 2.5M, 3.0M, 3.5M, 4.0M, 4.5M, 5.0M.
If the unit of measurement is set to FEET, the settable values are
OFF, 3.0F, 4.5F, 6.0F, 7.5F, 9.0F, 10.5F, 12.0F, 13.5F, 15F.
Increase
Decrease
Confirm value and go back to FUNCTIONS menu.
SETTINGS MENU - FUNCTIONS - AUTOMATIC DOWN
The automatic down function is enabled or disabled with this option. This function allows the anchor
to automatically move down to the set depth (see chapter CHAIN COUNTER OPERATION paragraph
AUTOMATIC DOWN FUNCTION).
ATTENTION: the chain counter is not able to compensate for mechanical inertia of the
windlass (the gypsy can rotate downward direction as soon as the command has been
inactivated). Take this factor into consideration when setting the automatic down value.
ATTENTION: even if the automatic down function is enabled, the user must always pay
careful attention and make sure the anchor is correctly lowered.
AUTO DOWN
SET VALUE:
OFF
AUTO DOWN
SET VALUE:
5M
Examples of the windows used for the automatic down function are
shown below:
default: OFF
If the unit of measurement is set to METERS, the settable values are
OFF, from 5M to 100M with 5M steps.
If the unit of measurement is set to FEET, the settable values are OFF,
from 15T to 300F with 15F steps.
Increase
Decrease
Confirm value and go back to FUNCTIONS menu.
17
GB
SETTING THE CHAIN COUNTER
PERSONAL SET
CONTRAST
LIGHT
LIGHT DELAY
KEY BEEP
EXIT
SETTINGS MENU
PERSONAL SET
This option allows the user to enable and set several functions to
personalize the chain counter.
The PERSONAL SET sub-menu is shown below.
Selects the data items in the sub-menu.
Press this key to go to the menu shown in REVERSE; if EXIT has
been selected the system goes back to the SETTINGS menu.
SETTINGS MENU - PERSONAL SET
CONTRAST
Use this option to adjust the contrast of the LCD. The change is immediately made without having to confirm the value.
CONTRAST
SET VALUE:
4
Selectable values: 1, 2, 3, 4, 5, 6, 7, 8. (default: 4).
Increase
Decrease
Confirm value and go back to PERSONAL SET menu.
LIGHT
SET VALUE:
4
SETTINGS MENU - PERSONAL SET
LIGHT
Use this option to adjust the back-lighting of the display screen.
The brightness is immediately changed without having to confirm
the value.
Selectable values: OFF,1, 2, 3, 4, 5, 6, 7, 8. (default: 4).
Increase
Decrease
Confirm value and go back to PERSONAL SET menu.
18
SETTING THE CHAIN COUNTER
LIGHT DELAY
SET VALUE:
GB
SETTINGS MENU - PERSONAL SET
LIGHT DELAY
Use this option to set the delay time for shutting off the back-lighting
of the display screen. The delay time starts to elaps as soon as the
last key is released (or when FREE FALL is completed).
Selectable values: 30S, 60S, 90S, 120S, 180S, 240S, ON
(always on). (default: 30S).
30S
Increase
Decrease
Confirm value and go back to PERSONAL SET menu.
SETTINGS MENU - PERSONAL SET
KEY BEEP
Use this option to activate or deactivate the beep that sounds whenever a key is pressed.
KEY BEEP
SET VALUE:
YES
NO
Selectable options: YES and NO. (default: YES).
Select the values available.
Confirm value and go back to PERSONAL SET menu.
DATE AND TIME
SETTINGS MENU
DATE AND TIME
Use this option to set the clock and calendar.
The DATE AND TIME window appears as follows:
SET VALUE:
2003 JAN 03
00:00
EXIT
Increase
Decrease
Confirm value and go to next parameter; if EXIT has been selected
the system goes back to SETTINGS menu.
19
GB
SETTING THE CHAIN COUNTER
SETTINGS MENU
LANGUAGE
Use this option to select the language in which the system messages are displayed.
The LANGUAGE sub-menu appears as shown below.
LANGUAGE
ENGLISH
ITALIANO
FRANCAIS
DEUTSCH
ESPANOL
Select the data items.
Confirm value and go back to SETTINGS menu.
CALIBRATION
SET MEASURE
GYPSY LAP
MAGNETS NUMBER
EXIT
SETTINGS MENU
CALIBRATION
Use this option to calibrate the chain counter according to the windlass it is mounted on.
The CALIBRATION sub-menu appears as follows:
Select the data items in the menu.
Confirm value and go to next parameter; if EXIT has been selected
the system goes back to SETTINGS menu.
SETTINGS MENU - CALIBRATION
SET MEASURE
Use this option to select the unit of measurement relative to measurement of chain lowered.
SET MEASURE
SET VALUE:
METERS
FEET
Selectable options: METERS or FEET. (default: METERS).
Select the values available.
Confirm value and go back to CALIBRATION menu.
20
SETTING THE CHAIN COUNTER
GB
SETTINGS MENU - CALIBRATION - GYPSY LAP
Use this option to set the measurement of the chain in one gypsy lap. To obtain this value, remove
the gypsy, wind the chain around it and then measure its length.
GYPSY LAP
Consult the User’s
manual of the windlass
for more detailed
instructions on how to
remove and re-install
the gypsy.
It is extremely important that the value set for GYPSY LAP is precise as it affects the
accuracy with which the length of the lowered chain is measured
GYPSY LAP
SET VALUE:
10.0 INC
If the unit of measurement is set to FEET, the settable values are
from 1.0 to 999.0 inc (default: 10 inc).
GYPSY LAP
SET VALUE:
10.0 CM
If the unit of measurement is set to METERS, the settable values are
from 1.0 to 999.9 cm (default: 10 cm).
Increase
Decrease
Confirm value and go back to CALIBRATION menu.
MAGNETS NUMBER
SETTINGS MENU - CALIBRATION - NUMBER OF MAGNETS
Use this option to set the number of magnets installed on the gypsy.
SET VALUE:
1
Selectable Values: 1 to 16. (default: 1).
Increase
Decrease
Confirm value and go back to CALIBRATION menu.
21
GB
SETTING THE CHAIN COUNTER
AUTO CALIBRATE
SET VALUE:
METERS
FEET
SETTINGS MENU - AUTOMATIC CALIBRATION
Use this option to automatically calibrate the chain counter.
The first window regarding AUTOMATIC CALIBRATION is shown
below:
Use this option to select the unit of measurement used to measure
the chain lowered. Selectable values: METERS or FEET.
EXIT
Select the values available.
Confirm value and go to next window for AUTOMATIC CALIBRATION
procedure, if EXIT is selected the system goes back to menu SETTINGS.
AUTO CALIBRATE
PRESS
UNTIL 6M
DEPTH
PRESS
TO EXIT
AUTO CALIBRATE
PRESS
UNTIL 20FT
DEPTH
This window tells the user the chain has to be lowered 6 meters (or
20 feet, depending on the unit of measurement selected) in an uninterrupted manner. The length of the chain unwound each lap can be
calculated according to the number of laps completed by the gypsy
(counted by the chain counter).
PRESS
TO EXIT
Not active
Chain down; it counts the number of gypsy laps.
Cancel procedure and go back to SETTINGS menu.
Once key 6 (DOWN) is released the chain counter will stop the chain from moving down and automatically set the following values:
GYPSY LAP
CM=600/number of laps counted
NUMBER OF MAGNETS=1
GYPSY LAP
CM=240/number of laps counted
NUMBER OF MAGNETS=1
After which the following window will be displayed for two seconds:
AUTO CALIBRATE
END OF
PROCEDURE
22
And the SETTINGS menu will be shown again.
SETTING THE CHAIN COUNTER
UTILITY
SENSOR TEST
LCD TEST
CLOCK BATTERY
SW VERSION
SET DEFAULT
CHECK FLASH
UTILITY
SW VERSION
SET DEFAULT
CHECK FLASH
CHECK EEPROM
CAN MESSAGE
EXIT
GB
SETTINGS MENU
UTILITY
This option allows the user to perform procedures to check and control the chain counter operation.
The UTILITY sub-menu appears as shown below:
Select data items from sub-menu
Press this key to go to the menu shown in REVERSE; if EXIT has been
selected the system goes back to the SETTINGS menu.
SENSOR TEST
SENSOR STATUS:
ON
SENSOR TEST
SETTINGS MENU - UTILITY
SENSOR TEST
This function can be used during installation or to check that the lap
sensor works properly. If the sensor detects the magnet, ON is displayed and the buzzer sounds; otherwise OFF is displayed and the
buzzer does not sound.
SENSOR STATUS:
OFF
Go back to UTILITY
SETTINGS MENU - UTILITY -LCD TEST
This function can be used to check correct operation of the LCD display’s pixels.
Once the data item has been confirmed from the utility menu, all the display pixels will be activated
for 5 seconds; after which the system will go back to menu UTILITY.
CLOCK BATTERY
CLOCK BATTERY
X.XX VDC
SETTINGS MENU - UTILITY
CLOCK BATTERY
This function displays the voltage of the clock’s buffer battery.
Go back to UTILITY menu.
23
GB
SETTING THE CHAIN COUNTER
SETTINGS MENU - UTILITY
SW VERSION
This function displays the software version installed in the chain
counter.
SW VERSION
SW VERSION
VX.X
Go back to UTILITY menu.
SET DEFAULT
ARE YOU SURE?
YES
NO
SETTINGS MENU - UTILITY
SET DEFAULT
This function allows the user to enter the default values and restart
the chain counter.
The SET DEFAULT window appears as shown below:
YES or NO can be entered.
Select data items from sub-menu.
Confirm value.
SETTINGS MENU - UTILITY
CHECK FLASH (PROGRAM MEMORY)
This function shows the calculated FLASH memory checksum (SUM)
and the one stored during production (TRUE).
CHECK FLASH
CHECK FLASH
TRUE:
XXXX
SUM:
YYYY
In order for the chain counter to operate properly the two values
must match.
Go back to UTILITY menu.
24
SETTING THE CHAIN COUNTER
GB
SETTINGS MENU - UTILITY
CONTROL EEPROM (DATA MEMORY)
This function shows the calculated EEPROM memory checksum
(SUM) and the one stored (TRUE).
CHECK EEPROM
CHECK EEPROM
TRUE:
XXXX
SUM:
YYYY
In order for the chain counter to operate properly the two values
must match.
Go back to UTILITY menu.
CAN MESSAGE
TX MSG:
RX MSG:
LAST ID:
CAN UPD:
000
000
000
000
SETTINGS MENU - UTILITY
CAN MESSAGE
This function shows some information regarding CAN messages
transmission state.
Go back to UTILITY menu.
SETTINGS MENU
CAN CONFIGURATION
This option allows the user to determine chain counter’s priority in
the CAN network (see chapter MULTIPLE CHAIN COUNTERS).
CAN CONFIG
SET VALUE:
MASTER
SLAVE
MASTER and SLAVE can be entered (default: MASTER).
Select the values available.
Confirm entry and go back to SETTINGS menu.
25
GB
SYSTEM ERRORS AND FAULTS
SYSTEM ERRORS
System errors may arise when the chain counter chain counter is turned on.
Checksum error
The following windows are displayed if the counter detects an error in the memorized data:
CONTROL CHECKSUM
FLASH CHECKSUM
ERROR
CONTROL EEPROM
EEPROM CHECKSUM
ERROR
TRUE:
XXXX
TRUE:
XXXX
SUM:
YYYY
SUM:
YYYY
FLASH memory checksum error
EEPROM memory checksum error
If one of these messages appears do not use the chain counter and contact a service center or
QUICK® customer service without delay.
Multi Master error
If the chain counter detects more then one of MASTER chain counters
in the CAN network, the following window is displayed:
Select chain counter’s priority in the CAN network
(see chapter MULTIPLE CHAIN COUNTERS).
MULTI MASTER
ERROR
SET VALUE:
MASTER
SLAVE
SYSTEM FAULTS
System faults that appear on the state line divided into three categories which are shown below:
problems with automatic reset, problems with automatic reset and keys locked and problems with
manual reset.
PROBLEMS WITH AUTOMATIC RESET
These faults are automatically reset as soon as the cause that had generated the problem disappears.
Low voltage
This fault is displayed if the voltage drops below 10.5Vdc for more than
one second. Reset takes place if the voltage is higher than 11.0Vdc for
more than one second. Check the charge level of the batteries that supply voltage or the electrical system.
The window shown below appears when this problem is present:
Clock battery low
This fault is displayed if the voltage of the clock battery drops below
2.80Vdc. The chain counter checks the battery voltage when turned on
and every half hour. The problem is reset if the voltage is higher than or
equal to 2.80Vdc. The clock battery can be replaced only at an authorized service center.
The window shown below appears when this problem is present:
26
LOW VOLTAGE
SPEED
0M/M
CLOCK BAT LOW
SPEED
0M/M
SYSTEM FAULTS
No MASTER
This fault is displayed if there is not a chain counter with MASTER priority in the CAN network (see chapter MULTIPLE CHAIN COUNTERS).
See if the MASTER chain counter is on and the data line connections.
The window shown below appears when this problem is present:
NO MASTER
CAN BUS communication error
This fault is displayed if there are errors that cannot be recovered during CAN network communication.
Make sure the data cables are properly connected.
The window shown below appears when this problem is present:
CAN ERROR
SPEED
SPEED
GB
0M/M
0M/M
PROBLEMS WITH AUTOMATIC RESET AND KEYS LOCKED
These faults are automatically reset as soon as the cause that had generated the problem disappears. Some keys are disabled when these faults are present.
Opposed commands
This fault is displayed if keys UP or DOWN are pressed at the same time
as the respective external control DOWN or UP key (other chain counters
or other remot switch).
If the fault is present keys 5,6 (UP, DOWN) are disabled.
The window shown below appears when this problem is present:
Overload
This fault is signaled when the instrument detects at short circuit or
overload at the instrument's output.
Check wiring of signals UP and DOWN and absorption of the points of
use connected to the instrument’s output. If a fault is present, keys,
5,6 (UP, DOWN) are inoperative.
A window similar to the one shown below appears if a fault is present:
Remote programming active
This fault is displayed if a chain counter has entered the SETTINGS menu
in the CAN network (see chapter MULTIPLE CHAIN COUNTERS). Wait until the chain counter has exit the menu.
If the fault is present key = (SELECT) is disabled
The window shown below appears when this problem is present:
OPPOSED
SPEED
0M/M
OVERLOAD
SPEED
0M/M
REMOTE PROG
SPEED
0M/M
27
GB
SYSTEM FAULTS
PROBLEMS WITH MANUAL RESET
These problems are reset by the user: by pressing key = (SELECT) or turn off the chain counter and
turn it back on. If the fault is present keys 5, 6(UP, DOWN) are disabled.
Up alarm
This fault is displayed if the length of the chain is less than the value set
on the FUNCTIONS\UP ALARM menu.
The window shown below appears when this problem is present:
No sensor
This fault is displayed if the laps sensor does not detect the gypsy
movement within four seconds when key 5 or 6 (UP or DOWN ) of
the chain counter or other switches are pressed.
Check the distance between the magnet and sensor, operation of the
laps sensor and the wiring/connections.
The window shown below appears when this problem is present:
Sensor failure
This fault is displayed if the chain counter detects a short circuit in the
sensor for more than four seconds when key 5 or 6 (UP or DOWN ) of
the chain counter or other switches are pressed.
Check operation of the laps sensor and the wiring/connections.
The window shown below appears when this problem is present:
UP ALARM
SPEED
0M/M
NO SENSOR
SPEED
0M/M
SENSOR FAILUR
SPEED
0M/M
CONFIRMATION MESSAGES
Confirmation messages that may appear on the state line are shown below.
STOP
Stop
When no commands are sent to the windlass, the following window is
displayed:
Memory stored
As soon as four seconds elapsed from the last operation was completed (up, down, automatic down, free fall), the chain counter stores
the length of the lowered chain in the EEPROM memory.
The window shown below is displayed while the data are being saved:
28
SPEED
0M/M
MEMORY STORED
SPEED
0M/M
MAINTENANCE - TECHNICAL DATA
GB
MAINTENANCE
The chain counter does not require any particular maintenance. To assure top performance, check
the cables and electrical connections once a year.
Clean the chain counter with a soft rag dampened in water. Do not use chemicals or harsh products to clean the chain counter.
TECHNICAL DATA
MODEL
CHC 1202 M
OUTPUT CHARACTERISTICS
UP/DOWN contacts current
5A max - 2A in continuous
External connections
Gold plated male snap-on connector
INPUT CHARACTERISTICS
from 9 to 30 Vdc
Supply voltage (1)
Current absorbed when
idling (2)
Maximum current absorbed
(3)
35 mA
150 mA + current used by solenoid/reversing solenoid unit
AMBIENT CHARACTERISTICS
-20 ÷ +70 °C
Operating temperature (4)
Degree of protection (5)
IP 67
CASE
Dimensions (WxHxD)
90 x 94 x 25 [38] mm (94 x 97 x 28 [42] mm with cover)
172 g (204 g with cover)
Weight
GENERAL
Communication interface
CAN BUS with differential transceiver
Clock battery
EMC class
(1)
(2)
(3)
(4)
(5)
CR2032 (3Vdc)
EN 55022/B
The chain counter can reset itself if the voltage is less than 9 Vdc.
Typical value with back-lighting off and windlass not on.
Typical value with back-lighting on at highest level and windlass on.
With temperatures below 0°C the crystals in the LCD slow down.
Except for the area where the electric contacts are connected (IP 00).
QUICK® RESERVES THE RIGHT TO MODIFY THE TECHNICAL CHARACTERISTICS OF THE EQUIPMENT AND THE CONTENTS OF THIS MANUAL WITHOUT PRIOR NOTICE.
29
94
CHC 1202 M - DIMENSIONS (mm)
90
38
SENSOR
FUSE 4A FAST
150
UP
DOWN
CA
NL
UP
DOWN
CA
NL
UP
DOWN
DOWN
UP
WINDLASS
OPERATE SWITCH
150
UP
DOWN
CA
NL
GYPSY
BATTERY
BATTERIE
12/24 V
POWER SUPPLY
SWITCH
SOLENOID UNIT/
REVERSE
SOLENOID UNIT
THE WIRING DIAGRAM
R
SO
SEN
CAN H
CAN H
R
SO
SEN
R
SO
SEN
CAN H
CMCNTCHCNR03
QUICK® - VIA PIANGIPANE , 120/A - 48020 PIANGIPANE (RAVENNA) - ITALY
TEL. +39.0544.415061 - FAX +39.0544.415047
www.quickitaly.com - E-mail: [email protected]