1
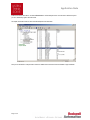
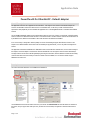
Application Note
PowerFlex40 On EtherNet/IP – Default Adapter
Overall Description
This application note serves as a supplement to the PowerFlex ‘4’ class range of drives, and the communication adapter user
manuals. The EtherNet IP address and subnet mask for a PowerFlex40 drive, can be set by a number of different methods,
dependant on what peripherals you have available. See application note on KnowledgeBase #39161 to understand all the different
methods.
The 22-COMM-E EtherNet/IP adapter for the PowerFlex40 drive when you take it out of the box (set at defaults), is BOOTP enabled
with no IP address set. Therefore this allows the user to use a BOOTP server to set the IP address. However once the address is set
by the BOOTP server, BOOTP is then disabled so that a static address is held within the 22-COMM-E.
If it is now necessary to change the IP address perhaps as a result of renumbering the project, BOOTP will not function as the
adapter is set to BOOTP disabled. Unless other tools are available (see app note #39161), it is now very difficult to change the IP
address.
This application note details how RSNetworx for EtherNet/IP can be used with the Class Instance editor, to send a reset message to
the adapter, to return the adapter to its default state. This will allow BOOTP to be used again to set the IP address. Alternatively a
message instruction can be used in the RSLogix5000 program using the same Class, Instance, Attributes to achieve the same thing.
However all the above does assume that you know the IP address of the 22-COMM-E, or it is in the same address range so
RSNetworx can browse for it.
.
Description
The method used below details the use of RSNetworx for EtherNet/ IP.
Launch RSNetworx and browse the network to discover your devices. Click Edits Enabled and when the network has checked all
the devices, save your project. Now select your drive (192.168.100.7 in this instance) and right click to select the Class Instance
Editor.
Page 1 of 2
Application Note
Enter the the data as shown above, and click the Execute button. Unfortunately this doesn’t reset the drive to defaults every time
you use it, therefore try again in 30s until it works.
The adapter values will be reset as shown in the DriveExplorer screen shot below.
Now you can use BOOTP to setup the new IP address as detailed in the user manual for the 22-COMM-P or app note #39161
Page 2 of 2