1
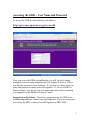
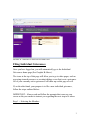
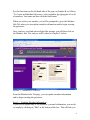
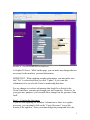
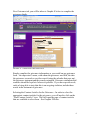
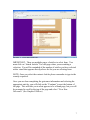
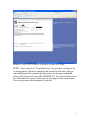
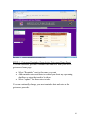
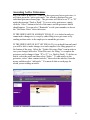
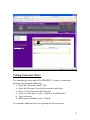
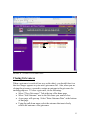
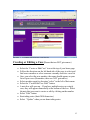
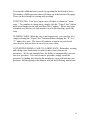
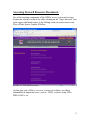
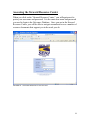
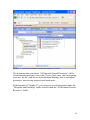
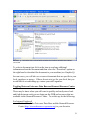
Grievance Data Base
User Manual
(updated 10-13-09)
The SEIU 503 Grievance Data Base (GDB) is a web based application that
stewards can access in order to:
• File and track grievances
• Update membership information
• Access resource documents that support stewards
We urge all stewards to use the GDB when filing and processing grievances,
because it is through the use of the GDB that we hope to achieve better
tracking of grievances in order to inform future worksite and bargaining
strategies, as well as to create precedence for future grievances.
This manual is intended to be a step by step guide for using the GDB.
Technological Requirements and Limitations
In order to use the GDB effectively, you will need a high speed internet
connection. The preferred web browser is Internet Explorer 8. If you are
using a different web browser and encountering problems, you should
download Internet Explorer 8. In addition you will also need Adobe Acrobat
Reader (Version 8 or above) to read documents stored in the Steward
Resource Center. The Adobe Acrobat Reader is a free download from the
Adobe website at http://get.adobe.com/reader/
Delay Issues – It is possible that you may encounter some delay issues
waiting for the data base to access information or respond to the most recent
command. It is important to be patient. Trying to click ahead can cause the
data base to freeze up. If this occurs, your best course of action is to log out
and then log back in.
Caution – Back Arrow and Refresh Buttons: Do not use the back arrow
or refresh buttons when you are creating a new grievance, as it can bring
unintended results, such as taking you back to the log-in page.
1
Accessing the GDB -- User Name and Password
To access the GDB, use the following web address:
http://grievance.opeuseiu.org/grievancedb
GRAPHIC A -- LOG IN PAGE
Once you access the GDB web application, you will log on by simply
putting in your user name and password (See Graphic A Above). Please
note that the password is case sensitive. If you do not yet know your user
name and password, contact your staff organizer. If you are in DHS or
Marion County, you can get your user name and password by contacting
your organizer or the Member Resource Center.
Suggestions or Problems -- If you have suggestions for the GDB or are
encountering problems, contact your staff organizer. If you are in a group
covered by the MRC, contact your staff organizer or MRC Staff.
2
GRAPHIC B – INDIVIDUAL GRIEVANCES HOME PAGE
Filing Individual Grievances
Once you have logged on, you will automatically go to the Individual
Grievances home page (See Graphic B Above).
The icons at the top of this page will allow you to go to other pages, such as
accessing steward resources or creating/editing a case that is not a grievance.
All of your currently active grievances will show up on this page as well.
If, on the other hand, your purpose is to file a new individual grievance,
follow the steps outlined below:
IMPORTANT: Always read and follow the prompts that come on your
screen as they are meant to instruct you regarding the next step to be taken.
Step 1 -- Selecting the Member:
3
See the directions on the left hand side of the page on Graphic B, as follows:
“To Create an Individual Grievance, select members by typing part of or all
of members’ last name and then click the find button.”
When you select your member, you will be prompted to go to the Member
Info Tab where you can update member information and/or begin creating
the grievance.
Once you have read and acknowledged the prompt, you will then click on
the Member Info Tab, and you will be taken to Graphic C below:
GRAPHIC C – MEMBER INFO TAB PAGE
From the Member Info Tab page, you can update member information
and/or begin creating the grievance.
Step 2 -- Updating Member Information:
If you need to update any of the members’ personal information, you can do
so simply by clicking on “Edit” at the bottom of the box. This will take you
4
GRAPHIC D – UPDATING PERSONAL INFORMATION
to Graphic D Above. While on this page, you can make any changes that are
necessary for the members’ personal information.
IMPORTANT: When updating member information, you must make sure
that “Yes” is selected and that you click “Update” if you want this
information to be saved to the Union’s membership data base.
For any changes to worksite information that should be reflected in the
Union’s data base, you must go through your staff organizer. However, for
your grievance purposes, you can make these changes on the grievance form
itself.
Step 3 – Creating the Grievance:
If you are done updating the members’ information or there is no update
necessary, you can simply click on the “Create Grievance” icon at the
bottom of the right box. Once you acknowledge the prompt and select the
5
New Grievance tab, you will be taken to Graphic E below to complete the
grievance details.
GRAPHIC E – COMPLETING THE GRIEVANCE
Simply complete the grievance information as you would on any grievance
form – the supervisor’s name, with whom the grievance was filed, the date
the grievance occurred or was discovered (using the calendar that pops up),
the grievance statement and the remedy requested. Grievance statements and
remedies should be kept brief wherever possible. If you have special needs,
such as being able to state that this is an on-going violation, include those
words in the statement of grievance.
Selecting the Contract Articles for the Grievance – In order to select the
appropriate contract articles for the grievance, you will need to click on the
“Find Contract Articles” icon. This will open the page of contract articles
that are available to select from – See Graphic F Below.
6
GRAPHIC F – SELECTING ARTICLES
IMPORTANT: There are multiple pages of articles to select from. You
must click on “Attach Articles” for each page where you are making a
selection. You will be reminded of the number of articles you have selected
with a visual that appears directly above the list you are selecting from.
NOTE: Once you select the contract Articles please remember to type in the
remedy requested.
Once you are done completing the grievance information and selecting the
appropriate articles, you will click on the “Continue” icon at the bottom of
the page. This will take you to what appears to be a blank page, but you will
be prompted to scroll to the top of the page and select “View New
Grievance” (See Graphic G Below)
7
GRAPHIC G – VIEW NEW GRIEVANCE
Review the grievance to make sure that everything is properly documented.
DRAFT -- If you need to make changes, and/or are just not ready to file the
grievance for any other reason, select “Review or Print Grievance Form as
Draft.” With this selection you can edit your grievance by accessing it from
your active grievances page.
FINAL -- If the information on the grievance is correct, and you are ready to
file the grievance, select “Print Grievance Form for Filing.” With this
selection, your grievance will not be updateable and you should file the
grievance with management ASAP in accordance with your contract.
IMPORTANT: Once you “Print Grievance Form for Filing,” it is locked in
and you cannot make any more changes to it. If changes are needed, you
would either need to process a new grievance or amend it by written notice
to the employer.
8
GRAPHIC H – THE ACTUAL “OFFICIAL STATEMENT OF GRIEVANCE FORM”
PRINT – Once you select “View/Print Form,” the grievance will appear for
viewing purposes (Please be patient as this can take a little time) and you
can actually print it by going to the little printer on the upper right hand
corner of the Grievance Form (SEE GRAPHIC H). You can be taken back to
the “Individual Grievances” home page by selecting the back arrow button.
Your new grievance should appear on your list.
9
GRAPHIC I – ADDING REMINDER INORMATION
STEP 4 – Grievance Reminder (From Active Grievances Home Page)
You can establish a grievance reminder date and note from your active
grievances home page.
• Select “Reminder” next to the name you want
• Add reminder notes and dates to remind you about any upcoming
deadlines or steps that need to be taken
• Select “update” for those notes to take.
You can continually change your next reminder date and note as the
grievance proceeds.
10
Accessing Active Grievances
SEE GRAPHIC B BELOW -- Once you have processed a new grievance, it
will show up on the “active grievances” list, which is displayed on your
individual grievances home page. The grievance will show as an “F” or “D”
under the question “Final or Draft.” To access active grievances, simply
click the “select” button to the left of the name, and the grievance details
should appear. You can select “Reminder” to edit your reminder or choose
the “Grievance Notes” tab to take notes.
IF THE GRIEVANCE IS ALREADY FINAL (F), it is locked in and you
cannot make changes to it, except by either filing a new grievance or by
sending written notice to the employer to amend the grievance.
IF THE GRIEVANCE IS NOT YET FINAL (D), it is in draft form only and
you will be able to make changes to it and complete it for filing purposes at
the bottom of the page. Select the “Update Grievance Data” icon in order to
save your changes and select “Print Grievance for Filing,” to complete the
grievance and to change it from “D” to “F” (i.e. Draft to Final). To delete an
article, select the article and then select “delete.” To add articles to the
grievance, select “show contract articles,” then select the article(s) from the
menu, and then select “add article.” You must do this on each page for
which you are adding an article.
GRAPHIC B – INDIVIDUAL GRIEVANCES HOME PAG
11
GRAPHIC J – CREATING A GRIEVANCE NOTE
Taking Grievance Notes
You can take grievance notes (See GRAPHIC J) on any of your active
grievances by doing the following:
• Select the “Grievance Notes” Tab
• Select the Grievance for which you want to take notes
• Select “Create Grievance Note Record”
• A new box will open -- select “Add Note Text/Edit Note”
• Type your notes
• When you are finished, select “Update”
You can take additional notes by repeating the above process.
12
GRAPHIC K – CLOSING ACTIVE GRIEVANCE
Closing Grievances
When a grievance is resolved (one way or the other), you should close it so
that it no longer appears on your active grievances list. Also, when you are
closing the grievance, you need to assign an outcome to the grievance for
tracking purposes. To close a grievance, do the following:
• Select “Close Grievances” Tab at the top of the home page
• Select “Add Outcome” next to the Grievance you want to close
• A new page will open up. Select “Enter Outcome Data” at the bottom
of that page.
• Using the pull down menu, select the outcome that most closely
reflects the outcome of the grievance.
13
• Describe the issue of the grievance. BE BRIEF – you have a limit of
100 characters.
• Describe the outcome of the grievance. BE BRIEF – you have a limit
of 50 characters.
• Select Update Outcome and Close Grievance – This grievance should
now appear on your list of closed grievances.
IMPORTANT NOTE: When you are describing the issue and the outcome
of the grievance, be sure to include only those words that are necessary and
use abbreviations where possible. The purpose of limiting the # of
characters is so that the information can be included in a report where
someone is looking for possible precedence.
SAMPLE “Describe Issue” – wrkr denied hardship transfr based on childs
need to be near OHSU for cancer treatment (86 characters)
SAMPLE “Describe Outcome” – mgmt granted transfr w next avail opening
(40 characters)
14
GRAPHIC L – ENTERING AND EDITING CASE NOTES
Creating or Editing a Case (Issues that are NOT grievances)
• Select the “Create or Edit Case” icon at the top of your home page
• Follow the directions on the left hand side of the page to select and
find a new member or select someone currently on active cases list
• Once you select the new member, the name should appear on your
list of open cases (Remember, these are NOT grievances)
• Select member again by choosing “select” to the left of their name
• Select the “Create/Edit Case Note” button
• A note box will open up – If you have multiple notes on a single
case, they will appear numerically at the bottom of the box. Select
the note that you want to create or edit by clicking on the number
• Select “Edit” button
• Start taking notes (limit 3000 characters)
• Select “Update” when you are done taking notes
15
You can take additional note records by repeating the last 4 bullets above.
The number of different notes taken will show up at the bottom of the page.
These can be selected for viewing and/or editing.
TOPIC/STATUS: Your list of open cases will show a column for “main
topic.” To complete or change these, simply click the “Topic/Close” button,
make your changes to the topic and then select “update.” Please keep your
statement very brief as it is only meant to be a header that flags you to the
issue.
CLOSING CASES: When the case is no longer active, you can close it by
simply selecting the “Topic/Close” button and then changing the “N” to a
“Y” under close case. The issue will continue to appear on your closed
cases list, but will not show as one of your active cases.
CONVERTING FROM A CASE TO A GRIEVANCE: Remember, creating
and editing cases should only be used for those issues that are not
grievances. We do not currently have the ability to automatically convert a
case to a grievance. If a case becomes a grievance, simply create the
grievance by finding and selecting the member as you would with any new
grievance and then going to the member info tab and following instructions.
16
Accessing Steward Resource Documents
One of the exciting components of the GDB is access to steward resource
documents, which you can do by either clicking on the “Super Steward” icon
in the upper right hand corner, or by clicking on the steward resources tab.
This will take you to Graphic M below.
GRAPHIC M – STEWARD RESOURCES
On this page you will have access to a variety of websites, providing
information on important issues, such as – BOLI, workers comp, ADA,
FMLA/OFLA, etc.
17
Accessing the Steward Resource Center
When you click on the “Steward Resource Center,” you will again need to
put in your user name and password. It is the same user name and password
you used to login to the Grievance Database. Once you are in the Steward
Resource Center, you will be able to navigate around and access a number of
resource documents that support you in the work you do.
GRAPHIK N – STEWARD RESOURCES LOGIN PAGE
18
GRAPHIK O – DOCUMENT LOCATOR INTERFACE
Once you log in, you will come to a screen with the Document Locator
“Web View” or “Web Tools” icon. Click on the item “Documents” on the
left hand side of the screen (See Grapic O) to access the documents that you
have rights to view and/or download.
NOTE: You will only see the folders and documents that are related to your
Local.
19
GRAPHIC P – FINDING DOCUMENTS WITHIN DOCUMENT LOCATOR
The documents that you find in “All Stewards General Resources” will be
steward training materials, such as the 7 tests of just cause, tips for preparing
your case, the do’s and don’ts of pre-dismissal hearings, how to investigate
grievances, interviewing witnesses and much more.
In the example of “Graphic P”, you can access several documents under the
“Discipline and Discharge” folder located within the “All Stewards General
Resources” folder.
20
GRAPHIC Q – READING INFO AND DOWNLOADING DOCUMENTS WITHIN DOCUMENT
LOCATOR
To select a document just click on the item to read any additional
information about the document and then select the “Download” option on
the right hand to download the document to your machine (see Graphic Q).
In some cases, you will also see resource documents that are specific to your
local, employer or agency. If these do not exist yet for your local, but you
would like to set something up, contact your staff organizer.
Toggling Between Grievance Data Base and Steward Resource Center
There may be times when you will want to quickly and easily move back
and forth between work you are doing on the GDB and resources that are
available in the Steward Resource Center. To set this up, do the following:
For Internet Explorer 8
• Bookmark both the Grievance Data Base and the Steward Resource
Center (http://stewardresources.opeuseiu.org) to your favorites
21
• Access the Grievance Data Base Log in Page
• On the top left of the screen, just above the purple space, you will see
a bar that says “login” – click on the little box to the right of that bar
• A new page will open up – Now go to your list of favorites and
choose the Steward Resource Center
• You should now be able to quickly and easily toggle between the
GDB and the Steward Resource Center.
22