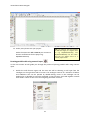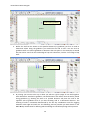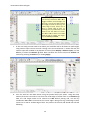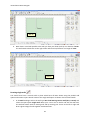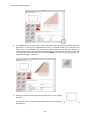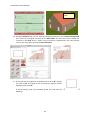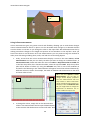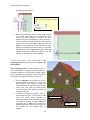
1
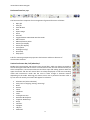
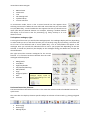
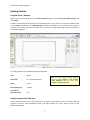
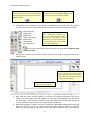
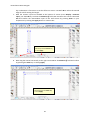
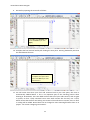
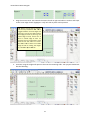
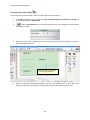
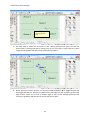
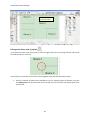
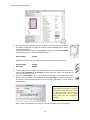
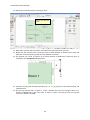
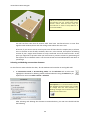
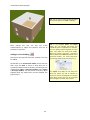
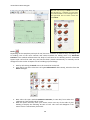
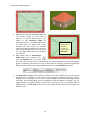
3D Architect Home Designer 3D Architect Home Designer Getting Started Guide Produced and published in the UK by Eleco Software Limited
© 2014 Eleco plc. All rights reserved.
The software and hardware names and labels used in this document are generally protected
trademarks of their respective owners.
All data and programs described in this document were compiled and/or arranged by the
authors with utmost care and reproduced under adherence to proper and effective control
measures. Nevertheless, there may be errors. Therefore, Eleco Software Limited would like to
point out that neither a warranty, legal responsibility, nor any liability for consequences of using
the software or documentation can be ascribed to the publisher, or the distributor.
No part of this document may be reproduced, stored in a retrieval system, or transmitted by any
means, electronic, mechanical, photocopying, recording or otherwise, without the prior
permission of the publisher.
1 3D Architect Home Designer Contents Welcome .......................................................................................................................................................... 3 3D Architect: The Basics .................................................................................................................................. 3 Understanding the Interface ......................................................................................................................... 3 Horizontal icon bar, top: ........................................................................................................................... 4 Vertical tool menu bar, left (what bar): ..................................................................................................... 4 Tool options catalogue, right: ................................................................................................................... 5 Horizontal status bar, bottom: .................................................................................................................. 5 Switching different displays on and off ..................................................................................................... 6 Construction mode and 3D Furnishing mode ................................................................................................. 6 Getting Started ................................................................................................................................................. 7 Program Start / General................................................................................................................................ 7 Adding Construction Elements....................................................................................................................... 7 Drawing external walls using numeric input .............................................................................................. 8 Drawing parallel walls using numeric input ........................................................................................... 12 Drawing single walls ............................................................................................................................... 16 Drawing walls at fixed angle .................................................................................................................. 18 Editing tools: Mitre walls (L) option......................................................................................................... 20 Window and door placement ................................................................................................................ 22 Assigning room names ............................................................................................................................ 28 Adding staircase to your plan .................................................................................................................. 28 Creating additional floors ....................................................................................................................... 31 Selecting and deleting construction elements ......................................................................................... 34 Adding a roof to building ....................................................................................................................... 35 Using in‐line measurements ................................................................................................................... 40 Adding skylights to existing roof ............................................................................................................ 42 Furnishing Your Project ............................................................................................................................... 43 Objects ................................................................................................................................................. 43 Materials ................................................................................................................................................ 46 Applying materials to objects ............................................................................................................. 47 Scaling a texture ................................................................................................................................. 47 Material area ..................................................................................................................................... 48 Apply lighting and shadow effects ...................................................................................................... 49 2 3D Architect Home Designer Welcome This guide has been created for users of all levels and is ideal for anyone new to 3D Architect software, experienced users looking for some suggested methods or for prospective users who want to see how easy 3D Architect can be. This guide will not teach you architecture, interior design, drawing or building methods, it will teach you how to use 3D Architect. After practice, you will soon realise how effective 3D Architect is as a design and visualisation tool. Please note that this guide will only teach you the basics of 3D Architect. If you need more details on a particular function in 3D Architect, you should refer to the help system in the software or visit the support section on our website www.3darchitect.co.uk. The screenshots in this guide have been produced through different stages of development and whilst still being appropriate to the described function, the appearance may vary slightly depending on the version in use and the operating system you are running. If you are experiencing problems viewing the PDF files supplied with software, please ensure you have the latest version of Adobe Reader from www.adobe.com 3D Architect: The Basics If you are new to 3D Architect you should work through this chapter first before you embark on the main tutorial to get you started. While using 3D Architect you will find many things in common with other Windows programs. Of course, the individual program functions and details are different, being adapted to the special needs of design and planning. If you have already worked with other Windows programs, you know the basic operation of the Windows user interface. You know, for example, how to select a menu option from a menu, how to open and minimise windows, and how to launch and exit a program. Before you get started in 3D Architect, we'll first explain a little about the program interface and the two main modes you will be working in. Understanding the Interface As with other Windows programs 3D Architect consists of a menu bar at the top of the screen for convenient access to various operations within the program. Besides the menu bar are the vertical and horizontal toolbars. These bars consist of arranged sets of icons, which serve to access program functions or change the view. The individual icons on the bars behave similarly to icons in Windows programs. By left‐clicking them you can activate or deactivate functions. In the horizontal bar that appears at the top, under the classic menu bar, you’ll find icons, which are used throughout the whole project. Tabs for accessing component properties also become visible on selection of construction elements. 3 3D Architect Home Designer Horizontal icon bar, top: The horizontal bar comprises of an arrangement of general functions as follows: • Open file • Save file • Undo & Redo • Print • Export image • Zoom • Show all • Toggle between 2D and 3D and Plan mode • Move texture • Material/texture picker • Active layer display • Active floor display • Tool options • Catalogue on/off • Quick help • Help topics Tabs for accessing component properties also become visible on selection of construction elements. Vertical tool menu bar, left (what bar): Besides the horizontal bar, 3D Architect uses vertical bars, which are always arranged to the left and right‐hand side of screen. In Construction mode, the left vertical bar lets you select components, construction elements and their input and editing options. Both the upper horizontal and the left vertical bars are always displayed, in both 3D Furnishing mode and Construction mode. But the icons in them change or become inactive depending on the mode. Hovering your mouse cursor over a particular function in bar a fly‐out menu of recently used tools will appear for selection. • Selection tool (select elements) • Tools (such as copying, moving, mirroring) • Walls • Rooms • Doors • Windows • Stairs • Ceiling & Cut‐outs • Balconies & Platforms • Supports & Chimneys • Roofs • Dormers • Skylights • Objects • Materials 4 3D Architect Home Designer •
•
•
•
•
•
Material area Dimensions Text 2D drawing tools Symbols library Current selection In Construction mode, there is also a second vertical bar that appears when selecting certain tools. Where the main left‐hand vertical bar lets you select what to input (What bar), a second smaller bar also appears that lets you decide how to input (How bar) the desired element. For example, selecting a window element will display a set of icons in bar for positioning e.g. freely, midway or at a set distance in wall. Tool options catalogue, right: To the right of the screen you will find the catalogue panel. This catalogue display will vary depending on what mode you are in and what function you are currently using. By left‐clicking a tool from the set of icons at the left‐hand side of screen (What bar), a list of icons/folders will appear in the catalogue. Here you can left‐click individual tools to use in your project and depending on the tool selected, a second bar (How bar) also displays in the catalogue letting you decide how to input the desired element. The right vertical bar contains catalogues for the current function. If no function has been selected then the Tools catalogue will be displayed. • Modify walls • Trim/Bevel • Segments/Breaks • Fills/Outlines/Hatching • Move/Rotate • Copy • Polygons/Splines TIP: You can switch the catalogue display on/off by • Misc clicking the following icon in the • Selection horizontal bar. Horizontal status bar, bottom: The horizontal bar at the bottom of screen is the status bar which includes all available functions for quick access. The status bar also displays element specific tooltips on selection of some tools e.g. placing polygonal walls. •
•
•
Ruler on/off Grid on/off Manage layers 5 3D Architect Home Designer •
•
•
•
•
•
•
•
•
•
•
•
•
•
•
•
•
•
Hatching on/off 2D View background overlay on/off Walkthrough Collision control during walk through Hide facing walls Interior objects on/off Exterior objects on/off Roofs on/off Light source display Shadow display Reflections display Use 3D textures Timber construction on/off Room labels on/off Edge dimensions on/off North point on/off Camera on/off Sketch (blur) TIP: You can configure the status bar display by adding or removing all available functions. To do this, click the following icon. In this same dialogue box, you can also rearrange the order of the icon display on the status bar. Switching different displays on and off The Display menu allows you to decide what parts of the screen (catalogue, numeric input, toolbar, construction tools, status bar) you want visible. This is particularly useful for freeing up some space on drawing sheet as and when you need to. For example, when drawing in 2D Construction mode you might not have a use for numeric input so therefore want to temporarily turn this display off. Construction mode and 3D Furnishing mode A principle concept of 3D Architect is operating in two different modes ‐ Construction and 3D Furnishing mode. When you start a new project, you automatically start in Construction mode. In Construction mode you always operate in a 2D Plan view and in this mode you enter all structural elements for your building. These include, for example, walls, windows, doors, roofs, and chimneys. In 3D Furnishing mode you place your objects, such as furniture and accessories. You can also change the appearance of your 3D model, for example, choosing a wall or floor finish. It's often easier to place furniture items in top view e.g. for laying out kitchen units. Therefore, Construction mode also lets you place objects directly on to plan. There is also an optional Plan mode. In this mode, you can layout your 2D plans, elevations and 3D views on to one sheet. You can toggle between each mode using the following icons in the horizontal toolbar. 6 3D Architect Home Designer Getting Started Program Start / General When you first start 3D Architect the Start Assistant appears. Select Start new blank project and click Finish. A border and title block will appear on the drawing sheet. At any point you can hide or delete these in the Layers drop down list > Manage Layers. Almost all buttons are activated on the program interface. If you move your mouse cursor over a function, a tooltip containing a short description of each feature appears: An empty project has the following default properties: Unit: Metre Sheet size: A4 ‐ Landscape format Scale: 1:100 Grid spacing X/Y: 1.000 m Title block/ Drawing frame Yes TIP: You can change project settings before selecting Create a new project using Assistant under the menu item Project > Project Properties. Adding Construction Elements In this tutorial we will start on the ground floor and guide you through some of the basic functions required to draw a simple bungalow home, with stairs leading in to attic space to give you the following end result. 7 3D Architect Home Designer Drawing external walls using numeric input 1. We will start by entering external walls. There are several wall types to choose from. Left‐
click the Walls icon in the vertical bar on the left and a fly‐out menu will appear with some preset walls. TIP: After left‐clicking the Wall icon in the left vertical bar, an extensive selection of wall types are made available in the catalogue bar on the right‐hand side of screen under the catalogue name Beams/Walls. 2. Select the first wall option: Exterior wall (thick, 0.365m). Selecting a 'Wall' element will display a selection of tabs for accessing component properties. In this example we will continue with the default properties. 8 3D Architect Home Designer TIP: Under the Tool Options you can change parameters specific to that tool for example setting the distance from reference point for placing windows. TIP: You can turn the grid display on and off under the menu option View > Grid or from the display icon on the bottom toolbar: 3. Furthermore, when selecting a 'Wall' element an additional vertical bar (How bar) appears. This bar determines the input method of the construction element by using the following: ‐ Polygonal walls TIP: This structure also works with ‐ Single wall other construction elements i.e. ‐ Angled wall where the main left‐hand vertical ‐ Wall at right angle bar lets you select what to input ‐ Parallel wall (What bar), the second smaller bar ‐ Wall midway lets you decide how to input (How ‐ Round off walls bar) the desired element. In this exercise we will draw walls using the first input option Polygonal walls and Numeric input. 4. Set the start reference point of first external wall by left‐clicking at the bottom‐left of the drawing sheet: TIP: Use the mouse wheel or + and ‐
keys to zoom in and out of your plan. With the right mouse button held down, pan the floor plan view using mouse movements. Left‐click to set the start reference point of exterior 5. Next, drag the mouse vertically upwards. The wall to be created is attached to the mouse pointer. The inside edge of wall will highlight red. This wall side highlighted red is relevant to the wall length. In this example we will be entering the length of the outside edge of wall and to do this we need to determine the corresponding axis of the wall. 6. Before placing walls in position, use the key combination Ctrl + W to toggle between the wall edges and wall axis. This lets you define which wall edge to place in relation to reference point e.g. the inside edge of wall, centre line of wall or outside edge of wall. Try pressing this 9 3D Architect Home Designer key combination a few times to see the effect on screen. Use Ctrl + W to select the outside edge of wall for setting the length. 7. With the numeric input bar enabled at the bottom of screen (menu Display > Numeric input), use the Tab key to select the Distance (l) field. Now overwrite the current value with 9m and confirm the intermediate input of this wall section by pressing Enter on your keyboard or by clicking the Apply button on numeric bar. Enter 9m in the Distance
field and press the Enter key or click Apply 8. Now drag the mouse horizontally to the right. Enter 11m in the Distance (l) field and confirm by pressing the Enter key or clicking Apply. Enter 11m in the Distance
field and press the Enter key or click Apply 10 3D Architect Home Designer 9. Proceed by inputting the next wall as follows: Enter 9m in the Distance and press the Enter key or click Apply 10. Complete the final external wall by left‐clicking the start point. Pressing the Esc key will close the wall element function. Click the start point to complete the input of final wall. Press Esc key to close wall function. 11. You will notice that when your final wall connects back to your start point, the room is automatically labelled Room 1. This is an important part of the checking process when drawing in 3D Architect. The room label confirms that all of your walls connect, with no gaps or spaces, to form a fully contained room. Once walls connect like this they are a room, which means that the floor and ceiling are created. If the walls do not connect, then no floor or ceiling will be added. Room labels can be changed to more meaningful names later on in project ‐ see section 'Assigning room names'. 11 3D Architect Home Designer 12. At this point please save your project: Under the menu item File > Save As you can enter a location and filename for the project e.g. My3DHouse01.anp. Drawing parallel walls using numeric input TIP: It is useful to save your project at different stages, so a regular save of e.g. My3DHouse01.anp, and My3DHouse002.anp etc will mean that you can always return to a known project state. In this next section we will guide you through the process of placing parallel walls using numeric input. 1. Enable the wall function again and this time we will be selecting a wall type from the catalogue on the right‐hand side of screen. The catalogue consists of a selection of folders and subfolders that can be opened by double‐clicking. Items in the catalogue can be displayed as a detailed list and also expanded so that all items are listed together outside their folders. There are also icons for navigating the folder structure. 12 3D Architect Home Designer 2. Double‐click the Walls folder and select the wall type Load‐bearing wall (thin 0.175m) and then select the input type Parallel Wall (in How bar) from within the catalogue or from the left‐side of screen. 3. Move the mouse cursor over the reference line/element (in this example, the inner edge of left wall) you would like the new wall to be drawn parallel to. The cursor will snap to the reference line/element and highlight in red (see below). Select it by left‐clicking and in the Tool Options dialogue box that appears, enter a distance of 3.6m and click OK. 2. Enter a distance and click OK
1. Click reference line/element e.g. inner side of wall TIP: If the reference line/element does not highlight red then it's possible you will have to make some changes in the Snap dialogue box (menu item Options > Snap). There are a number of settings in the Snap dialogue box but the most common cause for snap not working in 2D is if the 'Snap only in current layer' box has been selected. Uncheck this box. 4. You now need to define what side of the reference line/element you would like the new wall to be drawn. By moving the mouse cursor either side of the reference line/element, a green guideline will appear at the desired distance you entered in previous dialogue box. In this example, left‐click to place the guideline on the 'right' side of reference line/element: 13 3D Architect Home Designer Click to place guideline 5. Before the wall can be drawn at the specified distance (to guideline) you first to need to determine where along the guideline you would like the wall to start. You can click on guideline itself or to side of guideline to determine the start point. In this example, we would like the wall to start from the inside edge of top wall. Therefore, click the 'inner edge of top wall': Click to set the start of wall
6. By moving your mouse cursor up or down you will see a ghost image of new wall together with dimensions attached to guideline. The wall direction also affects how the wall is placed along guideline e.g. drawing the wall in an upward direction will place the wall to the opposite side of guideline than if you were drawing wall in a downward direction. The drawing of walls is sometimes determined by the last key combination used for toggling between walls edges and wall axis. The following TIP box provides you with details on the Ctrl + W key combination for defining which wall edge to use before placing wall in position. 14 3D Architect Home Designer TIP: Before placing walls in position, use the key combination Ctrl + W to toggle between the wall edges and wall axis. This lets you define which wall edge you wish to place e.g. the inside edge of wall, centre line of wall or outside edge of wall. Try pressing this key combination a few times to see the effect on screen. Use Ctrl + W to select the outside edge of wall for setting the length. Try also Ctrl+Q and Ctrl+E. 7. In this next step you now need to set where you would like wall to be drawn to (wall length) using numeric input. Ensure the wall is facing in the correct direction i.e. down and with the numeric input bar enabled at the bottom of screen (menu Display > Numeric input), use the Tab key to select the Distance (l) field. Now overwrite the current value with 4.155m and confirm by pressing the Enter key or clicking Apply. Wall (1) 8. Your first wall has now been drawn using the parallel wall input option. Using the same method, draw the next wall to start from the inside edge of bottom wall. In the Distance (l) field, the wall length needs to be entered as 2.9m. Before placing wall, use the key combination Ctrl + W to ensure that the correct edge is being used e.g. inside edge of wall, centre line of wall or outside edge of wall. The position of the 2nd wall should look like the following: 15 3D Architect Home Designer Wall (2) 9. Now draw in a 3rd wall parallel to the wall you have just drawn (wall 2) at a distance of 3.0m. The wall needs to be drawn to the right of the reference line/element at a length of 3.1m: Wall (3)
Drawing single walls You should now have 3 vertical walls in place which have all been drawn using the parallel wall option and numeric input. We will now use the single wall option to draw in the horizontal walls. 1. In the Wall catalogue select the wall type Non load‐bearing interior wall (thin, 0.115m) and select the input option Single wall. Move your cursor over to wall 3 and click the wall end. The wall will attach itself to existing wall and by moving your cursor to the left or right will draw a ghost image of wall together with dimensions. 16 3D Architect Home Designer 2. Drag the mouse cursor out towards the external wall on right and when it reaches and snaps to the 'inner edge of wall' (highlight in red), left‐click to place wall in position. TIP: Before placing walls in position, use the key combination Ctrl + W to toggle between the wall edges and wall axis. This lets you define which wall edge you wish to place e.g. the inside edge of wall, centre line of wall or outside edge of wall. Try pressing this key combination a few times to see the effect on screen. Use Ctrl + W to select the outside edge of wall for setting the length. Try also Ctrl + Q and Ctrl + E. 3. Continue using the single wall option to draw in the remaining walls. Your project should look like the following: 17 3D Architect Home Designer Drawing walls at fixed angle In this section we will now draw a wall at a fixed angle of 45° from Room 2. 1. In the Wall catalogue select the wall type Non load‐bearing interior wall (thin, 0.115m) and select the input option Angled wall. 2.
Click the Tool Options icon in horizontal toolbar and in the dialogue box that appears enter 45° in to field. 3. Move your cursor over towards Room 2 and click the reference line/element you wish to draw the angled wall from: Click reference line/element to draw angled wall from 4. With the reference line/element defined, now select the starting point of wall. Move your mouse to where the two walls join and left‐click to specify the starting point of wall: 18 3D Architect Home Designer Click to specify the starting point of wall 5. You now need to specify the end point of wall. Having specified start point, the wall will attach itself to existing wall and by moving your cursor to the left or right will draw a ghost image of wall together with dimensions attached to guideline. 6. Before placing the wall in position, use the key combination Ctrl + W to toggle between the wall edges and wall axis. This lets you define which wall edge you wish to place e.g. the inside edge of wall, centre line of wall or outside edge of wall. In this example place the wall centrally to guideline and left‐click to set the end point of wall: 19 3D Architect Home Designer Click to specify the end point of wall
Editing tools: Mitre walls (L) option In the previous section you learnt how to draw an angled wall from an existing wall but notice how the walls do not join correctly! In this section you will learn how to mitre walls together using the editing tools provided. 1. There are number of editing tools available to you for modifying parts of drawing. Left‐click the Editing tools icon in the vertical bar on the left and a fly‐out menu will appear with some preset tools. 20 3D Architect Home Designer 2. From the fly‐out menu select the tool Mitre walls (L). Alternatively, select this from the Modifying walls folder in the Tools catalogue. 3. With the Mitre walls (L) tool selected, left‐click the 'horizontal wall' in Room 2 followed by the 'angled wall': TIP: After left‐clicking the Editing tools icon in the left vertical bar, an extensive selection of tools are made available in the catalogue bar on the right‐hand side of screen under the catalogue name Tools. 2. Next click the angled wall 1. First click the horizontal wall The two walls will mitre together. 2. Next click the angled wall 1. First click the vertical wall 4. Now repeat this method in Room 2 by first selecting the 'vertical wall' followed by the 'angled wall' to get the following result. All 3 walls will now be mitred together: 21 3D Architect Home Designer TIP: Note it is not always necessary to use this mitre tool for joining corner walls together. Depending on position of wall start/end point, the software will often determine the mitre joints automatically. 5. Locate Room 3. We are now going to use the same tool and method to mitre together the 'angled wall' and the 'horizontal wall'. The two walls will trim to the correct length so that the corner ends mitre together. 6. With the Mitre walls (L) tool selected, left‐click the 'horizontal wall' in Room 3 followed by the 'angled wall': 1. First click the horizontal wall 2. Next click the angled wall The two walls will mitre together giving you the following result: Window and door placement In this next section you will learn how to insert windows and doors into walls at a set distance in your plan. There is a large selection of window and door types available in software. These can all be modified separately and inserted into wall using different input methods. Windows 1. Start by left‐clicking the Windows icon in the vertical bar on the left. 22 3D Architect Home Designer TIP: After left‐clicking the Windows icon in the left vertical bar, an extensive selection of windows are made available in the catalogue bar on the right‐hand side of screen under the name Windows/Cut‐outs. 2. From the fly‐out menu select a window type. Alternatively, select one from the folder Windows > Rectangular windows in the Windows/Cut‐outs catalogue. 3. On selection of window type a 'Component' button will appear in the horizontal bar at top. Clicking this will enable you to make various changes to selected component. 4. After clicking the 'Component' button, the following Component dialogue box will appear: TIP: The dialogue box can be left open if you want to select and preview another window type from catalogue. The preview and properties of selected window will update accordingly in dialogue box. The dialogue box can be left open for making further changes and closed by clicking the cross in the top right. All window settings will be retained in dialogue box for future access. 5. The Component dialogue box consists of different tabs that enable you to make various adjustments to all aspects of component via the use of interactive graphics and/or list view. By clicking on parts of graphic, you are able to make changes to component quickly and easily. The corresponding values in detailed list view will update accordingly. You can toggle between a graphical display and full list view using the icon in the bottom‐right of dialogue box: 23 3D Architect Home Designer 6. We will now adjust some basic shape properties of component which include the width, height and sill height of window. Under the Style section, locate the following graphic: 7. Left‐click on the horizontal arrow (highlighted red) and in the Overall width input box that appears enter the following value: Overall width: 1.010m Repeat and click the other arrows on graphic entering the following values: Overall height: 1.510m Sill height: 0.800m 8. To accurately insert a window at a specified distance from reference point, select the input method Window at set distance (in How bar) from within the catalogue or from the left‐side of screen. 9. Click the Tool Options icon in the horizontal bar and in the dialogue box that appears enter an offset value of 1.4m and select Left edge. The offset value will set the distance from the reference point to the left edge, right edge or centre point of window/door. TIP: Setting the distance to the 'left' or 'right' edge of window/door is always determined by the direction in which the walls have been drawn and the corresponding view. You can toggle edges using the key combination Ctrl + W. After setting all parameters you can now insert the window in the following way. 24 3D Architect Home Designer 10. Specify the reference point by clicking on wall: Click to set reference point 11. Now select and click the wall where you would like the window to be inserted. 12. Before the 3rd and final click, move the cursor around window to determine the stop and direction of window opening. Click to insert window in position. 13. The window (a) is now in position at an offset distance of 1.4m from reference point as specified in the Tool Options dialogue box. 12. Continue inserting the remaining windows (b, c, d, e, f, g) using the same input method and offset distance. 13. On the top external wall, in Room 1, insert a window (h) from the top‐right corner at a distance of 5.0m and on the other side, in Room 3, insert a window (i) from the top‐left corner at a distance of 2.4m. 25 3D Architect Home Designer Doors You insert doors in the same way as windows using the three input methods Door free positioning, Door at set distance or Door midway. 1. Let's start by left‐clicking the Doors icon in the vertical bar on the left. In the Doors catalogue that appears, select a standard entrance door. 2. Now select the input method Door at set distance and click the Tool Options icon in the horizontal bar and in the dialogue box that appears enter an offset value of 0.5m and select Left edge. The offset value will set the distance from the reference point to the left edge, right edge or centre point of window/door. Insert the door into front wall from the inside wall of room 2. See below: 3. For Room1, select a standard internal door from catalogue and insert door using the input method Door Midway. In the first two steps you define the two reference points along the wall you would like the door to be inserted midway. In the third step click the wall where you would like the door to be inserted and in the fourth and final step, move the cursor around door to determine the stop and direction of door opening. Click to insert door in position as follows: 26 3D Architect Home Designer 4. For the remaining internal doors, use the input method Door free positioning. Move the door along the desired wall and once you have determined its position, left‐
click. In the next step, move the cursor around door to determine the stop and direction of door opening. Click to insert door in position as follows: 5. To view the current plan in 3D, click the 3D Furnishing Mode icon in top horizontal toolbar. 27 3D Architect Home Designer TIP: If your 3D display appears slower than normal then it's possible 3D Textures are being used. You can turn off the 3D Texture display in the menu View > Display Quality (3D) > 3D Textures. Alternatively, turn off the 3D Texture display in the icon bar at bottom of window. 6. To go back to your plan, click the Construction Mode icon Assigning room names By default, room names are generated automatically labeled Room 1, 2, 3 etc. These can be easily changed to more meaningful names that are relevant to your project. 1. In Construction mode, left‐click inside one of the rooms and in the horizontal toolbar, select the tab for Room Data. A dialogue box will open where you can change the room name and add further detail such as room description, area etc. TIP: After left‐clicking the Stairs icon in the left vertical bar, an extensive selection of stairs are made available in the catalogue bar on the right‐hand side of screen under the name Stairs. Adding staircase to your plan There is a large selection of stair types available in software but in this next section you will learn how to insert an L‐shaped stair in to your plan. 28 3D Architect Home Designer Stairs 1. Start by left‐clicking the Stairs icon in the vertical bar on the left. 2. From the fly‐out menu select the stair type L‐Shaped Staircase. Alternatively, select this from the Stairs catalogue. 3. The staircase is placed with a series of 3 clicks. The first point sets the starting point of staircase, the second sets the direction and length of staircase from the starting point and the third sets the width of staircase from starting point. By default, the staircase is constructed from base level‐up but in this example we will construct staircase from top‐
down. 4. With the L‐Shaped Staircase selected, click the Tool Options icon in horizontal toolbar and in the dialogue box that appears select the checkbox option Enter top‐down. Now you can place the staircase in the following way: 5. Set the start point of staircase by clicking stair point 1 as follows: 29 3D Architect Home Designer Click series of stair points to place staircase 1. First click to set starting point 6. Next set the direction and length of staircase by clicking stair point 2: TIP: Preset parameters of staircases can be changed during input or later on in project by selecting the Stairs tab in horizontal toolbar. This tab only appears on selection of stair icon or stair component. 2. Next click to set direction and length 7. Next set the width of staircase by clicking stair point 3. Staircase in position 3. Next click to set width
30 3D Architect Home Designer At this stage in project your ground floor should like the following: Creating additional floors With the ground floor plan created, we can now construct extra floors. Before we add a new floor let's first look at the current floor properties. 1. Locate the menu Floors > Edit Active Floor... In the dialogue box that appears, various properties of current floor can be changed either before or after you create a new floor. There are different tabs for naming floors, changing height settings and assigning different materials (which can also be carried out in 3D mode). 2. In this exercise, keep the current properties unchanged and click OK. Currently, your project consists of a single ground floor. If you are working with multiple floors, the preset floor levels of the various floors are determined in such a way that all floors merge into one another seamlessly. 31 3D Architect Home Designer In this exercise we want to create a bungalow home that consists of a ground floor and a top floor with walls for roof to sit on. If you were to place a roof directly on to current ground floor, visually this might look correct however, if you were to change appearance of roof e.g. change roof side to gable end, then the gable walls will not be present. The roof is still treated as the top floor of house and therefore you need to assign this to roof as described ne next steps below. When working with floors, it's important that you understand how they behave in project in particular when constructing floor for roof. Creating top floor for roof 1. Now locate the menu Floors > New Upper Floor... The following dialogue box will appear but includes an additional tab for copying across walls and associated elements to new floor. 2. Click the Floor tab. Select Roof from drop down list. 3. Click Floor height tab. Change Floor height value to 6m. Changing this value will ensure that the gable wall height extends to below the roof line. You can change this value at any time in project if for example the gable wall height needs to be extended further. The roof construction also determines the wall height so whatever value you enter, the wall will not go beyond roof line. See below example: 32 3D Architect Home Designer Standard floor height set to 2.75m. Note gap in upper floor level of gable wall. Floor height set to 6m. Gable wall height extended to below the roof line. 4. Click the tab for Copy walls. When creating a new floor you have control as to what construction elements you want to transfer over from current floor including walls (external and internal) and associated elements i.e. windows, doors, openings and interior furnishings. You can of course create a completely blank floor by selecting the option None. In this exercise we want to copy across external walls only, windows and doors. In the Walls to transfer drop down list choose the option for Only exterior walls and select the checkbox Windows, doors, openings to copy. TIP: Any new floor created that consists of elements copied over from existing floor, can be edited as normal. Additional elements can also be inserted in to floor plan. 5. Click OK to confirm these settings and switch to 3D Furnishing mode. Your 3D view will look like the following: 33 3D Architect Home Designer TIP: If you need to make any changes to the ground floor too e.g. create some further rooms, ensure that the floor entry for Ground floor is active in drop down list in horizontal toolbar. You will see from view that all exterior walls have been transferred across to new floor together with windows, doors and also ceiling cutout where the stairs exist. Of course, if you want to mirror room layouts over all floors then the simplest way to achieve this is to transfer across all walls, windows, doors etc. In this tutorial, the top floor of building consists of just a single room because we only transferred across the external walls. At this point you might like to practice what you have learnt in previous sections by partitioning off the top floor in to individual rooms. Use the internal wall tool and add windows and doors to your design. Selecting and deleting construction elements On this floor we want to delete the door, all side windows and a window on each gable wall. 1. In Construction mode or 3D Furnishing mode, use the Selection tool to select and highlight the elements for deleting. Delete selected elements using the Delete key on keyboard or menu item Edit > Delete > Selection TIP: With the Selection tool active, click the Tool options icon in the horizontal bar and in the dialogue box that appears you are able to change how this tool functions e.g. drawing rectangle around element to either select it or to zoom in to it. After selecting and deleting the elements mentioned above, your 3D view should look like the following. 34 3D Architect Home Designer TIP: You are able to select multiple elements whilst holding down the Shift or Ctrl keys. After placing the roof, we will use in‐line measurements to adjust the position and size of windows on top floor. Adding a roof to building Now that a new top floor has been created, a roof can be added. Switch back in to Construction mode. Ensure that the floor entry for Roof is active in drop down list in horizontal toolbar and that all floors and all layers are visible (menu Floors > All Floors Visible, menu Layers > All Layers Visible). The active floor is shown in black together with any visible floors (in this example, the ground floor). 35 TIP: In the separate Floors and Layers
menu, you can manage how floors and individual layers are displayed. For example, you can display all floors together or if you wish, only make the active floor visible. When you create a new floor, a new entry will be added to the Floors drop down list in horizontal toolbar. You select what floor you want to make active from this list e.g. The Layers drop down list sits above the floors list. When you add an element to floor plan, this will be assigned to a relevant layer within project that can be controlled and managed in a similar way to floors. 3D Architect Home Designer TIP: After left‐clicking the Roofs icon in the left vertical bar, a selection of roof types are made available in the catalogue bar on the right‐hand side of screen under the name Roofs. Roofs Depending on the complexity and style of roof, there are a number of different ways for adding roof to building. One of the most common and easiest methods for adding roofs is by Automatic Detection. This method will determine the shape of roof based on the building outline. A standard hipped style roof will be used. Any roof that has been placed automatically or manually can be changed in order to alter all aspects of roof including style and design. 1. Start by left‐clicking the Roofs icon in the vertical bar on the left. 2. From the fly‐out menu select the roof type Freeform Roof. Alternatively, select this from the Roofs catalogue. 3. Now select the input method Automatic Detection (in How bar) from within the catalogue or from the left‐side of screen. 4. With this option selected, move your mouse cursor over any of the walls of your building to display the following 2D view of roof. This view will disappear if the mouse cursor is moved away from walls. 36 3D Architect Home Designer 5. With the 2D view of roof showing, left‐click your mouse button to place roof in position. To see the placed roof in 3D, switch to 3D Furnishing mode. As mentioned above, a standard hipped roof Select roof to has been used for design and in this display tabs for example you will notice the windows accessing currently protrude through roof. In the next component properties and step we will change the roof so that there Roof Editor. are two gable ends where the windows currently are. 6. Now switch back to Construction mode. With roof in position, left‐
click the Selection tool and move the cursor over towards the roof. On detection, the outline appearance of roof will highlight green as following. On selection of roof, various tabs for accessing component properties become visible in the top horizontal toolbar. Select the tab for Roof Editor to open it. 7. The Roof Editor dialogue box consists of different tabs that enable you to make various adjustments to all aspects of roof via the use of interactive graphics and/or list view. By clicking on parts of graphic, you are able to make changes to roof style and design quickly and easily. The corresponding values in detailed list view will update accordingly. You can toggle between a graphical display and full list view using the icon in the bottom‐right of dialogue box. In the 2D View section you can also make settings how the roof appears and behaves in 2D. 37 3D Architect Home Designer 8. In the Style section, we now want to select and change sides of roof from standard hipped to gable ends. In the top left of dialogue box there is a preview showing the outline of roof shape. Here, you can directly click on side you want to change or use the arrow buttons to switch between sides. The selected side will highlight in red (as above). Select this as the side to change and then select the graphic below for Gable roof. The main preview graphic will update accordingly to roof style: 9. Repeat this exercise and change the opposite side of roof to gable end also. In 2D and 3D, your roof with the two gable ends in place should like the following: 38 3D Architect Home Designer Roof pitch set at 38° 10. Using the Selection tool, you can select and change properties of roof in 3D Furnishing mode also. Select the roof again and open up the Roof Editor. This time we want to change the roof pitch in the Style section. Select a side of roof that is hipped and in the main preview section, click the graphic element for Roof side pitch. 11. In the input box that appears, the default pitch is set at 38°. Change this value to 45° and repeat so the roof pitch on opposite side of building is also set to 45°. In 3D Furnishing mode, your building should now look like the following. 39 3D Architect Home Designer Roof pitch set at 45° Using in‐line measurements In‐line measurements give you greater control and flexibility allowing you to make direct changes around selected elements either on plan or on the 3D model itself. Changes to a selected element are also shown in real time as you change the value in the input field. We will demonstrate this by making some basic changes to the height and position of end windows on the top floor. Once you have learnt how to use the basics of in‐line measurements you can practice using this method on other parts of drawing including doors, walls, roof and also on furnishing objects. 1. Firstly, ensure that the in‐line measurements display is active in the menu View > In‐line measurements. So that you can clearly see what you want to change on individual floors, in Construction mode, locate and select the menu item Floors > Only Active Floor is Visible and in the floor drop down list in horizontal toolbar, select the top floor Roof. Only the top floor plan will be shown as follows (a). Using the Selection tool, click on one of the windows on end walls. The following in‐line measurements will appear around the selected element (b). Different values are shown for example, the width of window and the distances to the inner and outer sides of wall. TIP: In the menu Options > In‐line (b) (a) Measurements, you are able to change various display properties of in‐line measurements and how they behave in both Construction mode and 3D Furnishing mode. For example, under the Dimension Line tab, you might want to change the appearance of dimension line or end to a different style or size. 2. To change the values, simply click on the desired value of the in‐line measurement and an input field will display. In this exercise click the distance to outer wall value ‐ 2.4. 40 3D Architect Home Designer An input field will appear: TIP: Always place the cursor to the right of value you want to change e.g. 3. Now click the mouse cursor to the desired position in the field and change the corresponding value using the mouse wheel or arrows on side. Alternatively you can highlight a value and enter a numeric value from your keyboard. In this exercise, change the value from 2.4m to 5m and press the Enter on your keyboard or click outside the input field box to update the window position. The width of window remains unchanged but other values will update accordingly. Repeat this exercise for the window on the opposite side of building. To see your results in 3D, switch back to 3D Furnishing mode and select menu item Floors > All Floors Visible. In 3D Furnishing mode, it is also possible to use in‐
line measurements. Using in‐line measurements in 3D mode enables us to also change height values, such as window and sill heights. In this exercise we will change the height of windows on top floor. 1. Use the Selection tool and click on one of the end windows on top floor. The in‐line measurements will appear around the selected element in 3D. Moving the mouse cursor over each value will display what this value refers to on model e.g. width, sill height, position etc. 2. To adjust the height of window, click the value 1.5m and enter a new value of 1m using the same input methods as mentioned above. Now adjust the window sill height by clicking on value 0.8m and increasing this to 1.3m. The changes are displayed instantly. Repeat this exercise for the window on the opposite side of building. 41 Window Height
Sill Height 3D Architect Home Designer Your finished result should look like the following. At this point you can also adjust height of any other windows in project e.g. to ground floor. Adding skylights to existing roof In Construction mode ensure that the floor entry for Roof is active in drop down list in horizontal toolbar. 1. Start by left‐clicking the Skylights icon in the vertical bar on the left. From the fly‐
out menu or from Skylights catalogue, select a skylight of choice. 2. Once you have selected a skylight, move the mouse cursor over towards the edge of roof to where you want skylight placed (approximate position). On detection, the outline appearance of roof will highlight green. 3. Now left‐click mouse button and the skylight will attached itself to pointer so you can move it about until you find the desired position. To place the skylight in position, left‐click mouse button again. In Construction mode or 3D Furnishing mode, use the in‐
line measurements to change its size and position. 42 3D Architect Home Designer 2D and 3D example of skylights Furnishing Your Project Once you are happy with the layout of your design, you can start adding furnishing objects and materials to help bring your design to life and give you a real feel of the living space you have just created. The software comes included with a number of individual databases that contain 1,000's of objects and textures to choose from. If you locate the menu item Options > Database... you can see what databases have been registered to use in program. Each database contains items for different aspects of program such as construction elements, 2D drawing symbols and objects and materials. Furnishing objects, textures and materials can be applied to project in both Construction mode and 3D Furnishing mode. Placing objects in Construction mode gives you greater control and accuracy when laying them out in a plan view. Objects So that you can clearly see what you want to change on individual floors, in Construction mode, locate and select the menu item Floors > Only Active Floor is Visible and in the floor drop down list in horizontal toolbar, select Ground floor. Only the ground floor will be shown. 1. In this tutorial we will place some furniture items in the kitchen/dining room area of your plan. 2. Start by left‐clicking the Objects icon in the vertical bar on the left. 43 3D Architect Home Designer 3. From the fly‐out menu you can select a recently used object or one from the main Objects catalogue on right of screen. 4. In the Objects catalogue, scroll through the catalogue, locate and double‐click the Kitchen folder followed by Set 1 > Short cabinets 1. 5. Locate and click the object for Corner cabinet 90cm. Move cursor over towards the room you want to place object in. The object attaches itself to the cursor. 6. We want to place the corner cabinet in the top‐left of kitchen/dining area so move the object to the corner of room until the object snaps to the two adjoining inside walls as follows (a). This is your fixed reference point for object. TIP: If you want a 3D preview of object before placing, double‐click item with left mouse button. (a) (b) 7. In the above example (a) the cabinet needs rotating so that the corner cabinet doors are facing out in to the room. Using the key combination Ctrl + D rotate object so that it looks like example (b). 8. Now you need to position the object correctly so that the back edges of object fix to wall edge. This is determined by the object snap point which you can change using the key combination Ctrl + W. Use this key combination to get the following result. Place object in position by left‐clicking mouse button. 44 3D Architect Home Designer 9. In the same objects folder, select object for Short cabinet 100cm and use the same steps as above to place this object either side of corner cabinet so that you end up with following result. 10. The size and position of placed objects can of course be modified afterwards in both Construction mode and 3D Furnishing mode using various methods via in‐line measurements or tabs in horizontal bar. TIP: In addition to making changes to objects, at this point you can also make any necessary changes to other parts of plan. In this example, using in‐line measurements, we will make adjustments to the window sill heights from 0.8m to 1m so that the sill sits above worktop. Resize so the window height adjusts accordingly. See example on left. 11. If for example you have a placed a hanging cabinet that is currently set so that it is sitting on ground floor level, left‐click object and select the tab Size and Position from the horizontal bar. In the top section of dialogue box you can specify position of object in relation to reference point. The entry for Z (height) lets you determine height from floor to object. 12. In the Set 1 > Hanging cabinets folder, select the object for Corner hanging cabinet and place this above the corner cabinet on base level using the same steps as above. Now left‐click to select it and click the tab Size and Position from the top horizontal bar. As described above, in the input box for Z (height) enter 2m. The object will reposition itself 2m from the ground floor as in example below. 45 3D Architect Home Designer Materials There are a number of different ways to apply materials to your design from the registered databases that comes included with program. One of the easiest and quickest ways is in 3D Furnishing mode. 1. In this tutorial we will apply some wall and floor materials in the kitchen/dining room area of your plan. 2. Start by left‐clicking the Materials icon in the vertical bar on the left. 3. From the fly‐out menu you can select a recently used materials or one from the main Materials catalogue on right of screen. 4. In the Materials catalogue, double‐click the ELECO folder. Open the Tiles folder and left‐click to select Beige_Tile‐02. Move cursor over an area of room you want to apply material to and the cursor symbol will change its appearance to a paint bucket. If there is a part of the design where you are not permitted to apply material to, the paint bucket symbol will also include a 'no entry' symbol. 5. With the above material selected left‐click to apply this to the floor area to get the following result (a) 6. Now locate any colour from the main ARCON database and apply this to the walls e.g. (b) 7. By applying materials using this method, all adjoining facing walls will change together. You can apply different materials/textures to individual walls or other aspects of building using the Editing tools in 3D Furnishing mode as follows. (a) (b) 8. In 3D Furnishing mode, left‐click the Tools icon in the vertical bar on the left 9. From the fly‐out menu you can select specific tools or one from the main 3D Tools catalogue on right of screen. 10. Left‐click to select tool for Edit material 46 3D Architect Home Designer 11. Hold down the Shift key on your keyboard and then left‐click the wall you would like to apply a different material to. 12. The Material settings dialogue box will appear. TIP: If you want to select and apply a material from one part of your building design project to another e.g. duplicate a floor tile to another part of building, use the Texture/Material picker tool in the horizontal bar. Left‐click this icon and the cursor symbol will change to a pipette. Left‐click on the material you want to select and use again and the symbol will change to a paint bucket symbol you will already be familiar with. TIP: Use the mouse controls to zoom, rotate preview Apply material in the same way by left‐clicking on part of the design you want the material to go. 13. In this dialogue box you have advanced settings for changing the properties of material which you can experiment with later on in project. In this tutorial we want to apply a different material to individual wall. Click the Load material button and select a different colour or texture from the one before and click OK to confirm settings. 14. If you wish to change parts of the building that have a transparent material for example a window panel, hold down the Ctrl key on your keyboard and then left‐click it to open above dialogue box and change material in the same way as described in previous steps. Applying materials to objects With some objects in the database you are able to apply different materials to parts of object either by dropping it on to object in the normal way as described in step 1, or using the Edit material tool option as mentioned above. The different methods for doing this depend on the object itself and how the object was originally created or modelled. Practice these methods on the kitchen units that have already been placed in project e.g. change the worktop surface to a material of choice or change the cabinet doors to a different colour. Scaling a texture The 3D Tools catalogue also contains a selection of tools including tools for moving and scaling textures. Left‐click the tool for Scale Texture and move the cursor over the floor area in kitchen/dining room with the left‐mouse button held down. Notice that the texture size will scale up or down depending on the direction you are moving the mouse in. In this exercise, I have scaled the texture so that the floor tiles appear bigger than before. I've also used the Move Texture icon to position the texture correctly. 47 3D Architect Home Designer Material area Quite often there are parts of the building where you want to define for example a small area for texturing. This might include a brick soldier course above window or a tile splashback over kitchen units. To do this you first need to be in Construction mode. 1. Left‐click to select the inside or outside of wall where you want material area applied to. 2. The selected wall side will highlight in a thick red line as above. 3. Double‐click selected wall with left mouse button. 4. An elevation view of selected wall will display with relevant construction elements, objects etc in place. The elevation view might also be displaying grid which can be turned off via View menu or Grid icon in bar at bottom of screen. To define an area in this mode, start by left‐clicking the Material area icon in the vertical bar on the left. An additional vertical bar will appear (How bar). This bar determines the input method of the material area. 6. Select the input method for Material Area (Polygon at fixed width) 7. In this tutorial we will add an area of tiles to wall over kitchen unit at fixed width. Using this method will help to tile an area on adjoining wall at same size. 5.
8.
With Material Area (Polygon at fixed width) selected, click the Tool Options icon in horizontal toolbar and in the dialogue box that appears enter 0.4m in to field. 9. Click to set the start point of line (a). Draw out rectangle and press Ctrl + click to set second point to complete rectangle (b). 48 3D Architect Home Designer (a) (b) TIP: Before placing rectangle in position, use the key combination Ctrl + W to determine placement of rectangle in relation to reference point. You can select and edit the drawn area using the Selection tool in vertical bar on left. On selection of drawn area, various tabs for accessing properties become visible in the top horizontal toolbar including materials. 11. If you wish to change the material in 3D Furnishing mode, follow the steps as described in previous sections. 10.
TIP: Drawing material area over a component part
that includes a cut‐out, sill etc e.g. window, automatically creates cut‐out in material area. You can see the effect of this in detail in 3D mode. If necessary you can use other input methods e.g. Material Area (Polygon) for drawing around more complicated parts of drawing. Note, when drawing detailed material area use mouse controls for zooming and panning as required. 12.
To exit this mode and return to Construction mode, click the Back to the main plan icon in the top horizontal bar of screen. To tile another area, click on wall side and repeat steps. 13. Here is an example of tiled area over two walls. TIP: If you want to edit a material area or add another material area to wall, just double left‐click relevant wall side in Construction mode to open up editor. Apply lighting and shadow effects To enhance the appearance of your model, there are pre‐set lighting scenes that can be applied to your project at any time. Locate the View > Lighting menu and select Eleco lighting from list. Now select the menu item View > Shadows. This will calculate where shadows will cast in accordance with the lighting conditions. You can also use relevant icon in bar at bottom of screen for turning shadow display on and off. Following example is of kitchen/dining room with some extra furniture items in place and lighting scene on. 49 3D Architect Home Designer TIP: You can also create your own lighting scenes in the menu View > Lighting Having worked through this complete section you should have learnt some basic techniques on how to furnish your project using objects, materials and other effects. To get the best output, experiment with advanced settings and other techniques the software has to offer in particular lighting scenes and materials. In the Material settings dialogue box there are advanced settings for texturing that include 3D textures, animation and tiling, bump and reflection map capabilities, colours and gloss lighting effects. 50