1
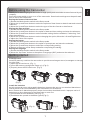
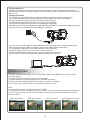
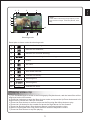
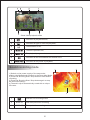
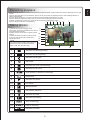
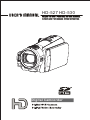
HD-527 HD-530
Digital Camcorder
Thank you for selecting digital camcorder of high quality and resolution as manufactured by our
company.
Press the power switch to turn on or off the camcorder. Some basic settings must be performed
prior to use of this camcorder.
Setting the format of date and time
1) Rotate the Mode knob to switch to the Setup mode.
2) Move the Up and Down button to select the options of time format or date format and enter the
submenu;
3) Move the Up and Down button to select the type of the time format or date format.
Setting the date and time
1) Rotate the Mode knob to switch to the Setup mode
2) Move the Up and Down button to the option of date and time setting and enter the submenu;
3) Move the Up and Down button to select whether setting the time and date; if selecting “Yes”,
enter the submenu;
4) Move the Up and Down button to select changing the option; Move the Left and Right button
to adjust the value of the option.
Setting the buzzer
1) Rotate the Mode knob to switch to the Setup mode
2) Move the Up and Down button to the option of prompt tone and enter the submenu;
3) Move the Up and Down button to make the corresponding setting;
4) Return to the menu of the Setup mode after completing the setting.
Setting the language
1) Rotate the Mode knob to switch to the Setup mode
2) Move the “Up-Down” button to the option of language (ABC) and enter the submenu.
Getting started
Insert SD card
Install SD memory card into the camcorder to provide more images stored, messages or storage
for other files.
1) Open the SD card cover. (Fig.1)
2) Insert SD memory card(golden finger up). (Fig.2)
3) Properly close the SD card cover. (Fig.3)
(Fig.1)
(Fig.2)
(Fig.3)
Install the batteries
As this camcorder uses rechargeable batteries, please make sure to use attached batteries or
similar batteries as recommended by the manufacturer or distributor.
Note: Please set in batteries properly as per instructions described herein. Improper set-in of
batteries may incur damages to the camcorder or even fire.
1) Insert batteries into the battery slot (Fig.4)
2) Push batteries upward to the battery pack (Fig.5).
(Fig.4)
(Fig.5)
1
(Fig.6)
English
Before using the Camcorder
Take out batteries
Operate according to the procedures shown in Figure 6 to remove batteries properly as per
procedures as shown in Figure 6; push to open the battery pack, and remove batteries from the
battery slot.
Charging batteries
You can use the attached charger to charge batteries as per the following procedures.
1) Connect the switch power to the camcorder in the mode as shown in the diagram.
2) Insert the switch power plug into the socket to start charging.
3) Red indicator light flashes to show the charging is under way.
4) LED indicator light will extinguish once charging is completed.
5) Batteries will be fully charged within approximately 180 minutes. Specific charging time may
vary as per battery capacity and local charging conditions
You can also use USB cable to charge batteries in the standby mode. Charge batteries by
following procedures stated as follows. Connect the USB with the camcorder.
1) Connect the USB cable to the USB interface of the computer.
2) Switch off the power to the camcorder to start charging.
3) LED indicator light will extinguish once the charging is completed.
4) Batteries will be fully charged within approximately 180 minutes.
Shooting video
1) Switch on the power supply of the camcorder, and turn the Mode knob to switch to the
Shooting mode;
2) Make use of LCD screen to capture photo images
3) Press the Shooting Start/Stop button to start the recording;
4) Press the Shooting Start/Stop button again to stop the recording;
5) The video clip is automatically saved with a unique file name.
Note:
1) The maximum size of each video file is 3.75GB.
2) The high resolution and high quality will produce the larger file, so the length will be shorter.
3) LCD preview and the proportion for image shooting will vary with the different resolution.
Please refer to:
720P 16:9 screen
QVGA 4:3 screen
VGA 4:3 screen
2
photograph 4:3 screen
2
3
English
1
4
Note:
5
In the mode of Shooting (image capture), Press
Down button to adjust resolution (QVGA, VGA,
HD);
6
7
8
12
9
10
11
Shooting mode
Description to icons under the shooting mode:
1
Indicator for shooting status:
2
Indicator for resolution;
3
Indicator for close/far shooting;
4
Indicator for remaining time of recording;
5
Scene;
6
EV value;
7
White balance;
8
Anti-shake indicator;
9
Indicator for battery:
10
Shooting time;
11
Shooting date;
12
Indicator for zoom.
Playing video clip
1) Turn the Mode knob to switch to the Photography Playback mode, and the latest files will be
displayed on the LCD screen.
2) Press the Up button to enter the Nine-picture mode, and press the Up/Down button and Left/
Right button to select the video file recorded.
3) Press the Enter button to confirm and press the Shooting Start/Stop button to play.
4) Press the Left button for fast rewind and press the Right button for fast forward.
5) Press the Shooting Start / Stop button to pause / resume playing the video.
6) When reviewing the video clip, press the Zoom button to adjust the volume.
7) Press the Enter button to stop the playing.
3
Shoot video playback mode
1
Indicator for playback mode;
2
Indicator for type of video file playback;
3
Total number of file;
4
Total time period of file;
5
File playback progress bar;
6
Indicator for fast forward and fast rewind of file
7
Indicator for file pause or playback;
Sound recording mode
1
1) Switch on the power supply of the camcorder,
and turn the Mode knob to switch to the Recording Mode;
2) Press the Shooting Start / Stop button to start sound
recording;
3) Press the Shooting Start / Stop button again to stop
the sound recording;
4) The audio clip is automatically saved with a unique
file name.
2
00:00:43
00:00:00
3
Indicator for recording status
1
2
00:00:43
Total time period for recording
3
00:00:00
Time period for recording
4
Taking photos
1) Switch on the power supply of the
camcorder, and turn the Mode knob to switch
to the Photograph mode;
2) Make use of LCD screen to capture photo
images;
3) Press the Shutter button to take a photo;
4) The file is automatically saved with a
unique file name;
10/1000
8
9
10
11
12
Note:
13
In the Photograph mode (image capture),
press Down button to adjust resolution
(VGA, 1.3M, 3M, 5M, 8M, 12M);
14
17
09:39:35
15
1
Indicator for shooting status;
2
Indicator for photo quality;
3
Indicator for fill light;
4
Self-timer;
5
Indicator for close / far shooting;
6
Indicator for SD card;
7
Total number of photos for shooting;
8
Resolution;
9
Indicator for scene;
10
E V value;
11
White balance;
12
Anti-shake indicator;
13
Indicator for flash;
14
Indicator for battery;
15
Time of shooting;
16
Date of shooting;
17
Indicator for zoom
5
2010/01/21
16
English
Recording playback
1) Turn the Mode knob to switch to the Recording playback Mode, and the latest files will be displayed on the LCD
screen;
2) Press the Up button to enter the Nine-picture mode, and press the Up/Down button and Left/Right button to
select required files.
3) Press the Enter button to confirm and press the Shooting Start/Stop button to play.
4) Press the Shooting Start / Stop button to pause / resume playing the sound record.
5) When reviewing the audio clip, press the Zoom button to adjust the volume.
5 6
6) Press the Enter button to stop playing.
4
1
2 3
7
Photo playback
1) Turn the Mode knob to switch to the Photo playback mode, and the latest files will be
displayed on the LCD screen;
2) Press the Up button to enter the Nine-picture mode, and press the Up/Down button and Left/
Right button to select required files.
3) Press the Enter button to view the photo in the full screen;
4) Press the Zoom push button to enlarge or reduce the photo;
5) Press the Up/Down button and Left/Right button to view the local photo enlarged;
6) Press the Enter button to return to the full Screen status.
Playing MP3 (optional)
1) Turn the Mode knob to switch to the MP3 Play mode.
2) Press the Up/Down buton to select playing songs, and press the Enter button to confirm .
3) Press the Left/Right button to select playing the previous song or the next song;
4) Press the Start/Stop button to pause the playing, and press the button again to resume the
playing;
5) Press the Zoom button to increase or reduce the volume;
6) Press the Menu button to return to songs list.
Music player
Stereo
6.36MB
ABC
01:07
Shoot:Pause
04:37
Note: The files of MP3 shall be put into the folder of MP3 in the SD card.
Characteristics of digital camera
Please refer to the following illustrations and tables to get familiar with control functions of each
button on this camcorder.
1
2
3
4
1. Flash;
2. LED fill light;
3. Self-timer;
4. Lens;
6
5
7
5. Remote-control receiver;
9. Speaker;
6. Microphone;
7. Zooming push button (zooming button);
8. Shooting button (shutter button);
6
8
9
16
13
17
18
19
20
21
14
15
10
25 24 23
11
10. Battery pack;
11. Tripod hole;
12. Switch of lens cover;
13. Power button;
14. Disp button;
15. Menu button;
16. LED fill light button;
17. Left button;
18. Up button;
19. Right button;
20. Enter button;
21. Down button;
English
12
22
22. HDMI output interface;
23. Headset output interface (optional);
24. USB output interface;
25. AV output interface;
34
33 32
26
27
26. Mode knob;
27. Wristband;
28. Focusing ring;
29. LCD display screen;
30. Battery;
28
29
30
31
31. Start/Stop button;
32. Power indicator light;
33. Charging indicator light;
34. SD card cover;
Please refer to the following table for the functions of the buttons.(if the camcorder has the
MP3 function)
Button
Designation
Function
Mode button
Mode switchover knob is available in 6 modes: Camcorder mode, Camera
mode, Recording mode,MP3 Play mode, File Playback mode and Setup
mode.
Power button
Press this button to switch on the camera in case of the power-off state,
and press this button for 3 seconds to switch off theCamera in case of the
power-on state.
7
Button
Function
Designation
Light button
It is set as off by the system. Press the button to switch on the fill light, and
press the button again to switch off the fill light.
DISP button
In the mode of Shooting , Recording,Taking photo, it is set as common OSD on
by the system, and press the button to switch of the common OSD, and press
the button again to switch off the backlight and power of the LCD screen, and
then finally press the button to switch on the common OSD;
In the mode of MP3 playback, press the button to switch off the backlight and
power of the LCD screen, and press the button again to switch on the common
OSD;In the mode of file playback, press the button to switch off the OSD, and
press the button again to switch off the backlight and power of LCD screen, and
then press the button again to switch on the common OSD.
Left button
Right button
Up button
Down button
In the mode of Shooting,Recording,Taking photo, this button is invalid;In the
mode of MP3 Playback (browsing MP3), the button is invalid; In the mode of MP3
Playback (during playback), press the button to switch to the previous MP3
song;In the mode of File Playback (browsing video/voice), press the button to
switch to the previous file;In the mode of File Playback (during video playback),
press the button for fast rewind;In the mode of File Playback (browsing photo),
press the button to switch to the previous file;In the mode of File Playback (
browsing the enlarged photo), press the button to move the visual area of the
photo to left; In the Setup mode, press the button to select the options from left;
In the mode of Shooting,Recording, this button is invalid;
In the Shooting mode (during shooting), the button is invalid;
In the Photograph mode (image capture ), it is the switch of self-timer.
Press the button to switch the self-timer for 5 s and self-timer for 10 s, and then
press the button again to return to the initial state (timer off);
In the mode of MP3 Playback (browsing MP3), the button is invalid;
In the mode of MP3 Playback (during playback), press the button to switch to
the next MP3 song; In the mode of File Playback (browsing video/voice), press
the button to switch to the next file;In the mode of File Playback (during video
playback), press the button for fast-forward; In the mode of file playback (
browsing photo), press the button to switch to the next file;In the mode of file
playback (browsing enlarged photo), press the button to move the visual area
to right;
In the Setup mode, press the button to select the options from right.
In the mode of Shooting,Recording,Taking Photo , the button is invalid;
In the mode of MP3 Playback (browsing MP3), press the button to switch to the
previous MP3 song;
In the mode of MP3 Playback (during playback), the button is invalid;
In the mode of File Playback (browsing video/voice), press the button to switch
to the 9 picture browse (in which the current picture is), press the button again
to select browsing the previous line of files in the 9 pictures;
In the mode of File Playback (during video/voice playback), press the button to
switch to the 9-picture browse (in which the current picture is), press the button
again to browse the previous line of files in the current 9 pictures;
In the mode of File Playback (browsing photos), press the button to switch to
the 9-picture browse (in which the current picture is), press the button again to
browse the previous line of files in the current 9 pictures;
In the mode of File Playback (browsing enlarged photo), press the button to
move the visual area of the photo upward;
In the Setup mode, press the button to select the options from top.
Special note: In the mode of playback, the viewed files are of the same type
(photo, video, sound record) so as to facilitate the user’s operation. When
browsing in the mode of 9-picture, the files are combined together.
In the mode of Shooting (image capture ), it is used for resolution adjustment
(QVGA, VGA, HD);In the Photograph mode ( image capture ), it is used for
resolution adjustment (VGA, 1.3M, 3M, 5M, 8M, 12M); In the mode of MP3
Playback (browsing MP3), press the button to switch to the next MP3 song;
In the mode of MP3 Playback (during playback), the button is invalid;In the
mode of File Playback, the button is invalid; In the mode of File Playback (
browsing the enlarged photo), press the button to move the visual area of the
photo downward;
In the Setup mode, press the button to select the options from bottom.
8
Function
Designation
Enter button
Menu button
In the mode of Shooting, the button is invalid;
In the Photograph mode (image capture), the button is invalid;
In the mode of MP3 Playback (browsing MP3), press the button to play MP3 ;
In the mode of MP3 Playback (during playback), the button is invalid;
In the mode of File Playback (browsing video/voice), the button is invalid;
In the mode of File Playback (during video playback), press the button to stop;
In the mode of File Playback (browsing photos), the button is invalid;
In the mode of File Playback (browsing enlarged photo), press the button to
stop enlarging the photo;
In the Setup mode, press the button to select function of the current option;
In the modes of Video/Voice Playback, Photo Playback and File Playback,
press the button to open the menu function, and press the button again to
close the menu; When playing the MP3 songs, press the Menu button to return
the interface of Mp3 list;
Shooting button In the Photograph mode, press the button half to focus, and then press the
(shutter button) button fully to take a photo;
Zoom push button
(zooming button)
In Shooting /Taking photos, it is used for the function of W - - - T;
In Video/Voice Playback / MP3 Playback, W refers to the reduction of the
AUDIO AMP volume, and T refers to the increase of the AUDIO AMP volume;
In Photo playback, when viewing a single photo, W refers to zoom in, and T
refers to zoom out;
Start /
Pause button
this button is control the Camcorder/Recording function to Start/Stop.
In the mode of File Playback (during video/voice playback),Press the button
to Pause .
In the mode of MP3 play (During playing), press the button to pause
Focusing ring
If it is required to take the close-up microphotography, turn the red spot of the
focusing ring to the position (
), and the icon (
) will displayed on the
left of the LCD screen at the same time.
If the camcorder without MP3 function,please refer to the following table for the functions of the
buttons.
Button
Function
Designation
Mode button
Mode switchover button is available in 5 modes: Camcorder mode,
Camera mode, Recording mode , File Playback mode and Setup mode.
Power button
Press this button to switch on the camera in case of the power-off state, and
press this button for 3 seconds to switch off the camera in case of the poweron state
Light button
It is set as off by the system. Press the button to switch on the light, and
press the button again to switch off the light.
DISP button
In the mode of Shooting,Recording,Taking photo, it is set as common OSD on
by the system, and press the button to switch off the common OSD, and press
the button again to switch off the backlight and power of the LCD screen, and
then finally press the button the switch on the common OSD;
In the mode of File Playback, press the button to switch off the backlight and
power of the LCD screen, and press the button again to switch on the common
OSD
9
English
Button
Button
Function
Designation
Left button
Right button
Up button
Down button
Enter button
In the mode of Shooting,Recording, Taking photo, this button is invalid;
In the mode of File Playback (browsing video), press the button to switch to the
previous file;
In the mode of File Playback (during video playback), press the button for fast
rewind;
In the mode of File Playback (browsing photo), press the button to switch to the
previous file;
In the mode of File Playback (browsing the enlarged photo), press the button to
move the visual area of the photo to left;
In the Setup mode, press the button to select the options from left;
In the Shooting/Recording mode, the button is invalid;
In the Shooting mode (during shooting), the button is invalid;
In the Photograph mode(image capture), it is the switch of self-timer. Press the
button to switch the self-timer for 5 seconds and self-timer for 10 seconds, and
then press the button again to return to the initial state (timer off);
In the mode of File Playback (browsing video/voice), press the button to switch
to the next file;
In the mode of File Playback (during video playback), press the button for fastforward;
In the mode of File Playback (browsing photo), press the button to switch to the
next file;
In the mode of File Playback (browsing enlarged photo), press the button to
move the visual area to right;
In the Setup mode, press the button to select the options from right.
In the mode of Shooting ,Recording,Photograph mode, the button is invalid;
In the mode of File Playback (browsing video/voice), press the button to switch
to the 9-picture browse (in which the current picture is), press the button again
to select browsing the previous line of files in the 9 pictures;
In the mode of file playback (during video/voice playback), press the button to
switch to the 9-picture browse (in which the current picture is), press the button
again to browse the previous line of files in the current 9 pictures;
In the mode of File Playback (browsing photos), press the button to switch to the
9-picture browse (in which the current picture is), press the button again to
browse the previous line of files in the current 9 pictures;
In the mode of File Playback (browsing enlarged photo), press the button to
move the visual area of the photo upward;
In the Setup mode, press the button to select the options from top.
Special note: In the mode of playback, the viewed files are of the same type
(photo, video, sound record) so as to facilitate the user’s operation. When
browsing in the mode of 9-picture, the files are combined together.
In the mode of shooting (image capture), it is used for resolution adjustment
(QVGA, VGA, HD);
In the Photograph mode(image capture), it is used for resolution adjustment
(VGA, 1.3M, 3M, 5M, 8M, 12M);
In the mode of File Playback, the button is invalid;
In the mode of File Playback (browsing the enlarged photo), press the button to
move the visual area of the photo downward;
In the Setup mode, press the button to select the options from bottom.
In the mode of Shooting/Recording, the button is invalid;
In the mode of Photograph mode(image capture), the button is invalid;
In the mode of File Playback (browsing video/Voice), the button is invalid;
In the mode of File Playback (during video playback), press the button to stop;
In the mode of File Playback (browsing photos), the button is invalid;
In the mode of File Playback (browsing enlarged photo), press the button to
stop enlarging the photo;
In the Setup mode, press the button to select function of the current option;
10
Function
Designation
In the modes of Video Playback,Voice Playback Playback, Photo Playback
and File Playback, press the button to open the menu function, and press the
button again to close the menu;
Menu button
Shooting button In the Photograph mode, press the button half to focus, and then press the
(shutter button) button fully to take a photo;
Zoom push button
(zooming button)
In Shooting / Taking photos mode, it is used for the function of W - - - T;
In Video Playback, W refers to the reduction of the AUDIO AMP volume, and
T refers to the increase of the AUDIO AMP volume;
In Photo Playback, when viewing a single photo, W refers to zoom in, and T
refers to zoom out;
Start /
Pause button
In the mode of Shooting/Recording, press the button to start shooting/
Recording, and press the button again to stop shooting/Recording;
In the mode of Video/Voice Playback (During playing), press the button to
pause playing
Focusing ring
If it is required to take the close-up microphotography, turn the red spot of the
focusing ring to the position (
), and the icon (
) will displayed on the
left of the LCD screen at the same time.
Testing switch functions
LCD rollover testing switch
LCD screen will be converted to the upright image mode when it is rotated to the
front side.
LCD stand by testing switch
LCD screen switch will be displayed when LCD screen is closed.
1) Wait for 5 seconds before stopping recording or playing videos in the video/
sound playback mode; wait for 10 minutes before auto shutdown.
2) Wait for 10 minutes before auto shutdown in other modes (Photography,
Photo Playback and Setup modes).
Note: This camcorder will not be available for auto shutdown when the LCD
turned to the front side is closed.
LCD rollover testing switch
LCD Stand by testing switch
11
English
Button
Connecting to a computer
Use attached USB cable to connect the camcorder to the computer as shown in the figure.
Connecting to a CVBS TV port
Use attached AV cable to connect the camcorder to the standard TV set as shown in the figure.
HDMI Output
Connect the camcorder to a HD TV as shown with the HDMI cable
Note: One end of the HDMI cable must be A-type interface, and the other end must be C-type interface.
Driver
Large-capacity storage
This camcorder can provide large-capacity storage via the built-in card reader. You can use this
camcorder as a USB device.
Windows Vista/XP is a plug-and-play operating system, which requires no manual installation
of drive program.
EMS memory of the camcorder and SD card will be displayed as a large-capacity storage device
in the Windows explorer once the camcorder is connected.
You can drag and drop files.
Webcam
You can use the camcorder as the webcam in all the Windows operating systems (Windows XP/
2000/Vista) only if you have installed the driver.
Note: The webcam driver shall be installed for all the operating systems.
Accessories
1.Digital camcorder 2.CD 3. Pouch 4.User manual 5.Battery
6.Adapter 7.AV cable 8.USB cable 9.SD card(optional) 10.Remote controller(optional)
11.HDMI cable(optional) 12.Headset(optional)
12
Image sensor
Pixel
Storage media
Sensitivity of sensor
Lens
Focusing range
Video clips
Image resolution
Static image
Zoom
L T P S screen
English
Specification
1/2.5 inch CMOS 5 mega pixels sensor
12 mega pixels
SD memory card; supporting up to 16GB
Auto
Prime lens
Normal: 30CM~inf.; Close-up: 15CM~30CM
H.264
QVGA;VGA;720P
JPG format;VGA/1.3M/3M/5M/8M/12M
8X digital zooming
HD-527 is 2.7”;HD-530 is3”
Flash
Effective range:1M~1.5M
Scene
Automatic; landscape; night; portrait; night portrait; beach; movement; banquet
EV
+2.0EV/+1.5EV/+1.0EV/0EV/-1.0EV/-1.5EV/-2.0EV
White balance
Auto, Sunny, Cloudy, Tungsten light, Fluorescent lamp
Anti-shake / motion
compensation
Off/on
Picture quality
optimal; fine; common
light
Self-timer
PC interface
TV output format
Shutter
Auto power on/off
Power Supply
Size
Weight
Off/on
Off/5S/10S
USB2.0
NTSC/PAL;AV/HDMI
1~1/2000 SEC.
Off/60S/120S
Li-ion battery
66X66.5X125mm
Approx. 400g (without SD card and batteries)
13