1
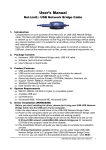
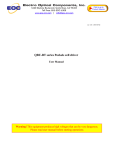
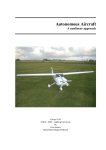
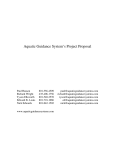
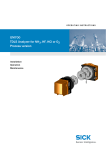
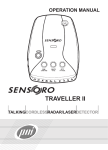
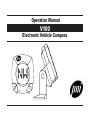
Operation Manual V100 Electronic Vehicle Compass CONGRATULATIONS! You have acquired one of the most sophisticated compasses available for use in a vehicle. The V100 incorporates patented magnetic sensor technology that was developed for the United States Military to give you the most accurate electronic compass headings. The V100 compass utilizes the same magnetic sensor technology found in built-in compasses in GM, Ford, and Chrysler vehicles. V100 Features: • Works in Any Vehicle: accurate in all types of vehicles - cars, trucks, SUVs, or RVs. Unlike traditional floating ball compasses, which require difficult manual adjustments, the V100 compass electronically compensates for the magnetic fields generated by a vehicle. Direction of travel is provided instantly on a large LCD display, without the settling time required with floating ball compasses. • Adjustable Holding Bracket: easily mounts to any windshield with heavy-duty suction cups (included). • Easy to Read Display: compass heading is displayed with 8 large cardinal points (N, NW, W, SW, S, SE, E, NE). 1 V100 FEATURES • Removable Compass Unit: compass easily slides off from its holding bracket to be used outside the vehicle or to prevent theft. • Magnetic Distortion Message: alerts you when magnetic interference from outside sources is affecting the accuracy of the compass. • Electronic Calibration: Just press a button and drive your vehicle in two circles. Calibration doesn’t have to be repeated until the batteries are removed or the compass is mounted elsewhere. • Low Power Requirements: operates on 2 “AAA” batteries for over 1 year of usage. • “Smart” Auto Shut-Off: turns off automatically to save battery power when the vehicle is parked and no magnetic field change is detected for ten minutes. • Accuracy of +/- 10° and resolution of 45°. • Wide Temperature Range: -14°F to 140°F operating temperature; -40°F to 160°F storage temperature. 2 DISPLAY AND BUTTONS [4] DISTORTION Message [1] Heading Display - Compass heading is displayed with 8 cardinal points (N, NW, W, SW, S, SE, E, NE). [1] Heading Display [2] ADVANCE Button - to turn the unit on or off, and to calibrate the compass. [3] ON Button - to turn the unit on or to exit calibration programming. DISTORTION [3] ON Button [4] “DISTORTION” Message -- The V100 detects when outside magnetic interference is compromising compass accuracy by displaying the word “DISTORTION.” Distortion occurs when there has been a significant change in the surrounding magnetic fields, such as when you are driving underneath an overpass or over a [2] ADVANCE Button 3 bridge. INSTALLING / REPLACING THE BATTERIES The V100 uses two “AAA” size batteries Notes: • If nothing happens, or if the display becomes “stuck” with characters, remove the batteries, wait approximately 1 minute, and then reinsert them. Make sure the batteries are positioned correctly. • Every time the batteries are removed or replaced, you must recalibrate the compass (see pages 7-8). • The V100 has an auto shut off power. When you have parked your vehicle and no magnetic field change has been detected for approximately 10 minutes, the compass automatically shuts off. To turn the power back on, press the ON button. Installing / Replacing the Batteries: 1. Remove the compass from its holding bracket and place it on a solid surface with the LCD facing down and the back of the compass facing up. 2. Slide open the battery cover on the back of the compass housing. 3. Install the two batteries, noting the polarity as shown inside the battery compartment. Replace battery cover. After the V100 goes through a self-test pattern, the calibration message “CAL” will flash. You now must proceed with calibration. See pages 7-8 for information on Calibrating the V100. 4 MOUNTING THE V100 Mounting Guidelines: rate. If it is adjusted more than 20°, the heading information may not be accurate. • The V100 should be mounted on the windshield. • Choose a place on the windshield that will not obstruct the view of the driver and is within reach so the buttons can be easily pushed. Mounting the V100: • For maximum accuracy, the V100 should be mounted at least 5 inches away from strong stereo speakers. 2. Adjust the angle of the holding bracket so that the face of the compass is pointing towards the rear of the vehicle. Loosen the screw on the holding bracket stem by a quarter turn. Make your up and down adjustments, then tighten the screw. 1. Install the suction cups (included) onto the base of the holding bracket by fitting them into their holes. • Once installed, the face of the compass must be pointing towards the rear of the vehicle. The compass can be adjusted vertically, up to ±20° from road level and still remain accu5 MOUNTING THE V100 3. Press the holding bracket base firmly against the windshield, until the suction cups securely take hold (clean surface of windshield and suction cups, if necessary). mechanism eliminates the need for recalibration, since the unit will be repositioned in its holding bracket the same way as when originally calibrated. 4. Readjust the angle of the holding bracket, if necessary. You are now ready to calibrate your compass. Feature: The compass easily slides out of its holding bracket without having to remove the bracket mechanism. This is useful if you want to use the compass outside of the vehicle or to avoid theft. Removing the compass without disrupting the bracket 6 CALIBRATING THE V100 Calibration allows the V100 to separate the earth’s field from the magnetic fields generated by your vehicle, and therefore provides accurate heading information. Calibration Guidelines: When to Calibrate: Before you begin calibration, the V100 must be mounted on the windshield in the location where it will be used in the vehicle. The backlight must also be off. • When the compass is used for the first time in a vehicle. Calibration should be performed on a level surface. • When the compass is used in a different location than where previously calibrated. TIP: Try calibrating your compass on a flat, non-metallic surface prior to driving your vehicle. This will help you get acquainted with the process of calibration. • When the magnetic “DISTORTION” message is continuously displayed. • When the batteries are removed or replaced. 7 CALIBRATING THE V100 Calibrating the V100: Notes: Note: If the “CAL” message is already flashing, proceed to step 2. • The size of the circles or the direction your vehicle is pointing when beginning or ending the circles does not matter. The circles do not need to be perfect circles, but must be completed in the same direction. It is also important that each circle takes a minimum of 20 seconds but less than 1 minute to complete. 1. Press and hold for 2 seconds both the ON and ADVANCE buttons until the “CAL” message flashes. 2. Press the ADVANCE button. The “TURN TWICE” message will flash. 3. Turn your vehicle in two circles (see Notes below). • If at any time during calibration the ON button is pressed, calibration is exited and the previous calibration settings remain in memory. 4. Press the ADVANCE button. Calibration is now complete and the compass heading is displayed. 8 FREQUENTLY ASKED QUESTIONS How does the V100 work? netic fields, displaying highly accurate compass readings. Magneto-Inductive The V100 uses a patented magnetic sensor technology has many advantages sensor technology that was developed over other technologies including better by PNI Corp. for the U.S. Military. This performance, consuming less power and technology is called Magneto-Inducbeing less expensive. These advantive and is the largest advance in comtages have made Magneto-Inductive pass technology since the fluxgate was sensor technology the choice for many invented 60 years ago. The earth genhigh profile compass applications erates a magnetic field, and through including GM, Ford, and Chrysler a mathematical calculation, compass automobiles, Polaris jet skis, Bayliner heading is determined. The Magnetoboats and Timex watches. Inductive technology is able to electronically sense the difference in the earth’s field from your vehicle’s magnetic field. The V100’s microprocessor electronically subtracts your vehicle’s mag- Where can the V100 be used? The V100 can be used in any type of vehicle including cars, trucks, vans, SUVs, and RVs. 9 FREQUENTLY ASKED QUESTIONS When do I need to calibrate the V100? How do I read the display? The V100 needs to be calibrated when The V100 displays direction with 8 used for the first time, when used in an cardinal points (N, NW, W, SW, S, SE, environment with a different magnetic E, NE). field, or when the batteries are removed What is calibration and why is it or replaced. Using the V100 in a differnecessary? ent environment includes moving it to a Calibration is the process whereby the new position in the same vehicle, installV100 separates the earth’s magnetic ing it in a different vehicle, or when there field from externally generated mag- has been a change to your vehicle such as netic fields such as those generated by installation of a new stereo. a vehicle’s steel body or electronics. Without calibration, the V100 thinks the entire magnetic field it is reading is from the earth and therefore displays inacurate compass readings. 10 FREQUENTLY ASKED QUESTIONS What happens when the batteries are may occur when driving over a bridge, removed? under an overpass, over railroad tracks or within close proximity to something Removing the batteries from the V100 with a strong magnetic field. Once the vehierases calibration information. The cle has moved away from the source of compass must be recalibrated. interference, the V100 will be accurate See pages 7 and 8 for instructions on again. “Calibrating the V100.” If the “DISTORTION” message is continuWhat is magnetic distortion? ously displayed, it is usually a sign that Many things generate external magnetic there has been a significant change in fields that can cause a compass to be inacmagnetic fields and recalibration is necescurate, such as metal and electronics. sary. See pages 7 and 8 for instructions on “Calibrating the V100.” Unlike all other compasses, the V100 senses when there has been a signifial magnetic elds that can cant change in magnetic fields and discause a compass to be inacplays the “DISTORTION” message. This curate, such as metal and 11 SERVICE AND REPLACEMENT For the fastest service, contact or return 2. Provide a proof of purchase, such as your V100 to the place of purchase. a mechanical reproduction or carbon copy of a sales receipt. If you send If you wish to return the unit for your original receipt, it cannot be replacement or repair to PNI, please returned. Proof-of-purchase must follow the following procedures: show printed date of purchase, model 1. Obtain a Return Merchandise Authonumber, and place of purchase. rization (RMA) number by contactOnce you have acquired a RMA ing PNI: number, pack the unit securely to pre• By Phone: vent damage in transit. If possible, 1-888-422-6672 (Toll-Free within use the original packing material and the U.S. only) or at 707-566-2260 box. Be sure to send the entire product. • By Fax: 3. Ship prepaid and insured by way of 707-566-2261 a traceable carrier: such as United • By E-mail: [email protected] 12 Parcel Service (UPS), Roadway Parcel Service (RPS), or First Class SERVICE AND REPLACEMENT Mail to avoid loss in transit. 4. With the issued RMA number written on the outside of your package, send your proof-of-purchase and description of the problem to: PNI Corporation 5464 Skylane Blvd., SuiteA Santa Rosa, CA 95403-1084 Type or print your name and address where the replacement should be delivered. After receipt of your documents and unit, a replacement unit will be sent to you. Please allow 2-3 weeks from receipt of your returned product to delivery of your replacement. 13 LIMITED WARRANTY; LIMITATION OF LIABILITY Precision Navigation, Inc. (“PNI”) warrants to the original user that this product will be free of defects in workmanship and materials for one (1) year from the date of purchase. This warranty does not cover wear and tear due to normal use, or damage to the product as the result of improper usage, neglect of care, alteration, accident or unauthorized repair. If the product is found by PNI to be defective and you have provided proof of purchase acceptable to PNI, PNI’s entire liability and your exclusive remedy for breach of warranty shall be that PNI, at its option, will replace or repair the product and return the replacement or repaired product to you at no charge, provided that you ship the product to PNI at your expense. PNI warrants the repaired or replaced product to be free from defects in material and workmanship for a period of the greater of: (i) ninety (90) days from the date it is shipped to you; or (ii) the period of time remaining on the original one (1) year warranty. THE FOREGOING WARRANTY IS GIVEN IN LIEU OF AND PNI DISCLAIMS ALL OTHER WARRANTIES OR REPRESENTATIONS, EXPRESSED OR IMPLIED, IN FACT OR IN LAW, WITH RESPECT TO THIS PRODUCT, INCLUDING, BUT NOT LIMITED TO, (1) THE IMPLIED WARRANTIES OF MERCHANTABILITY AND OF FITNESS FOR A PARTICULAR PURPOSE, OR (2) THAT USE OF THE PRODUCT WILL BE UNINTERRUPTED AND ERROR FREE. PNI shall have no liability for any indirect or speculative damages (including, but not limited to, consequential, incidental and special damages) relating to the use of or inability to use this product, whether arising out of contract, negligence, tort, or under any warranty theory, or for infringement of any other party’s intellectual property rights, irrespective of whether PNI had advance notice of the possibility of any such damages, including, but not limited to, loss of use, revenue or prot. In no event shall PNI’s total liability for all claims regarding the product exceed the price paid for the product. PNI neither assumes nor authorizes anyone to assume for it any other liabilities. Some states do not allow the exclusion or limitation of incidental or consequential damages, so the above limitations or exclusions may not apply to you. 14 5464 Skylane Blvd.,Suite A Santa Rosa, CA 95403 www.pnicorp.com Version B2-02